

Page 1
This Instruction Manual is also available for download on our Web-site: eutechinst.com or 4oakton.com 68X090828 08/04 Rev 0
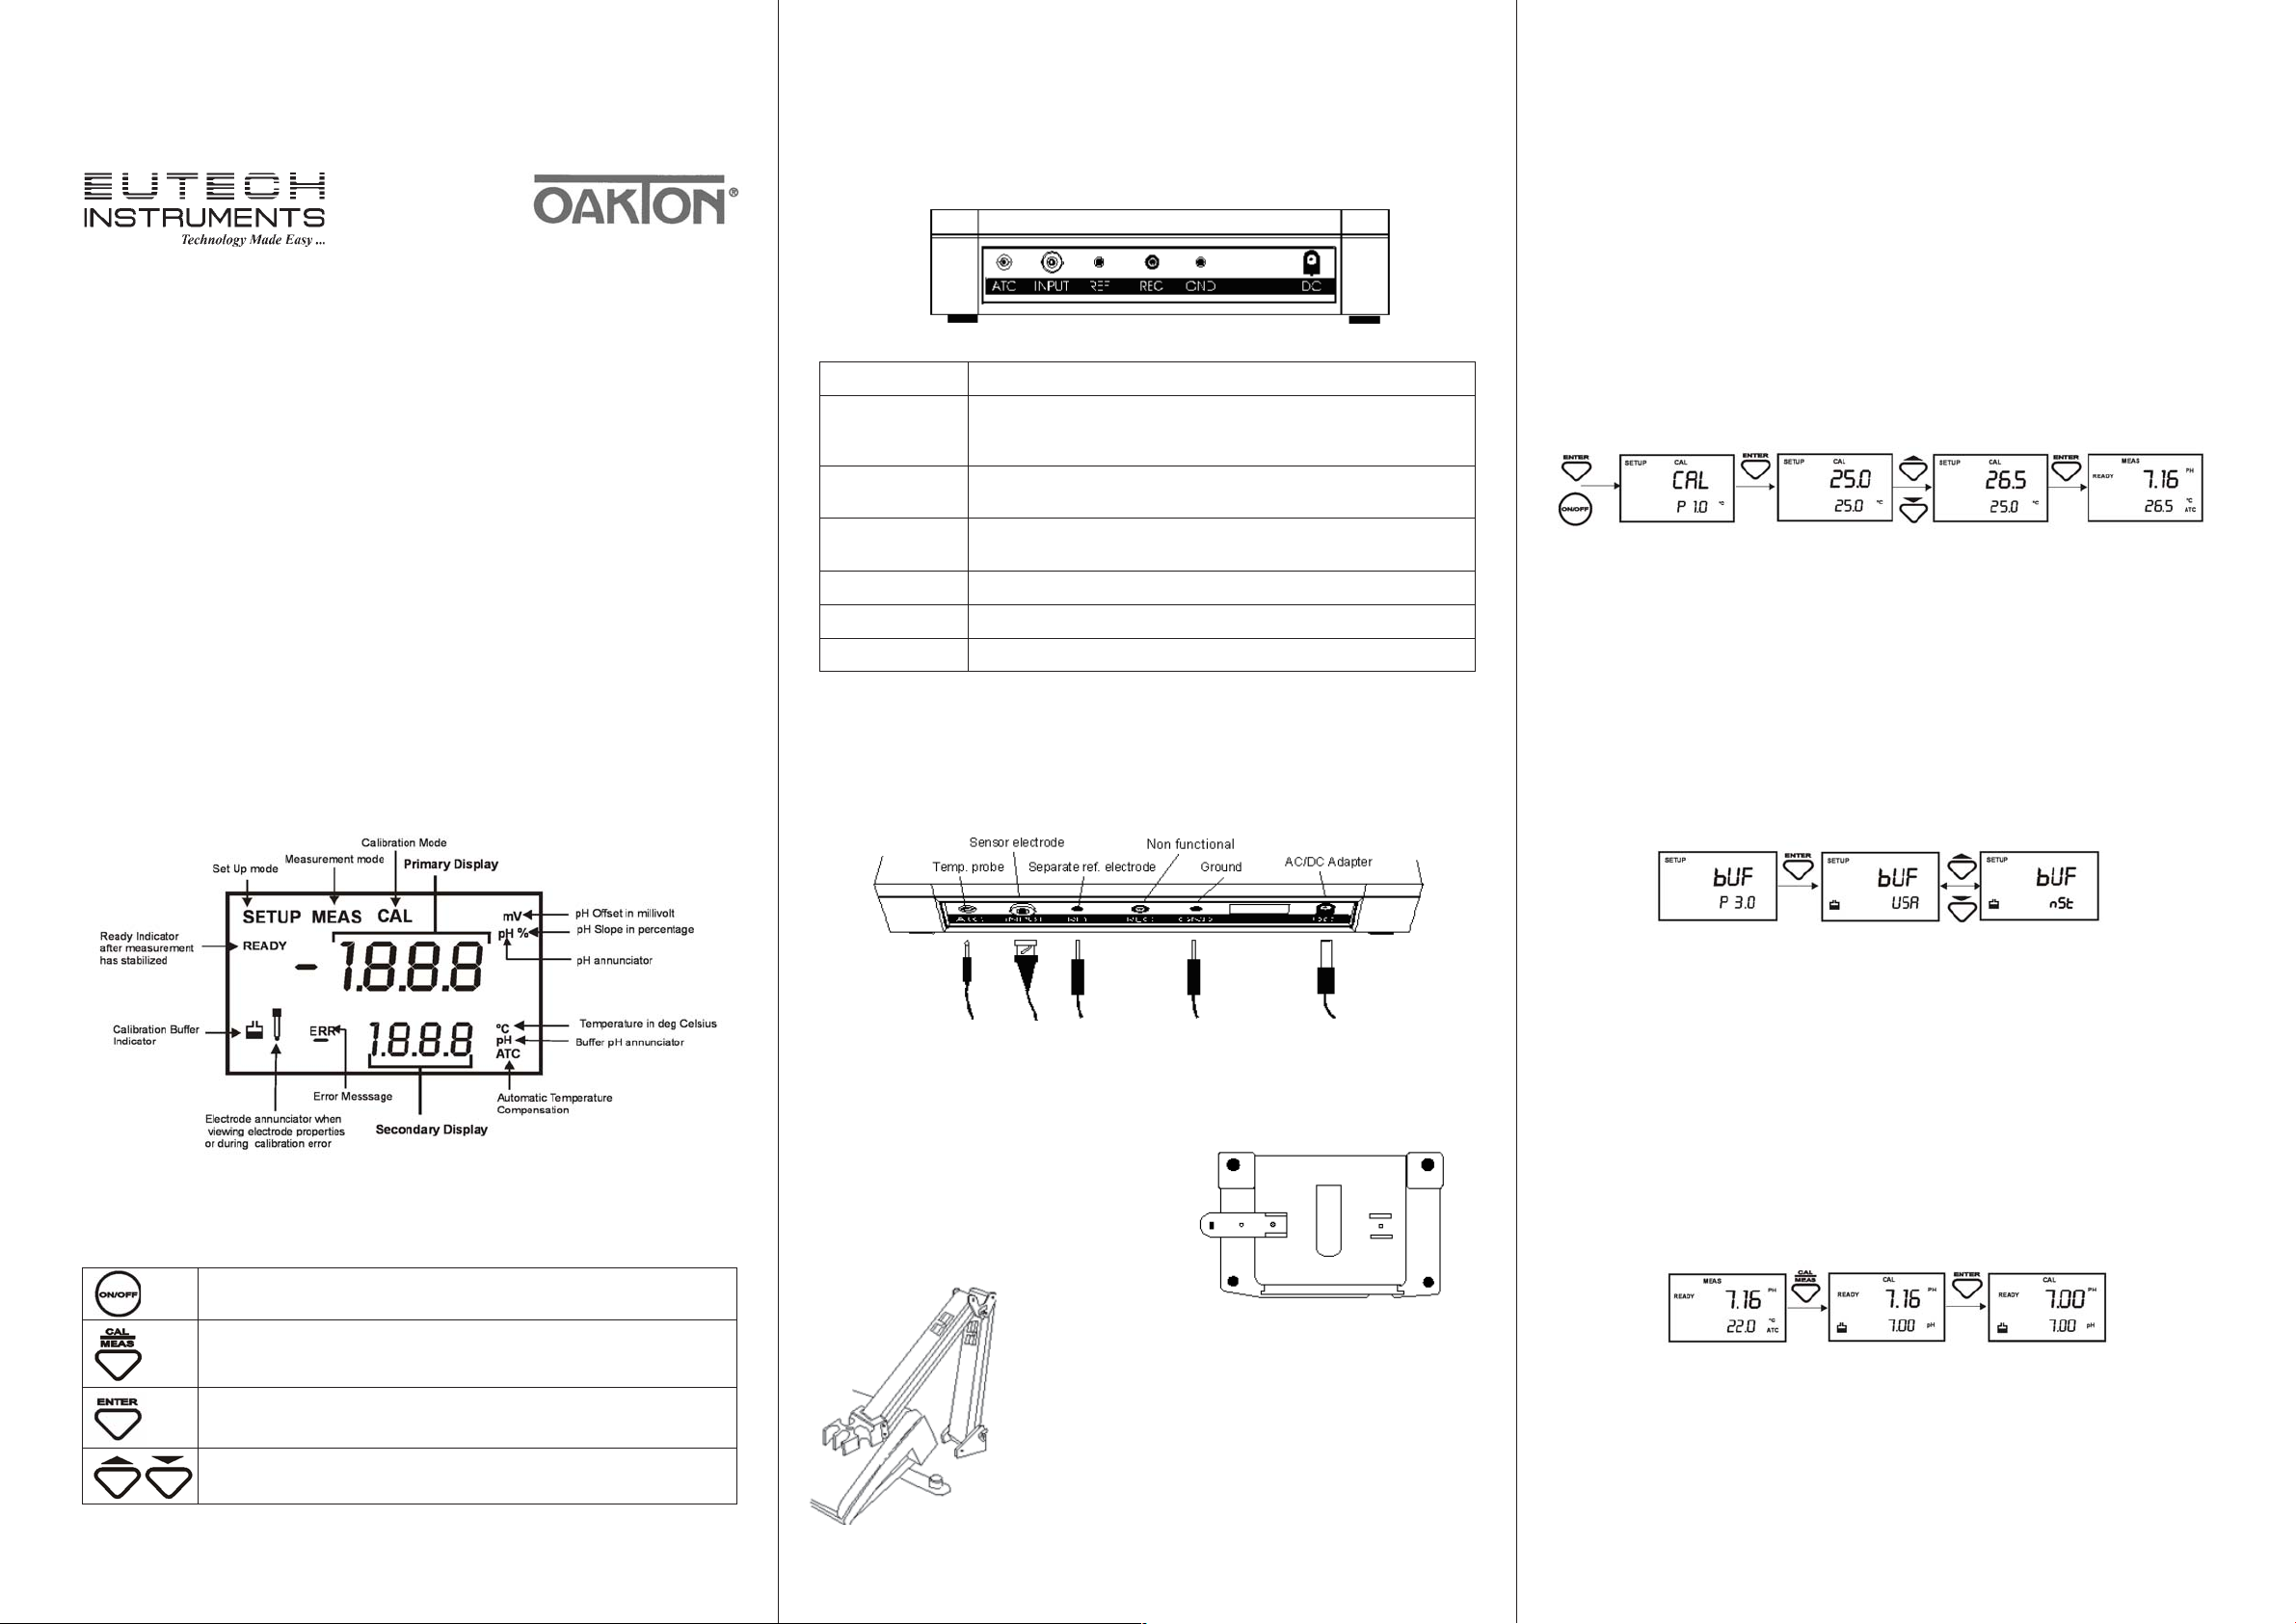
Rear Instrument Panel
Temperature Calibration
(Optional Probe Purchase)
INSTRUCTION MANUAL
pHTutor
Bench meter
Introduction
Thank you for selecting our pHTutor pH/Temperature bench meter.
This manual provides a step-by-step guide to operate the pHTutor bench meter.
Display And Keypad Functions
Display
The pHTutor bench meter provides a complete set of connectors for the various accessories
commonly used.
Connection Function
ATC For phono jack connection from the temperature probe for
Automatic Temperature compensation. The probe should
be a 30KW thermistor type.
INPUT For connection to pH electrodes with BNC type connectors.
Always ensure that the connector is clean and dry.
REF For connection to pin type reference electrode normally
used with half cell (mono) type pH electrodes.
REC Non-functional
GND For connection to the ground earth jack (standard tip connectors).
DC For connection for the AC/DC power adapter
For ATC, you must connect a temperature probe (optional purchase).
1. While pressing the ENTER key, switch on the meter by pressing the ON/OFF key.
2. Release the ENTER key. You will enter the setup mode with the display showing “CAL”
3. Press ENTER key to enter the Temperature Calibration mode. The upper display act as the
adjustable temperature setting and the lower display shows the current measured temperature
value.
4. Dip the temperature probe into a solution of known temperature, such as a temperature bath
for a few minutes until the temperature probe stabilizes.
5. Press ▲ or ▼ key to adjust the temperature setting to the known temperature value from
step 4.
6. Press the ENTER key to confirm the setting and to return to the measurement mode.
Note: To abort Temperature Calibration, do not press the ENTER key in step 6. Press the ‘CAL
/ MEAS’ key instead.
pH Buffer Set Selection
The pHTutor features USA (pH 4.01, pH 7.00 and pH 10.01) or NIST (pH 4.01, pH 6.86, and pH
9.18) standards. Select either one to suit your requirements.
The LCD (Liquid Crystal Display) has an upper and lower display which shows the measured pH
and the measured temperature.
The display also shows error messages, keypad functions and program functions.
Keypad
A large splash proof membrane keypad with tactile feedback makes meter easy to use.
Starting Up
Connect the accessory connectors at the rear of the instrument panel. During operation, it is
important that water does not get onto the BNC connector. Also avoid touching the connector
with soiled or wet hands.
Connecting the Electrode Holder (Optional Purchase)
This meter’s base plate has a side metal bar to which you can attach an integral swivel electrode
holder. You can mount the electrode holder on either right or left side of the meter.
To position the electrode arm:
Use a Phillips screwdriver to remove the screw
holding the electrode holder. Slide the side metal
bar until the second screw slot lines up with the
original screw hole. Use the screw removed
earlier to secure the electrode holder into position.
1. While pressing the ENTER key, switch on the meter by pressing the ON/OFF key.
2. Release the ENTER key. You will enter the setup mode with the display showing “CAL”.
3. Press the ▲ or ▼ key to scroll through the setup page until you view the “bUF” display.
4. Press the ENTER key to enter the buffer set selection page.
5. Choose the buffer set selection you desire using the ▲ and ▼ key and confirm your
selection by pressing the ENTER key.
pH Calibration
Calibration should be done regularly, preferably once a week. You can calibrate up to three
points using either the USA or the NIST buffer set standards.
1. Press ON/OFF key to switch unit on.
2. Dip electrode about 2 to 3 cm into the pH standard buffer solution.
3. Press the CAL key to enter calibration mode. The ‘CAL’annunciator will be shown on top of
the LCD. The upper display will show the default measurement while the lower display will
indicate the pH standard buffer solution.
Note: The meter automatically recognizes the buffers as the buffer standard you have set in the
SETUP mode, i.e. either USA (pH 4.01, 7.00 or 10.01) or NIST (pH 4.01, 6.86 or 9.18) buffers.
Note: To abort calibration, press the ‘CAL / MEAS’ key.
Powers on and shuts off the meter
Toggles between the measurement and calibration modes of the meter.
In SETUP mode, pressing CAL/MEAS key returns meter to the
measurement mode
Confirms the calibration values in calibration mode and the selections in the
SETUP menu.
Sets the calibration values during the calibration mode.
Scrolls through each SETUP menu and the configuration settings.
To install the electrode arm to the meter:
T o mount the electrode arm into the metal rod on the side bar , align
the slot with the metal rod and base of electrode arm. Push it
downwards until it fully sits into position.
NOTE: Move the base of the electrode holder if you wish to
swing the electrode holder about. To prevent the meter from
toppling over causing accidental spills, DO NOT swing the body
of the electrode holder.
4. Allow the meter reading to stabilize (READY will be displayed) before pressing the ENTER
key to confirm the first calibration point. The upper display will be calibrated to the pH
standard buffer solution and the lower display will switch to the next calibration point.
Note: If the upper measured display is not within the buffer acceptable window, an error
message “ERR” and the electrode icon will flash upon pressing the ENTER key. Press CAL/
MEAS key to exit calibration and resume to the measurement mode. Check electrode condition
and recalibrate.
Page 2
5. Repeat with other buffers if necessary. Rinse electrode in tap water before dipping into
next buffer.
Note: The calibration mode allows you to perform up to three calibration points before returning
to the measurement mode automatically. However , if you opted to have only one or two calibration
points, simply skip the remaining calibration points by exiting to the measurement mode by
pressing the CAL / MEAS key.
pH Measurement
Automatic T emperature Compensation (A TC) (Optional Probe Purchase)
For ATC measurements, simply attach a temperature probe into the meter.
The “ATC” annunciator light s up on the LCD. Submerse the probe in the liquid
you are measuring so that the sample temperature can be recorded and
compensated for.
Manual Temperature Compensation (MTC)
For MTC, you must disconnect the temperature probe.
1. While pressing the ENTER key, switch on the meter by pressing the ON/OFF key.
2. Release the ENTER key. You will enter the setup mode with the display showing “CAL”
3. Press ENTER key to enter the Temperature compensation mode. The upper display act as
the adjustable temperature setting and the lower display shows the default temperature
value of 25°C or indicates the last set temperature setting.
4. Check the temperature of your sample using an accurate thermometer.
5. Press ▲ or ▼ key to offset the temperature to the measured value from step 4.
6. Press the ENTER key to confirm the setting and to return to the measurement mode. The
meter will compensate pH reading for the manually set temperature.
Note: To abort MTC calibration, do not press the ENTER key in step 6. Press the ‘CAL / MEAS’
key instead.
Taking Measurements
Be sure to remove any electrode soaker bottle or protective rubber cap from the electrode
before measurement.
1. Press ON/OFF key to switch on meter. The MEAS annunciator appears on the top of the
LCD. When used with temperature probe, an ATC annunciator will appear in the lower righthand corner to indicate Automatic Temperature Compensation.
2. Dip the electrode about 2 to 3 cm into the test solution. Stir and let the reading stabilize.
3. “READY” annunciator will be displayed once the reading stabilizes. Note the reading on the
display.
User Reset
You can reset the pH calibration to the factory default by using the user reset function. Buffer
set selection and user temperature calibration are not affected by the user reset function.
1. Switch off the meter.
2. While pressing the ENTER key, switch on the meter by pressing the ON/OFF key.
3. Release the ENTER key. You will enter the setup mode with the display showing “CAL”
4. Press the ▲ or ▼ key to scroll through the setup page until you view the “rSt” display.
5. Press the ENTER key to enter the user reset option page.
6. Use the ▲ or ▼ key to decide your option on the user reset function.
● nO deactivates reset function
● YES activates the reset function
7. Press the ENTER key to confirm your option.
8. If you have selected ‘YES’, the display will flash momentarily and proceed to the measurement
mode with the calibration reset back to factory default value.
9. If ‘nO’ is selected, the unit will proceed to the measurement mode without any user reset
performed.
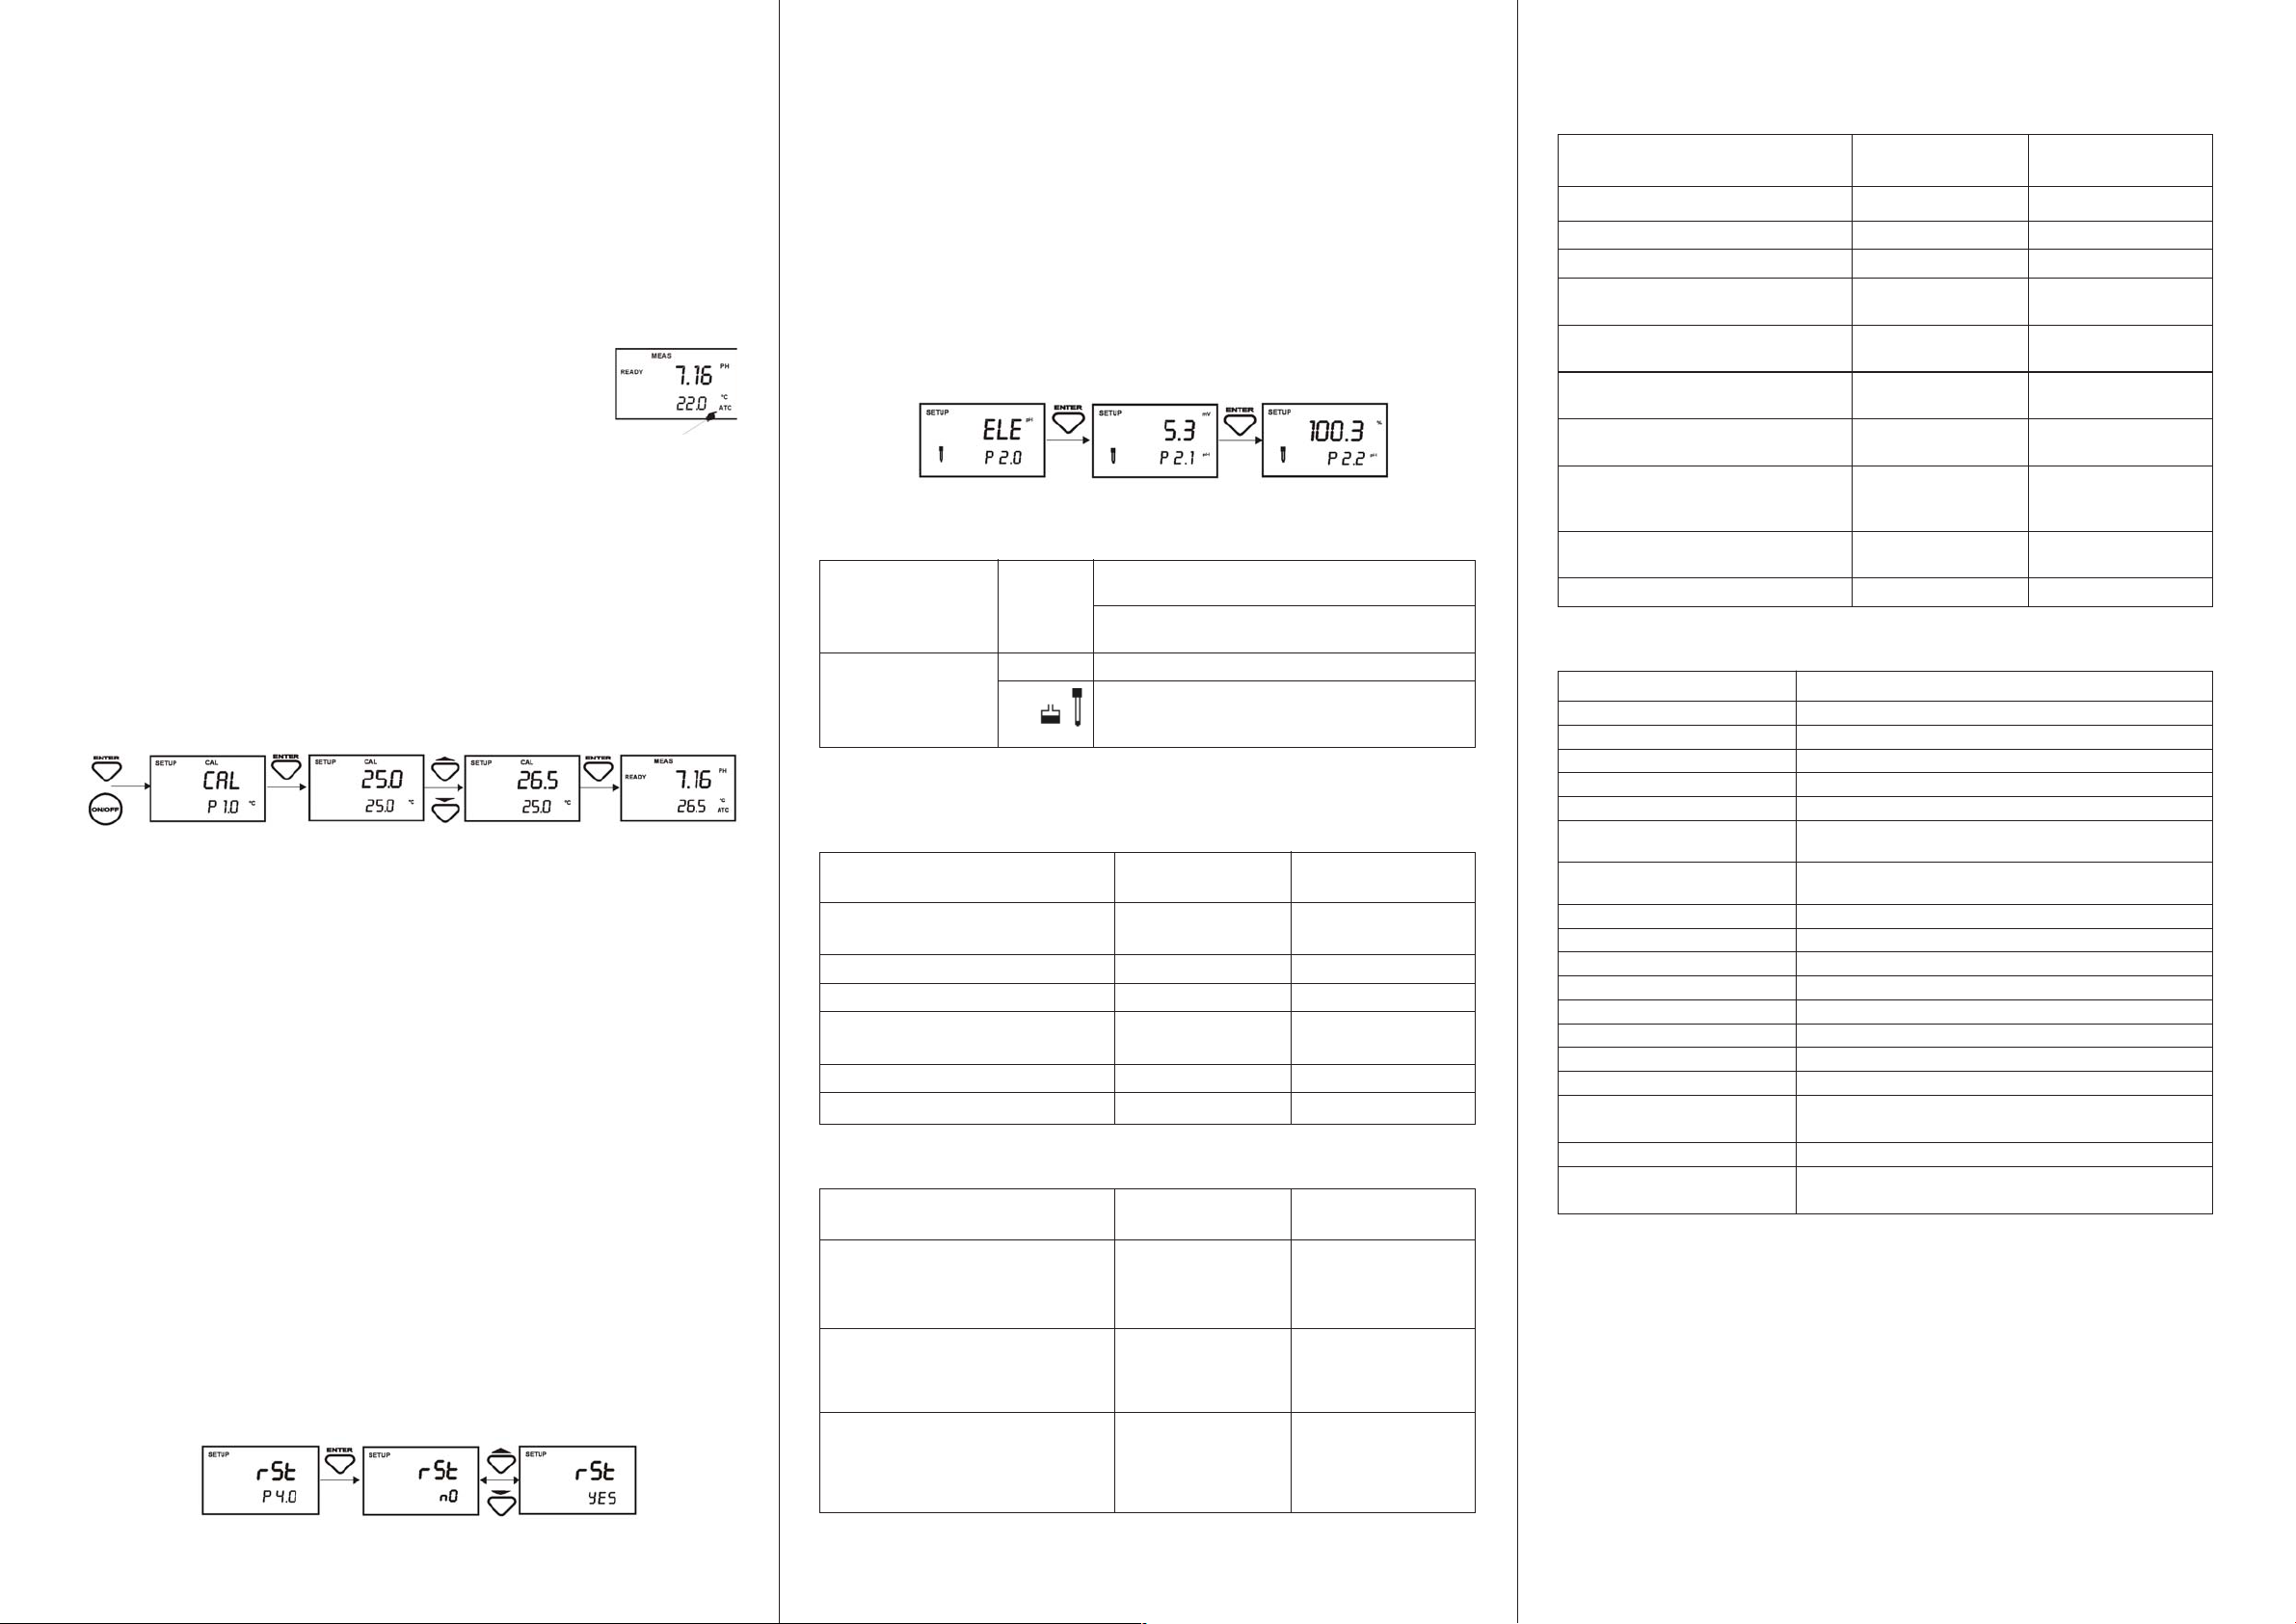
Viewing Electrode Properties
Your pHTutor lets you check the electrode parameters for diagnostic purposes. You can view
the offset and slope of the electrode to determine its effectiveness.
1. While pressing the ENTER key, switch on the meter by pressing the ON/OFF key.
2. Release the ENTER key. You will enter the setup mode with the display showing “CAL”
3. Press the ▲ or ▼ key to scroll through the setup page until you view the “ELE” display.
4. Press the ENTER key to enter the electrode properties viewing page. The display will show
the mV offset value of the electrode.
5. Press the ENTER key again to view the slope in % of the electrode.
6. To return to the “ELE” page, press the ENTER key.
7. Press ▲ or ▼ key to select a new program OR press CAL/MEAS key to return to the
measurement mode.
Self-Diagnostic Messages
Over range / Under Or / Ur Electrode is not in contact with solution or
range signal electrode is failing.
Measured pH value or temperature value exceeds
its specified maximum or minimum value
Err Wrong key selected
Error Message
Err
pH calibration error of attempting to confirm a
calibration value which is not within the specified
calibration window
Accessories
Replacement meter and accessories
Item Description Eutech Instruments Oakton Instruments
CyberScan pHTutor Bench pH/ EC-PHTUTOR 35619-30
T emp Meter
Temperature Probe for pHTutor bench EC-PH5-TEMB01P 35613-05
meter, 1m cable length
Electrode Stand with Swivel Arm & EC-PH-ELSTDC 35617-50
Base Plate
110/120VAC power adapter, 50/60 Hz EC-120-ADA 35615-07
220/230VAC power adapter, 50/60 Hz EC-220-ADA 35615-08
Replacement Electrodes
Item Description Eutech Instruments Oakton Instruments
General purpose, Epoxy-body EC-FC72522-01B 35641-51
double junction pH Combination
Electrode, 12 X 110 mm,
1m cable length
General purpose, Epoxy-body EC-FC73529-01B 35811-71
“3-in-1” pH/T emp. Combination
Electrode, 12 X 110 mm,
1m cable length
Glass body Refillable pH EC-FG73504-01B 05997-10
Combination Electrode:
Annular ceramic reference junction
with protective sensor guard,
1 m cable length
Order Code No. Order Code No.
Order Code No. Order Code No.
pH Buffers/Sachets, Reference Electrolyte & Others
Item Description Eutech Instruments Oakton Instruments
Order Code No. Order Code No.
pH 4.01 Buffer Solution (480 ml bottle) EC-BU-4BT 00654-00
pH 7.00 Buffer Solution (480 ml bottle) EC-BU-7BT 00654-04
pH 10.01 Buffer Solution (480 ml bottle) EC-BU-10BT 00654-08
pH 4.01 Buffer Sachets EC-BU-4BS 35653-01
(20 ml x 20 pcs. per box)
pH 7.00 Buffer Sachets EC-BU-7BS 35653-02
(20 ml x 20 pcs. per box)
pH 10.01 Buffer Sachets EC-BU-10BS 35653-03
(20 ml x 20 pcs. per box)
Reference Electrolyte (KCl with EC-RE001 05992-47 (125 ml)
Ag/AgCl) (480 ml bottle)
Reference Electrolyte (4MKCI) EC-RE002 05992-48 (125 ml)
for Calomel (Hg/ Hg2Cl2) electrodes
& double-junction electrodes
Storage Solution for pH Electrode EC-RE005 00653-04
(480 ml bottle)
Protein Cleaning Solution (480 ml bottle) EC-DPC-BT 00653-06
Specifications
pHTutor Specifications
pH Range 0.00 to 14.00 pH
Resolution 0.01 pH
Relative Accuracy 0.01 pH
Calibration Points Up to 3 points with Auto-buffer recognition
Buffer Set Standard Selection USA- 4.01/7.00/10.01NIST- 4.01/6.86/9.18
Calibration Window +/-1.00 pH (pH 4.01 & pH 10.01),+/-1.50 pH (pH 7.0)
(USA Buffer Set Standard)
Calibration Window +/-1.00 pH (pH 4.01 & pH 9.18),+/-1.25 pH (pH 6.86)
(NIST Buffer Set Standard)
Temperature Compensation Automatic / Manual (0 to 100 °C)
Temperature Range 0 to 100 °C
T emp Resolution 0.1 °C
Temp Accuracy +/- 0.3 °C
Temp Calibration Window +/- 5 °C
pH Slope and Offset Display Ye s
User reset Yes
Non Volatile Memory Backup Yes
LCD Display Custom Dual LCD
(1 x 4.5 digits, 1 x 3.5 digits, annunicators)
Power Requirement AC/DC 9V Adapter (110 VAC/220 VAC, 50-60Hz)
Dimensions / Weight Meter : 18 x 23 x 6 cm / 1250 g
Boxed : 40 x 26 x 9 cm / 1950 g
Warranty
The pHTutor are warranted to be free from manufacturing defects for 3 years and electrode
module for 6 months. If repair, adjustment or replacement is necessary and has not been the
result of abuse or misuse within the time period, please return the product – freight prepaid – and
correction will be made without charge. Out of warranty products will be repaired on a charge
basis.
Return of Items
Authorization must be obtained from your distributor before returning items for any reason.
When applying for authorization, please include information regarding the reason the item(s) are
to be returned.
Note: We reserve the right to make improvements in design, construction and appearance of
products without notice. Prices are subject to change without notice.
 Loading...