

Page 1
NOVA LIVE “R”
ELECTRIC PAN EL H E AT E R S
User Manual
PLEASE READAND SAVETHIS DOCUMENT
Available Models: 1000W, 1500W & 2000W
www.nova-live.co.uk
Page 2
IMPORTANTSAFEGUARDS
Before use, please read and follow all the instructions carefully even if you feel you are familiar with the
product. It contains important instructions concerning the operation, safety and maintenance of the
heater. Please keep it handy for future reference.
■
Only connect the apparatus if the voltage indicated on the type plate
corresponds with the mains voltage.
■
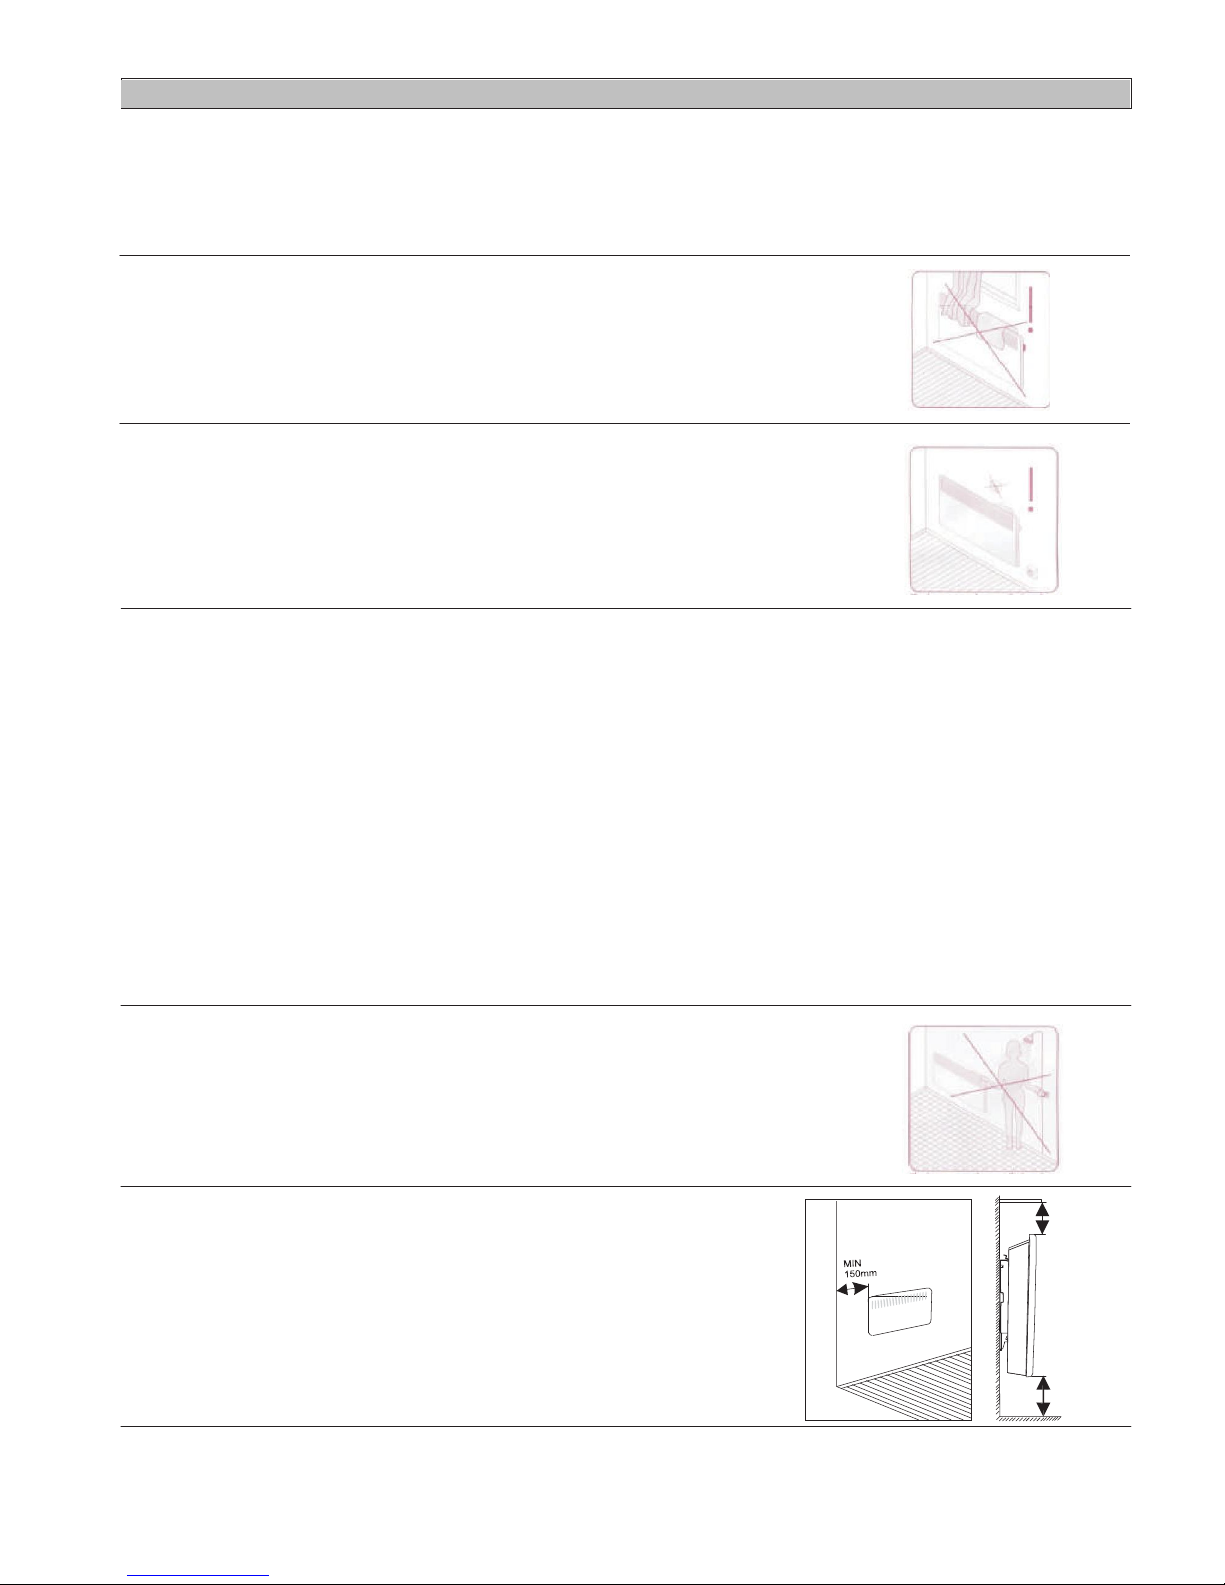
In order to avoid overheating,do not cover the heater with towels,
curtains etc.
■
The heater must not be located immediately below a socket.
■ Do not unplug by pulling on the cord.To unplug,grasp the plug,not the cord.
■ Turn off the appliance and unplug from outlet when not in use and before cleaning.Allow it to cool down .
■ Do not use the heater in areas where petrol,paint,or flammable liquids are used or stored.
■ If the supply cord is damaged,it must be replaced by a service agent or equivalent qualified persons
otherwise it may cause a hazard.
■ This appliance is not intended for use by young children or uninformed persons unless they are
adequately supervised by a responsible person to ensure that they can use the appliance safety.
■ To protect against fire,electric shocks and injury to the user,please do not immerse appliance,
power cord or plug in water or any other liquid.
■ This appliance is for indoor use only.
■ Do not handle plug with wet hands.
■ To clean theheater itmust be unplugged from the wall socket first. Thenuse a cloth to wipe the unit
making sure the heaters is dry before being turned back on.
■ When the heater is working in free standing mode with the wheels attached,do not use this heater in the
immediate surroundings of a bath, shower, swimming pool or any open water source.
■
When the heater is working in wall mounted mode, the heater is to be
installed so that switches and other controls cannot be touched by a personin
the bath or shower.
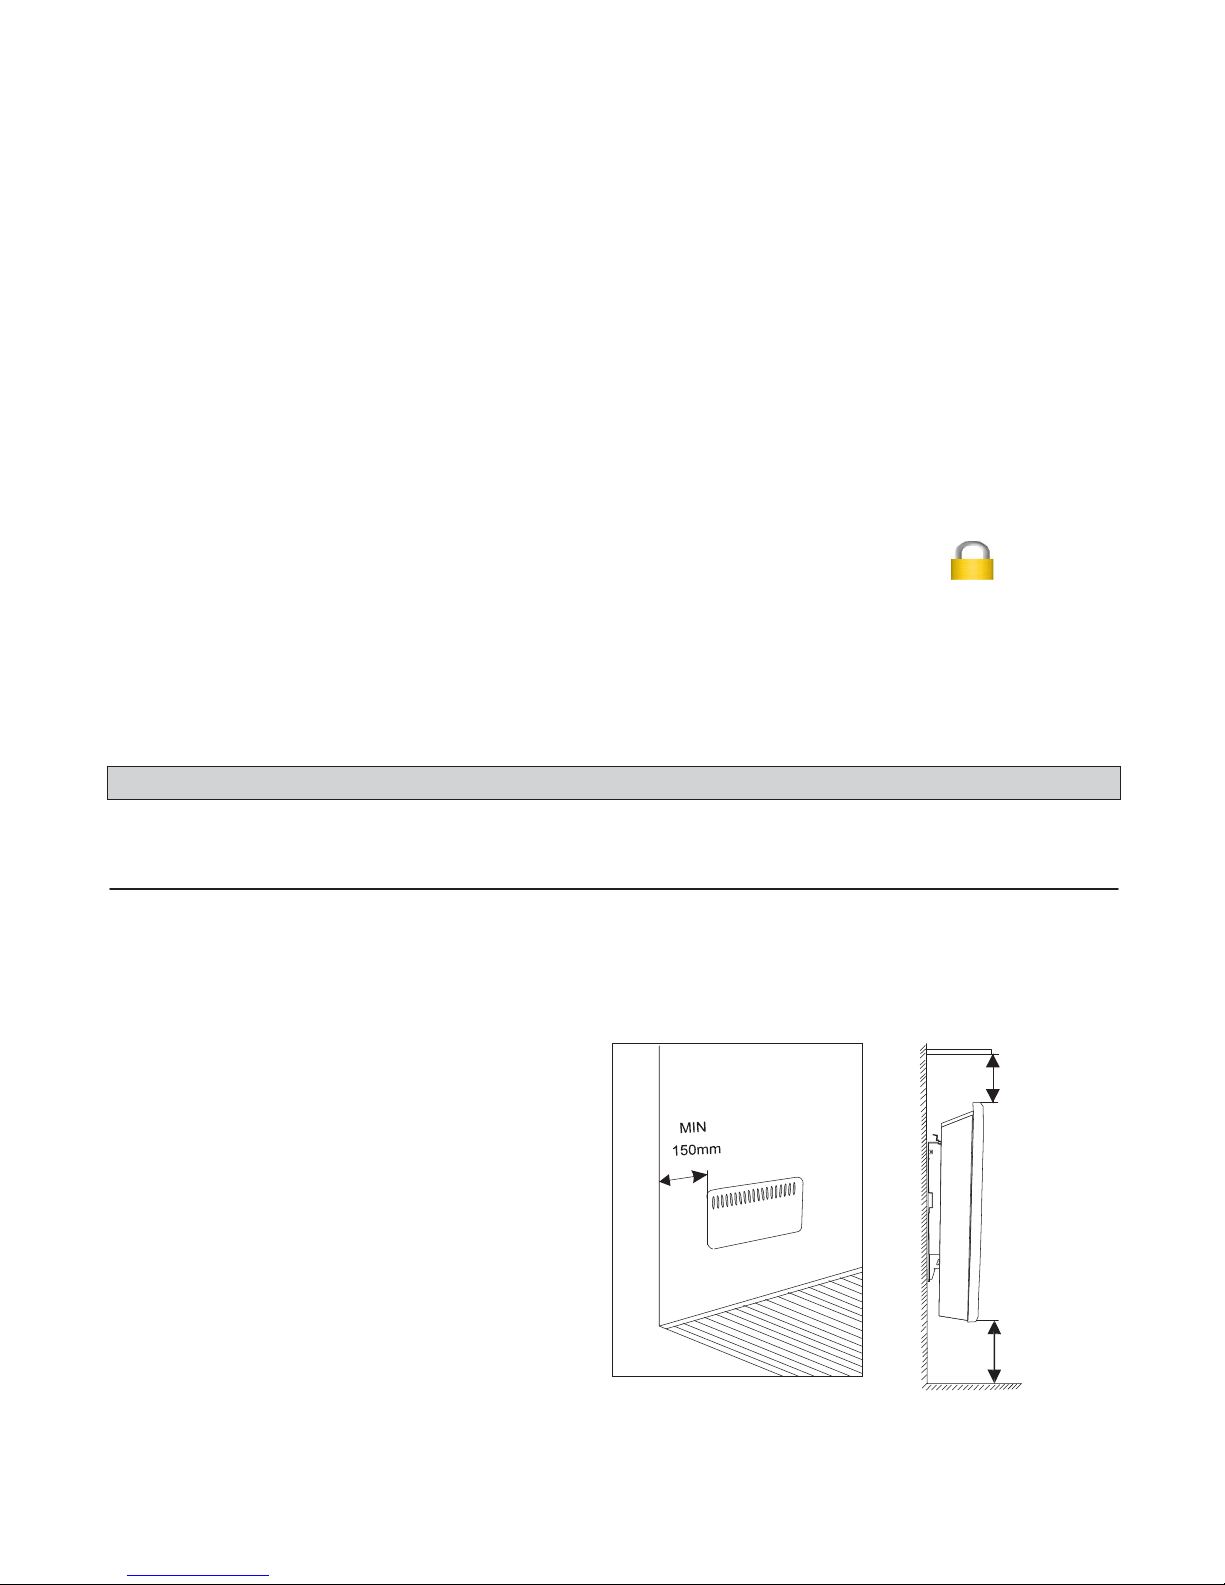
■ Fixing the heater correctly on the wall: The appliance should be
installed at least 150mm from any obstruction on all sides
150m m
MIN
150m m
MIN
■Always unplug the heater and make sure it has cooled down before storage.
Page 3
DISPOSAL
This product must not be disposed of along with the domestic waste. This product has
to be disposed at an authorized place for recycling of electrical appliances.
By collecting and recycling waste,you help save natural resources,and make sure the
product is disposed in an environmental friendly way.
CONTROLS
1.General
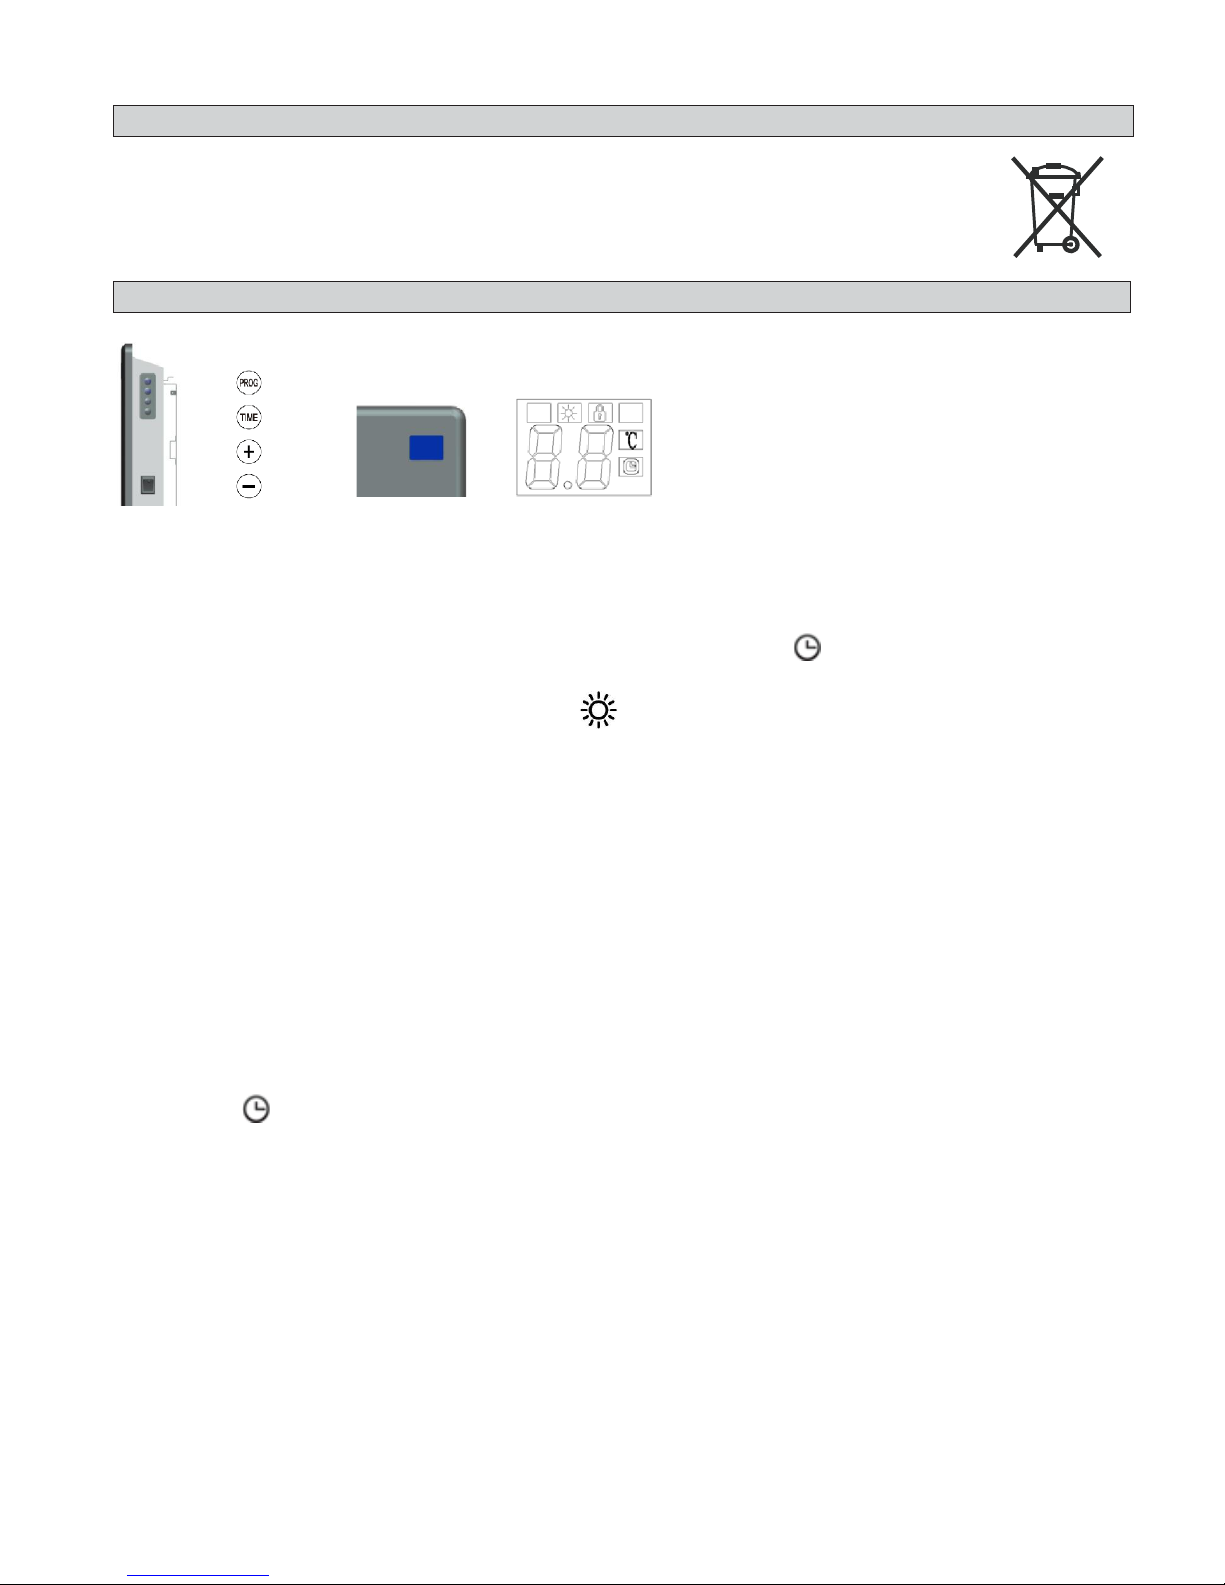
When first powering the heater, it will make a beeping sound, the LED display will flash.
The factory default,high level heat temperature is 20°C, this can be set from 5°C to 35°C by the user and
will be displayed in LED window. Low level heat temperature is 5°C, and this cannot be altered.
Default working mode is P1 and the time is Monday (d1), 12:00.The symbol will flash to remind you
to set the time.
When the heater is on and producing heat the symbol, will light on the LED display.
The function module is equipped with an accurate thermal cut-out when the programmed temperature is
achieved. It has a built in memory with 6 heatingprograms, of which 5 are pre-defined as
“P1,P2,P3,P4,P5” and 1 is available for programming by the user as “UP”.
2. Setting the Day and Time:
When the panel heater is first installed, or has been switched off or disconnected from the mains supply
for more than 72 hours, the Dayand Time will need to be set again.
2.1 – Press the“Time” button.The LED display will display d.1, and “1” will flash. Use the “+” or “-” buttons
to choose the correct day. It’s from 1 to 7which means from Monday to Sunday.
2.2 - Press the “Time” button. The LED display will flash “12”. Use the “+” or “-” button to choose the
correct Hour. This is from 0 to 23.
2.3 - Press the “Time”button. The LED display will flash “0”, use the “+” or “-” button to choose the correct
Minute. This is from 0 to 59.
2.4 - Press the “Time” button once more to save. The LED window will return to the display setting
temperature, will light off.
2.5 -If want to check the time, just press Time button once to show the Day, second time to show the Hour,
third time to show the Minute, the fourth time to quitand return to the temperature display.
3. Setting the Temperature:
The LED displaywill show thecurrent set temperature, press the “+” or “-” button to choose the required
temperature, it’s from 5°C to 35°C. During low heat time periods, it will display 5°C.
4. Description of the Programs Available:
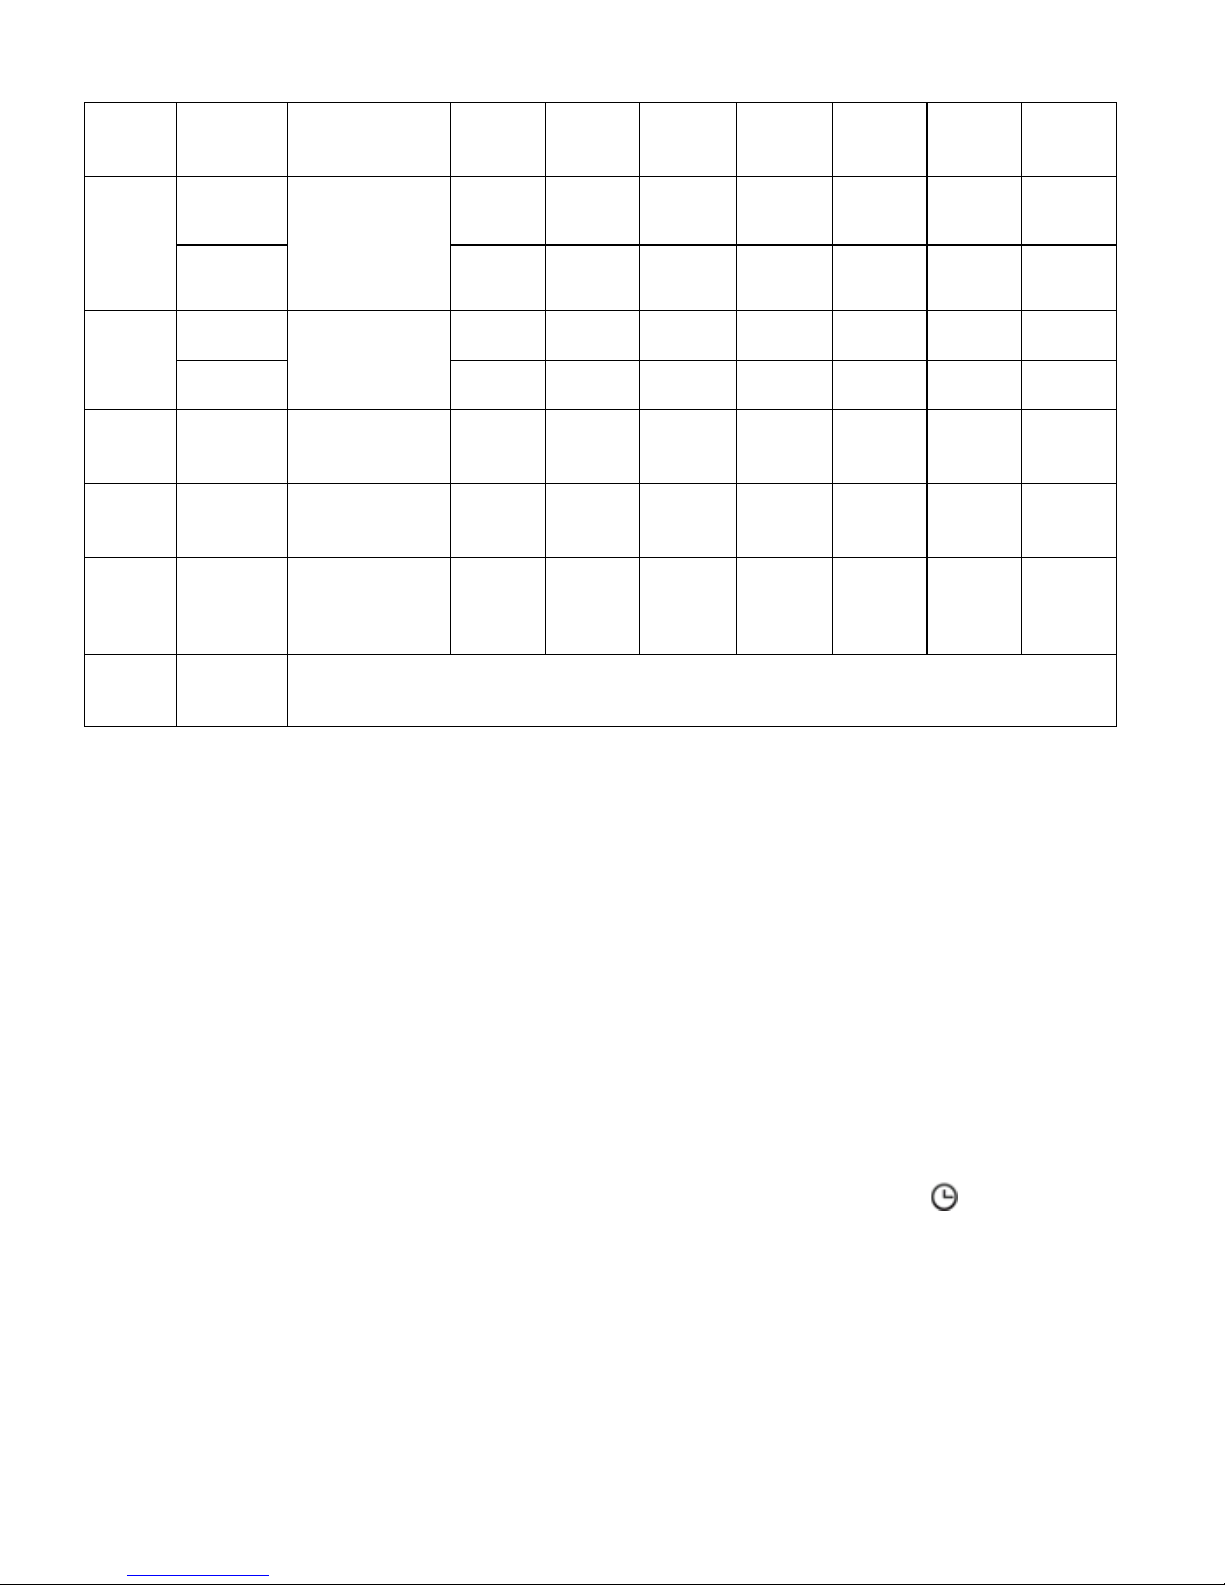
There are 6 programs which switch the heating between Low Heat and High Heat at various times of the
dayand night. 5 of which are pre-defined and cannot be altered. These are displayed as
“P1,P2,P3,P4,P5”. The other is the"UP" programs which can be defined bythe user.
The table over the page shows the Low/High heat setting running times for each available program.
Page 4
Pre-set
program
Days Description LOW HIGH LOW HIGH LOW HIGH LOW
P1
Monday-Frida
y
9-5 Routine
00:00am-6
:30am
6:30am-8:
30am
8:30am17:00pm
17:00pm-2
2:30pm
22:30pm-2
4:00pm
Saturday-Su
nday
00:00am-7
:30am
7:30am-10
:00am
10:00am-1
2:00am
12:00pm-1
4:00pm
14:00pm-1
7:00pm
17:00pm-2
2:30pm
22:30pm-2
4:00pm
P2
Monday-Frid
ay
Office
00:00am-6
:00am
6:00am-17
:00pm
17:00pm-2
4:00pm
Saturday-Su
nday
00:00am-2
4:00pm
P3
Monday-Sun
day
CommercialLocation
00:00am-6
:00am
6:00am-22
:00pm
22:00pm-2
4:00pm
P4
Monday-Sun
day
Constant Heating
0:00am-24
:00pm
P5
Monday-Sun
day
Frost Protection
0:00am24:00pm
UP
User program,Runs at the time defined by the user – See Section 4.2
4.1 Setting the Chosen Program:
To select a program to run:
1) Press the “Prog” Button on the side of the heater.The current selected program will be displayed;
2) Press “+” or “-” to scroll through the available programs until you find the required one.
3) Wait 5 seconds, the selected program will be saved and run, the LED display will once again show
the current set temperature.
4.2 - Changing the Settings for the User Program "UP":
The "UP" program allows the heater to be programmed to switch from low to high heat output settings
atrequired times. Each day of the week can have different settings.A maximum of three interval high heat
output times can be input per day. The time not covered in these 3 intervals will run at the low
temperature setting (5°C)
To program the high level heating settings for the "UP" program:
1) Press the “Prog” button and “+”or “-” until “UP”is displayed on the LED display.
2) Press the “Time” button within 5 seconds, the LED display will show “d.1” and will light on. You
are now setting the first time interval for Monday.
3) Press the “Time” button within2 minutes, the LED display will display “1”,You are now setting the
Starting hour for the first time interval of the day.
4) Press “+”or “-”, the display will show “0”firstly,continue press “+”or “-“until the display shows the
required starting hour.
5) Press the “Time” button, the LED display will now show the number 1 hour after the starting time.
press “+” or “-” until get the required finished hour.
6) Press the “Time” button to save above setting,and LED display “2”, it comes to the 2nd time interval
for high heat output.
7) Repeat step 3) to 6) to set the 2nd and 3rd intervals.
8) On setting all three intervals the heater will then move on to d.2 and you will need to repeat the
Page 5
process for each day of the week. If you only need to set 1 or 2 time intervals for the day,just press
the “Time”buttonuntil the LED Display shows the next d. number.
9) If all days have been set the unit will save the setting and
10) If nobuttons are pressed within 2 minutes or you press the “Prog” button, it will quit setting and LED
Display will show the set temperature once again.
5.Check the “UP”Program Setting:
1) Press the “Prog” and “+”or “-”to display “UP”, then press “Time”for 3 seconds, LED window display
“d.1”, press “+”or “-” to choose from d1.d2.d3.d4.d5.d6.d7 to get the correct day you want to check.
2) Press “Time”,the LED display “1”
3) Press “Time”,the LED display will show starting hour.
4) Press “Time”, the LED display will show finish hour.
5) Repeat step 2) to 4) to display 3rd high level heat output time interval.
6) If no time is input for a time interval, it will display“--”.
6.Child Lock:
1) Press the “Prog”button for 5 seconds, all the buttons will be locked,Thesymobl “ ” will lighton
LED window.
2) Press the “Prog”button for 5 seconds again, all buttons will be unlocked.
INSTALLATION GUIDE
For Wall Mounted Installation:
1.When mounting the heater on a wall do not attach the foot plates to the base.
2.Make sure the heater is unplugged and the power switches are off. Ensure the wall is suitable for
mounting this panel heater.
3.Ensure the sides of the appliance have at least a150mm clearance.
15 0m m
MI N
15 0m m
mi n
Page 6
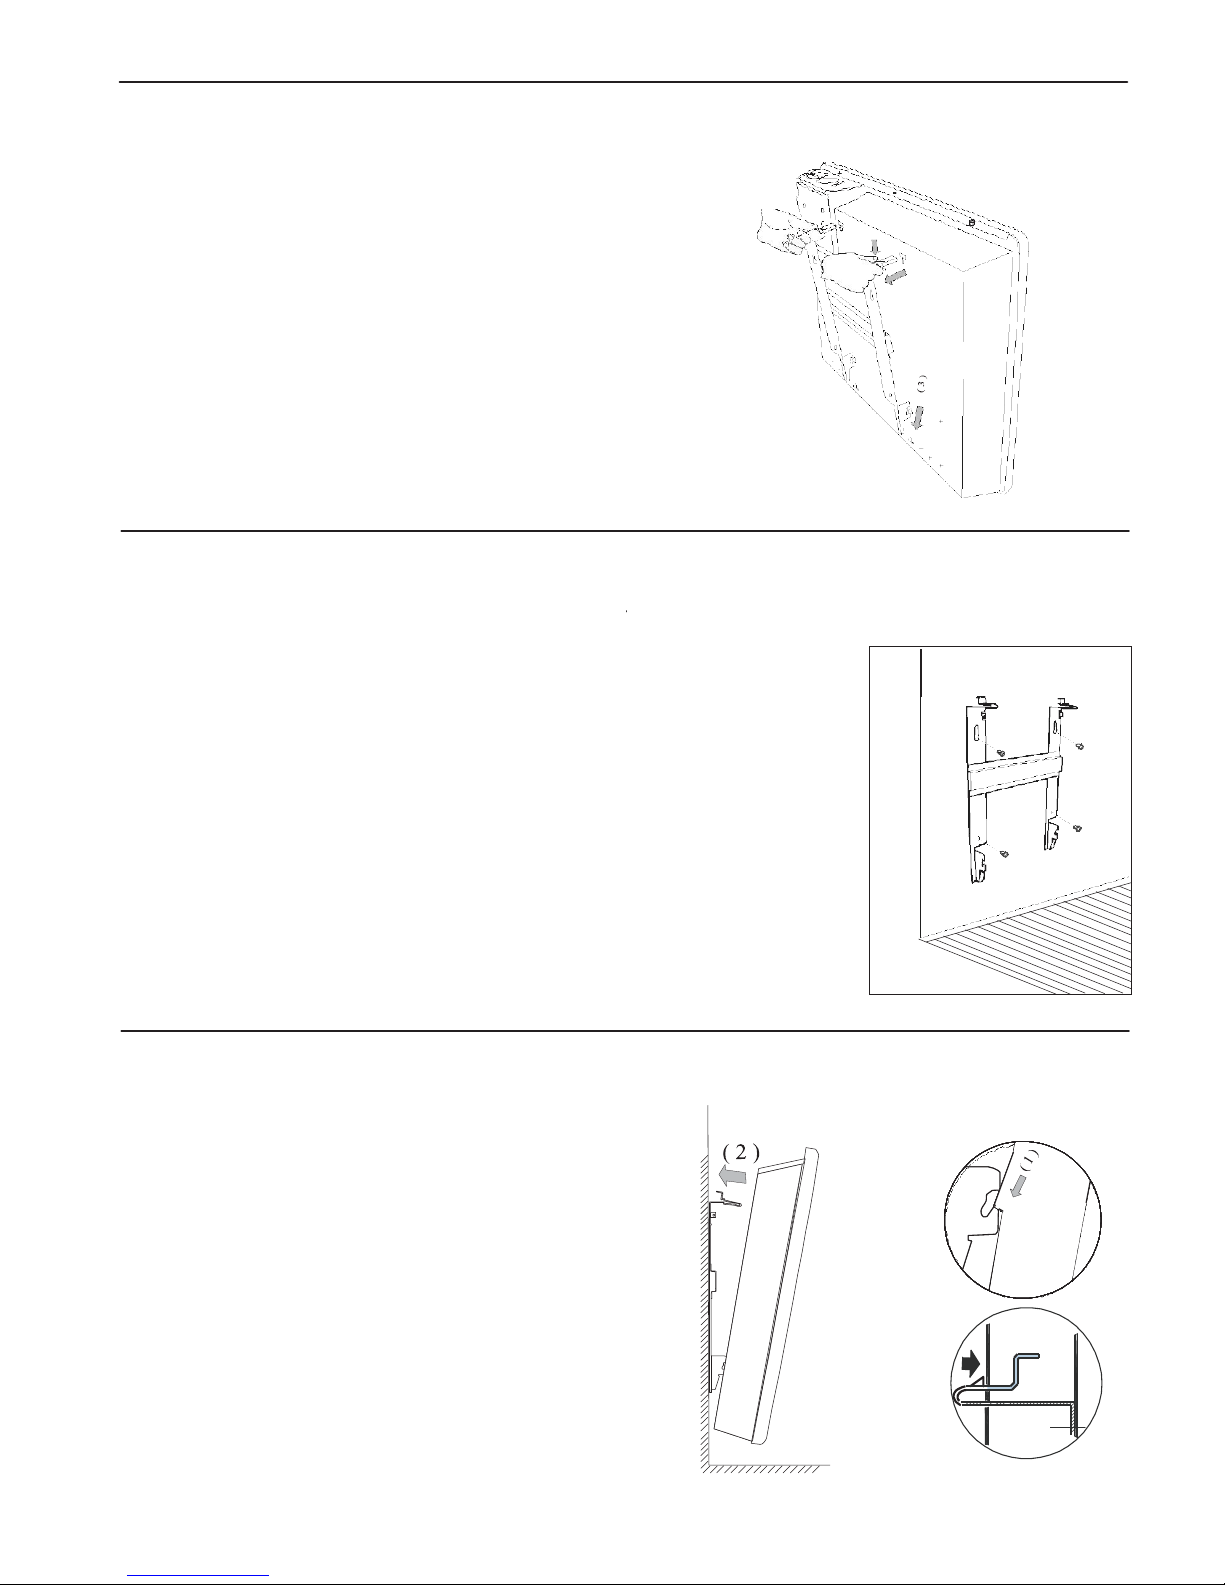
4.Detach the moun
ting bracket from the back of the panel heater
5. Positioning the bracket level on the wal
l mark your mounting holes
6.Securethe mounting bracket to the wall with th
e 4
(For masonry walls use the plastic sheaths with
screw
7.Hangthe hooks of the bracket into the back of
heater
8 Push the heaterinto the upright position,the uppe
r
9.Plugor hardwire the heater into a 220~240supply
.
following the steps below.
(1)
(2)
and drillthe holes as required.
mounting screws provided.
s provided)
. (Fig.1).
hook will slideinto the back of the heater. (Fig.2).
(1)
(2 )
Page 7
INSTALLATION GUIDE
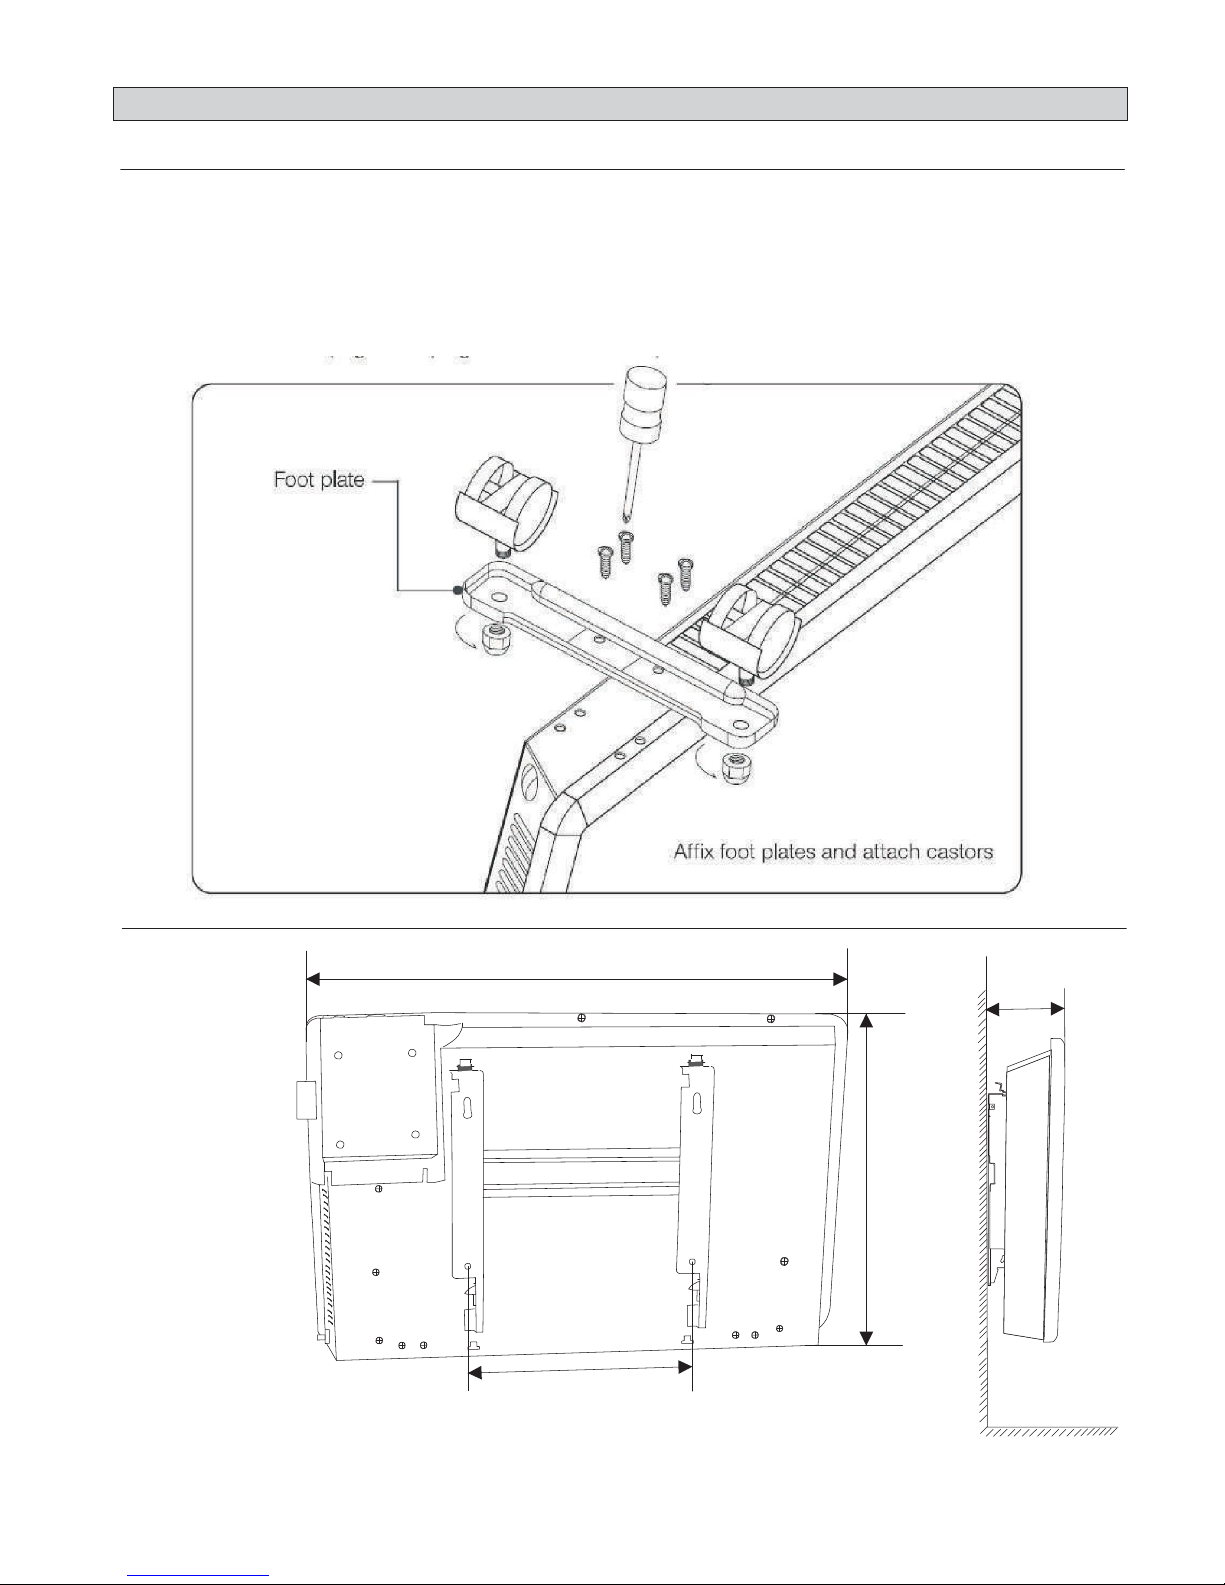
For Freestanding Installation:
1.Besure theheater is unplugged and the power switches are off.
2.Standthe heater upside down.
3.Locate the four holes at each end of the base of the heater.
4.Secure the foot plates to the base using the provided screws through these holes.
5.Set heater upright and plug into a standard 220~ 240 volt AC electrical outlet.
Dimensions
A
D
B
C
Page 8
INSTALLATION GUIDE
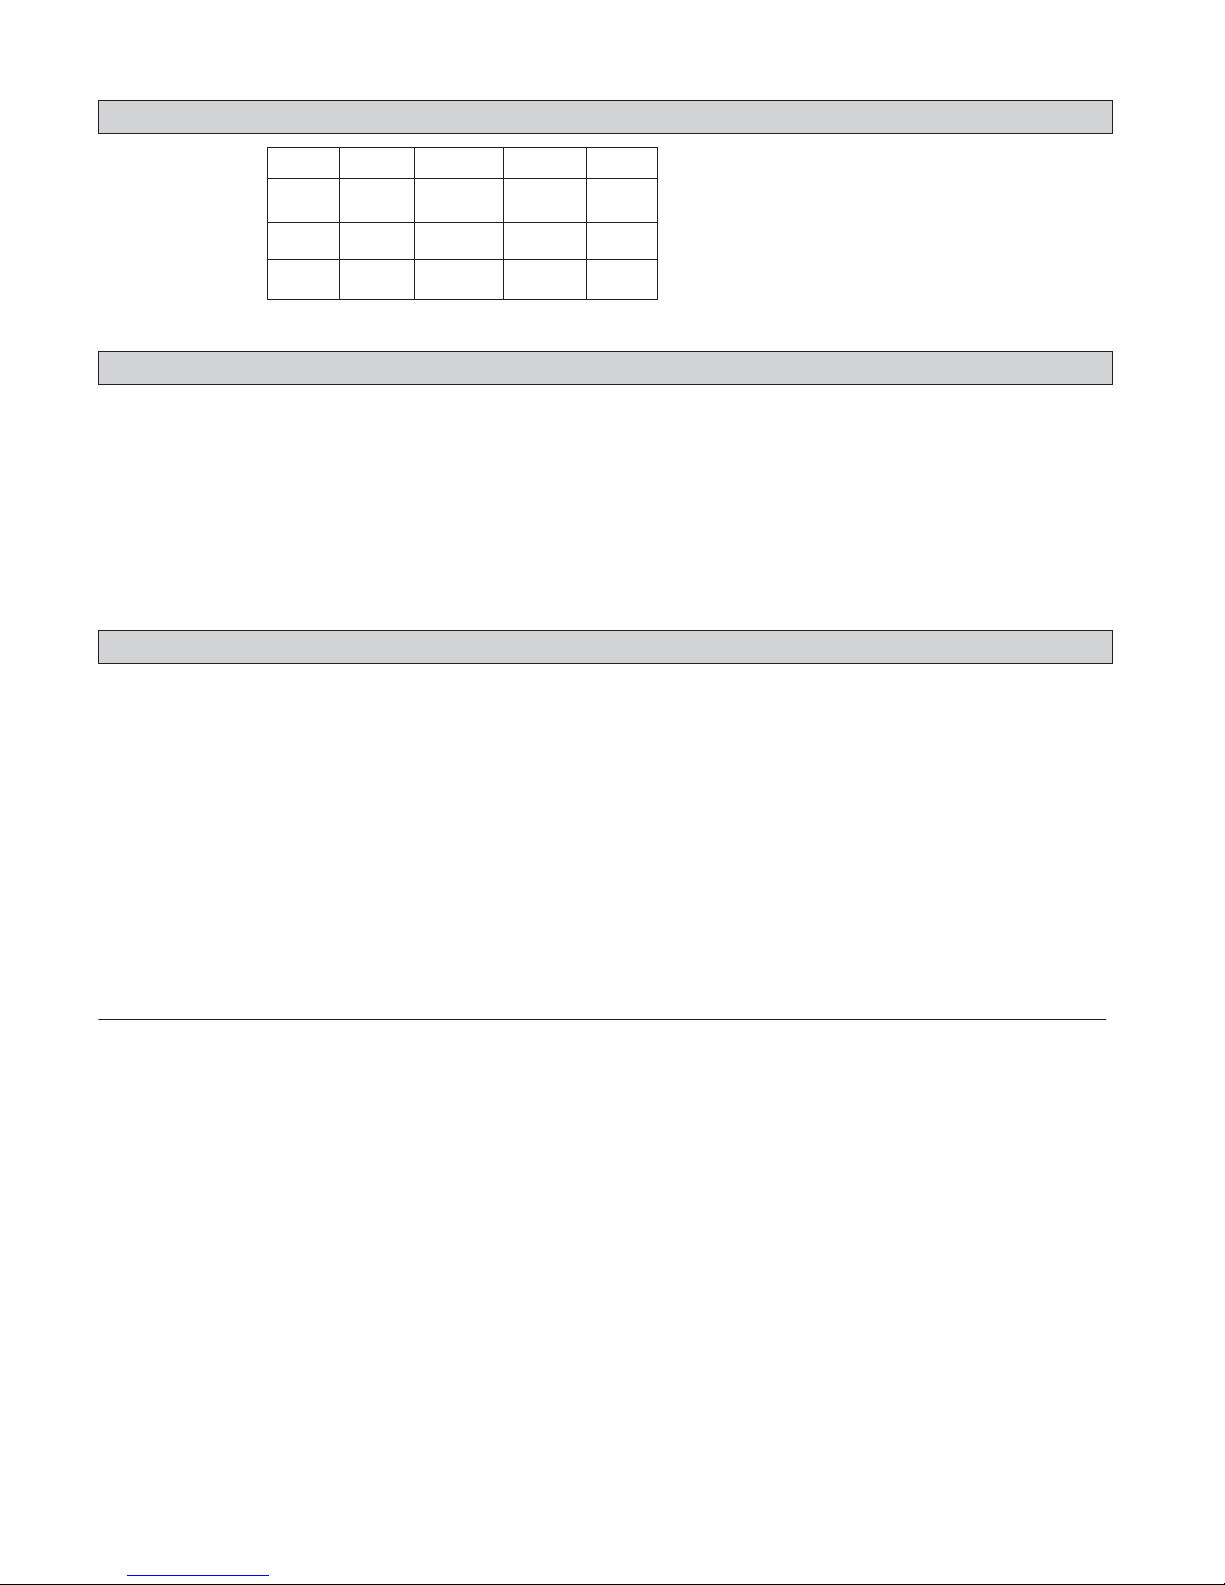
Watts
A
B C
D
1000
500 400
190
95
1500
640
400
190
95
2000
940
400
390
95
Above specification is subject to change without prior notice for purpose of improvement
OVERHEAT PROTECTION
This product has protective safeguards that shut off the product when part become in danger of
overheating. If it does overheat, switch off your panel heater and remove the main plug from the
power socket. Allow your heater to cool for 45 minutes. The unit will work again when it has cool
down.
Carefully check obvious cause like curtain or clothes that may have prevented air from
accessing the inlet or outletgrill.
CAREANDCLEANING
The heater requires regular cleaning to ensure trouble free operation:
- Unplug the heater from the mains supply before cleaning.
- Use a damp cloth to wipe the exterior of the heater to remove dust and dirt.
- Use a vacuum cleaner to remove dust and fluff from the inlet and outlet grills.
- To clean behind the heater (when mounted on a wall):unfasten the two hooks located on the
top of the mounting bracket to tilt the heater forward. Whenthe heater is tilted forward, it is easier
to clean behind it. It is important to returnthe heater to its original position after cleaning and to
refasten the hooks.
- Ensure the heater is dry before plugging back into the mains supply.
If your heater does not work:
-Check that power is available to the heater.
-Check the ambient temperature of the room against the programmed set temperature.
-Check that the thermal cut-out has not operated.( Service staff only)
-Do not attempt to repair the heater.
-Please call your local dealer for service advise.
 Loading...