

Page 1
THE MILLENNIUM PRO
The Millennium Pro takes the dependability of the original Millennium charger to new
levels for even better battery performance, new or old. With large backlit display, battery
conditioning, and charge history, you get vital information that is easy to comprehend.
The Millennium Pro is equipped with Ni-Cd Linear Mode for all Ni-Cd cells, Ni-Cd Reverse
Pulse Mode for Ni-Cd cells, and the new NOVAK Ni-MH2 Mode for the ultimate charge of
all sizes of Ni-MH cells. All modes have easy to understand user-adjustable charge parameters.
Case Size ...........................................................4.00” x 4.38” x 2.33” (10.16 x 11.13 x 5.92 cm)
Weight ............................................................................................... 14.2 ounces (402 grams)
Input Voltage (Power Source)............................................................................................. 12-15 volts DC
Charging Modes ........................
TIONS
Charging Capability ............................................................................... 4-8 cells (1.2 VDC/cell)
Ni-Cd Charge Rate
Trickle Charge Rate
Reverse Pulse Duration
Ni-MH Charge Rate ........................................................................... 0.5-7.0 amps (adjustable)
SPECIFICA
Circuit Protection ...............
(Linear & Reverse Pulse) ..........................................................
(Linear/after peak) ...................................................................
(Reverse Pulse) ............................................................................
Ni-Cd Linear(Ni-Cd) • Ni-Cd Rev.Pulse(Ni-Cd) • Ni-MH2(Ni-Cd/Ni-MH)
0.5-7.0 amps (adjustable)
0.1-0.4 amp (adjustable)
5-20 milliseconds
Input & Output RVP/Short-Circuits, Shorted Batteries, Thermal Overload
IMPORTANT PRECAUTIONS
The following precautions will help to prevent possible damage to the Millennium Pro,
the battery pack, or the input power source.
• Charge only nickel-cadmium or nickel-metal hydride rechargeable battery packs––
Damage will occur from charging other battery types
• Never allow water, moisture, or other foreign materials to enter Millennium Pro.
• Do not use automobile battery chargers to power the Millennium Pro––False peaks
can occur, and excessive voltage spikes can damage the Millennium Pro.
•
Do not obstruct the air intake on the bottom of the Millennium Pro––This will cause
overheating and thermal shut down. Be careful if putting Millennium Pro on a pit towel.
•
Do not charge batteries with fewer than 4 or more than 8 cells––connected in series.
•
Do not charge battery packs connected in parallel––Batteries will be damaged.
•
Enhanced-voltage
company for charging recommendations.
•
Excessive charge current can damage batteries––Follow battery maker recommendations.
• Never exceed 15 volts DC input power source to power the Millennium Pro.
• Gases from a lead-acid battery may ignite if sparks occur when connecting or dis-
connecting the Millennium’s alligator clips––Using a lead-acid battery as a power source
may generate hydrogen gas and should only be used in a well ventilated area. Avoid
open flames and sparks which may ignite battery gases.
(“zapped”)
PLEASE FOLLOW ALL INSTRUCTIONS CAREFULLY
batteries charge erratically––Consult the battery matching
(lead-acid, lithium-ion, gel cells, etc.).
PROFILE SELECT OPTION
OPERATION MANUAL
The Millennium Pro has the ability to store five custom charge profiles in the software’s
memory, and to quickly change the active profile and begin charging. Follow the steps
below to navigate through the sub menus of the Profile Select option and change the
active profile. For each screen displayed, follow the given button inputs as shown.
DISPLAY BUTTON
ENTER ∆∇
Start
ENTER ∆∇
Profile Select
Activate Profile
1 of 5 PROFILE1
EDIT CHARGE OPTION
The Millennium Pro is equipped with three charge modes: Ni-Cd Rev.Pulse (larger Ni-Cd
cells), Ni-Cd Linear (all sizes Ni-Cd), & NOVAK Ni-MH2 (all sizes Ni-MH cells). Each charge
mode has various user-adjustable settings. To customize and activate the desired charge
mode, follow the steps below to navigate through the Edit Charge sub menus.
DISPLAY BUTTON
ENTER ∆∇
Profile Select
Press
down (∇) or up (∆) arrows
scroll to Profile Select menu option.
⇓⇓
⇓
⇓⇓
Press ENTER to go to
Activate Profile screen.
⇓⇓
⇓
⇓⇓
Press down (∇) or up (∆) arrows to
change the active charge profile.
(Memory position & profile name displayed) then:
Then press ENTER to activate profile
and jump back to Start screen.
to
∇∇
∇
∇∇
∇∇
∇
∇∇
Edit Charge
or
ENTER
or
ENTER
ENTER ∆∇
∆∆
∆
∆∆
∆∆
∆
∆∆
INPUT POWER SOURCE
Input power source voltage should be 1.5 volts DC above peak-voltage of the battery.
Example 1: (6 cell Ni-Cd pack peak-voltage≈10.5 volts) + (1.5 volts) = 12 volts DC
Example 2: (8 cell transmitter pack peak-voltage≈13.5 volts) + (1.5 volts) = 15 volts DC
Remember that older battery packs peak at higher voltages.
If power supply’s voltage is not high enough to peak battery, charge 8 cell packs as two, 4 cell packs.
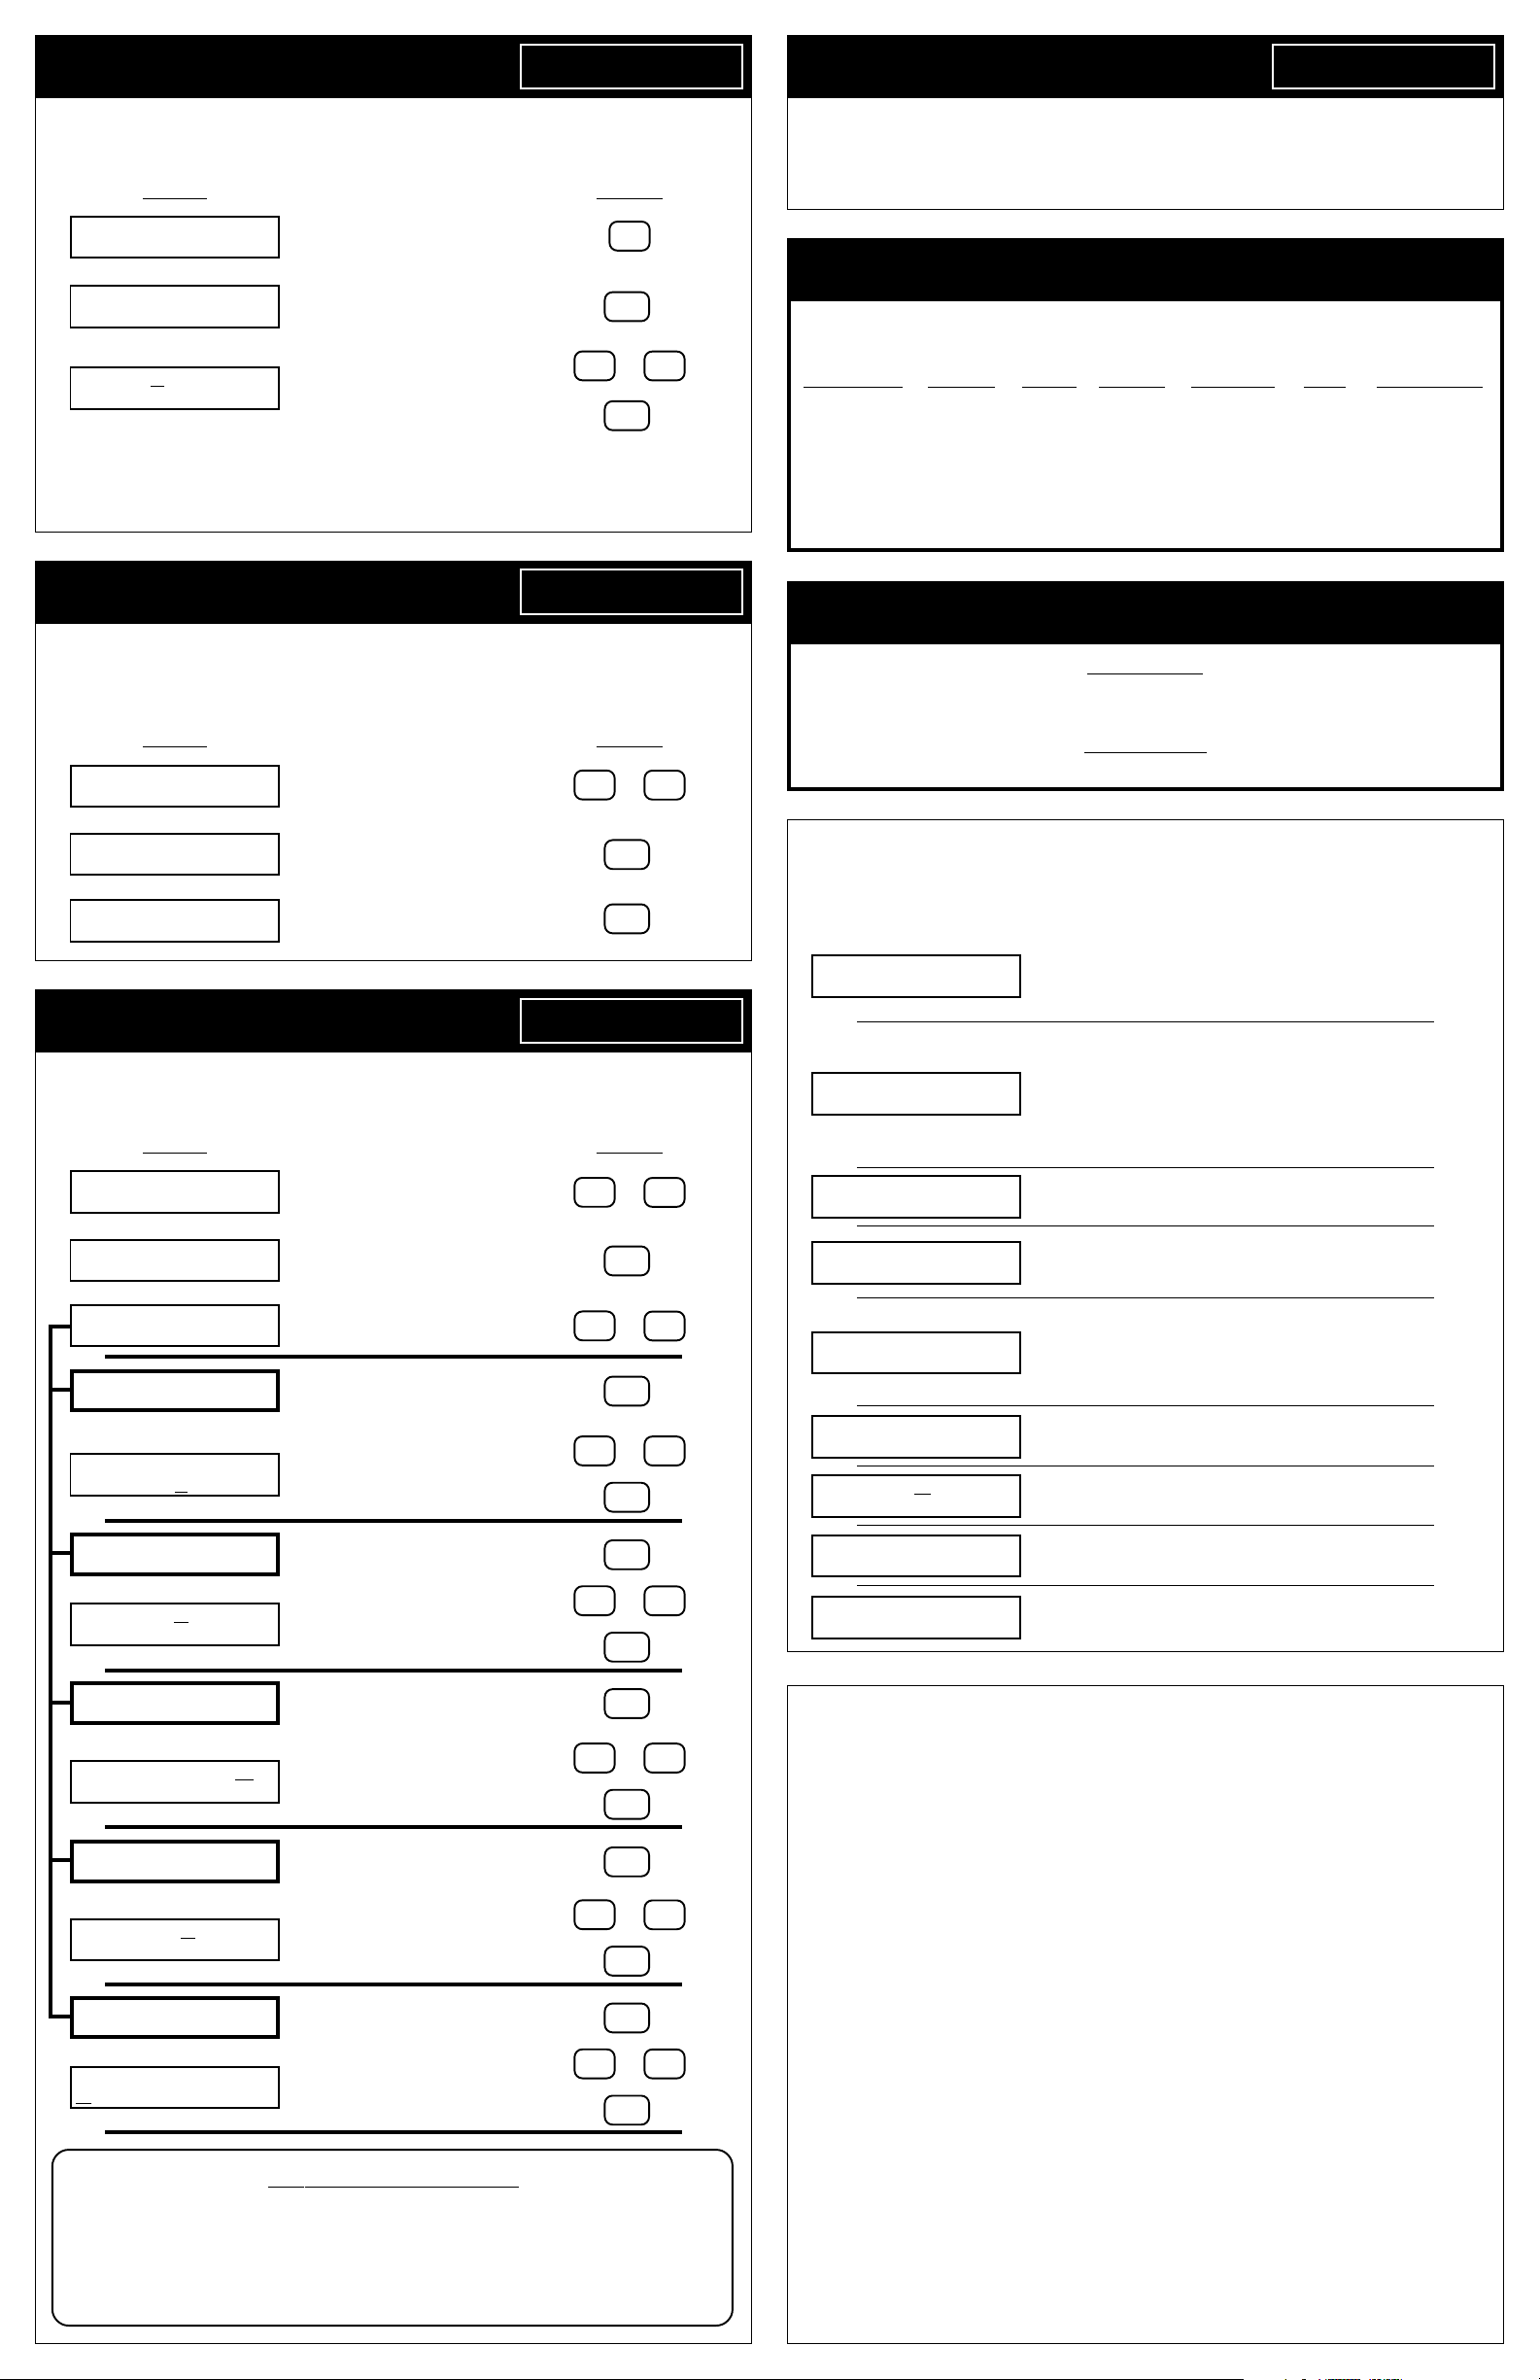
Input power source connection on the Millennium Pro is located on the lower corner of
the back of the case. The supplied power harness has a matching connector attached to it,
and will plug directly to the panel-mounted connector on the back of the Millennium Pro.
When looking at the input power connector, the pin marked with a raised rib in the
plastic is the positive (+) connection as shown below.
Panel-mounted
input connector
Positive (+) pin
(Rib in plastic)
Acceptable Input Power Sources: DC power supply* or lead-acid battery**
*Output current of power source should meet/exceed desired charge rate.
**Connect input power harness to lead-acid battery before connecting harness to Millennium Pro.
If using Millennium Pro with power supply, cut wires of included input power harness to
the desired length and secure them to the output terminal screws of the power supply.
If your power supply has post-style output terminals, or if
acid battery, you can solder the in
the red alligator clip to the wire that goes to the Millennium Pro’s positive (+) pin (rib in
plastic of connector). Solder the black alligator clip to other wire.
cluded alligator clips to the input power harness. Solder
MAIN SELECTION MENUS
The MAIN MENU screens are the
the Millennium Pro. The available screens are shown here
In each of the MAIN MENU screens the top line of the LCD
displays the available button choices. ENTER and the up (∆)
and down (∇) arrows to prompt you to use one of these
keys to continue navigation.
The bottom line displays your current software location. To
go the second level of the Millennium’s software, simply
push the ENTER button at any of the MAIN MENU screens.
When in the Start menu screen, the display will alternate
between the Start option and Active Profile screen which
shows the active Charge Profile
stored settings
The Start option begins the charge process, while the other
options take you to the next software level where you can
change charge modes and various other parameters.
SHORTCUT: At the Start option screen, pressing the BACK
button takes
you quickly change the Active Profile.
(the top line shows charge mode, # of cells, & current)
you directly to the Activate Profile Screen
first level of navigation in
(bottom line) and the profile’s
VOLTAGE & CONNECTION
Install rubber feet (4)
using Millennium Pro with a lead-
ENTER ∆∇
Start
→→
→
→→
to let
.
Last Charge Info
ENTER ∆∇
Start
↔↔
↔↔
↔
ENTER ∆∇
Profile Select
↔↔
↔↔
↔
ENTER ∆∇
Edit Charge
↔↔
↔↔
↔
ENTER ∆∇
Delayed Charge
↔↔
↔↔
↔
ENTER ∆∇
↔↔
↔↔
↔
ENTER ∆∇
Settings
↔↔
↔↔
↔
ENTER ∆∇
Pit Wizard
ENTER ∆∇
Start
ENTER ∆∇
Edit Charge
CHARGE MODE
XXXX XXXXXX
CHARGE MODE
NiCd Linear
Cells Current(A)
6 4.5
Trickle Charge
Off 0.2A
SELECT MENU
Volt Threshold
∆/Cell ∆/Pack
14mV 84mV
ENTER to Save
∆∇ to Cancel
CHARGE MODE
NiCd Rev Pulse
Cells Amps Pulse
6 4.5 12ms
SELECT MENU
Volt Threshold
∆/Cell ∆/Pack
14mV 84mV
ENTER to Save
∆∇ to Cancel
CHARGE MODE
NOVAK NiMH2
Cells Current(A)
6 4.0
ENTER to Save
∆∇ to Cancel
Press
down (∇) or up (∆) arrows
scroll to Edit Charge option screen.
⇓⇓
⇓
⇓⇓
Press ENTER to go to
Charge Mode screen.
⇓⇓
⇓
⇓⇓
∆∇
∆∇
∆∇
∆∇
Press down (∇) or up (∆) arrows to
change the active charge mode. or
(NiCd Linear/NiCd Rev.Pulse/NOVAK NiMH2)
Press ENTER to activate charge mode
and move to next screen.
⇓⇓
⇓
⇓⇓
Press down (∇) or up (∆) arrows to or
change the underlined parameter.
Press ENTER to move to next parameter.
⇓⇓
⇓
⇓⇓
Press down (∇) or up (∆) arrows to or
change the underlined parameter.
Press ENTER to move to next parameter.
⇓⇓
⇓
⇓⇓
Press ENTER to move to next screen.
⇓⇓
⇓
⇓⇓
Press down (∇) or up (∆) arrows to or
change the underlined parameter.
Press ENTER to move to next screen.
⇓⇓
⇓
⇓⇓
Press ENTER to save changes
cancel) and jump back to Start screen.
Press ENTER to activate charge mode
and move to next screen.
⇓⇓
⇓
⇓⇓
Press down (∇) or up (∆) arrows to or
change the underlined parameter.
Press ENTER to move to next parameter.
⇓⇓
⇓
⇓⇓
Press ENTER to move to next screen.
⇓⇓
⇓
⇓⇓
Press down (∇) or up (∆) arrows to or
change the underlined parameter.
Press ENTER to move to next screen.
⇓⇓
⇓
⇓⇓
Press ENTER to save changes
cancel) and jump back to Start screen.
Press ENTER to activate charge mode
and move to next screen.
⇓⇓
⇓
⇓⇓
Press down (∇) or up (∆) arrows to or
change the underlined parameter.
Press ENTER to move to next parameter.
⇓⇓
⇓
⇓⇓
Press ENTER to save changes
cancel) and jump back to Start screen.
to
(∆ or ∇ to
(∆ or ∇ to
(∆ or ∇ to
∇∇
∇
∇∇
∇∇
∇
∇∇
∇∇
∇
∇∇
∇∇
∇
∇∇
∇∇
∇
∇∇
∇∇
∇
∇∇
∇∇
∇
∇∇
∇∇
∇
∇∇
or
ENTER
ENTER
then:
ENTER
then:
ENTER
ENTER
then:
ENTER
ENTER
ENTER
then:
ENTER
ENTER
then:
ENTER
ENTER
ENTER
then:
ENTER
ENTER
∆∆
∆
∆∆
∆∆
∆
∆∆
∆∆
∆
∆∆
∆∆
∆
∆∆
∆∆
∆
∆∆
∆∆
∆
∆∆
∆∆
∆
∆∆
∆∆
∆
∆∆
Page 2
DELAYED CHARGE OPTION
Delayed Charge
ENTER ∆∇
PIT WIZARD OPTION
ENTER ∆∇
Pit Wizard
The Millennium Pro allows you to set the charger to begin charging after a preset amount
of time. Follow the steps below to navigate through the sub menus of the Delayed
Charge option, set countdown time, and activate the delayed charge.
DISPLAY BUTTON
ENTER ∆∇
Start
ENTER ∆∇
Delayed Charge
Time 0hr 1min
Timer Off
Pressing ENTER while “On” is underlined will activate the timer and begin counting down.
The Millennium Pro will automatically start charging with the active charge profile at the end
of the countdown time. No changes may be made to the charger during the Delayed Charge
countdown. To cancel the Delayed Charge timer, press the BACK button on the keypad.
LAST CHARGE INFO OPTION
This option provides vital statistics that let you manage your battery pack’s performance
and life. Keeping record of this information will let you track the peak charge voltage “V”,
charge time “sec”, capacity “mAh”
Follow the steps below to navigate to the Last Charge Info screen.
DISPLAY BUTTON
ENTER ∆∇
Start
ENTER ∆∇
Last Charge Info
9.26V 2653sec
3026mAh 90836J
SETTINGS OPTION
The Millennium Pro allows the user to define various parameters for personal preference.
Follow the steps below to enter customize charge profile names, change the alarm tone,
turn the button tone on or off, adjust the contrast, and enter a personalized user name.
DISPLAY BUTTON
Press
down (∇) or up (∆) arrows
scroll to Delayed Charge option screen.
⇓⇓
⇓
⇓⇓
Press ENTER to go to
presets screen.
⇓⇓
⇓
⇓⇓
Press down (∇) or up (∆) arrows to
change the underlined value.
(Hours, Minutes, & ON/OFF) then:
Press ENTER to move to next setting.
(milliamp hours)
Press
down (∇) or up (∆) arrows
scroll to Last Charge Info screen.
Press ENTER to go to
Press ENTER or any button to
return to Last Charge Info screen.
, and energy “J”
⇓⇓
⇓
⇓⇓
presets screen.
⇓⇓
⇓
⇓⇓
to
Last Charge Info
to
∆∆
∆
∆∆
ENTER
or
∇∇
∇
∇∇
ENTER
ENTER ∆∇
(joules)
of the battery.
or
∇∇
∇
∇∇
ENTER
ENTER
ENTER ∆∇
Settings
∆∆
∆
∆∆
∆∆
∆
∆∆
The Millennium Pro has Novak’s Pit Wizard Software built-in, and can be used with the
included MP D•LINK2 harness to connect to and customize the throttle profiles in the
Cyclone C2 and TC2
(Cyclone, CycloneTC, & Atom with the “MP Classic D•LINK” harness/See attached coupon).
Refer to instruction sheet 2 for Pit Wizard software operation.
RECOMMENDED CHARGE SETTINGS
We have already programmed our recommendations for the five most common charging setups into the Millennium Pro’s five charge profile locations. The following is our complete list of
recommendations for charging different packs, cell sizes, and types of batteries.
BATTERY TYPE CELL SIZE # CELLS CURRENT DELTA-PEAK PULSE CHARGE MODE
Ni-Cd sub-C & D 4-8 4.5A 14mV/cell – Ni-Cd Linear
Ni-Cd sub-C & D 4-8 4.5A 14mV/cell 12ms Ni-Cd Rev.Pulse
Ni-Cd AA & smaller 4-8 1.5A 8mV/cell – Ni-Cd Linear
Ni-MH sub-C & D 4-8 4.0A – – Ni-MH2
Ni-MH AA & smaller 4-8 1.0A – – Ni-MH2
Note: To reset all user-adjustable parameters in the Millennium Pro to
factory defaults, press & hold the BACK button during start-up.
RE-PEAKING BATTERIES
If you prefer to re-peak your Ni-Cd cells after charging, wait a short amount of time after the
initial charge is complete to allow the individual cells to equalize, then re-start the charger to
bring all the cells up together until they peak.
We DO NOT recommend re-peaking Ni-MH cells. Use these immediately after initial charge.
Ni-Cd CELLS
Ni-MH CELLS
TROUBLE-SHOOTING GUIDE
The following messages may appear on the Millennium Pro’s display. Check the various
causes and solutions to solve the problem. If you are unable to solve the problem, check
our website or call our Customer Service Department.
•Battery voltage too low to begin charge process.
Condition . . .
In Progress
Battery Not
Connected
•One or more cells shorted.
•Number of cells set too high.
•Output leads/alligator clips are shorted.
•Charging attempted with no battery connected or disconnected while charging.
•Charging attempted with no power source connected.
•
Battery pack has open cell or bad connection––Check pack.
•Battery voltage too close to power source voltage––Increase input power source voltage.
•Output leads un-shorted during conditioning.
Press
ENTER ∆∇
Start
ENTER ∆∇
Settings
ENTER ∆∇
XXX XXX XXX
ENTER ∆∇
Name Profile 1
Save Profile 1
Name As PROFILE1
ENTER ∆∇
Alarm Tone
Select 1 of 10
Alarm Tones
ENTER ∆∇
Button Tone
Button Tone On
ENTER ∆∇
Contrast
Select 1 of 8
Contrasts
ENTER ∆∇
User Name
Save UserName As
NOVAK RACING
(jumps back to Start screen after last character)
(jumps back to Start screen after last character)
down (∇) or up (∆) arrows
to scroll to Settings screen.
⇓⇓
⇓
⇓⇓
Press ENTER to go to
the Settings sub menu.
⇓⇓
⇓
⇓⇓
Press
down (∇) or up (∆) arrows
to scroll through available Settings.
Press ENTER to modify name
of active* charge profile.
(*change active profile & repeat for others)
⇓⇓
⇓
⇓⇓
Use
down (∇) or up (∆) arrows or
to change underlined character.
Press ENTER to move to next character.
Press ENTER to change Alarm Tone.
⇓⇓
⇓
⇓⇓
Use
down (∇) or up (∆) arrows or
to sample various tones
Press ENTER to select Alarm Tone
and jump back to Start screen.
Press ENTER to go to Button Tone
ON/OFF sub screen.
Use
down (∇) or up (∆) arrows or
to toggle Button Tone On or Off.
Press ENTER to make selection
and jump back to Start screen.
Press ENTER to go to Contrast
adjustment sub screen.
Use
down (∇) or up (∆) arrows or
to adjust contrast level.
Press ENTER to make selection
and jump back to Start screen.
Press ENTER to modify User Name.
(User Name appears during start-up)
Use
down (∇) or up (∆) arrows or
to change underlined character.
Press ENTER to move to next character.
(“X” is off)
⇓⇓
⇓
⇓⇓
⇓⇓
⇓
⇓⇓
⇓⇓
⇓
⇓⇓
.
∇∇
∇
∇∇
∇∇
∇
∇∇
∇∇
∇
∇∇
∇∇
∇
∇∇
∇∇
∇
∇∇
∇∇
∇
∇∇
∇∇
∇
∇∇
or
ENTER
or
ENTER
then:
ENTER
ENTER
then:
ENTER
ENTER
then:
ENTER
ENTER
then:
ENTER
ENTER
then:
ENTER
∆∆
∆
∆∆
∆∆
∆
∆∆
∆∆
∆
∆∆
∆∆
∆
∆∆
∆∆
∆
∆∆
∆∆
∆
∆∆
∆∆
∆
∆∆
NAVIGATION NOTE:
At almost any place in the Millennium Pro’s software, you
can use the BACK button to return to the last screen without
making any changes to the screen that you are on. If you
repeatedly press the BACK button, you will eventually work
your way back to one of the 7 MAIN MENU screens.
Power Supply Not
Connected
Outputs Shorted
Battery
Failure
Charger Shutoff
Due to Overheat
Select X of 10
Alarm Tones
Calibration Data
Is Invalid!
X XXXXXX XXXX
COMM ERROR
•Power source disconnected while charging.
•Output leads un-shorted during conditioning, then reshorted––Check output leads for short.
•Output leads shorted during charging––Check for short.
•Number of cells set too high.
•After conditioning, battery voltage still too low to begin
charge process––try new battery.
•Battery pack connected backwards.
•Output leads shorted and no battery pack attached.
•Internal temperature above 203ºF––Check intake grill for
blockage. Will go to Start screen when cool.
•No alarm tone is heard––Alarm tone set to OFF (X).
Factory programmed software calibration data has been
•
damaged––Contact Novak Customer Service.
• MP D•LINK2 harness not connected to ESC––Check harness
and connection. Make sure ESC DataLink socket is clean.
CUSTOMER SERVICE & REPAIRS
NOVAK ELECTRONICS, INC. (949) 833-8873
18910 Teller Avenue FAX (949) 833-1631
Irvine, CA 92612 www.teamnovak.com
Monday-Thursday: 8:00am-5:00pm (PST) • Friday: 8:00am-4:00pm (closed every other Friday)
Before sending your Millennium Pro for service, review the Trouble-Shooting Guide and instructions.
After reviewing instructions, if you feel your charger requires service,
product service options and pricing by one of the followings methods:
WEBSITE: We have an abundance of information available for all of our products. Print a copy of the
PRODUCT SERVICE FORM from the SERVICE section of the website. Fill out the
on this form and return with the Novak product that requires servicing.
PHONE/FAX/E-MAIL: If you do not have access to the internet, contact our customer service department by phone, fax, or e-mail as listed above, and they will supply you with current service options
and send you a PRODUCT SERVICE FORM.
WARRANTY SERVICE: For warranty work, you MUST CLAIM WARRANTY on the PRODUCT SERVICE
FORM and include a valid cash register receipt with purchase date on it, or a previous service invoice
If warranty provisions have been voided there will be service charges.
• Hobby dealers/distributors are not authorized to replace product thought to be defective.
• If a hobby dealer returns your product for service, submit a completed PRODUCT SERVICE FORM
to the dealer and make sure it is enclosed with the product.
•
Novak Electronics does not make any electronic components (transistors, etc.) available for sale.
•
MP D•LINK2 harness must also be included for claims regarding Pit Wizard software programming/problems.
PRODUCT WARRANTY
Novak Electronics, Inc. guarantees the Millennium Pro to be free from defects in materials and workmanship for a
period of 120 days from original date of purchase (verified by dated, itemized sales receipt). Warranty does not
cover incorrect installation, components worn by use or excessive force, exceeding the recommended input voltage,
damage resulting from charging fewer or more than the recommended number of cells, or from improper
connection or charging of receiver battery packs or enhanced-voltage batteries, any splices to the output wires or
the MP D•LINK2 harness, damage from disassembling the case, tampering with the internal electronics, allowing
water, moisture, or any foreign materials to enter charger or get onto the PC board. In no case shall our liability
exceed the product’s original cost or cover the cost of batteries damaged while charging. We reserve the right to
modify the provisions stated in this warranty without notice.
Because Novak Electronics, Inc. has no control over connection and use of this product, no liability may be assumed
nor will be accepted for damage resulting from the use of this product. Every Millennium Pro is thoroughly tested
before leaving our facility, and is therefore considered operational. By the act of connecting/operating this product,
the user accepts all resulting liability.
please obtain the most current
needed information
IM-4490-1 8-2001
.
Page 3

PIT WIZARD SOFTWARE
ACQUIRING DEFAULT PARAMETERS
Before you can edit Profiles, customize Profiles, or even monitor the transmitter’s
trigger position, you MUST upload the Neutral, Full Throttle, and Full Brake
settings that are stored in your speed control’s One-Touch memory.
If you do not do this, you will download incorrect values for these settings
into the your speed control’s One-Touch memory for all four Profiles.
PIT WIZARD OPTION
The Millennium Pro has Novak’s Pit Wizard Software built-in, and can be used with the
included MP D•LINK2 harness to connect to and customize the throttle profiles in the
Cyclone C2 and TC2
Pit Wizard software enables a hidden fourth throttle profile in any one of the Novak
programmable ESCs, and allows you to modify various speed control parameters.
(Cyclone, CycloneTC, & Atom require the “MP Classic D•LINK” harness). The
ENTER ∆∇
Pit Wizard
ADJUSTABLE SPEED CONTROL PARAMETERS
NEUTRAL (µs)––Position at which ESC is at rest with no Drive or Brake being applied.
µ
FULL THROTTLE (
FULL BRAKE (
Note: Neutral, Full Throttle, & Full Brake are programmed into ESC during One-Touch Set-Up.
These values are NOT usually changed, as this changes the One-Touch programming.
DEADBAND (% of Full Throttle)––Space between Minimum Brake & Minimum Drive.
Increasing Deadband requires more trigger to reach the first pulse of Drive & Brake.
Decreasing Deadband requires less trigger to reach the first pulse of Drive & Brake.
DRIVE PWM FREQUENCY (Hz)––Frequency ESC sends drive information to motor.
Increasing Drive Frequency requires more initial trigger to obtain given speed.
(Smoother response with light vehicles; Heavy vehicles feel more sluggish)
Decreasing Drive Frequency requires less initial trigger to obtain given speed.
(Light vehicles are harder to control at low end; Heavy vehicles are more reactive)
MINIMUM DRIVE
Increasing Minimum Drive applies more Drive with initial trigger movement.
(High traction conditions; Eliminates ‘dead’ trigger with heavy vehicles)
Decreasing Minimum Drive applies less Drive with initial trigger movement.
BRAKE PWM FREQUENCY (Hz)––Frequency ESC sends braking information to motor.
Increasing Brake Frequency requires more initial trigger to obtain given braking.
(Light vehicles more controllable during initial braking; Heavy vehicles brake less reactively)
Decreasing Brake Frequency requires less initial trigger to obtain given braking.
(Light vehicles harder to control during initial braking; Heavy vehicles are more reactive)
DRAG BRAKE VALUE (% of Full Brake)––Amount of Drag Brake applied during Neutral.
DRAG BRAKE TOGGLE
Drag Brake Toggle ON: ESC BRAKE pot adjusts Drag Brake Value & Minimum Brake Value
to same level. Drag Brake & triggered braking both operate at Brake PWM Frequency.
(Drag Brake Value can NOT be set with Pit Wizard software when toggle is ON)
Drag Brake Toggle OFF: Independent adjustment of Drag Brake & Brake PWM frequencies.
DRAG BRAKE FREQUENCY (Hz)––Frequency ESC sends drag brake information to motor.
Increasing Drag Brake Frequency makes braking more subtle during Neutral/Deadband.
Decreasing Drag Brake Frequency makes braking more reactive during Neutral/Deadband.
s)––Trigger position at which ESC reaches Full Drive.
µ
s)––Trigger position at which ESC reaches Full Brake.
(% of Full Drive)––Amount of Drive applied with initial trigger movement.
(Low traction conditions; Makes light vehicles more controllable)
––Switches ESC’s BRAKE pot between Drag Brake & Minimum Brake
UPLOAD 1-TOUCH DATA
1 Upload Data
With the MP D•LINK2 harness connecting C2/TC2 to the Millennium Pro, and a charged
battery pack connected to the C2/TC2, follow the steps below to upload the One-touch
values from the speed control’s memory.
Note: Default values for each of the ‘Adjustable Parameters’ (listed in column to the left) will be
uploaded from the throttle profile that is currently active in the speed control. So if you plan on
modifying Profile 3, you will have less work if you upload Profile 3 to the Pit Wizard software.
DISPLAY BUTTON
Press
ENTER ∆∇
Start
ENTER ∆∇
Pit Wizard
1 Upload Data
1 Upload Data
DONE
***
***
down (∇) or up (∆) arrows
scroll to Pit Wizard option screen.
⇓⇓
⇓
⇓⇓
Press ENTER to go to
Pit Wizard sub menu.
⇓⇓
⇓
⇓⇓
Press ENTER to upload
One-Touch settings.
⇓⇓
⇓
⇓⇓
Press
down (∇) or up (∆) arrows
scroll to next Pit Wizard sub menu screen.
to
to
∇∇
∇
∇∇
∇∇
∇
∇∇
or
ENTER
ENTER
or
∆∆
∆
∆∆
∆∆
∆
∆∆
VERIFYING TRANSMITTER THROW
If your transmitter is not set-up to provide the proper amount of Full Throttle and Full
Brake throw, you will not get the full potential out of your Novak speed control. Follow
the steps in the Monitor Trigger section to determine your transmitter’s throw.
6 Monitor Trig
MONITORING TRIGGER
The Monitor Trigger option of the Pit Wizard software allows you to monitor the position
(position is measured in
transmitter as described in ‘CONNECTION’ section to left and follow the steps below to
determine the Neutral to Full Throttle & Neutral to Full Brake throw of your transmitter.
DISPLAY BUTTON
ENTER ∆∇
Start
.
6 Monitor Trig
ENTER ∆∇
Pit Wizard
Trigger Throw
1603µS
µ
S) of your transmitter. Connect Millennium Pro, ESC, receiver, &
Press
down (∇) or up (∆) arrows
scroll to Pit Wizard option screen.
⇓⇓
⇓
⇓⇓
Press ENTER to go to Pit Wizard sub menu.
Then press down (∇) or up (∆) arrows
to scroll to Monitor Trigger screen.
⇓⇓
⇓
⇓⇓
Press ENTER to monitor
transmitter’s trigger position.
⇓⇓
⇓
⇓⇓
Pull trigger to monitor Full Drive &
push trigger to monitor Full Brake.
Press
BACK to exit this screen.
to
∇∇
∇
∇∇
∇∇
∇
∇∇
or
ENTER
then:
or
ENTER
BACK
∆∆
∆
∆∆
∆∆
∆
∆∆
CONNECTION TO SPEED CONTROL
Included with your Millennium Pro is the MP D•LINK 2 harness for direct connection to
Novak’s Cyclone C2 & TC2. Connect the harness between the ESC & charger as follows:
Connect C2/TC2 to charged battery pack. ESC requires power for all Pit Wizard functions.
1.
2. Connect the DataLink end of harness to C2/TC2. The connector has offset pins that will
only go into the ESC’s socket in one direction.
3. Connect the other end of harness to the pins inside the rectangular opening of the
Millennium Pro’s front panel––Install connector with the WHITE WIRE TOWARD THE LEFT.
Note: If harness is installed backwards into Millennium Pro, a COMM ERROR will occur when
data transmission is attempted. No damage will occur––simply reverse connector and retry.
white wire
4. For the Monitor Trigger function, ESC must also be connected to a receiver. Receiver
and transmitter must have correct matching crystals, or be connected with a DSC cord.
MP Classic D•LINK COUPON
Return this coupon for FREE “MP Classic D•LINK” harness.
If you own an original Novak Cyclone, CycloneTC, or Atom ESC and would like to
utilize the ultimate programmability of the Pit Wizard software that is now built-into
the Millennium Pro charger, send us a self-addressed stamped envelope
postage) & this coupon (no photo copies) with following information completed:
name:
address 1:
address 2:
city: state: zip: country:
date purchased: where purchased:
(with sufficient
The difference between the values displayed for the Neutral & Full Throttle trigger
positions
Brake positions should be a minimum of 350µS.
should be a minimum of 550µS. The difference between the Neutral & Full
IMPORTANT: If you do not get 550µS Drive & 350µS Brake throw, your ESC will not operate at its full potential. Increase transmitter’s ATV, EPA, or ATL settings to get more throw.
RECOMMENDED THROTTLE PROFILES
We have already programmed our recommended settings for the three most common
set-ups for the given programmable ESC type into its main throttle profile locations. The
following is a general list of recommendations for different car set-ups and driving conditions.
We suggest uploading one of the three main throttle profiles from your speed control and
using it along with the profiles listed below as the basis for creating your own custom profiles.
With these recommended starting points,
the trial and error of changing various parameters
DRAG BRAKE TOGGLE OPTION OFF
VEHICLE MOTOR GRIP DRIVE FREQ. MIN. DRIVE BRAKE FREQ. DRAG BR.FREQ. DRAG BR.VALUE
BUGGY MOD HIGH 11.7 4% 3.9 – 0%
BUGGY MOD LOW 15.6 2% 3.9 – 0%
BUGGY STOCK HI/LO 11.7 9% 3.9 – 0%
TRUCK MOD HI/LO 11.7 7% 3.9 – 0%
TRUCK STOCK HI/LO 7.8 9% 3.9 – 0%
1/10 ONROAD
1/10 ONROAD
1/10 ONROAD
4WD SEDAN MOD HI/LO 23.4 6% 3.9 – 0%
FORMULA 1 HI/LO 23.4 3% 5.86 – 0%
1/12 ONROAD 6C MOD
1/12 ONROAD 4C MOD
4WD BUGGY MOD LOW 11.7 6% 3.9 3.9 15%
BUGGY MOD LOW 11.7 2% 3.9 3.9 15%
DRAG BRAKE TOGGLE OPTION ON––brake freq. = drag brake freq.
VEHICLE MOTOR GRIP DRIVE FREQ. MIN. DRIVE BRAKE FREQ. DRAG BR.FREQ. DRAG BR.VALUE
BUGGY MOD HIGH 15.6 4% 5.86 (5.86) (@ BRAKE pot)
BUGGY MOD LOW 23.4 6% 5.86 (5.86) (@ BRAKE pot)
1/10 ONROAD
4WD SEDAN MOD HI/LO 23.4 6% 3.9 (3.9) (@ BRAKE pot)
MOD HI/LO 23.4 8% 3.9 – 0%
MOD HI/LO 23.4 8% 3.9 5.86 4%
STOCK HI/LO 15.6 9% 3.9 – 0%
HI/LO 23.4 4% 3.9 – 0%
HI/LO 5.86 7% 3.9 – 0%
MOD HI/LO 23.4 8% 5.86 (5.86) (@ BRAKE pot)
––individual freqs. for brake & drag brake
you will minimize your set-up time by reducing
(ESC’s BRAKE pot adjusts min.brake)
(ESC’s BRAKE pot adjusts drag brake value)
Page 4

EDITING PARAMETERS
2 Edit Profile
DOWNLOAD PROFILE
3 Download Data
This is where you will be able to edit and customize the various adjustable parameters of
Profile 4 in the Novak programmable ESCs
Brake will overwrite the One-Touch programming in all 4 ESC throttle profiles)
connect the ESC to the Millennium Pro to work in the Edit Profile mode.
Any parameters modified in this section are making changes to the Pit Wizard software’s
active throttle profile.
(0-9), or they will be lost when you turn off the Millennium Pro or exit the Pit Wizard software screens.
DISPLAY BUTTON
ENTER ∆∇
Start
ENTER ∆∇
Pit Wizard
2 Edit Profile
21 Neutral
21 Neutral
1394µS
You must save the active profile to one of the Pit Wizard’s memory locations
Press
scroll to Pit Wizard option screen.
Press ENTER to go to Pit Wizard sub menu.
Then press down (∇) or up (∆) arrows
Press ENTER to go to Edit Profile sub menu.
Then press down (∇) or up (∆) arrows
Press ENTER to edit Neutral** point.
**Not usually changed (One-Touch setting).
Press down (∇) or up (∆) arrows
to change the parameter value.
Then press ENTER to store new value.
(Note: Any changes to Neutral, Full Throttle, & Full
down (∇) or up (∆) arrows
⇓⇓
⇓
⇓⇓
to scroll to Edit Profile screen.
⇓⇓
⇓
⇓⇓
to scroll to parameter to edit.
⇓⇓
⇓
⇓⇓
. You do not need to
to
∇∇
∇
∇∇
∇∇
∇
∇∇
∇∇
∇
∇∇
∇∇
∇
∇∇
ENTER
ENTER
ENTER
ENTER
or
then:
or
then:
or
or
then:
∆∆
∆
∆∆
∆∆
∆
∆∆
∆∆
∆
∆∆
∆∆
∆
∆∆
With the MP D•LINK2 harness connecting C2/TC2 to the Millennium Pro, and a charged
battery pack connected to the C2/TC2, follow the steps below to download the Pit Wizard
software’s active throttle profile to the speed control’s Profile 4 memory position. Note
that Profile 4 will be the active profile in the speed control after downloading.
IMPORTANT: Did you upload your One-Touch settings? If you did not first upload
a throttle profile from the ESC, and use it as the starting point for the profile you are
about to download, your ESC will not be properly adjusted to your transmitter.
DISPLAY BUTTON
Press
ENTER ∆∇
Start
ENTER ∆∇
Pit Wizard
3 Download Data
3 Download Data
DONE
***
***
down (∇) or up (∆) arrows
scroll to Pit Wizard option screen.
⇓⇓
⇓
⇓⇓
Press ENTER to go to Pit Wizard sub menu.
Then press down (∇) or up (∆) arrows
to scroll to Download Data screen.
⇓⇓
⇓
⇓⇓
Press ENTER to download Pit Wizard’s
active profile to ESC Profile 4 location.
⇓⇓
⇓
⇓⇓
Press
down (∇) or up (∆) arrows
scroll to next Pit Wizard sub menu screen.
to
to
4 Read Profile
∇∇
∇
∇∇
∇∇
∇
∇∇
∇∇
∇
∇∇
or
ENTER
then:
or
ENTER
or
∆∆
∆
∆∆
∆∆
∆
∆∆
∆∆
∆
∆∆
RECALL STORED PROFILE
22 Full Throttle
22 Full Throttle
510µS
23 Full Brake
23 Full Brake
351µS
24 Deadband
24 Deadband
4%
25 Drive Freq
Select Freq
5.86KHz
Press ENTER to edit Full Throttle** position.
**Not usually changed (One-Touch setting).
⇓⇓
⇓
⇓⇓
Press down (∇) or up (∆) arrows
to change the parameter value.
Then press ENTER to store new value.
Press ENTER to edit Full Brake** position.
**Not usually changed (One-Touch setting).
⇓⇓
⇓
⇓⇓
Press down (∇) or up (∆) arrows
to change the parameter value.
Then press ENTER to store new value.
Press ENTER to edit Deadband percentage.
⇓⇓
⇓
⇓⇓
Press down (∇) or up (∆) arrows
to change the parameter value.
Then press ENTER to store new value.
Press ENTER to edit Drive PWM Frequency.
⇓⇓
⇓
⇓⇓
Press down (∇) or up (∆) arrows
to change the parameter value.
Then press ENTER to store new value.
∇∇
∇
∇∇
∇∇
∇
∇∇
∇∇
∇
∇∇
∇∇
∇
∇∇
ENTER
or
then:
ENTER
ENTER
or
then:
ENTER
ENTER
or
then:
ENTER
ENTER
or
then:
ENTER
Follow the steps below to recall any of the stored throttle profiles from the Pit Wizard
software’s ten storage locations (The ESC does not need to be connected to the charger).
∆∆
∆
∆∆
∆∆
∆
∆∆
∆∆
∆
∆∆
∆∆
∆
∆∆
Once recalled, the profile can be reviewed and modified in the Edit Profile mode, or
downloaded to the speed control from the Download Data mode.
DISPLAY BUTTON
Press
ENTER ∆∇
Start
ENTER ∆∇
Pit Wizard
4 Read Profile
4 Read Profile
0
4 Read Profile
Read Complete
down (∇) or up (∆) arrows
scroll to Pit Wizard option screen.
⇓⇓
⇓
⇓⇓
Press ENTER to go to Pit Wizard sub menu.
Then press down (∇) or up (∆) arrows
to scroll to Read Profile screen.
⇓⇓
⇓
⇓⇓
Press ENTER to go to
Read Profile sub menu.
⇓⇓
⇓
⇓⇓
Press
down (∇) or up (∆) arrows
to change profile number.
Press ENTER to recall stored profile.
⇓⇓
⇓
⇓⇓
Press
down (∇) or up (∆) arrows
scroll to next Pit Wizard sub menu screen.
to
to
5 Save Profile
∇∇
∇
∇∇
∇∇
∇
∇∇
∇∇
∇
∇∇
∇∇
∇
∇∇
or
ENTER
then:
or
ENTER
or
then:
ENTER
or
∆∆
∆
∆∆
∆∆
∆
∆∆
∆∆
∆
∆∆
∆∆
∆
∆∆
SAVING PROFILES
26 Minimum Drv
26 Minimum Drv
5%
27 Brake Freq
Select Freq
3.90KHz
28 Drag Brk Frq
Select Freq
3.90KHz
29 Drag Brk Val
29 Drag Brk Val
0%
Press ENTER to edit Minimum Drive.
⇓⇓
⇓
⇓⇓
Press down (∇) or up (∆) arrows
to change the parameter value.
Then press ENTER to store new value.
Press ENTER to edit Brake PWM Frequency.
⇓⇓
⇓
⇓⇓
Press down (∇) or up (∆) arrows
to change the parameter value.
Then press ENTER to store new value.
Press ENTER to edit Drag Brake Frequency.
⇓⇓
⇓
⇓⇓
Press down (∇) or up (∆) arrows
to change the parameter value.
Then press ENTER to store new value.
Press ENTER to edit Drag Brake Value.
⇓⇓
⇓
⇓⇓
Press down (∇) or up (∆) arrows
to change the parameter value.
Then press ENTER to store new value.
∇∇
∇
∇∇
∇∇
∇
∇∇
∇∇
∇
∇∇
∇∇
∇
∇∇
ENTER
or
then:
ENTER
ENTER
or
then:
ENTER
ENTER
or
then:
ENTER
ENTER
or
then:
ENTER
The Millennium Pro’s built-in Pit Wizard software has the ability to store ten custom ESC
throttle profiles. Once stored, the throttle profiles can be recalled at any time from the
∆∆
∆
∆∆
∆∆
∆
∆∆
∆∆
∆
∆∆
∆∆
∆
∆∆
Read Profile mode, modified in the Edit Profile mode, or downloaded to the speed control
with the Download Data mode.
Follow the steps below to save the Pit Wizard’s active throttle profile to one of the storage
locations (The ESC does not need to be connected to the charger).
DISPLAY BUTTON
Press
ENTER ∆∇
Start
ENTER ∆∇
Pit Wizard
5 Save Profile
5 Save Profile
0
5 Save Profile
Profile Saved
down (∇) or up (∆) arrows
scroll to Pit Wizard option screen.
⇓⇓
⇓
⇓⇓
Press ENTER to go to Pit Wizard sub menu.
Then press down (∇) or up (∆) arrows
to scroll to Save Profile screen.
⇓⇓
⇓
⇓⇓
Press ENTER to go to
Save Profile sub menu.
⇓⇓
⇓
⇓⇓
Press
down (∇) or up (∆) arrows
to change profile number.
Press ENTER to save active profile.
⇓⇓
⇓
⇓⇓
Press
down (∇) or up (∆) arrows
scroll to next Pit Wizard sub menu screen.
to
to
∇∇
∇
∇∇
∇∇
∇
∇∇
∇∇
∇
∇∇
∇∇
∇
∇∇
or
ENTER
then:
or
ENTER
or
then:
ENTER
or
∆∆
∆
∆∆
∆∆
∆
∆∆
∆∆
∆
∆∆
∆∆
∆
∆∆
2A Toggle Opt.
Toggle Select
00000000
Press ENTER to edit Toggle Options.
⇓⇓
⇓
⇓⇓
Press down (∇) or up (∆) arrows
to turn toggle ON (1) or OFF (0).
Press ENTER for each toggle position,
until returning to Toggle Options screen .
(Press BACK to go back to previous position)
∇∇
∇
∇∇
ENTER
or
then:
ENTER
∆∆
∆
∆∆
TOGGLE POSITION 1 (Drag Brake Toggle)
When ON (1), BRAKE pot on speed control adjusts Drag Brake Value.
(Currently this is the only toggle that controls a feature in the ESC)
TOGGLE POSITION 2 (Throttle Channel Position)
This toggle indicates your transmitter’s throttle channel position: Normal (0) or Reversed (1).
(If your transmitter throttle channel is reversed, you will also see a number sign “#”
displayed to the left of the value on the Full Throttle & Full Brake sub-screens)
WWW.TEAMNOVAK.COM
NOVAK ELECTR9ONICS, INC.
18910 TELLER AVENUE • IRVINE • CA • 92612
 Loading...