

Page 1
Nova
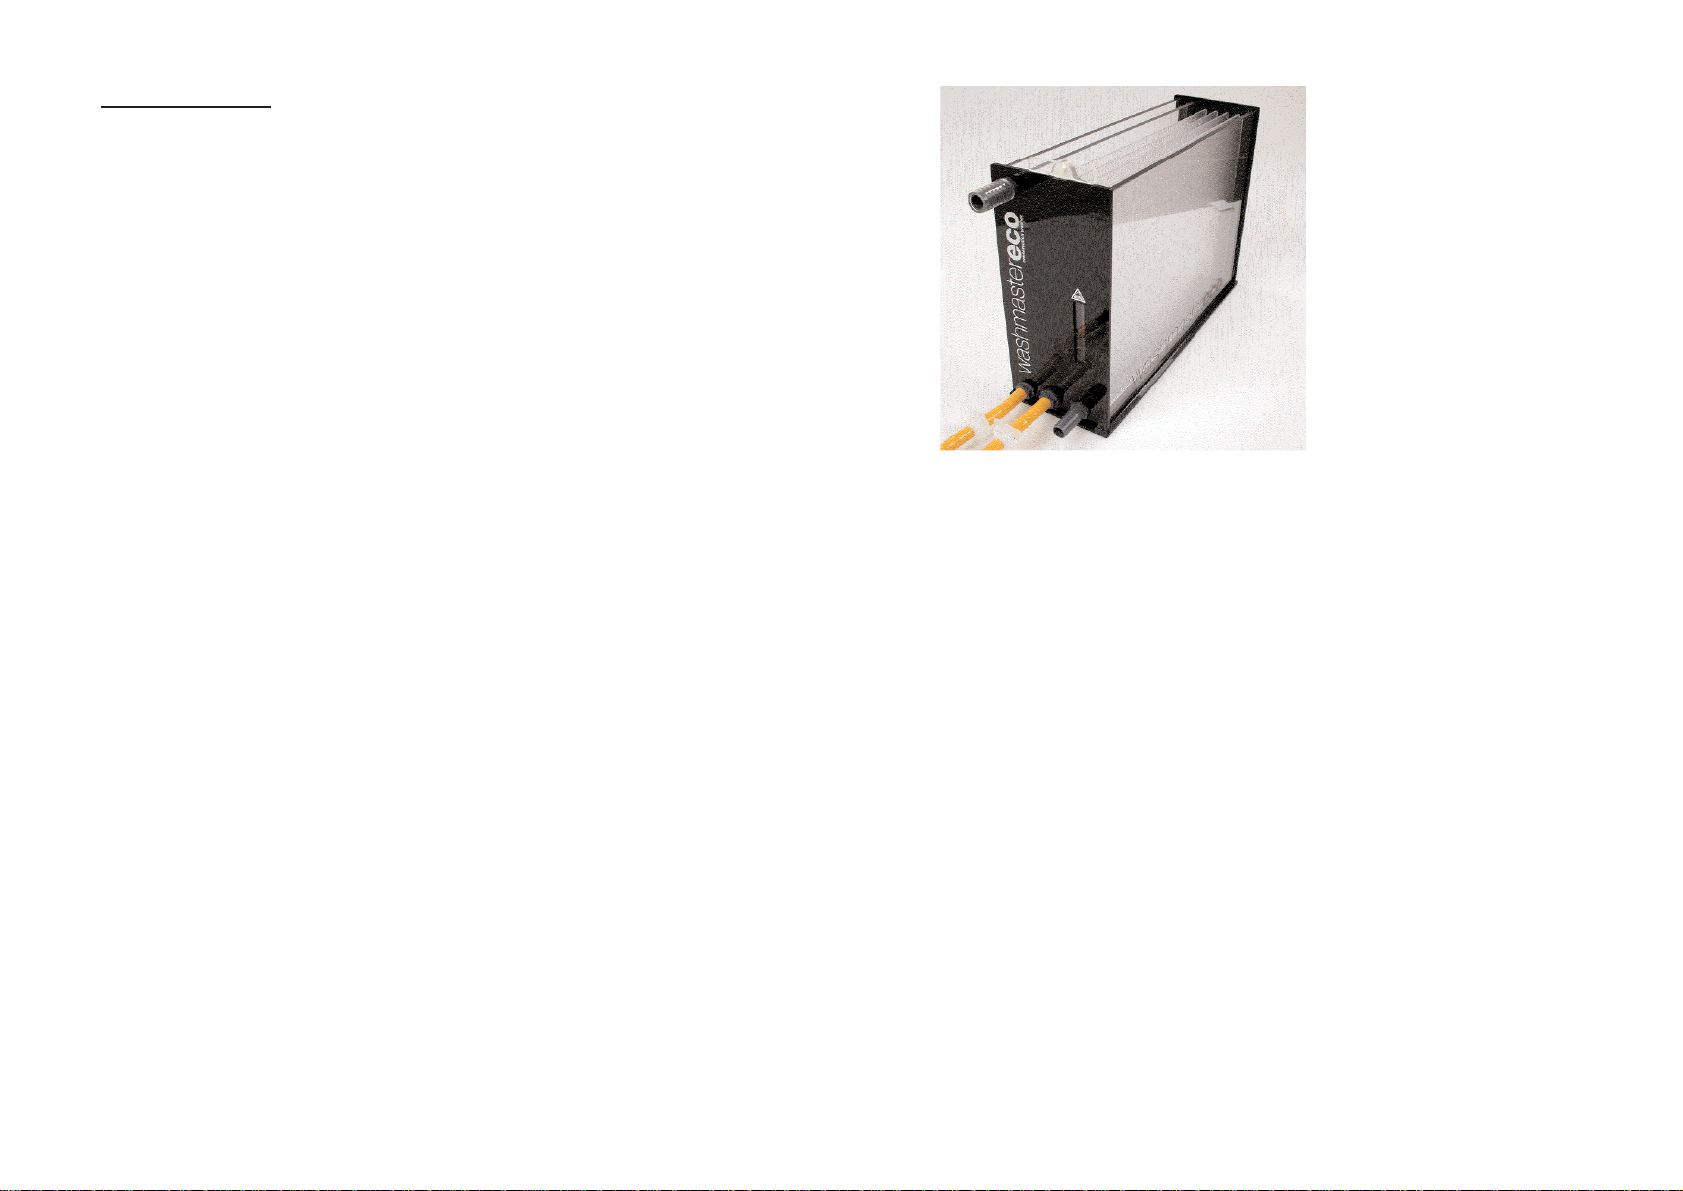
Washmaster-ECO
Archival
Print Washer
OPERATING INSTRUCTIONS FOR THE
MAINTENANCE
Unless the unit is to be used every day, it is
best to empty the unit totally using the drain
tap and daggar blade to prevent the build up of
algae.
Every month, remove the separators, taking
care to keep them in order and wash them in
warm soapy water.
NEVER, under any circumstances, use very
hot water or attempt to move the washer
when it is full.
ILFORD`s latest information on fibre base
washing for decreasing the wash time by using a
Hypo Clearing Agent/Washaid:-
a) 60 seconds FIX (no longer) with a
non-hardening
fixer
b) 5 minutes RINSE in running water.
c) 10 minutes in HYPO clearing agent.
d) 5 minutes WASH in running water
(at 20°C or higher)
Or if lower than 20°C
a) 10 minutes WASH in running water
(single weight paper)
b) 20 minutes WASH in running water
(double weight paper)
NOVA DARKROOM EQUIPMENT LTD
UNIT 1A, HARRIS RD
WEDGNOCK INDUSTRIAL ESTATE
WARWICK. CV34 5JU
ENGLAND
Telephone:- ++44 (0)1926 403090
Fax:- ++44 (0)1926 499992
E-Mail:- support@novadarkroom.com
Washmaster-ECO ISSUE 1 09/01
Page 2

To gain the full benefit of all the features of the NOVA WASHMASTER-ECO , it is
extremely important that you read all the instructions contained within this leaflet.
UNPACKING
Carefully unpack the washer and check that the following items are present:The main wash unit, 4 - Internal Separators, 1 - Inlet Plumbing Kit (containing
1 - Novaclip, 2 - Drain Taps and pipes, 1.5 metre inlet hose and connector),
1 - Black Print Retrieval Blade, 1 - Black Outlet Plumbing Hose
INSTALLATION
1) Place the unit on a strong bench or in a sink, both of which should be
structurally sound to support the weight of the washer when full (see below),
and should also be flat and level. Approximate weight when full:-
16 x 12 (40 x 30 cm) = 25kg
20 x 16 (50 x 40 cm) = 40kg
2) Remove the plastic packaging from the washer. Ensure that each
separator is correctly inserted into the grooved channels.
3) Push the two short yellow drain hoses with taps onto each of the
smaller diameter grey inlet connectors situated on the front of the unit as
far as they will go. Push the 1.5 metre yellow inlet hose onto the central tap
fully and ease the tap connector end onto your water supply tap carefully
ensuring thatit is correctly fitted and tightened.
4) The black water outlet hose should be pushed fully onto the righthand
larger diameter grey tube and direct the tube to the nearest drain/sink.
NOTE:-
It is possible to stand the unit in a sink or on a draining board, in
which case no outlet pipe would be required.
IN OPERATION
5) Fill the left-hand slot with HYPO Clearing agent/Wash-aid mixed to
the manufacturers’ recommended strength. Approximate amounts of wash-aid
required to fill the washers are listed below:
16x12 (40x30cm) =4.7L, 20x16 (50x40cm) =7.5L
6) Ensure that the central inlet tap is turned to open and then turn on
your water supply and wait for the unit to fill up. When the water reaches the
top of the weir, reduce the pressure to a trickle using your water mains tap.
By using the water guage window on the front, you should aim to get the water
level visible as near to the central marker as possible. This is the washer’s
most effective flow rate.
7) The visible water turbulence at this point indicates that there are no
stationary elements in the flow pattern. Further fine-tuning of the mains
supply is possible using the inline flow guage tap. Monitor the water level on
the flow guage during use and use this as a guide for future water flow
settings.
8) You will note that the separators have a smooth side and a textured side.
The prints will be washed most effectively when their emulsion faces the most
textured side of the separator.
9) Lower the fixed print into the first available wash compartment, raising
and lowering it for a few seconds to remove surface fixer and any air bubbles.
10) Leave the print in this compartment for 5 minutes, then transfer it to
the HYPO Clearing slot for the recommended time.
NOTE:- As each slot is independently supplied with water, freshly fixed prints can be put into
the washer without fear of contaminating the first print(s) that is already being washed. It is
recomended after placing freshly fixed prints in the wash slot, that the top centimeter of the
divider is rinsed with water by runing your finger along the edge or temporeraly increasing the
flow rate such that water flows to a level to clear the fixer from the divider.
11) When the Hypo Clearing time has expired, remove the print and return it
the first available water washing slot for the required time (see table overleaf)
12) Washing of smaller prints is possible by suspending prints on the
Nova Clip (supplied) or if left to float freely, can be recovered by inserting
the black print retrieval blade (supplied) between the back of the print and
the separator, twist the blade and then lift the print, blade and separator all
together.
Recommended Minimum Wash Times (without use of HYPO clear/washaid)
Water 20°C or less Water 21°C or higher
All Fibre Based Papers 60 mins 45 mins
All Resin Coated Papers 6 mins 3 mins
Reversal/IlfoChrome Papers 6 mins 3 mins
ADDITIONAL
FEATURES
The WASHMASTER-ECO incorporates a rapid water expulsion facility. This
means that the user can turn off the mains water supply and leave the print
to soak for several minutes before raising the dagger blade to let all the
water come out of the outlet. This method is preferred by some professional
users in order to reduce wash times and expel ‘fixer contaminated’ water
more quickly.
The Hypo Clearing section can be converted into a sixth washing slot or rapid
pre-wash by simply purchasing a plumbing conversion kit - ask your stockist
for further details on this item.
 Loading...