

Page 1
Page 2

1
Table of Contents
Safety Instructions.. …..…………………………………………………………………………… 2
Introduction..………….……………………………………………………………………………… 3-4
Front Panel and Rear Panel Illustration……………………………………………………....... 5-6
Remote Control Guide……...…………..………………………………………………………….. 7
Installing The Batteries…………………...……………………………..………………………… 8
Cable Connections……...…………..…………………………………………………………….. 9-11
Basic Operation…..…………………….………………………………………………………….. 12-14
Scanning Channels. ……………….……………………………………………………….. 12
Changing Channels….……..……………………………………………………………….. 12
Info Box…………...………………………………………………………………………….. 12
Favorite Channel…………...……………………………………………………………….. 12
Changing Volume…………………………………………………………………………….. 12
Subtitle / Aspect / Audio / Recall / Mute………………………………………………… 13
Electronic Program Guide (EPG)…………………………………………………………. 13
Time Shift Function………….………………………………………………………………. 14
PIP Function................................................................................................................... 14
AV Input Function……………………………………………………………………………. 14
Recording Function……………………………………………………………………………….. 15
Other Functions…………………………………………………………………………………….. 16
Main Menu………………………………………………………………………………………….. 17-18
Trouble Shooting…..……………………………………………………………………………….. 19
Technical Specifications……………………………………………………............................. 20
Page 3

2
Safety Instructions
z Always read the safety instructions carefully.
z Keep this User's Manual for future reference.
z Keep this equipment away from humidity.
z Place this equipment on a reliable flat surface before setting it up.
z Do not stand it on soft furnishings.
z If any of the following situation arises, get the equipment checked by a service technician:
- The equipment has been exposed to moisture.
- The equipment has been dropped and damaged.
- The equipment has obvious sign of breakage.
- The equipment has not been working well or you cannot get it work according to User's Manual.
Warning
z To prevent the risk of electric shock, do not open the cover or the back of the receiver.
z Do not block the ventilation holes of the device. Leave appropriate gap above and around it to allow for
adequate ventilation.
z Do not place the device in an unventilated cabinet or on top of a unit which emits heat.
z Danger of explosion if battery is incorrectly replaced. Replaced only with the same or equivalent type.
z The apparatus shall not be exposed to dripping or splashing and no objects filled with liquids, such as
vases, shall be placed on the apparatus.
z The mains plug is used as the disconnect device, the mains plug shall remain readily operable.
z To reduce the risk of fire or electric shock, do not expose this apparatus to rain or colds.
Copyright Statement
No part of this publication may be reproduced in any form by any means without the prior written permission.
Other trademarks or brand names mentioned herein are trademarks or registered trademarks belong to
EIGHT Limited.
Disclaimer
Information in this document is subject to change without notice. The manufacturer does not make any
representations or warranties (implied or otherwise) regarding the accuracy and completeness of this
document and shall in no event be liable for any loss of profit or any commercial damage, including but not
limited to special, incidental, consequential, or other damage.
This symbol indicates that this product incorporates double insulation between hazardous mains
voltage and user accessible parts. When servicing use only identical replacement parts.
Page 4

3
Introduction
Applications/Features
z Supports DMB-T/H digital broadcast standard
z Time Shift support with record function up to 3 hours
z Picture-In-Picture (PIP) function in Time Shift mode
z 7 days Electronic Program Guide (EPG) with Vertical and Horizontal layout options
z Support EPG program short/long description
z MP3 and Digital Photo support
z Personal Video Recorder (PVR) with schedule/EPG recording
z Dual tuners support
z Dual recordings plus a live channel or AV playback
z Aspect Ratio Conversion (16:9, 4:3 Pan Scan, 4:3 Letterbox)
z Channel List
z Favorite Channels Support
z Logical Channels (0-999) Number Display
z On Screen Display (OSD) support
z OSD Languages support Simplified /Traditional Chinese and English
z Support Ethernet (10Mbps/100Mbps)
z Support Channel search in Automatic, Quick and Manual methods
z USB 2.0 supported
z Software upgradeable via USB 2.0 (Ext2/FAT32/NTFS)
z System restore function
z Support USB HDD (EXT2) recording (PVR)
z MHEG5 Support
z 1920 x 1080p Resolution
z Support HD or SD output (HDMI, YPbPr, CVBS, S-Video)
z Output display support 1080p/1080i/720p/576p
z HDMI Output : 1080p/1080i/720p/576p
z YPbPr Output : 1080p/1080i/720p/576p
z Dolby AC-3 audio decoding
z Support PCM digital audio output
z Digital Audio Output S/P DIF (Optical/Coaxial)
z Support RCA and S-Video AV input
z Recorded program backup via exporting to an external USB Disk (EXT2, NTFS)
z Bookmark and Preview functions for recorded programs
z Trick Play in Time Shift mode and in PVR playback mode: Fast Forward & Rewind (2X/4X/8X/16X/32X),
Instant Replay, Pause, Quick Skip Play
z Single/batch recorded program deletion
z Support Internal/External Hard Disk Format
z Support Internal Hard Disk Quick Format
z Dynamic Hard Disk space monitoring
z Color adjustments (Contrast, Brightness, Saturation, Hue)
z Time Zone settings
Page 5

4
Introduction
Package Contents
Before installation, please check the items of the package. The package should contain the following items:
1. PVR x1
2. Remote control x1
3. AAA size battery for remote control x2
4. Instruction manual x1
5. YPbPr cable x1
6. Composite cable x1
7. RF loop cable x1
8. Power cord x1
9. External Adaptor
x1
Page 6
5
Front and Rear Panel Illustration
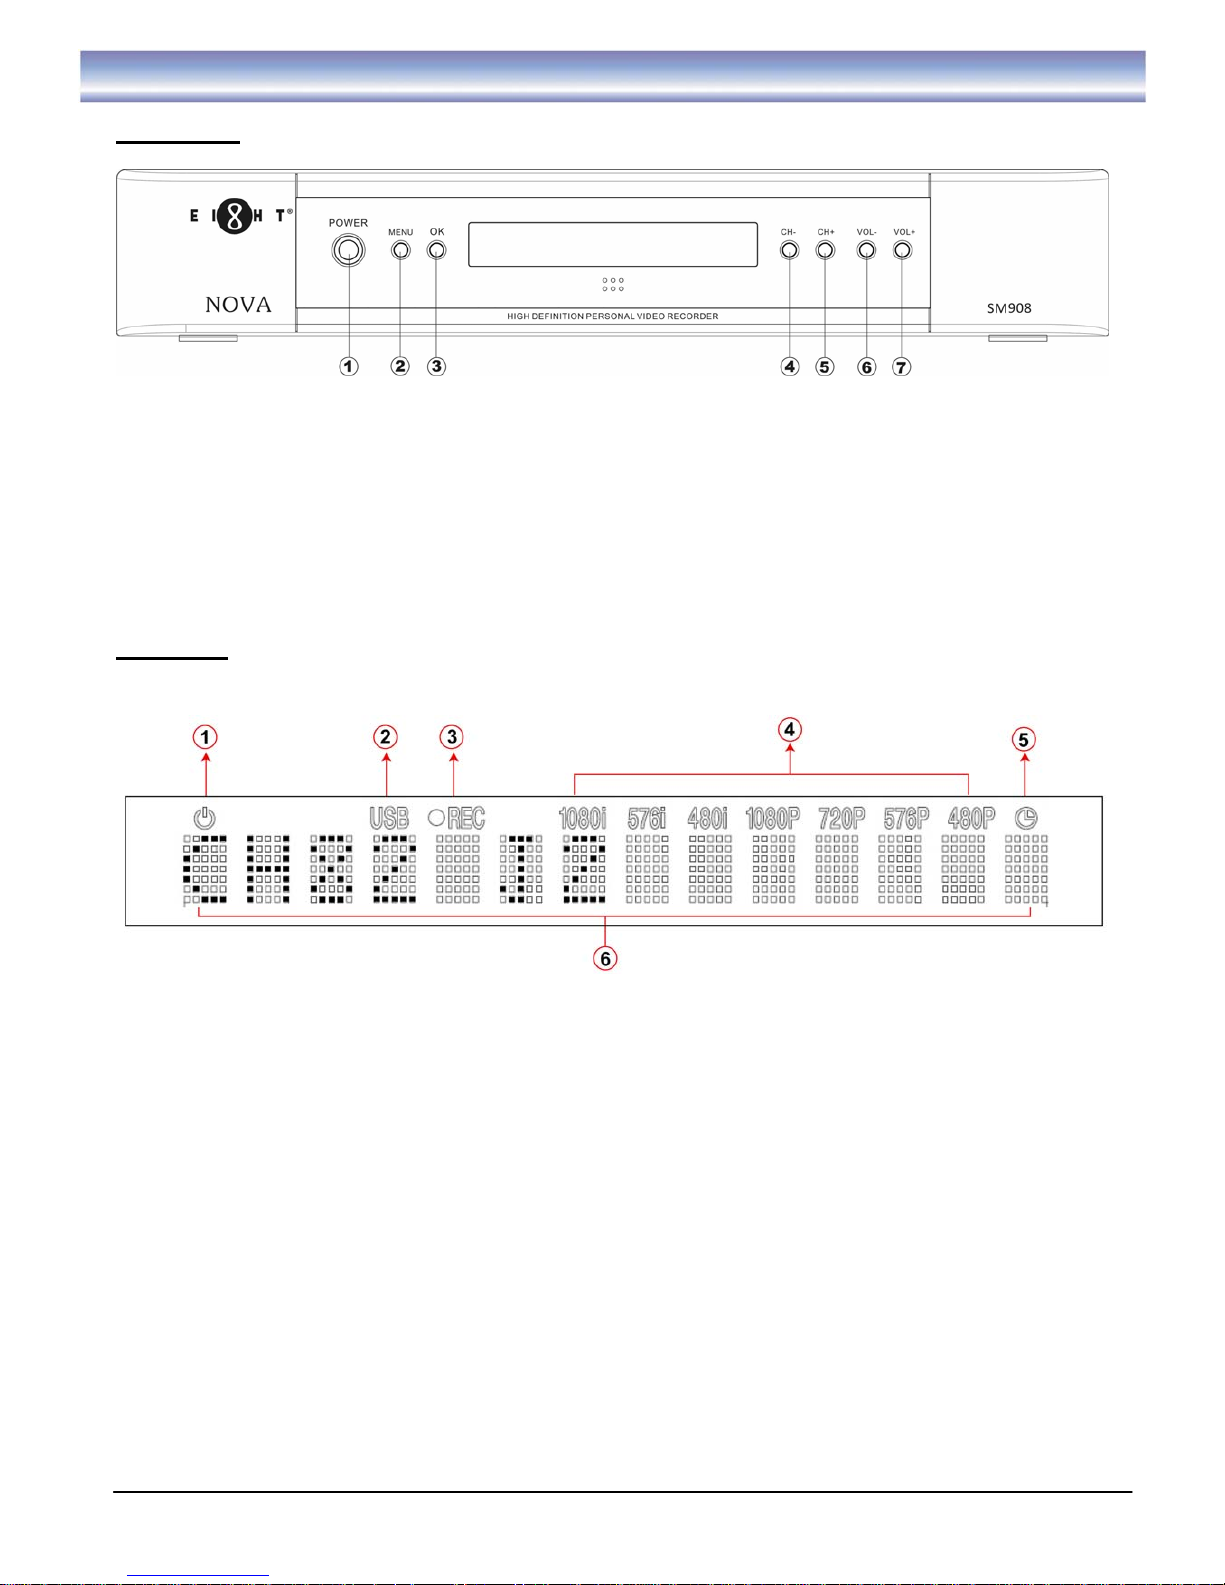
Front Panel
1. POWER: To turn the Stand-by mode ON/OFF.
2. MENU:
To enter into the Main menu. Press again to exit to previous menu.
3. OK:
To confirm the selected menu item.
4. CH-:
To change the Channel down in the live mode or to move the program down in the menu
mode.
5. CH+:
To change the Channel up in the live mode or to move the program up in the menu mode.
6. VOL-:
To decrease the level of the volume or to move right in the menu mode.
7. VOL+:
To increase the level of the volume or to move left in the menu mode.
VFD Panel
1. Stand-by: Unit is under Stand-by mode.
2. USB: Have connected with USB drive.
3. REC: Recording is processing.
4. Resolution: The resolution being used.
5. Timer: Pre-recorded Timer has been set.
6. Functions Display: Function being used or channel being viewed.
Page 7
6
Front and Rear Panel Illustration
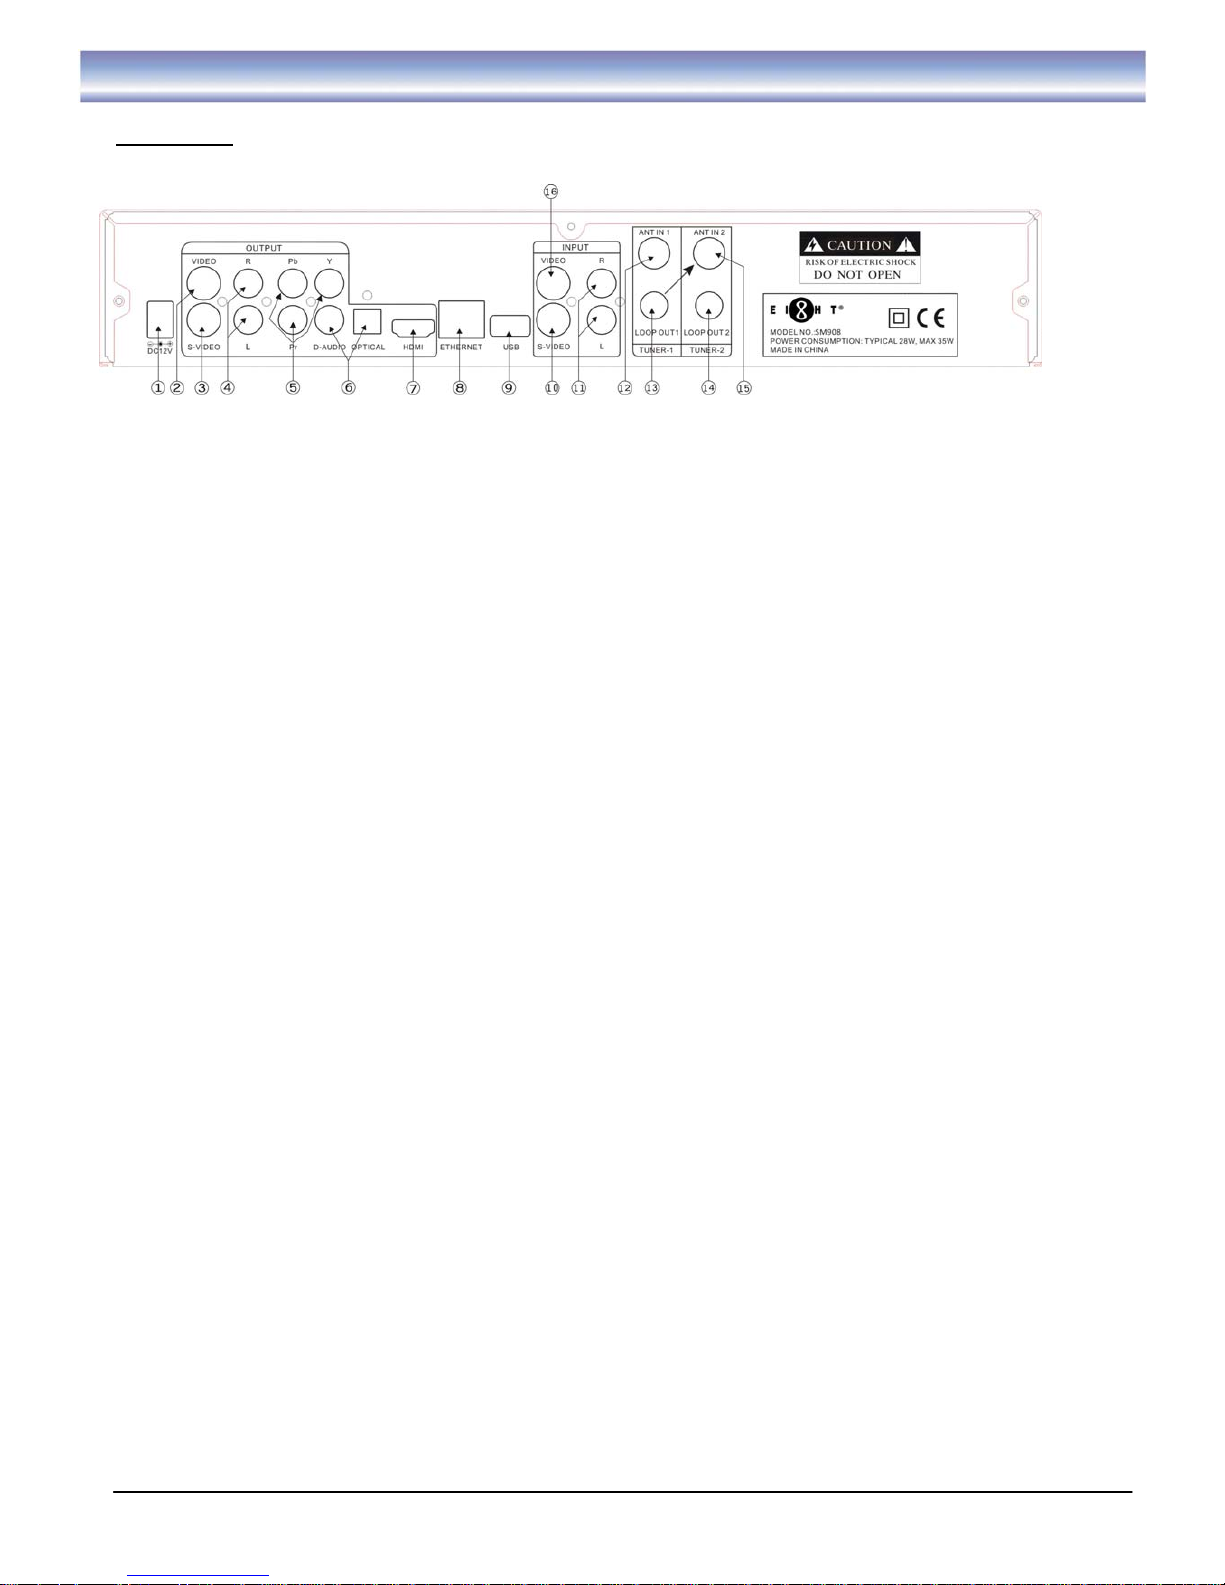
Rear Panel
1. DC 12V:
Power plug.
2. VIDEO(OUTPUT):
CVBS output to connect TV.
3. S-VIDEO(OUTPUT): S-Video output to connect TV.
4. AUDIO L/R(OUTPUT):
Audio output to connect TV.
5. YPbPr :
High definition video output to connect TV.
6. D-AUDIO/OPTICAL:
Digital audio output to connect home theater system.
7. HDMI:
High-Definition Multimedia Interface to connect TV receiver or home theater
system.
8. ETHERNET:
Connect to network (For firmware upgrade and MHEG 5 function only).
9. USB:
Connect to USB slot (for firmware upgrade only).
10. S-VIDEO(INPUT):
S-Video input to connect Audio Input signal from other STB/DVD.
11. AUDIO L/R(INPUT):
Audio input to connect Audio Input signal from other STB/DVD.
12. ANT IN1:
Signal input to connect antenna.
13. LOOP OUT1:
To connect RF Loopback cable.
14. LOOP OUT2:
RF signal output to connect other reception equipment.
15. ANT IN2:
To connect RF Loopback cable.
16. VIDEO(INPUT):
CVBS input to connect Audio Input signal from other STB/DVD.
Page 8
7
Remote Control Guide
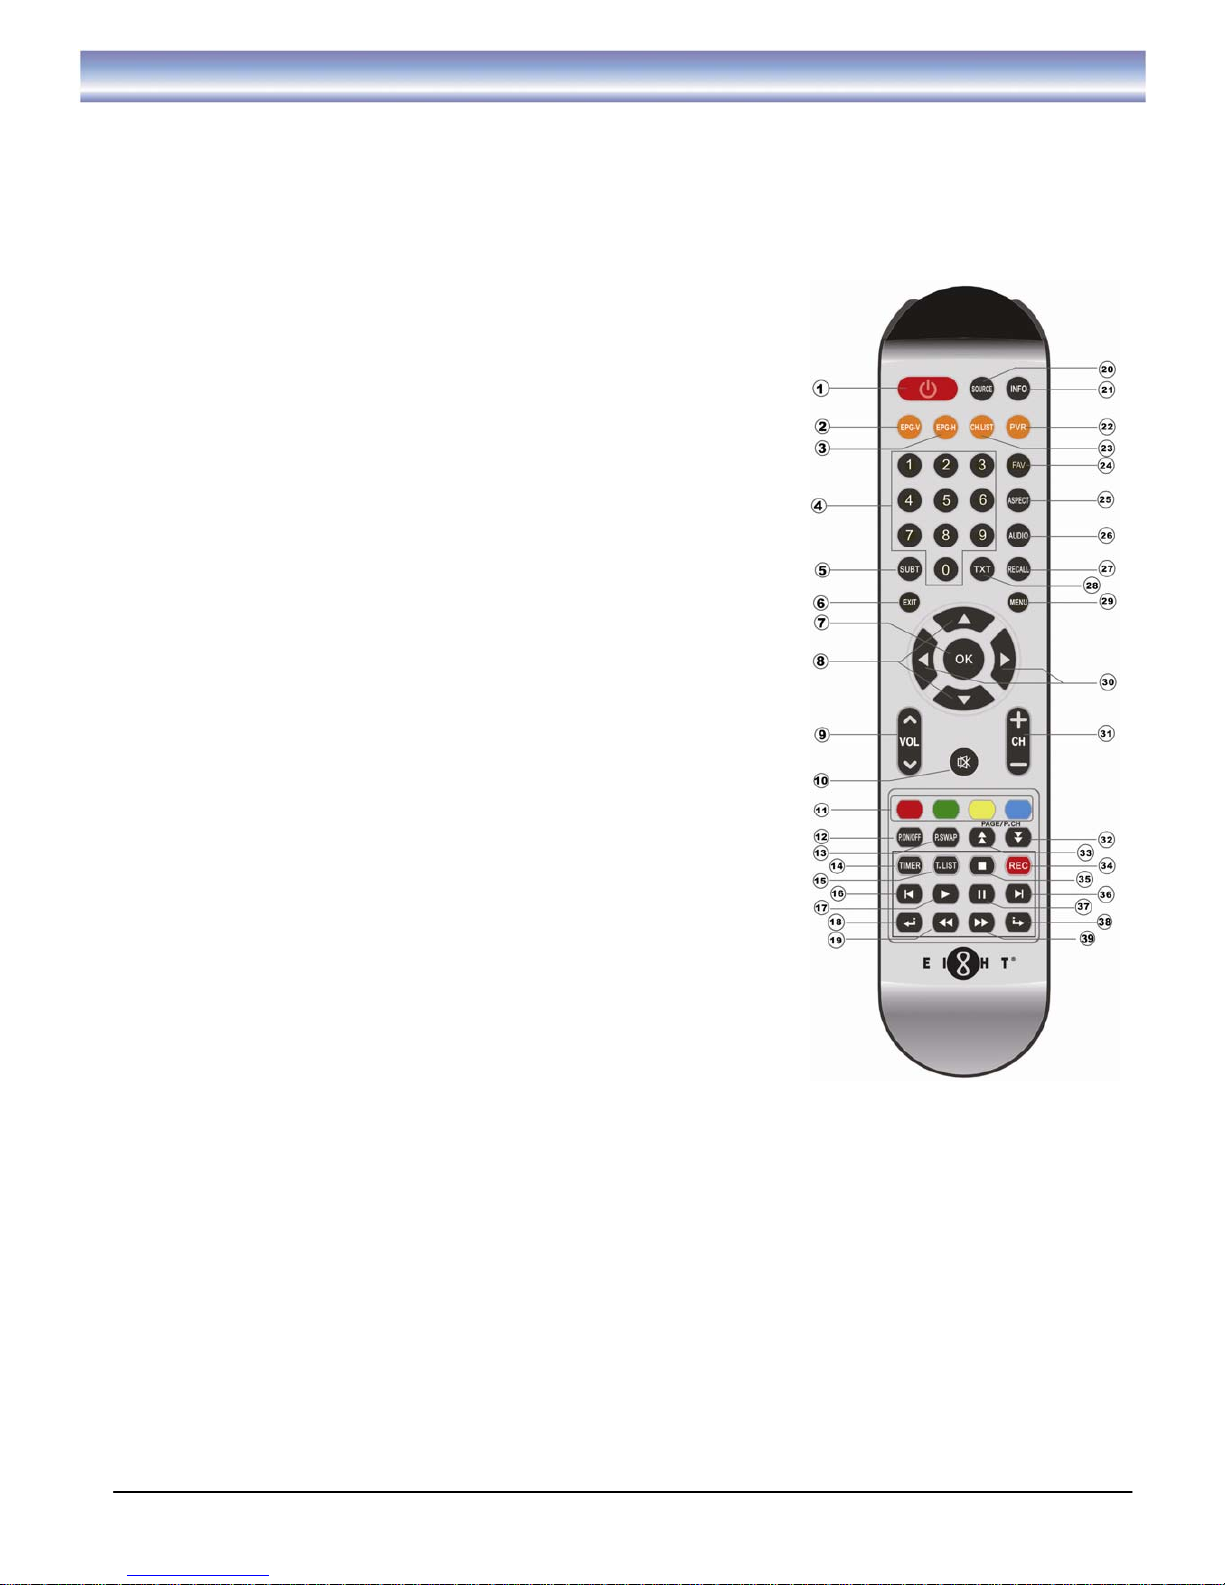
Key functions for remote control:
1. POWER: To turn unit ON/OFF.
2. EPG-V: Shortcut to vertical EPG display.
3. EPG-H: Shortcut to horizontal EPG display.
4. NUMERIC BUTTONS (0-9): For channel change by LCN or setting input.
5. SUBT: To switch on or off of the subtitle.
6. EXIT: Return to previous step or main menu.
7. OK: To confirm the selected menu item.
8. ▲▼ To move the program upward / downward or to switch channels.
9. VOL
∧∨ : To control the level of the volume.
10. MUTE: To mute or recover the sound of the unit.
11. 4 COLOR KEYS: For referring usage shown on the screen.
12. P.ON/OFF: To turn PIP on/off.
13. P.SWAP: To convert between the full screen and small screen.
14. TIMER: Add a New Timer.
15. T.LIST: Shortcut for Timer List.
16. PREV: Go to the starting point of a program (in time shift or PVR
mode).
17. PLAY: Start to play a record or resume time shift.
18. B.SKIP: Skip Backward 2 minutes (in time shift or PVR mode).
19. REW: Rewind playing record or time shift (Support 2X, 4X, 8X, 16X,
32X).
20. SOURCE: To switch between AV and DTV.
21. INFO: To display the current and following program information.
22. PVR: Enter record program list.
23. CH.LIST: To call out the program list.
24. FA V: To call out Favorite list.
25. ASPECT: Change Aspect Ratio.
26. AUDIO: To switch audio track.
27. RECALL: Back to previous watching channel.
28. TXT: Switch the teletext service ON/OFF or work as “TEXT” key in
MHEG 5 application.
29. MENU: Call out Main Menu.
30.
◀▶: Move between left and right or to control the level of the volume.
31. CH+/-: Change the watching channel.
32. PAGE/P.CH DOWN: To enter into the next page.
33. PAGE/P.CH UP: To enter into the previous page.
34. REC:To start an instant record on current channel.
35. STOP: Stop to run existing program (recording, time shift).
36. NEXT: To go to the end of the program.
37. PAUSE: Pause to play or start time shift function.
38. F.SKIP: To skip forward 2 minutes (in time shift or PVR mode).
39. FF: Forward playing record or time shift (Support 2X, 4X, 8X, 16X, 32X).
Page 9
8
Installing the Batteries
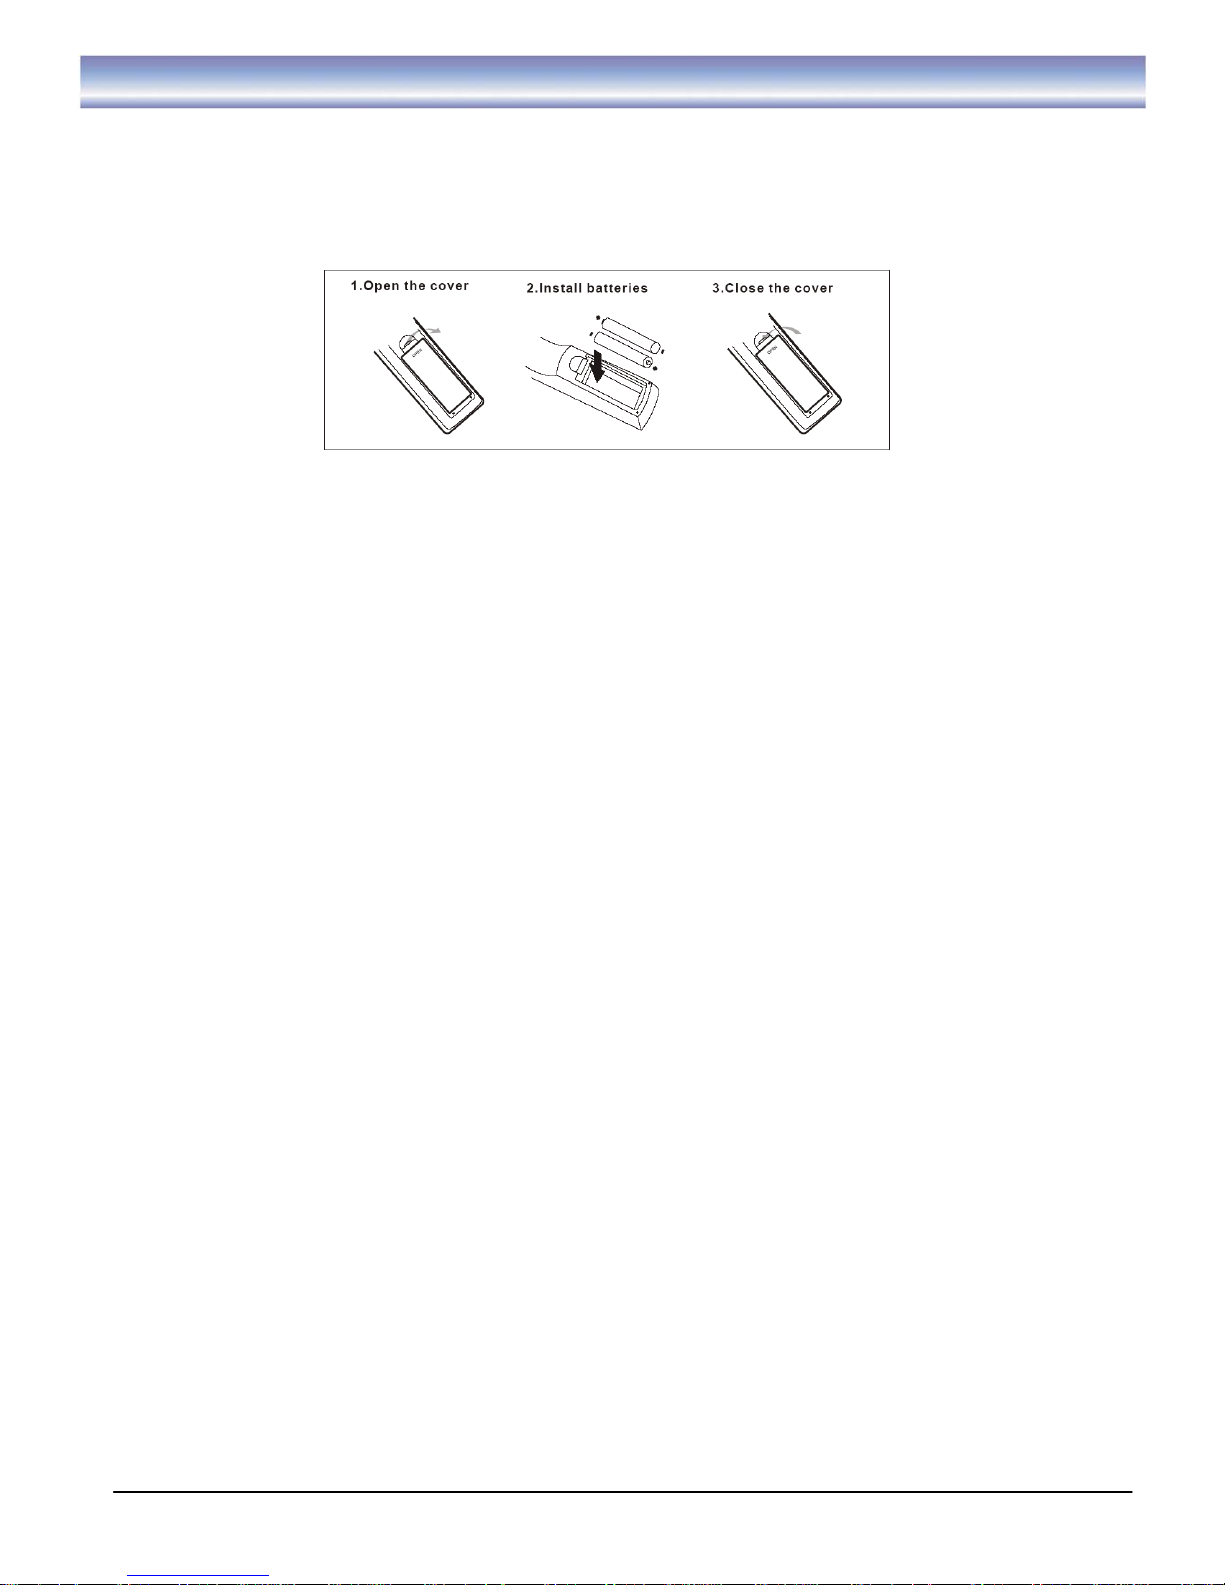
To install AAA size batteries for remote control:
Remove the battery cover from the remote control and put two AAA size batteries inside the compartment.
The diagram shows the correct way to install the batteries.
Caution:
1. Keep batteries out of children’s reach.
2. Don’t attempt to recharge, short-circuit, disassemble heat or throw the batteries into the fire. Always
replace both batteries at the same time. Never mix new and old batteries or batteries of a different type.
3. If you don’t intend to use the remote controller for an extended period, remove the batteries to prevent
possible leakage and corrosion.
4. Do not drop, apply shock or step on the remote control.
5. Do not spill water on the remote control.
Notes: If the receiver does not operate from a close range, please replace with a fresh new set of batteries.
Using the Remote Control
1. To use the remote control, point it towards the front of the digital set top box.
2. The remote control has a range of up to 8 meters from the set top box at an angle of up to 60 degrees.
3. The remote control will not operate if its path is blocked.
Note: Sunlight or very bright light will affect the sensitivity of the remote control.
Page 10
9
Cable Connections
The following figure shows cable connections required for TV and other related electrical equipment.
Connections Diagrams:
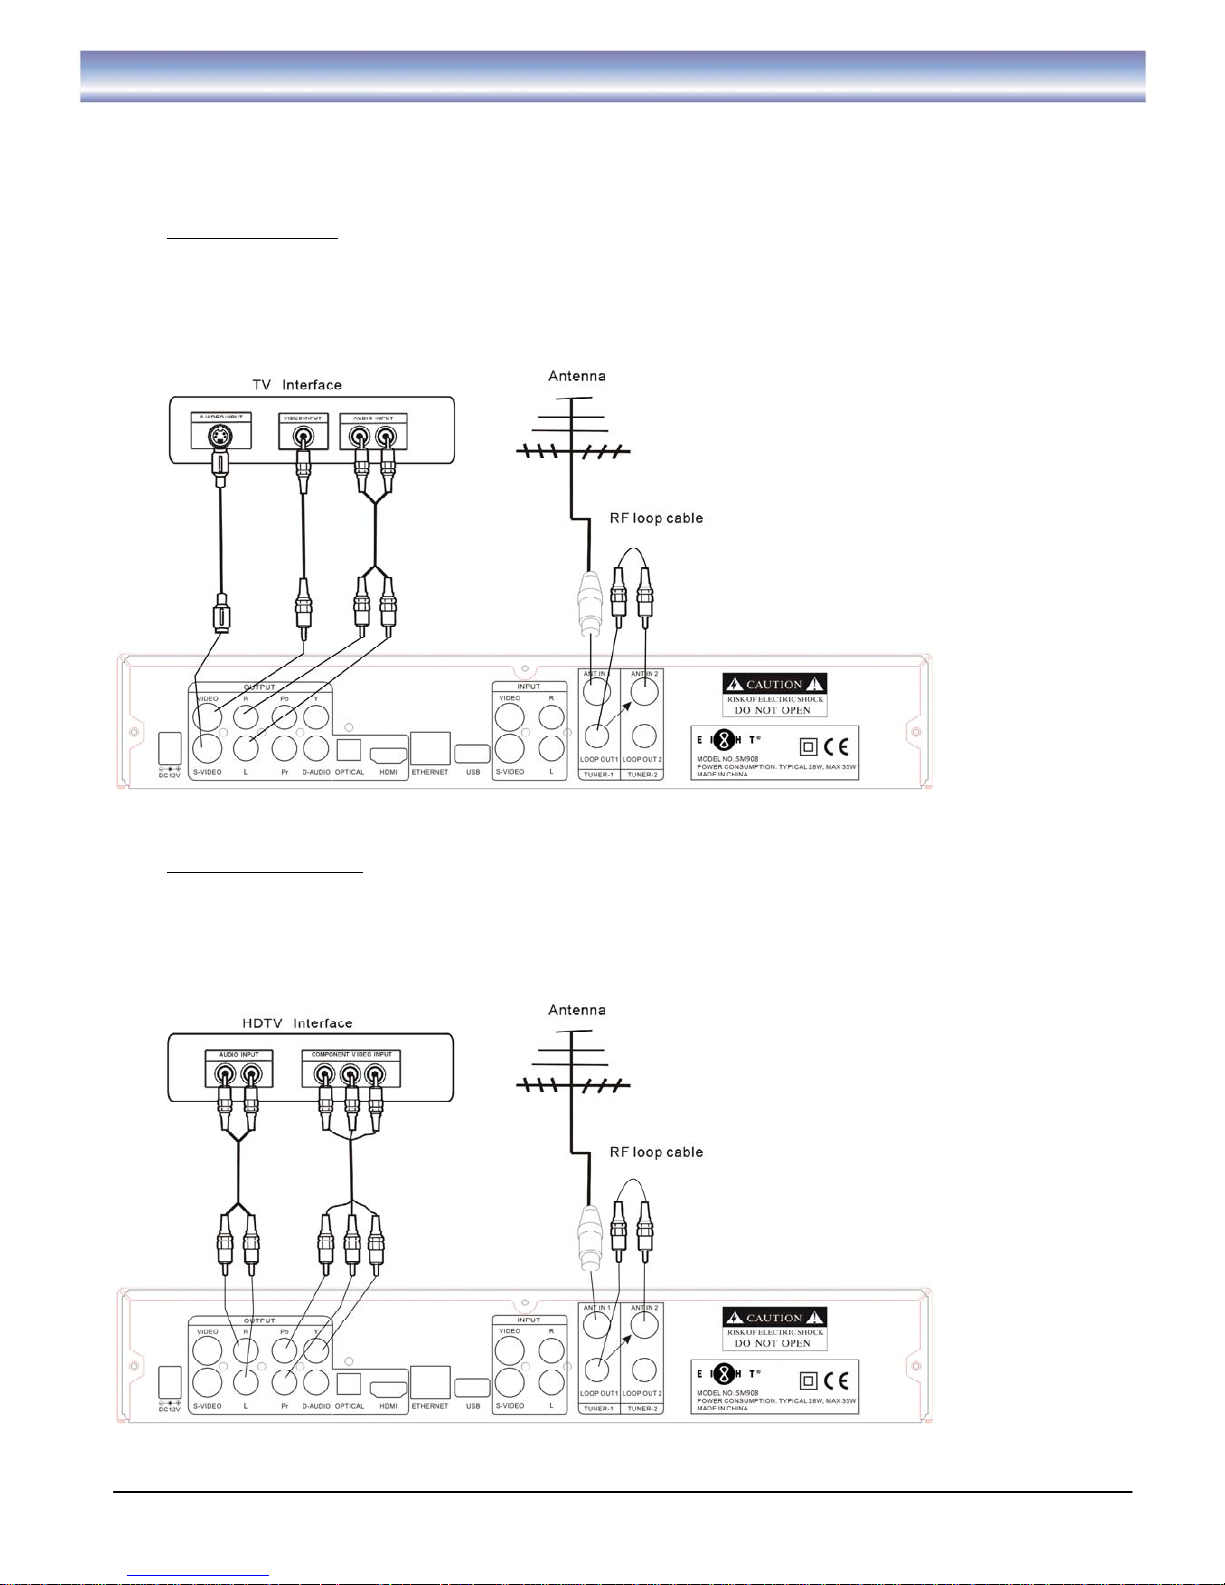
A) Basic Connections
1. Connect the antenna with ANT IN 1 of the unit.
2. Connect the RF loop cable via ANT IN 2 and LOOP OUT 1 interfaces.
3. Connect the external adaptor with the unit.
4. Connect the unit via VIDEO/S-AUDIO/AUDIO L/R.
B) Connect YPrPb Ports
1. Connect the antenna with ANT IN 1 of the unit.
2. Connect the RF loop cable via ANT IN 2 and LOOP OUT 1 interfaces.
3. Connect the external adaptor with the unit.
4. Connect to TV via YPrPb cable as the following figure.
Page 11
10
Cable Connections
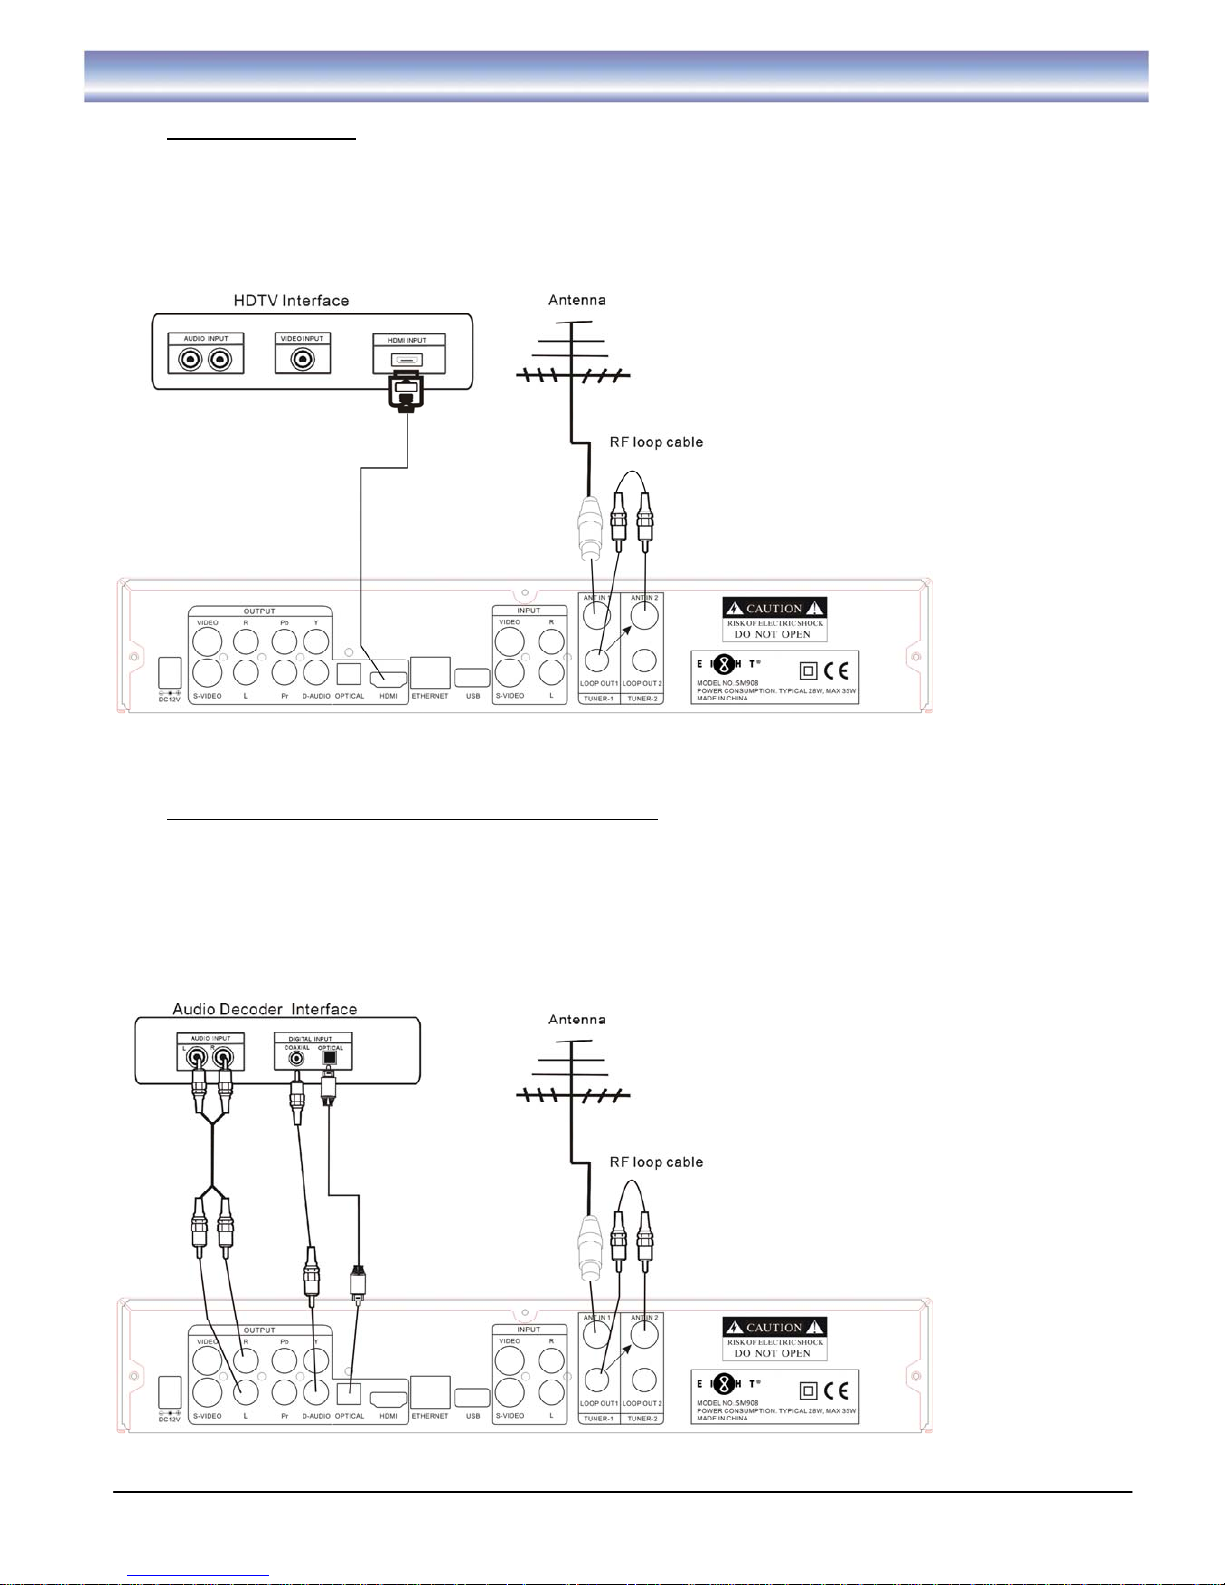
C) Connect HDMI Ports
1. Connect the antenna with ANT IN 1 of the unit.
2. Connect the RF loop cable via ANT IN 2 and LOOP OUT 1 interfaces.
3. Connect the external adaptor with the unit.
4. Connect the unit to TV via HDMI cable as the following figure.
D) Audio connection via Optical/Coaxial/ Audio L/R Ports
1. Connect the antenna with ANT IN 1 of the unit.
2. Connect the RF loop cable via ANT IN 2 and LOOP OUT 1 interfaces.
3. Connect the external adaptor with the unit.
4. Connect the unit to TV/Amplifier via AV cable as the following figure.
Page 12
11
Cable Connections
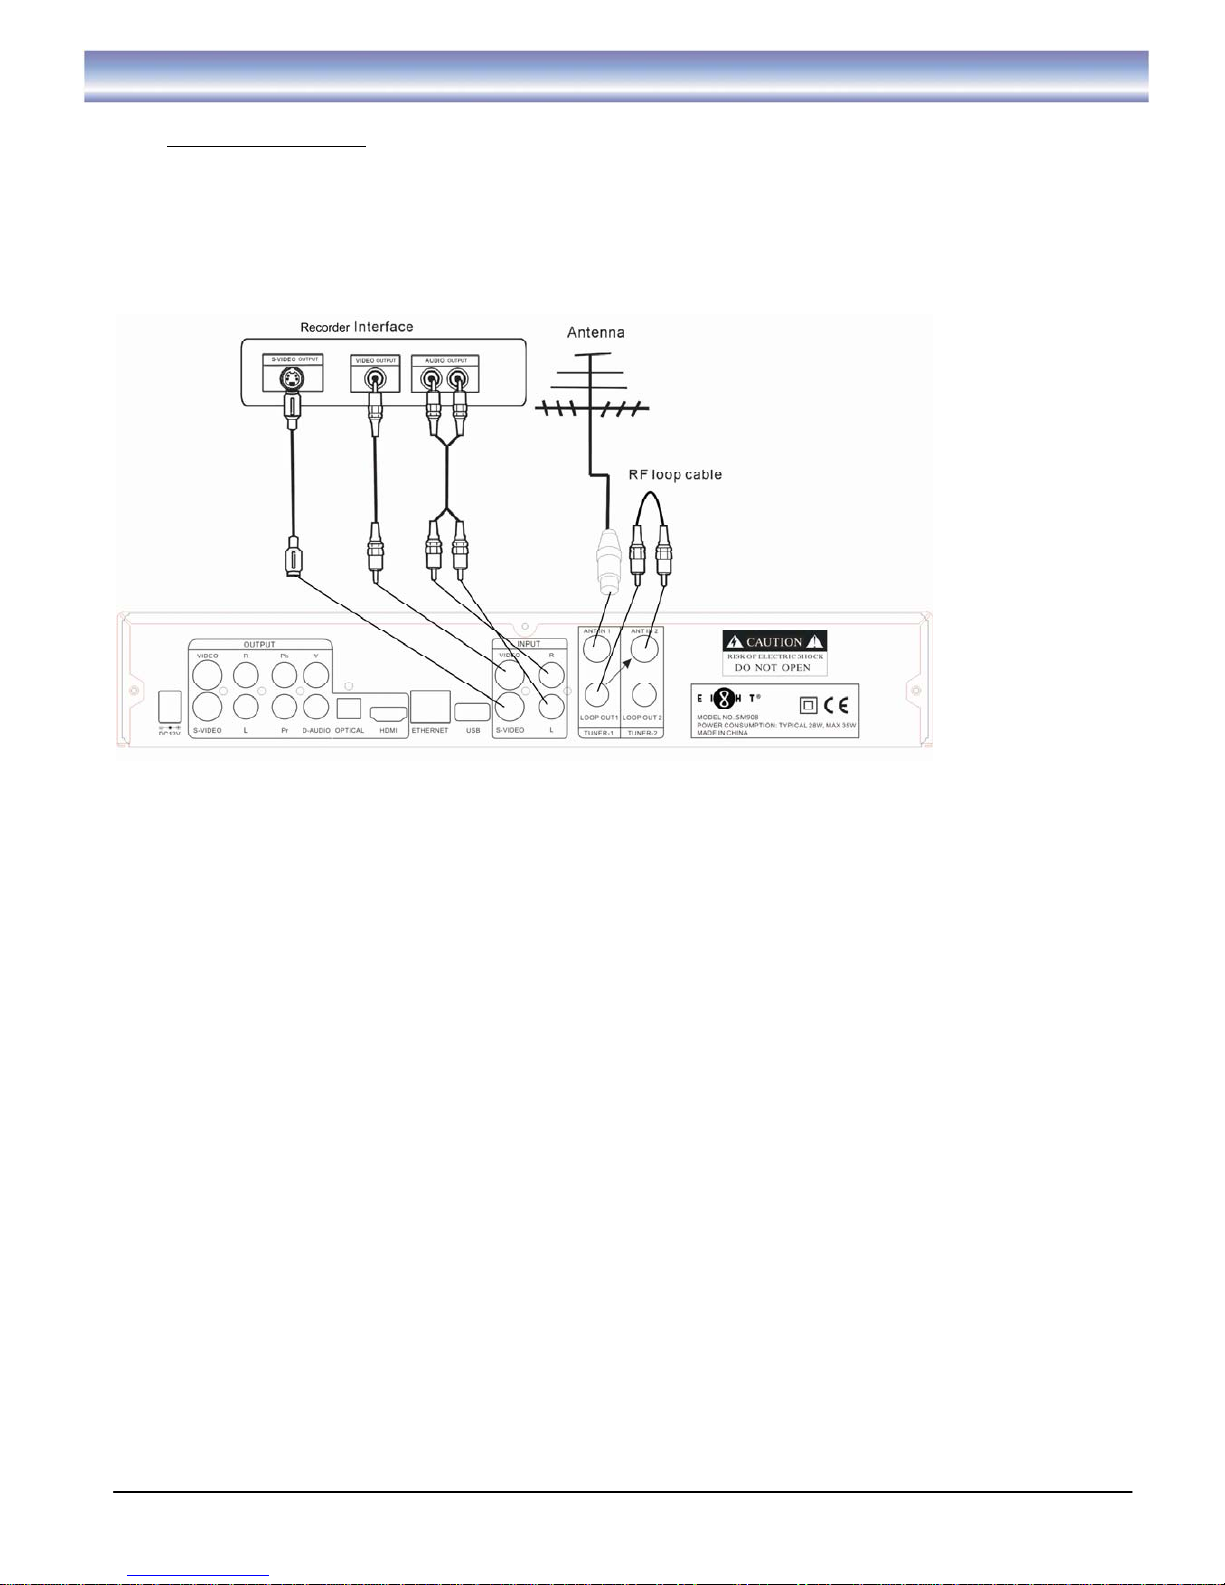
E) AV Input Connections
1. Connect the antenna with ANT IN1 of the unit.
2. Connect the RF loop cable via ANT IN 2 and LOOP OUT1 interfaces.
3. Connect the external adaptor with the unit.
4. Video Connection: Connect the unit via VIDEO/S-VIDEO(INPUT).
5. Audio Connection: Connect the unit via AUDIO L/R(INPUT).
Page 13

12
Basic Operation
Scanning Channels
1. Press [Menu] and then click [UP][DOWN] to [Setting].
2. Press [OK] to enter [Channel Settings] menu.
3. Press [OK] to enter [Search Method].
4. Press▲▼ to navigate for the method you want to use.
z Quick : Recommended for most users.
z Manual : Suitable when specific channel to be searched, press◀▶ to navigate.
z Auto : For searching all frequency should be used when quick search fails.
5. Press [OK] on Start Search when search method is selected.
Note: Any added timer in time list will be cleared when any channel search is performed.
Changing Channels
1. Open Channel List menu by pressing [CH.LIST] in Live TV Mode.
2. Press [UP] [DOWN] key to navigate for the channel you want.
3. Press [OK] key to play the channel.
4. Press Blue Button to toggle it as Favorite Channel.
5. Channel Change can also be done by:
z Press [CH+][CH-] in Live TV Mode
z Input the Channel LCN by keypad in Live TV Mode.
Info Box
1. Open Info Box by pressing [INFO] in Live TV Mode.
2. It shows the current and next program and the relative information
of the programs.
3. Wait a moment or press [EXIT] to quit.
Favorite Channel
1. Open Favorite Channel list by pressing [FAV] in Live TV Mode.
2. Press [UP] [DOWN] to navigate for the channel you want.
3. Press [OK] to play the channel.
4. Press [EXIT] to quit.
Changing Volume
Press the [VOL+] and [VOL-] to increase or decrease the volume
accordingly, an OSD on the top left corner shows the current volume
level.
Page 14

13
Basic Operation
Subtitle
Press [SUBT] to circulate between available subtitles of currently watching channel or to turn it off, an OSD
on the top left corner shows the current choice.
Aspect
Press [ASPECT] to circulate between available options which are 16:9, 4:3 Letter Box, and 4:3 Pan scan. An
OSD on the top left corner shows the current choice.
Audio
Press [AUDIO] to circulate between available sound tracks of currently watching channel or to turn it off, an
OSD on the top left corner shows the current choice.
Recall
Press [RECALL] to switch between present and previous channels.
Mute
Press [MUTE] to mute or recover the sound.
Electronic Program Guide (EPG)
Open EPG menu by pressing [EPG-V] or [EPG-H] in Live TV Mode.
EPG-V (Vertical display)
1. The cursor displayed in the channel list.
(1) Press [UP][DOWN] to browse channel list, then press [OK] to switch channel.
(2) Press [CH+][CH-] to switch channel.
(3) Press [RIGHT]/[EPG-V] to make the cursor displayed in the electronic program data list.
(4) Press Green button to enter horizontal EPG display.
(5) Press EXIT button to quit EPG.
2. The cursor displayed in the electronic program data list
(1) Press [UP] [DOWN] to navigate for programs.
(2) Press [PAGE UP][PAGE DOWN] to scroll across pages.
(3) Press Blue button to confirm the recording format.
o Repeat (once, daily, weekly, weekday, weekend)
o Delayed End (none, 3, 5,15 min)
o Advanced Start (none, 1, 3, 5 min)
o Press [OK] to confirm
(4) Press Yellow button to quit recording.
(5) Press OK button to view its short/long program description.
(6) Press Green button to enter horizontal EPG display.
(7) Press EXIT button to back to channel list.
EPG-H (Horizontal display)
1. Press OK button to enter electronic program data list.
2. Press▲▼
◀▶ to navigate.
3. Press Blue button to confirm the recording format.
o Repeat (once, daily, weekly, weekday, weekend)
o Delayed End (none, 3, 5,15 min)
o Advanced Start (none, 1, 3, 5 min)
o Press [OK] to confirm
4. Press Yellow button to quit recording.
5. Press EXIT button to quit.
6. Press Green button to enter vertical EPG display.
Page 15

14
Basic Operation
Time Shift Function
1. Activate Time Shift by pressing [PAUSE] in Live TV Mode, Time Shift supports with record function up to
3 hours.
2. Main Screen will be paused, a PIP of live TV shows up at the right bottom corner.
3. A counter (shows up at the top left hand corner) to live appears telling how long the main screen is
delayed from the live TV in PIP.
4. Press [PLAY] / [PAUSE] to resume the main screen.
5. While playing in time shift mode, you can press [PAUSE] again to pause the main screen.
6. Press [FF] to circulate between 2X, 4X, 8X, 16X, 32X fast forward & play mode.
7. Press [REW] to circulate between 2X, 4X, 8X, 16X, 32X fast rewind & play mode.
8. Press [F.SKIP] to skip forward 2 minutes.
9. Press [B.SKIP] to skip backward 2 minutes.
10. Press [PREV] to reach the start of time shift instantly.
11. Press [NEXT] to reach the live TV instantly.
12. Press [STOP] to stop time shift and return to live TV mode.
Note: You can’t change to watch other channels in time shift mode. So
if Time shift plus one recording are running, all upcoming recordings will
be ignored, until either Time Shift or the recording stops.
PIP Function
1. Activate PIP by pressing [P.ON/OFF] button in both Live TV mode and PVR playback mode.
2. After turning on PIP, a PIP window of live TV shows up at the right bottom corner.
3. Press the [CH.LIST] or [FAV] or [CH+/-] or numeric buttons to change the channel in the main screen,
press the [PAGE/P.CH], use [DOWN/UP] button to change the channel in the PIP window.
4. Press the [P.SWAP] button to swap channels in the main screen and the PIP window.
Note: Priority of PIP is lower than recordings and Time Shift. If Time shift or at least one recording starts, PIP
will be turned off automatically; P.SWAP in PVR playback mode works different. Both PVR playback and PIP
will be turned off, and box will goes back to the Live TV mode, with the channel in the PIP window played.
AV Input Function
1. Switch to AV Input
Switch to AV Input by pressing the [SOURCE] button.
2. Set AV Input Source
Press the [MENU] button, then navigate to [AV Input Source] under [MENU] Æ [Settings] Æ
[Audio & Video] Æ [AV Input Source]. There are two options: RCA and S-Video.
Note: For RCA AV input, AV cable is required; and for S-Video AV input, standard 4-pin S-Video cable is
required.
PIP, Time Shift, EPG are not supported in AV mode.
3. Instant Recording on AV Input
(1) Switch to AV Input by pressing the [SOURCE] button;
(2) Press the [REC] button to start an instant recording;
(3) Current AV channel will be recorded instantly;
(4) During the AV Input recording, it is allowed to operate other functions (e.g. watching DTV
channels, playing PVR/Time Shift, browse EPG, operate on the Channel List and Favorite
Channel List, etc).
(5) Press the [STOP] button to stop the recording instantly, recorded clips can be viewed on the PVR
menu.
4. Scheduled Recording on AV Input
(1) Set up a timer on AV Input (Refer the Timer Setting section for instructions on setting up a timer);
(2) After the recording triggered by the timer starts, it is allowed to operate other functions (e.g.
watching DTV channels, playing PVR/Time Shift, browse EPG, operate on the Channel List and
Favorite Channel List, etc).
(3) After the recording finishes, recorded clips can be viewed on the PVR menu.
Page 16

15
Recording Function
Instant Recording
Activate Instant Recording by pressing [REC] in Live TV Mode.
1. Current watching channel will be recorded instantly, repeat to press [REC] for choosing timing (from
30 minutes to 240 minutes)
2. During recording, you can change to watch other channels at your desire, recording will continue in
the background.
3. Press [STOP] to stop recording instantly, recorded clips can be viewed from the PVR menu.
New Timer
1. Press [Timer] key in live TV mode.
2. Select the desired channel timer recording by pressing [Left] or
[Right].
3. Select the period for recording
(Once/Daily/Weekly/Weekday/Weekend).
4. Select the Start (Once) or Repeat (Daily).
5. Select the Start Time and End Time.
6. Timer recording will be started when the scheduled start time is
reached, and will stop when the end time is reached as well.
7. A timer recording in progress can be stopped by pressing the [STOP] key, recorded clips can still be
found in the PVR menu.
8. If there are conflicts between added timers, the latter will be skipped. E.g.: A timer started from 19:00
to 20:00, another timer scheduled from 19:30 to 21:00 will be skipped automatically.
Timer List
1. Press [T.LIST] to open the Timer list.
2. All the added schedules can be shown here.
3. You can delete a schedule by pressing Blue button on the selected
schedule, a confirmation dialogue will be shown up, answer “Yes”
to delete it.
4. Activate Schedule Recording through EPG. Please refer to section
[Electronic Program Guide (EPG)] on page 13.
PVR
1. Open PVR Menu by pressing [PVR] in Live TV Mode.
2. All the recorded clips will be shown up.
3. You can preview the clip by pressing Red Button on the selected
clip.
4. You can also press [OK] to view the clip in full screen.
5. While in full screen playback, press [FF] to circulate between 2X,
4X, 8X, 16X, 32X fast forward & play mode.
6. Press [REW] to circulate between 2X, 4X, 8X, 16X, 32X fast
rewind & play mode.
7. Press [STOP] to playback and return to PVR menu or wait until the
clip is finished playing.
8. To delete recorded program(s):
o Press Green button to confirm and then press Blue button to proceed.
o Press [Menu] to choose all the current page programs, and then press Blue button to proceed.
9. To transfer the recorded program to USB:
o Plug in the USB drive
o Press Yellow button and then press [OK].
Page 17

16
Other Functions
MP3
1. Open the MP3 menu by pressing [MENU] → [PVR] → [MP3 Music].
2. Three kinds of play modes are supported: shuffle, upward, downward (by default).
3. Play MP3 by highlighting then press OK button on it, press MP3 again will stop its play.
Note: Only .mp3 files are supported at present.
Digital Photo
1. Open the photo menu by pressing [MENU] → [PVR] → [Digital Photo].
2. Play a photo in full screen by highlighting then pressing OK on it.
3. Start the slide show of all photos by pressing the RED button.
4. In the full screen mode:
(a) Press [UP/LEFT] to play the previous photo.
(b) Press [DOWN/RIGHT] to play the next photo.
(c) Press [OK/EXIT] button to exit the full screen mode.
5. In the slide show mode:
(a) Press [UP/LEFT] to play the previous photo.
(b) Press [DOWN/RIGHT] to play the next photo.
(c) Press [PAUSE] to suspend the slide show, then PLAY or
PAUSE again to resume the slide show.
(d) Press [OK/EXIT] button to exit the slide show mode.
Note: Only .jpg files are supported at present.
Bookmark Function
1. Bookmark Function works only in the PVR playback mode.
2. During PVR playback, Press the [INFO] button to open the
play bar.
3. With the play bar on the screen:
(a) Press the [RED] button to add a bookmark.
(b) Press the [BLUE] button to delete a bookmark.
(c) Press the [NEXT] button to jump to the next bookmark.
(d) Press the [PREV] button to jump to the previous bookmark.
(e) Press the [EXIT] button to close the play bar.
Note: Each clip on PVR is supported up to 8 bookmarks.
Page 18

17
Main Menu
Pressing [MENU] to open MAIN MENU. Description on each setting items are as below:
LIVE TV mode
Press [OK] to enter the program.
EPG Menu
Press [OK] to choose the display.
z Vertical EPG
z Horizontal EPG
PVR Menu
Press [OK] to select following functions.
z Recorded Programs
z Timer List
z New Timer
z Format HDD
z MP3 Music
z Digital Photo
Recommend to use hot keys. For details operations, please refer to section [Recording Function] from
page 15.
Page 19

18
Main Menu
Setting Menu
Open Settings Menu by pressing [MENU] > SETTING.
z Channel settings, please refer to page 12 for detail illustration
z Video & Audio Settings
-Screen : Select the suitable aspect ratio for your TV
-Items : 4:3 Letterbox, 4:3 Panscan, 16:9
-Resolution: Select video output resolution
-Available options: 1080p50, 1080i50, 720p50, 576p50
-Audio : Digital Audio output format
-Available options: PCM, RAW
-AV input : To identify source in AV mode
-Available options: RCA, S-VIDEO
z OSD Settings
-Menu Language : Select menu languages
-Available options: English, Simplified Chinese, Traditional Chinese
z System Settings
-Time Zone setting: Set the correct time zone you are located.
(By default, it’s set to Asia/HongKong+8:00)
-System Info: Display current firmware version
-Firmware upgrade: Upgrade new version firmware.
Before upgrade the firmware, please make sure that:
a. The upgradeable firmware is copied to an USB disk
b. The USB disk is connected to STB via USB interface.
-Restore to Default: Restore to default factory setting.
-Storage Device:
a.
This is the storage device for recordings. All related files for incoming
recordings will be stored in the specified device.
b.
There are two options: Int. HDD (by default), External HDD.
Note: Those USB drivers which will be used as external recording devices, their file systems are
required to be EXT2. Using the External HDD Format function under [MENU]->[PVR]->[Format HDD]
to achieve this if possible.
*Warning : During firmware upgrade/restoring default, DO NOT shut down the power otherwise
the STB will be damaged and needs to be returned to EIGHT Limited for repair.
Proceeding firmware upgrade it will delete all the recorded clips on the box.
z Color setting
-Available options: Contrast, brightness, saturation, hue.
Page 20

19
Trouble shooting
If you experience problems with this receiver or its installation, in the first instance please read carefully the
relevant sections of this User Manual and this Troubleshooting section.
Problem
Possible Causes
What To Do
The display on the front
panel does not light up.
Power cord is not
connected.
Check that the power cord is plugged into
power socket.
No sound and no picture The receiver is under
standby
Press POWER key to switch to operation
mode
The signal cable is
disconnected
Connect the signal cable securely
No signal when selecting
channels
Program parameters are set
incorrectly
Set correct parameters
Audio cable is not
connected securely
Connect it securely
System in MUTE mode
Press MUTE key on the RCU to restore
volume
Volume is set to minimum Increase the volume to suitable level
Picture only, but no sound
Audio setting parameter is
wrong
Please go to Audio Setting menu, select
proper audio mode and proper audio
language.
Sound only, but no picture Video cable is not
connected securely
Connect the video cable securely
Video and audio mismatch
or abnormal sound
Audio channel is not set
correctly
Select proper Audio channel
Picture is still or mosaic
phenomenon
Signal is too weak
Check to make sure that the signal cord
has been connected tightly.
Record fails or play back is
mosaic, but live TV is
property
Signal is too weak in Turner 2 Exchange the loop in to Ant In 1 and
loop out to LOOP Out 2
RCU not aimed at the
sensor on the front panel
Aim at the sensor on the front panel
Remote control not work
No enough power in the
battery of the remote control
Change battery
Warning: If this doesn’t work, contact a qualified repair technician, never attempt to repair the
receiver by yourself.
Page 21

20
Technical specifications
* Specifications are subject to change without prior notice.
This marking shown on the product or its literature, indicates that it should not be disposed with
other household wastes at the end of its working life. To prevent possible harm to the environment or
human health from uncontrolled waste disposal, please separate this from other types of wastes and
recycle it responsibly to promote the sustainable reuse of material resources.
Item Specification
VFD display (support Digital and English Character)
Front Panel Interfaces
Standby key with LED
AC 240V input YPbPr video output
L/R Stereo audio output USB 2.0
S-Video S/P-DIF (coaxial/optical)
HDMI RF input (x2)
Rear Panel Interfaces
RF loopthrough Ethernet port
MPEG2 MP@HL
MPEG4 SP/ASP
Video Capabilities
MPEG4 AVC/H.264 (Main Profile and High Profile)
AAC LC/HE 1.0
MPEG-1 Audio Layer 2/3
AC-3 (downmix)
AC-3 passthrough
Audio Capabilities
Multi AC-3 stream selection
Power supply 100 V~240V AC
Power consumption 35W (with Hard disk)
Operating temperature 0ºC to +50ºC
Storage temperature -55ºC to +85ºC
Humidity 5 % to 90%
Environmental
Specifications
Safety compliance to HKTA 2001
MHEG 5
Software
USB firmware upgrade
Demodulator TDS-OFDM
Sub-carrier demodulation QPSK (4QAM), 16QAM, or 64QAM
Demodulation
Guard interval duration
420 or 945 symbols
(1/9 or 1/4 of 3780)
Page 22

1
目錄
安全指南 ……………….. …..………………………………………………………………………..
2
產品介紹 ………….…………………………………………………………………………………..
3-4
前面板和後面板介紹 ………………………………………………………………………………...
5-6
遙控器指南 ………………………...…………..……………………………………………………..
7
電池安裝 ………………………………………...……………………………..……………………..
8
系統連接 …………………...…………..……………………………………………………………..
9-11
基本操作 …………... …………………….…………………………………………………………..
12-14
頻道搜索 ……………. ……………….………………………………………………………..
12
頻道轉換 ……………….……..………………………………………………………………..
12
頻道資訊 …………...…………………………………………………………………………..
12
喜愛頻道 ……………………...………………………………………………………………..
12
音量控制………………………………………………………………………………………..
12
字幕 / 螢幕比例 / 音頻 / 返回鍵 / 靜音…………………………………………………
13
電子節目指南..………………………………………………………………………………….
13
時移功能………..……………….……………………………………………………………….
14
畫中畫功能......................................................................................................................
14
AV輸入功能…………………………………………………………………………………….
14
錄影功能………………………………………………………………………………………………..
15
其他功能………………………………………………………………………………………………..
16
主菜單…………………………………………………………………………………………………..
17-18
故障排除………………………………………………………………………………………………..
19
技術規格…………………………………………………………………………...............................
20
Page 23

2
安全指南
• 仔細閱讀這些安全指引。
• 妥善保管好這些安全指引。
• 請勿在潮濕的地方使用此設備。
• 安裝前請把此機放置在平穩的地方。
• 請勿將此機放在室內裝飾品上。
• 如出現以下情況,請讓專業的維修人員檢查:
- 機器受潮
- 機器摔壞、損壞
- 機器有明顯的破損現象
- 機器無法按照此說明正常工作
警告
• 請勿打開此機外殼或後面板以防觸電。
• 請勿堵塞此機通風孔,留出合適的間隙,保持通風。
• 請勿將此機安放在不通風的壁櫃裏或者發熱的物體上。
• 如果電池更換不正確將有爆炸的危險。請用同型號的電池更換。
• 此機器不能遭受雨淋或潮濕,也不得有水濺入或液體滴入機器中。 請您不要把盛有水的物品(如花瓶)放置
在機器上。
• 電源插頭是用來作為斷開裝置,此電源插頭應隨時保持可操作性。
• 為避免火災或觸電,請勿將此機淋雨或放置在潮濕的地方。
版權聲明
在未經事先書面許可前不得以任何形式本和任何手段轉載本出版物。在此提及的商標或品牌名稱均屬於EIGHT
Limited.
免責聲明
本文檔中的資訊如有變更,恕不另行通知。(隱含或其他方式) 關於此檔的準確性和完整性製造商將不作出任何
陳述說明或保證。對在任何情況造成任何利潤損失或任何商業損害,包括但不限於特殊的,偶然的,後果的,
或其他損失,不能追究製造商任何責任。
此標誌表明為雙絕緣標記,維修時只能使用相同的替換零件。
Page 24

3
產品介紹
功能及應用:
z 香港DMB-T/H數碼電視廣播
z 時移功能,並時移錄影可最高達到3小時
z 時移模式時支援畫中畫技術
z 7日電子節目指南,設有直版及橫版畫面選項
z EPG節目詳細/簡短描述
z MP3和數碼照片
z 支援PVR模式播放,錄影電子節目清單,預約錄影
z 雙調諧器
z 支援雙頻道,可同時錄影和播放其他電視或AV頻道
z 長寬比轉換 (16:9, 4:3)
z 節目列表
z 支援喜愛的頻道
z 邏輯頻道顯示(0-999)
z 支持OSD
z 支援簡體中文,繁體中文和英文
z 支援乙太網(10Mbps/100Mbps)
z 頻道自動,快速/手動搜索
z 支持USB2.0
z 可通過USB2.0(Ext2/FAT32/NTFS)進行軟體升級
z 支持系統還原
z USB硬碟驅動器(EXT2)錄影(PVR)
z 支持MHEG 5
z 支持1920X1080p解析度
z 支援高清/標清輸出(HDMI, YpbPr, CVBS, S-Video)
z 輸出顯示支援1080p/1080i/720p/576p
z HDMI輸出支援1080p/1080i/720p/576p
z 分量端子輸出支援1080p/1080i/720p/576p
z 杜比,AC-3音頻混合輸出
z 支援PCM數位音頻輸出
z 數碼音頻輸出S/P,DIF
z 支援RCA和S端子輸入
z 支援通過輸出到外接硬碟進行錄製節目備份(EXT2, NTFS)
z 為錄製節目進行標識和預覽
z
在時移和PVR播放模式下運作:快進 & 快退(2X/4X/8X/16X/32X),即時重放,暫停,快速跳動播放.
z 單個/多個錄製節目刪除
z 內置/外接硬碟格式化
z 內置硬碟快速格式化
z 移動硬碟空間監測
z 色彩調整(對比度,亮度,飽和度,色調)
z 時區設置
Page 25

4
產品介紹
包裝內容
在安裝前,請檢查包裝內容。此機包裝應包括以下配件:
1. PVR 主機 x 1
2. 遙控器 x 1
3. AAA 電池 x 2
4. 用戶手冊 x 1
5. 色差線 x 1
6. AV視頻線 x 1
7. RF線 x 1
8. 電源線 x 1
9. 外置電源 x 1
Page 26

5
前面板和後面板介紹
前面板示意圖
1. POWER: 開啟/關閉待機模式。
2. MENU:
進入/退出主功能表,重複按鍵返回對上目錄。
3. OK:
確定。
4. CH-: 在TV模式下切換頻道。在目錄中向下瀏覽。
5. CH+:
在TV模式下切換頻道。在目錄中向上瀏覽。
6. VOL-: 降低音量。在目錄中向右瀏覽。
7. VOL+:
增加音量。在目錄中向左瀏覽。
VFD顯示屏
1. 待機: 待機中。
2. USB顯示: 已接合USB。
3. 錄影顯示: 正在錄影中。
4. 解像度顯示: 正在使用的解像度。
5. 預錄顯示燈: 預錄節目已設定。
6. 功能顯示: 功能顯示或正在收看頻道顯示。
Page 27

6
前面板和後面板介紹
後面板示意圖
1. DC 12V: 外置電源接入.
2. VIDEO(OUTPUT):
CVBS輸出, 用於連接電視。
3. S-VIDEO(OUTPUT):
S-影像輸出, 用於連接電視。
4. AUDIO L/R(OUTPUT):
左/右聲道輸出用於連接電視。
5. YPbPr:
色差影像輸出,用於連接到電視。
6. D-AUDIO/OPTICAL:
數位聲音輸出, 用於連接家庭影院。
7. HDMI: 高清晰度多媒體介面, 用於連接電視或者家庭影院。
8. ETHERNET:
用於連接網路(只限於軟體升級和MHEG5功能)。
9. USB: 連接USB連接頭(只限於軟體升級)。
10. S-VIDEO(INPUT): S-影像輸入, 用於連接其他機頂盒/DVD的音頻輸入信號。
11. AUDIO L/R(INPUT): 左/右聲道輸入用於連接其他機頂盒/DVD的音頻輸入信號。
12. ANT IN1:
RF信號輸入,用於連接天線。
13. LOOP OUT1 : 用於連接自機的RF線。
14. LOOP OUT2: RF信號輸出,用於連接其他接收設備。
15. ANT IN2:
用於連接自機的RF線。
16. VIDEO(INPUT): CVBS輸入,用於連接其他機頂盒/DVD的音頻輸入信號。
Page 28

7
遙控器指南
遙控器按鍵功能
1. POWER: 打開或關閉電源。
2. EPG-V: 快捷鍵進入直板電子節目表。
3. EPG-H: 快捷鍵進入橫板電子節目表。
4. 數字鍵(0-9) : 直接轉換頻道或輸入安裝設置。
5. SUBT: 開啟或關閉字幕。
6. EXIT:返回到上一級或主目錄。
7. OK: 確定所選功能。
8. ▲▼:上下移動鍵,並轉換頻道。
9. VOL
∧∨: 控制音量調節。
10. MUTE:靜音操作。
11. 4個顏色鍵: 用於螢幕上所指的幫助功能。
12. P.ON/OFF:開啟或關閉畫中畫。
13. P.SWAP:小畫面和大畫面轉換。
14. TIMER: 快捷鍵增加新的預錄。
15. T.LIST: 快捷鍵進入現有的預錄清單。
16. PREV: 在時間轉移或PVR模式下進入開始重播起點。
17. PLAY: 開始播放錄像或恢復時移功能
18. B.SKIP: 在時間轉移或PVR模式下後退2分鐘。
19. REW: 錄像或時移播放快退(支援2X, 4X, 8X, 16X, 32X倍)。
20. SOURCE: AV/DTV頻道切換。
21. INFO: 顯示當前的和下一個節目的資訊。
22. PVR: 快捷鍵進入現有的錄影清單。
23. CH.LIST: 打開頻道清單。
24. FAV: 打開喜愛頻道清單。
25. ASPECT: 轉換觀看螢幕高寬比。
26. AUDIO: 轉換聲道模式。
27. RECALL: 返回之前所觀看的節目頻道。
28. TXT: 打開或關閉圖文資訊服務功能,或者在MHEG 5應用範圍中
可作TEXT 按鍵。
29. MENU: 打開主目錄。
30.
◀▶: 左右移動,並進行聲音控制。
31. CH+/- : 轉換當前節目頻道。
32. PAGE DOWN: 進入下一頁。
33. PAGE UP 進入上一頁。
34. REC: 立刻開始錄影當前節目。
35. STOP: 停止正在播放的錄像或時間轉移。
36. NEXT: 進入重放末部。
37. PAUSE: 暫停正在播放的錄像或進行時間轉移。
38. F.SKIP: 在時間轉移或PVR模式下向前快跳2分鐘。
39. FF: 錄像或時移播放快進 (支援2X, 4X, 8X, 16X, 32X倍)。
Page 29

8
電池安裝
安裝AAA電池於遙控器中:
將遙控器後的電池蓋取下,然後將2枚AAA電池放入裏面。
以下圖表為安裝電池的正確步驟。
1. 打開電池蓋 2. 裝入電池 3. 關上電池蓋
警告
1. 請勿讓兒童接觸此電池。
2. 切勿嘗試自行充電、短路、拆解、加熱或將電池扔在火裏。同時更換 2 節電池。請勿將新舊電池或不同型
號的電池混合使用。
3. 如果你不打算長期使用遙控器,請將電池取出以防止電池洩漏和腐蝕。
4. 請不要將遙控摔在地上。同時請勿使遙控受到踩踏或撞擊。
5. 請不要將水弄濕到遙控摔上。
注意: 如果在近距離範圍內無法操作,請更換新的電池。
遙控使用
1. 當使用遙控時,請將遙控指向主機的前面板。
2. 遙控使用範圍為在距離主機 8 米以內,角度為 60°。
3. 如果遙控道路受阻,遙控將無法操作。
注意: 陽光或強光將會降低遙控的靈敏度。
Page 30

9
系統連接
請參照以下圖片連接您的電源、天線信號、電視及其它相關設備。
系統連接示意圖:
A) 基本連接
1. 將天線連接到主機後面板上的 ANT IN 1 介面。
2. 通過 ANT IN 2 和 LOOP OUT 1 介面將 RF 線連接上去。
3. 連接主機與外置電源。
4. 按以下示意圖連接主機的 VIEDO/S-VIDEO 和 AUDIO 介面。
B) 連接 YPrPb 介面
1. 將天線連接到主機後面板上的 ANT IN 1 介面。
2. 通過 ANT IN 2 和 LOOP OUT 1 介面將 RF 線連接上去。
3. 連接主機與外置電源。
4. 按以下示意圖連 YPrPb 線至電視機。
Page 31

10
系統連接
C) 連接 HDMI 介面
1. 將天線連接到主機後面板上的 ANT IN 1 介面。
2. 通過 ANT IN 2 和 LOOP OUT 1 介面將 RF 線連接上去。
3. 連接主機與外置電源。
4. 按以下示意圖連 HDMI 線至電視機。
D) 通過 Optical/Coaxial/ Audio L/R 聲音連接
1. 將天線連接到主機後面板上的 ANT IN 1 介面。
2. 通過 ANT IN 2 和 LOOP OUT 1 介面將 RF 線連接上去。
3. 連接主機與外置電源。
4. 按以下示意圖連接 AV 線至電視機或音響設備。
Page 32

11
系統連接
E) AV 輸入連接
1. 將天線連接到主機後面板上的 ANT IN 1 介面。
2. 通過 ANT IN 2 和 LOOP OUT 1 介面將 RF 線連接上去。
3. 連接主機與外置電源。
4. 視頻連接: 通過 VIDEO/S-VIDEO (INPUT)連接機器。
5. 音頻連接: 通過 AUDIO L/R (INPUT)連接機器。
Page 33

12
基本操作
頻道搜索
1. 按[MENU 鍵]進入主菜單,並按[UP][DOWN]瀏覽到[設置]。
2. 按[OK]進入頻道設置。
3. 按[OK]進入搜索方法。
4. 按上下▲▼鍵瀏覽搜索方法。
z 快速: 建議使用此方法。
z 手動: 用於搜索某一具體頻道,按◀▶瀏覽。
z 自動: 當某些頻道在快速搜索時無法搜索到時,可選用此種方法。
5. 當某一搜索方法選定後按[OK]鍵開始搜索。
注意: 當任何一種頻道搜索執行後所有已添加在時間清單上的預錄將被清除。
頻道轉換
1. 在電視直播模式時按[CH.LIST]打開頻道清單。
2. 按[UP] [DOWN]瀏覽您所需要的頻道。
3. 按 [OK]播放此頻道節目。
4. 按藍色鍵可把此頻道設定為喜愛節目頻道。
5. 頻道轉換也可通過以下方式完成:
z 在電視直播模式時按[CH+][CH-]鍵。
z 在電視直播模式時鍵入邏輯頻道編號。
頻道信息
1. 在電視直播模式時按[INFO]鍵打開頻道信息。
2. 此頻道信息將會顯示當前及下個節目相關的節目資訊。
3. 再次按[EXIT]鍵退出。
喜愛頻道
1. 在電視直播模式時按[FAV]鍵打開我的最愛節目列表。
2. 按[UP] [DOWN]鍵瀏覽您所需要的節目頻道。
3. 按[OK]鍵即可播放此頻道。
4. 按[EXIT]鍵退出。
音量控制
按[VOL+]和[VOL-]可增加或降低音量。在螢幕左上角將會顯示當前
的音量。
Page 34

13
基本操作
字幕
按[SUBT]鍵可顯示或關閉當前節目可用的字幕,在螢幕左上角將會顯示當前的選擇。
螢幕比例
按[ASPECT]選擇 4:3 Letterbox 信箱模式,4:3 Panscan 面板子模式,16:9 模式。選擇的比例在螢幕的左上角顯示。
音頻
按【AUDIO】對當前節目進行聲道切換,所選擇的聲道在螢幕左上角顯示出。
返回鍵
按【RECALL】在當前和上一個頻道之間切換。
靜音
按【MUTE】打開/關閉靜音。
電子節目指南 (EPG)
在電視直播模式時按 [EPG-V] / [EPG-H] 鍵打開電子節目單。
EPG-V (直版電子節目單)
1. 光標顯示在頻道列表上。
1) 按【UP】/【DOWN】瀏覽節目列表,按【OK】鍵切換頻道。
2) 按【CH+】/【CH-】切換頻道。
3) 按【RIGHT】/【EPG-V】將光標顯示在電子節目數據列表中。
4) 按【GREEN】進入橫電子節目單。
5) 按【EXIT】退出 EPG。
2. 光標顯示在電子節目數據列表上。
1) 按【UP】/【DOWN】瀏覽節目。
2) 按【PAGE-UP】/【PAGE-DOWN】進行翻頁。
3) 按【BULE】進行設置選中的電子節目進行預錄。
o 週期(每次,每天,每週,工作日,週末)
o 推遲時間(0,3,5,15 分鐘)
o 提前時間(0,1,3,5 分鐘)
o 按[OK]鍵確定
4) 按【YELLOW】鍵取消選中電子節目之預錄。
5) 按【OK】鍵觀看節目簡介。
6) 按【GREEN】鍵進入橫版電子節目單。
7) 按【EXIT】退回頻道列表。
EPG-H(橫版電子節目單)
1. 按【OK】鍵進入電子數據列表。
2. 按▲▼ 鍵導航。
3. 按【BULE】進行設置選中的電子節目進行預錄。
o 週期(每次,每天,每週,工作日,週末)
o 推遲時間(0,3,5,15 分鐘)
o 提前時間(0,1,3,5 分鐘)
o 按[OK]鍵確定
4. 按【YELLOW】鍵取消選中電子節目之預錄。
5. 按【EXIT】鍵退出。
6. 按【GREEN】鍵進入直版版電子節目單。
Page 35

14
基本操作
時移功能
1. 在電視直播模式時按[PAUSE]鍵啟動時移功能,在錄影下的時移時間可最高達到 3 小時。
2. 主畫面將暫停,在右方底部將顯示電視直播模式的 PIP 畫中畫。
3. 螢幕上將會顯示一個計時器並告之 PIP 與主畫面之間延遲時間為長。
4. 按[PLAY]/[PAUSE]還原主畫面。
5. 當在時移模式播放時,你可以再次按[PAUSE] 鍵暫停主畫面。
6. 按 [FF] 鍵可循環切換 2X, 4X, 8X, 16X, 32X 快進和播放模式。
7. 按 [REW] 鍵可循環切換 2X, 4X, 8X, 16X, 32X 快退和播放模式。
8. 按 [F.SKIP] 鍵可向前快跳 2 分鐘。
9. 按 [B.SKIP] 鍵可向後快跳 2 分鐘。
10. 按 [PREV] 鍵可快速啟動時移功能。
11. 按 [NEXT] 鍵可即時進入電視直播模式。
12. 按 [STOP] 鍵可停止時移功能並返回電視直播模式。
注意:在時移模式下,請勿轉換到其他節目觀看。如果時移加上節目錄影正在進行,所有即將進行錄影的節目
都將被忽視,直到時移與錄影停止。
畫中畫功能
1. 在電視或者PVR模式下,按[P.ON/OFF]鍵打開畫中畫。
2. 打開畫中畫後,小畫面將顯示在右下角。
3. 按【CH.LIST】【FAV】【CH+/-】或者數字鍵選擇大畫面頻道,按【PAGE / P.CH】,按【UP / DOWN】選
擇小畫面頻道。
4. 按【P.SWAP】對大小畫面進行切換。
注意:錄影與時移優先於畫中畫,如果時移或者至少一個節目在錄影,畫中畫將自動關閉;在PVR播放,畫中
畫開啟時,按【P.SWAP】鍵會停止PVR播放,關閉畫中畫。同時返回到電視模式,小畫面的節目將播放。
AV 輸入功能
1. 切換至視頻輸入
按[SOURCE]鍵進入AV輸入功能
2. 設置AV輸入源
按 [MENU]鍵,進入[設置]->[音頻/視頻設置]->[輸入源] 對此有兩種選
擇: RCA 和 S-Video。
注意: 於
RCA
視頻輸入
,AV
線是必須的
;S-Video
視頻輸入,標準的
4-pin S-Video
線是必須的。AV情況之下不支持 畫中畫,
EPG
,時
移功能。
3.
即時 AV 輸入錄製
1) 按[SOURCE]鍵切換到 AV 輸入。
2) 按[REC]鍵開始錄製 AV 節目。
3) 當前播放的 AV 頻道節目將即時錄影。
4) AV 輸入錄製期間,同時可以操作其他功能 (e.g. 觀看 DTV 節目,播放 PVR/時間轉移, 瀏覽 EPG, 操作節
目列表和喜愛節目列表等)。
5) 按[STOP]鍵停止錄製,已錄製節目可在 PVR 目錄中顯示。
4. 預定 AV 輸入錄製
1) 為 AV 輸入設置一個時間錄影(可參照預錄功能部份設定)
2) 在錄影啟動後,同時也可以操作其他功能(如收看其他數碼電視頻道,播放 PVR/時間轉換,瀏覽 EPG,
3) 操作節目列表和喜愛節目列表等)。
4) 錄製完成後,已錄製的節目可在 PVR 目錄中顯示。
Page 36

15
錄影功能
即時錄影
在電視直播模式時按【REC】鍵即可啟動錄影功能。
1. 在電視直播模式時按【REC】鍵啟動錄影功能。目前觀看節目被錄影。再按【REC】選擇錄影時間(從 30
分鐘至 240 分鐘)。
2. 在錄影時,您可以隨意轉換觀看其他頻道,錄影仍在繼續運行。
3. 按 [STOP] 鍵即可停止錄影。您可以從 PVR 功能表中瀏覽錄影剪輯。
預錄功能
1. 在電視直播模式時, 按[TIMER]鍵即可啟動預錄功能。
2. 按[左][右]鍵選定你所喜歡頻道。
3. 選擇錄影時段(一次/每天/每週/星期一至五/週未及週日)。
4. 選擇開始日期(一次)或者重複日期(每天)。
5. 最後選擇開始時間和結束時間。
6. 錄影計時將在所設置的預約錄影開始時間到達時進行,同時也在結
束時間終止。
7. 可按[STOP]鍵停止正在刻錄的節錄,同時所刻錄的剪輯可在 PVR 目
錄中找到
。
8. 當有衝突存在於現有的預錄時間與新加的預錄時間內, 新加的預錄
時間會略過. 例如: 現有一個預錄時間設定於 19:00 至 20:00, 另一
個新加的預錄時間設定於 19:30 至 21:00. 19:30 至 21:00 的預錄時
間會自動略過.。
預錄列表
1. 在電視直播模式時, 按[T.LIST]鍵即可打開預錄列表。
2. 從這您可以瀏覽所有增加的預約錄影項目。
3. 在所選定的預約錄影專案上按藍色鍵,將會彈出確認刪除對話方
塊,選擇 [確認] 即可刪除。
4. 可通過 EPG 啟動預約錄影,請參考 13 頁“電子節目指南"內容。
PVR
1. 在電視直播模式時, 按[PVR]鍵可打開 PVR 目錄。
2. 所有錄影剪輯將會顯示出來。
3. 您可以在所選擇的錄影剪輯上按【RED】鍵預覽此錄影剪輯。
4. 您可以按[OK]鍵全屏觀看錄影剪輯。
5. 在全屏播放時,按[FF] 鍵可迴圈切換 2X, 4X, 8X, 16X, 32X 快進和播
放模式。
6. 按[REW]鍵可迴圈切換 2X, 4X, 8X, 16X, 32X 快退和播放模式。
7. 按[STOP]鍵播放和返回PVR 功能表或等待所觀看的錄影剪輯完成播
放。
8. 刪除錄影節目:
o 按【GREEN】鍵選中指定節目後,按【BLUE】鍵進行刪除。
o 按【MENU】鍵選中當前頁面所有節目,後按【BLUE】鍵刪除。
9. 移動已錄影節目到 USB:
o 連接 USB 記憶體 。
o 按[YELLOW]鍵進行複製到 USB 記憶體中,並按[OK]鍵確認。
Page 37

16
其他功能
MP3
1. 打開 MP3 菜單 通過【MENU】→【PVR】→【MP3 音樂】。
2. 支援 3 種播放模式:隨機播放,循環向上播放,循環向下播放(默認)。
3. 按【OK】鍵播放/停止選中的 MP3。
注意:目前只支持 .MP3 格式。
電子相冊
1. 打開電子相冊菜單,通過【MENU】→【PVR】→【電子相冊】。
2. 按【OK】鍵選擇照片並全屏播放。
3. 按【RED】鍵開始幻燈片模式播放所有照片。
4. 全屏模式:
a) 按【UP/LEFT】鍵播放之前的照片
b) 按【DOWM/RIGHT】鍵播放下一個照片
c) 按【OK/EXIT】鍵退出全屏模式
5. 幻燈片模式:
a) 按【UP/LEFT】鍵播放上一個照片
b) 按【DOWN/RIGHT】鍵播放下一個照片
c) 按【PAUSE】鍵暫停播放滾動條,按【PLAY】鍵或再次按【PAUSE】鍵恢復幻燈片播放
d) 按【OK/EXIT】鍵退出幻燈片播放模式
注意:目前只支持.jpg 格式。
標籤功能
1. 標籤只能在 PVR 模式下操作。
2. 在 PVR 模式下,按【INFO】鍵打開播放進度條。
3. 播放條顯示在螢幕上:
a) 按【RED】鍵增加標籤。
b) 按【BLUE】鍵刪除標籤。
c) 按【NEXT】鍵跳到下一個標籤播放。
d) 按【PREV】鍵跳到上一個標籤播放。
e) 按【EXIT】鍵退出。
注意:PVR 中,每個播放條中最多可達到 8 個標籤。
Page 38

17
主菜單
按[MENU]鍵可打開主菜單功能表。 以下為每個設置項目的描述:
現場直播菜單
按【OK】進入電視畫面。
EPG 菜單
按【OK】鍵進入 EPG 功能表。
z 竪(直)電子節目表。
z 橫電子節目表。
PVR 菜單
按【OK】鍵進入 PVR 功能表,選擇其他功能
z 錄影節目
z 預錄列表
z 新增預錄
z 硬盤信息
z MP3 音樂
z 電子相冊
建議使用方法快速鍵. 具體的操作方法,請參考第 15 頁“錄影功能"
內容。
Page 39

18
主菜單
設置菜單
按【OK】鍵進入設置菜單。
z 搜索頻道
請查照前面第 12 頁說明。
z 影音設定
-圖像縱橫比: 可供您選擇合適的電視螢幕高寬比
-項目: 4:3 Letterbox 信箱模式,4:3 Panscan 面板子模式,
16:9 模式
-圖片解析度:選擇影像輸出圖片解析度
-可選項有:1080p50, 1080i50, 720p50, 576p50
-數碼音效輸出: 選擇聲音輸出格式
-可選格式有:PCM, RAW
-AV 輸入源:在 AV 模式下選擇輸入源
-可選格式有:RCA, S-VIDEO
z 語言
-功能表語言: 選擇功能表語言
-可選項有:英文,簡體中文,繁體中文
z 系統設置
-時區設置: 可設置您所在位置的正確時區,(默認設置為亞洲/香港+8:00)。
-系統資訊: 顯示本機軟體版本。
-軟體升級: 升級新的固件版本。
在升級前請確認:
a.
最新軟體需複製到 USB 盤中。
b.
USB 盤通過 USB 插口連接到主機上。
-恢復出廠設定:可恢復到出廠設定狀態。
-存儲設備:
a. 存儲設備用於錄影。所有將要錄影的文檔均被通過特定的方式進行存儲。
b. 有兩種方式可選擇:內置硬盤(默認),外置硬盤。
注意:USB 將作為外部的錄影設備,檔系統要求為 EXT2.可通過【MENU】-〉【PVR】-〉【Format HDD】
實現外置硬盤格式化功能。
警告:在進行軟體升級時/在恢復出廠設置時, 不要切斷電源,否則可能對主機造成損害,且需要
返回給 EIGHT Limited 來維修, 同時所有之前所保留之錄影節目均會被刪除。
z 色彩設置
-彩色參數:設置彩色參數。
彩色參數有:對比度,明亮度,飽和度,色度。
Page 40

19
故障排除
如果您在安裝或使用此機時遇到問題,請首先仔細閱讀說明書中的相關章節和故障排除。
問題 可能的原因 解決方案
前面顯示燈不亮
電源沒有連接到主機 檢查電源連接
無圖片且聲音 主機處於待機模式 按 POWER 鍵開啟進入工作模式
信號線未連接上 正確連接好信號線
搜台時沒有信號
節目參數設置錯誤 正確設置節目參數
聲音線連接不當 正確連接好聲音線
系統處於靜音模式 按遙控器上的 MUTE 鍵恢復音量
音量設置為最小值 將音量設置為適合的水準
只有圖片卻沒有聲音
聲音設置參數不正確 進入聲音設置功能表,選擇合適的聲音模式和語
言
有聲音卻無圖片 影像線連接不當 正確連接影像線
影像聲音配合不當,混亂的頻道資
訊,或者聲音出現異常
聲道設置不正確
正確選擇合適的聲道
圖片靜止或出現馬賽克現象
信號太弱
檢查確定信號線已經緊緊連接上
錄影失敗或播放馬賽克, 但播放電
視正常
2 號高頻頭
(TUNER 2) 信號太弱
將原有之 LOOP OUT 1 與 ANT IN 2 位置調轉至
LOOP OUT 2 與 ANT IN 1
遙控器沒有對準前面
板的感測器
遙控器對準前面板的感測器
遙控器無法工作
電池不夠 更換電池
警告:如果此機無法正常工作,請與您的經銷商或專業的技術人員聯繫。在任何情況下,請勿自行修理或修改本
產品,因為這有可能導致您觸電,和/或您的設備受到嚴重損害。
Page 41

20
技術規格
*此規格僅供參考,如有變動,恕不另行通知。
本產品上的此標誌表明此物品不能與其他家居廢物一起處理。為防止對環境和人體造成可能的傷害,
請將此物品與其他廢物品分離開回收處理,以促進可持續利用的物質資源。
項目 規格
VFD 顯示 (支援數位元元元和英文字體)
前面板
LED 待機鍵
AC 240V 輸入 YPbPr 影像輸出
L/R 立體聲音輸出 USB 2.0
S-Video S/P-DIF (coaxial/optical)
HDMI RF 輸入 (x2)
後面板
RF 環路 乙太網介面
MPEG2 MP@HL
MPEG4 SP/ASP
影像性能
MPEG4 AVC/H.264
AAC LC/HE 1.0
MPEG-1 Audio Layer 2/3
AC-3 (downmix)
AC-3 passthrough
聲音性能
Multi AC-3 stream selection
電源 100 V~240V AC
功耗 35W (帶有硬碟)
工作溫度 0ºC to +50ºC
存儲溫度 -55ºC to +85ºC
濕度 5 % to 90%
環境規格
安全遵守 to HKTA 2001
MHEG 5
軟體
USB 軟體升級
RF 頻率範圍 474 MHz – 858 MHz
通道帶寬 7/8MHz
RF 環路範圍 ch E2 - ch E69
高頻頭 1611
IF 中心頻率 36.16 MHz
解調器 TDS-OFDM
副載波解調 QPSK (4QAM), 16QAM, or 64QAM
解調
守衛間隔時間 420 或 945 符號 (1/9 or 1/4 of 3780)
Page 42

1
 Loading...