

Page 1

63438
Nova Primary
Glucose Analyzer
Only
Instructions for Use
Manual
Page 2

Page 3

Preface
Nova Primary Glucose Analyzer Instructions for Use Manual
Ordering Information
The Nova Primary Glucose Analyzer Instructions for Use Manual can be ordered from Nova
Biomedical Order Services. Write or call:
Nova Biomedical Telephone: 1-800-822-0911
200 Prospect Street FAX: 1-800-316-1178 (in the U.S.A.) or
Waltham, MA 02454 U.S.A. +1-781-891-9718 (outside the U.S.A.)
Website: www.novabiomedical.com
REP
EC
Nova Biomedical Deutschland GmbH Telephone: + 49 (0) 61054505-0
Hessenring 13A, Geb. G FAX: + 49 (0) 61054505-37
64546 Mörfelden-Walldorf
Germany
Authorized Representative
Trademarks
Nova Biomedical is a registered trademark of Nova Biomedical.
Copyright
Printed in the U.S.A. Copyright 2024, Nova Biomedical, Waltham, MA 02454.
T echnical Assistance
For technical assistance inside the United States and Canada, call Nova Biomedical T echnical
Services at:
U.S.A.: 1-800-545-NOVA (1-781-894-0800) or FAX: 1-781-894-0585
Canada: 1-800-263-5999
Page 4

T echnical Assistance
For technical assistance outside the United States and Canada, call your local Nova
subsidiary or authorized distributor.
Nova Biomedical recommends users report any serious incidents/adverse events back to
Nova Biomedical or Nova Biomedical's Authorized Representative as well as to their local
Competent Authority as required.
Nova Biomedical Benelux B.V.
Korenmolen 22
5281 PB, Boxtel, The Netherlands
Tel: + 31 (0) 733032701
benelux-support@novabio.com
Nova Biomedical Brasil
Rua Massena, 107, Jardim Canadá
Nova Lima – MG – Cep: 34007-746 Brasil
Tel: +55-31-3360-2500
supportec@novabiomedical.com.br
Nova Biomedical Canada, Ltd
17 - 2900 Argentia Road
Mississauga, Ontario L5N 7X9 Canada
Tel: +1-800-263-5999
+1-905-567-7700
Fax: +1-905-567-5496
ca-novaservice@novabio.com
Nova Biomedical France
Parc Technopolis
Bât. Sigma 3 avenue du Canada 91940
Les Ulis courtaboeuf, France
Tel: +33-1-64 86 11 74
Fax: +33-1-64 46 24 03
fr-support@novabio.com
Nova Biomedical GmbH, Deutschland
Hessenring 13 A, Geb. G
64546 Mörfelden-Walldorf, Germany
Tel: +49-6105 4505-0
Fax: +49-6105 4505-37
de-service@novabio.com
Nova Biomedical Iberia, S.L.
c/Vic 17
Planta 3A 08173
Sant Cugat del Vallès, Barcelona,
Spain
Tel: +34 935531173
es-soporte@novabio.com or
pt-suporte@novabio.com
Nova Biomedical Schweiz GmbH
Herostrasse 7
8048 Zürich, Switzerland
Tel: +41-41-521-6655
Fax: +41-41-521-6656
ch-support@novabio.com
Nova Biomedical U.K.
Innovation House
Aston Lane South
Runcorn, Cheshire WA7 3FY, UK
Tel: +44-1928 704040
Fax: +44-1928 796792
uk-support@novabio.com
Nova Biomedical ANZ Pty. Ltd.
5/372 Eastern Valley Way
Chatswood NSW, 2067 Australia
AU-info@novabio.com
Nova Biomedical Italia S.r.l.
Via Como, 19
20045 Lainate (MI) Italia
Tel: +39 02 87070041
Fax: +39 02 87071482
it-serviziotecnico@novabio.com
Nova Biomedical K.K.: Japan
Harumi Island Triton Square Ofce Tower X 7F
1-8-10 Harumi,
Chuo-ku, Tokyo 104-6007, Japan
Tel: 03-5144-4144
Fax: 03-5144-4177
jp-service@novabio.com
Page 5
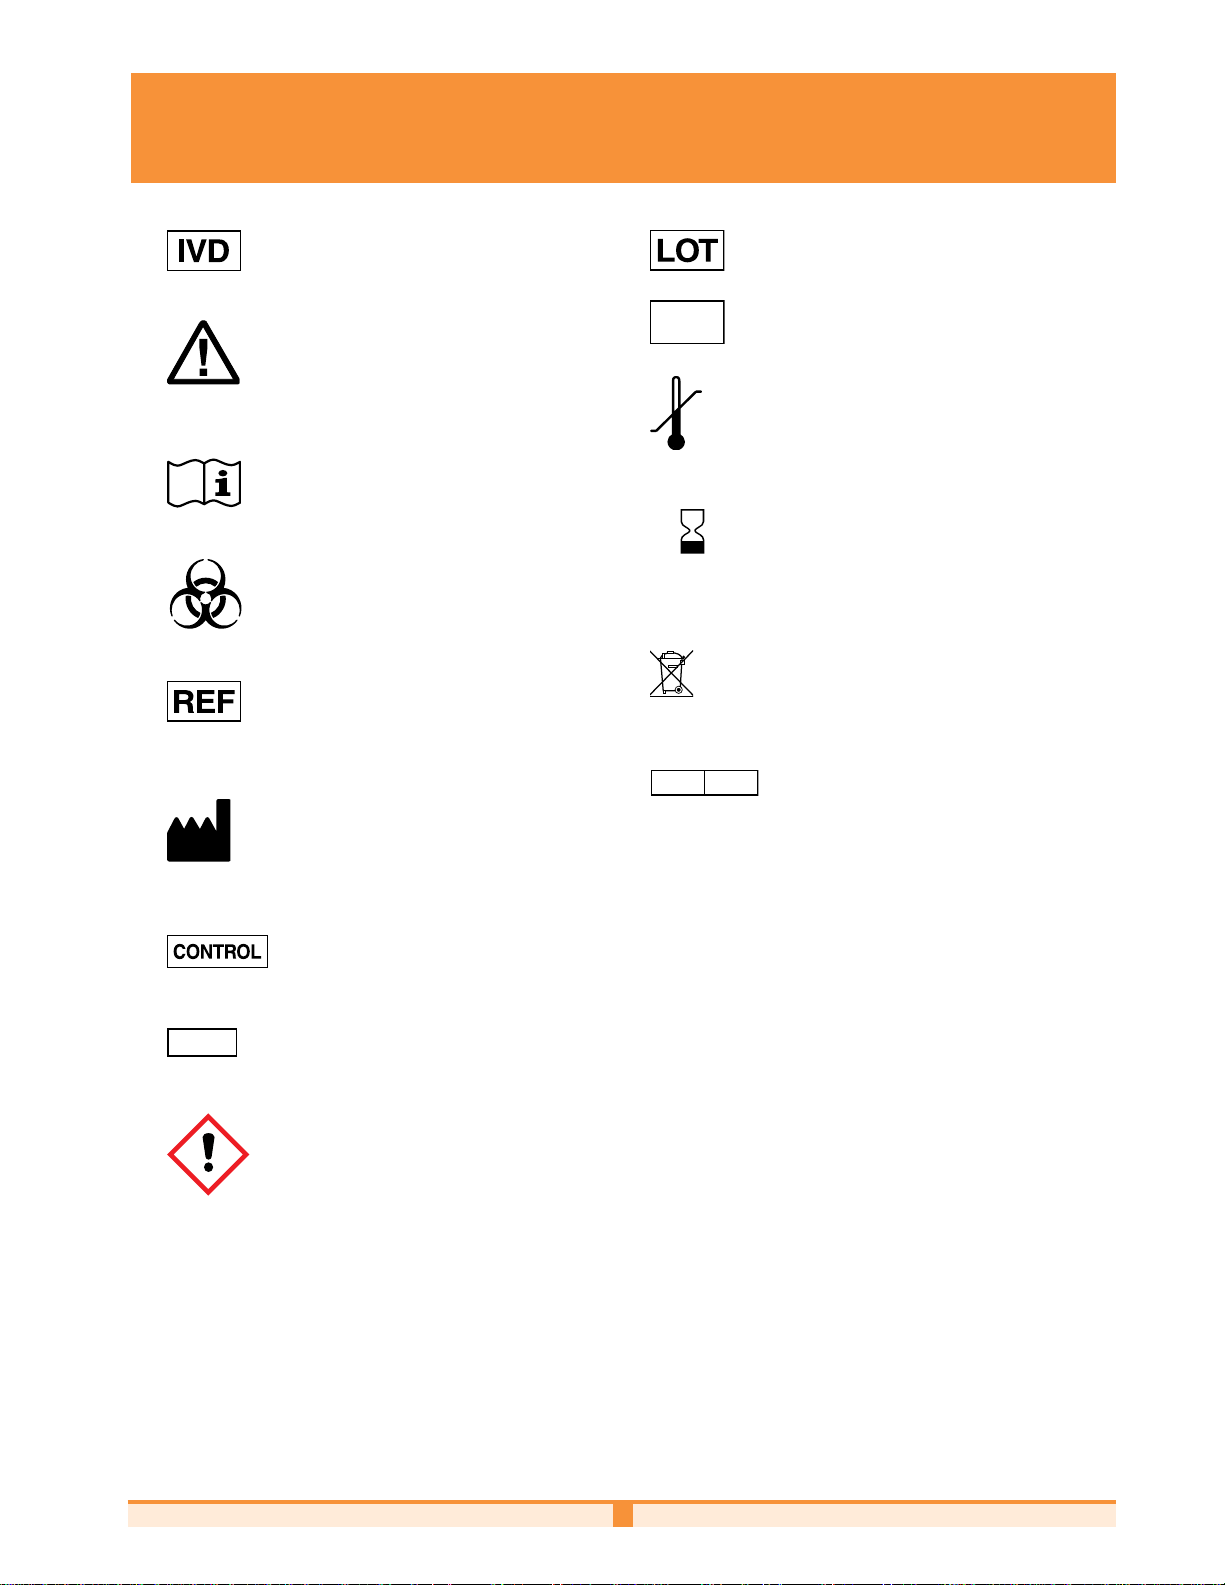
NOVA BIOMEDICAL SYMBOL DIRECTORY
LEVEL
SN
REP
EC
In vitro diagnostic medical device
Caution
Consult instructions for use
Batch code
Serial Number
Temperature limitation
YYYY-MM-DD
Use by
Biological risk
Electronic Waste
Catalog number
Authorized Representative in the
Manufactured by
European Commission
Laser Radiation - Do Not Stare Into
Control
Level
Beam
Prescription Use Only
Only
Hazard
1
Page 6

Revision History
Rev. Release Description
A 12-2021 Initial Release
B 06-2023 FDA 510(k) review and IVDR compliance updates
C 09-2024 Updates to include latest software features
Page 7

Table of ConTenTs
Table of Contents
1 Introduction . . . . . . . . . . . . . . . . . . . . . . . . . . . . . . . . . . . . . . . . . . . . 1-1
1.1 About This Manual ...................................................................................................................... 1-1
1.2 Safety ..................................................................................................................................... 1-1
1.3 Installation and Use .................................................................................................................... 1-2
1.4 Requirements ............................................................................................................................ 1-3
1.5 Cleaning the Analyzer ................................................................................................................ 1-3
1.6 Intended Use, Tests Performed, and Clinical Utility ............................................................................. 1-4
1.7 The Sample ............................................................................................................................... 1-4
1.7.1 Handling Requirements ...........................................................................................................................................1-4
1.7.2 Acceptable Anticoagulants ........................................................................................................................................ 1-5
1.8 Warnings and Precautions ............................................................................................................ 1-5
2 Getting Started. . . . . . . . . . . . . . . . . . . . . . . . . . . . . . . . . . . . . . . . . . 2-1
2.1 Analyzer Startup Procedure .......................................................................................................... 2-2
2.2 The User Interface ......................................................................................................................2-3
2.2.1 Log-In to the Analyzer ............................................................................................................................................. 2-3
2.2.2 The Status Bar .........................................................................................................................................................2-4
2.3 Destination Screens .................................................................................................................... 2-6
2.3.1 Logs ........................................................................................................................................................................2-7
2.3.2 Calibrate .................................................................................................................................................................2-8
2.3.3 Service ....................................................................................................................................................................2-9
2.3.4 Quality Control (QC) ................................................................................................................................................ 2-9
2.3.5 Configuration ........................................................................................................................................................2-10
2.3.6 Maintenance .........................................................................................................................................................2-10
2.3.7 Analysis ................................................................................................................................................................ 2-10
2.3.8 Results History ...................................................................................................................................................... 2 -11
2.3.9 Shut Down ............................................................................................................................................................ 2-11
2.4 System Calibration ....................................................................................................................2-11
3 Sample Analysis . . . . . . . . . . . . . . . . . . . . . . . . . . . . . . . . . . . . . . . . . 3-1
3.1 Analyzing a Whole Blood or Plasma Sample ..................................................................................... 3-1
3.2 Analyzing a QC Sample ............................................................................................................... 3-3
3.3 Recalling Sample Results .............................................................................................................3-4
3.4 Recalling QC Results ................................................................................................................... 3-5
63438 C 2024 - 09
TOC-1
Page 8

Nova Primary Glucose iNstructioNs for use maNual
4 Maintenance . . . . . . . . . . . . . . . . . . . . . . . . . . . . . . . . . . . . . . . . . . . 4-1
4.1 Change Sensor and/or Membrane Cap ............................................................................................ 4-1
4.2 Change Calibrator Pack................................................................................................................4-2
4.3 Change Probe ............................................................................................................................ 4-3
4.4 Change Syringe..........................................................................................................................4-3
4.5 Change Pump Tubing ................................................................................................................... 4-5
5 Configuration and Setup . . . . . . . . . . . . . . . . . . . . . . . . . . . . . . . . . . . . 5-1
5.1 General ..................................................................................................................................5-1
5.2 Parameter ................................................................................................................................5-2
5.3 Operators ................................................................................................................................. 5-2
5.4 Enhanced Data Entry ................................................................................................................... 5-5
5.5 Quality Control Configuration ........................................................................................................5-6
6 Troubleshooting . . . . . . . . . . . . . . . . . . . . . . . . . . . . . . . . . . . . . . . . . 6-1
6.1 Status Overlay ...........................................................................................................................6-1
6.2 Event Log .................................................................................................................................6-2
6.3 Troubleshooting Procedures ..........................................................................................................6-3
6.3.1 Event Codes .............................................................................................................................................................6-3
7 Advanced User Functions . . . . . . . . . . . . . . . . . . . . . . . . . . . . . . . . . . . 7-1
7.1 Installing Software ..................................................................................................................... 7-1
7.2 Flowpath Service ........................................................................................................................ 7-1
7.3 System Backflush .......................................................................................................................7-2
7.4 Clear Data ................................................................................................................................ 7-3
7.5 Long Term Shutdown ................................................................................................................... 7-3
7.6 Auditable Actions ....................................................................................................................... 7-4
7.7 Resource Issues .........................................................................................................................7-5
7.8 Installing 3rd Party Software ........................................................................................................ 7-5
TOC-2
Page 9

Table of ConTenTs
A Appendix..............................................A-1
A.1 Specifications ............................................................................................................................A-1
A.2 Quality Control ..........................................................................................................................A-1
A.3 Analytical Specificity ..................................................................................................................A-2
A.4 Analytical Performance Studies ...................................................................................................... A-4
A.4.1 Method Comparison ................................................................................................................................................ A-4
A.4.2 Precision ................................................................................................................................................................ A-6
A.4.2.1 Within-Run Precision Performance ..........................................................................................................A-6
A.4.2.2 Whole Blood Run-to-Run Precision Performance .......................................................................................A-9
A.4.2.3 Quality Control and Plasma Run-to-Run Precision Performance .............................................................A-10
A.5 Calibrator Pack ........................................................................................................................ A -12
A.6 Traceability of Calibrators, Controls, and Standards .......................................................................... A-12
A.7 Reference Values ..................................................................................................................... A-12
A.8 Cybersecurity ......................................................................................................................... A-12
A.8.1 Cybersecurity Protection Overview .........................................................................................................................A-12
A.8.2 Software Updates .................................................................................................................................................A-12
A.8.3 Operating System Patches ......................................................................................................................................A-13
A.8.4 Anti-Malware Updates ...........................................................................................................................................A-13
A.8.4.1 Malware Control ................................................................................................................................... A -14
A.8.5 Creation of Software for Release ..........................................................................................................................A-14
A.8.6 Security Risks Related to Ethernet Connectivity .......................................................................................................A-14
A.8.7 Security Risks Related to USB Ports ......................................................................................................................A-14
A.8.8 Physical Protection ................................................................................................................................................A-14
A.8.9 Driver Level Protection ...........................................................................................................................................A -14
A.8.9.1 Data Import ........................................................................................................................................... A-15
A.8.9.2 Data Export ........................................................................................................................................... A-15
A.8.10 Firewall Setup and Maintenance ............................................................................................................................A -15
A.9 Emission and Immunity Testing .................................................................................................... A -15
A.10 Ordering Information ................................................................................................................ A-16
B Theory ...............................................B-1
B.1 Two-Point Calibration .................................................................................................................. B-1
B.2 One-Point Calibration ................................................................................................................. B-1
B.3 Principle of Measurement ............................................................................................................. B-1
B.3.1 Glucose ...................................................................................................................................................................B-1
B.4 Warranty ................................................................................................................................. B-2
TOC-3
Page 10

Nova Primary Glucose iNstructioNs for use maNual
TOC-4
Page 11

IntroductIon
1 IntroductIon
This manual provides all necessary instructions for the routine operation and upkeep of the
Nova Primary Glucose Analyzer. Please read this manual carefully. It has been prepared to
help you attain optimum performance from your analyzer.
WARNING: Blood samples and blood products are potential sources of infectious
agents. Handle all blood products and ow path components (waste-line,
sample probe and adaptor, sensor, membrane cap, etc.) with care. Gloves
and protective clothing are recommended. When performing maintenance
and troubleshooting procedures, also use protective eyewear.
1.1 about thIs Manual
This manual is for the Nova Primary Glucose Analyzer.
This section introduces the Primary Glucose Analyzer and covers requirements, tests
performed, procedural limitations, clinical utility, and sample handling.
Throughout this manual:
IntroductIon
1
NOTE indicates especially important information;
CAUTION indicates information that is critical to avoid instrument damage or incorrect results;
WARNING indicates a possible hazard to the operator.
1.2 safety
Personnel operating this analyzer must be procient in the operating and replacement
procedures of the analyzer. The following safety procedures should be followed.
General Safety
1. Read the safety and operating instructions before operating the analyzer.
2. Retain the safety and operating instructions for future reference.
3. Observe all warnings on the analyzer and in the operating instructions.
4. Follow all operating and use instructions.
5. Do not use the analyzer near water, for example near a sink, etc.
6. Use only with a cart or stand that is recommended by the manufacturer . The analyzer and
cart combination should be used with care. Quick stops, excessive force, and uneven
surfaces may cause the analyzer and cart combination to overturn.
7. Place the analyzer so that its location or position does not interfere with its proper ventilation.
8. Place the analyzer away from heat sources.
9. Connect the analyzer to a power supply only of the type described in the operating
instructions or marked on the analyzer.
10. Do not defeat the safety purpose of the polarized or grounding-type plug.
11. Route power cords so that they are not likely to be walked on or pinched by items placed
upon or against them, paying particular attention to cords at plugs, power sockets, and
at the point where they exit from the analyzer.
12. The analyzer should be cleaned only as recommended by the manufacturer.
13. Take care not to let objects or liquids fall into the analyzer.
14. The analyzer should be serviced by qualied service personnel.
15. Do not attempt to service the analyzer beyond that described in the operating instructions.
All other servicing should be referred to qualied service personnel.
1-1
Page 12

Nova Primary Glucose iNstructioNs for use maNual
Electrical Safety
1. To reduce the risk of electric shock, do not remove the cover.
2. There are no user-serviceable parts inside the analyzer.
3. Servicing must be done by qualied service personnel.
4. To reduce the risk of re or electric shock, do not expose the analyzer to water.
5. Use Nova Part Number 64118 external power supply to power up the analyzer.
6. Ensure that the wall outlet receptacle is properly wired and earth grounded.
7. DO NOT use a 3-to-2 wire plug adapter.
8. DO NOT use a 2-wire extension cord or a 2-wire multiple-outlet power strip.
Chemical and Biological Safety
1. Observe all precautionary information printed on the original solution containers.
2. Operate the analyzer in the appropriate environment.
3. Take all necessary precautions when using pathologic or toxic materials to prevent the
generation of aerosols.
4. Wear appropriate laboratory personal protective equipment (PPE), e.g., safety glasses,
gloves, lab coat, and breathing apparatus, when working with hazardous materials.
5. Dispose of all waste solutions according to standard hospital procedures and local
regulations.
Disposal of Used Analyzers for Customers in Europe
This symbol (
household waste.
Device/Accessories: T o ensure the product is disposed of properly, clean all analyzer surfaces
and components and hand over the product to the applicable collection point for the recycling
of electrical and electronic equipment.
) on the product label indicates that the product should not be treated as
1.3 InstallatIon and use
This section covers the installation requirements and assembly procedures for the Nova
Primary Analyzer . Before using the analyzer , operators should be familiar with the Operation
and Operating Procedures described in this manual.
Federal Communications Commission (FCC) Notice
The Nova Primary Analyzer complies with Part 15 of the FCC Rules: Operation is subject
to the following conditions:
1. The Nova Primary may not cause harmful interference.
2. The Nova Primary must accept any interference received, including interference that
may cause undesired operation. Changes and Modications not expressly approved by
Nova Biomedical Corporation can void your authority to operate this equipment under
the Federal Communications Commission rule.
NOTE: Under the warranty, a Nova factory trained service representative will install
this equipment for you.
1-2
Page 13

1.4 requIreMents
Working Area Requirements (Environmental):
Keep the working area around the system free of dirt, corrosive fumes, vibration, and
excessive temperature changes.
Electrical Requirements
Operating Voltage Range 100 – 240 VAC
Operating Frequency 47 – 63 Hz
Power Consumption Maximum: 180 W, Typical Load: Less than 100 W
Heat Load Maximum: 614BTU/hr., Typical: Less than 340 BTU/hr.
Ambient Operating Temperature 15 °C – 32 °C (59°F – 89.6°F)
Operate at Humidity 20 to 85% (noncondensing)
Operate at Altitude up to 10,000 feet (3050 meters)
IntroductIon
IntroductIon
1
Table 1-1 Nova Primary Requirements
Dimensions
Height 17.2 in (43.8 cm)
Width 11.3 in (28.8 cm)
Depth 17.8 in (45.3 cm)
Weight
26.5 lb (12.0 kg) without reagent pack
31.9 lb (14.5 kg) with full reagent pack, power supply and wireless keyboard
Lifting the Analyzer:
1. One person is needed to lift the analyzer.
CAUTION: Never use the door (open or closed) to assist you in lifting the analyzer. The
door cannot support the weight of the analyzer.
2. From the front of the analyzer, place your hands under each side of the analyzer.
3. Lift the analyzer . Remember to bend your knees and lift with your legs and not your back.
4. Place the analyzer on a clean, at surface.
1.5 cleanIng the analyzer
Nova Biomedical recommends using 70% reagent alcohol (v/v) or isopropyl alcohol (IP A) for
cleaning the various analyzer surfaces or components when required. When using alcohol,
use a lint-free cloth lightly dampened with the cleaning reagent to wipe down the analyzer
surfaces. Never spray or pour reagent directly onto or into the analyzer. Once wiped down,
dry all residual uid with a lint-free cloth.
1-3
Page 14

Nova Primary Glucose iNstructioNs for use maNual
1.6 Intended use, tests PerforMed, and clInIcal utIlIty
Intended Use
The Nova Primary Glucose Analyzer System is indicated for in vitro diagnostic use by health
care professionals in clinical laboratory settings for the quantitative determination of Glucose
in lithium heparinized venous whole blood and plasma.
Measured Parameter
Glucose
Clinical Utility
Glucose measurement is used in the diagnosis and treatment of carbohydrate metabolism
disturbances including diabetes mellitus, neonatal hypoglycemia, and idiopathic hypoglycemia,
and of pancreatic islet cell carcinoma.
1.7 the saMPle
• Lithium heparin venous whole blood and plasma samples from syringes, blood
collection tubes, and small cups.
• The minimum sample size for analysis is 25 μL.
1.7.1 handlIng requIreMents
Correct sample handling is critical to ensure that the values obtained accurately reect the
in vivo state. Ensure that all samples have been obtained and stored following consistent,
clinically accepted protocols.
Whole Blood
Venous blood samples should be collected with minimal stasis, without the exercise of the
arm. Collect blood for analysis in vacuum tubes containing lithium heparin. It is particularly
important to ensure that samples are well mixed before introduction into the analyzer. Nova
Biomedical recommends that you analyze the sample within 15 minutes for glucose to
minimize the clinical impact of glycolysis on the measured glucose result. Measurement
delays greater than 15 minutes may impact the clinical accuracy of the whole blood glucose
measurement.
Plasma
The Current CLSI Guideline is GP44-A4 Vol. 30 No. 10 (replaces document H18) indicates
that plasma should be physically separated from contact with cells as soon as possible to
a maximum time limit of 2 hours from the time of collection.
Collect plasma samples with minimal stasis, without the exercise of the arm, in vacuum tubes
containing lithium heparin. Obtain plasma by centrifuging heparinized whole blood within 1
hour of collection. Following centrifugation at 1000 RCF for 10 to 15 minutes, remove the cap
and use a syringe or bulb pipette to obtain a plasma sample. Take the sample from the area
close to the cells. Plasma samples more than 1 hour old should be centrifuged immediately
before analysis to remove any brin clots. If assays will not be completed within 8 hours,
the plasma sample should be stored refrigerated at 2 to 8˚C. If assays will not be completed
within 48 hours or if the plasma sample is to be stored beyond 48 hours, the samples are
to be stored frozen at -20˚C.
1-4
Page 15

References
1. CLSI Guideline GP44-A4. Procedures for the Handling and Processing of Blood Specimens
for Common Laboratory Tests; Approved Guideline - Fourth Edition.
2. CLSI Guideline GP41, 7th Edition. Collection of Diagnostic Venous Blood Specimens.
3. Jacobs., Kasten, DeMott, and Wolfson, ed. 1990. Laboratory T est Handbook. Lexi-Comp
Inc.
4. Tietz, N.W., ed. 1986. Textbook of Clinical Chemistry. W.B. Saunders Co.
1.7.2 accePtable antIcoagulants
• Lithium heparin is the acceptable anticoagulant for use with the analyzer.
• EDTA, citrate, oxalate, sodium heparin, and sodium uoride have not been evaluated
for use.
• Depending on the amount of heparin used in the collection syringe and whether it
is lled to capacity with blood, heparin concentrations of 20 I.U. per mL to over 100
I.U. per mL may result.
• Liquid or dry heparin when present in excess of 100 IU/mL may cause errors. Ensure
blood collection devices are lled per manufacturer's instructions.
• Our experience suggests that lyophilized lithium heparin giving a nal concentration
in blood of not more than 20 I.U. per mL is acceptable.
IntroductIon
IntroductIon
1
1.8 WarnIngs and PrecautIons
• T o ensure optimal system performance, the Use By symbol printed on the glucose
membrane, glucose sensor, syringe, sample probe, and pump tubing packaging
indicates the last date they should be installed on the analyzer.
• Operators should periodically inspect the sample owpath for signs of uid leakage.
This includes the syringe, sample probe, waste pump, and all tubing connections to
these components. If a potential leak is observed, please contact Nova Technical
Support or your authorized Nova distributor for assistance.
• Whole blood samples with Hematocrit values below 17% or above 62% have not
been evaluated for use on the system.
1-5
Page 16

Nova Primary Glucose iNstructioNs for use maNual
1-6
Page 17

2 gettIng started
The Nova Primary Glucose Analyzer is pictured below.
GettinG Started
GettinG Started
2
2
1
1. Touch-screen Display
2. Printer
3. Sampler
4. Door/Front Panel
4
3
2-1
Page 18
Nova Primary Glucose iNstructioNs for use maNual
1. Sampler Assembly
2. Sensor/Well Assembly
3. Syringe Assembly
4. Waste Pump
5. Calibrator Cartridge
4
1
2
5
3
2.1 analyzer startuP Procedure
The Nova Primary Glucose Analyzer is a semi-automated instrument. When the Nova
Primary Analyzer is powered on, it automatically loads the required operating sequences
and launches the Graphical User Interface (GUI) on the touch screen display. When the
power-up procedure is complete, the User Account Login window will be displayed.
To navigate the User Interface and to enter alphanumeric text, the operator can use a
combination of the touchscreen display , a popup keyboard overlay on the display, an external
wireless keyboard, and the wireless barcode scanner.
To use the keyboard overlay, press the keyboard icon
and use it as you would any keyboard. Use the arrows in each corner to move the keyboard
to a desired corner of the screen, or touch and drag the keyboard to the desired location.
Press any arrow key to display additional special characters. Press the red X to remove the
keyboard from the screen.
NOTE: If the active screen does not support special characters, the additional characters
are not shown.
when displayed on the screen
2-2
Page 19

2.2 the user Interface
GettinG Started
During the initial installation, an Administrator User Account and Password must be created
to log into the analyzer’s User Interface. This Administrator account is then used to create
any additional Administrator or User accounts and passwords required for other operators.
User Names must be a minimum of 3 alphanumeric characters and are not case sensitive.
User Passwords must be a minimum of 8 and a maximum of 25 alphanumeric characters
and must contain at least one capital letter and one number . Passwords are case sensitive
and should not include spaces or special characters (!,@,#,$,%,^,&,*,/,<).
The default Administrator account User Name is Flex2admin. The password is Password1.
Once logged in, you will be prompted to change the password.
2.2.1 log-In to the analyzer
Pressing the Destination Screen
button in the lower-left corner of
the touchscreen will display the
Destinations Overlay used to
navigate through the user interface.
The operator is prompted to enter their Username and Password. The operator can also
choose to power down the analyzer by selecting the plug icon in the lower left-hand corner
of the log-in window.
Once a valid Username and Password is entered, the checkmark to the right of the Username
will turn green . Press Enter on the keyboard or tap the green check mark to access the
User Interface.
GettinG Started
2
When rst logging into the analyzer, the Sample Analysis screen is displayed. On this screen,
the operator can see the current system status and access the remainder of the user interface
features. The display contains two sections, the Status Bar, and the Destination Screen.
Status Bar
Destination
Screen
2-3
Page 20

Nova Primary Glucose iNstructioNs for use maNual
2.2.2 the status bar
The Status Bar at the top of the screen shows the current Analyzer Status, Date and Time,
next Scheduled Event, Calibrator Pack status, System Events, the currently logged in
Operator (when login is required), and time to completion.
Analyzer
Status
Analyzer Status – indicates if the analyzer is Ready for analysis or Busy with a blue
background. If the analyzer is Not Ready for analysis, Not Ready is displayed with a yellow
background.
Press on any open area on the Status Bar
to display the Analyzer Status Overlay . The
overlay provides additional information
about the Calibration Status, Calibrator
Pack Status, and other system status data.
Operators are also able to Flush the waste
well and Prime the Calibrator Pack from
the overlay as required.
Date/Time
Scheduled
Events
Calibrator Pack
Status
System
Events
Operator
Time to
Completion
2-4
Date/Time – displays the current system
date and time.
Press the Date/Time on the status bar to
display the Date/Time overlay . Operators
can update the current system date and
time from the overlay.
Page 21

GettinG Started
Scheduled Events – press the Scheduled Events icon to display the next scheduled
event’s date and time. If a scheduled calibration is due in less than 5 minutes the icon will
be displayed with a yellow background and a countdown timer indicating how much time is
left before the calibration will begin.
Calibrator Pack Status - displays the estimated number of samples remaining in the
Calibrator Pack. When less than 10% of the pack is remaining, < 10% is displayed with a
yellow background. If the Calibrator Pack is Empty, Expired, or Not Installed, the status
is displayed with a red background.
GettinG Started
2
System Events – press the System
Events icon to display the Event overlay .
This will provide additional information to
help the operator identify any problems
with the system. T ouch the display to clear
the event overlay.
Operator – press the Operator icon to Logout of the User Interface or to update the loggedin user’s password.
Operator Logout/Change Password Overlay
Time to Completion – a countdown timer is displayed whenever an active process is running
on the analyzer. The timer displays the amount of time left until the process is completed.
2-5
Page 22

Nova Primary Glucose iNstructioNs for use maNual
2.3 destInatIon screens
The Destination Screens are accessed to analyze patient and Quality Control samples, review
test results, and to congure, maintain, and service the Nova Primary Analyzer. Destination
Screens are displayed below the Status Bar on the touchscreen display and change to the
selected Destination.
Pressing the Destination Screen button
in the lower-left corner of the touchscreen
will display the Destinations Overlay used
to navigate through the user interface.
Destination screens include:
• System Logs - Audit Log, Error Log,
Calibration Log, and Maintenance
Log
• Calibrate the system manually.
• Service level features
• QC conguration and testing menu
• System Conguration options
• System Maintenance procedures
• Sample Analysis testing menu
• Previous Results History
• Shut Down the analyzer if needed.
2-6
Page 23

2.3.1 logs
The Logs screen provides access to the analyzer Audit, Error , Calibration, and Maintenance
Logs. Select the button of the log to display to show any entries for the current date.
GettinG Started
GettinG Started
2
The Set Dates button on the bottom of each log screen allows the operator to enter a date
range of the log entries to display.
To Print reports, use the Select All button or select individual entries in the displayed list,
then press the Print button.
To Export log entries as a comma separated values (.csv) le, insert a compatible USB drive
in the USB port on the back of the analyzer. Use the Select All button or select individual
entries in the displayed list, then press the Export button.
The analyzer will create a le name based on the log being displayed and current date and
time. Select the green checkmark to copy the le to the USB drive, or press the red X to
cancel.
2-7
Page 24

Nova Primary Glucose iNstructioNs for use maNual
Audit Log – the Audit Log contains
the date and time and the operator
ID that an auditable action was
performed. For a list of recorded
activities, see Section 7.6 Auditable
Actions.
Event Log - The Event Log will
display the date and time an event
occurs and a brief description
of the event. Refer to Chapter 6
Troubleshooting for more information
on system events. Operators cannot
delete or modify the Event Log.
Calibration Log - The Calibration
Log displays the date and time
of each system calibration, the
calibration status, and the slope of
the glucose sensor.
Maintenance Log - The Maintenance
Log displays the date and time each
maintenance activity was performed,
the operator that performed the
maintenance, and the maintenance
activity performed.
2.3.2 calIbrate
Press the Calibrate button to initiate a 2-point calibration of the Glucose sensor/membrane
and air detectors.
2-8
Page 25

2.3.3 servIce
The Service screen contains advanced user and service only functions. Please refer to
Chapter 7 Advanced User Functions.
Install Software – used by your local
Nova Service representative to update
analyzer software when a new release
is made available.
GettinG Started
GettinG Started
Flowpath Service – provides
manual control of the analyzer’s
electromechanical components for use
in troubleshooting system errors.
Clear Data – provides a means of
permanently clearing patient and QC
data as well as selected log les from
the analyzer's database.
System Backush – used to clear any obstructions within the sensor/dilution well assembly .
Long Term Shutdown – used to shutdown the analyzer for extended periods of time.
Resource Issues – contains additional information on errors logged by the analyzer. Used
by Technical Support and Service representatives for troubleshooting purposes.
Clear Print Queue – tool to purge any queued printer les if needed.
Tools – used by your local Nova Service representative as a troubleshooting aid.
Auto Log – provides a means of downloading analyzer log les for review by Nova’s software
development team if needed.
PSoC’s – (Programmable System on Chip) Displays the status and software version of the
analyzer Controller and Sensor Well assemblies.
2
2.3.4 qualIty control (qc)
The QC screen provides the ability to
congure and analyze Quality Control
(QC) samples on the analyzer.
Analysis – select the Analysis button
then select the desired QC, Linearity, or
Prociency Level to analyze.
Results – select the Results button to
review past QC sample results.
Conguration – select the Conguration
button to add new QC, Linearity, or
Prociency lot numbers and expected
ranges.
2-9
Page 26

Nova Primary Glucose iNstructioNs for use maNual
2.3.5 confIguratIon
The Conguration screen provides a way
to customize the analyzer for the location
where it will be used.
General – select the General button to
enter an analyzer ID and location and
select from several options to customize
the analyzer as desired.
Parameter – select the Parameter
button to choose the unit of measure,
measurement resolution, and modify
the reportable analytical measurement
range.
Operators – select the Operators button to add new or edit existing operators.
Network – for future connectivity options.
Enhanced Data Entry - displayed when enabled in the General Conguration menu. Allows
custom text or list elds to be added by the end user.
Import – import an analyzer conguration le from a USB device.
Export – export the current analyzer conguration le to a USB device.
2.3.6 MaIntenance
The Maintenance screen provides a means
of replacing the consumables used on the
analyzer, ushing the system if necessary,
placing the analyzer in Standby , and taking
it out of Standby. Step-by-step instructions
for these maintenance procedures can be
found in Chapter 4.
2.3.7 analysIs
The Analysis screen is displayed when
preparing to run patient samples. The
operator selects the Sample Type if
necessary , enters a sample ID, and presses
Analyze to begin the sample analysis.
Results are posted as soon as they are
available.
2-10
Page 27

2.3.8 results hIstory
The Results History screen displays all samples for the current date. The date range can
be modied to show additional samples. Selected samples can be printed or exported to a
USB device.
2.3.9 shut doWn
GettinG Started
GettinG Started
2
Press Shut Down to shut down the analyzer. An "Are You Sure?" popup will be displayed,
select Yes to shut down the analyzer. Select No to cancel the shut down process.
2.4 systeM calIbratIon
The Nova Primary performs a 2-point calibration of the glucose sensor and membrane
and the system’s air detectors every two hours to maintain optimal sensor performance. A
1-point calibration is run during each whole blood sample analysis to conrm the current
sensor/membrane calibration has not changed. Due to differences in the sample matrix, a
1-point calibration is run on Plasma samples every 30 minutes or after every 10 samples,
whichever occurs rst.
2-Point calibrations also occur more frequently after a sensor or membrane is changed. For
the rst two hours, calibrations are run every 30 minutes. For the next two hours, calibrations
occur every hour. After four hours, the analyzer returns to its normal 2-hour calibration
frequency.
2-11
Page 28

Nova Primary Glucose iNstructioNs for use maNual
2-12
Page 29

3 saMPle analysIs
The Nova Primary Glucose Analyzer System was designed for in vitro diagnostic use by
health care professionals in clinical laboratory settings for the quantitative determination of
Glucose in lithium heparinized venous whole blood and plasma samples.
Sample analySiS
3.1 analyzIng a Whole blood or PlasMa saMPle
To analyze a whole blood or plasma sample:
1. Verify the analyzer is READY to analyze the sample.
2. If necessary, press the Destinations button then select Analysis to display the Sample
Analysis screen.
3. Select Sample Type, Whole Blood or Plasma, if necessary. The default Sample Type is
displayed automatically.
4. Enter a Sample ID of up to 40 alpha-numeric characters, if desired.
5. Press Analyze to extend the sample probe.
Sample analySiS
3
6. Position the sample container so the sample probe is immersed in the sample, then
press Aspirate.
7. The analyzer aspirates the sample into the owpath, the sample probe retracts, and the
analysis starts. If desired, press Cancel to terminate the analysis.
3-1
Page 30

Nova Primary Glucose iNstructioNs for use maNual
8. The analyzer displays the sample results on the screen. If enabled, the on-board thermal
printer prints the results. If not enabled, press the Print button to print the results, if desired.
9. Results within the expected normal range are displayed with a green checkmark
Results below the expected range are displayed with a red down-arrow
the expected range are displayed with a red up-arrow
.
, results above
.
NOTE: Sample IDs, and any additional sample information elds, are blank when the
Analysis screen is rst accessed from the Destinations button. After the initial
sample analysis, these elds are left lled in to minimize reentry of sample
information when repeating an analysis on the same sample multiple times.
The elds are editable if any changes are needed.
NOTE: If desired, press the Rerun button to
display a free text entry popup to describe
the reason the sample was rerun. Press
the green checkmark to save the entry
and close the popup window, or press
the red X to discard any changes and
close the window.
3-2
Page 31

3.2 analyzIng a qc saMPle
To analyze a Quality Control sample:
1. Verify that the analyzer is READY for a QC sample analysis.
2. If necessary, press the Destinations button then, select QC to display the QC screen.
3. Select Analysis, then select the button for the desired QC, Linearity, or Prociency sample.
4. Press Analyze to extend the sample probe.
5. Position the QC vial so the sample probe is immersed in the sample, then press Aspirate.
6. The analyzer aspirates the sample into the owpath, the sample probe retracts, and the
analysis starts. If desired, press Cancel to terminate the analysis.
7. The analyzer displays the sample results on the screen. If enabled, the on-board thermal
printer prints the results.
Sample analySiS
Sample analySiS
3
8. Results within the expected range are displayed with a green checkmark . Results
below the expected range are displayed with a red down-arrow
expected range are displayed with a red up-arrow .
, results above the
3-3
Page 32

Nova Primary Glucose iNstructioNs for use maNual
3.3 recallIng saMPle results
Previously analyzed sample results are retained indenitely in the analyzers database.
These samples can be recalled for review, printed, and exported to a USB device as a .csv
le for use in an ofine spreadsheet. Samples can also be rerun by rst selecting a sample,
then pressing the Rerun button. The sample analysis screen is displayed with the sample
information from the selected sample entered.
NOTE: Use the left/right and up/down scrollbars to view additional sample details.
To recall sample results:
1. If necessary, press the Destinations button, then select Results History to display the
Results History screen. Samples analyzed on the current date are shown automatically .
2. To expand the date range of the displayed samples, press the Set Dates button and
enter the starting and ending date range for samples to be displayed. Press the green
checkmark to display the results or press the red X to cancel.
3. An individual result’s Sample ID can be edited by rst selecting the sample ID to edit,
then pressing Edit. The Sample ID is displayed and can be updated by the user. Press
the green checkmark to save any changes or press the red X to cancel without saving.
4. To print a sample result, rst select the sample to print then press the Print button. Select
multiple samples or select all samples, then press Print to print the selected sample
results. If the Print button is inactive (greyed out) no results have been selected.
3-4
Page 33

Sample analySiS
5. To export samples to a USB drive,
a. Insert a USB drive in the USB connector on the back of the analyzer.
b. Select the sample data to export. Use the Set Dates button to recall data from a
specic time frame then select the data to export.
c. Press the Export button to display the
destination drive and timestamped le
name that will be created. If the Export
button is inactive (greyed out) no results
have been selected.
d. If le encryption has been enabled in the
Conguration Menu, a blank Password
eld is displayed. Enter a case sensitive
password that will be required to open
the le.
e. Press the green checkmark to export the
le or press the red X to cancel. If the destination is blank and the checkbox remains
grey, a USB drive was not found.
Sample analySiS
3
3.4 recallIng qc results
Previously analyzed QC results are retained indenitely in the analyzers database. These
samples can be recalled for review, printed, and exported to a USB device as a .csv le for
use in an ofine spreadsheet.
To recall QC results:
1. If necessary, press the Destinations button, then select QC to display the QC Analysis
screen.
2. Select the Results button. All QC samples analyzed on the current date are shown
automatically.
3. To narrow the list of displayed results,
select the Level dropdown list and select
the desired level to display . Deselect the
Current lots only checkbox to include
inactive lots of QC.
3-5
Page 34

Nova Primary Glucose iNstructioNs for use maNual
4. To expand the date range of the displayed samples, press the Set Dates button and
enter the starting and ending date range for samples to be displayed. Press the green
checkmark to display the results or press the red X to cancel.
5. To print a sample result, rst select the sample or samples to print then press the Print
button. Select multiple samples or select all samples, then press Print to print the selected
sample results.
6. To export samples to a USB drive:
a. Insert a USB drive in the USB connector on the back of the analyzer.
b. Select the sample data to export. Use the Set Dates button to recall data from a
specic time frame then select the data to export.
c. Press the Export button to display the destination drive and timestamped le name
that will be created. If the Export button is inactive (greyed out) no results have been
selected.
d. Press the green checkmark to export the results or press the red X to cancel.
3-6
Page 35

4 MaIntenance
The following section provides detailed information and directions for maintaining the Nova
Primary Analyzer . T o access the maintenance functions from the Destinations overlay , press
the Maintenance button to display the available system maintenance functions.
From the Maintenance Menu, the operator can change the Glucose membrane cap and
sensor, Calibrator Pack, Sample Probe, Syringe Assembly, and Pump Tubing. The system
can also be placed in a Standby state to conserve uids when not in use and taken out of
Standby when ready for use.
Maintenance
Maintenance
4.1 change sensor and/or MeMbrane caP
WARNING: Exposure to Blood Borne Pathogens. Follow established Good Laboratory
Practices (GLP). Gloves and protective clothing are recommended.
To replace the Glucose sensor or Membrane Cap
1. From the Destinations overlay, select Maintenance, then select Change Sensor and/
or Membrane Cap.
2. Press Start to display the Lot Number overlay.
3. If desired, enter the Lot Number of the sensor or membrane. If changing the glucose
sensor, rst select the Sensor Lot Number checkbox, then enter the Lot Number . Press
the green checkmark
owpath.
to continue. The pump will run briey to remove uid from the
4
4-1
Page 36

Nova Primary Glucose iNstructioNs for use maNual
4. Unlock the Glucose sensor from the chamber.
5. Remove the sensor from the chamber.
6. Remove the old membrane cap and discard it.
7. Wipe the tip of the glucose sensor with a
lintless tissue dampened with deionized water
to remove any residue from the old membrane
cap, then dry the sensor with a lintless tissue.
8. Press the Install Sensor button
in the upper right hand corner of the screen.
9. Install a new Glucose membrane cap onto
the sensor.
10. Install the sensor into the sensor chamber.
4
5
6
7
9 10
11. Press Continue to prime the owpath and recalibrate the sensor.
4.2 change calIbrator Pack
WARNING: Exposure to Blood Borne Pathogens. Follow established Good Laboratory
Practices (GLP). Gloves and protective clothing are recommended.
To replace the Calibration Pack
1. From the Destinations overlay , select Maintenance then select Change Calibrator Pack
and Adapter.
2. Press Start.
The Sample Probe will reposition itself so
the adapter can be accessed.
3. Remove the old Calibrator Pack.
4. Remove the old adapter and install the new
adapter.
5. Press Install Calibrator Pack
6. Mix the new calibrator pack by gentle inversion for 10 seconds.
7. Install the new Calibrator Pack in the analyzers uid bay.
3 4
.
4-2
6 7
8. Press Continue to prime the Calibrator pack and calibrate the analyzer.
Page 37

Maintenance
4.3 change Probe
WARNING: Exposure to Blood Borne Pathogens. Follow established Good Laboratory
Practices (GLP). Gloves and protective clothing are recommended.
To change the Sample Probe
1. From the Destinations overlay, select
Maintenance then select Change Sample
Probe.
2. Press Start to display the Lot Number
overlay.
3. If desired, enter the Lot Number of the
Sample Probe being installed. Press the
green checkmark
to continue.
4 5
6 7
The Sample Probe will be repositioned for
replacement.
4. Remove the adapter from the sampler
assembly.
5. Disconnect the sample line connecting the
sample probe to the syringe assembly.
6. Disconnect the Air Detector cable from the
chassis.
7. Pinch the probe tabs to release the probe
from the sampler assembly , then gently pull
the probe to the left to remove it.
8. Press Install Probe
9. Slide the new Probe onto the sampler
assembly, ensuring the locking tabs click
into place securely.
10. Install the adaptor by sliding it over the probe
and onto the sampler assembly.
11. Connect the air detector cable to the chassis.
12. Attach the sample line to the syringe
assembly. Conrm all connections are
secure, then press Continue
.
.
9 10
11
12
Maintenance
4
4.4 change syrInge
WARNING: Exposure to Blood Borne Pathogens. Follow established Good Laboratory
Practices (GLP). Gloves and protective clothing are recommended.
To change the Syringe
1. From the Destinations overlay, select Maintenance then select Change Syringe.
2. Press Start to display the Lot Number overlay.
3. If desired, enter the Lot Number of the Syringe being installed. Press the green checkmark
to continue.
4-3
Page 38

Nova Primary Glucose iNstructioNs for use maNual
The syringe will retract.
4. After the syringe fully retracts, loosen the plunger thumbscrew.
5. Push the plunger up into the syringe.
6. Unscrew the syringe by turning the barrel counterclockwise.
4 5
6
7. Press Install Syringe .
8. Attach the syringe barrel by turning the barrel clockwise.
9. Extend the syringe plunger
10. Tighten the thumbscrew.
8
9
10
11. Press Continue .
4-4
Page 39

Maintenance
4.5 change PuMP tubIng
WARNING: Exposure to Blood Borne Pathogens. Follow established Good Laboratory
Practices (GLP). Gloves and protective clothing are recommended.
To change the Pump Tubing
1. From the Destinations overlay, select Maintenance then select Change Pump Tubing.
2. Press Start to display the Lot Number overlay.
3. If desired, enter the Lot Number of the Pump Tubing being installed. Press the green
checkmark
to continue.
4. Disconnect the waste tubing from the well
assembly.
5. Disconnect the waste tubing line connected
to the analyzer chassis.
6. Press the pump pressure plate release
button and lower the pressure plate.
7. Slide the old pump tubing off the pump
rollers.
8. Press Install Tubing
9. Slide the new pump tubing onto the pump
roller cage and close the pump pressure
plate. Ensure the plate clicks into place
securely.
10. Connect the waste line to the chassis.
11. Connect the waste tubing to the well
assembly.
.
9 10
4 5
76
Maintenance
4
12. Press Continue .
11
4-5
Page 40

Nova Primary Glucose iNstructioNs for use maNual
4-6
Page 41

5 confIguratIon and setuP
The Nova Primary conguration and setup options are used to customize the analyzer’s
User Interface to meet each location’s operating requirements. This section explains the
available options and their function.
5.1 general
General conguration settings include the following options:
• Language – select the desired display
language from the drop-down list of
available languages.
• Analyzer ID – enter an analyzer ID of up
to 25 alpha-numeric characters.
• Location – enter a location for the analyzer
of up to 50 alpha-numeric characters.
• Use Network Time – when selected, the
analyzer will synchronize with the network
time server when connected to the local
network. When not selected, the analyzer
will use its internal clock.
• Default Sample Type – select the default sample type used on the analyzer. The sample type
is shown on the analysis screen and can be changed there if needed.
• 24 Hour/12 Hour Time Format – select the time format to use. Choose 24 hour (0 to 24) or 12
hour (0 to 12 AM/PM).
• Date Separator – select the date separator to use. Choose backslash (/), dash (–) or decimal
(.) from the drop-down list.
• Date Format – select the date format to use. Choose MM DD YYYY, DD MM YYYY, or YYYY
MM DD from the drop-down list.
• Enable Standby – when enabled, the analyzer will go into Standby mode at the Enter time and
exit Standby mode at the Exit time. Standby mode conserves calibrator uids by pausing the
normal calibration cycle and running a brief maintenance sequence occasionally to prevent any
blockages in the sample owpath.
• Enable Auto Logoff – if Users are congured in the system, enabling Auto Logoff will log off the
currently logged in user after the entered number of minutes.
• Enable QC Lockout – when enabled, the analyzer will not report a sample result if a Quality
Control result is outside the expected range. QC lockout can be cleared by running a QC sample
that recovers a value within the expected range.
• Enable Auto Print – when selected, sample results are automatically printed on the local printer .
• Require Login – when individual Users are congured in the system, enabling Require Login
prevents use of the analyzer unless a valid User has logged into the analyzer.
• Encrypt Exported Sample Results – when enabled, sample results uploaded to an external
drive are encrypted. If not selected, results are sent as an unencrypted .csv le.
• Display Sample ID – when enabled, a sample ID eld is displayed
• Enable Enhanced Data Entry – when enabled, operators have access to a congurable,
enhanced data entry menu.
• Numeric Format – Select either a decimal point or a comma numeric separator.
Configuration and Setup
Configuration
and Setup
5
NOTE: Use this feature when a regular Standby schedule is expected. The analyzer
can be put into and brought out of Standby mode at any time if desired.
5-1
Page 42

Nova Primary Glucose iNstructioNs for use maNual
5.2 ParaMeter
Parameter settings include the following options:
• Lower Limit – enter the lower limit of
expected values. Results that fall below
this limit are agged with a red down
arrow.
• Upper Limit – enter the upper limit of
expected values. Results that fall above
this limit are agged with a red up arrow.
• Units of Measure – select the desired
unit of measure from the available
options.
• Decimal Places – select no decimal
(X.) or 1 decimal place (X.x) for results
less than 100 mg/dL.
Press Save to save any changes.
5.3 oPerators
The Nova Primary allows an operator with Administrator privileges to create and edit Operator
Accounts for other system operators. Each Operator Account must have a unique User Name
and an associated Password. Once an Operator Account is created, it can be activated
or deactivated, but it cannot be deleted or removed from the system database. Operator
Accounts are assigned a specic privilege level (Basic, Intermediate, or Administrator) based
on the desired level of system access. A system administrator can set a password expiration
date for individual Operator Accounts and can also set a limit for the number of failed log-in
attempts for each operator.
To add a new operator or change the conguration of an existing user:
1. Select Operators, then press Add to add a new operator or highlight an existing operator
and press Change to update the conguration of an existing operator.
5-2
Page 43

2. Enter an Operator Name in the box
provided. User Names must be 3-25
alphanumeric characters and are
not case-sensitive. User names can
include dashes (-) and underscores (_)
but no spaces or special characters
(!,@,#,$,%,^,&,*,/,<).
3. Enter a Password for the User Account.
Passwords must be 8-25 alphanumeric
characters and are case-sensitive. The
password must include at least 1 capital
letter, 1 lowercase letter, and 1 number.
Passwords can include dashes (-) and
underscores (_) but no spaces and no
special characters (!,@,#,$,%,^,&,*,/,<).
Configuration and Setup
NOTE: The alert icon will appear and ash
next to the User Name and Password
entry boxes when entering in these
items. The alert icon will be visible until
the User Name and Password criteria
have been met. When adding a new
User Account, the system will not let
the operator enter any information into
the next section until the criteria for
the previous section have been met.
4. Select the Status for the User Account (Active or Inactive). Only active User Accounts can
login to the system. If a User Account has been made inactive or has been deactivated
as a result of too many failed login attempts, the account must be made active again by
a system administrator.
Configuration
and Setup
5
5-3
Page 44
Nova Primary Glucose iNstructioNs for use maNual
5. Select the Privilege Level for the User Account (Basic, Intermediate, or Administrator).
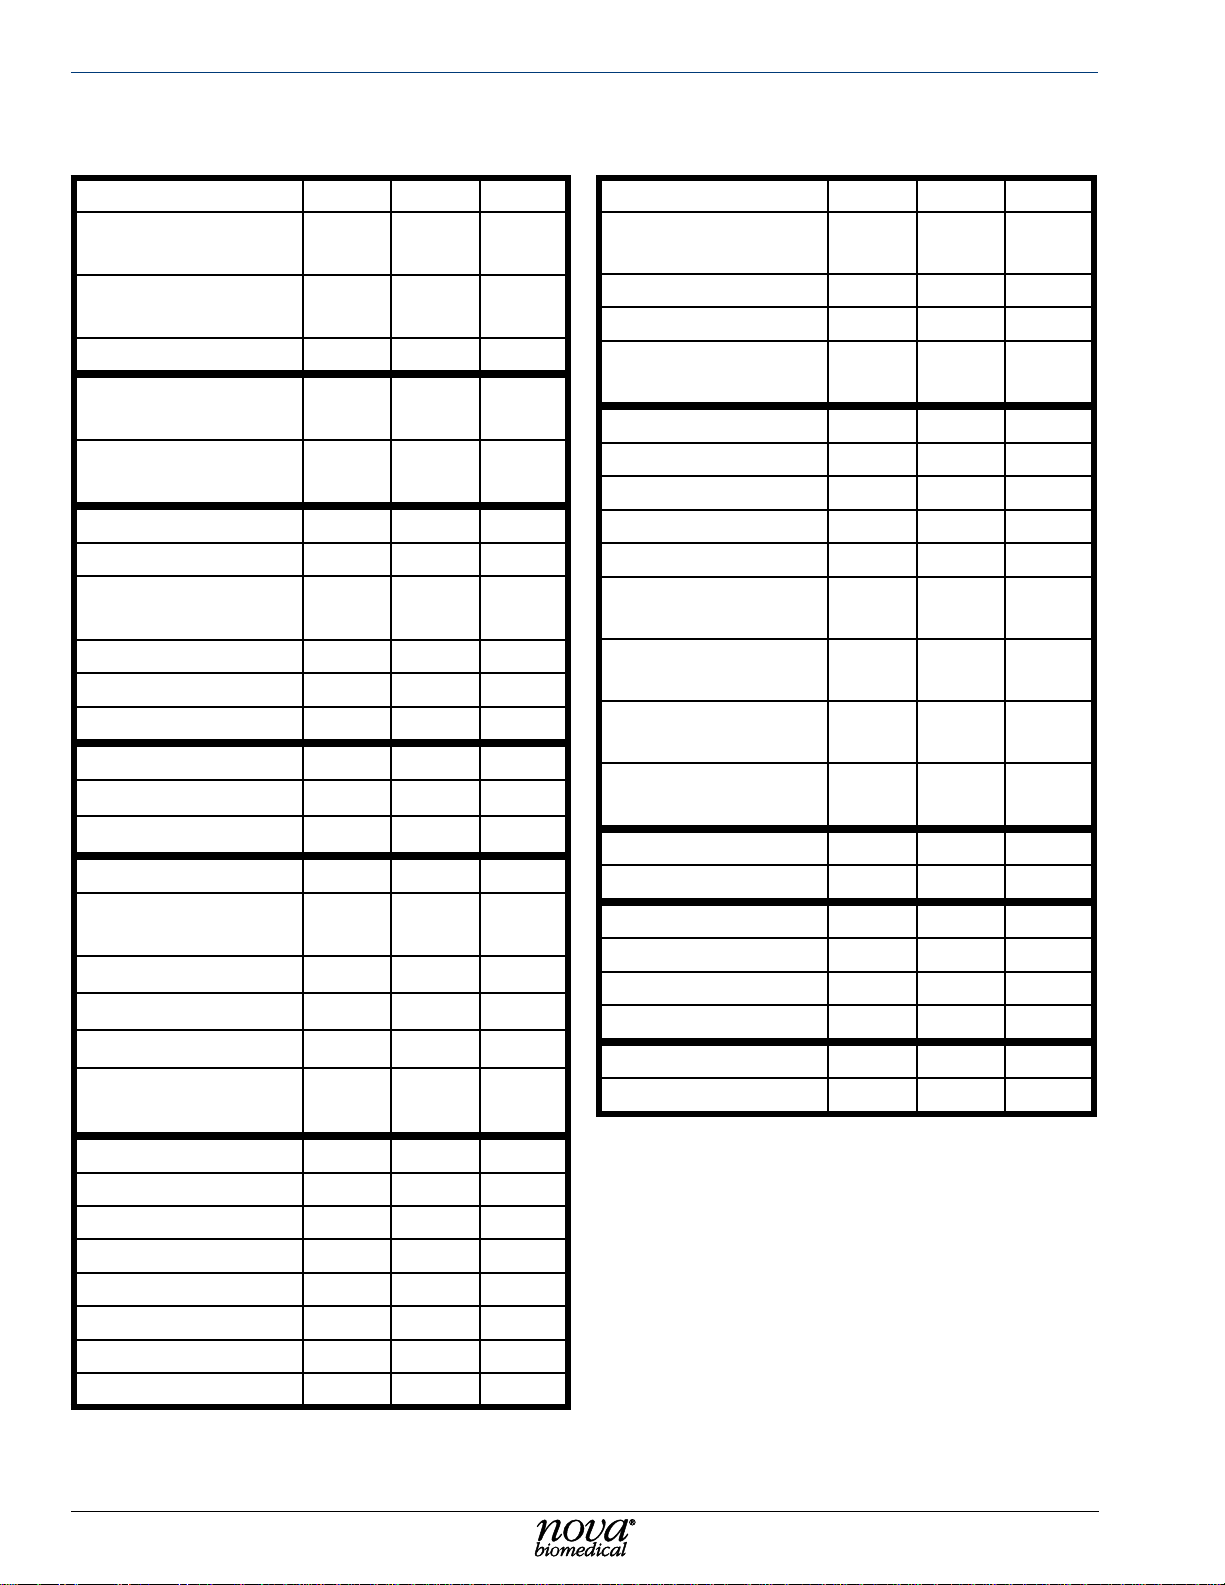
Refer to the chart below for detailed user functionality.
Analysis Menu
Run Sample
Analysis
Cancel Sample
Analysis
Enter Sample ID X X X
Historical Results
Menu
Export/Print
Historical Results
QC Menu
Run External QC X X X
Export/Print QC
Results
View QC Results X X X
Cancel QC Analysis X X X
Congure QC X X X
User Menu
Change Password X X X
Log Out Current User
Maintenance Menu
Change Sensor/
Membrane Cap
Change Syringe X X X
Change Probe X X X
Change Pump Tubing
Calibrate Air
Detectors
Basic Interm. Admin
X X X
X X X
Basic Interm. Admin
X X X
Basic Interm. Admin
X X X
Basic Interm. Admin
X X X
Basic Interm. Admin
X X X
X X X
X X X
Conguration
Modify General
Settings
Create/Edit Users X
Modify Parameters X
Modify Network
Settings
Logs Menu
View Audit Logs X X X
Export Audit Logs X X X
View Error Logs X X X
Export Error Logs X X X
View Calibration
Logs
Export Calibration
Logs
View Maintenance
Logs
Export Maintenance
Logs
Shutdown Button
Shutdown Analyzer X X X
Status Window
Run Calibration X X X
Run Flush Wells X X X
Run Prime X X X
Time/Date Window
Change Date/Time X X
Basic Interm. Admin
X
X
Basic Interm. Admin
X X X
X X X
X X X
X X X
Basic Interm. Admin
Basic Interm. Admin
Basic Interm. Admin
Service Menu
Install Software X
Flowpath Service X
System Backush X
Archive Data X
Long Term Shutdown
Resource Issues X
Clear Print Queue
5-4
Basic Interm. Admin
X X X
X X X
Page 45

6. Set the number of days after which the password will expire. For example, if this
number is set to 30 days, the password will expire every 30 days. The end user will
be required to create a new password every 30 days upon logging in to the system.
The same password cannot be used twice. If this number is set to 0, the password
will have no expiration for this User Account.
7. Set the failed Login Attempts number . For example, if this number is set to 3, the User
Account will be made inactive after 3 failed login attempts by the end user. A system
administrator would then need to make the User Account active again. If this number
is set to 0, the User Account will have no limit to the number of failed login attempts.
8. When all User Account information is correctly entered, select the green checkmark
to add the User Account to the system database. Selecting the red X will cancel the
process.
5.4 enhanced data entry
When enabled in General settings, Enhanced Data Entry allows the end user to customize
default data elds as required or optional and to create up to 6 additional free text entry elds
or drop-down lists. The Priority Field can be either a text or a list eld and will be displayed
as the rst eld on the sample analysis screen.
Configuration and Setup
Configuration
and Setup
To congure the Priority and Other Fields:
1. Select the eld type to add, either Add Text or Add List.
2. When adding a Text eld, a popup window is displayed to add a eld Name of up to
20 alphanumeric characters including space, dash -, and underscore _. If Required is
selected, a sample analysis cannot begin until the eld has a valid entry.
3. If the name contains illegal characters or is too long, a red exclamation icon
at the end of the eld. Hover over the icon to see a description of the problem. Select
to save the eld name or click X to cancel and discard any changes.
is displayed
5
5-5
Page 46

Nova Primary Glucose iNstructioNs for use maNual
4. When adding a List eld, a popup window is displayed to add a eld Name of up to 20
alphanumeric characters including space, dash -, and underscore _. If Required is
selected, a sample analysis cannot begin until the eld has a valid entry. If the name
contains illegal characters or is too long, a red exclamation icon is displayed. Hover over
the icon to see a description of the problem.
5. Next, add entries to select in the dropdown
list. Entries names can be up to 20
alphanumeric characters including space,
dash -, and underscore _. One entry can
be selected as a default entry by checking
the Default checkbox.
6. Press Add to add the current Entry to the list.
7. When all Entries have been completed select
to save the list eld or click X to cancel
and discard any changes.
8. Remember to press Save
the Enhanced Data Entry screen to save
any changes that were made.
5.5 qualIty control confIguratIon
before exiting
The Nova Primary has 2 levels of external Quality Control material for monitoring. Results
that exceed the entered ranges are agged for easy identication. There are additional
selections for Linearity and Prociency testing materials.
To congure a lot of QC material:
1. From the Destinations Overlay, select the QC button to display the QC screen.
2. Select Conguration then select the desired QC Level 1 or Level 2.
3. Enter the Lot Number of the QC material.
4. Enter the Expiration Date. Select the Year and Month from the dropdown list.
5. Enter the Lower Limit and Upper Limit for the selected level of Quality Control, Linearity,
or Prociency material. Test results lower than the Lower Limit are agged with a red
down arrow; results above the upper limit are agged with a red up arrow. Results within
the entered range are displayed with a green checkmark.
6. Press Save to save the QC lot entries.
5-6
Page 47

6 troubleshootIng
The Nova Primary continuously monitors the status of all electromechanical components,
consumables, and software processes to ensure the analyzer is operating correctly. In the
event an error condition is identied, the analyzer will display a system event icon
Header Bar to notify the user of the problem. This section explains the meaning of each
event code and lists troubleshooting steps that you can take to resolve the problem.
6.1 status overlay
The Status Overlay provides a quick summary of the overall status of the analyzer. T o display
the Status Overlay, touch an open section of the blue header bar at the top of the screen.
To clear the Status Overlay, touch the screen a second time.
The Status Overlay contains the:
Calibration Status of the glucose sensor.
Calibrated (Cal) or Uncalibrated (UnCal), the
glucose sensor slope, and the programmed
analytical measurement range (Lower and
Upper Limits).
TroubleshooTing
in the
Calibrator Pack Status shows the lot number
of the installed calibrator pack, the expiration
date, the date the pack was installed, and the
estimated number of samples remaining in the
pack.
Flow Time displays the measured owtime from
the last calibration sequence and the expected
owtime range programmed into the analyzer.
Primed indicates if the analyzer is primed with the required reagent. The analyzer must be
primed to be available for sampling. If the module is primed, the prime status will read T rue.
If the module is not primed, the status will read False.
Connected indicates if the analyzer is connected to the internal onboard computer. The
analyzer must be connected to be available for sampling. If the analyzer is connected, the
connected status will read True. If the analyzer is not connected, the status will read False.
Well shows the status (Blocked or Clear) of the sample dilution well. This well must be clear
for the analyzer to be available for sampling. If the well status indicates that is blocked,
additional troubleshooting is required.
Three functions are available on the bottom of the overlay for use as a rst step to correct
specic problems. If these do not correct the issue, additional troubleshooting procedures
are detailed later in this section.
TroubleshooTing
6
Calibrate will initiate a 2-point calibration for the glucose sensor and air detectors to address
an UnCal status.
Flush Well will initiate an automated process that will attempt to clear any blockages that
may exist in the dilution well.
Prime will initiate a system priming sequence to address ow issues that may exist when
the Primed status is False.
6-1
Page 48

Nova Primary Glucose iNstructioNs for use maNual
6.2 event log
All system events that have occurred are recorded in the analyzer’s Event Log. To access
the event log:
1. Press the Destinations button then select the Logs button.
2. Press the Event button to display the Events screen.
3. Any system events that occurred on the current date are displayed with the Date/Time the event
occurred and a Description of the event. Refer to Section 6.3 Troubleshooting Procedures.
4. To expand the date range of the displayed events, press the Set Dates button and enter
the starting and ending date range for events to be displayed. Press the green checkmark
to display the events or press the red X to cancel.
To Print reports:
1. Use the Select All button or select individual entries in the displayed list.
2. Press the Print button.
To Export log entries as a comma separated values (.csv) le:
1. Insert a compatible USB drive in the USB port on the back of the analyzer.
2. Use the Select All button or select individual entries in the displayed list.
3. Press the Export button.
The analyzer will create a le name based on the log being displayed and current date
and time. Select the green checkmark to copy the le to the USB drive, or press the red
X to cancel.
6-2
Page 49

6.3 troubleshootIng Procedures
These troubleshooting procedures use the most logical and direct steps to resolve an event
code. The solutions are set up in a block format that lists steps to perform to restore correct
operation. These steps are also organized to prevent unnecessary consumable replacement.
If the recommendations given here do not resolve the problem, contact Nova Technical
Services for troubleshooting assistance.
FOR TECHNICAL ASSISTANCE CALL:
USA: 1-800-545-NOVA
CANADA: 1-800-263-5999
OTHER COUNTRIES: Contact the local Nova Biomedical Sales Ofce or authorized Nova
Biomedical Distributor.
6.3.1 event codes
Slope Error
The sensor slope is calculated during each calibration sequence. A Slope Error is generated
when the calculated slope is lower than the slope low limit or above the slope high limit.
TroubleshooTing
Recommended Solutions:
1. Recalibrate the analyzer.
2. Install a new Glucose Membrane Cap.
3. Install a new Glucose Sensor.
4. Contact Nova Biomedical Technical Support.
Slope Drift Error
A slope drift check is performed during each calibration sequence. A Slope Drift Error is
generated when the difference between the current sensor slope and the previous slope
exceeds software limits.
Recommended Solutions:
1. Recalibrate the analyzer.
2. Install a new Glucose Membrane Cap.
3. Install a new Glucose Sensor.
4. Contact Nova Biomedical Technical Support.
Background Error
A background check is performed during each calibration sequence. A Background Error is
generated when the difference between sensor readings of the Diluent and the Standard A
calibrator exceed software limits.
TroubleshooTing
6
Recommended Solutions:
1. Recalibrate the analyzer.
2. Install a new Glucose Membrane Cap.
3. Install a new Glucose Sensor.
4. Contact Nova Biomedical Technical Support.
6-3
Page 50

Nova Primary Glucose iNstructioNs for use maNual
Sensor Error
A Standard A to Diluent ratio check is performed in the calibration sequence before the slope
is calculated. A Sensor Error is generated when the ratio of the Standard A sensor reading
to the Diluent sensor reading exceeds software limits.
Recommended Solutions:
1. Recalibrate the analyzer.
2. Install a new Glucose Membrane Cap.
3. Install a new Glucose Sensor.
4. Contact Nova Biomedical Technical Support.
Flow Slow
Fluid ow through the dilution well is checked during the calibration and analysis sequence.
Fluid in the dilution well is pulled through the assembly by the peristaltic pump. If there is still
uid in front of the well air detector when the pump stops, a Flow Slow error is displayed,
and the sequence is terminated.
Recommended Solutions:
1. Repeat the analysis.
2. Backush the dilution well. Refer to Section 7.3, System Backush.
3. Replace the Pump Tubing. Refer to Section 4.5, Change Pump Tubing.
4. Contact Nova Biomedical Technical Support.
Flow Fast
During an analysis sequence, if the measured ow time is faster than expected, a Flow Fast
error is displayed, and the analysis sequence is terminated.
Recommended Solutions:
1. If the calibrator pack indicates <10% uid remaining, replace the calibrator pack.
2. Backush the dilution well. Refer to Section 7.3, System Backush.
3. Contact Nova Biomedical Technical Support.
Temperature Drift
At the start of an analysis sequence if the current temperature of the dilution well assembly is
greater than 4˚C from the temperature at the time the last calibration was run, a Temperature
Drift error is displayed, and the sequence is terminated.
Recommended Solutions:
1. Recalibrate the analyzer.
6-4
2. If the Temperature Drift error reoccurs, contact Nova Biomedical Technical Support.
Waste Well Not Available
The Dilution Well is monitored by the system to determine a ready/not ready status. If the well
is not ready , a W aste W ell Not A vailable error is displayed, and the sequence is terminated.
Recommended Solutions:
1. Calibrate the analyzer.
2. Contact Nova Biomedical Technical Support.
Page 51

TroubleshooTing
No Sample
During an analysis sequence when sample is aspirated, if no sample is detected or the volume
aspirated exceeds software limits, a No Sample error is displayed, and the sequence terminates.
Recommended Solutions:
1. Repeat the analysis.
2. If the problem persists, ush the sample probe with DI water using the ushing kit.
3. Conrm the sample probe air detector is connected to the analyzer.
4. Replace the sample probe.
5. Contact Nova Biomedical Technical Support.
System Probe Not Available
At the start of an analysis sequence, the state of the system (Sample) probe air detector is
veried. If the air detector is not available, a System Probe Not Available error is displayed,
and the sequence terminates.
Recommended Solutions:
1. Conrm the sample probe air detector is connected to the analyzer.
2. Recalibrate the analyzer.
3. Replace the sample probe.
4. Contact Nova Biomedical Technical Support.
Sensor Not Primed
At the start of an analysis sequence, if the sensor (system) is not primed, a System Not
Primed error is displayed, and the sequence terminates.
Recommended Solutions:
1. From the Calibration Status window, Prime the system.
2. Recalibrate the analyzer.
3. Contact Nova Biomedical Technical Support.
Pack Not Primed
At the start of an analysis sequence, the state of the calibrator pack is conrmed. If the pack
is not primed, a Pack Not Primed error is displayed, and the sequence terminates.
Recommended Solutions:
1. From the Calibration Status window, Prime the system.
2. Recalibrate the analyzer.
3. Contact Nova Biomedical Technical Support.
TroubleshooTing
6
Well Air Detector Not Calibrated
At the start of an analysis sequence, the state of the well air detector is conrmed. If the
air detector is not calibrated, a Well Air Detector Not Calibrated error is displayed, and the
sequence terminates.
Recommended Solutions:
1. Recalibrate the analyzer.
2. Contact Nova Biomedical Technical Support.
6-5
Page 52

Nova Primary Glucose iNstructioNs for use maNual
Probe Air Detector Calibration Failed
If the sample probe air detector calibration fails, a Probe Air Detector Calibration Failed error
is displayed and the analysis terminates.
Recommended Solutions:
1. Recalibrate the analyzer.
2. Verify the sample probe air detector is connected to the analyzer.
3. Replace the sample probe assembly.
4. Contact Nova Biomedical Technical Support.
Probe Error
If the Hct sensor calibration fails, a Probe Error is displayed, and the analysis terminates.
Recommended Solutions:
1. Recalibrate the analyzer.
2. Verify the sample probe air detector is connected to the analyzer.
3. Replace the sample probe assembly.
4. Contact Nova Biomedical Technical Support.
6-6
Page 53

7 advanced user functIons
Advanced user functions are available in the Service menu for use as needed. These include
software updates, advanced troubleshooting resources and an extended shutdown procedure
if the analyzer will be unused for an extended period of time.
7.1 InstallIng softWare
This function is intended for use by authorized Nova service representatives to update the
analyzer’s analytical software.
7.2 floWPath servIce
The Flowpath Service screen is primarily for use by trained Nova service representatives to
test and evaluate the analyzer’s electromechanical components.
Select the white box next to a component to display additional information about that
component and, where applicable, allow the component to be exercised to test functionality .
Press the toolbox icon to return to the service page.
AdvAnced User FUnctions
User FUnction
7
AdvAnced
7-1
Page 54

Nova Primary Glucose iNstructioNs for use maNual
7.3 systeM backflush
System Backush positions the sample probe to allow easy access to
the dilution well. The backush tool (syringe with tubing and threaded
adapter) can be connected to the dilution well waste outlet port to
backush the dilution well assembly in the event it becomes blocked.
To backush the dilution well:
• From the Service page press the System Backush button to
reposition the sample probe away from the dilution well.
• Remove the glucose sensor and insert the sensor blank.
• Disconnect the waste line from the dilution well assembly.
• Attach the backush syringe tubing to the dilution well assembly.
• Fill the syringe with air, deionized water, or a dilute (10%)
bleach solution.
• Hold gauze or similar absorbent material over the dilution well
to catch any overow.
• Press the syringe to backush the well assembly and clear
any obstruction that may be present.
• Use a disposable pipette to remove any remaining uid from
the dilution well.
• Remove the syringe tubing from the dilution well assembly and reattach the waste line.
• Remove the sensor blank and reinstall the glucose sensor.
NOTE: In most cases, it is advisable to replace the sensor membrane cap. Refer to
Section 4.1 Change Sensor and/or Membrane Cap.
CAUTION: When ushing with a bleach solution, ush a second time with deionized water.
• When done, press Continue to prime the system.
7-2
Page 55

AdvAnced User FUnctions
7.4 clear data
Data can be cleared from the analyzer’s database if desired. Please note that the Clear Data
function DOES NOT save a copy of the data before permanently deleting it from the analyzer .
Export any Patient data, QC data, and logs you wish to save before clearing the data.
NOTE: The analyzer will shut down and restart to complete the archiving process.
To Clear data:
• From the Service Page, select Clear Data to display Clear Data page.
• All data categories are selected by default when entering the page. Deselect (uncheck)
any data category(s) you wish to retain in the database.
• Press Clear to clear the selected data.
7.5 long terM shutdoWn
Long Term Shutdown ushes the analyzer’s internal tubing and analytical owpath to prepare
it for long term shut down. This will clear the pathway of any uids that may dry up and block
it if the analyzer is shut down for an extended period of time. Y ou will need the following tools:
• Nova Primary Flushing Adapter (PN 66021).
• A small beaker lled with deionized or distilled water.
• An empty beaker to collect the waste uids.
Follow the steps below to ush the analyzer prior to long term shutdown.
1. Remove the calibrator cartridge and insert the ushing adapter in its place.
2. Place the ends of the three (3) unmarked reagent lines into the beaker of water.
3. Place the Waste line (labeled with a W) into the empty beaker.
4. From the Service page, press the Long Term Shutdown button, then press Start.
The analyzer will ush the internal tubing and sample owpath with the water in the
beaker.
5. When the pump and syringe stop, the owpath has been ushed but still contains
water. Remove the three reagent lines from the beaker of water leaving the waste
line in its beaker.
Clear
User FUnction
AdvAnced
7
6. Press Continue to ush the owpath of any remaining uids.
7. When the pump and syringe stop, open the pump pressure plate, then remove the
waste line from the pump roller cage.
8. From the Destinations page press Shut Down to turn off the analyzer.
7-3
Page 56

Nova Primary Glucose iNstructioNs for use maNual
7.6 audItable actIons
The following are the actions recorded in the Primary's Audit Log:
General Activity
System Started System Calibrations System Prime Sequences
Flush Well Sequences Sample Analysis Sequence QC Sample Analysis Sequence
Export System Conguration Import System Conguration Operator Logging In
Operator Logging Out
Sample Results History
Change Sample ID Change Priority Field Change Other Field
Export Sample Results Printing Sample Results
QC Results History
Export QC Result Print QC Result
Analyzer Conguration
Change Analyzer ID Change Location Change Language
Change Use Network Time Change Time Format Change Date Format
Change Date Separator Change Numeric Format Change Auto Logoff
Change Require Login Change Auto Print Change Require Login
Change Display Sample ID Change Encrypt Exported Results Change Enhanced Data Entry
Change Default Sample Type Change System Date Change System Time
Parameter Conguration
Maximum Login Attempts Exceeded
System Shut Down
Change Upper Limit Change Lower Limit Change Units of Measure
Change Decimal Places
Operator Conguration
Change Operator's Password Change Operator's Status Change Operator's Privilege
Change Operator's Password
Expiration Days
Enhanced Data Entry
Change Display Sample Draw Time
Change Priority Field Required Delete Priority Field Change Priority Field List Item
Delete Priority Field List Item Changed Other Field Name Change Other Field Required
Delete Other Field
Maintenance Actions
Change Sample Probe Change Calibrator Pack Change Sensor and Membrane
Change Syringe Change Pump Tubing Enter Standby Mode
Exit Standby Mode
Change Operator's Login Attempts
Change Sample Draw Time Required
Change Priority Field Name
7-4
Page 57

Service Actions
Enter Service Screen Install New Software Perform Flowpath Service
Perform System Backush Perform Long Term Shutdown Clear Print Queue
Exit Service Screen
7.7 resource Issues
Resource Issues may provide additional information to Technical Support and Service
representatives on the status of the analyzer’s electronic and electromechanical components.
Press the toolbox icon to return to the service page.
7.8 InstallIng 3rd Party softWare
Please contact Nova Technical Support for information on installing 3rd party software on
the analyzer. The analyzer software contains numerous built in cybersecurity precautions
and additional software may not be required.
AdvAnced User FUnctions
User FUnction
7
AdvAnced
7-5
Page 58

Nova Primary Glucose iNstructioNs for use maNual
7-6
Page 59
a aPPendIx
Appendix A includes analyzer specications, performance data, solutions and reagents,
consumable lists, reference information, and warranty for the Nova Primary Glucose Analyzer.
a.1 sPecIfIcatIons
Glucose Operating Range 20 – 900 mg/dL 1.1 – 50 mmol/L
Glucose Measurement Resolution 1 mg/dL
Sample Type Lithium heparin whole blood and plasma
Sample Volume 25 μL
Limit of Blank 1.0 mg/dL
Limit of Detection 4.0 mg/dL
Appendix
Limit of Quantication 4.0 mg/dL
a.2 qualIty control
Healthcare facilities should follow federal, state, and local guidelines for testing quality control
materials. At a minimum, Nova Biomedical recommends that each laboratory performs the
following minimum QC procedures (External Ampule QC) on each analyzer:
During every 24 hours of testing, analyze one normal and one abnormal level of control.
After performing system maintenance, follow good laboratory practice guidelines for performing
quality control analysis.
CAUTION: Sensor performance may be affected by the use of controls or linearity
material other than those offered for sale by Nova Biomedical. Contact Nova
Biomedical for additional information.
Appendix
A
A-1
Page 60

Nova Primary Glucose iNstructioNs for use maNual
a.3 analytIcal sPecIfIcIty
Interference testing was performed according to the Interference T esting in Clinical Chemistry;
Approved Guideline - Third Edition: CLSI EP07-A3. T esting was done using lithium heparinized
venous whole blood and plasma collected from consenting donors.
No signicant interference (<10%) was observed up to the following concentration levels:
T able A-1
Interfering Substances Causing No Clinically Signicant Effect on Test Results
(Whole Blood)
Acetaminophen 20 mg/dL Hydroxyurea 0.8 mg/dL
Acetoacetate 2 mmol/L Ibuprofen 2.4 mmol/L
Acetylsalicylic Acid 3.62 mmol/L Intralipid 1.0% solution
Ammonium Chloride 107 μmol/L Lactate 6.6 mmol/L
Ascorbic Acid 50 mg/dL Low Hematocrit 17%
Bilirubin 342 μmol/L Maltose 13 mmol/L
Benzalkonium Chloride 10 mg /L Mannose 1 mmol/L
B-hydroxybutyrate 2 mmol/L Pyruvate 309 μmol/L
Dobutamine 2 mg/dL Salycylic Acid 4.34 mmol/L
Dopamine Hydrochloride 5.87 μmol/L Sodium Citrate 12 mmol/L
Ethanol 86.8 mmol/L Sodium Oxalate 500 mg/dL
Fluoride 105 μmol/L Thiocyanate 6.8 mmol/L
D-Galactose 1.0 mmol/L Xylose 25 mg/dL
Glucosamine 30 μmol/L N-Acetylcysteine 10.2 mmol/L
Glycolic Acid 1 mmol/L Glutathione 3 mmol/L
Hemoglobin 2 g/L Creatinine 15 mg/dL
Heparin 100 IU/mL Cholesterol 500 mg/dL
High Hematocrit 62% Methyl-DOPA 2 mg/dL
A-2
Page 61

Appendix
T able A-2
Interfering Substances Causing No Clinically Signicant Effect on Test Results
(Plasma)
Acetaminophen 20 mg/dL Hydroxyurea 0.8 mg/dL
Acetoacetate 2 mmol/L Ibuprofen 2.4 mmol/L
Acetylsalicylic Acid 3.62 mmol/L Intralipid 1.0% solution
Ammonium Chloride 107 μmol/L Lactate 6.6 mmol/L
Ascorbic Acid 50 mg/dL Maltose 13 mmol/L
Bilirubin 342 μmol/L Mannose 1 mmol/L
Benzalkonium Chloride 10 mg /L Pyruvate 309 μmol/L
B-hydroxybutyrate 2 mmol/L Salycylic Acid 4.34 mmol/L
Dobutamine 2 mg/dL Sodium Citrate 12 mmol/L
Dopamine Hydrochloride 5.87 μmol/L Sodium Oxalate 500 mg/dL
Ethanol 86.8 mmol/L Thiocyanate 6.8 mmol/L
Fluoride 105 μmol/L Xylose 25 mg/dL
D-Galactose 1.0 mmol/L N-Acetylcysteine 10.2 mmol/L
Glucosamine 30 μmol/L Glutathione 3 mmol/L
Glycolic Acid 1 mmol/L Creatinine 15 mg/dL
Hemoglobin 2 g/L Cholesterol 500 mg/dL
Heparin 100 IU/mL Methyl-DOPA 2 mg/dL
Appendix
A
A-3
Page 62

Nova Primary Glucose iNstructioNs for use maNual
a.4 analytIcal PerforMance studIes
a.4.1 Method coMParIson
Nova Biomedical conducted a method comparison study in a clinical laboratory setting
comparing three Nova Primary Glucose Analyzers to two YSI 2300 Analyzers. The protocol
was based upon methods described in Method Comparison and Bias Estimation Using Patient
Samples; Approved Guideline - Third Edition, CLSI EP09-A3. Discarded lithium heparinized
venous whole blood and plasma samples from consenting donors were evaluated. Samples
were spiked or diluted to cover the analytical measurement range. Each sample was tested
in a singlet on the 3 test analyzers and the 2 reference analyzers. The singlet result was
compared to the average of the test results from the reference analyzers.
T able A-3
Whole Blood Method Comparison Nova Primary vs YSI 2300
Nova
Primary
Analyzer
GP01 174 15 34-871 0.9927 0.3878 0.9992
GP02 174 15 34-871 1.0017 -1.5404 0.9990
GP03 174 15 34-871 1.0083 -3.7425 0.9989
Nova
Primary
Analyzer
GP01 170 15 30-835 1.0088 1.1364 0.9992
GP02 170 15 30-835 0.9935 1.0018 0.9991
N
Plasma Method Comparison Nova Primary vs YSI 2300
N
# altered
samples
# altered
samples
range Slope Intercept r
T able A-4
range Slope Intercept r
A-4
GP03 170 15 30-835 1.0002 -0.2388 0.9991
Page 63

100
YSI Average Results (mg/dL)
80
60
40
20
0
0 100 200 300 400 500 600 700 800 900
-20
-40
Nova Primary Differences (mg/dL)
-60
Appendix
Glucose Blood Bias Plot
Nova Primary Differences vs Average YSI Results
-80
-100
100
80
60
40
20
0
0 100 200 300 400 500 600 700 800 900
-20
-40
Nova Primary Differences (mg/dL)
-60
Med ical Decis ion Level s
YSI Average Results (mg/dL)
Glucose Plasma Bias Plot
Nova Primary Differences vs Average YSI Results
Appendix
A
-80
-100
Med ical Decis ion Levels
A-5
Page 64

Nova Primary Glucose iNstructioNs for use maNual
a.4.2 PrecIsIon
a.4.2.1 WIthIn-run PrecIsIon PerforMance
Within-run precision was assessed for aqueous (QC/Linearity), whole blood, and plasma
specimens by measuring 20 replicates of targeted sample concentrations on three analyzers.
The average, SD, and CV% for each analyzer for each sample type and level were calculated.
The pooled average, SD, and CV% from all 3 analyzers for each QC level were calculated.
The venous whole blood and plasma samples were manipulated to increase the glucose
levels.
Nova Primary
QC and Linearity Within Run Precision
Quality Control Level 1
n = 20 Analyzer GP01 Analyzer GP02 Analyzer GP03 Pooled
Mean (mg/dL) 76 73 75 74
SD 1.6 1.9 1.2 1.9
CV% 2.1 2.5 1.6 2.6
Quality Control Level 2
n = 20 Analyzer GP01 Analyzer GP02 Analyzer GP03 Pooled
Mean (mg/dL) 180 181 178 180
SD 1.7 1.4 1.8 2.1
CV% 0.9 0.8 1.0 1.2
Linearity Level 1
n = 20 Analyzer GP01 Analyzer GP02 Analyzer GP03 Pooled
Mean (mg/dL) 524 528 521 525
SD 2.7 3.6 2.3 4.2
CV% 0.5 0.7 0.4 0.8
A-6
Linearity Level 2
n = 20 Analyzer GP01 Analyzer GP02 Analyzer GP03 Pooled
Mean (mg/dL) 869 862 868 866
SD 13.3 10.6 11.1 11.9
CV% 1.5 1.2 1.3 1.4
Page 65

Appendix
Nova Primary
Whole Blood Within Run Precision
Whole Blood Level 1
n = 20 Analyzer GP01 Analyzer GP02 Analyzer GP03 Pooled
Mean (mg/dL) 35 34 34 34
SD 1.0 1.4 1.0 1.4
CV% 2.9 4.0 2.9 4.0
Whole Blood Level 2
n = 20 Analyzer GP01 Analyzer GP02 Analyzer GP03 Pooled
Mean (mg/dL) 75 74 78 76
SD 1.6 1.2 2.1 2.5
CV% 2.1 1.7 2.7 3.3
Whole Blood Level 3
n = 20 Analyzer GP01 Analyzer GP02 Analyzer GP03 Pooled
Mean (mg/dL) 181 181 178 180
SD 2.7 2.8 2.9 3.1
CV% 1.5 1.5 1.6 1.7
Whole Blood Level 4
n = 20 Analyzer GP01 Analyzer GP02 Analyzer GP03 Pooled
Mean (mg/dL) 309 308 308 308
SD 3.7 2.5 3.2 3.2
CV% 1.2 0.8 1.0 1.0
Whole Blood Level 5
n = 20 Analyzer GP01 Analyzer GP02 Analyzer GP03 Pooled
Mean (mg/dL) 507 510 512 510
SD 8.3 8.4 7.3 8.2
CV% 1.6 1.6 1.4 1.6
Whole Blood Level 6
n = 20 Analyzer GP01 Analyzer GP02 Analyzer GP03 Pooled
Mean (mg/dL) 677 680 675 677
SD 8.5 7.6 12.4 9.7
Appendix
A
CV% 1.3 1.1 1.8 1.4
Whole Blood Level 7
n = 20 Analyzer GP01 Analyzer GP02 Analyzer GP03 Pooled
Mean (mg/dL) 761 763 762 762
SD 13.0 11.3 14.2 12.7
CV% 1.7 1.5 1.9 1.7
A-7
Page 66

Nova Primary Glucose iNstructioNs for use maNual
Nova Primary
Plasma Within Run Precision
Plasma Level 1
n = 20 Analyzer GP01 Analyzer GP02 Analyzer GP03 Pooled
Mean (mg/dL) 37 36 36 36
SD 0.5 0.6 0.7 0.7
CV% 1.4 1.7 1.9 1.9
Plasma Level 2
n = 20 Analyzer GP01 Analyzer GP02 Analyzer GP03 Pooled
Mean (mg/dL) 121 120 122 121
SD 1.7 1.0 1.5 1.5
CV% 1.4 0.8 1.2 1.2
Plasma Level 3
n = 20 Analyzer GP01 Analyzer GP02 Analyzer GP03 Pooled
Mean (mg/dL) 186 187 183 185
SD 1.7 1.3 1.2 2.5
CV% 0.9 0.7 0.7 1.4
Plasma Level 4
n = 20 Analyzer GP01 Analyzer GP02 Analyzer GP03 Pooled
Mean (mg/dL) 398 404 400 401
SD 2.0 3.1 1.8 3.4
CV% 0.5 0.8 0.4 0.8
Plasma Level 5
n = 20 Analyzer GP01 Analyzer GP02 Analyzer GP03 Pooled
Mean (mg/dL) 558 556 558 557
SD 4.1 3.7 4.5 4.2
CV% 0.7 0.7 0.8 0.7
Plasma Level 6
n = 20 Analyzer GP01 Analyzer GP02 Analyzer GP03 Pooled
Mean (mg/dL) 696 698 692 695
SD 6.0 5.4 6.4 6.4
A-8
CV% 0.9 0.8 0.9 0.9
Plasma Level 7
n = 20 Analyzer GP01 Analyzer GP02 Analyzer GP03 Pooled
Mean (mg/dL) 846 845 841 844
SD 3.7 8.4 6.6 6.8
CV% 0.4 1.0 0.8 0.8
Page 67

a.4.2.2 Whole blood run-to-run PrecIsIon PerforMance
To simulate total run-to-run precision for whole blood, samples of targeted concentrations
were run in triplicate in ten separate runs during a single day . Each analyzer was calibrated
between triplicate runs. The average SD and CV% for each analyzer for each level were
calculated. The venous whole blood samples were manipulated to increase the glucose levels.
Nova Primary
Whole Blood Run-to-Run Precision
Whole Blood Level 1
n = 30 Analyzer GP01 Analyzer GP02 Analyzer GP03 Pooled
Mean (mg/dL) 37 38 37 37
SD 1.2 1.5 1.7 1.5
CV% 3.3 3.9 4.6 4.1
Whole Blood Level 2
n = 30 Analyzer GP01 Analyzer GP02 Analyzer GP03 Pooled
Mean (mg/dL) 80 81 82 81
Appendix
SD 1.6 2.1 1.9 2.1
CV% 2.0 2.6 2.3 2.5
Whole Blood Level 3
n = 30 Analyzer GP01 Analyzer GP02 Analyzer GP03 Pooled
Mean (mg/dL) 190 192 196 193
SD 3.1 3.6 2.8 4.1
CV% 1.6 1.9 1.4 2.1
Whole Blood Level 4
n = 30 Analyzer GP01 Analyzer GP02 Analyzer GP03 Pooled
Mean (mg/dL) 370 373 375 373
SD 7.2 6.6 6.3 6.9
CV% 1.9 1.8 1.7 1.9
Whole Blood Level 5
n = 30 Analyzer GP01 Analyzer GP02 Analyzer GP03 Pooled
Mean (mg/dL) 547 551 553 550
SD 14.2 6.1 12.9 11.8
CV% 2.6 1.1 2.3 2.1
Appendix
A
Whole Blood Level 6
n = 30 Analyzer GP01 Analyzer GP02 Analyzer GP03 Pooled
Mean (mg/dL) 656 658 660 658
SD 13.3 10.3 11.0 11.6
CV% 2.0 1.6 1.7 1.8
A-9
Page 68

Nova Primary Glucose iNstructioNs for use maNual
a.4.2.3 qualIty control and PlasMa run-to-run PrecIsIon PerforMance
Estimates of the run-to-run precision were determined for each level of Quality Control
and plasma. Statistical analysis included individual and pooled analyzer imprecision from
3 analyzers. The plasma samples were altered to decrease or increase the glucose levels.
Nova Primary
Quality Control Run-to-Run Precision
Quality Control Level 1
n = 80 Analyzer GP01 Analyzer GP02 Analyzer GP03 Pooled
Mean (mg/dL) 74 74 74 74
SD 2.3 1.9 1.7 2.0
CV% 3.1 2.6 2.2 2.7
Quality Control Level 2
n = 80 Analyzer GP01 Analyzer GP02 Analyzer GP03 Pooled
Mean (mg/dL) 198 195 202 198
SD 3.9 1.9 2.5 3.9
CV% 1.9 1.0 1.2 2.0
A-10
Page 69

Appendix
Nova Primary
Plasma Run-to-Run Precision
Plasma Level 1
n = 80 Analyzer GP01 Analyzer GP02 Analyzer GP03 Pooled
Mean (mg/dL) 39 40 41 40
SD 1.7 1.3 0.9 1.4
CV% 4.2 3.2 2.3 3.5
Plasma Level 2
n = 80 Analyzer GP01 Analyzer GP02 Analyzer GP03 Pooled
Mean (mg/dL) 99 93 95 96
SD 2.9 2.9 2.6 3.5
CV% 2.9 3.1 2.8 3.7
Plasma Level 3
n = 80 Analyzer GP01 Analyzer GP02 Analyzer GP03 Pooled
Mean (mg/dL) 201 198 199 199
SD 5.6 6.1 4.7 5.6
CV% 2.8 3.1 2.4 2.8
Plasma Level 4
n = 80 Analyzer GP01 Analyzer GP02 Analyzer GP03 Pooled
Mean (mg/dL) 405 408 413 409
SD 12.2 13.4 13.4 13.4
CV% 3.0 3.3 3.2 3.3
Plasma Level 5
n = 80 Analyzer GP01 Analyzer GP02 Analyzer GP03 Pooled
Mean (mg/dL) 560 576 579 572
SD 11.7 19.2 14.0 17.4
CV% 2.1 3.3 2.4 3.1
Appendix
A
Plasma Level 6
n = 80 Analyzer GP01 Analyzer GP02 Analyzer GP03 Pooled
Mean (mg/dL) 740 781 789 770
SD 15.1 26.2 22.4 30.5
CV% 2.0 3.4 2.8 4.0
A-11
Page 70
Nova Primary Glucose iNstructioNs for use maNual
a.5 calIbrator Pack
In addition to the calibrators and solutions, the Calibrator Pack has a self-contained waste
bag for safe disposal of waste.
WARNING: Exposure to Blood Borne Pathogens.
a.6 traceabIlIty of calIbrators, controls, and standards
The Glucose Calibrators, Controls, and Standards are traceable to National Institute of
Standards and Technology (NIST) Standard SRM-917.
a.7 reference values
Each laboratory should establish and maintain its reference values. The values shown below
should be used only as a guide.
Analyte
Glucose
(Serum, Fasting, Adult)1
Reference
1. Burtis, Carl A. and Bruns, David E., ed. 2015. Tietz Fundamentals of Clinical Chemistry,
Saunders St. Louis, MO.
Default (U.S.) Units of
Measure
74 - 100 mg/dL
a.8 cybersecurIty
a.8.1 cybersecurIty ProtectIon overvIeW
The Nova Primary system includes extensive safeguards to protect the system from outside
cybersecurity attacks. In the following sections, you will nd a summary of the safeguards.
Professional laboratory and Information T echnology users that require extensive information
and details may contact Nova Biomedical Technical Support at 1-800-545-6682 in North
America. Outside of the USA, contact your authorized Nova Primary distributor.
a.8.2 softWare uPdates
A-12
Healthcare facilities will be notied by Nova Biomedical Technical Support or a local dealer
when a software update becomes available. Customer communication is through a Customer
Information Bulletin that is forwarded to primary contacts within each healthcare facility.
Nova factory-trained Field Support Specialists perform Nova Primary software updates. The
software update image is not made public or left at healthcare facility sites. All valid software
updates are password protected and contain an embedded SHA-512 cryptographic digest.
The Nova Primary Analyzer will not execute a software update if it cannot verify the SHA512 digest from the update image. Installation of a Nova software update can be scheduled
through Nova Technical Support or your local distributor.
Page 71

a.8.3 oPeratIng systeM Patches
The Nova Primary Analyzer main operating system is an embedded version of Windows®
that has been “trimmed” to contain only applications and drivers that are pertinent to the
functionality of the analyzer. Each new Nova Primary software version contains the latest
Microsoft Operating System patches available at the time of software release by Nova
Biomedical. In addition, healthcare facilities should apply Windows Operating System updates
on a schedule consistent with their IT department security policy.
For network-connected analyzers, you may download operating system patches directly from
®
Microsoft
after contacting Nova Biomedical Technical Support or your local distributor. Outgoing ports
from the rewall become temporarily enabled for the duration of the download. The SH-2
signature from Microsoft protects the download image. If the signature cannot be veried,
Windows will not install the patch.
Operating system patches may also be performed off-line via a USB drive. This requires
a time-limited password that changes daily and is available only after contacting Nova
Biomedical Technical Support or your local distributor. The USB device must be explicitly
identied and enabled by a factory trained service representative. The SH-2 signature from
Microsoft protects the patch image. If the signature cannot be veried, Windows will not
install the patch.
. This requires a time-limited password that changes daily and is available only
Appendix
Installation of Windows Operating System patches can be scheduled through Nova T echnical
Support or your local distributor.
a.8.4 antI-MalWare uPdates
The Nova Primary Analyzer runs the Windows Defender anti-malware platform. Microsoft
publishes regular updates of virus and malware denitions to identify new threats as they
are discovered in the eld. Healthcare facilities should apply Windows Defender updates on
a schedule consistent with their IT department security policy. Windows Defender updates
are initiated from the Network Conguration screen and can be performed by IT department
users with administrative level accounts.
For network-connected analyzers, operating malware denition updates may be downloaded
directly from Microsoft. This requires a time-limited password that changes daily and is
available only after contacting Nova Biomedical Technical Support or your local distributor.
Outgoing ports from the rewall are temporarily enabled for the duration of the download.
The SH-2 signature from Microsoft protects the download image. If the signature cannot be
veried, Windows will not install the update.
Malware denition updates may also be performed ofine via a USB drive. This requires
a time-limited password that changes daily and is available only after contacting Nova
Biomedical Technical Support or your local distributor. The USB device must be explicitly
identied and enabled by a factory-trained service representative. The SH-2 signature from
Microsoft protects the updated image. If the signature cannot be veried, Windows will not
install the update.
Appendix
A
Installation of a Windows defender update can be scheduled through Nova T echnical Support
or your local distributor.
A-13
Page 72

Nova Primary Glucose iNstructioNs for use maNual
a.8.4.1 MalWare control
The Nova Primary software update image is created following a strict factory procedure that
denes the process steps required to ensure that software is free of viruses, malware, and
other non-intended consequences. And the system continually runs Windows Defender in
the background to scan for viruses and malware.
a.8.5 creatIon of softWare for release
Nova Primary software is built on a virtual computer-controlled and physically accessed only
by Nova Biomedical Information Technology resources. The virtual computer is scanned
for viruses daily. The introduction of malware is not possible through physical access. The
virtual computer is exclusively utilized to create Nova Primary software.
a.8.6 securIty rIsks related to ethernet connectIvIty
The Nova Primary Analyzer has one RJ-45 Ethernet port. As shipped, the port is physically
secured behind an access plate. If access to the port is required for data export or software
updates, the access plate must be removed.
Ethernet communication is further protected by the Windows Firewall. In normal operation,
all incoming and outgoing ports except for DHCP and NTP are blocked.
Outgoing ports required for operating system security updates may be explicitly enabled by
a logged-in user.
Incoming ports for diagnostic purposes are accessible only to factory trained service
representatives and requires a time-limited password that changes daily and is available
only after contacting Nova Biomedical Technical Support or your local distributor.
a.8.7 securIty rIsks related to usb Ports
There are many potential risks associated with USB devices. The simplest threats are when
a common USB storage device is infected with les containing a virus or malware. More
sophisticated threats include normal-looking storage devices that conceal other types of
USB devices.
A hidden HID device may attempt to compromise the system by injecting operating system
commands to install a virus or malware. A hidden network device may attempt to redirect
communication to or from malicious sites.
a.8.8 PhysIcal ProtectIon
The Nova Primary Analyzer contains one external USB port. As shipped, the port is physically
secured behind an access plate. If access to the port is required for data export or software
updates, remove the access plate.
a.8.9 drIver level ProtectIon
As further protection, any devices plugged into the USB port are immediately disabled at the
device driver level. Before a device can be used, it must be explicitly identied and enabled
through the Nova Primary GUI by a logged-in user. Only USB Storage devices may be
enabled in this way. Other device types such as HID or Ethernet devices remain disabled
at the driver level.
A-14
Page 73

a.8.9.1 data IMPort
Data import operations on USB Storage devices are limited to software and security updates
as detailed above. "Autorun" is disabled at the operating system level. Transferring malware
or a virus from the storage device would require operating system access. This is protected
by a time-limited password that changes daily and is available only after contacting Nova
Biomedical Technical Support or your local distributor.
a.8.9.2 data exPort
Data and log les can be exported to a USB storage device. First, the device must be explicitly
identied and enabled by a logged-in user. Exported les can be encrypted.
a.8.10 fIreWall setuP and MaIntenance
As shipped to end user facilities, the Nova Primary rewall is congured with all inbound
ports disabled, except for port 68 for DHCP. Default outbound ports are limited to DHCP,
NTP, and those required for Microsoft Defender updates. Outbound ports for external LIS
systems can be congured via the Network Conguration display in the Nova Primary GUI.
The Nova Primary does not support other alterations to the rewall conguration.
The Nova Primary automatically scans the rewall state every 30 minutes. Detected differences
from the congured state are logged in the database, and the conguration is re-asserted.
Appendix
a.9 eMIssIon and IMMunIty testIng
EMC testing on the Nova Primary Glucose System was conducted to IEC 60601-1-2-2014
standard. The Nova Primary Glucose Analyzer System met the Basic Safety and Essential
Performance. Essential Performance was dened as follows: the Nova Primary Glucose
Analyzer may reset when power is interrupted and/or the display may jitter on multiple
ESD events during testing, allowing for an immediate return to an operational state. This
minimizes the risk associated with delayed test results. The analyzer must not experience
a non-recoverable ESD event that prevents the analyzer from returning to an immediate
operational state.
Testing met the following standards:
Test Result Customer Specied Criterion
IEC 61000-4-2 Pass Basic Safety and Essential Performance
IEC 61000-4-3 Pass Basic Safety and Essential Performance
IEC 61000-4-4 Pass Basic Safety and Essential Performance
IEC 61000-4-5 Pass Basic Safety and Essential Performance
IEC 61000-4-6 Pass Basic Safety and Essential Performance
IEC 61000-4-8 Pass Basic Safety and Essential Performance
IEC 61000-4-11 Pass Basic Safety and Essential Performance
Appendix
A
Testing demonstrated that when used in clinical laboratory settings, the Nova Primary
Glucose System met Basic Safety and Essential Performance. The system has not been
evaluated for use in Point-of-Care settings, or healthcare settings in close proximity to
patient-connected devices.
A-15
Page 74

Nova Primary Glucose iNstructioNs for use maNual
a.10 orderIng InforMatIon
Description ..............................................................................................Reference Number
Calibrator Cartridges
Nova Primary Calibrator Cartridge 450 Sample ..............................................................63162
Nova Primary Calibrator Cartridge 150 Sample ..............................................................63167
Sensors and Membranes
Nova Primary Glucose Sensor ........................................................................................63231
Nova Primary Glucose Membrane ..................................................................................63230
QC and Linearity
Nova Primary Ampuled Control .......................................................................................63164
Nova Primary Linearity Level 1 .......................................................................................63165
Nova Primary Linearity Level 2 .......................................................................................63166
Other
Assembly Pump Tubing Harness Nova Primary .............................................................63568
Replacement Probe/S-Line Nova Primary ......................................................................63679
Replacement Syringe, 500 µL Nova Primary ..................................................................63772
Replacement Power Supply Nova Primary .....................................................................64118
Thermal (Printer) Paper ..................................................................................................49200
Backush Kit ...................................................................................................................63933
Barcode Scanner ............................................................................................................63524
Flushing Adapter .............................................................................................................66021
A-16
Page 75

b theory
This section explains the instrument theory of the Nova Primary Glucose Analyzer.
b.1 tWo-PoInt calIbratIon
The analyzer uses a 2-point calibration to set the glucose sensor slope and verify sensor
performance. The Calibrator Pack contains the standards that are used for this purpose.
Calibration can be initiated manually by pressing CALIBRA TE from the Destinations overlay
and will also occur automatically at regular intervals.
b.2 one-PoInt calIbratIon
The determination of the activity for an unknown sample is dependent on both the electrode
potential generated by the unknown and that generated by the standard. Sensor drift is the
slow variation in sensor response over time. To monitor and minimize the effect of sensor
drift on the analytical results, the analyzer uses a 1-point calibration during sample analysis.
A drift error will occur when the 1-point calibration is beyond the validated acceptable drift
limits and the result will not be reported.
Theory
b.3 PrIncIPle of MeasureMent
Measuring Technology: Measures blood glucose utilizing a discrete glucose sensor and
membrane/cap assembly, that are user-replaceable, and based on the enzymatic reaction
between glucose and oxygen molecules in the presence of the glucose oxidase enzyme.
b.3.1 glucose
Glucose measurement is based on the level of H2O2 produced during the enzymatic reaction
between glucose and oxygen molecules in the presence of the glucose oxidase enzyme.
The current generated by the ow of electrons at the surface of the platinum electrode is
proportional to the glucose concentration of the sample.
Glucose + O2 ————————> Gluconic acid + H2O
At a constant potential of 0.70 volts, electroactive H2O2 is oxidized at the surface of the
platinum anode as follows:
H2O2 ––––––––> 2H+ + O2 + 2e
The current generated by the ow of electrons at the surface of the platinum sensor is
proportional to the glucose concentration of the sample.
Glucose Oxidase
2
-
Theory
B-1
B
Page 76

Nova Primary Glucose iNstructioNs for use maNual
b.4 Warranty
Subject to the exclusions and upon the conditions specied below, Nova Biomedical or the authorized
Nova Biomedical distributor warrants that he will correct free of all charges including labor, either by
repair, or at his election, by replacement, any part of an instrument which fails within one (1) year
after delivery to the customer because of defective material or workmanship. This warranty does
not include normal wear from use and excludes: (A) Service or parts required for repair to damage
caused by accident, neglect, misuse, altering the Nova equipment, unfavorable environmental
conditions, electric current uctuations, work performed by any party other than an authorized Nova
representative or any force of nature; (B) Work which, in the sole and exclusive opinion of Nova, is
impractical to perform because of location, alterations in the Nova equipment or connection of the
Nova equipment to any other device; (C)Specication changes; (D) Service required to parts in the
system contacted or otherwise affected by expendables or reagents not manufactured by Nova which
cause shortened life, erratic behavior, damage or poor analytical performance; (E) Service required
because of problems, which, in the sole and exclusive opinion of Nova, have been caused by any
unauthorized third party; or (F) Instrument refurbishing for cosmetic purposes. All parts replaced
under the original warranty will be war-ranted only until the end of the original instrument warranty.
All requests for warranty replacement must be received by Nova or their authorized distributor within
thirty (30) days after the component failure. Nova Biomedical reserves the right to change, alter,
modify or improve any of its instruments without any obligation to make corresponding changes to
any instrument previously sold or shipped. All service will be rendered during Nova’ s principal hours
of operation. All requests for service outside Nova’s principal hours of operation will be rendered at
the prevailing weekend/holiday rates after receipt of an authorized purchase order. Contact Nova
for specic information. The following exceptions apply:
1. The The glucose membrane is warranted as stated on the insert that is shipped with the
membrane, provided they are stored as stated on the packaging and placed into service
prior to the expiration date on the packaging. This warranty is invalid under the conditions
specied after item 4.
2. Consumable items, including the calibrator cartridges and reagent packs, pump tubing, and
external and internal standards are warranted to be free of defects at time of installation. The
item must be placed into service prior to the expiration date printed on the packaging. All defects
must be promptly reported to Nova Biomedical in writing. This warranty is invalid under the
conditions specied after item 4.
3. Freight is paid by the customer.
The above warranties are invalid if:
1. The date printed on the package label has been exceeded.
2. Non-Nova Biomedical reagents or controls are used, as follows: Nova Biomedical will not be
responsible for any warranties on sensor cards, tubing, probe, or other parts if these parts are
used in conjunction with and are adversely affected by reagents, controls, or other material
not manufactured by Nova but which contact or affect such parts. Reagent formulations not
manufactured by Nova Biomedical may contain acids, concentrated salt solutions, and articial
preservatives that have been shown to cause problems such as shortened sensor life, electrode
drift, erratic analytical results, and inaccurate instrument performance.
THE FOREGOING OBLIGA TIONS ARE IN LIEU OF ALL OTHER OBLIGA TIONS AND LIABILITIES
INCLUDING NEGLIGENCE AND ALL WARRANTIES, OF MERCHANTABILITY OR OTHERWISE,
EXPRESSED OR IMPLIED IN FACT BY LAW AND STA TE OUR ENTIRE AND EXCLUSIVE LIABILITY
AND BUYER’S EXCLUSIVE REMEDY FOR ANY CLAIM OF DAMAGES IN CONNECTION WITH
THE SALE OR FURNISHING OF GOODS OR PARTS, THEIR DESIGN, SUITABILITY FOR USE,
INST ALLATION OR OPERATION. NOVA BIOMEDICAL WILL IN NO EVENT BE LIABLE FOR ANY
SPECIAL OR CONSEQUENTIAL DAMAGES WHATSOEVER, AND OUR LIABILITY UNDER NO
CIRCUMST ANCES WILL EXCEED THE CONTRACT PRICE FOR THE GOODS FOR WHICH THE
LIABILITY IS CLAIMED.
IN ORDER FOR THE WARRANTY TO BE EFFECTIVE, THE W ARRANTY CARD MUST BE SENT
TO NOV A BIOMEDICAL, 200 PROSPECT STREET, WAL THAM, MASSACHUSETTS, 02453, USA.
B-2
 Loading...