

Page 1
Vers.1.0
01/02/2011 S. 1 / 33
MANUAL
Version 1.0 / 01.02.2011
Page 2

Vers.1.0
01/02/2011 S. 2 / 33
NOVA ....................................................................................... 6
The BION ................................................................................ 7
Short technical description ......................................................... 7
Safety ............................................................................................ 7
Handling Characteristics ............................................................ 7
Performance ................................................................................. 7
New Features: .............................................................................. 8
Target Group ............................................................................... 8
General information bevor implementing ................................. 9
First flight .................................................................................. 9
Registration ................................................................................ 9
Scope of delivery .......................................................................... 9
Modifications on the glider ......................................................... 9
Adjusting the length of the main brake line .............................. 9
Suited harnesses ......................................................................... 10
Weight range .............................................................................. 10
Flying the BION .................................................................... 11
Launch ........................................................................................ 11
Normal flight .............................................................................. 12
Turning ....................................................................................... 13
Landing ....................................................................................... 13
Manoeuvres for fast decent ....................................................... 14
Big ears .................................................................................... 14
B-Stall ...................................................................................... 14
Page 3

Vers.1.0
01/02/2011 S. 3 / 33
Deep spiral ............................................................................... 14
C-Stall ...................................................................................... 16
Collapses ..................................................................................... 16
Asymmetric collapse ............................................................... 16
Front tuck ................................................................................. 16
Stall manoeuvres ........................................................................ 17
Spin .......................................................................................... 17
Fullstall .................................................................................... 17
Deep/Parachutal stall ............................................................... 17
Cravates ...................................................................................... 18
Winch launch ............................................................................. 19
Speed system .............................................................................. 19
Using the accelerator in flight ................................................. 19
Service and maintenance ...................................................... 20
General advice ........................................................................... 20
Cleaning ...................................................................................... 21
Repair ......................................................................................... 21
Check .......................................................................................... 21
Environment friendly behaviour: ........................................ 22
Disposal: ................................................................................. 22
Technical data ....................................................................... 23
Übersicht Schirm................................................................... 25
Line plans ............................................................................... 26
Over all line lengths: ............................................................. 31
Page 4

Vers.1.0
01/02/2011 S. 4 / 33
Manual Tandembar: ............................................................ 31
Page 5

Vers.1.0
01/02/2011 S. 5 / 33
Congratulations, for choosing to fly a NOVA BION. You have got a glider, to
experience exiting and safe flights for many years.
This manual contains important information and instructions to use your glider.
Please read the following pages carefully before your first flight. For questions
and suggestions please contact us: info@nova-wings.com.
To find further information about this or other products please visit our
website: www.nova-wings.com
To fully use all our maintainance and guarantee services you have to register
your glider on our website. (click LOGIN & REGISTRATION)
For more information on our guarantee services have a look here:
http://www.nova-wings.com/english/nova/guarantee.html
Now we wish you many nice ours in the air and a safe landing at the end of
every flight.
NOVA Team
Page 6

Vers.1.0
01/02/2011 S. 6 / 33
NOVA
Since the company was founded in 1989, NOVA has become one of the
world’s leading paraglider manufacturers with their head office in
Terfens/Austria.
NOVA consists of a highly qualified team and most of the team members share
the passion of flying with those pilots, who decided to fly a NOVA glider.
This passion and our Know-How are the fundamental parts of our work. By
now, the passion and the Know-How are continuously growing. This is why we
are for example pioneers in the area of air flow simulations, which allows us to
predict certain properties of a new wing quite accurately on the computer.
Last but not least we have outstanding test pilots who provide a substantial
contribution to make every new wing an unmistakable NOVA glider, which
impresses in every aspect.
But NOVA doesn’t only just stand for the development and the design of
paragliders. We also want to take the responsibility for the manufacture of our
gliders. That’s why the production of NOVA-gliders takes place in our factory
in the Hungarian town of Pecs. This allows us to influence important factors,
for example quality assurance during the whole production process.
Furthermore we can guarantee fair working conditions for about 100 NOVAemployees in Hungary.
We are convinced that the customer benefits from better employee working
conditions, in terms of high-quality products.
What we want to achieve are happy and enthusiastic pilots, because the future
of our sport depends on the enthusiasm of the people who are part of this
wonderful sport.
Page 7

Vers.1.0
01/02/2011 S. 7 / 33
The BION
The BION is a complete new development and is suitable for professional
tandem pilots as well as recreational pilots in search of maximum safety, high
performance and minimum stress.
Short technical description
The BION has 43 cells. Four of those cells are closed stabilo cells on each side.
There are four layers of lines. The first layer, the A-lines are red. B, C and D
lines are yellow. The brake layer, which is not one of the four line layers, is
orange. (The stabilo lines are orange as well.)
The risers consist of 5 belts. On the first two belts (red) both A stem lines are
attached. On the next three belts the B, C, and D stem lines are attached.
Further more the trim system and a “Big Ears” fixation is mounted on the Dbelt.
Safety
The BION stands out for its easy launch behaviour, its high stability and the
very smooth handling characteristics. This leads to a very high safety level in
any situation. The EN / LTF test protocols show the very big safety margins of
the glider. The BION is definitely not at the limit of its certification class. (EN
B)
Handling Characteristics
We are especially proud of the balanced handling characteristics. The BION
stands out for its smooth and agile handling characteristics. Even with a low
wing loading, the glider will precisely follow the pilots steering inputs.
The combination of well balanced handling behavior and high stability allows
enjoying long thermal flights without tiring the pilot.
Performance
In best tradition of Nova, the BION offers a very good glide ratio. Due to the
high stability the glide performance can be comfortably used also in rough
Page 8

Vers.1.0
01/02/2011 S. 8 / 33
conditions. When thermalling, the smooth handling makes it easy to climb
efficiently. Even with a high wing loading, the BION doesn’t tend to „dive“ in
sharp turns.
New Features:
Split A-risers with magnet fixation.
Dirt holes on the stabile.
New position and fixation of the brake pulleys for better ergonomics
A vector band behind the cell openings maintains a very good shape of
this important part of the wing.
New developed carbon spreader bar.
Target Group
The BION aims to appeal to a wide range of pilots. On one side there are
professional tandem pilots who want an easy launch behaviour and maximum
longevity. On the other hand there are recreational pilots who are looking for a
glider to enjoy nice and long thermal flights. These pilots will like the BION
for its smooth handling, its speed and its glider performance.
The high safety level is important for both groups of pilots.
Pilots requirements:
The BION is very easy to fly. Due to the high responsibility of every tandem
pilot we think that a superior flying technique and a solid level of experience
are essential. Further more it is important question before each take off, if it is
safe to fly in the given conditions.
This means, that the pilots have to be able to decide if their skills and
equipment is adequate for the respective conditions. The BION offers superior
safety but even on such a glider with maximum passive safety, misjudgements
may have serious consequences.
The best way to avoid misjudgements is a defensive approach to the sport.
Some times it makes sense to pass on a flight, instead of getting yourself into
Page 9

Vers.1.0
01/02/2011 S. 9 / 33
conditions you cannot handle. Regular training improves your skills and
enables you to enjoy your flights, even in more difficult conditions.
Please consider these thoughts!
General information bevor implementing
First flight
Every NOVA glider has to be flown and checked through a NOVA dealer. This
flight (date and pilot) has to be entered on the stabilo of the wing.
Registration
To get all warranty and service features, you have to register your glider on our
Homepage. Please choose “LOGIN” and follow the advice for registration
Scope of delivery
The BION is shipped with a rucksack, an inner pack sack, a riserbag, a tandem
spreader bar, a windsock, the manual and a patch.
Modifications on the glider
Any modification (e.g. change of line lengths, changes on the speed system)
causes a loss of certification. We recommend that you contact NOVA before
performing any kind of change.
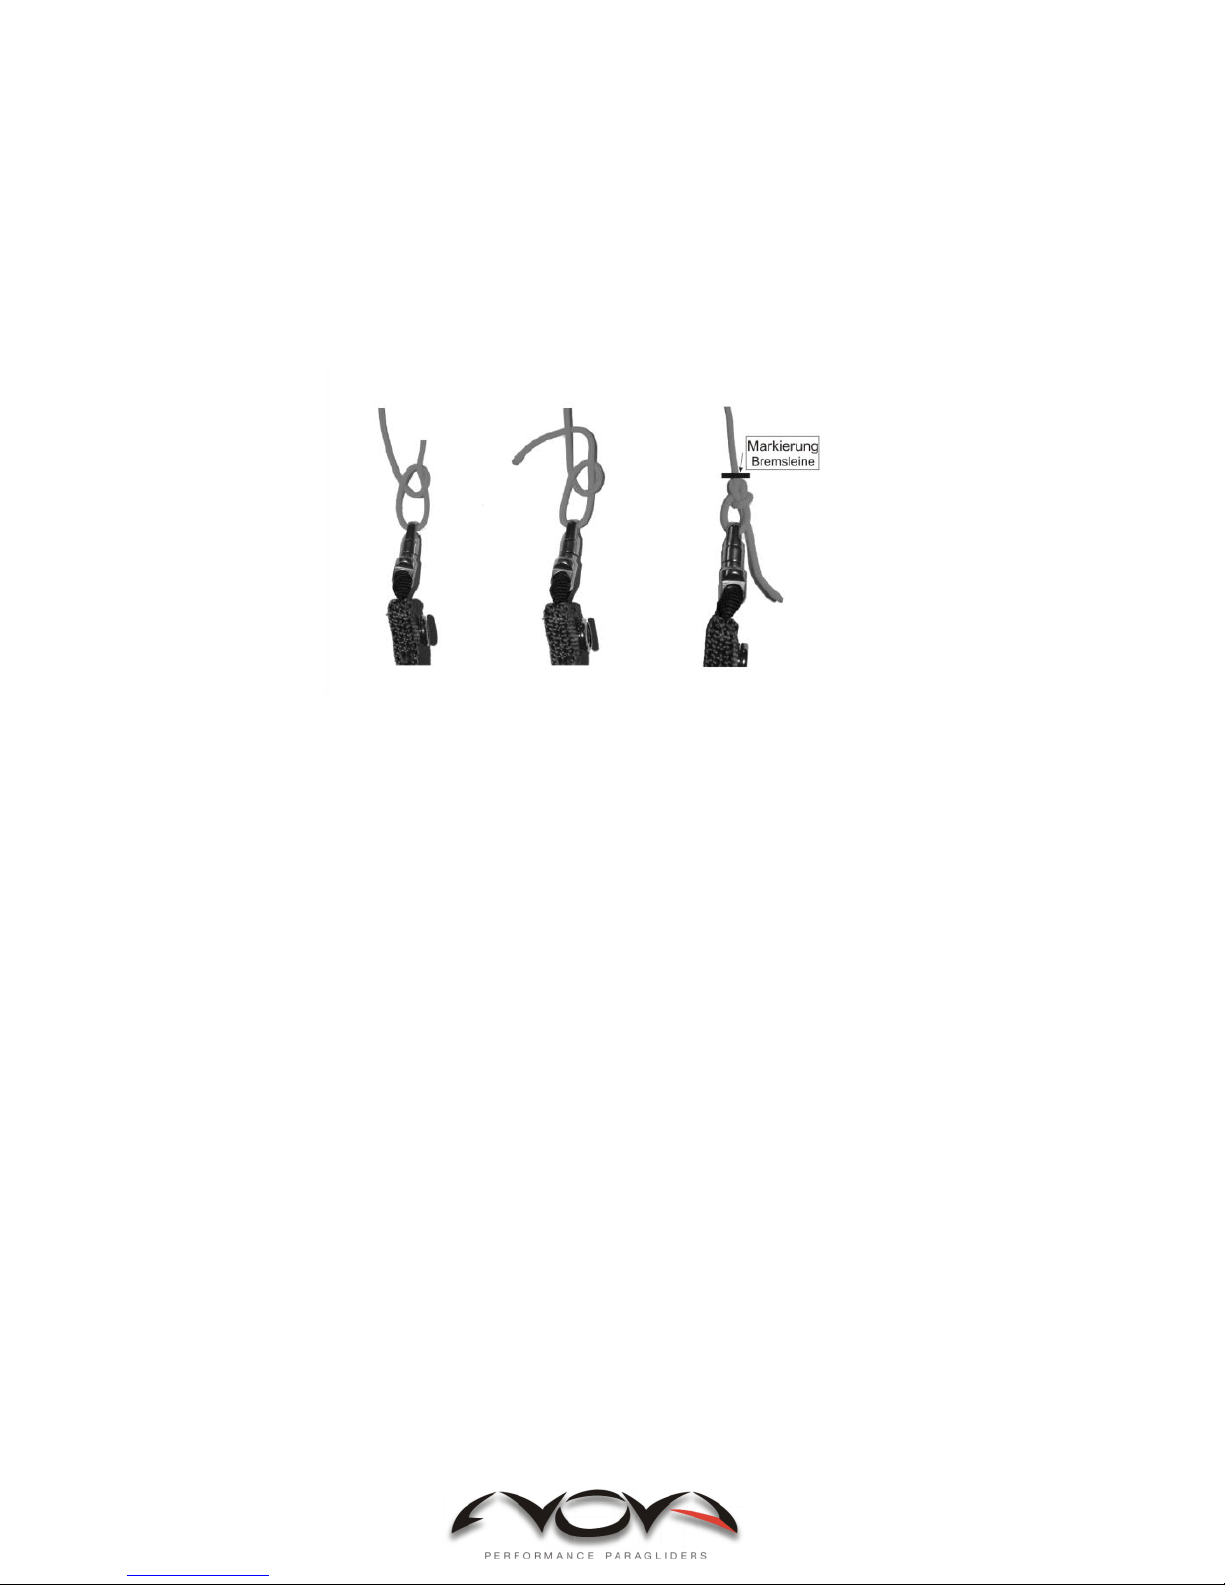
Adjusting the length of the main brake line
Especially if you use your glider with a motor it might be necessary to lengthen
your main brake line. You have to make sure, that the length of both brakes is
always the same. Further more you have to use a palstek to mount the brake
handle to the brake line. (see picture below)
If you adjust the brake lengths for motor use, do not forget to shorten it again
before flying the wing without a motor. Otherwise you might experience
serious problems at take off.
Page 10
Vers.1.0
01/02/2011 S. 10 / 33
The brake line must not be shorter than the original length. The black mark has
to be always visible like shown in the picture below.
If the brake line is shorter, this might affect the safety of your glider.
Palstek:
Suited harnesses
The BION is approved for any harness of the class “GH” (without diagonal
bracing). This means almost every harness which is currently available.
The choice of the harness has a big influence on the flight characteristics of the
BION. There are harnesses which allow very effective weight shifting on the
one hand, but which tip to the side in turbulences quite undamped on the other
hand.
Other harnesses don’t allow extreme weight shifting, but they will give the pilot
a calmer feel in turbulent conditions.
A good flying school can help on this topic with individual advice.
Weight range
Each size of the BION is certified for a certain weight range. The weight refers
to the “overall take off weight”. This means the weight of the pilot, the
passenger, the glider, the harnesses and all other equipment.
If you fly the BION on the lower half of the weight range, the agility decreases
and the glider will be more damped. In strong turbulences the wing tends to
Page 11

Vers.1.0
01/02/2011 S. 11 / 33
deform and to collapse slightly more than with a higher wing loading. If you fly
the BION with very little wing loading, we recommend to not completely close
the trim system. (open it by at least 2cm)
If you fly the BION on the upper half of the weight range, the agility and the
stability in turbulences will increase. Also the speed will increase slightly. The
self damping will decrease in turns, as well as after collapses.
Flying the BION
We suggest performing your first flights with a new wing in calm conditions to
get used to the flight behaviour without any stress.
Launch
Before every take off the pilot has to ensure that the equipment is in a proper
condition, especially the glider, the harness and the reserve system.
Just before launch we recommend a check routine, which should be performed
carefully. (Many accidents at take off could be avoided by a proper check!)
We recommend the following routine:
1.) Strapped up (Leg strap and chest strap on the harness and helmet strap
all done up. Pilot and Passenger)
2.) Clipped in (Risers untwisted and connected to the karabiners, speed
system attached and karabiners properly closed, tandem bar properly
connected)
3.) Lines (A lines on top, all lines sorted, brake line unlooped between
brake handle and pulley)
4.) Glider (glider lies arched with opened cell openings at take off.)
5.) Wind and airspace (wind suitable for launch and airspace in front of
take off free of other gliders)
The BION has a very well balanced and easy take off behaviour. Corrections
are easy to perform at any time and no special advice is needed for forward or
Page 12

Vers.1.0
01/02/2011 S. 12 / 33
reverse launches. We recommend performing launches with closed trimmers.
(So with the slowest setting)
Normal flight
If you release both brakes (“Hands up”) and if you close the trimmers the
BION glides at the so called “trim speed”. At this speed, the glide ratio reaches
its maximum.
If you fly into a headwind or through sinking air, you should use the trim
system. If you use the trim system in very turbulent conditions, you have to
consider more demanding reactions in the case of a collapse. This is why you
should keep more distance to the ground if you fly accelerated.
If you fly in strong turbulences we recommend applying both brakes slightly.
This increases the stability and you get good feedback through the brakes,
which is necessary to fly your wing actively.
Flying actively means permanent control and correction of the angle of attack
in turbulent air. If you fly from lift into an area of sinking air, the angle of
attack will decrease and the wing will pitch down. A good pilot will realise this
even before the wing pitches down, by a reduced brake pressure. The right
reaction would be to apply the brakes more and thereby increase brake pressure
to prevent the wing from pitching down or even from collapsing in turbulent
conditions.
Flying from sinking air into lift is just the opposite: Without any pilot action,
the angle of attack would increase and the wing would pitch up. The pilot can
feel this, by an increased brake pressure. In this situation, the pilot should
release the brakes to reduce the pitch movement.
To generalize:
If the brake pressure decreases and if the wing pitches down, the pilot should
apply more brakes. If the brake pressure increases and if the wing pitches up,
the brakes should be released.
With proper active flight control, the pilot can avoid most of the collapses and
keep control in every moment. The best way to learn this is of course flying,
Page 13

Vers.1.0
01/02/2011 S. 13 / 33
but ground handling definitely helps to improve the feeling for the glider. A
good training exercise is to stabilise the wing above your head with the brakes,
without looking at it. This helps as well for improving the forward launch.
Turning
A smooth turn is an interaction of inner brake, outer brake and weight shifting.
The difficulty is finding the right amount, which is important if you want to
climb efficiently in thermals.
The BION turns quite sensitively, so only small inputs are needed for
performing precise turns. Tight and quick turns or fast changes of turning
direction without unwanted pendulum movement are quite complex and take
some training. It should be the goal of every pilot to master these skills
perfectly.
Attention:
If you can’t use the brakes for steering the glider you can use the D-risers
instead. (This might be necessary for example, if the brake lines tangled up due
to a bad pre-launch check or less likely, if the main brake line tears).
The BION can be turned quite well with the D-risers combined with weight
shifting. You can also land the glider nice and smooth just with the D-risers.
Don’t pull the D-risers too much, to avoid a deep stall!
Landing
Landing the BION is very easy. In turbulent conditions we recommend
applying brakes (approximately 20% of the available brake travel) during the
whole approach. This will increase the stability of the glider and the feeling of
the wing.
Just before touch down you should apply more brake. Many times it makes
sense to induce a stall.
Attention:
A deep stall in just 2 meters height can cause a quite violent touch down. Make
sure to not fully apply the brakes until you are close enough to the ground.
Page 14

Vers.1.0
01/02/2011 S. 14 / 33
Manoeuvres for fast decent
Big ears
To do big ears, pull the outer A-line (attached on a separate belt) on both sides.
Clamps on the D-risers allow fixing the ears effortless for a long time. Before
using the clamp you have to remove the neoprene cover from the clamp.
As long as you keep both outer A-risers pulled, the wingtips will be folded and
the sink speed will increase. We recommend to additionally opening the
trimmers to increase the sink speed further and to also increase forward speed.
The drag of the folded wingtips increases the angle of attack. By opening the
trim system, this effect is compensated.
To end the manoeuvre, release the A-risers. If the wingtips don’t open
automatically, you can inflate them by applying the brakes with a short impulse
movement.
Caution:
You have to make sure before every take off that the neoprene-cover
completely covers the clamp. Otherwise it might happen, that the brake line
gets fixed in the clamp, which might lead to serious accidents.
B-Stall
Due to the short B-risers and due to the high load on the B-riser, the B-stall is
not practicable.
Deep spiral
The deep spiral is the most demanding of the three manoeuvres for fast descent.
(Ears, B-Stall and Deep Spiral) You should only fly deep spirals with the BION
if you perfectly perform the manoeuvre with your solo glider. Due to the longer
lines on a tandem glider, the g-force tends to be higher, than on a solo wing.
Entering a deep spiral can be divided into two phases:
First, you fly a turn by applying one brake and by shifting your weight to the
same side, the glider will bank up and increase its turning speed. This phase
ends at a sink rate of roughly 8m/s – 10m/s. (depending on the wing loading)
Page 15

Vers.1.0
01/02/2011 S. 15 / 33
Then at the beginning of the second phase the g-forces increase rapidly and the
leading edge will lean towards the ground. In a fully developed deep spiral, the
leading edge is almost parallel to the ground. The maximum sink rate with the
BION can get up to 25m/s and more.
The first attempts to fly a deep spiral should be stopped clearly before reaching
the second phase to get used to the quick rotation and to practice the exit
without pendulum swinging. The exit should be performed by simply releasing
the inner brake with a neutral weight-shift. The BION will then decrease its
bank angle and go back to normal flight. To avoid a pendulum movement, the
inner brake has to be pulled in the moment the wing wants to reduce its bank
rapidly.
By applying the inner brake again, you force the glider to exit the spiral
movement not rapidly but during two or three rotations. It is very important to
master this exercise before continuing to the second phase of the deep spiral.
The pilot will feel the entering of this phase by the suddenly increased g-force.
In this moment, the pilot is being pushed to the outer side of the harness. It is
important to not counteract. So the pilot should lean to the outer side to avoid a
stable spiral. (See below)
If the pilot weight shifts to the outer side, the spiral movement will get slower
as soon as the pilot releases the inner brake. The rest of the exit works as
explained above for the first phase of the deep spiral.
If the pilot shifts his weight clearly to the inner side, the BION might stay in a
deep spiral, even when releasing both brakes. In this case, it helps to apply the
outer brake, or both brakes and of course to shift the weight to the outer side.
Please don’t underestimate the difficulty of learning the deep spiral. The sink
rates are a lot higher than what you are used to from other manoeuvres and the
fast rotation might lead to disorientation. The high g-loads of up to 3g make the
manoeuvre even more demanding as you might have problems like the so
called “black out”, where you temporarily lose your vision due to the g-load. It
is very important to get a feeling for the reactions of your body to this
manoeuvre.
If you practice it well, it is a fun manoeuvre that enables you to loose height
faster than with any other manoeuvre.
Page 16

Vers.1.0
01/02/2011 S. 16 / 33
C-Stall
This manoeuvre can be found sporadically in some paragliding literature. This
manoeuvre can’t be performed with the BION.
Collapses
Asymmetric collapse
If you fly in strong turbulences, one side of the glider might collapse. This
happens if one side of the wing doesn’t produce lift anymore, due to a low
angle of attack. If there is no lift, the lines get loose and the wing deforms or
collapses.
Most of these collapses are rather small – they only affect a small part of the
wingspan. In such a case, the BION continues to fly almost unaffected. If the
collapse affects 50% of the wingspan or more, the wing will react considerably:
Due to the increased drag of the collapsed wing, the glider will turn to the
collapsed side. Furthermore, the glider will pitch down because of the increased
wing loading. (The glider has to increase its speed because of the reduced area
– that’s what causes the pitching down.)
The pilot can prevent the glider from pitching and turning, by applying the
brake on the non collapsed side of the wing. If a collapse occurs close to the
ground it is essential to react properly. The proper reaction should be taught at
high altitude, ideally under professional guidance.
As explained above, most of the collapses can be prevented, if you fly actively!
Front tuck
A front tuck occurs, if the angle of attack gets too low on the whole wingspan,
then the whole leading edge will collapse. After the asymmetric tuck, the BION
will go back to normal flight automatically. The pilot can expedite the opening
process by slightly applying both brakes.
Page 17

Vers.1.0
01/02/2011 S. 17 / 33
Stall manoeuvres
Spin
If you pull one brake too much, you might induce a so called spin. The centre
of rotation is no longer far outside the wing (like during a normal turn), but it
moves inside the wing. Furthermore the rotation speed increases. The BION
will go back to normal flight, if the pilot releases both brakes. The BION’s spin
behaviour is easily manageable: It takes a lot of brake travel to induce the spin,
and then the pilot has quite some time to react and release both brakes.
Fullstall
If you pull both brakes too far, the wing will perform a so called full stall. The
wing suddenly stops its forward motion, but the pilot is still moving forward.
So from the pilots view, the glider will tilt backwards. It is very important to
not release the brakes in this moment. Otherwise the glider might surge forward
below the pilot.
The Full Stall is a complex manoeuvre and the perfect execution can not be
explained in this manual. If you want to learn a proper full stall, it makes sense
to do this under professional guidance.
The available brake travel before stalling the wing depends on the size. It is
approximately 60cm for the BION 19, 63cm for the BION 21, 66cm for the
BION 23, 70cm for the BION 25, and 73cm for the BION 27. Those numbers
are just a rough indication. (The publication of the brake travel is claimed by
the EN 926.)
It would be dangerous to use the brake travel according to those numbers,
because it is not practicable to measure the brake travel during flight, and in
turbulences the stall might occur with less brake travel. If you want to use the
whole brake travel of your glider safely, it is necessary do many intended spins
and full stalls to get a feeling for the stall behaviour.
Deep/Parachutal stall
The Deep Stall, or Parachutal Stall is kind of the pre stage to a Full Stall. The
wing has no forward motion and a high sink speed, but it is almost fully
inflated. The pilot can enter the Deep Stall by applying both brakes. It is very
difficult to keep the wing in a Deep Stall: If you pull the brakes a little too
Page 18

Vers.1.0
01/02/2011 S. 18 / 33
much, the glider will enter a Full Stall. If you release the brakes too much, the
glider will go back to normal flight. To practice a Deep Stall, it is necessary to
master the Full Stall first.
A very old or worn out glider with a porous cloth or with a changed trim (due
to many winch launches, or deep spirals) might stay in a deep stall even after
releasing both brakes. Do not apply the brakes in such a situation, because the
wing would then enter a full stall ! You can exit the deep stall by pushing the
speed bar, or by simply pushing the A-risers forward. If you fly through rain,
the risk of a deep stall is higher. We strongly advice against flying in rainy
conditions. If it happens, that you get into rainfall, we recommend not
performing a B-stall or Big Ears. Our recommendation is to leave the rain as
soon as possible and to fly with both brakes released, or even accelerated, as
this reduces the risk of a deep stall. (The available brake travel before entering
a deep stall may be reduced significantly.)
Cravates
After a big collapse or after a badly executed Full Stall, a part of the wing
might be tangled up in the lines, and won’t reopen automatically. This is what
you call a cravate. During our extensive test flights with the BION we never
experienced a cravate but this situation can not be eliminated with any
paraglider.
In case of a cravate we recommend the following actions:
1.) Counter steer: Probably the wing wants to turn to the side of the
cravate. In some cases, the turning happens quickly and will end in a
stable deep spiral without the pilot’s action. So it is important to react
quickly by counter steering.
2.) Opening the cravate by applying the brake with an impulse movement:
Some cravats can be opened with this method. It is important to keep
the wing in straight flight by pulling the other brake all the time.
3.) Pulling the stabilo line: Some cravats can be opened by strongly
pulling the stabilo line. (It is the orange line on the B-riser. Have a
look at it or grab it every once in a while and you will be able to react
quicker in a moment of danger.)
Page 19

Vers.1.0
01/02/2011 S. 19 / 33
4.) Full stall: Many cravats can be opened by using the Full Stall. But of
course you have to have solid experience with this manoeuvre to be
able to use it properly.
5.) Reserve: If you loose control or if you are not absolutely sure that you
have enough height for further attempts to recover, immediately use
your reserve!
Many pilots wait way too long before using their reserve. Some don’t use the
reserve at all if they lose control of their glider. We strongly recommend to at
least mentally practice the use of the reserve from time to time: Grab the handle
of the reserve in flight, like you would do it in case of emergency. Many clubs
or schools offer to throw the rescue for example in a gym. The most realistic
way of training is to use the reserve in real flight. Many SIV Clinics offer that
as part of their training.
Please use these possibilities: There are already too many pilots, who almost
forgot that they have a reserve they could use, which is a very bad precondition
to use it without hesitating in a dangerous moment.
Winch launch
The BION is very easy to launch on the winch. You should start to climb at a
flat angle.
We recommend the use of a towing device which accelerates the glider during
the winch launch.
Speed system
The Bion has a trim system. The standard setting is a “closed” trimmer. This
means that all risers have the same length. To accelerate, you can open the
trimmers.
Using the accelerator in flight
If you fully apply the trim system, the angle of attack decreases and the speed
increases by about 10km/h. This is helpful to cover more distance in headwind
or in sinking air.
Page 20

Vers.1.0
01/02/2011 S. 20 / 33
Please consider, that the wing behaves more dynamic if a collapse occurs in
accelerated flight. You should be aware, that you might need more height to
recover to normal flight!
Measurements of the speed systems (publication required by EN 926)
A
A1 B C
D
Trimmers closed
370
370
370
370
370
Trimmers open
370
370
400
445
490
Service and maintenance
General advice
To keep your glider in good condition for many years, please consider the
following advice:
Don’t expose your glider to unnecessary UV radiation – for example
by leaving it on the landing site unpacked.
Don’t fold the nylon rod reinforcements at the cell openings too hard.
If you pack the glider when it is wet or just damp, it has to be dried
later. Don’t leave it packed in a wet condition!
When you practice ground handling, avoid crashing the glider hard on
the ground with the leading edge, as this might lead to damage.
Avoid unnecessary dirt or sharp stones touching the lines and the
cloth. Don’t step on the lines if they are laying on a stony surface!
Humidity combined with dirt can lead to shrinking of the lines and
thereby to the wrong trim on your glider.
Sand and Saltwater (sweat) may damage the lines in the long run.
Page 21

Vers.1.0
01/02/2011 S. 21 / 33
To store your glider for a longer time, avoid a humid or a very hot
environment. (Like in a car during hot summer days)
Cleaning
To clean the wing, only use water and a cleaning cloth. Never use any solvents.
If there is sand, dirt or small stones inside the canopy, you should remove them
because they will damage the coating of the cloth and the seams in the long run.
Repair
Repairs may only be performed by authorised service centres or by NOVA.
You can repair small holes or tears in the cloth (smaller than 5cm) yourself
with a special self adhesive repair tape. (You can order it at NOVA or in any
service centre.) If you are not sure about the damage, or if the damage affects
parts of a seam, please contact NOVA. (info@nova-wings.com)
Check
We suggest a trim inspection (Nova Trim Tuning NTT) in the first year after
the date of purchase (new glider). In the case that the NTT is done, the next full
check (NFS: NOVA full service) has to be done 3 years after purchase (new
glider).
In the case of commercially used gliders, (tandems or school gliders) the NFS
has to be performed every year.
In the case that the NTT is not done, the wing needs a full check after 2 years.
The check expert can define the next check interval on the basis of the wing’s
condition. In areas where conditions are harsh on the material (i.e. by salty air
next to the coast), an annual complete check (NFS) is strongly recommended!
The check has to be confirmed with the check-stamp on the stabilo. All
necessary documents for the inspection can be found on the NOVA homepage
(http://www.nova-wings.com): Downloads: Check.
The date of purchase of the new glider is decisive for any deadline
concerning NTT and NFS, as well as for guarantee.
Independent from the deadlines mentioned above:
Page 22

Vers.1.0
01/02/2011 S. 22 / 33
A check (NFS) has to be performed not later than after 200 hours of flight, or
after 400 flights. (Depending on what happens first.)
More information about our check system:
http://www.nova-wings.com/english/info_zone/ntt.html
Environment friendly behaviour:
Apart from self-evident things, like not leaving your rubbish behind, we would
like to appeal for a thoughtful behaviour towards animals, like birds of prey or
game animals. If you notice, that your fly by affects those animals (like
causing a shortening reaction) please increase your distance.
Disposal:
Disused paragliders need a proper disposal. If you are not sure about the correct
removal, please send your glider to NOVA.
Page 23

Vers.1.0
01/02/2011 S. 23 / 33
Technical data
Size
32
36
Zoom Factor
1.15
1.22
Number of cells
43
Projected Wingspan
m
10.67
11.32
Projected Surface area
m²
32.4
36.44
Projected Aspect Ratio
3.52
Flat Wingspan
m
14.18
15.05
Flat Surface Area
m²
39.1
44
Flat Aspect Ratio
5.14
Line diameter
m
m
1.1 2.15 / 3.15
Line length
m
7.76
8.14
Line consumption
m
426
452
max. profile depth
m
3.47
3.66
min. profile depth
m
0.71
0.75
weight
kg
7.5
8.5
Legal take of weight
LTF/EN1
kg
(100-200)
115-230
Places
(1-2)
1-2
Certification LTF
(B)
B
Certification EN
(B)
B
1
Pilot + passenger + total equipment
Page 24

Vers.1.0
01/02/2011 S. 24 / 33
Overview risers
1
A1-riser
6
Main suspension loop
2
A2-riser (EARS)
7
Trim System
3
B-riser
8
EARS clamp
4
C-riser
9
Clamp cover
5
D-riser
Page 25

Vers.1.0
01/02/2011 S. 25 / 33
Übersicht Schirm
1
Stammleinen
5
Zellöffnungen
2
Mittelleinen
6
Obersegel
3
Gallerieleinen
7
Hinterkante
4
Untersegel
8
Typenschild
Page 26
Vers.1.0
01/02/2011 S. 26 / 33
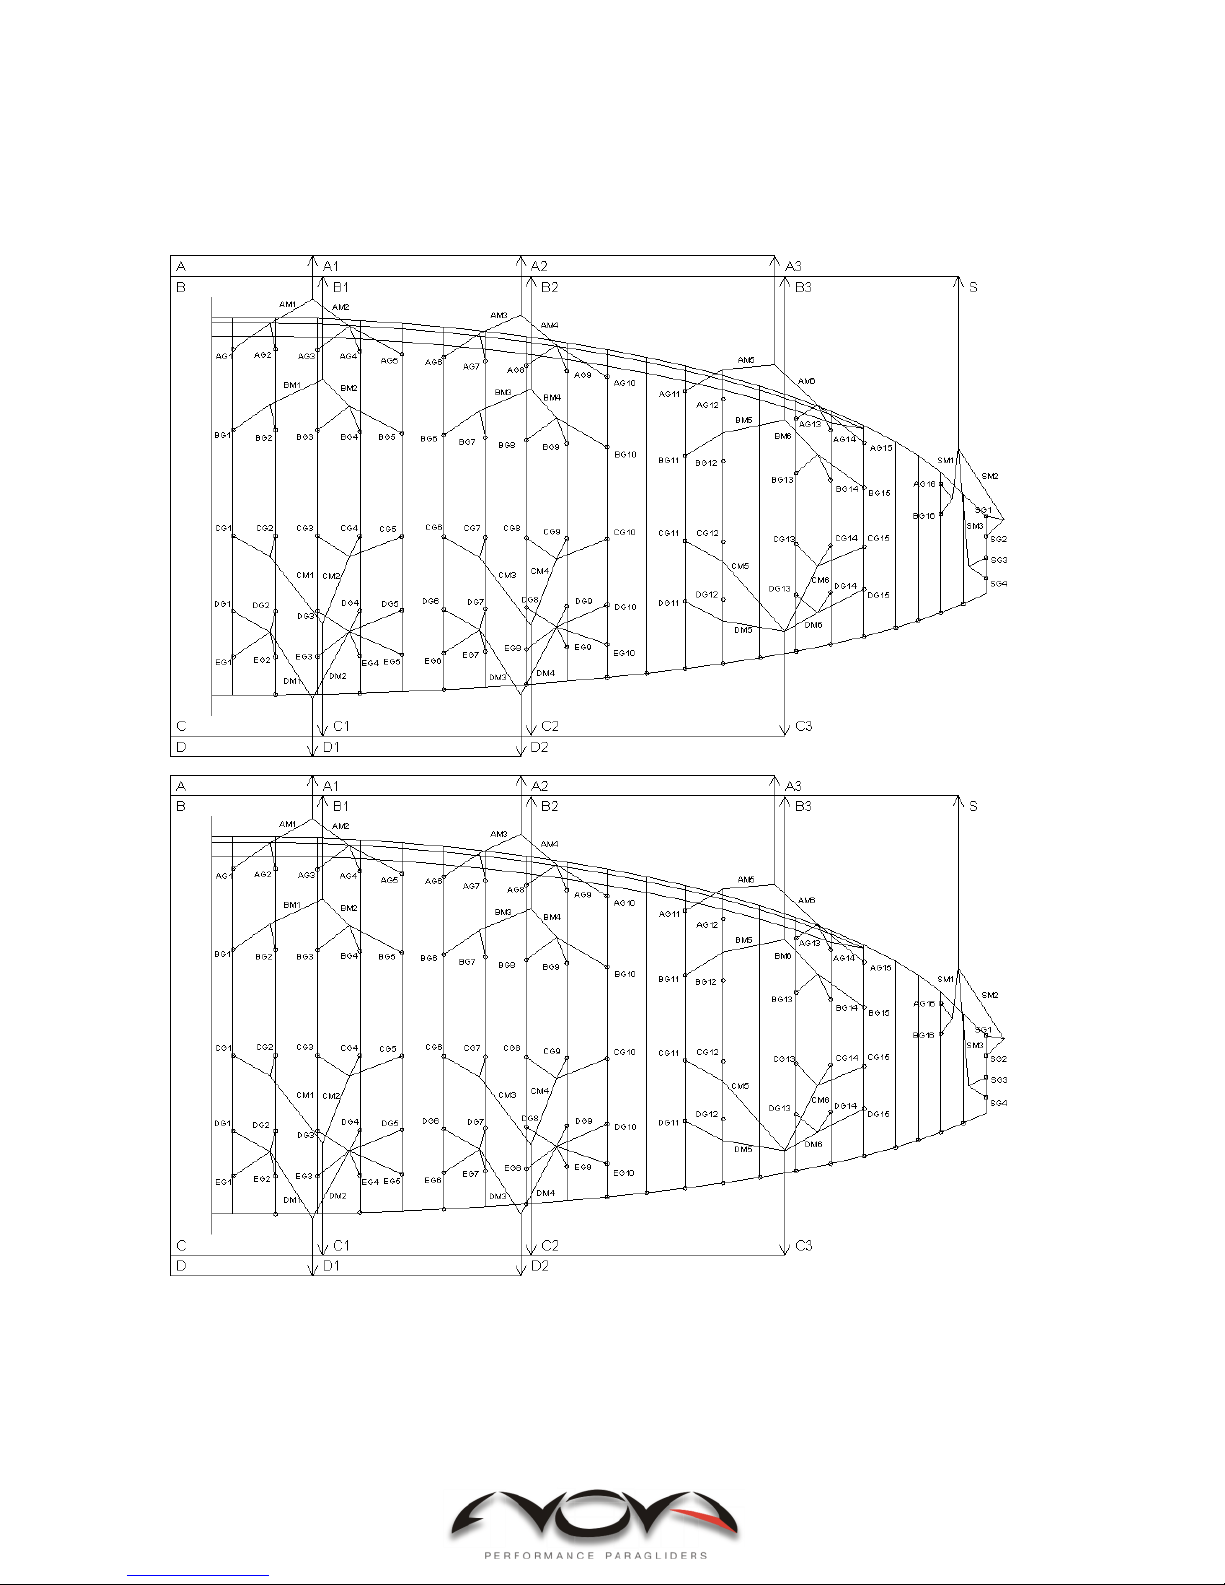
Line plans
Page 27

Vers.1.0
01/02/2011 S. 27 / 33
Line lengths:
BION
Leinentyp
33
37
A1
Edelrid A6843-340 red
A2
Edelrid A6843-340 red
A3
Edelrid A6843-340 red
AM1
Liros PPSL160 red
AM2
Liros PPSL160 red
AM3
Liros PPSL160 red
AM4
Liros PPSL160 red
AM5
Liros PPSL160 red
AM6
Liros PPSL160 red
AG1
Cousin Ultimate095-85kg red
AG2
Cousin Ultimate095-85kg red
AG3
Cousin Ultimate095-85kg red
AG4
Cousin Ultimate095-85kg red
AG5
Cousin Ultimate095-85kg red
AG6
Cousin Ultimate095-85kg red
AG7
Cousin Ultimate095-85kg red
AG8
Cousin Ultimate095-85kg red
AG9
Cousin Ultimate095-85kg red
AG10
Cousin Ultimate095-85kg red
AG11
Cousin Ultimate095-85kg red
AG12
Cousin Ultimate095-85kg red
AG13
Cousin Ultimate095-85kg red
AG14
Cousin Ultimate095-85kg red
AG15
Cousin Ultimate095-85kg red
AG16
Cousin Ultimate095-85kg orange
B1
Edelrid A6843-340 yellow
B2
Edelrid A6843-340 yellow
B3
Edelrid A6843-340 yellow
BM1
Liros PPSL160 yellow
BM2
Liros PPSL160 yellow
BM3
Liros PPSL160 yellow
BM4
Liros PPSL160 yellow
Page 28

Vers.1.0
01/02/2011 S. 28 / 33
BM5
Liros PPSL160 yellow
BM6
Liros PPSL160 yellow
BG1
Cousin Ultimate095-85kg yellow
BG2
Cousin Ultimate095-85kg yellow
BG3
Cousin Ultimate095-85kg yellow
BG4
Cousin Ultimate095-85kg yellow
BG5
Cousin Ultimate095-85kg yellow
BG6
Cousin Ultimate095-85kg yellow
BG7
Cousin Ultimate095-85kg yellow
BG8
Cousin Ultimate095-85kg yellow
BG9
Cousin Ultimate095-85kg yellow
BG10
Cousin Ultimate095-85kg yellow
BG11
Cousin Ultimate095-85kg yellow
BG12
Cousin Ultimate095-85kg yellow
BG13
Cousin Ultimate095-85kg yellow
BG14
Cousin Ultimate095-85kg yellow
BG15
Cousin Ultimate095-85kg yellow
BG16
Cousin Ultimate095-85kg orange
C1
Edelrid A6843-340 yellow
C2
Edelrid A6843-340 yellow
C3
Edelrid A6843-240 yellow
CM1
Liros PPSL160 yellow
CM2
Liros PPSL160 yellow
CM3
Liros PPSL160 yellow
CM4
Liros PPSL160 yellow
CM5
Liros PPSL160 yellow
CM6
Liros PPSL160 yellow
CG1
Cousin Ultimate095-85kg yellow
CG2
Cousin Ultimate095-85kg yellow
CG3
Cousin Ultimate095-85kg yellow
CG4
Cousin Ultimate095-85kg yellow
CG5
Cousin Ultimate095-85kg yellow
CG6
Cousin Ultimate095-85kg yellow
CG7
Cousin Ultimate095-85kg yellow
CG8
Cousin Ultimate095-85kg yellow
CG9
Cousin Ultimate095-85kg yellow
Page 29

Vers.1.0
01/02/2011 S. 29 / 33
CG10
Cousin Ultimate095-85kg yellow
CG11
Cousin Ultimate095-85kg yellow
CG12
Cousin Ultimate095-85kg yellow
CG13
Cousin Ultimate095-85kg yellow
CG14
Cousin Ultimate095-85kg yellow
CG15
Cousin Ultimate095-85kg yellow
D1
Edelrid A6843-240 yellow
D2
Edelrid A6843-240 yellow
DM1
Liros PPSL160 yellow
DM2
Liros PPSL160 yellow
DM3
Liros PPSL160 yellow
DM4
Liros PPSL160 yellow
DM5
Liros PPSL160 yellow
DM6
Liros PPSL160 yellow
DG1
Cousin Ultimate095-85kg yellow
DG2
Cousin Ultimate095-85kg yellow
DG3
Cousin Ultimate095-85kg yellow
DG4
Cousin Ultimate095-85kg yellow
DG5
Cousin Ultimate095-85kg yellow
DG6
Cousin Ultimate095-85kg yellow
DG7
Cousin Ultimate095-85kg yellow
DG8
Cousin Ultimate095-85kg yellow
DG9
Cousin Ultimate095-85kg yellow
DG10
Cousin Ultimate095-85kg yellow
DG11
Cousin Ultimate095-85kg yellow
DG12
Cousin Ultimate095-85kg yellow
DG13
Cousin Ultimate095-85kg yellow
DG14
Cousin Ultimate095-85kg yellow
DG15
Cousin Ultimate095-85kg yellow
EG1
Cousin Ultimate095-85kg yellow
EG2
Cousin Ultimate095-85kg yellow
EG3
Cousin Ultimate095-85kg yellow
EG4
Cousin Ultimate095-85kg yellow
EG5
Cousin Ultimate095-85kg yellow
EG6
Cousin Ultimate095-85kg yellow
EG7
Cousin Ultimate095-85kg yellow
Page 30

Vers.1.0
01/02/2011 S. 30 / 33
EG8
Cousin Ultimate095-85kg yellow
EG9
Cousin Ultimate095-85kg yellow
EG10
Cousin Ultimate095-85kg yellow
S
Liros TSL 220 orange
SM1
Liros PPSL 120 orange
SM2
Liros PPSL120 orange
SG1
Cousin Ultimate095-85kg orange
SG2
Cousin Ultimate095-85kg orange
SG3
Cousin Ultimate095-85kg orange
SG4
Cousin Ultimate095-85kg orange
FF
Edelrid 7850-360 orange
F1
Liros PPSL 120 orange
F2
Liros PPSL 120 orange
F3
Liros PPSL 120 orange
FM1
Cousin Ultimate095-85kg orange
FM2
Cousin Ultimate095-85kg orange
FM3
Cousin Ultimate095-85kg orange
FM4
Cousin Ultimate095-85kg orange
FM5
Cousin Ultimate095-85kg orange
FM6
Cousin Ultimate095-85kg orange
FG1
Cousin Ultimate095-85kg orange
FG2
Cousin Ultimate095-85kg orange
FG3
Cousin Ultimate095-85kg orange
FG4
Cousin Ultimate095-85kg orange
FG5
Cousin Ultimate095-85kg orange
FG6
Cousin Ultimate095-85kg orange
FG7
Cousin Ultimate095-85kg orange
FG8
Cousin Ultimate095-85kg orange
FG9
Cousin Ultimate095-85kg orange
FG10
Cousin Ultimate095-85kg orange
FG11
Cousin Ultimate095-85kg orange
FG12
Cousin Ultimate095-85kg orange
FG13
Cousin Ultimate095-85kg orange
FG14
Cousin Ultimate095-85kg orange
FG15
Cousin Ultimate095-85kg orange
FG16
Cousin Ultimate095-85kg orange
Page 31

Vers.1.0
01/02/2011 S. 31 / 33
Over all line lengths:
You can find the overall line lengths (from the shackle to the loops on the
bottom sail) on the homepage of the Para-Academy. (www.para-academy.eu)
Please note, that you can not calculate the over all length, by just adding the
single line lengths listed above!
Manual Tandembar:
The tandem bar stands out for low weight and high strength. Depending on the
weight of the pilot and the passenger, the riser can be attached in the loops 1-3.
A very light pilot should choose the loop (1) to avoid that heavy passengers
will hang too low.
The reserve line has to be connected to one of the remaining two loops. If, for
example, the riser of the glider is attached to loop (1), the reserve can be
attached in loop (2) or loop (3).
Caution:
Make sure, that you use a proper shackle or soft link to connect the reserve to
the loop. The shackle or soft-link has to surround the main belt of the spreader
bar. (like the carabiner surrounds the belt in the picture above)
If you just mount the shackle from below into the loop, the strength might not
be sufficient in case of an reserve deployment.
The pilots harness is always mounted in loop (4). If a passenger is light, the
passengers harness can be mounted in loop (6). Heavier passengers should be
mounted in loop (5).
Page 32

Vers.1.0
01/02/2011 S. 32 / 33
1,2,3
Suspension loops for riser and reserve
4
Suspension loop for Pilot
5,6
Suspension loop for Passagier
Page 33

Vers.1.0
01/02/2011 S. 33 / 33
VERTRIEBSGESELLSCHAFT m. b. H.
Auweg 14
A-6123 TERFENS
AUSTRIA
Tel.: +43 5224 66026
Fax.: +43 5224 6602619
Mail:
info@nova-wings.com
Homepage:
www.nova-wings.com
 Loading...