

Page 1
Semi-Recessed
Retrofit Kit
Assembly Instructions
-24, -30, -33, -34
M
o
d
el
#
Step 1
P.O. Box 725 • 421 W. Industrial Avenue • Effingham, Illinois 62401 • Phone: (800) 730-6682 • Fax: (800) 940-6682 • E-mail: info@novasolutionsinc.com • Website: http://www.novadesk.com
The natural way to look at a computer™
50-9-2121
FIGURE 1a
Step 2
50-9-2121 Asy. Instr. - Rev. 3/04/05, © Nova Solutions, Inc. 2005
IISR004
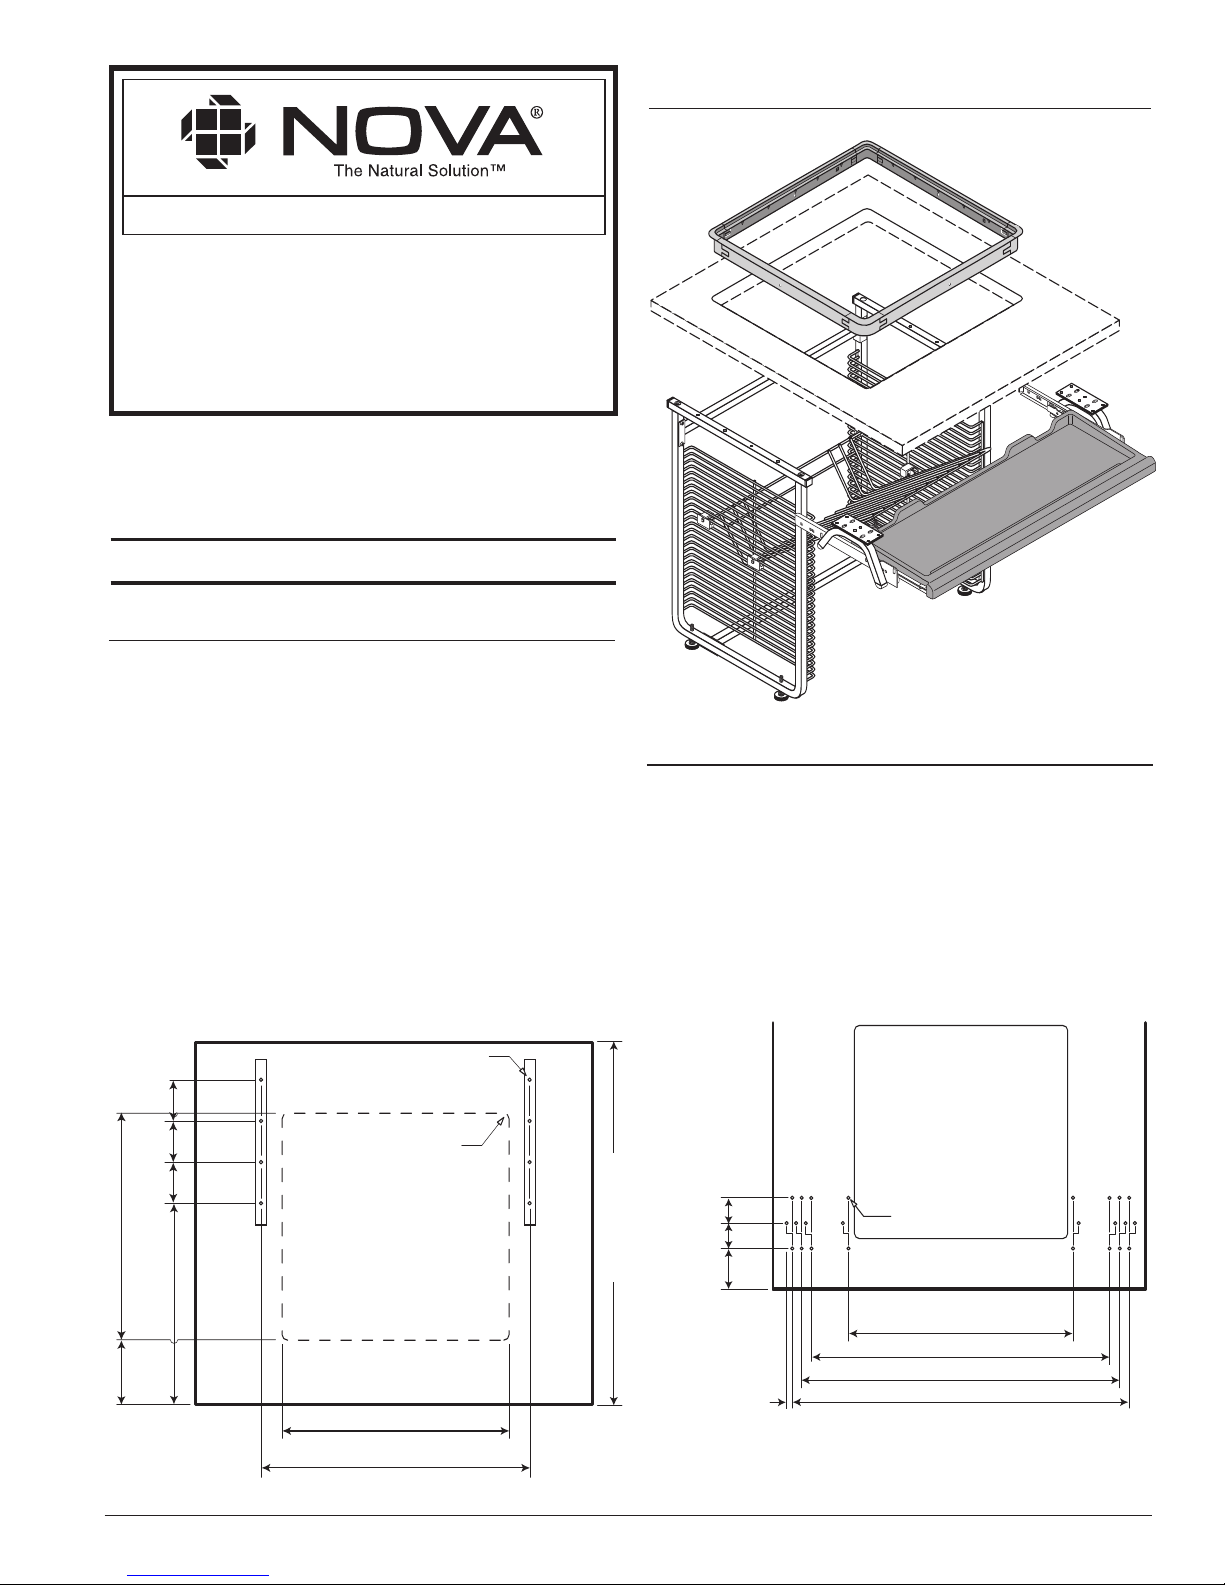
ASSEMBLED VIEW
FIGURE 1b
Page 1
21-1/4"
(540
mm
)
FRONT EDGE
1
/2"(12.7mm) R.
4 Places
UNDERSIDE OF TOP
8-
1
/
2
"
(216
mm
)
25-1/16"
(637
mm
)
21-
1
/
4
"
(540
mm
)
15-
3
/
8
"
(390
mm
)
min.
Min. 33" (838
mm
)
(96
mm
)
3
-
3
/
4
"
(96
mm
)
3
-
3
/
4
"
(96
mm
)
3
-
3
/
4
"
3
/16" Dia.
5
/8" Deep
8 Places
FRONT EDGE
22-1/2" (574mm)
(f/24"Keyboard)
31-1/4" (794mm)
(f/33"Keyboard)
32-1/8" (816mm)
(f/34"Keyboard)
2-1/2"
(64
mm
)
2-1/2"
(64
mm
)
4"
(102
mm)
3
/16" Dia.
5
/8" Deep
6 Places
28-
1
/16" (713mm)
(f/30"Keyboard)
1-1/4"(
Offset
32mm)
(Typ.)
Keyboard Drawer holes (as shown in Figure 1b) should be drilled for
the specific keyboard size. Care must be exercised to use the
specifications in Figure 1b regarding drill size and hole depth.
To offset viewport and keyboard drawer, please call customer
support at 1-800-730-6682 for special instructions.
If the worksurface is prepared for Retrofit Kit & Keyboard Drawer
Installation, skip to Step 3. Otherwise, please prepare your worksurface
to the specifications shown in Figure 1a for Viewport & Side Assembly
milling/drilling.
The retr ofit kit can be installed in almost any work surface. The kit is
designed to attach to a work surface that is 1-1/8" to 2" in thickness. Thinner
work surfaces may requir e some build-up of material for pr oper installation.
Glass work surfaces are not recommended. If your countertop is a solid
material such as natural granite or marble or a fabricated solid surface such
as Corian, you should use a professional fabricator to cr eate the opening and
surface mounting anchors requir ed for your kit.For ward a copy of the
boring pattern and hole size cut out to a professional fabricator.
Page 2
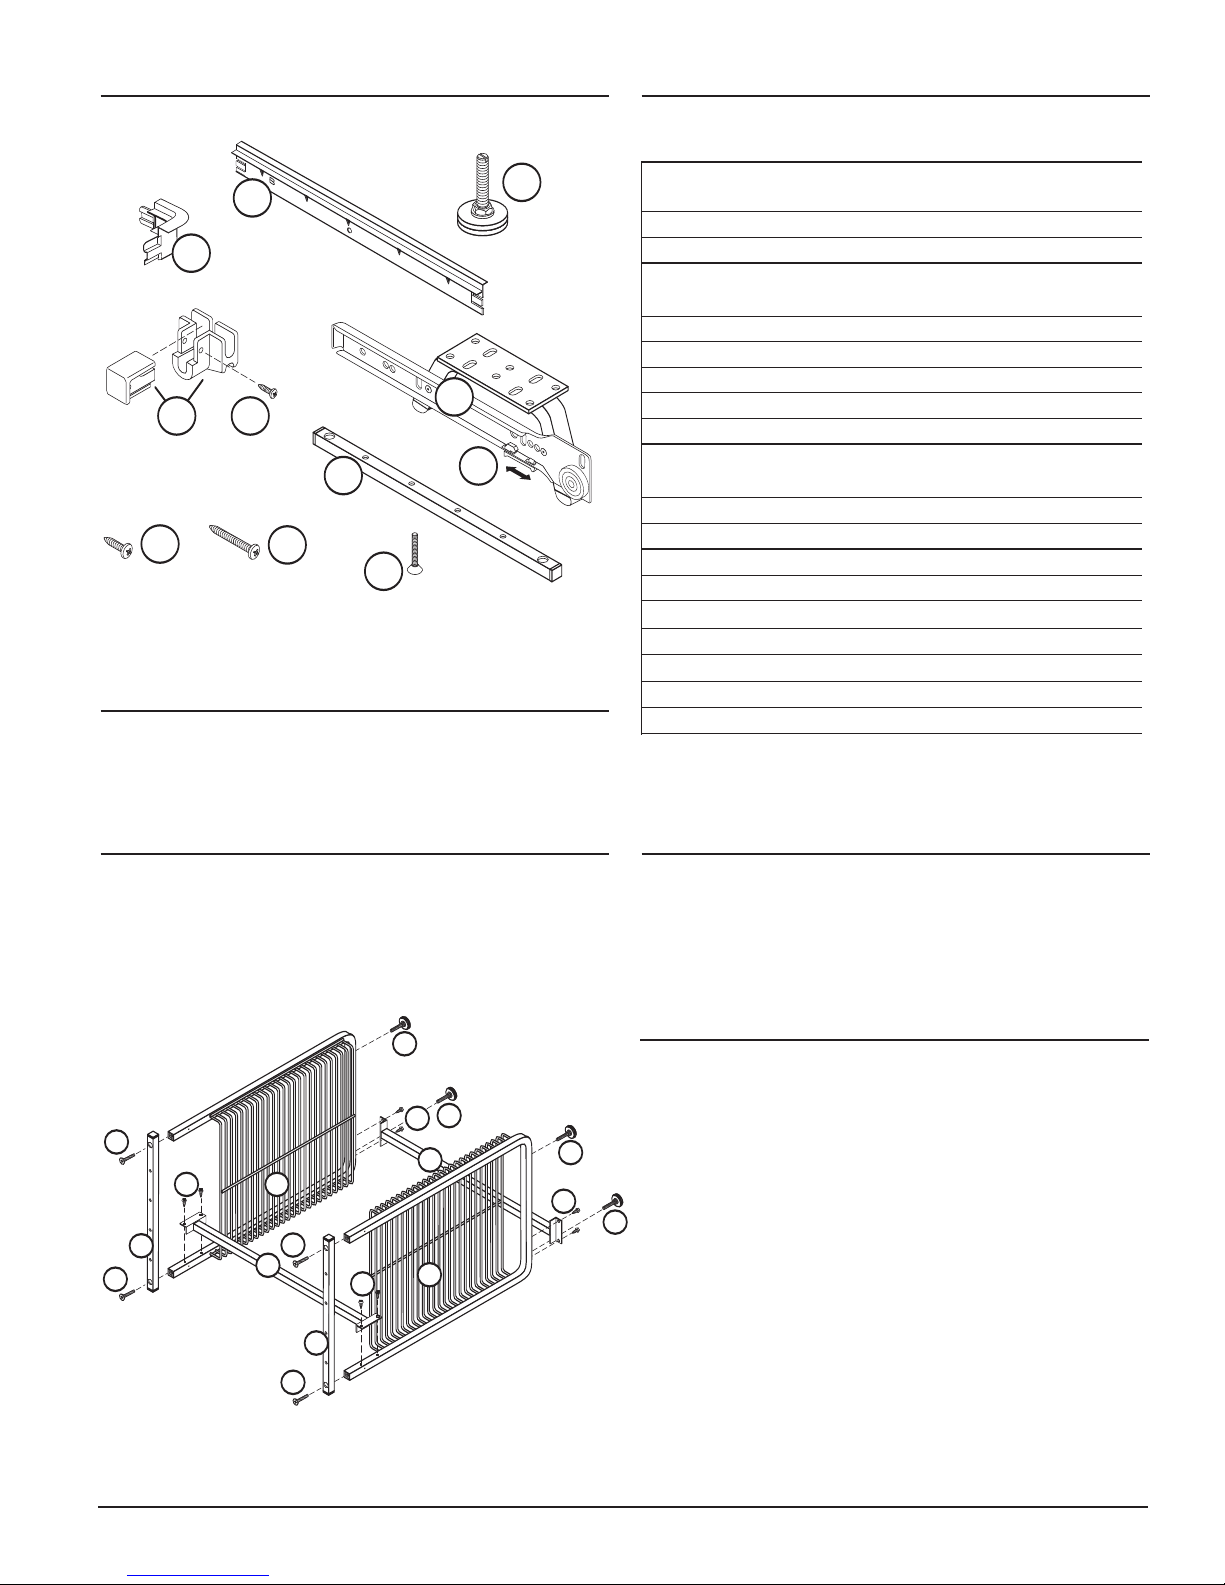
Review and identify Retrofit Kit parts listed above.
PACKING LISTHARDWARE
FIGURE 2
Step 3
Attach Cross Braces (Ref. #3) to Side Assemblies (Ref. #2) using
eight (8) Screws (Ref. #9). Attach Top Rails (Ref. #14) using four
(4) T op Rail Screws (Ref. #15). See Figu re 2.
Step 4
Insert Levelers (Ref. #7) into bottom of Side Assemblies (Ref.
#2). See Figure 2.
Step 5
Step 6
8
11
15
16
7
10
12
13
4
Page 2
50-9-2121 Asy. Instr., © Nova Solutions, Inc. 2005
Turn Retrofit Assembly upright. Slide under view port cutout in
worksurface. Align holes in top rails of Side Assemblies (Ref. #2)
with holes in worksurface. Attach Retrofit Assembly to the
worksurface securely using eight (8) Screws (Ref. #10). Optional:
Adjust Levelers (Ref. #7).
9
14
3
8
7
7
3
8
2
8
2
7
7
8
14
14
15
15
15
15
Ref. # Item # Qty. Description
1 20060126 1 Keyboard hanger with glide
– Left
2 5002121SA 2 Side Assembly
3 20060104 2 Cross Brace
4 20060127 1 Keyboard hanger with glide
– Right
5
Varies with Retrofit
1 Keyboard Drawer
6 20060116 1 Monitor Support
7
50900258
4 Leveler
8 1412APPBO 18 Screw - #14x3/4"
9 50900032 6 Screw - #14x1-1/2"
10 TB-M 4 Tracking Block
TB-F 4 Tracking Block
11 6N50TXPZ 8 Screw - Security, #6x5/8"
12 50900034 4 Trim Ring Corner
13 50900037 4 Trim Ring Straight - C
14 5002121-01 2 Top Rail
15 5002121-02 4 Threaded Screw - Top Rail
16 FR2020/Clip 2 Locking Tab
OPTIONS
5081120 1 Power Strip
5081066 1 CPU Holder
Page 3

4
8
9
1
FIGURE 3
As shown in
Figure 3, attach Left Keyboard Hanger securely
to the underside of the worksurface using three (3) Screws
(Ref. #8) and one (1) Screw (Ref. #9). Repeat procedure for
other side.
IMPORTANT: The longer of the screws (Ref. #9) passes
through the tubular section of the Keyboard Hanger allowing
the assembly to be leveled by either tightening or loosening the
screw. Adjusting the screws allows you to fine-tune the action
of the keyboard drawer.
Step 7
Install Trim Ring by snapping pieces together (Ref. #12 and
#13), lowering into cutout, and attaching with four (4) screws
(Ref. #11).
Step 9
Adjusting Your Monitor: The Monitor Support adjusts three
ways — height, angle, and forward/backward. Adjust it so that
you have a comfortable viewing angle of the monitor when
you're in a normal working position. Push Outward Locking
Tabs back to unlock keyboard drawer. See Figure 4. Remove
the keyboard drawer and the glass. Lower the monitor through
the viewport opening while allowing the wires to feed through
the back of the monitor support. If the monitor is too heavy,
make sure you get assistance.
Step 10.1
EXPLODED VIEW
50-9-2121 Asy. Instr., © Nova Solutions, Inc. 200550-9-2121 Asy. Instr., © Nova Solutions, Inc. 2005
Outward
Locking
Tab
FIGURE 4
After installing the Keyboard Drawer, pull Outward Locking
T
ab forward to lock in place. See Figure 4.
Step 8
8
9
Page 3
7
7
11
10
3
2
6
7
2
8
5
9
1
9
4
8
9
15
15
15
15
12
13
11
Angle
Forward-Backward
Up-Down
Page 4

1. Install monitor as high as possible without loosing the
appropriate viewing angle.
2. Screen should point slightly above user's face (bottom
edge of monitor is nearer to the eye than top edge).
Determine the modification necessary to accomplish the
preferred viewing angle. To make angle adjustments, move
either the top or the bottom Tracking Block assemblies
independently of each other. For oversized monitors, a good
starting point is 11 spaces down in front and 9 spaces down
in back.
Monitor Adjustment
Downward Gaze™ Monitor Installation
Step 10.2
Once the angle is adjusted, adjust the height by raising or
lowering both upper and lower Tracking Block assemblies
the same number of spaces.
Step 10.3
The bottom of the screen should always be closer to your eyes
than the top.
Step 10.5
After you achieve the desired height and angle, you can fine
tune the viewing distance by sliding the carriage forward and
backward. Each time you make an adjustment, reinsert the
Male Tracking Blocks. When the adjustment is completed,
install the Security Screws.
Step 10.4
50-9-2121 Asy. Instr., © Nova Solutions, Inc. 2005
PATENT INFORMATION: Nova products are covered by one or more of the following U.S. patents: Re. 34,266; 4,869,564; 5,125,727; 5,290,099; 5,294,193 & 5,408,939.
Other U.S. and foreign patents issued and pending.
Too Low!
...Monitor is located too
far below surface so that
view is obstructed.
Incorrect Installation
Correct Installation
Page 4
Wrong Angle!
...Top of monitor is closer
to the eye than the
bottom of the monitor.
Maximum Monitor Dimensions:
23-1/2"D x 20-1/8"W x 19"H
Specs for 50-9-2121 will accommodate most 21" monitors.
TRACKING
BLOCK-F
SECURITY
S
CREW
TRACKING
BLOCK-M
LOWE
R
TRACKING
BLOCK
UPPE
R
TRACKING
BLOC
K
LOWER
TRACKING
BLOC
K
UPPER
T
RACKING
BLOCK
19"
3"
11"
Keyboard drawer from
edge of top
7-9/16"(1st Stop)
10"(Last Stop)
33"
(838 mm)
25-
3
/4"
3-5/8"
28"
Min.
 Loading...