

Page 1

NOTHING
phone (1)
1
phone (1)
User Guide
VERSION 1.0.0
Page 2

NOTHING
phone (1)
2
Table of contents
GETTING STARTED
1.Hardware Layout
2.Charging
3.Navigation
4.Launcher
5.Quick Settings / Notifications
BASICS
1.Network
2.Connected Devices
3.Installing / Deleting Apps
4.Battery
5.Storage
ADVANCED FAQ
1.Camera & Mic Optimisation
2.App Shortcuts
3.Expanded Icons
4.Do not disturb
5.Google assistant
6.Sound & Vibration
7.Glyph Interface
8.Screen lock & Security
9.About phone (1)
6.Reverse charging
7.Screenshot
8.NFC
Page 3

NOTHING
phone (1)
3
Getting started
1.Hardware Layout
2.Charging
3.Navigation
4.Launcher
5.Quick Settings / Notifications
Page 4
NOTHING
phone (1)
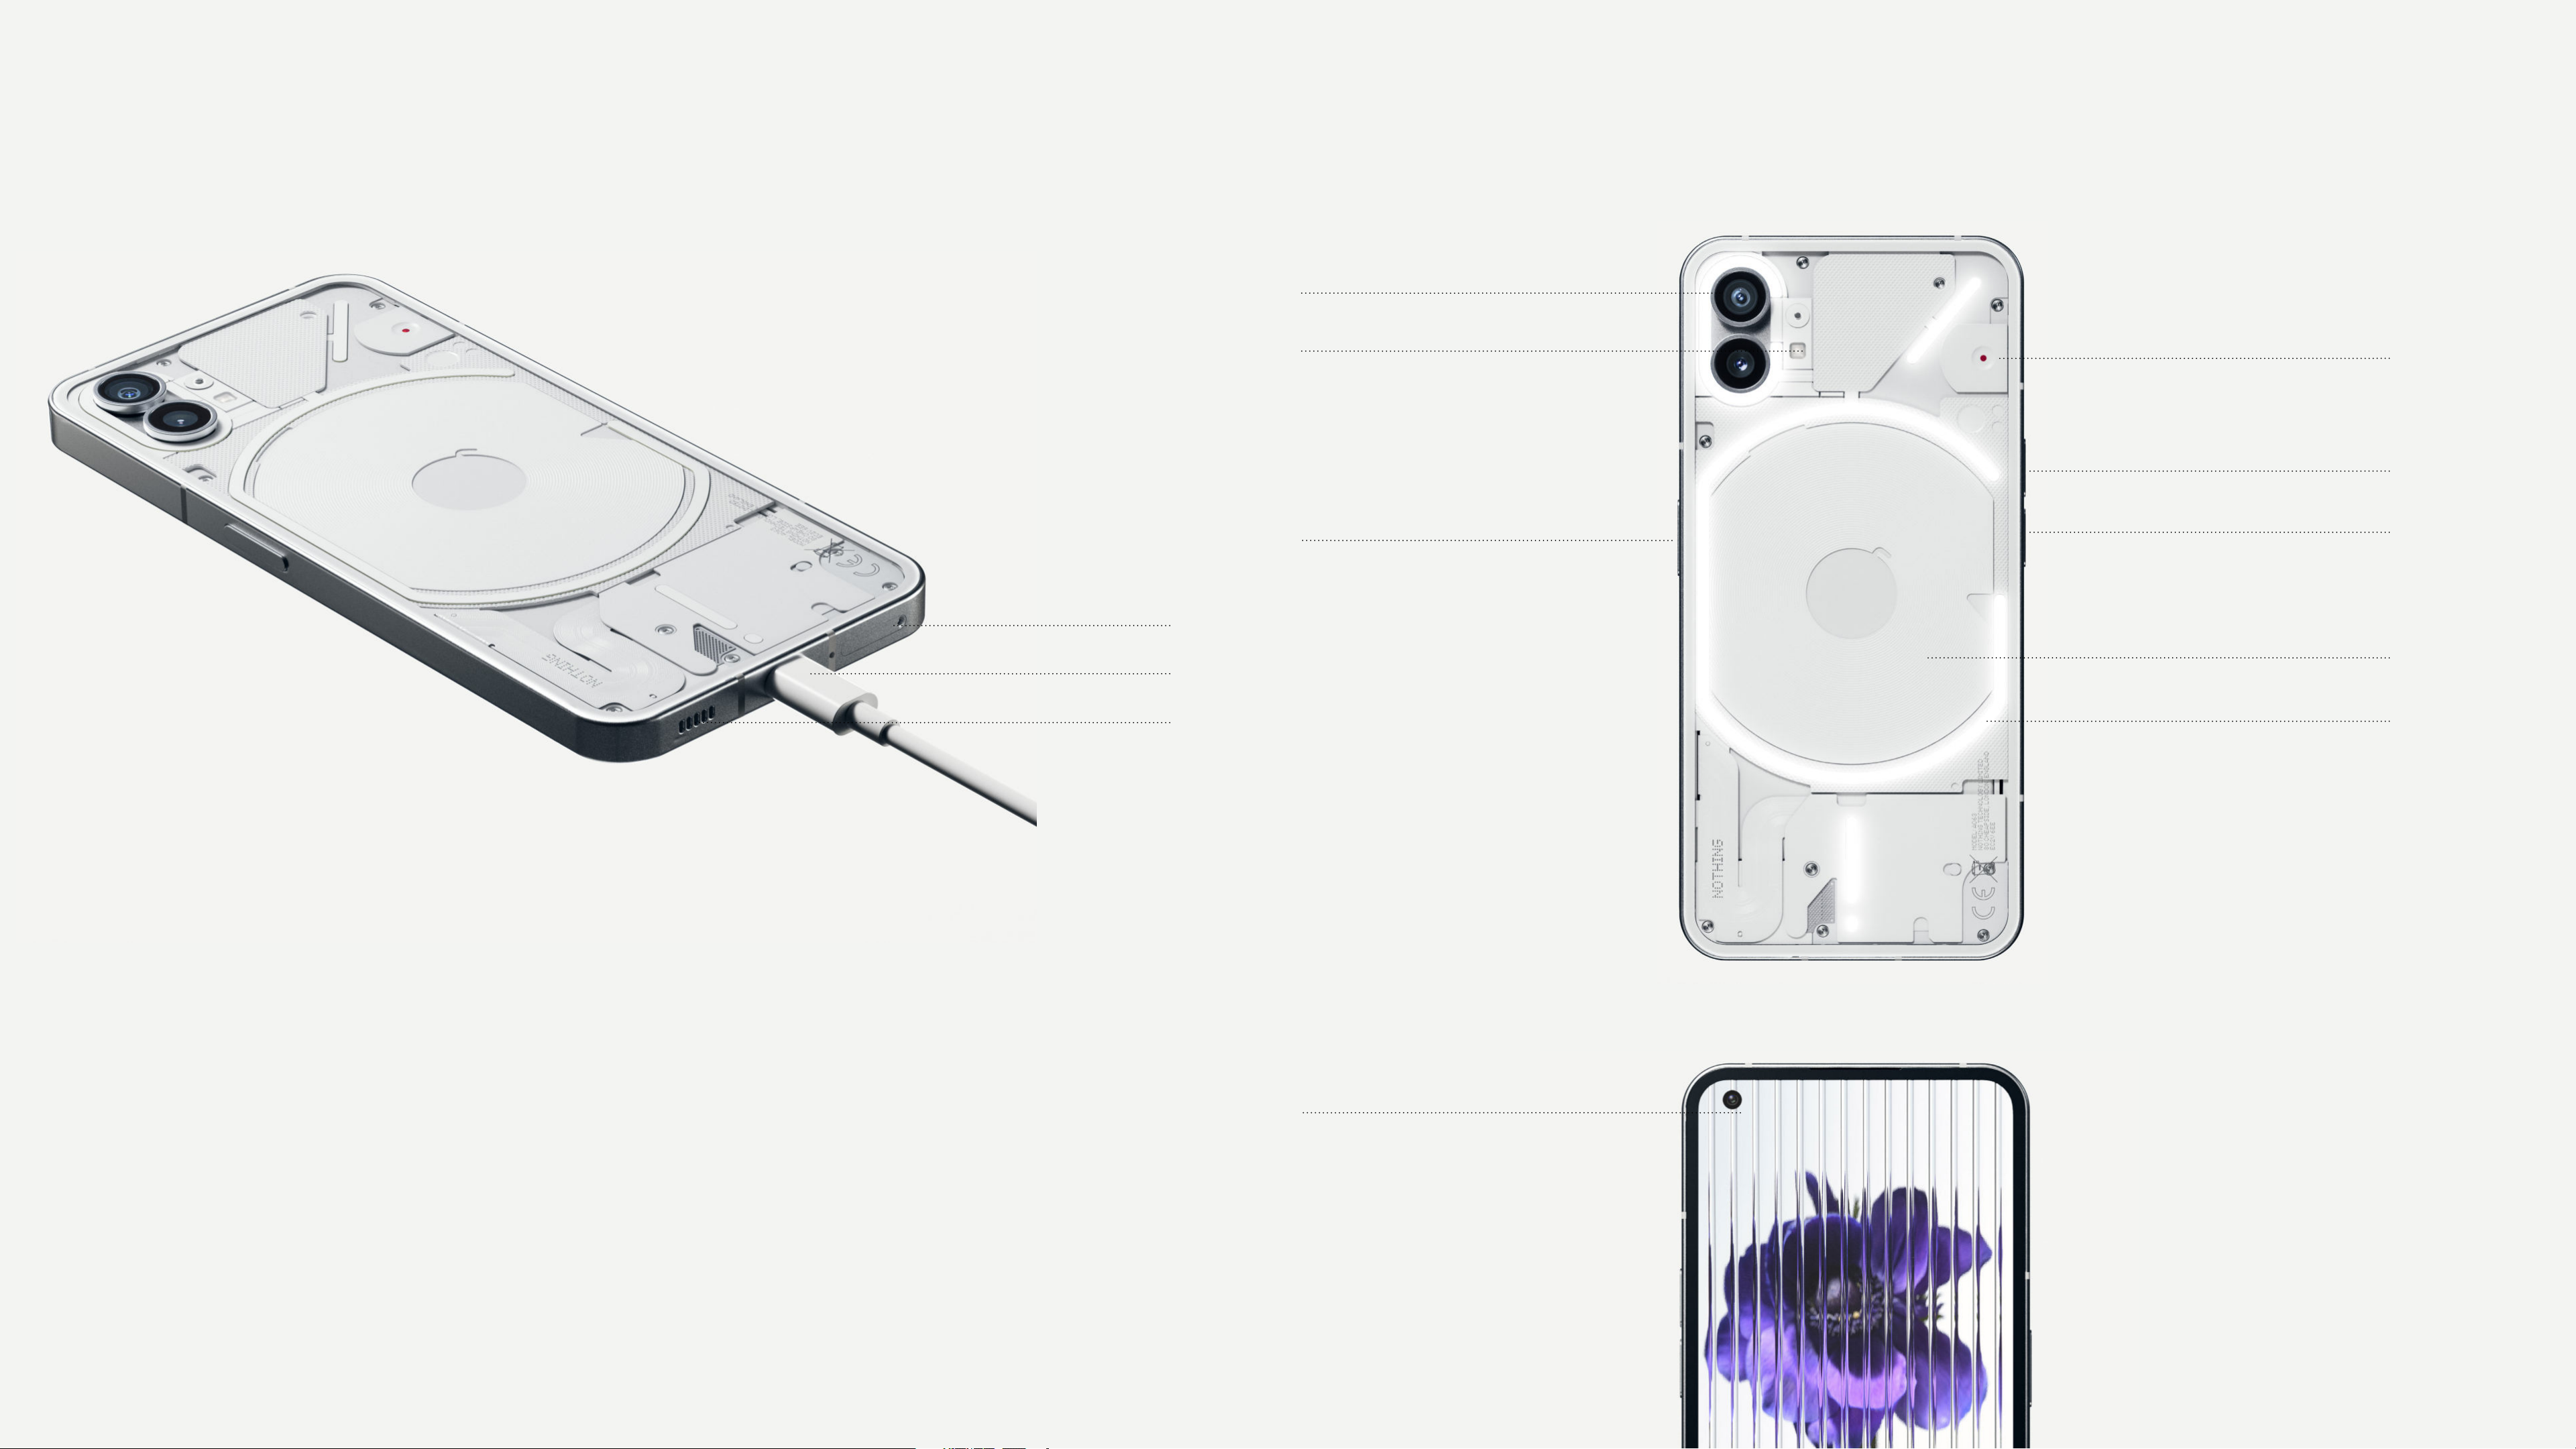
Back Camera
4
SIM card tray
Charging port
Speaker
Flashlight
Power button
Recording light
Volume up button
Volume down button
Wireless charging coil
Glyph Interface
Getting started
1.Hardware Layout
Front Camera
Page 5
NOTHING
phone (1)
5
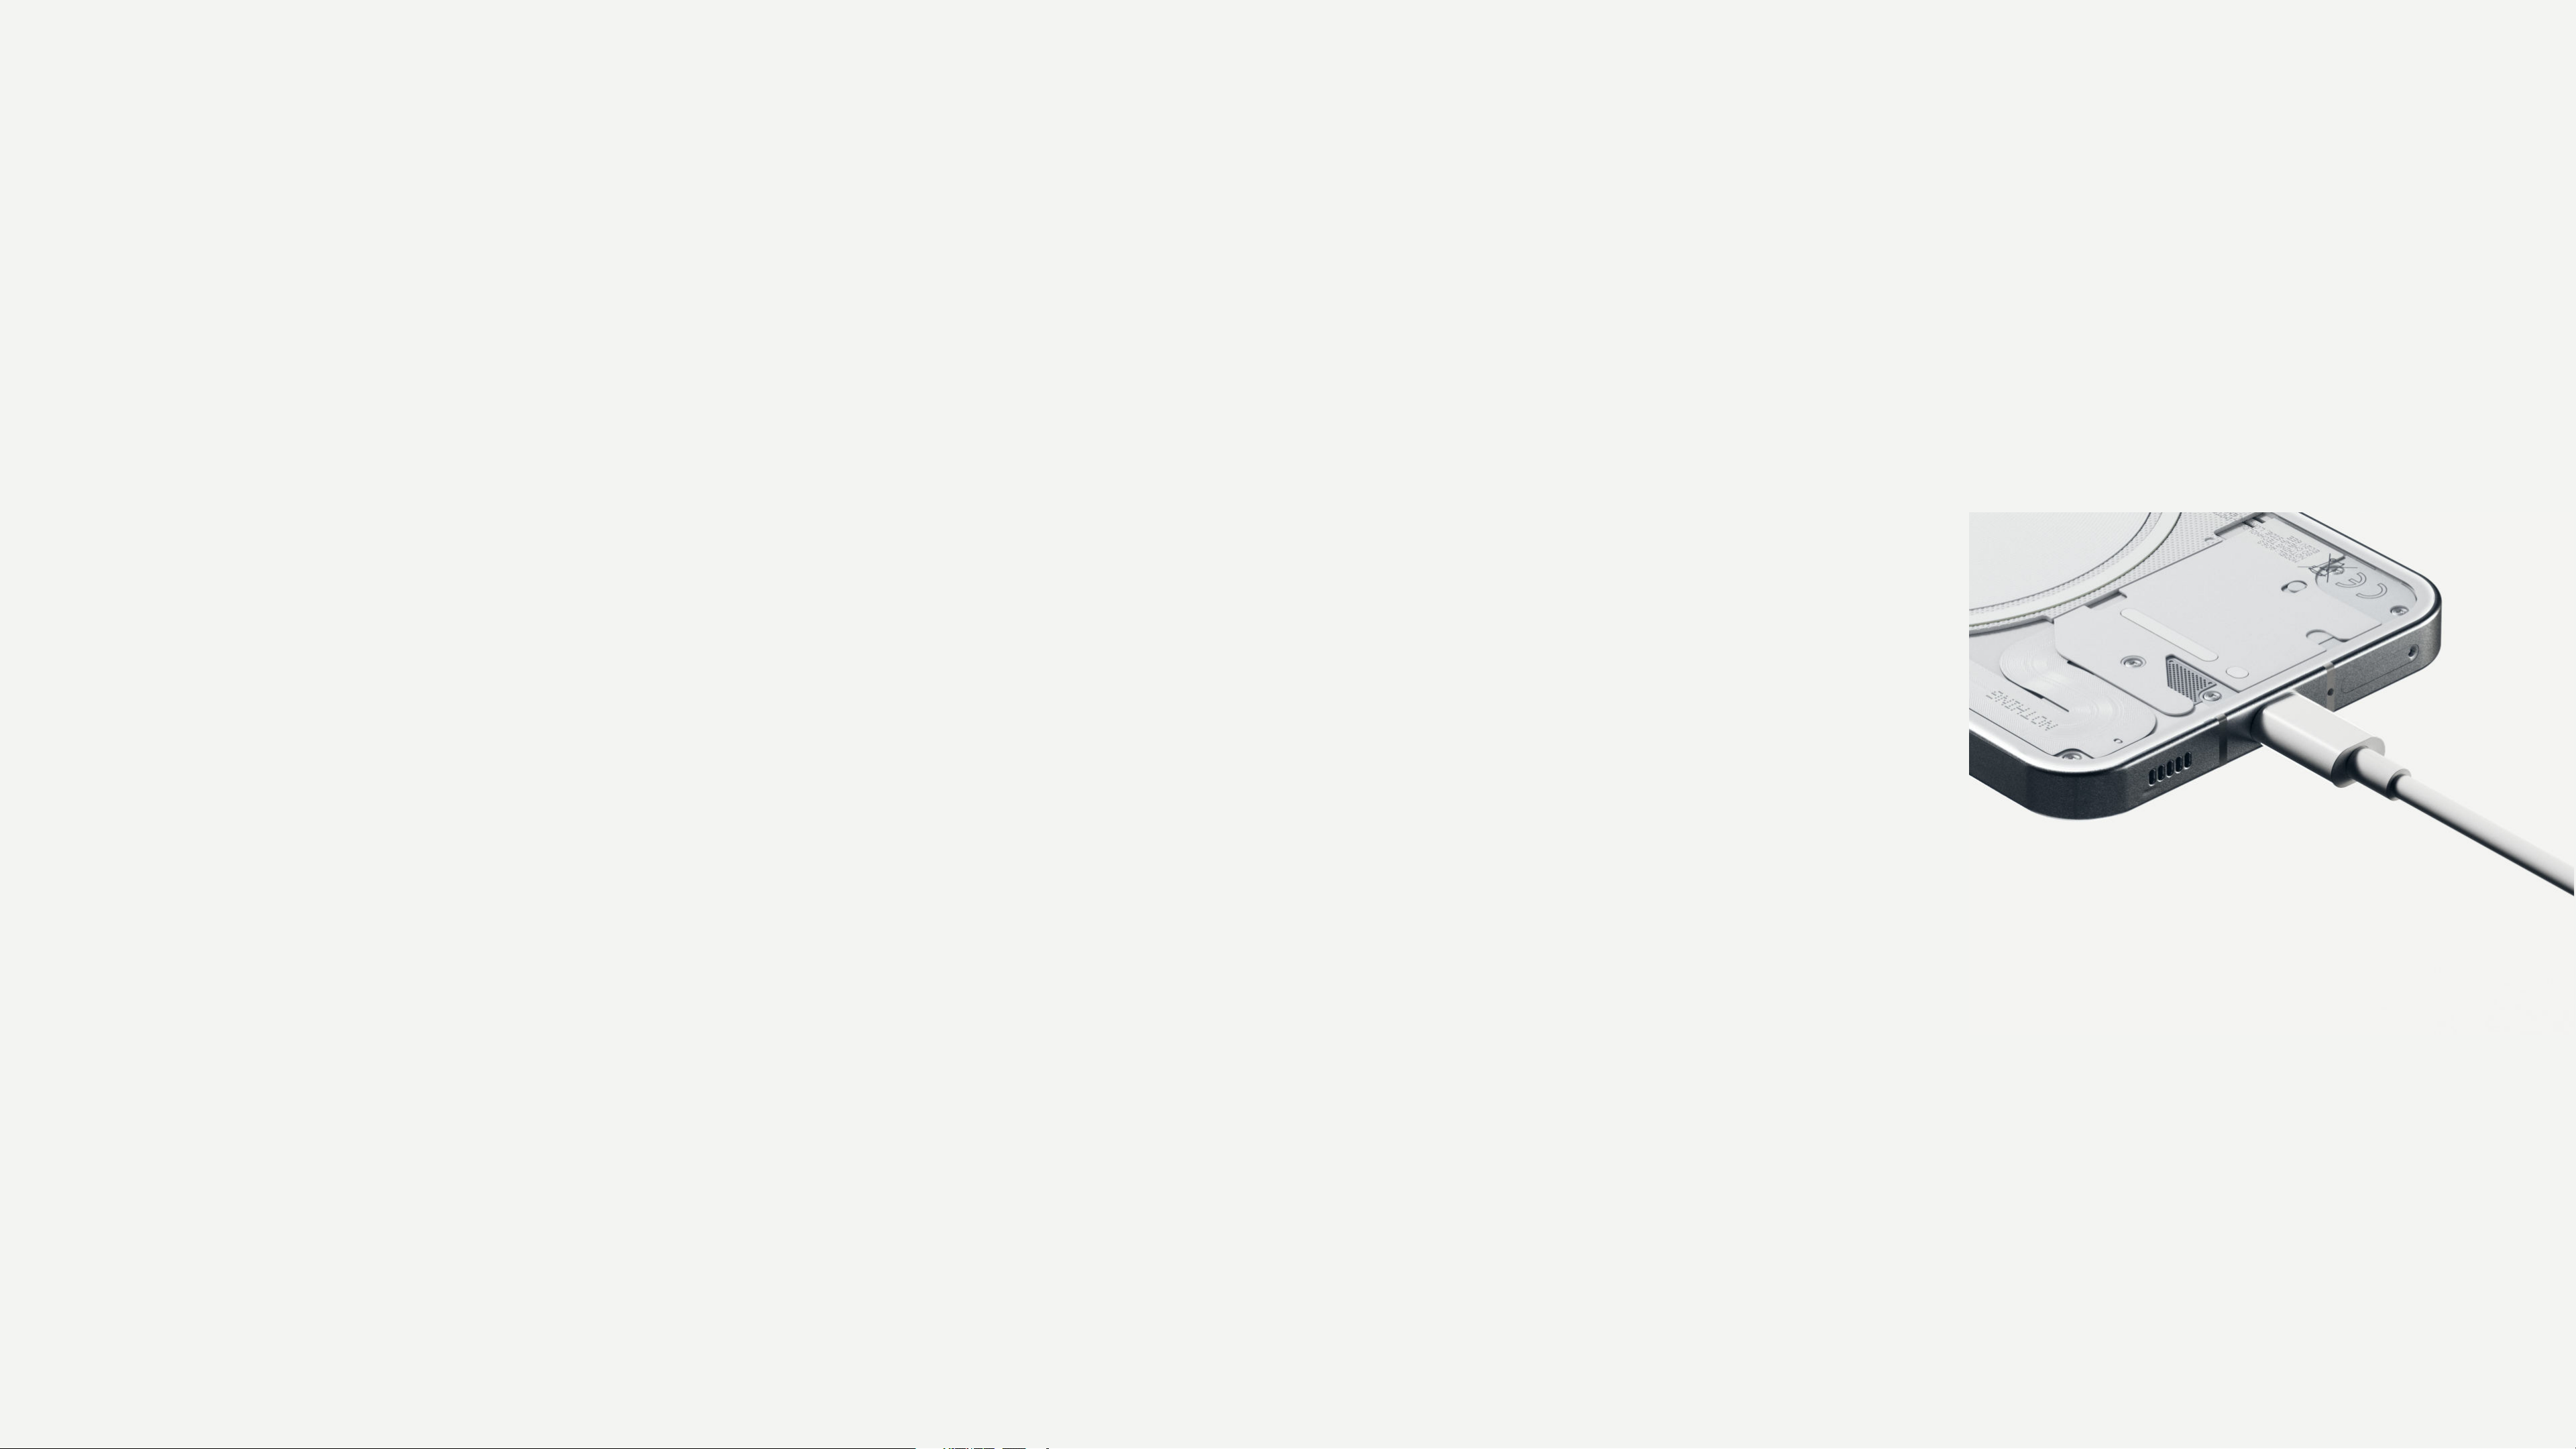
phone (1) charges at 33W. Able to reach 100%
power in just 76 minutes with wired fast charge
and a compatible fast charge adapter.
Alternatively, the wireless 15W charger will
charge the device completely in 130 minutes.
To use wireless charging, place the phone (1)
face up on a compatible
wireless charger.
Getting started
2.Charging
Page 6

NOTHING
phone (1)
6
Back
Swipe inwards from the left or right
edge of the screen.
Home
Swipe up from the bottom edge of the
screen.
App switcher
Swipe up and hold from the bottom
edge of the screen.
3-BUTTON NAVIGATIONGESTURE NAVIGATION
Back
Return to the previous screen or
reverse the last action.
Home
Return to the home page of the
launcher.
App switcher
Open the app switcher to change to
a recently opened app or to free up
memory by closing apps running in the
Getting started
background.
3.Navigation
Page 7

NOTHING
phone (1)
7
HOME SCREEN
1.Long press empty area to bring up Home
settings, Widgets and Customisation.
2.Long press app icons to show app shortcuts
and rearrange the icons position.
3.Long press and drag one app icon to
another icon to create a folder.
APP DRAWER
WIDGETS
1.Open Widgets menu through app shortcuts
or long press empty area of home screen.
2.Long press and drag any widget to the
home screen.
3.Long press widget to resize or edit.
Getting started
1.Swipe up from the bottom to pull up App
drawer.
2.Long press and drag the app icon to add
apps to the home screen.
4.Launcher
Page 8

NOTHING
phone (1)
8
Pull down from the status bar to access
Quick Settings & the Notication Centre. In
Quick Settings, tap each tile to toggle each
feature. Long press the tiles to access more
detailed settings.
Pull down a second time to access the expanded
Quick Settings. Swipe left and right to access
more Quick Settings tiles. Press the edit
(pencil) icon and drag the tiles to customise
the layout.
Getting started
5.Quicksettings/Notifications
Page 9

NOTHING
phone (1)
9
Basics
1.Network
2.Connected devices
3.Installing/Deleting apps
4.Battery
5.Storage
6.Sound & vibration
7.Glyph Interface
8.Screen lock & security
9.About phone (1)
Page 10

NOTHING
phone (1)
10
To change the Network Settings, either drag down the Quick
Settings panel and long press the rst tile on the top left,
or open the Settings app and tap on “Network & Internet”.
To connect to Wi-Fi, tap on the wi menu item and turn on
the Wi-Fi toggle. Proceed to select the wireless network of
choice and enter the password.
Internet sharing can also be turned on via this page. To
do so, simply tap on “Hotspot & Tethering” to select the
preferred method and proceed to set it up. This option can
also be easily accessed through Quick Settings.
Basics
1.Network
Page 11

NOTHING
phone (1)
11
To connect to a Bluetooth device, either drag down the
Quick Settings panel and long press the second tile to the
top right, or open the Settings app and tap on “Connected
devices”
Tap on “Pair new device” and select on the target device
to connect to it.
Basics
2.Connected devices
Page 12

NOTHING
phone (1)
12
Launch the “Play Store” and log into a
Google account. Proceed to search for the
app on the top search bar and tap the green
“Install” button. The installed app can be
found in the app drawer.
DELETINGINSTALLING
Open the app drawer, hold and drag the app
that needs to be deleted. Drag it to the top
right corner of the screen and release it
under the area marked “Uninstall”.
*Note: If this action is performed on the
home screen, the zone will be marked as
“Remove”, which only removes the icon from
the home screen and will not uninstall the
app.
Basics
3.Installing/deleting apps
Page 13

NOTHING
phone (1)
13
The phone (1) uses a 4500mAh battery, which should last a whole day
of medium to heavy usage. If the battery is running low, enable
Battery Saver mode by either tapping on the “Battery Saver” tile in
Quick Settings, or pressing the Low Power notication that appears
automatically when the device’s battery falls below 15%.
The phone (1) optimises its long term battery health by reducing
the charging speed overnight when an alarm is set. This is to avoid
trickle charging and ensures that the device only becomes fully
charged close to wakeup time.
Basics
4.Battery
Page 14

NOTHING
phone (1)
14
To check the available storage on the device, open the
Settings app and tap on “Storage” to get an overview of the
storage consumption of each type of tiles.
To clear app storage or wipe app cache, open the Settings
app and tap on “App”, then “All apps” to view all installed
apps and the respective storage each app is using. Tap on a
select app to access its “More info” page, which shows the
two buttons for either clearing storage or clearing cache.
Basics
5.Storage
Page 15

NOTHING
phone (1)
15
Press the physical volume up or down button on the side of the
device to adjust the volume for the most recently used audio
source and open the audio menu.
In the audio menu, tap on the top bell icon to change between
the “Ring mode”, “Vibration Only”, and “Silent mode”.
In the audio menu, tap on the bottom three dots icon to open
a slider menu with four sliders to adjust the volume of media
volume, call volume, ring & notication volume, and alarm
volume respectively.
Basics
6.Sound & vibration
Page 16

NOTHING
phone (1)
16
The Glyph Interface are the ve individually controlled lighting
segments on the back of phone (1). All of the preloaded Nothing
ringtones and notication sounds have their bespoke, handcrafted Glyph
patterns, lighting up the Glyph Interface in sync with audio and
vibration, providing users a new way to interact with phone (1).
To setup individual features, nd the Glyph Interface section in the
Settings app. Alternatively, long press the Glyphs toggle in Quick
Settings.
Drag the brightness slider to adjust the brightness of the Glyph
Interface. This will scale all Glyphs down from maximum brightness to
the set brightness.
To preview and set ringtones, nd the Ringtones tab in the Glyph
Interface settings. Choose between setting the default ringtone or
Basics
pair individual contacts with unique ringtones, then proceed to decide
between Nothing sounds (handcrafted Glyphs) or My sounds (imported
sounds, generated Glyphs).
To add a custom ringtone, go to My sounds and press “Add new sounds.”
This will open the le browser where you can select the les to
import.
Notication sounds can be set in a similar manner, deciding between
original Nothing sounds or imported sounds.
7.Glyph Interface(1)
Page 17

NOTHING
phone (1)
17
GLYPH INTERFACE ALSO INCLUDES:
Charging Metre
Passively displays the device’s charging progress when plugged in.
Google Assistant
Lights up the Glyph Interface when Google Assistant is triggered.
Flip to Glyph
Temporarily silencing and turning off the vibration of the device when
phone (1) is placed with the screen face down, reducing distractions
while not missing out on any important calls.
Basics
Bedtime Schedule
Temporarily disables the Glyph Interface at set times of select days
ensuring users won’t be distracted at night time.
Secret easter egg feature - the most passionate Nothing fans will
gure this one out in no time.
Do not disturb will temporarily disable the Glyph Interface.
7.Glyph Interface(2)
Page 18

NOTHING
phone (1)
18
To change the unlocking method, open the Settings app and nd the
“Screenlock & Security” option. Enter the page to set the unlocking
PIN, record additional ngerprints, or record
facial data used for unlocking the device.
Note: ngerprint / face data unlocking cannot be used without a PIN
as otherwise anyone could simply swipe to unlock the device.
Basics
8.Screenlock & security
Page 19

NOTHING
phone (1)
19
Contains all the device specic information such as hardware
information, phone number etc.
Press on the device name to edit how phone (1) appears on
other devices.
If there is a new software update available for the device,
a red number (1) will show up next to the NothingOS version.
Tap 9 times, you know where...
Basics
9.About phone (1)
Page 20

NOTHING
phone (1)
20
Advanced
1.Camera & mic optimisation
2.App shortcuts
3.Expanded Icons
4.Do not disturb
5.Google assistant
6.Battery share
7.Screenshot
8.NFC
Page 21

NOTHING
phone (1)
21
Phone (1) offers OS-level camera and microphone
optimisation algorithms that affect all rst- and
third-party applications. Whenever a camera or
microphone is being used, a green icon will appear on
the rightside of the status bar.
To switch optimisation modes, swipe down once and tap
on the green icon to select the best algorithm to use
in the current environment.
Advanced
1.Camera & mic optimisation
Page 22

NOTHING
phone (1)
22
In the launcher, app-specic shortcuts can be
accessed by long holding on an app icon to show
the expanded menu of shortcuts.
Tip: the shortcut can also be made into its own
standalone icon by dragging and dropping it on the
homescreen.
Advanced
2.App shortcuts
Page 23

NOTHING
phone (1)
23
The Nothing launcher offers the option to expand any icon on the
homescreen to four times the size, allowing full customisation
options for users. To use this feature, long hold on an app icon
and press the expand icon to enlarge the selected app icon.
The same procedure can also be carried out on folders,
allowing users to organise their homescreen without
adding another step of opening the folder rst for the rst
three apps in the folder.
Advanced
3.Expanded icons
Page 24

NOTHING
phone (1)
24
Do not disturb mode offers a distraction free experience,
temporarily muting any non-whitelisted notications and
incoming calls, as well as hiding any unseen notications on the
status bar and notication tray. To toggle this feature, open
the Quick Settings and tap on the “Do not disturb” tile.
To make changes to the list of whitelisted people / apps,
simply long hold the “Do not disturb” tile in Quick Settings and
edit the important people / apps. This will allow them to
bypass the notication.
Do not disturb mode also temporarily disables the Glyph
Interface by default. To change this behaviour, long hold the
“Do not disturb” tile in quick settings and turn off the “Mute
Glyphs” toggle.
Advanced
4.Do not disturb
Page 25

NOTHING
phone (1)
25
Google Assistant provides a virtual personal
assistant experience through a natural language
speech interface to perform a variety of tasks. It
can be activated by short holding the power button
or swiping up from the bottom right corner of the
screen.
Learn more about things to say to Google Assistant
from the Google Assistant app.
Advanced
5.Google Assistant
Page 26

NOTHING
phone (1)
26
phone (1) is capable of charging other Qi-compatible
wireless charging devices using its wireless
charging coil.
To activate this feature, open the Quick Settings
menu and toggle the battery share feature on. The
Glyph Interface will light up if the feature is
successfully activated.
Advanced
6.Battery share
Page 27

NOTHING
phone (1)
27
To capture a screenshot on phone (1), simultaneously press the
volume down and power button. The image will be stored in the
screenshot album in the Google Photos app. By default, this folder
might not be synchronised to the main photo album. To access
the album, go to Google Photos and navigate to the bottom right
“Library” tab.
To take an expanded screenshot, take a normal screenshot rst
and wait for a “Capture more” button to show up on the bottom
of the screen. Once tapped, a full page view will be visible for
any scrollable interface. Simply drag the borders to adjust the
size of the screenshot.
The screenshot can also be quickly edited by pressing the pencil
icon that pops up after taking the screenshot. Make any changes
like crop, add text, or annotate, then press “Save” on the top
Advanced
left corner to save the edited screenshot.
7.Screenshot
Page 28

NOTHING
phone (1)
28
NFC (Near Field Communication) allows phone (1) to connect to other
NFC-supported devices by placing the two devices in proximity to each
other. The most common use is to use phone (1) as a virtual credit /
debit card through Google Pay.
It is recommended to keep NFC on for convenience as it does not drain
much battery when left on standby. To toggle this feature off, open
the Quick Settings and tap on the “NFC” tile.
Advanced
8.NFC
Page 29

NOTHING
phone (1)
29
FAQ
Page 30

NOTHING
phone (1)
30
FAQ
How do I turn on my Nothing phone (1)?
Press and hold the power button until the Nothing logo appears on the display.
How do I transfer data from my existing phone to my Nothing phone (1)?
In the setup wizard, there will be an option to copy data from an existing device,
either via a Google account backup or by connecting the two
devices with a cable.
How do I change the language?
The language can be set on the rst page of the setup wizard. It can also be changed
in Settings > System > Languages and input.
How do I enable location services?
Location services can be activated in Settings > Location. When this toggle is on,
apps that require location services will request permission to access your location
data when you open the app for the rst time.
How do I activate Find My Device on my Nothing phone (1)?
Find My Device will be automatically activated after you log into a Google account.
However, the location can only be accessible if location services are toggled on. For
more information, check out Settings > Google > Find My Device.
How do I back up data on my Nothing phone (1)?
phone (1) uses Google’s default backup routine when it’s connected to Wi-Fi and
charging on standby for 2 hours. To backup immediately, navigate to Settings > Google
> Backup and tap on the “Back up now” button.
Page 31

NOTHING
phone (1)
31
FAQ
How do I change the wallpaper and accent colours on my Nothing phone (1)?
The wallpaper and accent colours can be changed by long pressing on an empty space in
the homescreen, and selecting “Customisation” in the pop up menu. Tap on “Wallpaper &
style” to select your wallpaper and accent colour. By default, phone (1) will deploy
Android 12’s new Dynamic Colour feature to extract colours from the wallpaper unless
specied.
How do I use screen recording on my Nothing phone (1)?
To set up the screen recording feature, swipe down from the top of the screen two
times to access the expanded Quick Settings. Press the edit (pencil) icon and drag the
Screen Recording tile up from the hidden tiles.
To begin recording, swipe down to open the Quick Settings and nd the
newly added Screen Recording tile. Tap it once and conrm to begin recording after the
three-second countdown, shown on the right side of the
notication bar.
To nish recording, swipe down to open the notication centre and tap “Stop” to save
the recording. The le can be accessible in Google Photos > Library > Movies.
How do I add the ear (1) widget on my Nothing phone (1)?
Just like any other widget, the ear (1) widget can be accessible by long pressing on
an empty space in the homescreen and selecting “Widget” in the pop-up menu. Next,
scroll down to the ear (1) app and drag the widget out to the homescreen.
Page 32

NOTHING
phone (1)
32
FAQ
How do I record on my Nothing phone (1)?
Launch the camera app and tap on the “Video” option on the mode selection bar.
How do I set and use passcode on my Nothing phone (1)?
Go to Settings > Security to choose your preferred unlocking method. Note that
you need to set a pattern / PIN rst in order to use ngerprint or Face Unlock.
How do I do factory reset on my Nothing phone (1)?
To carry out a factory reset, go to Settings > Reset options > Erase all data
(factory reset).
How do I eject the SIM tray on my Nothing phone (1)?
Insert the provided SIM card remover tool into the hole next to the SIM tray,
located on the bottom of the phone.
How do I connect my ear (1) to my Nothing phone (1)?
The Fast Pair feature launches on the phone (1) when opening an unpaired ear (1)
case with the buds inside. Navigate through the Fast Pair setup to nish the
pairing.
If Fast Pair does not appear, go to Settings > Connected Devices > Pair new
device to search for Nothing ear (1). For more details, please refer to the ear
(1) manual.
Page 33

NOTHING
phone (1)
33
FAQ
How do I enable battery saver on my Nothing phone (1)?
When the phone (1)’s battery falls below 15%, a low battery notication will appear to
prompt you to turn on battery saver.
To toggle it manually, swipe down from the top of the screen two times to access the
expanded Quick Settings. Press the edit (pencil) icon and drag the Battery Saver tile
up from the hidden tiles. Tap it to toggle it on and off from the Quick Setting.
How do I force restart my Nothing phone (1)?
Hold the power button and volume up button simultaneously until the Nothing logo
appears on the display.
How do I enable Game Mode on my Nothing phone (1)?
Game mode is automatically activated when a listed app is launched. To edit the list
of apps, go to Settings > System > Game Mode > App list. Apps that are listed as games
on the Play Store will be added to this list by default.
How do I know when a new software update is available?
Whenever a new software update becomes available, a notication will pop up reminding
you to update to the latest version. However, you can also manually check for
updates by going to Settings > About phone > Software info. If there is a new update
available, a red icon will appear next to the Nothing OS label.
How do I hide message details on the lockscreen?
Go to Settings > Display > Lockscreen > Privacy to pick the notication preview
option.
Page 34

NOTHING
phone (1)
34
FAQ
How do I enable call waiting on Nothing phone (1)?
Open the Phone app and tap on the three-dots icon to the right of the search bar.
Next, navigate to Settings > Caller accounts > Additional settings and toggle on Call
waiting.
How do I block / blacklist numbers on Nothing phone (1)?
Open the Phone app and tap on the three-dots icon to the right of the search bar.
Next, navigate to Settings > Blocked numbers > Add a number, to block incoming calls
and texts from the added number.
How do I screen cast Nothing phone (1) to my TV?
To set up the screen cast feature, swipe down from the top of the screen two times to
access the expanded Quick Settings. Press the edit (pencil) icon and drag the Screen
Cast tile up from the hidden tiles.
To begin mirroring, swipe down to open the Quick Settings and nd the newly added
Screen Recording tile. Tap it once and select the targeted device to cast to connected
in the same local area network.
How do I enable dark theme on Nothing phone (1)?
Dark theme is enabled by default. To change it, swipe down to access Quick Settings
and nd the “Dark Theme” tile and tap it to toggle it on / off.
How do I change fonts on Nothing phone (1)?
The font in phone (1) cannot be changed. However, to change to font size, navigate to
Settings > Display > Font Size.
How do I restore deleted photos or videos?
Open the Photos app and navigate to Library on the bottom bar. Next, tap on “Bin” to
see items deleted within the recent 60 days.
Page 35

NOTHING
phone (1)
35
Thanks
 Loading...