


THANK YOU FOR CHOOSING A NORTHERN TOOL + EQUIPMENT CO., INC. PRODUCT!
For future reference, please complete the owner's record below:
Model: _______________ Purchase Date: _______________
Save the receipt, warranty, and instruction manual. It is important that you read the entire
manual to become familiar with this product before you begin using it.
This machine is designed for certain applications only. Northern Tool + Equipment cannot
be responsible for issues arising from modification. We strongly recommend this machine is
not modified and/or used for any application other than that for which it was designed. If you
have any questions relative to a particular application, DO NOT use the machine until you
have first contacted Northern Tool + Equipment to determine if it can or should be performed
on the product.
For technical questions please call 1-800-222-5381.
INTENDED USE
This electric bicycle is installed with an electric drive system. Although this product
operates much like a standard bicycle, there are differences. Please carefully read the
User's Manual before use.
CAUTION: Do not lend this electric bicycle to those who cannot ride a bicycle.
HELMETS SAVE LIVES! Always wear a properly fitted helmet when riding your electric
bicycle. Do not ride at night. Avoid riding in wet or hazardous conditions.
TECHNICAL SPECIFICATIONS
1 OF 13
Electric Driving System
Frame Size
Frame
Wheel Size
Fork
Gear Shifter
Rear Derailleur
Chain
Rims
Brake
Spoke
Tire
Battery
Max Speed
Charging Time
Battery Life Span
Motor
Riding Distance at one charge
Recommended Load Capacity
Max Climbing Angle
1:1.5 ASSIST POWER
26"
Alloy
26"
Suspension
7 SPEED
M310 7T SHIMANO
HP20
26"
Front: Disc brake, Rear: V-brake
UCP
26" 1.75
Lithium-Ion (24V/8Ah)
15 1/2 MPH (25km/h)
5-6 hours
500 times
24V 180W
15 1/2 miles (25Km)
165 lbs. (75 kg)
7
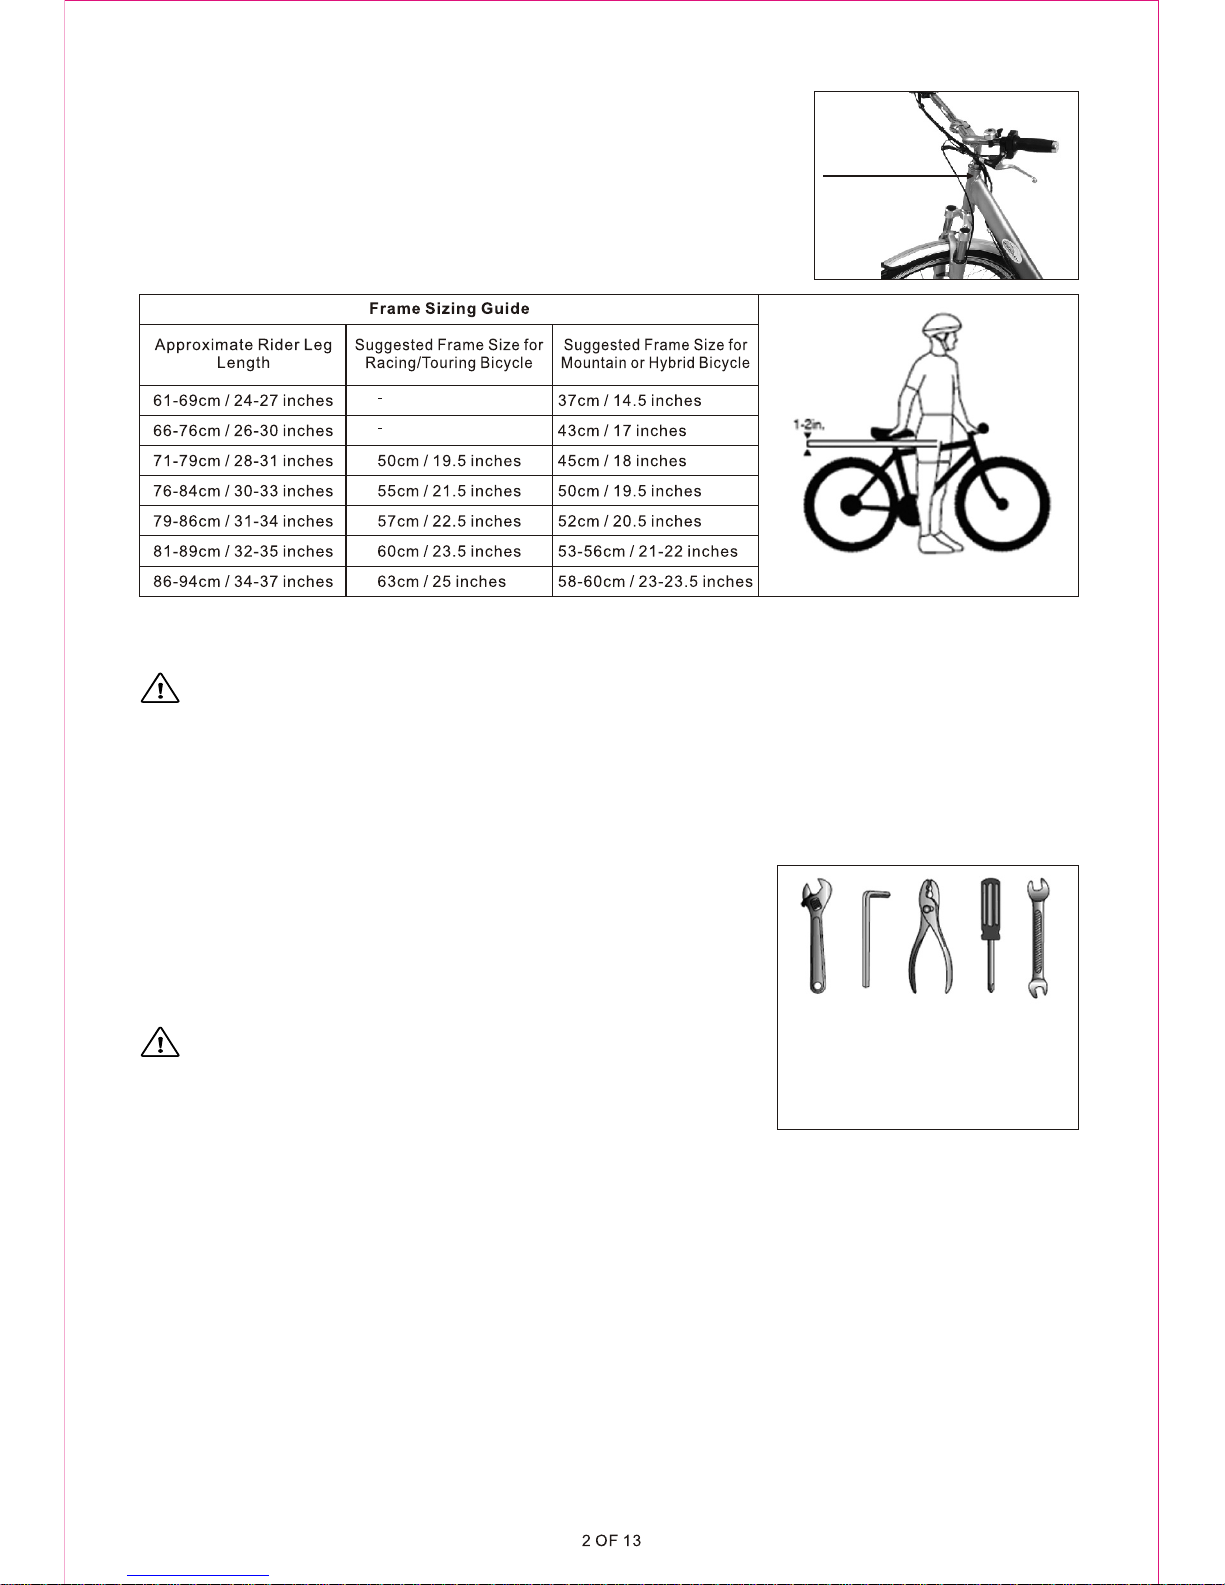
CORRECT FRAME SIZE
When selecting a new bicycle, frame size is very important.
Most full-sized bicycles come in a range of frame sizes. These
sizes usually refer to the distance between the center of the
bottom bracket and the top of the frame seat tube.
The above chart and diagram will help you find the correct
frame size. Rider leg length should be measured from the inseam.
WARNING: For riding safety and comfort, there should be no less than 1" to 2" of
clearance between the intended rider and the top tube of the bicycle frame.
The ideal clearance will vary based on rider preference. These basic rules are in place to
make straddling the frame when off the saddle easier and safer.
When measuring the fit of the bicycle, make sure you have both feet flat on the ground. It is
okay for women to use a men's bike to determine proper fit.
ASSEMBLY INSTRUCTIONS
Your new bicycle was assembled and tuned in the factory
and then partially disassembled for shipping. You may have
purchased the bicycle already fully assembled and ready to
ride or in the shipping carton in the partially disassembled
form. The following instructions will enable you to prepare
your bicycle for years of riding enjoyment.
WARNING: We recommend that you consult a bicycle
technician if you have doubts or concerns about your ability
to properly assembly, repair, or maintain your bicycle.
GETTING STARTED
Open the carton from the top and remove the bicycle. Remove the straps and protective
wrapping. Inspect the bicycle and all accessories and parts for damaged or missing parts. It
is recommended that the threads be lubricated prior to installation. Do not discard packing
materials until assembly is complete to insure that no required parts are accidentally
discarded. Assemble your bicycle following the steps that pertain to your model.
Handlebars
Remove the bubble bag from the handlebar. Place the handlebar stem into the top of the
handle tube, ensuring that all cables are free of tangles. Tighten the stem bolt observing the
minimum insertion mark and checking that the forks and the handlebars are facing
forward.
Tools Required: Inner Hex Wrench (not included)
Serial Number
Tools Required:
- Philips head screw driver
- 4mm 5mm 6mm & 8mm Allen keys
- Adjustable wrench or a 9mm, 10mm,
14mm & 15mm open and box end
wrenches
- A pair of pliers with cable cutting ability

WARNING: Over tightening the stem bolt or headset assembly may cause damage to
the bicycle and/or injury to the rider.
If the stem is not inserted to at least the "Minimum Insertion" mark, it is possible to overtighten the stem bolt and damage the fork steering tube. This could result in unsafe
conditions and an injury risk to the rider. Check steering tightness prior to riding by
straddling the front wheel and turning the handlebar. If you can turn it without the front
wheel turning, the stem is too loose. Re-align the handlebar with the front wheel and retighten the stem bolt.
Seat
Insert the seat assembly into the frame of the bicycle and adjust the seat to the desired
height. The seat post must be inserted to at least the " Minimum Insertion" line marked on
the seat post. Move the quick release lever to the closed position. You should feel
considerable resistance while moving the lever. If not, re-open and re-tighten the lever, then
move it to the closed position so it is in line with the frame. Position the top of the seat
parallel with the ground. Push the front of the seat up and down to firmly mesh the serrations
together. The serrations must mesh completely together to insure a stable riding position.
Check for tightness by twisting the seat from side to side, and from front to back. If the seat
moves at the seat clamp or quick release, reposition and re-tighten the appropriate
clamping mechanism.
Pedals
Start each pedal spindle by hand to avoid stripping the threads, then tighten with a 15mm
narrow open-ended wrench. It is very important that you check the crank set for correct
adjustment and tightness before riding your bicycle. The new crank may become loose with
initial use. Once the pedals have been attached, check that the crank arm rotates smoothly
and that there is no lateral movement.
WARNING: Attachment of an incorrect pedal into a crank arm will cause irreparable
damage.
Final Check
All other parts like front wheel, front disc brakes, headlights etc. were assembled by the
factory; no other assembly needed.
Tire Pressure: Check the tire pressure and inflate to the range recommended on the tire
sidewalls.
WARNING: Before riding, ensure all nuts, bolts and fittings on the bicycle have been
correctly tightened.
GENERAL SAFETY RULES
· Bicyclists are expected to obey the same laws as all other road vehicles. These include
giving way to pedestrians and stopping at red lights and stop signs. For further information,
contact the Department of Transportation in your State.
· Ride in a predictable manner. Always ride with traffic.
· Always use hand signals to indicate turning and stopping.
· Ride defensively. To other road users, you may be hard to see.
· Concentrate on what's ahead. Avoid pot holes, loose gravel, wet road markings, oil, curbs,
speed bumps, drainage grates and other obstacles if at all possible.
· Cross train tracks at a 90-degree angle or walk your bicycle across.
· Expect the unexpected, such as opening car doors or cars backing out of concealed
driveways.
· Be extra careful at intersections and when attempting to pass other vehicles.
· Familiarize yourself with all of the bicycle's features. Practice gear shifts, braking, and the
use of toe clips and straps, if fitted.
· Wear proper riding attire and avoid open toe shoes. When wearing loose pants, use leg
clips or elastic bands to prevent them from being caught in the chain.
3 OF 13

· Do not carry packages or passengers that will interfere with your visibility or diminish
control of the bicycle.
· Do not use items that may restrict your hearing.
· When braking, always apply the rear brake first, then the front. The front brake is more
powerful and if it is not correctly applied, you may lose control. Never lock up the brakes.
· Maintain a safe stopping distance from all other riders, vehicles, and objects. Safe braking
Distances are subject to the prevailing weather conditions.
Wet Weather Riding
CAUTION: Riding in wet weather is not recommended. Follow these precautions:
· Brake earlier and provide yourself with a longer stopping distance.
· Decrease your riding speed, avoid sudden braking and take corners with additional
caution.
· Wear reflective clothing and use safety lights for greater visibility when riding.
· Take extra care around potholes and slippery surfaces, such as line markings and train
tracks.
Riding At Night
CAUTION: Ride at night only when necessary. Follow these precautions:
· Ensure the bicycle is equipped with a full set of clean, correctly positioned reflectors.
· Use properly functioning lights, with a white headlight and a red taillight.
· If the lights are battery powered, make sure the batteries are well charged.
· Certain taillights have a flashing mechanism, which enhances visibility.
· Always wear reflective or light colored clothing.
· Slow down and use familiar roads with street lighting, whenever possible.
Hill Technique
· Gear down before a climb and continue gearing down as required to maintain pedaling
speed.
· If you reach the lowest gear and are struggling, stand up on your pedals. This will give you
more power from each pedal revolution.
· When descending, use the high gears to avoid rapid pedaling.
· Do not exceed a comfortable speed; maintain control and take additional care.
Cornering Technique
· Brake slightly before cornering and prepare to lean your body into the corner.
· Keep the inside pedal at the 12 o'clock position and slightly point the inside knee in the
direction you are turning. Keep the other leg straight; don't pedal through fast or tight
corners.
MAINTENANCE INSTRUCTIONS
Every time you ride your bicycle, its condition changes. The more you ride, the more
frequently maintenance will be required. We recommend you spend a little time on regular
maintenance tasks. The following schedules are a useful guide. You should be able to
accomplish most tasks. For additional assistance we recommend you see a bicycle
technician.
Brakes
The correct adjustment and operation of your bicycle's brakes is extremely important for
safe operation. Brakes should be checked for effective operation before every ride.
Frequent checking for adjustments is necessary as the control cable will stretch and the
brake pads will become worn with use.
WARNING: Never ride a bicycle unless the brakes are functioning properly.
4 OF 13

Inspection
Brake levers should be checked for tightness at least every three months. They should be
set in a comfortable position within easy reach of the rider's hands. Brake levers should be
firmly affixed to the handlebar. The brake pads should be checked for correct positioning
and tightness before every ride, and the various bolts and nuts at least every three months.
Squeeze each brake lever to make sure they operate freely and that the brake pads press
hard enough on the rims to stop the bike. There should be about 1mm2mm clearance
between each pad and the rim when the brakes are not applied. The brake pads must be
properly centered for maximum contact with the rim. Replace the brake pads if they are over
worn (when the grooves or pattern can't be seen). The brake cable wires should be checked
for kinks, rust, broken strands, or frayed ends. The outer casing should also be checked for
kinks, stretched coils, and other damage. If the cables are damaged, they should be
replaced.
Cables and Cable Housing
Cables and housing are one of the most over-looked parts on the bicycle. The first indication
that your cables and housing need to be replaced is an increased amount of pressure
needed to operate the brakes or shifters. Before every ride, check that there are no kinks or
frays in the cables and housing. Also check that the housing is seated properly into each
cable stop on the bicycle. It is recommended that the cables and housing be replaced at
least every riding season to prolong the life of your bike.
WARNING: Do not ride a bicycle that is not operating properly.
Hub Bearing
When checked, the hub bearings of either wheel will require adjustment if there is any play.
1.Check to make sure locknuts are tight.
2.To adjust, remove wheel from bicycle and loosen the locknut on one side of the hub while
holding the bearing cone with a flat open-end wrench.
3.Rotate the adjusting cone as needed to eliminate play.
4.Re-tighten the locknut while holding the adjusting cone in position.
5.Re-check that the wheel can turn freely without excessive play.
Wheel Inspection
It is important that wheels are kept in top condition. Properly maintaining your bicycle's
wheels will help braking performance and stability when riding. Be aware of the following
potential problems:
Dirty or greasy rims
CAUTION: Dirty or greasy rims can render your brakes ineffective. When cleaning, use
a clean rag and wash with soapy water, rinse and air dry. Don't ride while the wheels are still
wet. When lubricating your bicycle, do not get oil on the rim.
Straight wheels
Lift each wheel off the ground and spin them to see if they are straight and true. If wheels are
not straight, they will need to be adjusted. This is difficult and is best left to a bicycle
technician.
Broken or loose spokes
Check that all spokes are tight and that none are missing or damaged.
CAUTION: Damaged spokes can cause serious injury.
Loose hub bearings
Lift each wheel off the ground and try to move the wheel from side to side.
CAUTION: If there is movement between the axle and the hub, adjustment is
required.
5 OF 13

Axle nuts
Check that they are tight before each ride.
Quick release
Check that they are set to a closed position and are properly tensioned before each ride.
CAUTION: Maintain the closed position and the correct adjustment. Failure to do so
may result in serious injury.
Lubrication
Reflectors
Your bicycle is supplied with one front, one rear, two wheel, and two pedal reflectors. These
are an important safety and legal requirement. They should remain securely fitted and in
good, clean condition at all times. Periodically, inspect all reflectors, brackets, and
mounting hardware for signs of wear or damage. Replace immediately if damaged.
Tires
Tires must be maintained properly to ensure stability. Check the following areas:
Inflation: Use a tire gauge to check that the tires are inflated to the pressure indicated on the
tire sidewalls.
CAUTION: If inflating tires with a service station pump, take care. Over-inflation can
cause a tire blow out.
Bead Seating: When inflating or refitting tire, make sure that the bead is properly seated in
the rim.
Tread: Check that the tread shows no signs of excessive wear or flat spots, and that there
are no cuts or other damage.
Valves: Make sure valve caps are fitted and that valves are free from dirt. Allowing dirt in the
valve can lead to a flat tire, and serious injury.
Recommended Tire Pressures
The recommended pressure on the sidewall of the tire should match the following chart. Use
this as a general guide.
6 OF 13
Frequency
Weekly
Monthly
Every Six Months
Yearly
Component
chain
derailleur wheels
derailleur
brake calipers
brake levers
shift levers
freewheels
brake cables
bottom bracket
pedals
derailleur cables
wheel bearings
headset
seat pillar
Lubricant
chain lube or light oil
chain lube or light oil
oil
oil
oil
lithium-based grease
oil
lithium-based grease
lithium-based grease
lithium-based grease
lithium based grease
lithium based grease
lithium based grease
lithium based grease
How to Lubricate
brush on or squirt
brush on or squirt
oil can
3 drops from oil can
2 drops from oil can
disassemble
2 squirts from oil can
disassemble
disassemble
disassemble
disassemble
disassemble
disassemble
disassemble
Note: The frequency of maintenance should increase with use in wet or dusty conditions. Do not over lubricate-remove
excess lubricant to prevent dirt build-up. Never use a degreaser to lubricate your chain.

BMX: 35-50 PSI
MTB: 46-65 PSI
Road Touring: 70-90 PSI (Recommended)
Road Racing: 110-125 PSI
Hybrid/Cross: 60-100 PSI
How To Fix a Flat Tire
If you need to repair a tire, follow these steps:
1.Remove the wheel from the bicycle.
2.Deflate the tire completely through the valve. Loosen the tire bead by pushing it inward.
3.Press one side of the tire bead up over the edge of the rim.
Note: Use tire levers. Using a screwdriver may damage the rim.
4.Remove the tube, leaving the tire on the rim.
5.Patch the leaks using a tube repair kit, or replace the tube.
Note: Make sure that the size of the replacement tube matches the size stated on the tire
sidewall and that the valve is the correct type for your bicycle.
6.Match the position of the leak in the tube with the tire to locate the possible cause and
mark the location on the tire.
7.Remove the tire completely and inspect it for nails, glass, etc. The inside of the rim should
also be inspected to make sure there are no protruding spokes, rust or other potential
causes. Replace the rim tape, which covers the spoke ends, if damaged.
8.Remount one side of the tire onto the rim.
9.Using a hand pump, inflate the tube just enough to give it some shape.
10.Place the valve stem through the hole in the rim and work the tube into the tire. Note: Do
not let the tube twist.
11.Using your hands only, remount the other side of the tire by pushing the edge toward the
center of the rim. Start on either side of the valve and work around the rim.
12.Before the tire is completely mounted, push the valve up into the rim so that the tire sits
squarely in position.
13.Fit the rest of the tire, rolling the last, most difficult, part on with your thumbs. Note: Avoid
using tire levers as these can puncture the tube or damage the tire.
14.Check that the tube is not caught between the rim and the tire bead at ay point.
15.Using a hand pump, inflate the tube until the tire begins to take shape. Check that the tire
bead is evenly seated all the way around the rim. When properly seated, fully inflate the tire
to the pressure marked on the sidewall. Use a tire gauge to check.
16.Place the wheel into the frame checking that all gears, brakes and quick release levers
are properly adjusted.
Handlebar Stem
The handlebar stem fits into the steering column. It is held firm
by the action of a binder bolt and expander wedge which, when
tightened, binds with the inside of the fork steerer tube.
When removing the stem, loosen the stem bolt two or three
turns, and then tap it to loosen the wedge inside.
To lubricate, first wipe off any grease and grime. Next, apply a
thin film of grease to the part, including the wedge that will be
inserted into the frame. The height of the handlebar can be
adjusted for comfort. The stem is marked with the words max.
height/minimum insertion.
WARNING: Never ride a bicycle if the stem has been raised so that the max.
height/minimum insertion line can be seen.
WARNING: Over tightening the stem bolt or headset assembly may cause damage to
the bicycle and/or injury to the rider.
When re-fitting the stem, make sure the handlebar is correctly aligned and tightened using
the appropriate hex wrench.
7 OF 13

Test the security of the handlebar within the stem, and the stem within the fork steerer tube,
by clamping the front wheel between your knees and trying to move the handlebar up and
down, and from side to side. The handlebar should not move when applying pressure.
Handlebars
The exact positioning of the handlebar is a matter of personal comfort. Make sure the
handlebar and the fork are facing forward. If you need to replace the fork, please consult a
qualified bicycle technician.
WARNING: Never ride unless the handlebar clamping mechanism has been securely
tightened.
Headset Inspection
The headset bearing adjustment should be checked every month. This is important because
the headset locks the fork into the frame, and if loose, can cause damage or result in an
accident. Stand over the frame top tube with both feet on the ground. Apply the front brake
firmly and rock the bicycle back and forth. If you detect any looseness in the headset, it will
need adjustment.
Check that the headset is not overly tight by slowly rotating the fork to the right and left. If
the fork tends to stick or bind at any point, the bearings are too tight.
Note: If your bike is equipped with a threadless headset, please see a qualified bicycle
technician for repairs and adjustments.
Headset Adjustment
Loosen the top locknut (or remove it completely) along with the reflector bracket, if fitted.
Turn the adjusting cup clockwise until finger tight. Replace the lock washer and reflector
bracket, and then re-tighten the lock nut using a suitable wrench.
Note: Do not over tighten or bearing damage will occur.
WARNING: Always make sure that the headset is properly
adjusted and that the headset locknut is tight before riding.
WARNING: Over tightening the stem bolt or headset
assembly may cause damage to the bicycle and /or injury to the
rider.
Saddle and Seat Post
Inspection:
The seat fixing bolt and the seat post binder bolt should be
checked for tightness and adjustment every month. On
removing the seat post from the frame, you will notice a mark
with words max. height/minimum insertion.
WARNING: To avoid damage, the minimum insertion mark
must be inside the frame.
Lubrication:
Remove the seat post from the frame and wipe off any grease,
rust or dirt. Apply a thin film of new grease to the part that will be inserted into the frame. Reinsert, adjust, and tighten the seat post.
Adjustment:
The seat can be adjusted in height, angle, and distance from the handlebars to suit the
individual rider. Saddle angle is a matter of personal preference but the most comfortable
position will usually be found when the top of the seat is almost parallel to the ground, or
slightly raised at the front.
The saddle can also be adjusted by sliding it forward or back along the mounting rails.
When fitting, position the seat post into the clamp under the seat and place it in the frame
without tightening. Adjust it to the desired angle and position, and tighten the clamping
8 OF 13

Indicator
Power indicator light is red
Power and Charging indicator light is red
Power indicator light is red and charging indicator light is green
Charger State
Power on
Charging State
Full State
Please see the label on the charger for additional instruction.
mechanism.
Test it by grasping the seat and trying to turn it sideways. If it moves, tighten the binder bolt.
Note: Remember that the minimum insertion mark must remain inside the frame assembly.
CHARGING THE BATTERY
The battery of the electric bicycle can be charged with the bicycle
or independently.
Please use the special charger provided.
Charging the battery on the bicycle
1.Stop the electric bicycle at suitable place and turn the main
switch to OFF position.
2.Turn the handle of battery box to expose the charging inlet.
3.Insert the plug into the charging inlet.
4.When finished, unplug it and close the handle.
Charging the battery after removing
1.Place the bicycle on an even surface.
2.Turn the main switch to the OFF position and take out the key.
3.Insert the key into the battery lock and turn 180° counter
clockwise.
4.Lift the bar under the saddle so that the saddle is vertical. Pull
the handle of battery box to remove the battery
Installing the battery
1.Hold the handle of battery box and re-insert the battery.
2.Turn the key 180° clockwise, then remove the key.
3.Pull back the handle of battery box.
4.Return the saddle to its normal position.
5.Connect the plug.
Charging Method
1.Plug of charger into the charging socket of the battery.
2.Plug of charger into an outlet (110V).
WARNING: The battery should be kept upright when charging.
Indication of Charger State
9 OF 13

Charging Environment
A dry, level surface
Should be out of direct sunlight
Make sure there is proper ventilation
Keep away from children and pets
Temperature range should be 0-40 C during charging
Cautions for charging the battery
Please refer to the charger instructions for detailed information.
Battery should be charged once every 2 months when not used.
Remove the battery when not used frequently.
Charge the battery before using.
WARNING:
Battery should only be charged using the charger provided.
Keep the battery and charger away from children and pets.
Do not touch the charger plug and power supply with wet hands.
Do not turn the pedal when charging (on the bicycle).
Do not use the charger for other electric bicycles and electrical products.
Charger will become warm when charging. Do not cover.
Store the charger in a dry, secure environment.
Follow all operating instructions.
Keep the charger free of dirt, dust, and moisture.
Dispose of the battery in a proper manner.
OPERATING THE ELECTRIC BICYCLE
This electric bicycle is motor-driven.
This product complies with the state standards.
The product performs at its best on flat, even surfaces. Hills and uneven surfaces will
increase the burden on the motor and battery. Please use the pedals for better performance.
This will increase the driving distance and prolong the life of the bicycle and the battery.
Power Supply
Insert the key into the main power switch. Turn it clockwise to activate it.
The controller should indicate that the power is on. The handle indicator should be lit. The
electric bike is now ready.
CAUTION: Please turn the main power switch to the OFF position when finished riding.
Riding with the Motor
When riding the bicycle, you can adjust the speed from 315 1/2 MPH (525 km/h).
To stop the motor, simply let off the throttle and apply the front or rear brake.
Avoid power failure by making sure the battery is charged.
Riding without the Motor
This electric bicycle can also be ridden using the pedals.
Since an electric bicycle is heavier than a normal bicycle, extra force is required to pedal it.
Battery voltage indication
This electric bicycle is installed with power volume indicator
The power volume indicator will light on when the battery is fully charged.
The indicator will gradually diminish with use. Battery should be charged when there is only
one indicator light on.
Instruction
Please take in to consideration how far you plan on going when assessing whether the
battery needs charging.
10 OF 13

Estimated distance with a fully-charged, new battery
On a flat road: 1224 mile (2545 km) range.
Note: There are a number of factors that can affect riding distance: How many times you
stop and start, the amount of weight on the bicycle, the slope and condition of the road, wind
conditions, temperature, and tire pressure.
Temperature has a direct effect on the battery. Lower temperatures decrease battery
performance.
Load Goods
Recommended max. load of this electric bicycle (weight of the passengers and goods) is
165 lbs. (75kg). NOTE: Increased weight will affect travel speed and mile range.
The loading capacity and goods size of the bracket and luggage tank are shown below:
Too many goods will impact traveling distance and battery and motor performance.
WARNING: Do not exceed maximum load weight and size. Overloading and improperly
affixed loads can result in unsafe riding conditions and serious injury.
Instructions for parking and storing the electric bicycle
Stop the electric bicycle on even and solid surface.
Hold the rack and kick the support.
CAUTION: Lock the support rods after parking the bicycle. Turn the main power switch
to OFF position or refer to the power lock indication mark.
Turn the main power switch to the OFF position
If the main power switch is not turned off, it can cause driving system failure due to
inadequate power supply, and may result in a loss of battery performance.
Take out the key
Take the key out to avoid theft after the bicycle is stopped.
Check before operating
Make sure to thoroughly inspect the electric bicycle before driving.
Max Load
Size of Goods
Bracket
Luggage Tank
Width
Length
Height
6 lbs. (3kg)
22 lbs. (10kg)
3.9" (10cm) left and right of the luggage tank
3.9" (10cm) behind the luggage tank
15.7" (40cm) up the luggage tank
11 OF 13

Confirm before driving
1.Make sure the handlebar is stable.
2.Ring of bell.
3.Inspect the brakes and brake levers.
Hold the front and rear brake, confirm that there is 1/2"
of distance between the brake and brake handle
Check the wear of brake rubber
Please replace the brake rubber if the slot is less than 1/32"
(1mm).
Slot of brake rubber exceeds 1/32" (1mm).
4.Height of saddle and handlebar
The saddle is the proper height when your feet tips touch the ground when sitting on the bike.
Your elbows should be slightly bent when holding the handlebar.
5.Power volume of battery
Turn the main switch to ON position, confirm remaining power through the power indicator.
6.Installation of battery
Confirm the battery is tightly installed in the bicycle.
7.Check the wheel shaft
Confirm that the front and rear wheels are tight (recommended torque is shown below)
Rotation Torque of Front Shaft Nut: 265-354 in-lbs. (300-400kgfcm) (30-40Nm)
Rotation Torque of Rear Shaft Nut: 398-637 in-lbs. (450-720kgfcm) (45-72Nm)
8.Air pressure and damage to tires
Confirm the air pressure of tires. Low air pressure may cause
broken wheels or swaying. Inspect the tires for damage,
including foreign objects such as nails and glass.
9.Confirm that the pedals are stable.
If there is play in the pedals, tighten the bolts immediately.
10.Make sure the saddle is tight and free from movement.
11.Check the chain tension.
Please adjust the chain if it exceeds 46" (1015mm).
12.Confirm the chain is lubricated (30# machine oil) and works smoothly.
Length contacting with floor
3 1/24" (9-10cm)
Test condition
Weight of passenger
132 lbs. (60kg)
Air pressure
44 PSI (300kpa)
12 OF 13

TROUBLESHOOTING
Electric Driving System
Charger
WARRANTY
One-Year Limited Warranty
Phenomenon
Electric driving system is unstable
Low speed
Power indicator is off
Electric driving system makes
noise
Electric driving system generates
smoke or odor
Battery power indicator lights on,
but the motor doesn't work
Drive distance is short
Check
Battery is not charged
Tire pressure is low
Tire is damaged
Overloading
Does plug tightly connect with
the battery
Is the battery fully charged?
Is it used in a low temperature
environment?
Battery service life has expired
Solution
Charge the battery
Inflate the tire
Repair the tire
Limit the goods at max load
Tightly connect the plug
If this doesn't solve the problem, it is possible
that the battery terminal or wire is loose.
Please contact the seller
Check for foreign objects in the electric driving
system or a lack of lubricant
Please contact the seller
Electric driving system is faulty
Please contact the seller
Wire is loose or electric drive system is faulty
Please contact the seller
Charge the battery
Operate in warmer environment
Please replace the battery.
The Battery service life is expired when the dis
charging time is less than 70 minutes at 5A
current in the 20 environment after charging.
Connect it again. If it still won't charge, that
means the charger has failed or the fuse is
damaged
Please contact the seller
Confirm the charging method and charge
again If it still doesn't charge, you have charger
failure
Please contact the seller
Immediately unplug the power socket and stop
using.
Please contact the seller
Immediately unplug the power socket and stop
using.
Please contact the seller
Charge failure
Charger generates noise, odor
and smoke
Charger becomes warm
Is the power socket tightly
connected with charging plug?
Is the charger indicator light on?
It may generate heat when
o
charging (4060 C)
13 OF 13

Northern Tool + Equipment Co.,
2800 Southcross Drive West
P.O. Box 1499 Burnsville, MN 5337-0499
Made in China
WARNING
Some dust created by power sanding, sawing, grinding, drilling, and other construction
activities contains chemicals known to the State of California to cause cancer, birth defects
or other reproductive harm. Some examples of these chemicals are:
Lead from lead-based paints
Crystalline silica from bricks and cement and other masonry products, and arsenic and
chromium from chemically-treated lumber.
Your risk from these exposures varies, depending on how often you do this type of work. To
reduce your exposure to these chemicals: work in a well ventilated area, and work with
approved safety equipment, such as those dust masks that are specially designed to filter
out microscopic particles.
·
·
Tools
 Loading...