


P
M
L
AHGI
N
K
O
A-Side D ring
B-Bridge adjustment strap
C-Bridge strap buckle
EB
D-Rope bridge
E-Bridge ring
F-Bridge anchor plate
G-Elastic waist strap
H-Waist belt strap
Q
J
K
I-Waist belt connect buckle
J-Leg strap with connect buckle
K-Leg pad keeper straps
L-Accessory loops (8)
M-Accessory rings (2)
N-Accessory pouch straps (not pictured)
O-Leg Pads
P-Suspender Loop
Q-Chainsaw Snap (not pictured)
D
F
C
B
J

Notch™ Sentinel Arborist Harness
FIELD OF APPLICATION:
This product can be part of personal protective equipment for
protection (PPE) for position at the work station, or to prevent
the operator from entering a zone where a fall is possible. The
product should be allocated to one individual.
Attention! Sit harnesses are not suitable for fall ar rest
purposes!
Personal protection equipment products may only be used to
belay persons. Do not use the personal protective equipment
for work load.
Work at height is inherently dangerous activity. Understand and
accept the risks involved before participating.
These instructions for use contain important notes, a control
card, and proof of inspection. Before using this product, all
documents must have been read and their content understood.
This document must be provided to the user by the retailer in
the respective country’s language and must be kept with the
equipment while it is in use.
WEARING INSTRUCTIONS:
Thoroughly inspect har ness and all components before each
use. Your safety is related to the integrity of your equipment.
•Release and open the elastic waist strap
•Open the waist belt connect buckle
•Open the leg strap connect buckles (if necessary)
•Hold the harness facing forward and step into the harness
•Raise harness into position just above your hip bones
•Secure the elastic waist strap
Note: Elastic waist strap is for support and comfort only.
Caution, do not over tension.
• Ensure the work positioning side D rings are slightly forward
of the hip then close the waist belt connect buckle (using
thumb press in the center of buckle to open/close)
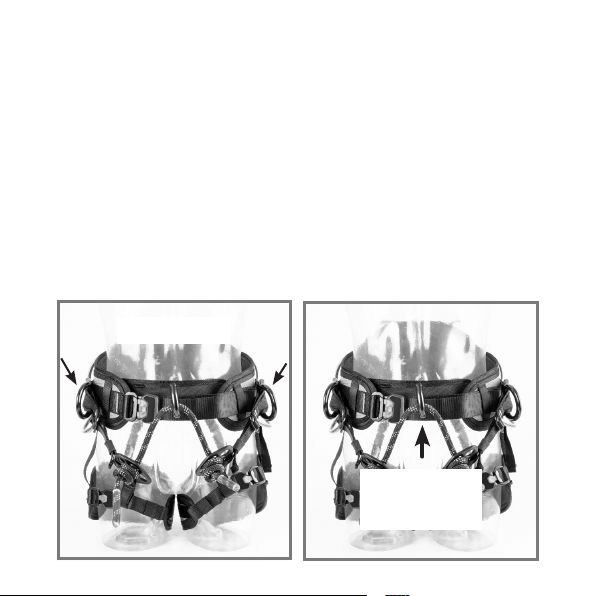
• Pull on the waist belt strap until strap feels snug (Fig 1), fold
excess strap into the waist strap keeper
• Wrap the leg straps around the leg so that the padded
portions of the leg straps are behind the leg and the buckles
are on the side of the leg
•Connect the leg strap buckles (if not connected)
• Adjust the leg strap as necessary so they are snug, but
comfortable
•Fold the excess strap into the elastic leg strap keeper E
Fig. 1

ADJUSTMENT INSTRUCTIONS:
Adjust the fit of your harness so that your body is supported
with weight evenly distributed between the belt and leg straps,
balanced to hang upright and relaxed, without uncomfortable
pinching or pressure. Fit the harness before your first climb
where you can hang.
Choose the correct size:
hipbelt min.
(elastic, not stretched)
72 cm 28,35 in 75 cm 29,53 in
1
92 cm 36,22 in 95 cm 37,40 in
2
hipbelt max. legloops min.
100 cm 39,37 in 50 cm 19,69 in
1
130 cm 51,18 in 65 cm 25,59 in
2
hipbelt min.
(webbing)
BRIDGE STRAP ADJUSTMENT:
• Locate the Bridge strap buckle positioned between the Bridge
anchor plate and the Side D ring
• Using thumb pull back on the tension buckle releasing the
webbing to extend distance (Fig 2), to shorten simply loosen
webbing and work it back through the tension buckle
• Fold the excess strap into the elastic leg strap keeper
Fig 2
• Tightening the adjustment straps will bring the bridge closer
to your body while loosening them will move the bridge away
from your body.

REPLACEMENT OF ROPE BRIDGE:
Replacement rope bridges are supplied separately and include
detailed replacement instructions to be used when replacing
worn bridge. Use only replacement Notch™ bridge
(manufactured from approved arborist climbing rope) supplied
by Notch Equipment. Replace suspension bridge if protective
cover of stitching (shrink tube) is damaged, missing or torn.
Ring
TYING THE ROPE BRIDGE STOPPER KNOT:
This stopper knot is recommended by the rope manufacturer
to secure the replacement Notch™ rope bridge. It stops the
rope from passing thought the hole in the bridge anchor plate.
The knots should be hand-tightened to prevent any possibility
of movement/slippage. Tie one at the end of the bridge leaving
at minimum 3 inches of tail. Pass the rope from the outside to
the inside of one anchor plate, using the center hole, pass it
though the ring, then through the center hole of the opposite
anchor plate, form inside to outside. Finish by tying another
knot on the outside with the desired length of the bridge
between the two plates after tightening. Only use double
fisherman’s knots on both sides. Construct the knot as shown
below:
Rigging
Plate
transparent Shrinking
Tube
Stopp Bartack
Double Fishermen‘s
knot
black Shrinked Label
Label
80 mm ≈ 3 in

TRIPLE-LOCK BUCKLE OPERATION:
The Triple-Lock Buckles offer a very high safety standard by providing a three-way closure. To open the buckle, press the top
button releasing the frame and pull back as shown below.
To close the buckle, push frame into the main buckle body and pull back, audible click will be heard confirming secure closure.
Strap length can be adjusting by pulling on the tail end of the webbing. Strap end can be retrieved by pulling up on the end as
shown below.

LEG PAD BUCKLE ADJUSTMENT:
• Open the Leg strap connect buckle by pressing in the center
of the buckle and release the single slot frame from main
buckle
• Adjust the length of the webbing by pulling on webbing in
either direction to move the main buckle frame
• Close buckle and test fit, continue adjustment until leg pads
are snug
•Repeat for opposite side of leg strap
•Fold the excess strap into the elastic leg strap loop keeper
• Proper adjustment of the leg pad straps will ensure the leg
pads will be in the most comfortable position on your legs
REAR LEG STRAP ADJUSTMENT:
• Adjust the length of the elastic webbing by pulling in either
direction through the plastic friction buckle, retain excess
webbing in the strap loop keeper
• Proper adjustment of the rear leg strap will ensure the pads
are in the correct distance below the waist
USING BRIDGE ANCHOR PLATES:
Bridge anchor plates are designed for maximum strength along
their major axis. Anchor plates should be loaded ONLY between
the single slot shaped connector holes and any combination of
the other three round holes. Only use the bridge anchor plates
for tie-in the rope bridge and only use both plates together.
Inspection:
Prior to each use, carefully inspect this equipment for
indications of wear or deterioration. The inspection should
include but not be limited to inspection for:
•tearing, cuts, severe abrasion of the webbing or rope
•burnt, singed, or melted webbing or rope
• faded, discolored from exposure to ultraviolet light, chemical
exposure of webbing or rope
•torn or pulled threads (broken fibers)
• nicks, cracks, distortion or corrosion of hardware (buckle,
rigging plate, D-ring, etc.)
•nonfunctional buckles
•evidence of involvement in dynamic fall
•readability of the marking
•if there are any indications for impact loading
Note: All load bearing bartacks are constructed of contrast
color stitching for easy identification. Replace suspension
bridge if protective cover of stitching (shrink tube) is damaged,
missing or torn.
If any evidence of wear or deterioration as outlined is observed,
immediately cease use, destroy the product and replace with
new equipment. Should any unusual condition conditions not
outlined above be observed, or you have reasonable doubt
about a particular condition, remove the equipment from
service. Failure to carefully and completely inspect your
equipment could result in serious injur y or death. Notch
Equipment recommends a detailed inspection by competent
person at least once every 12 months (depending on current
regulations in your country, and your conditions of use). Record
the results on your PPE inspection form: type, model,
manufacturer contact info, serial number or individual number,
dates: manufacture, purchase, first use, next periodic
inspection, problems, comments, Inspector’s name and
signature.
WORK POSITIONING HARNESS EN 358:1999
These attachment points are designed to either hold the user
in position at the work station, or to prevent the operator from
entering a zone where a fall is possible.
Attachment points according EN 358 must only be used to
attach a restraint or work positioning system, maximum fall
height 0.5 m. The connection device for work positioning
harnesses must be kept tight, the tie-in point must
be above or at hip height.
These attachment points are not designed for fall arrest usage.
It may be necessary to supplement work positioning or travel
restraint system with collective or personal fall arrest systems.
A – Side D rings
The two side D rings must always be used together.
EN 358: 1999
SEAT HARNESS EN 813:2008
Nominal maximum load = 140 kg (308 lbs). Designed for progression on rope and work positioning. Use the attachment
bridge to attach a descender, positioning lanyards, or progression lanyards.This attachment point is not suitable for fall
arrest.
EN 813: 2008
and
EN 358:1999

LIFESPAN AND REPLACEMENT:
The lifespan of the product will depend on frequency of use and
external conditions. This product is made from synthetic fibre
(polyamide, polyester, aluminium alloy, steel). Part of these
components degrade over time. Seven years is considered the
safe life of nylon climbing equipment when it is stored properly
and never used.
WHEN TO RETIRE THE EQUIPMENT:
A product must be retired when:
•It’s over 10 years old and made of plastic or textiles
•It has been subjected to a major fall (or load)
• It fails to pass inspection. You have any doubt as to its
reliability
•You do not know its full usage history
• When it becomes obsolete due to changes in legislation,
standards, technique, or incompatibility with other equipment
STORAGE:
Store in a clean, cool, dark, place free of acids, alkalis, exhaust
emissions, rust and strong chemicals. Store without
mechanical stress caused by jamming, pressure or tension.
TRANSPORT:
The product must be transported to avoid direct sunlight,
moisture, chemicals, dirt, extreme temperatures and
mechanical damage.
CLEANING:
Clean soiled products in luke warm water (if necessary, use pH
neutral soap). Rinse well. Hang dry at room temperature in well
ventilated area out of direct sunlight, never use a tumble dryer.
If required, halogen-free commercial disinfectants may be
used.
Metal hardware parts (anchor plates, buckles, etc.) should be
cleaned and dried. If necessary, minor sharp edges may be
polished using a fine abrasive cloth before cleaning.
Periodic lubrication of metal hardware using a lightweight
lubricant will maintain smooth operation, wipe off any excess
lubricant with a clean dry cloth.
WARNINGS FOR ROPE BRIDGE:
Rope bridge attached to this harness is designed to be replaced
by the user at regular intervals. Interval will be dictated by the
frequency of use and external working conditions rather than
set time.
Manufacturer does not place a time limit on the replacement
of the rope bridge. Due to the rigorous strain the rope bridge
endures, it should be replaced at the earliest signs of wear.
Bridge should be carefully inspected prior to each use. This
inspection should include but not be limited to: rope cuts, nicks,
tears, kinks, abrasions, burns, excessive swelling, excessive
jacket wear, discoloration, broken, fraying, or unraveling fibers,
loose stitching, chemical or physical exposure. Failure to
regularly inspect and replace the rope bridge could result in
injury or death.
WARNINGS:
• Manufacturer’s instructions shall be provided by the user of
this product. If additional copy is needed, contact Notch
Equipment.
• Completely read, understand, and follow all instructions,
warnings, and cautions pertaining to this particular harness
and all associated equipment before use. Failure to do so
could result in serious injury or death.
•Make sure the markings on the product are legible
• Service (repairs) may only be carried out by the manufacturer
or a center authorized by the manufacturer.
• Notch™ harnesses are manufactured in accordance with EN
358:1999, EN 813:2008, ASTM F887 and are intended for use
as personal protective equipment only comply with the
requirements of ANSI Z133-12.
• This product is designed to be used by a person with a
maximum weight of 308 lbs when fully equipped.
• This harness is not designed to be used with a retro fit Fall
Arrest Harness.
• Notch™ harness is to be used for work positioning and
suspension only, NOT FOR FALL ARREST.
• In any case of fall arrest use a fall arrest system according EN
363. If you use a fall arrest system, it must be ensured that
the necessary free space in the work area beneath the user
(clear height) of 7 m is guaranteed.
• Retire and destroy the harness and all other personal
protective equipment if involved in a fall.
• Retire harness if it’s been seven or more years past the
manufacturing date.
• Only trained and experienced people under guidance and
supervision are allowed to make use of it.
• Users must be aware that poor physical and/or mental health
can jeopardise safety under normal conditions and in
emergencies.
• Prior to first use, the user should carry out a suspension test
in a safe place that the equipment is of the correct size, has
sufficient adjustment and is of an acceptable comfort level
• Before using the equipment, the user must ensure that, in the
event of falling into the personal protection equipment
system, the person caught can be rescued immediately,
safely and effectively. A rescue plan for all work operations is
recommended.
• In case of an emergency, an accident or loss of consciousness
prevent the victim from suspension trauma. Suspension
trauma can cause serious harm to health and death.
• Keep equipment from contacting with sharp edges, abrasive
surfaces, extreme temperatures, excessive ultra violet rays,
chemical agents, moving machinery, and electrical hazards.
Exposure to these elements may compromise the integrity of
the equipment.
• Always visually check that all buckles are properly closed.
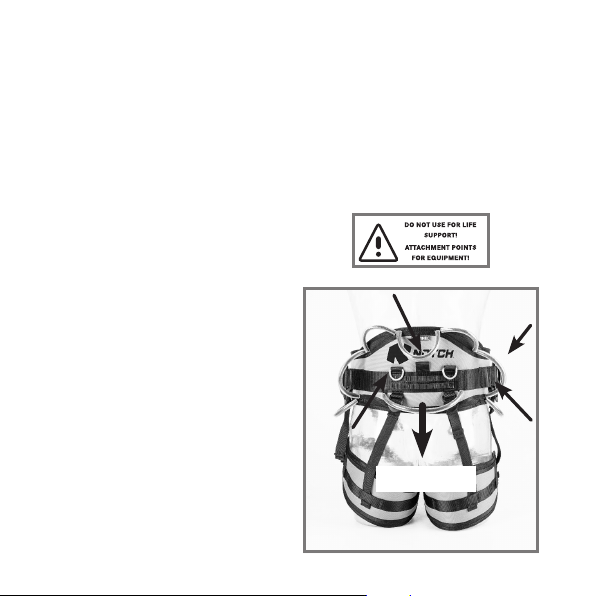
• The large loop centered at the rear of the back pad is intended
for connection of harness suspenders only (Fig 4). Harness
suspenders are not safety products. Suspenders are
designed to support only the weight of the saddle and the
equipment it contains, NOT the individual.
• Accessory loops (8), carabiner slots, accessory rings (2) are
attachment points (Fig 4) for equipment ONLY. Do not use for
any life safety attachment, gear loops are not suitable for
anchoring or belaying.
Fig 4
10 kg max

• During use all fastening and adjusting elements must be
regularly checked to ensure proper adjustment and closure.
• Attach only connecting devices meeting standard/
regulations for intended use for positioning and suspension
to belt D rings and bridge anchor plate.
• Only positioning equipment, such as lanyards, should be
attached to D rings, as D rings are not intended for fall arrest
• The equipment should not be modified in any way or altered
to allow attachment of additional parts without the
manufacturer’s written recommendation.
• Make sure the anchor point is correctly positioned in order to
limit the risk and the height of the fall.
• The anchor points for fall arrest forces must be rated for at
least 12 kN, see also EN 795.
• For Connecting to the anchor points only use ppe partial
systems (e. g. connecting elements (karabiners) to EN 362).
• When combining this product with other components, the
safety aspects of the products may interfere with each other.
• If this product is used in combination with other components
of a rescue/fall arrest system, users must acquaint
themselves with the enclosed recommendations, notes and
instructions for these components prior to use and comply
with them.
WARRANTY:
Every Notch™ harness carries a limited lifetime warranty
against defects in materials and workmanship. Notch
Equipment will replace the defective product at no charge and
return it back to the customer.
Coverage terminates if the product is sold or transferred.
RETURNS:
You may return your Notch™ product for any reason. Please call
Notch Equipment at 866-345-2468 to request a Return
Merchandise Authorization (RMA). Mark the package with the
RMA number and follow the instructions on the enclosed return
slip.
Returned products will be inspected within three working days
of receipt and you will be contacted with the results of the
inspection. Depending on our findings, Notch Equipment will
replace your product or refund your purchase price, at our sole
discretion.
No returns will be accepted on items returned after 30 days.
Only authorized replacement parts from Notch Equipment
should be used on this product. The use of unauthorized
replacement parts will void manufacturer’s warranty.
PRODUCT INFORMATION:
Manufacturer: EDELRID
Model: Name of the product
Size: 1 – small, 2 – large;
Product description: Work positioning harness according to
EN 358:1999, sit harness according to EN 813:2008.
Standards indicated in some cases with year of issue;
Users weight: max. 140 kg/ 308 lbs;
Lot number: GV XXX MM YYYY NNN
Nomenclature of the lot number:
XXX – Lot Number
MM – Month of Production
YYYY - Year of production
NNN – Serial Number
MM YYYY: Month and year of manufacturing
Identification: To be entered by the user if appropriate
i-Symbol: Warning notices and instructions must be read and
observed
CE 0123: the authority supervising production of PPE
(TÜV SÜD Product Service GmbH, 80339 Munich, Germany)

NOTCH EQUIPMENT Distribution Europe:
496 GALLIMORE DAIRY ROAD, SUITE D Notch by EDELRID
GREENSBORO, NC 27409 Achener Weg 66
1-800-525-8873 88316 Isny im Allgäu
info@notchequipment.com Germany
PSA-Richtlinie / PPE-Guideline / EPI-directive 89/686 / (EWG/EEC/CEE)
Certified by CE 0123: TÜV SÜD Product Service GmbH
01.17
80339 München, Ridlerstraße 65, Germany
 Loading...