

Page 1

All products are trademarks of Nostalgia Products LLC.
Worldwide design & utility patented or patents pending.
© 2017 Nostalgia Products LLC.
www.nostalgiaproducts.com
(rev. 08/02/17 KW)
Page 2
HDT900RD
TSC2
Grilled Cheese Sandwich Toaster
Tostadora para emparedado de queso tostado
Grille-pain pour sandwich au fromage grillé
Instructions and Recipes
Instrucciones y Recetas
Instructions et Recettes
Page 3

Page 4

Make every day a party!
Visit www.nostalgiaproducts.com for more fun products.
CONTENTS
SAFETY . . . . . . . . . . . . . . . . . . . . . . . . . . . . . . . . . . . . . . . . . 2
IMPORTANT SAFEGUARDS . . . . . . . . . . . . . . . . . . . . . . . . . . . . . 3
ADDITIONAL IMPORTANT SAFEGUARDS . . . . . . . . . . . . . . . . . . . . 3
INTRODUCTION . . . . . . . . . . . . . . . . . . . . . . . . . . . . . . . . . . . . 4
PARTS & ASSEMBLY . . . . . . . . . . . . . . . . . . . . . . . . . . . . . . . . . . 5
HOW TO OPERATE . . . . . . . . . . . . . . . . . . . . . . . . . . . . . . . . . . 6
HELPFUL TIPS . . . . . . . . . . . . . . . . . . . . . . . . . . . . . . . . . . . . . 7
CLEANING & MAINTENANCE . . . . . . . . . . . . . . . . . . . . . . . . . . . 8
RECIPES . . . . . . . . . . . . . . . . . . . . . . . . . . . . . . . . . . . . . . . . . 8
RETURNS & WARRANTY . . . . . . . . . . . . . . . . . . . . . . . . . . . . . . . 9
SAFETY
ENGLISH
Your safety and the safety of others is very important.
We have provided many important safety messages in this manual and
on your appliance. Always read and obey all safety messages.
This is the safety alert symbol.
This symbol alerts you to potential hazards that can
cause serious injury to you and others.
All safety messages will follow the safety alert symbol.
All safety messages will tell you what the potential hazard is, tell you how to reduce the
chance of injury, and tell you what can happen if the instructions are not followed.
Appliance Specications:
120 V, 60 Hertz
600 Watts
THIS PRODUCT IS FOR USE IN 120V AC OUTLET ONLY.
Refer to www.nostalgiaproducts.com/user-manuals/ for the most updated manual.
2
Page 5

IMPORTANT SAFEGUARDS
A person who has not read and understood all operating and safety instructions
is not qualied to operate this appliance. All users of this appliance must read and
understand this Instruction Manual before operating or cleaning this appliance.
When using electrical appliances, basic safety precautions
ENGLISH
should always be followed, including:
1. Read all instructions before operating this appliance.
2. DO NOT TOUCH the hot surfaces. Use handles or knobs.
3. This appliance is NOT A TOY.
4. Unsupervised young children and cognitively challenged
individuals should never operate this appliance.
5. Close supervision is necessary when any appliance is used by or near children.
6. To protect against electrical shock do not immerse cord, plug
or any part of this unit in water or other liquids.
7. Unplug from outlet when not in use, before removing parts and before cleaning.
Allow to cool before putting on or taking o any parts, and before cleaning.
8. DO NOT operate any appliance with a damaged cord or plug, or after the appliance
malfunctions, or if the appliance has been damaged in any manner. Return the
appliance to the nearest repair shop for examination, repair or adjustment.
9. The manufacturer does not recommend the use of accessory attachments other than
what is provided by the manufacturer. Use of attachments may cause injuries.
10. DO NOT use the appliance for other than its intended use.
11. DO NOT use outdoors. FOR HOUSEHOLD USE ONLY.
12. DO NOT place on or near a hot gas or electric burner, or in a heated oven.
13. DO NOT let cord hang over edge of table or counter, or touch hot surfaces.
14. NEVER leave unit unattended while in use or when plugged into an outlet.
15. Extreme caution must be used when moving an appliance containing hot food.
16. Always attach plug to appliance rst, then plug cord in the wall outlet. To
disconnect, turn any control to "o," then remove plug from wall outlet.
ADDITIONAL IMPORTANT SAFEGUARDS
Operating Safety Precautions
1. Check the inside of the toaster for the presence of foreign objects prior to use.
2. DO NOT attempt to insert any utensil or any other object while the toaster is plugged
in or in operation. Doing so may lead to personal injury or electrical shock.
3. Oversized foods or metal utensils must not be inserted in the
toaster as a re or risk of electrical shock may occur.
4. This toaster is strictly intended for the use of regular sized slices of bread for grilled
cheese sandwiches. DO NOT attempt to cook any other food items in this unit.
3
Page 6

Instructions for the Electrical Cord and Plug
1. This appliance has a polarized plug (one blade is wider than the other). To reduce the
risk of electrical shock, this plug is intended to t into a polarized outlet only one way.
If the plug does not t fully into the outlet, reverse the plug. If it still does not t,
contact a qualied electrician. Do not attempt to modify the plug in any way.
2. A short power supply cord is provided to reduce the risk resulting
from becoming entangled or tripping over a long cord.
3. If a long detachable power-supply cord or extension cord is used:
• Extension cords can be used if care is exercised in their use.
• The marked electrical rating of the cord or extension cord should
be at least as great as the electrical rating of the appliance.
• When using a longer cord or extension cord, make sure that
the cord does not drape over a countertop or tabletop where
it can be pulled on or tripped over unintentionally.
4. The manufacturer does not recommend using this machine in countries that do not
support 120V AC even if a voltage adapter, transformer, or converter is in use.
SAVE THESE INSTRUCTIONS!
INTRODUCTION
Congratulations on your purchase of the GRILLED CHEESE SANDWICH TOASTER
from Nostalgia™! Now you can make perfectly toasted, hot and melty cheese
sandwiches in just minutes! Simply place your assembled cheese sandwich in the
toasting basket, adjust the dial to your doneness preference, and then toast. Who
knew that making delicious cheese sandwiches was as simple as making toast!
Features include:
• Makes two grilled cheese sandwiches at a time in just minutes
• Two removable toasting baskets hold cheese sandwiches while cooking
• Adjustable toasting dial makes it easy to perfectly melt your cheese sandwich
• Cancel, preheat and defrost functions
• Cool touch housing and handles
• Cord wrap for tidy storage
• Removable drip tray
ENGLISH
4
Page 7
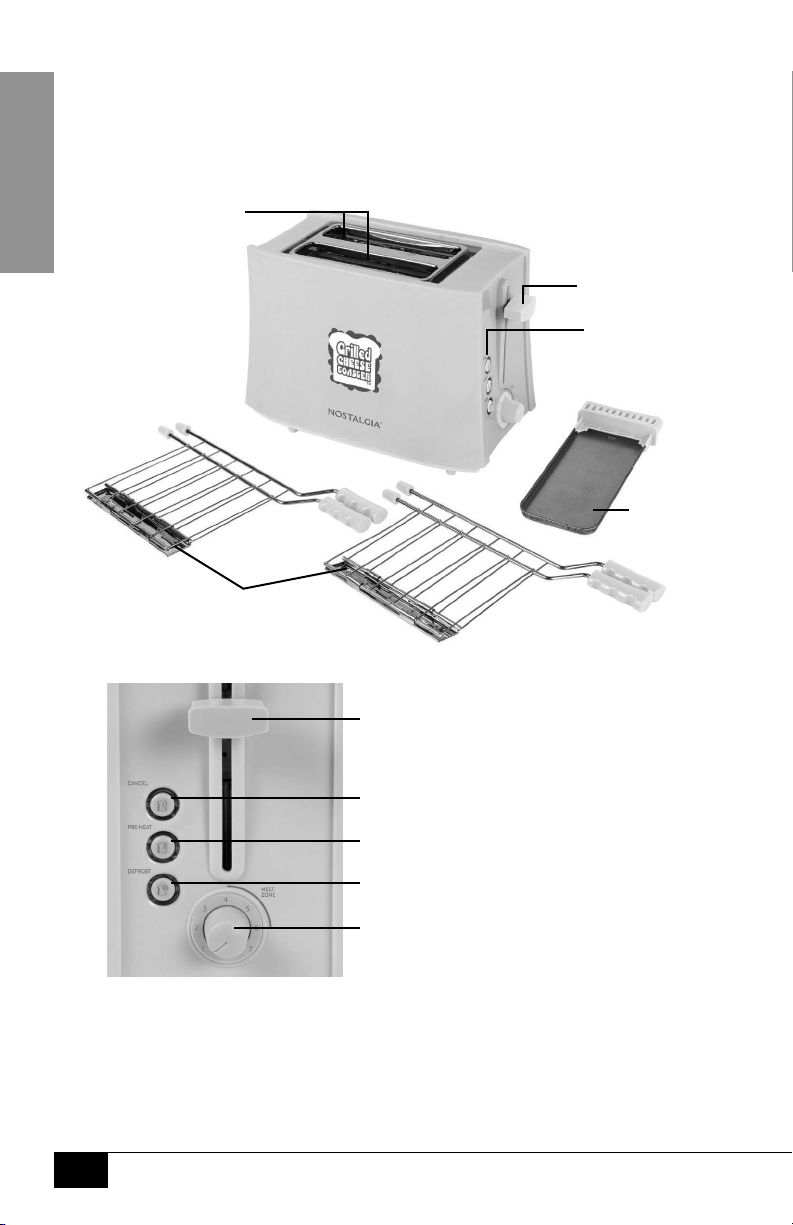
PARTS & ASSEMBLY
PARTS
Your GRILLED CHEESE SANDWICH TOASTER comes fully assembled. Be
sure all packaging materials have been removed from the unit.
Toasting Slots
ENGLISH
Control Lever
Control Panel
Drip Tray
Toasting Baskets
CONTROL PANEL
Control Lever
CANCEL: Press to stop the toasting cycle at any time.
PREHEAT: Brings toaster to temperature for toasting.
DEFROST: Defrosts and toasts frozen bread.
Toasting Dial: Dial adjust to toast sandwich to
your preferred doneness, from light to dark.
5
Page 8
HOW TO OPERATE
Before using your GRILLED CHEESE SANDWICH TOASTER for the rst time, be sure
to follow the directions under CLEANING & MAINTENANCE to clean your unit.
There may be a slight smell and some smoke the rst time using
this appliance. This is both normal and temporary.
1. Place the unit on a stable surface near an electrical outlet, away from
any water source. Plug the appliance into an electrical outlet.
2. Butter the outside of two pieces of bread.
3. Build your sandwich using your favorite grilled cheese ingredients. For recipe ideas, see the
RECIPES section of this manual. When assembling your sandwich, be sure the buttered side
of each piece of bread is facing outwards.
PRO TIP: Visit the HELPFUL TIPS section of this manual for
guildelines on building the best grilled cheese sandwich.
4. Preheat the toaster by pressing down on the Control Lever, then
pressing the PREHEAT button (
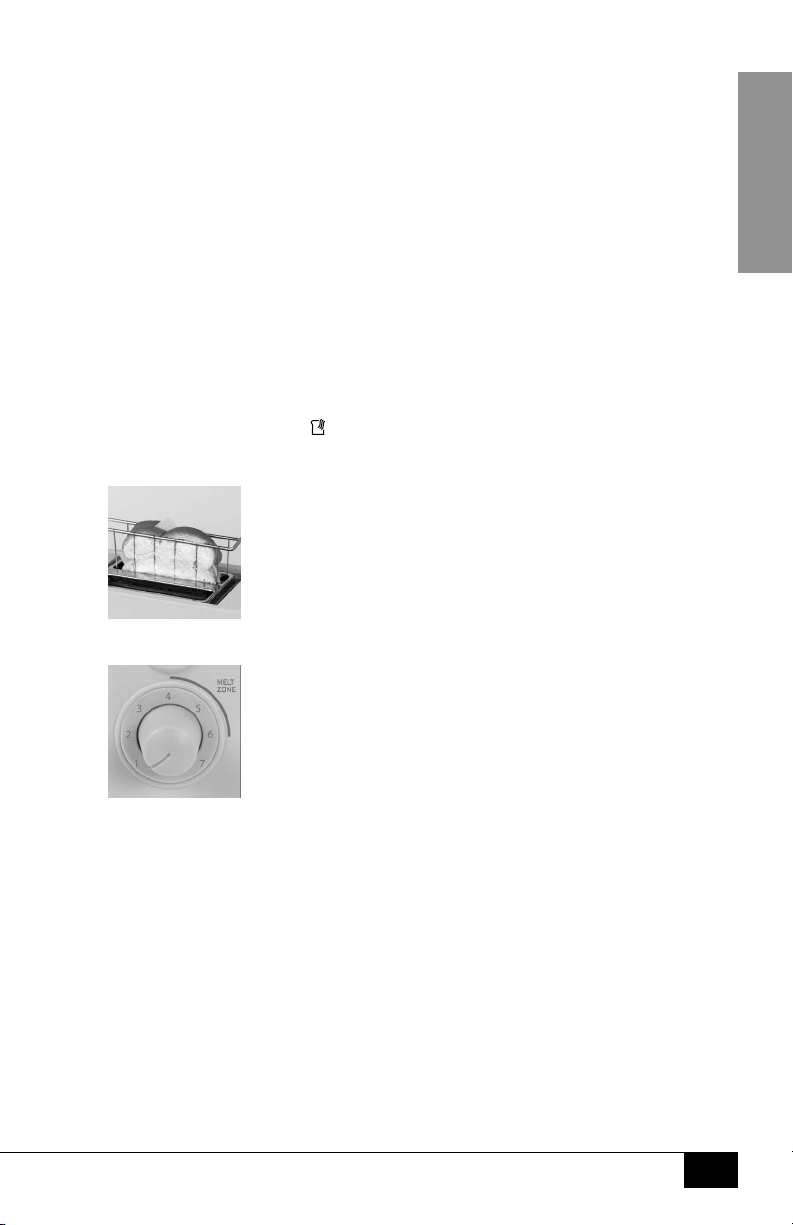
5. When done preheating, the Control Lever will pop up. Insert your prepared sandwich into
the Toasting Basket, then place the Toasting Basket into the Toasting Slot.
6. Depending on your preferred level of doneness, adjust the Toasting Dial to within the MELT
ZONE (levels 4 to 6) indicated on the Toasting Dial. (4 = less toasted, 6 = more toasted)
) on the Control Panel.
ENGLISH
7. Press down on the Control Lever to start the toasting cycle.
8. After the Control Lever pops up, allow the sandwich to sit in the toaster for about 30
seconds before removing from the toaster. This will allow the cheese to fully melt.
NOTE: If your grilled cheese sandwich needs additional time, adjust the Toasting Dial to
between 1 to 4 and press down the Control Lever.
CAUTION! Toasted food will be hot to the touch, so handle with care.
9. When done using your GRILLED CHEESE SANDWICH TOASTER, unplug
the unit from the electrical outlet and allow to cool completely.
6
Page 9

HELPFUL TIPS
BUILDING YOUR GRILLED CHEESE SANDWICH
• Use a soft cheese with a low melting point.
• Be sure to preheat the toaster before toasting your sandwich.
• Build your sandwich with thin slices of bread. Thick slices of
ENGLISH
bread may be too large for the Toasting Slots.
• Do not add too many ingredients to your sandwich, making it too thick may leave the center
cold or the cheese unmelted. We recommend using 1-2 slices of cheese per sandwich.
• Always be sure to butter the outside of the each slice of bread before
toasting. This will create a deliciously crisp outside to your sandwich.
• Allow the grilled cheese to sit in the toaster for about 30 seconds after the
toasting cycle has completed to allow the cheese to fully melt.
RECOMMENDED CHEESES
The best cheeses to use when making a grilled cheese sandwich
are soft cheeses with a low melting point.
Recommended cheeses:
• Swiss
• Asiago
• Provolone
• Mozzarella
• Cheddar
• Gruyere
• Pepper Jack
RECOMMENDED BREADS
Due to the size of the Toasting Slots, thick-cut breads do not work well with this
toaster. For best results, stick to the standard-cut or thin slices of bread.
Recommended breads:
• White
• Wheat
• Multigrain
• Sourdough
• English Mun
• Pumpernickel
• Rye
• Italian
BURNING/SMOKING
If your unit is burning or smoking while toasting, press the CANCEL button
to end the toasting cycle, and unplug from the electrical outlet. Remove the
Toasting Basket from the Toasting Slot and allow unit to cool completely.
Smoking may also be caused by excess crumbs and pieces of cheese stuck inside the
machine. To prevent smoking, make sure to clean the Drip Tray after each use.
7
Page 10

CLEANING & MAINTENANCE
Make sure the unit is unplugged before cleaning. Allow all parts to COOL
to the touch, especially the Toasting Baskets and Drip Tray.
To prolong the life of your GRILLED CHEESE SANDWICH TOASTER, please follow these
simple instructions for maintenance. Never place the appliance in a dishwasher.
• Do not try to remove sandwiches if they get jammed inside the
Toasting Slots without rst unplugging the toaster.
• Clean outer surface of the toaster with a soft damp cloth and
only when it is unplugged and completely cooled.
• Use soapy water to clean the Toasting Basket before and after use.
• Make sure the toaster is completely cooled before storing or cleaning.
• Unplug the toaster before removing the Drip Tray from the base.
Crumbs in the mechanism must be removed by blowing or gentle
shaking. Drip Tray tray must be cleaned after every use.
• Do not operate toaster without at least one grilled cheese sandwich in place.
• Never use the toaster without the Toasting Basket and Drip Tray in place.
RECIPES
Use your GRILLED CHEESE SANDWICH TOASTER for quick, easy-to-serve
meals! Build your own delicious grilled cheese sandwich with your favorite
ingredients or try one of the tasty recipe combinations below.
The Classic
cheddar + white bread
The Pesto
pesto + provolone + mozzarella + white bread
Swiss-Mushroom
sauteed mushrooms & onions + swiss cheese + Thousand Island dressing + rye bread
Bacon & Tomato
crispy bacon + tomato + your favorite cheese
Roast Beef & Brie
roast beef + dijon mustard + brie + caramelized onions + sourdough bread
Spanish Olive Sandwich
grated manchego cheese + sliced green olives + white bread
ENGLISH
8
Page 11

RETURNS & WARRANTY
SHOULD YOUR UNIT NOT WORK OR IF DAMAGED WHEN YOU FIRST TAKE IT OUT OF
THE BOX, PLEASE RETURN IT TO THE PLACE OF PURCHASE IMMEDIATELY.
GRILLED CHEESE SANDWICH TOASTER / TCS2
ENGLISH
Should you have any questions, please contact us via email or at the customer service number listed
below between the hours of 8:00 AM and 5:00 PM, Monday through Friday, Central Standard Time.
Distributed by:
Nostalgia Products LLC
1471 Partnership Dr.
Green Bay, WI 54304-5685
Customer Service
Phone: (920) 347-9122
Web: www.nostalgiaproducts.com
Customer Service Inquiry
To submit a Customer Service inquiry, go to www.nostalgiaproducts.com and ll
out the Customer Service Inquiry form and click the Submit button.
A representative will contact you as soon as possible.
Product Warranty Terms
Nostalgia Products LLC (the “Company”) hereby warrants that for a period of one (1) year from the
date of original purchase, this product will be free of defects in material and workmanship under
normal home use, provided that the product is operated and maintained in accordance with the
operating instructions. As the sole and exclusive remedy under this warranty, the Company will
at its discretion either repair or replace the product found to be defective, or issue a refund on the
product during the warranty period. This warranty is only available to the original retail purchaser of
the product from the date of initial retail purchase, and is only valid with the original sales receipt, as
proof of purchase date is required to obtain warranty benets. All warranty claims must be brought
to the attention of the Company within the warranty period and no later than 30 days of the failure
to perform. This warranty does not cover normal wear or damage caused by shipping, mishandling,
misuse, accident, alteration, improper replacement parts, or other than ordinary household use.
You may be required to return the product (with shipping prepaid by you) for inspection and
evaluation. Return shipping costs are not refundable. The Company is not responsible for returns
damaged or lost in transit. Unless otherwise specically permitted by the operating instructions, this
warranty applies to indoor household use only. In order to obtain service under this warranty, please
contact the Company at the telephone number listed above or by lling out the Customer Service
Inquiry Form located at www.nostalgiaproducts.com. Warranty valid only in USA and Canada.
This warranty is in lieu of all other warranties, expressed or implied, including warranties of
merchantability and tness for a particular purpose, which are hereby excluded to the extent
permitted by law. In no event shall the Company be liable for any indirect, incidental, consequential,
or special damages arising out of or in connection with this product or the use thereof. Some
states, provinces or jurisdictions do not permit the exclusion or limitation of incidental or
consequential damages, so the foregoing exclusion or limitation may not apply to you.
This warranty does not apply to re-manufactured merchandise.
Please read the operating instructions carefully. Failure to comply
with the operating instructions will void this warranty.
For more information, visit us online at www.nostalgiaproducts.com.
Like us on Facebook at www.facebook.com/NostalgiaElectrics.
Follow our boards on Pinterest at www.pinterest.com/nostalgiaelctrx.
Tweet along with us on Twitter at www.twitter.com/NostalgiaElctrx.
9
Page 12

¡Que cada día sea una esta!
Visite www.nostalgiaproducts.com y
encuentre más productos agradables.
CONTENIDO
SEGURIDAD . . . . . . . . . . . . . . . . . . . . . . . . . . . . . . . . . . . . . . . 10
PROTECCIONES IMPORTANTES . . . . . . . . . . . . . . . . . . . . . . . . . . . 11
PROTECCIONES IMPORTANTES ADICIONALES. . . . . . . . . . . . . . . . . .11
INTRODUCCIÓN . . . . . . . . . . . . . . . . . . . . . . . . . . . . . . . . . . . . 12
PIEZAS Y ENSAMBLAJE . . . . . . . . . . . . . . . . . . . . . . . . . . . . . . . . 13
CÓMO UTILIZAR. . . . . . . . . . . . . . . . . . . . . . . . . . . . . . . . . . . . . 14
CONSEJOS ÚTILES . . . . . . . . . . . . . . . . . . . . . . . . . . . . . . . . . . . 15
LIMPIEZA Y MANTENIMIENTO . . . . . . . . . . . . . . . . . . . . . . . . . . .16
RECETAS . . . . . . . . . . . . . . . . . . . . . . . . . . . . . . . . . . . . . . . . . 16
DEVOLUCIONES Y GARANTÍA . . . . . . . . . . . . . . . . . . . . . . . . . . . . 17
SEGURIDAD
ESPAÑOL
Su seguridad y la seguridad de los demás es muy importante.
Hemos dado muchos mensajes de seguridad importantes en este manual y en
el aparato. Siempre lea y cumpla con todos los mensajes de seguridad.
Este es el símbolo de alerta de seguridad.
Este símbolo le avisa de los peligros potenciales que
pueden provocar serias lesiones a usted y a otros.
Todos los mensajes de seguridad seguirán al símbolo de alerta de seguridad.
Todos los mensajes de seguridad le indicarán cuál es el peligro potencial, cómo
reducir la posibilidad de lesiones, y qué puede suceder si no sigue las instrucciones.
Especicaciones del aparato:
120 V, 60 Hercios
600 vatios
ESTE PRODUCTO ES PARA USAR SOLAMENTE EN UN TOMACORRIENTE DE 120 VCA.
Visite www.nostalgiaproducts.com/user-manuals/ para ver el manual más actualizado.
10
10
Page 13

PROTECCIONES IMPORTANTES
Una persona que no haya leído y comprendido todas las instrucciones
de uso y seguridad no está calicada para utilizar este aparato. Todos
los usuarios de este dispositivo deben leer y comprender este Manual
de instrucciones antes de utilizar o limpiar este aparato.
Cuando se utiliza aparatos eléctricos, siempre se deben seguir algunas
medidas básicas de seguridad que incluyen las siguientes:
1. Lea todas las instrucciones antes de utilizar este aparato.
2. NO TOQUE las supercies calientes. Use agarraderas o mangos.
3. Este aparato NO ES UN JUGUETE.
4. Sin supervisión los niños ni las personas con discapacidad
intelectual nunca deben usar este aparato.
5. Una supervisión estricta se requiere cuando un aparato se use por niños o cerca de ellos.
6. Como medida de protección contra el riesgo de descarga eléctrica, no sumerja el
cable, los enchufes ni ninguna otra parte de la unidad en agua ni en otros líquidos.
7. Desconéctelo del tomacorriente cuando no esté en uso, antes de
retirar piezas y antes de la limpieza. Déjelo enfriar antes de colocar
o retirar cualquiera de las piezas, y antes de la limpieza.
8. NO utilice ningún aparato con el cable o el enchufe dañados, ni si el aparato
tiene desperfectos o SI se ha dañado de cualquier manera. Devolver el
aparato al taller de reparación más cercano para su reparación o ajuste.
9. El fabricante no recomienda el uso de otros aditamentos o accesorios diferentes a los
proporcionados por el fabricante. El uso de accesorios puede provocar lesiones.
10. NO utilice el aparato para usos no previstos.
11. NO utilice el aparato al aire libre. SÓLO PARA USO DOMÉSTICO.
ESPAÑOL
12. NO lo coloque sobre una hornilla caliente, ni eléctrica ni de gas,
ni en un horno caliente ni cerca de ninguno de estos.
13. NO permita que el cable cuelgue sobre el borde de la mesa o
del mostrador, ni que toque supercies calientes.
14. NUNCA deje la unidad desatendida mientras esté en uso ni
cuando esté enchufada a una toma de corriente.
15. Debe ser extremadamente cuidadoso al mover cualquier aparato con comida caliente.
16. Siempre conecte primero el enchufe al aparato, luego enchufe el cable
a la toma de corriente. Para desconectar, mueva todos los controles
a “apagado”, luego retire el enchufe del tomacorriente.
PROTECCIONES IMPORTANTES ADICIONALES
Precauciones de seguridad operativa
1. Antes del uso, revise el interior de la tostadora por si tiene objetos extraños.
2. NO intente insertar ningún utensilio ni ningún otro objeto mientras la tostadora esté
enchufada. Hacerlo podría conducir a lesiones personales o a sufrir descargas eléctricas.
3. No debe insertar alimentos muy grandes ni utensilios de metal en la tostadora,
puesto que pueden producir incendios o descargas eléctricas.
11
11
Page 14

4. Esta tostadora está destinada estrictamente para usar rebanadas de
tamaño normal de pan para emparedados de queso tostado. NO intente
cocinar ningún otro producto alimenticio en esta unidad.
Instrucciones para el cable eléctrico y el enchufe
1. El aparato tiene un enchufe polarizado (una patita más ancha). Para reducir
el riesgo de descarga eléctrica, este enchufe entra en un tomacorriente
polarizado solo en una posición. Si el enchufe no entra completo en el
tomacorriente, inviértalo. Si aún así no entra, comuníquese con un electricista
calicado. No trate de modicar el enchufe de ninguna manera.
2. Se provee un cable de alimentación corto para reducir el riesgo
resultante de enredarse o tropezar con un cable largo.
3. Si se utiliza un cable alargador o un cable de alimentación más largo:
• Los cables de extensión se pueden utilizar si se tiene cuidado con su uso.
• Las características eléctricas nominales del grupo de cables o del cable
de extensión deben ser al menos iguales a las del aparato.
• Cuando utiliza un cable más largo o cable de extensión, asegúrese
de que el cable no sobresalga de la encimera ni de la mesa ya que se
puede halar el cable o tropezarse involuntariamente con él.
4. El fabricante no recomienda el uso de esta máquina en países que no admiten 120 V
CA incluso si se está usando un adaptador, transformador o convertidor de voltaje.
¡GUARDE ESTAS INSTRUCCIONES!
INTRODUCCIÓN
¡Felicitaciones por su compra de la TOSTADORA PARA EMPAREDADO DE QUESO
TOSTADO de Nostalgia™! ¡Ahora puede hacer emparedados de queso fundido
y caliente perfectamente tostados en solo minutos! Simplemente coloque su
emparedado de queso montado en la cesta de tostar, regule el dial a su preferencia
de cocción y tueste después. ¡Quién sabía que hacer deliciosos emparedados
de queso era tan sencillo como hacer una tostada! Características:
Las características incluyen:
• Prepara dos emparedados de queso tostado a la vez en solo minutos
• Dos cestas de tostar extraíbles sostienen los emparedados de queso mientras se cocinan
• El dial regulable para tostar facilita fundir perfectamente su emparedado de queso
• Funciones de cancelar, precalentar y descongelar
• Carcasa y agarraderas frías al tacto
• Cordón enrollable para un guardado más simple
• Bandeja de goteo removible
ESPAÑOL
12
12
Page 15

PIEZAS Y ENSAMBLAJE
PIEZAS
Su TOSTADORA PARA EMPAREDADO DE QUESO TOSTADO
viene completamente ensamblada. Asegúrese de que todos los
materiales de empaque han sido retirados de la unidad.
Ranuras para
tostar
Palanca de control
Panel de control
Bandeja
de goteo
Cestas de tostar
ESPAÑOL
PANEL DE CONTROL
13
13
Palanca de control
CANCELAR: Presione para detener el ciclo
de tostar en cualquier momento.
PRECALENTAR: Lleva la tostadora hasta
la temperatura para tostar.
DESCONGELAR: Descongela y tuesta pan congelado.
Dial para tostar: Ajuste de dial para tostar
el emparedado a su nivel preferido de
cocción, de tueste claro a oscuro.
Page 16

CÓMO UTILIZAR
Antes de usar su TOSTADORA PARA EMPAREDADO DE QUESO TOSTADO
por primera vez, asegúrese de seguir las instrucciones de la sección
LIMPIEZA Y MANTENIMIENTO para limpiar su unidad.
Puede sentirse un ligero olor y algo de humo la primera vez que se
use este aparato. Eso es tanto normal como temporal.
1. Coloque la unidad en una supercie estable cerca de un tomacorriente y lejos
de cualquier fuente de agua. Conecte el aparato en una toma de corriente.
2. Unte manteca en el exterior de dos rebanadas de pan.
3. Monte su emparedado usando sus ingredientes favoritos de queso tostado. Para ideas de
recetas, vea la sección RECETAS de este manual. Cuando monte su emparedado, asegúrese
de que la cara untada de manteca de cada rebanada de pan se orienta hacia afuera.
SUGERENCIA PROFESIONAL: Visite la sección CONSEJOS ÚTILES de este manual para
que obtenga los lineamientos para montar el mejor emparedado de queso tostado.
4. Precaliente la tostadora presionando sobre la Palanca de control, después
presione el botón PRECALENTAR (
5. Cuando termine el precalentamiento, la Palanca de control se subirá. Inserte su emparedado
preparado en la Cesta de tostar, coloque después la Cesta de tostar en la Ranura de tostar.
6. En dependencia de su nivel preferido de cocción, regule el Dial para tostar hasta dentro de
la ZONA DE FUSIÓN (niveles 4 al 6) indicada en el Dial para tostar. (4 = menos tostado, 6 =
más tostado)
) en el Panel de control.
ESPAÑOL
7. Presione sobre la Palanca de control para comenzar el ciclo de tostar.
8. Después de que la Palanca de control sube, deje reposar el emparedado en la tostadora
durante aproximadamente 30 segundos antes de sacarlo de la tostadora. Eso posibilitará
que el queso se funda completamente
NOTA: Si su emparedado de queso tostado necesita más tiempo, regule el Dial para tostar
hasta entre 1 y 4 y presione sobre la Palanca de control.
¡PRECAUCIÓN! Los alimentos tostados estarán calientes al tacto, manipule con cuidado.
9. Cuando termine de usar su TOSTADORA PARA EMPAREDADO DE QUESO TOSTADO,
desconecte la unidad del tomacorriente y déjela enfriar completamente.
14
14
Page 17

CONSEJOS ÚTILES
MONTAR SU EMPAREDADO DE QUESO TOSTADO
• Use un queso blando con un bajo punto de fusión.
• Asegúrese de precalentar la tostadora antes de tostar su emparedado.
• Monte su emparedado con rebanadas de pan delgadas. Las rebanadas de pan
gruesas pudiesen ser demasiado grandes para las Ranuras de tostar.
• No añada demasiados ingredientes a su emparedado, hacerlo
demasiado grueso puede dejar frío el centro o sin fundir el queso.
Recomendamos usar 1-2 rebanadas de queso por emparedado.
• Asegúrese siempre de untar manteca al exterior de cada rebanada de pan antes
de tostar. Eso le creará un exterior deliciosamente crocante a su emparedado.
• Deje reposar el queso tostado en la tostadora durante aproximadamente
30 segundos después de haberse completado el ciclo de tostar
para posibilitar que el queso se funda completamente.
QUESOS RECOMENDADOS
Los mejores quesos para usar cuando se hace un emparedado de queso
tostado son los quesos blandos con un bajo punto de fusión.
Quesos recomendados:
• Suizo
• Asiago
• Provolone
• Mozzarella
• Cheddar
• Gruyer
ESPAÑOL
• Pepper Jack
PANES RECOMENDADOS
Debido al tamaño de las Ranuras de tostar, los panes de corte grueso no
funcionan bien con esta tostadora. Para obtener los mejores resultados,
limítese a las rebanadas de pan de corte normal o delgadas.
Panes recomendados:
• Blanco
• De trigo
• Multigrano
• De levadura natural
• Panecillos ingleses
• Pumpernickel
• De centeno
• Italiano
COMBUSTIÓN/HUMO
Si su unidad quema o humea mientras tuesta, presione el botón CANCELAR
para terminar el ciclo de tostar y desconéctela del tomacorriente. Retire la
Cesta de tostar de la Ranura de tostar y deje que la unidad se enfríe
completamente. El humo puede deberse al exceso de migas y pedazos
de queso atorados dentro de la máquina. Para evitar el humo, asegúrese
de limpiar la Bandeja de goteo después de cada uso.
15
15
Page 18

LIMPIEZA Y MANTENIMIENTO
Asegúrese de que el aparato esté desconectado antes de limpiarlo. Deje que todas las
piezas se ENFRÍEN al tacto, especialmente las Cestas de tostar y la Bandeja de goteo.
Para extender la vida útil de su TOSTADORA PARA EMPAREDADO DE
QUESO TOSTADO, siga, por favor, estas simples instrucciones para su
mantenimiento. No coloque nunca el aparato en un lavavajillas.
• No intente retirar los emparedados si se atoran dentro de las
Ranuras de tostar sin desconectar primero la tostadora.
• Limpie la supercie exterior de la tostadora con un paño húmedo suave
y solamente cuando esté desconectada y completamente fría.
• Use agua jabonosa para limpiar la Cesta de tostar antes y después del uso.
• Asegúrese de que la tostadora se haya enfriado
completamente antes de guardarla o limpiarla.
• Desconecte la tostadora antes de retirar la Bandeja de goteo de la base.
Las migas deben eliminarse del mecanismo soplando o sacudiendo
ligeramente. La Bandeja de goteo debe limpiarse después de cada uso.
• No utilice la tostadora sin al menos haber introducido un emparedado de queso tostado.
• Nunca use la tostadora si la Cesta de tostar y la Bandeja de goteo no están en su lugar.
RECETAS
¡Utilice su TOSTADORA PARA EMPAREDADO DE QUESO TOSTADO para
preparar comidas rápidas y fáciles de servir! Monte su propio emparedado
delicioso de queso tostado con sus ingredientes favoritos o pruebe
una de las combinaciones de sabrosas recetas a continuación.
El Clásico
cheddar + pan blanco
El Pesto
pesto + provolone + mozzarella + pan blanco
Suizo-Hongos
hongos y cebollas salteados + queso suizo + mayonesa sazonada + pan de centeno
Tocino y Tomate
tocino crocante + tomate + su queso favorito
Carne de res asada y queso Brie
carne de res asada + mostaza de Dijon + queso Brie + cebollas
caramelizadas + pan de levadura natural
Emparedado español de aceitunas
queso manchego rallado + aceitunas verdes en rodajas + pan blanco
ESPAÑOL
16
16
Page 19

DEVOLUCIONES Y GARANTÍA
SI LA UNIDAD NO FUNCIONA O ESTÁ DAÑADA AL SACARLA POR PRIMERA VEZ
DE LA CAJA, DEVUÉLVALA AL LUGAR DE COMPRA INMEDIATAMENTE.
TOSTADORA PARA EMPAREDADO DE QUESO TOSTADO / TCS2
Si tiene preguntas, contacte con nosotros por correo electrónico o por el número
telefónico de servicio al cliente que aparece a continuación en el horario de
8:00 AM a 5:00 PM, de lunes a viernes, Hora Estándar del Este.
Distribuida por:
Nostalgia Products LLC
1471 Partnership Dr.
Green Bay, WI 54304-5685
Servicio al cliente
Teléfono: (920) 347-9122
Web: www.nostalgiaproducts.com
Solicitud de servicio al cliente
Para enviar una solicitud al Servicio al Cliente, vaya a www.nostalgiaproducts.com, llene
el formulario de Solicitud de Servicio al Cliente y haga clic en el botón Enviar.
Un representante le contactará tan pronto como sea posible.
Términos de garantía del producto
Po este medio, Nostalgia Products LLC (la “Compañía”) garantiza que por un período de un (1) año a
partir de la fecha de compra original, este producto estará sin defectos en cuanto a materiales y mano
de obra en uso normal en casa, siempre que el producto se maneje y mantenga de acuerdo con las
instrucciones de manejo. Como único y exclusivo remedio en virtud de esta garantía, la Compañía, a
su discreción, podrá optar por reparar o sustituir el producto que se encuentre defectuoso, o emitir un
reembolso por el producto durante el período de garantía. Esta garantía sólo está disponible para el
comprador original minorista del producto a partir de la fecha inicial de compra al por menor, y sólo es
ESPAÑOL
válida con el recibo de compra original, y como prueba de la fecha de compra, es necesario obtener los
benecios de la garantía. Todos los reclamos de garantía deben hacerse a la atención de la Compañía
dentro del período de garantía y no más tarde que 30 días desde la imposibilidad de realizarlo. Esta
garantía no cubre el desgaste normal o daños ocasionados por el embarque, malos manejos, mal uso,
accidentes, alteración, piezas de cambio incorrectas, o algo distinto al uso doméstico normal. Es posible
que deba devolver el producto (con los gastos de envío pagados por usted) para inspección y evaluación.
Los costos de envío no son reembolsables. La empresa no se hace responsable por devoluciones
dañadas o perdidas en tránsito. A menos que se indique lo contrario especícamente permitido por
las instrucciones de manejo, esta garantía sólo se aplica al uso en interiores de las viviendas. Para
realizar una reparación bajo esta garantía, comuníquese con la Compañía mediante el número de
teléfono indicado anteriormente o al llenar el formulario de consulta para el servicio de Atención al
Cliente en www.nostalgiaproduct s.com. El período de garantía sólo es válido en EE.UU. y Canadá.
Esta garantía está en lugar de cualquier otra garantía, expresa o implícita, incluso las garantías de
comerciabilidad y conveniencia para un propósito en particular, que quedan excluidas en la medida
permitida por la ley. En ningún caso la compañía será responsable de cualquier daño indirecto, incidental,
consecuente, especial o daños que surjan o estén relacionados con este producto o la utilización del
mismo. Algunos estados, provincias o corregimientos no permiten la exclusión o la limitación de daños
incidentales o consecuentes, por lo que la exclusión o la limitación anterior quizás no se aplique a usted.
Esta garantía no se aplica a mercancía reelaborada.
Lea las instrucciones de manejo cuidadosamente. El incumplimiento
de las instrucciones de manejo anulará esta garantía.
Para obtener más información, visítenos en línea en www.nostalgiaproducts.com.
Me Gusta en Facebook en www.facebook.com / NostalgiaElectrics.
Siga nuestros consejos sobre Pinterest en www.pinterest.com / nostalgiaelctrx.
Tweet con nosotros en Twitter en www.twitter.com / NostalgiaElctrx.
17
17
Page 20

Faire une fête tous les jours!
Visiter le site Web www.nostalgiaproducts.com
pour d’autres produits agréables.
TABLE DES MATIÈRES
SÉCURITÉ . . . . . . . . . . . . . . . . . . . . . . . . . . . . . . . . . . . . . . . .18
PRÉCAUTIONS IMPORTANTES . . . . . . . . . . . . . . . . . . . . . . . . . . . 19
PRÉCAUTIONS IMPORTANTES ADDITIONNELLES . . . . . . . . . . . . . . . 19
INTRODUCTION . . . . . . . . . . . . . . . . . . . . . . . . . . . . . . . . . . . . 20
PIÈCES ET ASSEMBLAGE . . . . . . . . . . . . . . . . . . . . . . . . . . . . . . . 21
COMMENT FAIRE FONCTIONNER . . . . . . . . . . . . . . . . . . . . . . . . . . 22
CONSEILS UTILES . . . . . . . . . . . . . . . . . . . . . . . . . . . . . . . . . . .23
NETTOYAGE ET ENTRETIEN . . . . . . . . . . . . . . . . . . . . . . . . . . . . .24
RECETTES . . . . . . . . . . . . . . . . . . . . . . . . . . . . . . . . . . . . . . . . 24
RETOURS ET GARANTIES . . . . . . . . . . . . . . . . . . . . . . . . . . . . . . . 25
SÉCURITÉ
Votre sécurité est très importante, ainsi que celle des autres.
Nous avons fourni de nombreux messages de sécurité importants dans ce manuel
et sur votre appareil. Toujours lire et respecter les consignes de sécurité.
Ceci est le symbole d'alerte de sécurité.
Ce symbole vous signale les dangers potentiels qui peuvent
causer des blessures graves pour vous et les autres.
Tous les messages de sécurité suivront le symbole d'alerte de sécurité.
Tous les messages de sécurité vous diront quel est le danger potentiel
et vous diront comment réduire le risque de blessure et vous diront
ce qui peut arriver si les instructions ne sont pas suivies.
Spécications de l'appareil :
120 V, 60 Hertz
600 Watts
CE PRODUIT EST DESTINÉ POUR UNE PRISE ÉLECTRIQUE DE 120V AC UNIQUEMENT.
Reportez-vous à www.nostalgiaproducts.com/user-manuals/
pour la version la plus récente.
FRANÇAIS
18
18
Page 21

PRÉCAUTIONS IMPORTANTES
Une personne qui n'a pas lu et compris toutes les instructions de
fonctionnement et de sécurité n'est pas qualiée pour faire fonctionner cet
appareil. Tous les utilisateurs de cet appareil doivent lire et comprendre
ce manuel d'utilisation avant d'utiliser ou de nettoyer cet appareil.
Lorsque l'on utilise un appareil électrique, il faut toujours
respecter les précautions de base, y comprises celles-ci :
1. Lisez toutes les instructions avant d'utiliser cet appareil.
2. NE TOUCHEZ PAS aux surfaces chaudes. Utiliser les poignées ou les boutons.
3. Cet appareil N'EST PAS UN JOUET.
4. Les jeunes enfants non supervisés ainsi que les personnes intellectuellement
atteintes ne doivent jamais faire fonctionner cet appareil.
5. Une surveillance étroite est nécessaire lorsque tout appareil
est utilisé par ou à proximité des enfants.
6. Pour protéger contre les chocs électriques ne pas submerger le cordon, la
che ou une partie de cette unité dans l'eau ou d'autres liquides.
7. Toujours débrancher la prise lorsque l'appareil n'est pas en fonctionnement
et ce, avant de retirer les pièces et faire le nettoyage. Laisser refroidir avant
de remettre ou de retirer les pièces ainsi qu'avant de faire le nettoyage.
8. NE PAS utiliser l'appareil ayant un cordon ou une che électrique endommagée, ni
suivant un mauvais fonctionnement ou une détérioration quelconque. Retournez-le à
l’atelier de réparation le plus proche pour examen, une réparation ou un ajustement.
9. Le fabricant ne recommande pas l’utilisation d’accessoires autres que ceux
fournis par le fabricant. L'utilisation d’accessoires peut causer des blessures.
10. N'employez PAS l'appareil à d'autres ns que son usage prévu.
11. NE PAS utiliser l'appareil à l'extérieur. POUR UN USAGE DOMESTIQUE UNIQUEMENT.
12. NE PAS placer sur ou près d'un brûleur à gaz ou électrique ou dans un four chaué.
13. NE JAMAIS laisser le cordon dépasser sur le côté d'une table
ou d'un comptoir ni toucher les surfaces chaudes.
14. NE JAMAIS laisser l'appareil sans surveillance tout en cours
d’utilisation ou lorsqu’il est branché sur une prise.
15. Soyez extrêmement prudent pour déplacer un appareil contenant des liquides chauds.
16. Toujours brancher la prise de l’appareil tout d’abord, puis branchez dans
la prise murale. Pour débrancher l’appareil, remettre tous les boutons en
mode « arrêt » (o), puis débranchez la che de la prise murale.
PRÉCAUTIONS IMPORTANTES ADDITIONNEL
Instructions et précautions de sécurité
1. Vériez l’intérieur du grille-pain pour la présence de corps étrangers avant de les utiliser.
2. NE PAS essayer d'insérer des ustensiles ou d'autres objets pendant
que le grille-pain est branché ou en fonctionnement. Ceci pourrait
vous iniger des blessures, voire des chocs électriques.
3. Des aliments ou des ustensiles en métal ne doivent pas être insérés dans le grille-
FRANÇAIS
19
19
Page 22

pain comme un incendie ou de risque de choc électrique pourrait se produire.
4. Ce grille-pain est strictement conçu pour un usage avec des tranches de
pain de dimension régulières an de faire des sandwiches au fromage grillé.
NE PAS essayer de faire cuire d'autres aliments dans cet appareil.
Directives pour le cordon et la che électrique
1. Cet appareil possède une che polarisée (une lame est plus large que l'autre). Pour
réduire le risque de choc électrique, cette che est conçue pour s’insérer dans une prise
polarisée d’une seule façon. Si vous n’arrivez pas à insérer entièrement la che dans la
prise, branchez-la dans l’autre sens. Si elle ne s’enfonce toujours pas, contactez un
électricien qualié. Ne pas tenter de modier la che de quelque façon que ce soit.
2. Un court cordon d'alimentation est fourni pour réduire les risques
d'enchevêtrement ou risques de trébucher sur un cordon plus long.
3. Si un cordon d'alimentation amovible ou une rallonge est utilisée :
• Rallonges électriques peuvent être utilisées avec prudence.
• Les caractéristiques électriques du câble ou de la rallonge doivent être
au moins aussi grandes que la puissance nominale de l’appareil.
• Lorsque vous utilisez une corde plus longue ou rallonge électrique,
assurez-vous que celle-ci ne pende pas au-delà du comptoir ou
d'une table où elle peut faire trébucher ou être tirée.
4. Le fabricant ne recommande pas l’utilisation de cette machine dans les
pays qui ne supportent pas les tensions de 120V AC, même si un adaptateur
de tension, un transformateur ou un convertisseur est utilisé.
CONSERVEZ CES INSTRUCTIONS !
INTRODUCTION
Félicitations pour l’achat de l’appareil GRILLE-PAIN POUR SANDWICHES AU
FROMAGE GRILLÉ de NostalgiaTM ! Maintenant vous pouvez griller parfaitement
des sandwiches au fromage grillé parfaitement chauds et fondants en quelques
minutes seulement ! Il suffit de placer votre sandwich au fromage déjà prêt sur la
grille, ajuster le bouton selon vos préférences et le faire griller. Qui aurait cru qu’il était
aussi simple que cela de faire des griller des sandwichs au fromage délicieux !
Les caractéristiques comprennent les éléments suivants :
• Grille deux sandwichs au fromage en même temps en quelques minutes
• Deux grilles amovibles contiennent les sandwiches au fromage pendant la cuisson
• Le cadran d'ajustement de cuisson facilite la fonte du fromage dans votre sandwich.
• Fonctions d'annuler, préchauer et dégeler
• Poignées et boîtier froides au toucher
• Range-cordon pour un entreposage rangé
• Ramasse-gouttes amovible
FRANÇAIS
20
20
Page 23

PIÈCES ET ASSEMBLAGE
PIÈCES
Votre GRILLE-PAIN POUR SANDWICHES AU FROMAGE GRILLÉ vient
complètement assemblé. Assurez-vous que tous les matériaux d'assemblage
soient enlevés de l'appareil avant son fonctionnement.
Fentes pour griller
Levier de commande
Panneau des
commandes
Ramasse-
gouttes
Grilles
PANNEAU DES COMMANDES
FRANÇAIS
21
21
Levier de commande
ANNULER : Appuyez sur la touche arrêter
pour arrêter de griller à tout moment.
PRÉCHAUFFER : Hausse la température
du grille-pain pour griller
DÉGIVRAGE : Dégivre et grille le pain congelé.
Cadran d'intensité de cuisson : Le cadran
ajuste la cuisson des sandwichs selon
vos préférences, de léger à foncé.
Page 24

COMMENT FAIRE FONCTIONNER
Avant d'utiliser pour la première fois votre GRILLE-PAIN POUR SANDWICH
AU FROMAGE GRILLÉ, assurez-vous de suivre les directives sous la rubrique
NETTOYAGE ET ENTRETIEN an de bien nettoyer votre appareil au préalable.
Il peut y avoir une légère odeur et de la fumée lorsque vous utiliserez
votre appareil pour la première fois. Ceci est normal et temporaire.
1. Placez l'appareil sur une surface plane et stable près d'une prise électrique murale,
loin de sources d'eau. Branchez l'appareil dans une prise électrique murale.
2. Beurrer l’extérieur des deux morceaux de pain.
3. Façonnez votre sandwich avec vos ingrédients et votre fromage à griller préférés. Pour des
idées de RECETTES, consultez la rubrique recettes dans ce manuel. Lorsque vous façonnez
votre sandwich, assurez-vous que chaque morceau de pain fait face à l'extérieur.
CONSEIL DE PRO : Voir la rubrique CONSEILS DE PRO dans ce manuel pour avoir des
lignes directrices sur comment façonner les meilleurs sandwichs au fromage grillé.
4. Préchauez l'appareil en appuyant sur le levier de commande vers le bas, puis
sur le bouton PRÉCHAUFFER (
5. Une fois l'appareil préchaué, le levier de commande remontera par lui-même. Placez votre
sandwich sur la grille, puis placez-la dans la fente de cuisson.
6. Selon vos préférences de pain grillé, ajustez le cadran de cuisson selon les ZONES DE
CUISSON (niveaux 4 à 6) indiqués sur le cadran de cuisson. (4 = moins grillé, 6 = plus grillé)
) situé sur le panneau des commandes.
7. Appuyez sur le levier de commande pour démarrer le cycle griller.
8. Une fois que le levier de commande se remonte, laissez le sandwich dans le grille-pain pour
environ 30 secondes avant de l'enlever du grille-pain. Cela permettra au fromage de fondre
complètement.
REMARQUE : Si votre sandwich au fromage à besoin de griller davantage, ajustez le cadran
de cuisson entre 1 et 4 puis appuyez à nouveau sur le levier de commande.
MISE EN GARDE ! Les aliments chauds seront chauds au toucher, donc manipulez avec soin.
9. Lorsque vous avez terminé d'utiliser votre GRILLE-PAIN POUR SANDWICH
AU FROMAGE GRILLÉ, débranchez-le de la prise murale électrique
puis laissez-le refroidir complètement avant de le manipuler.
FRANÇAIS
22
22
Page 25

CONSEILS UTILES
FAÇONNER VOS SANDWICHS AU FROMAGE GRILLÉ
• Utilisez un fromage mou ayant un faible point de fonte.
• Assurez-vous de préchauer le grille-pain avant de griller votre sandwich.
• Façonner votre sandwich avec de minces tranches de pain. Des tranches
épaisses de pain pourraient obstruer les fentes de cuisson.
• Ne pas ajouter trop d'ingrédients dans votre sandwich, car ceci pourrait
faire en sorte que le centre soit trop bourré et reste froid et non fondu.
Nous recommandons d'utiliser 1 à 2 tranches de pain par sandwich.
• Assurez-vous de toujours beurrer l'extérieur de chaque tranche de pain avant
de griller. Cela créera un pourtour croustillant délicieux à votre sandwich.
• Laissez reposer le sandwich au fromage grillé dans le grille-pain pour environ 30
secondes une fois le cycle griller terminé an que le fromage fonde complètement.
FROMAGES RECOMMANDÉS
Les meilleurs fromages à utiliser pour les sandwichs au fromage grillé
sont les fromages mous ayant un faible point de fonte.
Fromages recommandés :
• Suisse
• Asiago
• Provolone
• Mozzarella
• Cheddar
• Gruyère
• Jack au poivre
PAINS RECOMMANDÉS
En raison de la dimension des fentes de cuisson, les tranches de pain
épaisses ne sont pas idéales pour le grille-pain. Pour de meilleurs
résultats, utilisez des tranches de pain de dimension régulière.
Pains recommandés :
• Blanc
• Blé
• Multigrains
• Levain
• Mun anglais
• Pumpernickel
• Seigle
• Italien
BRÛLER/FUMÉE
Si votre appareil brûle et fume durant la cuisson, appuyez sur la touche ANNULER
an de terminer le cycle de cuisson et débranchez-le de la prise électrique murale.
Enlever la grille de la fente de cuisson et laissez l'appareil refroidir complètement.
La fumée peut-être causée par un excès de miettes et de morceaux de
FRANÇAIS
fromage coincés dans l'appareil. An d'éviter qu'il y ait de la fumée, assurezvous de nettoyer le plateau ramasse-gouttes après chaque utilisation.
23
23
Page 26

NETTOYAGE ET ENTRETIEN
Assurez-vous que l'appareil soit débranché avant de le nettoyer. Laissez toutes les pièces
REFROIDIR jusqu'à froides au toucher, surtout la grille et le plateau ramasse-gouttes.
An de prolonger la durée de votre GRILLE-PAIN POUR SANDWICH AU FROMAGE GRILLÉ
suivez ces simples directives d'entretien. Ne jamais mettre l'appareil au lave-vaisselle.
• N'essayez pas de retirer les sandwiches si ceux-ci sont coincés à l'intérieur
des fentes de cuisson sans avoir débranché l'appareil en premier lieu.
• Nettoyez la surface du grille-pain à l'aide d'un linge doux et humide et
ce, seulement lorsqu'il est débranché et complètement refroidi.
• Utilisez de l'eau savonneuse pour nettoyer la grille avant et après sont utilisation.
• Assurez-vous que l'appareil soit complètement refroidi avant de le ranger et le nettoyer.
• Débranchez le grille-pain avant d'enlever le plateau ramasse-gouttes de la base. Les miettes
prises dans le mécanisme doivent être enlevées en souant dessus doucement et le
secouant légèrement. Le plateau ramasse-gouttes doit être nettoyé après chaque utilisation.
• Ne pas faire fonctionner le grille-pain sans au moins y avoir
inséré un sandwich au fromage grillé à l'intérieur.
• Ne jamais utiliser le grille-pain sans la grille ni le plateau ramasse-gouttes mis en place.
RECETTES
Utilisez votre appareil GRILLE-PAIN POUR SANDWICHS AU FROMAGE GRILLÉ pour des
repas rapides et faciles-à-servir ! Façonnez votre propre sandwich au fromage grillé
garni de vos ingrédients favoris ou essayez une des recettes délicieuses ci-incluse.
Le Classique
cheddar + pain blanc
Le Pesto
pesto + fromage provolone + mozzarella + pain blanc
Suisse-champignons
champignons sautés et oignons + Gruyère + vinaigrette Milles Îles + pain de seigle
Bacon et tomate
tomate + bacon croustillant + votre fromage préféré
Rôti de bœuf et Brie
rôti de bœuf + moutarde de Dijon + brie + oignons caramélisés + pain au levain
Sandwich espagnol aux olives
fromage manchego râpé + olives vertes en tranches + pain blanc
FRANÇAIS
24
24
Page 27

RETOURS ET GARANTIE
SI VOTRE APPAREIL NE FONCTIONNE PAS OU S'IL EST ENDOMMAGÉ QUAND VOUS LE RETIREZ
DE LA BOÎTE, VEUILLEZ LE RETOURNER IMMÉDIATEMENT À L'ENDROIT OÙ IL A ÉTÉ ACHETÉ.
GRILLE-PAIN POUR SANDWICH AU FROMAGE GRILLÉ / TCS2
Pour toute question, communiquer par courriel ou au numéro de téléphone du service à
la clientèle, entre 08 h 00 et 17 h 00, du lundi au vendredi, heure normale du Centre.
Distribué par :
Nostalgia Products LLC
1471 Partnership Dr.
Green Bay, WI 54304-5685
Service à la clientèle
Téléphone : (920) 347-9122
Site Web : www.nostalgiaproducts.com
Demande pour le service à la clientèle
Pour soumettre une demande au service à la clientèle, rendez vous au www.nostalgiaproducts.com puis
remplissez le formulaire de demande au service à la clientèle puis cliquez sur le bouton Soumettre.
Un représentant vous contactera dès que possible.
Conditions de garantie du produit
Le groupe Nostalgia Products LLC (référé tel « l’Entreprise ») garantit que pour une période d’un
(1) an en date d’achat, ce produit est sans défaut de matériel et de fabrication selon une utilisation
normale à domicile, seulement si le fonctionnement et l’entretien du produit sont conforment aux
directives fournies. À titre de réparation exclusive et entière sous cette garantie, l’Entreprise pourra
à sa discrétion, réparer ou remplacer le produit défectueux, voire émettre un remboursement du
produit durant la période couverte sous garantie. Cette garantie n’est disponible seulement qu’à
l’acheteur d’origine du produit, en date d’achat au détail dudit produit et sera valide uniquement
avec le reçu de caisse d’origine, à titre de preuve d’achat, lequel est requis pour obtenir les bienfaits
reliés à cette garantie. Toute réclamation doit être rapportée à l’attention de l’Entreprise dans la
fenêtre de la période de la garantie, sans dépasser 30 jours à défaut de performance. Cette garantie
ne couvre pas l’usure normale ou dommage cause par l'expédition, la mauvaise manipulation, la
mauvaise utilisation, les accidents, les modications, les mauvaises pièces de remplacement, voire
toute autre utilisation anormale du produit à domicile. Il est possible que vous ayez à retourner le
produit (avec les frais de retour prépayés par vous) pour une inspection et une évaluation. Les frais
des coûts de retour ne sont pas remboursables. L'Entreprise n’est aucunement responsable pour les
retours endommagés ou perdus en transit. Autrement que spéciquement permit selon les directives
de fonctionnement, cette garantie s’applique à une utilisation à domicile à d'intérieur seulement.
An d'obtenir un service couvert sous cette garantie, veuillez contacter l'Entreprise au numéro de
téléphone inclut ci-haut ou en remplissant le formulaire de demande au service à la clientele, sur le
site www.nostalgiaproducts.com. La garantie est valide seulement aux États-Unis et au Canada.
Cette garantie prévaut toute autre garantie, expresse ou implicite incluant les garanties de qualité
marchande ou ayant une aptitude pour une intention en particulier, lesquelles sont exclues selon la
loi. Sous aucun prétexte l’Entreprise ne pourra être tenue responsable pour tout dommage indirect,
accidentel, conséquentiel ou spécial provenant de ou en relativité avec ce produit ou son utilisation.
Certains états, provinces ou juridictions n'allouent pas l'exclusion ou la limitation de tels dommages
accidentels ou conséquentiels, donc l'exclusion ou limitation suscitée peut ne pas s'appliquer à vous.
Cette garantie ne s’applique pas à la merchandise de renaissance.
Veuillez lire les directives de fonctionnement attentivement. Ne pas se
conformer aux directives de fonctionnement annulera cette garantie.
Pour plus d’informations, visitez notre site Web à www.nostalgiaproducts.com.
Aimez-nous sur Facebook à l’adresse www.facebook.com / NostalgiaElectrics.
Suivez nos conseils sur Pinterest à www.pinterest.com / nostalgiaelctrx.
FRANÇAIS
Tweet avec nous sur Twitter à l’adresse www.twitter.com / NostalgiaElctrx.
25
25
Page 28

 Loading...