

Page 1

All products are trademarks of Nostalgia Products Group, LLC.
Worldwide design & utility patented or patents pending.
© 2012 Nostalgia Products Group, LLC.
2013
www.nostalgiaelectrics.com
(rev. 07/03/13)
Page 2
SCC399
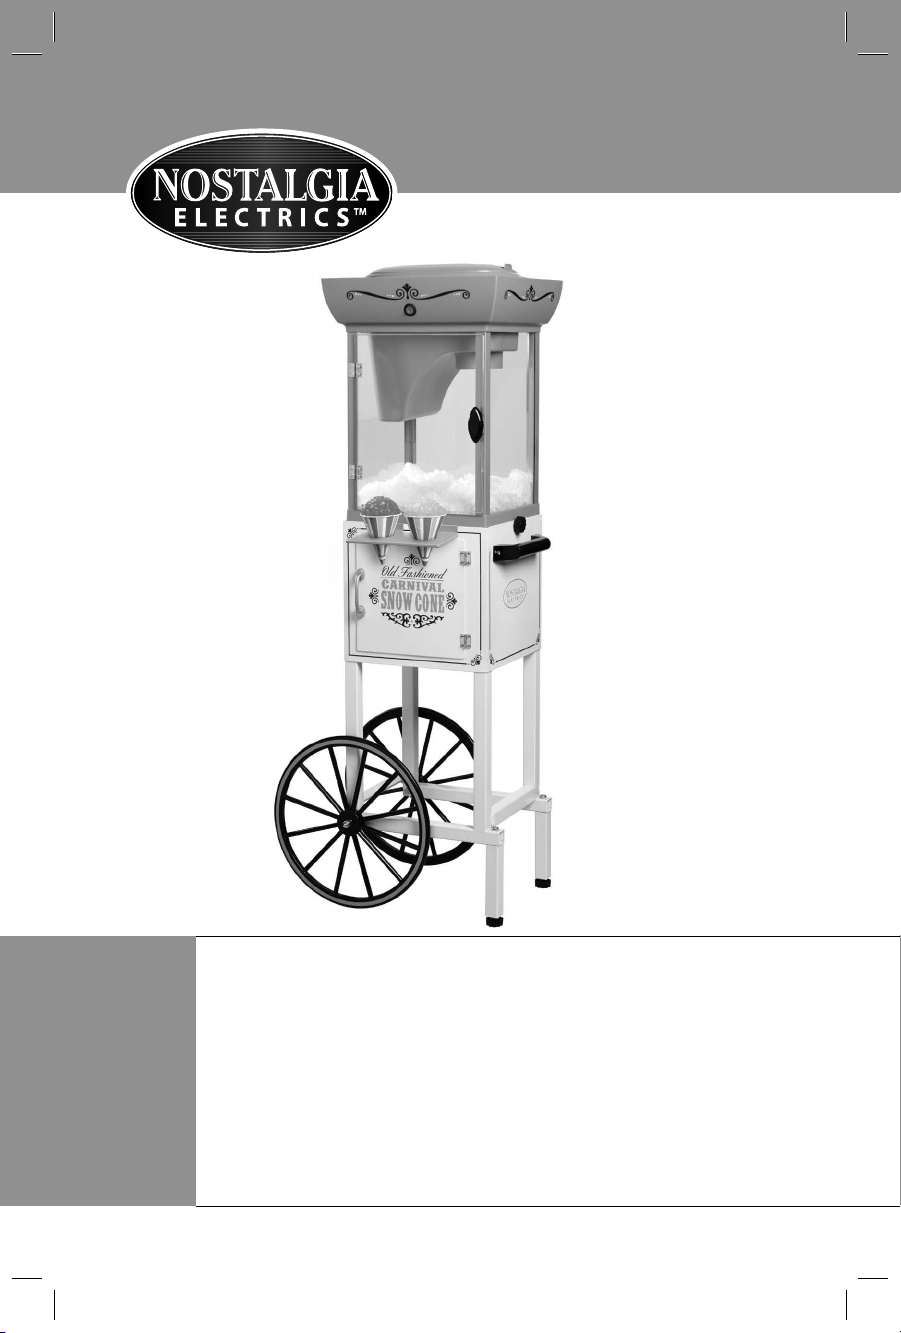
Snow Cone Cart
Carrito de Conos de Nieve
Chariot pour cornet glacé
Instructions and Recipes
Instrucciones y recetas
Consignes et recettes
Page 3

Page 4
Make every day a party!
Visit www.nostalgiaelectrics.com for more fun products.
CONTENTS
IMPORTANT PRECAUTIONS . . . . . . . . . . . . . . . . . . . . . . . . . . . . . 3
IMPORTANT SAFEGUARDS . . . . . . . . . . . . . . . . . . . . . . . . . . . . . 3
INTRODUCTION . . . . . . . . . . . . . . . . . . . . . . . . . . . . . . . . . . . . 4
PARTS & ASSEMBLY . . . . . . . . . . . . . . . . . . . . . . . . . . . . . . . . . . 5
HOW TO OPERATE . . . . . . . . . . . . . . . . . . . . . . . . . . . . . . . . . . 10
HELPFUL TIPS . . . . . . . . . . . . . . . . . . . . . . . . . . . . . . . . . . . . . 11
CLEANING & MAINTENANCE . . . . . . . . . . . . . . . . . . . . . . . . . . . 11
RECIPES . . . . . . . . . . . . . . . . . . . . . . . . . . . . . . . . . . . . . . . . . 13
RETURNS & WARRANTY . . . . . . . . . . . . . . . . . . . . . . . . . . . . . . . 15
SAFETY
ENGLISH
Your safety and the safety of others is very important.
We have provided many important safety messages in this manual and
on your appliance. Always read and obey all safety messages.
This is the safety alert symbol.
This symbol alerts you to potential hazards that
can kill or hurt you and others.
All safety messages will follow the safety alert symbol.
All safety messages will tell you what the potential hazard is, tell you how to reduce the
chance of injury, and tell you what can happen if the instructions are not followed.
Appliance Specications:
120 Volts, 60 Hz
100 Watts, ETL Approved
THIS PRODUCT IS FOR USE IN 120V AC OUTLET ONLY.
2
Page 5

IMPORTANT PRECAUTIONS
1. NEVER immerse in water.
2. NEVER use near water.
3. NEVER use an abrasive sponge or cloth.
ENGLISH
4. NEVER use a scouring pad on the appliance.
5. NEVER leave appliance unattended while in use.
6. NEVER try to force the cover in the locking mechanism.
7. Unplug unit from outlet when not in use and during cleaning.
8. DO NOT operate this appliance with a damaged cord or
plug, or if the appliance ever malfunctions.
9. DO NOT clean any parts of this appliance in a dishwasher.
10. Keep out of reach of children.
11. This appliance is NOT A TOY.
12. Unsupervised young children and cognitively challenged
individuals should never operate this appliance.
13. Young children should be supervised while in proximity of the
appliance to ensure that they do not play with it.
IMPORTANT SAFEGUARDS
Basic safety precautions should always be followed when using
electrical appliances, including the following:
1. Read all instructions before operating this appliance.
2. Keep hands away from blade mechanism. Use handles or knobs.
3. Avoid contact with moving parts. NEVER put ngers or utensils into feed or discharge areas.
4. To protect against electrical shock do not immerse cord, plug or
any part of this appliance in water or other liquids.
5. To avoid re or shock hazard, or damage to the unit, this unit should
be plugged into a polarized 120 Volt AC outlet ONLY.
6. Close supervision is necessary when any appliance is used near children.
7. Unplug from outlet when not in use, before removing parts and before cleaning.
8. DO NOT operate any appliance with a damaged cord or plug, or if the
appliance has been damaged in any manner. Return the appliance
to the nearest repair shop for examination or repair.
9. Do not attempt to service this appliance yourself, as opening or
removing covers may expose you to dangerous voltage or other
hazards. Refer all servicing to qualied service personnel.
10. The manufacturer does not recommend the use of accessory
attachments. Use of accessory attachments may cause injuries.
11. DO NOT use outdoors.
3
Page 6

1. Position the appliance as close to the outlet as possible
to prevent injury due to tripping over cord.
2. Extreme caution must be used when moving this appliance.
3. DO NOT use the appliance for other than its intended use.
4. An appliance that is plugged into an outlet should not be left unattended while in operation.
5. Check Ice Hopper for presence of foreign objects prior to use.
6. Blades are extremely sharp. Use with extreme caution.
7. A short power supply cord is provided to reduce the risk resulting
from becoming entangled or tripping over a long cord.
8. Longer detachable power supply cords can be used if care is exercised in their use.
9. The marked electrical rating of an extension cord should be at
least as great as the electrical rating of the appliance.
10. This appliance has a polarized plug (one blade is wider than the other). To reduce
the risk of electrical shock, this plug is intended to t into a polarized outlet only one
way. If the plug does not t fully into the outlet, reverse the plug. If it still does not
t, contact a qualied electrician. Do not attempt to modify the plug in any way.
SAVE THESE INSTRUCTIONS!
INTRODUCTION
The SNOW CONE CART is a fun, easy to use appliance. Use ice cubes from your own
freezer to shave and craft refreshing snow cones for any occasion. The handy storage
compartment is ideal for storing syrups, extra cones and other supplies. Standing 48" tall,
this snow cone cart is perfect for large groups, parties and events such as fundraisers.
With endless avor varieties, snow cones have always been incredibly fun to eat.
Use the machine to create mounds of shaved ice for smoothies, fruit-avored
slushies, other dessert treats, or to chill beverages. See the recipe section of
this manual for more fun ideas on how to enjoy your SNOW CONE CART.
Features include:
• Tempered Windows
• Wheels and Cart Handle for easy portability
• Storage Compartment
ENGLISH
4
Page 7
PARTS & ASSEMBLY
Please ensure that you have removed all of the hardware and parts listed before
discarding packaging. In our eorts to reduce packaging, we maximize the packing
material to protect your new purchase. As a result, small parts may not be readily visible.
ENGLISH
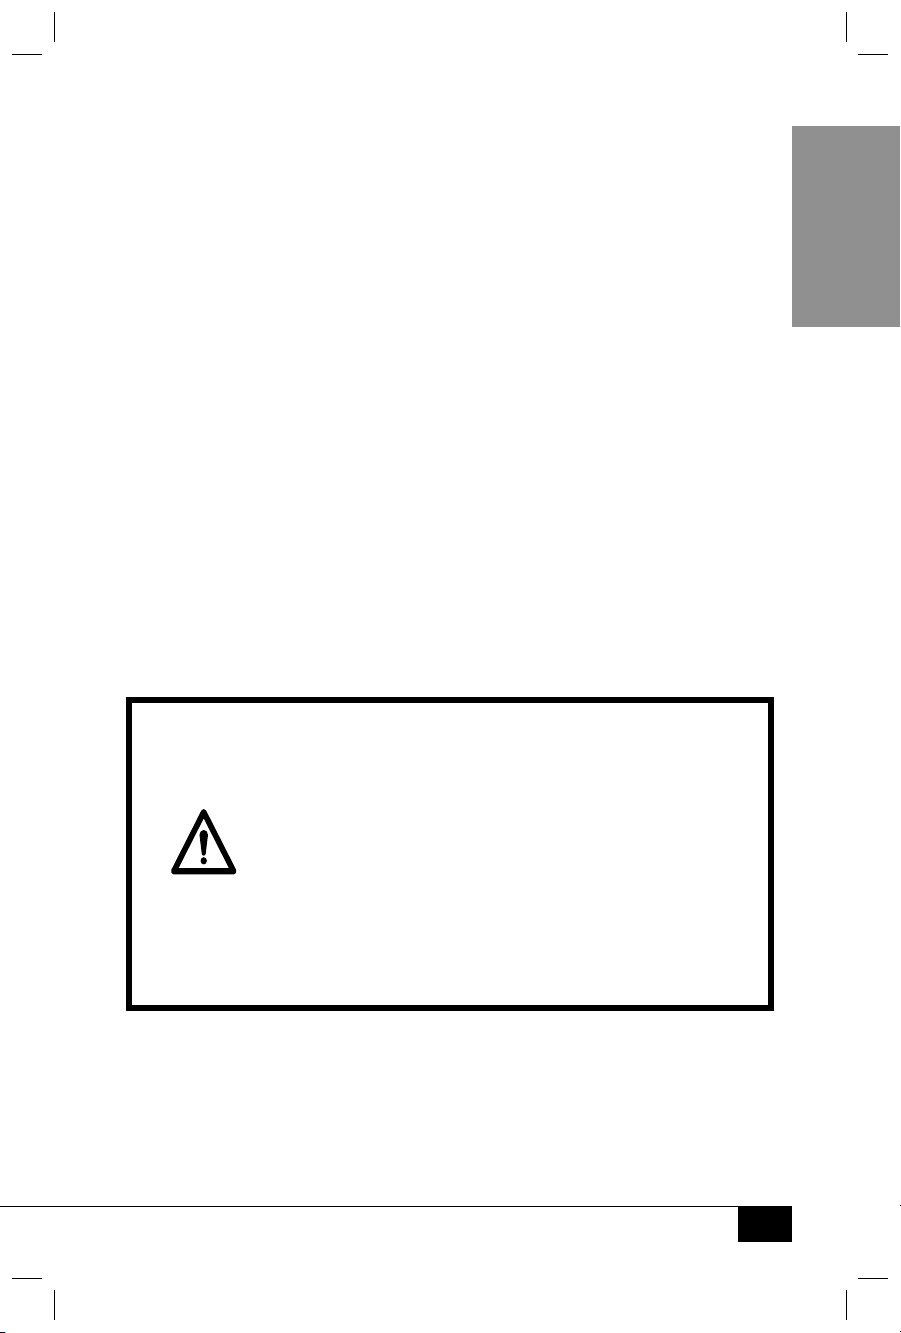
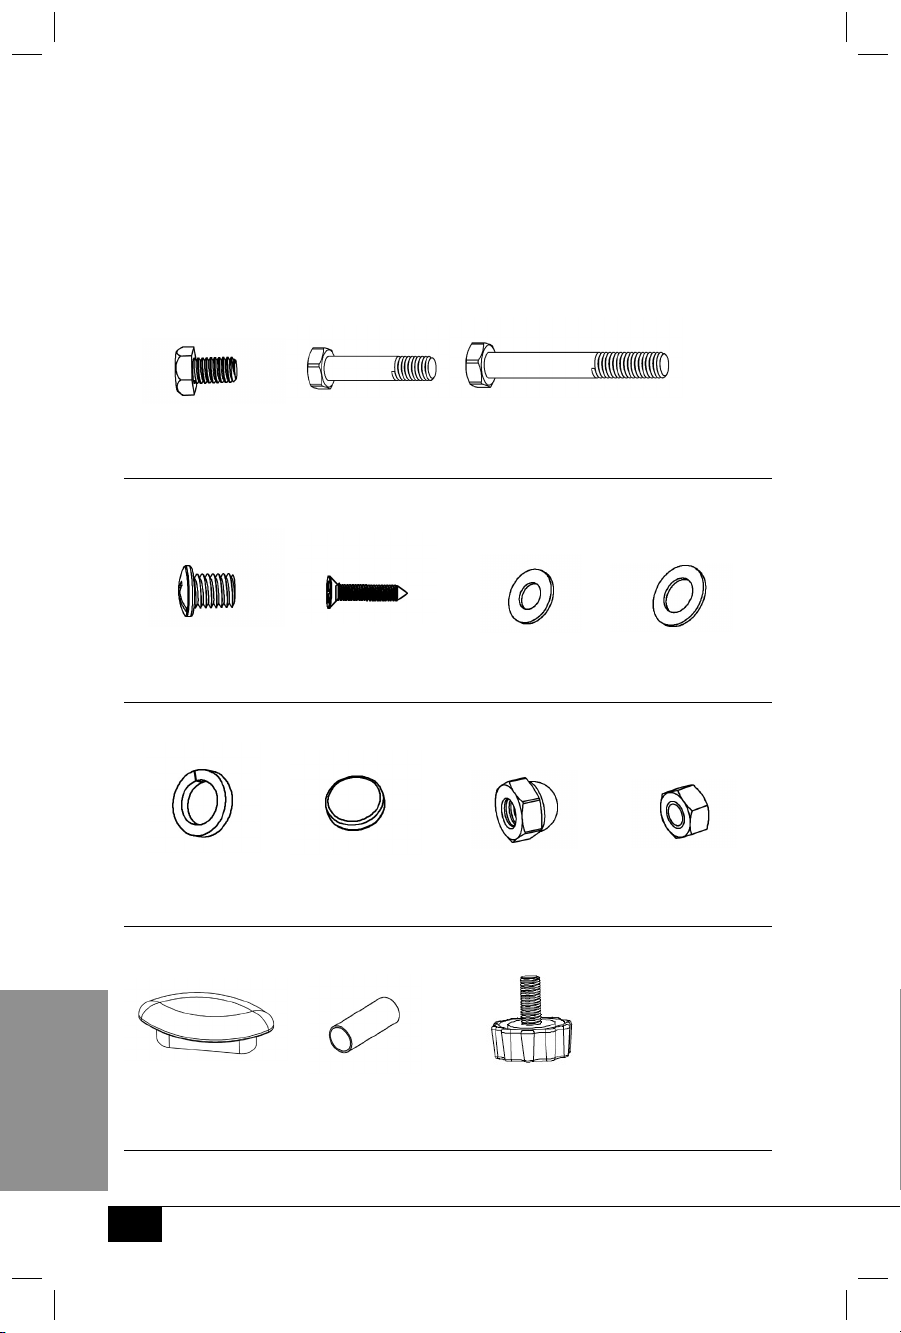
Hardware
#1 Bolt (10mm) #2 Bolt (38mm) #3 Bolt (60mm)
Qty. 10 Qty. 2 Qty. 2
#4 Screw (10mm) #5 Screw (15mm) #6 Flat Washer (6mm) #7 Flat Washer (8mm)
Qty. 4 Qty. 2 Qty. 10 Qty. 8
#8 Locking Washer #9 Magnet #10 Nut Cap #11 Nut
Qty. 4 Qty. 1 Qty. 2 Qty. 2
#12 Door Handle #13 Sleeve Barrel #14 Base Foot
Qty. 1 Qty. 2 Qty. 2
5
Page 8
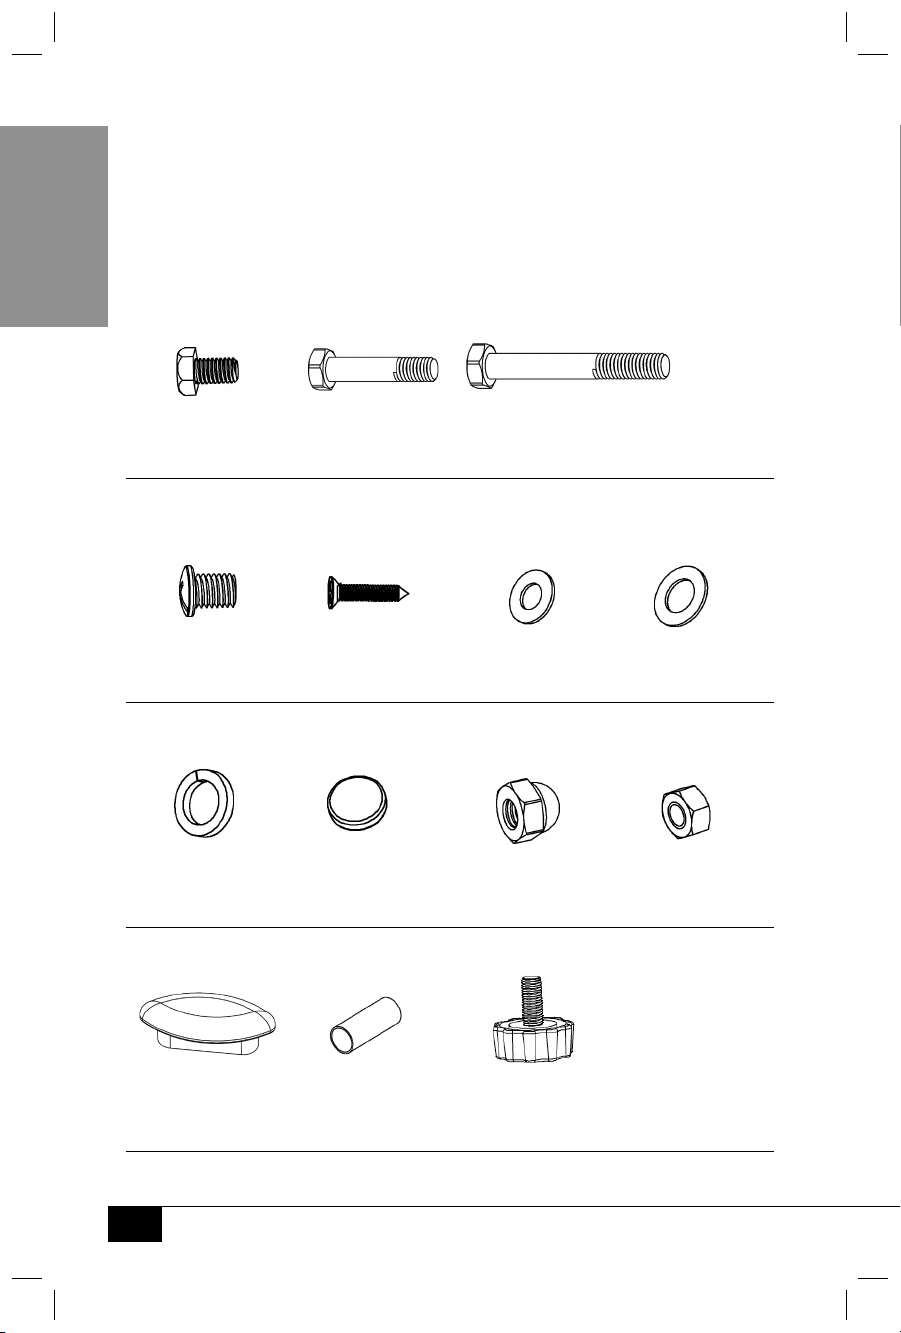
Parts
(G)Wheel
(A) Main Unit (B) Storage (C) Push Handle (D) Bottom Plate
Compartment
(E) Wheel (F) Base Support (G) Cross Bar (H) Leg
Qty. 2 Qty. 2 Qty. 2 Qty. 2
ENGLISH
(I) Ice Shovel (J) Wrench (K) Disassembly Tool (L) Cone Holder
Qty. 2
(M) Blade
6
Page 9
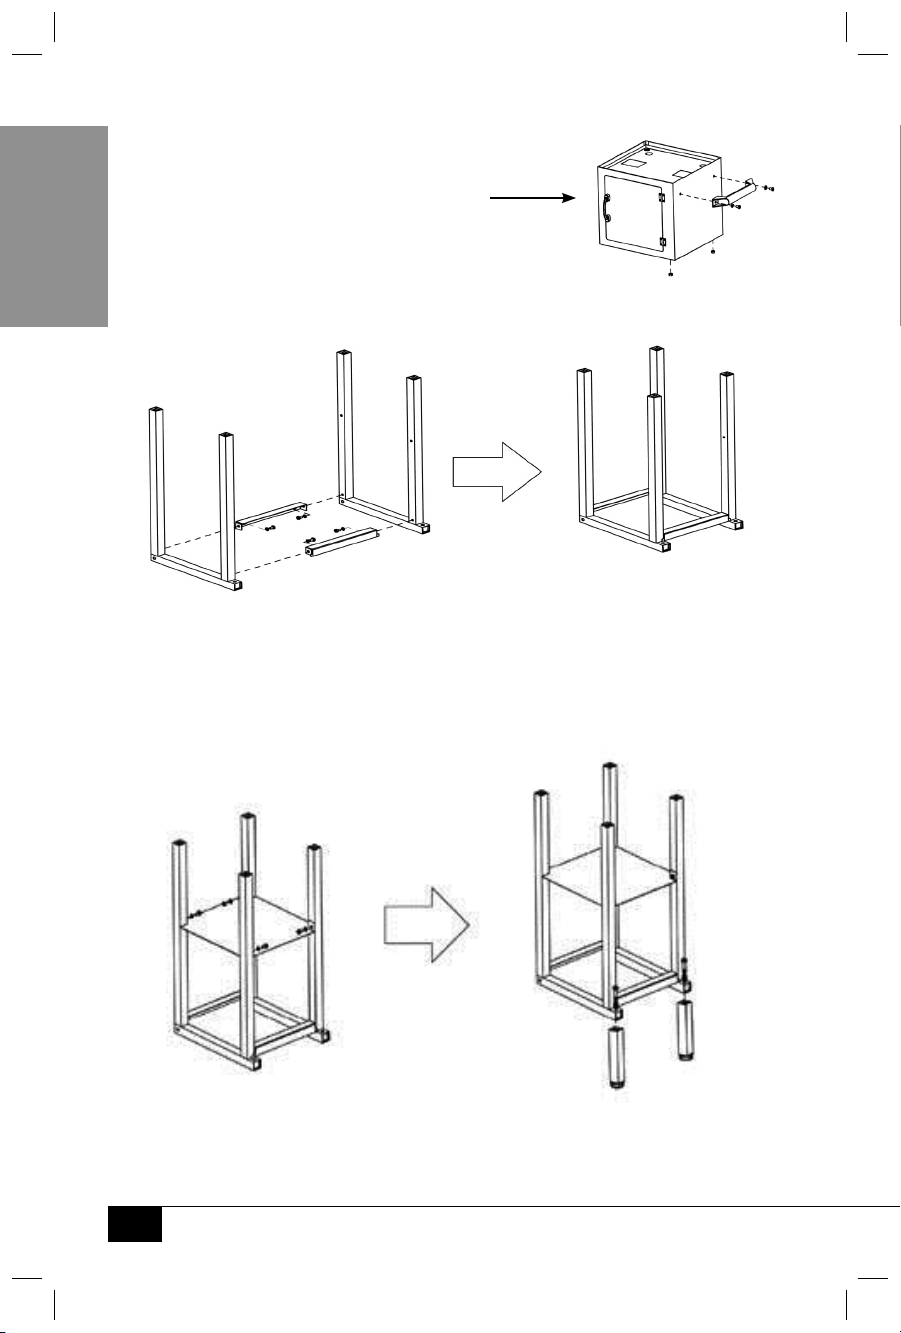
Assembly of Base Support
1. Attach Push Handle (C) from inside Storage
Compartment (B) using two #1 Bolts and two
#6 Flat Washers. Attach two #11 Nuts to bottom.
ENGLISH
2. Attach Cross Bar (G) to Base Support (F) and secure with
four #1 Bolts and four #6 Flat Washers.
3. Secure Bottom Plate (D) to Base Support (F) using four #1 Bolts and four #6 Flat Washers.
4. Attach Legs (H) to protruding ends of Base Support (F) using two #2
Bolts, two #7 Flat Washers and two #8 Locking Washers.
7
Page 10
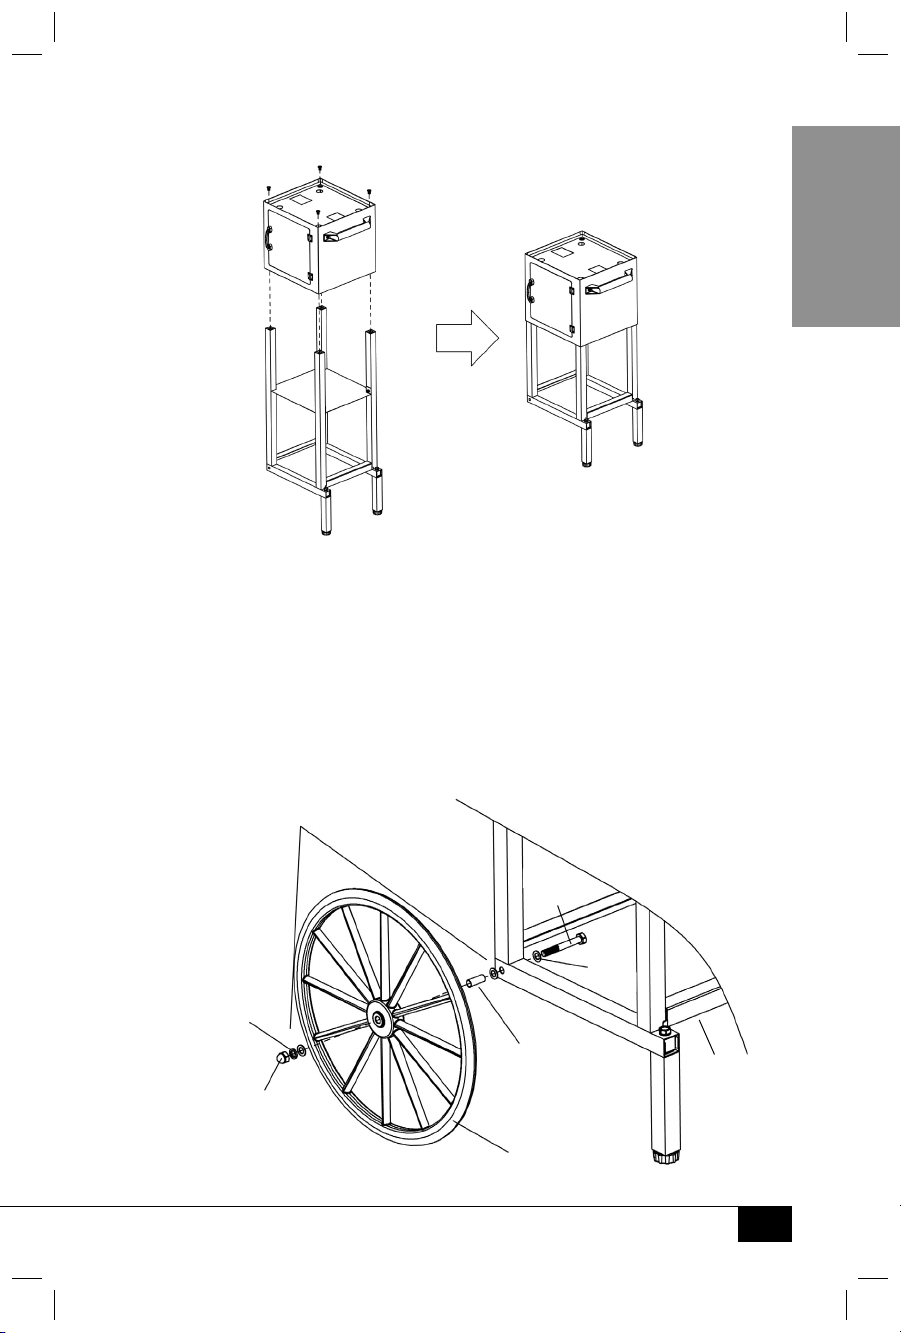
5. Assemble Base Support (F) into the bottom of the Storage Compartment (B) and secure with
four #4 Screws.
Assembly of Wheels
1. Place #7 Flat Washer onto #3 Bolt and insert into predrilled hole on inside of Base Support (F).
2. Put #7 Flat Washer and #13 Sleeve Barrel on end of inserted #3 Bolt.
3. Attach the Wheel (E) to the #3 Bolt. Place #7 Flat Washer and #8 Locking Washer
on Wheel (E). Use the end of Wrench (J) with small notch to hold the #3 Bolt in
place. While holding #3 Bolt in place, tighten the #10 Nut Cap with Wrench (J).
4. Repeat on other side, following the directions above.
(#7)
Flat
Washer
ENGLISH
(#8)
Locking
Washer
(#10)
Nut
Cap
(#13)
Sleeve
Barrel
(E)
Wheel
(#3)
Bolt
(#7)
Flat
Washer
(F)
Base
Support
8
Page 11
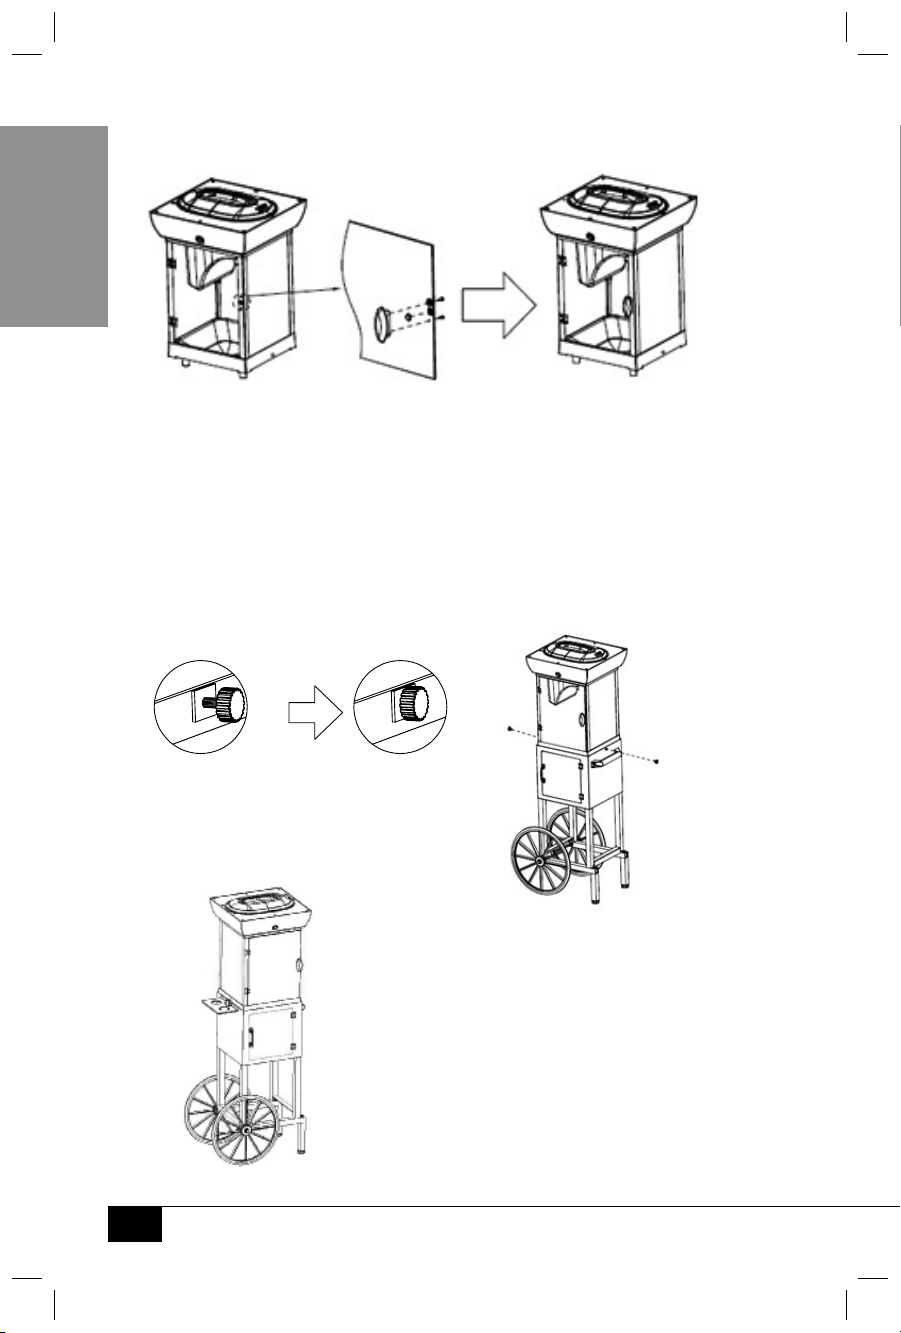
Attaching Door Handle
ENGLISH
1. Attach #9 Magnet to transparent door of Main Unit (A).
2. Place #12 Door Handle using two #5 Screws.
3. Place Main Unit (A) onto the top of the Storage Compartment (B).
4. Ensure that the two inserting pins at the bottom of the Main Unit (A) line up correctly so
that Main Unit (A) can be locked under the beam of the Storage Compartment (C).
Locking Main Unit to Storage Compartment
Place the Main Unit (A) onto the Storage Compartment (B) so that the two side
holes match up. Lock by tightening the Lock Screws as shown below:
Attaching Cone Holder
Attach Cone Holder (L) to opposite side
of Cart Handle or opposite side of Base Door.
9
Page 12

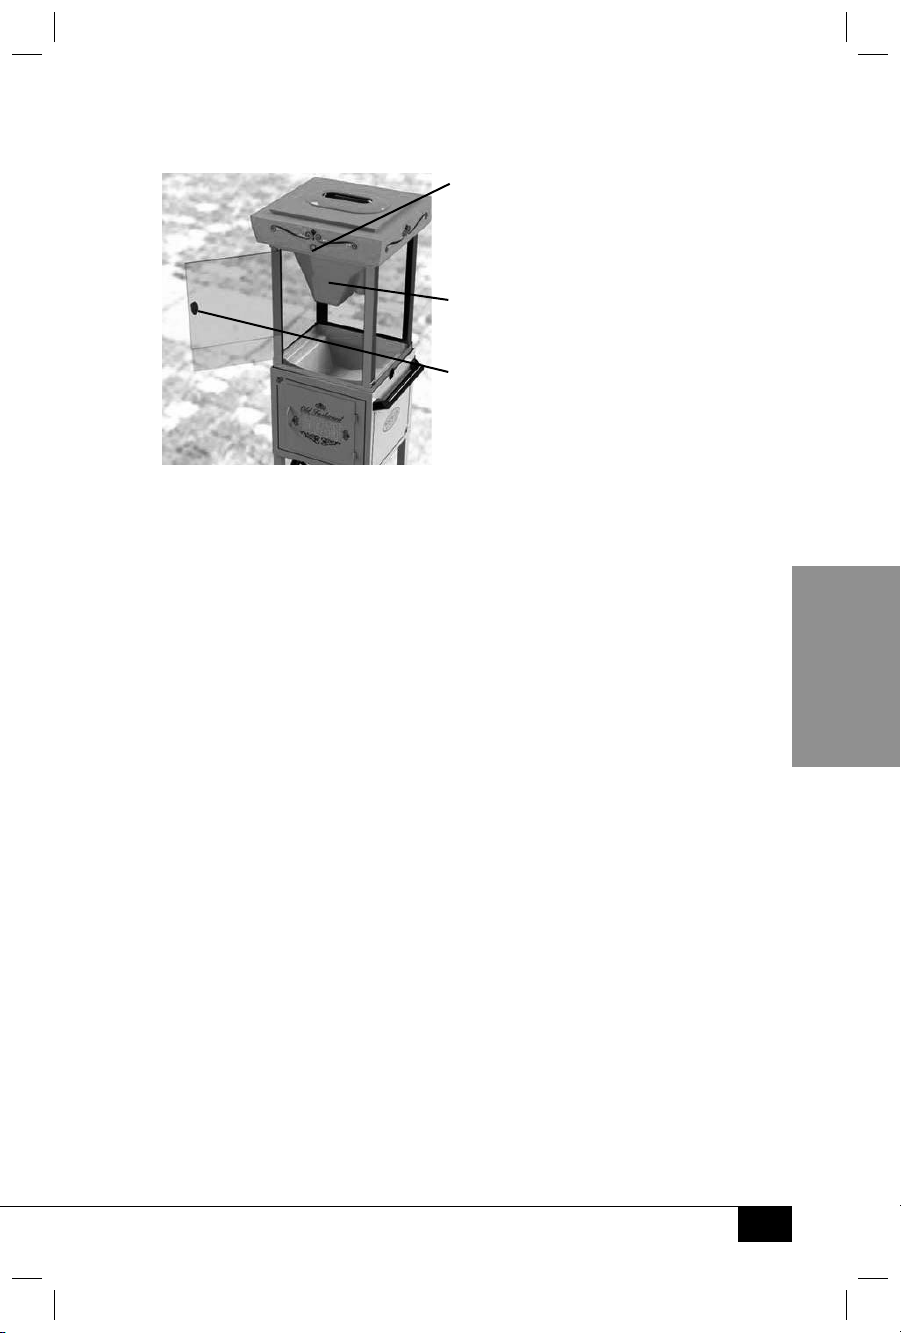
HOW TO OPERATE
ON / OFF Switch
Ice Hopper
Door Handle
Before rst use, clean the inside of the unit by wiping with a moist, non-abrasive
sponge, towel or cloth and then wipe with a non-abrasive dry towel.
1. First, nd a at surface near an electrical outlet before starting. Make sure your cord
is away from any water source. It is acceptable to use an extension cord if needed.
2. Before plugging in the unit, add ice cubes by removing the clear lid
from the Main Unit of your SNOW CONE CART. To remove the lid,
simply push the release button on the lid, lift and remove.
3. Plug in the appliance while switch is ipped to OFF position.
4. When ice cubes are ready, place cubes in the shaving unit while allowing enough
room for the lid to be placed back on the unit easily. Never force it shut.
5. Return the clear lid to the unit and turn the power button to the ON
position. This will activate the unit to begin shaving. Please note that
the ice will not shave unless the lid is properly secured.
6. Repeat steps 2 and 3 until you have shaved the amount of ice desired.
Turn unit OFF and then unplug when you are nished.
7. Once you have the desired amount of ice, open the housing door on the Main Unit to
retrieve your ice and create your favorite snow-based treats!
ENGLISH
10
Page 13
1. HELPFUL TIPS
Ice
For optimal ice shaving results, ice cubes should sit out of the freezer, in a bowl, for about
10 minutes before putting them into the shaving unit. If ice is frosty in appearance, it
is too hard to shave. When ice is clear and wet to the touch, then it is ready to shave.
ENGLISH
CLEANING & MAINTENANCE
1. Make sure appliance is turned o and unplugged before cleaning.
2. Open the housing door to clean and dry the inside of the unit
using a slightly damp, non-abrasive cloth or sponge.
3. Wipe the outside of the unit using a slightly damp, non-abrasive
cloth or sponge, then dry with a non-abrasive towel.
4. The shaving unit and clear lid are dishwasher safe. To take
out the shaving unit, refer to steps on page 11.
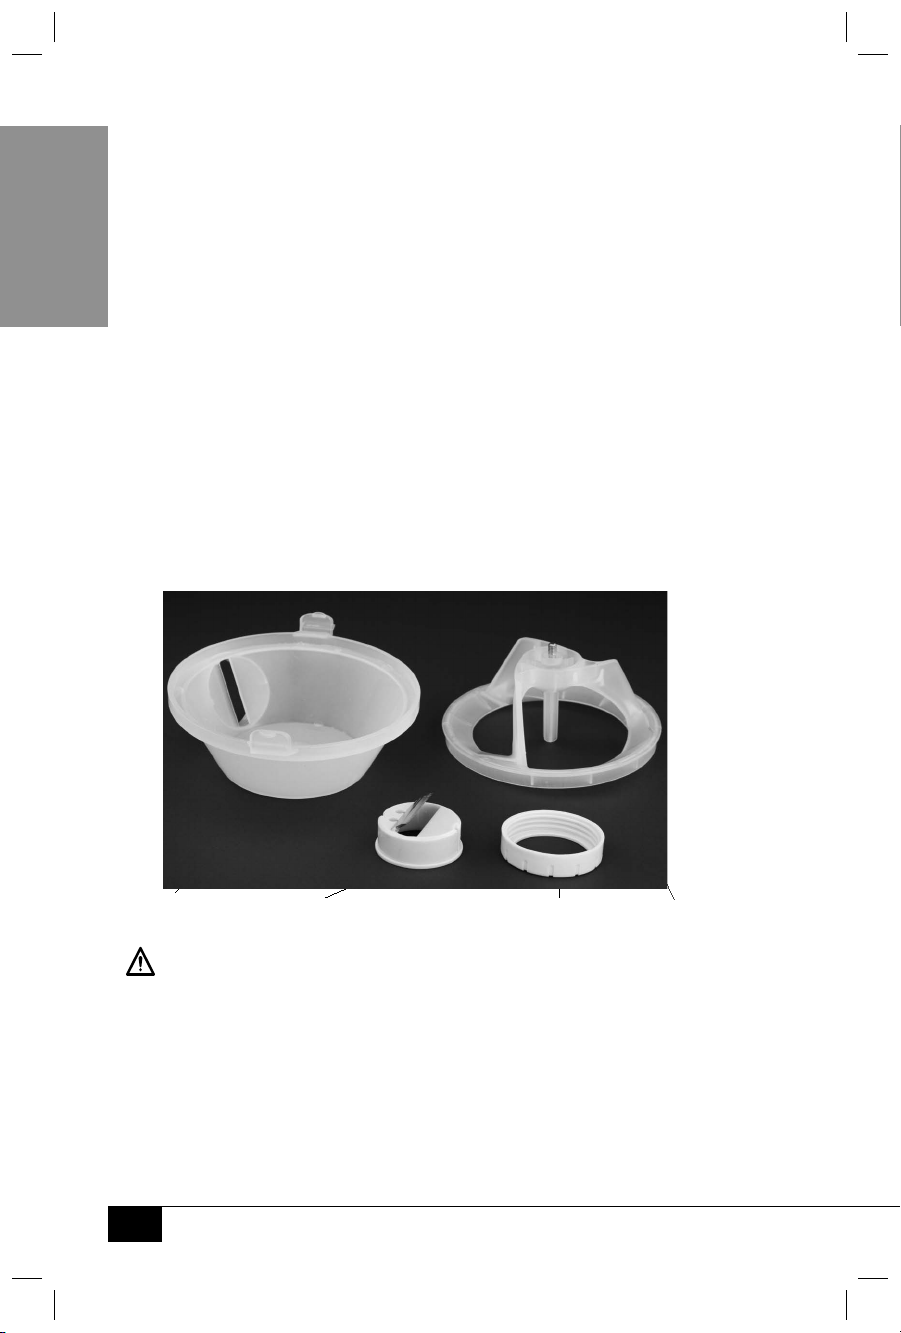
Replacing the Blade
When your SNOW CONE CART blade becomes dull after a long period of normal
use, replace it with the included Replacement Blade and Tool. Should you need
additional blades, you can order them directly from the manufacturer.
Blade Housing
The blade is VERY sharp. Use EXTREME CAUTION when handling.
11
Blade (M)
Blade Cap
Spinner
Page 14
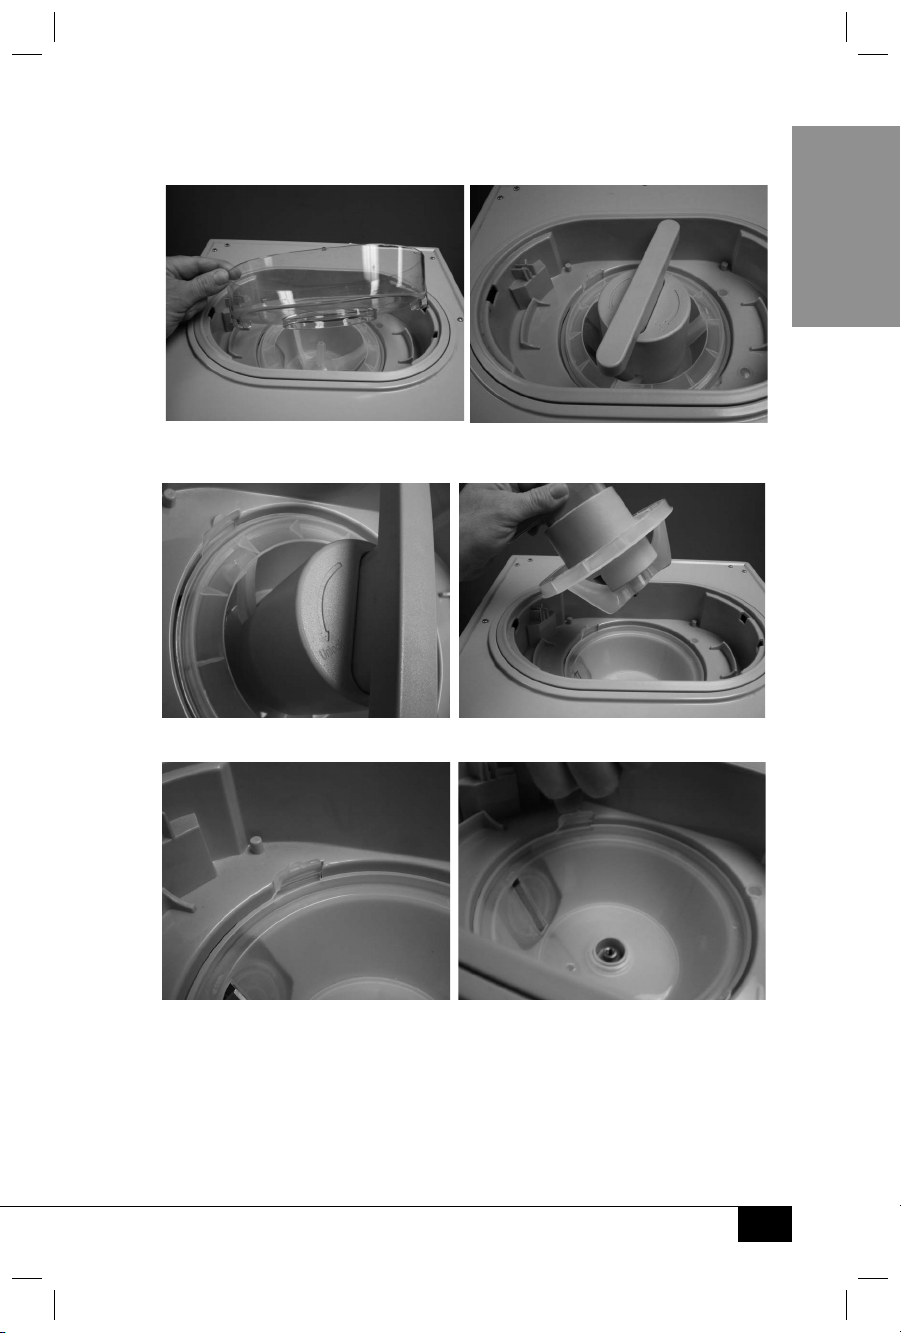
Steps to Replace the Blade
1. Remove the Ice Tray and insert the Disassembly Tool (K) over the three arms of the Spinner.
2. Once the Disassembly Tool (K) is properly inserted, twist counterclockwise (as the arrow shows) and lift the Spinner out.
3. Carefully press the tabs of the Blade Housing inward and lift up to release.
ENGLISH
4. Twist o the Blade Cap and, using extreme caution, remove the Blade
Cartridge. Insert the replacement Blade Cartridge, and reverse the above
steps to reassemble. USE EXTREME CAUTION. BLADE IS VERY SHARP.
5. When replacing the Spinner, reverse all steps and make sure
to lock Spinner using the Disassembly Tool.
12
Page 15

RECIPES
The SNOW CONE CART makes light, uy mounds of ice. Use dierent fruits,
syrups, teas, and juices to create a number of refreshing, icy, low-fat treats, drinks
and desserts. Use your imagination and enjoy your SNOW CONE CART!
ENGLISH
BOTTLED SYRUP CONCENTRATE
• 19-oz. Warm Water
• 2¾ Cups Sugar
(1.25 lb.)
• 1-oz. Food Coloring
• 1-qt. Empty Bottle
SOUR SYRUP
• 1-oz. Liquid
Citric Acid
• 1-oz. Flavor
Concentrate
• 1-qt. Simple Syrup
• 1-oz. Food Coloring
• 1-qt. Empty Bottle
CHOCOLATE SYRUP
• 15-oz. Simple Syrup
• 15-oz. Chocolate
Syrup
Put 19-oz. of warm water into a one quart (or larger) bottle.
Using a funnel, add 2¾ cups of sugar to the water.
Screw cap on tightly. Shake bottle until sugar dissolves.
Add 1-oz. of food coloring. Shake until mixed.
Now you can add your favorite avor to syrup.
*To make sugar-free concentrate, use your choice
of powdered sugar substitute in place of sugar.
Put 1 ounce of liquid citric acid and 1 ounce of avor
concentrate (grape, cherry, strawberry, watermelon, apple
or lemon work well) into a one quart (or larger) bottle.
Fill the rest of the bottle with simple syrup (you can
use the recipe above for bottled syrup concentrate).
Add one ounce of food coloring.
Screw cap on tightly. Shake bottle until well mixed.
Pour ingredients into a 1 quart or larger bottle.
Screw cap on tightly. Shake bottle until well mixed.
CREAM SYRUP
• 4-oz. Evaporated Milk
• Simple Syrup
• 1-oz. Flavored Syrup
13
Pour 4 ounces of evaporated milk into 1 quart bottle.
Top o with simple syrup.
Add 1 ounce of avoring.
Screw on cap and shake until well mixed. Keep refrigerated.
Page 16

PEACH SPRITZER
• 2 Cups Peach Seltzer
• 2 Tbsp. Freshly
Squeezed
Orange Juice
• 1 Packet of Sugar
Substitute
VANILLA SNOW
• 3 Scoops of Vanilla
Ice Cream
• Shaved Ice
• Vanilla Flavored Syrup
Fill a cup halfway with freshly shaved ice.
Pour peach seltzer and orange juice over ice.
Empty packet of sugar substitute into cup.
Stir until well blended.
Add additional ice if desired, until cup is full.
Serves one.
Put scoops of ice cream in a bowl.
Shovel shaved ice over ice cream to create a mound.
Squirt vanilla avored syrup over shaved ice and serve.
(Try this recipe with other ice cream and syrup avors.)
ROOT BEER FLOAT SLUSH
• 2 Scoops Vanilla
Ice Cream
• Shaved Ice
• Root Beer
FROZEN MARGARITA
• 1 Cup Shaved Ice
• 3-oz. Tequila
• 1-oz. Triple Sec
• 2-oz. Lime Juice
• 1 Lime Wedge
• 2 Tsp. Coarse Salt
ESPAÑOL
Freeze a beer mug until it is cold and frosty.
Put 2 round scoops of vanilla ice cream into beer mug.
Scoop shaved ice into mug, leaving
three ngers of space at the top.
Pour root beer into mug until full.
Serves one.
Put salt in a saucer. Rub rim of margarita glass
with a lime wedge and dip glass into salt,
coating rim thoroughly. Set lime aside.
Fill margarita glass with shaved ice.
Pour tequila, triple sec and lime juice into glass.
Stir well and garnish with lime wedge.
Serves one.
14
14
Page 17

RETURNS & WARRANTY
SHOULD YOUR UNIT NOT WORK OR IF DAMAGED WHEN YOU FIRST TAKE IT OUT
OF THE BOX, PLEASE RETURN IT TO THE PLACE OF PURCHASE IMMEDIATELY.
SNOW CONE CART / SCC399
Should you have any questions, please contact us via email or at the
customer service number listed below between the hours of 8:00 AM
and 5:00 PM, Monday through Friday, Central Standard Time.
Distributed by:
Nostalgia Products Group LLC
1471 Partnership Dr.
Green Bay, WI 54304-5685
Customer Service
Phone: (920) 347-9122
Web: www.nostalgiaelectrics.com
Customer Service Inquiry
To submit a Customer Service inquiry, go to www.nostalgiaelectrics.com and
ll out the Customer Service Inquiry form and click the Submit button.
A representative will contact you as soon as possible.
This appliance is designed and built to provide many years of satisfactory performance
under normal household use. The distributor pledges to the original owner that
ESPAÑOL
should there be any defects in material or workmanship during the rst 90 days of
purchase, we will repair or replace the unit at our option. Our pledge does not apply
to damages caused by shipping, mishandling or unit being dropped. A product
deemed defective either from manufacturing or being mishandled is up to the
distributor’s discretion. In order to obtain service under this warranty, please contact
Nostalgia Products Group, LLC at the telephone number listed above or by lling
out the Customer Service Inquiry Form located at www.nostalgiaelectrics.com.
This product is not recommended for use outside of North America. The warranty
is void if products are exported outside of the USA, Canada or Mexico.
This warranty does not apply to re-manufactured merchandise.
Please read these instructions carefully. Failure to comply with these instructions,
damages caused by improper replacement parts, abuse or misuse will void this
pledge to you and is being made in place of all other expressed warranties.
For more information, visit us online at www.nostalgiaelectrics.com.
Like us on Facebook at www.facebook.com/NostalgiaElectrics.
15
15
Page 18

¡Haga de cada día una esta!
Visite www.nostalgiaelectrics.com para
ver más productos divertidos.
CONTENIDO
PRECAUCIONES IMPORTANTES . . . . . . . . . . . . . . . . . . . . . . . . . . 17
MEDIDAS DE SEGURIDAD IMPORTANTES . . . . . . . . . . . . . . . . . . . . 17
INTRODUCCIÓN . . . . . . . . . . . . . . . . . . . . . . . . . . . . . . . . . . . . 18
PIEZAS Y ENSAMBLAJE . . . . . . . . . . . . . . . . . . . . . . . . . . . . . . . . 19
FUNCIONAMIENTO . . . . . . . . . . . . . . . . . . . . . . . . . . . . . . . . . . 24
CONSEJOS ÚTILES . . . . . . . . . . . . . . . . . . . . . . . . . . . . . . . . . . 25
LIMPIEZA Y MANTENIMIENTO . . . . . . . . . . . . . . . . . . . . . . . . . . . 25
RECETAS . . . . . . . . . . . . . . . . . . . . . . . . . . . . . . . . . . . . . . . . . 27
DEVOLUCIONES Y GARANTÍA . . . . . . . . . . . . . . . . . . . . . . . . . . . . 29
SAFETY
Your safety and the safety of others is very important.
We have provided many important safety messages in this manual and
on your appliance. Always read and obey all safety messages.
This is the safety alert symbol.
This symbol alerts you to potential hazards that
can kill or hurt you and others.
All safety messages will follow the safety alert symbol.
All safety messages will tell you what the potential hazard is, tell you how to reduce the
chance of injury, and tell you what can happen if the instructions are not followed.
Appliance Specications:
120 Volts, 60 Hz
100 Watts, ETL Approved
THIS PRODUCT IS FOR USE IN 120V AC OUTLET ONLY.
ESPAÑOL
16
16
Page 19

PRECAUCIONES IMPORTANTES
1. No lo sumerja NUNCA en agua.
2. No lo utilice NUNCA cerca del agua.
3. No utilice NUNCA una esponja o un paño abrasivo.
4. No utilice NUNCA un estropajo en el aparato.
5. No deje NUNCA el aparato desatendido mientras esté en funcionamiento.
6. NUNCA trate de forzar la cubierta en el mecanismo de cierre.
7. Desconecte el aparato de la toma de corriente cuando no lo esté utilizando y para
limpiarlo.
8. NO opere este aparato con un cable o enchufe dañados, ni si funciona
incorrectamente.
9. NO introduzca ningún componente del aparato en un lavavajillas.
10. Manténgalo fuera del alcance de los niños.
11. Este aparato NO ES UN JUGUETE.
12. Este aparato no debe ser operado nunca por niños o personas con limitaciones
cognitivas que no estén supervisados.
13. Se debe supervisar a los niños mientras estén cerca del aparato
para asegurarse de que no jueguen con el mismo.
MEDIDAS DE SEGURIDAD IMPORTANTES
Cuando utilice aparatos eléctricos debe seguir siempre las
precauciones básicas de seguridad, entre las que se incluyen:
1. Lea todas las instrucciones antes de utilizar este aparato.
2. Mantenga las manos alejadas del mecanismo de la cuchilla. Use agarraderas o mangos.
ESPAÑOL
3. Evite el contacto con piezas en movimiento. NUNCA ponga los dedos
ni coloque utensilios en las áreas de alimentación o descarga.
4. Como medida de protección contra el riesgo de descarga eléctrica, no sumerja el
cable, los enchufes ni ninguna otra parte del aparato en agua ni en otros líquidos.
5. Para evitar los riesgos de incendios o de choques eléctricos, así como daños a la unidad,
este aparato debe conectarse SOLAMENTE en una toma de corriente de 120 VCA polarizada.
6. Cuando cualquier aparato se utilice cerca de niños,
es necesaria una supervisión estrecha.
7. Desenchufe el aparato de la red cuando no lo esté utilizando,
antes de retirar piezas y antes de su limpieza.
8. NO utilice ningún aparato con el cable o el enchufe dañados, ni
si el aparato se ha dañado de cualquier manera. Devuelva el aparato al
taller de reparación más cercano para su examen o reparación.
9. No intente revisar este aparato usted mismo, ya que abrirlo o retirar
las cubiertas podría estar expuesto a tensiones peligrosas u otros peligros.
Para cualquier revisión acuda a personal de servicio calicado.
10. El fabricante no recomienda el uso de implementos accesorios.
El uso de implementos accesorios puede provocar lesiones.
11. NO lo utilice en exteriores.
17
17
Page 20

12. Posicione el aparato tan cerca de la toma de corriente como
sea posible para evitar lesiones por tropezar con el cable.
13. Debe tenerse extrema precaución cuando se mueva este aparato.
14. NO utilice el aparato para otro uso que no sea el cual para el que está destinado.
15. Un aparato que esté conectado a una toma de corriente no
debe dejarse sin atención mientras esté funcionando.
16. Antes del uso, revise la tolva de hielo para ver si tiene objetos extraños.
17. Las cuchillas están muy aladas. Utilícelas con extrema precaución.
18. Se proporciona un cable de alimentación corto para reducir el
riesgo de enredarse o tropezar con un cable más largo.
19. Pueden usarse cables de alimentación desmontables
más largos si se tiene cuidado al utilizarlos.
20. Las características nominales del cable de extensión
deben ser al menos iguales a las del aparato.
21. Este aparato tiene un enchufe polarizado (una clavija es más ancha que la
otra). Para reducir el riesgo de descarga eléctrica, este enchufe se ha diseñado para
introducirse en una toma de corriente polarizada solo en una posición. Si el enchufe
no entra bien en la toma de corriente, déle la vuelta. Si aun así no entra bien, llame a
un electricista cualicado. No intente modicar el enchufe de ninguna manera.
¡ GUARDE ESTAS INSTRUCCIONES!
ESPAÑOL
INTRODUCCIÓN
El CARRITO DE CONOS DE NIEVE es un aparato divertido y fácil de usar. Use
cubos de hielo de su propio congelador para rasparlos y hacer conos de nieve
refrescantes para cualquier ocasión. El compartimiento de almacenamiento,
que está a mano, es ideal para guardar siropes, conos extras y otros suministros.
Con una altura de 48”, este carrito de conos de nieve es perfecto para grandes
grupos, estas y eventos tales como para la recaudación de fondos.
Con innitas variedades de sabor, los conos de nieve siempre han sido increíblemente
divertidos de comer. Use la máquina para crear montículos de hielo raspado
para batidos de fruta, nieve espesa con sabor a frutas, otros platos de postre o
para enfriar bebidas. Consulte la sección de recetas de este manual para ver más
ideas divertidas de cómo disfrutar de su CARRITO DE CONOS DE NIEVE.
Las características incluyen:
• Ventanillas templadas
• Ruedas y agarradera de empuje para una portabilidad más fácil
• Compartimiento de almacenamiento
18
18
Page 21

PIEZAS Y ENSAMBLAJE
Asegúrese de haber extraído todos los accesorios y piezas enumeradas antes de desechar
el embalaje. En nuestros esfuerzos para reducir el embalaje, maximizamos el material de
embalaje para proteger su nueva compra. Como resultado de eso, es posible que las piezas
pequeñas no se vean fácilmente.
Accesorios
No. 1 Perno (10 mm) No. 2 Perno (38mm) No. 3 Perno (60mm)
Cant. 10 Cant. 2 Cant. 2
No. 4 Tomillo (10mm) No. 5 Tomillo (15mm) No. 6 Arandela plana No. 7 Arandela plana
Cant. 4 Cant. 2 (6mm) Cant. 10 (8 mm) Cant. 8
ESPAÑOL
No. 8 Arandela de presión No. 9 Imán No. 10 Tapa de tuerca No. 11 Tuerca
Cant. 4 Cant. 1 Cant. 2 Cant. 2
No. 12 Agarradera de puerta No. 13 Manguito No. 14 Pata de base
Cant. 1 Cant. 2 Cant. 2
19
19
Page 22

Partes
(G)Wheel
(A) Unidad principal (B) Compartimiento (C) Agarradera para (D) Placa inderior
de almacenamiento empujar
(E) Rueda (F) Soporte de base (G) Barra transversal (H) Pata
Cant. 2 Cant. 2 Cant. 2 Cant. 2
ESPAÑOL
(I) Pala para hielo (J) Llaves (K) Herramienta de (L) Soporte de conos
Cant. 2 desensamblaje
(M) Cuchilla
20
20
Page 23

Ensamblaje del soporte de base
1. Fije la Agarradera de empujar (C) desde el interior del
Compartimiento de almacenamiento (B) usando dos
Pernos No. 1 y dos Arandelas planas No. 6. Coloque dos
Tuercas No. 11 en la parte inferior.
2. Fije la Barra transversal (G) al Soporte de base (F) y asegúrela con
cuatro Pernos No. 1 y cuatro Arandelas planas No. 6.
3. Asegure la Placa inferior (D) al Soporte de base (F) usando
cuatro Pernos No.1 y cuatro Arandelas planas No. 6.
4. Fije las Patas (H) a los extremos sobresalientes del Soporte de base (F) usando dos
ESPAÑOL
Pernos No. 2, dos Arandelas planas No. 7 y dos Arandelas de presión No. 8.
21
21
Page 24

5. Ensamble el Soporte de base (F) en la parte inferior del Compartimiento de almacenamiento
(B) y asegúrelo con cuatro Tornillos No. 4.
Ensamblaje de las ruedas
1. Coloque una Arandela plana No. 7 en un Perno No. 3 e insértelo
en el agujero abierto en el interior del Soporte de base (F).
2. Ponga una Arandela plana No. 7 y un Manguito No. 13 en el extremo del Perno No. 3.
3. Coloque la Rueda (E) en el Perno No. 3. Coloque una Arandela plana No. 7
y una Arandela de presión No. 8 en la Rueda (E). Use el extremo de la Llave (J)
con la muesca pequeña para sujetar en su lugar el Perno No. 3. Mientras sujeta
el Perno No. 3 en su lugar, apriete la Tapa de tuerca No. 10 con la Llave (J).
4. Repita las instrucciones anteriores en el otro lado.
(No. 7)
Arandela
plana
ESPAÑOL
(No. 8)
Arandela
de presión
(No. 10)
Tapa de
tuerca
(No. 3)
Perno
(No. 13)
Manguito
(E) Rueda
(No. 7)
Arandela
plana
(F) Soporte
de base
22
22
Page 25

Colocación de la Agarradera de la puerta
1. Fije el Imán No. 9 en la puerta transparente de la Unidad principal (A).
2. Coloque la Agarradera de la puerta No. 12 usando dos Tornillos No. 5.
3. Coloque la Unidad principal (A) en la parte superior
del Compartimiento de almacenamiento (B).
4. Asegúrese de que los dos pasadores de inserción de la parte inferior de la
Unidad principal (A) se alineen correctamente, de manera que la Unidad principal (A)
pueda jarse bajo la viga del Compartimiento de almacenamiento (C).
Fijación de la Unidad principal en el Compartimiento de almacenamiento
Coloque la Unidad principal (A) sobre el Compartimiento de almacenamiento
(B) de manera que los dos agujeros laterales coincidan. Fíjela apretando
los Tornillos de jación como se muestra a continuación:
ESPAÑOL
Fijación del Soporte de conos
Fije el Soporte de conos (L) en el lado opuesto a la Agarradera del
carrito o en el lado opuesto de la Puerta de la base.
23
23
Page 26
FUNCIONAMIENTO
Interruptor ON / OFF
Tolva para hielo
Agarradera de la puerta
Antes del primer uso, limpie el interior de la unidad con una esponja, toalla o paño
no abrasivos húmedos y entonces séquelo con una toalla seca no abrasiva.
1. Primero, encuentre una supercie nivelada cerca de una toma de corriente. Asegúrese de
que cable esté alejado de cualquier fuente de agua. Si es necesario, use un cable de extensión.
2. Antes de conectar la unidad a la toma de corriente, añada cubos de hielo quitando la
tapa transparente de la Unidad principal de su CARRITO DE CONOS DE NIEVE. Para quitar
la tapa, simplemente empuje el botón de liberación de la tapa, levántela y quítela.
3. Conecte el aparato mientras que el interruptor esté colocado en la posición OFF:
4. Cuando los cubos de hielo estén listos, colóquelos en la unidad de
raspado al mismo tiempo que deja espacio suciente para colocar de nuevo
la tapa con facilidad en la unidad. Nunca la fuerce para cerrarla.
5. Coloque de nuevo la tapa transparente en la unidad y coloque el interruptor de
encendido en la posición ON. Esto activará la unidad para que comience a raspar. Tenga
presente que el hielo no se raspará a menos que la tapa esté colocada adecuadamente.
6. Repita los pasos 2 y 3 hasta que haya raspado la cantidad de hielo
deseada. Ponga la unidad en OFF y entonces desconéctela al acabar.
7. Una vez que tenga la cantidad deseada de hielo, ¡abra la puerta del alojamiento de la
Unidad principal para recuperar el hierro y crear sus platillos favoritos basados en nieve!
ESPAÑOL
24
24
Page 27

CONSEJOS ÚTILES
Hielo
Para obtener óptimos resultados en el raspado del hielo, los cubos de hielo
deben colocarse fuera del congelador en un tazón por alrededor de 10
minutos antes de ponerlos en la unidad de raspado. Si el hielo tiene una
apariencia de escarcha, está demasiado duro para rasparse. Cuando el hielo
esté transparente y húmedo al tacto, entonces está listo para rasparse.
LIMPIEZA Y MANTENIMIENTO
1. Asegúrese de que el aparato esté apagado y desconectado antes de limpiarlo.
2. Abra la puerta del alojamiento para limpiar y secar el interior de la unidad
usando un paño o esponja no abrasivos ligeramente húmedos.
3. Limpie el exterior de la unidad usando un paño o esponja no abrasivos
ligeramente húmedos y después séquelo con una toalla no abrasiva.
4. La unidad de raspado y la tapa transparente se pueden lavar en el lavavajillas.
Para extraer la unidad de raspado, consulte los pasos de la página 11.
Sustitución de la cuchilla
Cuando la cuchilla del CARRITO DE CONOS DE NIEVE pierda lo después de un período
largo de uso normal, sustitúyala con la Cuchilla de repuesto y la Herramienta que se
incluye. Si necesita cuchillas adicionales, puede solicitarlas directamente al fabricante.
ESPAÑOL
Alojamiento de la
cuchilla
Las cuchillas están MUY aladas. Actúe con EXTREMA PRECAUCIÓN cuando las
manipule.
25
25
Cuchilla (M)
Tapa de la
cuchilla
Rotor
Page 28

Pasos para la sustitución de la cuchilla
1. Extraiga la Bandeja para hielo e inserte la Herramienta de
desensamblaje (K) sobre los tres brazos del Rotor.
2. Una vez que la Herramienta de desensamblaje (K) esté correctamente insertada, gírela en
sentido contrario a las agujas del reloj (como muestran las echas) y extraiga el rotor.
ESPAÑOL
3. Presione cuidadosamente hacia adentro las pestañas del
Alojamiento de la cuchilla y levántelo para liberarlo.
4. Extraiga la Tapa de las cuchillas girándola y retire el Cartucho de la cuchilla
con extremo cuidado. Inserte el Cartucho de la cuchilla de repuesto
e invierta los pasos anteriores para armar de nuevo. PROCEDA CON
EXTREMA PRECAUCIÓN. LAS CUCHILLAS ESTÁN MUY AFILADAS.
5. Cuando coloque de nuevo el Rotor, invierta todos los pasos y asegúrese
de bloquear el Rotor usando la Herramienta de desensamblaje.
26
26
Page 29

RECETAS
El CARRITO DE CONOS DE NIEVE hace montículos de hielo ligero y esponjoso. Use diferentes
frutas, siropes, tes y jugos para crear múltiples refrescos, granizados, platillos bajos de grasa,
bebidas y postres. ¡Use su imaginación y disfrute de su CARRITO DE CONOS DE NIEVE!
CONCENTRADO DE SIROPE EMBOTELLADO
• 19-oz de agua tibia
• 2 ¾ de tazas de
azúcar (1.25 lb.)
• 1 oz. de colorante
alimentario
• Botella de 1
cuarto vacía
SIROPE AMARGO
• 1 oz de ácido
cítrico líquido
• 1 oz. de sabor
concentrado
• 1 cuarto de
ESPAÑOL
sirope sencillo
• 1 oz. de colorante
alimentario
• Botella de 1
cuarto vacía
Ponga 19 oz. de agua tibia en una botella
de un cuarto (o más grande).
Utilizando un embudo, añada 2 ¾ tazas de azúcar al agua.
Apriete bien la tapa. Agite la botella
hasta que el azúcar se disuelva.
Añada 1 oz. de colorante alimentario. Agite hasta mezclar.
Ahora puede añadir su sabor favorito al sirope.
* Para elaborar un concentrado sin azúcar, use su elección
de sustituto de azúcar pulverizado en lugar de azúcar.
Ponga 1 onza de ácido cítrico líquido y 1 onza de sabor
concentrado (uva, cereza, fresa, melón, manzana o limón
son adecuados) en una botella de un cuarto (o mayor).
Llene el resto de la botella con sirope sencillo (puede usar la
receta anterior para concentrado de sirope embotellado).
Añada 1 onza de colorante alimentario.
Apriete bien la tapa. Agite la botella hasta mezclar bien.
SIROPE DE CHOCOLATE
• 4 oz. de leche
evaporada
• Sirope sencillo
• 1 oz. de sirope
saborizado
SIROPE DE CREMA
• 4 oz. de leche
evaporada
• Sirope sencillo
• 1 oz. de sirope
saborizado
27
27
Vierta los ingredientes en una botella de 1 cuarto o mayor.
Apriete bien la tapa. Agite la botella hasta mezclar bien.
Vierta 4 onzas de leche evaporada en una botella de 1
cuarto.
Rellene con sirope sencillo.
Añada 1 onza de saborizante.
Enrosque la tapa y agite hasta mezclar
bien. Manténgalo refrigerado.
Page 30

SPRITZER DE MELOCOTÓN
• 2 tazas de Seltzer
de melocotón
• 2 Cdas. de jugo
de naranja recién
exprimido
• 1 paquete de
sustituto del azúcar
NIEVE DE VAINILLA
• 3 medidas de
helado de vainilla
• Hielo raspado
• Sirope con sabor
a vainilla
Llene una taza hasta la mitad con hielo recién raspado.
Vierta el Seltzer de melocotón y el jugo
de naranja sobre el hielo.
Vacíe un paquete de sustituto del azúcar en la taza.
Remueva hasta que se mezcle bien.
Añada hielo si lo desea, hasta que la taza esté llena.
Da una ración.
Vierta las medidas de helado en un tazón
Vierta una pala de hielo raspado sobre el
helado para crear un montículo.
Vierta un chorrito de sirope con sabor a
vainilla sobre el hielo raspado y sírvalo.
(Pruebe esta receta con otros sabores
de helados y de siropes).
GRANIZADO DE ROOT BEER
• 2 medidas de
helado de vainilla
• Hielo raspado
• Bebida de
zarzaparrilla
FROZEN MARGARITA
• 1 taza de hielo
raspado
• 3 oz. de tequila
• 1 oz. de Triple Sec
• 2-oz de jugo de lima
• 1 cuña de lima
• 2 cucharaditas
de sal gruesa
ESPAÑOL
Congele una jarra para cerveza hasta que esté fría y nevada.
Ponga 2 medidas completas de helado
de vainilla en la jarra para cerveza.
Vierta el hielo raspado en la jarra, dejando
tres dedos de distancia al borde.
Vierta la bebida de zarzaparrilla en la jarra hasta llenarla.
Da una ración.
Ponga sal en un plato. Frote el borde del vaso
de margarita con una cuña de lima y sumerja
el vaso en sal. Ponga a un lado la lima.
Llene el vaso de margarita con hielo raspado.
Vierta el tequila, el triple sec y el jugo de lima en el vaso.
Agite bien y adórnelo con la cuña de lima.
Da una ración.
28
28
Page 31

DEVOLUCIONES Y GARANTÍA
SI SU UNIDAD NO TRABAJA O ESTÁ DAÑADA CUANDO LA EXTRAE POR PRIMERA VEZ
DE LA CAJA, DEVUÉLVALA INMEDIATAMENTE AL LUGAR DONDE LA COMPRÓ.
CARRITO DE CONOS DE NIEVE / SCC399
Si tiene cualquier duda, póngase en contacto con nosotros por correo electrónico o
a través del número de atención al cliente indicado a continuación entre las 8:00 a.m.
y las 5:00 p.m. de lunes a viernes (horario de la zona central de Estados Unidos).
Distribuido por:
Nostalgia Products Group LLC
1471 Partnership Dr.
Green Bay, WI 54304-5685
Atención al cliente
Teléfono: (920) 347-9122
Web: www.nostalgiaelectrics.com
Consultas para el servicio de Atención al Cliente
Para enviar una consulta el servicio de Atención al Cliente vaya a www.
nostalgiaelectrics.com, rellene un formulario de consulta para el Servicio
de Atención al Cliente y haga clic en el botón de Entregar (Submit).
Uno de nuestros agentes se pondrá en contacto con usted tan pronto como sea posible.
Este aparato se ha diseñado y fabricado para ofrecer muchos años de funcionamiento
ESPAÑOL
satisfactorio en condiciones normales de uso doméstico. El distribuidor garantiza
al propietario original que, en caso de que se observara cualquier defecto de los
materiales o la mano de obra durante los primeros 90 días a partir de la compra,
nosotros decidiremos reparar o cambiar la unidad. Nuestra garantía no incluye
daños causados por el transporte, la manipulación incorrecta o caídas de la unidad.
La consideración de que un producto es defectuoso debido a la fabricación o a
una manipulación incorrecta será a discreción del distribuidor. Para realizar una
reparación bajo esta garantía, póngase en contacto con Nostalgia Products Group,
LLC en el número de teléfono indicado anteriormente o rellenando el formulario de
consulta para el Servicio de Atención al Cliente en www.nostalgiaelectrics.com.
No se recomienda el uso de este producto fuera de Norteamérica. La garantía se
anulará si los productos se exportan fuera de los Estados Unidos, Canadá o México.
Esta garantía no es válida para productos remanufacturados.
Lea estas instrucciones atentamente. Si no se siguen estas instrucciones, se causan daños
por la sustitución incorrecta de piezas, se produce un abuso o una utilización incorrecta, se
invalidará esta garantía que se le ofrece y que sustituye a cualquier otra garantía expresa.
Para obtener más información, visítenos en línea en www.nostalgiaelectrics.com.
Véanos en Facebook en www.facebook.com/NostalgiaElectrics.
29
29
Page 32

Une fête tous les jours!
Visiter le site Web www.nostalgiaelectrics.
com pour d'autres produits amusants.
TABLE DES MATIÈRES
IMPORTANTES MESURES DE PRÉCAUTION . . . . . . . . . . . . . . . . . . . 31
IMPORTANTES MISES EN GARDE . . . . . . . . . . . . . . . . . . . . . . . . . 31
INTRODUCTION . . . . . . . . . . . . . . . . . . . . . . . . . . . . . . . . . . . . 32
PIÈCES ET ASSEMBLAGE . . . . . . . . . . . . . . . . . . . . . . . . . . . . . . . 33
MODE DE FONCTIONNEMENT . . . . . . . . . . . . . . . . . . . . . . . . . . . 38
CONSEILS UTILES . . . . . . . . . . . . . . . . . . . . . . . . . . . . . . . . . . . 39
NETTOYAGE ET ENTRETIEN . . . . . . . . . . . . . . . . . . . . . . . . . . . . . 39
RECETTES . . . . . . . . . . . . . . . . . . . . . . . . . . . . . . . . . . . . . . . . 41
RETOUR ET GARANTIE . . . . . . . . . . . . . . . . . . . . . . . . . . . . . . . . 43
SÉCURITÉ
Votre sécurité et celle des autres sont très importantes.
De nombreux messages de sécurité importants sont donnés dans le présent manuel
concernant cet appareil. Toujours lire et respecter toutes les consignes de sécurité.
Ceci est le symbole d'avertissement de sécurité.
Ce symbole avertit des risques potentiels, pouvant entraîner
la mort ou des blessures, à vous-même et à d'autres.
Tous les messages de sécurité suivront le symbole d'avertissement de sécurité.
Tous les messages de sécurité indiqueront le danger potentiel, la façon de réduire
le risque de blessure et ce qui peut arriver si les consignes ne sont pas suivies.
Fiche technique de l'appareil :
120 volts, 60 Hz
100 watts, homologué par ETL
CE PRODUIT NE DOIT ÊTRE UTILISÉ QUE DANS UNE PRISE
DE COURANT DE 120 VCA SEULEMENT.
30
30
FRANÇAIS
Page 33

IMPORTANTES MESURES DE PRÉCAUTION
1. NE JAMAIS immerger dans l'eau.
2. NE JAMAIS utiliser près d'une source d'eau.
3. NE JAMAIS utiliser aucun(e) éponge ou chion abrasi(f)ve.
4. NE JAMAIS utiliser aucun tampon à récurer sur l'appareil.
5. NE JAMAIS laisser l'appareil sans surveillance pendant le fonctionnement.
6. NE JAMAIS essayer de forcer le couvercle du mécanisme de verrouillage.
7. Débrancher l'appareil de la prise murale lorsqu'il n'est pas utilisé ou qu'il est nettoyé.
8. NE PAS faire fonctionner cet appareil lorsque la prise ou le cordon
est endommagé(e) ou qu'il ne fonctionne pas correctement.
9. NE PAS nettoyer quelque pièce de cet appareil au lave-vaisselle.
10. Garder hors de portée des enfants.
11. Cet appareil n'est PAS UN JOUET.
12. Les enfants laissés sans surveillance et les personnes ayant une
décience cognitive ne devraient jamais utiliser cet appareil.
13. Les jeunes enfants qui sont à proximité de l'appareil ne devraient pas être
laissés sans surveillance pour s'assurer qu'ils ne jouent pas avec celui-ci.
IMPORTANTES MISES EN GARDE
Des mesures de précaution de base devraient toujours être suivies au
moment de l'utilisation d'un appareil électrique, notamment
1. Lire toutes les consignes avant d'utiliser l'appareil.
2. Tenir les mains éloignées du mécanisme de la lame. Utiliser les poignées ou les boutons.
3. Éviter de toucher aux pièces mobiles. NE JAMAIS mettre les doigts
ou les ustensiles dans les orices d'entrée ou de sortie.
4. Pour éviter l'électrisation, ne pas immerger le cordon, la prise ou
quelque pièce de cet appareil dans l'eau ou autre liquide.
5. Pour éviter les risques d'incendie et d'électrisation ou d'endommagement de l'appareil,
cet appareil NE devrait être branché QUE dans une prise de courant de 120 Vca UNIQUEMENT.
6. La surveillance étroite des enfants est nécessaire lorsque
quelque appareil électrique est utilisé à leur proximité.
7. Débrancher de la prise murale lorsqu'il n'est pas utilisé,
avant de retirer des pièces ou de le nettoyer.
8. NE PAS faire fonctionner aucun appareil lorsque le cordon ou la che est
endommagé(e) ou qu'il a été endommagé de quelque façon que ce soit. Retourner
l'appareil à l'atelier de réparation le plus proche pour qu'il soit révisé ou réparé.
9. Ne pas essayer de réparer cet appareil soi-même, car l'ouverture ou le retrait
des couvercles pourra provoquer une exposition à des tensions dangereuses
FRANÇAIS
ou autres dangers. Coner toute réparation à un personnel qualié.
31
31
Page 34

10. Le fabricant ne recommande l'utilisation d'aucun accessoire.
L'utilisation de quelque accessoire pourra provoquer des blessures.
11. NE PAS utiliser à l'extérieur.
12. Placer l'appareil le plus près possible d'une prise de courant
pour éviter de se blesser en trébuchant sur le cordon.
13. Faire preuve d'une extrême prudence au moment de déplacer le présent appareil.
14. NE PAS utiliser l'appareil à une autre n que celle pour laquelle il est prévu.
15. Un appareil qui est branché dans une prise de courant ne devrait pas
être laissé sans surveillance lorsqu'il est en cours de fonctionnement.
16. Vérier qu'il n'y a aucun corps étranger dans la Trémie à glace avant son utilisation.
17. Les lames sont extrêmement tranchantes. Faire preuve d'une EXTRÊME PRUDENCE.
18. Un cordon d'alimentation court est prévu pour diminuer le risque
d'emmêlement ou de trébuchement que pourrait causer un cordon plus long.
19. Un cordon d'alimentation amovible plus long peut être utilisé, mais avec prudence.
20. La puissance nominale électrique indiquée d'une rallonge
devrait être aussi élevée que celle de l'appareil.
21. Cet appareil possède une che polarisée (une lame est plus large que l'autre).
Pour réduire le risque d'électrisation, cette che est conçue pour s'intégrer dans
une prise polarisée que dans un sens. Si la che n'entre pas complètement dans
la prise, inverser la che. Si ceci ne fonctionne toujours pas, communiquer avec
un électricien agréé. Ne pas tenter de modier la che de quelque façon.
CONSERVER CES CONSIGNES!
INTRODUCTION
Le Chariot pour cornet glacé est un appareil amusant, facile à utiliser. Utiliser des
cubes de glace de son congélateur an de piler et façonner des cornets glacés
rafraîchissants pour n'importe quelle occasion. Le compartiment de rangement
pratique est idéal pour ranger les sirops, les cônes supplémentaires et autre fourniture.
D'une hauteur de 122 cm (48 po), ce chariot pour cornet glacé est parfait pour les
grandes réceptions, les fêtes et les événements tels que les collectes de fonds.
Dans une variété innie de saveurs, les cornets glacés ont toujours été incroyablement
amusants à manger. Utiliser la machine an de créer des monticules de glace
pilée pour les frappés à saveur de fruit, les barbotines fruitées ou les boissons
glacées. Voir la section recettes du présent manuel pour des idées amusantes
supplémentaires sur la façon de proter de son CHARIOT POUR CORNET GLACÉ.
Les fonctionnalités comprennent :
• Fenêtres en verre trempé
• Roues et poignée de chariot pour faciliter le transport
• Compartiment de rangement
32
32
FRANÇAIS
Page 35
PIÈCES ET ASSEMBLAGE
S'assurer de retirer tout le matériel d'emballage et les pièces avant de
le jeter au rebut. Dans nos eorts visant à minimiser l'emballage, le
matériel d'emballage a été maximisé pour protéger son nouvel achat. En
conséquence, les petites pièces pourront ne pas être facilement visibles
Quincaillerie
Nº 1 Boulon (10 mm) Nº 2 Boulon (38 mm) Nº 3 Boulon (60 mm)
Qté 10 Qté 2 Qté 2
Nº 4 Vis (10 mm) Nº 5 Vis (15 mm) Nº 6 Rondelle plate (6 mm) Nº 7 Rondelle plate
Qté 4 Qté 2 Qté 10 (8mm) Qté 8
Nº 8 Rondelle frein Nº 9 Aimant Nº 10 Cache-écrou Nº 11 Écrou
Qté 4 Qté 1 Qté 2 Qté 2
Nº 12 Poignée de la porte Nº 13 Douille Nº 14 Patte
Qté 1 Qté 2 Qté 2
FRANÇAIS
33
33
Page 36

Pièces
(G)Wheel
(A) Appareil principal (B) Compartiment (C) Poignée-poussoir (D) Plaque de fond
de rangement
(E) Roue (F) Base (G) Barre transversale (H) Montant
Qté 2 Qté 2 Qty. 2 Qty. 2
(I) Pelle à glace (J) Clé (K) Outil de démontage (L) Porte-cornet
Qté 2
(M) Lame
34
34
FRANÇAIS
Page 37

Assemblage de la base
1. Fixer la Poignée-poussoir (C) depuis l'intérieur du
Compartiment de rangement (B) à l'aide de deux Boulons
nº 1 et de deux Rondelles plates nº 6. Fixer les deux Écrous
n° 11 au fond.
2. Fixer la Barre transversale (G) à la Base (F), puis la xer à l'aide de
quatre Boulons nº 1 et de quatre Rondelles plates nº 6.
3. Fixer la Plaque de fond (D) à la Base (F) à l'aide de quatre
Boulons nº 1 et de quatre Rondelles plates nº 6.
4. Fixer les Montants (H) aux extrémités saillantes de la Base (F) à l'aide de deux
Boulons nº 2, de deux Rondelle plate nº 7 et de deux Rondelles freins nº 8.
FRANÇAIS
35
35
Page 38

5. Assembler la Base (F) dans le fond du Compartiment de rangement (B), puis xer solidement
à l'aide de quatre Vis nº 4.
Assemblage des roues
1. Poser une Rondelle plate nº 7 sur le Boulon nº 3, puis insérer
dans le trou prépercé à l'intérieur de la Base (F).
2. Poser une Rondelle plate nº 7 et une Douille nº 13 à l'extrémité du Boulon nº 3 inséré.
3. Fixer la Roue (E) sur le Boulon nº 3. Poser une Rondelle plate nº 7 et une
Rondelle frein nº 8 sur la Roue (E). Utiliser l'extrémité d'une Clé (J) avec une
petite encoche pour maintenir le Boulon nº 3 en place. Tout en maintenant le
Boulon nº 3 en place, serrer le Cache-écrou nº 10 à l'aide de la Clé (J).
4. Refaire la même chose de l'autre côté, en suivant les consignes susmentionnées.
(nº 7)
Rondelle
plate
(nº 8)
Rondelle
frein
(nº 10)
Cache-
écrou
(nº 3)
Boulon
(nº 13)
Douille
(E)
Roue
(nº 7)
Rondelle
plate
(F)
Base
36
36
FRANÇAIS
Page 39

Fixation de la poignée de la porte
1. Fixer l'Aimant nº 9 à la porte transparente de l'Appareil principal (A).
2. Poser la Poignée de porte nº 12 à l'aide de deux Vis nº 5.
3. Mettre l'Appareil principal (A) sur le dessus du Compartiment de rangement (B).
4. S'assurer que les deux goupilles d'insertion à la base de l'Appareil principal (A) s'alignent
correctement de manière à ce que l'Appareil principal (A) se verrouille sous la barre du
Compartiment de rangement (C).
Verrouillage de l'Appareil principal sur le Compartiment de rangement
Poser l'Appareil principal (A) sur le dessus du Compartiment de rangement
(B) de sorte que les deux trous latéraux puissent être alignés. Verrouiller
en serrant les Vis de verrouillage, tel qu'il est indiqué ci-dessous:
Fixation du Porte-cornet
Fixez le Porte-cornet (L) du côté opposé de la Poignée du
chariot ou du côté opposé de la Porte de la base.
FRANÇAIS
37
37
Page 40

MODE DE FONCTIONNEMENT
ON / OFF Switch
Interrupteur de
marche/arrêt
Trémie à glace
Poignée de la porte
Avant sa première utilisation, nettoyer l'intérieur de l'appareil en l'essuyant
à l'aide d'une éponge, d'une serviette ou d'un chion non abrasi(f)ve,
humide, puis l'assécher à l'aide d'une serviette sèche, non abrasive.
1. Premièrement, trouver une surface plane près d'une prise murale
avant de le démarrer. S'assurer que le cordon est éloigné de toute source
d'eau. L'utilisation d'une rallonge est acceptable, le cas échéant.
2. Avant de brancher l'appareil, ajouter les cubes de glace en enlevant le couvercle transparent
de l'Appareil principal de son CHARIOT POUR CORNET GLACÉ. Pour retirer le couvercle,
appuyer simplement sur le bouton de déverrouillage du couvercle, soulever, puis retirer.
3. Brancher l'appareil alors qu'il est à la position OFF (arrêt).
4. Lorsque les cubes de glace seront prêts, les placer dans l'appareil de
pilage tout en laissant susamment de place pour remettre facilement
le couvercle sur l'appareil. Ne jamais forcer pour le fermer.
5. Remettre le couvercle transparent sur l'appareil, puis tourner le bouton d'alimentation
à la position ON (marche). Ceci permettra d'activer l'appareil pour commencer le
pilage. Noter que la glace ne pilera pas si le couvercle n'est pas xé correctement.
6. Refaire les étapes 2 et 3 jusqu'à ce qu'il y ait la quantité de glace pilée désirée.
Mettre l'appareil à la position OFF (arrêt), puis le débrancher une fois terminé.
7. Une fois la quantité la glace désirée, ouvrir la porte de l'Appareil principal
pour récupérer la glace et créer les friandises à base de glace de son choix!
38
38
FRANÇAIS
Page 41

1. CONSEILS UTILES
Glace
Pour des résultats optimaux en matière de pilage de glace, les cubes devraient être
sortis du congélateur, puis déposés dans un bol, environ 10 minutes avant de les
mettre dans l'appareil de pilage. Si la glace a un aspect givré, le pilage sera trop
dicile. Lorsque la glace est claire et humide au toucher, elle sera plus facile à piler.
NETTOYAGE ET ENTRETIEN
1. S'assurer que l’appareil est éteint et débranché avant de le nettoyer.
2. Ouvrir la porte pour nettoyer et assécher l'intérieur de l'appareil à l'aide
d'un chion ou d'une éponge légèrement humide et non abrasi(f)ve.
3. Essuyer l'intérieur de l'appareil à l'aide d'un chion ou d'une éponge légèrement
humide et non abrasi(f)ve, puis assécher à l'aide d'une serviette non abrasive.
4. L'appareil de pilage et le couvercle transparent vont au lave-vaisselle. Pour retirer
l'appareil de pilage, suivre les étapes de la Page 11.
Remplacement de la lame
Lorsque la lame de son CHARIOT POUR CORNET GLACÉ devient émoussée après une longue
période d'utilisation normale, la remplacer par la Lame de rechange à l'aide de l'Outil
compris. Pour des lames supplémentaires, les commander directement auprès du fabricant.
Logement de la
lame
FRANÇAIS
39
39
Lame (M)
La lame est TRÈS tranchante. Faire preuve d'une EXTRÊME PRUDENCE au moment de
la manipulation.
Écrou de la
lame
Tournette
Page 42

Étapes à suivre pour remplacer la Lame
1. Retirer le Bac à glace, puis insérer l'Outil de démontage (K) sur les trois bras de la Tournette.
2. Une fois l'Outil de démontage (K) correctement inséré, tourner dans le sens
antihoraire (comme l'indique la èche), puis soulever la Tournette.
3. Appuyer délicatement sur les onglets du Logement de la
lame vers l'intérieur, puis soulever pour le retirer.
4. Dévisser l'Écrou de la lame et, en faisant preuve d'une extrême prudence, retirer
la Cartouche de la lame. Insérer la Cartouche de la lame de remplacement,
puis inverser les étapes susmentionnées pour le remontage. FAIRE PREUVE
D'UNE EXTRÊME PRUDENCE. LA LAME EST TRÈS TRANCHANTE.
5. Au moment du remplacement de la Tournette, inverser toutes les étapes,
puis s'assurer de la verrouiller à l'aide de l'Outil de démontage.
40
40
FRANÇAIS
Page 43

RECETTES
Le CHARIOT POUR CORNET GLACÉ fait des monticules de glace légères, douces.
Utiliser diérents fruits, sirops, tisanes et jus de fruits pour créer un nombre inni
de friandises, boissons et desserts faibles en gras et rafraîchissants. Laisser libre
cours à son imagination et proter de son CHARIOT POUR CORNET GLACÉ!
CONCENTRÉ DE SIROP EN BOUTEILLE
• 540 mL (19
oz) d'eau tiède
• 525 g (2 ¾
tasses) de sucre
• 28 mL (1 oz) de
colorant alimentaire
• 1 bouteille vide
de 570 mL (1 pinte)
SIROP AMER
• 28 mL (1 oz)
d'acide citrique liquide
• 28 mL (1 oz) de
concentré d'arôme
• 1 bouteille vide
de simple sirop
• 28 mL (1 oz) de
colorant alimentaire
• 1 bouteille vide
de 570 mL (1 pinte)
Verser 540 mL (19 oz) d'eau tiède dans une
bouteille de 570 mL (1 pinte) ou plus.
À l'aide d'un entonnoir, ajouter 525 g
(2 ¾ tasses) de sucre à l'eau.
Visser solidement le capuchon. Bien agiter la
bouteille jusqu'à dissolution du sucre.
Ajouter 28 mL (1 oz) de colorant alimentaire. Bien agiter.
Ajouter maintenant la saveur de son choix au sirop.
*Pour faire un concentré sans sucre, remplacer par
un succédané de sucre en poudre de son choix.
Verser 28 mL (1 oz) d'acide citrique liquide et 28 mL
(1 oz) de concentré d'arôme (raisin, cerise, fraise,
pastèque, pomme ou citron – les fruits sont parfaits)
dans une bouteille de 570 mL (1 pinte) ou plus.
Remplir le reste de la bouteille d'un simple sirop.
Utiliser la recette susmentionnée pour
concentré de sirop en bouteille).
Ajouter 28 mL (1 oz) de colorant alimentaire.
Visser solidement le capuchon. Agiter la bouteille
jusqu'à obtenir un mélange homogène.
• 285 mL (15 oz)
de simple sirop
• 285 mL (15 oz)
de sirop au chocolat
• 120 mL (4 oz)
de lait évaporé
• Simple sirop
• 20 mL (1 oz) de
FRANÇAIS
sirop aromatisé
41
41
CHOCOLATE SYRUP
Verser les ingrédients dans une bouteille
de 570 mL (1 pinte) ou plus grande.
Visser solidement le capuchon. Agiter la bouteille
jusqu'à obtenir un mélange homogène.
CREAM SYRUP
Verser 120 mL (4 oz) de lait évaporé dans
1 bouteille de 570 mL (1 pinte)
Recouvrir de simple sirop.
Ajouter 20 mL (1 oz) d'aromatisant.
Visser le capuchon, puis agiter jusqu'à obtenir un
mélange homogène. Garder au réfrigérateur.
Page 44

PEACH SPRITZER
• 470 mL (2 tasses)
de panaché de pêche
• 2 c. à soupe
de jus d'orange,
fraîchement pressé
• 1 emballage de
succédané de sucre
VANILLA SNOW
• 3 boules de crème
glacée à la vanille
• Glace pilée
• Sirop à la vanille
ROOT BEER FLOAT SLUSH
• 2 boules de crème
glacée à la vanille
• Glace pilée
• Racinette
Remplir une tasse à moitié avec de
la glace fraîchement pilée.
Verser le panaché de pêche et le jus d'orange sur la glace.
Vider le contenu d'un emballage de
succédané de sucre dans la tasse.
Remuer jusqu'à obtenir un mélange homogène.
Ajouter de la glace supplémentaire, le cas
échéant, jusqu'à ce que la tasse soit pleine.
Portion : 1
Mettre les boules de crème glacée dans un bol.
Déposer la glace pilée sur la crème
glacée pour créer un monticule.
Déposer un let de sirop à la vanille
sur la glace pilée, puis servir.
(Décliner cette recette avec une autre crème
glacée et une autre saveur de sirop.)
Faire réfrigérer une chope de bière jusqu'à
ce qu'elle soit froide et glacée.
Déposer 2 boules de crème glacée à la
vanille dans la chope de bière.
Déposer la glace pilée dans une chope, laissant
trois doigts d'espace sur le dessus.
Verser la racinette dans la chope
jusqu'à ce qu'elle soit pleine.
Portion : 1
FROZEN MARGARITA
• 120 g (1 tasse)
de glace pilée
• 85 g (3 oz) de tequila
• 30 mL (1 oz)
de triple-sec
• 60 mL (2 oz)
de jus de lime
• 1 quartier de lime
• 2 c. à café de gros sel
Mettre du sel dans une soucoupe. Frotter le bord
d'un verre pour margarita à l'aide d'un quartier de
lime, puis tremper le verre dans le sel pour recouvrir
complètement le bord. Réserver la lime.
Remplir un verre pour margarita avec de la glace pilée.
Verser la tequila, le triple sec et le jus de lime dans le verre.
Bien mélanger, puis garnir avec un quartier de lime.
Portion : 1
42
42
FRANÇAIS
Page 45

RETOUR ET GARANTIE
SI L'APPAREIL FONCTIONNE PAS OU S'IL EST ENDOMMAGÉ AU MOMENT DE LE
SORTIR DE SON EMBALLAGE, LE RETOURNER IMMÉDIATEMENT AU LIEU D'ACHAT.
CHARIOT POUR CORNET GLACÉ / SCC399
Pour toute question, communiquer par courriel ou au numéro de téléphone du service
à la clientèle, entre 08 h 00 et 17 h 00, du lundi au vendredi, heure normale du Centre.
Distribué par :
Nostalgia Products Group LLC
1471 Partnership Dr.
Green Bay, WI 54304-5685
Service à la clientèle
Téléphone : +1 (920) 347-9122
Site Web www.nostalgiaelectrics.com
Demande de renseignements auprès du service à la clientèle
Pour soumettre une demande de renseignements auprès du service à la clientèle,
visiter le site Web www.nostalgiaelectrics.com et remplir le Formulaire de demande de
renseignements du service à la clientèle, puis cliquer sur le bouton Submit (transmettre).
Un représentant entrera en communication avec vous dès que possible.
Cet appareil est conçu et fabriqué pour fournir de nombreuses années de performance
satisfaisante sous réserve de conditions normales d'utilisation. Le distributeur garantit
à l'acheteur initial que s'il y a un défaut de matériaux ou de fabrication pendant les
90 premiers jours suivant l'achat, il réparera ou remplacera l'appareil à sa discrétion.
La garantie ne s'applique pas aux dommages causés par le transport, la manipulation
abusive ou la chute de l'appareil. Un produit jugé défectueux en raison de la fabrication
ou d'une mauvaise manipulation est laissé à la discrétion du distributeur. An d'obtenir
un service au titre de la garantie, communiquer avec Nostalgia Products Group, LLC au
numéro de téléphone ci-dessus ou remplir le formulaire de demande de renseignements
auprès du service à la clientèle sur le site Web www.nostalgiaelectrics.com.
L'utilisation de ce produit n'est pas recommandée à l'extérieur de
l'Amérique du Nord. La garantie est nulle si les produits sont exportés
à l'extérieur des États-Unis, du Canada et du Mexique.
La présente garantie ne s'applique pas aux marchandises réusinées.
Please read these instructions carefully. Failure to comply with these instructions,
damages caused by improper replacement parts, abuse or misuse will void this
pledge to you and is being made in place of all other expressed warranties.
Pour de l'information supplémentaire, visiter le site Web www.nostalgiaelectrics.com.
Dire « J'aime » sur Facebook sur le site Web www.facebook.com/NostalgiaElectrics.
FRANÇAIS
43
43
Page 46

44
44
FRANÇAIS
 Loading...