

Page 1

All products are trademarks of Nostalgia Products Group, LLC.
Worldwide design & utility patented or patents pending.
© 2010 Nostalgia Products Group, LLC.
www.nostalgiaelectrics.com
(rev. 05/24/10)
Page 2
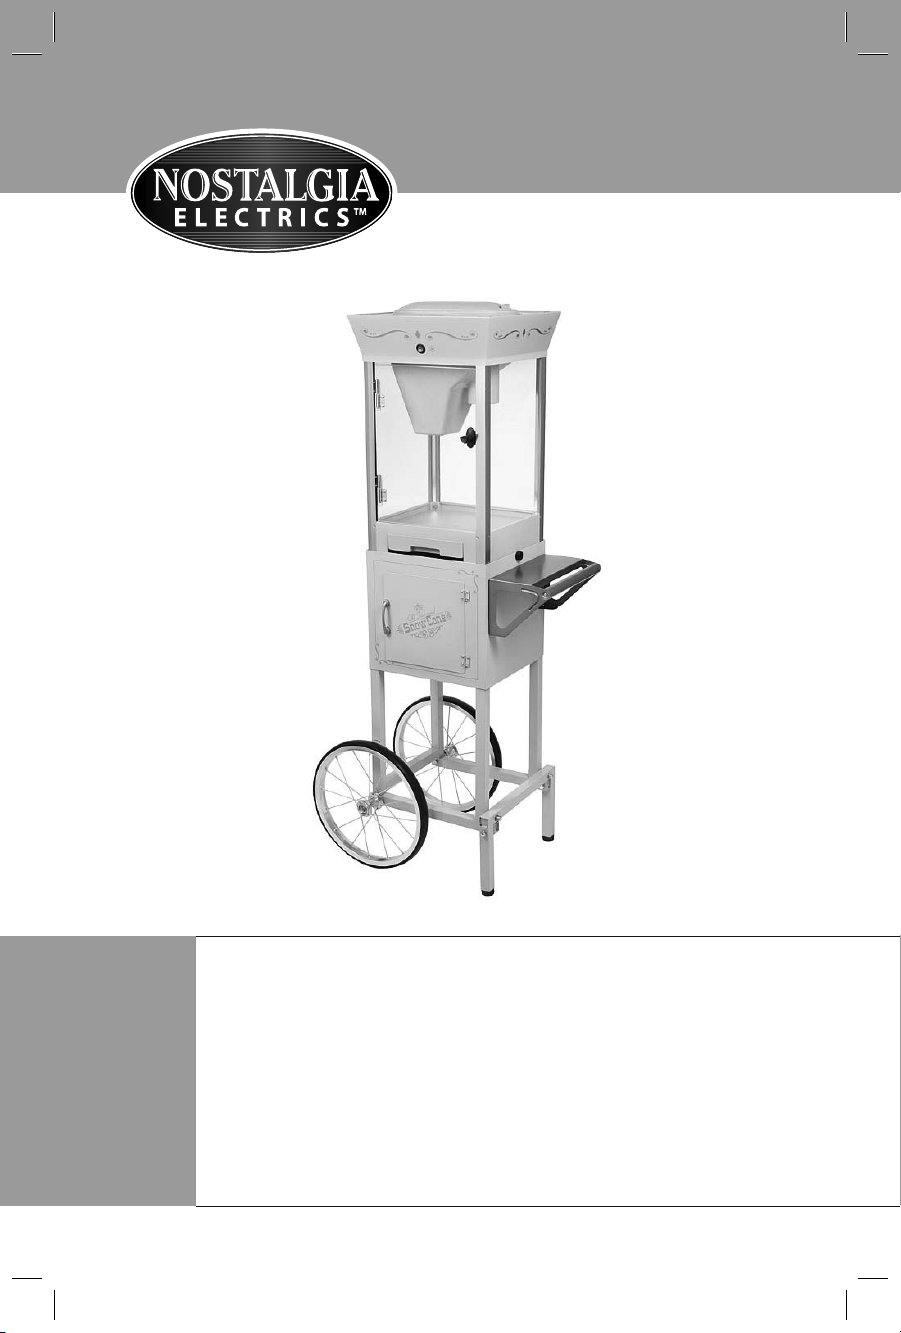
SCC200
Vintage Collection™
Old Fashioned Snow Cone Cart
Instructions and Recipes
Page 3

Page 4
CONTENTS
IMPORTANT PRECAUTIONS . . . . . . . . . . . . . . . . . 3
IMPORTANT SAFEGUARDS . . . . . . . . . . . . . . . . . . 3
INTRODUCTION . . . . . . . . . . . . . . . . . . . . . . . . 4
PARTS & ASSEMBLY . . . . . . . . . . . . . . . . . . . . . . 5
HOW TO OPERATE . . . . . . . . . . . . . . . . . . . . . . . 9
HELPFUL TIPS . . . . . . . . . . . . . . . . . . . . . . . . . 10
CLEANING & MAINTENANCE . . . . . . . . . . . . . . . . . 10
RECIPES . . . . . . . . . . . . . . . . . . . . . . . . . . . . 12
RETURNS & WARRANTY . . . . . . . . . . . . . . . . . . . . 13
SAFETY
Your safety and the safety of others are very important.
We have provided many important safety messages in this manual and
on your appliance. Always read and obey all safety messages.
This is the safety alert symbol.
This symbol alerts you to potential hazards
that can kill or hurt you and others.
All safety messages will follow the safety alert symbol.
All safety messages will tell you what the potential hazard
is, tell you how to reduce the chance of injury, and tell you
what can happen if the instructions are not followed.
ENGLISH
Appliance Specifications:
120 Volts, 60 Hz
100 Watts, ETL Approved
2
Page 5

ENGLISH
3
IMPORTANT PRECAUTIONS
NEVER immerse in water.1.
NEVER use near water.2.
NEVER use an abrasive sponge or cloth.3.
NEVER use a scouring pad on the appliance.4.
NEVER leave appliance unattended while in use.5.
NEVER try to force the cover in the locking mechanism.6.
Unplug unit from outlet when not in use and during cleaning.7.
DO NOT operate this appliance with a damaged cord or 8.
plug, or if the appliance ever malfunctions.
DO NOT clean any parts of this appliance in a dishwasher.9.
Keep out of reach of children. 10.
This appliance is NOT A TOY.11.
Unsupervised young children and cognitively challenged 12.
individuals should never operate this appliance.
Young children should be supervised while in proximity of the 13.
appliance to ensure that they do not play with it.
IMPORTANT SAFEGUARDS
Basic safety precautions should always be followed when
using electrical appliances, including the following:
Read all instructions before operating this appliance.1.
DO NOT touch hot surfaces. Keep hands away from 2.
blade mechanism. Use handles or knobs.
To protect against electrical shock do not immerse cord, plug 3.
or any part of this appliance in water or other liquids.
Close supervision is necessary when any appliance is used near children.
4.
Unplug from outlet when not in use, before removing parts and before cleaning.5.
DO NOT operate any appliance with a damaged cord or plug, 6.
or if the appliance has been damaged in any manner. Return the
appliance to the nearest repair shop for examination or repair.
The manufacturer does not recommend the use of accessory 7.
attachments. Use of accessory attachments may cause injuries.
DO NOT use outdoors.8.
Position the appliance as close to the outlet as possible 9.
to prevent injury due to tripping over cord.
Extreme caution must be used when moving this appliance.
10.
DO NOT use the appliance for other than its intended use.11.
Page 6

ENGLISH
4
An appliance that is plugged into an outlet should 12.
not be left unattended while in operation.
Check Shaving Stirrer for presence of foreign objects prior to use.
13.
Blades are extremely sharp. Use with extreme caution.14.
A short power supply cord is provided to reduce the risk resulting 15.
from becoming entangled or tripping over a long cord.
16.
Longer detachable power supply cords can be used if care is exercised in their use.
The marked electrical rating of an extension cord should be at 17.
least as great as the electrical rating of the appliance.
This appliance has a polarized plug (one blade is wider than
18.
the other). To reduce the risk of electrical shock, this plug is
intended to fit into a polarized outlet only one way.
Save these instructions!19.
INTRODUCTION
The OLD FASHIONED SNOW CONE CART marries the best of both
worlds: vintage appeal with the convenience of a modern appliance. Use
ice cubes from your own freezer to shave and craft refreshing snow cones
for any occasion. The handy storage compartment is ideal for storing
syrups, extra cones and other supplies. Standing 53" tall, this snow cone
cart is perfect for large groups, parties and events such as fundraisers.
With endless flavor varieties, snow cones have always been incredibly
fun to eat. Use the machine to create mounds of shaved ice for
smoothies, fruit-flavored slushies, other dessert treats, or to chill
beverages. See the recipe section of this manual for more fun ideas
on how to enjoy your OLD FASHIONED SNOW CONE CART.
Page 7

ENGLISH
5
PARTS & ASSEMBLY
Hardware
#1 Screw (10mm) #2 Bolt (10mm) #3 Bolt (20mm) #4 Bolt (65mm)
Qty. 4 Qty. 6 Qty. 4 Qty. 4
#5 Flat Washer #6 Nut Cap
Qty. 8 Qty. 6
Page 8

ENGLISH
6
Parts
A
C
D E
F
G
E-Push handle 1
F
-Axle bolt 2
G
-Wheel 2
I
-Base support 1
J
-Bottom Plate 1
L
-Leg assembly 1
C
-Storage compartent 1
A-Main unit 1
H
-Wrench 2
M
-Leg assembly bolt 4
B
B-Shovel 1
H
D-Lock screw 2
K-Cross bar 1
N-Knife disassembly tool 1
F
G
H
G
H
E-Push handle 1
F
-Axle bolt 2
G
-Wheel 2
I
-Base support 1
J
-Bottom Plate 1
L
-Leg assembly 1
C
-Storage compartent 1
A-Main unit 1
H
-Wrench 2
M
-Leg assembly bolt 4
B
B-Shovel 1
D-Lock screw 2
K-Cross bar 1
N-Knife disassembly tool 1
H
E-Push handle 1
F-Axle bolt 2
-Wheel 2
I
-Base support 1
J
-Bottom Plate 1
L
-Leg assembly 1
C
-Storage compartent 1
A-Main unit 1
H
-Wrench 2
-Leg assembly bolt 4
B-Shovel 1
D-Lock screw 2
K-Cross bar 1
A
E-Push handle 1
F
-Axle bolt 2
G
-Wheel 2
I
-Base support 1
J
-Bottom Plate 1
L
-Leg assembly 1
C
-Storage compartent 1
A-Main unit 1
H
-Wrench 2
M
-Leg assembly bolt 4
B
B-Shovel 1
D-Lock screw 2
K-Cross bar 1
N-Knife disassembly tool 1
E-Push handle 1
F-Axle bolt 2
G
-Wheel 2
I
-Base support 1
J
-Bottom Plate 1
L-Leg assembly 1
C-Storage compartent 1
A-Main unit 1
H-Wrench 2
M-Leg assembly bolt 4
B-Shovel 1
D-Lock screw 2
K-Cross bar 1
D E
F
G
E-Push handle 1
F
-Axle bolt 2
G
-Wheel 2
I
-Base support 1
J
-Bottom Plate 1
L
-Leg assembly 1
C
-Storage compartent 1
A-Main unit 1
H
-Wrench 2
M
-Leg assembly bolt 4
B
B-Shovel 1
H
D-Lock screw 2
K-Cross bar 1
N-Knife disassembly tool 1
(A) Main Unit (B) Storage (C) Disassembly (D) Ice Shovel
Compartment Tool
(E) Push Handle (F) Axle Bolts (G) Wheels (H) Wrenches
(I) Base Support (J) Bottom Plate (K) Cross Bar (L) Leg Assembly
Page 9

ENGLISH
7
Assembly of Base Support
Attach Push Handle (E) from inside Storage 1.
Compartment (B) using supplied #1 Screws.
Insert Cross Bar (K) into the square inserts on the inside of Base Support (I) 2.
and secure from below with two #2 Bolts. Insert the Leg Assembly (L) over
the protruding ends of the Base Support (I) and fasten from the inside of Base
Support (I) using four #4 Bolts, four #5 Flat Washers, and four #6 Nut Caps.
Secure Bottom Plate (J) to Base Support (I) using four #2 Bolts. 3.
Assemble Base Support (I) into the bottom of the Storage 4.
Compartment (B) and secure with four #3 Bolts.
Page 10

ENGLISH
8
Assembly of Wheels
Insert Axle Bolt (F) into Base Support (I). 1.
Put on #5 Flat Washer. Slide Wheel (G) onto Axle Bolt (F), then 2.
add a second #5 Flat Washer and #6 Nut Cap.
Use Wrench (H) to tighten the #6 Nut Cap.3.
On the other side of Base Support (I), insert second Axel Bolt (F), add #5 4.
Flat Washer, second Wheel (G), another #5 Flat Washer, and a #6 Nut Cap.
Use Wrench (H) to tighten the #6 Nut Cap.5.
(#5)
Flat
Washer
(F)
Axle
Bolt
(#6)
Nut
Cap
(G)
Wheel
Locking Main Unit to Storage Compartment
Place the Main Unit (A) onto the Storage Compartment (B) so that the two
side holes match up. Lock by tightening the Lock Screws as shown below:
(I)
Base
Support
Page 11

ENGLISH
9
HOW TO OPERATE
Before first use, clean the inside of the unit by wiping with a moist, nonabrasive sponge, towel or cloth and then wipe with a non-abrasive dry towel.
First, find a flat surface near an electrical outlet before 1.
starting. Make sure your cord is away from any water source.
It is acceptable to use an extension cord if needed.
Before plugging in the unit, add ice cubes by removing the clear lid from 2.
the Main Unit of your OLD FASHIONED SNOW CONE CART. To remove
the lid, simply push the release button on the lid, lift and remove.
Plug in the appliance while switch is flipped to OFF position.3.
When ice cubes are ready, place cubes in the shaving unit while allowing enough 4.
room for the lid to be placed back on the unit easily. Never force it shut.
Return the clear lid to the unit and turn the power button to the ON 5.
position. This will activate the unit to begin shaving. Please note
that the ice will not shave unless the lid is properly secured.
Repeat steps 2 and 3 until you have shaved the amount of ice 6.
desired. Turn unit OFF and then unplug when you are finished.
Once you have the desired amount of ice, open the housing door on the Main 7.
Unit to retrieve your ice and create your favorite snow-based treats!
ON / OFF & Light
Switches
Ice Hopper
Door Handle
Page 12

ENGLISH
10
HELPFUL TIPS
Ice
For optimal ice shaving results, ice cubes should sit out of the freezer,
in a bowl, for about 10 minutes before putting them into the shaving
unit. If ice is frosty in appearance, it is too hard to shave. When
ice is clear and wet to the touch, then it is ready to shave.
CLEANING & MAINTENANCE
Make sure appliance is turned off and unplugged before cleaning. 1.
Open the housing door to clean and dry the inside of the unit 2.
using a slightly damp, non-abrasive cloth or sponge.
Wipe the outside of the unit using a slightly damp, non-abrasive
3.
cloth or sponge, then dry with a non-abrasive towel.
The shaving unit and clear lid are dishwasher safe. To take 4.
out the shaving unit, refer to steps on page 11.
Replacing the Blade
When your OLD FASHIONED SNOW CONE CART blade becomes
dull after a long period of normal use, replace it with the included
Replacement Blade and Tool. Should you need additional blades,
you can order them directly from the manufacturer.
Blade Housing
The blade is VERY sharp. Use EXTREME CAUTION when handling.
Steps to replace the blade are on the next page.
Blade
Blade Cap
Spinner
Page 13

ENGLISH
11
Steps to Replace the Blade
Remove the Ice Tray and insert the Disassembly Tool 1.
(C) over the three arms of the Spinner.
Once the Disassembly Tool (C) is properly inserted, twist counter-2.
clockwise (as the arrow shows) and lift the Spinner out.
Carefully press the tabs of the Blade Housing inward and lift up to release.3.
Twist off the Blade Cap and, using extreme caution, remove the Blade Cartridge. 4.
Insert the replacement Blade Cartridge, and reverse the above steps to
reassemble. USE EXTREME CAUTION. BLADE IS VERY SHARP.
When replacing the Spinner, reverse all steps and make 5.
sure to lock Spinner using the Disassembly Tool.
Page 14

ENGLISH
12
RECIPES
The OLD FASHIONED SNOW CART makes light, fluffy mounds of
ice. Use your imagination with different fruits, syrups, sodas, teas,
and juices to create any number of refreshing, icy, low-fat treats,
drinks and desserts. Enjoy your shaved ice in a variety of ways.
BOTTLED SYRUP CONCENTRATE
19 Ounces of •
Warm Water
2• ¾ Cups Sugar
1-Quart Empty •
Bottle
1 Ounce of •
Food Coloring
SOUR SYRUP
1 Quart Simple •
Syrup
1 Ounce Liquid •
Citric Acid
1 Ounce Flavor •
Concentrate
1 Ounce Food •
Coloring
Put 19 ounces of warm water into a
one quart, or larger, bottle.
Using a funnel, add 2 ¾ cups of sugar to
the water. (equals 1¼ pounds of sugar)
Screw cap on tightly. Shake bottle
until sugar dissolves.
Add 1 ounce of food coloring. Shake until mixed.
Now you can add your favorite flavor to syrup.
*To make sugar free concentrate, subsitite sugar
for your choice of powdered sugar substitute.
Put 1 ounce of liquid citric acid and 1
ounce of flavor concentrate (grape, cherry,
strawberry, watermelon, apple or lemon work
well) into a one quart, or larger, bottle.
Fill the rest of the bottle with simple syrup (you can
use the recipe above for bottled syrup concentrate).
Add one ounce of food coloring.
Screw cap on tightly. Shake bottle until well mixed.
CHOCOLATE SYRUP
15 Ounces •
Simple Syrup
15 Ounces •
Chocolate Syrup
CREAM SYRUP
Simple Syrup•
4 Ounces •
Evaporated Milk
1 Ounce Flavored •
Syrup
Pour ingredients into a 1 quart or larger bottle.
Screw cap on tightly. Shake bottle until well mixed.
Pour 4 ounces of evaporated milk into 1 quart bottle.
Top off with simple syrup.
Add 1 ounce of flavoring.
Screw on cap and shake until well
mixed. Keep refrigerated.
Page 15

ENGLISH
13
PEACH SPRITZER
2 Cups Peach •
Seltzer
2 Tbsps. Freshly •
Squeezed
Orange Juice
1 Packet of Sugar •
Substitute
VANILLA SNOW
3 Scoops of •
Vanilla Ice Cream
Shaved Ice•
Vanilla Flavored •
Syrup
ROOTBEER FLOAT SLUSH
Shaved Ice•
Rootbeer•
2 Scoops Vanilla •
Ice Cream
Chilled Beer Mug•
Fill a cup halfway with freshly shaved ice.
Pour peach seltzer and orange juice over ice.
Empty packet of sugar substitute into cup.
Stir until well blended.
Add additional ice if desired, until cup is full.
Serves one.
Put scoops of ice cream in a bowl.
Shovel shaved ice over ice cream to create a mound.
Squirt vanilla flavored syrup over
shaved ice and serve.
Try this recipe with other ice cream
and syrup flavors for fun.
Freeze a beer mug until it it is cold and frosty.
Put 2 round scoops of vanilla ice
cream into beer mug.
Scoop shaved ice into mug, leaving
three fingers of space at the top.
Pour root beer into mug until full.
Serves one.
FROZEN MARGARITA
1 Cup Shaved Ice•
3 Ounces Tequila•
1 Ounce Triple Sec•
2 Ounces •
Lime Juice
1 Lime Wedge•
2 Teaspoons •
Coarse Salt
Put salt in a saucer. Rub rim of margarita glass
with a lime wedge and dip glass into salt,
coating rim thoroughly. Set lime aside.
Fill margarita glass with shaved ice.
Pour tequila, triple sec and lime juice into glass.
Stir well and garnish with lime wedge.
Serves one.
Page 16

ENGLISH
14
RETURNS & WARRANTY
SHOULD YOUR UNIT NOT WORK OR IS DAMAGED WHEN
YOU FIRST TAKE IT OUT OF THE BOX, PLEASE RETURN
IT TO THE PLACE OF PURCHASE IMMEDIATELY.
OLD FASHIONED SNOW CONE CART / SCC200
Should you have any questions, please contact us via email or at the
customer service number listed below between the hours of 8:00 AM
and 5:00 PM, Monday through Friday, Central Standard Time.
Distributed by:
Nostalgia Products Group LLC
1471 Partnership Dr.
Green Bay, WI 54304-5685
Customer Service
Phone: (920) 347-9122
Web: www.nostalgiaelectrics.com
Customer Service Inquiry
To submit a Customer Service inquiry, go to www.nostalgiaelectrics.com and
fill out the Customer Service Inquiry form and click the Submit button.
A representative will contact you as soon as possible.
This appliance is designed and built to provide many years of satisfactory
performance under normal household use. The distributor pledges to the
original owner that should there be any defects in material or workmanship
during the first 90 days of purchase, we will repair or replace the unit at
our option. Our pledge does not apply to damages caused by shipping,
mishandling or unit being dropped. A product deemed defective either from
manufacturing or being mishandled is up to the distributor’s discretion.
In order to obtain service under this warranty, please contact Nostalgia
Products Group, LLC at the telephone number listed above or by filling out
the Customer Service Inquiry Form located at www.nostalgiaelectrics.com.
This warranty does not apply to re-manufactured merchandise.
Please read these instructions carefully. Failure to comply with these instructions,
damages caused by improper replacement parts, abuse or misuse will void this
pledge to you and is being made in place of all other expressed warranties.
 Loading...