

Page 1
RETRO SNOW CONE MACHINE™
Model # RSM-602
For Household Use Only
Read These Instructions Before Using
This Unit!
Save These Instructions!
Page 2

ENGLISH 1
IMPORTANT SAFE GUARDS
When usin g el ec tr ic a l ap pli ances, basic safety prec autions should always be followed,
including the following:
Read all instructions before operating this appliance.
1. To protect against electrical shock do not immerse cord, plug or the motor base
2. Close supervision is necessary when any appliance is used by or near children.
3. Unplug from outlet when not in use and before cleaning.
unit in water or other liquids.
4. DO NOT operate any appliance with a damaged cord or plug or if the appliance
has been damaged in any manner. Return the appliance to the place of
purchase or send back to company for repair or replacement as stated in this
booklet in the warranty.
5. The appliance manufacturer does not recommend the use of accessory
6. DO NOT use outdoors.
attachments. This may cause injuries.
7. DO NOT let the cord hang over the edge of table or counter tops or touch hot
8. DO NOT place on or near a hot gas or electric burner, or in a heated oven.
9. Extreme caution must be used when moving this appliance.
10. DO NOT use the appliance for other than its intended use.
11. A unit that is plugged into an outlet should not be left unattended.
surfaces.
12. Check ice feed insert and ice shaving canister for presence of foreign objects
prior to use.
13. Blades are extremely sharp. Use extreme caution when cleaning the i c e
shaving canister.
14. A short power supply cord is provided to reduce the risk resulting from becoming
entangled or tripping over a long cord.
15. Longer detachable power supply cords can be used if care is exercised in their
use.
16. The marked electrical rating of an extension cord should be at least as great as
the el ectrical rating of the appliance.
17. This appliance has a polarized plug (one blade is wider than the other). To
reduce the risk of electrical shock, this plug is intended to fit into a polarized
outlet only one way.
SAVE THESE INSTRUCTIONS!
Page 3

ENGLISH 2
IMPORTANT PRECAUTIONS
Appliance Specifications:
120 Volts
60HZ
9 Amps
35 Watts
ETL Approved
Important Precautions to Remember:
A. NEVER immerse in water.
B. NEVER use near water.
C. NEVER use an abrasive sponge, cloth or scouring pad on the unit.
D. NEVER leave unit unattended while in use.
E. Unplug unit from outlet when not in use and when cleaning.
F. DO NOT operate this appliance with a damaged cord or plug or in the event the
G. This unit is NOT A TOY.
appliance ever malfunctions.
H. This appliance is not intended for use by young children or infirm persons without
INTRODUCTION
supervision.
Thank you for purchasing The RETRO SNOW CONE MACHINE. This nos talgic looking
snow cone maker resembles the popular Retro designs of the 1950’s. This snow cone
maker is on ly des ig ne d in ap pearance to look lik e t h e nos t alg ic des i g n sty le ; however, it is
a technologically advanced snow cone maker.
The RETRO SNOW CONE MACHINE uses ice cubes from your freezer to create:
Snow Cones
Slush’s
Smoothies, Low Fat Snacks
The RETRO SNOW CONE MACHINE is designe d for kit c hen use but can be used
anywhere such as;
Family Room
Dorm Rooms
Office
Club House
And more…
Now you can enjoy icy cool snow cones and more to snack on…
Watchi ng TV or a movi e at home
Parties
Listening to music
As a low fat treat
And more…
Page 4

ENGLISH 3
INTRODUCTION
The RETRO SNOW CONE MACHINE is easy to use, just follow these simple
instructions.
After Taking the Unit Out Of the Box
1. Your RETRO SNOW CONE MACHINE is already fully assembled, but has three
separate bonus pieces.
1 side cone shelf
2 plastic cone holders (Paper cones not provided)
1 plastic shaved ice scoop
2. Before first us e, lift off the clear safety power contr ol li d, and remove t he ic e sh av i ng
canister. Remove the top housing lid off of the body and wipe clean the inside of
the shaved ice collection chamber with a non-abrasive moist sponge, towel or cloth
and then dry with a non-abrasive so ft towel or cloth.
BREAKDOWN of parts ILLUSTRATION A
E. Shaved Ice
Collection
Chamber
A. Housing Top lid F. Ice Feed
insert
B. Cone Holders
G. Ice shaving
Canister
C. Shaved ice scoop
H. Locking
cap for
Ice shaving
canister
D. Side cone shelf H. Clear
Safety power
control li d
3. After cleaning the inside of the shaved ice collection chamber, put the housing top
lid back on the ice collection chamber and base unit.
4. Locate the Ice Shaving canister. Unscrew and remove the center locking cap (This
cap has “LOCK and UNLOCK” with directional arrows, clearly marked on the top)
Separate the Ice Feed Insert from the Ice Shaving Canister. Carefully wash these
parts in warm soapy water. Use extre me ca ution when cleaning and handling the
Ice Shaving Canister. Blades are very sharp! Rinse and dry with a soft clean cloth.
Reassemble the Ice Shaving Canister and lock the center locking cap securely.
Return the Ice Shaving Canister to the receptacle hole in the top housing lid. Wash
and dry the Clear Safety power control lid, and reposition over the Ice Shaving
Canister.
5. Attach the Side Cone Shelf. NOW, you are ready to enjoy cool, refreshing icy
snacks from your RETRO SNOW CONE MACHINE™.
Page 5

ENGLISH 4
USING YOUR RETRO SNOW CONE MACHINE™
First, find a stable surface near an electrical outlet to place your snow cone machine.
(Make sure your cord is away from any water source. If needed, it is acceptable to use an
extension cord.)
A. Before plugging in your unit, to add ice cubes, remove clear power control lid
from your RETRO SNOW CONE MACHINE™, by turning clockwise, lift and
remove.
B. Place ice cubes in the ice feed canister allowing
enough room for the clear power control lid to be
placed b ac k on eas ily .
ILLUSTRATION B
Ice Feed Canister with ice
C. Plug in unit with lid in the OFF position.
D. Turn the clear power control lid count er cl o c kw is e, to th e ON pos i ti o n. This wil l
activate the unit to begin shaving (To turn “OFF” shaving unit, simply turn the lid
clockwise.)
NOTE: “ON” / “OFF” is clearly marked on the clear power control lid with directional
arrows. See illustration C below.
ILLUSTRATION C
E. Turn the clear power control lid clockwise
to turn off the unit and refill the ice feed unit
with ice. Repeat STEPS D and E until you
have shave d t h e am ou nt of ic e des ir e d.
F. Use the shaved ice scoop to shovel shaved
ice from the collection chamber (accessible through the side door) to your cone
to create your favorite treats. We have included a few recipes on page 5 of this
manual to enhance the enjoyment of your snow cone machine or use your
imagination and create your own recipes.
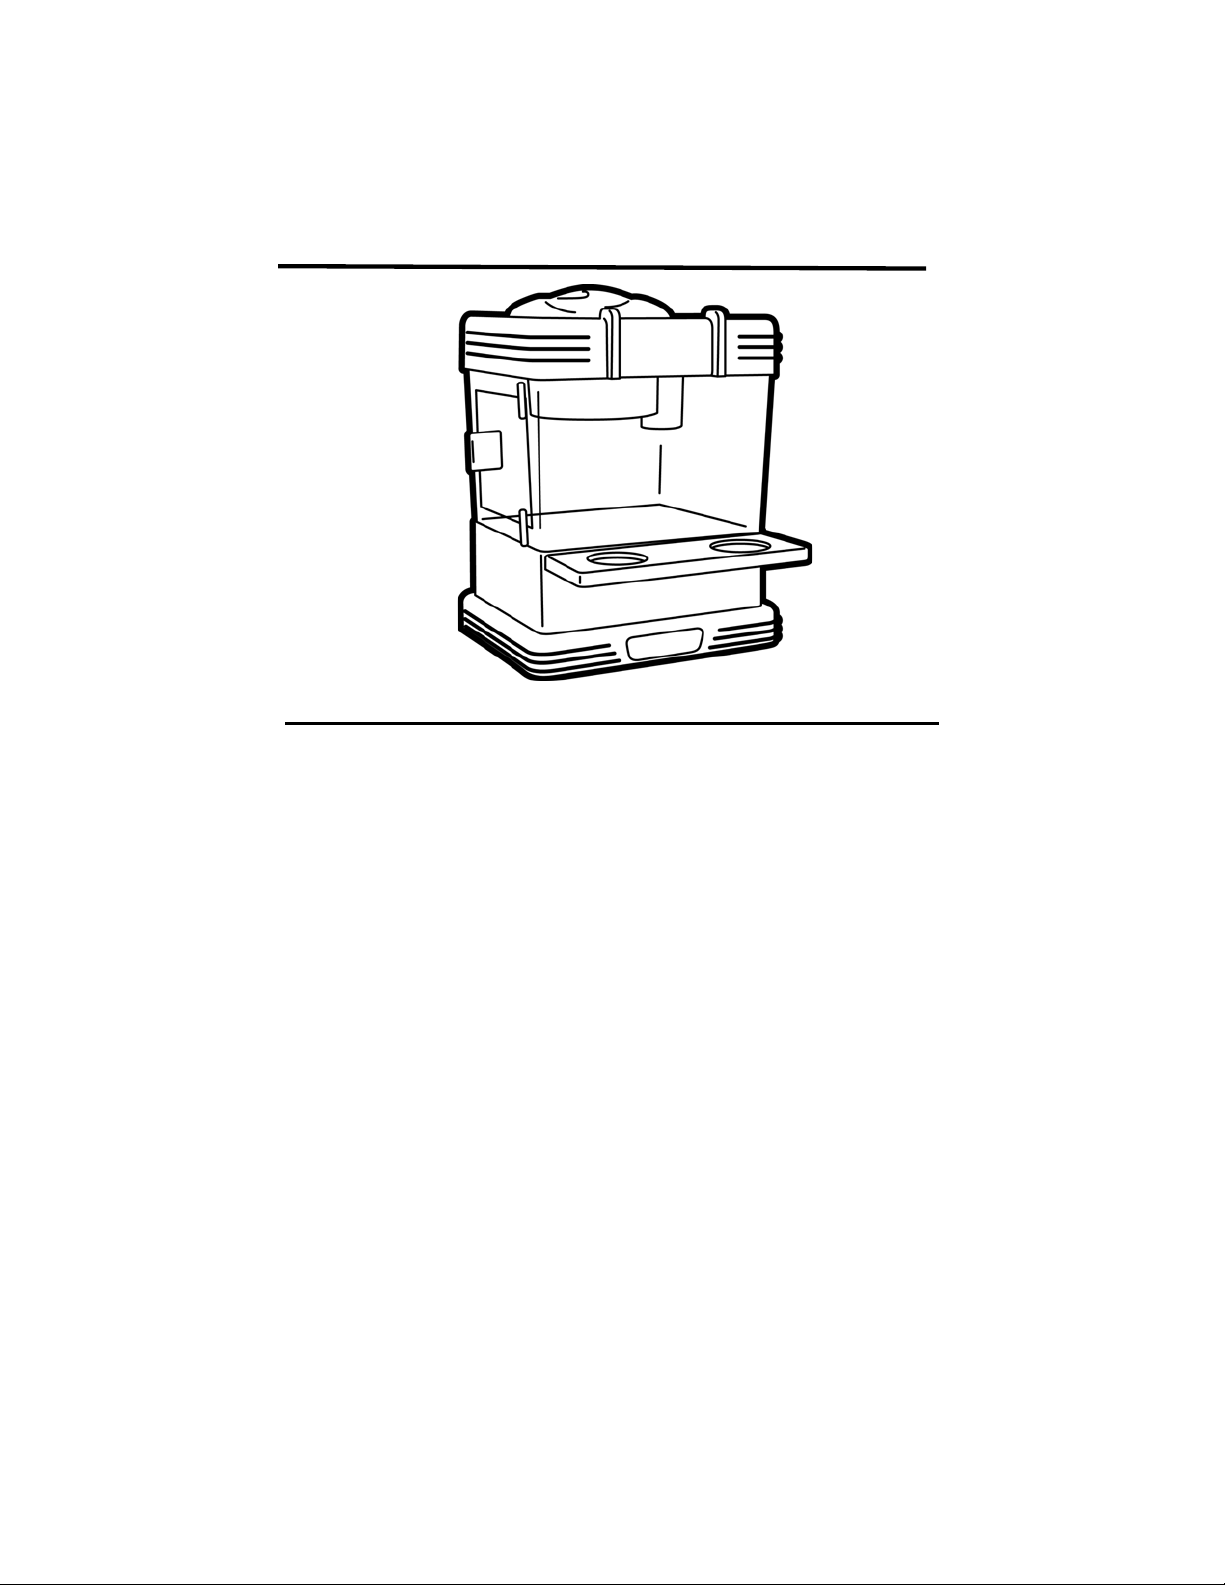
ILLUSTRATION D
Showing designed use of cone shelf and
Plastic cone holders. (Paper cones not
Included)
Whatever you create, we are sure the RETRO SNOW CONE MACHINE™ will make it fun
for the whole family!
Page 6

ENGLISH 5
CLEANING
1. Make sure unit is unplugged before cleaning.
NOTE: The top of the unit (housing the motor and electrical cord) is easily removed
making the inside of the shaved ice collection chamber accessible.
2. Lift off and remove the top housing lid and clean and dry inside shaved ice
colle ction chamber of the unit.
3. The Ice Feed Insert, Ice Shaving Canister, Locking Cap and Clear Power Control
Lid are dishwasher safe.
IMPORTANT The Ice Shaving Canister Blade is very sharp! When c lea ni ng an d handling ,
use EXTREME CAUTION!
4. Use slightly damp, non-abrasive sponge, cloth or towel to wipe clean outside of
The shelf on the outside of the unit is also removable for washing.
unit, dry wi th a no n- a brasive cloth.
Display your RETRO SNOW CONE MACHINE™ with pride and have a cool day!
RECIPES
Your RETRO SNOW CONE MACHINE makes light and fluffy mounds of shaved ice that
can be used t o mak e ;
SNOW CONES – Just add your choice of your favorite flavored
syrup. Add more than one flavor to increase the fun and vary
the flavor by creating Rainbow Snow Cones.
ILLUSTRATION E
Adding flavored syrup to your snow cone
SLUSH DRINKS
–Fill a glass with freshly shaved ice and add
your favorite soft drink, flavored tea or fruit juices.
FRUITY SLUSH
– Fill a mug with freshly shaved ice, add flavored syrup and top with
chopped fruit of your choice.
YOGURT SNOW
frozen, you can use your RETRO SNOW CONE MACHINE
– Pre - freeze your favorite flavored yogurt in ice cube trays. When
to shave the yogurt cubes
and make a refreshing, healthy treat. Add flavored syrup for even more flavor.
SNOW SMOOTHIES
– Freeze 6 ounces of milk in ice cube trays. Once the milk cubes are
frozen, use your RETRO SNOW CONE MACHINE to shave the milk cubes. Place the
shaved milk cubes and a handful of fresh strawberries (or your choice of fruit) in a blender.
Add 1 Tbs. of sugar for sweetness, blend until smooth to your desired consistency.
JUICY TREATS
– Freeze your favorite juice in ice cube trays, once they are frozen, use
your RETRO SNOW CONE MACHINE to shave the cubes and create a healthy, juicy
treat.
Use yo ur imagination
with different fruits, syrups, sodas, teas and juices to create any
number of refreshing, icy, healthy, low fat treats, drinks, and desserts that will delight kids
of any age
Page 7

ENGLISH 6
RETURNS & WARRANTY
SHOULD YOUR UNIT NOT WORK OR IS DAMAGED WHEN YOU FIRST TAKE IT OUT OF
THE BOX, PLEASE RETURN IT TO THE PLACE OF P URCHASE IMMEDIATELY.
Should you have any quest i ons, please cont act us via emai l or at the customer serv ice number
listed below between the h ours of 8:00 AM an d 5:00 PM, Monday through F riday, Central
Standard Time.
Distribut ed by:
Nostalgia Products Grou p LLC
1471 Partnership Dr.
Green Bay, WI 54304-5685
Customer Service
Phone: (920) 347-9122
Web: www.nostalgiaelectrics . com
To submit a Customer Service inquiry, go t o www.nostalgiaelectrics.com and fill out the
Customer Service Inquiry
form and click the Submit button. A representative will
contact you as soon as pos sible.
Customer Service Inquiry
RETRO SNOW CONE MACHINE™
RSM-602
Limited Wa rranty
This applianc e i s designed a nd bui lt to provide m any years of satisfactory performance under
normal household use. The dis tributor pl edges to the origi nal owner that should there be any
defects in material or workmanship during the first 90 days of purchase, we will repair or replace
the unit at our option. Our pledge does not apply to damages caused by shipping, mishandli ng or
unit being dropped. A product deemed def ective either f rom m anufacturing or being mishandled
is up to the di stributor’s discretion. To obtain service under this wa rranty, return this unit to
Nostalgia Products Grou p, LLC at the add ress above, shi ppi ng prepaid. Y ou m ust also incl ude a
copy of the ori gi nal receipt alo ng wi th your name, address and phone number. I nclude a
descripti on of the defect alo ng wi th the date y ou purchased th e product.
This warrant y does not apply to re-manufactured merchandise.
Please read these instruc tions carefull y. Failure to c om pl y with these instructions , damages
caused by im proper replacement parts , abuse or misus e will v oid this pledge to you and is being
made in plac e of al l other express ed warranties.
Page 8

Nostalgia Products Group LLC
1471 Partnership Dr.
Green Bay, WI 54304-5685
Visit Us Online at
www.nostalgiaelectrics.com
©2009 Nostalgia Products Group LLC
Rev. 6/16//09
 Loading...