

Page 1

All products are trademarks of Nostalgia Products Group, LLC.
Worldwide design & utility patented or patents pending.
2013
© 2011 Nostalgia Products Group, LLC.
www.nostalgiaelectrics.com
(rev. 11/20/13)
Page 2
SERIES
RIC100
Retro Series™ Ice Maker
Máquina de Hielo
Machine à glaçons
Instructions and Recipes
Instrucciones y recetas
Instructions et recettes
Page 3

Page 4

CONTENTS
IMPORTANT PRECAUTIONS . . . . . . . . . . . . . . . . . . . . . . . . . . . . . 3
IMPORTANT SAFEGUARDS . . . . . . . . . . . . . . . . . . . . . . . . . . . . . 3
INTRODUCTION . . . . . . . . . . . . . . . . . . . . . . . . . . . . . . . . . . . . 4
PARTS & ASSEMBLY . . . . . . . . . . . . . . . . . . . . . . . . . . . . . . . . . . 5
HOW TO OPERATE . . . . . . . . . . . . . . . . . . . . . . . . . . . . . . . . . . 5
HELPFUL TIPS . . . . . . . . . . . . . . . . . . . . . . . . . . . . . . . . . . . . . 7
CLEANING & MAINTENANCE . . . . . . . . . . . . . . . . . . . . . . . . . . . 7
RECIPES . . . . . . . . . . . . . . . . . . . . . . . . . . . . . . . . . . . . . . . . . 8
RETURNS & WARRANTY . . . . . . . . . . . . . . . . . . . . . . . . . . . . . . . 10
SAFETY
Your safety and the safety of others are very important.
We have provided many important safety messages in this manual and
on your appliance. Always read and obey all safety messages.
This is the safety alert symbol.
This symbol alerts you to potential hazards that
can kill or hurt you and others.
All safety messages will follow the safety alert symbol.
All safety messages will tell you what the potential hazard is, tell you how to reduce the
chance of injury, and tell you what can happen if the instructions are not followed.
ENGLISH
Appliance Specications:
115 Volts, 60 Hz
Ice Making Current - 1.9A, Ice Harvest Current - 2.7A
Refrigerant R134a, ETL Approved
2
Page 5
IMPORTANT PRECAUTIONS
1. NEVER immerse in water.
2. NEVER use near water.
3. NEVER use an abrasive sponge, cloth or scouring pad on the unit.
4. NEVER leave appliance unattended while in use.
ENGLISH
5. NEVER force the cover to lock.
6. Unplug unit from outlet when not in use and during cleaning.
7. DO NOT operate this appliance with a damaged cord or
plug, nor if the appliance ever malfunctions.
8. DO NOT clean any parts of this appliance in a dishwasher.
9. Keep out of reach of children.
10. This appliance is NOT A TOY.
11. Unsupervised young children and cognitively challenged
individuals should never operate this appliance.
12. Young children should be supervised while in proximity
of the appliance to ensure their safety.
IMPORTANT SAFEGUARDS
Basic safety precautions should always be followed when using
electrical appliances, including the following:
1. Read all instructions before operating this appliance.
2. To protect against electrical shock do not immerse cord, plug or
any part of this appliance in water or other liquids.
3. Close supervision is necessary when any appliance is used near children.
4. Unplug from outlet when not in use, before removing parts and before cleaning.
5. DO NOT clean unit with ammable liquids. The fumes can create a re hazard or
6. DO NOT operate any appliance with a damaged cord or plug, nor if
7. The manufacturer does not recommend the use of accessory
8. Position the appliance as close to the outlet as possible
9. DO NOT run the power cord over carpeting or heat insulators.
10. DO NOT let the cord hang over the edge of a table or counter top or touch hot surfaces.
11. DO NOT place on or near a hot gas or electric burner, or in a heated oven.
12. Extreme caution must be used when moving this appliance.
explosion.
the appliance has been damaged in any manner. Return the appliance
to the nearest repair shop for examination or repair.
attachments. Use of accessory attachments may cause injuries.
to prevent injury due to tripping over cord.
DO NOT cover the cord or submerge cord in water.
3
Page 6

13. DO NOT use the appliance for other than its intended use.
14. An appliance that is plugged into an outlet should not be left unattended.
15. Check Ice Hopper for presence of foreign objects prior to use.
16. DO NOT turn unit upside down while in use, or when lled with ice.
17. A short power supply cord is provided to reduce the risk resulting
from becoming entangled or tripping over a long cord.
18. Longer detachable power supply cords can be used if care is exercised in their use.
19. The marked electrical rating of an extension cord should be at
least as great as the electrical rating of the appliance.
20. This appliance has a polarized plug (one blade is wider than the other). To reduce the
risk of electrical shock, this plug is intended to t into a polarized outlet only one way.
21. Save these instructions!
INTRODUCTION
Thank you for purchasing The RETRO SERIES™ ICE MAKER from Nostalgia Electrics!
This stylish, portable ice maker has the look of classic diners of the 1950s. Designed
for counter top use to complement your kitchen, bar or oce, this ice machine can
produce up to 26 pounds of ice per day. Just plug in the RETRO SERIES™ ICE MAKER,
ll the reservoir with water and watch the ice maker go to work quickly and eciently
making perfect ice cubes. You’ll have your rst batch in as little as 15 minutes. Designed
for household use, but can be used indoors and outdoors in places such as:
• Family Room
• Oce
• Club House
• Kitchen
• Patio or Deck
ENGLISH
4
Page 7
PARTS & ASSEMBLY
ENGLISH
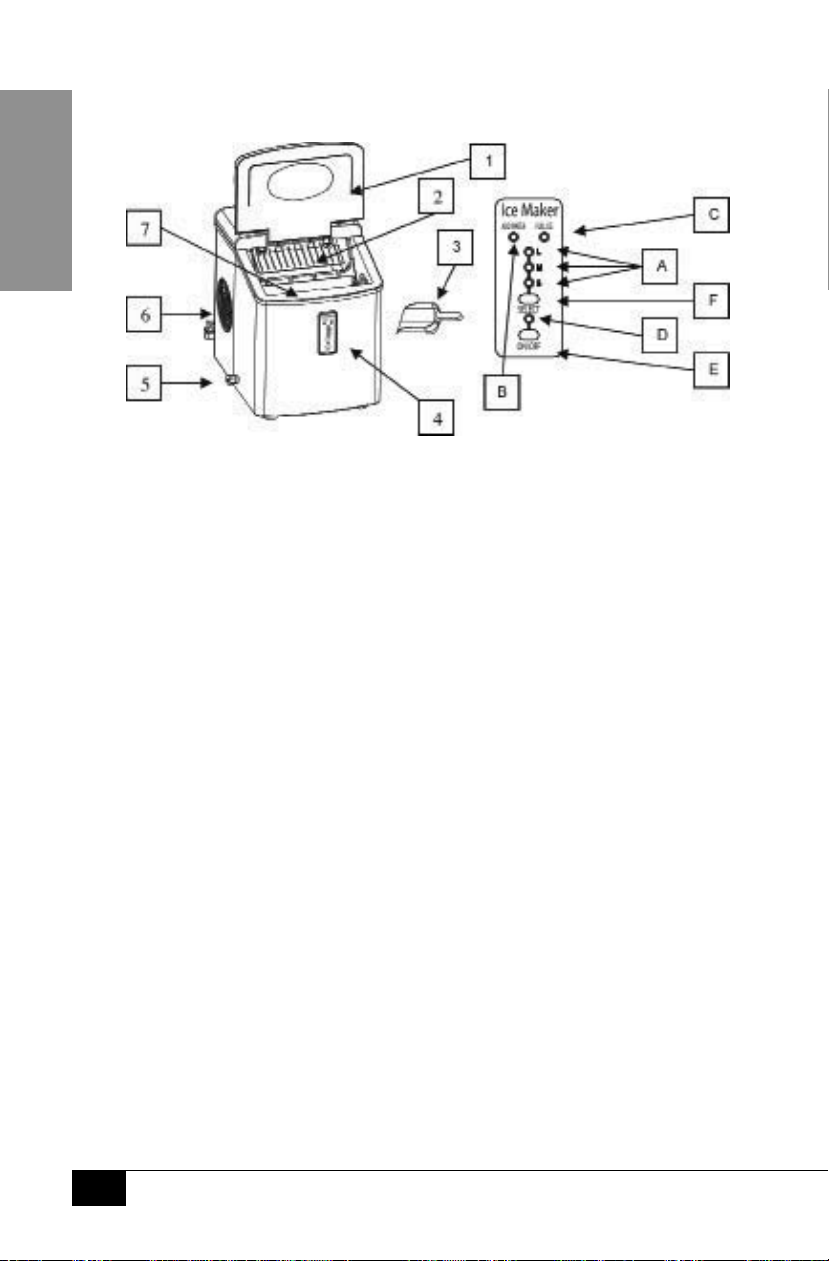
1. Cover: Has transparent window to allow interior visibility
2. Ice Scoop
3. Ice Shovel
4. Control Panel:
A. Display of selected ice size: Small, Medium or Large
B. Add Water Indicator (lights up when it is time to add water to Water Resevoir)
C. Ice Indicator (lights up when the Ice Basket is full)
D. Power Indicator
E. ON/OFF Power Button
F. Ice Size Button (press to select the size of ice cubes)
5. Water Drain Cap: For draining water from Water Reservoir
6. Air Outlet
7. Ice Basket
HOW TO OPERATE
BEFORE FIRST USE
1. Remove the exterior and interior packaging. Make sure that the Ice Basket and
Ice Scoop is included. If any parts are missing, please contact Customer Service at
the phone number listed on the Returns and Warranty page of this manual.
2. Take out the Ice Basket and clean it. Clean the interior using a soft
cloth and mixture of mild detergent and warm water.
3. Use the water to rinse the inside parts, and drain out the water
by unplugging the Water Drain Cap on the side.
4. Find a location for your RETRO SERIES™ ICE MAKER that is protected from
5
Page 8
direct sunlight and other sources of heat (i.e. stove, furnace, radiator). Place
the RETRO SERIES™ ICE MAKER on a at, level surface. Make sure that there is at
least 4 inches of empty space all around the RETRO SERIES™ ICE MAKER.
5. Allow one hour for the refrigerant uid to settle before
plugging the cord into an outlet for the rst time.
6. Conrm that the chosen location for placing your RETRO
SERIES™ ICE MAKER is near an electrical outlet.
CONNECTING YOUR RETRO SERIES™ ICE MAKER
Improper use of the grounded plug can result in the risk of electrical
shock. DO NOT use the machine If the power cord is damaged.
Plug your appliance into a properly installed, grounded wall outlet. Do not under any
circumstances, cut or remove the third (ground) prong from the power cord. Any questions
concerning power and/or grounding should be directed toward a certied electrician.
USING YOUR RETRO SERIES™ ICE MAKER
1. Open the cover, remove the Ice Basket and pour water into the
Water Resevoir. Keep the water level below the level mark.
2. Press ON/OFF Power Button on the Control Panel to begin the ice making cycle.
3. Select the desired size of the ice cubes by pressing the Ice Size Button. If the
room temperature is lower than 60°F (16°C), it is recommended to select the
small or medium sized ice cubes in order to keep ice from sticking together.
4. The ice making cycle lasts 6 to 15 minutes, depending on the size of
the ice cube selection and the ambient temperature. In the extreme
hot temperature, ice making time may vary considerably.
5. While the ice maker is on, verify water level periodically. If the water
pump cannot inject water, the RETRO SERIES™ ICE MAKER will stop
automatically, and the Add Water Indicator light will turn on.
6. Press the ON/OFF Power Button to turn the unit OFF, ll water up to the level
mark and press the ON/OFF Power Button again to turn the unit ON again.
7. The RETRO SERIES™ ICE MAKER automatically stops working when
the Ice Basket is full and the Ice Indicator light comes on.
8. Change the water in the Water Reservoir every 24 hours to ensure a reasonable
hygiene level. If the unit isn’t in use, drain all water left in the tank.
IMPORTANT NOTE: In the event that the RETRO SERIES™ ICE MAKER power is
disconnected during the ice making cycle or that the LED lights on the Control
Panel are blinking, press the ON/OFF Power Button to stop the ice making cycle.
Unplug the unit from the power source. Let the RETRO SERIES™ ICE MAKER sit for
a few minutes to let it warm up and allow ice to fall from the evaporator ngers.
Empty the Water Tray and wait three minutes before restarting the unit.
ENGLISH
DO NOT touch the Evaporator while the unit is in use or during the ice making
process. This could cause severe burns.
6
Page 9

HELPFUL TIPS
ADD WATER INDICATOR
If the Add Water Indicator comes on, try the following:
• Turn o the Ice Maker, add water and press the POWER Button again to restart the unit.
ENGLISH
• There may be too much ice. Turn o the Ice Maker,
remove some ice from the Ice Basket.
ICE CUBES STUCK TOGETHER
• The ice cycle may be too long. Stop the Ice Maker, then restart it when the
ice cubes melt. Select smaller sized ice cubes using the Ice Size Button.
• The water temperature in the Water Resevoir may be too low. Change the water
in the Water Resevoir. The temperature should be set between 45˚ F - 90˚ F.
ICE MAKER NOT WORKING
If the ice making cycle seems to be running properly, but
no ice is being made, try the following:
• The ambient temperature or water temperature in Water Resevoir may
be too high. The Ice Maker must be in an environment below 90˚ F. Try
pouring colder water (between 45˚ F - 90˚ F) into the Water Resevoir.
• If changing the water or allowing the Ice Maker to cool does not work, there
may be a leakage of the regrigerant uid, or a pipe in the cooling system may
be blocked. Please take the Ice Maker to a qualied technician for repair.
LED LIGHTS
• If the LED lights on the Control Panel are blinking, tere may be a disruption in the
power source. Press the ON/OFF Power Button to stop the ice making cycle. Let the Ice
Maker sit for a few minutes to let it warm up and allow ice to fall from the evaporator
ngers. Empty the Water Tray and wait three minutes before restarting the unit.
CLEANING & MAINTENANCE
Your RETRO SERIES™ ICE MAKER should be cleaned after each use.
This will help to maintain your unit for a long time.
• Unplug the unit.
• Take out the Ice Basket.
• Clean the interior with a soft cloth using warm water mixed with a mild detergent.
• Use warm water to rinse the interior, and drain out the water by unplugging the Drain Cap.
• The outside of the RETRO SERIES™ ICE MAKER should be cleaned regularly
with a soft cloth using a mild detergent mixed in warm water.
• Dry the interior and exterior with a non-abrasive soft cloth or towel.
• When the machine is not in use for a long time, always open the Water
Drain Cap and completely drain the water from the Water Reservoir.
7
Page 10
RECIPES
Your RETRO SERIES™ ICE MAKER can be used to instantly make ice cubes to be used for a
variety of beverages. Here are some delicious beverages that you can make at home.
STRAWBERRY LEMONADE
• 1 Cup Sugar
• 1 Cup Hulled
and Sliced Fresh
Strawberries
• 2 Cups Fresh
Squeezed
Lemon Juice
• 3 Cups Cold Water
• 12 oz. club
soda, chilled
MINT JULEPS
• 2 Cups Cold Water
• 2 Cups White,
Granulated Sugar
• ½ Cup Fresh Mint
Leaves, Chopped
• 32 fl. oz. Bourbon or
Kentucky Whisky
• Sprigs of Fresh Mint
Leaves for Garnish
Over a saucepan, bring two cups of water and
sugar to a boil. Reduce heat to a low simmer,
while stirring mixture until the sugar has dissolved
completely. Remove from heat and allow to cool.
Blend together remaining cup of water
and strawberries until pureed.
Pour sugar mixture into a pitcher and add
lemon juice. If you prefer, you may strain
lemon juice into pitcher to remove pulp.
Add strawberry puree to pitcher and stir until well mixed.
Put pitcher into refrigerator and allow to cool completely.
Add club soda to pitcher just before serving
and pour into glasses lled with ice made
with your RETRO SERIES™ ICE MAKER.
Make simple syrup by combining water, sugar and
chopped mint leaves in a small saucepan. Bring
to a boil over high heat for about ve minutes
until the sugar is completely dissolved.
Allow syrup to cool, approximately 1 hour. Pour
syrup through a strainer to remove mint leaves.
Fill eight glasses with ice from your RETRO
SERIES™ ICE MAKER and pour 4 ounces of
bourbon and ¼ cup simple syrup in each.
Garnish each cup with a mint sprig.
To make alcohol-free Mint Juleps, substitute
liquor with lemonade or iced tea.
ENGLISH
8
Page 11

SWEET TEA
• 2 Cups White,
Granulated Sugar
• 8 Cups Water
• 6 Teabags of Orange
Pekoe Black Tea
ENGLISH
SWEET ICED COFFEE
• 1½ Cup Dark
Brewed Coee
• ½ Cup Sweetened
Condensed Milk
• ½ Cup Half-and-Half
• ¼ Teaspoon Nutmeg
Pour water into a large pot. Bring water to boil over high
heat. When the water begins to boil, remove from heat,
and place the teabags in. Let steep for 5 to 6 minutes.
Pour the sugar into a large pitcher rst, then add the tea.
Stir until the sugar has completely dissolved.
Fill the pitcher half way with ice from your RETRO
SERIES™ ICE MAKER. Put pitcher into refrigerator
until it has cooled. Some of the ice will melt.
If desired, add cold water when ready to serve and stir.
Combine coee and condensed milk in a medium bowl.
Using a blender at a very low setting, add half-and-half
and nutmeg until well blended and a small froth forms.
Pour coee mixture into glass lled with ice
from your RETRO SERIES™ ICE MAKER.
Add additional sweetener or avored
syrup to taste, if desired.
ORANGE MARGARITAS ON THE ROCKS
• 2 Cups Sweet
and Sour Mix
• 1 Cup Triple Sec
• 1½ Cup Silver Tequila
• ¹/
3 Cup Orange Liquer
• ½ Cup Fresh
Squeezed
Orange Juice
• 2 Oranges, Quartered
9
In a blender, combine sweet and sour mix,
triple sec, tequila, fresh squeezed orange juice
and orange liquer. Blend until smooth.
Pour into glasses, squeeze an orange
wedge into each glass, and serve.
Pour salt onto a small plate, rub the rims of the 8
glasses with orange, and press them into the salt.
Fill the glasses with ice from your
RETRO SERIES™ ICE MAKER.
Pour margarita mixture into the glasses.
Garnish with an orange wedge.
Page 12

RETURNS & WARRANTY
SHOULD YOUR UNIT NOT WORK OR IS DAMAGED WHEN YOU FIRST TAKE IT OUT
OF THE BOX, PLEASE RETURN IT TO THE PLACE OF PURCHASE IMMEDIATELY.
RETRO SERIES™ ICE MAKER / RIC100 SERIES
Should you have any questions, please contact us via email or at the
customer service number listed below between the hours of 8:00 AM
and 5:00 PM, Monday through Friday, Central Standard Time.
Distributed by:
Nostalgia Products Group LLC
1471 Partnership Dr.
Green Bay, WI 54304-5685
Customer Service
Phone: (920) 347-9122
Web: www.nostalgiaelectrics.com
Customer Service Inquiry
To submit a Customer Service inquiry, go to www.nostalgiaelectrics.com and
ll out the Customer Service Inquiry form and click the Submit button.
A representative will contact you as soon as possible.
This appliance is designed and built to provide many years of satisfactory performance
under normal household use. The distributor pledges to the original owner that
should there be any defects in material or workmanship during the rst 90 days of
purchase, we will repair or replace the unit at our option. Our pledge does not apply
to damages caused by shipping, mishandling or unit being dropped. A product
deemed defective either from manufacturing or being mishandled is up to the
distributor’s discretion. In order to obtain service under this warranty, please contact
Nostalgia Products Group, LLC at the telephone number listed above or by lling
out the Customer Service Inquiry Form located at www.nostalgiaelectrics.com.
This warranty does not apply to re-manufactured merchandise.
Please read these instructions carefully. Failure to comply with these instructions,
damages caused by improper replacement parts, abuse or misuse will void this
pledge to you and is being made in place of all other expressed warranties.
For more information, visit us online at www.nostalgiaelectrics.com.
Like us on Facebook at www.facebook.com/NostalgiaElectrics.
Follow our boards on Pinterest at www.pinterest.com/nostalgiaelctrx.
Tweet along with us on Twitter at www.twitter.com/NostalgiaElctrx.
ENGLISH
10
Page 13

ESPAÑOL
11
11
Page 14

CONTENIDO
PRECAUCIONES IMPORTANTES . . . . . . . . . . . . . . . . . . . . . . . . . . 13
MEDIDAS IMPORTANTES . . . . . . . . . . . . . . . . . . . . . . . . . . . . . . . 13
INTRODUCCIÓN . . . . . . . . . . . . . . . . . . . . . . . . . . . . . . . . . . . . 14
PIEZAS Y ENSAMBLAJE . . . . . . . . . . . . . . . . . . . . . . . . . . . . . . . . 15
CÓMO FUNCIONA . . . . . . . . . . . . . . . . . . . . . . . . . . . . . . . . . . . 15
CONSEJOS ÚTILES . . . . . . . . . . . . . . . . . . . . . . . . . . . . . . . . . . . 17
LIMPIEZA Y MANTENIMIENTO . . . . . . . . . . . . . . . . . . . . . . . . . . . 17
RECETAS . . . . . . . . . . . . . . . . . . . . . . . . . . . . . . . . . . . . . . . . . 18
DEVOLUCIONES Y GARANTÍA . . . . . . . . . . . . . . . . . . . . . . . . . . . . 20
SEGURIDAD
Su seguridad y la de los demás son muy importantes.
Hemos proporcionado numerosos mensajes de seguridad importantes en este manual
y en su electrodoméstico. Siempre lea y obedezca todos los mensajes de seguridad.
Este es el símbolo de alerta de seguridad.
Este símbolo le previene de peligros potenciales que pueden
causar la muerte o lesiones a usted y a otras personas.
Todos los mensajes de seguridad estarán antecedidos por el símbolo de alerta.
Todos los mensajes de seguridad le dirán de qué peligro potencial se trata, cómo reducir
la posibilidad de lesiones y qué puede ocurrir si no se obedecen las instrucciones.
Especicaciones del electrodoméstico:
115 Volts, 60 Hz
Corriente para hacer hielo - 1.9A, Corriente para recoger hielo - 2.7A
Refrigerante R134a, aprobado por ETL
12
12
ESPAÑOL
Page 15

PRECAUCIONES IMPORTANTES
1. No lo sumerja NUNCA en agua.
2. No lo utilice NUNCA cerca del agua.
3. No utilice NUNCA una esponja, un paño abrasivo o un estropajo de acero con la unidad.
4. No deje NUNCA el aparato desatendido mientras esté en funcionamiento.
5. No fuerce NUNCA la tapa para cerrar.
6. Desconecte el aparato de la toma de corriente cuando no lo esté utilizando y para limpiarlo.
7. NO opere este aparato con un cable o enchufe dañados, ni si funciona incorrectamente.
8. NO introduzca ningún componente del aparato en un lavavajillas.
9. Manténgalo fuera del alcance de los niños.
10. Este aparato NO ES UN JUGUETE.
11. Este aparato no debe ser operado nunca por niños o personas
con limitaciones cognitivas que no estén supervisados.
12. Los niños pequeños deben supervisarse mientras que estén
cerca del aparato para garantizar su seguridad.
MEDIDAS IMPORTANTES
Cuando utilice aparatos eléctricos debe seguir siempre las
precauciones básicas de seguridad, entre las que se incluyen:
1. Lea todas las instrucciones antes de utilizar este aparato.
2. Como medida de protección contra el riesgo de descarga eléctrica, no sumerja el
cable, los enchufes ni ninguna otra parte del aparato en agua ni en otros líquidos.
3. Cuando cualquier aparato se utilice cerca de niños, es necesaria una supervisión estrecha.
4. Desenchufe el aparato de la red cuando no lo esté utilizando,
antes de retirar piezas y antes de su limpieza.
5. NO limpie la unidad con líquidos inamables. Los humos
pueden crear un riesgo de incendio o explosión.
6. NO utilice ningún aparato con el cable o el enchufe dañados, ni si el
aparato se ha dañado de cualquier manera. Devuelva el aparato al
taller de reparación más cercano para su examen o reparación.
7. El fabricante no recomienda el uso de implementos accesorios. El
uso de implementos accesorios puede provocar lesiones.
8. Posicione el aparato tan cerca de la toma de corriente como sea
posible para evitar lesiones por tropezar con el cable.
9. NO haga funcionar el cable de corriente sobre alfombras o aislantes
de calor. NO cubra el cable ni lo sumerja en agua.
10. NO permita que el cable cuelgue del borde de una mesa o encimera o toque supercies
calientes.
ESPAÑOL
13
13
Page 16

11. NO coloque el aparato sobre o cerca de un fogón de gas
o eléctrico o dentro de un horno caliente.
12. Debe tenerse extrema precaución cuando se mueva este aparato.
13. NO utilice el aparato para otro uso que no sea el cual para el que está destinado.
14. Un aparato que esté conectado a una toma de corriente no debe dejarse sin atención.
15. Antes del uso, revise la tolva de hielo para ver si tiene objetos extraños.
16. NO vire la unidad boca abajo mientras esté en uso, o cuando esté llena de hielo.
17. Se proporciona un cable de alimentación corto para reducir el
riesgo de enredarse o tropezar con un cable más largo.
18. Pueden usarse cables de alimentación desmontables
más largos si se tiene cuidado al utilizarlos.
19. Las características nominales del cable de extensión
deben ser al menos iguales a las del aparato.
20. Este aparato tiene un enchufe polarizado (una clavija es más ancha que la otra).
Para reducir el riesgo de descarga eléctrica, este enchufe se ha diseñado para
introducirse en una toma de corriente polarizada solo en una posición.
21. ¡GUARDE ESTAS INSTRUCCIONES!
INTRODUCCIÓN
¡Gracias por comprar la MÁQUINA DE HIELO DE LA SERIE RETRO de Nostalgia Electrics!
Esta elegante y portátil máquina de hielo se parece a los comensales clásicos de los
años cincuenta. Diseñado para usarlo en una encimera para complementar su cocina,
bar o en la ocina, esta máquina de hielo puede producir hasta 26 kilos de hielo por día.
Sólo tiene que conectar la MÁQUINA DE HIELO DE LA SERIE RETRO, llenar el depósito
de agua y ver cómo la maquina de hielo trabaja de manera rápida y ecaz para hacer
cubitos de hielo perfectos. Tendrá su primer lote en tan sólo 15 minutos. Está diseñado
para el hogar, pero puede utilizarse en interiores y al aire libre en lugares como:
• Habitación familiar
• Ocina
• Casa Club
• Cocina
• Patio o Cubierta
14
14
ESPAÑOL
Page 17

PIEZAS Y ENSAMBLAJE
1. Cubierta: Tiene una ventana transparente para permitir visibilidad interior
2. Cuchara para hielo
3. Pala para hielo
4. Panel de control:
A. Pantalla del tamaño de hielo seleccionado: Pequeño, mediano o grande
B. Indicador de agregar agua (se iluminará cuando
haya que agregar agua al depósito de agua)
C. Indicador de hielo (se encenderá cuando la cesta de hielo esté llena)
D. Indicador de corriente
E. Botón de corriente Encendido/Apagado
F. Botón Tamaño del hielo (pulse para elegir el tamaño de los cubitos de hielo)
5. Tapa de drenaje de agua: para drenaje del agua del depósito de agua
6. Salida de aire
7. Cesta de hielo
CÓMO FUNCIONA
ANTES DEL PRIMER USO
1. Retire el paquete exterior e interior. Asegúrese de que la cesta de hielo y la cuchara de hielo
se hayan incluido. Si falta alguna pieza, por favor comuníquese con Servicio al cliente al
número de teléfono que aparece en la página de Garantía y devoluciones de este manual.
2. Retire la cesta de hielo y límpiela. Limpie el interior con un paño
suave y una mezcla de detergente suave y agua tibia.
3. Use agua para enjuagar las piezas internas y drene el agua
al retirar el tapón de drenaje de agua al lado.
4. Encuentre un lugar para la MÁQUINA DE HIELO DE LA SERIE RETRO que está
ESPAÑOL
protegida de la luz solar directa y de otras fuentes de calor (es decir una
15
15
Page 18

estufa, un horno, un radiador). Coloque la MÁQUINA DE HIELO DE LA SERIE
RETRO en una supercie plana y nivelada. Vea que haya al menos 4” de
espacio vacío cerca de toda la MÁQUINA DE HIELO DE LA SERIE RETRO.
5. Deje una hora para que el refrigerante se asiente antes de
conectar el cable a una salida por primera vez.
6. El lugar elegido para situar la MÁQUINA DE HIELO DE LA
SERIE RETRO estará cerca de una salida.
CONEXIÓN DE LA MÁQUINA DE HIELO DE LA SERIE RETRO
El uso incorrecto de la toma de tierra puede resultar en riesgo de sufrir una
descarga eléctrica. NO utilice la máquina si el cable de corriente está dañado.
Conecte el aparato a una salida instalada correctamente y con toma de tierra. Bajo ninguna
circunstancia, corte o retire la tercera punta (tierra) del cable de corriente. Cualquier
pregunta sobre corriente y/o conexión a tierra debe dirigirse a un electricista calicado.
USO DE LA MÁQUINA DE HIELO DE LA SERIE RETRO
1. 1. Abra la tapa, retire la cesta de hielo y vierta agua en el depósito de
agua. Mantenga el nivel de agua por debajo de la marca de nivel.
2. 2. Pulse el botón de corriente Encendido/Apagado en el Panel
de Control para iniciar el ciclo de hacer hielo.
3. 3. Elija el tamaño deseado de los cubitos de hielo al pulsar el botón Tamaño del
hielo. Si la temperatura ambiente es inferior a 16°C (60 °F), se recomienda que elija
cubitos de hielo pequeños o medianos para evitar que se pegue junto el hielo.
4. 4. El hielo ciclo de hacer hielo dura de 6 a 15 minutos, según el tamaño de la
selección del cubito de hielo y la temperatura ambiente. A temperaturas muy
calientes, el tiempo de hacer hielo puede variar considerablemente.
5. 5. Mientras que la máquina de hielo esté encendida, verique el nivel de
agua periódicamente. Si la bomba de agua no puede inyectar agua, la
MÁQUINA DE HIELO DE LA SERIE RETRO se detendrá automáticamente,
y la luz indicadora de Agregar agua se encenderá.
6. 6. Pulse el botón de corriente Encendido/Apagado para apagar la unidad, llénela de agua
hasta la marca de nivel y pulse el botón de corriente de nuevo para encenderla otra vez.
7. 7. La MÁQUINA DE HIELO DE LA SERIE RETRO dejará de funcionar automáticamente
cuando la cesta de hielo esté llena y se encienda la luz indicadora del hielo.
8. 8. Cambie el agua en el depósito de agua cada 24 horas, a n de garantizar un nivel de
higiene razonable. Si la unidad no está en uso, drene toda el agua en el depósito.
NOTA IMPORTANTE: En caso de que desactive la corriente en la MÁQUINA DE HIELO
DE LA SERIE RETRO durante el ciclo de hacer hielo o cuando las luces LED en el Panel
de control estén destellando, pulse el botón de corriente Encendido/Apagado para
detener el ciclo de hacer hielo. Desconecte la unidad de la fuente de alimentación.
Deje que la MÁQUINA DE HIELO DE LA SERIE RETRO se asiente durante unos minutos
para que se caliente y permita que caiga el hielo de los dedos del evaporador. Vacíe
la bandeja de agua y espere tres minutos antes de volver a arrancar la unidad.
NO toque el evaporador mientras la unidad esté en uso o durante el proceso de
hacer hielo. Esto podría causar quemaduras graves.
16
16
ESPAÑOL
Page 19

CONSEJOS ÚTILES
INDICADOR DE AGREGAR AGUA
Si el indicador de Agregar agua se enciende, intente lo siguiente:
• Apague la maquina de hielo, agregue agua y pulse el botón de
encendido nuevamente para reiniciar la unidad.
• Puede que haya mucho hielo. Apague la máquina de hielo, retire algo de hielo de la cesta de
hielo.
CUBITOS DE HIELO PEGADOS
• El hielo ciclo puede ser muy largo. Detenga la máquina de hielo
y reiníciela cuando se derritan los cubitos. Elija cubitos de hielo
de tamaño pequeño con el botón Tamaño del hielo.
• La temperatura del agua en el depósito de agua puede ser muy baja. Cambiar el
agua en el depósito de agua. La temperatura debe estar entre 45° F - 90° F.
LA MÁQUINA DE HIELO NO FUNCIONA
Si el ciclo de hacer hielo parece funcionar adecuadamente,
pero no hay hielo, intente lo siguiente:
• La temperatura ambiente o temperatura del agua en la reserva de agua puede
ser muy alta. La máquina de hielo debe estar en un ambiente inferior a 90° F.
Pruebe vertiendo agua fría (entre 45° F - 90° F) en el depósito de agua.
• Si cambiar el agua o dejar que se enfríe la máquina de hielo no funciona, es posible que
haya una fuga de uido refrigerante o un tubo en el sistema de enfriamiento puede estar
bloqueado. Por favor, lleve la máquina de hielo a un técnico calicado para reparación.
LUCES LED
• Si las luces LED en el Panel de control destellan, es posible que haya una interrupción
en la fuente de alimentación. Pulse el botón de corriente Encendido/Apagado para
detener el ciclo de hacer hielo. Deje que la máquina de hielo se asiente durante unos
minutos para que se caliente y permita que caiga el hielo de los dedos del evaporador.
Vacíe la bandeja de agua y espere tres minutos antes de volver a arrancar la unidad.
LIMPIEZA Y MANTENIMIENTO
La MÁQUINA DE HIELO DE LA SERIE RETRO se debe limpiar después de
cada uso. Esto ayudará a mantener la unidad por un largo período.
• Desenchufe la unidad.
• Retire la cesta de hielo.
• Limpie el interior con un paño suave con agua caliente mezclada con un detergente suave.
• Use agua caliente para lavar el interior y drene el agua al retirar el tapón de drenaje.
• La parte exterior de la MÁQUINA DE HIELO DE LA SERIE RETRO debe limpiarse
regularmente con un paño suave con un detergente suave mezclado con agua tibia.
• Seque el interior y el exterior con una toalla o paño suave no abrasivo.
• Cuando la máquina no esté en uso durante un largo tiempo, siempre abra el tapón
de drenaje de agua y drene completamente el agua del depósito de agua.
ESPAÑOL
17
17
Page 20

RECETAS
La MÁQUINA DE HIELO DE LA SERIE RETRO se puede utilizar para hacer
instantáneamente cubitos de hielo que se usarán para una variedad de
bebidas. Aquí están algunas deliciosas bebidas que puede hacer en casa.
LIMONADA DE FRESA
• 1 taza de azúcar
• 1 taza de fresas
frescas cortadas y
descascaradas
• 2 tazas de jugo
de limón fresco
exprimido
• 3 tazas de agua fría
• 12 onzas de club
soda, enfriada
JULEPES DE MENTA
• 2 tazas de agua fría
• 2 taza de azúcar
blanco granulado
• 1/2 taza de
hojas de menta
frescas, picadas
• 32 onzas fluidas
de Whisky Borbón
o Kentucky
• Ramitas de hojas
de menta fresca
para decorar
En una cacerola, vierta dos tazas de agua y azúcar
para hervir. Reduzca el calor a fuego bajo, mientras
revuelve la mezcla hasta que el azúcar se haya disuelto
completamente. Retírela del calor y deje que se enfríe.
Mezcle la taza de agua restante con
las fresas hasta volverse puré.
Vierta la mezcla de azúcar en una jarra y agregar
jugo de limón. Si preere, puede colar jugo
de limón en el jarro para quitar la pulpa.
Agregue puré de fresas al jarro y revuelva
hasta estar bien mezclado.
Coloque el jarro en el refrigerador y
deje que se enfríe totalmente.
Agregue club soda al jarro antes de servir y
viértalo en vasos llenos de hielo hecho con la
MÁQUINA DE HIELO DE LA SERIE RETRO.
Haga un sirope simple al combinar agua, azúcar y
hojas de menta picadas en una cacerola pequeña.
Lleve a ebullición a fuego alto durante unos cinco
minutos hasta que el azúcar se disuelva totalmente.
Permita que el sirope se enfríe, aproximadamente
1 hora. Vierta el sirope a través de un colador
para eliminar las hojas de menta.
Llene ocho vasos de hielo de la MÁQUINA DE HIELO
DE LA SERIE RETRO y vierta 4 onzas de whisky Borbón
y 1/4 de taza de sirope simple en cada vaso.
Decore cada copa con una ramita de menta.
Para hacer julepes sin alcohol, sustituya
el licor con limonada o té helado.
ESPAÑOL
18
18
Page 21

TÉ DULCE
• 2 taza de azúcar
blanco granulado
• 8 Tazas agua
• 6 bolsitas de té negro
Orange Pekoe
CAFÉ CON HIELO DULCE
• 11/2 taza de café
colado oscuro
• 1/2 taza de leche
condensada
azucarada
• 1/2 taza de Halfand-Half
• 1/4 cucharadita de
nuez moscada
Vierta agua en una olla grande. Ponga el agua
a hervir a fuego alto. Cuando el agua comience
a hervir, retire la olla del fuego y deposite las
bolsitas. Deje que se remojen de 5 a 6 minutos.
Vierta el azúcar primero en un gran
jarro, luego agregue el té.
Revuelva hasta que el azúcar se haya
disuelto completamente.
Llene el jarro hasta la mitad de hielo de la
MÁQUINA DE HIELO DE LA SERIE RETRO.
Coloque el jarro en el refrigerador hasta que se
haya enfriado. Algo de hielo se derretirá.
Si lo desea, agregue agua fría cuando
esté listo para servir y revuelva.
Combine el café y la leche condensada
en un tazón mediano.
Con una batidora a muy baja velocidad, agregue
Half-and-Half y nuez moscada hasta que todo esté
bien mezclado y se forme algo de espuma.
Vierta la mezcla de café en el vaso con hielo de
la MÁQUINA DE HIELO DE LA SERIE RETRO.
Agregue edulcorante o jarabe con
sabor al gusto, si lo desea.
MARGARITAS NARANJAS EN LAS ROCAS
• 2 tazas de mezcla
dulce y amarga
• 1 taza de Triple Sec
• 11/2 taza de
Tequila Silver
• 1/3 taza de licor
de naranja
• 1/2 taza de jugo
de naranja recién
exprimido
• 2 naranjas
descuartizadas
ESPAÑOL
19
19
En una licuadora, combine la mezcla dulce y amarga, Triple
Sec, tequila, jugo de naranja recién exprimido y licor de
naranja. Mezcle hasta obtener una consistencia suave.
Viértalo en los vasos, inserte un gajo de
naranja en cada vaso y sirva.
Vierta sal en un plato pequeño, frote los bordes de
los 8 vasos con naranja y presiónelos en la sal.
Llene los vasos de hielo de la MÁQUINA
DE HIELO DE LA SERIE RETRO.
Vierta la mezcla de margarita en los vasos.
Adorne con un gajo de naranja.
Page 22

DEVOLUCIONES Y GARANTÍA
SI SU UNIDAD NO TRABAJA O ESTÁ DAÑADA CUANDO LA EXTRAE POR PRIMERA VEZ
DE LA CAJA, DEVUÉLVALA INMEDIATAMENTE AL LUGAR DONDE LA COMPRÓ.
MÁQUINA DE HIELO DE LA SERIE RETRO / SERIE RIC100
Si tiene preguntas, contacte con nosotros por correo electrónico o por el
número telefónico de servicio al cliente que aparece a continuación en el
horario de 8:00 AM a 5:00 PM, de lunes a viernes, Hora Estándar del Este.
Distribuida por:
Nostalgia Products Group LLC
1471 Partnership Dr.
Green Bay, WI 54304-5685
Servicio al cliente
Teléfono: (920) 347-9122
Web: www.nostalgiaelectrics.com
Solicitud de servicio al cliente
Para enviar una consulta el servicio de Atención al Cliente vaya a www.
nostalgiaelectrics.com, rellene un formulario de consulta para el Servicio
de Atención al Cliente y haga clic en el botón de Entregar (Submit).
Un representante le contactará tan pronto como sea posible.
Este electrodoméstico está diseñado y fabricado para proporcionar muchos años de
trabajo satisfactorio bajo un uso doméstico normal. El distribuidor se compromete con
el propietario original que si hay algún defecto en materiales o mano de obra durante
los primeros 90 días de la compra, repararemos o sustituiremos la unidad, según nuestra
elección. Este compromiso no se aplica a daños causados por el envío, mala manipulación
o caídas de la unidad. La determinación de si los defectos del producto son debidos
a la fabricación o a una mala manipulación, queda a la decisión del distribuidor. Para
realizar una reparación bajo esta garantía, póngase en contacto con Nostalgia Products
Group, LLC en el número de teléfono indicado anteriormente o rellenando el formulario
de consulta para el Servicio de Atención al Cliente en www.nostalgiaelectrics.com.
Esta garantía no se aplica a mercancía reelaborada.
Lea estas instrucciones cuidadosamente. El no cumplir con estas instrucciones,
los daños causados por piezas de repuesto inapropiadas, abuso o mal uso,
anularán este compromiso con usted y de todas las otras garantías expresas.
Para obtener más información, visítenos en línea en www.nostalgiaelectrics.com.
Véanos en Facebook en www.facebook.com/NostalgiaElectrics.
Siga a nuestros tableros en Pinterest en www.pinterest.com/nostalgiaelctrx.
Envíenos tweets en Twitter en www.twitter.com/NostalgiaElctrx.
ESPAÑOL
20
20
Page 23

ESPAÑOL
21
21
Page 24

TABLE DES MATIÈRES
IMPORTANTES MESURES DE PRÉCAUTION . . . . . . . . . . . . . . . . . . . 23
IMPORTANTES MISES EN GARDE . . . . . . . . . . . . . . . . . . . . . . . . . . 23
INTRODUCTION . . . . . . . . . . . . . . . . . . . . . . . . . . . . . . . . . . . . 24
PIÈCES ET ASSEMBLAGE . . . . . . . . . . . . . . . . . . . . . . . . . . . . . . . 25
MODE D'EMPLOI . . . . . . . . . . . . . . . . . . . . . . . . . . . . . . . . . . . 25
CONSEILS UTILES . . . . . . . . . . . . . . . . . . . . . . . . . . . . . . . . . . . 27
NETTOYAGE ET ENTRETIEN . . . . . . . . . . . . . . . . . . . . . . . . . . . . . 27
RECETTES . . . . . . . . . . . . . . . . . . . . . . . . . . . . . . . . . . . . . . . . 28
RETOURS DE LA MARCHANDISE ET GARANTIES . . . . . . . . . . . . . . . . 30
SÉCURITÉ
Votre sécurité tout comme celle des autres est importante.
Ce manuel contient plusieurs avis importants sur la sécurité lors de l’utilisation
de votre appareil. Lisez et respectez toutes les consignes de sécurité.
Ceci est le symbole d'avertissement de sécurité.
Ce symbole avertit des risques potentiels, pouvant entraîner
la mort ou des blessures, à vous ainsi qu'aux d'autres.
Tous les messages de sécurité seront suivis par ce symbole.
Tous les messages de sécurité vous alerteront des dangers potentiels, et
vous indiqueront comment minimiser les possibilités de blessures et des
conséquences qui en résulteraient si vous ne suivez pas les instructions.
FRANÇAIS
Fiche technique du produit :
115 Volts, 60 Hertz
Consommation de la machine à glaçon - 1,9 A, consommation pour le collecteur de glaçons
- 2,7 A.
Réfrigérant R134a, approuvé ETL
22
22
Page 25

IMPORTANTES MESURES DE PRÉCAUTION
1. NE JAMAIS plonger dans l'eau.
2. NE JAMAIS utiliser près d'une source d'eau.
3. NE JAMAIS utiliser d'éponge abrasive, chion ou tampon à récurer sur l'appareil.
4. NE JAMAIS laisser l'appareil sans surveillance en cours d'utilisation.
5. NE JAMAIS forcer le couvercle pour fermer.
6. Débranchez la prise de l'appareil lorsqu'il n'est pas utilisé et au moment du nettoyage.
7. NE JAMAIS utiliser cet appareil avec un cordon ou une prise
endommagée, ou si l'appareil fonctionne mal.
8. NE JAMAIS laver les pièces de l'appareil dans le lave-vaisselle.
9. Le tenir hors de portée des enfants.
10. Cet appareil n'est PAS UN JOUET.
11. Les enfants laissés sans surveillance et les personnes ayant une
décience cognitive ne devraient jamais utiliser cet appareil.
12. Pour des raisons de sécurité, les jeunes enfants qui sont à proximité
de l'appareil ne devraient pas être laissés sans surveillance.
MISES EN GARDE SÉCURITAIRES
IMPORTANTES
Des mesures de précaution de base devraient toujours être prises
FRANÇAIS
pendant l'utilisation d'appareils électriques, notamment:
1. Lisez toutes les consignes avant d'utiliser cet appareil.
2. Pour éviter les électrocutions, ne pas immerger le cordon, la
che ou l'appareil dans l'eau ou tout autre liquide.
3. Une surveillance étroite est nécessaire lorsque tout appareil
électrique est utilisé à proximité des enfants.
4. Avant de retirer les pièces et de les nettoyer, débrancher l'appareil lorsqu'il n'est pas utilisé.
5. NE PAS nettoyer l'appareil avec des liquides inammables. Les émanations
pourraient causer un feu ou une explosion.
6. NE PAS utiliser l'appareil avec un cordon ou une prise endommagée ni si l'appareil
est endommagé de quelque façon que ce soit. Retournez l'appareil à l'atelier
de réparation le plus près de chez vous pour qu'il soit inspecté ou réparé.
7. Le fabricant ne recommande pas l'utilisation d'accessoires.
L'usage d'accessoires pourrait causer des blessures.
8. Placez l'appareil aussi près que possible de la prise pour éviter
de trébucher sur le cordon et de se blesser.
9. NE PAS faire passer le cordon sur du tapis ou des calorifuges.
NE PAS couvrir le cordon ou l'immerger dans l'eau.
23
23
Page 26

10. NE PAS laisser le cordon pendre d'un bord de table, de
comptoir ou toucher à une surface chaude.
11. NE PAS laisser le cordon pendre d'un bord de table, de
comptoir ou toucher à une surface chaude.
12. Être extrêmement prudent lorsque vous déplacez cet appareil.
13. NE JAMAIS utiliser cet appareil pour un usage autre que celui auquel il est destiné.
14. Un appareil qui est branché dans une prise de courant
ne devrait pas être laissé sans surveillance.
15. Vériez qu'il n'y a aucun corps étranger dans la trémie à glaçons avant son utilisation.
16. NE PAS retourner l'appareil quand il est utilisé ou rempli de glaçons.
17. Un cordon d'alimentation court est fourni pour réduire le risque
de s'emmêler ou de trébucher sur un long cordon.
18. Un cordon d'alimentation plus long peut être utilisé avec prudence.
19. La capacité électrique d'une rallonge doit être supérieure
ou égale à la puissance électrique de l'appareil.
20. Cet appareil possède une che polarisée (une che est plus large que l'autre). Pour éviter
tout risque d'électrocution, cette che est conçue pour se brancher dans une prise polarisée.
21. Gardez ces instructions!
INTRODUCTION
Merci d'avoir acheté la MACHINE À GLAÇONS DE RETRO SERIES™ de Nostalgia Electrics!
Cette machine, élégante et portative, à glaçons à l'air des « diners » classiques des années
1950. Conçue pour compléter votre comptoir de cuisine, bar ou bureau, cette machine
de glaçons peut produire jusqu'à 26 livres de glaçons par jour. Branchez seulement la
MACHINE À GLAÇONS RÉTRO SERIES™, remplissez le réservoir d'eau et voyez la machine
à glaçons au travail rapidement et ecacement faire des cubes parfaits de glace.
Le premier lot sera prêt en 15 minutes seulement. Conçu pour l'usage domestique,
mais peut être utilisé à l'intérieur et à l'extérieur, dans les endroits comme :
• Salle familiale
• Bureau
• Club House
• Cuisine
• Patio ou terrasse
FRANÇAIS
24
24
Page 27

PIÈCES ET ASSEMBLAGE
1. Couvercle : A une fenêtre transparente pour permettre de voir à l'intérieure
2. Cuillère à glaçons
3. Pelle à glaçons
4. Panneau de commande :
A. Voyant pour indiquer la taille des glaçons : Petit, moyen et gros
B. Voyant pour rajouter de l'eau (s'allume quand il faut rajouter de l'eau au réservoir)
C. Le voyant de glaçons (s'allume quand le panier est plein)
D. Voyant d'alimentation
E. Touche de mise en marche « ARRÊT/MARCHE » (ON/OFF)
FRANÇAIS
F. Bouton pour la taille des glaçons (poussez pour choisir la taille des cubes de glaçons)
5. Bouchon de vidange d'eau : Pour vider l'eau du réservoir
6. Sortie d'air
7. Panier à glaçons
COMMENT LE FAIRE FONCTIONNER
AVANT LA PREMIÈRE UTILISATION :
1. Retirez l'emballage extérieur et intérieur. Vériez si le panier et la cuillère à glaçons
sont inclus. S'il manque des pièces, veuillez contacter le service à la clientèle au
numéro de téléphone mentionné à la page de retours et de garantie de ce manuel.
2. Retirez le panier à glaçons et nettoyez-le. L'intérieur de l'appareil doit être
nettoyé avec un chion doux et avec l'eau savonneuse douce et tiède.
3. Rincez avec de l'eau les pièces intérieures, et videz l'eau en
enlevant le bouchon de vidange d'eau, situé sur le côté.
4. Trouvez un endroit pour mettre la machine à glaçons RETRO SERIESTM à l'abri des rayons
du soleil et toutes autres sources de chaleur (c.-à-d. fourneau, four, radiateur). Placez la
machine à glaçons RETRO SERIES™ sur une surface plate et de niveau. Assurez-vous qu'il y
25
25
Page 28

ait au moins 4 pouces d'espace tout autour de la MACHINE À GLAÇONS RETRO SERIES™.
5. Accordez une heure pour que le uide réfrigérant se répartisse
avant de brancher le cordon pour la première fois.
6. Assurez-vous que l'endroit choisi pour mettre votre MACHINE À GLAÇONS
RETRO FABRICANT SERIETM soit près d'une sortie électrique.
BRANCHEZ VOTRE MACHINE À GLAÇONS RETRO SERIES™
Un mauvais branchement de la prise de mise à la terre peut résulter en une
électrocution. NE PAS utiliser la machine si le cordon d'alimentation est endommagé.
Branchez l'appareil à une prise murale bien installée et bien mise à la terre. La che de la
mise à la terre ne doit, en aucune circonstance, être coupée ou retirée. Pour toutes questions
concernant l'alimentation ou la mise à la terre, veuillez consulter un électricien certié.
UTILISATION DE VOTRE MACHINE À GLAÇONS RETRO SERIES™
1. Ouvrez le couvercle, enlevez le panier de glaçons et versez l'eau dans le
réservoir. Gardez le niveau d'eau en dessous de la marque de niveau.
2. Appuyez sur le bouton « MARCHE/ARRÊT » du panneau de commande
pour commencer le cycle de fabrication de glaçons.
3. Choisissez la taille des cubes de glaçons en poussant sur le bouton « Taille de glaçons
». Si la température ambiante est sous 60°F (16°C), on recommande de choisir
les petits ou moyens cubes de glaçons an d'éviter qu'ils collent ensemble.
4. Le cycle de fabrication de glaçons est de 6 à 15 minutes, selon la taille des
cubes sélectionnée et la température ambiante. Lors de température très
chaude, le temps de fabrication peut considérablement varier.
5. Lorsque la machine à glaçons est allumée, vériez le niveau d'eau périodiquement.
Si la pompe d'eau ne peut pas injecter d'eau, la MACHINE À GLAÇONS RETRO
SERIES™ s'arrêtera automatiquement, et le voyant pour ajouter l'eau s'allumera.
6. Appuyez sur le bouton « MARCHE/ARRÊT » pour arrêter l'unité, remplissez
d'eau jusqu'à la marque de niveau et appuyez à nouveau sur le bouton
« MARCHE/ARRÊT » pour que l'unité se mette en MARCHE.
7. La MACHINE À GLAÇONS RETRO SERIES™ s'arrêtera automatiquement lorsque
le panier à glaçons est plein et le voyant pour glaçons s'allumera.
8. Changez l'eau toutes les 24 heures dans le réservoir pour avoir une hygiène
raisonnable. Si vous n'utilisez pas l'unité , videz toute l'eau du réservoir.
REMARQUE IMPORTANTE : Au cas ou la MACHINE À GLAÇONS RETRO SERIES™ serait
débranchée pendant le cycle de fabrication de glaçons ou que les lumières DEL
clignotent sur le tableau de commande, appuyez sur le bouton « MARCHE/ARRÊT
» pour interrompre le cycle de glaçons. Débranchez l'unité de la prise de courant.
Laisser la MACHINE À GLAÇONS RETRO SERIES™ se reposer quelques minutes pour
se réchauer et permettre aux glaçons de tomber des bandes de l'évaporateur.
Vider le plateau d'eau et attendre trois minutes avant de rebrancher l'unité.
FRANÇAIS
NE PAS TOUCHER l'évaporateur pendant que l'appareil fonctionne ou pendant la
fabrication des glaçons. Cela pourrait provoquer de graves brulures.
26
26
Page 29

CONSEILS PRATIQUES
VOYANT « AJOUTER DE L'EAU »
Si le voyant « ajoutez de l'eau » s'allume, essayez ce qui suit :
• Arrêtez la machine à glaçons, ajoutez de l'eau et appuyez
sur le bouton pour redémarrer l'unité
• Il se peut qu'il y ait trop de glaçons. Arrêtez la machine, enlevez quelques glaçons du panier.
CUBES DE GLAÇONS COLLÉS ENSEMBLE
• Le cycle de glaçons pourrait être trop long. Arrêtez la machine, et
redémarrez lorsque les cubes de glaçons seront fondus. Choisissez la
taille des glaçons en poussant sur le bouton « Taille de glaçons ».
• La température de l'eau dans le réservoir pourrait être trop basse. Changez
l'eau du réservoir. La température devrait être réglée entre 45°F à 90°F.
LA MACHINE À GLAÇONS NE FONCTIONNE PAS
Si le cycle de la machine à glaçons semble bien fonctionner
mais ne fabrique pas de glaçons, essayez ce qui suit :
• La température ambiante ou la température de l'eau dans le réservoir pourrait être trop
haute. La machine à glaçons doit être dans un environnement ou la température est
moins de 90°F. Essayez de mettre de l'eau plus froide (entre 45°F à 90°F) dans le réservoir.
• Si changement d'eau ou le refroidissement de la machine à glaçons ne
fonctionne pas, il se peut qu'il y ait une fuite du uide réfrigérant, ou un
tuyau du système de refroidissement pourrait être bloqué. Veuillez amener
la machine à glaçons chez un technicien qualié pour la réparer.
LUMIÈRES DEL
• Si les lumières DEL sur le panneau de commande clignotent, il se peut qu'il ait eu une
panne de courant. Appuyez sur le bouton « MARCHE/ARRÊT » pour arrêter le cycle
FRANÇAIS
de fabrication de glaçons. Laisser la MACHINE À GLAÇONS RETRO SERIES™ se reposer
quelques minutes, se réchauer et permettre à la glace de tomber des bandes de
l'évaporateur. Vider le plateau d'eau et attendre trois minutes avant de rebrancher l'unité.
NETTOYAGE ET ENTRETIEN
Nettoyez VOTRE MACHINE À GLAÇONS RETRO SERIES™ après chaque
usage. Ceci aidera à prolonger la durée de vie de votre appareil.
• Débranchez l'appareil.
• Retirez le panier à glaçons et nettoyez-le.
• Nettoyez l'intérieur avec un chion doux en utilisant de
l'eau tiède mélangée à un détergent doux.
• Rincez avec de l'eau tiède les pièces intérieures, et videz
l'eau en enlevant le bouchon de vidange d'eau.
• L'extérieur de la MACHINE À GLAÇONS RETRO SERIES™ devrait être nettoyé régulièrement
avec un chion doux en utilisant un détergent doux mélangé à de l'eau tiède.
• Séchez l'intérieur et l'extérieur avec un chion doux non-abrasif ou une serviette.
• Quand la machine n'est pas utilisée pendant longtemps, toujours ouvrir le
bouchon de vidange d'eau et vider complètement l'eau du réservoir.
27
27
Page 30

RECETTES
Votre MACHINE À GLAÇONS RETRO SERIES™ peut être utilisée pour faire
instantanément des cubes à glaçons pour faire une variété de boissons. Voici
quelques boissons délicieuses que vous pouvez faire à la maison.
LIMONADE AUX FRAISES
• 1 tasse de sucre
• 1 tasse de fraises
fraiches décortiquées
et tranchées
• 2 tasses du jus
de citron frais
• 3 tasses d'eau froide
• 12 onces de club
soda, froid
Mettez dans une casserole deux tasses d'eau et du sucre et
amenez à ébullition. Réduisez le feu à basse température,
tout en remuant le mélange jusqu'à ce que le sucre soit
complètement fondu. Enlevez du feu et laissez refroidir.
Mélangez la tasse d'eau restante et les fraises
jusqu'à l'obtention d'une purée.
Versez le mélange de sucre dans un pichet et ajoutez
le jus de citron. Si vous préférez, vous pouvez ltrer le
jus de citron dans le pichet pour enlever la pulpe.
Ajoutez la purée de fraises dans le pichet et bien remuer.
Mettez le pichet dans le réfrigérateur et
laissez-le refroidir complètement.
Ajoutez le club soda dans le pichet juste avant de
servir et versez dans des verres remplis de glaçons faits
avec votre MACHINE À GLAÇONS RETRO SERIES™.
FRANÇAIS
JULEPS DE MENTHE
• 2 tasses d'eau froide
• 2 tasses de sucre
blanc granulé
• 1/2 tasse de
feuilles de menthe
fraiche, hachées
• 32 fl. oz. Bourbon ou
Kentucky Whisky
• Brins des feuilles
fraiches de menthe
pour garnir
Faites du sirop simple avec de l'eau, sucre et des
feuilles de menthe ciselées dans une petite casserole.
Portez à ébullition environ cinq minutes jusqu'à
ce que le sucre soit complètement fondu.
Laissez le sirop se refroidir, environ 1 heure. Versez le
sirop dans un tamis pour enlever les feuilles de menthe.
Remplissez huit verres avec des glaçons de votre
MACHINE À GLAÇONS RETRO SERIES™ et versez 4 onces
de bourbon et 1/4de tasse de sirop dans chacun.
Garnissez chaque verre avec un brin de menthe.
Pour faire du Juleps non-alcoolisé à la menthe, remplacez
l'alcool avec de la citronnade ou du thé glacé.
28
28
Page 31

THÉ SUCRÉ
• 2 tasses de sucre
blanc granulé
• 8 tasses d'eau
• 6 sachets de thé
Orange Pekoe
Thé noir
CAFÉ GLACÉ SUCRÉ
• 11/2 Tasses de
café fort infusé
• 1/2 Tasse de lait
condensé sucré
• 1/2 Tasse de
moitié-moitié
• 1/4 Cuillère à thé de
noix de muscade
FRANÇAIS
Versez de l'eau dans une grande casserole. Portez
l'eau à ébullition. Quand l'eau commence à
bouillir, retirez du feu et mettez les sacs de thé.
Les laisser infuser pendant 5 à 6 minutes.
Versez d'abord le sucre dans un grand
pichet, puis ajoutez le thé.
Mélangez jusqu'à ce que le sucre soit complètement fondu.
Remplir la moitié du pichet avec des glaçons
de votre MACHINE À GLAÇONS RETRO SERIES™.
Mettez le pichet dans le réfrigérateur jusqu'à ce
qu'il soit froid. Une partie des glaçons fondront.
Si désiré, ajoutez de l'eau froide quand
vous êtes prêt à servir et remuez.
Mélangez le café et le lait condensé dans un bol moyen.
En utilisant un mélangeur à basse vitesse, ajoutezle moitié-moitié et de la noix de muscade, bien
mélangé le tout jusqu'à il y ait une petite mousse.
Remplir le mélange de café dans un verre avec des glaçons
de la MACHINE À GLAÇONS DE RETRO SERIESTM.
Ajoutez du sucre ou du sirop aromatisé selon le goût.
ORANGE MARGARITAS SUR GLACE
• 2 tasses de mélange
aigre-doux
• 1 tasse de triple sec
• 11/2 tasses de
Silver Tequila
• 1/3 tasse de
liqueur d'orange
• 1/2 tasse de jus
d'orange frais
• 2 oranges en
quartiers
29
29
Dans un mixeur, mettez le mélange aigre-doux, triple
sec, tequila, jus d'orange frais et la liqueur d'orange.
Mélangez jusqu'à consistance homogène
Versez dans des verres, pressez une tranche
d'orange dans chaque verre et servez.
Versez du sel dans une petite assiette, frottez
les bords des 8 verres avec l'orange, et trempez
les rebords des verres dans le sel.
Remplissez les verres avec des glaçons de la
MACHINE À GLAÇONS DE RETRO SERIESTM.
Versez le mélange de margarita dans les verres.
Garnir avec une tranche d'orange.
Page 32

RETOURS DE LA MARCHANDISE ET GARANTIES
SI L'UNITÉ NE FONCTIONNE PAS OU SI ELLE EST ENDOMMAGÉE AU MOMENT DE LE SORTIR
DE SON EMBALLAGE, LA RETOURNÉE IMMÉDIATEMENT LÀ VOUS L'AVEZ ACHETÉE.
MACHINE À GLAÇONS RETRO SERIES™/ SÉRIE RIC100
Pour toutes questions, communiquez par courriel ou téléphonez au numéro du service
à la clientèle, entre 8 h et 17 h, du lundi au vendredi, heure normale du Centre.
Distribué par:
Nostalgia Products Group LLC
1471 Partnership Dr.
Green Bay, WI 54304-5685
Service à la clientèle
Téléphone : (920) 347-9122
Web : www.nostalgiaelectrics.com
Question pour le service à la clientèle
Pour soumettre une question au service à la clientèle, veuillez visiter
le site www.nostalgiaelectrics.com et remplissez le formulaire du
service à la clientèle puis cliquez sur la touche soumettre.
Un représentant vous contactera dans les plus brefs délais.
Cet appareil est conçu pour orir plusieurs années d'utilisation et de satisfaisante, et
ce, sous de conditions normales d'utilisation. Le grossiste exige que le propriétaire
d'origine se doive de faire réparer ou changer l'appareil à sa discrétion, advenant
en cas de défectuosités des matériaux ou des pièces durant les 90 premiers jours
après la date d’achat. Ceci ne s'applique nullement pour les dommages causés
durant le transport, une mauvaise utilisation de l'appareil ou le fait de laisser tomber
l'appareil. Un produit jugé défectueux en raison de la fabrication ou d'une mauvaise
manipulation est laissé à la discrétion du distributeur. Pour obtenir un service basé
sous garantie, veuillez communiquer avec Nostalgia Products Group, LLC au numéro
de téléphone ci-dessus ou remplir le formulaire de demande de renseignements
auprès du service à la clientèle sur le site Web : www.nostalgiaelectrics.com.
Cette garantie ne s’applique nullement à la marchandise réusinée.
Veuillez lire ces instructions attentivement. À défaut de vous conformer à ces
instructions, tous dommages causés par un mauvais remplacement de pièces,
abus ou mauvaise utilisation de l’appareil annulera toute promesse faite à
votre égard, et prévaudra sur toute autre garantie, implicite ou expresse.
Pour de l'information supplémentaire, visitez le site Web www.nostalgiaelectrics.com.
Dire « J'aime » sur Facebook sur le site Web www.facebook.com/NostalgiaElectrics.
Suivez nos conseils sur Pinterest à l'adresse www.pinterest.com/nostalgiaelctrx
Tweetez avec nous sur Twitter à l'adresse www.twitter.com/NostalgiaElctrx
FRANÇAIS
30
30
 Loading...