

Page 1

All products are trademarks of Nostalgia Products Group, LLC.
Worldwide design & utility patented or patents pending.
© 2012 Nostalgia Products Group, LLC.
www.nostalgiaelectrics.com
(rev. 03/28/14)
2014
Page 2
RSM650
RETRO SERIES™ Slush Machine
Máquina de Hielo Picado
Machine à barbotine
Instructions and Recipes
Instrucciones y recetas
Instructions et recettes
Page 3

Page 4
ENGLISH
2
Make every day a party!
Visit www.nostalgiaelectrics.com for more fun products.
CONTENTS
IMPORTANT PRECAUTIONS . . . . . . . . . . . . . . . . . . . . . . . . . . . . . 3
IMPORTANT SAFEGUARDS . . . . . . . . . . . . . . . . . . . . . . . . . . . . . 3
INTRODUCTION . . . . . . . . . . . . . . . . . . . . . . . . . . . . . . . . . . . . 4
PARTS & ASSEMBLY . . . . . . . . . . . . . . . . . . . . . . . . . . . . . . . . . . 5
HOW TO OPERATE . . . . . . . . . . . . . . . . . . . . . . . . . . . . . . . . . . 6
HELPFUL TIPS . . . . . . . . . . . . . . . . . . . . . . . . . . . . . . . . . . . . . 7
CLEANING & MAINTENANCE . . . . . . . . . . . . . . . . . . . . . . . . . . . . 7
RECIPES . . . . . . . . . . . . . . . . . . . . . . . . . . . . . . . . . . . . . . . . . 8
RETURNS & WARRANTY . . . . . . . . . . . . . . . . . . . . . . . . . . . . . . . 10
SAFETY
Appliance Specications:
120 Volts, 60 Hz
20 Watts, ETL Approved
Your safety and the safety of others is very important.
We have provided many important safety messages in this manual and
on your appliance. Always read and obey all safety messages.
This is the safety alert symbol.
This symbol alerts you to potential hazards that
can kill or hurt you and others.
All safety messages will follow the safety alert symbol.
All safety messages will tell you what the potential hazard is, tell you how to reduce the
chance of injury, and tell you what can happen if the instructions are not followed.
Page 5

ENGLISH
3
IMPORTANT PRECAUTIONS
1. NEVER immerse the base or cord in water.
2. NEVER use near water.
3. NEVER leave unit unattended if used near children.
4. NEVER use a scouring pad on the appliance.
5. NEVER use an abrasive sponge or harsh cleaning products on or inside of the appliance.
6. NEVER use for anything other than what this item was originally intended.
7. Avoid contact with moving parts.
8. DO NOT operate this appliance with a damaged cord or plug,
or in the event the appliance ever malfunctions.
9. DO NOT place parts in dishwasher.
10. Keep out of reach of children.
11. Unplug appliance from electrical outlet when not in use and before
cleaning. Remove plug by gripping the plug body and pulling out
of the outlet. Never yank or twist cord to unplug the unit.
12. This appliance is NOT A TOY.
13. This appliance is not intended for use by young children or
cognitively challenged individuals without supervision.
IMPORTANT SAFEGUARDS
When using electrical appliances, basic safety precautions should always be followed,
including:
1. Read all instructions before operating this appliance.
2. NEVER put ngers or utensils into feed or discharge areas.
3. Keep hands and utensils out of container while blending to reduce
the risk of severe personal injury or damage to the appliance.
4. To protect against electrical shock do not immerse cord,
plug or main unit in water or other liquids.
5. Close supervision is necessary when any appliance is used by or near children.
6. Unplug from outlet when not in use and before removing parts for cleaning.
7. DO NOT operate any appliance with a damaged cord or plug or if the
appliance has been damaged in any manner. Return the appliance
to the nearest repair shop for examination or repair.
8. The manufacturer does not recommend the use of accessory
attachments. Use of attachments may cause injuries.
9. Blades are sharp. DO NOT touch.
10. DO NOT remove Lid when in use.
11. DO NOT let the cord touch hot surfaces.
Page 6

ENGLISH
4
12. DO NOT place on or near a hot gas or electric burner, or in a heated oven.
13. Extreme caution must be used when moving this appliance with liquids inside.
14. This unit must be on a level surface to operate properly.
15. DO NOT use this appliance for other than its intended use.
16. DO NOT leave unit unattended while in use or when plugged into an outlet.
17. Check inside of the Blending Chamber for foreign objects prior to use.
18. A short power supply cord is provided to reduce the risk resulting
from becoming entangled or tripping over a long cord.
19. Extension cord can be used if care is exercised in use.
20. The marked electrical rating of an extension cord should be at
least as great as the electrical rating of the appliance.
21. This appliance has a polarized plug (one blade is wider than the other). To reduce the
risk of electrical shock, this plug is intended to t into a polarized outlet only one way.
If the plug does not t fully into the outlet, reverse the plug. If it still does not t,
contact a qualied electrician. Do not attempt to modify the plug in any way.
22. Do not attempt to service this appliance yourself, as opening or
removing covers may expose you to dangerous voltage or other
hazards. Refer all servicing to qualied service personnel.
23. Always operate the appliance with cover in place.
24. Make sure the Blending Chamber is properly attached to the base before turning on unit.
SAVE THESE INSTRUCTIONS!
INTRODUCTION
Thank you for purchasing the RETRO SERIES™ SLUSH MACHINE from Nostalgia
Electrics™! This frozen drink maker will add thirst-quenching fun to any occasion! It
not only makes fantastic frozen soda drinks, but can also mix up batches of your other
favorite frosty beverages such as daiquiris and fruit-avored slushes for the kids!
Your RETRO SERIES™ SLUSH MACHINE has a generous, one quart (32-ounce),
clear mixing chamber and is ideal for small groups. It features an attractive, slim,
upright design that will take a limited amount of space on the counter.
Features include:
• Tank detaches from base for easy cleanup
• Cup rest also catches drips
• Easy pour spout & convenient cord storage
Page 7
ENGLISH
5
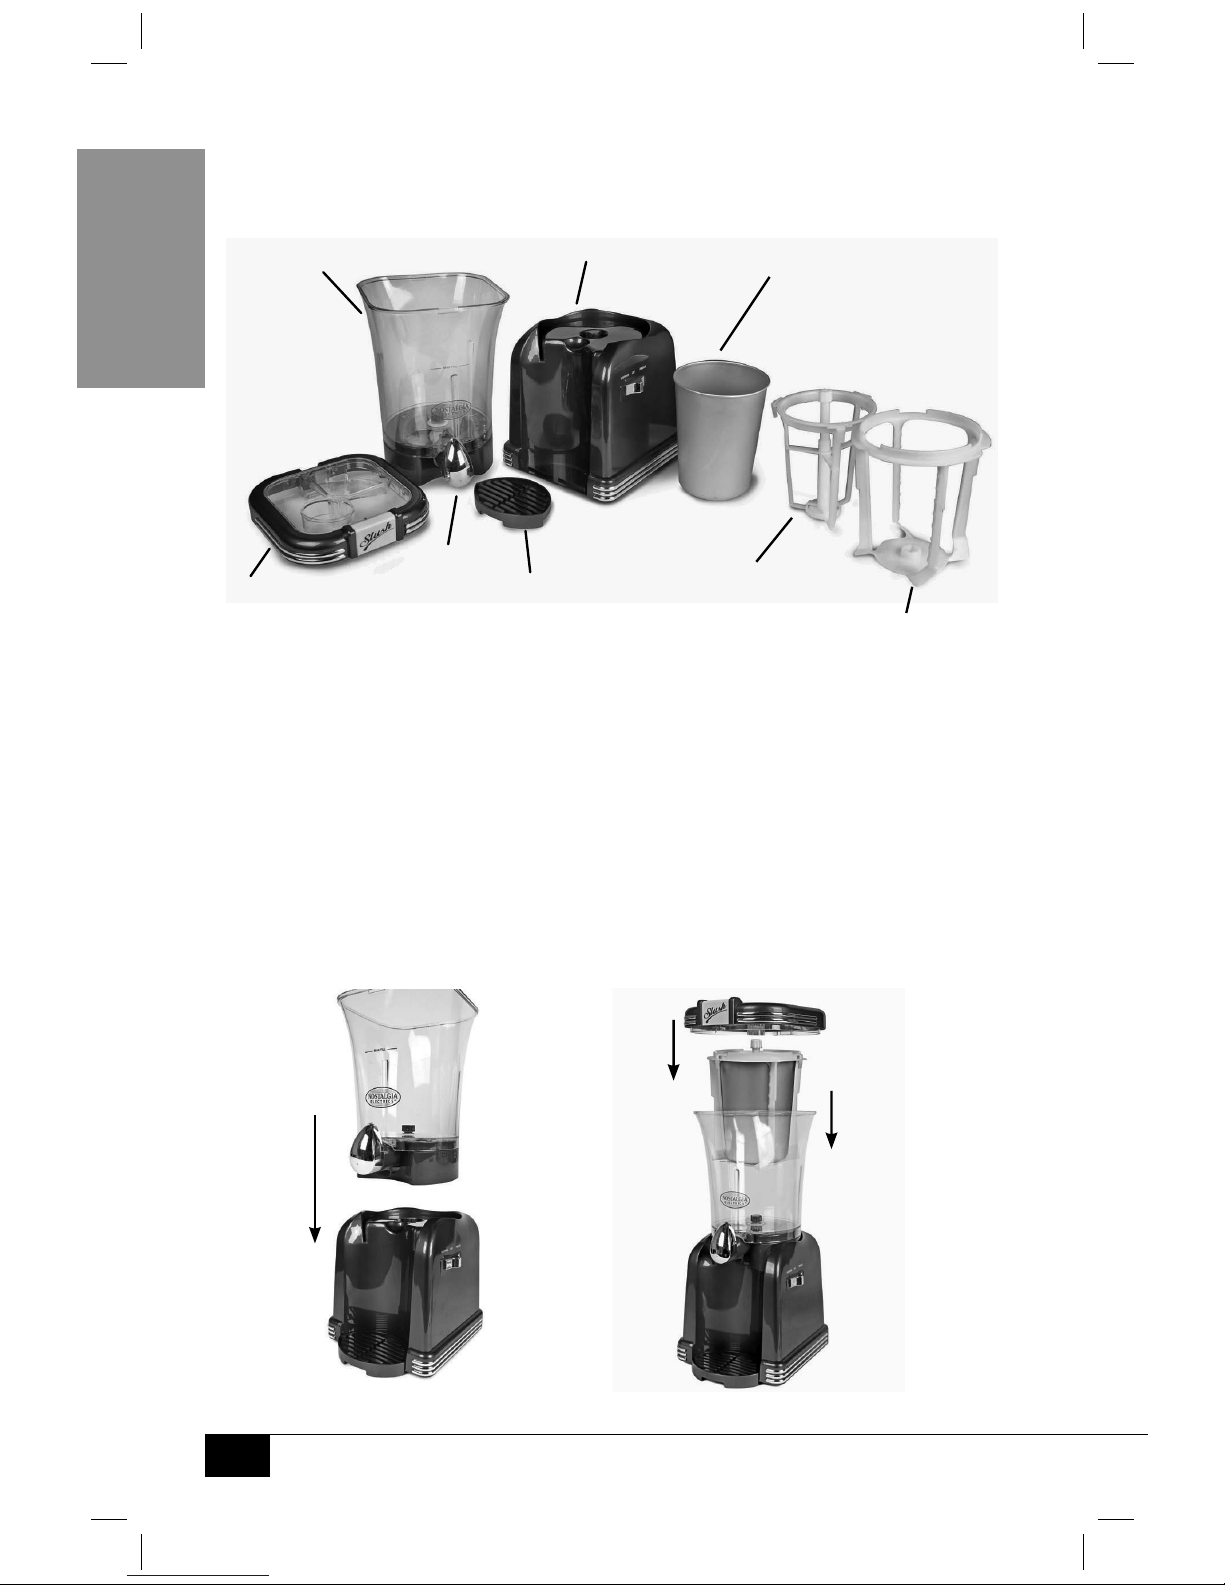
PARTS & ASSEMBLY
Parts
After Taking the Unit Out of the Box
Wipe down the RETRO SERIES™ SLUSH MACHINE exterior with a clean, non-abrasive
cloth or sponge. Thoroughly wash Blending Chamber, Aluminum Cylinder, Cylinder
Cage and Lid in warm, sudsy water and thoroughly dry. DO NOT put the Base in water.
Assembly
1. After drying, rmly attach Blending Chamber to Base by placing the
Blending Chamber on top of Base. If Blending Chamber is attached properly,
it will be aligned with Base so that the Spout is over the Drip Tray.
2. Next, put Mixing Mechanism inside of Aluminum Cylinder and put Aluminum Cylinder
inside of Cylinder Cage. Then place Cylinder assembly inside of Blending Chamber.
1. 2.
Blending Chamber
Drip Tray
Base
Blending Chamber
Lid
Spout
Aluminum Cylinder
Cylinder Cage
Mixing Mechanism
Page 8
ENGLISH
6
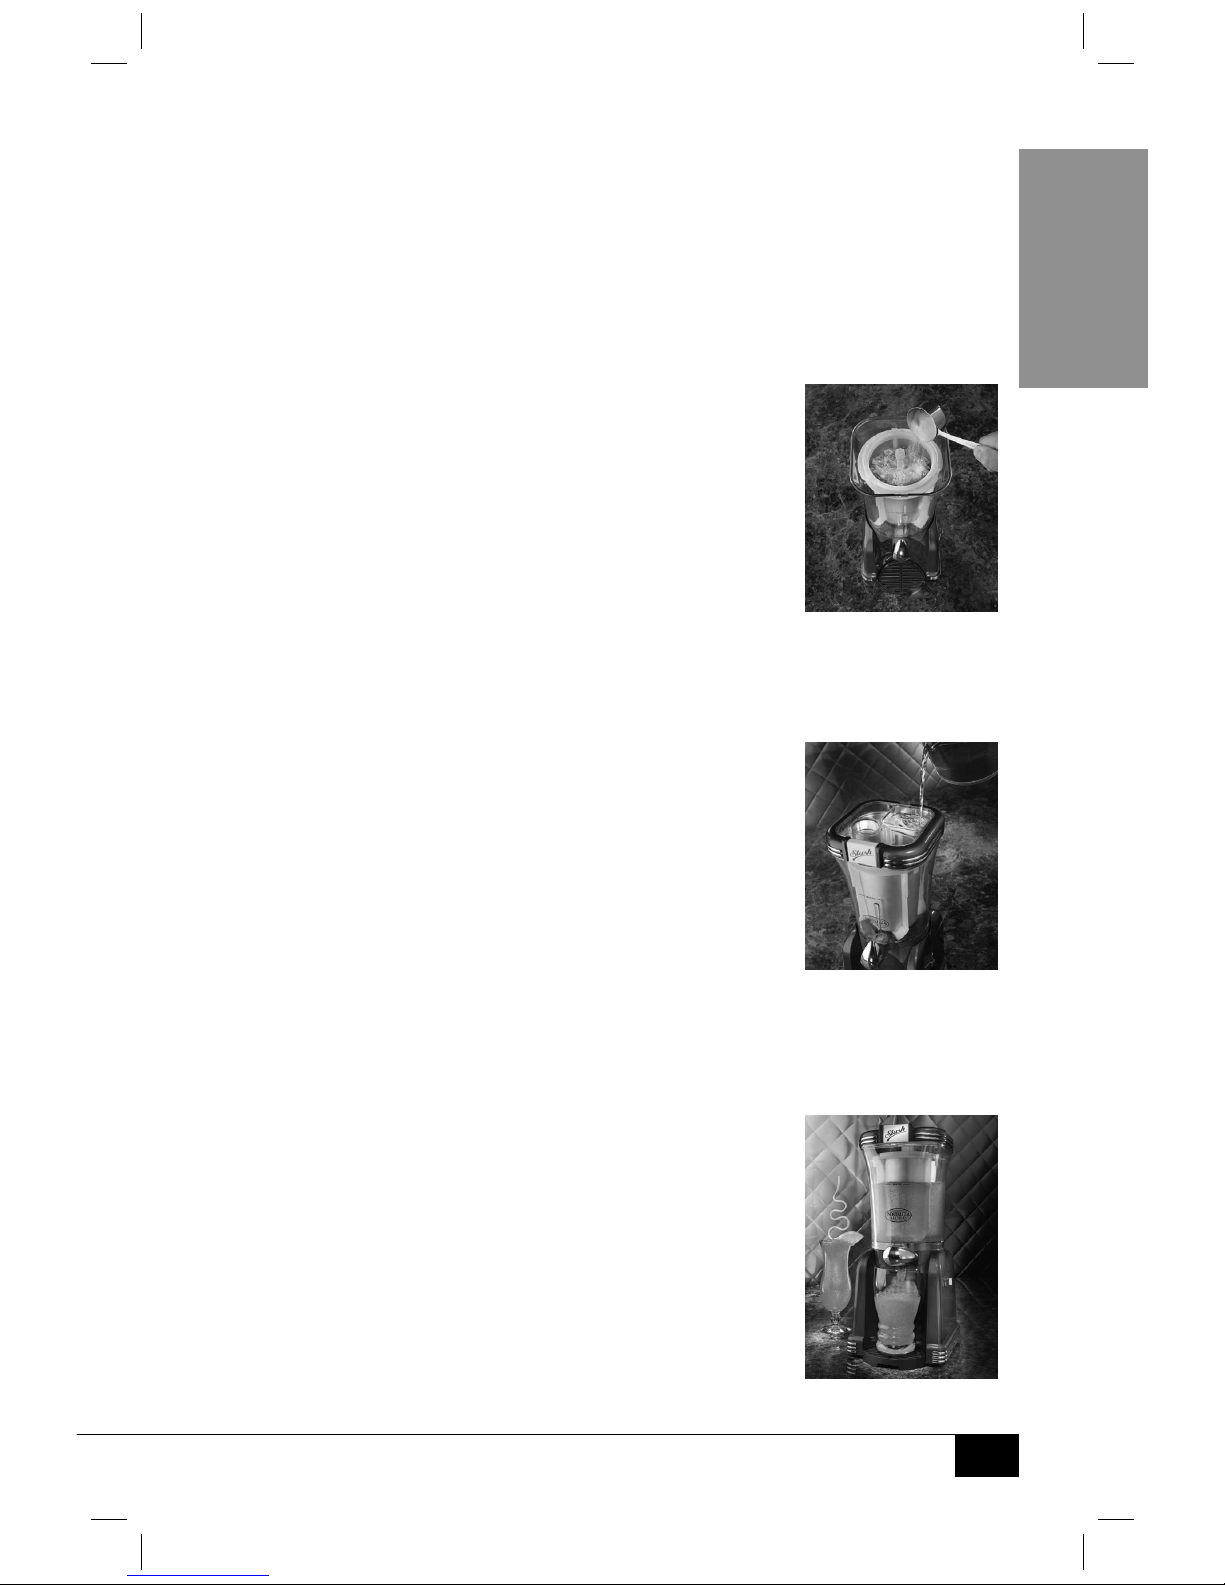
HOW TO OPERATE
1. First, nd a stable, waterproof surface near an electrical outlet before
starting. Make sure the cord is away from any water source.
2. DO NOT place the RETRO SERIES™ SLUSH MACHINE near the edge of a table or countertop.
3. Remove the Blending Chamber Lid by pinching the lock tab together
while lifting up on the Lid and carefully unhinging the front.
4. Fill the Aluminum Cylinder with small or broken pieces of ice through opening labeled
ICE AND SALT, to within 1 inch of the Aluminum Cylinder top.
Ensure that the Spout is in the closed position to avoid spillage.
5. Add ½ cup of regular table salt and ½ cup of water in the
Aluminum Cylinder (be sure to add salt rst then water in order
to mix well). Salt is necessary for the freezing process. It may
take ½ cup of salt or more for your slush to freeze properly.
Return the Lid to Blending Chamber, making sure it is aligned
properly over the mixing mechanism, locked down securely
to the clear mixing chamber, and lid is latched securely.
6. Slide the ON/OFF switch back to FREEZE to
turn the unit on and begin the slush making process. DO NOT turn the
unit OFF during use as the Aluminum Cylinder may freeze.
7. Pour your selected beverage directly into the unit through the molded square
indention located on the top of your RETRO SERIES™ SLUSH MACHINE. DO NOT ll
beyond the MAX FILL line (approximately 1 qt. of liquid).
Sugar-free beverages and alcoholic beverages will
not freeze. DO NOT use them in the machine.
NOTE: Do not use the slush maker to freeze liquids
without any sugar (such as water), as this may damage the
appliance. Water will freeze very quickly to the exterior
of the ice cylinder and could damage the unit.
8. Allow the mixture to blend for up to 15 minutes
until you reach the desired slush consistency.
NOTE: You can continually add ice and salt to the unit as you are creating slush by
dropping ice and salt into the round, open hole in the Lid above the Aluminum
Cylinder. DO NOT exceed lling the Aluminum Cylinder 1 inch from the top as
there is a risk that the slush mixture will become contaminated with salt.
9. When mixture reaches desired consistency, place cup under Spout and slide
the ON/OFF switch forward to DISPENSE. Turn the slush
dispenser handle to the right to dispense drink. Keep
unit running until all slush has been dispensed. Be sure
to turn handle back to CLOSE after lling each cup.
NOTE: If slush gets too thick, or does not dispense well,
add more liquid to the mixing chamber opening.
Page 9

ENGLISH
7
HELPFUL TIPS
• If Spout is sti during rst use, apply more force to turn the knob.
• Add more liquid to Blending Chamber if vacuum occurs around Cylinder during use.
• Blending Chamber must be rmly attached to Base or unit will not turn on.
• A towel placed under your RETRO SERIES™ SLUSH MACHINE, will
help with clean-up. You should expect some dripping.
• DO NOT store slush drinks in freezer or fridge. They should be consumed immediately.
• REMINDER: 32 ounces of liquid does not produce 32 ounces of slush.
You are creating slush and the liquid has solidied into ice.
Liquids
• Drinks with a high sugar or corn syrup base will crystallize faster and
produce a thicker slush than those with milk or lower sugar content.
Carbonated drinks will set up slower and will not be as thick.
• We recommend adding pre-chilled liquid to your RETRO SERIES™
SLUSH MACHINE. This will quicken the slush making process.
• Carbonated diet drinks and alcoholic beverages will not slush.
DO NOT add alcohol until the slush is poured into glasses.
• DO NOT use sti mixtures such as whipped cream or frozen liquids.
Mixture is Not Freezing
• DO NOT operate the unit longer than required. If after 15 minutes the
mixture has not yet achieved the slush consistency or has thawed again, do
not continue. Possible reasons for mixture not chilling or freezing:
1. The Aluminum Cylinder was not cold enough. Try adding more ice
and salt. Salt is a critical part of the freezing process and you will need
plenty of salt added to the ice for the slush to freeze properly.
2. The mixture was too warm.
3. Alcohol was added to the mixture. DO NOT add alcohol
until the slush is poured into glasses.
CLEANING & MAINTENANCE
1. After using your RETRO SERIES™ SLUSH MACHINE, disconnect from
electrical outlet. Remove plug by gripping the plug body and pulling
out of the outlet. Never yank or twist cord to unplug the unit.
2. Thoroughly wash the Blending Chamber, Aluminum Cylinder, Cylinder
Cage, Mixing Mechanism, Lid and Drip Tray in warm, sudsy water and
thoroughly dry. DO NOT put the Base in water. When needed, use a damp,
non-abrasive cloth to wipe exterior and then dry thoroughly.
3. Once washing and drying is complete, reassemble your RETRO SERIES™ SLUSH MACHINE.
4. NEVER immerse Base in water or put any parts in the dishwasher.
Page 10
ENGLISH
8
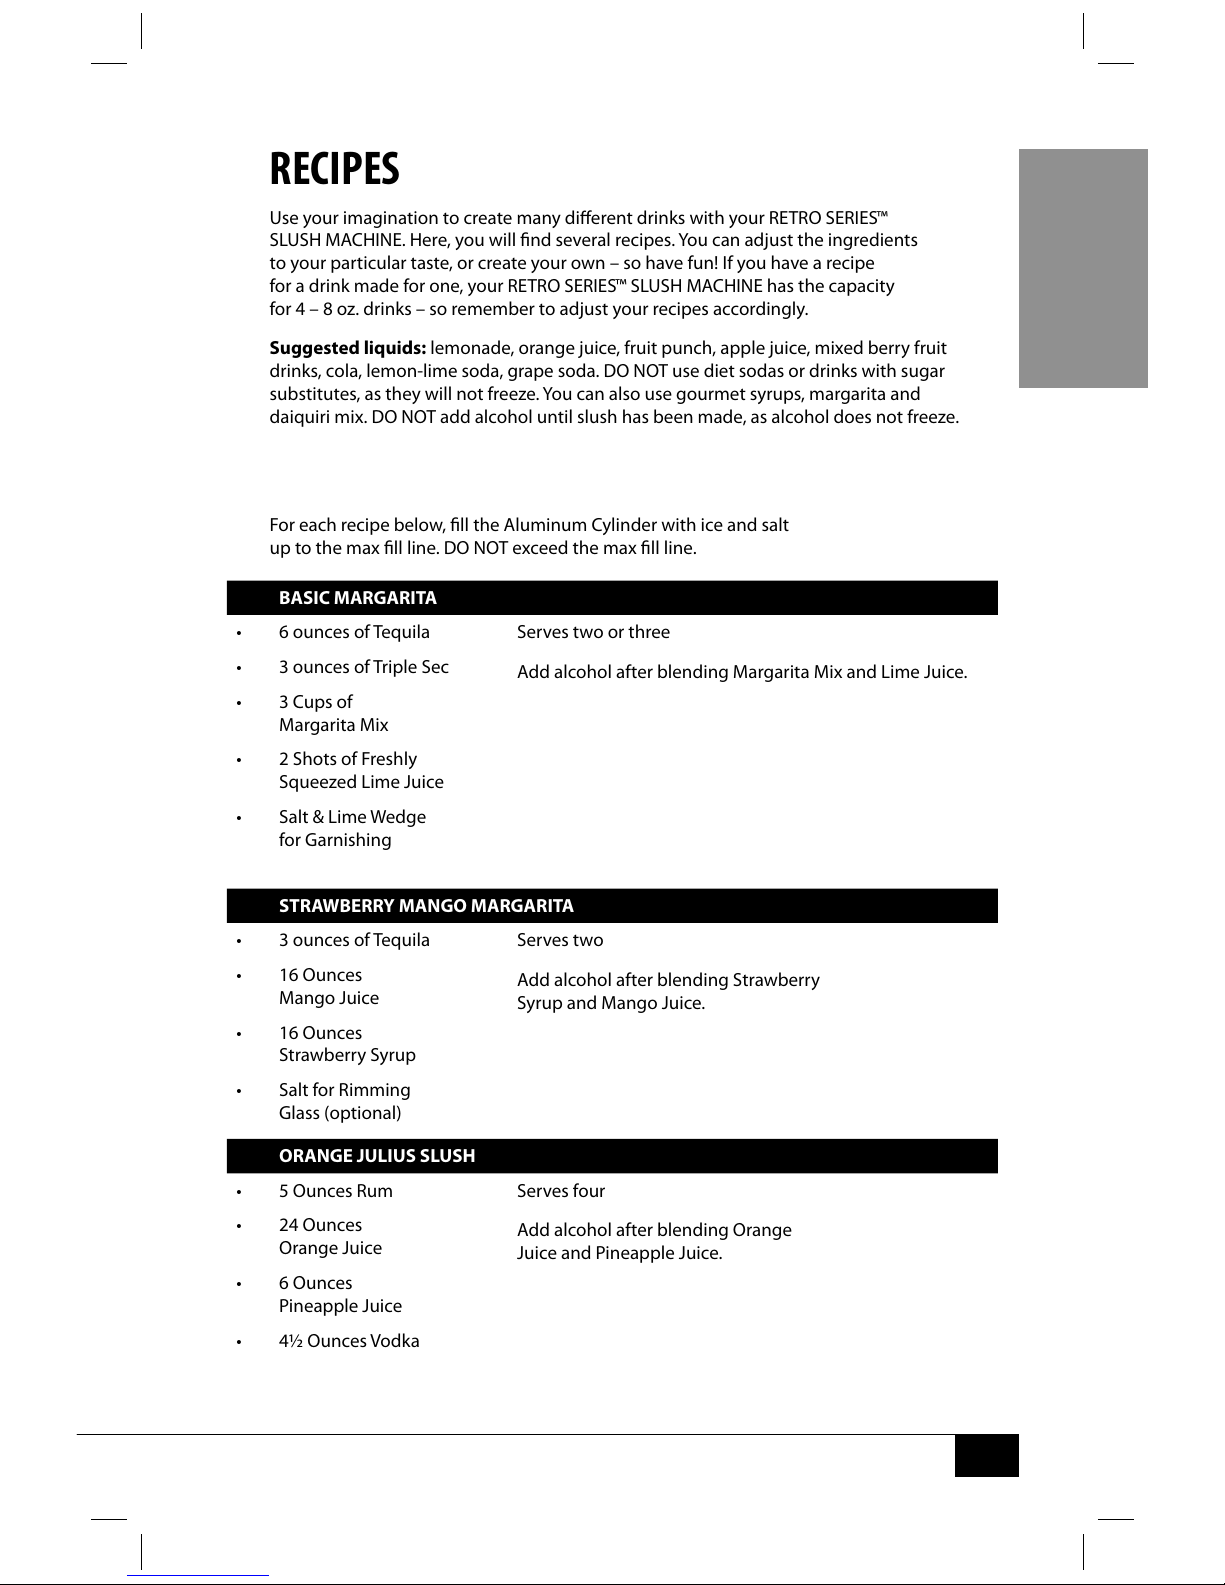
RECIPES
Use your imagination to create many dierent drinks with your RETRO SERIES™
SLUSH MACHINE. Here, you will nd several recipes. You can adjust the ingredients
to your particular taste, or create your own – so have fun! If you have a recipe
for a drink made for one, your RETRO SERIES™ SLUSH MACHINE has the capacity
for 4 – 8 oz. drinks – so remember to adjust your recipes accordingly.
Suggested liquids: lemonade, orange juice, fruit punch, apple juice, mixed berry fruit
drinks, cola, lemon-lime soda, grape soda. DO NOT use diet sodas or drinks with sugar
substitutes, as they will not freeze. You can also use gourmet syrups, margarita and
daiquiri mix. DO NOT add alcohol until slush has been made, as alcohol does not freeze.
For each recipe below, ll the Aluminum Cylinder with ice and salt
up to the max ll line. DO NOT exceed the max ll line.
BASIC MARGARITA
• 6 ounces of Tequila
• 3 ounces of Triple Sec
• 3 Cups of
Margarita Mix
• 2 Shots of Freshly
Squeezed Lime Juice
• Salt & Lime Wedge
for Garnishing
Serves two or three
Add alcohol after blending Margarita Mix and Lime Juice.
STRAWBERRY MANGO MARGARITA
• 3 ounces of Tequila
• 16 Ounces
Mango Juice
• 16 Ounces
Strawberry Syrup
• Salt for Rimming
Glass (optional)
Serves two
Add alcohol after blending Strawberry
Syrup and Mango Juice.
ORANGE JULIUS SLUSH
• 5 Ounces Rum
• 24 Ounces
Orange Juice
• 6 Ounces
Pineapple Juice
• 4½ Ounces Vodka
Serves four
Add alcohol after blending Orange
Juice and Pineapple Juice.
Page 11

ENGLISH
9
APRICOT SMOOTHIE
• 2 Ounces White Rum
• 1 Ounce Triple Sec
• 26 Ounces
Apricot Juice
• 1 Ounce Cream
Serves two
Add alcohol after blending apricot juice and cream.
GINGER FRUIT SLUSH
• 8 Ounces Ginger Ale
• 8 Ounces
Orange Juice
• 12 Ounces of
Pineapple Juice
Serves four
BERRY SLUSH
• 1¼ Cup Strawberry
Juice
• 1¼ Cup Blueberry
Juice
• 1 Cup Peach Juice
• ½ Cup Orange Juice
• 2 Tbsp. Lemon Juice
Serves four
STRAWBERRY DAIQUIRI
• ½ Cup Simple Syrup
• ½ Cup Strawberry
Syrup
• ¹
/8 Cup Lime Juice
• ½ Cup Lemon Juice
• ¾ Cup Lemon-
Lime Soda
• ¾ Cup Rum
Serves four
Add Rum after blending juices and syrups.
GRAPEFRUIT SLUSH
• 6 Ounces
Grapefruit Juice
• 6 Ounces White
Grape Juice
• 3 Cups Club Soda
Serves four
Page 12

ENGLISH
10
RETURNS & WARRANTY
SHOULD YOUR UNIT NOT WORK OR IF DAMAGED WHEN YOU FIRST TAKE IT OUT
OF THE BOX PLEASE RETURN IT TO THE PLACE OF PURCHASE IMMEDIATELY.
RETRO SERIES™ FROZEN TREAT MAKER / RSM650
Should you have any questions, please contact us via email or at the
customer service number listed below between the hours of 8:00 AM
and 5:00 PM, Monday through Friday, Central Standard Time.
Distributed by:
Nostalgia Products Group LLC
1471 Partnership Dr.
Green Bay, WI 54304-5685
Customer Service
Phone: (920) 347-9122
Web: www.nostalgiaelectrics.com
Customer Service Inquiry
To submit a Customer Service inquiry, go to www.nostalgiaelectrics.com and
ll out the Customer Service Inquiry form and click the Submit button.
A representative will contact you as soon as possible.
This appliance is designed and built to provide many years of satisfactory performance
under normal household use. The distributor pledges to the original owner that
should there be any defects in material or workmanship during the rst 90 days of
purchase, we will repair or replace the unit at our option. Our pledge does not apply
to damages caused by shipping, mishandling or unit being dropped. A product
deemed defective either from manufacturing or being mishandled is up to the
distributor’s discretion. In order to obtain service under this warranty, please contact
Nostalgia Products Group, LLC at the telephone number listed above or by lling
out the Customer Service Inquiry Form located at www.nostalgiaelectrics.com.
This warranty does not apply to re-manufactured merchandise.
Please read these instructions carefully. Failure to comply with these instructions,
damages caused by improper replacement parts, abuse or misuse will void this
pledge to you and is being made in place of all other expressed warranties.
For more information, visit us online at www.nostalgiaelectrics.com.
Like us on Facebook at www.facebook.com/NostalgiaElectrics.
Follow our boards on Pinterest at www.pinterest.com/nostalgiaelctrx.
Tweet along with us on Twitter at www.twitter.com/NostalgiaElctrx.
Page 13

11
ESPAÑOL
11
¡Convierta todos los días en una etsa!
Visite www.nostalgiaelectrics.com para ver más productos divertidos.
CONTENIDO
PRECAUCIONES IMPORTANTES . . . . . . . . . . . . . . . . . . . . . . . . . . 12
MEDIDAS IMPORTANTES . . . . . . . . . . . . . . . . . . . . . . . . . . . . . . 12
INTRODUCCIÓN . . . . . . . . . . . . . . . . . . . . . . . . . . . . . . . . . . . . 13
PIEZAS Y ENSAMBLAJE . . . . . . . . . . . . . . . . . . . . . . . . . . . . . . . . 14
CÓMO FUNCIONA . . . . . . . . . . . . . . . . . . . . . . . . . . . . . . . . . . 15
CONSEJOS ÚTILES . . . . . . . . . . . . . . . . . . . . . . . . . . . . . . . . . . 16
LIMPIEZA Y MANTENIMIENTO . . . . . . . . . . . . . . . . . . . . . . . . . . . 17
RECETAS . . . . . . . . . . . . . . . . . . . . . . . . . . . . . . . . . . . . . . . . . 17
DEVOLUCIONES Y GARANTÍA . . . . . . . . . . . . . . . . . . . . . . . . . . . 20
SEGURIDAD
Especicaciones del Electro Doméstico:
120 Volts, 60 Hz
20 Watts, Aprobado por la ETL
Su seguridad y la de otras personas es muy importante.
Hemos proporcionado numerosos mensajes de seguridad importantes en este manual
y en su electrodoméstico. Siempre lea y obedezca todos los mensajes de seguridad.
Este es el símbolo de alerta de seguridad.
Este símbolo le previene de peligros potenciales que pueden
causar la muerte o lesiones a usted y a otras personas.
Todos los mensajes de seguridad estarán antecedidos por el símbolo de alerta.
Todos los mensajes de seguridad le dirán de qué peligro potencial se trata, cómo reducir
la posibilidad de lesiones y qué puede ocurrir si no se obedecen las instrucciones.
Page 14

12
ESPAÑOL
12
PRECAUCIONES IMPORTANTES
1. NUNCA sumerja la base o el cable en agua.
2. NUNCA lo utilice cerca del agua.
3. NUNCA deje la unidad sin atención si se utiliza cerca de niños.
4. NUNCA utilice paños abrasivos en el aparato.
5. NUNCA utilice esponjas ni productos de limpieza abrasivos ni fuera ni dentro del aparato.
6. NUNCA utilice la máquina otro uso que no sea el previsto.
7. Evite el contacto con las partes móviles.
8. NO utilice este aparato si tiene el cable o el enchufe dañados
o en el caso de que esté funcionando mal.
9. NO coloque las partes dentro de un lavavajillas.
10. Mantenga fuera del alcance de los niños.
11. Desenchufe el aparato del tomacorriente eléctrico cuando no esté en uso y
antes de su limpieza. Quite el enchufe tomándolo del cuerpo y sacándolo fuera
del tomacorriente. Nunca gire ni tire del cable para desenchufar la unidad.
12. Este aparato NO ES UN JUGUETE.
13. Este aparato no debe ser utilizado por niños ni por individuos
con problemas cognitivos, sin estar supervisados.
MEDIDAS IMPORTANTES
Cuando utiliza aparatos eléctricos siempre deberán seguirse las precauciones básicas de
seguridad, que incluyen:
1. Lea todas las instrucciones antes de manejar este equipo.
2. NUNCA ponga los dedos ni utensilios en las zonas de alimentación o descarga.
3. Mantenga las manos y los utensilios fuera del recipiente mientras bate,
para reducir el riesgo de lesiones graves o daños al aparato.
4. Para protegerlo de una descarga eléctrica, no sumerja el cable, el enchufe
ni ninguna parte de esta unidad en agua ni en ningún otro líquido.
5. Cuando el aparato es utilizado por un niño o si se utiliza cerca
de éstos, los niños deberán estar supervisados.
6. Desenchufe del tomacorriente cuando no se encuentra en
uso o antes de quitar las partes para su limpieza.
7. NO utilice ningún aparato que tenga el cable o el enchufe dañado, o si el aparato se daña de
alguna manera. Lleve el aparato al servicio técnico más cercano para su control o reparación.
8. El fabricante del aparato no recomienda el uso de accesorios que no sean
los suministrados junto a la unidad ya que podrían ocasionar daños.
9. Las cuchillas son losas. NO las toque.
10. NO quite la Tapa mientras está en uso.
Page 15

13
ESPAÑOL
13
1. NO permita que el cable toque supercies calientes.
2. NO coloque sobre una hornalla a gas ni eléctrica, ni dentro de un horno caliente.
3. Se debe tener sumo cuidado al trasladar este aparato con líquido adentro.
4. Esta unidad debe colocarse sobre una supercie plana para que funcione correctamente.
5. NO use este aparato de ninguna otra manera que no sea la prevista.
6. NO deje la unidad sin atención mientras esté en uso o enchufada a un tomacorriente.
7. Antes de usar, controle si hay objetos extraños dentro del Vaso de Batido.
8. Se proporciona un cable de energía corto, para reducir el riesgo de
estrangulamiento o tropiezos que podrían resultar con un cable largo.
9. Se pueden utilizar cables prolongadores de suministro
de energía si se tiene cuidado en su uso.
10. La clasicación eléctrica indicada en un prolongador debe ser al menos
del mismo valor que la clasicación eléctrica del aparato.
11. Este aparato tiene un enchufe polarizado (una pata es más ancha que la otra).
Para reducir el riesgo de descarga eléctrica, este enchufe está previsto para
que se adapte a un tomacorriente polarizado de una sola manera. Si el enchufe
no entra completamente, delo vuelta. Si aún no entra, comuníquese con un
electricista calicado. No intente modicar el enchufe de ninguna manera.
12. No intente de realizar un mantenimiento al aparato usted mismo, ya que al abrir o
quitar las tapas usted puede quedar expuesto a un voltaje peligroso o a otros riesgos.
Deje todo tipo de mantenimiento a personal de mantenimiento calicado.
13. Siempre opere el aparato con la tapa puesta.
14. Asegúrese de que el Vaso de Batido esté correctamente
sujeto a la base antes de encender la unidad.
¡GUARDE ESTAS INSTRUCCIONES!
INTRODUCCIÓN
¡Gracias por comprar la MÁQUINA DE HIELO PICADO de Nostalgia Electrics™! La
MÁQUINA DE HIELO PICADO es una máquina de bebidas heladas que aportará
diversión al combatir la sed ¡en cualquier ocasión! La MÁQUINA DE HIELO PICADO no
sólo prepara fantásticas bebidas congeladas, sino que también prepara otras mezclas
y sus bebidas heladas favoritas como por ejemplo ¡daiquiris y jugos para los niños!
Su MÁQUINA DE HIELO PICADO cuenta con un generoso vaso mezclador transparente
de 32 onzas (1 litro) y es ideal para grupos pequeños. Tiene un diseño atractivo,
delgado y vertical que ocupará un lugar muy pequeño sobre la mesada.
Sus características son:
•El recipiente se separa de la base para su fácil limpieza
•El lugar donde se apoya la copa también recoge lo que gotea
•Pico vertedor fácil de usar y práctico guardado del cable
Page 16

14
ESPAÑOL
14
PIEZAS Y ENSAMBLAJE
Partes
Luego de Sacar la Unidad de la Caja
Limpie la parte exterior de la MÁQUINA DE HIELO PICADO con un trapo o esponja
limpios, no abrasivos. Lave bien el Vaso Mezclador, el Cilindro de Aluminio, la Jaula del
Cilindro y la Tapa con agua tibia y jabón y seque bien. NO ponga la Base en agua.
Armado
1. Luego de secar, sujete el Vaso Mezclador rmemente a la Base colocando el Vaso
Mezclador sobre la parte de arriba de la Base. Si el Vaso Mezclador está bien sujeto,
quedará alineado a la Base, el Pico quedará encima de la Bandeja de Goteo.
2. Coloque el Mecanismo para Mezclar dentro del Cilindro de Aluminio y
coloque el Cilindro de Aluminio dentro de la Jaula del Cilindro. Luego
coloque el Cilindro armado dentro del Vaso Mezclador.
1. 2.
Vaso Mezclador
Bandeja de
Goteo
Base
Tapa del Vaso Mezclador
Pico
Cilindro de Aluminio
Jaula del Cilindro
Mecanismo para
Mezclar
Page 17

15
ESPAÑOL
15
CÓMO FUNCIONA
1. Primero, encuentre una supercie estable cerca de un tomacorriente eléctrico.
Asegúrese de que el cable esté alejado de cualquier fuente de agua.
2. NO apoye la MÁQUINA DE HIELO PICADO cerca del borde de una mesa o de una mesada.
3. Retire la Tapa del Vaso Mezclador apretando la pestaña de la traba
mientras levanta la Tapa y desenganche el frente con cuidado.
4. Llene el Cilindro de Aluminio con pedazos pequeños o partidos de hielo por la abertura que
contiene la etiqueta ICE AND SALT (Hielo y Sal), 1 pulgada hacia
adentro de la parte superior del Cilindro de Aluminio. Asegúrese
de que el Pico esté en posición cerrada para evitar derrames.
5. Agregue 1/2 taza de sal de mesa regular y ½ taza de agua en
el Cilindro de Aluminio (asegúrese de agregar primero la sal
y luego el agua para mezclar bien). La sal es necesaria para el
proceso de congelamiento. Podría ser necesaria ½ taza de sal o
más para que el aguanieve se congele bien. Vuelva a poner la
Tapa en el Vaso Vertedor, asegurándose que esté todo alineado
correctamente sobre el mecanismo para mezclar, que esté
bien trabado sujeto al vaso transparente para mezclar y tapa queda bien cerrada.
6. Vuelva a deslizar el interruptor ON/OFF (Encendido/Apagado) en FREEZE (Congelar)
para encender la unidad y comenzar el proceso para hacer aguanieve. NO apague
la unidad (OFF) durante el uso ya que el Cilindro de Aluminio podría congelarse.
7. Vierta su bebida seleccionada directamente en la unidad a
través de las marcas cuadradas moldeadas ubicadas en la parte
superior de su MÁQUINA DE HIELO PICADO. NO llene más allá
de la línea MAX FILL (Llenado Máximo) (aproximadamente 1
cuarto de líquido). ). Las bebidas sin azúcar y alcohólicas
no se congelarán NO las use en la máquina.
NOTA: No use la máquina de hielo picado para congelar
líquidos sin azúcar (como por ejemplo agua) ya que podría
dañar el aparato. El agua se congelará muy rápido en el
exterior del cilindro del hielo y podría dañar la unidad.
8. Deje que la mezcla se bata durante por lo menos 15 minutos
hasta alcanzar la consistencia de aguanieve deseada.
NOTA: Podrá ir agregando hielo y sal continuamente a la unidad mientras crea
aguanieve arrojando hielo y sal en el oricio redondo abierto de la Tapa que se
encuentra sobre el Cilindro de Aluminio. NO llene más de 1 pulgada desde la parte
superior del Cilindro de Aluminio ya que existe el riesgo
de que la mezcla de aguanieve se mezcle con sal.
9. Cuando la mezcla alcance la consistencia deseada, coloque la
copa debajo del Pico y deslice el interruptor ON/OFF (Encendido/
Apagado) hacia adelante en DISPENSE (SERVIR). Gire la manija
del dispensador de aguanieve hacia la derecha para servir la
bebida. Mantenga la unidad funcionando hasta que se haya
servido toda el aguanieve. Asegúrese de volver a girar la manija
hacia la posición CLOSE (Cerrar) luego de llenar cada copa.
NOTA: Si el aguanieve está muy espesa o si no se sirve bien,
agregue más líquido en la abertura del vaso para mezclar.
Page 18

16
ESPAÑOL
16
CONSEJOS ÚTILES
Si el Pico está duro durante el primer uso, haga toda la
fuerza que sea necesaria para girar la perilla.
• Agregue más líquido al Vaso Mezclador si se genera un
vacío alrededor del Cilindro durante su uso.
• El Vaso Mezclador deberá estar sujeto rmemente a la Base,
de lo contrario la unidad no se encenderá.
• Si coloca un repasador debajo de su MÁQUINA DE HIELO PICADO,
ayudará a la limpieza. Deberá esperar algo de goteo.
• NO guarde las bebidas de aguanieve en el freezer o en la
heladera. Deberán consumirse inmediatamente.
• RECORDATORIO: 32 onzas (1 litro) de líquido no producen 32 onzas (1 litro) de aguanieve.
Está creando aguanieve y el líquido se ha solidicado convirtiéndose en hielo.
Líquidos
• Las bebidas que contienen mucha azúcar o una base de jarabe de maíz
se cristalizarán más rápido y producirán un aguanieve más espesa
que las que llevan leche o un menor contenido de azúcar. Las bebidas
carbonatadas se asentarán más lentamente y no serán tan espesas.
• Recomendamos agregar líquidos previamente enfriados a su MÁQUINA DE
HIELO PICADO. Esto acelerará el proceso para elaborar el aguanieve.
• Las bebidas carbonatadas dietéticas y las bebidas alcohólicas no formarán
aguanieve. NO agregue alcohol hasta que el aguanieve se vierta en los vasos.
• NO use mezclas rígidas como por ejemplo crema batida o líquidos congelados.
La Mezcla No se Congela
NO haga funcionar la unidad por más tiempo que el necesario. Si luego de 15
minutos la mezcla no logra la consistencia de aguanieve o si se ha vuelto a derretir,
no continúe. Los posibles motivos de que la mezcla no se enfríe o congele son:
1. El Cilindro de Aluminio no se ha enfriado lo suciente. Intente agregar más
hielo y sal. La sal es una parte crítica del proceso de congelamiento y
necesitará agregarle mucha sal al hielo para que el aguanieve se congele bien.
2. La mezcla estaba demasiado tibia.
3. Se ha agregado alcohol a la mezcla. NO agregue alcohol
hasta que el aguanieve se vierta en los vasos.
Page 19

17
ESPAÑOL
17
LIMPIEZA Y MANTENIMIENTO
1. Luego de utilizar su MÁQUINA DE HIELO PICADO, desconéctela del tomacorriente
eléctrico. Desenchufe tomando el enchufe del cuerpo y sacándolo hacia afuera
del tomacorriente. Nunca gire ni tire del cable para desenchufar la unidad.
2. Lave bien el Vaso Mezclador, el Cilindro de Aluminio, la Jaula del Cilindro, el
Mecanismo para Mezclar, la Tapa y la Bandeja de Goteo con agua tibia y jabón
y seque bien. NO sumerja la Base en agua. Cuando sea necesario, use un
paño húmedo, no abrasivo para limpiar el exterior y luego seque bien.
3. Una vez que haya lavado y secado, vuelva a armar su MÁQUINA DE HIELO PICADO.
4. NUNCA sumerja la Base en agua ni coloque las partes en el lavavajillas.
RECETAS
Utilice su imaginación para crear diferentes tragos con su MÁQUINA DE HIELO PICADO.
Aquí encontrará varias recetas. Puede modicar los ingredientes para adaptarlos a su
gusto personal o crear tragos propios para ¡divertirse! Si cuenta con la receta para preparar
un solo trago, tenga en cuenta que su MÁQUINA DE HIELO PICADO tiene capacidad
para 4 tragos de 8 onzas (240 cm3), recuerde ajustar sus recetas de acuerdo a esto.
Líquidos Sugeridos: limonada, jugo de naranja, bebidas con mezclas de fruta,
cola, soda de lima-limón, soda de uva. NO use sodas dietéticas ni bebidas con
sustitutos del azúcar ya que no se congelarán. También podrá usar jarabes
gourmet, mezclas para margaritas y daiquiris. NO agregue alcohol hasta
que se haya hecho el aguanieve, ya que el alcohol no se congelará.
Para cada receta a continuación llene el Cilindro de Aluminio con hielo y sal
hasta la línea de llenado máximo. NO supere la línea de llenado máximo.
MARGARITA BÁSICA
• 6 onzas de Tequila
• 3 onzas de Triple Sec
• 3 Copas de Mezcla
para Margaritas
• 2 Medidas de Jugo
de Lima Recién
Exprimida
• Sal y Rodajas de
Lima para Decorar
Para Dos o Tres
Agregue alcohol luego de mezclar la Mezcla
de Margarita y el Jugo de Lima.
Page 20

18
ESPAÑOL
18
MARGARITA DE FRESAS Y MANGO
• 3 onzas de Tequila
• 16 onzas (480 cm3)
de Jugo de Mango
• 16 Onzas (480 cm3)
de Jarabe de Frutillas
• Sal para el Borde del
Vaso (opcional)
Para Dos
Agregue alcohol luego de mezclar el Jarabe
de Frutillas y el Jugo de Mango.
JUGO DE NARANJA JULIUS
• 5 onzas (150
cm3) de Ron
• 24 onzas (700 cm3)
de Jugo de Naranja
• 6 Onzas (170 cm3)
de Jugo de Ananás
• 4½ onzas (125
cm3) de Vodka
Para cuatro
Agregue alcohol luego de mezclar el Jugo
de Naranja y el Jugo de Ananás.
BATIDO DE DAMASCO
• 2 onzas (60 cm3)
de Ron Blanco
• 1 onza (30 cm3)
de Triple Sec
• 26 onzas (750 cm3)
de Jugo de Damasco
• 1 onza (30 cm3)
de Crema
Para dos
Agregue alcohol luego de mezclar el Jugo de damascos y
la crema.
Page 21

19
ESPAÑOL
19
NIEVE DE FRUTA DE JENGIBRE
• 8 onzas (230 cm3)
de Ginger Ale
• 8 onzas (230 cm3)
de Jugo de Naranja
• 12 onzas (340 cm3)
de Jugo de Ananás
Para cuatro
NIEVE DE FRUTOS DEL BOSQUE
• 1¼ Copas de
Jugo de Frutilla
• 1¼ Copas de Jugo
de Arándanos
• 1 Copa de Jugo
de Durazno
• ½ Copa de Jugo
de Naranja
• 2 Cucharadas de
Jugo de Limón
Para cuatro
DAIQUIRI DE FRUTILLA
• ½ Copa de
Jarabe Simple
• ½ Copa de Jarabe
de Frutilla
• ¹
/8 Copa de Jugo
de Lima
• ½ Copa de Jugo
de Limón
• ¾ Copa de Soda
de Lima-Limón
• ¾ Copa de Ron
Para cuatro
Agregue el Ron luego de mezclar los jugos y los jarabes.
NIEVE DE POMELO
• 6 Onzas (170 cm3)
de Jugo de Pomelo
• 6 Onzas (170 cm3) de
Jugo de Uva Blanca
• 3 Copas de 6 Onzas
(170 cm3) de Agua
Carbonatada
Para cuatro
Page 22

20
ESPAÑOL
20
DEVOLUCIONES Y GARANTÍA
SI SU UNIDAD NO TRABAJA O ESTÁ DAÑADA CUANDO LA EXTRAE POR PRIMERA VEZ
DE LA CAJA, DEVUÉLVALA INMEDIATAMENTE AL LUGAR DONDE LA COMPRÓ.
MÁQUINA DE HIELO PICADO / RSM650
Si tiene preguntas, contacte con nosotros por correo electrónico o por el
número telefónico de servicio al cliente que aparece a continuación en el
horario de 8:00 AM a 5:00 PM, de lunes a viernes, Hora Estándar del Este.
Distribuida por:
Nostalgia Products Group LLC
1471 Partnership Dr.
Green Bay, WI 54304-5685
Servicio al cliente
Teléfono: (920) 347-9122
Web: www.nostalgiaelectrics.com
Solicitud de servicio al cliente
Para enviar una solicitud al Servicio al Cliente, vaya a www.nostalgiaelectrics.com,
llene el formulario de Solicitud de Servicio al Cliente y haga clic en el botón Enviar.
Un representante le contactará tan pronto como sea posible.
Este electrodoméstico está diseñado y fabricado para proporcionar muchos años de
trabajo satisfactorio bajo un uso doméstico normal. El distribuidor se compromete
con el propietario original que si hay algún defecto en materiales o mano de obra
durante los primeros 90 días de la compra, repararemos o sustituiremos la unidad,
según nuestra elección. Este compromiso no se aplica a daños causados por el
envío, mala manipulación o caídas de la unidad. La determinación de si los defectos
del producto son debidos a la fabricación o a una mala manipulación, queda a la
decisión del distribuidor. Para obtener servicio bajo esta garantía, contacte con
Nostalgia Products Group, LLC por el número telefónico que aparece anteriormente
o llenando el Formulario de Solicitud de Servicio al Cliente que se encuentra en
www.nostalgiaelectrics.com. Esta garantía no se aplica a mercancía reelaborada.
Por favor, lea estas instrucciones cuidadosamente. El incumplimiento de estas
instrucciones, los daños causados por repuestos inapropiados, el abuso o mal
uso, anularán este compromiso hacia usted y cualquier otra garantía expresa.
Para obtener más información, visítenos en línea en www.nostalgiaelectrics.com.
Me Gusta en Facebook en www.facebook.com / NostalgiaElectrics.
Siga nuestros consejos sobre Pinterest en www.pinterest.com / nostalgiaelctrx
Tweet con nosotros en Twitter en www.twitter.com / NostalgiaElctrx.
Page 23

21
FRANÇAIS
21
Faire une fête tous les jours! Visiter le site Web
www.nostalgiaelectrics.com pour d’autres produits agréables.
TABLE DES MATIÈRES
PRÉCAUTIONS IMPORTANTES . . . . . . . . . . . . . . . . . . . . . . . . . . . 22
MISES EN GARDE SÉCURITAIRES IMPORTANTES . . . . . . . . . . . . . . . . 22
INTRODUCTION . . . . . . . . . . . . . . . . . . . . . . . . . . . . . . . . . . . . 23
PIÈCES ET ASSEMBLAGE . . . . . . . . . . . . . . . . . . . . . . . . . . . . . . . 24
COMMENT FAIRE FONCTIONNER . . . . . . . . . . . . . . . . . . . . . . . . . 25
CONSEILS PRATIQUES . . . . . . . . . . . . . . . . . . . . . . . . . . . . . . . . 26
NETTOYAGE ET ENTRETIEN . . . . . . . . . . . . . . . . . . . . . . . . . . . . . 27
RECETTES . . . . . . . . . . . . . . . . . . . . . . . . . . . . . . . . . . . . . . . . 27
RETOURS DE LA MARCHANDISE ET GARANTIES . . . . . . . . . . . . . . . . 30
SÉCURITÉ
Spécications des Appareils :
120 volts, 60 Hz
20 watts, Approbation ETL
Votre sécurité tout comme celle des autres est primordiale.
Ce manuel renferme plusieurs avis importants sur la sécurité lors de l’utilisation
de votre appareil. Lire le manuel et conformez-vous aux avis contre-indiqués.
Ceci représente le symbole d'avertissement pour votre sécurité.
Ce symbole vous alerte des dangers potentiels, pouvant
vous être fatals à vous ou envers d'autres utilisateurs.
Ce symbole d'alerte à la sécurité suivra tous les avis relatifs à la sécurité.
Tous les avis sécuritaires indiqueront le danger potentiel exact, la façon
dont vous pouvez réduire vos chances de blessure et vous indiquerons les
conséquences potentielles si vous ne suivez pas ces instructions à la lettre.
Page 24

22
FRANÇAIS
22
PRÉCAUTIONS IMPORTANTES
1. NE JAMAIS plonger le socle ou le cordon dans l'eau.
2. NE JAMAIS utiliser l'appareil près de l'eau.
3. NE JAMAIS laisser l'appareil sans surveillance pendant son utilisation.
4. NE JAMAIS utiliser de tampon à récurer sur l'appareil.
5. NE JAMAIS utiliser d'éponge abrasive ou de produit nettoyant
caustique sur ou à l'intérieur de l'appareil.
6. NE JAMAIS utiliser cet appareil à un usage autre que celui pour lequel il a été initialement prévu.
7. Éviter de toucher les pièces mobiles.
8. NE PAS faire fonctionner le présent appareil lorsque le cordon ou la che
est endommagé(e) ou qu'il ne fonctionne pas correctement.
9. NE PAS mettre les pièces au lave-vaisselle.
10. Garder hors de la portée des enfants.
11. Débrancher de la prise de courant lorsque l'appareil n'est pas utilisé et avant de le
nettoyer. Retirer la che en la saisissant par le corps et en la retirant de la prise de
courant. Ne jamais tirer sur le cordon ou le tordre pour débrancher l'appareil.
12. Le présent appareil n'est PAS UN JOUET.
13. Le présent appareil n'est pas prévu pour être utilisé par de jeunes enfants
non supervisés ou des individus ayant une décience cognitive.
MISES EN GARDE SÉCURITAIRES
IMPORTANTES
Au moment de l'utilisation d'un appareil électrique, toujours respecter les consignes de
sécurité élémentaires, y compris :
1. Lisez toutes les instructions avant d’utiliser cet appareil.
2. NE JAMAIS mettre les doigts ou les ustensiles dans les orices d'entrée ou de sortie.
3. Garder les mains et les ustensiles hors du récipient au moment du malaxage an de
réduire le risque de blessures corporelles graves ou d'endommagement de l'appareil.
4. Pour se protéger contre l'électrisation, ne pas plonger le cordon, la
che ou l'appareil principal dans l'eau ou autre liquide.
5. La surveillance étroite des enfants est nécessaire lorsqu'un appareil
électrique est utilisé par des enfants ou à leur proximité.
6. Débrancher de la prise de courant lorsque l'appareil n'est pas
utilisé et avant de retirer des pièces pour les nettoyer.
7. NE PAS faire fonctionner l'appareil lorsque le cordon ou la che est endommagé(e)
ou qu'il a été endommagé de quelque façon que ce soit. Retourner l'appareil
à l'atelier de réparation le plus près pour qu'il soit révisé ou réparé.
8. Le fabricant ne recommande l'utilisation d'aucun accessoire.
L'utilisation d'accessoires pourra provoquer des blessures.
9. Les lames sont tranchantes. NE PAS toucher.
10. NE PAS retirer le Couvercle lorsque l'appareil est en marche.
11. NE PAS laisser le cordon toucher les surfaces chaudes.
12. NE PAS placer sur un brûleur au gaz ou électrique ou à sa proximité ou dans un four chaud.
Page 25

23
FRANÇAIS
23
1. Une attention toute particulière doit être accordée au moment de
déplacer le présent appareil avec un liquide à l'intérieur.
2. Le présent appareil doit être posé sur une surface plane pour qu'il fonctionne de façon appropriée.
3. NE PAS utiliser l'appareil à un usage autre que celui pour lequel il est prévu.
4. NE PAS laisser l'appareil sans surveillance lorsqu'il est
utilisé ou branché dans une prise de courant.
5. Vérier la présence d'objets étrangers dans la Chambre de malaxage avant son utilisation.
6. Un cordon d'alimentation court est prévu pour réduire le risque d'emmêlement
ou de trébuchement que peut présenter un cordon plus long.
7. Une rallonge peut être utilisée, mais avec prudence cependant.
8. La puissance nominale électrique indiquée sur une rallonge
devrait être aussi élevée que celle de l'appareil.
9. Le présent appareil comporte une che polarisée (une lame est plus large que l'autre).
Pour réduire le risque d'électrisation, cette che est destinée à s'intégrer dans une
prise polarisée que d'une seule façon. Si la che n'entre pas complètement dans
la prise, inverser celle-ci. Si elle ne convient toujours pas, communiquer avec
un électricien agréé. Ne pas tenter de modier la che de quelque façon.
10. Ne pas tenter de réparer cet appareil soi-même, car l'ouverture ou le
retrait peut présenter un risque d'électrisation ou d'autres dangers.
Coner toutes les réparations à un personnel technique qualié.
11. Toujours faire fonctionner l'appareil avec le couvercle en place.
12. S'assurer que la Chambre de malaxage est correctement xée
au socle avant de mettre l'appareil en marche.
CONSERVEZ CES INSTRUCTIONS!
INTRODUCTION
Merci d'avoir acheté la MACHINE À BARBOTINE de Nostalgia ElectricsMC! La MACHINE
À BARBOTINE est une machine à boisson surgelée qui ajoutera un plaisir désaltérant à
toutes les grandes occasions! La MACHINE À BARBOTINE permet non seulement de faire
de fantastiques boissons gazeuses glacées, mais aussi de mélanger diérentes boissons
glacées préférées telles que les daïquiris et les barbotines aux fruits pour les enfants!
La MACHINE À BARBOTINE comporte une grande chambre de malaxage transparente
de 0,90 mL (32 oz) et est idéale pour les petits groupes. Il est d'une conception
verticale, elée, attrayante qui prendra peu d'espace sur le comptoir.
Les fonctionnalités comprennent :
• Un réservoir qui se sépare du socle pour en faciliter le nettoyage
• Un appui-tasse pour recueillir les gouttes
• Un bec verseur facile et un rangement pratique pour le cordon
Page 26

24
FRANÇAIS
24
PIÈCES ET ASSEMBLAGE
Pièces
Après la sortie de l'appareil du carton
Essuyer l'extérieur de la MACHINE À BARBOTINE avec un tissu non abrasif ou
une éponge. Laver soigneusement la Chambre de malaxage, le Récipient en
aluminium, la Cage du récipient et le Couvercle dans l'eau chaude savonneuse,
puis assécher soigneusement. NE PAS plonger le Socle dans l'eau.
Assemblage
1. Une fois séchée, xer solidement la Chambre de malaxage au Socle en plaçant celle-ci sur le
dessus du Socle. Lorsque la Chambre de malaxage sera correctement xée, elle sera alignée
avec le Socle de telle sorte que le Bec verseur se trouvera au-dessus du Ramasse-goutte.
2. Ensuite, poser le Mécanisme de malaxage à l'intérieur du Récipient en
aluminium, puis poser celui-ci à l'intérieur de la Cage du récipient. Ensuite,
poser l'ensemble Récipient à l'intérieur de la Chambre de malaxage.
1. 2.
Chambre de malaxage
Ramassegouttes
Socle
Couvercle de la
chambre de malaxage
Bec verseur
Récipient en aluminium
Cage du
récipient
Mécanisme de
malaxage
Page 27

25
FRANÇAIS
25
COMMENT FAIRE FONCTIONNER
1. Premièrement, trouver une surface imperméable stable, à proximité d'une prise de
courant avant de commencer. S'assurer que le cordon est éloigné de toute source d'eau.
2. NE PAS poser la MACHINE À BARBOTINE près d'un bord de table ou de comptoir.
3. Retirer le Couvercle de la Chambre de malaxage en pinçant le loquet de verrouillage
tout en soulevant le Couvercle, puis soigneusement décrocher la partie avant.
4. Remplir le Récipient en aluminium avec des petits morceaux de glace ou de glace concassée
par l'ouverture étiquetée ICE AND SALT (glace et sel), à environ
2,5 cm (1 po) du bord du Récipient en aluminium. S'assurer que le
Bec verseur est en position fermée pour éviter tout déversement.
5. Ajouter 120 mL (1/2 tasse) de sel ordinaire et 120 mL (1/2 tasse)
d'eau dans le Récipient en aluminium (ne pas oublier pas d'ajouter
le sel en premier, puis l'eau an de bien malaxer). Le sel est
nécessaire au processus de congélation. Une quantité de 120
mL (1/2 tasse) de sel ou plus sera peut-être nécessaire pour que
la barbotine gèle de façon appropriée. Remettre le couvercle
sur la chambre de mélange, s'assurer qu'il est correctement
aligné avec le mécanisme de mélange, solidement xé à la
chambre de mélange transparent, et le couvercle est verrouillé en toute sécurité.
6. Faire glisser le commutateur ON/OFF (marche/arrêt) sur FREEZE (geler) pour allumer
l'appareil et commencer le processus de malaxage de la barbotine. NE PAS éteindre
l'appareil pendant son utilisation, car le Récipient en aluminium pourra se ger.
7. Verser la boisson sélectionnée directement dans l'appareil
par l'encoche carrée moulée, située sur le dessus de la
MACHINE À BARBOTINE. NE PAS remplir au-delà de la ligne
MAX FILL (remplissage maximal) (environ 0,5 L (1 pinte de
liquide). Les boissons sans sucre et les boissons alcoolisées
ne gèlent pas. NE PAS les utiliser dans l'appareil.
Remarque : Ne pas utiliser la machine à barbotine pour
geler les liquides sans sucre (comme l'eau), car ceci pourra
endommager l'appareil. L'eau gèlera très rapidement à l'extérieur
du récipient de glace et pourra endommager l'appareil.
8. Laisser le mélange malaxer pendant 15 minutes jusqu'à ce
qu'à la consistance désirée de la barbotine.
Remarque : Ajouter continuellement de la glace et du sel dans l'appareil pour faire de la
barbotine en les laissant tomber dans l'orice rond ouvert du Couvercle sur le Récipient en
aluminium. NE PAS remplir le Récipient en aluminium à plus de 2,5 cm (1 po) du bord, car il y
a un risque que le mélange de barbotine soit contaminé par le sel.
9. Lorsque le mélange atteint la consistance désirée, placer une
tasse sous le Bec verseur, puis faire glisser le commutateur ON/
OFF (marche/arrêt) sur DISPENSE (dispenser). Tourner la poignée
du distributeur de barbotine vers la droite pour dispenser la
boisson. Garder l'appareil en marche jusqu'à ce que toute la
barbotine ait été dispensée. S'assurer de remettre la poignée
sur CLOSE (fermer) après le remplissage de chaque tasse.
Remarque : Si la barbotine devient trop épaisse
ou ne se dispense pas bien, ajouter plus de liquide
par l'ouverture de la Chambre de malaxage.
Page 28

26
FRANÇAIS
26
CONSEILS PRATIQUES
• Si le Bec verseur est rigide au cours de la première utilisation,
appliquer plus de force pour tourner le bouton
• Ajouter plus de liquide à la Chambre de malaxage si un vide se
produit autour du Récipient en cours d'utilisation.
• La Chambre de malaxage doit être solidement xée au Socle,
sinon l'appareil ne se mettra pas en marche.
• Une serviette posée sous la MACHINE À BARBOTINE facilitera
le nettoyage. Un certain égouttement est normal.
• NE PAS ranger les barbotines au congélateur ou au réfrigérateur.
Elles devraient être consommées immédiatement.
• SE RAPPELER : 0,90 L (32 oz) de liquide ne produit pas 0,90 L (32 oz) de
barbotine. Avec la barbotine, le liquide se solidie en glace.
Liquides
• Les boissons qui ont une forte teneur en sucre ou en sirop de maïs se
cristalliseront plus rapidement et produiront une barbotine plus épaisse
que celles avec du lait ou à faible teneur en sucre. Les boissons gazeuses
se formeront plus lentement et ne seront pas aussi épaisses.
• Nous recommandons d'ajouter un liquide prérefroidi à la MACHINE À
BARBOTINE. Ceci facilitera le processus de solidication de la barbotine.
• Les boissons gazeuses basses calories et les boissons alcoolisées ne formeront aucune
barbotine. NE PAS ajouter d'alcool jusqu'à ce que la barbotine soit versée dans les verres.
• NE PAS utiliser de mélange ferme comme de la crème fouettée ou un liquide gelé.
Le mélange de gèlera pas
• NE PAS faire fonctionner l'appareil plus longtemps qu'il ne le faut. Si après 15
minutes, le mélange n'atteint pas la consistance désirée ou qu'il dégèle, ne pas
continuer. Les raisons possibles qui font que le mélange ne refroidit ni ne gèle :
1. Le Récipient en aluminium n'était pas assez froid. Ajouter plus de glace et de
sel. Le sel est un élément essentiel au processus de congélation et une grande
quantité de sel sera nécessaire pour que la barbotine gèle correctement.
2. Le mélange était trop chaud.
3. De l'alcool a été ajouté au mélange. NE PAS ajouter d'alcool jusqu'à ce que la barbotine
soit versée dans les verres.
Page 29

27
FRANÇAIS
27
NETTOYAGE ET ENTRETIEN
1. Après avoir utilisé la MACHINE À BARBOTINE, la débrancher de la prise de courant.
Retirer la che en la saisissant par le corps et en la retirant de la prise de courant.
Ne jamais tirer sur le cordon ou le tordre pour débrancher l'appareil.
2. Laver soigneusement la Chambre de malaxage, le Récipient en aluminium, la
Cage du récipient et le Couvercle dans de l'eau chaude savonneuse, puis assécher
soigneusement. NE PAS plonger le Socle dans l'eau. Le cas échéant, utiliser un chion
humide non abrasif pour essuyer l'extérieur, puis assécher soigneusement.
3. Une fois le lavage et l'essuyage terminés, reposer la MACHINE À BARBOTINE.
4. NE JAMAIS plonger le Socle dans l'eau ou mettre quelque pièce au lave-vaisselle.
RECETTES
Laisser aller l'imagination pour créer diérentes boissons avec la MACHINE À
BARBOTINE. Voici quelques recettes. Ajuster les ingrédients au goût ou créer une
recette à partir de ses propres ingrédients - quel plaisir agréable! S'il s'agit d'une
recette de boisson pour une personne, la MACHINE À BARBOTINE peut faire 4
boissons de 227 mL (8 oz); se rappeler d'ajuster la recette par conséquent.
Liquides suggérés : limonade, jus d'orange, punch aux fruits, jus de pomme, boissons
aux baies, cola, boisson au citron-lime, boisson gazeuse au jus de raisin. NE PAS utiliser de
boisson gazeuse à basses calories ou de boisson avec des succédanés de sucre, car elles
ne gèleront pas. Utiliser également des sirops ns, un mélange de margarita et de daïquiri.
NE PAS ajouter d'alcool jusqu'à ce que la barbotine soit terminée, car l'alcool ne gèle pas.
Pour chaque recette ci-dessous, remplir le Récipient en aluminium avec de la glace et du
sel jusqu'à la ligne de remplissage max. NE PAS dépasser la ligne de remplissage max.
MARGARITA CLASSIQUE
• 168 mL de tequila
• 84 mL de triple sec
• 720 mL (3 tasses) de
mélange à margarita
• 2 mesures de jus de
lime fraîchement
pressée
• Sel et quartier de lime
comme garniture
Portion : 2 ou 3
Ajouter de l'alcool après avoir mélangé le
mélange à margarita et le jus de lime.
Page 30

28
FRANÇAIS
28
MARGARITA À LA MANGUE ET À LA FRAISE
• 84 mL de tequila
• 450 mL (16 oz) de
jus de mangue
• 450 mL (16 oz) de
sirop de fraise
• Sel pour le bord du
verre (en option)
Portion : 2
Ajouter de l'alcool après avoir mélangé le
sirop de fraise et le jus de mangue.
BARBOTINE À L'ORANGE JULIUS
• 142 mL (5 oz) de rhum
• 680 mL (24 oz) de
jus d'orange
• 170 mL (6 oz) de
jus d'ananas
• 127 mL (4½ oz)
de vodka
Portion : 4
Ajouter de l'alcool après avoir mélangé
le jus d'orange et le jus d'ananas.
FRAPPÉ À L'ABRICOT
• 57 mL (2 oz) de
rhum blanc
• 28,5 mL (1 oz)
de triple sec
• 737 mL (26 oz) de
jus d'abricot
• 28,5 mL (1 oz)
de crème
Portion : 2
Ajouter de l'alcool après avoir mélangé
le jus d'abricot et la crème.
BARBOTINE AUX FRUITS ET AU GINGEMBRE
• 227 mL (8 oz) de
Ginger Ale
• 227 mL (8 oz) de
jus d'orange
• 340 oz (12 oz) de
jus d'ananas
Portion : 4
Page 31

29
FRANÇAIS
29
BARBOTINE AUX BAIES
• 300 mL (1 ¼ tasse)
de jus de fraise
• 300 mL (1 ¼ tasse)
de jus de bleuet
• 240 mL (1 tasse)
de jus de pêche
• 120 mL (½ tasse)
de jus d'orange
• 2 c. à table de
jus de citron
Portion : 4
DAÏRIQUI À LA FRAISE
• 120 mL (½ tasse)
de sirop simple
• 300 mL (1 ¼ tasse)
de sirop de fraise
• 30 mL (¹/8 tasse)
de jus de lime
• 120 mL (½ tasse)
de jus de citron
• 180 mL (¾ tasse)
de boisson gazeuse
au citron-lime
• 180 mL (¾ tasse)
de rhum
Portion : 4
Ajouter du rhum après avoir mélangé les jus et les sirops
.
BARBOTINE AU PAMPLEMOUSSE
• 170 mL (6 oz) de jus
de pamplemousse
• 170 mL (6 oz) de
jus de raisin blanc
• 720 mL (3 tasses)
de Club Soda
Portion : 4
Page 32

30
FRANÇAIS
30
RETOURS DE LA MARCHANDISE ET GARANTIES
SI VOTRE APPAREIL NE FONCTIONNE PAS OU EST ENDOMMAGÉ
LORSQUE VOUS LE SORTEZ DE LA BOÎTE, VEUILLEZ LE RETOURNER
IMMÉDIATEMENT À L'ENDROIT OÙ VOUS L'AVEZ ACHETÉ.
MACHINE À BARBOTINE / RSM650COKE
Pour toutes autres questions pertinentes, veuillez contacter le service à la
clientèle soit par courriel ou au numéro de service tel qu'indiqué ci-bas,
entre 8h00 et 17h00, du lundi au vendredi, heure normale de l'est.
Distribué par:
Nostalgia Products Group LLC
1471 Partnership Dr.
Green Bay, WI 54304-5685
Service à la clientèle
Téléphone: (920) 347-9122
Site Internet: www.nostalgiaelectrics.com
Question pour le service à la clientèle
Pour soumettre une question au service à la clientèle, veuillez visiter
le site www.nostalgiaelectrics.com et remplir un formulaire destiné
au service à la clientèle puis cliquer sur la touche Soumettre.
Un représentant vous contactera sous peu.
Cet appareil est conçu pour orir plusieurs années d'utilisation de performance satisfaisante,
et ce, sous de conditions normales d'utilisation. Le grossiste nantit que le propriétaire
d'origine se doit de faire réparer ou changer l'appareil à notre discrétion, advenant le cas de
défectuosités des matériaux ou des pièces durant les 90 premiers jours en date d’achat de
l’appareil neuf. Notre nantissement ne s'applique aucunement sur les dommages causés
par le transport, une mauvaise utilisation de l'appareil ou le fait d'échapper l'appareil. Un
produit réclamé défectueux, soit suite à sa fabrication ou une mauvaise utilisation sera
évaluée à l’entière discrétion du grossiste. An que la garantie couvre ce produit, veuillez
contacter Nostalgia Products Group, LLC au numéro de téléphone suivant ou en remplissant
un formulaire de question destine au service à la clientèle situé sur le site Internet : www.
nostalgiaelectrics.com. Cette garantie ne s’applique aucunement à la marchandise ré-usinée.
Lire ces instructions attentivement. Le manque de vous conformer à ces
instructions, de tous dommages causés par un remplacement erroné des pièces,
l’abus ou mauvaise utilisation de l’appareil annulera toute promesse faite à
votre égard, et prévaudra sur toute autre garantie, implicite ou expresse.
Pour plus d’informations, visitez notre site Web à www.nostalgiaelectrics.com.
Aimez-nous sur Facebook à l’adresse www.facebook.com / NostalgiaElectrics.
Suivez nos conseils sur Pinterest à www.pinterest.com / nostalgiaelctrx.
Tweet avec nous sur Twitter à l’adresse www.twitter.com / NostalgiaElctrx.
 Loading...