

Page 1

All products are trademarks of Nostalgia Products Group, LLC.
Worldwide design & utility patented or patents pending.
© 2012 Nostalgia Products Group, LLC.
2014
www.nostalgiaelectrics.com
(rev. 08/26/14)
Page 2
HCC100NP
Hollow Chocolatier
Chocolatera Hueca
Chocolatière à Coquille
Instructions and Recipes
Instrucciones y Recetas
Consignes et Recettes
Page 3

Page 4

Make every day a party!
Visit www.nostalgiaelectrics.com for more fun products.
CONTENTS
IMPORTANT PRECAUTIONS . . . . . . . . . . . . . . . . . . . . . . . . . . . . . 3
IMPORTANT SAFEGUARDS . . . . . . . . . . . . . . . . . . . . . . . . . . . . . 3
INTRODUCTION . . . . . . . . . . . . . . . . . . . . . . . . . . . . . . . . . . . . 4
PARTS & ASSEMBLY . . . . . . . . . . . . . . . . . . . . . . . . . . . . . . . . . . 5
HOW TO OPERATE . . . . . . . . . . . . . . . . . . . . . . . . . . . . . . . . . . 6
HELPFUL TIPS . . . . . . . . . . . . . . . . . . . . . . . . . . . . . . . . . . . . . 7
CLEANING & MAINTENANCE . . . . . . . . . . . . . . . . . . . . . . . . . . . . 7
RECIPES . . . . . . . . . . . . . . . . . . . . . . . . . . . . . . . . . . . . . . . . . 8
RETURNS & WARRANTY . . . . . . . . . . . . . . . . . . . . . . . . . . . . . . . 9
SAFETY
ENGLISH
Your safety and the safety of others is very important.
We have provided many important safety messages in this manual and
on your appliance. Always read and obey all safety messages.
This is the safety alert symbol.
This symbol alerts you to potential hazards that
can kill or hurt you and others.
All safety messages will follow the safety alert symbol.
All safety messages will tell you what the potential hazard is, tell you how to reduce the
chance of injury, and tell you what can happen if the instructions are not followed.
Appliance Specications:
Chocolatier: uses one 9volt battery (not included)
2
Page 5
IMPORTANT PRECAUTIONS
1. NEVER immerse appliance in water.
2. NEVER use near water.
3. NEVER use an abrasive sponge or cloth on the appliance.
4. NEVER leave appliance unattended while in use.
ENGLISH
5. NEVER place anything other than what is intended.
6. DO NOT place appliance in dishwasher.
7. Keep out of reach of children.
8. This appliance is NOT A TOY.
9. This appliance is not intended for use by young children or
the cognitively challenged without supervision.
10. Young children should be supervised to ensure that they do not play with the appliance.
IMPORTANT SAFEGUARDS
When using battery operated appliances, basic safety
precautions should always be followed, including:
1. Read all instructions before operating this appliance.
2. DO NOT touch hot surfaces.
3. DO NOT use outdoors. FOR HOUSEHOLD USE ONLY.
4. To protect against risk of electrical shock, do not immerse
appliance in water or any other liquid.
5. DO NOT operate any appliance after the appliance malfunctions, or if it is dropped
or damaged in any manner. Return the appliance to the nearest authorized
service facility for examination, or to a repair shop for mechanical adjustment.
6. The appliance manufacturer does not recommend the use of accessory
attachments other than what is supplied with the unit. They may cause injuries.
7. Close supervision is necessary when any appliance is used by or near children.
8. DO NOT place on or near a hot gas or electric burner, or in a heated oven.
9. This appliance should not be used for purposes other than stated
in the instructions accompanying this appliance.
10. DO NOT leave unit unattended while in use.
11. Allow to cool before putting on or taking o parts and before cleaning the appliance.
12. Extreme caution should be used when moving an appliance with hot food.
13. During use, the appliance is very hot and remains hot for some time after being
14. Do not attempt to service this appliance yourself, as opening or
turned o. DO NOT touch hot surfaces.
removing covers may expose you to dangerous voltage or other
hazards. Refer all servicing to qualied service personnel.
3
Page 6
SAVE THESE INSTRUCTIONS!
INTRODUCTION
Thank you for purchasing the HOLLOW CHOCOLATIER from Nostalgia Electrics!
Making delightful hollow chocolate candies right at home has never been easier;
Simply ll the mold with melted chocolate and the ashing, color-changing
lights will illuminate your candy creation! (9-Volt Battery Not Included)
Your HOLLOW CHOCOLATIER includes:
• 5candymolds
• Spatula/Knifefordetailwork
• Injectorfordecoratingorinfusing
• 20piecesofdouble-sidedred/silverfoil
ENGLISH
4
Page 7
ENGLISH
PARTS & ASSEMBLY
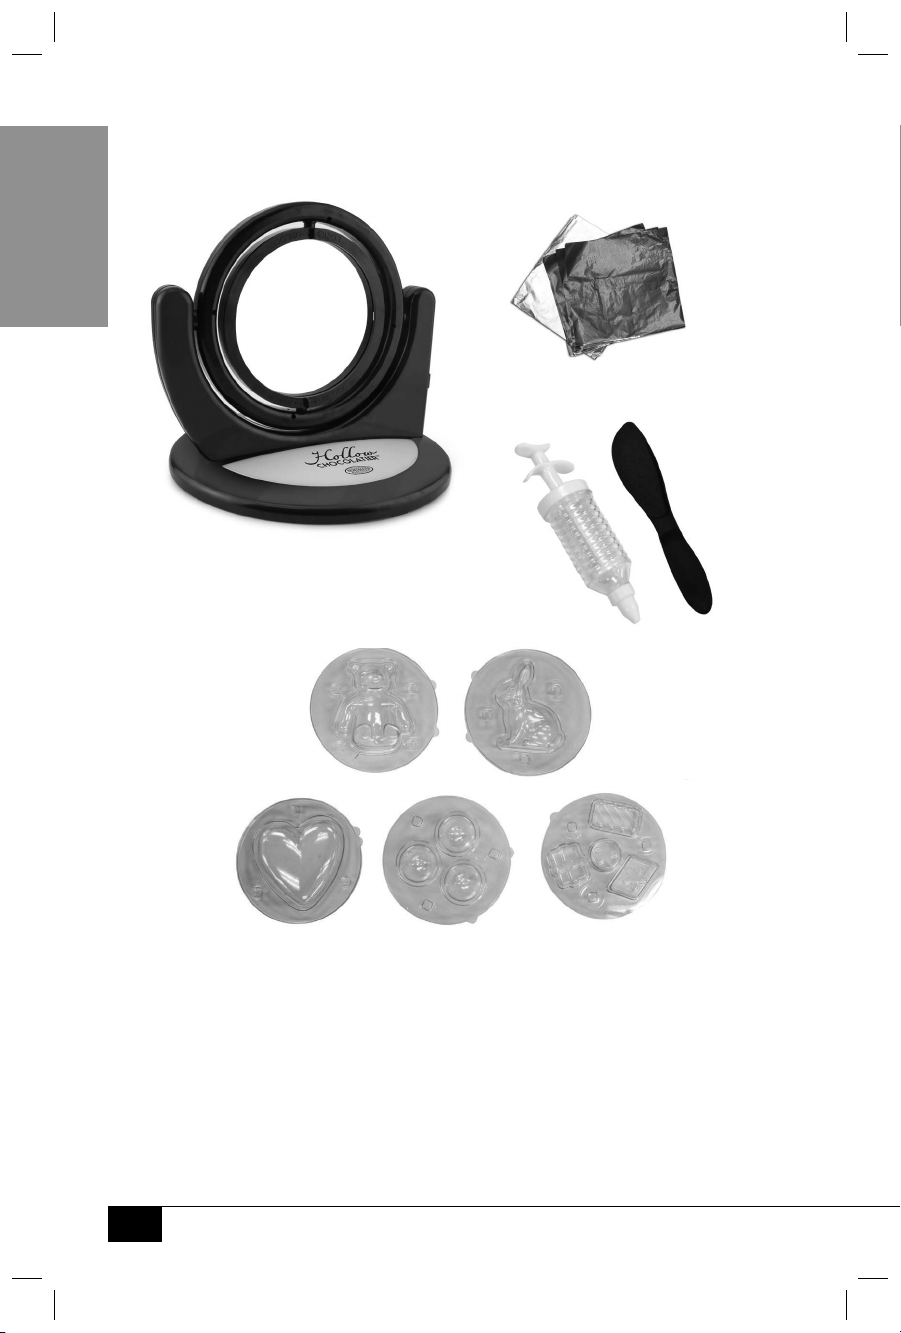
Parts
Lighted Chocolatier
(requires one 9-volt
battery, not included)
Chocolate molds included:
Bear Rabbit
20 pieces of doublesided decorative foil
Spatula/Knife
Injector
Heart
Installing the Battery (9-volt battery not included)
1. Remove base from Lighted Chocolatier to access the 9-Volt Battery
Compartment located at the bottom of the unit.
2. Align the polarities of the 9-volt battery with the power connector. The large (-)
terminal on the battery aligns with the small terminal on the power connector, and
the small (+) terminal on the battery aligns with the large terminal on the power
connector. (Power connector is located inside the 9-Volt Battery Compartment.)
3. Firmly snap battery into power connector, and place connected battery into
9-volt Battery Compartment. Reconnect base of Lighted Chocolatier.
5
4-in-1 CandiesEggs
Page 8

HOW TO OPERATE
1. Before rst use, wipe all parts with a damp, non-abrasive cloth and dry thoroughly. Be
very careful to not get any water in the Lighted Chocolatier, or unit will not function.
2. Find a dry, heat-resistant, level surface.
3. Using your own recipe, prepare your chocolate mixture.
4. Steam may be released from food during cooking. For your safety, avoid contact
with steam, as it is very hot and can cause burns.
5. Be careful to watch the chocolate mixture and stir mixture if necessary.
DO NOT let mixture boil over, as this could cause burns.
6. While the chocolate is heating, insert one 9-volt battery into the Chocolatier. To do this,
press in the plastic tab on the left underside of the unit to remove the base and reveal the
battery compartment. After locking the base back into place, unlock the top half of the
center ring by turning it counterclockwise, so that the mold can be placed in after it is lled.
7. When mixture is ready to use, pour into half of the mold of your choice (see Helpful Tips
section for mold-specic suggestions).
8. Seal mold and place in the center ring. Replace the other half of the center ring and turn it
clockwise to lock mold in place. Press the "ll" switch. The HOLLOW CHOCOLATIER will rotate
and ash its color-changing lights as it spins the mold to form the shape of your choosing.
9. When the chocolate has covered the mold, turn the unit o and unlock the mold and place it
in the freezer. Let the chocolate harden for about 30 minutes and gently remove from mold.
10. Once candy has been removed, you can use the knife/spatula to trim the edges or add
detail. You can also add decorations on the outside or lling on the inside with the injector.
11. If using the injector to ll candy with your favorite cream, jelly or other liquid, make a small
hole in the candy with a fork. Use the injector with the lling of your choice, then use the
spatula/knife tool to patch the hole with your remaining chocolate in the melting pot.
12. Replace candy in the freezer until patch has hardened. The included
foils can also be used to wrap candies after they are hardened.
13. Once you are nished with the chocolate, empty remaining heated mixture
into a bag or trash receptacle and follow the directions in the Cleaning
& Maintenance section to clean your HOLLOW CHOCOLATIER.
ENGLISH
6
Page 9

HELPFUL TIPS
NEVER leave the unit unattended while operating.
• Use the included spatula/knife to shave edges and rene shapes.
The injector not only lls candies, but can be used to decorate the outside of pieces.
ENGLISH
• For colored chocolates, melt down white chocolate and add food dye.
• For a thinner candy shell, ll less of the mold, relative to its size.
Filling the 4-in-1 mold to the very top, for example, will create a very
thick shell due to the small size of the individual molds.
• For a thicker shell in any of the molds, ll mold to the very top.
• When using molds with small indents or details, such as the Bear or Rabbit mold, be
sure to ll each area with the chocolate mixture to ensure full chocolate coverage.
• After removing the mold from the HOLLOW CHOCOLATIER, make sure that
every part of the mold is covered with chocolate. If small spaces remain clear,
shake the mold to move the chocolate into the space remaining.
• For solid candies, ll one half of the mold of your choice and freeze.
• To turn on only the lights of the unit, press the switch to "l".
CLEANING & MAINTENANCE
Please take care of your HOLLOW CHOCOLATIER by following
these simple instructions and precautions.
• Make sure the appliance is completely cool before cleaning.
• Disassemble all parts.
• Dispose of any remaining mixture by emptying into a bag or trash receptacle.
It is not recommended that you pour the leftover mixture down the sink.
• Hand wash molds and any utensils used in warm, soapy water with a non-abrasive cloth.
• Dry parts thoroughly with a soft, non-abrasive cloth.
• DO NOT put any parts in a dishwasher.
• NEVER immerse Lighted Chocolatier in water.
7
Page 10

RECIPES
Creating delightful candies for yourself or family and friends has never
been easier or more entertaining! With the HOLLOW CHOCOLATIER, you
can make, ll and wrap chocolate candies in shapes for all occasions.
Try using different varies in either chip or block form:
• 16 oz. Milk, Dark, Semisweet or White Chocolate Chips
• 16 oz. Belgian Milk Chocolate
• 16 oz. Peanut Butter Chips
• 16 oz. Butterscotch Chips
Use your favorite:
frostings
creams
liqueurs
or jellies
to fill the hollow candies. You can also use different combinations of fillings to make new and
exciting flavors, and don't forget the included foil wraps that make anything more festive!
ENGLISH
8
Page 11

RETURNS & WARRANTY
SHOULD YOUR UNIT NOT WORK OR IF DAMAGED WHEN YOU FIRST TAKE IT OUT
OF THE BOX, PLEASE RETURN IT TO THE PLACE OF PURCHASE IMMEDIATELY.
ENGLISH
HOLLOW CHOCOLATIER / HCC100NP
Should you have any questions, please contact us via email or at the
customer service number listed below between the hours of 8:00 AM
and 5:00 PM, Monday through Friday, Central Standard Time.
Distributed by:
Nostalgia Products Group LLC
1471 Partnership Dr.
Green Bay, WI 54304-5685
Customer Service
Phone: (920) 347-9122
Web: www.nostalgiaelectrics.com
Customer Service Inquiry
To submit a Customer Service inquiry, go to www.nostalgiaelectrics.com and
ll out the Customer Service Inquiry form and click the Submit button.
A representative will contact you as soon as possible.
This appliance is designed and built to provide many years of satisfactory performance
under normal household use. The distributor pledges to the original owner that should
there be any defects in material or workmanship during the rst 90 days of purchase, we
will repair or replace the unit at our option. Our pledge does not apply to damages caused
by shipping, mishandling or unit being dropped. A product deemed defective either from
manufacturing or being mishandled is up to the distributor’s discretion. In order to obtain
service under this warranty, please contact Nostalgia Products Group, LLC at the telephone
number listed above or by lling out the Customer Service Inquiry Form located at www.
nostalgiaelectrics.com. This warranty does not apply to re-manufactured merchandise.
Please read these instructions carefully. Failure to comply with these instructions,
damages caused by improper replacement parts, abuse or misuse will void this
pledge to you and is being made in place of all other expressed warranties.
For more information, visit us online at www.nostalgiaelectrics.com.
Like us on Facebook at www.facebook.com/NostalgiaElectrics.
Follow our boards on Pinterest at www.pinterest.com/nostalgiaelctrx.
Tweet along with us on Twitter at www.twitter.com/NostalgiaElctrx.
9
Page 12

¡Haga de cada día una esta!
Visite www.nostalgiaelectrics.com para
ver más productos divertidos.
CONTENIDO
PRECAUCIONES IMPORTANTES . . . . . . . . . . . . . . . . . . . . . . . . . . 11
MEDIDAS IMPORTANTES . . . . . . . . . . . . . . . . . . . . . . . . . . . . . . 11
INTRODUCCIÓN . . . . . . . . . . . . . . . . . . . . . . . . . . . . . . . . . . . 12
PIEZAS Y ENSAMBLAJE . . . . . . . . . . . . . . . . . . . . . . . . . . . . . . . 13
FUNCIONAMIENTO . . . . . . . . . . . . . . . . . . . . . . . . . . . . . . . . . . 14
CONSEJOS ÚTILES . . . . . . . . . . . . . . . . . . . . . . . . . . . . . . . . . . 15
LIMPIEZA Y MANTENIMIENTO . . . . . . . . . . . . . . . . . . . . . . . . . . . 15
RECETAS . . . . . . . . . . . . . . . . . . . . . . . . . . . . . . . . . . . . . . . . 16
DEVOLUCIONES Y GARANTÍA . . . . . . . . . . . . . . . . . . . . . . . . . . . 17
SEGURIDAD
ESPAÑOL
Su seguridad y la de los demás es muy importante.
En este manual y en el aparato hemos incluido numerosos mensajes referentes
a la seguridad. Lea y siga siempre todos los mensajes de seguridad.
Este es el símbolo de aviso de seguridad.
Este símbolo le avisa de peligros potenciales que podrá
causar la muerte o lesionarle a usted y a otros.
Todos los mensajes de seguridad seguirán al símbolo de aviso de seguridad.
Todos los mensajes de seguridad le informarán acerca de peligros
potenciales, cómo reducir la posibilidad de lesionarse y le dirán
lo que puede ocurrir si no se siguen las instrucciones.
Especicaciones del aparato:
Chocolatera: utiliza una batería de 9 voltios (no incluida)
10
10
Page 13

PRECAUCIONES IMPORTANTES
1. No sumerja NUNCA el aparato en agua.
2. No lo utilice NUNCA cerca del agua.
3. No utilice NUNCA una esponja o un paño abrasivo con el aparato.
4. No deje NUNCA el aparato desatendido mientras esté en funcionamiento.
5. No introduzca NUNCA ninguna otra cosa en el aparato, aparte de para lo que se ha diseñado.
6. NO introduzca el aparato en el lavavajillas.
7. Manténgalo fuera del alcance de los niños.
8. Este aparato NO ES UN JUGUETE.
9. Este aparato no se ha diseñado para que lo utilicen los niños ni
personas con dicultades de aprendizaje sin supervisión.
10. Se debe supervisar a los niños para asegurarse de que no jueguen con el aparato.
MEDIDAS IMPORTANTES
Cuando utilice un dispositivo con pilas debe seguir siempre las
precauciones básicas de seguridad, entre las que se incluyen:
1. Lea todas las instrucciones antes de utilizar este aparato.
2. NO toque las supercies calientes.
3. NO lo utilice en exteriores. ÚNICAMENTE PARA EL USO INTERIOR.
4. Como medida de protección contra el riesgo de descarga eléctrica,
no sumerja el aparato en agua o cualquier otro líquido.
5. NO utilice ningún aparato después de que haya sufrido una avería, de que
ESPAÑOL
haya caído o de que se haya dañado de cualquier manera. Devuelva el aparato
al centro de revisión autorizado más cercano para que lo examinen, o a un
centro de reparaciones para que realicen cualquier ajuste mecánico.
6. El fabricante del aparato no recomienda el uso de accesorios que no se
hayan proporcionado con la unidad. Estos podrían causar lesiones.
7. Es necesaria una supervisión estricta cuando los niños utilicen
el aparato o cuando se encuentren a su alrededor.
8. NO coloque el aparato sobre o cerca de un fogón de gas
o eléctrico o dentro de un horno caliente.
9. Este aparato no se debe utilizar para otros usos distintos
de los indicados en las instrucciones adjuntas.
10. NO deje la unidad desatendida mientras esté en uso.
11. Deje que se enfríe antes de montar o desmontar piezas y antes de limpiarlo.
12. Debe ser extremadamente cuidadoso al mover un aparato con comida caliente.
13. Durante el uso, el aparato está muy caliente y permanecerá caliente por algún
tiempo cuando se apague. NO TOQUE las supercies calientes.
14. No intente revisar este aparato usted mismo, ya que abrirlo o retirar las
cubiertas podría estar expuesto a tensiones peligrosas u otros peligros.
Para cualquier revisión acuda a personal de revisiones cualicado.
11
11
Page 14

¡GUARDE ESTAS INSTRUCCIONES!
INTRODUCCIÓN
¡Gracias por comprar la CHOCOLATERA HUECA de Nostalgia Electrics™! ¡Hacer
deliciosos contes de chocolate huecos en casa nunca ha sido más fácil, basta
con rellenar el molde con chocolate derretido y las luces que destellan y cambian
de colores iluminarán su creación! (Batería de 9 voltios no incluida)
La CHOCOLATERA HUECA incluye:
• 5moldesdecontes
• Unaollaparaderretirchocolate
• Espátula/cuchilloparatrabajarendetalle
• Inyectorparadecoraroinyectar
• 20piezasdepapelrojo/plateadodedoblecara
ESPAÑOL
12
12
Page 15

PIEZAS Y ENSAMBLAJE
Piezas
Chocolatera iluminada
(Requiere una batería de
9 voltios no incluida)
Moldes de chocolate incluyeron:
ESPAÑOL
20 piezas de papel
decorativo de doble cara
Espátula/Cuchillo
Inyector
Oso Conejo
Corazón
Instalación de la Batería (batería de 9 voltios no incluido)
1. Retire la base de Chocolatier Iluminado para acceder a Compartimiento
de la Batería 9-Voltios situada en la parte inferior de la unidad.
2. Alinear las polaridades de la Batería de 9-Voltios con el conector de alimentación.
La gran (-) terminal de la batería se alinea con la pequeña (+) terminal en el
conector de alimentación, y la pequeña terminal de la batería se alinea con
la gran terminal del conector de alimentación. (Conector de alimentación
está situado dentro del Compartimiento de la Batería 9-Voltios.)
3. Cierre rmemente la batería en el conector de alimentación y coloque la batería conectada
a Compartimiento de la Batería 9-Voltios. Reconecte la base del Chocolatera Iluminada.
13
13
Contes 4 en 1Huevos
Page 16

FUNCIONAMIENTO
1. Antes del primer uso, limpie todas las piezas con un paño húmedo,
no abrasivo y séquelas bien. Tenga mucho cuidado de que no entre
agua a la base calentada, o la unidad no funcionará.
2. Encuentre una supercie seca y resistente al calor.
3. Con su propia receta, prepare su mezcla de chocolate.
4. Puede que escape algo de vapor de la comida durante la cocción. Para su propia
seguridad, evite el contacto con el vapor ya que está muy caliente y podría causarle
quemaduras.
5. Tenga cuidado de observar la mezcla y revuelva la mezcla si es necesario.
NO deje que la mezcla hierva, ya que esto podría causar quemaduras.
6. Mientras que el chocolate se esté calentando, inserte una batería de 9 voltios en la
Chocolatera. Para ello, presione la pestaña de plástico en la parte inferior izquierda
de la unidad para retirar la base y mostrar el compartimiento de la batería. Después
de jar la base en su lugar, abra la parte superior del anillo central, al girar hacia
la izquierda, de modo que el molde se pueda colocar después de llenarse.
7. Cuando la mezcla esté lista para su uso, vierta la mitad en el molde de su elección (consulte
la sección Consejos útiles para sugerencias especícas de moldes).
8. Selle el molde y colóquelo en el anillo central. Sustituya la otra mitad del
anillo central y gírela hacia la derecha para jar el molde en su lugar. Presione
el interruptor "ll". La CHOCOLATERA HUECA girará y destellará sus luces que
cambian de colores cuando gira el molde para crear la gura de su elección.
9. Cuando el chocolate haya cubierto el molde, apague la unidad, abra el
molde y colóquelo en el congelador. Deje que el chocolate se endurezca
durante unos 30 minutos y retírelo suavemente de molde.
10. Una vez que se haya retirado el conte, puede usar el cuchillo/la espátula
para recortar los bordes o añadir detalles. También puede añadir
decoraciones en el exterior o rellenar el interior con el inyector.
11. Si utiliza el inyector para llenar los contes con su crema favorita, jalea u otro
líquido, haga un pequeño agujero en el conte con un tenedor. Utilice el
inyector con el relleno de su elección, luego use la espátula/el cuchillo para
rellenar el agujero con el chocolate restante en la olla para derretir.
12. Sustituya el conte en el congelador hasta que se haya endurecido el relleno. Las láminas
incluidas también pueden usarse para envolver contes después de que se endurezcan.
13. Una vez que haya terminado con el chocolate, vacíe la mezcla calentada
restante en una bolsa o basura y siga las instrucciones en la sección
Limpieza y Mantenimiento para limpiar la CHOCOLATERA HUECA.
ESPAÑOL
14
14
Page 17

CONSEJOS ÚTILES
No deje NUNCA el aparato desatendido mientras esté en funcionamiento.
• Utilice la espátula/el cuchillo incluido para rebajar los bordes y renar las guras.
• El inyector no sólo llena contes, también se puede
utilizar para decorar el exterior de las piezas.
Para chocolates de colores, derrita el chocolate blanco y añada colorante de comida.
•
• Para una capa de conte más delgada, llene menos el molde, en relación con su tamaño.
• Llenar el molde 4 en 1 hasta arriba, por ejemplo, creará una capa muy
gruesa debido al tamaño pequeño de los moldes individuales.
Para obtener una capa más gruesa en cualquiera de los moldes, llene el molde hasta arriba.
•
• Al utilizar moldes con dientes o detalles pequeños tal como el molde
de oso o conejito, asegúrese de llenar cada área con la mezcla de
chocolate para garantizar la cobertura total de chocolate.
Después de retirar el molde de la CHOCOLATERA HUECA, asegúrese de que
•
todas las partes del molde se cubran con chocolate. Si quedan espacios
pequeños, agite el molde para mover el chocolate en el espacio restante.
Para obtener contes sólidos, llene la mitad del molde de su elección y congélelo.
•
• Para encender las luces de la unidad, mueva el interruptor a "l"
ESPAÑOL
LIMPIEZA Y MANTENIMIENTO
Cuide la CHOCOLATERA HUECA siguiendo estas simples instrucciones y precauciones.
• Asegúrese de que el aparato esté completamente frío antes de limpiarlo.
• Desmonte todas las piezas.
• Deseche el resto de la mezcla al vaciarla en una bolsa o bote de basura.
No se recomienda que vierta la mezcla sobrante por el fregadero.
• Lave a mano los moldes y cualquier utensilio utilizado con
agua tibia y jabonosa y con un paño no abrasivo.
• Seque las piezas por completo con un paño suave, no abrasivo.
• NO coloque ninguna pieza en el lavavajillas.
• No sumerja NUNCA la Chocolatera iluminada en agua.
15
15
Page 18

RECETAS
¡Crear confites deliciosos para el hogar y la familia y los amigos nunca ha
sido tan fácil y divertido! Con la CHOCOLATERA HUECA, puede hacer, llenar
y envolver confites de chocolate en figuras para toda ocasión.
Trate de usar diferentes variedades, ya sea en forma de botón o bloque:
• 16 onzas de botones de chocolate de leche, oscuros, semidulces o blancos
• 16 onzas de chocolate de leche belga
• 16 onzas de botones de mantequilla de maní
• 16 onzas de botones de sirope de caramelo
Use su relleno favorito:
garapiñas
cremas
licores
o jaleas
para rellenar los confites huecos. ¡También puede utilizar diferentes
combinaciones de rellenos para crear nuevos y excitantes sabores, y no
olvide de envolver con papel de aluminio para lograr algo más festivo!
ESPAÑOL
16
16
Page 19

DEVOLUCIONES Y GARANTÍA
SI LA UNIDAD NO FUNCIONA O ESTÁ DAÑADA AL SACARLA POR PRIMERA VEZ
DE LA CAJA, DEVUÉLVALA AL LUGAR DE COMPRA INMEDIATAMENTE.
CHOCOLATERA HUECA / HCC100NP
Si tiene cualquier duda, póngase en contacto con nosotros por correo electrónico o
a través del número de atención al cliente indicad a continuación entre las 8:00 a.m.
y las 5:00 p.m. de lunes a viernes (horario de la zona central de Estados Unidos).
Distribuido por:
Nostalgia Products Group LLC
1471 Partnership Dr.
Green Bay, WI 54304-5685
Atención al cliente
Teléfono: (920) 347-9122
Web: www.nostalgiaelectrics.com
Consultas para el servicio de Atención al Cliente
Para enviar una consulta el servicio de Atención al Cliente vaya a www.
nostalgiaelectrics.com, rellene un formulario de consulta para el servicio
de Atención al Cliente y haga clic en el botón de Entregar (Submit).
Uno de nuestros agentes se pondrá en contacto con usted tan pronto como sea posible.
Este aparato se ha diseñado y fabricado para ofrecer muchos años de funcionamiento
satisfactorio en condiciones normales de uso doméstico. El distribuidor garantiza
ESPAÑOL
al propietario original que, en caso de que se observara cualquier defecto de los
materiales o la mano de obra durante los primeros 90 días a partir de la compra, nosotros
decidiremos reparar o cambiar la unidad. Nuestra garantía no incluye daños causados
por el transporte, la manipulación incorrecta o caídas de la unidad. La consideración de
que un producto es defectuoso debido a la fabricación o a una manipulación incorrecta
será a discreción del distribuidor. Para obtener servicio bajo esta garantía, contacte con
Nostalgia Products Group, LLC por el número telefónico que aparece anteriormente o
llenando el Formulario de Solicitud de Servicio al Cliente que se encuentra en www.
nostalgiaelectrics.com. Esta garantía no es válida para productos remanufacturados.
Lea estas instrucciones atentamente. Si no se siguen estas instrucciones, se causan daños
por la sustitución incorrecta de piezas, se produce un abuso o una utilización incorrecta, se
invalidará esta garantía que se le ofrece y que sustituye a cualquier otra garantía expresa.
Para obtener más información visítenos en línea en www.nostalgiaelectrics.com.
Pulse el botón de Me gusta en Facebook en www.facebook.com/NostalgiaElectrics.
Siga a nuestros tableros en Pinterest en www.pinterest.com/nostalgiaelctrx.
Envíenos tweets en Twitter en Twitter at www.twitter.com/NostalgiaElctrx.
17
17
Page 20

Faites de chaque jour une fête !
Visiter le site Web www.nostalgiaelectrics.com pour
d’autres produits agréables.
TABLE DES MATIÈRES
IMPORTANTES MESURES DE PRÉCAUTION . . . . . . . . . . . . . . . . . . . 19
IMPORTANTES MISES EN GARDE . . . . . . . . . . . . . . . . . . . . . . . . . 19
INTRODUCTION . . . . . . . . . . . . . . . . . . . . . . . . . . . . . . . . . . . . 20
PIÈCES ET ASSEMBLAGE . . . . . . . . . . . . . . . . . . . . . . . . . . . . . . . 21
MODE D'EMPLOI . . . . . . . . . . . . . . . . . . . . . . . . . . . . . . . . . . . . 22
CONSEILS UTILES . . . . . . . . . . . . . . . . . . . . . . . . . . . . . . . . . . . 23
NETTOYAGE ET ENTRETIEN . . . . . . . . . . . . . . . . . . . . . . . . . . . . . 23
RECETTES . . . . . . . . . . . . . . . . . . . . . . . . . . . . . . . . . . . . . . . . 24
RETOURS ET GARANTIE . . . . . . . . . . . . . . . . . . . . . . . . . . . . . . . 25
SÉCURITÉ
Votre sécurité et celle des autres sont très importantes.
Ce manuel contient plusieurs avis importants sur la sécurité lors de l’utilisation
de votre appareil. Toujours lire et respecter toutes les consignes de sécurité.
Ceci est le symbole d'avertissement de sécurité.
Ce symbole avertit des risques potentiels, pouvant entraîner
la mort ou des blessures, à vous-même et à d'autres.
Tous les messages de sécurité suivront le symbole d'avertissement de sécurité.
Tous les messages de sécurité indiqueront le danger potentiel et la façon de réduire
le risque de blessure et ce qui peut arriver si les consignes ne sont pas suivies.
Fiche technique de l'appareil :
Chocolatière : nécessite une pile de 9 volts (pas incluse)
18
18
FRANÇAIS
Page 21

IMPORTANTES MESURES DE PRÉCAUTION
1. NE JAMAIS immerger l'appareil dans l'eau.
2. NE JAMAIS utiliser près d'une source d'eau.
3. NE JAMAIS utiliser une éponge ou un chion abrasif sur l'appareil.
4. NE JAMAIS laisser l'appareil sans surveillance pendant le fonctionnement.
5. NE JAMAIS mettre autre chose que ce qui est prévu dans l'appareil.
6. NE JAMAIS mettre l'appareil au lave-vaisselle.
7. Garder hors de portée des enfants.
8. Cet appareil n'est PAS UN JOUET.
9. Les enfants laissés sans surveillance et les personnes ayant une
décience cognitive ne devraient jamais utiliser cet appareil.
10. Les jeunes enfants devraient être supervisés au moment de l'utilisation
de l'appareil pour s'assurer qu'ils ne jouent pas avec celui-ci.
IMPORTANTES MISES EN GARDE
Des mesures de précaution de base devraient toujours être suivies au moment
de l'utilisation d'un appareil fonctionnant sur batterie, notamment :
1. Lire toutes les consignes avant d'utiliser l'appareil.
2. NE PAS toucher les surfaces chaudes.
3. NE PAS utiliser à l'extérieur. POUR USAGE DOMESTIQUE SEULEMENT.
4. Pour éviter de s'électrocuter, ne pas immerger appareil
chauante dans l'eau ou tout autre liquide.
5. NE PAS faire fonctionner le présent appareil lorsque le cordon ou la che est endommagé(e),
qu'il ne fonctionne pas correctement ou qu'il a été échappé ou endommagé de
quelque façon que ce soit. Retourner l'appareil au centre de service agréé le plus
près pour révision ou à un atelier de réparation pour un réglage mécanique.
6. Le fabricant ne recommande l'utilisation d'aucun accessoire autre que ce
qui est prévu avec l'appareil. Ceci pourra provoquer des blessures.
7. Une surveillance étroite des enfants est nécessaire lorsque
quelque appareil électrique est utilisé à leur proximité.
8. NE PAS placer sur un brûleur à gaz ou électrique ou à sa proximité, ou dans un four chaud.
9. Cet appareil ne doit pas être utilisé à d'autres ns que celles indiquées
dans les consignes qui accompagnent cet appareil.
10. Un appareil ne devrait pas être laissé sans surveillance
lorsqu'il est en cours de fonctionnement.
11. Laisser refroidir avant de mettre ou d'enlever des pièces pour le nettoyer.
12. Une extrême prudence doit être observée lorsque vous
déplacez un appareil avec des aliments chauds.
13. Pendant l'utilisation, l'appareil est très chaud et reste chaud pendant un certain
14. Ne pas tenter de réparer cet appareil soi-même, car l'ouverture ou le retrait
FRANÇAIS
temps après avoir été mis hors tension. NE PAS toucher les surfaces.
des couvercles pourrait provoquer des tensions dangereuses ou autres
19
19
Page 22

dangers. Coner toutes les réparations à un personnel qualié.
CONSERVER CES CONSIGNES !
INTRODUCTION
Merci d'avoir acheté la CHOCOLATIÈRE À COQUILLE de Nostalgia Electrics ! Faire de
délicieuses friandises en chocolat creux à la maison n'a jamais été aussi facile ; Il sut
de remplir le moule avec un chocolat fondu et les lumières clignotantes et à couleurs
changeantes illumineront vos créations de friandises ! (pile de 9 volts non incluse)
Votre CHOCOLATIÈRE À COQUILLE inclut :
• 5 moules à chocolat
• Caquelon pour faire fondre le chocolat
• Spatule / couteau pour sculpter les détails
• Injecteur pour décorer ou infuser
• 20 morceaux de feuilles minces à double face rouge / argent
20
20
FRANÇAIS
Page 23

PIÈCES ET ASSEMBLAGE
Pièces
Chocolatière éclairée
(nécessite une pile
de 9 V, non incluse)
Moules à chocolat inclus :
Ours Lapin
20 morceaux de feuilles minces
décorées à double face
Spatule / Couteau
Injecteur
Cœur
Installation de la batterie (pile de 9 volts non inclus)
1. Retirez la base de Chocolatière éclairée pour accéder au
Compartiment de la pile 9-Volts située au bas de l'appareil.
2. Aligner les polarités de la pile de 9 volts avec le connecteur d'alimentation.
La grande (-)borne de la pile est aligné avec la petite extrémité sur le
connecteur d'alimentation, et la petite (+) extrémité de la pile est aligné avec
le grand borne sur le connecteur d'alimentation. (Connecteur d'alimentation
est situé à l'intérieur de la Compartiment de Pile de 9-Volts.)
3. Appuyer fermement la batterie dans le connecteur d'alimentation, et placer la batterie
FRANÇAIS
connectée en Compartiment de Pile de 9-Volts. Rebranchez base Chocolatière éclairée .
21
21
Bonbons 4 en 1Œufs
Page 24

MODE D'EMPLOI
1. Avant la première utilisation, essuyer toutes les parties à l'aide d'un
chion humide, non abrasif puis assécher soigneusement.
2. Trouver une surface plane sèche, résistant à la chaleur.
3. Tout en utilisant votre propre recette, préparer votre mélange de chocolat.
4. De la vapeur pourrait se dégager de l'appareil pendant la cuisson. Pour assurer la
5. Surveiller le caquelon et si nécessaire remuer le mélange. NE PAS
6. Pendant que le chocolat chaue, insérer une pile de 9-volts dans la Chocolatière. Pour
7. Lorsque le mélange est prêt à être utilisé, verser dans la moitié dans le moule de votre choix
8. Sceller le moule et le placer au centre de l'anneau. Remettre l'autre moitié de
9. Lorsque le chocolat a couvert le moule, arrêter l'appareil et
10. Quand le chocolat a été enlevé, vous pouvez utiliser le couteau / spatule
11. Si vous utilisez l'injecteur pour remplir le chocolat avec votre crème préférée,
12. Remettre le chocolat dans le congélateur jusqu'à ce que le trou bouché ait durci.
13. Lorsque vous avez terminé avec le chocolat, verser le mélange restant
sécurité, éviter tout contact avec la vapeur, car elle est très chaude et peut
provoquer des brûlures.
laisser le mélange bouillir, il pourrait causer des brûlures.
ce faire, appuyez sur le bouton en plastique sur le côté gauche du dessous de l'unité
pour retirer la base et révéler le compartiment de la batterie. Après le verrouillage de
la base en place, déverrouiller la moitié supérieure de l'anneau central en le tournant
dans le sens antihoraire, de sorte que le moule peut être placé une fois qu'il est rempli
(voir section Conseils utiles pour moule - suggestions spéciques).
l'anneau central en le tournant dans le sens antihoraire, de sorte que le moule puisse
être placé une fois qu'il est rempli. Appuyer sur le bouton « II ». La CHOCOLATIÈRE
À COQUILLE tournera et clignotera ses lumières multicolores changeantes
pendant que le moule tourne pour former la gurine de votre choix.
déverrouiller le moule et le mettre au congélateur. Laisser le chocolat
durcir 30 minutes et l'enlever délicatement du moule.
pour tailler les contours ou ajouter des détails. Vous pouvez également le
décorer de l'extérieur ou le remplir de l'intérieur avec un injecteur.
ou de gelée ou d'autres liquides, faire un petit trou dans le chocolat avec une
fourchette. Utiliser l'injecteur avec la garniture de votre choix, puis à l'aide de la
spatule / couteau boucher le trou avec le chocolat restant dans le caquelon.
Les feuilles minces peuvent servir d'emballages pour les chocolats durcis.
dans un sac ou dans la poubelle et suivre les directives dans la section
Nettoyage et Entretien de votre CHOCOLATIÈRE À COQUILLE.
22
22
FRANÇAIS
Page 25

CONSEILS UTILES
NE JAMAIS laisser l'appareil sans surveillance lorsqu'il est utilisé.
• Utiliser la spatule / couteau pour nettoyer et sculpter les formes.
• L'injecteur ne sert pas uniquement à remplir les chocolats mais il
peut également servir à décorer l'extérieur des pièces.
• Pour du chocolat de couleur, faire fondre du chocolat
blanc et ajouter du colorant alimentaire.
• Pour une coquille de chocolat plus mince, moins remplir le moule.
• Remplir jusqu'à en haut le moule 4-en-1, par exemple, pour avoir une coquille
très épaisse en raison de la petite taille des moules individuels.
• Pour une coquille plus épaisse dans n'importe quel moule,
il sut de remplir le moule jusqu'en haut.
• Lorsque vous utilisez les moules avec de petits entailles ou détails,
tels que le moule de l'ours ou du lapin, veillez à remplir chaque
zone avec le mélange de chocolat an de bien le couvrir.
• Après avoir enlevé le moule de la CHOCOLATIÈRE À COQUILLE, s'assurer que
chaque partie du moule soit couverte de chocolat. S'il y a de petits espaces sans
chocolat , bouger le moule pour déplacer le chocolat dans l'espace vide.
• Pour du chocolat dur, remplir un demi-moule à votre choix et le réfrigérer.
• Pour seulement allumer les lumières de l'appareil, appuyer sur le bouton « I ».
NETTOYAGE ET ENTRETIEN
Veuillez prendre soin de votre CHOCOLATIÈRE À COQUILLE en
suivant ces consignes et mesures de précaution, simples.
• S'assurer que l'appareil ait refroidi avant de le nettoyer.
• Démonter toutes les pièces.
• Jeter le reste de mélange dans un sac ou dans la poubelle. Il n'est
pas recommandé de jeter le mélange qui reste dans l'évier.
• Laver les moules et les ustensiles à la main, à l'eau chaude
savonneuse à l'aide d'un chion non abrasif.
• Assécher complètement avec un chion doux, non abrasif.
• NE PAS mettre de pièces au lave-vaisselle.
• NE JAMAIS immerger la Chocolatière éclairée ou le cordon dans l'eau
FRANÇAIS
23
23
Page 26

RECETTES
Créer de délicieux chocolats pour vous-même ou votre famille et vos amis n'a jamais
été aussi facile ou aussi amusant ! Avec la CHOCOLATIÈRE À COQUILLE, vous pouvez
faire, remplir et emballer les chocolats de diverses formes pour diverses occasions.
Essayer d'utiliser différentes variétés, pépites ou chocolat en bloc :
• 16 oz Chocolat au lait, noir, semi-sucré ou des pépites de chocolat blanc
• 16 oz Chocolat Belge au lait
• 16 oz Pépites de beurre d'arachides
• 16 oz Pépites de caramel
Mettre vos :
glaçages
crèmes
liqueurs
ou gelées préférées
pour fourrer les bonbons. Vous pouvez également utiliser diverses combinaisons
pour le remplissage, et faire de nouvelles et excitantes saveurs, et n'oubliez
pas les feuilles minces pour emballer et donner une allure festive !
24
24
FRANÇAIS
Page 27

RETOURS ET GARANTIE
SI VOTRE APPAREIL NE FONCTIONNE PAS OU S'IL EST ENDOMMAGÉ
QUAND VOUS LE RETIREZ DE LA BOÎTE, VEUILLEZ LE RETOURNER
IMMÉDIATEMENT À L'ENDROIT OÙ IL A ÉTÉ ACHETÉ.
CHOCOLATIÈRE À COQUILLE / HCC100NP
Pour toute question, communiquer par courriel ou au numéro de téléphone du service
à la clientèle, entre 08 h 00 et 17 h 00, du lundi au vendredi, heure normale du Centre.
Distribué par :
Nostalgia Products Group LLC
1471 Partnership Dr.
Green Bay, WI 54304-5685
Service à la clientèle
Téléphone : (920) 347-9122
Site Web: www.nostalgiaelectrics.com
Demande de renseignements auprès du service à la clientèle
Pour soumettre une demande de renseignements auprès du service à la clientèle,
visiter le site Web www.nostalgiaelectrics.com et remplir le Formulaire de demande de
renseignements du service à la clientèle, puis cliquer sur le bouton Submit (transmettre).
Un représentant entrera en communication avec vous dès que possible.
Cet appareil est conçu pour orir plusieurs années d'utilisation satisfaisante, et ce, sous
de conditions normales d'utilisation. Le distributeur garantit à l'acheteur initial que s'il y
a un défaut de matériaux ou de fabrication pendant les 90 premiers jours suivant l'achat,
il réparera ou remplacera l'appareil à sa discrétion. La garantie ne s'applique pas aux
dommages causés par le transport, la manipulation abusive ou la chute de l'appareil. Un
produit défectueux suite à sa fabrication ou à une mauvaise utilisation sera à l’entière
discrétion du grossiste. An que la garantie couvre ce produit, veuillez contacter
Nostalgia Products Group, LLC au numéro de téléphone suivant ou en remplissant un
formulaire de question destine au service à la clientèle situé sur le site Internet : www.
nostalgiaelectrics.com. La présente garantie ne s'applique pas aux marchandises réusinées.
Veuillez lire ces consignes attentivement. Le non-respect de ces consignes,
les dommages causés par des pièces de rechange inappropriées, l'utilisation
abusive ou la mauvaise utilisation entraîneront l'annulation de la présente
garantie qui tient lieu et place de toute autre garantie explicite.
Pour de l'information supplémentaire, visiter le site Web www.nostalgiaelectrics.com.
Dire « J'aime » sur Facebook sur le site Web www.facebook.com/NostalgiaElectrics.
Suivre nos conseils sur Pinterest à l'adresse www.pinterest.com/nostalgiaelctrx.
Gazouiller avec nous sur Twitter à l'adresse www.twitter.com/NostalgiaElctrx.
FRANÇAIS
25
25
Page 28

 Loading...