

Page 1

All products are trademarks of Nostalgia Products Group, LLC.
Worldwide design & utility patented or patents pending.
© 2012 Nostalgia Products Group, LLC.
2013
www.nostalgiaelectrics.com
(rev. 05/02/13)
Page 2
CDP200RED
Electric Cookie Press
Molde Electrónico para Galletas
Presse à biscuits électrique
Instructions and Recipes
Instrucciones y recetas
Instructions et recettes
Page 3

Page 4
Make every day a party!
Visit www.nostalgiaelectrics.com for more fun products.
CONTENTS
IMPORTANT PRECAUTIONS . . . . . . . . . . . . . . . . . . . . . . . . . . . . . 3
IMPORTANT SAFEGUARDS . . . . . . . . . . . . . . . . . . . . . . . . . . . . . 3
INTRODUCTION . . . . . . . . . . . . . . . . . . . . . . . . . . . . . . . . . . . . 4
PARTS & ASSEMBLY . . . . . . . . . . . . . . . . . . . . . . . . . . . . . . . . . . 5
HOW TO OPERATE . . . . . . . . . . . . . . . . . . . . . . . . . . . . . . . . . . 9
HELPFUL TIPS . . . . . . . . . . . . . . . . . . . . . . . . . . . . . . . . . . . . . 10
CLEANING & MAINTENANCE . . . . . . . . . . . . . . . . . . . . . . . . . . . . 11
RECIPES . . . . . . . . . . . . . . . . . . . . . . . . . . . . . . . . . . . . . . . . . 12
RETURNS & WARRANTY . . . . . . . . . . . . . . . . . . . . . . . . . . . . . . . 18
SAFETY
ENGLISH
Your safety and the safety of others is very important.
We have provided many important safety messages in this manual and
on your appliance. Always read and obey all safety messages.
This is the safety alert symbol.
This symbol alerts you to potential hazards that
can kill or hurt you and others.
All safety messages will follow the safety alert symbol.
All safety messages will tell you what the potential hazard is, tell you how to reduce the
chance of injury, and tell you what can happen if the instructions are not followed.
Appliance Specications:
120 Volts, 60 Hz, 15 Watts
ETL Approved
2
Page 5

IMPORTANT PRECAUTIONS
1. NEVER immerse appliance or cord in water.
2. NEVER use near water.
3. NEVER use an abrasive sponge or cloth on the appliance.
4. NEVER leave appliance unattended while in use.
ENGLISH
5. Unplug appliance from outlet when not in use and when cleaning.
6. DO NOT place appliance in dishwasher.
7. Keep out of reach of children.
8. This appliance is NOT A TOY.
9. This appliance is not intended for use by young children or
the cognitively challenged without supervision.
10. Young children should be supervised to ensure that they do not play with the appliance.
IMPORTANT SAFEGUARDS
When using electrical appliances, basic safety precautions should always be followed,
including:
1. Read all instructions before operating this appliance.
2. Do not immerse or rinse motor body, cord or plug in water or any other liquid.
3. This appliance is not for use by or near children.
4. The unit should be unplugged when not in use, before putting
on or taking o parts, and before cleaning.
5. Using attachments that are not recommended or sold by the manufacturer
of this appliance can result in re, electric shock, or injury.
6. For indoor household use only.
7. Keep hands, hair and clothing, as well as utensils, away from
moving parts, discs, and tips while processing, to prevent the risk
of severe injury to persons or damage to the cookie press.
8. Handle discs and tips carefully when removing, inserting or cleaning.
9. Lock cover and tube securely in place before operating appliance.
Do not try to remove tube or tube cover while in use.
10. A short power-supply cord or detachable power-supply cord is provided to
reduce the risk resulting from becoming entangled in or tripping over a longer
cord. Do not let cord hang over edge of table or touch hot surfaces.
11. Always plug cord into wall outlet before operation. Allow
unit to cool completely before putting away.
12. Longer detachable power-supply cords or extension cords are available and may be used
if care is exercised in their use. Exception: An extension cord or longer detachable cord is
not recommended for use with this appliance.
3
Page 6

13. If a long detachable power-supply cord or extension cord is used: 1) The marked
electrical rating of the cord or extension cord should be at least as great as the
electrical rating of the appliance; 2) If the appliance is of the grounded type,
the extension cord should be a grounding 3-wire cord; and 3) The longer cord
should be arranged so that it does not drape over the countertop or table top
where it can be pulled on by children or tripped over unintentionally.
14. This appliance has a polarized plug (one blade is wider than the other). To reduce the
risk of electric shock, this plug is intended to t into a polarized outlet only one way.
If the plug does not t fully into the outlet, reverse the plug. If it still does not t,
contact a qualied electrician. Do not attempt to modify the plug in any way.
15. Do not attempt to service this appliance yourself, as opening or
removing covers may expose you to dangerous voltage or other
hazards. Refer all servicing to qualied service personnel.
SAVE THESE INSTRUCTIONS!
INTRODUCTION
Thank you for purchasing the ELECTRIC COOKIE PRESS from Nostalgia Electrics™! Now
you can design and decorate delicious cookies like a professional baker! The ELECTRIC
COOKIE PRESS makes it fast and easy to whip up beautifully decorated cakes and cookies,
as well as other appetizing hors d'oeuvres. Use your imagination and have fun!
Features:
• Includes 12 cookie discs and 8 decorating tips
• Ergonomic handle with ON/OFF power button makes it easy to use
• Follow the included cookie recipes, or use store bought dough
• Can also be used for lling pasta shells, hard-boiled eggs or to decorate cupcakes and cakes
ENGLISH
4
Page 7
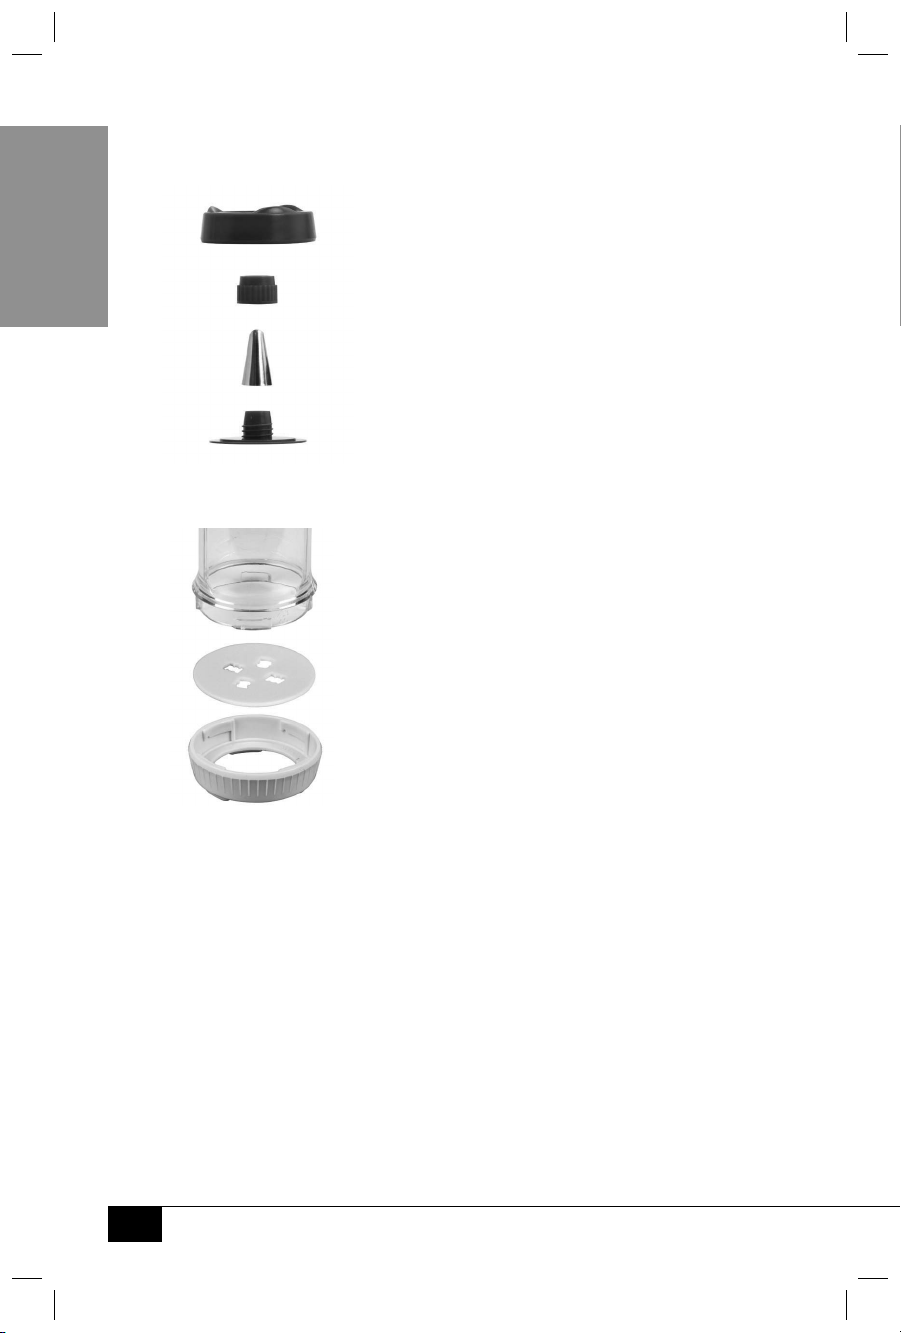
PARTS & ASSEMBLY
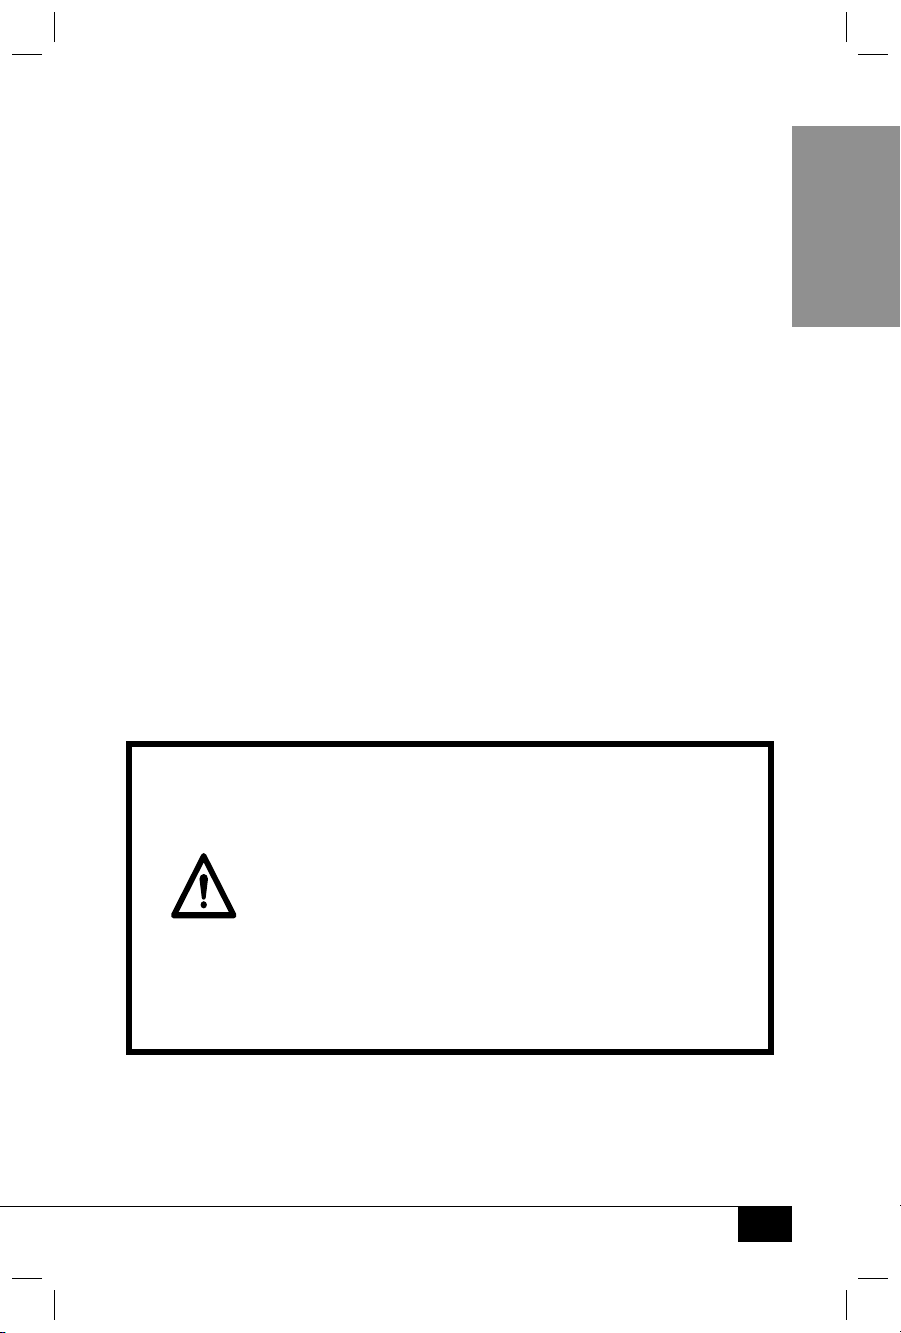
PARTS
Tube
ON/OFF Switch
ENGLISH
PASTRY TIPS (8)
Tube Cover
Pastry Tip Adapter
Cookie Press Shaft
Motor Body
Pastry Tip Cover
Shaft Disc
COOKIE DISCS (12)
5
Page 8
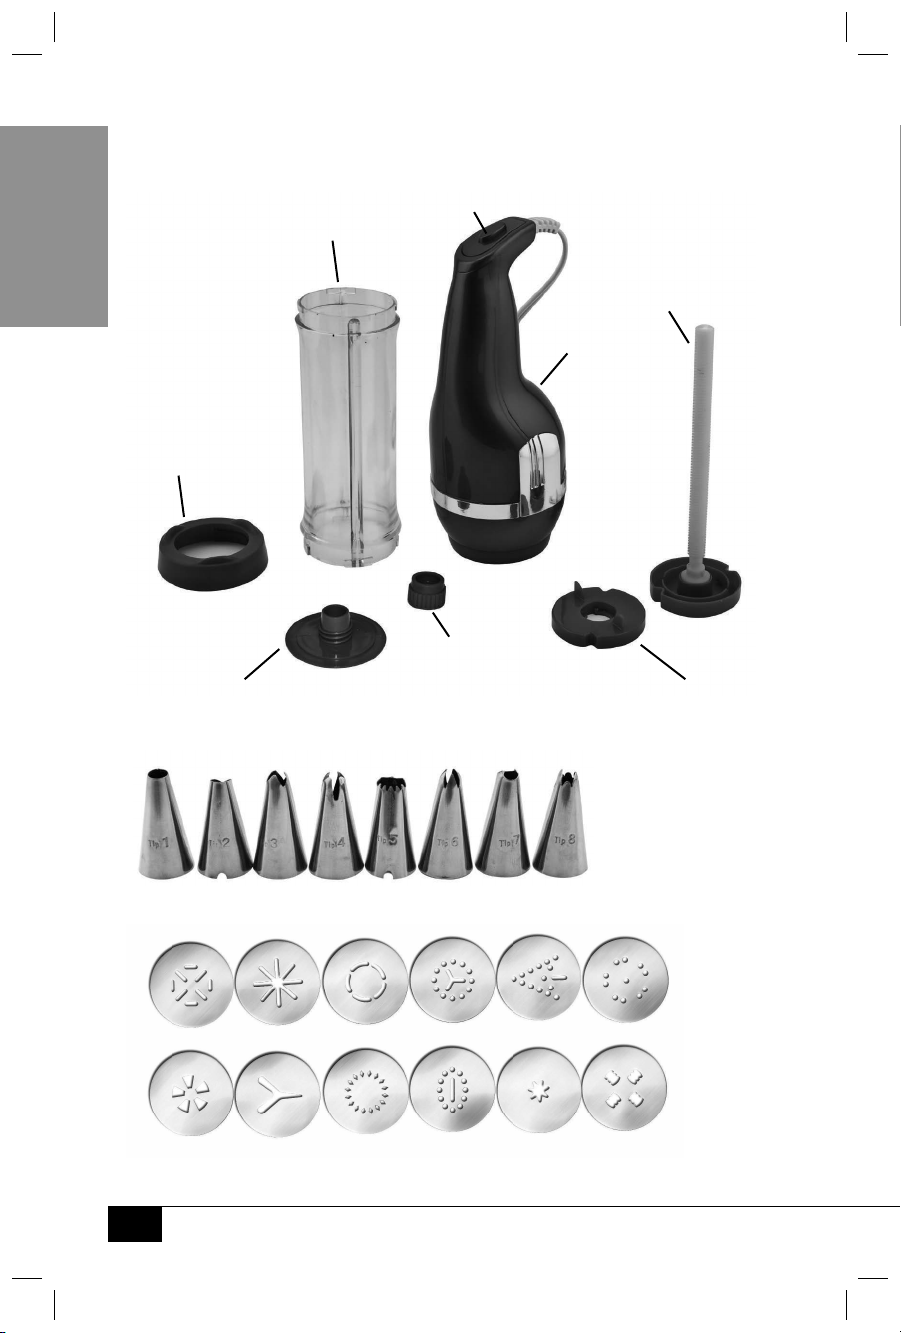
ASSEMBLY
1. With the Shaft Disc in place, insert the stem of the Cookie Press Shaft
into the center hole of the Motor Body. Push the Cookie Press Shaft
completely inside the Motor Body and press rmly into place.
2. Attach the Tube by aligning the pegs on the inside of the Tube with
the outside grooves of the Shaft Disc. The arrow on the Tube will
line up with the UNLOCK position on the Motor Body.
3. Grasp Tube rmly and turn until the top arrow on the Tube lines up with the
LOCK (
4. Load freshly prepared cookie dough or lling into the unit with a spoon or spatula.
NOTE: Do not ll the tube past the MAX ll line.
) position. You will hear a click when it is in the proper position.
ENGLISH
6
Page 9
5. If you are using a Pastry Tip, put the desired tip over the Pastry Tip Adapter and secure
with the Pastry Tip Cover. Put the fully assembled Pastry Tip into the Tube Cover,
place the Tube Cover onto the Tube and turn clockwise to a locked position.
ENGLISH
6. If using the Cookie Discs, choose your preferred disc and place it at the end of the Tube.
Place the Tube Cover onto the Tube and turn clockwise until it locks in place.
You are now ready to use your ELECTRIC COOKIE PRESS!
7
Page 10
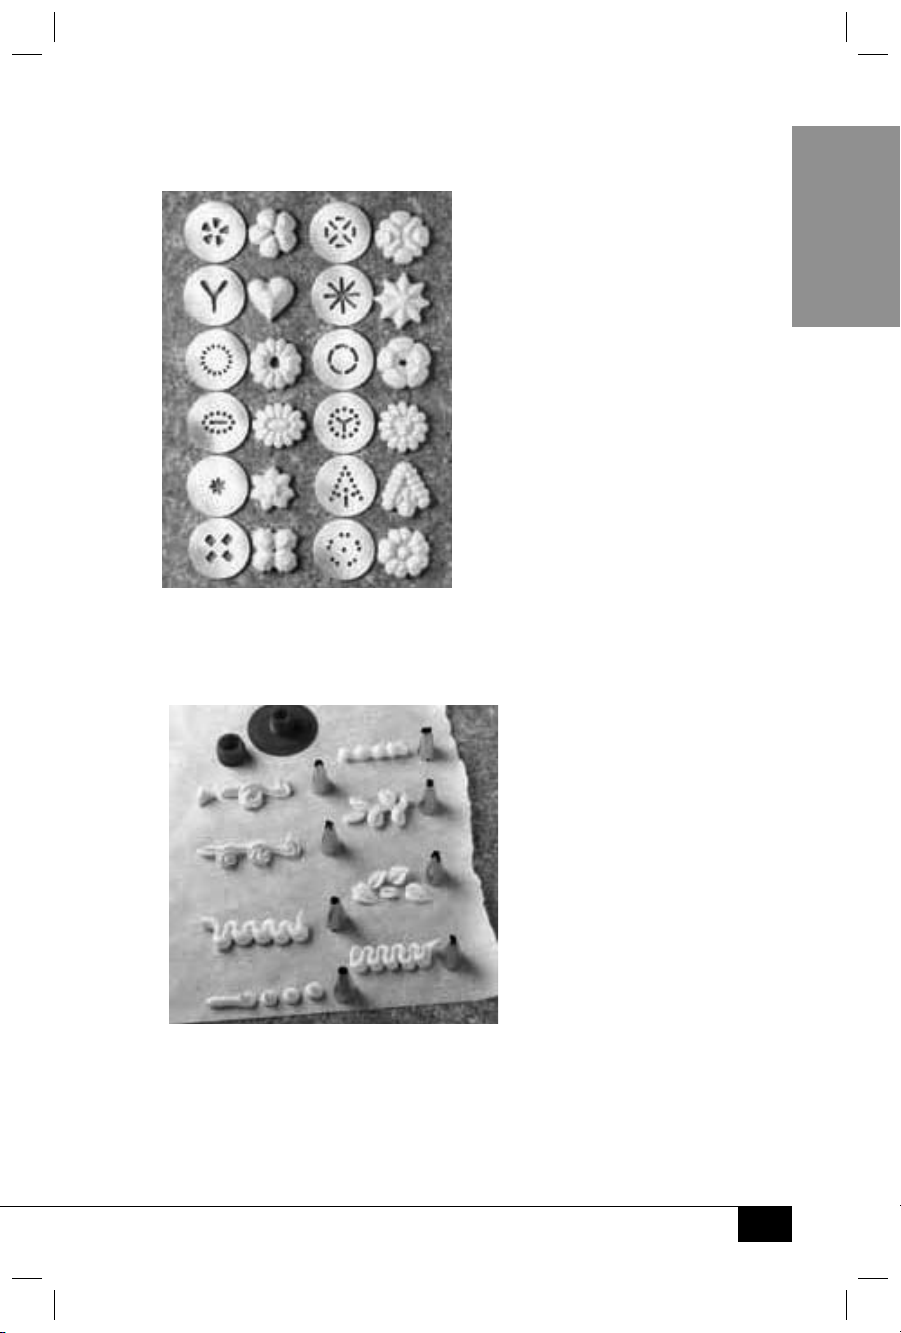
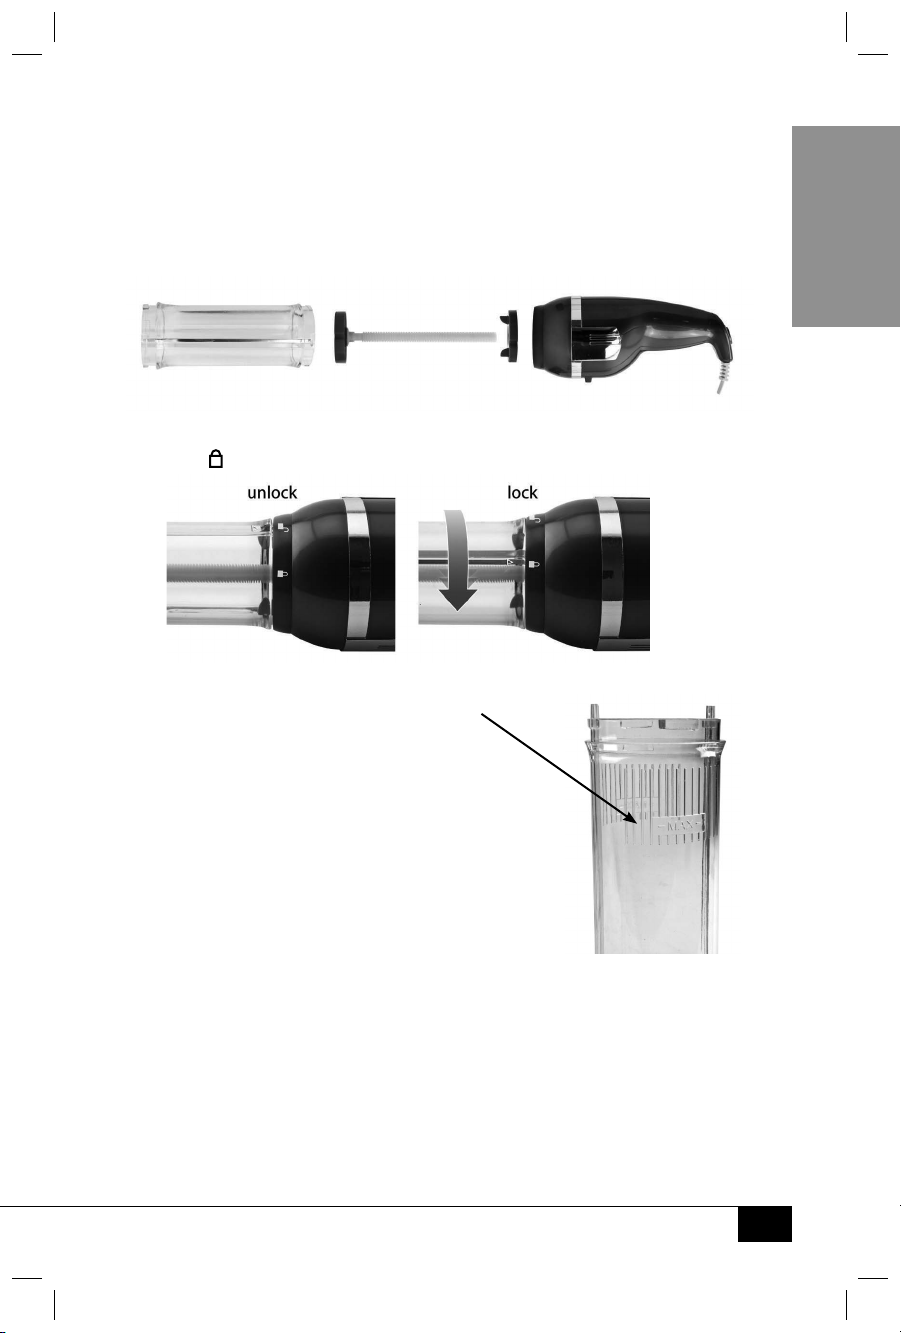
COOKIE DISC SHAPES
The ELECTRIC COOKIE PRESS comes with 12 dierent
Cookie Discs for pressing fun cookie shapes.
DECORATIVE TIP SHAPES
The ELECTRIC COOKIE PRESS comes with 8 dierent Pastry Tips to suit all of your
decorating and piping needs. From decorating cakes, cookies and cupcakes, to
lling cream pus and topping savory hors d’oeuvres like deviled eggs, the ELECTRIC
COOKIE PRESS from Nostalgia Electrics™ is a versatile and convenient baking tool.
ENGLISH
8
Page 11

HOW TO OPERATE
BEFORE FIRST USE
1. Carefully unpack the ELECTRIC COOKIE PRESS and all accessories.
2. Wash Cookie Discs, Pastry Tips, Pastry Tip Adapter, Tube Cover, Pastry Tip
Cover, Tube, Shaft Adapter, and Cookie Press Shaft in warm, soapy water.
ENGLISH
Rinse and dry completely with a non-abrasive cloth or towel.
3. Wipe all surfaces of the Motor Body with a slightly moistened, nonabrasive cloth and dry thoroughly making sure that no water enters
the Motor Body. MAKE SURE THE UNIT IS UNPLUGGED.
4. NEVER immerse the Motor Body, plug or cord in water or any other liquid, and do not
use steel wool, scouring pads or abrasive cleansers as they will damage the nish.
MAKING COOKIES
The proper consistency of cookie dough is critical. If it is too sti, the dough
will not release from the cookie press. If it is too soft or sticky, the cookies
will not retain their shape. It may take some practice to achieve the optimal
consistency of cookie dough to use with your ELECTRIC COOKIE PRESS.
1. After assembling your ELECTRIC COOKIE PRESS, ll with dough to
the MAX ll line. DO NOT use dough with nuts or candy.
2. Plug the lled cookie press and stand in an upright position with the tube cover
resting on an unlined/ungreased baking sheet. Before pressing your rst cookie,
all of the air pockets must be pressed out of the dough. To do so, hold down the
ON/OFF button until the dough just starts to be pressed out of the disc.
3. To form a cookie, hold the button down for 1 to 2 seconds, depending on the type
of dough you prepared or the disc you are using. After pressing for 1 to 2 seconds,
gently lift the cookie press from the pan and then repeat to press your next cookie,
and so on. You should always have the tube cover resting on the cookie sheet when
pressing cookies. Failing to do so will prevent the cookies from forming properly.
USING PASTRY TIPS
Whether you are lling pâte à choux or piping a decoration on a cake, it is advised to
pulse the ON/OFF button as opposed to holding it down continuously. This allows
for more control on the amount of lling or frosting that will be used at one time.
The consistency of what you are to pipe is very important. In most cases, frostings
will have to be thicker than normal in order to achieve best results. If the frosting,
especially for decorating, is too thin, it will not hold its shape. You will notice
that most frostings, decorating or not, will need to be thicker than normal. It is
recommended that you practice piping before you decorate a nal product.
When decorating pastries, quickly pulse once and then gauge your work from
there. There will always be more frosting/lling than expected pressed out of the
tip, so go slowly. As when using a traditional pastry bag for decorating, you want
to guide the frosting as if it were a ribbon, as opposed to forcing it in place.
When lling, be it cream pus or deviled eggs, pipe desired amount and then pause
between each, making sure all of the lling is removed from the tip before moving on to the
next one.
9
Page 12

REFILLING COOKIE PRESS
Most recipes provided require the user to rell the cookie press at least once. Depending
on the size of the cookie that you are pressing, you can usually get 25 to 40 cookies per ll.
• In order to rell the press, remove the tube from the motor body, press
the shaft to disengage, and reassemble as instructed on page 2.
• Rell with dough to MAX ll line. Again, press all air pockets out of the dough by
holding down the On/O button, and then press your next batch of cookies.
NOTE: If you wish to use a dierent type of dough or if dough has built up
in the shaft adapter, it may be necessary to take apart and clean the entire
cookie press before relling. Always clean and reassemble your cookie press as
directed in this manual, and be sure to adhere to food safety guidelines.
HELPFUL TIPS
COOKIE DOUGH
• Consistency of the cookie dough is very important. If dough is too sti or dry, it will not be
able to be pressed out. You want the dough to be slightly sticky, but not too sticky. If dough
is too soft, the cookies will not hold their shape. This may take some practice. Recipes may
need to be adjusted to get the desired consistency. You will nd your shapes improving as
you become accustomed to the rhythm and timing that works best for each cookie type.
• Cookie dough must be smooth in texture. It is not recommended
that you use nuts, chocolate chips or candies in your dough.
This will prevent the cookie press from being clogged.
• Always use the dough immediately after making. This will yield the best results.
It is not recommended that you use frozen dough. The dough should be pliable
enough to come out of the disc easily and keep its shape on the cookie sheet.
• If dough is too sticky or soft, refrigerate it for 15 minutes. Another option is to beat a small
amount of our into the dough. Adding margarine may also help to cut the stickiness.
• If the dough is too sti, mix in a little beaten egg.
• Once dough has been placed into the Tube, use it immediately.
• Never grease or line your cookie sheets when using the cookie press.
If you do, your cookie dough will not stick to the pan, therefore
preventing the cookies from maintaining a consistent shape.
DECORATING
• To decorate candies, cookies, and desserts or to insert pastry
or hors d’oeuvres llings, etc, use Pastry Tips.
• If the dough is not moist enough to hold decorations, lightly brush a small
amount of water, milk or honey where you wish to place the decorations.
ENGLISH
10
Page 13

CLEANING & MAINTENANCE
Please take care of your ELECTRIC COOKIE PRESS by following these
simple instructions and precautions. For best results, we recommend that
you clean your ELECTRIC COOKIE PRESS after each lling is used.
1. Disconnect from the electrical outlet by unplugging the appliance.
2. Unlock the Tube by holding the motor body with one hand, and the Tube with the
ENGLISH
other hand. Turn the Tube so that the arrow on the Tube lines up with the unlock
position on the Motor Body (refer to Assembly section). Pull o to remove.
3. Slide out the Shaft.
4. Remove the Cookie Disc or Pastry Tip assembly from the Tube.
5. Wash all removable parts and accessories in warm, soapy water. Rinse
and dry thoroughly with a non-abrasive cloth or towel.
6. Wipe the exterior of the Motor Body with a soft, damp cloth and dry
completely making sure that no water gets inside the Motor Body.
7. DO NOT use steel wool, scouring pads or abrasive cleansers, as they will damage the nish.
8. A soft brush can be used to clean the inside of the Tube and Pastry Tips.
9. Any other servicing should be performed by an authorized service representative.
10. NEVER immerse the ELECTRIC COOKIE PRESS in water or put in a dishwasher.
STORAGE
It is recommended that you keep the original box and packing materials and
repackage the ELECTRIC COOKIE PRESS as purchased. Store in a clean, dry location.
11
Page 14

RECIPES
With the ELECTRIC COOKIE PRESS you can use your favorite cookie dough
recipes or store bought cookie dough to create beautifully designed cookies
that everyone will love! Depending on the recipe, the cookie disc used, and
the size of the cookies desired, the amount of cookies yielded will vary.
You can also use your ELECTRIC COOKIE PRESS to ll eggs,
decorate cakes, cookies, cupcakes and much more!
Be creative and ENJOY your ELECTRIC COOKIE PRESS!
CHOCOLATE COOKIES
• 1¾ Cups White,
Granulated Sugar
• 6 Tbsp. Cocoa Powder
• 2 Cups AllPurpose Flour
• ½ Tsp. Salt
• 1 Cup Shortening
• ¼ Cup Margarine
• 1 Egg, beaten
• ½ Tsp. Pure
Vanilla Extract
• 3 Tsp. Milk
Preheat oven to 350˚ F (180˚ C).
In a large bowl, stir together the sugar, cocoa,
our and salt until well blended.
Cut in the shortening and margarine until
lumps are no larger than peas.
Add egg, vanilla and milk; mix until a sti dough
forms. It may take a minute to come together. If
the dough is too sticky, chill for a little bit.
Put through ELECTRIC COOKIE PRESS and
form cookies onto baking sheets.
Bake for 8 to 10 minutes in preheated oven,
or until the surface appears dry.
Allow cookies to cool for a couple minutes on the baking
sheet before transferring to wire racks to cool completely.
ENGLISH
BUTTER COOKIES
• ¾ Cup Unsalted
Butter, softened
• ½ Cup White,
Granulated Sugar
• 1 Egg, separated
• 1 Tbsp. Water, divided
• 1¾ Cup and 2 Tbsp.
All-Purpose Flour
• 1 Pinch of Salt
• 1½ Tsp. Pure
Vanilla Extract
Preheat the oven to 400˚ F (205˚ C).
Cream together the butter and sugar until light and uy.
Mix in the egg yolk, ½ Tbsp. water, our, salt and vanilla.
Fill the cookie press and shape the cookies
on an ungreased baking sheet.
Brush the top of each cookie with the egg
white mixed with ½ Tbsp. of the water.
Bake until the cookies are golden brown
on top, about 10 minutes.
Decorate as desired.
12
Page 15

LAVENDER SHORTBREAD COOKIES
• 1½ Cups Butter,
softened
• 2/3 Cup White,
Granulated Sugar
• ¼ Cup Confectioners'
ENGLISH
Sugar, sifted
• 2 Tbsp. Fresh
Lavender, finely
chopped
• 1 Tbsp. Fresh
Mint Leaves,
finely chopped
• 1 Tsp. Grated
Lemon Zest
• 2½ Cups AllPurpose Flour
• ½ Cup Cornstarch
• ¼ Tsp. Salt
SHORTBREAD COOKIES
• 2 Cups Butter,
softened
• 1 Cup White,
Granulated Sugar
• 2 Tsp. Pure
Vanilla Extract
• 4 Cups AllPurpose Flour
Preheat the oven to 325˚ F (165˚ C).
In a medium bowl, cream together the butter, white
sugar and confectioners' sugar until light and uy.
Mix in the lavender, mint and lemon zest.
Combine the our, cornstarch and salt; mix
into the batter until well blended.
Put through ELECTRIC COOKIE PRESS and
form cookies onto baking sheets.
Bake for 18 to 20 minutes in preheated oven, just
until cookies begin to brown at the edges.
Cool for a few minutes on the baking sheets then
transfer to wire racks to cool completely.
Preheat oven to 350˚ F (180˚ C).
Cream butter and sugar until uy.
Stir in vanilla.
Add our and mix well.
Put through ELECTRIC COOKIE PRESS and
form cookies onto baking sheets.
Bake for 10 - 12 minutes.
BROWN SUGAR SHORTBREAD COOKIES
• 1¼ Cups AllPurpose Flour
• 3 Tbsp. Brown Sugar
• 1 Tbsp. White Sugar
• ½ Tsp. Ground
Cinnamon
• ½ Cup Butter
13
Preheat the oven to 325˚ F (165˚ C).
In a medium bowl, stir together the our,
brown sugar, white sugar and cinnamon.
Cut in the butter until the mixture is like ne crumbs.
Pack the crumbs into a ball, then
knead by hand until smooth.
Put through ELECTRIC COOKIE PRESS and
form cookies onto baking sheets.
Bake for 25 minutes in preheated oven.
Page 16

MAPLE COOKIES
• 1 Cup Butter
• ½ Cup Real
Maple Syrup
• 2 Cups AllPurpose Flour
• ¼ Tsp. Salt
PUDDING COOKIES
• 1 Cup Buttermilk
Baking Mix
• 1 (3-oz.) Package
Instant Pudding Mix
(lemon, chocolate,
coconut, pistachio,
banana, or your
flavor of choice)
• 1 Egg
• ¼ Cup Vegetable Oil
• 1/3 Cup Granulated,
White Sugar
Preheat an oven to 350˚ F (180˚ C).
Beat the butter and maple syrup together with an
electric mixer in a large bowl until smooth.
Stir the our and salt together in a separate
bowl; gradually mix the our mixture into the
butter mixture until just incorporated.
Put dough through cookie press and
arrange onto a baking sheet.
Bake in the preheated oven until lightly
browned, 10 to 12 minutes.
Do not overcook.
Preheat oven to 350˚ F (180˚ C).
Mix baking mix, pudding, egg and oil in
a large bowl until dough forms.
Roll dough into 1" balls. Place balls 2"
apart on the cookie sheets.
Dip ELECTRIC COOKIE PRESS into sugar. Press onto
dough ball and atten into ¼" thick cookie.
Bake until just golden brown on the edges, about 10
minutes. Transfer to racks and cool completely.
ENGLISH
CREAM CHEESE COOKIES
• 1 Cup Butter,
softened
• 1 (3 oz.) Package
Cream Cheese,
softened
• 1 Cup White,
Granulated Sugar
• 1 Egg Yolk
• ½ Tsp. Pure
Vanilla Extract
• 2½ Cups AllPurpose Flour
Preheat oven to 325˚ F (165˚C).
In a large bowl, cream together butter, cream
cheese, and sugar until light and uy.
Beat in egg yolk and vanilla. Stir in our until well blended.
Put dough through cookie press and
arrange onto a baking sheet.
If using oral cookie press design, make an
indentation in the center with a thimble, ll
with preserves, or press candy into center.
Bake for 15 minutes in preheated
oven. Cookies should be pale.
14
Page 17

FRUITY COOKIES
• 4 Cups AllPurpose Flour
• 1 Tsp. Baking Powder
• 1½ Cups Margarine
• 1 Cup White,
ENGLISH
Granulated Sugar
• 1 (3-oz.) Package
Fruit-Flavored
Gelatin Mix
• 1 Egg
• 1 Tsp. Vanilla Extract
• 1 (1-oz.) Package
Fruit-Flavored
Gelatin Mix
CHOCOLATE FROSTING
• 51/3 Tbsp. Butter,
softened
• ½ Cup Cocoa Powder
• 1 Pinch Salt
• 3 Tbsp. Boiling Water
• 1½ Cups
Confectioners' Sugar
Preheat oven to 400˚ F (205˚ C).
Sift our with baking powder.
Cream margarine; gradually add sugar
and 3-oz. gelatin and cream well.
Add egg and vanilla; beat well.
Gradually add our mixture; mix until smooth.
Force dough through cookie press
onto ungreased cookie sheet.
Sprinkle with 1 oz. gelatin.
Bake for about 12-13 minutes or until
golden brown at the edges.
In a large bowl, cream the butter.
Add in cocoa, salt and boiling water, stirring until smooth.
Add powdered sugar and beat until frosting
reaches a spreadable consistency.
If frosting seems too thick, add water. If it
seems too thin, add powdered sugar.
Store in the refrigerator after use.
CHOCOLATE BUTTERCREAM FROSTING
• 1½ Cups
Confectioners' Sugar
• ¼ Cup Butter,
softened
• 1 Pinch Salt
• 1½ (1-oz.) Squares
Unsweetened
Chocolate, Melted
• 1½ Tbsp. Milk
• 1 Tsp. Pure
Vanilla Extract
15
In small bowl mix at medium speed, sugar, butter
(softened), and salt until light and uy.
Add melted chocolate, milk and vanilla
extract, beating until well blended.
Store in the refrigerator after use.
Page 18

CREAM CHEESE FROSTING
• 2 (8-oz.) Packages
Cream Cheese,
softened
• ½ Cup Butter,
softened
• 1 Tsp. Pure
Vanilla Extract
• 2 Cups Confectioners'
Sugar, sifted
PASTRY CREAM FILLING
• 2 Cups Milk
• ¼ Cup White,
Granulated Sugar
• 2 Egg Yolks
• 1 Egg
• ¼ Cup Cornstarch
• 1/3 Cup White,
Granulated Sugar
• 2 Tbsp. Butter
• 1 Tsp. Pure
Vanilla Extract
In a medium bowl, cream together the
cream cheese and butter until creamy.
Mix in the vanilla, then gradually stir
in the confectioners' sugar.
Store in the refrigerator after use.
In a heavy saucepan, stir together the milk and ¼
cup of sugar. Bring to a boil over medium heat.
In a medium bowl, whisk together the egg yolks and egg.
Stir together the cornstarch and 1/3 cup sugar;
then stir them into the egg until smooth.
When the milk comes to a boil, drizzle it into the
bowl in a thin stream while mixing so that you do not
cook the eggs. Return the mixture to the saucepan,
and slowly bring to a boil, stirring constantly so
the eggs don't curdle or scorch on the bottom.
When the mixture comes to a boil and
thickens, remove from the heat.
Stir in the butter and vanilla, mixing until
the butter is completely blended in.
Pour into a heat-proof container and place a piece of
plastic wrap directly on the surface to prevent a skin
from forming. Refrigerate until chilled before using.
ENGLISH
DEVILED EGGS
• 6 Hard-Boiled Eggs
• 2 Tbsp. Mayonnaise
• 1 Tsp. White,
Granulated Sugar
• 1 Tsp. White Vinegar
• 1 Tsp. Mustard
• ½ Tsp. Salt
• Paprika
Slice eggs in half lengthwise; remove
yolks and set whites aside.
In a small bowl, mash yolks with a fork.
Add the mayonnaise, sugar, vinegar,
mustard and salt; mix well.
Use ELECTRIC COOKIE PRESS with Pastry Tip to
ll eggs with mixture. Sprinkle with paprika.
Refrigerate until serving.
16
Page 19

CANNOLI CREAM FILLING
• 1½ Cup Ricotta
Cheese
• 3 Tbsp. White,
Granulated Sugar
• 1 Tsp. Vanilla
ENGLISH
• 1½ Tsp. Ground
Cinnamon
WHITE CHEESE PASTA SHELL FILLING
• 2 lbs. Ricotta or
Cottage Cheese
• ½ lb. Mozzarella
Cheese, grated
• 2 Eggs
• ½ Cup Parmesan
Cheese, grated
• 1 Tsp. Salt
• ¼ Tsp. Pepper
• 1 Tsp. Parsley
Mix all ingredients with electric beater until smooth.
Chill until ready to use.
Yield: slightly more than 1½ cups lling,
or enough for about 12 cannolis.
Preheat oven to 350˚ F (180˚ C).
Prepare jumbo-sized pasta shells. Bring water to boil and
then add pasta, boil pasta approximately 10-15 minutes.
Drain pasta.
Prepare cheese lling: Beat eggs; add ricotta,
Mozzarella, and Parmesan cheese; mix in seasonings.
Fill jumbo-sized pasta shells using ELECTRIC COOKIE PRESS.
Cover shells with marinara sauce and bake for 45 minutes.
17
Page 20

RETURNS & WARRANTY
SHOULD YOUR UNIT NOT WORK OR IF DAMAGED WHEN YOU FIRST TAKE IT OUT
OF THE BOX, PLEASE RETURN IT TO THE PLACE OF PURCHASE IMMEDIATELY.
ELECTRIC COOKIE PRESS / CDP200RED
Should you have any questions, please contact us via email or at the
customer service number listed below between the hours of 8:00 AM
and 5:00 PM, Monday through Friday, Central Standard Time.
Distributed by:
Nostalgia Products Group LLC
1471 Partnership Dr.
Green Bay, WI 54304-5685
Customer Service
Phone: (920) 347-9122
Web: www.nostalgiaelectrics.com
Customer Service Inquiry
To submit a Customer Service inquiry, go to www.nostalgiaelectrics.com and
ll out the Customer Service Inquiry form and click the Submit button.
A representative will contact you as soon as possible.
This appliance is designed and built to provide many years of satisfactory performance
under normal household use. The distributor pledges to the original owner that should
there be any defects in material or workmanship during the rst 90 days of purchase, we
will repair or replace the unit at our option. Our pledge does not apply to damages caused
by shipping, mishandling or unit being dropped. A product deemed defective either from
manufacturing or being mishandled is up to the distributor’s discretion. In order to obtain
service under this warranty, please contact Nostalgia Products Group, LLC at the telephone
number listed above or by lling out the Customer Service Inquiry Form located at www.
nostalgiaelectrics.com. This warranty does not apply to re-manufactured merchandise.
ENGLISH
Please read these instructions carefully. Failure to comply with these instructions,
damages caused by improper replacement parts, abuse or misuse will void this
pledge to you and is being made in place of all other expressed warranties.
For more information, visit us online at www.nostalgiaelectrics.com.
Like us on Facebook at www.facebook.com/NostalgiaElectrics.
Follow our boards on Pinterest at www.pinterest.com/nostalgiaelctrx.
Tweet along with us on Twitter at www.twitter.com/NostalgiaElctrx.
18
Page 21

¡Convierta todos los días en una etsa!
Visite www.nostalgiaelectrics.com para ver más productos divertidos.
CONTENIDO
PRECAUCIONES IMPORTANTES . . . . . . . . . . . . . . . . . . . . . . . . . . 20
MEDIDAS IMPORTANTES . . . . . . . . . . . . . . . . . . . . . . . . . . . . . . 20
INTRODUCCIÓN . . . . . . . . . . . . . . . . . . . . . . . . . . . . . . . . . . . . 21
PARTES Y ENSAMBLAJE . . . . . . . . . . . . . . . . . . . . . . . . . . . . . . . 22
CÓMO FUNCIONA . . . . . . . . . . . . . . . . . . . . . . . . . . . . . . . . . . 26
CONSEJOS ÚTILES . . . . . . . . . . . . . . . . . . . . . . . . . . . . . . . . . . 27
LIMPIEZA Y MANTENIMIENTO . . . . . . . . . . . . . . . . . . . . . . . . . . . 28
RECETAS . . . . . . . . . . . . . . . . . . . . . . . . . . . . . . . . . . . . . . . . . 29
DEVOLUCIONES Y GARANTÍA . . . . . . . . . . . . . . . . . . . . . . . . . . . 35
SEGURIDAD
ESPAÑOL
Su seguridad y la de otras personas es muy importante.
Hemos proporcionado numerosos mensajes de seguridad importantes en este manual
y en su electrodoméstico. Siempre lea y obedezca todos los mensajes de seguridad.
Este es el símbolo de alerta de seguridad.
Este símbolo le previene de peligros potenciales que pueden
causar la muerte o lesiones a usted y a otras personas.
Todos los mensajes de seguridad estarán antecedidos por el símbolo de alerta.
Todos los mensajes de seguridad le dirán de qué peligro potencial se trata, cómo reducir
la posibilidad de lesiones y qué puede ocurrir si no se obedecen las instrucciones.
Especicaciones del electrodoméstico:
120 Volts, 60 Hertz
15 Watts, aprobado por ETL
19
19
Page 22

PRECAUCIONES IMPORTANTES
1. NUNCA sumerja el aparato o el cable en agua.
2. NUNCA lo utilice cerca del agua.
3. NUNCA use una esponja o paño abrasivo en el aparato.
4. NUNCA deje el aparato sin supervisar mientras está en uso.
5. Desenchufe el aparato del toma corriente cuando no está en uso y para su limpieza.
6. NO coloque el aparato en el lava vajillas.
7. Mantenga fuera del alcance de los niños.
8. Este equipo NO ES UN JUGUETE.
9. Este aparato no está destinado a ser usado por niños pequeños
o personas con dicultades cognitivas sin supervisión.
10. Los niños pequeños deben ser supervisados para
asegurarse de que no jueguen con el aparato.
MEDIDAS IMPORTANTES
Cuando utiliza aparatos eléctricos, siempre se deben seguir algunas medidas básicas de
seguridad que incluyen las siguientes:
1. Lea todas las instrucciones antes de manejar este equipo.
2. No sumerja ni lave el cuerpo del motor, el cable ni el
enchufe en agua ni en ningún otro líquido.
3. Este aparato no debe ser utilizado por niños ni cerca de ellos.
4. Esta unidad debe desenchufarse cuando no esté en uso, antes
de colocarle o quitarle partes y antes de su limpieza.
5. El uso de accesorios no recomendados o vendidos por el fabricante de este
aparato podría ocasionar un incendio, una descarga eléctrica o lesiones.
6. Sólo para uso en el interior.
7. Mantenga las manos, el cabello y la ropa, como así también los utensilios, fuera
de las partes móviles, los discos y las puntas, mientras esté procesando, para
evitar el riesgo de daños graves a las personas o daños al molde para galletas.
8. Sostenga los discos y las puntas cuidadosamente cuando
quite, introduzca o limpie las partes.
9. Trabe la tapa y el tubo de forma segura en su lugar antes de hacer funcionar el
aparato. No intente quitar el cobertor del tubo mientras se encuentra en uso.
10. Se incluye un cable de alimentación de energía más corto o extraíble para reducir el
riesgo resultante de quedar atrapado o tropezarse con un cable más largo. No permita
que el cable cuelgue de los extremos de la mesa ni toque supercies calientes.
11. Siempre enchufe el cable al tomacorriente antes de utilizarlo.
Deje enfriar la unidad antes de guardarla.
12. Existen cables de alimentación o cables de extensión más largos y
ESPAÑOL
20
20
Page 23

pueden usarse con cuidado. Excepción: No se recomienda un cable de
extensión o cable extraíble más largo para usar con este aparato.
13. Si usa un cable de alimentación extraíble largo o un cable de extensión: 1) La clasicación
eléctrica indicada del cable o del cable de extensión debe ser al menos equivalente
a la clasicación eléctrica del aparato; 2) Si el aparato tiene conexión a tierra, el cable
de extensión debe ser un cable de 3 vías con conexión a tierra; y 3) El cable más largo
debe disponerse de tal forma que no cuelgue de la mesa de trabajo ni de la mesa de tal
forma que pueda ser arrastrado por los niños o pueda ser enganchado sin intención.
14. Este electrodoméstico tiene un enchufe polarizado (una hoja es más ancha que la
otra). Para reducir el riesgo de una descarga eléctrica, este enchufe está diseñado para
insertarse en un tomacorriente polarizado solamente en una posición. Si el enchufe no
encaja totalmente en el toma corriente, invierta el enchufe. Si aún no encaja, contacte
a un electricista calicado. No intente modicar el enchufe de ninguna forma.
15. No intente realizar tareas de servicio en el aparato, ya que abrir o retirar las
cubiertas puede exponerlo da tensiones peligrosas u otros riesgos. Solicite
al personal de servicio calicado que realice las tareas de servicio.
¡GUARDE ESTAS INSTRUCCIONES!
INTRODUCCIÓN
¡Gracias por comprar el MOLDE ELECTRÓNICO PARA GALLETAS de Nostalgia Electrics™!
¡Ahora puede diseñar y decorar deliciosas galletas como un panadero profesional! El
ESPAÑOL
MOLDE ELECTRÓNICO PARA GALLETAS hace que elaborar tortas y galletitas hermosamente
decoradas y otros divertidos canapés, sea rápido y fácil. ¡Use su imaginación y diviértase!
Incluye:
• 12 Discos para Galletas y 8 Puntas para Decorar
• Mango ergonométrico con Botón de ENCENDIDO/APAGADO
que hace que el aparato sea Fácil de Usar.
• Se incluyen Recetas de Galletas en el Manual de Instrucciones,
o Use Masa Comprada en la Tienda.
• También Puede Utilizarse para Rellenar Pastas, Huevos
Duros o para Decorar Pastelitos y Tortas
21
21
Page 24

PIEZAS Y ENSAMBLAJE
PARTES
Botón de ENCENDIDO/APAGADO
Tubo
Cobertor del
Tubo
Adaptador para Puntas de Repostería
Eje del Molde
para Galletas
Cuerpo del Motor
ESPAÑOL
Tapa para Puntas
de Repostería
Disco del Eje
PUNTAS DE REPOSTERÍA (8)
DISCOS PARA GALLETAS (12)
22
22
Page 25

ARMADO
1. Con el Disco del Eje colocado, introduzca el vástago del Eje del Molde para Galletas en el
oricio central del Cuerpo del Motor. Presione el Eje del Molde para Galletas completamente
dentro del Cuerpo del Motor y presione rmemente para que calce correctamente.
2. Colocar el Tubo alineando las ranuras de la parte interior del Tubo con
las líneas fuera del Disco del Eje. La echa del Tubo debe estar alineada
con la posición UNLOCKED (DESTRABADO) del Cuerpo del Motor.
3. Sujete el Tubo rmemente y gírelo hasta que la echa superior del Tubo quede en la
posición LOCK (TRABADO) (
4. Cargue la unidad con masa para galletas recién elaborada o con relleno, con una cuchara
o espátula. NOTA: No rellene el tubo sobrepasando la línea de
ESPAÑOL
relleno MÁXIMO.
). Escuchará un clic cuando esté en la posición correcta.
23
23
Page 26

5. Si utiliza una Punta de Repostería, coloque la punta deseada sobre el Adaptador para
Puntas de Repostería y sujete con la Tapa para las Puntas de Repostería. Coloque la
Punta de Repostería completamente armada en el Cobertor del Tubo, coloque el
Cobertor del Tubo en el Tubo y gire en dirección a las agujas del reloj hasta trabar.
6. Si utiliza los Discos para Galletas, elija el disco que preera y colóquelo en el extremo del
Tubo. Coloque la Tapa del Tubo en el Tubo y gírelo en dirección a las agujas del reloj, hasta
que quede trabado en su lugar.
ESPAÑOL
¡Su MOLDE ELÉCTRICO PARA GALLETAS ya está listo para usar!
24
24
Page 27

FORMAS DE LOS DISCOS PARA GALLETAS
El MOLDE ELÉCTRICO PARA GALLETAS viene con 12 Discos para
Galletas diferentes para lograr formas de galletas divertidas.
FORMAS DECORATIVAS
El MOLDE ELÉCTRICO PARA GALLETAS viene con 8 Puntas de Repostería diferentes
para adaptarse a todas sus necesidades decorativas y a sus mangas pasteleras.
Desde decorar tortas, galletas y pastelitos hasta rellenar proteroles y adornar
sabrosos canapés como huevos endiablados, el MOLDE ELÉCTRICO PARA GALLETAS
de Nostalgia Electrics™ es una herramienta de panadería versátil y práctica.
ESPAÑOL
25
25
Page 28

CÓMO FUNCIONA
ANTES DE USAR POR PRIMERA VEZ
1. Desembale el MOLDE ELÉCTRICO PARA GALLETAS y todos los accesorios con cuidado.
2. Lave con agua tibia y jabón los Discos para Galletas, las Puntas de Pastelería,
el Adaptador para las Puntas de Pastelería, el Cobertor del Tubo, la Tapa
para las Puntas de Pastelería, el Tubo, el Adaptador del Eje y el Eje del Molde
para Galletas. Lave y seque bien con un paño o toalla no abrasivos.
3. Limpie todas las supercies del Cuerpo del Motor con un paño levemente
humedecido, no abrasivo y seque bien asegurándose de que no ingrese agua al
Cuerpo del Motor. ASEGÚRESE DE QUE LA UNIDAD ESTÉ DESENCHUFADA.
4. NUNCA sumerja el Cuerpo del Motor, el enchufe ni el cable en
agua ni en ningún otro líquido y no use lana de acero, estropajos
ni limpiadores abrasivos, ya que dañarán las supercies.
CÓMO HACER LAS GALLETAS
Es muy importante que la masa tenga la consistencia correcta. Si está muy dura, la masa
no saldrá del molde para galletas. Si está demasiado blanda, las galletas no mantendrán
su forma. Es posible que tenga que practicar un poco antes de lograr la consistencia
perfecta de la masa para galletas para usar en su MOLDE ELÉCTRICO PARA GALLETAS.
1. Luego de armar su MOLDE ELÉCTRICO PARA GALLETAS, llene con masa hasta
la línea MÁXIMA de relleno. NO use masa con frutas secas ni golosinas.
2. Enchufe el molde para galletas lleno y colóquelo en posición vertical con el cobertor del
tubo apoyado sobre una lámina para panadería sin arrugas/sin engrasar. Antes de presionar
su primera galleta, deberá quitarle todo el aire a la masa. Para ello, mantenga apretado el
botón ENCENDIDO/APAGADO hasta que la masa comience a presionar, saliendo del disco.
3. Para formar una galleta, sostenga el botón presionado durante 1 a 2 segundos,
dependiendo del tipo de masa que haya elaborado o del disco que esté utilizando.
Luego de presionar durante 1 a 2 segundos, levante suavemente el molde para galletas
de la asadera y repita presionando su próxima galleta y así sucesivamente. Siempre
deberá dejar el cobertor del tubo apoyado sobre la placa para galletas mientras
presiona las galletas. Si no lo hace, las galletas no se formarán correctamente.
CÓMO UTILIZAR LAS PUNTAS PARA REPOSTERÍA
Ya sea que esté rellenando la corona de una pasta choux o decorando
una torta, es aconsejable que pulse el botón ENCENDIDO/APAGADO en
lugar de sostenerlo presionado continuamente. Esto le dará un mayor
control de la cantidad de relleno o glaseado que utilizará.
Es muy importante la consistencia de lo que utilizará para decorar. En la mayoría
de los casos el glaseado tendrá que ser más espeso de lo normal para lograr
mejores resultados. Si el glaseado, especialmente para decorar, es demasiado
liviano, no mantendrá su forma. Observará que la mayoría de los glaseados, para
decoración u otros usos, necesitan ser más espesos de lo normal. Se recomienda
que practique cómo decorar antes de trabajar sobre el producto nal.
Cuando decore pastelería, pulse rápidamente una vez y luego mida desde allí
su trabajo. Siempre habrá más glaseado/relleno de lo que espera que salga de
la punta, entonces hágalo lentamente. Al igual que cuando utiliza una manga
de repostería tradicional para decorar, será conveniente que guíe el glaseado
como si estuviese haciendo una cinta, en lugar de glasear en el lugar.
ESPAÑOL
26
26
Page 29

Cuando realice rellenos, ya sean proteroles o huevos endiablados, coloque
en el molde la cantidad deseada y luego pause entre cada uno, asegurándose
de haber quitado todo el relleno de la punta, antes de pasar al siguiente.
CÓMO RELLENAR EL MOLDE PARA GALLETAS
La mayoría de las recetas proporcionadas requieren que el usuario vuelva a
rellenar el molde para galletas al menos una vez. Dependiendo del tamaño de
las galletas que haga, en general obtendrá entre 25 y 40 galletas por relleno.
• Para volver a llenar el molde, quite el tubo del cuerpo del motor, presione el
eje para desenganchar y vuelva a armar como se indica en la página 2.
• Vuelva a llenar con masa hasta la línea de relleno MÁXIMO. Nuevamente, presione
todo el aire fuera de la masa sosteniendo presionado el botón de Encendido/
Apagado hacia abajo y luego trabaje sobre su nueva serie de galletas.
NOTA: Si desea utilizar un tipo de masa diferente o si se acumuló masa en el adaptador
del eje, podría ser necesario separar y limpiar todo el molde de galletas antes de
volver a llenar. Siempre limpie y vuelva a armar su molde de galletas como se indica
en este manual y asegúrese de cumplir con las pautas de seguridad para cocinar.
CONSEJOS ÚTILES
MASA PARA GALLETAS
• Es muy importante la consistencia de la masa para galletas. Si la masa está muy pesada o
seca, no podrá salir del molde. La masa deberá estar un poco pegajosa, pero no mucho. Si
la masa está demasiado suave, las galletas no mantendrán su forma. Esto podría requerir de
un poco de práctica. Las recetas podrían tener que ajustarse para obtener la consistencia
deseada. Podrá observar que sus formas van a ir mejorando a medida que se vaya
acostumbrando al ritmo y a los tiempos que funcionen mejor para cada tipo de galleta.
• La masa para galletas deberá tener una textura pareja. No se recomienda
ESPAÑOL
el uso de frutas secas, pepitas de chocolate o golosinas en la
masa. Esto evitará que se trabe el molde para galletas.
• Siempre use la masa apenas termina de prepararla. Esto le dará mejores
resultados. No es recomendable que utilice una masa congelada. La masa
debería ser lo sucientemente exible como para que pueda salir del
disco fácilmente y mantener su forma en la placa para galletas.
• Si la masa está muy pegajosa o suave, refrigérela durante 15 minutos. Otra opción es mesclar
un poco la masa con harina. Si agrega margarina también ayudará a cortar la pegajosidad.
• Si la masa está demasiado dura, mézclela con un poco de huevo batido.
• Una vez colocada la masa en el Tubo, utilícela inmediatamente.
• Nunca ponga grasa ni arrugue las placas para galletas mientras
presiona el molde. Si lo hace, la masa de sus galletas no se pegará a la
asadera y las galletas no mantendrán una forma consistente.
CÓMO DECORAR
• Para decorar golosinas, galletas y postres o para introducir rellenos
de pastelería o canapés, utilice los Consejos de Pastelería.
• Si la masa no está sucientemente húmeda como para mantener las decoraciones, pincele
suavemente con un poco de agua, leche o miel donde desee colocar las decoraciones.
27
27
Page 30

LIMPIEZA Y MANTENIMIENTO
Por favor, cuide su MOLDE ELÉCTRICO PARA GALLETAS siguiendo estas simples
instrucciones y precauciones. Para obtener mejores resultados, le recomendamos
que limpie su MOLDE ELÉCTRICO PARA GALLETAS luego de utilizar cada relleno.
1. Desconecte del toma eléctrico desenchufando la unidad.
2. Destrabe el Tubo sosteniendo el cuerpo del motor con una mano y el Tubo con la
otra mano. Gire el Tubo para que la echa del mismo quede alineada con la posición
“Destrabar” (Unlock) del Cuerpo del Motor (diríjase a la sección Armado). Tire para extraer.
3. Deslice el Eje hacia afuera.
4. Quite el Disco para Galletas o el armado de Puntas de Pastelería del Tubo.
5. Lave todas las partes extraíbles y accesorios con agua tibia y jabón.
Lave y seque bien con un paño o toalla no abrasivos.
6. Limpie el exterior del Cuerpo del Motor con un paño suave y húmedo y seque
completamente asegurándose de que no entre agua en el Cuerpo del Motor.
7. NO utilice lana de acero, estropajos ni limpiadores abrasivos, ya que dañarán la terminación.
8. Puede utilizarse un cepillo suave para limpiar el interior del Tubo y las Puntas de Pastelería.
9. Cualquier otro servicio de mantenimiento deberá ser realizado
por un representante de servicio técnico autorizado.
10. NUNCA sumerja el MOLDE ELÉCTRICO PARA GALLETAS en agua ni lo coloque en un
lavavajillas.
CÓMO GUARDARLO
Es recomendable que guarde la caja original y los materiales del
embalaje y vuelva a embalar el MOLDE ELÉCTRICO PARA GALLETAS
en su caja original y lo guarde en un lugar limpio y seco.
ESPAÑOL
28
28
Page 31

RECETAS
¡Con el MOLDE ELÉCTRICO PARA GALLETAS podrá utilizar su receta preferida para masa de
galletas o masa para galletas compradas en la tienda, para crear galletas bellísimamente
diseñadas que todo el mundo adorará! El rendimiento en cantidad de galletas variará
dependiendo de la receta, el disco para galletas que se utilice y el tamaño de las galletas.
¡También podrá utilizar el MOLDE ELÉCTRICO PARA GALLETAS para
rellenar huevos, decorar tortas, galletas, pastelitos y mucho más!
¡Sea creativo y DISFRUTE su MOLDE ELÉCTRICO PARA GALLETAS!
GALLETAS DE CHOCOLATE
• 1¾ Tazas de Azúcar
Blanca Granulada
• 6 cucharadas de
cacao en polvo
• 2 Tazas de Harina
Común
• ½ Cucharadita de Sal
• 1 Taza de Grasa
Vegetal
• ¼ Taza de Margarina
• 1 Huevo Batido
• ½ Cucharadita de
Extracto de Vainilla
ESPAÑOL
• 3 Cucharadas
de Leche
Precaliente el horno a 350° F (180° C).
En un bol grande, mezcle el azúcar de pastelería, el
cacao, la harina y la sal hasta que quede uniforme.
Corte la grasa vegetal y la margarina hasta que los
grumos queden más pequeños que una arveja.
Agregue el huevo y la vainilla; mezcle hasta que se
forme una masa rme. Podrá tomar un minuto unirlos.
Si la masa está muy pegajosa, enfríela un poco.
Coloque la masa en el MOLDE ELÉCTRICO PARA
GALLETAS y forme las galletas en las placas para horno.
Hornee durante 8 a 10 minutos en el horno
precalentado o hasta que la supercie esté seca.
Deje enfriar las galletas durante un par de
minutos en una placa para horno antes de quitar
las rejillas de alambre completamente.
GALLETAS DE MANTECA
• ¾ Taza de Manteca
Sin Sal, ablandada
• ½ Taza de Azúcar
Blanca Granulada
• 1 Huevo separado
• 1 Cucharada de
agua, dividida
• 1¾ Tazas y 2
Cucharadas de
Harina Común
• 1 Pizca de Sal
• 1½ Cucharadas de
esencia de vainilla
29
29
Precaliente el horno a 400˚ F (205˚ C).
Forme una crema con la manteca y el azúcar
hasta que quede suave y esponjosa.
Mezcle la yema de huevo con ½ cucharada de
agua, harina, sal y esencia de vainilla.
Llene el molde para galletas y forme las galletas
en una placa para horno sin engrasar.
Pincele la parte de arriba de cada galleta con la clara
de huevo mezclada con ½ cucharada de agua.
Hornee hasta que las galletas estén doradas
arriba, aproximadamente 10 minutos.
Decore a gusto.
Page 32

GALLETAS MANTECADAS DE LAVANDA
• 1½ Tazas de Manteca
ablandada
• 2/3 Taza de Azúcar
Blanca Granulada
• ¼ Taza de Azúcar de
Confitería, cernida
• 2 Cucharadas de
Lavanda fresca,
finamente cortada
• 1 Cucharada de Hojas
de Menta Fresca,
finamente cortadas
• 1 Cucharada
de Cáscara de
Limón Rallada
• 2½ Tazas de
Harina Común
• ½ Taza de Maicena
• ¼ Cucharada de Sal
GALLETAS MANTECADAS
• 2 Tazas de Manteca
ablandada
• 1 Taza de Azúcar
Blanca Granulada
• 2 Cucharadas de
Esencia de Vainilla
• 4 Tazas de Harina
Común
Precaliente el horno a 325 grados F (165 grados C).
En un bol mediano, forme una crema con
manteca, azúcar blanca y azúcar de contería
hasta que quede suave y esponjosa.
Mezcle la lavanda, la menta y la cáscara de limón.
Una la harina, la maicena y la sal; mezcle en el
batido hasta que quede bien mezclado.
Introduzca la masa en el MOLDE ELÉCTRICO PARA
GALLETAS y forme las galletas en las placas para horno.
Hornee durante 18 a 20 minutos en el horno precalentado,
hasta que las galletas comiencen a dorarse en las puntas.
Enfríe durante unos minutos en las placas
para horno y luego colóquelas en la rejilla de
alambre para enfriar completamente.
ESPAÑOL
Precaliente el horno a 350˚ F (180˚ C).
Forme una crema con la manteca y el
azúcar hasta que quede esponjosa.
Mezcle agregando la esencia de vainilla.
Agregue harina y mezcle bien.
Introduzca la masa en el MOLDE ELÉCTRICO PARA
GALLETAS y forme las galletas en las placas para horno.
Hornee durante 10 a 12 minutos.
GALLETAS MANTECOSAS DE AZÚCAR NEGRA
• 1¼ Tazas de
Harina Común
• 3 Cucharadas de
Azúcar Negra
• 1 Cucharada de
Azúcar Blanca
• ½ Cucharada de
Canela Molida
• ½ Taza de Manteca
Precaliente el horno a 325˚ F (165˚ C).
En un bol mediano, mezcle harina, azúcar
negra, azúcar blanca y canela.
Corte la manteca hasta que la mezcla parezca de migas.
Forme bolitas con las migas, luego amase con las
manos hasta que la masa quede homogénea.
Introduzca la masa en el MOLDE ELÉCTRICO PARA
GALLETAS y forme las galletas en las placas para horno.
Hornee durante 25 minutos en horno precalentado.
30
30
Page 33

GALLETAS DE MAPLE
• 1 Taza de Manteca
• ½ Taza de Jarabe
de Arce Real
• 2 Tazas de Harina
Común
• ¼ Cucharada de Sal
GALLETAS DE BUDÍN
• 1 Taza de Mezcla
de Crema de Leche
para Hornear
• 1 (3 oz.) Paquete
de Mezcla de Budín
Instantáneo (limón,
chocolate, coco,
pistacho, banana
o el gusto que
usted prefiera)
• 1 Huevo
• ¼ Taza de Aceite
ESPAÑOL
Vegetal
• 1/3 Taza de Azúcar
Blanca Granulada
Precaliente el horno a 350 grados F (180 grados C).
Bata la manteca con el jarabe de arce con una batidora
eléctrica en un bol grande hasta que quede pareja.
Mezcle la harina y la sal en un bol separado; vaya
incorporando gradualmente la mezcla de harina en la
mezcla de manteca hasta que se haya incorporado.
Coloque la masa en el MOLDE ELÉCTRICO PARA
GALLETAS y forme las galletas en la placa para horno.
Hornee en el horno precalentado hasta que se doren
levemente, de 10 a 12 minutos. No cocine de más.
Precaliente el horno a 350˚ F (180˚ C).
Mezcle la mezcla para hornear, el budín, el huevo y el
aceite en un bol grande, hasta que se forme la masa.
Enrolle la masa formando bolitas de 1”. Coloque las
bolitas separadas cada 2” en las placas para galletas.
Sumerja el MOLDE ELÉCTRICO PARA GALLETAS
en el azúcar. Presione la bola de masa y aplaste
formando una galleta gruesa de ¼".
Hornee hasta que comiencen a dorarse los
bordes, aproximadamente 10 minutos. Páselas
a la rejilla de alambre y deje enfriar bien.
GALLETAS DE QUESO CREMA
• 1 Taza de Manteca,
ablandada
• 1 (3 oz.) Paquete
de Queso Crema,
ablandado
• 1 Taza de Azúcar
Blanca, Granulada
• 1 Yema de Huevo
• ½ Cucharada de
Esencia de Vainilla
• 2½ Tazas de
Harina Común
31
31
Precaliente el horno a 325˚ F (165˚C).
En un bol grande, forme una crema con la
manteca, el queso crema y el azúcar hasta
que quede suave y esponjosa.
Bata la yema de huevo con la esencia de vainilla. Incorpórela
a la harina hasta que quede todo bien mezclado.
Coloque la masa en el MOLDE ELÉCTRICO PARA
GALLETAS y forme las galletas en la placa para horno.
Si utiliza el diseño oral para galletas, haga una
hendidura en el centro con un dedal, llene con
mermelada, o aplique golosinas en el centro.
Hornee durante 15 minutos en horno precalentado.
Las galletas deberán quedar pálidas.
Page 34

GALLETAS FRUTALES
• 4 Tazas de Harina
Común
• 1 Cucharada de
Polvo de Hornear
• 1½ Tazas de
Margarina
• 1 Taza de Azúcar
Blanca, Granulada
• 1 (3 oz.) Paquete de
Mezcla de Gelatina
con Sabor a Fruta
• 1 Huevo
• 1 Cucharada de
Esencia de Vainilla
• 1 (1 oz.) Paquete de
Mezcla de Gelatina
con Sabor a Fruta
Precaliente el horno a 400 grados F (205 grados C).
Tamice la harina con polvo de hornear.
Forme una crema con la margarina; agregue gradualmente
el azúcar y 3 oz. de gelatina hasta que quede bien cremoso.
Agregue el huevo y la vainilla; bata bien.
Agregue la mezcla de harina gradualmente;
mezcle hasta que quede homogéneo.
Presione la masa dentro del MOLDE
ELÉCTRICO PARA GALLETAS y fórmelas en
una placa para galletas sin engrasar.
Espolvoree con 1 oz. de gelatina en polvo.
Hornee durante aproximadamente 12 a 13
minutos o hasta que estén doradas las puntas.
BAÑO DE CHOCOLATE
• 51/3 Cucharadas de
Manteca, ablandada
• ½ Taza de Cacao
en Polvo
• 1 Pizca de Sal
• 3 Cucharadas de
Agua Hirviendo
• 1½ Tazas de Azúcar
de Repostería
BAÑO DE CHOCOLATE CON CREMA DE MANTEQUILLA
• 1½ Tazas de Azúcar
de Repostería
• ¼ Taza de Manteca,
ablandada
• 1 Pizca de Sal
• 1½ (1oz.) Cuadrados
de Chocolate
Amargo, Derretidos
• 1½ Cucharadas
de Leche
• 1 Cucharadas de
Esencia de Vainilla
En un bol grande, forme una crema con la manteca.
Agregue el cacao, la sal y el agua hirviendo,
mezclando hasta homogeneizar.
Agregue el azúcar en polvo y bata hasta que el
baño alcance una consistencia fácil de untar.
Si el baño parece estar demasiado espeso, agregue agua.
Si parece demasiado liviano, agregue azúcar en polvo.
Guarde en el refrigerador luego de usar.
En un bol pequeño, mezcle a velocidad
media, el azúcar, la manteca (derretida) y la
sal, hasta que quede suave y esponjosa.
Agregue chocolate derretido, leche y esencia de
vainilla, batiendo hasta que quede bien mezclado.
Guarde en el refrigerador luego usar.
ESPAÑOL
32
32
Page 35

BAÑO DE QUESO CREMA
• 2 (8 oz.) Paquetes
de Queso Crema,
ablandado
• ½ Taza de Manteca,
ablandada
• 1 Cucharada de
Esencia de Vainilla
• 2 Tazas de Azúcar de
Repostería, tamizada
RELLENO DE CREMA PASTELERA
• 2 Tazas de Leche
• ¼ Taza de Azúcar
Blanca Granulada
• 2 Yemas de Huevo
• 1 Huevo
• ¼ Taza de Maicena
• 1/3 Taza de Azúcar
Blanca Granulada
• 2 Cucharadas
de Manteca
• 1 Cucharada de
Esencia de Vainilla
ESPAÑOL
En un bol mediano, forme una crema con el queso crema
y la manteca hasta que la manteca quede cremosa.
Mezcle la vainilla, luego mezcle con el azúcar de repostería.
Guarde en el refrigerador luego de usar.
En una cacerola grande, mezcle la leche y ¼ taza
de azúcar. Hágala hervir a fuego medio.
En un bol mediano, bata las yemas de huevo y el huevo.
Mezcle lo que queda de azúcar y la maicena; luego
mézclelos con el huevo hasta que quede homogéneo.
Cuando hierva la leche, vierta en el bol con un chorro
no mientras mezcla para que no se cocinen los huevos.
Vuelva a poner la mezcla en la cacerola y haga hervir
lentamente, revolviendo constantemente para que
no se corten ni se quemen los huevos en el fondo.
Cuando hierva la mezcla y se espese, retire del calor.
Mezcle la manteca con la esencia de vainilla, mezclando
hasta que la manteca se haya derretido completamente.
Vierta en un contenedor resistente al calor y coloque
un poco de envoltorio plástico directamente en
la supercie para evitar que se forme una piel.
Refrigere hasta que se enfríe antes de usar.
HUEVOS ENDIABLADOS
• 6 huevos duros
• 2 Cucharadas
de mayonesa
• 1 Cucharadas de
Azúcar Blanca
Granulada
• 1 Cucharada de
Vinagre Blanco
• 1 Cucharada
de Mostaza
• ½ Cucharada de Sal
• Paprika
33
33
Corte los huevos por la mitad, a lo largo;
quite las yemas y separe las claras.
En un bol pequeño, aplaste las yemas con un tenedor.
Agregue la mayonesa, el azúcar, el vinagre,
la mostaza y la sal; mezcle bien.
Utilice el MOLDE ELÉCTRICO PARA GALLETAS con
la Punta para Pastelería para rellenar los huevos
con la mezcla. Espolvoree con Paprika.
Refrigere hasta servir.
Page 36

RELLENO DE CREMA PARA CANNOLIS
• 1½ Tazas de Ricota
• 3 Cucharadas de
Azúcar Blanca
Granulada
• 1 Cucharada de
Esencia de Vainilla
• 1½ Cucharada de
Canela en Polvo
RELLENO DE PASTAS DE QUESO BLANCO
• 2 lbs. de Ricota o
Queso Cottage
• ½ lb. de Queso
Mozzarella, rallado
• 2 Huevos
• ½ Taza de Queso
Parmesano, rallado
• 1 Cucharada de Sal
• ¼ Cucharada
de Pimienta
• 1 Cucharada
de Perejil
Mezcle todos los ingredientes con batidora
eléctrica hasta homogeneizar.
Enfríe hasta que esté lista para usar.
Rendimiento: un poco más de 1 ½ tazas de relleno, o lo
suciente como para hacer aproximadamente 12 cannolis.
Precaliente el horno a 350 grados F (180°C).
Prepare una pasta (deos con forma de
conchilla) de tamaño grande. Ponga a hervir
agua y luego agregue la pasta, hierva la pasta
aproximadamente entre 10 y 15 minutos.
Cuele la pasta.
Prepare el relleno de queso: Bata los huevos;
agregue la ricota, la mozzarella y el queso
parmesano; mezcle los condimentos.
Rellene la pasta utilizando el MOLDE
ELÉCTRICO PARA GALLETAS.
Cubra la pasta con salsa marinara y
hornee durante 45 minutos.
ESPAÑOL
34
34
Page 37

DEVOLUCIONES Y GARANTÍA
SI SU UNIDAD NO TRABAJA O ESTÁ DAÑADA CUANDO LA EXTRAE POR PRIMERA VEZ
DE LA CAJA, DEVUÉLVALA INMEDIATAMENTE AL LUGAR DONDE LA COMPRÓ.
MOLDE ELÉCTRICO PARA PREPARAR GALLETAS / CDP200RED
Si tiene preguntas, contacte con nosotros por correo electrónico o por el
número telefónico de servicio al cliente que aparece a continuación en el
horario de 8:00 AM a 5:00 PM, de lunes a viernes, Hora Estándar del Este.
Distribuida por:
Nostalgia Products Group LLC
1471 Partnership Dr.
Green Bay, WI 54304-5685
Servicio al cliente
Teléfono: (920) 347-9122
Web: www.nostalgiaelectrics.com
Solicitud de servicio al cliente
Para enviar una solicitud al Servicio al Cliente, vaya a www.nostalgiaelectrics.com,
llene el formulario de Solicitud de Servicio al Cliente y haga clic en el botón Enviar.
Un representante le contactará tan pronto como sea posible.
Este electrodoméstico está diseñado y fabricado para proporcionar muchos años de
trabajo satisfactorio bajo un uso doméstico normal. El distribuidor se compromete con
el propietario original que si hay algún defecto en materiales o mano de obra durante
ESPAÑOL
los primeros 90 días de la compra, repararemos o sustituiremos la unidad, según
nuestra elección. Este compromiso no se aplica a daños causados por el envío, mala
manipulación o caídas de la unidad. La determinación de si los defectos del producto son
debidos a la fabricación o a una mala manipulación, queda a la decisión del distribuidor.
Para obtener servicio bajo esta garantía, contacte con Nostalgia Products Group, LLC
por el número telefónico que aparece anteriormente o llenando el Formulario de
Solicitud de Servicio al Cliente que se encuentra en www.nostalgiaelectrics.com.
Esta garantía no se aplica a mercancía reelaborada.
Por favor, lea estas instrucciones cuidadosamente. El incumplimiento de estas
instrucciones, los daños causados por repuestos inapropiados, el abuso o mal
uso, anularán este compromiso hacia usted y cualquier otra garantía expresa.
Para obtener más información, visítenos en línea en www.nostalgiaelectrics.com.
Me Gusta en Facebook en www.facebook.com / NostalgiaElectrics.
Siga nuestros consejos sobre Pinterest en www.pinterest.com / nostalgiaelctrx.
Tweet con nosotros en Twitter en www.twitter.com / NostalgiaElctrx.
35
35
Page 38

Faire une fête tous les jours!
Visiter le site Web www.nostalgiaelectrics.com pour d’autres produits agréables.
TABLE DES MATIÈRES
PRÉCAUTIONS IMPORTANTES . . . . . . . . . . . . . . . . . . . . . . . . . . . 37
MISES EN GARDE SÉCURITAIRES IMPORTANTES . . . . . . . . . . . . . . . . 37
INTRODUCTION . . . . . . . . . . . . . . . . . . . . . . . . . . . . . . . . . . . . 38
PIÈCES ET ASSEMBLAGE . . . . . . . . . . . . . . . . . . . . . . . . . . . . . . . 39
COMMENT FAIRE FONCTIONNER . . . . . . . . . . . . . . . . . . . . . . . . . 43
CONSEILS PRATIQUES . . . . . . . . . . . . . . . . . . . . . . . . . . . . . . . . 44
NETTOYAGE ET ENTRETIEN . . . . . . . . . . . . . . . . . . . . . . . . . . . . . 45
RECETTES . . . . . . . . . . . . . . . . . . . . . . . . . . . . . . . . . . . . . . . . 46
RETOURS DE LA MARCHANDISE ET GARANTIES . . . . . . . . . . . . . . . . 52
SÉCURITÉ
Votre sécurité tout comme celle des autres est primordiale.
Ce manuel renferme plusieurs avis importants sur la sécurité lors de l’utilisation
de votre appareil. Lire le manuel et conformez-vous aux avis contre-indiqués.
Ceci représente le symbole d'avertissement pour votre sécurité.
Ce symbole vous alerte des dangers potentiels, pouvant
vous être fatals à vous ou envers d'autres utilisateurs.
Ce symbole d'alerte à la sécurité suivra tous les avis relatifs à la sécurité.
Tous les avis sécuritaires indiqueront le danger potentiel exact, la façon
dont vous pouvez réduire vos chances de blessure et vous indiquerons les
conséquences potentielles si vous ne suivez pas ces instructions à la lettre.
Spécications des Appareils:
120 volts, 60 Hz
15 watts, approbation ETL
36
36
FRANÇAIS
Page 39

PRÉCAUTIONS IMPORTANTES
1. NE JAMAIS plonger l'appareil dans l'eau.
2. NE JAMAIS utiliser l'appareil près de l'eau.
3. NE JAMAIS utiliser une éponge abrasive ou un chion sur l'appareil.
4. NE JAMAIS laisser l'appareil sans surveillance lorsqu'il est utilisé.
5. Débrancher l'appareil de la prise lorsqu'il n'est pas utilisé et au moment du nettoyage.
6. NE PAS placer l'appareil au lave-vaisselle.
7. Garder hors de portée des enfants.
8. Cet appareil NEST PAS UN JOUET.
9. Cet appareil n'est pas destiné à être utilisé par les enfants ou les
personnes atteintes d'un décit cognitif, laissés sans surveillance.
10. Les jeunes enfants doivent être surveillés an que vous vous
assuriez qu'ils ne jouent pas avec l'appareil.
MISES EN GARDE SÉCURITAIRES
IMPORTANTES
Des mesures de précaution de base devraient toujours être suivies au moment de
l'utilisation d'un appareil électrique, y compris :
1. Lisez toutes les instructions avant d’utiliser cet appareil.
2. Ne pas immerger le bloc moteur ou rincer le cordon ou la che dans l'eau ou autre liquide.
3. Cet appareil ne doit pas être utilisé par des enfants ou à leur proximité.
4. L'appareil doit être débranché lorsqu'il n'est pas utilisé, avant
de mettre ou de retirer des pièces et de le nettoyer.
5. L'utilisation d'accessoires qui ne sont pas recommandés ou vendus par le fabricant
de cet appareil peut provoquer un incendie, une électrisation ou une blessure.
6. À usage domestique seulement.
7. Tenir les mains, les cheveux et les vêtements, ainsi que les ustensiles, éloignés des pièces
mobiles, des disques et des douilles à pâtisserie pendant le processus pour réduire
le risque de blessure grave aux personnes ou de dommage à la presse à biscuits.
8. Manipuler les disques et les douilles à pâtisserie avec soin
au moment de leur insertion ou nettoyage.
9. Fixer solidement le couvercle et le tube avant de faire fonctionner l'appareil. Ne
pas essayer de retirer le tube ou le couvercle du tube en cours d'utilisation.
10. Un cordon d'alimentation court ou amovible est fourni pour réduire le
risque de s'emmêler ou de trébucher sur un cordon plus long. Ne pas
laisser pendre le cordon d'une table ou toucher une surface chaude.
11. Toujours brancher le cordon dans la prise murale avant le fonctionnement.
FRANÇAIS
Laisser refroidir l'appareil complètement avant de le ranger.
37
37
Page 40

12. De cordons d'alimentation ou des rallonges amovibles plus longues sont disponibles
et pourront être utilisés avec prudence. Exception : aucun(e) rallonge ou long cordon
amovible plus long(ue) n'est recommandé(e) pour utilisation avec cet appareil.
13. Si un cordon d'alimentation amovible long ou une rallonge est utilisé(e) : 1)
La puissance nominale du câble ou de la rallonge devrait être au moins aussi
élevée que celle de l'appareil; 2) Si l'appareil est de type mise à la terre, la
rallonge doit être un cordon de terre à 3 ls et 3) le cordon plus long devrait
être soit placé de manière à ce qu'il ne soit pas étalé sur le comptoir ou la
table ou puisse être tiré par des enfants ou faire trébucher quelqu'un.
14. Cet appareil est muni d’une che électrique polarisée (une des lames est plus
large que l’autre). An de minimiser les risques de choc électrique, cette che
est conçue de façon à être branchée dans une prise électrique polarisée d’une
seule façon. Si la che n'entre pas complètement dans la prise, inverser celleci. Si elle ne convient toujours pas, communiquer avec un électricien
agréé. Ne pas essayer de modier la che de quelque façon.
15. Ne pas tenter de réparer cet appareil soi-même, car l'ouverture ou le retrait
des couvercles pourra provoquer des tensions dangereuses ou autres
dangers. Coner toutes les réparations à un personnel qualié.
CONSERVEZ CES INSTRUCTIONS !
INTRODUCTION
Merci d'avoir acheté la PRESSE À BISCUITS ÉLECTRIQUE de ElectricsMC! Confectionner
et décorer maintenant des biscuits délicieux à la manière d'un boulanger
professionnel ! La PRESSE À BISCUITS ÉLECTRIQUE confectionne rapidement et
facilement des gâteaux et des biscuits joliment décorés, ainsi que d'autres horsd'œuvre appétissants. Laisser libre cours à son imagination et à son plaisir !
Fonctionnalités :
• Comprend 12 disques à biscuit et 8 douilles à pâtisserie de décoration
• La poignée ergonomique munie de son bouton ON/
OFF (marche/arrêt) en facilite l'utilisation
• Suivre les recettes de biscuits comprises ou un utiliser une pâte du commerce
• Peut aussi être utilisé pour le remplissage des coquilles de pâtes, des
œufs durs ou pour décorer les petits gâteaux et les gâteaux
FRANÇAIS
38
38
Page 41

PIÈCES ET ASSEMBLAGE
PIÈCES
Tube
Couvercle du tube
Adaptateur de douille à pâtisserie
DOUILLES (8)
Interrupteur de marche/arrêt
Arbre de la presse
à biscuits
Bloc moteur
Couvercle de
douille à pâtisserie
Disque
d'arbre
DISQUES À BISCUITS (12)
FRANÇAIS
39
39
Page 42

ASSEMBLAGE
1. Avec le Disque d'arbre en place, insérer la tige de l'Arbre de la presse à biscuits
dans le trou central du Bloc moteur. Pousser l'Arbre de la presse à biscuits
complètement à l'intérieur du Bloc moteur, puis appuyer pour xer solidement.
2. Fixer le Tube en alignant les chevilles à l'intérieur du Tube avec les
rainures extérieures du Disque d'arbre. La èche sur le Tube s'alignera
avec la position UNLOCK (déverrouiller) sur le Bloc moteur.
3. Saisir le Tube fermement, puis tourner jusqu'à ce que la èche du
haut sur les lignes du Tube s'aligne avec la position LOCK (
clic se fera entendre lorsqu'il sera à la position appropriée.
4. Remplir l'appareil avec de la pâte à biscuits fraîchement
préparée à l'aide d'une cuillère ou d'une spatule. REMARQUE :
Ne pas remplir le tube au-delà de la ligne de remplissage MAX.
). Un
FRANÇAIS
40
40
Page 43

5. Avec l'utilisation d'une Douille à pâtisserie, poser la Douille à pâtisserie
désirée sur l'Adaptateur de douille à pâtisserie, puis xer solidement à l'aide
du Couvercle de douille à pâtisserie. Poser la Douille à pâtisserie entièrement
assemblée dans le Couvercle du tube, poser le Couvercle du tube sur le
Tube, puis tourner dans le sens horaire à une position verrouillée.
6. À l'aide des Disques à biscuits - choisir le disque de son choix -, puis le poser à l'extrémité
du Tube. Poser le Couvercle du tube sur le Tube, puis tourner dans le sens horaire jusqu'à ce
qu'il se verrouille en place.
FRANÇAIS
La PRESSE À BISCUITS ÉLECTRIQUE peut être maintenant utilisée !
41
41
Page 44

FORME DES DISQUES À BISCUITS
La PRESSE À BISCUITS ÉLECTRIQUE comprend 12 Disques à biscuit
diérents pour confectionner des biscuits de forme amusante.
DOUILLES DE FORME DÉCORATIVE
La PRESSE À BISCUITS ÉLECTRIQUE comprend 8 Douilles à pâtisserie pour les besoins
en matière de décoration ou d'application à la douille à pâtisserie. De la décoration
de gâteaux, de biscuits et de petits gâteaux, aux choux à la crème et à de savoureux
hors-d'œuvre garnis comme les œufs mayonnaise, la PRESSE À BISCUITS ÉLECTRIQUE
de Nostalgia ElectricsMC est un outil de cuisson polyvalent et pratique.
FRANÇAIS
42
42
Page 45

COMMENT FAIRE FONCTIONNER
AVANT SON UTILISATION
1. Déballer soigneusement la PRESSE À BISCUITS ÉLECTRIQUE avec les accessoires.
2. Laver les Disques à biscuit, les Douilles à pâtisserie, l'Adaptateur de douille à
pâtisserie, le Couvercle du tube, le Couvercle de douille à pâtisserie, le Tube,
l'Adaptateur d'arbre et l'Arbre de la presse à biscuits à l'eau chaude savonneuse.
Rincer, puis assécher à l'aide d'un chion ou d'une serviette non abrasi(f)ve.
3. Essuyer toutes les surfaces du Bloc moteur à l'aide d'un chion non abrasif,
légèrement humide, puis assécher soigneusement en s'assurant que l'eau ne pénètre
à l'intérieur du Bloc moteur. S'ASSURER QUE L'APPAREIL EST DÉBRANCHÉ.
4. Ne JAMAIS immerger le Bloc moteur, la che ou le cordon dans l'eau ou
tout autre liquide, et ne pas utiliser de laine d'acier, de tampon à récurer
ou de produit nettoyant abrasif, car ils endommageront le ni.
CONFECTION DE BISCUITS
La consistance appropriée de la pâte à biscuits est essentielle. Si elle est
trop ferme, la pâte ne sortira pas de la presse à biscuits. Si elle est trop
molle ou collante, les biscuits ne conserveront pas leur forme. Un peu de
pratique sera nécessaire pour obtenir une consistance optimale de pâte à
biscuits pouvant être utilisée dans la PRESSE À BISCUITS ÉLECTRIQUE.
1. Après l'assemblage de la PRESSE À BISCUITS ÉLECTRIQUE, remplir avec de la pâte jusqu'à la
ligne de remplissage MAX. NE PAS utiliser de pâte qui contient des noix ou des bonbons.
2. Brancher la presse à biscuits remplie, puis la mettre en position verticale avec le
couvercle du tube reposant sur une plaque à biscuits non tapissée/non graissée.
Avant d'appuyer sur la presse pour le premier biscuit, toutes les poches d'air
doivent être enlevées de la pâte. Ainsi, maintenir enfoncé le bouton ON/OFF
(marche/arrêt) jusqu'à ce que la pâte commence à être pressée sur le disque.
3. Pour former un biscuit, maintenir le bouton enfoncé pendant 1 à 2 seconde(s), en fonction
de la pâte préparée ou du disque utilisé. Après avoir appuyé pendant 1 à 2 seconde(s),
soulever doucement la presse à biscuits de la plaque, puis répéter pour le biscuit suivant et
ainsi de suite. Le couvercle du tube doit toujours reposer sur la plaque à biscuits au moment
de presser pour confectionner les biscuits. Sinon, les biscuits ne se formeront correctement.
UTILISATION DES DOUILLES À PÂTISSERIE
Que ce soit pour le remplissage avec de la pâte à choux à la crème ou l'application
d'une décoration à la douille sur un gâteau, faire pulser le bouton ON/OFF (marche/
arrêt), par opposition au maintien du bouton enfoncé. Ceci permet de mieux
contrôler la quantité de garniture ou de glaçage qui sera utilisée à la fois.
La consistance de la pâte qui sera appliquée à la douille est très importante. Dans la plupart
des cas, les glaçages devront être plus épais pour de meilleurs résultats. Si le glaçage, en
particulier pour une décoration, est trop clair, il ne conservera pas sa forme. La plupart
des glaçages, qui servent ou non à décorer, devront être plus épais que la normale.
Pratiquer l'application d'une décoration à la douille avant de décorer un produit nal.
Au moment de la décoration d'une pâtisserie, faire pulser rapidement une fois, puis
évaluer la décoration réalisée. Il y aura toujours plus de glaçage/garniture que ce
qui avait été prévu sortant de la presse à biscuits, aller lentement. Au moment de
l'utilisation d'une poche à pâtisserie traditionnelle pour la décoration, étendre le
FRANÇAIS
glaçage comme s'il s'agissait d'un ruban, plutôt que de le xer solidement en place.
43
43
Page 46

Au moment de garnir une pâtisserie, que ce soit un chou à la crème ou un œuf mayonnaise,
appliquer la quantité désirée à la douille, puis faire une pause entre chaque application,
en s'assurant que toute la garniture est sortie de la douille avant de passer à la suivante.
NOUVEAU REMPLISSAGE DE LA PRESSE À BISCUITS
La plupart des recettes comprises exigent de l'utilisateur qu'il remplisse la
presse à biscuits au moins une fois. Selon la taille du biscuit à confectionner,
un remplissage permet d'obtenir généralement de 25 à 40 biscuits.
• An de remplir la presse à biscuits, retirer le tube du bloc moteur, appuyer sur
l'arbre pour le dégager, puis reposer, tel qu'il est indiqué à la Page 2.
• Remplir à nouveau avec de la pâte jusqu'à la ligne de remplissage MAX. Une fois de
plus, enlever toutes les poches d'air de la pâte en maintenant enfoncé le bouton ON/
OFF (marche/arrêt), puis appuyer pour confectionner la prochaine fournée de biscuits.
REMARQUE : Pour un autre type de pâte ou lorsque de la pâte s'est
accumulée dans l'adaptateur de l'arbre, la presse à biscuits devra être déposée
(désassemblée) et nettoyée avant le remplissage. Toujours nettoyer et reposer
(réassembler) la presse à biscuits, tel qu'il est indiqué dans ce manuel et s'assurer
de se conformer aux consignes en matière d'innocuité alimentaire.
CONSEILS PRATIQUES
PÂTE À BISCUIT
• La consistance appropriée de la pâte à biscuits est très importante. Si la pâte est trop
ferme ou sèche, elle ne sortira pas de la presse. La pâte doit être légèrement collante,
mais pas trop. Si la pâte est trop molle, les biscuits ne conserveront pas leur forme. Un
peu de pratique sera nécessaire. Les recettes pourront être modiées pour obtenir
la consistance désirée. Les formes s'amélioreront avec la pratique et un rythme et
un synchronisme appropriés se développeront pour chaque type de biscuit.
• La pâte à biscuits doit être d'une texture lisse. L'utilisation de noix, de
grains de chocolat ou de bonbons dans la pâte n'est pas recommandée.
Ceci permettra d'éviter que la presse à biscuits ne se bouche.
• Toujours utiliser la pâte immédiatement après l'avoir confectionnée. Ceci
donnera de meilleurs résultats. L'utilisation d'une pâte congelée n'est pas
recommandée. La pâte doit être susamment malléable pour sortir du
disque facilement et conserver sa forme sur la plaque à biscuits.
• Si la pâte est trop collante ou molle, la réfrigérer pendant 15 minutes.
Une autre option est d'incorporer une petite quantité de farine à la pâte.
L'ajout de margarine pourra aussi en réduire la consistance collante.
• Si la pâte est trop ferme, la mélanger à un peu d'œuf battu.
• Une fois la pâte placée dans le tube, l'utiliser immédiatement.
• Ne pas graisser ou tapisser la plaque à biscuits au moment d'utilisation
de la presse à biscuits. Sinon, la pâte à biscuits ne collera pas à la
plaque, et les biscuits ne pourront pas conserver leur forme.
DÉCORATION
• Pour décorer les bonbons, les biscuits, les desserts ou pour garnir les
pâtisseries ou les hors-d'œuvre, etc., utiliser les Douilles à pâtisserie.
• Si la pâte n'est pas susamment humide pour maintenir les décorations en place,
les badigeonner légèrement avec une petite quantité d'eau, de lait ou de miel.
FRANÇAIS
44
44
Page 47

NETTOYAGE ET ENTRETIEN
Pour l'entretien de la PRESSE À BISCUITS ÉLECTRIQUE, suivre ces simples consignes
et mesures de précaution. Pour de meilleurs résultats, le nettoyage de la PRESSE
À BISCUITS ÉLECTRIQUE devrait être eectué après chaque utilisation.
1. Débrancher l'appareil de la prise de courant.
2. Déverrouiller le Tube en tenant le Bloc moteur à l'aide d'une seule main et le Tube de
l'autre. Tourner le Tube de manière à ce que la èche sur le Tube s'aligne avec la position de
déverrouillage sur le Bloc moteur (consulter la section Assemblage). Retirer pour enlever.
3. Sortir l'Arbre.
4. Retirer le Disque à biscuit ou l'ensemble Douille à pâtisserie du Tube.
5. Laver toutes les pièces amovibles et les accessoires à l'eau chaude savonneuse. Rincer,
puis assécher soigneusement à l'aide d'un chion ou d'une serviette non abrasi(f)ve.
6. Essuyer l'extérieur du Bloc moteur à l'aide d'un chion humide, doux, puis assécher
soigneusement en s'assurant que l'eau ne pénètre pas à l'intérieur du Bloc moteur.
7. Ne JAMAIS utiliser de laine d'acier, de tampon à récurer ou de
produit nettoyant abrasif, car ils endommageront le ni.
8. Une brosse douce peut être utilisée pour nettoyer
l'intérieur du Tube et les Douilles à pâtisserie.
9. Toute autre réparation doit être eectuée par un représentant de service autorisé.
10. Ne JAMAIS immerger la PRESSE À BISCUITS ÉLECTRIQUE dans l'eau ou le mettre au lavevaisselle.
RANGEMENT
Conserver le carton d'origine et le matériel d'emballage, puis remettre la PRESSE À
BISCUITS ÉLECTRIQUE dans le carton. Ranger l'appareil dans un endroit propre, sec.
FRANÇAIS
45
45
Page 48

RECETTES
Avec la PRESSE À BISCUITS ÉLECTRIQUE, utiliser les recettes de pâte à biscuits
de son choix ou de la pâte achetée du commerce pour confectionner de
magniques biscuits qui plairont à tous ! En fonction de la recette, du disque
à biscuit utilisé et de la taille de biscuit désirée, la quantité pourra varier.
Utiliser la PRESSE À BISCUITS ÉLECTRIQUE pour garnir les œufs, décorer
les gâteaux, les biscuits, les petits gâteaux et bien plus encore !
Faire preuve de créativité et proter de la PRESSE À BISCUITS ÉLECTRIQUE !
BISCUITS AU CHOCOLAT
• 420 g (1 ¾ tasse) de
sucre cristallisé blanc
• 6 c. à table de
poudre de cacao
• 480 g (2 tasses) de
farine tout-usage
• ½ c. à café de sel
• 240 g (1 tasse) de
graisse végétale
• 60 g (¼ tasse)
de margarine
• 1 œuf, battu
• ½ c. à café d'extrait
de vanille pur
• 3 c. à café de lait
Faire préchauer le four à 180 °C (350 °F).
Dans un grand bol, mélanger le sucre, le cacao, la farine
et le sel jusqu'à obtenir une consistance homogène.
Incorporer la graisse végétale et la margarine jusqu'à ce
que les morceaux soient de la grosseur d'un petit pois.
Ajouter l'œuf, la vanille et le lait; mélanger jusqu'à obtenir
une pâte ferme. Ceci pourra prendre jusqu'à une minute. Si
la pâte est trop collante, la réfrigérer pendant un moment.
Faire passer dans la PRESSE À BISCUITS ÉLECTRIQUE
et former des biscuits sur la plaque à biscuits.
Faire cuire pendant 8 à 10 minutes dans un four
préchaué ou jusqu'à ce que la surface semble sèche.
Laisser refroidir les biscuits pendant 1 à 2 minutes
sur la plaque à biscuits avant de les transférer sur
une grille pour les faire refroidir complètement.
BISCUITS AU BEURRE
• 180 g (¾ tasse)
de beurre non
salé, ramolli
• 120 g (½ tasse) de
sucre cristallisé blanc
• 1 œuf, séparé
• 1 c. à table
d'eau, divisée
• 420 g (1 ¾ tasse)
et 2 c. à table de
farine tout-usage
• 1 Pincée de sel
• 1 ½ c. à café d'extrait
de vanille pur
Faire préchauer le four à 205 °C (400 °F).
Battre en crème le sucre et le beurre jusqu'à
obtenir une consistance légère et mousseuse.
Incorporer le jaune d'œuf, ½ c. à table
d'eau, la farine, le sel et la vanille.
Remplir la presse à biscuits, puis former des
biscuits sur une plaque à biscuits non graissée.
Badigeonner le dessus de chaque biscuit avec le
blanc d'œuf mélangé à ½ c. à table d'eau.
Faire cuire les biscuits jusqu'à ce qu’ils soient
dorés sur le dessus, environ 10 minutes.
Décorer au goût.
46
46
FRANÇAIS
Page 49

BISCUITS SABLÉS À LA LAVANDE
• 360 g (1 ½ tasse)
de beurre, ramolli
• 180 g (2/3 tasse) de
sucre cristallisé blanc
• 60 g (¼ tasse) de
sucre glace, tamisé
• 2 c. table de
lavande fraîche,
finement hachée
• 1 c. à table de
feuille de menthe,
finement hachée
• 1 c. à café de zeste
de citron, râpé
• 600 g (2 ½ tasses) de
farine tout-usage
• 120 g (½ tasse) de
fécule de maïs
• ¼ c. à thé de sel
BISCUITS SABLÉS
• 480 g (2 tasses) de
beurre, ramolli
• 240 g (1 tasse) de
sucre cristallisé blanc
• 2 c. à café d'extrait
de vanille pur
• 960 g (4 tasses) de
farine tout-usage
Faire préchauer le four à 165 °C (325 °F).
Dans un bol moyen, battre en crème le beurre,
le sucre et le sucre glace jusqu'à obtenir une
consistance légère et mousseuse.
Incorporer la lavande, la menthe et le zeste de citron.
Mélanger la farine, la fécule de maïs et le sel; incorporer
à la pâte jusqu'à obtenir un mélange homogène.
Faire passer dans la PRESSE À BISCUITS ÉLECTRIQUE
et former des biscuits sur la plaque à biscuits.
Faire cuire pendant 18 à 20 minutes dans un
four préchaué ou jusqu'à ce que les biscuits
commencent à brunir sur les côtés.
Laisser refroidir les biscuits pendant 1 à 2 minutes
sur la plaque à biscuits avant de les transférer sur
une grille pour les faire refroidir complètement.
Faire préchauer le four à 180 °C (350 °F).
Battre en crème le sucre et le beurre jusqu'à obtenir
une consistance mousseuse. Incorporer la vanille.
Ajouter la farine, puis mélanger jusqu'à
obtenir un mélange homogène.
Faire passer dans la PRESSE À BISCUITS ÉLECTRIQUE
et former des biscuits sur la plaque à biscuits.
Faire cuire pendant 10 à 12 minutes.
BISCUITS SABLÉS À LA CASSONADE
• 300 g (1 ¼ tasse) de
farine tout-usage
• 3 c. table de
cassonade
• 1 c. à table de
sucre blanc
• ½ c. à café de
cannelle moulue
• 120 g (½ tasse)
de beurre
FRANÇAIS
47
47
Faire préchauer le four à 165 °C (325 °F).
Dans un bol moyen, incorporer la farine, la
cassonade, le sucre blanc et la cannelle.
Incorporer le beurre jusqu'à ce que le
mélange soit nement grumeleux.
Former des boules avec le mélange, puis pétrir
à la main jusqu'à obtenir une texture lisse. Faire
passer dans la PRESSE À BISCUITS ÉLECTRIQUE et
former des biscuits sur la plaque à biscuits.
Faire cuire dans un four préchaué pendant 25 minutes.
Page 50

BISCUITS À L'ÉRABLE
• 240 g (1 tasse)
de beurre
• 120 mL (½ tasse) de
sirop d'érable pur
• 480 g (2 tasses) de
farine tout-usage
• ¼ c. à thé de sel
BISCUITS AU PUDDING
• 240 mL (1 tasse)
de mélange pour
babeurre
• 1 emballage (85 g/3
oz) de mélange pour
pudding instantané
(citron, chocolat, noix
de coco, pistache,
banane ou la saveur
de son choix)
• 1 œuf
• 60 mL (¼ tasse)
d'huile végétale
• 80 g ( 1/3 tasse) de
sucre cristallisé blanc
Faire préchauer le four à 180 °C (350 °F).
Battre le beurre et le sirop d'érable à l'aide d'un mixeur
dans un grand bol jusqu'à obtenir une consistance lisse.
Mélanger la farine et le sel dans un bol séparé; incorporer
graduellement le mélange de farine au mélange de
beurre jusqu'à obtenir un mélange homogène.
Faire passer la pâte dans la presse à biscuits,
puis disposer sur une plaque à biscuits.
Faire cuire dans un four préchaué jusqu'à
ce qu'ils soient légèrement brunis, de 10 à
12 minutes. Ne pas trop faire cuire.
Faire préchauer le four à 180 °C (350 °F).
Mélanger le mélange pour babeurre, le
mélange pour pudding, l'œuf et l'huile dans un
grand bol jusqu'à ce que la pâte forme.
Rouler la pâte en boules de 2,5 cm (1 po).
Déposer les boules sur la plaque à biscuits à une
distance de 5 cm (2 po) les unes des autres.
Tremper la PRESSE À BISCUITS ÉLECTRIQUE dans
le sucre. Appuyer sur les boules de pâte avec
la presse à biscuits, puis aplatir jusqu'à obtenir
un biscuit de 6,3 mm (¼ po) d'épaisseur.
Faire cuire jusqu'à ce que les bords soient légèrement
dorés, environ 10 minutes. Transférer sur une
grille pour les laisser refroidir complètement.
BISCUITS À LA CRÈME SURE
• 240 g (1 tasse) de
beurre, ramolli
• 1 emballage de (85
g/3 oz) de fromage
à la crème, ramolli
• 240 g (1 tasse) de
sucre cristallisé blanc
• 1 jaune d'œuf
• ½ c. à café d'extrait
de vanille pur
• 600 g (2 ½ tasses) de
farine tout-usage
Faire préchauer le four à 165 °C (325 °F).
Dans un grand bol, battre en crème le beurre, le
fromage à la crème et le sucre jusqu'à obtenir
une consistance légère et mousseuse.
Incorporer le jaune d'œuf et la vanille. Remuer jusqu'à
obtenir un mélange homogène. Faire passer la pâte dans la
presse à biscuits, puis disposer sur une plaque à biscuits.
Pour une décoration de nature orale à l'aide de
la presse à biscuits, faire une indentation dans
le centre à l'aide d'un dé à coudre, garnir avec
de la conture ou des bonbons au centre.
Faire cuire dans un four préchaué pendant 15 minutes.
Les biscuits devraient être d'une couleur pâle.
48
48
FRANÇAIS
Page 51

BISCUITS AUX FRUITS
• 960 g (4 tasses) de
farine tout-usage
• 1 c. à café de
levure chimique
• 360 g (1 ½ tasse)
de margarine
• 240 g (1 tasse) de
sucre cristallisé blanc
• 1 emballage (85 g/3
oz) de mélange pour
gélatine aux fruits
• 1 œuf
• 1 c. à café d'extrait
de vanille
• 1 emballage (28 g/1
oz) de mélange pour
gélatine aux fruits
GLAÇAGE AU CHOCOLAT
• 51/3 c. à table de
beurre, ramolli
• 120 g (½ tasse) de
cacao en poudre
• 1 pincée de sel
• 3 c. table d'eau
bouillante
• 360 g (1 ½ tasse)
de sucre glace
Faire préchauer le four à 205 °C (400 °F).
Tamiser la farine avec la levure chimique.
Battre la margarine en crème; ajouter graduellement le
sucre et le mélange pour gélatine aux fruits de 85 g (3 oz).
Ajouter l'œuf et la vanille; battre jusqu'à
obtenir un mélange homogène.
Ajouter graduellement le mélange de farine;
mélanger jusqu'à obtenir une consistance lisse.
Faire passer la pâte dans la presse à biscuits
sur une plaque à biscuits non graissée.
Saupoudrer avec le mélange pour gélatine de28 g (1 oz).
Faire cuire au four pendant environ 12 à 13
minutes ou jusqu'à ce que le bord soit doré.
Dans un grand bol, battre le beurre en crème.
Ajouter le cacao, le sel et l'eau bouillante, en
remuant jusqu'à obtenir une consistance lisse.
Ajouter le sucre glace, puis battre jusqu'à ce que
le glaçage ait une consistance à tartiner.
Si le glaçage semble trop épais, ajouter de l'eau.
S'il semble trop clair, ajouter du sucre glace.
Réfrigérer après utilisation.
CHOCOLATE BUTTERCREAM FROSTING
• 360 g (1 ½ tasse)
de sucre glace
• 60 g (¼ tasse) de
beurre, ramolli
• 1 pincée de sel
• 1 ½ emballage (28
g/1 oz) de carré
de chocolat non
sucré, fondu
• 1 ½ c. à table de lait
• 1 c. à café d'extrait
de vanille pur
FRANÇAIS
49
49
Dans petit bol, mélanger à vitesse moyenne,
le sucre, le beurre (ramolli) et le sel jusqu'à
obtenir consistance légère et mousseuse.
Ajouter le chocolat fondu, le lait et l'extrait de vanille,
en battant jusqu'à obtenir un mélange homogène.
Réfrigérer après utilisation.
Page 52

GLAÇAGE AU FROMAGE À LA CRÈME
• 1 emballage (225
g/8 oz) de fromage
à la crème, ramolli
• 120 g (½ tasse) de
beurre, ramolli
• 1 c. à café d'extrait
de vanille pur
• 480 g (2 tasses) de
sucre glace, tamisé
GARNITURE POUR CHOUX À LA CRÈME
• 480 mL (2
tasses) de lait
• 60 g (¼ tasse) de
sucre cristallisé blanc
• 2 jaunes d'œuf
• 1 œuf
• 60 g (¼ tasse) de
fécule de maïs
• 80 g (1/3 tasse) de
sucre cristallisé blanc
• 2 c. à table de beurre
• 1 c. à café d'extrait
de vanille pur
Dans un bol moyen, battre en crème le fromage à la crème
et le beurre jusqu'à obtenir une consistance crémeuse.
Incorporer la vanille, puis graduellement le sucre glace.
Réfrigérer après utilisation.
Dans une casserole à fond épais, mélanger le lait et 60
g (¼ tasse) de sucre. Porter à ébullition à feu moyen.
Dans un bol moyen, fouetter ensemble
les jaunes d'œuf et l'œuf.
Mélanger la fécule de maïs et 80 g (1/3 tasse) de sucre; puis
les incorporer à l'œuf jusqu'à obtenir une consistance lisse.
Lorsque le lait commence à bouillir, le verser en let dans
le bol pour former un léger bouillon, tout en mélangeant
de manière à ne pas faire cuire les œufs. Remettre le
mélange dans la casserole, puis porter lentement à
ébullition, en remuant constamment de manière à
ne pas faire cailler ou brûler les œufs sur le fond.
Lorsque le mélange commencera à bouillir
et à épaissir, le retirer du feu.
Incorporer le beurre et la vanille, en mélangeant jusqu'à
ce que le beurre soit complètement mélangé.
Verser dans un récipient résistant à la chaleur, puis
le recouvrir d'une pellicule plastique directement
sur la surface pour éviter qu'une peau ne se
forme en surface. Réfrigérer jusqu'à ce que le
mélange soit refroidi avant de l'utiliser.
FRANÇAIS
50
50
Page 53

ŒUFS MAYONNAISE
• 6 œufs durs
• 2 c. à table de
mayonnaise
• 1 c. à café de sucre
cristallisé blanc
• 1 c. à café de
vinaigre blanc
• 1 c. à café de
moutarde
• ½ c. à café de sel
• Paprika
GARNITURE À LA CRÈME POUR CANNOLI
• 360 g (1 ½ tasse)
de ricotta
• 3 c. table de sucre
cristallisé blanc
• 1 c. à café de vanille
• 1 ½ c. à café de
cannelle moulue
Couper les œufs en deux sur la longueur; retirer
les jaunes et les blancs, puis réserver.
Dans un petit bol, écraser les jaunes à la fourchette.
Ajouter la mayonnaise, le sucre, le vinaigre,
la moutarde et le sel; bien mélanger.
Utiliser la PRESSE À BISCUITS ÉLECTRIQUE avec une douille
à pâtisserie pour garnir les œufs. Saupoudrer de paprika.
Réfrigérer jusqu'au moment de servir.
Mélanger tous les ingrédients à l'aide d'un batteur
jusqu'à obtenir une consistance lisse.
Réfrigérer jusqu'au moment de servir.
Rendement : un peu plus de 360 g (1 ½ tasse) de
garniture ou susamment pour environ 12 cannoli.
GARNITURE POUR COQUILLE DE PÂTE AU FROMAGE BLANC
• 0,9 kg (2 lb) de ricotta
ou de cottage
• 225 g (½ lb) de
mozzarella, râpé
• 2 œufs
• 120 g (½ tasse) de
parmesan, râpé
• 1 c. à café de sel
• ¼ c. à café de poivre
• 1 c. à café de persil
FRANÇAIS
51
51
Faire préchauer le four à 180 °C (350 °F).
Préparer les grosses coquilles de pâte. Porter
l'eau à ébullition, puis ajouter les pâtes, faire
bouiller les pâtes environ 10 à 15 minutes.
Égoutter les pâtes.
Préparer la garniture au fromage : Battre les
œufs, ajouter le ricotta, le mozzarella et le
parmesan; incorporer les assaisonnements.
Garnir les grosses coquilles de pâte à l'aide
de la PRESSE À BISCUITS ÉLECTRIQUE.
Couvrir les coquilles avec une sauce marinara,
puis faire cuire au four pendant 45 minutes.
Page 54

RETOURS DE LA MARCHANDISE ET GARANTIES
SI VOTRE APPAREIL NE FONCTIONNE PAS OU EST ENDOMMAGÉ
LORSQUE VOUS LE SORTEZ DE LA BOÎTE, VEUILLEZ LE RETOURNER
IMMÉDIATEMENT À L'ENDROIT OÙ VOUS L'AVEZ ACHETÉ.
PRESSE À BISCUITS ÉLECTRIQUE / CDP200RED
Pour toutes autres questions pertinentes, veuillez contacter le service à la
clientèle soit par courriel ou au numéro de service tel qu'indiqué ci-bas,
entre 8h00 et 17h00, du lundi au vendredi, heure normale de l'est.
Distribué par :
Nostalgia Products Group, LLC
1471, Boul. Partnership
Green Bay, WI 54304-5685
Service à la clientèle
Téléphone : (920) 347-9122
Site Internet : www.nostalgiaelectrics.com
Question pour le service à la clientèle
Pour soumettre une question au service à la clientèle, veuillez visiter
le site www.nostalgiaelectrics.com et remplir un formulaire destiné
au service à la clientèle puis cliquer sur la touche Soumettre.
Un représentant vous contactera sous peu.
Cet appareil est conçu pour orir plusieurs années d'utilisation de performance
satisfaisante, et ce, sous de conditions normales d'utilisation. Le grossiste nantit que le
propriétaire d'origine se doit de faire réparer ou changer l'appareil à notre discrétion,
advenant le cas de défectuosités des matériaux ou des pièces durant les 90 premiers
jours en date d’achat de l’appareil neuf. Notre nantissement ne s'applique aucunement
sur les dommages causés par le transport, une mauvaise utilisation de l'appareil ou
le fait d'échapper l'appareil. Un produit réclamé défectueux, soit suite à sa fabrication
ou une mauvaise utilisation sera évaluée à l’entière discrétion du grossiste. An que
la garantie couvre ce produit, veuillez contacter Nostalgia Products Group, LLC au
numéro de téléphone suivant ou en remplissant un formulaire de question destine
au service à la clientèle situé sur le site Internet : www.nostalgiaelectrics.com.
Cette garantie ne s’applique aucunement à la marchandise ré-usinée.
Lire ces instructions attentivement. Le manque de vous conformer à ces
instructions, de tous dommages causés par un remplacement erroné des pièces,
l’abus ou mauvaise utilisation de l’appareil annulera toute promesse faite à
votre égard, et prévaudra sur toute autre garantie, implicite ou expresse.
Pour plus d’informations, visitez notre site Web à www.nostalgiaelectrics.com.
Aimez-nous sur Facebook à l’adresse www.facebook.com / NostalgiaElectrics.
Suivez nos conseils sur Pinterest à www.pinterest.com / nostalgiaelctrx.
Tweet avec nous sur Twitter à l’adresse www.twitter.com / NostalgiaElctrx.
FRANÇAIS
52
52
 Loading...