

Page 1

All products are trademarks of Nostalgia Products Group, LLC.
Worldwide design & utility patented or patents pending.
© 2012 Nostalgia Products Group, LLC.
www.nostalgiaelectrics.com
(rev. 09/20/12)
Page 2
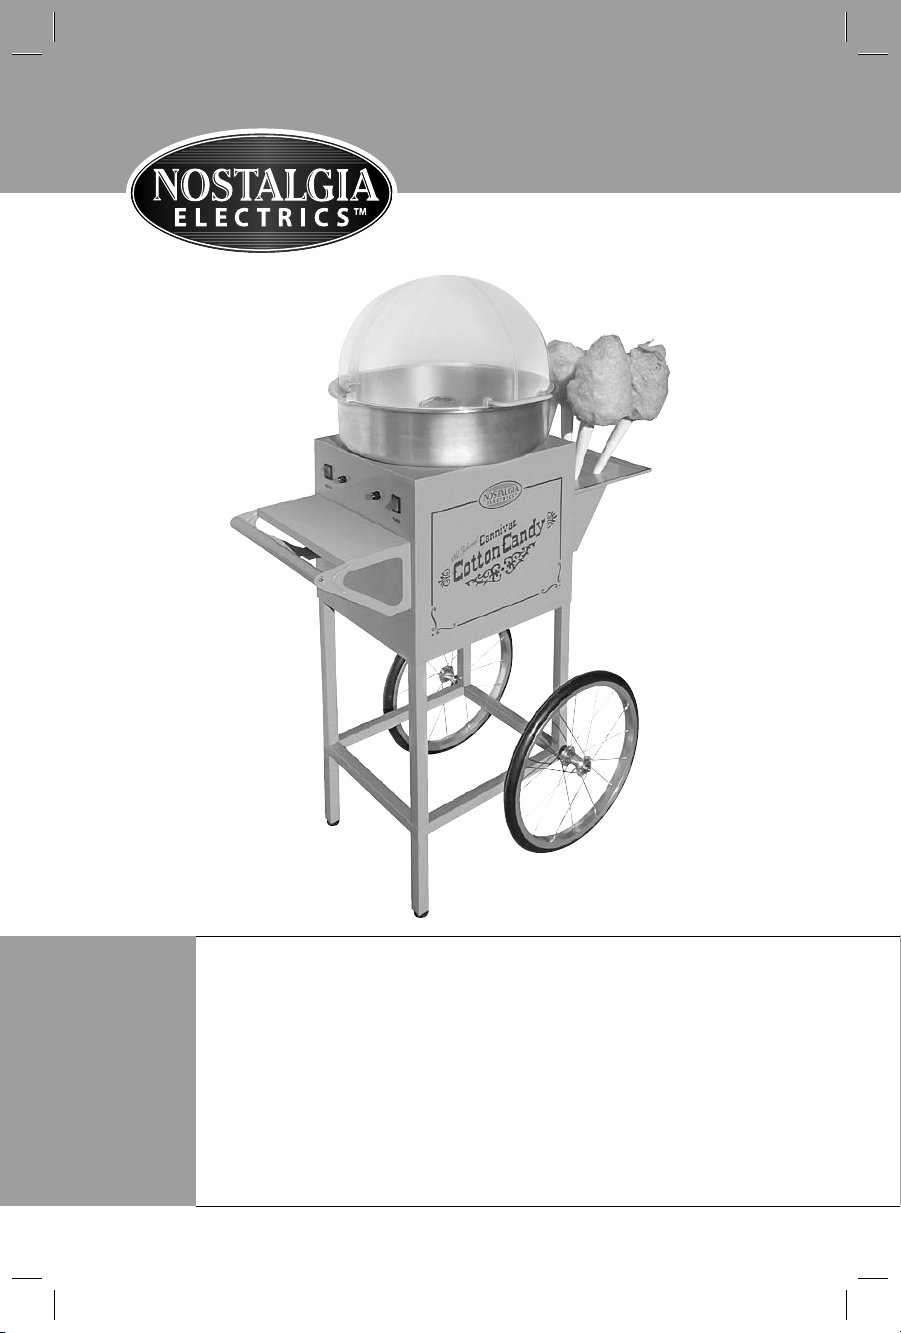
CCM600
Vintage Collection™ Old Fashioned Commercial Cotton
Candy Maker
Série d'antanMD Machine à barbe à
papa commerciale à l'ancienne
Instructions and Recipes
Instrucciones y recetas
Instructions et recettes
Page 3

Page 4
Make everyday a party!
Visit www.nostalgiaelectrics.com for more fun products.
CONTENTS
IMPORTANT PRECAUTIONS . . . . . . . . . . . . . . . . . . . . . . . . . . . . . 3
IMPORTANT SAFEGUARDS . . . . . . . . . . . . . . . . . . . . . . . . . . . . . 3
INTRODUCTION . . . . . . . . . . . . . . . . . . . . . . . . . . . . . . . . . . . . 4
PARTS & ASSEMBLY . . . . . . . . . . . . . . . . . . . . . . . . . . . . . . . . . . 5
HOW TO OPERATE . . . . . . . . . . . . . . . . . . . . . . . . . . . . . . . . . . 11
HELPFUL TIPS . . . . . . . . . . . . . . . . . . . . . . . . . . . . . . . . . . . . . 11
CLEANING & MAINTENANCE . . . . . . . . . . . . . . . . . . . . . . . . . . . . 12
RETURNS & WARRANTY . . . . . . . . . . . . . . . . . . . . . . . . . . . . . . . 13
SAFETY
Your safety and the safety of others is very important.
We have provided many important safety messages in this manual and
on your appliance. Always read and obey all safety messages.
This is the safety alert symbol.
This symbol alerts you to potential hazards that
can kill or hurt you and others.
All safety messages will follow the safety alert symbol.
All safety messages will tell you what the potential hazard is, tell you how to reduce the
chance of injury, and tell you what can happen if the instructions are not followed.
ENGLISH
Appliance Specications:
120 Volts, 60 Hz
700 Watts, ETL Approved
THIS PRODUCT IS FOR USE IN 120V AC OUTLET ONLY.
2
Page 5

IMPORTANT PRECAUTIONS
1. NEVER use a scouring pad on the unit.
2. NEVER leave unit unattended while in use.
3. NEVER place anything other than the intended sugar or hard candies in the Extractor Head.
4. NEVER pour water or any other liquid into the Extractor Head.
ENGLISH
5. NEVER put ngers on or near the Extractor Head or Heating
Element while machine is on, nor while it is still hot.
6. Unplug unit from outlet when not in use and when cleaning.
7. DO NOT operate this appliance with a damaged cord or plug
or in the event the appliance ever malfunctions.
8. DO NOT put parts in dishwasher for cleaning.
9. This appliance is NOT A TOY.
10. This appliance is not intended for use by young children.
11. Young children should be supervised while product is in use
to ensure that they do not play with the appliance.
IMPORTANT SAFEGUARDS
When using electrical appliances, basic safety precautions
should always be followed, including:
1. Read all instructions before operating this appliance.
2. DO NOT TOUCH the hot surfaces.
3. To protect against electrical shock do not immerse cord, plug
or any part of this unit in water or other liquids.
4. To avoid re or shock hazard, or damage to the unit, this unit should
be plugged into a polarized 120 Volt AC outlet ONLY.
5. Close supervision is necessary when any appliance is used by or near children.
6. Unplug from outlet when not in use and before removing parts for cleaning.
7. DO NOT operate any appliance with a damaged cord or plug or if the
appliance has been damaged in any manner. Return the appliance
to the nearest repair shop for examination or repair.
8. The manufacturer does not recommend the use of accessory
attachments. Use of attachments may cause injuries.
9. DO NOT let the cord touch hot surfaces.
10. DO NOT pour water or any other liquid into the Extractor Head.
11. DO NOT place parts on or near a hot gas or electric burner, or in a heated oven.
12. Extreme caution must be used when moving this appliance.
13. This unit must be on a level surface to operate properly.
14. DO NOT use this machine for other than its intended use.
3
Page 6
15. DO NOT leave unit unattended while in use or when plugged into an outlet.
16. Check the Extractor Head for foreign objects before switching to ON position.
17. The Extractor Head will get hot. Avoid contact until fully cooled.
18. A short power supply cord is provided to reduce the risk resulting
from becoming entangled or tripping over a long cord.
19. Extension cord can be used if care is exercised in use.
20. The marked electrical rating of an extension cord should be at
least as great as the electrical rating of the appliance.
21. This appliance has a polarized plug (one blade is wider than the other). To reduce the
risk of electrical shock, this plug is intended to t into a polarized outlet only one way.
If the plug does not t fully into the outlet, reverse the plug. If it still does not t,
contact a qualied electrician. Do not attempt to modify the plug in any way.
22. Keep hands away from the machine when it is in the ON position and is spinning.
SAVE THESE INSTRUCTIONS!
INTRODUCTION
The OLD FASHIONED COMMERCIAL COTTON CANDY MAKER is designed
to resemble vendor carts of the early 1900s, with the convenience of a
modern appliance. Simply plug in, turn on, pour pure, granulated sugar into
the center receptacle, and start spinning colorful and tasty treats.
This fanciful product is fun for the whole family and brings out the kid in everyone.
Instantly, gatherings are transformed into carnivals and dessert time into party time!
Your OLD FASHIONED COMMERCIAL COTTON CANDY MAKER will spin
the sugar into a sweet candy oss that you collect on cones by spinning
the cone as it circles the bowl…just like at the carnival!
ENGLISH
4
Page 7
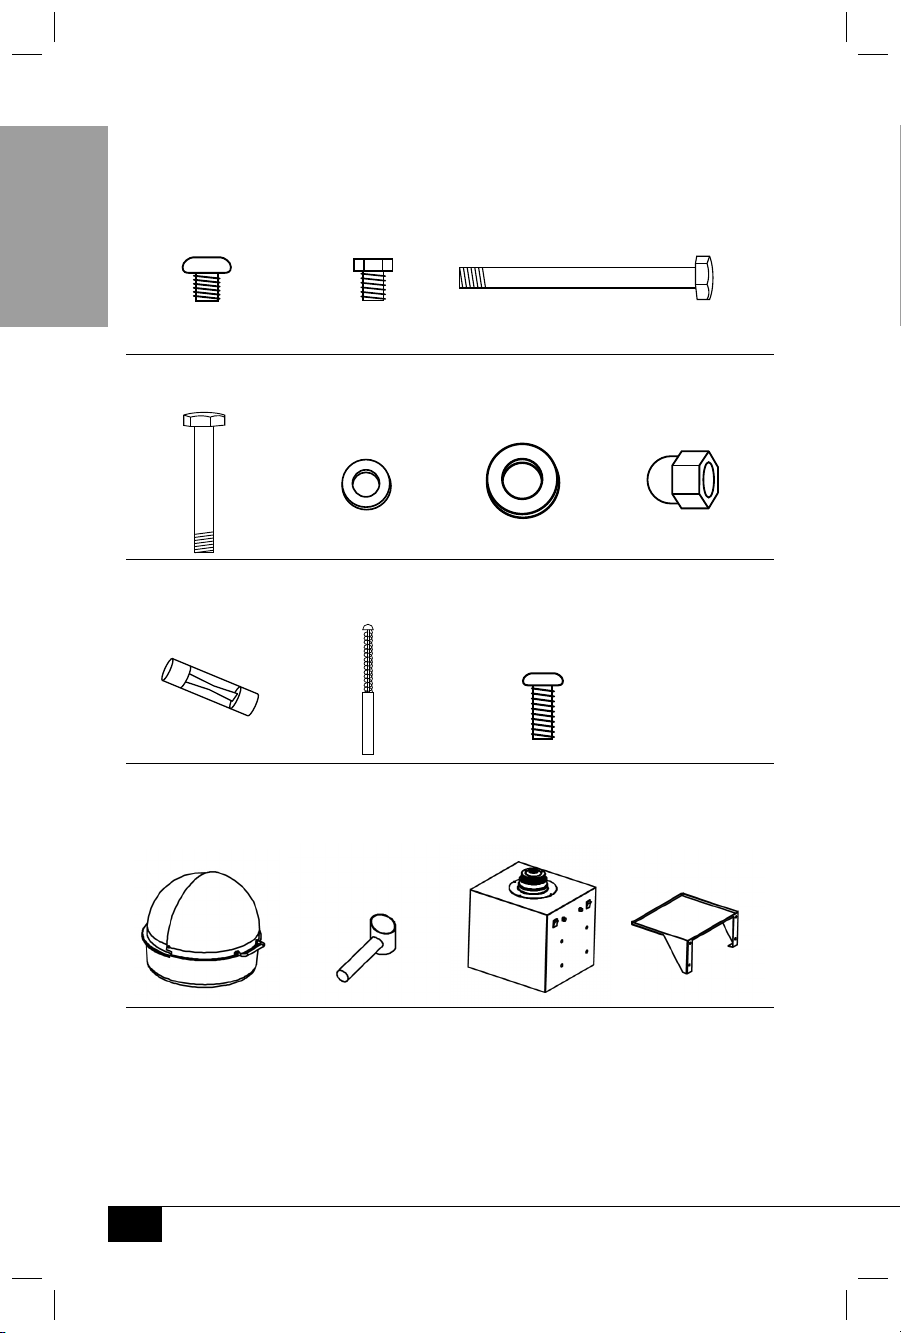
PARTS & ASSEMBLY
HARDWARE
ENGLISH
#1 Screw (10mm) #2 Bolt (10mm) #3 Axle Bolt (95mm)
Qty. 8 Qty. 8 Qty. 2
#4 Bolt (60mm) #5 Small Flat Washer #6 Large Flat Washer #7 Nut Cap
Qty. 2 Qty. 10 Qty. 4 Qty. 4
#8 Extra Fuses #9 Extra Kryptol #10 Screw (6mm)
(10 Amp) Qty. 2 Qty. 2 Qty. 3
PARTS
(A) Bowl & Dome (B) Sugar Shovel (C) Main Unit (D) Display Tray
5
Page 8
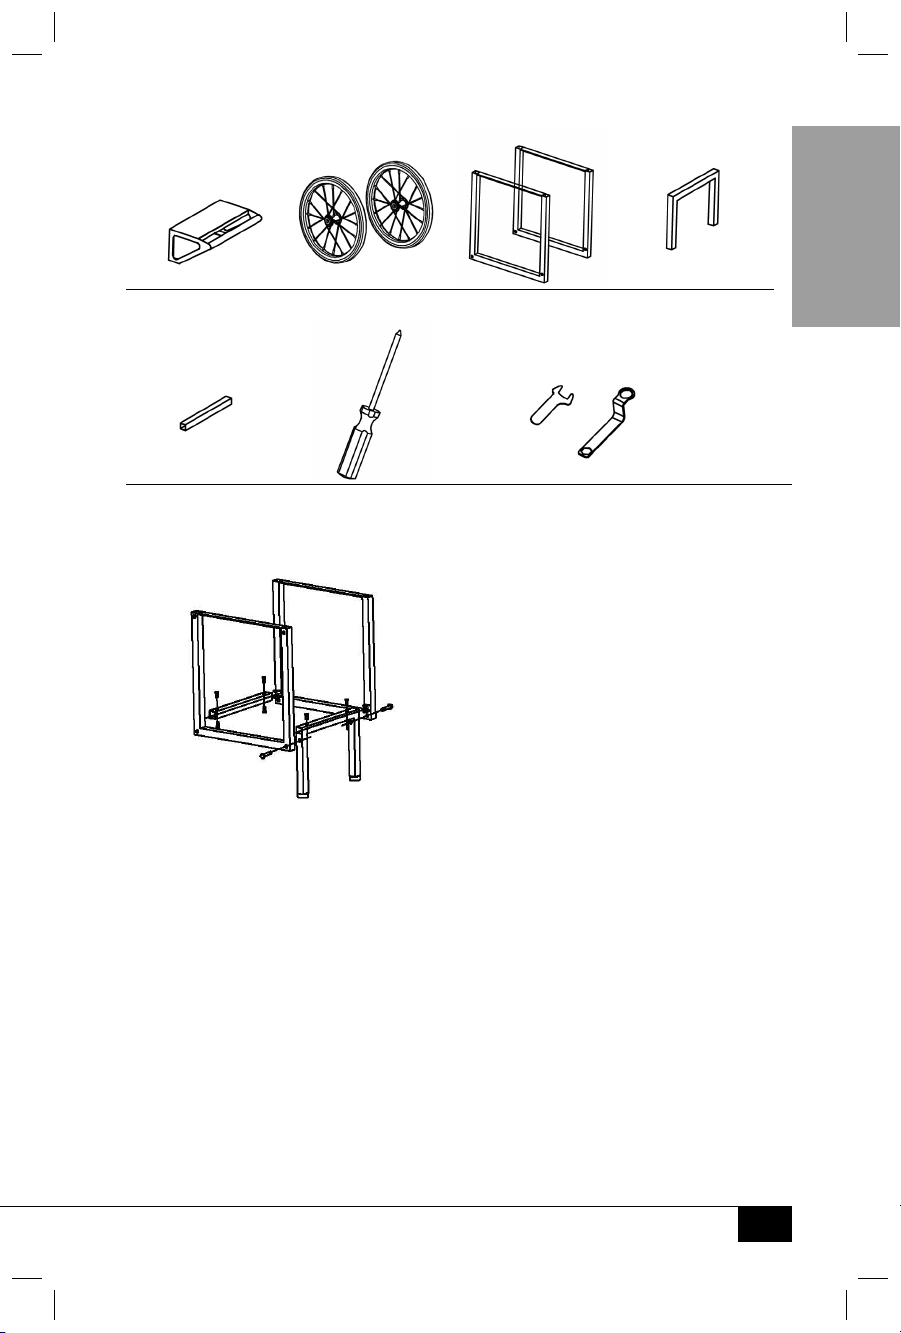
ENGLISH
(E) Push Handle (F) Wheels (G) Base Support (H) Leg Assembly
(I) Cross Bar (J) Screwdriver (K) Wrench #1 (L) Wrench #2
ASSEMBLY OF BASE SUPPORT
1. Insert Cross Bar (I) into the square inserts on the inside of Base Support (G)
and secure from below with two #2 Bolts and two #5 Flat Washers.
2. Insert the Leg Assembly (H) into the square inserts between the ends of
the Base Support (G) and fasten from inside with two #4 Bolts, two #6 Flat
Washers and two #7 Nut Caps and from the top with two #2 Bolts.
6
Page 9
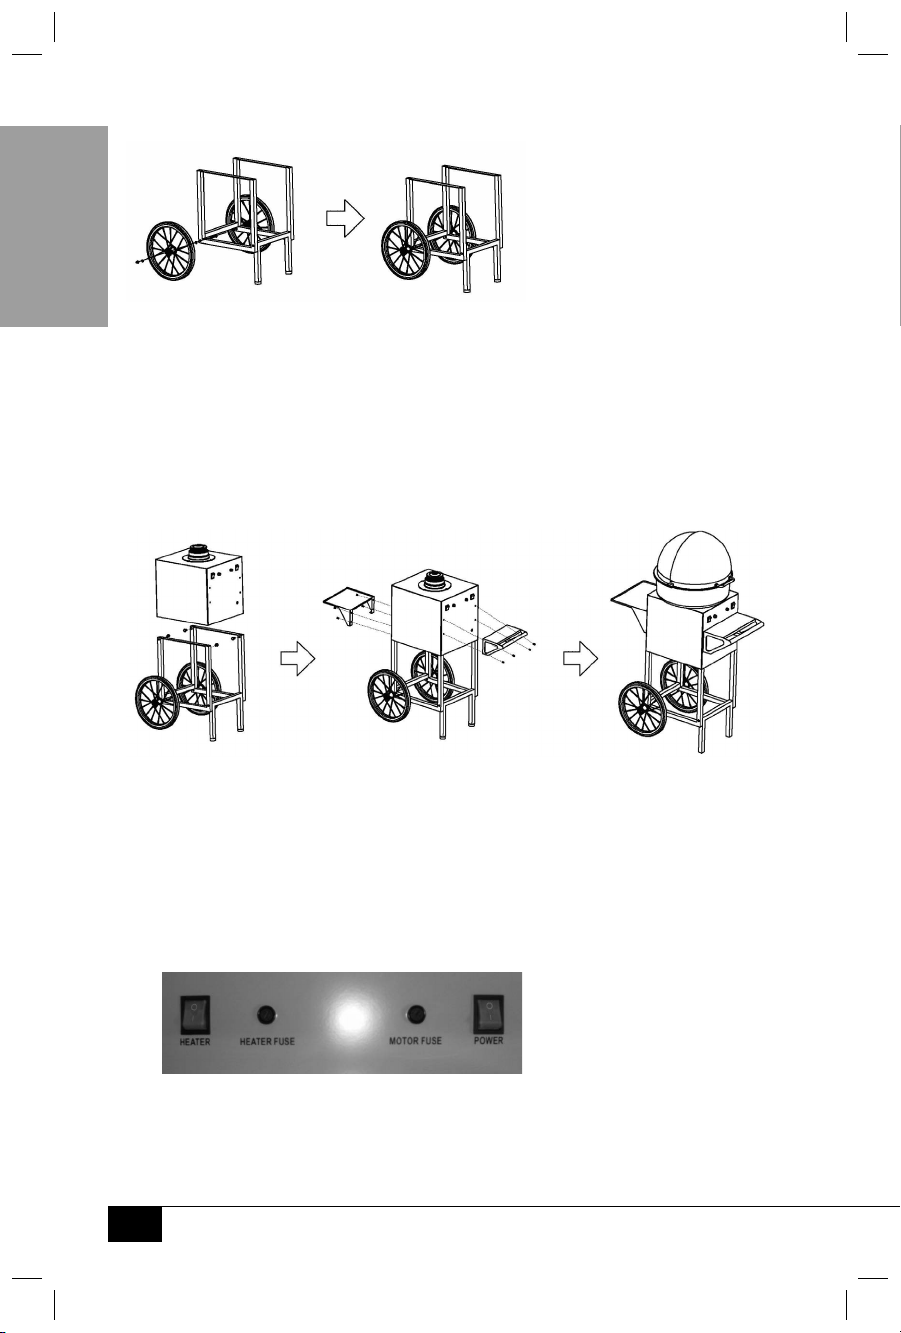
ASSEMBLY OF THE WHEELS
ENGLISH
1. Insert #3 Axle Bolt into Base Support (G).
2. Put on #6 Flat Washer. Slide one Wheel (F) into #3 Axle Bolt and
add a #5 Flat Washer and a #7 Nut Cap.
3. Use #2 Wrench (L) to tighten the #7 Nut Cap.
4. Insert the second #3 Axle Bolt to the other side of Base Support (G), add #6
Flat Washer, second Wheel (F), another #5 Flat Washer, and #7 Nut Cap to
the other side of the #3 Axle Bolt, following the directions above.
5. Use #2 Wrench (L) to tighten the #7 Nut Cap.
ASSEMBLY OF THE MAIN UNIT
1. Assemble Base Support (G) into the bottom of the Main
Unit (C) and secure with four #2 Bolts.
2. Push Handle (E) attaches onto the Main Unit (C) using four of the supplied #1 Screws
and four #5 Flat Washers. Attach Display Tray (D) to Main Unit (C) using four #1 Screws.
3. Attach Bowl (A) to Main Unit (C) by placing Bowl (A) over collar and
turning clockwise. Attach Dome to Bowl using three #10 Screws.
CHANGING THE FUSES
The Fuses are marked under each fuse compartment. Two
extra 10 Amp fuses are also included with this unit.
1. Using a at head screwdriver, push in, turning counter-clockwise.
2. Fuse is then accessible and can be changed. Once changed,
push in and turn clockwise to lock fuse into place.
7
Page 10
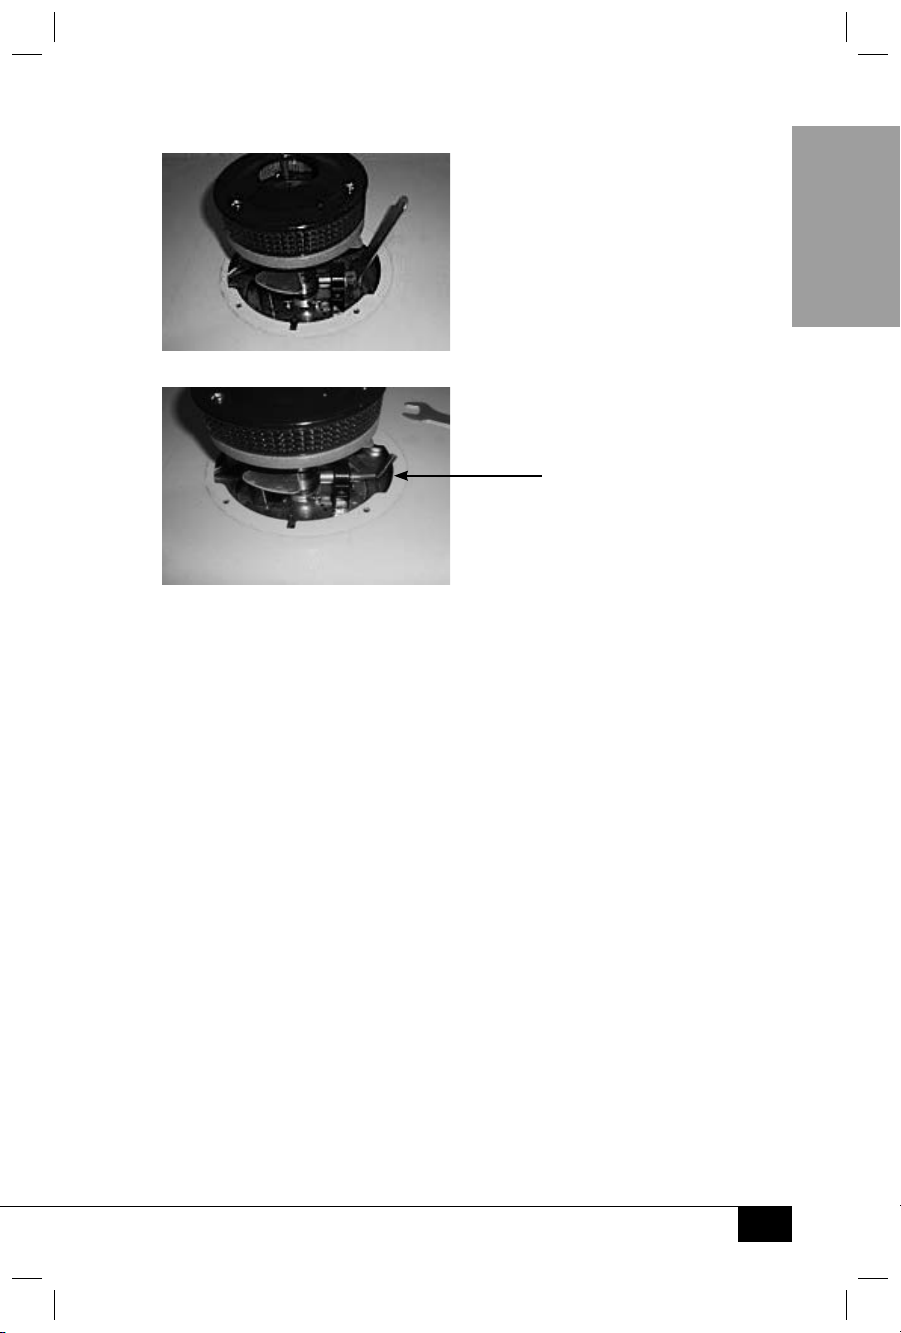
CHANGING EXTRACTOR HEAD
1. Before changing the Extractor Head, make sure that the machine is turned
OFF, unplugged, and that the Extractor Head has cooled completely.
2. Use #1 Wrench (K) to remove the center bolt.
3. Use pliers to loosen and remove the red and black wires
from the bottom of the Extractor Head.
ENGLISH
4. Attach the red and black wires to the new Extractor Head and tighten.
8
Page 11
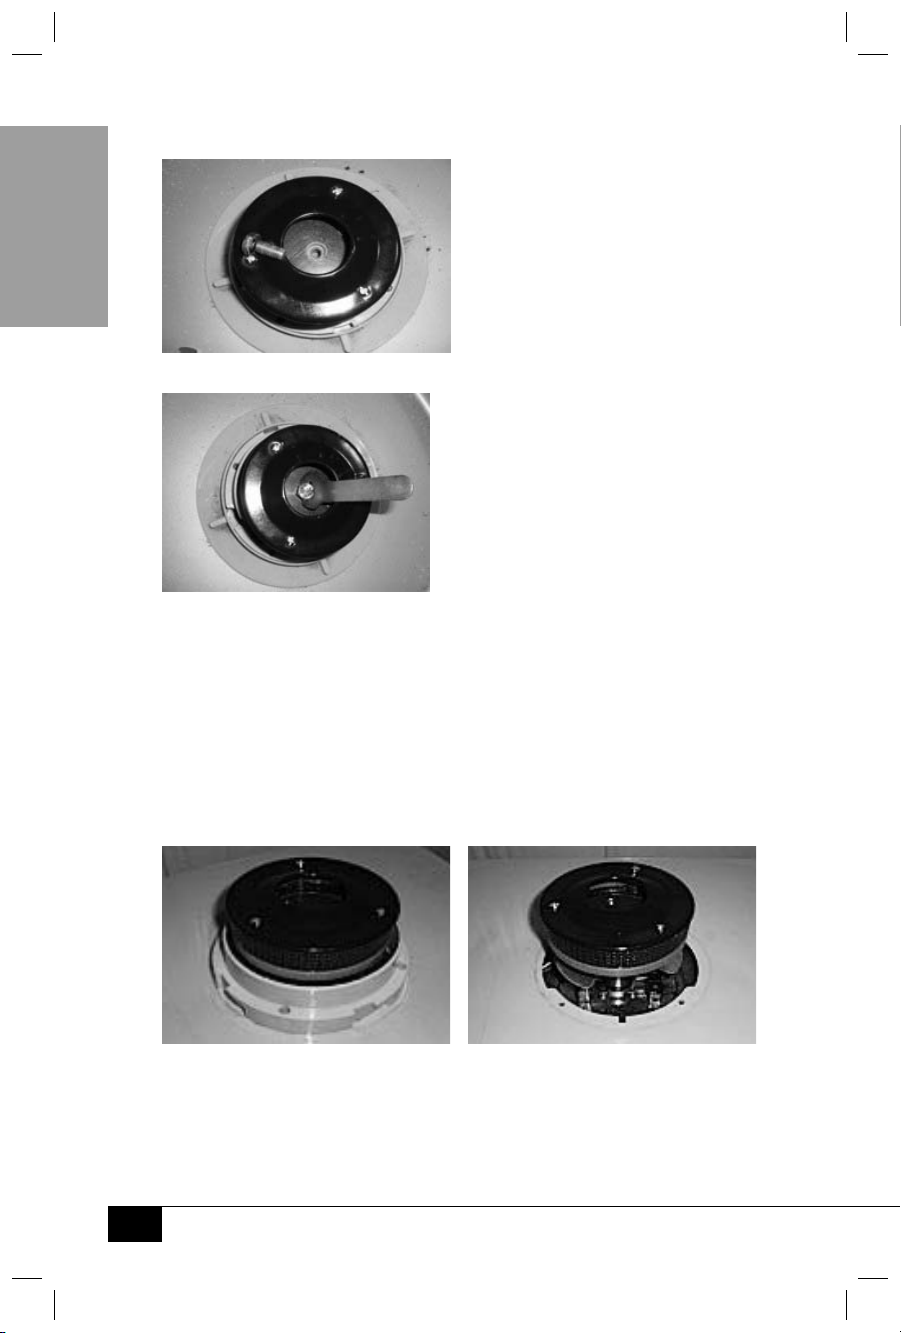
5. Place the new Extractor Head with wires attached onto the shaft and replace center bolt.
ENGLISH
6. Tighten the center bolt using the #1 Wrench (K).
CHANGING THE KRYPTOL
The Kryptol is the connection point that powers the heating element on the extractor
head. The electricity from the machine transmits heat through the Kryptol which allows
the Extractor Head to get hot and melt the sugar. Eventually the Kryptol wears down
with continued use of the OLD FASHIONED COMMERCIAL COTTON CANDY MAKER,
and needs to be replaced. Follow the directions below when changing the Kryptol:
1. Before replacing the Kryptol, make sure that the machine is turned OFF,
unplugged, and the Extractor Head has cooled completely.
2. Use the Screwdriver to remove all screws from the collar and remove collar.
9
Page 12
3. Remove Kryptol Housing Cover using (K) Wrench #1.
4. Pull Kryptol out of Housing and replace with new Kryptol.
Kryptol
5. Replace Kryptol Housing cover and tighten with #1 Wrench (K).
6. Repeat steps 3, 4 and 5 with the other Kryptol Housing.
7. Replace Collar and tighten screws using Screwdriver.
ENGLISH
10
Page 13

HOW TO OPERATE
1. First, position OLD FASHIONED COMMERCIAL COTTON CANDY MAKER close
to an electrical outlet before starting. Make sure the cord is away from any
water source. It is acceptable to use an extension cord if needed.
2. Plug in unit at the OFF position.
3. Turn both power switch and heater switch to ON position and allow unit to run for at
ENGLISH
least 10 minutes before adding sugar. This will allow the Extractor Head to heat.
4. Once Extractor Head has heated, turn unit OFF.
5. Place no more than one scoop of sugar (avored or white, granulated)
or up to four pieces of hard candy into the Extractor Head.
6. Switch to ON position.
7. When you see the cotton candy web begin, collect the cotton candy on the cone by
holding the cone and rotating the cone with your ngers while you circle the bowl.
8. Repeat above steps by turning o machine and adding another scoop of sugar or four more
pieces of hard candy into the Extractor Head. Once you have added sugar or candy, start
machine again. The cotton candy should ow more quickly as the unit is suciently warm.
9. Never use ingredients other than sugar or hard candy. DO NOT overll the Extractor
Head by adding more than one scoop of sugar or more than four pieces of hard
candy at a time. This will cause clogging and unit will not work properly.
10. By following these simple instructions, using your OLD FASHIONED
COMMERCIAL COTTON CANDY MAKER will be a fun experience for kids of
all ages and will bring the excitement of a carnival to any occasion.
HELPFUL TIPS
How Cotton Candy is Made
Cotton candy is made by heating sugar. This turns sugar into a liquid form.
Then the sugar liquid is forced out of tiny mesh with holes in the extractor
head by centrifugal force as the extractor head spins. As the liquid sugar hits
the air, it returns to a solid uy material that adheres to a paper cone.
Cleaning the Extractor Head
It is very important that the unit be cleaned properly after every use. If it
is not, the holes will get clogged and sugar will not be able to sift through
the tiny holes properly. NEVER put water in the extractor head.
You can clean the Extractor Head by letting the machine run
with an empty Extractor Head for ve minutes.
Catching Floss
If oss does not adhere easily to the cone, you can spray the cone lightly with water.
11
Page 14

CLEANING & MAINTENANCE
1. When you have nished making cotton candy, run unit for about ve
minutes until all sugar has been released through the extractor head.
2. When all remaining sugar is gone, unplug unit and allow to cool down before cleaning.
3. Make sure the unit is unplugged and has had time to cool down before cleaning.
4. Use a clean, slightly damp, non-abrasive sponge or non-abrasive cloth to
wipe the outside of the metal extractor head, aluminum Bowl, and inside and
outside of plastic Dome, then wipe with a non-abrasive towel to dry.
5. Use a clean, slightly damp, non-abrasive sponge or non-abrasive cloth to wipe
down the outside of the Main Unit, then wipe with a non-abrasive towel to dry.
6. NEVER put water in the Extractor Head.
ENGLISH
12
Page 15

ENGLISH
RETURNS & WARRANTY
SHOULD YOUR UNIT NOT WORK OR IF DAMAGED WHEN YOU FIRST TAKE IT OUT
OF THE BOX PLEASE RETURN IT TO THE PLACE OF PURCHASE IMMEDIATELY.
Vintage Collection™
Old Fashioned Commercial Cotton Candy Maker / CCM600
Should you have any questions, please contact us via email or at the
customer service number listed below between the hours of 8:00 AM
and 5:00 PM, Monday through Friday, Central Standard Time.
Distributed by:
Nostalgia Products Group LLC
1471 Partnership Dr.
Green Bay, WI 54304-5685
Customer Service
Phone: (920) 347-9122
Web: www.nostalgiaelectrics.com
Customer Service Inquiry
To submit a Customer Service inquiry, go to www.nostalgiaelectrics.com and
ll out the Customer Service Inquiry form and click the Submit button.
A representative will contact you as soon as possible.
This appliance is designed and built to provide many years of satisfactory performance
under normal household use. The distributor pledges to the original owner that
should there be any defects in material or workmanship during the rst 90 days of
purchase, we will repair or replace the unit at our option. Our pledge does not apply
to damages caused by shipping, mishandling or unit being dropped. A product
deemed defective either from manufacturing or being mishandled is up to the
distributor’s discretion. In order to obtain service under this warranty, please contact
Nostalgia Products Group, LLC at the telephone number listed above or by lling
out the Customer Service Inquiry Form located at www.nostalgiaelectrics.com.
This product is not recommended for use outside of North America. The warranty
is void if products are exported outside of the USA, Canada or Mexico.
This warranty does not apply to re-manufactured merchandise.
Please read these instructions carefully. Failure to comply with these instructions,
damages caused by improper replacement parts, abuse or misuse will void this
pledge to you and is being made in place of all other expressed warranties.
For more information, visit us online at www.nostalgiaelectrics.com.
Like us on Facebook at www.facebook.com/NostalgiaElectrics.
13
Page 16

¡Convierta todos los días en una etsa!
Visite www.nostalgiaelectrics.com para ver más productos divertidos.
CONTENIDO
PRECAUCIONES IMPORTANTES . . . . . . . . . . . . . . . . . . . . . . . . . . 15
MEDIDAS IMPORTANTES . . . . . . . . . . . . . . . . . . . . . . . . . . . . . . 15
INTRODUCCIÓN . . . . . . . . . . . . . . . . . . . . . . . . . . . . . . . . . . . . 16
PARTES Y ENSAMBLAJE . . . . . . . . . . . . . . . . . . . . . . . . . . . . . . . 17
CÓMO FUNCIONA . . . . . . . . . . . . . . . . . . . . . . . . . . . . . . . . . . 23
CONSEJOS ÚTILES . . . . . . . . . . . . . . . . . . . . . . . . . . . . . . . . . . 23
LIMPIEZA Y MANTENIMIENTO . . . . . . . . . . . . . . . . . . . . . . . . . . . 24
DEVOLUCIONES Y GARANTÍA . . . . . . . . . . . . . . . . . . . . . . . . . . . 25
SEGURIDAD
Su seguridad y la de otras personas es muy importante.
Hemos proporcionado numerosos mensajes de seguridad importantes en este manual
y en su electrodoméstico. Siempre lea y obedezca todos los mensajes de seguridad.
Este es el símbolo de alerta de seguridad.
Este símbolo le previene de peligros potenciales que pueden
causar la muerte o lesiones a usted y a otras personas.
Todos los mensajes de seguridad estarán antecedidos por el símbolo de alerta.
Todos los mensajes de seguridad le dirán de qué peligro potencial se trata, cómo reducir
la posibilidad de lesiones y qué puede ocurrir si no se obedecen las instrucciones.
ESPAÑOL
Especicaciones del electrodoméstico:
120 Volts, 60 Hz
700 Watts, aprobado por ETL
14
14
Page 17

PRECAUCIONES IMPORTANTES
1. NUNCA utilice un estropajo en la unidad.
2. NUNCA deje la unidad sin atención mientras se encuentra en uso.
3. NUNCA ponga nada en la Boca de Entrada del Extractor salvo el azúcar o caramelo.
4. NUNCA vuelque agua ni ningún otro líquido en la Boca del Extractor.
5. NUNCA ponga los dedos sobre la Boca de Entrada del Extractor ni
cerca del mismo ni del Elemento para Calentar mientras la máquina se
encuentra encendida ni mientras aún permanezca caliente.
6. Desenchufe la unidad del tomacorriente cuando no esté en uso o mientras se limpia.
7. NO maneje este aparato si tiene un cable o enchufe dañado o
en el caso de un mal funcionamiento del mismo.
8. NO lo coloque en el lavavajillas.
9. Este equipo NO ES UN JUGUETE.
10. Este aparato no debe ser utilizado por niños.
11. Se debe supervisar a los niños pequeños para asegurarse de que
no jueguen con el aparato mientras se encuentre en uso.
MEDIDAS IMPORTANTES
Cuando utiliza aparatos eléctricos, siempre se deben seguir algunas
medidas básicas de seguridad que incluyen las siguientes:
1. Lea todas las instrucciones antes de manejar este equipo.
2. NO toque supercies calientes.
ESPAÑOL
3. Para protegerlo de una descarga eléctrica, no sumerja el cable, el enchufe
ni ninguna parte de esta unidad en agua ni en ningún otro líquido.
4. Se requiere de una especial atención cuando el aparato
es utilizado por niños o cerca de ellos.
5. Desenchufe del toma corriente cuando no está en uso
y antes de retirar partes para su limpieza.
6. NO utilice ningún aparato que tenga el cable o el enchufe dañado o
si el aparato se dañó de alguna manera. Lleve el aparato al local de
reparación más cercano para que sea revisado o reparado.
7. El fabricante del aparato no recomienda el uso de accesorios. Estos podrían ocasionar daños.
8. NO deje que el cable toque supercies calientes.
9. NO vuelque agua ni ningún otro líquido en la Boca de Entrada del Extractor.
10. NO lo coloque sobre una hornalla a gas o sobre un quemador eléctrico
caliente, ni cerca de ellos y tampoco dentro de un horno caliente.
11. Se debe tener extremo cuidado cuando mueve el aparato.
12. Esta unidad debe estar en una supercie nivelada para que funcione correctamente.
13. NO utilice el aparato de otro modo que no sea para su uso pretendido.
15
15
Page 18

14. No deje la unidad sin atención mientras esté en uso o enchufada a un tomacorriente.
15. Controle la Boca de Entrada del Extractor para comprobar que no
haya objetos extraños antes de ENCENDER la unidad.
16. La Boca de Entrada del Extractor estará caliente. Evite el contacto
hasta que se haya enfriado completamente.
17. Se proporciona un cable de energía corto, para reducir el riesgo de
estrangulamiento o tropiezos que podrían resultar con un cable largo.
18. Se pueden utilizar cables prolongadores de suministro
de energía si se tiene cuidado en su uso.
19. La clasicación eléctrica indicada en un prolongador debe ser al menos
del mismo valor que la clasicación eléctrica del aparato.
20. Este electrodoméstico tiene un enchufe polarizado (una hoja es más ancha que la otra).
Para reducir el riesgo de una descarga eléctrica, este enchufe está diseñado para insertarse
en un tomacorriente polarizado solamente en una posición. Si el enchufe no encaja
totalmente en el toma corriente, invierta el enchufe. Si aún no encaja, contacte
a un electricista calicado. No intente modicar el enchufe de ninguna forma.
21. Mantenga las manos fuera de la máquina cuando se encuentra ENCENDIDA y esté girando.
¡GUARDE ESTAS INSTRUCCIONES!
INTRODUCCIÓN
La FÁBRICA DE ALGODÓN DE AZÚCAR COMERCIAL ESTILO ANTIGUO está diseñada para
que se asemeje a un carrito callejero de comienzos del siglo XX, pero con la practicidad
de un aparato moderno. Simplemente enchúfela, enciéndala, vierta azúcar granulada
pura en el centro del receptáculo y comience a girar coloridos y sabrosos dulces.
Este fantástico producto es divertido para toda la familia y despierta
al niño que todos llevamos adentro. ¡Las reuniones se convierten
inmediatamente en carnavales y la hora del postre en una esta!
Su FÁBRICA DE ALGODÓN DE AZÚCAR COMERCIAL ESTILO ANTIGUO hará girar azúcar
formando algodón de azúcar que se recoge haciendo girar los conos de plástico
alrededor del recipiente en forma de círculo… ¡al igual que los puestos callejeros!
ESPAÑOL
16
16
Page 19

PIEZAS Y ENSAMBLAJE
HARDWARE
N°1 - 8 Tornillos N°2 - 8 Pernos N°3 - 2 Pernos
de 10mm de 10mm Eje de 95mm
N°4 - 2 Pernos N°5 - 10 Arandelas N°6 - 4 Arandelas N°7 - 4 Tuercas
de 60mm Planas Pequeñas Planas Grandes Ciegas
ESPAÑOL
N°8 - 2 Fusibles N°9 - 2 Kryptoles N°10 – 3 Tornillos
Adicionales de 10 Amperes Adicionales de 6mm
PARTS
(A) Bol y Domo (B) Cuchara para (C) Unidad Principal (D) Bandeja de
el Azúcar Visualización
17
17
Page 20

(E) Manija para Empujar (F) Ruedas (G) Soporte Base (H) Ensamble de las Patas
(I) Barra transversal (J) Destornillador (K) Llave N° 1 (L) Llave N° 2
ARMADO DEL SOPORTE BASE
1. Introduzca la Barra Transversal (I) en las inserciones cuadradas que se
encuentran en la parte interior del Soporte Base (G) y sujete desde
abajo con dos Pernos N°2 y dos Arandelas Planas N°5.
2. Introduzca el Ensamble de la Pata (H) en las inserciones cuadradas que se encuentran
entre los extremos del Soporte Base (G) y sujete desde adentro con dos Pernos N°4, dos
Arandelas Planas N°6 y dos Arandelas Ciegas N°7 y desde arriba con dos Pernos N°2.
ESPAÑOL
18
18
Page 21

ARMADO DE LAS RUEDAS
1. Introduzca el Perno Eje N°3 en el Soporte Base (G).
2. Coloque la Arandela Plana N°6. Deslice una Rueda (F) por el Perno Eje N°3 y agregue
una Arandela Plana N°5 y una Arandela Ciega N°7.
3. Utilice la Llave N°2 (L) para ajustar la Arandela Ciega N°7.
4. Introduzca el segundo Perno Eje N°3 del otro lado del Soporte Base (G), agregue
la Arandela Plana N°6, la segunda Rueda (F), otra Arandela Plana N°5 y la Arandela
Ciega N°7 del otro lado del Perno Eje N°3, siguiendo las instrucciones anteriores.
5. Utilice la Llave N°2 (L) para ajustar la Arandela Ciega N°7.
ARMADO DE LA UNIDAD PRINCIPAL
ESPAÑOL
1. Ensamble el Soporte Base (G) con la parte inferior de la Unidad
Principal (C) y sujete con cuatro Pernos N°2.
2. La Manija para Empujar (E) se sujeta a la Unidad Principal (C) utilizando los cuatro
Tornillos N°1 proporcionados y cuatro Arandelas Planas N°5. Sujete la Bandeja
de Visualización (D) a la Unidad Principal (C) utilizando cuatro Tornillos N°1.
3. Sujete el Bol (A) a la Unidad Principal (C) colocando el Bol (A) sobre el collar y girando
en sentido de las agujas del reloj. Sujete el Domo al Bol utilizando tres Tornillos N°10.
CÓMO CAMBIAR LOS FUSIBLES
Los Fusibles están marcados debajo de cada compartimiento de fusible. También
se incluyen en esta unidad dos fusibles adicionales de 10 Amperes.
1. Utilizando un destornillador de cabeza plana, empuje hacia
adentro en sentido opuesto a las agujas del reloj.
2. De esta forma el fusible queda accesible y puede cambiarse. Una vez cambiado, empuje
19
19
Page 22

hacia adentro y gire en sentido de las agujas del reloj para trabar el fusible en su lugar.
CÓMO CAMBIAR LA BOCA DEL EXTRACTOR
1. Antes de cambiar la Boca del Extractor, asegúrese de que la máquina esté APAGADA,
desenchufada y que la Boca del Extractor se haya enfriado completamente.
2. Utilice la Llave N°1 (K) para quitar el perno del centro.
3. Utilice una pinza para soltar y quitar los cables rojo y negro
de la parte inferior de la Boca del Extractor.
ESPAÑOL
4. Sujete los cables rojo y negro a la nueva Boca de Extractor y ajuste.
20
20
Page 23

5. Coloque la nueva Boca del Extractor con los cables sujetos al eje y cambie el perno del centro.
6. Ajuste el perno del centro utilizando la Llave N°1 (K).
CÓMO CAMBIAR EL KRYPTOL
El Kryptol es el punto de conexión que le da energía al elemento de calefacción de la boca
del extractor. La electricidad de la máquina transmite calor a través del Kryptol que le
ESPAÑOL
permite a la Boca del Extractor calentarse y derretir el azúcar. Eventualmente, el Kryptol se
desgastará con el uso continuo de la FÁBRICA DE ALGODÓN DE AZÚCAR COMERCIAL ESTILO
ANTIGUO y deberá cambiarse. Siga las siguientes instrucciones para cambiar el Kryptol:
1. Antes de cambiar el Kryptol, asegúrese de que la máquina esté APAGADA,
desenchufada y que la Boca del Extractor se haya enfriado completamente.
2. Utilice el Destornillador para quitar todos los tornillos del collar y extraiga el collar.
21
21
Page 24

3. Extraiga la Tapa de la Estructura del Kryptol utilizando la Llave N°1 (K).
4. Tire del Kryptol para retirarlo de la Estructura y reemplácelo por uno nuevo.
Kryptol
5. Cambie la tapa de la Estructura del Kryptol y sujete con la Llave N°1 (K).
6. Repita los pasos 3, 4 y 5 con la otra Estructura del Kryptol.
7. Cambie el Collar y sujete los tornillos utilizando el Destornillador.
ESPAÑOL
22
22
Page 25

CÓMO FUNCIONA
1. Primero, coloque la FÁBRICA DE ALGODÓN DE AZÚCAR COMERCIAL ESTILO ANTIGUO
cerca de un tomacorriente eléctrico antes de comenzar. Asegúrese que el cable esté
lejos de cualquier fuente de agua. Se puede utilizar un prolongador si es necesario.
2. Enchufe la unidad en posición OFF (APAGADO).
3. Encienda el interruptor de energía y el calentador en posición ON (ENCENDIDO)
y déjela funcionar por lo menos durante 10 minutos antes de agregarle el
azúcar. Esto permitirá que se caliente la Boca de Entrada del Extractor.
4. Una vez que se haya calentado la Boca del Extractor, APAGUE la unidad.
5. Coloque como máximo una cucharada de azúcar (saborizada o blanca,
granulada) o hasta cuatro caramelos en la Cabeza del Extractor.
6. Coloque el interruptor en la posición ON (ENCENDIDO).
7. Cuando vea que comienza a generarse la red de algodón de azúcar, junte el
algodón de azúcar en el cono sosteniendo el cono en forma vertical y rotando
el cono con sus dedos mientras hace círculos sobre el recipiente.
8. Repita los pasos anteriores apagando la máquina y agregando otra medida de
azúcar o cuatro caramelos más en la Boca de Entrada del Extractor. Una vez que haya
agregado azúcar o caramelo, vuelva a arrancar la máquina. El algodón de azúcar deberá
uir más rápidamente a medida que la unidad se va calentando lo suciente.
9. NUNCA utilice ingredientes que no sea azúcar o caramelo. NO sobrellene la Boca
de Entrada del Extractor agregando más de una medida de azúcar ni más de cuatro
caramelos por vez. Esto hará que se atasque y la unidad no funcionará correctamente.
10. Siguiendo estas instrucciones simples, utilizar su FÁBRICA DE ALGODÓN
DE AZÚCAR COMERCIAL ESTILO ANTIGUO será una experiencia
ESPAÑOL
divertida para los niños de todas las edades y generará en cualquier
ocasión el mismo entusiasmo que genera un puesto callejero.
CONSEJOS ÚTILES
Cómo se Elabora el Algodón de Azúcar
El algodón de azúcar se elabora calentando azúcar. Convierte el azúcar a estado líquido.
Luego el líquido de azúcar sale por la pequeña malla con oricios que se encuentra en la
boca del extractor mediante una fuerza centrífuga a medida que va girando la boca del
extractor. A medida que el líquido de azúcar va tomando contacto con el aire va regresando
a su estado sólido tomando una consistencia esponjosa que se adhiere al cono de papel.
Cómo Limpiar la Boca del Extractor
Es muy importante que la unidad se limpie correctamente luego de cada uso. Si no se
limpia bien, los oricios se bloquean y el azúcar no puede tamizarse adecuadamente
cuando pasa por los pequeños oricios. NUNCA coloque agua en la boca del extractor.
Podrá limpiar la Boca del Extractor dejando que la máquina funcione
con la Boca del Extractor vacía durante cinco minutos.
Cómo Tomar el Algodón de Azúcar
Si el algodón de azúcar no se adhiere fácilmente al cono,
podrá rociar el cono levemente con agua.
23
23
Page 26

LIMPIEZA Y MANTENIMIENTO
1. Cuando haya terminado de elaborar el algodón de azúcar, deje funcionar la unidad durante
cinco minutos hasta que haya salido el azúcar completamente por la boca del extractor.
2. Cuando haya salido todo el remanente de azúcar, desenchufe
la unidad y deje enfriar antes de limpiar.
3. Asegúrese de que la unidad esté desenchufada y que haya transcurrido
suciente tiempo para que se enfrié, antes de limpiarla.
4. Utilice una esponja limpia, levemente humedecida no abrasiva o un paño no abrasivo para
limpiar la parte exterior de la boca del extractor de metal, el Bol de aluminio y el interior
y exterior del Domo de plástico, luego limpie con una toalla no abrasiva para secarlos.
5. Utilice una esponja limpia, levemente humedecida no abrasiva o un
paño no abrasivo para limpiar la parte exterior de la Unidad Principal,
luego limpie con una toalla no abrasiva para secarla.
6. NUNCA ponga agua en la Boca del Extractor.
ESPAÑOL
24
24
Page 27

DEVOLUCIONES Y GARANTÍA
SI SU UNIDAD NO TRABAJA O ESTÁ DAÑADA CUANDO LA EXTRAE POR PRIMERA VEZ
DE LA CAJA DEVUÉLVALA INMEDIATAMENTE AL LUGAR DONDE LA COMPRÓ.
Vintage Collection™
Fábrica de Algodón de Azúcar Comercial Estilo Antiguo / CCM600
Si tiene preguntas, contacte con nosotros por correo electrónico o por el
número telefónico de servicio al cliente que aparece a continuación en el
horario de 8:00 AM a 5:00 PM, de lunes a viernes, Hora Estándar del Este.
Distribuida por:
Nostalgia Products Group LLC
1471 Partnership Dr.
Green Bay, WI 54304-5685
Servicio al cliente
Teléfono: (920) 347-9122
Web: www.nostalgiaelectrics.com
Solicitud de servicio al cliente
Para enviar una solicitud al Servicio al Cliente, vaya a www.nostalgiaelectrics.com,
llene el formulario de Solicitud de Servicio al Cliente y haga clic en el botón Enviar.
Un representante le contactará tan pronto como sea posible.
Este electrodoméstico está diseñado y fabricado para proporcionar muchos años de
trabajo satisfactorio bajo un uso doméstico normal. El distribuidor se compromete con
el propietario original que si hay algún defecto en materiales o mano de obra durante
los primeros 90 días de la compra, repararemos o sustituiremos la unidad, según
ESPAÑOL
nuestra elección. Este compromiso no se aplica a daños causados por el envío, mala
manipulación o caídas de la unidad. La determinación de si los defectos del producto son
debidos a la fabricación o a una mala manipulación, queda a la decisión del distribuidor.
Para obtener servicio bajo esta garantía, contacte con Nostalgia Products Group, LLC
por el número telefónico que aparece anteriormente o llenando el Formulario de
Solicitud de Servicio al Cliente que se encuentra en www.nostalgiaelectrics.com.
Esta garantía no se aplica a mercancía reelaborada.
Lea estas instrucciones cuidadosamente. El no cumplir con estas instrucciones,
los daños causados por piezas de repuesto inapropiadas, abuso o mal uso,
anularán este compromiso con usted y de todas las otras garantías expresas.
Para obtener más información, visítenos en línea en www.nostalgiaelectrics.com.
Síganos en Facebook en www.facebook.com/NostalgiaElectrics.
25
25
Page 28

Faire une fête tous les jours! Visiter le site Web
www.nostalgiaelectrics.com pour d’autres produits agréables.
TABLE DES MATIÈRES
PRÉCAUTIONS IMPORTANTES . . . . . . . . . . . . . . . . . . . . . . . . . . . 27
MISES EN GARDE SÉCURITAIRES IMPORTANTES . . . . . . . . . . . . . . . . 27
INTRODUCTION . . . . . . . . . . . . . . . . . . . . . . . . . . . . . . . . . . . . 28
PIÈCES ET ASSEMBLAGE . . . . . . . . . . . . . . . . . . . . . . . . . . . . . . . 29
COMMENT FAIRE FONCTIONNER . . . . . . . . . . . . . . . . . . . . . . . . . 35
CONSEILS PRATIQUES . . . . . . . . . . . . . . . . . . . . . . . . . . . . . . . . 35
NETTOYAGE ET ENTRETIEN . . . . . . . . . . . . . . . . . . . . . . . . . . . . . 36
RETOURS DE LA MARCHANDISE ET GARANTIES . . . . . . . . . . . . . . . . 37
SÉCURITÉ
Votre sécurité tout comme celle des autres est primordiale.
Ce manuel renferme plusieurs avis importants sur la sécurité lors de l’utilisation
de votre appareil. Lire le manuel et conformez-vous aux avis contre-indiqués.
Ceci représente le symbole d'avertissement pour votre sécurité.
Ce symbole vous alerte des dangers potentiels, pouvant
vous être fatals à vous ou envers d'autres utilisateurs.
Ce symbole d'alerte à la sécurité suivra tous les avis relatifs à la sécurité.
Tous les avis sécuritaires indiqueront le danger potentiel exact, la façon
dont vous pouvez réduire vos chances de blessure et vous indiquerons les
conséquences potentielles si vous ne suivez pas ces instructions à la lettre.
Spécications des Appareils:
120 Volts, 60 Hz
700 Watts, approbation ETL
26
26
FRANÇAIS
Page 29

PRÉCAUTIONS IMPORTANTES
1. NE JAMAIS utiliser de tampon à récurer sur l'appareil.
2. NE JAMAIS laisser l'appareil sans surveillance lorsqu'il est utilisé.
3. NE JAMAIS placer autre chose que le sucre ou les bonbons durs dans la Tête de l'extracteur.
4. NE JAMAIS verser d'eau ou tout autre liquide dans la Tête de l'extracteur.
5. NE JAMAIS mettre les doigts sur la Tête de l'extracteur ou l'Élément chauant ou à
leur proximité alors que la machine tourne ou pendant qu'elle est encore chaude.
6. Débrancher l'appareil de la prise murale lorsqu'il n'est
pas utilisé et au moment de son nettoyage.
7. NE PAS faire fonctionner le présent appareil lorsque le cordon ou la che
est endommagé(e) ou qu'il ne fonctionne pas correctement.
8. NE PAS mettre les pièces au lave-vaisselle.
9. Cet appareil NEST PAS UN JOUET.
10. Le présent appareil n'est pas destiné à être utilisé par de jeunes enfants.
11. Les jeunes enfants devraient être supervisés au moment de l'utilisation
du produit pour s'assurer qu'ils ne jouent pas avec celui-ci.
MISES EN GARDE SÉCURITAIRES
IMPORTANTES
Des mesures de précaution de base devraient toujours être suivies au
moment de l'utilisation d'un appareil électrique, y compris :
1. Lisez toutes les instructions avant d’utiliser cet appareil.
2. NE PAS toucher les surfaces chaudes.
3. Pour se protéger contre les secousses électriques, ne pas immerger le cordon,
la che ou quelque pièce du présent appareil dans l'eau ou autre liquide.
4. Une surveillance étroite est nécessaire lorsque tout appareil
électrique est utilisé par des enfants ou à leur proximité.
5. Débrancher l'appareil lorsqu'il n'est pas utilisé et avant
de retirer les pièces pour le nettoyage.
6. NE PAS faire fonctionner l'appareil lorsque le cordon ou la che est endommagé(e)
ou qu'il a été endommagé de quelque façon que ce soit. Retourner l'appareil
à l'atelier de réparation le plus proche pour révision ou réparation.
7. Le fabricant ne recommande pas l'utilisation d'accessoires.
L'utilisation d'accessoires pourra provoquer des blessures.
8. NE PAS laisser le cordon toucher à des surfaces chaudes.
9. NE JAMAIS verser d'eau ou tout autre liquide dans la Tête de l'extracteur.
10. NE PAS placer des pièces sur un brûleur au gaz ou électrique
FRANÇAIS
ou à leur proximité ou dans un four chaud.
27
27
Page 30

11. Faire preuve d'une extrême prudence au moment de déplacer le présent appareil.
12. Le présent appareil doit être posé sur une surface plane pour fonctionner correctement.
13. NE PAS utiliser l'appareil à un usage autre que celui pour lequel il est prévu.
14. NE PAS laisser l'appareil sans surveillance lorsqu'il est
utilisé ou branché dans une prise de courant.
15. Vérier la Tête de l'extracteur pour la présence d'objets étrangers avant d'allumer l'appareil.
16. La Tête de l'extracteur deviendra chaude. Éviter de le toucher jusqu'à ce qu'il se soit refroidi.
17. Un cordon d'alimentation court est fourni pour réduire le risque
d'emmêlement ou de trébuchement sur un cordon plus long.
18. Un cordon prolongateur peut être utilisé, mais avec prudence cependant.
19. La puissance nominale électrique indiquée sur une rallonge doit
être au moins aussi élevée que celle de l'appareil.
20. Cet appareil est muni d’une che électrique polarisée (une des lames est plus
large que l’autre). An de minimiser les risques de choc électrique, cette che
est conçue de façon à être branchée dans une prise électrique polarisée d’une
seule façon. Si la che n'entre pas complètement dans la prise, inverser
celle-ci. Si elle ne convient toujours pas, communiquer avec un électricien
agréé. Ne pas essayer de modier la che de quelque façon.
21. Garder les mains loin de la machine lorsqu'elle est en
marche et que la Tête de l'extracteur tourne.
CONSERVEZ CES INSTRUCTIONS!
INTRODUCTION
LA MACHINE À BARBE À PAPA COMMERCIALE À L'ANCIENNE est conçue pour ressembler
à un chariot de marchand ambulant du début des années 1900, avec la commodité d'un
appareil moderne. Tout simplement, brancher, allumer et verser le sucre cristallisé, pur, dans
le réceptacle central, puis de savoureuses et colorées sucreries commenceront à tourner.
Ce produit de fantaisie est amusant pour toute la famille et fait ressortir
l'enfant en chacun de nous. Instantanément, les réunions de famille
se transformeront en carnavals et l'heure du dessert en fête!
Votre MACHINE À BARBE À PAPPA COMMERCIALE À L'ANCIENNE transformera le
sucre en barbe à papa que vous recueillez sur des cônes en les faisant tourner
au fur et à mesure de la rotation de la cuve ... tout comme au carnaval!
28
28
FRANÇAIS
Page 31

PIÈCES ET ASSEMBLAGE
QUINCAILLERIE
Vis nº 1 (10 mm) Boulon nº 2 (10 mm) Boulon essieu nº 3 (95 mm)
Qté 8 Qté 8 Qté 2
Boulon nº 4 (60 mm) Petites rondelles Grandes rondelles Chapeau d'écrou nº 7
Qté 2 plates nº 5 Qté 10 plates nº 6 Qté 4 Qté 4
Fusibles additionnels Kryptol additionnel nº 9 Vis nº10 (8 mm)
nº 8 (10 A) Qté 2 Qté 2 Qté 3
PARTS
(A) Cuve et Coupole (B) Pelle à sucre (C) Appareil principal (D) Plateau de montre
FRANÇAIS
29
29
Page 32

(E) Poignée-poussoir (F) Roues (G) Base (H) Élément inférieur
(I) Barre transversale (J) Tournevis (K) Clé nº 1 (L) Clé nº 2
ASSEMBLAGE DE LA BASE
1. Insérer la Barre transversale (I) dans les ches carrées à l'intérieur de la Base (G), puis
xer solidement en dessous avec deux Boulons nº 2 et deux Rondelles plates nº 5.
2. Insérer l'Élément inférieur (H) dans les ches carrées entre les extrémités de la
Base (G), puis xer à l'intérieur à l'aide de deux Boulons nº 4, deux Rondelles plates
nº 6 et deux Chapeaux d'écrou nº 7 et sur le dessus avec 2 Boulons nº 2.
FRANÇAIS
30
30
Page 33

ASSEMBLAGE DES ROUES
1. Insérer le Boulon essieu nº 3 dans la Base (G).
2. Poser une Rondelle plate nº 6. Glisser une roue (F) sur le Boulon essieu nº 3, puis ajouter
une Rondelle plate nº 5 et un Chapeau d'écrou nº 7.
3. Utiliser la Clé (L) nº 2 pour serrer le Chapeau d'écrou nº 7.
4. Ajouter le second Boulon essieu nº 3 de l'autre côté de la Base (G), ajouter une Rondelle
plate nº 6, la seconde Roue (F), une autre Rondelle plate nº 5 et un Chapeau d'écrou
nº 7 de l'autre côté du Boulon essieu nº 3, selon les consignes susmentionnées.
5. Utiliser la Clé (L) nº 2 pour serrer le Chapeau d'écrou nº 7.
ASSEMBLAGE DE L'APPAREIL PRINCIPAL
1. Assembler la Base (G) au fond de l'Appareil principal (C), puis
xer solidement à l'aide de quatre Boulons nº 2.
2. La Poignée-poussoir (E) se xe sur l'Appareil principal (C) à l'aide de quatre
Vis nº 1 prévues et de quatre Rondelles plates nº 5. Fixer le Plateau de
montre (D) à l'Appareil principal (C) à l'aide de quatre Vis nº 1.
3. Fixer la Cuve (A) à l'Appareil principal (C) en plaçant la Cuve (A) sur la bague et en
la tournant dans le sens horaire. Fixer la Coupole à l'aide de trois Vis nº 10.
REMPLACEMENT DES FUSIBLES
Les Fusibles sont indiqués sous chaque compartiment à fusibles. Deux fusibles
additionnels de 10 A sont également compris avec le présent appareil.
1. À l'aide d'un tournevis à tête plate, enfoncer, puis tourner dans le sens antihoraire.
2. Le fusible est alors accessible et peut être remplacé. Après l'avoir remplacé, enfoncer,
FRANÇAIS
puis tourner dans le sens horaire pour xer le fusible solidement en place.
31
31
Page 34

REMPLACER LA TÊTE DE L'EXTRACTEUR
1. Avant de remplacer la Tête de l'extracteur, s'assurer que la machine est éteinte,
débranchée et que la Tête de l'extracteur s'est complètement refroidie.
2. Utiliser la Clé (K) nº 1 pour enlever le boulon central.
3. Utiliser des pinces pour desserrer et enlever les ls rouge
et noir du fond de la Tête de l'extracteur.
4. Fixer les ls rouge et noir à la nouvelle Tête de l'extracteur, puis serrer.
32
32
FRANÇAIS
Page 35

5. Poser la nouvelle Tête de l'extracteur avec les ls xés sur l'arbre, puis reposer boulon central.
6. Serrer le boulon central à l'aide de la Clé (K) nº 1.
REMPLACEMENT DU KRYPTOL
Le Kryptol est le point de connexion qui alimente l'élément chauant sur la tête de
l'extracteur. L'électricité produite par la machine transmet la chaleur à travers le Kryptol
qui permet à la Tête de l'extracteur de chauer et de faire fondre le sucre. À la longue, le
Kryptol s'use avec l'utilisation de la MACHINE À BARBE À PAPA COMMERCIALE À L'ANCIENNE
et doit être remplacé. Suivre les consignes suivantes pour remplacer le Kryptol:
1. Avant de remplacer la Tête de l'extracteur, s'assurer que la machine est éteinte,
débranchée et que la Tête de l'extracteur s'est complètement refroidie.
2. Utiliser le tournevis pour enlever toutes les vis de la bague, puis déposer la bague.
FRANÇAIS
33
33
Page 36

3. Déposer le Couvercle (K) du boîtier de Kryptol nº 1.
4. Retirer le Kryptol du Boîtier et le remplacer par le nouveau.
Kryptol
5. Remettre le couvercle du Boîtier du Kryptol et le serrer à l'aide de la Clé (K) nº 1.
6. Refaire les étapes 3, 4 et 5 avec l'autre Boîtier du Kryptol.
7. Remettre la Bague, puis serrer les vis à l'aide du Tournevis.
34
34
FRANÇAIS
Page 37

COMMENT FAIRE FONCTIONNER
1. Premièrement, placer la MACHINE À BARBE À PAPA près d'une prise
électrique avant son utilisation. S'assurer que le cordon est éloigné de
toute source d'eau. Vous pouvez utiliser une rallonge, s'il y a lieu.
2. Brancher l'appareil alors qu'il est à la position OFF (arrêt).
3. Mettre l'interrupteur d'alimentation et l'élément chauant à la position ON
(marche), puis laisser fonctionner l'appareil pendant au moins 10 minutes avant
d'y ajouter le sucre. Ceci permettra à la Tête de l'extracteur de chauer.
4. Dès que la Tête de l'extracteur sera chaude, mettre l'appareil à la position OFF (arrêt).
5. Ne pas mettre plus d'une pelle de sucre (cristallisé, aromatisé ou blanc) ou
quatre morceaux de bonbons durs dans la Tête de l'extracteur à la fois.
6. Mettre l'interrupteur d'alimentation à la position ON (marche).
7. Lorsque vous verrez la toile de barbe à papa commencer à se former,
recueillir la barbe à papa sur le cône en tenant le cône et en le tournant
avec vos doigts pendant que la cuve eectue une révolution.
8. Refaire les étapes ci-dessus en éteignant la machine et en ajoutant une autre pelle de
sucre ou quatre morceaux de bonbons durs dans la tête de l'extracteur. Une fois que
vous aurez ajouté le sucre ou les bonbons durs, démarrer à nouveau la machine. La barbe
à papa devrait circuler plus rapidement lorsque l'appareil sera susamment chaud.
9. Ne jamais utiliser les ingrédients autres que le sucre ou les bonbons durs.
NE PAS trop remplir la tête de l'extracteur en ajoutant plus d'une pelle de
sucre ou de quatre morceaux de bonbons durs à la fois. Ceci entraînera
le blocage de l'appareil et il ne fonctionnera pas correctement.
10. En suivant ces simples consignes, l'utilisation de votre MACHINE À BARBE À PAPA
COMMERCIALE À L'ANCIENNE sera une expérience amusante pour les enfants quel
que soit leur âge et donnera un air de carnaval à toutes vos célébrations.
CONSEILS PRATIQUES
Confection de la barbe à papa
La barbe à papa est confectionnée à partir de sucre monté à température. Ceci transforme
le sucre en liquide. Le liquide de sucre est ensuite forcé à travers un grillage de trous
minuscules dans la tête de l'extracteur grâce à la force centrifuge au fur et à mesure que
la tête de l'extracteur tourne. Au fur et à mesure que le sucre liquide est exposé à l'air, il
se retransforme en une matière solide oconneuse qui adhère à un cône de papier.
Nettoyage de la tête de l'extracteur
L'appareil doit être nettoyé correctement après chaque utilisation. Le cas échéant,
les trous se boucheront et le sucre ne sera pas en mesure de passer dans les trous
minuscules correctement. NE JAMAIS mettre de l'eau dans la tête de l'extracteur.
Vous pouvez nettoyer la tête de l'extracteur en laissant tourner
la machine avec la Tête vide pendant cinq minutes.
Cueillette de la barbe à papa
Si la barbe à papa n'adhère pas facilement au cône, vous
pouvez pulvériser légèrement le cône avec de l'eau.
FRANÇAIS
35
35
Page 38

NETTOYAGE ET ENTRETIEN
1. Lorsque vous aurez terminé, faire tourner l'appareil pendant environ cinq
minutes jusqu'à ce que tout le sucre se dégage de la tête de l'extracteur.
2. Lorsqu'il ne restera plus aucun sucre, débrancher l'appareil
et le laisser refroidir avant le nettoyage.
3. S'assurer que l'appareil est débranché et qu'il s'est refroidi avant de le nettoyer.
4. Utiliser un chion ou une éponge propre, légèrement humide ou non abrasi(f)ve pour
essuyer l'extérieur de la tête en métal de l'extracteur, de la Cuve en aluminium et l'intérieur
et l'extérieur de la Coupole en plastique, puis assécher avec une serviette non abrasive.
5. Utiliser une éponge ou un chion légèrement humide, non abrasi(f)
ve pour essuyer l'intérieur et l'extérieur de l'Appareil principal,
puis l'assécher avec une serviette sèche non abrasive.
6. NE JAMAIS mettre de l'eau dans la Tête de l'extracteur.
36
36
FRANÇAIS
Page 39

RETOURS DE LA MARCHANDISE ET GARANTIES
SI VOTRE APPAREIL NE FONCTIONNE PAS OU EST ENDOMMAGÉ
LORSQUE VOUS LE SORTEZ DE LA BOÎTE, VEUILLEZ LE RETOURNER
IMMÉDIATEMENT À L'ENDROIT OÙ VOUS L'AVEZ ACHETÉ.
Série d'antan
Machine à barbe à papa commerciale à l'ancienne / CCM600
Pour toutes autres questions pertinentes, veuillez contacter le service à la
clientèle soit par courriel ou au numéro de service tel qu'indiqué ci-bas,
entre 8h00 et 17h00, du lundi au vendredi, heure normale de l'est.
Distribué par:
Nostalgia Products Group LLC
1471, Boul. Partnership
Green Bay, WI 54304-5685
Service à la clientèle
Téléphone: (920) 347-9122
Site Internet: www.nostalgiaelectrics.com
Question pour le service à la clientèle
Pour soumettre une question au service à la clientèle, veuillez visiter
le site www.nostalgiaelectrics.com et remplir un formulaire destiné
au service à la clientèle puis cliquer sur la touche Soumettre.
Un représentant vous contactera sous peu.
Cet appareil est conçu pour orir plusieurs années d'utilisation de performance
satisfaisante, et ce, sous de conditions normales d'utilisation. Le grossiste nantit que le
propriétaire d'origine se doit de faire réparer ou changer l'appareil à notre discrétion,
advenant le cas de défectuosités des matériaux ou des pièces durant les 90 premiers
jours en date d’achat de l’appareil neuf. Notre nantissement ne s'applique aucunement
sur les dommages causés par le transport, une mauvaise utilisation de l'appareil ou
le fait d'échapper l'appareil. Un produit réclamé défectueux, soit suite à sa fabrication
ou une mauvaise utilisation sera évaluée à l’entière discrétion du grossiste. An que
la garantie couvre ce produit, veuillez contacter Nostalgia Products Group, LLC au
numéro de téléphone suivant ou en remplissant un formulaire de question destine
au service à la clientèle situé sur le site Internet: www.nostalgiaelectrics.com.
Cette garantie ne s’applique aucunement à la marchandise ré-usinée.
Lire ces instructions attentivement. Le manque de vous conformer à ces
instructions, de tous dommages causés par un remplacement erroné des pièces,
l’abus ou mauvaise utilisation de l’appareil annulera toute promesse faite à
votre égard, et prévaudra sur toute autre garantie, implicite ou expresse.
Pour des renseignements supplémentaires, visiter le site Web
www.nostalgiaelectrics.com.
Dites « J'aime » sur Facebook à www.facebook.com/NostalgiaElectrics.
MD
FRANÇAIS
37
37
Page 40

 Loading...