

Page 1

All products are trademarks of Nostalgia Products Group, LLC.
Worldwide design & utility patented or patents pending.
© 2011 Nostalgia Products Group, LLC.
www.nostalgiaelectrics.com
(rev. 06/15/11)
Page 2
BTG100 SERIES
Breakfast Toaster
Instruction Manual
Instructions et Recettes
Instrucciones y Recetas
Page 3

Page 4
ENGLISH
2
CONTENTS
IMPORTANT PRECAUTIONS . . . . . . . . . . . . . . . . . 3
IMPORTANT SAFEGUARDS . . . . . . . . . . . . . . . . . . 3
INTRODUCTION . . . . . . . . . . . . . . . . . . . . . . . . 4
PARTS & ASSEMBLY . . . . . . . . . . . . . . . . . . . . . . 5
HOW TO OPERATE . . . . . . . . . . . . . . . . . . . . . . . 6
HELPFUL TIPS . . . . . . . . . . . . . . . . . . . . . . . . . 7
CLEANING & MAINTENANCE . . . . . . . . . . . . . . . . . 7
RECIPES . . . . . . . . . . . . . . . . . . . . . . . . . . . . 8
RETURNS & WARRANTY . . . . . . . . . . . . . . . . . . . . 9
SAFETY
Appliance Specifications:
120 Volts, 60 Hertz
Watts: 750 Toaster, 200 Griddle
Your safety and the safety of others are very important.
We have provided many important safety messages in this manual and
on your appliance. Always read and obey all safety messages.
This is the safety alert symbol.
This symbol alerts you to potential hazards
that can kill or hurt you and others.
All safety messages will follow the safety alert symbol.
All safety messages will tell you what the potential hazard
is, tell you how to reduce the chance of injury, and tell you
what can happen if the instructions are not followed.
Page 5

ENGLISH
3
IMPORTANT PRECAUTIONS
NEVER immerse appliance in water.1.
NEVER use near water.2.
NEVER use an abrasive sponge or cloth on the appliance.3.
NEVER leave appliance unattended while in use.4.
NEVER place anything other than what is being cooked in or on the appliance.5.
Unplug unit from outlet when not in use and during cleaning.6.
DO NOT operate this appliance with a damaged cord or 7.
plug, nor if the appliance ever malfunctions.
DO NOT place appliance in a dishwasher.8.
Keep out of reach of children. 9.
This appliance is NOT A TOY.10.
Unsupervised young children and cognitively challenged 11.
individuals should never operate this appliance.
Young children should be supervised while in proximity of the 12.
appliance to ensure that they do not play with it.
IMPORTANT SAFEGUARDS
Basic safety precautions should always be followed when
using electrical appliances, including the following:
Read all instructions before operating this appliance.1.
To protect against electrical shock do not immerse cord, plug 2.
or any part of this appliance in water or other liquids.
Close supervision is necessary when any appliance is used near children. 3.
Unplug from outlet when not in use, before removing parts and before cleaning.4.
DO NOT operate any appliance with a damaged cord or plug, 5.
nor if the appliance has been damaged in any manner. Return the
appliance to the nearest repair shop for examination or repair.
The manufacturer does not recommend the use of accessory 6.
attachments. Use of accessory attachments may cause injuries.
DO NOT use outdoors.7.
DO NOT place on or near a hot gas or electric burner, nor in a heated oven.8.
DO NOT use the appliance for other than its intended use.9.
An appliance that is plugged into an outlet should 10.
not be left unattended while in operation.
Check appliance for presence of foreign objects prior to use.11.
DO NOT attempt to stick any utensils or other objects 12.
into the toaster while appliance is plugged in.
Page 6

ENGLISH
4
A short power supply cord is provided to reduce the risk resulting 13.
from becoming entangled or tripping over a long cord.
Longer detachable power supply cords can be used if care is exercised in their use.14.
The marked electrical rating of an extension cord should be at 15.
least as great as the electrical rating of the appliance.
This appliance has a polarized plug (one blade is wider than the other). 16.
To reduce the risk of electrical shock, this plug is intended to fit into
a polarized outlet only one way. If the plug does not fit fully into the
outlet, reverse the plug. If it still does not fit, contact a qualified
electrician. Do not attempt to modify the plug in any way.
Do not attempt to service this appliance yourself, as opening or 17.
removing covers may expose you to dangerous voltage or other
hazards. Refer all servicing to qualified service personnel.
SAVE THESE INSTRUCTIONS!
INTRODUCTION
Thank you for purchasing the BREAKFAST TOASTER from Nostalgia
Electrics™! The BREAKFAST TOASTER is a fun and convenient way
to make a variety of quick and delicious meals. The unit has two slots
for toasting bread, buns, bagels and more. Grill pancakes, sausages,
patties, or eggs on the flip down griddle while your bread is toasting.
With the BREAKFAST TOASTER, simple meals are ready in minutes!
Features Include:
Two Large Slots for Toasting•
Nonstick Flip Down Griddle with Variable Temperature •
Control Removes for Easy Cleaning
Removable Drip Tray and Nonstick Griddle Plate•
Cancel Button on Toaster Prevents Burning•
Cord Wraps Around Brackets on the Bottom of Unit•
Easy to Use, Easy to Clean•
Page 7
ENGLISH
5
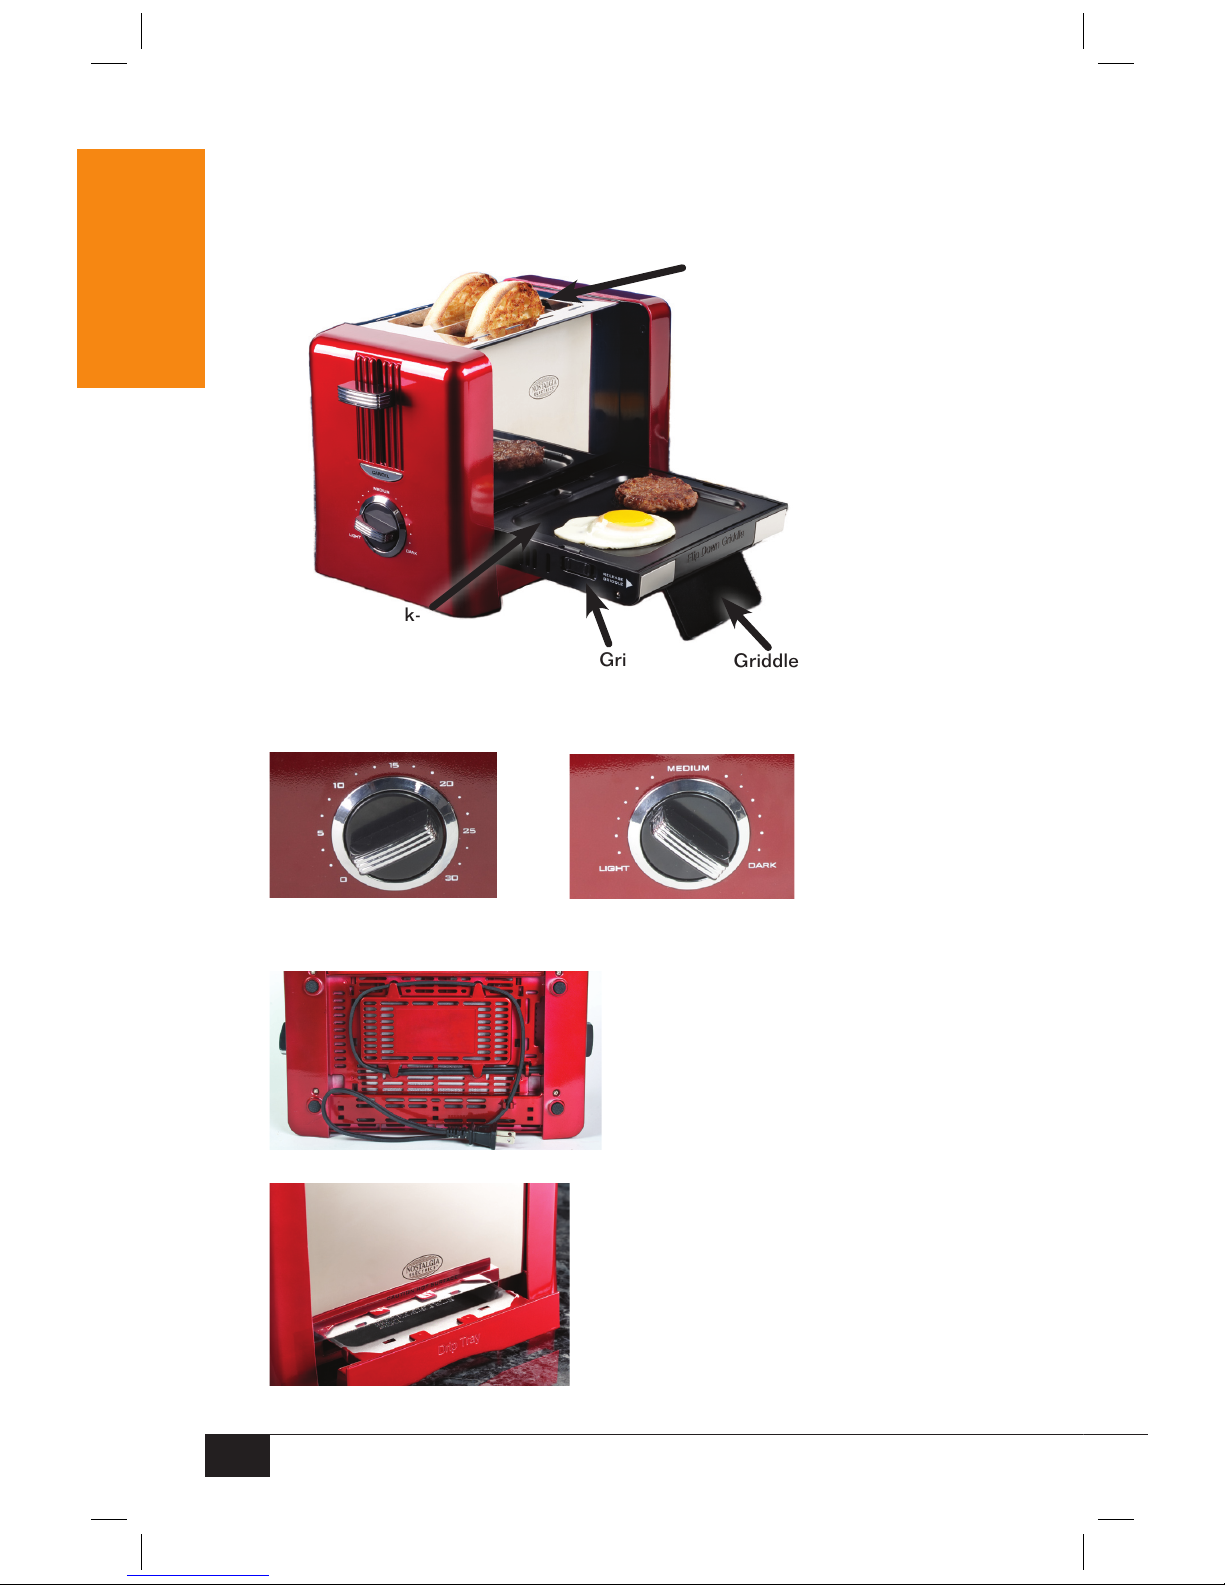
PARTS & ASSEMBLY
PARTS
Your BREAKFAST TOASTER is fully assembled.
COOKING SETTINGS
GRIDDLE: 0-30 Minute Timer TOASTER: LIGHT to DARK
CORD LOCATION
Cord wraps around brackets underneath the unit.
DRIP TRAY
Nonstick-
Folding
Griddle
Plate
Griddle
Latch
Toasting
Slots
Griddle
Lock
Page 8

ENGLISH
6
HOW TO OPERATE
Place the BREAKFAST TOASTER on a stable surface near an electrical outlet •
before starting. Always make sure that the cord is away from any water source.
Plug the appliance into an electrical socket.•
Pull out Flip Down Griddle Latch and lower Nonstick •
Griddle so that Latch is resting on flat surface.
Set timer for 2 to 5 minutes to preheat Nonstick Griddle before cooking.•
Apply a thin coat of vegetable oil to surface of •
Nonstick Griddle Plate to protect finish.
Set timer on Nonstick Griddle to desired setting (0 to 30 min.).•
Begin to cook breakfast meat, eggs, pancakes or desired food •
item. Cooking time will vary depending on the items being cooked.
Thicker cuts of meat and patties will take longer to cook.
Place two peices of bread into openings in the the Toaster. •
Select desired heat setting (Light to Dark). •
Press lever down to start cooking cycle.•
When cooking has completed, the bread will automatically pop up. •
To shorten the cooking time, simply turn the heat control knob to a lighter setting.•
To stop cooking before cycle has completed, press the CANCEL button. •
Unplug the appliance and allow unit to cool completely.•
After unit is cool to the touch, remove the Nonstick Griddle Plate and Drip •
Tray and follow directions in Cleaning and Maintenance section to clean unit.
After cleaning, return Nonstick Griddle Plate and Drip Tray to the toaster •
and store your BREAKFAST TOASTER in a safe place until next use.
By following these simple instructions, your
BREAKFAST TOASTER will be fun for
friends, family and kids of all ages!
REMOVING THE NONSTICK GRIDDLE
After you are done cooking with your BREAKFAST •
TOASTER and unit has cooled completely, place
fingers on Griddle Locks and push locks toward you.
You will hear Nonstick Griddle Plate snap •
as the locking mechanism is released.
Carefully lift Nonstick Griddle Plate up, being •
VERY careful not to spill hot liquids. For added
safety, wear oven mitts or use potholder.
Empty contents of Nonstick •
Griddle Plate into wastebasket and clean thoroughly.
Replace Nonstick Griddle Plate, making sure back of Nonstick •
Griddle Plate slides into Nonstick Griddle Base.
Push notches on sides of Nonstick Griddle Plate inside the •
Page 9

ENGLISH
7
holes on the sides of the Nonstick Griddle Base.
Nonstick Griddle will lock automatically.•
HELPFUL TIPS
TOASTING
THE BREAKFAST TOASTER is designed to use only two pieces of bread at a
time. DO NOT force bread into toasting slots. Heating may cause large pieces of
bread like bagels to swell and get stuck in the toaster. If bagels get stuck inside of
toaster, let them cool for a while so that they will contract and be easily removed.
All pieces of bread are not the same; therefore you will need to adjust
the variable heat controller accordingly. Room temperature bread will
cook more quickly than bread just removed from the refrigerator.
COOKING MEAT
When using the Griddle to cook meat, it is preferable that you use thinner
cuts of meat. The thicker the cut of meat or patty that you use, the longer
it will take to cook. Thinner cuts of meat and patties cook more quickly.
BURNING/SMOKING
If the machine is burning or smoking during cooking, press the CANCEL
button on the sides of the machine to end the cooking cycles.
Smoking may also be caused by excess crumbs or grease
stuck inside the machine. To prevent smoking, make sure
to empty and clean the Drip Tray after each use.
NONSTICK SURFACE
It is normal for appliances with nonstick coating to emit a
slight odor and smoke during the first few uses. The odor
and smoking should dissappate with normal usage.
Remember to always coat surface with vegetable oil
before each use to protect the nonstick finish.
CLEANING & MAINTENANCE
Make sure the unit is unplugged before cleaning. Allow all parts to COOL
to the touch, especially the Nonstick Griddle Plate and Drip Tray.
To prolong the life of your BREAKFAST TOASTER, please follow these simple
instructions for maintenance. Never place the appliance in a dishwasher.
Make sure the BREAKFAST TOASTER is completely •
cooled and unplugged before storing or cleaning.
Do not try to remove bread if it gets jammed inside the toaster •
slots without first unplugging the BREAKFAST TOASTER.
Clean outer surface of the BREAKFAST TOASTER with a soft •
damp cloth when it is unplugged and completely cooled.
Remove Nonstick Griddle Plate and Drip Tray.•
Use soapy water to clean the Nonstick Griddle Plate and Drip Tray.•
Page 10

ENGLISH
8
Dry all parts with a soft, non-abrasive towel or cloth.•
Do not operate BREAKFAST TOASTER without •
at least one peice of bread in place.
Never use the BREAKFAST TOASTER without the •
Nonstick Griddle Plate and Drip Tray in place.
RECIPES
Use your BREAKFAST TOASTER for a quick, easy-to-serve meal:
A Variety of Sausages and Patties (Pork, Beef, Turkey, Veggie, or Chicken) •
NOTE: Thinner cuts of meat and patties cook more quickly.
Hamburgers & Buns•
Breakfast Sandwiches•
Bacon, Eggs & Toast•
Silver Dollar Pancakes or French Toast•
Bagels and English Muffins•
and much more!
Page 11

ENGLISH
9
RETURNS & WARRANTY
SHOULD YOUR UNIT NOT WORK OR IS DAMAGED WHEN
YOU FIRST TAKE IT OUT OF THE BOX, PLEASE RETURN
IT TO THE PLACE OF PURCHASE IMMEDIATELY.
BREAKFAST TOASTER / BTG100 SERIES
Should you have any questions, please contact us via email or at the
customer service number listed below between the hours of 8:00 AM
and 5:00 PM, Monday through Friday, Central Standard Time.
Distributed by:
Nostalgia Products Group LLC
1471 Partnership Dr.
Green Bay, WI 54304-5685
Customer Service
Phone: (920) 347-9122
Web: www.nostalgiaelectrics.com
Customer Service Inquiry
To submit a Customer Service inquiry, go to www.nostalgiaelectrics.com and
fill out the Customer Service Inquiry form and click the Submit button.
A representative will contact you as soon as possible.
This appliance is designed and built to provide many years of satisfactory
performance under normal household use. The distributor pledges to the
original owner that should there be any defects in material or workmanship
during the first 90 days of purchase, we will repair or replace the unit at
our option. Our pledge does not apply to damages caused by shipping,
mishandling or unit being dropped. A product deemed defective either from
manufacturing or being mishandled is up to the distributor’s discretion.
In order to obtain service under this warranty, please contact Nostalgia
Products Group, LLC at the telephone number listed above or by filling out
the Customer Service Inquiry Form located at www.nostalgiaelectrics.com.
This warranty does not apply to re-manufactured merchandise.
Please read these instructions carefully. Failure to comply with these instructions,
damages caused by improper replacement parts, abuse or misuse will void this
pledge to you and is being made in place of all other expressed warranties.
Page 12

Page 13

11
FRANÇAIS
11
TABLE DES MATIÈRES
PRÉCAUTIONS IMPORTANTES . . . . . . . . . . . . . . . . 12
MISES EN GARDE SÉCURITAIRES IMPORTANTES . . . . . 12
INTRODUCTION . . . . . . . . . . . . . . . . . . . . . . . . 13
PIÈCES ET ASSEMBLAGE . . . . . . . . . . . . . . . . . . . 14
COMMENT FAIRE FONCTIONNER . . . . . . . . . . . . . . . 15
CONSEILS PRATIQUES . . . . . . . . . . . . . . . . . . . . 16
NETTOYAGE ET ENTRETIEN . . . . . . . . . . . . . . . . . . 17
RECETTES . . . . . . . . . . . . . . . . . . . . . . . . . . . . 17
RETOURS DE LA MARCHANDISE ET GARANTIES . . . . . . 18
SÉCURITÉ
Spécifications des Appareils:
120 Volts, 60 Hertz
Watts: 750 Grille-Pain, 200 Plaque Chauffante
Votre sécurité tout comme celle des autres est primordiale.
Ce manuel renferme plusieurs avis importants sur la sécurité lors de l’utilisation
de votre appareil. Lire le manuel et conformez-vous aux avis contre-indiqués.
Ceci représente le symbole d'avertissement pour votre sécurité.
Ce symbole vous alerte des dangers potentiels, pouvant
vous être fatals à vous ou envers d'autres utilisateurs.
Ce symbole d'alerte à la sécurité suivra tous les avis relatifs à la sécurité.
Tous les avis sécuritaires indiqueront le danger potentiel exact, la façon
dont vous pouvez réduire vos chances de blessure et vous indiquerons les
conséquences potentielles si vous ne suivez pas ces instructions à la lettre.
Page 14

12
FRANÇAIS
12
PRÉCAUTIONS IMPORTANTES
NE JAMAIS immerger l’appareil dans l’eau.1.
NE JAMAIS utiliser l'appareil près de l'eau.2.
NE JAMAIS utiliser un chiffon ou une éponge abrasive sur l’appareil. 3.
NE JAMAIS laisser l’appareil sans surveillance durant la mise en marche.4.
NE JAMAIS placer autre chose que ce qui est cuit dans, ou sur l’appareil.5.
Débranchez l’appareil lorsqu’il n’est pas en fonction 6.
et pendant que vous le nettoyez.
NE PAS utiliser cet appareil si son cordon d’alimentation 7.
est endommagé ou s’il fonctionne mal.
NE PAS placer l’appareil au lave-vaisselle.8.
Gardez hors de la portée des enfants.9.
Cet appareil NEST PAS UN JOUET.10.
Les jeunes enfants sans surveillance et les gens ayant des 11.
troubles cognitifs ne devraient jamais opérer cet appareil.
Les jeunes enfants doivent être supervisés lorsqu’à proximité 12.
de l’appareil afin de s’assurer qu’ils ne jouent pas avec.
MISES EN GARDE SÉCURITAIRES
IMPORTANTES
Les précautions de sécurité de base devraient toujours être suivies lors de 1.
l’utilisation d’un appareil électrique, incluant les précautions suivantes:
Lisez toutes les instructions avant d’utiliser cet appareil.2.
Afin de vous protéger contre les chocs électriques, ne pas immerger le câble 3.
ni toute autre partie de cet appareil dans l’eau ou tout autre liquide.
Une supervision rapprochée est requise lorsque tout 4.
appareil est utilisé a proximité d’enfants.
Débrancher de la prise de courant lorsque l’appareil n’est pas en 5.
service avant de retirer les composantes et avant de le nettoyer.
NE PAS UTILISER tout appareil dont le câble ou la fiche est endommagée, 6.
ni si l’appareil a été endommagé de quelque façon que ce soit. Retournez
l’appareil au réparateur le plus près afin de le faire examiner/réparer.
Le manufacturier ne recommande pas l’utilisation d’accessoires avec cet appareil. 7.
Attacher des accessoires à l’appareil pourrait causer des blessures à l’utilisateur.
NE PAS UTILISER à l'extérieur.8.
NE PAS placer sur, ou à proximité d’un brûleur chaud, 9.
électrique ou à gaz ; ni dans un four chaud.
NE PAS UTILISER l’appareil pour tout autre usage 10.
que celui pour lequel il est prévu.
Page 15

13
FRANÇAIS
13
Un appareil branché dans une prise ne devrait pas être 11.
laissé sans surveillance pendant son opération.
Avant son utilisation, vérifiez l’appareil pour la présence d'autres objets.12.
NE PAS tenter d’enfoncer d’ustensiles ou autres objets 13.
dans le grille-pain pendant qi’il est branché.
L’appareil a un câble d’alimentation court afin de réduire le risque 14.
de s’emmêler ou de trébucher sur un câble plus long.
Un câble d’alimentation plus long et détachable 15.
peut être utilisé si on le fait avec soin.
Le grade électrique indiqué sur la rallonge électrique devrait 16.
toujours être au moins égal ou plus élevé que le grade
électrique de l’appareil avec lequel elle est utilisée.
Cet appareil est muni d’une fiche électrique polarisée (une des lames est 17.
plus large que l’autre). Afin de minimiser les risques de choc électrique,
cette fiche est conçue de façon à être branchée dans une prise électrique
polarisée d’une seule façon. Si la fiche ne fait pas bien dans la prise
de courant, renversez-la. Si elle ne fait toujours pas, contactez un
électricien qualifié. N’essayez pas de modifier la fiche d’aucune façon.
N’essayez pas de réparer cet appareil vous-même, car le fait de l’ouvrir ou 18.
d’en retirer les couvercles peut vous exposer à un niveau dangereux de voltage
ou à d’autre risques. Référez-vous à du personnel de service qualifié.
CONSERVEZ CES
INSTRUCTIONS!
INTRODUCTION
Merci de votre achat du GRILL- PAIN POUR PETIT DÉJEUNER de Nostalgia
Electrics! Le GRILLE-PAIN POUR PETIT DÉJEUNER est une manière agréable
et commode de préparer un assortiment de repas délicieux de manière variée
et rapide. L’appareil a deux fentes pour le grillage du pain, des petits pains,
bagels et plus. Grillez crêpes, saucisses ou œufs. Avec le GRILLE-PAIN POUR
PETIT DÉJEUNER, les repas simples sont prêts en quelques minutes.
Ses fonctionnalités incluent:
Deux emplacements pour le grillage du pain•
Plaque chauffante antiadhésive à température variée •
rabattable et détachable pour un nettoyage facile.
Égouttoir (or plateau d’égouttage) détachable et plaque chauffante antiadhésive. •
Bouton d’interruption sur le grille-pain pour éviter le brûlage. •
Le câble s’enroule autour des supports au bas de l’appareil.•
Facile d’utilisation, facile à nettoyer.•
Page 16

14
FRANÇAIS
14
PIÈCES ET ASSEMBLAGE
COMPOSANTES
Votre GRILLE-PAIN POUR PETIT DÉJEUNER est entièrement assemblé.
RÉGLAGES DE CUISSON
PLAQUE CHAUFFANTE : GRILLE-PAIN : LÉGER à FONCÉ
Minuterie 0-30 minutes
EMPLACEMENT DU CÂBLE
Le câble s’enroule autour des supports au bas de l’appareil.
PLATEAU D’ÉGOUTTAGE)
Plaque
chauffante
antiadhésive
Loquet de
plaque
Fentes
pour le
grillage
du pain
Verrouillage
de la plaque
Page 17

15
FRANÇAIS
15
COMMENT FAIRE FONCTIONNER
Avant de débuter, placer le GRILLE-PAIN POUR PETIT DÉJEUNER •
sur une surface stable près d’une fiche électrique.
Toujours s’assurer que le câble est loin de toute source d’eau.•
Brancher l’appareil dans une fiche électrique. •
Régler la minuterie de 2 à 5 minutes à Griddle •
antiadhésif préchauffer avant la cuisson.
Abaisser le loquet de plaque et rabattre la plaque chauffante •
antiadhésive pour que le loquet repose sur une surface plane.
Appliquer une mince couche d’huile végétale sur la surface de la •
plaque chauffante antiadhésive afin d’en protéger le fini.
Ajuster la minuterie au temps désiré (0 to 30 min.).•
Commencer à cuire la viande à petit déjeuner, les œufs, crêpes ou l’aliment •
désiré. Le temps de cuisson varie selon l’aliment cuit. Le plus épais le
morceau de viande ou de galette que vous utilisez, plus il faudra faire cuire.
Insérer deux tranches de pain dans les fentes du grille-pain.•
Sélectionner le degré de chaleur désiré (Léger à foncé).•
Appuyer sur le levier pour amorcer le cycle de cuisson. •
Le pain ressort automatiquement lorsque la cuisson est terminée.•
Pour raccourcir le temps de cuisson, simplement ajuster le •
bouton de réglage de chaleur à un réglage plus léger.
Pour arrêter la cuisson avant la fin du cycle, appuyer sur le bouton ANNULER.•
Débrancher l’appareil et lui laisser le temps de refroidir complètement.•
Lorsque l’appareil est refroidi et froid au toucher, détacher la plaque •
chauffante antiadhésive, retirer l’égouttoir et suivre les consignes de
la section de nettoyage et d’entretien pour nettoyer l’appareil.
Après le nettoyage, rattacher la plaque chauffante antiadhésive et •
l’égouttoir au grille-pain et remiser votre GRILLE-PAIN POUR PETIT
DÉJEUNER dans un endroit sécuritaire jusqu'à sa prochaine utilisation.
En suivant ces instructions simples, votre GRILLEPAIN POUR PETIT DÉJEUNER sera amusant pour
la famille, les amis et les enfants de tous âges!
RETRAIT DE LA PLAQUE
CHAUFFANTE ANTIADHÉSIVE
Lorsque vous avez terminé de cuisiner avec •
votre GRILLE-PAIN POUR PETIT DÉJEUNER
et que l’appareil est complètement refroidi,
placez vos doigts sur les verrous de la
plaque et poussez les verrous vers vous.
Vous entendrez le clic de la plaque •
chauffante antiadhésive alors que le
mécanisme de verrou sera débloqué.
Page 18

16
FRANÇAIS
16
Levez soigneusement la plaque chauffante antiadhésive vers le haut •
tout en faisant attention de ne pas renverser de liquides chauds.
Pour plus de sécurité, utilisez des poignées ou mitaines de four.
Videz le contenu de la plaque chauffante antiadhésive •
à la poubelle et nettoyez complètement.
Replacez la plaque chauffante antiadhésive et assurez-•
vous que l’endos s’insère dans la base de la plaque.
Pousser les encoches sur le côté de la plaque chauffante antiadhésive •
dans les trous sur les côtés de la base de la plaque antiadhésive.
La plaque chauffante antiadhésive se verrouillera automatiquement.•
CONSEILS PRATIQUES
GRILLAGE
LE GRILLE-PAIN POUR PETIT DÉJEUNER est conçu pour griller deux
tranches de pain à la fois. NE PAS forcer le pain dans les fentes de
grillage. La cuisson peut faire gonfler les plus gros morceaux de pain
tels les bagels qui peuvent rester coincés dans le grille-pain ; laissez-les
refroidir afin qu’ils se contractent et ils seront facilement retirables.
Les morceaux de pain ne sont pas tous les mêmes; de ce fait vous devrez ajuster
le réglage de température variable en conséquence. Le pain à la temperature de
la pièce cuira plus rapidement que celui qui vient d’être sorti du réfrigérateur.
CUISSON DES VIANDES
Lorsque vous utilisez la plaque à cuire de la viande, il est préférable
que vous utilisez plus minces morceaux de viande. Le plus épais le
morceau de viande ou de galette que vous utilisez, plus il faudra faire
cuire. Diluant coupes de viande et galettes cuisent plus rapidement.
FEU/FUMÉE
Su l’appareil dégage des flammes ou fume durant la cuisson, appuyez sur le
bouton annuler au côté de l’appareil pour mettre fin au cycle de cuisson.
La fumée peut aussi être causée par un excès de miettes ou de
graisse dans l’appareil. Pour éviter la fumée, assurez-vous de
vider et de nettoyer l’égouttoir après chaque utilisation.
SURFACE ANTIADHÉSIVE
Il est normal pour les appareils au revêtement antiadhésif d’émettre
une légère odeur et de la fumée durant les premières utilisations.
L’odeur et la fumée devraient disparaitre avec l’usage normal.
Rappelez-vous de toujours appliquer une mince couche d’huile
végétale sur la surface afin de protéger le fini antiadhésif.
Page 19

17
FRANÇAIS
17
NETTOYAGE ET ENTRETIEN
Assurez-vous que l’appareil est débranché avant le nettoyage. Laissez
le temps aux composantes de REFROIDIR et d’être frais au toucher,
spécialement la plaque chauffante antiadhésive et l’égouttoir..
Pour prolonger la durée de vie de votre GRILLE-PAIN POUR
PETIT DÉJEUNER, veuillez suivre ces instructions simples
d’entretien. Ne jamais placer l’appareil au lave-vaisselle.
Assurez-vous que le GRILLE-PAIN POUR PETIT DÉJEUNER soit débranché •
et complètement refroidi avant son nettoyage ou son entreposage.
N’essayez pas de retirer le pain s’il se coince dans les fentes sans avoir •
au préalable débranché le GRILLE-PAIN POUR PETIT DÉJEUNER.
Nettoyez la surface externe du GRILLE-PAIN POUR PETIT DÉJEUNER avec •
un linge doux et humide lorsqu’il est débranché et complètement refroidi.
Retirez la plaque chauffante antiadhésive et l’égouttoir.•
Nettoyez la plaque chauffante antiadhésive et l’égouttoir à l’eau savonneuse.•
Nettoyez toutes les composantes a l’aide d’un linge doux et non abrasif.•
N’utilisez pas le GRILLE-PAIN POUR PETIT DÉJEUNER •
sans au moins une tranche de pain en place.
N’utilisez jamais le GRILLE-PAIN POUR PETIT DÉJEUNER •
sans la plaque chauffante antiadhésive ou l’égouttoir.
RECETTES
Utilisez votre GRILLE-PAIN POUR PETIT DÉJEUNER
pour un repas rapide et prêt à servir :
Un assortiment de saucisses et de galettes (Porc, Bœuf, Dinde, Végétariens ou •
Poulet)
NOTE: Diluant coupes de viande et galettes cuisent plus rapidement.
Hamburgers & petits pains•
Sandwiches petit déjeuner•
Bacon, œufs & rôties•
Mini-crêpes ou pain doré•
Bagels et muffins anglais•
Et bien plus !
Page 20

18
FRANÇAIS
18
RETOURS DE LA MARCHANDISE ET GARANTIES
SI VOTRE APPAREIL NE FONCTIONNE PAS OU EST ENDOMMAGÉ
LORSQUE VOUS LE SORTEZ DE LA BOÎTE, VEUILLEZ LE RETOURNER
IMMÉDIATEMENT À L'ENDROIT OÙ VOUS L'AVEZ ACHETÉ.
GRILLE-PAIN POUR PETIT DÉJEUNER / SÉRIE BTG100
Pour toutes autres questions pertinentes, veuillez contacter le service
à la clientèle soit par courriel ou au numéro de service tel qu'indiqué cibas, entre 8h00 et 17h00, du lundi au vendredi, heure normale de l'est.
Distribué par :
Nostalgia Products Group, LLC
1471, Boul. Partnership
Green Bay, WI 54304-5685
Service à la clientèle
Téléphone : (920) 347-9122
Site Internet : www.nostalgiaelectrics.com
Question pour le service à la clientèle
Pour soumettre une question au service à la clientèle, veuillez visiter
le site www.nostalgiaelectrics.com et remplir un formulaire destiné
au service à la clientèle puis cliquer sur la touche Soumettre.
Un représentant vous contactera sous peu.
Cet appareil est conçu pour offrir plusieurs années d'utilisation de performance
satisfaisante, et ce, sous de conditions normales d'utilisation. Le grossiste
nantit que le propriétaire d'origine se doit de faire réparer ou changer l'appareil
à notre discrétion, advenant le cas de défectuosités des matériaux ou des
pièces durant les 90 premiers jours en date d’achat de l’appareil neuf. Notre
nantissement ne s'applique aucunement sur les dommages causés par le
transport, une mauvaise utilisation de l'appareil ou le fait d'échapper l'appareil.
Un produit réclamé défectueux, soit suite à sa fabrication ou une mauvaise
utilisation sera évaluée à l’entière discrétion du grossiste. Afin que la garantie
couvre ce produit, veuillez contacter Nostalgia Products Group, LLC au numéro
de téléphone suivant ou en remplissant un formulaire de question destine au
service à la clientèle situé sur le site Internet : www.nostalgiaelectrics.com.
Cette garantie ne s’applique aucunement à la marchandise ré-usinée.
Lire ces instructions attentivement. Le manque de vous conformer à ces
instructions, de tous dommages causés par un remplacement erroné des pièces,
l’abus ou mauvaise utilisation de l’appareil annulera toute promesse faite à
votre égard, et prévaudra sur toute autre garantie, implicite ou expresse.
Page 21

19
ESPAÑOL
19
CONTENIDO
PRECAUCIONES IMPORTANTES . . . . . . . . . . . . . . . 20
MEDIDAS IMPORTANTES . . . . . . . . . . . . . . . . . . . 20
INTRODUCCIÓN . . . . . . . . . . . . . . . . . . . . . . . . 21
PARTES Y ENSAMBLAJE . . . . . . . . . . . . . . . . . . . . 22
CÓMO FUNCIONA . . . . . . . . . . . . . . . . . . . . . . . 23
CONSEJOS ÚTILES . . . . . . . . . . . . . . . . . . . . . . 24
LIMPIEZA Y MANTENIMIENTO . . . . . . . . . . . . . . . . . 25
RECETAS . . . . . . . . . . . . . . . . . . . . . . . . . . . . 25
DEVOLUCIONES Y GARANTÍA . . . . . . . . . . . . . . . . 26
SEGURIDAD
Especificaciones del Electrodoméstico:
120 Volts, 60 Hertz
Watts: 750 Tostador, 200 Parrilla
Su seguridad y la de otras personas es muy importante.
Hemos proporcionado numerosos mensajes de seguridad
importantes en este manual y en su electrodoméstico. Siempre
lea y obedezca todos los mensajes de seguridad.
Este es el símbolo de alerta de seguridad.
Este símbolo le previene de peligros potenciales que pueden
causar la muerte o lesiones a usted y a otras personas.
Todos los mensajes de seguridad estarán antecedidos por el símbolo de alerta.
Todos los mensajes de seguridad le dirán de qué peligro
potencial se trata, cómo reducir la posibilidad de lesiones y
qué puede ocurrir si no se obedecen las instrucciones.
Page 22

20
ESPAÑOL
20
PRECAUCIONES IMPORTANTES
1. NUNCA sumerja el aparato en agua.
2. NUNCA lo utilice cerca del agua
3. NUNCA utilice una esponja o trapo abrasivo sobre el aparato.
4. NUNCA deje el aparato desatendido mientras esté en uso.
5. NUNCA coloque nada más que lo que vaya a ser
cocinado dentro o sobre el aparato.
6. Desconecte la unidad del tomacorriente cuando no
esté usándola y durante su limpieza.
7. NO maneje este equipo si tiene el cable o el enchufe
dañados, o si funciona inadecuadamente.
8. NO coloque el aparato en el lavatrastos.
9. Manténgalo fuera del alcance de los niños.
10. Este equipo NO ES UN JUGUETE.
11. Los niños pequeños sin supervisión o las personas con
problemas cognitivos no deben operar este aparato.
12. Los niños pequeños deben de ser supervisados cuando estén cerca
del aparato para asegurarse de que no jueguen con él.
MEDIDAS IMPORTANTES
Siempre se deben seguir las instrucciones básicas de seguridad
al utilizar aparatos eléctricos, incluyendo las siguientes:
Lea todas las instrucciones antes de manejar este equipo.1.
Para evitar electrocución no sumerja el cable, enchufe o 2.
cualquier parte de este aparato en agua u otros líquidos.
Se necesita supervisión cercana cuando cualquier 3.
aparato sea utilizado cerca de niños.
Desconecte cuando no se utilice, antes de quitar las partes y antes de limpiar.4.
NO opere ningún aparato con un cable o enchufe dañado, tampoco 5.
si el aparato ha sido dañado de alguna manera. Regrese el aparato
al taller de reparación más cercano para revisión o reparación.
El fabricante no recomienda el empleo de implementos 6.
accesorios. El empleo de éstos puede causar lesiones.
NO se use en exteriores.7.
NO lo coloque sobre o cerca de un quemador de gas o 8.
eléctrico, tampoco sobre un horno caliente.
NO use el aparato para otro uso que no sea para el que se ha fabricado.9.
Un aparato que esté conectado a la toma de corriente no debe 10.
dejarse desatendido mientras esté en operación.
Page 23

21
ESPAÑOL
21
Revise que el aparato no tenga objetos extraños antes de utilizarse.11.
NO intente meter ningún utensilio u otros objetos en el 12.
tostador mientras el aparato esté conectado.
Se proporciona un cable de alimentación corto para reducir el 13.
riesgo de enredarse o tropezarse con un cable largo.
Se pueden utilizar extensiones de cable más largas 14.
si se pone extremado cuidado en su uso.
Las características nominales indicadas en un cable de extensión 15.
deben ser al menos iguales que las del electrodoméstico.
Este electrodoméstico tiene un enchufe polarizado (una hoja es más ancha que la 16.
otra). Para reducir el riesgo de una descarga eléctrica, este enchufe está diseñado
para insertarse en un tomacorriente polarizado solamente en una posición. Si el
enchufe no entra completamente, delo vuelta. Si aún no entra, comuníquese con
un electricista calificado. No intente modificar el enchufe de ninguna manera
No intente de realizar un mantenimiento al aparato usted mismo, ya que al abrir 17.
o quitar las tapas usted puede quedar expuesto a un voltaje peligroso o a otros
riesgos. Deje todo tipo de mantenimiento a personal de mantenimiento calificado.
¡GUARDE ESTAS
INSTRUCCIONES!
INTRODUCCIÓN
¡Gracias por comprar el TOSTADOR PARA DESAYUNO de Nostalgia Electrics™!
El TOSTADOR PARA DESAYUNO es una manera divertida y conveniente para
preparar una variedad de comidas rápidas y deliciosas. La unidad tiene dos
entradas para tostar pan, bollos, bagels y más. Ase pancakes, salchichas, carnes,
o huevos en la parrilla baja desmontable mientras su pan se está tostando. ¡Con
el TOSTADOR PARA DESAYUNO, las comidas simples quedan listas en minutos!
Sus Características Incluyen:
Dos Entradas Amplias para Tostar•
Parrilla Antiadherente y Abatible con Control de Temperaturas •
Variables que se Desmonta para Facilitar la Limpieza
Bandeja de Escurrimiento Desmontable y Parrilla Antiadherente•
El Botón Cancelar en el Tostador Evita que se Queme•
El Cable se Enreda al rededor de los Soportes en la Parte Inferior de la Unidad•
Fácil de Usar, Fácil de Limpiar•
Page 24

22
ESPAÑOL
22
PIEZAS Y ENSAMBLAJE
PARTES
Su TOSTADOR PARA DESAYUNO está completamente ensamblado.
CONFIGURACIONES DE COCINADO
PARRILLA: CLARO a OSCURO
Cronómetro del TOSTADOR de 0-30 Minutos
UBICACIÓN DEL CABLE
El cordón se enreda en los soportes por debajo de la unidad.
BANDEJA DE ESCURRIMIENTO
Parrila
Antiadherente
Abatible
Seguro de
la Parrilla
Entradas
para Tostar
Botón de
Seguridad de la Parrilla
Page 25

23
ESPAÑOL
23
CÓMO FUNCIONA
Coloque el TOSTADOR PARA DESAYUNO sobre una superficie estable
cerca de una toma de corriente eléctrica antes de empezar.
Siempre asegúrese de que el cable esté lejos de cualquier fuente de agua.•
Conecte el aparato en el enchufe eléctrico.•
Jale y desbloquee el Seguro de la Parrilla y baje la Parrilla Antiadherente •
de modo que el seguro quede descansando en la superficie plana.
Ajuste del temporizador de 2 a 5 minutos de plancha •
antiadherente de precalentamiento antes de cocinar.
Aplique una delgada capa de aceite vegetal sobre la superficie del •
Plato de la Parrilla Antiadherente para proteger el acabado.
Ponga el cronómetro de la Parrilla Antiadherente en •
la temperatura deseada (0 a 30 min.).
Comience a cocinar la carne para el desayuno, los huevos, pancakes •
o cualquier alimento que se quiera. El grueso del corte de carne o
de empanada que se utiliza, más tiempo tendrá para cocinar.
El tiempo de cocinado variará dependiendo de los alimentos que se cocinen.•
Coloque dos piezas de pan dentro de las entradas del Tostador.•
Seleccione la intensidad de calor deseada (Clara a Oscura).•
Presione la palanca hacia abajo para empezar el ciclo de cocinado.•
Cuando se ha completado el cocinado, el pan saltará automáticamente.•
Para disminuir el tiempo de cocinado, simplemente gire la •
perilla de control del calor a una intensidad más ligera.
Para detener el cocinado antes de que el ciclo se haya •
completado, presione el botón CANCELAR.
Desconecte el aparato y permita que se enfríe completamente.•
Después de que la unidad esté fría al tacto, quite el Plato de la Parrilla •
Antiadherente y la Bandeja de Escurrimiento y siga las instrucciones
de la sección de Limpieza y Mantenimiento de la unidad.
Después de limpiar, regrese el Plato de la Parrilla Antiadherente y la Bandeja •
de Escurrimiento al tostador y guarde su TOSTADOR PARA DESAYUNO
en un lugar seguro hasta el siguiente uso.
¡Siguiendo estas sencillas instrucciones, su
TOSTADOR PARA DESAYUNO será divertido para
amigos, familiares y niños de todas las edades!
REMOVER LA PARRILLA ANTIADHERENTE
Después de que ha terminado de cocinar su •
desayuno con su TOSTADOR PARA DESAYUNO
y la unidad se ha enfriado completamente,
ponga los dedos en los Seguros de la Parrilla
y empuje los seguros hacia usted.
Escuchará un sonido en el Plato de la •
Page 26

24
ESPAÑOL
24
Parrilla Antiadherente al liberarse el mecanismo de seguridad.
Levante cuidadosamente el Plato de la Parrilla Antiadherente, con •
MUCHO cuidado para evitar salpicar líquidos calientes. Para agregar
más seguridad, use guantes para horno o un sujetador de olla.
Vacíe los contenidos del Plato de la Parrilla Antiadherente •
en el bote de basura y limpie completamente.
Vuelva a colocar el Plato de la Parrilla Antiadherente, •
asegurándose de regresar los deslizadores del Plato de la Parrilla
Antiadherente a la Base de la Parrilla Antiadherente.
Empuje las marcas de los lados del Plato de la Parrilla Antiadherente dentro •
de los orificios en las laterales de la Base de la Parrilla Antiadherente.
La Parrilla Antiadherente se asegurará automáticamente.•
CONSEJOS ÚTILES
TOSTAR
EL TOSTADOR PARA DESAYUNO está diseñado para usar sólo dos piezas
de pan a la vez. No fuerce el pan en las entradas del tostador. El calor podría
causar que las piezas grandes de pan como los bagels se hinchen y atoren en
el tostador. Si los bagels se atoran dentro del tostador, deje que se enfríen
un momento de modo que se contraigan y se puedan retirar fácilmente.
Todas las piezas de pan son diferentes; por lo que tendrá que ajustar el
controlador de calor variable como corresponda. El pan a temperatura ambiente
se calentará más rápido que el pan que acaba de sacar del refrigerador.
COCINAR LA CARNE
Al usar la plancha para cocinar la carne, es preferible que utilice
diluyentes cortes de carne. El grueso del corte de carne o de
empanada que se utiliza, más tiempo tendrá para cocinar. Los cortes
más finos de carne y hamburguesas se cocinan más rápido.
QUEMADO/AHUMADO
Si la máquina se quema o humea durante el cocinado, presione el botón
CANCELAR en las laterales de la máquina para terminar los ciclos de cocinado.
El humo también podría ser causado por exceso de migajas o grasa
atorada dentro de la máquina. Para prevenir el humo, asegúrese de
vaciar y limpiar la Bandeja de Escurrimiento después de cada uso.
SUPERFICIE ANTIADHERENTE
Es normal que aparatos con coberturas antiadherentes
emitan un cierto olor y humo durante los primeros usos. El
olor y humo deben desaparecer con el uso normal.
Recuerde siempre cubrir la superficie con aceite vegetal antes
de cada uso para proteger el acabado antiadherente.
Page 27

25
ESPAÑOL
25
LIMPIEZA Y MANTENIMIENTO
Asegúrese de que la unidad esté desconectada antes de limpiar. Deje
que todas las partes de ENFRÍEN al tacto, especialmente el Plato
de la Parrilla Antiadherente y la Bandeja de Escurrimiento.
Para prolongar la vida de su TOSTADOR PARA DESAYUNO,
por favor siga estas sencillas instrucciones de mantenimiento.
Nunca coloque el aparato en el lavatrastos.
Asegúrese de que el TOSTADOR PARA DESAYUNO esté completamente •
frío y desconectado antes de guardarse o limpiarse.
No intente sacar el pan si se atora dentro de las entradas del tostador •
sin antes desconectar el TOSTADOR PARA DESAYUNO.
Limpie la superficie exterior del TOSTADOR PARA DESAYUNO con un •
trapo suave y húmedo cuando esté desconectado y completamente frío.
Retire el Platón de la Parrilla Antiadherente y la Bandeja de Escurrimiento.•
Utilice agua con jabón para limpiar el Platón de la Parrilla •
Antiadherente y la Bandeja de Escurrimiento.
Seque todas las partes con una toalla o trapo suave y no abrasivo.•
No opere el TOSTADOR PARA DESAYUNO sin al menos una pieza de pan dentro.•
Nunca utilice el TOSTADOR PARA DESAYUNO sin la Parrilla •
Antiadherente y la Bandeja de Escurrimiento.
RECETAS
Utilice su TOSTADOR PARA DESAYUNO para una comida rápida y fácil de servir:
Una Variedad de Salchichas y Carnes (Puerco, Res, Pavo, Vegetales, o Pollo) •
NOTA: Los cortes más finos de carne y hamburguesas se cocinan más rápido.
Hamburguesas y Bollos•
Sandwiches para Desayuno•
Tocino, Huevos y Pan Tostado•
Pancakes o Tostada Francesa•
Bagels y Panqués•
¡y mucho más!
Page 28

26
ESPAÑOL
26
DEVOLUCIONES Y GARANTÍA
SI SU UNIDAD NO TRABAJA O ESTÁ DAÑADA CUANDO
LA EXTRAE POR PRIMERA VEZ DE LA CAJA, DEVUÉLVALA
INMEDIATAMENTE AL LUGAR DONDE LA COMPRÓ.
TOSTADOR PARA DESAYUNO / SERIES BTG100
Si tiene preguntas, contacte con nosotros por correo electrónico o por el
número telefónico de servicio al cliente que aparece a continuación en el
horario de 8:00 AM a 5:00 PM, de lunes a viernes, Hora Estándar del Este.
Distribuida por:
Nostalgia Products Group LLC
1471 Partnership Dr.
Green Bay, WI 54304-5685
Servicio al cliente
Teléfono: (920) 347-9122
Web: www.nostalgiaelectrics.com
Solicitud de servicio al cliente
Para enviar una solicitud al Servicio al Cliente, vaya a www.
nostalgiaelectrics.com, llene el formulario de Solicitud de
Servicio al Cliente y haga clic en el botón Enviar.
Un representante le contactará tan pronto como sea posible.
Este electrodoméstico está diseñado y fabricado para proporcionar muchos
años de trabajo satisfactorio bajo un uso doméstico normal. El distribuidor se
compromete con el propietario original que si hay algún defecto en materiales
o mano de obra durante los primeros 90 días de la compra, repararemos o
sustituiremos la unidad, según nuestra elección. Este compromiso no se aplica
a daños causados por el envío, mala manipulación o caídas de la unidad. La
determinación de si los defectos del producto son debidos a la fabricación o
a una mala manipulación, queda a la decisión del distribuidor. Para obtener
servicio bajo esta garantía, contacte con Nostalgia Products Group, LLC por
el número telefónico que aparece anteriormente o llenando el Formulario de
Solicitud de Servicio al Cliente que se encuentra en www.nostalgiaelectrics.com.
Esta garantía no se aplica a mercancía reelaborada.
Lea estas instrucciones cuidadosamente. El no cumplir con estas instrucciones,
los daños causados por piezas de repuesto inapropiadas, abuso o mal uso,
anularán este compromiso con usted y de todas las otras garantías expresas.
 Loading...