


All products are trademarks of Nostalgia Products Group, LLC. Worldwide design & utility patented or patents pending.
© 20124 Nostalgia Products Group, LLC.
www.nostalgiaelectrics.com
(rev. 05/14/14)

BSET300 SERIES
3-in-1 Breakfast Station Estacion ÓN de Desayuno 3 en 1
Machine À Petit-DÉjeunder 3 en Un
Instruction Manual Manual de Instrucciones Manuel d'utilisation
FOR HOUSEHOLD USE ONLY


Make everyday a party!
Visit www.nostalgiaelectrics.com for more fun products.
CONTENTS
IMPORTANT PRECAUTIONS . . . |
. . |
. . |
. . |
. . |
|
. |
|
3 |
IMPORTANT SAFEGUARDS . . . |
. . |
. . |
. . |
. . |
|
. |
|
3 |
INTRODUCTION . . . . . . . . |
. . |
. . |
|
|
|
|
5 |
|
PARTS & ASSEMBLY . . . . . . . |
. . |
. . |
. |
5 |
||||
HOW TO OPERATE . |
|
|
|
|
|
|
|
7 |
HELPFUL TIPS . |
|
|
|
|
|
|
|
8 |
CLEANING & MAINTENANCE . . . |
. . |
. . |
. . |
. |
. |
. |
8 |
|
RECIPES . . . . . . . . . . . |
. |
|
|
|
|
. . . |
9 |
|
RETURNS & WARRANTY . . . . . |
. . |
. . |
. . |
. |
|
10 |
||
ENGLISH
SAFETY
Your safety and the safety of others is very important.
We have provided many important safety messages in this manual and on your appliance. Always read and obey all safety messages.
This is the safety alert symbol.
This symbol alerts you to potential hazards that can kill or hurt you and others.
All safety messages will follow the safety alert symbol.
All safety messages will tell you what the potential hazard is, tell you how to reduce the chance of injury, and tell you what can happen if the instructions are not followed.
Appliance Specifications:
120 Volts, 60 Hertz
1500 Watts
THIS PRODUCT IS FOR USE IN 120V AC OUTLET ONLY.
2

|
|
IMPORTANT PRECAUTIONS |
|
ENGLISH |
|
||
1. |
NEVER immerse appliance in water. |
||
|
|||
|
2. |
NEVER use near water. |
|
|
3. |
NEVER use an abrasive sponge or cloth on the appliance. |
|
|
4. |
NEVER leave appliance unattended while in use. |
|
|
5. |
NEVER place anything other than what is being cooked in or on the appliance. |
|
|
6. |
Unplug unit from outlet when not in use and during cleaning. |
|
|
|||
|
7. |
DO NOT operate this appliance with a damaged cord or |
|
|
|
plug, nor if the appliance ever malfunctions. |
|
|
8. |
DO NOT place appliance in a dishwasher. |
|
|
9. |
Keep out of reach of children. |
|
|
10. |
This appliance is NOT A TOY. |
|
|
11. |
Unsupervised young children and cognitively challenged |
|
|
|
individuals should never operate this appliance. |
|
|
12. |
Young children should be supervised while in proximity of the |
|
|
|
appliance to ensure that they do not play with it. |
IMPORTANT SAFEGUARDS
Basic safety precautions should always be followed when using electrical appliances, including the following:
1. Read all instructions before operating this appliance.
2. To protect against fire, electrical shock and injury to persons, do not immerse cord, plug or any part of this appliance in water or other liquids.
3. Close supervision is necessary when any appliance is used by or near children.
4. Unplug from outlet when not in use, before removing parts and before cleaning. Allow to cool before putting on or taking off parts, and before cleaning the appliance.
5. DO NOT operate any appliance with a damaged cord or plug, or after the appliance malfunctions or has been damaged in any manner. Return appliance to the nearest authorized repair shop for examination, repair or adjustment.
6. Use of accessory attachments not recommended by the appliance manufacturer and may result in fire, electric shock or injury to persons.
7. DO NOT use outdoors.
8. DO NOT let cord hang over edge of table or counter, or touch hot surfaces. 9. DO NOT place on or near a hot gas or electric burner, nor in a heated oven. 10. DO NOT touch hot surfaces. Use handles or knobs.
11. DO NOT use the appliance for other than its intended use.
12. An appliance that is plugged into an outlet should not be left unattended while in operation.
13. Extreme caution must be used when moving an appliance containing hot oil or other hot liquids.
3

14. |
To disconnect, turn any control to "off", then remove plug from wall outlet. |
|
|
|
|||
15. |
Scalding may occur if the lid of coffee maker is opened during the brewing cycles. |
ENGLISH |
|
16. |
The container is designed for use with this appliance. It must never be used on a range top. |
||
|
|||
17. |
DO NOT set a hot container on a wet or cold surface. |
|
|
18. |
DO NOT use a cracked container or a container with a loose or weakened handle. |
|
|
19. |
DO NOT clean container with cleansers, steel wool pads, or other abrasive material. |
|
|
20. |
Oversize foods or metal utensils must not be inserted in a toaster |
|
|
|
oven as they may create a fire or risk of electrical shock. |
|
|
21. |
A fire may occur if the toaster oven is covered or touching flammable |
|
|
|
material, including curtains, draperies, walls and the like, when in operation. |
|
|
|
DO NOT store any item on top of the appliance when in operation. |
|
|
22. |
DO NOT clean with metal scouring pads, pieces can break off the pad |
|
|
|
and touch electrical parts involving a risk of electrical shock. |
|
|
23. |
Extreme caution should be exercised when using containers |
|
|
|
constructed of other than metal or glass. |
|
|
24. |
DO NOT store any materials, other than manufacturers |
|
|
|
recommended accessories, in this oven when not in use. |
|
|
25. |
DO NOT place any of the following materials in the oven: |
|
|
|
paper, cardboard, plastic, and the like. |
|
|
26. |
DO NOT cover crumb tray or any part of the oven with metal |
|
|
|
foil. This will cause overheating of the oven. |
|
|
27. |
Use extreme caution when removing tray or disposing of hot grease. |
|
|
28. |
The preheat time for this appliance is not required, except |
|
|
|
the Grill function has to preheat for 5 minutes. |
|
|
29. |
CAUTION: To reduce the risks of fire or shock do not operatre |
|
|
|
the unit unless the removable top tray is in place. |
|
|
30. |
POWER CORD INSTRUCTION |
|
|
|
SHORT CORD: A short power supply cord is to be provided to reduce the risk |
|
|
|
resulting from becoming entangled in or tripping over a longer cord. An extension |
|
|
|
cord is used if care is exercised in their use. If an extension cord is used, the marked |
|
|
|
electrical rating of the appliance. This appliance is of the grounded type, the |
|
extension cord should be arranged so that it will not drape over the countertop or tabletop where it can be pulled on by children or tripped over unintentionally.
POLARIZED PLUG: This appliance has a polarized plug (one blade is wider than the other). To reduce the risk of electrical shock, this plug is intended to fit into a polarized outlet only one way. If the plug does not fit fully into the outlet, reverse the plug. If it still does
not fit, contact a qualified electrician. Do not attempt to modify the plug in any way.
SAVE THESE INSTRUCTIONS!
4
ENGLISH
INTRODUCTION
Thank you for purchasing the 3-IN-1 BREAKFAST STATION from Nostalgia Electrics™! The 3-IN-1 BREAKFAST STATION allows you to make hot and delicious breakfast meals and coffee all in one unit! Use the included toaster oven for toasting bread, buns, bagels and more. Grill pancakes, sausages, bacon, or eggs on the griddle while your bread is toasting and coffee is brewing! With the 3-IN-1 BREAKFAST STATION, simple meals are ready in minutes!
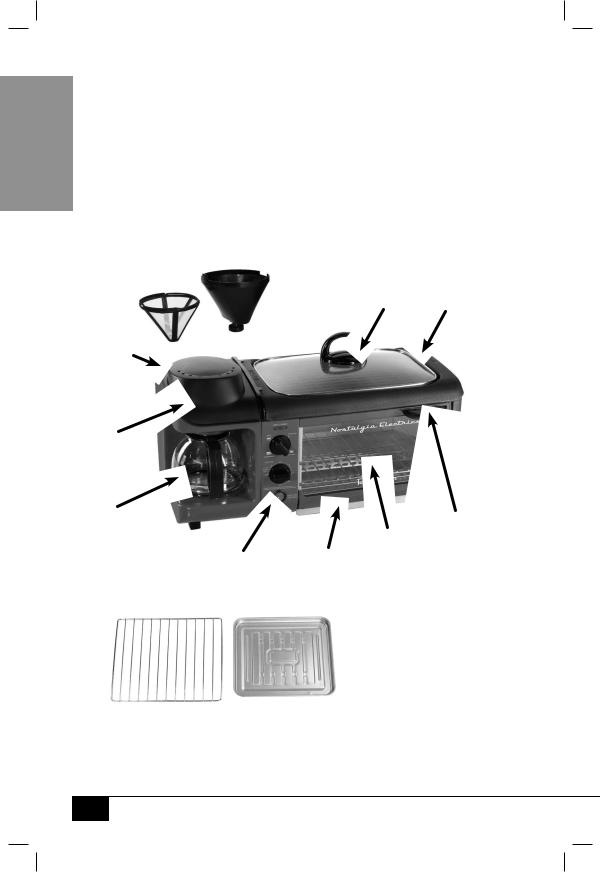
PARTS & ASSEMBLY
PARTS
Your 3-IN-1 BREAKFAST STATION requires little assembly.
|
Filter Basket |
Coffee Filter |
Griddle Lid |
|
Water
Removeable
Nonstick
Plate
|
|
|
Oven Door |
|
|
Toaster |
& Handle |
Control Panel |
Crumb |
Oven |
|
|
|
For use in Toaster Oven:
Wire Rack |
Oven Tray |
5

COFFEE MAKER
1.Place Coffee Filter inside of Filter Basket.
2.Lift Coffee Maker Lid
3.Place both inside of Coffee Maker.
CONTROL PANEL
POWER LIGHT:
Oven with Grill indicator
FUNCTION SWITCH:
Turn dial to the desired setting: GRILL, TOAST/BAKE, WARM/ HEAT, or OVEN OFF.
TIMER:
Turn the knob clockwise to switch on the appliance and then set the desired amount of cooking
time (0-30 minutes). When the  set time is reached, a chime bell
will be heard and the appliance will shut off automatically.
SELECTOR SWITCH:
Turn the Selector Switch to the desired setting: COFFEE / 3 in 1, or COFFEE OFF / Grill/Oven.
To switch off the oven, turn the Timer to "OFF"
To switch off the coffee maker, turn the Selector Switch to "COFFEE OFF"
ENGLISH
6

ENGLISH
HOW TO OPERATE
•Before first use, remove all accessories including Coffee Pot, Coffee Filter, Nonstick Griddle Plate and Trays and wash with clean water to remove any debris. Dry parts thoroughly and reassemble.
•Place the 3-IN-1 BREAKFAST STATION on a stable surface near an electrical outlet before using to cook or brew coffee.
•Always make sure that the cord is away from any water source.
•Plug the cord into an electrical socket.
TOASTER OVEN
1.For optimal Bake performance, turn the Function Switch to Bake and preheat appliance for 4-5 minutes.
2.Once appliance is preheated, turn the Function Selector to the desired position.
•Reheat-Warm Mode: Only the lower heating element will heat up to bake, which allows you to reheat food without roasting it.
•Bake-Toast Mode: Both heating elements heat up to bake and roast the food.
•Broil-Grill Mode: Only the upper heating element heats up in order to roast the food, or heat up the Nonstick Griddle Plate.
3.Place the food to be cooked on the Wire Rack. If food contains oil, grease or juices, make sure that Oven Tray is in place on Wire Rack first.
4.Turn the Timer to the required cooking time. The pilot light will come on, indicating that the oven is heating.
5.If you are cooking food for less than 5 minutes, first turn the Timer past the 5 minute mark and then back to the desired cooking time.
6.A bell will ring to signal the end of the cooking cycle. The appliance will switch off automatically.
7.When cooking cycle has finished, turn the Function Selector to OVEN OFF, open the Oven Door and remove the food from the Wire
Rack and/or Oven Tray using an oven mitt or pot holder.
8.Unplug appliance when finished and let it cool completely.
NONSTICK GRIDDLE
1.Apply a thin coat of vegetable oil to surface of Nonstick Griddle Plate to protect finish.
2.Turn Function Selector to Broil-Grill mode to begin heating Nonstick Griddle Plate. Allow to preheat for 3-5 minutes.
3.When preheated, begin to cook breakfast meat, eggs, silver dollar pancakes or desired food item. Cooking time will vary depending on the items being cooked.
4.When finished cooking, turn Function Selector to OVEN OFF position and remove food using a rubber spatula.
5.NEVER use a metal spatula, fork or other utensil to remove food, as this could scratch and damage the nonstick coating.
6.Unplug appliance and allow to cool completely before cleaning or removing Nonstick Griddle Plate.
7

COFFEE MAKER
1.Put desired amount of coffee grounds into Coffee Filter and place Coffee Filter inside of Filter Basket.
2.Pour desired amount of clean, cold water into the Water Tank. Never exceed the maximum level indicated.
3.Make sure that Coffee Pot is on burner.
4.Close Coffee Maker Lid and flip Selector Switch to the COFFEE/3 in 1 position.
5.While coffee is brewing, DO NOT open Coffee Maker Lid as this could cause scalding.
6.When coffee has finished brewing, flip Selector Switch to COFFEE OFF position.
7.Unplug appliance when finished and allow hot plate beneath Coffee Pot to cool completely before cleaning.
8.Coffee maker is equipped with a non-drip valve that will automatically operate to stop drops of coffee dripping onto the hotplate. However, if any coffee splashes or drips onto the hot plate beneath the Coffee Pot, clean it with a dry, non-abrasive cloth after appliance has cooled completely.
ENGLISH
HELPFUL TIPS
BURNING/SMOKING
If the machine is burning or smoking during cooking, turn all knobs and switches to the OFF position to end the cooking cycles.
Smoking may also be caused by excess crumbs or grease stuck inside the machine. To prevent smoking, make sure to empty and clean the Crumb Tray after each use.
NONSTICK SURFACE
It is normal for appliances with nonstick coating to emit a slight odor and smoke during the first few uses. The odor and smoking should dissipate with normal usage.
Remember to always coat nonstick surface with vegetable oil before each use to protect the nonstick finish.
CLEANING & MAINTENANCE
Make sure the unit is unplugged before cleaning. Allow all parts to COOL to the touch, especially the Toaster Oven, Griddle Plate, Coffee Pot and Crumb Tray.
To prolong the life of your 3-IN-1 BREAKFAST STATION, please follow these simple instructions for maintenance. Never place the appliance in a dishwasher.
•Make sure the 3-IN-1 BREAKFAST STATION is unplugged and completely cooled before storing or cleaning.
•Remove Griddle Plate, Wire Rack and Crumb Tray. Wash them using warm, soapy water and a non-abrasive sponge or cloth. Dry thoroughly with a dry, non-abrasive cloth.
•Clean outer surface of the 3-IN-1 BREAKFAST STATION with a dry, nonabrasive cloth when it is unplugged and completely cooled.
•Clean interior of the Toaster Oven with a damp (not wet), non-abrasive cloth. DO NOT use a scouring pad on the interior of the Toaster Oven. Dry thoroughly with a non-abrasive cloth.
8
 Loading...