

Page 1

All products are trademarks of Nostalgia Products LLC.
Worldwide design & utility patented or patents pending.
© 2018 Nostalgia Products LLC.
www.nostalgiaproductss.com
(rev. 09/25/18 JR)
Page 2
SM12
Edible Shot & Cup Maker
Máquina de vasos comestibles para tragos y bebidas
Machine pour faire des verres à liqueur et des tasses
Instructions and Recipes
Instrucciones y Recetas
Directives et recettes
Page 3

Page 4
Make every day a party!
Visit www.nostalgiaproducts.com for more fun products.
CONTENTS
SAFETY . . . . . . . . . . . . . . . . . . . . . . . . . . . . . . . . . . . . . . . . . 2
IMPORTANT SAFEGUARDS . . . . . . . . . . . . . . . . . . . . . . . . . . . . . 3
ADDITIONAL IMPORTANT SAFEGUARDS . . . . . . . . . . . . . . . . . . . . 3
INTRODUCTION . . . . . . . . . . . . . . . . . . . . . . . . . . . . . . . . . . . . 4
PARTS & ASSEMBLY . . . . . . . . . . . . . . . . . . . . . . . . . . . . . . . . . . 5
HOW TO OPERATE . . . . . . . . . . . . . . . . . . . . . . . . . . . . . . . . . . 6
HELPFUL TIPS . . . . . . . . . . . . . . . . . . . . . . . . . . . . . . . . . . . . . 7
CLEANING & MAINTENANCE . . . . . . . . . . . . . . . . . . . . . . . . . . . . 7
RECIPES . . . . . . . . . . . . . . . . . . . . . . . . . . . . . . . . . . . . . . . . . 8
RETURNS & WARRANTY . . . . . . . . . . . . . . . . . . . . . . . . . . . . . . . 12
SAFETY
ENGLISH
Your safety and the safety of others is very important.
We have provided many important safety messages in this manual and
on your appliance. Always read and obey all safety messages.
This is the safety alert symbol.
This symbol alerts you to potential hazards that can
cause serious injury to you and others.
All safety messages will follow the safety alert symbol.
All safety messages will tell you what the potential hazard is, tell you how to reduce the
chance of injury, and tell you what can happen if the instructions are not followed.
Appliance Specications:
120 Volts, 60 Hz, 40 Watts
THIS PRODUCT IS FOR USE IN 120V AC OUTLET ONLY.
Refer to www.nostalgiaproducts.com/user-manuals/ for the most updated manual.
2
Page 5

IMPORTANT SAFEGUARDS
A person who has not read and understood all operating and safety instructions
is not qualied to operate this appliance. All users of this appliance must read and
understand this Instruction Manual before operating or cleaning this appliance.
When using electrical appliances, basic safety precautions
ENGLISH
should always be followed, including:
1. Read all instructions before operating this appliance.
2. DO NOT TOUCH the hot surfaces. Use handles or knobs.
3. This appliance is NOT A TOY.
4. Unsupervised young children and cognitively challenged
individuals should never operate this appliance.
5. Close supervision is necessary when any appliance is used by or near children.
6. To protect against electrical shock do not immerse cord, plug
or any part of this unit in water or other liquids.
7. Unplug from outlet when not in use, before removing parts and before cleaning.
Allow to cool before putting on or taking o any parts, and before cleaning.
8. DO NOT operate any appliance with a damaged cord or plug, or after the appliance
malfunctions, or if the appliance has been damaged in any manner. Return the
appliance to the nearest repair shop for examination, repair or adjustment.
9. The manufacturer does not recommend the use of accessory attachments other than
what is provided by the manufacturer. Use of attachments may cause injuries.
10. DO NOT use the appliance for other than its intended use.
11. DO NOT use outdoors. FOR HOUSEHOLD USE ONLY.
12. DO NOT place on or near a hot gas or electric burner, or in a heated oven.
13. DO NOT let cord hang over edge of table or counter, or touch hot surfaces.
14. NEVER leave unit unattended while in use or when plugged into an outlet.
15. Extreme caution must be used when moving an appliance containing hot food.
16. Always attach plug to appliance rst, then plug cord in the wall outlet. To
disconnect, turn any control to "o," then remove plug from wall outlet.
ADDITIONAL IMPORTANT SAFEGUARDS
Operating Safety Precautions
1. NEVER put ngers or plastic utensils into the hot mixture.
2. Keep hands and face away from the opening of the pot.
3. During use, the appliance is very hot and remains hot for some time after
being turned o. DO NOT touch hot surfaces like the heated base.
4. Steam may be released from food during cooking. For your safety,
avoid contact with steam, as it is very hot and can cause burns.
Instructions for the Electrical Cord and Plug
1. This appliance has a polarized plug (one blade is wider than the other). To reduce the
risk of electrical shock, this plug is intended to t into a polarized outlet only one way.
3
Page 6

If the plug does not t fully into the outlet, reverse the plug. If it still does not t,
contact a qualied electrician. Do not attempt to modify the plug in any way.
2. A short power supply cord is provided to reduce the risk resulting
from becoming entangled or tripping over a long cord.
3. If a long detachable power-supply cord or extension cord is used:
• Extension cords can be used if care is exercised in their use.
• The marked electrical rating of the cord or extension cord should
be at least as great as the electrical rating of the appliance.
• When using a longer cord or extension cord, make sure that
the cord does not drape over a countertop or tabletop where
it can be pulled on or tripped over unintentionally.
4. The manufacturer does not recommend using this machine in countries that do not
support 120V AC even if a voltage adapter, transformer, or converter is in use.
SAVE THESE INSTRUCTIONS!
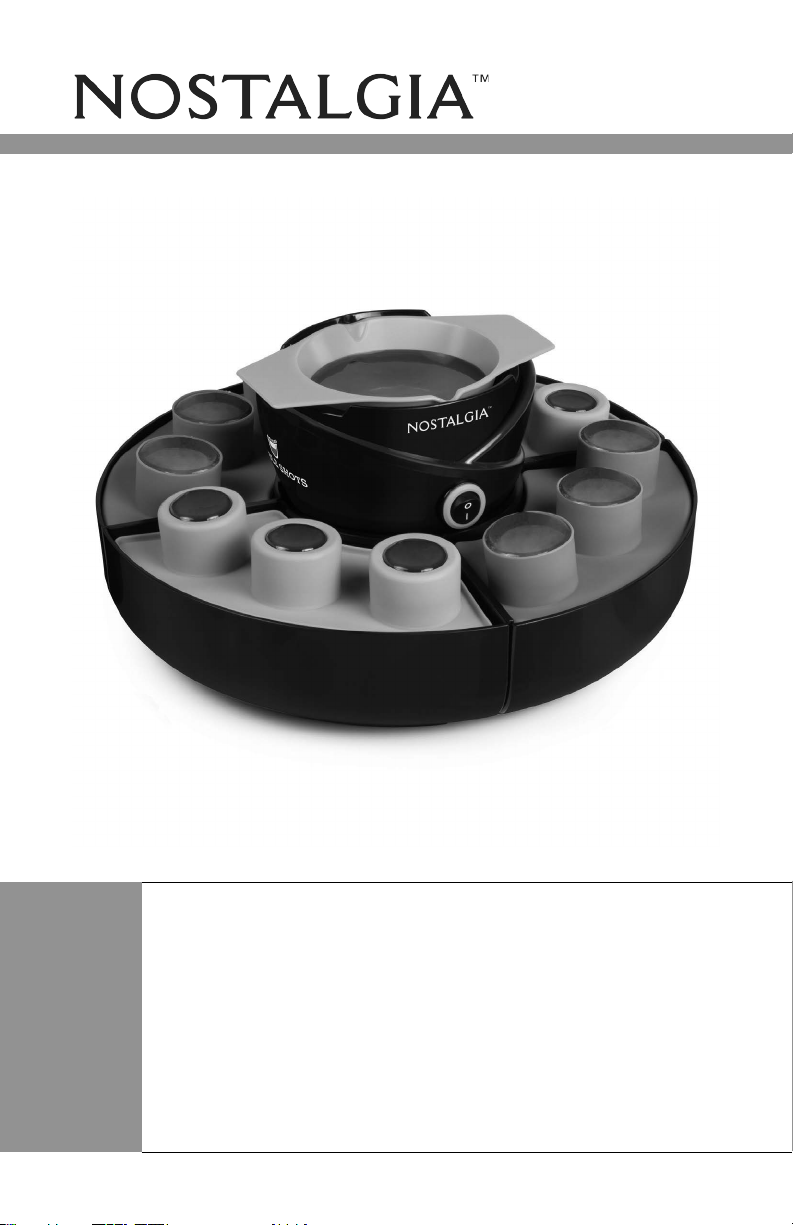
INTRODUCTION
Congratulations on your purchase of the Nostalgia™ EDIBLE SHOT & CUP
MAKER! Now you can make your very own ready-to-ll shot molds and readyto-eat shooters! These edible treats are perfect for making an impressive
dessert assortment and make the simplest occasion worth celebrating.
Features:
• Makes 12 edible shots at a time
• Perfect for Jell-O™, chocolate, juices, ice, hard candies, and more!
• Two-sided silicone molds are perfect for making ready-
to-ll shot molds or ready-to-eat shooters
• Silicone molds are freezer and oven safe (heat resistant to 500°F)
• Heated base works to melt chocolate or warm up your favorite shot beverage
• 2 melting pots with easy-pour spouts
• 4 silicone shot molds and ice trays
• Unit disassembles for easy cleaning
• Top shelf dishwasher safe silicone molds
ENGLISH
4
Page 7
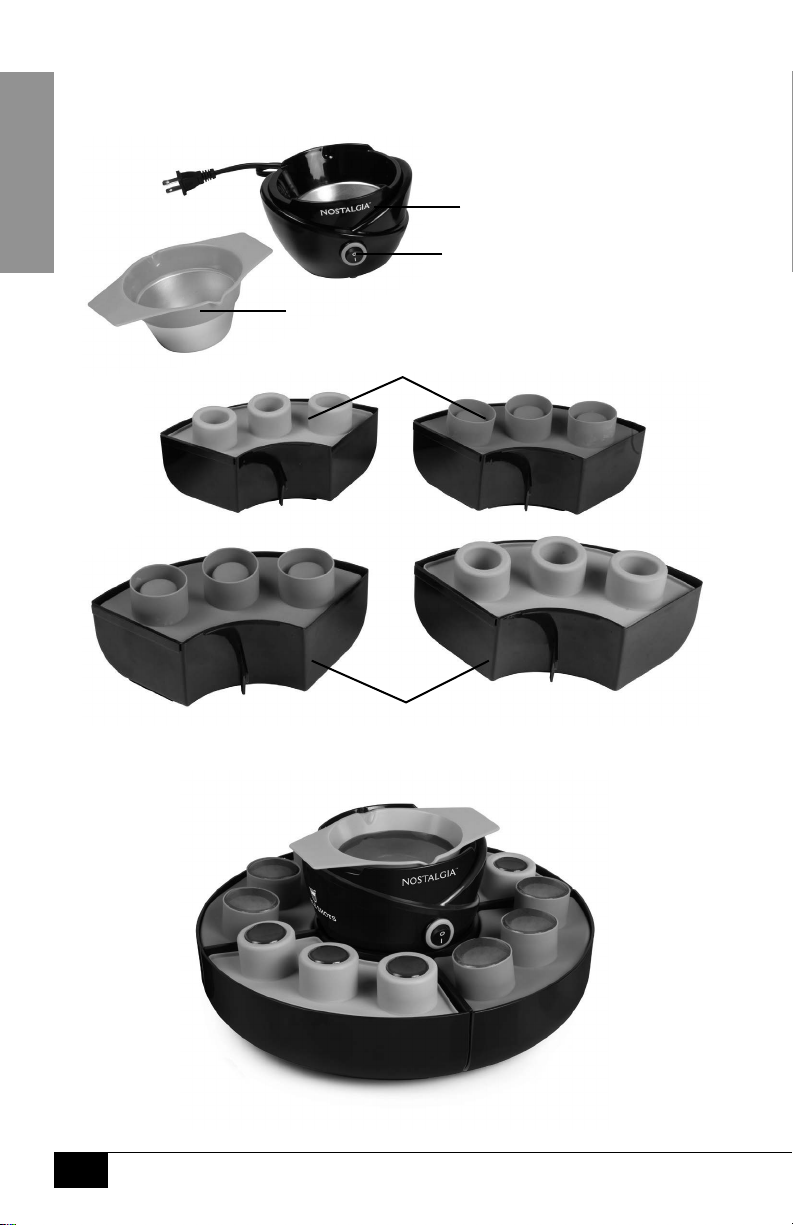
PARTS & ASSEMBLY
Parts
ENGLISH
Heated base
Power ON ( | )
/ OFF (O)
Heating pot
Silicone Shot Molds (4)
Assembly
5
Interlocking Trays (4)
Page 8
HOW TO OPERATE
Now is the time to let your creativity shine! Use these molds to make ready-to-ll shots
using Jell-O™, chocolate, hard candies, fruit chews, ice, and more! You can also turn the
silicone molds over to make a variety of ready-to-eat shooters - like avored ice cubes or
delicious ice pops. For more inspiration, check out the RECIPES section of this manual.
NOTE: Because your EDIBLE SHOT & CUP MAKER can be used in many
dierent ways, there is no singular how-to-operate method.
1. Find a dry, heat-resistant, level surface near an electrical outlet.
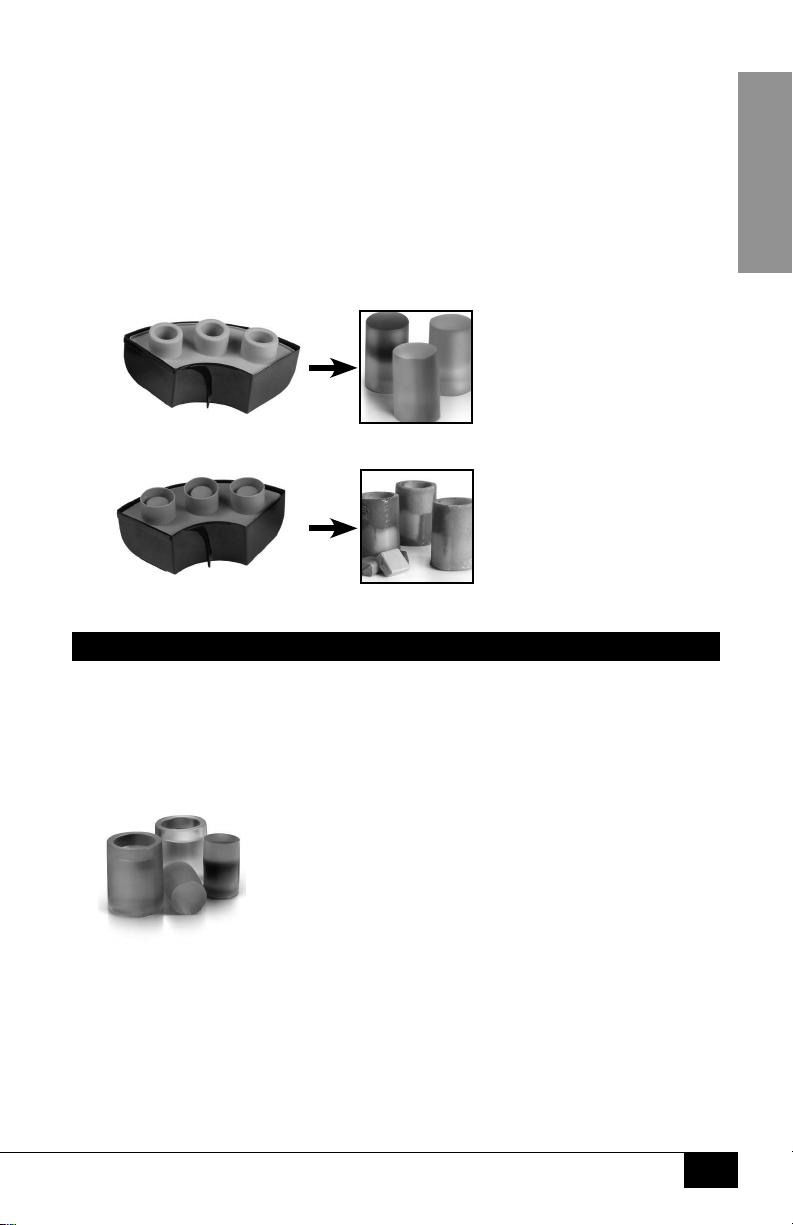
2. Assemble the trays by connecting them into a full circle. Place molds over trays.
If making Jell-O™, ll the trays ½ full with ice, then place molds over trays.
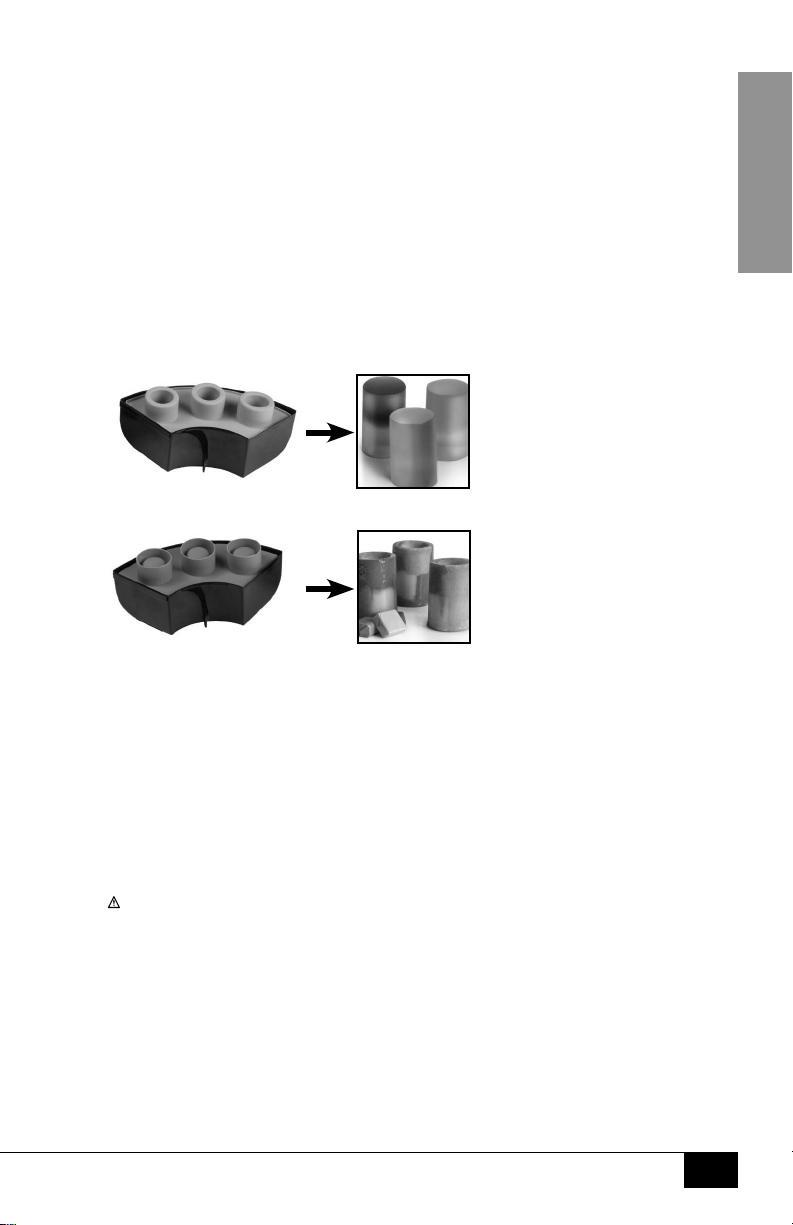
Silicone molds can be used two ways:
Ready-To-Eat
Shooters
Ready-To-Fill
Edible Cups
3. Place the heated base into the center of the trays, and then place the heating pot into the
heated base.
PRO TIP: Heated base can be used for melting ingredients,
such as chocolate or making Jell-O™.
4. Choose your recipe and prepare it per the directions. (Check out the
RECIPES section of this manual if you need inspiration.)
5. Pour into the silcone molds. To ensure a sturdy base to your
shot glasses, be sure to completely ll the molds.
6. When using the heated base, ip the switch to the ON "|" position and allow base to preheat
for 5-10 minutes. DO NOT exceed maximum capacity of heating pot, which is about 1
cup. When nished using heated base, ip the switch to the OFF "O" position and unplug
the unit.
Steam may be released from food during cooking! For your safety, avoid contact with
steam, as it is very hot and can cause burns.
7. Allow recipe to set. Depending on your chosen recipe, silicone molds can be placed in the
refrigerator or freezer, and are oven safe.
NOTE: Trays CANNOT be placed in the oven.
8. Once recipe has set, carefully remove the shot glass from the molds.
PRO TIP: Depending on your recipe, removing food product from these molds can be
tricky. To more easily release cups from the silicone mold, pull the silicone away from
the cup, releasing the seal. Then push from the bottom up, inverting the mold.
9. Fill and decorate your cup before serving. Try lling with
pudding, whipping cream, juice, or liquor!
ENGLISH
6
Page 9

HELPFUL TIPS
NEVER leave the unit unattended while operating.
To create a at base for your shots and shooters, be sure to keep unit
on a at, level surface as the recipe freezes, bakes or sets.
Heated base can be used for melting ingredients, such as chocolate or making Jell-O™.
ENGLISH
The ice cubes in the interlocking trays should provide the
temperature needed for any gelatin mixture to set. Trays and molds
can also be placed in the refrigerator for faster setting.
CLEANING & MAINTENANCE
Please take care of your EDIBLE SHOT & CUP MAKER by following
these simple instructions and precautions.
• Disconnect from the electrical outlet by unplugging the appliance.
• Make sure the appliance is completely cool before cleaning.
• Remove all parts from heated base.
• Dispose of any remaining mixture by emptying into a bag or trash receptacle.
It is not recommended that you pour the leftover mixture down the sink.
• Hand wash pots, molds and trays in warm, soapy water with a non-abrasive cloth.
• Dry parts thoroughly with a soft, non-abrasive cloth.
• Wipe the heated base with a dry, non-abrasive cloth. Be careful to not
submerge the heated base in water or it may not function.
• DO NOT put any parts in a dishwasher, except for the silicone molds. The
silicone molds may be washed in the dishwasher if you wish.
• NEVER immerse heated base or cord in water.
7
Page 10
RECIPES
Making delicious and edible shot glasses just got a whole lot more fun! Try
freezing water or your favorite beverage to make ice cold shots, then fill them
with juice or liquor. Or try gelatin, chocolate, cheese or hard candies and fill
them with pudding or whipping cream to create truly unique party pleasers.
Whether you're looking to make an impressive appetizer display or adorable
treats for a child's birthday party, the only limitations are your imagination!
Silicone molds are two-sided and can be used two ways:
Ready-To-Eat
Shooters
Mold Fill Capacity:
Approximately 1¾cups makes
12 ready-to-eat shooters
Ready-To-Fill
Edible Cups
Mold Fill Capacity:
Approximately 1¼cups makes
12 ready-to-ll edible cups
Gummy Edible Cups
• 1 packet Jell-O™
gelatin dessert (3 oz.)
• 5 (0.25 oz.) packets of
unavored gelatin
• 1 cup water
Assemble the trays by connecting them into a circle, then
ll trays ½ full with ice. Place molds over ice-lled trays.
Mix avored and unavored gelatin in a medium bowl.
Boil ½ cup of water, then add to the mixing bowl.
Stir until gelatin is completely dissolved. Add
½ cup of cold water and stir until mixed.
Carefully pour mixture into shot molds and allow to set.
For faster results, place molds in refrigerator to set.
Once set, remove from molds and ll with whipping
cream, or your favorite juice or liquor.
ENGLISH
8
Page 11
Chocolate Edible Cups
• 2 lb. bag of melting
chocolate wafers
ENGLISH
Icy Shot Glasses
• About 1 cup water
• Sliced fruit
(starwberry, lime, etc.)
Assemble the trays by connecting them
into a circle. Place molds over trays.
Add the melting chocolate wafers to a medium
bowl, then put in microwave for 1 minute. Stir
chocolate, then put in microwave for about 1
more minute or until completely melted.
Carefully pour chocolate into shot glass
molds, then set in freezer.
Once frozen, carefully remove shot glasses from molds.
When ready to serve, ll with frosting,
mousse, or even chocolate milk.
Assemble the trays by connecting them
into a circle. Place molds over trays.
Fill each shot glass mold half way with water.
Add the sliced fruit around the mold.
Top o molds with more water, and place molds into freezer.
When ready to serve, ll with liquor or juice.
9
Page 12
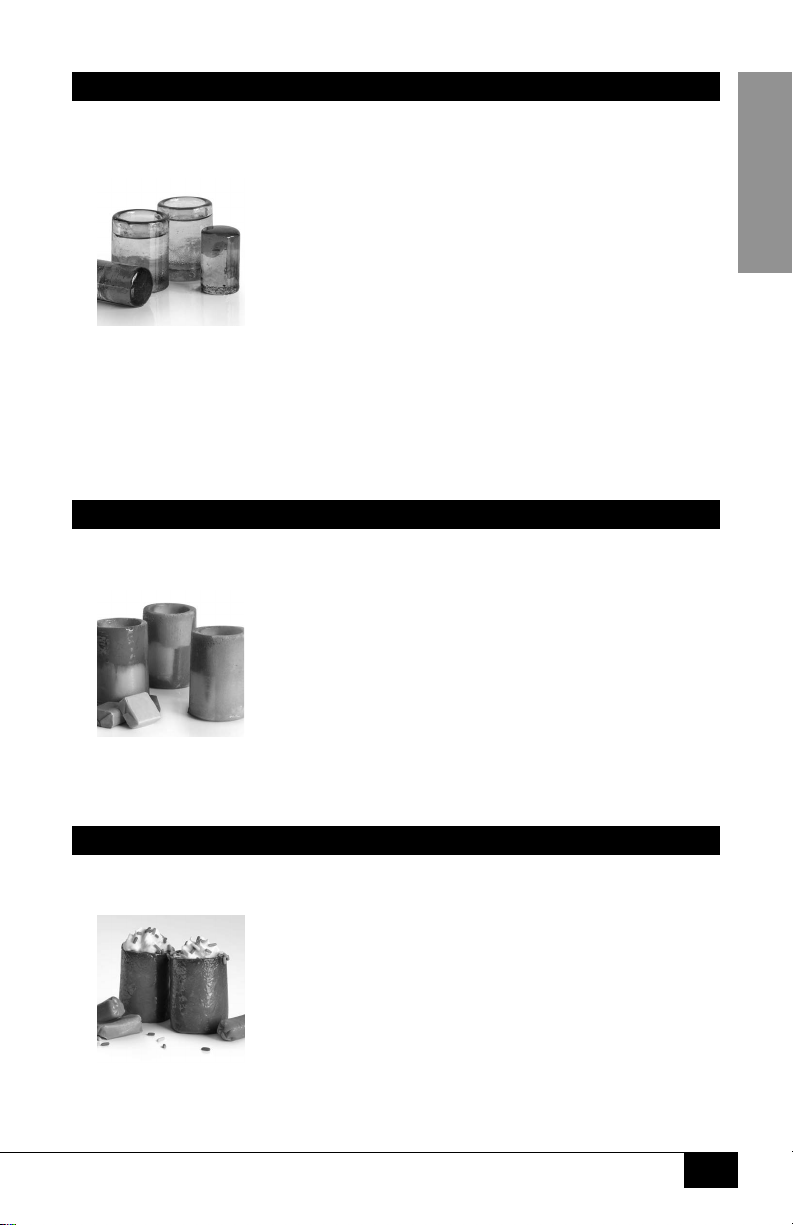
Hard Candy Edible Cups
• 1 bag (about 96)
multi-colored
hard candies
Fruit Chews Edible Cups
• 14 oz. bag fruit
chew candies
Preheat oven to 375°F.
Unwrap the hard candies. Place into a plastic
food storage bag and seal the bag.
Lay the bag on a cutting board and strike the bag
with a hammer, rolling pin or meat tenderizer until
the candy is crushed nely enough to t into the
molds. A light stroke is generally all that is needed.
Optional: To make colored layers of candy, separate
candies according to color before crushing candies.
Add crushed candy to the silicone molds.
Place molds onto a baking pan and transfer to oven and
bake until all the candies are melted, about 10 minutes.
Allow shot glasses to cool completely
before removing from molds.
Preheat oven to 375°F.
Unwrap the fruit chews.
Add fruit chews to the silicone molds.
Be sure to ll molds completely.
Place molds onto a baking pan and transfer to oven and
bake until all the candies are melted, about 10 minutes.
Allow shot glasses to cool completely
before removing from molds.
ENGLISH
Caramel Edible Cups
• 11 oz. bag caramel
candies
Preheat oven to 375°F.
Unwrap the caramel candies.
Add caramel candies to the silicone molds. If needed,
cut the caramels into smaller pieces to better t
the molds. Be sure to ll molds completely.
Place molds onto a baking pan and transfer to oven and
bake until all the caramels are melted, about 10 minutes.
Allow shot glasses to cool completely
before removing from molds.
10
Page 13

Strawberry Puree & Champagne Shooter
• 2 cups fresh or
frozen unsweetened
strawberries
• ¼ cup granulated
white sugar
ENGLISH
• Freshly squeezed
lemon juice (optional)
• Champagne
Vanilla Ice Cubes
• 2 cups almond milk
• 1/3 cup granulated
sugar
• 1 vanilla bean
• 1 tsp. vanilla
(optional)
Assemble the trays by connecting them
into a circle. Place molds over trays.
If using frozen strawberries, place in a
large bowl and thaw completely.
Remove stems from strawberries, then place
strawberries and their juice in a food processor or
blender. Process until berries are a smooth purée.
Pour purée into a 2 cup (480 ml) measuring cup.
Add sugar to purée and stir until sugar dissolves.
If desired, add lemon juice to purée.
Carefully pour mixture into shot molds and
set in freezer for 3 hours or until frozen.
When ready to serve, carefully remove shot
glasses from molds and ll with champagne.
Combine almond milk and sugar in a large saucepan.
Slice open vanilla bean lengthwise and scrape insides into
saucepan, then place empty vanilla bean into mixture.
Bring mixture to a simmer over medium heat,
whisking to break up any clumps of vanilla.
Once mixture has come to a simmer, reduce heat to low
and cook 10 minutes more, whisking occasionally.
Allow vanilla mixture to come to room temperature.
Pour mixture through a ne mesh strainer into bowl,
then carefully pour into cylindrical side of mold.
Freeze until completely solid.
Serve with iced coee, tea or other beverages.
Margarita Shot Glasses
• ½ cup fresh
orange juice
• 3 tbsp. fresh
lime juice
• ½ scant cup sugar
• 1 ½ cups ice cubes
• 1 lime, cut in half
• Tequila (optional)
• Salt (as needed)
11
Add the fresh orange juice, lime juice,
and sugar into a blender.
Assemble the trays by connecting them into
a full circle. Place molds over trays.
Add ice and blend until slushy. Carefully pour slush into
shot molds and set in freezer until completely frozen.
Once frozen, carefully remove shot glasses from
molds. Line the rim of the shot glasses with salt.
Pour tequila into shot glass right before serving.
Page 14

RETURNS & WARRANTY
SHOULD YOUR UNIT NOT WORK OR IF DAMAGED WHEN YOU FIRST TAKE IT OUT OF
THE BOX, PLEASE RETURN IT TO THE PLACE OF PURCHASE IMMEDIATELY.
EDIBLE SHOT & CUP MAKER / SM12
Should you have any questions, please contact us via email or at the customer service number listed
below between the hours of 8:00 AM and 5:00 PM, Monday through Friday, Central Standard Time.
Distributed by:
Nostalgia Products LLC
1471 Partnership Dr.
Green Bay, WI 54304-5685
Customer Service
Phone: (920) 347-9122
Web: www.nostalgiaproducts.com
Customer Service Inquiry
To submit a Customer Service inquiry, go to www.nostalgiaproducts.com and ll
out the Customer Service Inquiry form and click the Submit button.
A representative will contact you as soon as possible.
Product Warranty Terms
Nostalgia Products LLC (the “Company”) hereby warrants that for a period of one (1) year from the
date of original purchase, this product will be free of defects in material and workmanship under
normal home use, provided that the product is operated and maintained in accordance with the
operating instructions. As the sole and exclusive remedy under this warranty, the Company will
at its discretion either repair or replace the product found to be defective, or issue a refund on the
product during the warranty period. This warranty is only available to the original retail purchaser of
the product from the date of initial retail purchase, and is only valid with the original sales receipt, as
proof of purchase date is required to obtain warranty benets. All warranty claims must be brought
to the attention of the Company within the warranty period and no later than 30 days of the failure
to perform. This warranty does not cover normal wear or damage caused by shipping, mishandling,
misuse, accident, alteration, improper replacement parts, or other than ordinary household use.
You may be required to return the product (with shipping prepaid by you) for inspection and
evaluation. Return shipping costs are not refundable. The Company is not responsible for returns
damaged or lost in transit. Unless otherwise specically permitted by the operating instructions, this
warranty applies to indoor household use only. In order to obtain service under this warranty, please
contact the Company at the telephone number listed above or by lling out the Customer Service
Inquiry Form located at www.nostalgiaproducts.com. Warranty valid only in USA and Canada.
This warranty is in lieu of all other warranties, expressed or implied, including warranties of
merchantability and tness for a particular purpose, which are hereby excluded to the extent
permitted by law. In no event shall the Company be liable for any indirect, incidental, consequential,
or special damages arising out of or in connection with this product or the use thereof. Some
states, provinces or jurisdictions do not permit the exclusion or limitation of incidental or
consequential damages, so the foregoing exclusion or limitation may not apply to you.
This warranty does not apply to re-manufactured merchandise.
Please read the operating instructions carefully. Failure to comply
with the operating instructions will void this warranty.
For more information, visit us online at www.nostalgiaproducts.com.
Like us on Facebook at www.facebook.com/NostalgiaElectrics.
Follow our boards on Pinterest at www.pinterest.com/nostalgiaelctrx.
Tweet along with us on Twitter at www.twitter.com/NostalgiaElctrx.
ENGLISH
12
Page 15

CONTENIDO
SEGURIDAD . . . . . . . . . . . . . . . . . . . . . . . . . . . . . . . . . . . . . . . 13
PROTECCIONES IMPORTANTES . . . . . . . . . . . . . . . . . . . . . . . . . . 14
PROTECCIONES IMPORTANTES ADICIONALES . . . . . . . . . . . . . . . . . 14
INTRODUCCIÓN . . . . . . . . . . . . . . . . . . . . . . . . . . . . . . . . . . . . 15
PARTES Y ENSAMBLAJE . . . . . . . . . . . . . . . . . . . . . . . . . . . . . . . 16
CÓMO UTILIZAR . . . . . . . . . . . . . . . . . . . . . . . . . . . . . . . . . . . . 17
CONSEJOS ÚTILES . . . . . . . . . . . . . . . . . . . . . . . . . . . . . . . . . . 18
LIMPIEZA Y MANTENIMIENTO . . . . . . . . . . . . . . . . . . . . . . . . . . . 18
RECETAS . . . . . . . . . . . . . . . . . . . . . . . . . . . . . . . . . . . . . . . . . 19
DEVOLUCIONES Y GARANTÍA . . . . . . . . . . . . . . . . . . . . . . . . . . . . 24
SEGURIDAD
ESPAÑOL
Su seguridad y la seguridad de los demás es muy importante.
Hemos dado muchos mensajes de seguridad importantes en este manual y en
el aparato. Siempre lea y cumpla con todos los mensajes de seguridad.
Todos los mensajes de seguridad seguirán al símbolo de alerta de seguridad.
Todos los mensajes de seguridad le indicarán cuál es el peligro potencial, cómo
reducir la posibilidad de lesiones, y qué puede suceder si no sigue las instrucciones.
¡Que cada día sea una esta!
Visite www.nostalgiaproducts.com y
encuentre más productos agradables.
Este es el símbolo de alerta de seguridad.
Este símbolo le avisa de los peligros potenciales que
pueden provocar serias lesiones a usted y a otros.
Especicaciones del aparato:
120 Voltios, 60 Hz, 40 vatios
ESTE PRODUCTO SÓLO DEBE USARSE CON UN TOMACORRIENTE DE 120V CA.
Visite www.nostalgiaproducts.com/user-manuals/
para que vea el manual más actualizado.
13
13
Page 16

PROTECCIONES IMPORTANTES
Una persona que no haya leído y comprendido todas las instrucciones
de uso y seguridad no está calicada para utilizar este aparato. Todos
los usuarios de este dispositivo deben leer y comprender este Manual
de instrucciones antes de utilizar o limpiar este aparato.
Cuando se utiliza aparatos eléctricos, siempre se deben seguir algunas
medidas básicas de seguridad que incluyen las siguientes:
1. Lea todas las instrucciones antes de utilizar este aparato .
2. NO TOQUE las supercies calientes. Use agarraderas o mangos.
3. Este aparato NO ES UN JUGUETE.
4. Los niños pequeños sin supervisión y las personas con limitación
cognitiva nunca deben utilizar este aparato.
5. Una supervisión estricta se requiere cuando un aparato se use por niños o cerca de ellos.
6. Como medida de protección contra el riesgo de descarga eléctrica, no sumerja el
cable, los enchufes ni ninguna otra parte de la unidad en agua ni en otros líquidos.
7. Desconéctelo del tomacorriente cuando no esté en uso, antes de
retirar piezas y antes de la limpieza. Déjelo enfriar antes de colocar
o retirar cualquiera de las piezas, y antes de la limpieza.
8. NO utilice ningún aparato con el cable o el enchufe dañados, ni si el aparato
tiene desperfectos o SI se ha dañado de cualquier manera. Devolver el
aparato al taller de reparación más cercano para su reparación o ajuste.
9. El fabricante no recomienda el uso de otros aditamentos o accesorios diferentes a los
proporcionados por el fabricante. El uso de accesorios puede provocar lesiones.
10. NO utilice el aparato para otros usos que no haya sido diseñado.
11. NO utilice el aparato al aire libre. SOLO PARA USO DOMÉSTICO.
12. NO lo coloque sobre o cerca de una hornilla eléctrica o gas caliente, o en un horno caliente.
13. NO permita que el cable cuelgue sobre el borde de la mesa o
del mostrador, ni que toque supercies calientes.
14. NUNCA deje la unidad desatendida mientras esté en uso o
cuando esté enchufada a una toma de corriente.
15. Debe ser extremadamente cuidadoso al mover cualquier aparato con comida caliente.
16. Siempre conecte primero el enchufe al aparato, luego enchufe el cable
a la toma de corriente. Para desconectar, mueva todos los controles
a “apagar” y luego retire el enchufe del tomacorriente.
ESPAÑOL
PROTECCIONES IMPORTANTES ADICIONALES
Precauciones de seguridad operativa
1. NUNCA coloque los dedos o utensilios de plástico en la mezcla caliente.
2. Mantenga las manos y la cara lejos de la apertura de la olla.
3. Durante el uso, el aparato está muy caliente y permanecerá caliente por algún tiempo
cuando se apague. NO TOQUE las supercies calientes como la Base calentada.
4. Puede que escape algo de vapor de la comida durante la cocción. Por su seguridad,
evite el contacto con el vapor, ya que está muy caliente y puede causar quemaduras.
14
14
Page 17

Instrucciones para el cable eléctrico y el enchufe
1. El aparato tiene un enchufe polarizado (una patita más ancha). Se diseñó para
reducir el riesgo de descarga eléctrica, dado que entra en un tomacorriente
polarizado solo en una posición. Si el enchufe no entra bien en la toma
de corriente, déle la vuelta. Si aún así no entra,comuníquese con un
electricista calicado. No modique el enchufe de ninguna manera.
2. Se provee un cable de alimentación corto para reducir el riesgo
resultantede enredarse o tropezar con un cable largo.
3. Si se utiliza un cable alargador o un cable de alimentación más largo:
• Unos cables de extensión se pueden utilizar si se tiene cuidado con su uso.
• Las características nominales del grupo de cables o del cable de
extensión deben ser al menos iguales a las del aparato.
• Cuando se utiliza un cable largo o cable de extensión, asegúrese de
que el cable no sobresalga de la encimera ni una mesa ya que se
puede halar o tropezarse con el cable involuntariamente.
4. El fabricante no recomienda el uso de esta máquina en países que no admiten 120V
CA incluso si se está usando un adaptador, transformador o convertidor de voltaje.
¡GUARDE ESTAS INSTRUCCIONES!
INTRODUCCIÓN
¡Felicitaciones por su compra de la MÁQUINA DE VASOS COMESTIBLES PARA TRAGOS Y
BEBIDAS Nostalgia™! ¡Ahora puede hacer sus propios moldes de tragos listos para llenar y
ESPAÑOL
listos para comer! Estos bocadillos comestibles son perfectos para hacer un impresionante
surtido de postres, y hacen que incluso la ocasión más simple sea digna de ser celebrada.
Características:
• Prepara hasta 12 vasos comestibles a la vez
• ¡Ideal para Jell-O™, chocolate, jugos, hielo, dulces y más!
• Los moldes de silicona de dos lados son perfectos para hacer
moldes de tragos listos para llenar o listos para comer
• Los moldes de silicona son aptos para el congelador y
para el horno (resistentes al calor hasta 500 °F)
• La base calentada funciona para derretir chocolate o calentar su bebida favorita
• 2 recipientes de fundición con picos para un vertido sencillo
• 4 moldes de tragos de silicona y bandejas para hielo
• La unidad se desensambla para una limpieza sencilla
• Moldes de silicona aptos para el estante superior del lavavajillas
15
15
Page 18

PIEZAS Y ENSAMBLAJE
Piezas
Contenedor de
calentamiento
Base caliente
Encendido ( | )
Apagado (O)
Moldes de tragos
de silicona (4)
ESPAÑOL
Ensamblaje
Bandejas de
interbloqueo (4)
16
16
Page 19

CÓMO UTILIZAR
¡Ahora es el momento de dejar que su creatividad brille! Utilice estos moldes para hacer
moldes de tragos listos para rellenar con Jell-O ™, chocolate, dulces, frutas masticables,
hielo y más. También puede girar los moldes de silicona para crear una variedad de
vasos de tragos listos para el consumo, como cubitos de hielo con sabor o deliciosos
helados. Para más inspiración, consulte la sección RECETAS de este manual.
NOTA: Como su MÁQUINA DE VASOS COMESTIBLES PARA TRAGOS Y BEBIDAS se puede
usar en numerosas formas diferentes, no hay un único método de operación.
1. Encuentre una supercie seca y resistente al calor cerca
de una toma de corriente de electricidad.
2. Ensamble las bandejas conectándolas en un círculo completo. Coloque
los moldes sobre las bandejas. Si está haciendo Jell-O ™, llene las
bandejas 1/2 con hielo y coloque los moldes sobre las bandejas.
Moldes de tragos de silicona se puede usar de dos maneras:
Perlas Listas
Para Comer
Vasos Comestibles
Listos Para Llenar
ESPAÑOL
3. Coloque la base caliente en el centro de las bandejas y luego coloque el contenedor de
calentamiento en la base caliente.
SUGERENCIA PROFESIONAL: La base caliente se puede usar para
fundir ingredientes, como el chocolate o para preparar Jell-O ™.
4. Elija su receta y prepárela según las instrucciones. (Consulte la
sección de RECETAS de este manual si necesita inspiración).
5. Vierta en los moldes de silicona. Para garantizar una base sólida para sus
vasos de tragos, asegúrese de llenar completamente los moldes.
6. Cuando use la base caliente, coloque el interruptor en ENCENDIDO "|" y permita que la base
se precaliente por 5-10 minutos. NO exceda la capacidad máxima del contenedor de
calentamiento, que es alrededor de 1 taza. Al terminar de usar la base caliente, mueva el
interruptor a la posición de apagado "O" y desconecte la unidad.
Puede que escape algo de vapor de la comida durante la cocción. Por su seguridad, evite
el contacto con el vapor, ya que está muy caliente y puede causar quemaduras.
7. Deje reposar la receta. Dependiendo de la receta elegida, los moldes de silicona se pueden
colocar en el refrigerador o el congelador y son aptos para el horno.
NOTA: Las bandejas NO PUEDEN colocarse en el horno.
17
17
Page 20

8. Una vez que se haya endurecido la receta, retire cuidadosamente el vaso de los moldes.
SUGERENCIA PROFESIONAL: Dependiendo de su receta, eliminar el
producto alimenticio de estos moldes puede ser complicado. Para soltar más
fácilmente los vasos del molde de silicona, retire la silicona del vaso y libere
el sello. Luego empuje desde abajo hacia arriba, invirtiendo el molde.
9. Llene y decore su taza antes de servir. ¡Pruebe llenar con an, crema batida, jugo o licor!
CONSEJOS ÚTILES
NUNCA deje la unidad sin supervisión mientras está en uso.
Para crear una base plana para sus tragos y vasos, asegúrese de mantener la unidad en
una supercie plana y nivelada a medida que la receta se congela, hornea o endurece.
La base caliente se puede usar para fundir ingredientes,
como el chocolate o para preparar Jell-O ™.
Los cubitos de hielo en la bandejas con bloqueo deben proporcionar la temperatura
necesaria para que se asiente la mezcla de gelatina. Las bandejas y moldes
también se pueden colocar en el refrigerador para un ajuste más rápido.
LIMPIEZA Y MANTENIMIENTO
• Desconecte del tomacorriente desenchufando el aparato.
• Asegúrese de que el aparato esté completamente frío antes de limpiarlo.
• Retire todas las piezas de la base térmica.
• Deseche el resto de la mezcla al vaciarla en una bolsa o bote de basura.
No se recomienda que vierta la mezcla sobrante por el fregadero.
• Lave a mano las ollas, los moldes y bandejas con agua
tibia y jabonosa y con un paño no abrasivo.
• Seque las piezas por completo con un paño suave, no abrasivo.
• Limpie la base calentada con un paño seco y no abrasivo. Tenga cuidado
de no sumergir la base calentada en agua o puede que no funcione.
• NO coloque ninguna pieza en el lavavajillas, salvo los moldes de silicona.
Los moldes de silicona se pueden lavar en el lavavajillas si lo desea.
• No sumerja NUNCA la base calentada o el cable en agua.
ESPAÑOL
18
18
Page 21

RECETAS
¡Hacer vasos deliciosos y comestibles se volvió mucho más divertido! Intente congelar
el agua o su bebida favorita para hacer tomas heladas, luego llénelas con jugo o licor.
O pruebe con gelatina, chocolate, queso o caramelos duros y llénelos con budín o
crema batida para crear un deleite para una fiesta verdaderamente única. Ya sea que
esté buscando hacer una impresionante exhibición de aperitivos o golosinas adorables
para la fiesta de cumpleaños de un niño, ¡las únicas limitaciones son su imaginación!
Moldes de tragos de silicona se puede usar de dos maneras:
Perlas Listas
Para Comer
Vasos Comestibles
Listos Para Llenar
Vasos de trago de dulces de goma
• 1 paquete de
ESPAÑOL
postre de gelatina
Jell-O™ (3 oz.)
• 5 paquetes (0,25 oz.)
de gelatina sin sabor
• 1 taza de agua
Capacidad de llenado del molde:
Aproximadamente 1¾ tazas hacen
12 tiradores listos para comer
Capacidad de llenado del molde:
Aproximadamente 1¼tazas hacen 12
vasos comestibles listos para llenar
Monte las bandejas al conectarlas en un círculo,
luego rellene las bandejas a ½ con hielo. Coloque
los moldes sobre las bandejas llenas de hielo.
Mezcle la gelatinas con sabor y sin sabor
en contenedor intermedio.
Hierva ½ taza de agua, luego agregue al contenedor
de mezcla. Revuelva hasta que la gelatina se
disuelva por completo. Agregue ½ taza de
agua fría y revuelva hasta que se mezcle.
Vierta con cuidado la mezcla en los moldes
para tragos y deje endurecer.
Para resultados más rápidos, coloque los
moldes en el refrigerador para endurecer.
Una vez que esté listo, retire de los moldes y llene
con crema batida, o su jugo o licor favorito.
19
19
Page 22

Tazas comestibles de chocolate
• 2 libras bolsa de
chocolates de fusión
Vasos de chupito congelados
• Alrededor de 1
taza de agua
• Fruta en rodajas
(fresas, lima, etc.)
Ensamble las bandejas conectándolas en un
círculo. Coloque los moldes sobre las bandejas.
Agregue las obleas de chocolate derretidas a un tazón
mediano, luego ponga en el microondas durante
1 minuto. Revuelva el chocolate, luego colóquelo
en el microondas durante aproximadamente 1
minuto más o hasta que se derrita por completo.
Con cuidado, vierta el postre en moldes de
vidrio, luego endurezca en el congelador.
Una vez congelado, retire con cuidado
los vasos de los moldes.
Rellene con glaseado, mousse o
incluso chocolate con leche.
ESPAÑOL
Ensamble las bandejas conectándolas en un
círculo. Coloque los moldes sobre las bandejas.
Llene cada molde de vaso con agua hasta la mitad.
Agregue los elementos festivos de otoño (arilos de
granada, manzana, hierbas) alrededor del molde.
Rellene los moldes con más agua y coloque
los moldes en el congelador.
Combine la sidra de manzana, el bourbon y
el licor de naranja en una coctelera.
Cuando esté listo para servir, llénelo con licor o jugo.
20
20
Page 23

Vasos de trago de Caramelos duros
• 1 bolsa (alrededor
de 96) de caramelos
duros de colores
múltiples
Fruta comestible mastica tazas de dulces
• 14 onza bolsa
de caramelos
masticables de frutas
ESPAÑOL
Precaliente el horno a 375 °F.
Desenvuelva los caramelos duros. Coloque en una bolsa
plástica de almacenamiento de alimentos y selle la bolsa.
Coloque la bolsa en una tabla de cortar y golpee la bolsa
con un martillo, rodillo o ablandador de carne hasta que
el caramelo se triture lo suciente como para caber en
los moldes. Un golpe ligero es todo lo que se necesita.
Opcional: Para hacer capas de dulces de
colores, separe los dulces de acuerdo con el
color antes de triturar los caramelos.
Agregue caramelos triturados a los moldes de silicona.
Coloque los moldes en una bandeja para hornear y
transéralos al horno y hornee hasta que todos los
caramelos se derritan, aproximadamente 10 minutos.
Permita que los vasos de chupito se enfríen
completamente antes de quitarlos de los moldes.
Precaliente el horno a 375 °F.
Desenvolver los caramelos masticable de fruta.
Agregue masticables de frutas a los moldes de silicona.
Asegúrese de llenar los moldes completamente.
Coloque los moldes en una bandeja para hornear y
transéralos al horno y hornee hasta que todos los
caramelos se derritan, aproximadamente 10 minutos.
Permita que los vasos de chupito se enfríen
completamente antes de quitarlos de los moldes.
Tazas de caramelo comestibles
• 11 onza bolsa de
dulces de caramelo
21
21
Precaliente el horno a 375 °F.
Desenvolver los dulces de caramelo.
Agregue dulces de caramelo a los moldes de silicona.
Si es necesario, corte los caramelos en trozos más
pequeños para que se ajusten mejor a los moldes.
Asegúrese de llenar los moldes completamente.
Coloque los moldes en una bandeja para hornear y
transéralos al horno y hornee hasta que todos los
caramelos se derritan, aproximadamente 10 minutos.
Permita que los vasos de chupito se enfríen
completamente antes de quitarlos de los moldes.
Page 24

Trago de puré de fresas y champagne
• 2 tazas de fresas
sin azúcar frescas
o congeladas
• ¼ taza de azúcar
blando granulado
• Jugo de limón recién
exprimido (opcional)
• Champagne
Cubos de helado de vainilla
• 2 tazas de leche
de almendras
• ⁄ taza de azúcar
granulado
• 1 chaucha de vainilla
• 1 cucharadita de
vainilla (opcional)
Ensamble las bandejas conectándolas en un
círculo. Coloque los moldes sobre las bandejas.
Si usa fresas congeladas, colóquelas en un tazón
grande y descongélelas por completo.
Retire los tallos de las fresas, luego coloque las fresas
y su jugo en un procesador de alimentos o licuadora.
Procese hasta que las fresas sean un puré suave.
Vierta el puré en una taza medidora de 2 tazas (480 ml).
Agregue azúcar al puré y revuelva hasta
que el azúcar se disuelva.
Si lo desea, agregue jugo de limón al puré.
Con cuidado, vierta la mezcla en moldes y colóquela
en el congelador por 3 horas o hasta que se congele.
Cuando esté listo para servir, retire cuidadosamente
los vasos de los moldes y llene con champagne.
ESPAÑOL
Combine la leche de almendra y el
azúcar en una cacerola grande.
Abra la chaucha de vainilla a lo largo y raspa
el interior en la cacerola, luego coloque la
chaucha de vainilla vacía en la mezcla.
Lleva la mezcla a fuego lento a fuego medio,
batiendo para disolver los grumos de vainilla.
Una vez que la mezcla hierva a fuego lento,
reduzca el fuego a bajo y cocine 10 minutos
más, batiendo ocasionalmente.
Deje que la mezcla de vainilla alcance
la temperatura ambiente.
Vierta la mezcla a través de un colador de malla
na en el recipiente, luego vierta cuidadosamente
en el lado cilíndrico del molde.
Congele hasta que esté completamente sólido.
Sirva con café helado, té u otras bebidas.
22
22
Page 25

Vasos de trago de margarita
• ½ taza de jugo de
naranja fresco
• 3 cucharaditas de
jugo de lima fresco
• ½ taza al ras
de azúcar
• 1½ taza de cubos
de hielo
• 1 lima, cortada
a la mitad
• Tequila (opcional)
• Salt (cantidad
necesaria)
Agregue el jugo de naranja, el jugo de
limón y el azúcar en una licuadora.
Ensamble las bandejas conectándolas en un círculo
completo. Coloque los moldes sobre las bandejas.
Agregue el hielo y mezcle hasta que se una. Con
cuidado, vierta la mezcla en moldes y colóquela en el
congelador por hasta que se congele por completo.
Una vez congelado, retire con cuidado los vasos de
los moldes. Cubra el borde de los vasos con sal.
Vierta el tequila en un vaso de trago justo antes de servir.
ESPAÑOL
23
23
Page 26

DEVOLUCIONES Y GARANTÍA
SI LA UNIDAD NO FUNCIONA O ESTÁ DAÑADA AL SACARLA POR PRIMERA VEZ
DE LA CAJA, DEVUÉLVALA AL LUGAR DE COMPRA INMEDIATAMENTE.
MÁQUINA DE VASOS COMESTIBLES PARA TRAGOS Y BEBIDAS / SM12
Si tiene preguntas, contacte con nosotros por correo electrónico o por el número
telefónico de servicio al cliente que aparece a continuación en el horario de
8:00 AM a 5:00 PM, de lunes a viernes, Hora Estándar del Este.
Distribuida por:
Nostalgia Products LLC
1471 Partnership Dr.
Green Bay, WI 54304-5685
Servicio al cliente
Teléfono: (920) 347-9122
Web: www.nostalgiaproducts.com
Solicitud de servicio al cliente
Para enviar una solicitud al Servicio al Cliente, vaya a www.nostalgiaproducts.com, llene
el formulario de Solicitud de Servicio al Cliente y haga clic en el botón Enviar.
Un representante le contactará tan pronto como sea posible.
Términos de garantía del producto
Po este medio, Nostalgia Products LLC (la “Compañía”) garantiza que por un período de un (1) año a
partir de la fecha de compra original, este producto estará sin defectos en cuanto a materiales y mano
de obra en uso normal en casa, siempre que el producto se maneje y mantenga de acuerdo con las
instrucciones de manejo. Como único y exclusivo remedio en virtud de esta garantía, la Compañía, a
su discreción, podrá optar por reparar o sustituir el producto que se encuentre defectuoso, o emitir un
reembolso por el producto durante el período de garantía. Esta garantía sólo está disponible para el
comprador original minorista del producto a partir de la fecha inicial de compra al por menor, y sólo es
válida con el recibo de compra original, y como prueba de la fecha de compra, es necesario obtener los
benecios de la garantía. Todos los reclamos de garantía deben hacerse a la atención de la Compañía
dentro del período de garantía y no más tarde que 30 días desde la imposibilidad de realizarlo. Esta
garantía no cubre el desgaste normal o daños ocasionados por el embarque, malos manejos, mal uso,
accidentes, alteración, piezas de cambio incorrectas, o algo distinto al uso doméstico normal. Es posible
que deba devolver el producto (con los gastos de envío pagados por usted) para inspección y evaluación.
Los costos de envío no son reembolsables. La empresa no se hace responsable por devoluciones
dañadas o perdidas en tránsito. A menos que se indique lo contrario especícamente permitido por
las instrucciones de manejo, esta garantía sólo se aplica al uso en interiores de las viviendas. Para
realizar una reparación bajo esta garantía, comuníquese con la Compañía mediante el número de
teléfono indicado anteriormente o al llenar el formulario de consulta para el servicio de Atención al
Cliente en www.nostalgiaproduct s.com. El período de garantía sólo es válido en EE.UU. y Canadá.
Esta garantía está en lugar de cualquier otra garantía, expresa o implícita, incluso las garantías de
comerciabilidad y conveniencia para un propósito en particular, que quedan excluidas en la medida
permitida por la ley. En ningún caso la compañía será responsable de cualquier daño indirecto, incidental,
consecuente, especial o daños que surjan o estén relacionados con este producto o la utilización del
mismo. Algunos estados, provincias o corregimientos no permiten la exclusión o la limitación de daños
incidentales o consecuentes, por lo que la exclusión o la limitación anterior quizás no se aplique a usted.
Esta garantía no se aplica a mercancía reelaborada.
Lea las instrucciones de manejo cuidadosamente. El incumplimiento
de las instrucciones de manejo anulará esta garantía.
Para obtener más información, visítenos en línea en www.nostalgiaproducts.com.
Me Gusta en Facebook en www.facebook.com / NostalgiaElectrics.
Siga nuestros consejos sobre Pinterest en www.pinterest.com / nostalgiaelctrx.
Tweet con nosotros en Twitter en www.twitter.com / NostalgiaElctrx.
ESPAÑOL
24
24
Page 27

Faites que chaque jour soit une fête!
Visitez le www.nostalgiaproducts.com
pour plus de produits amusants.
TABLE DES MATIÈRES
SÉCURITÉ . . . . . . . . . . . . . . . . . . . . . . . . . . . . . . . . . . . . . . . . 25
PRÉCAUTIONS IMPORTANTES . . . . . . . . . . . . . . . . . . . . . . . . . . . 26
PRÉCAUTIONS IMPORTANTES ADDITIONNEL . . . . . . . . . . . . . . . . . . 26
INTRODUCTION . . . . . . . . . . . . . . . . . . . . . . . . . . . . . . . . . . . . 27
PIÈCES ET ASSEMBLAGE . . . . . . . . . . . . . . . . . . . . . . . . . . . . . . . 28
COMMENT FAIRE FONCTIONNER . . . . . . . . . . . . . . . . . . . . . . . . . 29
CONSEILS UTILES . . . . . . . . . . . . . . . . . . . . . . . . . . . . . . . . . . . 30
NETTOYAGE ET ENTRETIEN . . . . . . . . . . . . . . . . . . . . . . . . . . . . . 30
RECETTES . . . . . . . . . . . . . . . . . . . . . . . . . . . . . . . . . . . . . . . . 31
RETOURS ET GARANTIE . . . . . . . . . . . . . . . . . . . . . . . . . . . . . . . 36
SÉCURITÉ
Votre sécurité est très importante, ainsi que celle des autres.
Nous avons fourni de nombreux messages de sécurité importants dans ce manuel
et sur votre appareil. Toujours lire et respecter les consignes de sécurité.
Tous les messages de sécurité suivront le symbole d'alerte de sécurité.
Tous les messages de sécurité vous diront quel est le danger potentiel
et vous diront comment réduire le risque de blessure et indiqueront
ce qui peut arriver si les instructions ne sont pas respectées.
Spécications de l'appareil:
120 Volts, 60 Hz, 40 Watts
CE PRODUIT EST DESTINÉ POUR UNE PRISE DE 120V AC UNIQUEMENT.
Se reporter au site www.nostalgiaproducts.com/user-
FRANÇAIS
manuals/ pour la version la plus récente.
25
25
Ceci est le symbole d'alerte de sécurité.
Ce symbole vous signale les dangers potentiels qui peuvent
causer des blessures graves pour vous et les autres.
Page 28

PRÉCAUTIONS IMPORTANTES
Une personne qui n'a pas lu et compris toutes les instructions de
fonctionnement et de sécurité n'est pas qualiée pour faire fonctionner cet
appareil. Tous les utilisateurs de cet appareil doivent lire et comprendre
ce mode d'emploi avant d'utiliser ou de nettoyer cet appareil.
Lorsque l'on utilise un appareil électrique, il faut toujours
respecter les précautions de base, y comprises celles-ci :
1. Lisez toutes les instructions avant d'utiliser cet appareil.
2. NE PAS TOUCHER aux surfaces chaudes. Utiliser les poignées ou les cadrans.
3. Cet appareil n'EST PAS UN JOUET.
4. Les jeunes enfants non supervisés ainsi que les personnes intellectuellement
atteintes ne doivent jamais faire fonctionner cet appareil.
5. Une attention particulière est requise lors de l’utilisation de
tout appareil par des enfants ou à leur proximité.
6. An d'éviter tout risque de choc électrique, ne pas submerger le cordon d'alimentation,
la che ou n'importe quelle autre pièce de cet appareil dans l'eau ou autres liquides.
7. Toujours débrancher la prise lorsque l'appareil n'est pas en fonction et ce,
avant de retirer les pièces et le nettoyage. Laisser l'appareil refroidir avant
de remettre ou de retirer les pièces et avant de faire le nettoyage.
8. Ne pas utiliser l'appareil ayant un cordon d'alimentation ou une che
électrique endommagée, ni suivant un mauvais fonctionnement ou une
détérioration quelconque. Retournez-le à l’atelier de réparation le plus
proche pour une vérication, une réparation ou un ajustement.
9. Le fabricant ne recommande pas l’utilisation d’accessoires autres que ceux
fournis par le fabricant. L'utilisation d’accessoires peut causer des blessures.
10. N'employez PAS l'appareil à d'autres ns que son usage prévu.
11. NE PAS utiliser l'appareil à l'extérieur. UNIQUEMENT POUR UN USAGE DOMESTIQUE
12. NE PAS placer sur ou près d'un brûleur à gaz ou électrique ou dans un four chaué.
13. NE JAMAIS laisser le cordon d'alimentation dépasser sur le côté d'une
table ou d'un comptoir ou toucher les surfaces chaudes.
14. NE JAMAIS laisser l'appareil sans surveillance tout en cours
d’utilisation ou lorsqu’il est branché sur une prise électrique.
15. Soyez extrêmement prudent pour déplacer un appareil contenant des liquides chauds.
16. Toujours brancher la prise de l’appareil en premier lieu, puis branchez dans la
prise murale électrique par la suite. Pour débrancher l’appareil, remettre tous les
boutons en mode « arrêt » (o), puis débranchez la che de la prise murale.
PRÉCAUTIONS IMPORTANTES ADDITIONNEL
Instructions et précautions de sécurité
1. NE JAMAIS mettre les doigts ou des ustensiles en plastiques dans le mélange chaud.
2. Garder les mains et le visage loin de l'ouverture du pot.
3. Pendant l'utilisation, l'appareil devient très chaud et reste chaud
pendant un certain temps, même après avoir été mis hors tension. NE
PAS toucher les surfaces chaudes comme la base chauante.
FRANÇAIS
26
26
Page 29

4. De la vapeur pourrait se dégager de l'appareil pendant la cuisson. Pour assurer la sécurité,
évitez tout contact avec la vapeur, car elle est très chaude et peut provoquer des brûlures.
Instructions pour le cordon électrique et la prise
1. Cet appareil possède une che polarisée (une lame est plus large que l'autre). Pour
réduire le risque de choc électrique, cette che est conçue pour s’insérer dans une
prise polarisée d’une seule façon. Si la che ne s’enfonce pas complètement dans la
prise, la brancher dans l’autre sens. Si elle ne s’enfonce toujours pas, contactez un
électricien qualié. Ne pas essayer de modier la che de quelque façon que ce soit.
2. Un court cordon d'alimentation est fourni pour réduire les risques
d'enchevêtrement ou risques de trébucher sur un cordon plus long.
3. Si un cordon d'alimentation amovible ou une rallonge est utilisée :
• Les rallonges peuvent être utilisées avec précautions.
• Les caractéristiques électriques du cordon ou de la rallonge doivent être
au moins supérieures ou égales à la puissance nominale de l’appareil.
• Lorsque vous utilisez une rallonge ou un cordon plus long, assurez-
vous que le cordon ne pende pas par-dessus un comptoir ou
une table où quelqu'un pourrait le tirer ou trébucher.
4. Le fabricant ne recommande pas l’utilisation de cette machine dans les
pays qui ne supportent pas les tensions de 120V AC, même si un adaptateur
de tension, un transformateur ou un convertisseur est utilisé.
CONSERVEZ CES INSTRUCTIONS!
INTRODUCTION
Félicitations pour votre achat de la NostalgiaMC MACHINE POUR FAIRE DES VERRES À
LIQUEUR ET DES TASSES ! Maintenant vous pouvez faire vos propres verres à liqueur et
moules-prêts-à-remplir ! Ces gâteries comestibles sont parfaites pour faire un assortiment
de desserts impressionnants et rend même une simple occasion en célébration attendue.
Caractéristiques:
• Fabrique 12 verres à liqueur comestibles en une fois
• Parfait pour Jell-OMC, le chocolat, le jus de fruits, les glaces, les bonbons durs et plus !
• Les deux moules en silicone à doubles côtés sont parfaits pour
faire des moules prêts-à-remplir pour verres de liqueur.
• Les moules en silicone sont sans danger pour le congélateur
et le four (résistants à la chaleur jusqu'à 500°F)
• La base chauée fait fondre le chocolat ou réchaue
votre boisson préférée pour votre shooter
• 2 creusets avec becs verseurs faciles à verser
• 4 moules en silicone pour verres de liqueur et moules à glaçons
• L'unité se démonte pour un nettoyage facile
• Moules en silicone va au lave-vaisselle dans le plateau supérieur
FRANÇAIS
27
27
Page 30

PIÈCES ET ASSEMBLAGE
Pièces
Creuset chauant
Moule en silicone pour
Base chauante
Allumée ( | ) / Éteinte (O)
verres à liqueur (4)
Assemblage
Moules à glaçons
s'emboîtant (4)
FRANÇAIS
28
28
Page 31

COMMENT FAIRE FONCTIONNER
Il est maintenant temps de laisser votre créativité briller ! Utiliser ces moules
pour faire des verres à liqueur prêt-à-remplir de Jell-OMC, des bonbons durs, au
chocolat, des bouchées de fruits, des glaces et bien plus ! Vous pouvez également
retourner les moules en silicone pour faire une variété de verres à liqueur prêtsà-manger - comme des glaçons aromatisées ou des suçons glacés délicieux.
Pour plus d’inspiration, consultez la section RECETTES de ce manuel.
REMARQUE : À cause que votre MACHINE POUR FAIRE DES VERRES À
LIQUEUR ET DES TASSES peut être utilisée de diérentes manières, il n’existe
aucune méthode de COMMENT FAIRE FONCTIONNER unique.
1. Trouver une surface plane sèche, résistante à la chaleur, à proximité d'une prise électrique.
2. Assemblez les plateaux en les reliant dans un cercle complet. Placer les
moules sur plateaux. Si vous faites des Jell-OMC, remplissez les bacs à moitié
pleins avec de la glace, puis placez les moules sur les plateaux.
Moule en silicone pour verres à liqueur peut être utilisé de deux manières :
Shooters
Prêts-À-Manger
Coupes
Prêtes-À-Remplir
3. Placez la base chauante au centre des plateaux et placez ensuite le creuset chauant dans
la base chauée.
CONSEILDES PROS : La base chauée peut être utilisée pour faire fondre
les ingrédients, tels que le chocolat ou la fabrication de Jell-OMC.
4. Choisissez votre recette et la préparer selon les directives. (Pour plus
d’inspiration, consultez la section RECETTES de ce manuel).
5. Versez dans les moules en silicone. An d’assurer une base solide pour
vos verres, n’oubliez pas de remplir complètement les moules.
6. Lorsque vous utilisez la base chauée, positionnez l’interrupteur à ALLUMÉ"|" et permettez à
la base de se préchauer pendant 5 à 10 minutes. NE PAS dépasser la capacité maximale
du creuset, qui est environ 1 tasse. Lorsque vous avez terminé de la base chauante,
positionnez l’interrupteur sur ÉTEINT "O" et débranchez l’appareil.
De la vapeur pourrait se dégager de la nourriture pendant la cuisson ! Pour assurer la
sécurité, évitez tout contact avec la vapeur, car elle est très chaude et peut provoquer des
brûlures.
7. Laissez la recette ger. Selon la recette choisie, les moules en silicone peuvent être placés au
réfrigérateur ou au congélateur et sont sécuritaires au four.
FRANÇAIS
REMARQUE : Les plateaux NE PEUVENT PAS être mis au four.
29
29
Page 32

8. Une fois que la recette a gée, enlevez soigneusement le verre à liqueur des moules.
CONSEIL DE PRO : Selon votre recette, enlever le produit gé du moule peut
être dicile ou complexe. An de facilement retirer le verre à liqueur du moule
en silicone, tirez le moule vers l'extérieur du verre gé en relâchant le sceau gé.
Puis poussez à partir du fond du verre gé, en inversant le moule à l'envers.
9. Remplissez et décorez votre tasse avant de servir. Essayez de remplir de
pouding, de crème à fouetter, de jus, ou de boisson alcoolisée !
CONSEILS UTILES
NE JAMAIS laisser l'appareil sans surveillance pendant qu'il est en marche.
Pour créer une base plane pour vos verres à liqueurs ou shooters, soyez sûr de garder
l'appareil sur une surface plane et au niveau durant que la recette gèle, cuit ou ge.
La base chauante peut être utilisée pour faire fondre les ingrédients,
tels que le chocolat ou la fabrication de Jell-O
Les cubes de glace dans les plateaux emboîtables atteignent la bonne température
pour que la gélatine durcisse. Les plateaux et les moules peuvent également
être placés dans le réfrigérateur pour que le liquide ge plus rapidement.
MC
.
NETTOYAGE ET ENTRETIEN
Veuillez entretenir votre MACHINE EDIBLE SHOT MAKER en
suivant ces simples directives et précautions.
• Déconnectez de la prise électrique en débranchant l'appareil.
• Assurez-vous que l'appareil soit complètement refroidi avant le nettoyage.
• Enlevez toutes les parties de la base chauante.
• Jetez le reste de mélange dans un sac ou dans la poubelle. Il est
déconseillé de jeter le reste du mélange dans l'évier.
• Lavez les pots, les moules et les plateaux à la main à l'eau
chaude savonneuse à l'aide d'un chion non abrasif.
• Asséchez complètement avec un chion doux, non abrasif.
• Essuyez la base chauante à l'aide d'un chion non abrasif. Veillez à ne pas
submergez la base chauante dans l’eau car celle-ci pourrait ne plus fonctionner.
• NE PAS mettre de pièces au lave-vaisselle sauf les moules en silicone. Les
moules en silicone peuvent être mis au lave-vaisselle si désiré.
• NE JAMAIS submerger la base chauante ou le cordon d'alimentation dans l'eau.
FRANÇAIS
30
30
Page 33

RECETTES
Faire de délicieux verres à liqueur comestibles est devenu encore plus plaisant !
Essayez de congeler de l'eau ou votre boisson préférée afin de faire des shooters très
froids, puis remplissez-les avec du jus ou une liqueur alcoolisée. Ou encore essayez
de la gélatine, du chocolat, du fromage ou des bonbons durs puis remplissez-les
de pouding ou de la crème fouettée afin de créer des gâteries uniques pour les
fêtes ! Que vous cherchiez à préparer des apéritifs impressionnants ou des gâteries
adorables pour des fêtes d'enfants, votre imagination sera votre meilleur atout !
Moule en silicone pour verres à liqueur peut être utilisé de deux manières :
Shooters
Prêts-À-Manger
Capacité de remplissage du moule:
Environ 1¾tasses font 12
tireurs prêtsàmanger
Coupes
Prêtes-À-Remplir
Capacité de remplissage du moule:
Environ 1¼tasses font 12 coupes
prêtes-à-remplir
Gommeux tasses comestibles
• 1 paquet Jell-O
de dessert
gélatine (3 on.)
• 5 (0,25 on.) paquets
de gélatine
sans saveur
• tasse d'eau
MC
Assemblez les plateaux en les connectant en cercle,
puis remplissez les plateaux à ½ pleins de glace. Mettre
les moules au-dessus des plateaux remplis de glace.
Mélangez la gélatine aromatisée ou non
dans un cul-de-poule moyen.
Portez à ébullition ½ tasse d’eau, puis ajoutez-la au
mélange. Remuez la gélatine jusqu'à ce qu'elle soit
complètement dissoute. Ajoutez ½ tasse d'eau froide
et remuez jusqu'à ce que le tout soit homogène.
Versez soigneusement le mélange dans
les verres à liqueur et laissez ger.
Pour des résultats plus rapides, placez les
moules au réfrigérateur an qu'ils gent.
Une fois gés, enlevez les verres à liqueur des moules
puis remplissez-les avec de la crème fouettée ou
du jus, voire votre liqueur alcoolisée préférée.
FRANÇAIS
31
31
Page 34

Gobelets comestibles au chocolat
• 2 livres sac de
chocolat fondant
Verres à glace
Pour les verres à liqueur :
• Environ 1 tasse d’eau
• Fruits tranchés
(fraises, citron
vert, etc.)
Assemblez les plateaux en les reliant dans un
cercle complet. Placer les moules sur plateaux.
Ajouter les gaufrettes au chocolat fondant dans un bol
moyen, puis mettre au micro-ondes pendant 1 minute.
Incorporer le chocolat, puis mettre au micro-ondes environ
1 minute ou jusqu'à ce qu'il soit complètement fondu.
Versez soigneusement le pouding dans les moules
de verre à liqueur, puis placez-les au congélateur.
Une fois congelés, enlevez soigneusement
les verres à liqueur des moules.
Au moment de servir, remplir de glaçage, de
mousse ou même de lait au chocolat.
Assemblez les plateaux en les reliant dans un
cercle complet. Placer les moules sur plateaux.
Remplissez chacun des moules de
verres à liqueur à moitié d'eau.
Ajouter les tranches de fruits autour des moules.
Rajoutez de l'eau jusqu'au rebord du moule
puis placez les moules au congélateur.
Au moment de servir, remplissez de liqueur ou de jus.
FRANÇAIS
32
32
Page 35

Verres à bonbons durs
• 1 sac (environ
96 bonbons)
Multicolores
bonbons durs
Mâcher des fruits comestibles tasses de bonbons
• 14 onces sac de
bonbons à mâcher
aux fruits
Préchauez le four à 190°C (375°F).
Déballez les bonbons durs. Placez dans un sac
de rangement en plastique et sceller le sac.
Posez le sac sur une planche à découper et frappez le sac
d'un marteau, un rouleau à pâtisserie ou un attendrisseur à
viande, jusqu'à ce que le bonbon soit écrasé susamment
nement pour pouvoir être mis dans les moules. Un
coup léger est généralement tout ce qui est nécessaire.
Facultatif : Pour faire des couches colorées
de bonbons, séparez les bonbons selon leur
couleur avant d’écraser les bonbons.
Ajoutez les bonbons écrasés aux moules en silicone.
Placez les moules sur une lèchefrite et mettezle au four pour cuire les bonbons jusqu'à ce
qu'ils soient fondus, environ 10 minutes.
Laissez refroidir les verres à liqueur complètement
avant de les retirer des moules.
Préchauez le four à 190°C (375°F).
Déballer les bonbons à mâcher aux fruits.
Ajouter les fruits à mâcher aux moules en
silicone. Be sure to ll molds completely.
Placez les moules sur une lèchefrite et mettezle au four pour cuire les bonbons jusqu'à ce
qu'ils soient fondus, environ 10 minutes.
Laissez refroidir les verres à liqueur complètement
avant de les retirer des moules.
Tasses comestibles caramel
• 11 oz. bag caramel
candies
FRANÇAIS
33
33
Préchauez le four à 190°C (375°F).
Déballer les bonbons au caramel.
Ajouter les caramels aux moules en silicone. If
needed, cut the caramels into smaller pieces to better
t the molds. Be sure to ll molds completely.
Placez les moules sur une lèchefrite et mettezle au four pour cuire les bonbons jusqu'à ce
qu'ils soient fondus, environ 10 minutes.
Laissez refroidir les verres à liqueur complètement
avant de les retirer des moules.
Page 36

Shooter à la purée de fraises et champagne
• 2 tasses de fraises
fraîches ou congelées
non sucrées
• ¼ tasse de sucre
blanc granulé
• Jus de citron
fraîchement pressé
(facultatif)
• Champagne
Glaçons à la vanille
• 2 tasses de lait
d'amande
• ⁄ tasse de sucre
blanc granulé
• 1 gousse de vanille
• 1 c. à thé vanille
(facultatif)
Assemblez les plateaux en les reliant dans un
cercle complet. Placer les moules sur plateaux.
Si vous utilisez les fraises congelées, placez-les dans
un grand bol et décongelez complètement.
Équeutez les fraises, puis placez les fraises et leur jus
dans un robot culinaire ou un mélangeur. Mélangez
jusqu'à ce que les fruits rouges soient en purée.
Versez la purée dans une tasse à
mesurer de 480 ml (2 tasses).
Ajoutez le sucre à la purée et brassez
jusqu'à ce que le sucre soit dissout.
Si désiré, ajoutez le jus de citron à la purée.
Versez le mélange soigneusement dans les verres
à liqueur et gez au congélateur pour 3 heures
ou jusqu'à ce que la purée soit congelée.
Lorsque vous êtes prêt à servir, retirez délicatement les
verres des moules et remplissez-les avec du champagne.
Mélangez le lait d’amandes et le sucre dans une grande
casserole. Coupez la gousse de vanille dans le sens de
la longueur et grattez l’intérieur dans la casserole, puis
mettez la gousse vidée dans le mélange également.
Amenez le mélange à mijoter (frémir) à feu moyen,
en fouettant pour briser les morceaux de vanille.
Lorsque le mélange frémit, réduisez la chaleur
du rond à faible et cuire 10 minutes de plus,
en fouettant de temps en temps.
Laissez le mélange tiédir à la température de la
pièce. Passez le mélange au travers une passoire
ne (chinois) dans un cul-de-poule, puis versez avec
précaution dans le côté cylindrique du moule.
Congelez jusqu'à complète solide.
Servir avec du café, du thé ou autres boissons.
FRANÇAIS
34
34
Page 37

Verres de liqueur à la Margarita
• ½ tasses de jus
d’orange frais
• 3 c. à soupe de
jus de lime
• ½ tasse de sucre
• 1½ tasses de glaçons
• 1 lime, coupée
en deux
• Tequila (facultatif)
• Sel (si nécessaire)
Verres à bonbons durs
• 1 sac (environ
96 bonbons)
Multicolores
bonbons durs
Ajoutez le jus d'orange frais, le jus de lime
et le sucre dans un mélangeur.
Assemblez les plateaux en les reliant dans un
cercle complet. Placer les moules sur plateaux.
Ajoutez la glace et mélangez jusqu'à ce que le mélange soit
comme une barbotine. Versez la barbotine dans les moules
de verres à liqueur et gez jusqu'à congélation complète.
Une fois congelés, enlevez soigneusement
les verres à liqueur des moules. Enduisez le
rebord des verres à liqueur avec du sel.
Versez la tequila dans le verre à liqueur juste avant de servir.
Préchauez le four à 190°C (375°F).
Déballez les bonbons durs. Placez dans un sac
de rangement en plastique et sceller le sac.
Posez le sac sur une planche à découper et frappez le sac
d'un marteau, un rouleau à pâtisserie ou un attendrisseur à
viande, jusqu'à ce que le bonbon soit écrasé susamment
nement pour pouvoir être mis dans les moules. Un
coup léger est généralement tout ce qui est nécessaire.
Facultatif : Pour faire des couches colorées
de bonbons, séparez les bonbons selon leur
couleur avant d’écraser les bonbons.
Ajoutez les bonbons écrasés aux moules en silicone.
Placez les moules sur une lèchefrite et mettezle au four pour cuire les bonbons jusqu'à ce
qu'ils soient fondus, environ 10 minutes.
Laissez refroidir les verres à liqueur complètement
avant de les retirer des moules
FRANÇAIS
35
35
Page 38

RETOURS ET GARANTIE
SI VOTRE APPAREIL NE FONCTIONNE PAS OU S'IL EST ENDOMMAGÉ QUAND VOUS LE RETIREZ
DE LA BOÎTE, VEUILLEZ LE RETOURNER IMMÉDIATEMENT À L'ENDROIT OÙ IL A ÉTÉ ACHETÉ.
MACHINE POUR FAIRE DES VERRES À LIQUEUR ET DES TASSES / SM12
Pour toute question, communiquer par courriel ou au numéro de téléphone du service à
la clientèle, entre 08 h 00 et 17 h 00, du lundi au vendredi, heure normale du Centre.
Distribué par :
Nostalgia Products LLC
1471 Partnership Dr.
Green Bay, WI 54304-5685
Service à la clientèle
Téléphone : (920) 347-9122
Site Web : www.nostalgiaproducts.com
Demande pour le service à la clientèle
Pour soumettre une demande au service à la clientèle, rendez vous au www.nostalgiaproducts.com puis
remplissez le formulaire de demande au service à la clientèle puis cliquez sur le bouton Soumettre.
Un représentant vous contactera dès que possible.
Conditions de garantie du produit
Le groupe Nostalgia Products LLC (référé tel « l’Entreprise ») garantit que pour une période d’un
(1) an en date d’achat, ce produit est sans défaut de matériel et de fabrication selon une utilisation
normale à domicile, seulement si le fonctionnement et l’entretien du produit sont conforment aux
directives fournies. À titre de réparation exclusive et entière sous cette garantie, l’Entreprise pourra
à sa discrétion, réparer ou remplacer le produit défectueux, voire émettre un remboursement du
produit durant la période couverte sous garantie. Cette garantie n’est disponible seulement qu’à
l’acheteur d’origine du produit, en date d’achat au détail dudit produit et sera valide uniquement
avec le reçu de caisse d’origine, à titre de preuve d’achat, lequel est requis pour obtenir les bienfaits
reliés à cette garantie. Toute réclamation doit être rapportée à l’attention de l’Entreprise dans la
fenêtre de la période de la garantie, sans dépasser 30 jours à défaut de performance. Cette garantie
ne couvre pas l’usure normale ou dommage cause par l'expédition, la mauvaise manipulation, la
mauvaise utilisation, les accidents, les modications, les mauvaises pièces de remplacement, voire
toute autre utilisation anormale du produit à domicile. Il est possible que vous ayez à retourner le
produit (avec les frais de retour prépayés par vous) pour une inspection et une évaluation. Les frais
des coûts de retour ne sont pas remboursables. L'Entreprise n’est aucunement responsable pour les
retours endommagés ou perdus en transit. Autrement que spéciquement permit selon les directives
de fonctionnement, cette garantie s’applique à une utilisation à domicile à d'intérieur seulement.
An d'obtenir un service couvert sous cette garantie, veuillez contacter l'Entreprise au numéro de
téléphone inclut ci-haut ou en remplissant le formulaire de demande au service à la clientele, sur le
site www.nostalgiaproducts.com. La garantie est valide seulement aux États-Unis et au Canada.
Cette garantie prévaut toute autre garantie, expresse ou implicite incluant les garanties de qualité
marchande ou ayant une aptitude pour une intention en particulier, lesquelles sont exclues selon la
loi. Sous aucun prétexte l’Entreprise ne pourra être tenue responsable pour tout dommage indirect,
accidentel, conséquentiel ou spécial provenant de ou en relativité avec ce produit ou son utilisation.
Certains états, provinces ou juridictions n'allouent pas l'exclusion ou la limitation de tels dommages
accidentels ou conséquentiels, donc l'exclusion ou limitation suscitée peut ne pas s'appliquer à vous.
Cette garantie ne s’applique pas à la merchandise de renaissance.
Veuillez lire les directives de fonctionnement attentivement. Ne pas se
conformer aux directives de fonctionnement annulera cette garantie.
Pour plus d’informations, visitez notre site Web à www.nostalgiaproducts.com.
Aimez-nous sur Facebook à l’adresse www.facebook.com / NostalgiaElectrics.
Suivez nos conseils sur Pinterest à www.pinterest.com / nostalgiaelctrx.
Tweet avec nous sur Twitter à l’adresse www.twitter.com / NostalgiaElctrx.
FRANÇAIS
36
36
Page 39

 Loading...