

Page 1

All products are trademarks of Nostalgia Products Group, LLC.
Worldwide design & utility patented or patents pending.
© 2012 Nostalgia Products Group, LLC.
2013
www.nostalgiaelectrics.com
(rev. 04/25/13)
Page 2
SERIES
RWT500
Automatic Window Toaster
Instruction Manual
Page 3

Page 4
Make every day a party!
Visit www.nostalgiaelectrics.com for more fun products.
CONTENTS
IMPORTANT PRECAUTIONS . . . . . . . . . . . . . . . . . . . . . . . . . . . . . 3
IMPORTANT SAFEGUARDS . . . . . . . . . . . . . . . . . . . . . . . . . . . . . 3
INTRODUCTION . . . . . . . . . . . . . . . . . . . . . . . . . . . . . . . . . . . . 4
PARTS & ASSEMBLY . . . . . . . . . . . . . . . . . . . . . . . . . . . . . . . . . . 5
HOW TO OPERATE . . . . . . . . . . . . . . . . . . . . . . . . . . . . . . . . . . 6
HELPFUL TIPS . . . . . . . . . . . . . . . . . . . . . . . . . . . . . . . . . . . . . 7
CLEANING & MAINTENANCE . . . . . . . . . . . . . . . . . . . . . . . . . . . . 7
RETURNS & WARRANTY . . . . . . . . . . . . . . . . . . . . . . . . . . . . . . . 8
SAFETY
ENGLISH
Your safety and the safety of others is very important.
We have provided many important safety messages in this manual and
on your appliance. Always read and obey all safety messages.
This is the safety alert symbol.
This symbol alerts you to potential hazards that
can kill or hurt you and others.
All safety messages will follow the safety alert symbol.
All safety messages will tell you what the potential hazard is, tell you how to reduce the
chance of injury, and tell you what can happen if the instructions are not followed.
Appliance Specications:
120 Volts, 60 Hertz
750 Watts, ETL Approved
2
Page 5

IMPORTANT PRECAUTIONS
1. NEVER immerse appliance in water.
2. NEVER use near water.
3. NEVER use an abrasive sponge or cloth on the appliance.
4. NEVER leave appliance unattended while in use.
ENGLISH
5. NEVER place anything other than what is being cooked in or on the appliance.
6. Unplug unit from outlet when not in use and during cleaning.
7. DO NOT operate this appliance with a damaged cord or
plug, nor if the appliance ever malfunctions.
8. DO NOT place appliance in a dishwasher.
9. Keep out of reach of children.
10. This appliance is NOT A TOY.
11. Unsupervised young children and cognitively challenged
individuals should never operate this appliance.
12. Young children should be supervised while in proximity of the
appliance to ensure that they do not play with it.
IMPORTANT SAFEGUARDS
Basic safety precautions should always be followed when using
electrical appliances, including the following:
1. Read all instructions before operating this appliance.
2. To protect against electrical shock do not immerse cord, plug or
any part of this appliance in water or other liquids.
3. Close supervision is necessary when any appliance is used near children.
4. Unplug from outlet when not in use, before removing parts and
before cleaning. Allow to cool before cleaning or handling.
5. DO NOT operate any appliance with a damaged cord or plug, nor if
the appliance has been damaged in any manner. Return the appliance
to the nearest repair shop for examination or repair.
6. The manufacturer does not recommend the use of accessory
attachments. Use of accessory attachments may cause injuries.
7. DO NOT use outdoors. FOR HOUSEHOLD USE ONLY.
8. DO NOT place on or near a hot gas or electric burner, nor in a heated oven.
9. DO NOT use the appliance for other than its intended use.
10. DO NOT touch hot surfaces.
11. DO NOT touch the toaster when in use, except the control buttons.
12. DO NOT cover toaster with or allow toaster to touch ammable materials, such as
curtains, draperies or walls when in operation. Do not operate under wall cabinets.
3
Page 6
13. This appliance includes a heating function. Surfaces, other than the functional
controls may develop high temperatures. Since temperatures are perceived
dierently by dierent people, this device should be used with CAUTION. Hold the
appliance exclusively to grip surfaces intended to hold and use such heat protection
measures as heat protection gloves or pot holders. Areas that are not intended to grip must
be given sucient time to cool.
14. An appliance that is plugged into an outlet should not be left unattended while in operation.
15. Check appliance for presence of foreign objects prior to use.
16. DO NOT attempt to stick any utensils or other objects into
the toaster while appliance is plugged in.
17. DO NOT attempt to dislodge food when the toaster is plugged into an electrical outlet.
18. DO NOT insert oversize foods, metal foil packages or utensils in the toaster, as this
may result in re or electrical shock.
19. A short power supply cord is provided to reduce the risk resulting
from becoming entangled or tripping over a long cord.
20. Longer detachable power supply cords can be used if care is exercised in their use.
21. The marked electrical rating of an extension cord should be at
least as great as the electrical rating of the appliance.
22. DO NOT let cord hang over the edge of table or countertop, or touch hot surfaces.
23. This appliance has a polarized plug (one blade is wider than the other). To reduce the
risk of electrical shock, this plug is intended to t into a polarized outlet only one way.
If the plug does not t fully into the outlet, reverse the plug. If it still does not t,
contact a qualied electrician. Do not attempt to modify the plug in any way.
SAVE THESE INSTRUCTIONS!
ENGLISH
INTRODUCTION
Thank you for purchasing the AUTOMATIC WINDOW TOASTER from Nostalgia Electrics™!
Its revolutionary, lever-free design lowers and raises toast with the push of a button.
Also, you can watch your bread and bagels brown to perfection through the windows
on the sides of the unit. It has two slots for toasting bread, buns, bagels and more.
With the AUTOMATIC WINDOW TOASTER, making toast has never been more fun!
Features include:
• Easy-view window allows you to watch the toasting action
• Lever-free design lowers and raises toast with the push of a button
• ON/OFF and stop toasting buttons
• Adjustable browning control
• Two extra-wide slots ideal for bagels and thick bread
• Removable slide out crumb tray
• Cord wraps around brackets on bottom of unit
• Slot width adjustor
4
Page 7
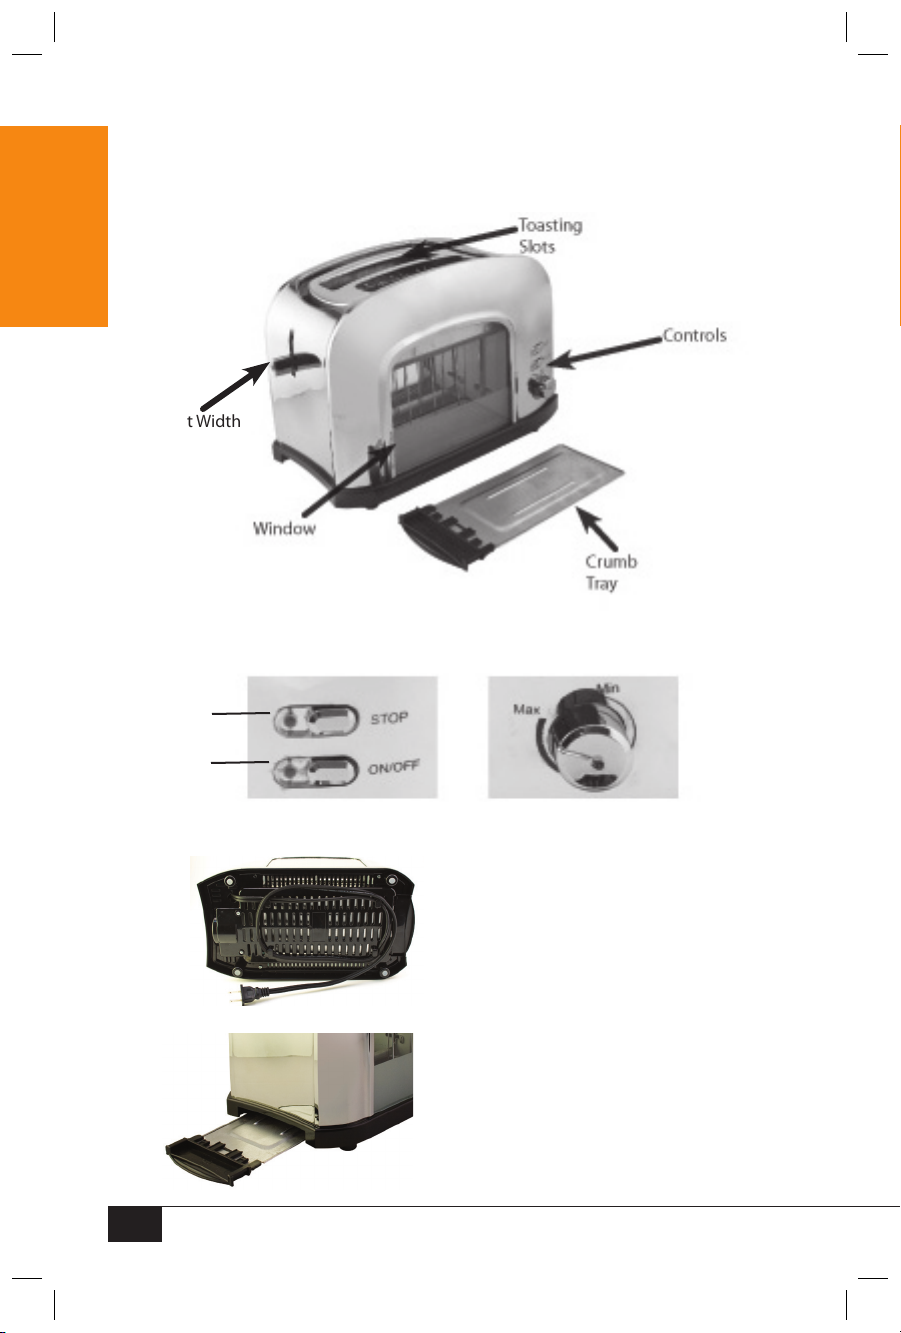
PARTS & ASSEMBLY
PARTS
Your AUTOMATIC WINDOW TOASTER is fully assembled.
ENGLISH
Slot Width
Adjustor
CONTROLS
Min / Max:
STOP / ON/OFF Light to Dark adjustable toasting setting
Stop
Heat
Light
Power
On Light
CORD LOCATION
Cord wraps around brackets underneath the unit.
CRUMB TRAY
5
Page 8

HOW TO OPERATE
• Place the AUTOMATIC WINDOW TOASTER on a stable surface
near an electrical outlet before starting.
• Always make sure that the cord is away from any water source.
• Ensure there is nothing blocking and there are no foreign objects inside the toaster slots.
• Plug the appliance into an electrical socket.
• Once plugged in, the Stop Heat and Power On Lights will ash
twice. That indicates the toaster is in standby mode.
• Before use, adjust the Slot Width Adjustor according to the bread slice thickness.
For best results, use bread slices of even thickness, size and freshness.
• Place two pieces of bread into openings in the Toaster. Do not operate
AUTOMATIC WINDOW TOASTER without at least one piece of bread in place.
• Select desired heat setting (Min to Max). Min is light. Max is dark.
• Press ON to start toasting cycle and lower bread into the toaster.
• When cooking has completed, the bread will automatically
rise up. Unit and Power On Light will turn o.
• To shorten the cooking time, simply turn the heat control knob to a lighter setting.
• To stop cooking before cycle has completed, press the STOP button.
• Unplug the appliance and allow unit to cool completely.
• After unit is cool to the touch, remove the Crumb Tray and follow
directions in Cleaning and Maintenance section to clean unit.
• After cleaning, return Crumb Tray to the toaster and store your
AUTOMATIC WINDOW TOASTER in a safe place until next use.
By following these simple instructions, your AUTOMATIC WINDOW
TOASTER will be a great addition to any home kitchen!
ENGLISH
6
Page 9
HELPFUL TIPS
NEVER leave the unit unattended while operating.
Smoking/Burning
During rst use, you may notice slight smoking or a slight odor; this is normal with most
ENGLISH
new appliances. The rst time you use the toaster, you should do so without bread. This
will pre-heat the new element and burn o any dust collected during the storage process.
If the machine is burning or smoking during cooking, press
the STOP button to end the toasting cycle.
Smoking may also be caused by excess crumbs stuck inside the machine. To
prevent smoking, make sure to empty and clean the Crumb Tray weekly.
Toasting
THE AUTOMATIC WINDOW TOASTER is designed to use only two pieces of
bread at a time. DO NOT force bread into toasting slots. Heating may cause
large pieces of bread like bagels to swell and get stuck in the toaster.
If a bagel or bread is stuck inside of toaster, let cool for so it
contracts and can be easily removed. ALWAYS unplug toaster before
attempting to dislodge bread or bagels from Toasting Slots.
All pieces of bread are not the same; therefore you will need to adjust
the variable heat controller accordingly. Room temperature bread will
cook more quickly than bread just removed from the refrigerator.
CLEANING & MAINTENANCE
Make sure the unit is unplugged before cleaning. Allow all parts to COOL to the touch.
To prolong the life of your AUTOMATIC WINDOW TOASTER, please follow these
simple instructions for maintenance. Never place the appliance in a dishwasher.
• Make sure the AUTOMATIC WINDOW TOASTER is completely
cooled and unplugged before storing or cleaning.
• Do not try to remove bread if it gets jammed inside the Toasting Slots
without rst unplugging the AUTOMATIC WINDOW TOASTER.
• Clean outer surface of the AUTOMATIC WINDOW TOASTER with a soft damp cloth when
it is unplugged and completely cooled. Do not use abrasive cleaning products.
• Once a week when toaster is completely cool, remove the Crumb Tray and empty crumbs
into trash. Wipe with a damp, non-abrasive cloth and dry thoroughly. Replace crumb tray.
• DO NOT hold the toaster upside down and shake to remove
crumbs. Do not insert metal objects inside the toaster.
• DO NOT use any sharp or pointed articles for cleaning the
inside as this will damage the heating element.
• NEVER put metal objects or your ngers into the toasting slots.
7
Page 10

RETURNS & WARRANTY
SHOULD YOUR UNIT NOT WORK OR IF DAMAGED WHEN YOU FIRST TAKE IT OUT
OF THE BOX, PLEASE RETURN IT TO THE PLACE OF PURCHASE IMMEDIATELY.
AUTOMATIC WINDOW TOASTER / RWT500 SERIES
Should you have any questions, please contact us via email or at the
customer service number listed below between the hours of 8:00 AM
and 5:00 PM, Monday through Friday, Central Standard Time.
Distributed by:
Nostalgia Products Group LLC
1471 Partnership Dr.
Green Bay, WI 54304-5685
Customer Service
Phone: (920) 347-9122
Web: www.nostalgiaelectrics.com
Customer Service Inquiry
To submit a Customer Service inquiry, go to www.nostalgiaelectrics.com and
ll out the Customer Service Inquiry form and click the Submit button.
A representative will contact you as soon as possible.
This appliance is designed and built to provide many years of satisfactory performance
under normal household use. The distributor pledges to the original owner that
should there be any defects in material or workmanship during the rst 90 days of
purchase, we will repair or replace the unit at our option. Our pledge does not apply
to damages caused by shipping, mishandling or unit being dropped. A product
deemed defective either from manufacturing or being mishandled is up to the
distributor’s discretion. In order to obtain service under this warranty, please contact
Nostalgia Products Group, LLC at the telephone number listed above or by lling
out the Customer Service Inquiry Form located at www.nostalgiaelectrics.com.
This warranty does not apply to re-manufactured merchandise.
Please read these instructions carefully. Failure to comply with these instructions,
damages caused by improper replacement parts, abuse or misuse will void this
pledge to you and is being made in place of all other expressed warranties.
For more information, visit us online at www.nostalgiaelectrics.com.
Like us on Facebook at www.facebook.com/NostalgiaElectrics.
Follow our boards on Pinterest at www.pinterest.com/nostalgiaelctrx.
Tweet along with us on Twitter at www.twitter.com/NostalgiaElctrx.
ENGLISH
8
 Loading...