

Page 1

All products are trademarks of Nostalgia Products LLC.
Worldwide design & utility patented or patents pending.
© 2015 Nostalgia Products LLC.
www.nostalgiaproducts.com
(rev. 06/24/15)
2015
Page 2
PT30 0RETRORED
'50s-Style Electric Twister & Peeler
Couteau Éplucheur À Torsion Électrique du Style des Années 50
Eléctrico Twister y Peeler en Estilo de 50s
Instructions and Recipes
Consignes et Recettes
Instrucciones y Recetas
Page 3

Page 4
ENGLISH
2
Make everyday a party!
Visit www.nostalgiaproducts.com for more fun products.
CONTENTS
IMPORTANT PRECAUTIONS . . . . . . . . . . . . . . . . . . . . . . . . . . . . . 3
IMPORTANT SAFEGUARDS . . . . . . . . . . . . . . . . . . . . . . . . . . . . . 3
INTRODUCTION . . . . . . . . . . . . . . . . . . . . . . . . . . . . . . . . . . . . 4
PARTS & ASSEMBLY . . . . . . . . . . . . . . . . . . . . . . . . . . . . . . . . . . 5
HOW TO OPERATE . . . . . . . . . . . . . . . . . . . . . . . . . . . . . . . . . . . 6
HELPFUL TIPS . . . . . . . . . . . . . . . . . . . . . . . . . . . . . . . . . . . . . 9
CLEANING & MAINTENANCE . . . . . . . . . . . . . . . . . . . . . . . . . . . 9
RECIPES . . . . . . . . . . . . . . . . . . . . . . . . . . . . . . . . . . . . . . . . . 10
RETURNS & WARRANTY . . . . . . . . . . . . . . . . . . . . . . . . . . . . . . . 13
SAFETY
Appliance Specications:
120 Volts, 60 Hertz
15 Watts, ETL Approved
THIS PRODUCT IS FOR USE IN 120V AC OUTLET ONLY.
Your safety and the safety of others is very important.
We have provided many important safety messages in this manual and
on your appliance. Always read and obey all safety messages.
This is the safety alert symbol.
This symbol alerts you to potential hazards that
can kill or hurt you and others.
All safety messages will follow the safety alert symbol.
All safety messages will tell you what the potential
hazard is, tell you how to reduce the chance of injury, and tell you
what can happen if the instructions are not followed.
Page 5

ENGLISH
3
IMPORTANT PRECAUTIONS
1. NEVER immerse Motor or plug in water.
2. NEVER use near water.
3. NEVER use an abrasive sponge or cloth on the appliance.
4. NEVER use a scouring pad on the appliance.
5. NEVER leave appliance unattended while in use.
6. Unplug unit from outlet when not in use, before placing
or removing parts and during cleaning.
7. DO NOT operate this appliance with a damaged cord or
plug, nor if the appliance ever malfunctions.
8. DO NOT put in a dishwasher.
9. Blades are EXTREMELY SHARP. Use EXTREME CAUTION when operating this appliance.
10. Keep out of reach of children.
11. This appliance is NOT A TOY.
12. Unsupervised young children and cognitively challenged
individuals should never operate this appliance.
13. Young children should be supervised while in proximity of the
appliance to ensure that they do not play with it.
IMPORTANT SAFEGUARDS
Basic safety precautions should always be followed when using
electrical appliances, including the following:
1. Read all instructions before operating this appliance.
2. Keep hands away from blade mechanism.
3. DO NOT touch moving parts.
4. To protect against electrical shock do not immerse cord,
plug or Motor in water or other liquids.
5. Close supervision is necessary when any appliance is used near children.
6. Unplug from outlet when not in use, before removing parts and before cleaning.
7. DO NOT operate any appliance with a damaged cord or plug, nor if
the appliance has been damaged in any manner. Return the appliance
to the nearest repair shop for examination or repair.
8. The manufacturer does not recommend the use of accessory
attachments. Use of accessory attachments may cause injuries.
9. DO NOT use outdoors.
10. Position the appliance as close to the outlet as possible
to prevent injury due to tripping over cord.
11. DO NOT place on or near a hot gas or electric burner, nor in a heated oven.
Page 6

ENGLISH
4
12. Check appliance for presence of foreign objects prior to use.
13. DO NOT use the appliance for other than its intended use.
14. DO NOT place ngers or utensils into feed or discharge areas.
15. DO NOT press the Drive / Twist button when appliance is not ready to be used.
16. An appliance that is plugged into an outlet should not be left unattended while in operation.
17. A short power supply cord is provided to reduce the risk resulting
from becoming entangled or tripping over a long cord.
18. Longer detachable power supply cords can be used if care is exercised in their use.
19. The marked electrical rating of an extension cord should be at
least as great as the electrical rating of the appliance.
20. This appliance has a polarized plug (one blade is wider than the other). To reduce the
risk of electrical shock, this plug is intended to t into a polarized outlet only one way.
SAVE THESE INSTRUCTIONS!
INTRODUCTION
Thank you for purchasing the '50S-STYLE ELECTRIC TWISTER & PEELER from Nostalgia™!
Now you can easily enjoy a multitude of peeled, spiraled and shredded snacks the whole
family will enjoy. The '50S-STYLE ELECTRIC TWISTER & PEELER's included cutting blades
work great on a variety of vegetables and fruit, so you can enjoy potatoes, apples, zucchini,
and more. Have fun, get creative, and enjoy your '50S-STYLE ELECTRIC TWISTER & PEELER!
Includes:
• Spiral Blade, Small Shredded Blade & Medium Shredded Blade
for perfectly peeled, spiraled and shredded potatoes
• Convenient storage compartment for Cord, Spiral Blade, Small Shredded
Blade, Medium Shredded Blade, Peel Fork & Cut Fork
• 10 bamboo skewers
Page 7
ENGLISH
5
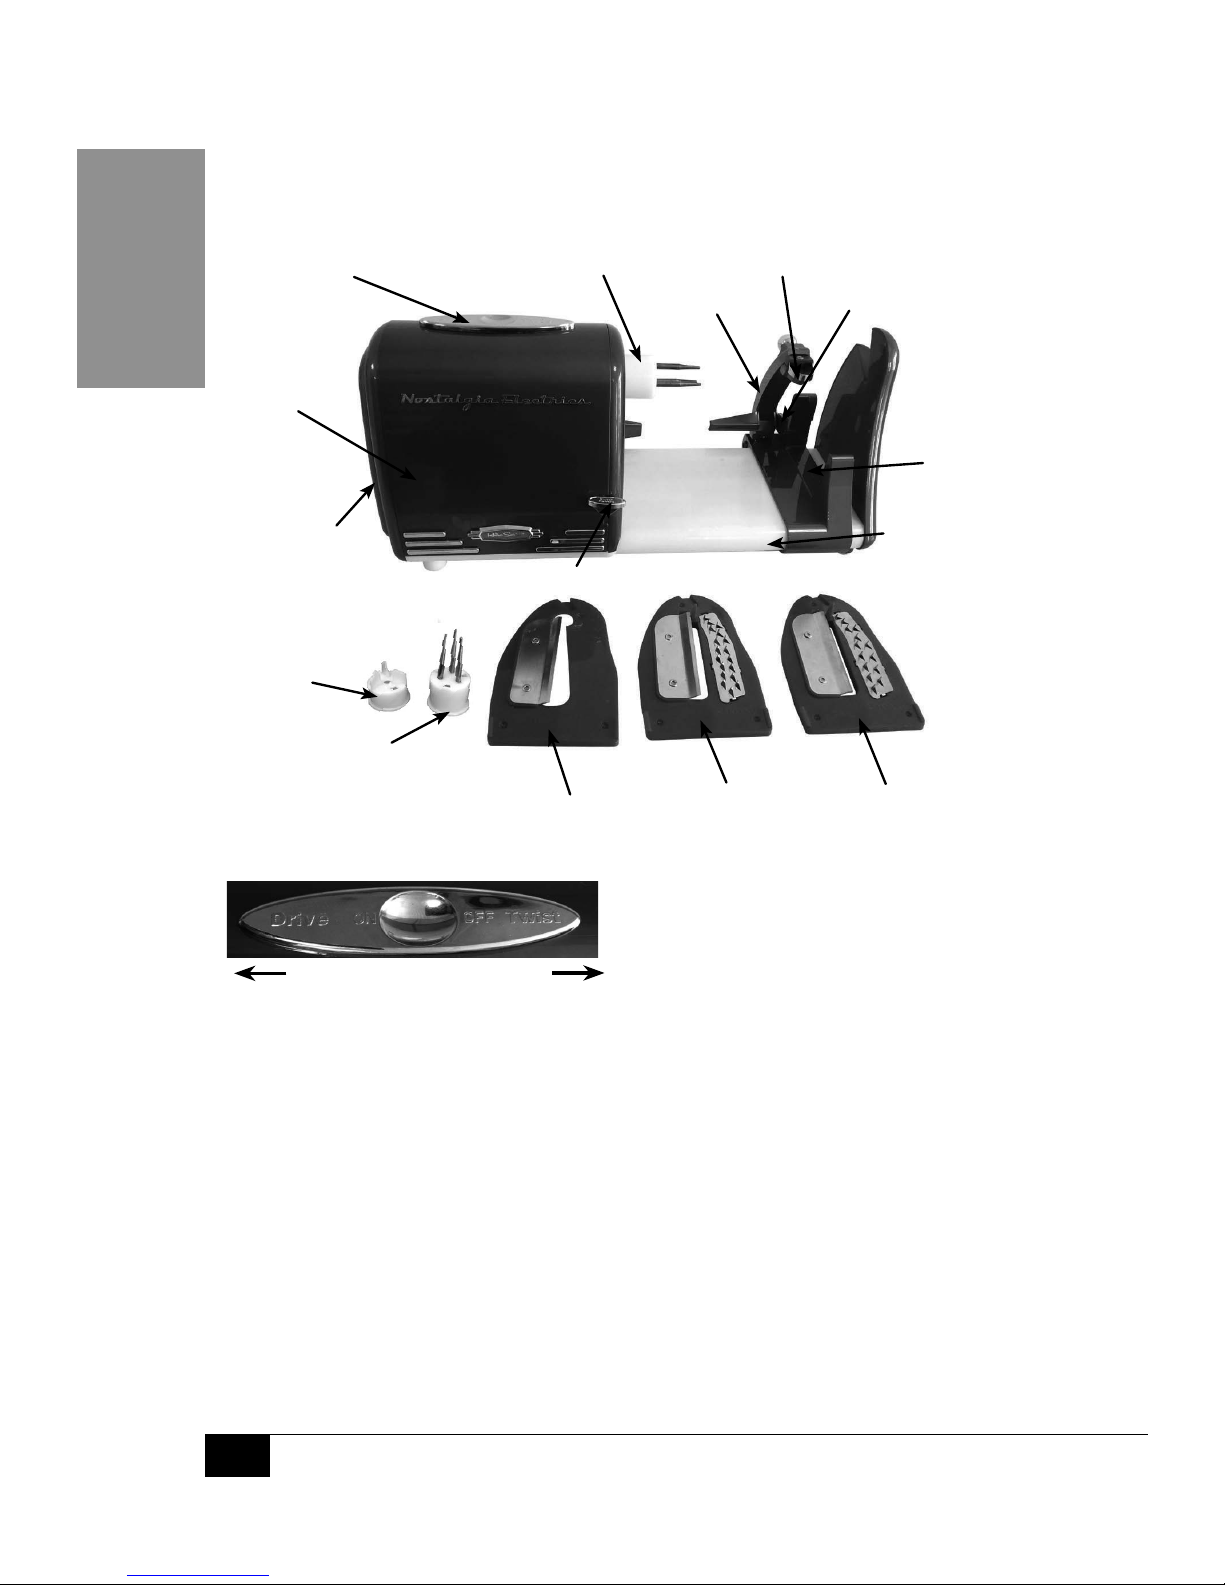
PARTS & ASSEMBLY
PARTS
Power Button
Drive/ON Twist/OFF
ASSEMBLY
Your '50S-STYLE ELECTRIC TWISTER & PEELER comes fully assembled when removed from
the box. The Spiral Blade, Small Shredded Blade, Medium Shredded Blade, Cut Fork, and Peel
Fork will be the only loose parts included, and can be found the Storage Compartment.
Prepare for rst use by thoroughly washing the Spiral Blade, Small Shredded
Blade, Medium Shredded Blade, Cut Fork, and Peel Fork in warm, sudsy water
and dry thoroughly. USE EXTREME CAUTION when handling the Blades
as they are very sharp and may cause injury if used improperly. DO NOT
submerge the Base in water. To clean the Base when needed, use a damp cloth
to wipe the exterior, and then dry o with a clean, non-abrasive towel.
Motor
Housing
Power Button
Storage
Compartment
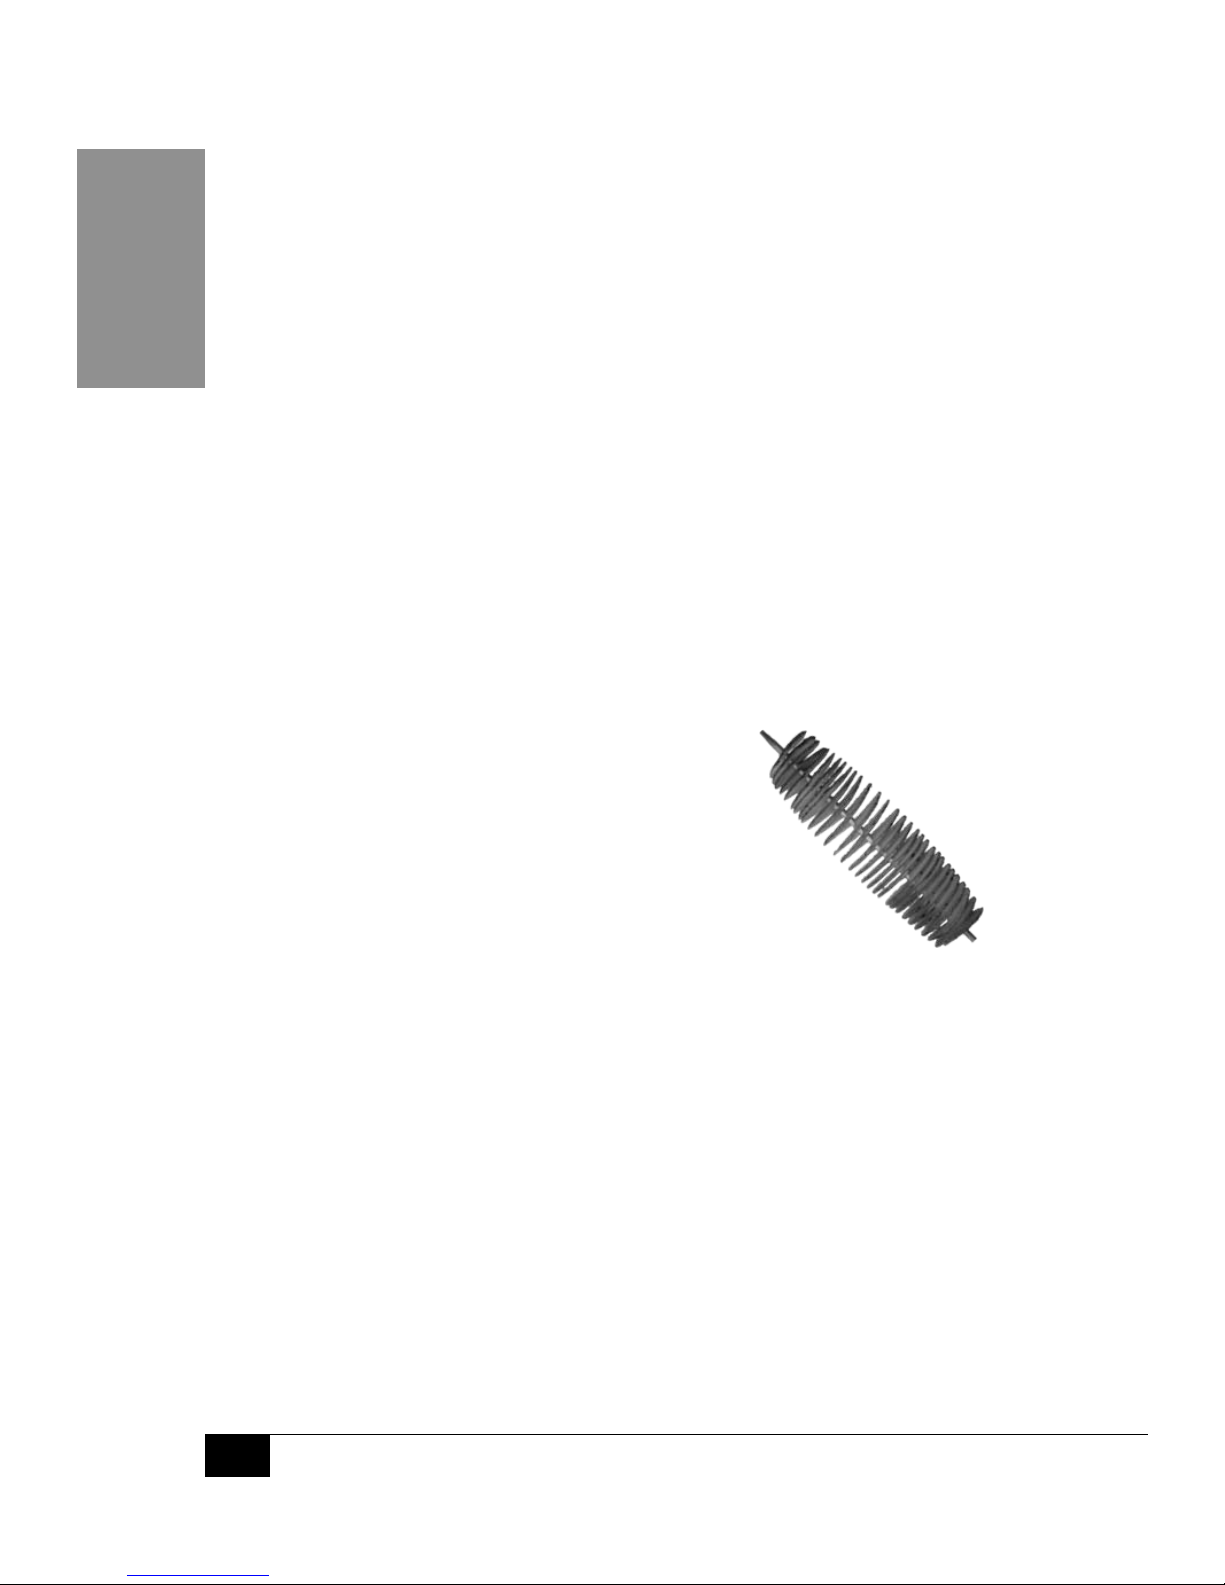
Spiral Blade
Small
Shredded
Blade
Medium
Shredded
Blade
Peeling Blade
Peeling Arm
Peel Fork
Cut Fork
Clutch Release
Blade
Mount
Peeling Arm Release
Base
Fork Mount
Page 8

ENGLISH
6
HOW TO OPERATE
Now that you have cleaned and reassembled your '50S-STYLE ELECTRIC
TWISTER & PEELER, peeling, spiraling and shredding is both easy and fun!
NOTE: Using the correct Cut Fork/Peel Fork and Blade is extremely
important. Incorrect use may damage the appliance.
SHRED
1. To prepare '50S-STYLE ELECTRIC TWISTER & PEELER, hold down Clutch Release
button and move Peeling Arm to end furthest from Fork Mount. Be sure Peeling
Arm Release is in the down position. NOTE: If you want to simultaneously
peel and shred, be sure Peeling Arm Release is in the up position.
2. Attach Cut Fork to Fork Mount by aligning notches on Cut Fork to grooves
on Fork Mount, then twisting the Cut Fork clockwise to secure.
3. Follow section on "ATTACHING BLADES TO BLADE MOUNT" on page 8 to attach
Small Shredded Blade or Medium Shredded Blade to Blade Mount.
4. Press end of potato into center of Cut Fork.
5. When ready to peel, slide the Power Button to Drive/ON and
the Shredded Blade will begin to shred your potato.
6. When done shredding, slide the Power Button to Twist/OFF.
7. Carefully remove remaining potato from '50S-STYLE ELECTRIC TWISTER & PEELER.
8. Repeat steps 1-8 to shred additional potatoes.
9. When done using the '50S-STYLE ELECTRIC TWISTER & PEELER, detach the Cut Fork by
twisting counter-clockwise and pulling away from the Fork Mount.
PEEL
1. To prepare '50S-STYLE ELECTRIC TWISTER & PEELER, hold down Clutch
Release button to slide Peeling Arm to end furthest from Fork Mount.
2. Carefully push end of potato into points of Peel Fork, making sure it is centered.
Next, attach Peel Fork to Fork Mount by aligning notches on Peel Fork to
grooves on Fork Mount. Twist Peel Fork clockwise to secure into place.
3. Move the metal Peeling Arm Release to the up position
so that the Peeling Arm can move freely.
4. When ready to peel, slide the Power Button to Drive/ON and
the Peeling Arm will begin peeling the potato.
5. When done peeling, slide the Power Button to Twist/OFF.
6. Return the Peeling Arm to its starting position and carefully remove the Peel Fork
and peeled potato from the Fork Mount. Slide potato o points of Peel Fork.
7. Repeat steps 1-5 to peel additional potatoes.
8. When done using the '50S-STYLE ELECTRIC TWISTER & PEELER, detach the Peel
Fork by twisting counter-clockwise and pulling away from the Fork Mount.
Page 9
ENGLISH
7
SPIRAL
1. To prepare '50S-STYLE ELECTRIC TWISTER & PEELER, hold down Clutch
Release button and move Peeling Arm to end furthest from Fork
Mount. Be sure Peeling Arm Release is in the down position.
2. Attach Cut Fork to Fork Mount by aligning notches on Cut Fork to grooves
on Fork Mount, then twisting the Cut Fork clockwise to secure.
3. Follow section on "ATTACHING BLADES TO BLADE MOUNT"
on page 8 to attach Spiral Blade to Blade Mount.
4. Press end of potato into center of Cut Fork.
5. When ready to peel, slide the Power Button to Drive/ON and
the Spiral Blade will begin to spiral cut your potato.
6. When done spiral cutting, slide the Power Button to Twist/OFF.
7. Carefully remove remaining potato from Cut Fork and the spiraled
potato from '50S-STYLE ELECTRIC TWISTER & PEELER.
8. Repeat steps 1-8 to spiral additional potatoes.
9. When done using the '50S-STYLE ELECTRIC TWISTER & PEELER, detach the Cut
Fork by twisting counter-clockwise and pulling away from the Fork Mount.
SPIRAL ON A STICK
1. To prepare '50S-STYLE ELECTRIC TWISTER & PEELER, hold down Clutch Release
button and move Peeling Arm to end furthest from Fork Mount. Be sure Peeling
Arm Release is in the down position.
2. Attach Cut Fork to Fork Mount by aligning notches
on Cut Fork to grooves on Fork Mount, then
twisting the Cut Fork clockwise to secure.
3. Follow section on "ATTACHING BLADES TO BLADE MOUNT"
on page 8 to attach Spiral Blade to Blade Mount.
4. Next, carefully pierce center of potato, lengthwise, with
pointed end of Bamboo Skewer. Stop when pointed
end of Bamboo Skewer reaches end of the potato.
5. Thread visible end of Bamboo Skewer through hole near top of Spiral Blade and notch
cutout on top of end panel. Center and press end of potato into center of Cut Fork.
6. When ready to peel, slide the Power Button to Drive/ON and
the Spiral Blade will begin to spiral cut your potato.
7. When done spiral cutting, slide the Power Button to Twist/OFF.
8. Carefully remove potato from '50S-STYLE ELECTRIC TWISTER & PEELER
and evenly fan out potato spirals on Bamboo Skewer.
9. Repeat steps 1-8 to spiral additional potatoes.
10. When done using the '50S-STYLE ELECTRIC TWISTER & PEELER, detach the Cut Fork by
twisting counter-clockwise and pulling away from the Fork Mount.
When nished using '50S-STYLE ELECTRIC TWISTER & PEELER, follow section on "REMOVING
BLADES FROM BLADE MOUNT" on page 8 to remove Blades from Blade Mount.
Page 10
ENGLISH
8
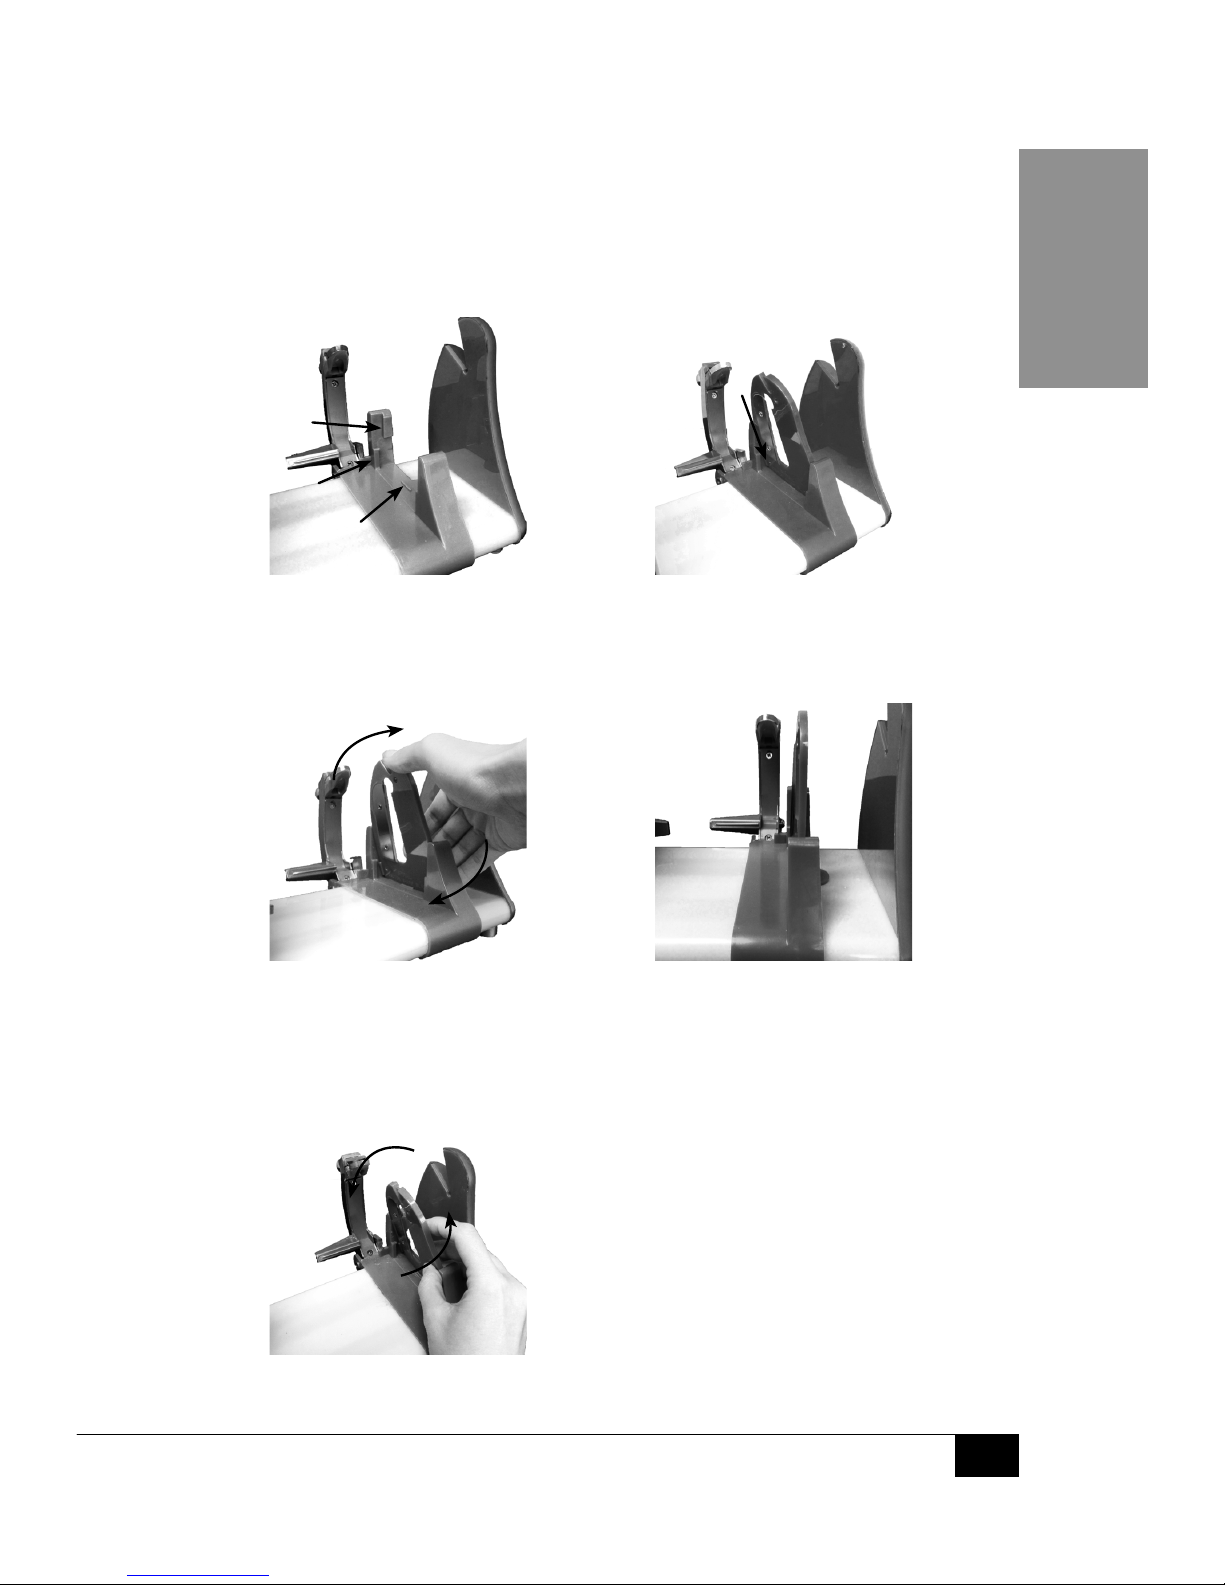
ATTACHING BLADES TO BLADE MOUNT
USE EXTREME CAUTION when handling all Blades! They are
extremely sharp and may cause injury if used improperly.
4. When secured, Blade will click and stand
vertical.
3. Simultaneously push top of Blade back
while pushing bottom of Blade towards
Fork Mount to snap into place. Some
may nd it easiest to secure using two
hands on either side of the Blade.
1. Take note of the notches on the Blade
Mount. Make sure the Peeling Arm
Release is in the down position.
2. Angle and slide chosen Blade between
the two notches on the arm of the Blade
Mount as shown below.
REMOVING BLADES FROM BLADE MOUNT
1. Simultaneously push bottom of Blade back
while pushing top of Blade towards Fork
Mount to remove. Blade will click upon
removal.
NOTE: Once attached, Blade is dicult
to remove. Removing Blade requires
more pressure than attaching. Some
may nd it easiest to remove using two
hands on either side of the Blade.
Page 11

ENGLISH
9
HELPFUL TIPS
CHOOSING FRUITS & VEGETABLES
The '50S-STYLE ELECTRIC TWISTER & PEELER works best with fruits and
vegetables that are rm, blemish free, and symmetrically shaped. Avoid
using soft fruits and vegetables. Soft fruit and vegetables will have
problems peeling and staying in place on the Cut Fork/Peel Fork.
Try using the '50S-STYLE ELECTRIC TWISTER & PEELER with sweet
potatoes, apples, beets, zucchini, cucumbers, and more!
PEEL AND SPIRAL/SHRED AT THE SAME TIME
Save time by peeling at the same time you shred or spiral cut. While following
the steps to SPIRAL or SHRED, simply make sure the Peeling Arm Release
is in the up position, so that the Peeling Arm can move freely.
PEELING TOO MUCH / NOT ENOUGH
If the Peeling Blade is taking o too much peel or not enough peel, you may need to adjust
the Peeling Blade. Generally, the Peeling Blade works best when adjusted to about ¹⁄₈ inch
past the head of the Peeling Arm. To adjust Peeling Blade, loosen the screw slightly. The
blade can be moved forwards to remove more peel or backwards to remove less peel. Firmly
tighten the screw after adjustment has been made. Finding the desired result may require a
few tests and further blade adjustments. NOTE: Use caution when adjusting, blade is sharp!
PEELING ARM SHUDDERS / STUCK
If the Peeling Arm is dicult to move or will not move when the Power Button
is turned to Drive/ON, be sure base of '50S-STYLE ELECTRIC TWISTER & PEELER
is clean and clear of all potato pieces. The starch found in potatoes may become
sticky when peeled and make moving the Peeling Arm dicult. A particularly
dense potato may also cause the Peeling Arm to shudder. If this happens, a
less dense potato must be used or you risk damaging the appliance.
CLEANING & MAINTENANCE
1. Make sure Power Button is in the Twist/OFF position.
Unplug the unit from the electrical outlet.
2. Wash all loose parts in warm, soapy water. Rinse and dry.
3. Wipe the Base with a damp, non-abrasive cloth, and dry.
4. When all parts are clean and dry, place the Spiral Blade, Small Shredded Blade, Medium
Shredded Blade, Cut Fork, Peel Fork and Power Cord in the Storage Compartment.
NOTE: To protect the motor plug from getting wet, never immerse the Base in
any liquid. Never place any parts in the dishwasher. Always wash by hand.
To prolong the life of your '50S-STYLE ELECTRIC TWISTER & PEELER, be sure
to follow the cleaning instructions above after each and every use.
Page 12

ENGLISH
10
RECIPES
Finish making your '50S-STYLE ELECTRIC TWISTER & PEELER creations in an oven,
deep fryer, dehydrator, or microwave. Once cooked to your liking, top o with
salt, cajun seasoning, parmesan cheese, or your own seasoning innovation!
Try some of these great tasting recipes:
SPIRAL BARBECUE POTATO CHIPS
• 1 large potato
• 1/2 tsp. paprika
• 1/2 tsp. garlic salt
• 1/4 tsp. sugar
• 1/4 tsp. onion powder
• 1/8 tsp. ground
mustard
• 1/4 tsp. chili powder
• Dash of cayenne
pepper
• 1 qt. ice water
• Canola oil, for
deep fryer
Follow the POTATO CHIPS ON A STICK directions
on page 6 to prepare the potato.
Keeping the potato on the Skewer, submerge the potato
in a large bowl of ice water for at least 30 minutes.
In a small bowl, combine all of the seasonings and spices.
Pat dry the potato and add to deep fryer. Potato
is done when golden brown in color.
Transfer potato to paper towels and uniformly
sprinkle barbecue seasoning on the chips.
Enjoy immediately.
Serves one.
SHREDDED POTATO PANCAKES
• 2 eggs
• 2 tbsp. all-
purpose flour
• 1/4 tsp. baking
powder
• 1/2 tsp. salt
• 1/4 tsp. pepper
• 6 medium potatoes,
peeled and shredded
• 1/2 cup finely
chopped onion
• 1/4 cup vegetable oil
Using the Small Shredded Blade or the Medium
Shredded Blade, follow the SHRED directions
on page 7 to prepare the potatoes.
In a large bowl, beat together eggs, our, baking
powder, salt, and pepper. Mix in potatoes and onion.
Heat oil in large skillet over medium heat.
In batches, drop heaping tablespoonfuls of the potato
mixture into the skillet. Press them to atten. Cook about
3 minutes on each side, until browned and crisp.
Drain on paper towels.
Serves six.
Page 13

ENGLISH
11
CRISPY BAKED POTATOES
• 10 medium,
yellow potatoes,
peeled & halved
• 2 tbsp. olive oil
• 1 tbsp. butter, melted
• Sea salt for sprinkling
Follow the PEEL directions on page
8 to prepare the potatoes.
Cut peeled potatoes lengthwise.
Place potatoes in a large saucepan of cold water.
Bring to a boil over high heat. Boil for 5 minutes, then
drain. Place potatoes, at face down, on a tray lined
with paper towels. Set aside for 20 minutes to cool.
Pre-heat oven to 350F (180C). Brush 2 large baking
trays with a little olive oil. Mix together the butter, 1/4
tsp. sea salt and remaining olive oil in a small bowl.
Use a fork to scrape the curved side of the
potato lengthways. Place potatoes in a single
layer, at side down, on the baking trays.
Brush potatoes with butter/oil mixture.
Bake in oven for 50 minutes or until golden
brown. Sprinkle with sea salt to serve.
Serves ve.
CLASSIC HASH BROWNS
• 2 russet potatoes,
peeled & shredded
• 2 tbsp. clarified butter
• 1 pinch paprika,
or to taste
• 1 pinch cayenne
pepper, or to taste
• Salt and ground black
pepper to taste
Using the Small Shredded Blade, simultaneously
peel and shred the potatoes by following
the SHRED directions on page 7.
Place shredded potatoes into a large bowl lled with
cold water. Stir until water is cloudy, drain, and cover
potatoes again with fresh cold water. Stir again to
dissolve excess starch. Drain potatoes well, pat dry with
paper towels, and squeeze out any excess moisture.
Heat claried butter in a large non-stick pan
over medium heat. Sprinkle shredded potatoes
into the hot butter and season with salt, black
pepper, cayenne pepper, and paprika.
Cook potatoes until a brown crust forms on the bottom,
about 5 minutes. Continue to cook and stir until
potatoes are browned all over, about 5 more minutes.
Serves two.
Page 14

ENGLISH
12
ONION STRAWS
• 2 cups buttermilk
• 2 large sweet
onions, shredded
• 2 cups allpurpose flour
• 2 tbsp. cornmeal
• 1 tbsp. salt
• 1 tbsp. ground
black pepper
• 2 tsp. cayenne pepper
• 1/2 tsp. paprika
• 1 qt. vegetable oil for
frying, or as needed
Follow the SHRED directions on page 7, using
either the Small Shredded Blade or Medium
Shredded Blade, to prepare the onions.
Pour buttermilk into a bowl. Place shredded
onion into buttermilk, cover the bowl with
plastic wrap, and refrigerate for 1 hour.
Heat oil in a deep fryer or large saucepan
to 400 degrees F (200 degrees C).
Whisk our, cornmeal, salt, black pepper, cayenne
pepper, and paprika together in a bowl.
Working in batches, remove onions from buttermilk, letting
any excess liquid drip o, place onions in our mixture and
toss to coat. Shake any excess our mixture o onions.
Cook onion rings in the preheated oil until
golden brown, about 3 to 4 minutes.
Transfer rings with a slotted spoon to a
paper towel-lined plate to drain.
Serves eight.
ZUCCHINI PARMESAN CHIPS ON A STICK
• Vegetable oil
for deep fryer
• 1 cup Panko
• 1/2 cup grated
Parmesan cheese
• 2 zucchinis, spiral
cut on a stick
• 1/2 cup allpurpose flour
• 2 large eggs, beaten
Follow the POTATO CHIPS ON A STICK directions
on page 6 to prepare the zucchinis.
Add vegetable oil to deep fryer and
set to medium high heat.
In a large bowl, combine Panko and Parmesan; set aside.
Working in batches, dredge each zucchini chips
on a stick in our, dip into eggs, then dredge in
Panko mixture, pressing carefully to coat.
Add zucchinis to the deep fryer, 1 at a time,
and cook until evenly golden and crispy.
Transfer to a paper towel-lined plate.
Serves four.
Page 15

ENGLISH
13
RETURNS & WARRANTY
SHOULD YOUR UNIT NOT WORK OR IF DAMAGED WHEN YOU FIRST TAKE IT OUT OF
THE BOX, PLEASE RETURN IT TO THE PLACE OF PURCHASE IMMEDIATELY.
'50S-STYLE ELECTRIC TWISTER & PEELER / PT300RETRORED
Should you have any questions, please contact us via email or at the customer service number listed
below between the hours of 8:00 AM and 5:00 PM, Monday through Friday, Central Standard Time.
Distributed by:
Nostalgia Products LLC
1471 Partnership Dr.
Green Bay, WI 54304-5685
Customer Service
Phone: (920) 347-9122
Web: www.nostalgiaproducts.com
Customer Service Inquiry
To submit a Customer Service inquiry, go to www.nostalgiaproducts.com and ll
out the Customer Service Inquiry form and click the Submit button.
A representative will contact you as soon as possible.
Product Warranty Terms
Nostalgia Products LLC (the “Company”) hereby warrants that for a period of one (1) year from the
date of original purchase, this product will be free of defects in material and workmanship under
normal home use, provided that the product is operated and maintained in accordance with the
operating instructions. As the sole and exclusive remedy under this warranty, the Company will
at its discretion either repair or replace the product found to be defective, or issue a refund on the
product during the warranty period. This warranty is only available to the original retail purchaser of
the product from the date of initial retail purchase, and is only valid with the original sales receipt, as
proof of purchase date is required to obtain warranty benets. All warranty claims must be brought
to the attention of the Company within the warranty period and no later than 30 days of the failure
to perform. This warranty does not cover normal wear or damage caused by shipping, mishandling,
misuse, accident, alteration, improper replacement parts, or other than ordinary household use.
You may be required to return the product (with shipping prepaid by you) for inspection and
evaluation. Return shipping costs are not refundable. The Company is not responsible for returns
damaged or lost in transit. Unless otherwise specically permitted by the operating instructions, this
warranty applies to indoor household use only. In order to obtain service under this warranty, please
contact the Company at the telephone number listed above or by lling out the Customer Service
Inquiry Form located at www.nostalgiaproducts.com. Warranty valid only in USA and Canada.
This warranty is in lieu of all other warranties, expressed or implied, including warranties of
merchantability and tness for a particular purpose, which are hereby excluded to the extent
permitted by law. In no event shall the Company be liable for any indirect, incidental, consequential,
or special damages arising out of or in connection with this product or the use thereof. Some
states, provinces or jurisdictions do not permit the exclusion or limitation of incidental or
consequential damages, so the foregoing exclusion or limitation may not apply to you.
This warranty does not apply to re-manufactured merchandise.
Please read the operating instructions carefully. Failure to comply
with the operating instructions will void this warranty.
For more information, visit us online at www.nostalgiaproducts.com.
Like us on Facebook at www.facebook.com/NostalgiaElectrics.
Follow our boards on Pinterest at www.pinterest.com/nostalgiaelctrx.
Tweet along with us on Twitter at www.twitter.com/NostalgiaElctrx.
Page 16

14
FRANÇAIS
14
Une fête tous les jours !
Visiter le site Web www.nostalgiaproducts.com pour
d'autres produits amusants.
TABLE DES MATIÈRES
IMPORTANTES MESURES DE PRÉCAUTION . . . . . . . . . . . . . . . . . . . 15
IMPORTANTES MISES EN GARDE . . . . . . . . . . . . . . . . . . . . . . . . . 15
INTRODUCTION . . . . . . . . . . . . . . . . . . . . . . . . . . . . . . . . . . . . 16
PIÈCES ET ASSEMBLAGE . . . . . . . . . . . . . . . . . . . . . . . . . . . . . . . 17
MODE DE FONCTIONNEMENT . . . . . . . . . . . . . . . . . . . . . . . . . . . 18
CONSEILS UTILES . . . . . . . . . . . . . . . . . . . . . . . . . . . . . . . . . . . 22
NETTOYAGE ET ENTRETIEN . . . . . . . . . . . . . . . . . . . . . . . . . . . . . 22
RECETTES . . . . . . . . . . . . . . . . . . . . . . . . . . . . . . . . . . . . . . . . 23
RETOURS ET GARANTIE . . . . . . . . . . . . . . . . . . . . . . . . . . . . . . . 26
SÉCURITÉ
Fiche technique de l'appareil :
120 V, 60 Hz
15 W, homologué par ETL
CE PRODUIT DOIT ÊTRE BRANCHÉ UNIQUEMENT DANS UNE PRISE DE COURANT DE 120 V CA.
Votre sécurité et celle des autres sont très importantes.
De nombreux messages importants de sécurité se trouvent dans le présent manuel
et sur votre appareil. Toujours lire et respecter toutes les consignes de sécurité.
Ceci est le symbole d'avertissement de sécurité.
Ce symbole avertit des risques potentiels qui présente
un danger pour votre vie et celle des autres.
Tous les messages de sécurité suivront le
symbole d'avertissement de sécurité.
Tous les messages de sécurité indiqueront le danger potentiel et la façon de réduire
le risque de blessure et ce qui peut arriver si les consignes ne sont pas suivies.
Page 17

15
FRANÇAIS
15
IMPORTANTES MESURES DE PRÉCAUTION
1. NE JAMAIS plonger le moteur ou le brancher dans l'eau.
2. NE JAMAIS utiliser près d'une source d'eau.
3. NE JAMAIS utiliser une éponge ou un chion abrasif sur l'appareil.
4. NE JAMAIS utiliser un tampon à récurer sur l'appareil.
5. NE JAMAIS laisser l'appareil sans surveillance pendant le fonctionnement.
6. Débrancher l'appareil de la prise électrique lorsqu'il n'est pas utilisé, au
moment de poser ou de retirer des pièces et pendant le nettoyage.
7. NE JAMAIS utiliser cet appareil avec un cordon ou une prise
endommagée, ou si l'appareil fonctionne mal.
8. NE PAS mettre dans le lave-vaisselle.
9. Les couteaux sont TRÈS TRANCHANTS. Être TRÈS PRUDENT
pendant le fonctionnement de cet appareil.
10. Garder hors de la portée des enfants.
11. Cet appareil n'est PAS UN JOUET.
12. Les enfants laissés sans surveillance et les personnes ayant une
décience cognitive ne devraient jamais utiliser cet appareil.
13. Les jeunes enfants qui sont à proximité de l'appareil ne devraient pas être
laissés sans surveillance pour s'assurer qu'ils ne jouent pas avec celui-ci.
IMPORTANTES MISES EN GARDE
Des mesures de précaution de base devraient toujours être prises
pendant l'utilisation d'appareils électriques, notamment :
1. Lire toutes les consignes avant d'utiliser l'appareil.
2. Garder les mains loin du mécanisme des coteaux.
3. NE PAS TOUCHER aux pièces mobiles.
4. Pour éviter les décharges électriques, ne pas immerger le cordon,
la prise ou le moteur dans l'eau ou tout autre liquide.
5. Une surveillance étroite est nécessaire lorsque tout appareil
électrique est utilisé à proximité des enfants.
6. Avant de retirer les pièces et de les nettoyer, débrancher l'appareil lorsqu'il n'est pas utilisé.
7. NE PAS utiliser l'appareil avec un cordon ou une prise endommagée ni si
l'appareil est endommagé de quelque façon que ce soit. Retourner l'appareil
à l'atelier de réparation le plus près pour qu'il soit révisé ou réparé.
8. Le fabricant ne recommande pas l'utilisation d'accessoires. L'utilisation
de quelque accessoire pourra provoquer des blessures.
9. NE PAS utiliser à l'extérieur.
10. Placer l'appareil aussi près que possible de la prise pour éviter
de trébucher sur le cordon et de se blesser.
Page 18

16
FRANÇAIS
16
11. NE PAS placer sur un brûleur à gaz ou électrique ou à sa proximité, ou dans un four chaud.
12. Vérier qu'il n'y a aucun corps étranger dans l'appareil avant l'utilisation.
13. NE JAMAIS utiliser cet appareil pour un usage autre que celui auquel il est destiné.
14. NE JAMAIS mettre les doigts ou des ustensiles dans les zones d'évacuation ou de décharge.
15. NE PAS appuyer sur le bouton En marche/Arrêt (Drive/Twist)
lorsque l'appareil n'est pas prêt à être utilisé.
16. Un appareil qui est branché dans une prise de courant ne devrait pas être
laissé sans surveillance lorsqu'il est en cours de fonctionnement.
17. Un cordon électrique court est fourni pour réduire le risque de
s'emmêler ou de trébucher sur un long cordon.
18. Une rallonge amovible peut être utilisée avec prudence.
19. La capacité électrique d'une rallonge doit être supérieure
ou égale à la puissance électrique de l'appareil.
20. Cet appareil possède une che polarisée (une lame est plus large que
l'autre). Pour réduire le risque d'électrisation, cette che est conçue
pour s'intégrer dans une prise polarisée que dans un sens.
CONSERVER CES CONSIGNES !
INTRODUCTION
Merci d'avoir acheté le COUTEAU ÉPLUCHEUR À TORSION ELECTRIQUE DU STYLE DES
ANNÉES 50 de Nostalgia™! Maintenant, vous apprécierez facilement d'une multitude de
collations pelées, spiralées et râpées, toute la famille en profitera. Le COUTEAU ÉPLUCHEUR
À TORSION ELECTRIQUE DU STYLE DES ANNÉES 50 comprend des lames de coupe qui
fonctionnent très bien sur une variété de légumes et de fruits, afin que vous puissiez
apprécier pommes de terre, pommes, courgettes, etc. Ayez du plaisir, soyez créatif et
appréciez votre COUTEAU ÉPLUCHEUR À TORSION ELECTRIQUE DU STYLE DES ANNÉES 50!
Comprend :
• La Lame à spiraler, La Lame à râper finement et la Lame à râper moyennement
ou pommes de terre parfaitement pelées, spiralées ou râpées
• Compartiment de rangement pratique pour le cordon, la Lame à spiraler, la Lame à râper
finement et Lame à râper moyennement ou Fourchette à éplucher et Fourchette à découper
• 10 Tiges à brochette en bambou
Page 19

17
FRANÇAIS
17
PIÈCES ET ASSEMBLAGE
PIÈCES
Bouton de mise en marche
En marche Arrêt
ASSEMBLAGE
Votre COUTEAU ÉPLUCHEUR À TORSION ELECTRIQUE DU STYLE DES ANNÉES 50 est livré
entièrement assemblé. La Lame à spiraler, la Lame à râper nement et Lame à râper
moyennement, la Fourchette à découper et la Fourchette à éplucher sont les seules
pièces fournies non assemblées, et se trouvent dans le compartiment de rangement.
Se préparer pour une première utilisation en lavant soigneusement la Lame à spiraler,
la Lame à râper nement, la Lame à râper moyennement, la Fourchette à découper
et la Fourchette à éplucher dans l'eau savonneuse et bien sécher. SOYEZ TRÈS
PRUDENT pendant la manipulation des lames car elles sont très tranchantes
et peuvent causer des blessures si elles sont utilisées incorrectement. NE PAS
immerger le socle dans l'eau. Pour nettoyer le socle, lorsque requis, utiliser un linge
humide pour essuyer l'extérieur, et ensuite assécher avec une serviette propre.
Logement
moteur
Bouton de mise
en marche
Compartiment
de rangement
Lame à spiraler
Lame à râper
nement
Lame à râper
moyennement
Lame à éplucher
Bras d'épluchage
Fourchette
à éplucher
Fourchette à
découper
Manette de débrayage
Manchon
à lame
Débrayage du Bras
d'épluchage
Socle
Manchon à
fourchette
Page 20

18
FRANÇAIS
18
MODE DE FONCTIONNEMENT
Puisque vous avez ni de nettoyer et de remonter votre COUTEAU
ÉPLUCHEUR À TORSION ELECTRIQUE DU STYLE DES ANNÉES 50, éplucher,
découper en spirale et râper sont beaucoup plus faciles et amusants!
REMARQUE : Utiliser la bonne Fourchette à découper/Fourchette à éplucher et la bonne
lame est très important. Une utilisation inappropriée pourrait endommager l'appareil.
RÂPER
1. Pour préparer le COUTEAU ÉPLUCHEUR À TORSION ELECTRIQUE DU STYLE DES
ANNÉES 50, maintenir enfoncée la Manette de débrayage et déplacer le Bras
d'épluchage vers l'extrémité le plus loin possible du Manchon à fourchette.
S'assurer que la Manette de débrayage du Bras d'épluchage est en position du
bas. REMARQUE : Si vous voulez peler et râper simultanément, s'assurer que
la Manette de débrayage du Bras d'épluchage est en position du haut.
2. Fixer la Fourchette à découper au Manchon à fourchette en alignant les encoches
de la Fourchette à découper aux cannelures du Manchon à fourchette, ensuite
tourner la Fourchette à découper dans le sens horaire pour verrouiller.
3. Suivre les directives du paragraphe “FIXER LES LAMES AU MANCHON À LAME” de la page 8
pour xer la Lame à râper nement ou la Lame à râper moyennement ou le Manchon à lame.
4. Pousser une extrémité de la pomme de terre sur le centre de la Fourchette à découper.
5. Pour éplucher, glisser le Bouton de mise en marche à la position En marche
(Drive/ON), la Lame à râper commencera à râper votre pomme de terre.
6. Un fois le râpage terminé, glisser le Bouton de mise en marche à Arrêt (Twist/OFF).
7. Retirer prudemment le reste de la pomme de terre du COUTEAU
ÉPLUCHEUR À TORSION ELECTRIQUE DU STYLE DES ANNÉES 50.
8. Répéter les étapes 1 à 8 pour râper plus de pommes de terre.
9. Lorsque vous avez ni d'utiliser le COUTEAU ÉPLUCHEUR À TORSION ELECTRIQUE DU STYLE
DES ANNÉES 50, détacher la Fourchette à découper en la tournant dans le sens antihoraire
et en la tirant du Manchon à fourchette.
ÉPLUCHAGE
1. Pour préparer le COUTEAU ÉPLUCHEUR À TORSION ELECTRIQUE DU STYLE DES
ANNÉES 50, maintenir enfoncée la Manette de débrayage et pour faire glisser le
Bras d'épluchage vers l'extrémité le plus loin possible du Manchon à fourchette.
2. Pousser prudemment une extrémité de la pomme de terre sur les pointes
de la Fourchette à éplucher tout en s'assurant qu'elle est centrée. Ensuite,
xer la Fourchette à peler au Manchon à fourchette en alignant les encoches
de la Fourchette à peler aux cannelures du Manchon à fourchette. Tourner
la Fourchette à éplucher dans le sens horaire pour la verrouiller.
3. Déplacer le Manette de débrayage du Bras d'épluchage en métal à la position
du haut de sorte que le Bras d'épluchage puisse mouvoir librement.
4. Pour éplucher, glisser le Bouton de mise en marche à la position En marche (Drive/
ON), le Bras d'épluchage commencera à éplucher la pomme de terre.
5. Un fois l'épluchage terminé, glisser le Bouton de mise en marche à Arrêt (Twist/OFF).
Page 21

19
FRANÇAIS
19
6. Remettre le Bras d'épluchage à sa position de départ et enlever prudemment
la Fourchette à éplucher et la pomme de terre épluchée du Manchon à
fourchette. Faire glisser la pomme de terre de la Fourchette à éplucher.
7. Répéter les étapes 1 à 5 pour éplucher plus de pommes de terre.
8. Lorsque vous avez ni d'utiliser le COUTEAU ÉPLUCHEUR À TORSION ELECTRIQUE
DU STYLE DES ANNÉES 50, détacher la Fourchette à éplucher en la tournant
dans le sens antihoraire et en la tirant du Manchon à fourchette.
DÉCOUPE SPIRALÉE
1. Pour préparer le COUTEAU ÉPLUCHEUR À TORSION ELECTRIQUE DU STYLE DES
ANNÉES 50, maintenir enfoncée la Manette de débrayage et déplacer le Bras
d'épluchage vers l'extrémité le plus loin possible du Manchon à fourchette. S'assurer
que la Manette de débrayage du Bras d'épluchage est la position du bas.
2. Fixer la Fourchette à découper au Manchon à fourchette en alignant les encoches
de la Fourchette à découper aux cannelures du Manchon à fourchette, ensuite
tourner la Fourchette à découper dans le sens horaire pour verrouiller.
3. Suivre les directives de la section “FIXER LES LAMES AU MANCHON À LAME”
de la page 8 pour xer la Lame à spiraler au Manchon à lame.
4. Pousser une extrémité de la pomme de terre sur le centre de la Fourchette à découper.
5. Pour éplucher, glisser le Bouton de mise en marche à la position En marche (Drive/
ON), la Lame à spiraler commencera la découpe spiralée de votre pomme de terre.
6. Une fois la découpe spiralée terminé, glisser le Bouton
de mise en marche à Arrêt (Twist/OFF).
7. Enlever prudemment le reste de la pomme de terre de la Fourchette
à découper et la pomme de terre découpée en spirale du COUTEAU
ÉPLUCHEUR À TORSION ELECTRIQUE DU STYLE DES ANNÉES 50.
8. Répéter les étapes 1 à 8 pour découper en spirale plus de pommes de terre.
9. Lorsque vous avez ni d'utiliser le COUTEAU ÉPLUCHEUR À TORSION ELECTRIQUE
DU STYLE DES ANNÉES 50, détacher la Fourchette à découper en la tournant
dans le sens antihoraire et en la tirant du Manchon à fourchette.
BROCHETTE SPIRALÉE
1. Pour préparer le COUTEAU ÉPLUCHEUR À TORSION
ELECTRIQUE DU STYLE DES ANNÉES 50, maintenir
enfoncée la Manette de débrayage et déplacer le
Bras d'épluchage vers l'extrémité le plus loin possible
du Manchon à fourchette. S'assurer que la Manette
de débrayage du Bras d'épluchage est la position du bas.
2. Fixer la Fourchette à découper au Manchon à fourchette
en alignant les encoches de la Fourchette à découper aux
cannelures du Manchon à fourchette, ensuite tourner la
Fourchette à découper dans le sens horaire pour verrouiller.
3. Suivre les directives de la section “FIXER LES LAMES AU MANCHON À LAME”
de la page 8 pour xer la Lame à spiraler au Manchon à lame.
4. Ensuite, percer prudemment le centre de la pomme de terre, avec la pointe
de la tige à brochette en bambou. Arrêter quand la pointe de la tige à
brochette en bambou arrive à l'extrémité de la pomme de terre.
Page 22

20
FRANÇAIS
20
5. Enler l'extrémité visible de la tige à brochette en bambou dans le trou près du sommet
de la Lame à spiraler et l'encoche sur le dessus au bout du panneau. Centrer et pousser
une extrémité de la pomme de terre sur le centre de la Fourchette à découper.
6. Pour éplucher, glisser le Bouton de mise en marche à la position En marche (Drive/
ON), la Lame à spiraler commencera la découpe spiralée de votre pomme de terre.
7. Une fois la découpe spiralée terminée, glisser le Bouton
de mise en marche à Arrêt (Twist/OFF).
8. Enlever prudemment la pomme de terre du COUTEAU ÉPLUCHEUR À
TORSION ELECTRIQUE DU STYLE DES ANNÉES 50 et étirer de façon
égale la pomme de terre sur la tige à brochette en bambou.
9. Répéter les étapes 1 à 8 pour découper en spirale plus de pommes de terre.
10. Lorsque vous avez ni d'utiliser le COUTEAU ÉPLUCHEUR À TORSION ELECTRIQUE DU STYLE
DES ANNÉES 50, détacher la Fourchette à découper en la tournant dans le sens antihoraire
et en la tirant du Manchon à fourchette.
À la n de l'utilisation du COUTEAU ÉPLUCHEUR À TORSION ELECTRIQUE DU
STYLE DES ANNÉES 50, suivre les directives de la section “ENLEVER LES LAMES DU
MANCHON À LAME” de la page 8 pour enlever les lames du Manchon à lame.
Page 23

21
FRANÇAIS
21
FIXER LES LAMES AU MANCHON À LAME
Soyez TRÈS PRUDENT pendant la manipulation de toutes les lames! Elles sont très
tranchantes et peuvent causer des blessures si elles sont utilisées incorrectement.
4. Lorsque la lame sera xée, elle fera un
déclic et restera verticale.
3. Appuyer simultanément sur le dessus de
la lame arrière en poussant le bas de la
lame vers le Manchon à fourchette pour
s'enclencher en place. Certains peuvent
trouver plus facile de xer la lame avec les
deux mains de chaque côté de celle-ci.
1. Veuillez noter les encoches du Manchon
à lame. S'assurer que la Manette
de débrayage du Bras d'épluchage
est positionnée vers le bas.
2. Incliner et glisser la Lame entre les deux
encoches du Bras du Manchon à lame
comme illustrée ci-dessous.
ENLEVER LES LAMES DU MANCHON À LAME
REMARQUE : Une fois xé, il est dicile
de retirer la lame. Il faut mettre plus de
pression pour retirer la lame que pour la
xer. Certaines personnes peuvent trouver
plus facile d'enlever la lame avec les deux
mains de chaque côté de celle-ci.
1. Pousser simultanément le bas de la lame
de nouveau tout en poussant le haut vers
le Manchon à fourchette à enlever. Vous
entendrez un clic lorsque vous enlèverez
la lame.
Page 24

22
FRANÇAIS
22
CONSEILS UTILES
CHOISIR LES FRUITS ET LÉGUMES
Le COUTEAU ÉPLUCHEUR À TORSION ELECTRIQUE DU STYLE DES ANNÉES 50 fonctionne
mieux sur des fruits et légumes qui sont fermes, sans tache, et de forme symétrique.
Éviter d'utiliser des fruits et légumes mous. Les fruits et légumes mous seront diciles
à éplucher et à rester en place sur la Fourchette à découper/Fourchette à éplucher.
Essayez d'utiliser le COUTEAU ÉPLUCHEUR À TORSION ELECTRIQUE
DU STYLE DES ANNÉES 50 avec des pommes de terre sucrées, des
pommes, des betteraves, des zucchinis, des concombres et plus!
ÉPLUCHER ET FAIRE DES SPIRALES/RÂPER EN MÊME TEMPS
Gagner du temps en épluchant, en râpant et en coupant en spirale en même
temps. Alors que vous suivez les étapes pour faire des SPIRALES ou RÂPÉS,
assurez-vous que la Manette de débrayage du Bras d'épluchage est en position
haute de sorte que le Bras d'épluchage puisse mouvoir librement.
ÉPLUCHER TROP/PAS ASSEZ
Si la Lame à éplucher épluche trop ou pas assez, il se peut qu'elle ait besoin d'un réglage.
Généralement, la Lame à éplucher fonctionne mieux lorsqu'elle est réglée à environ 3
mm (1⁄8 po) au-delà de la tête du Bras d'épluchage. Pour régler la Lame à éplucher,
desserrer légèrement la vis. La lame peut être déplacée vers l'avant pour éplucher plus
ou vers l'arrière pour éplucher moins. Bien serrer la vis après que le réglage soit fait.
Pour obtenir le résultat désiré, quelques tests et d'autres réglages de lame peuvent être
nécessaires. REMARQUE : Soyez prudent lors du réglage, la lame est tranchante !
LE BRAS D'ÉPLUCHAGE VIBRE/EST BLOQUÉ
Si le Bras d'épluchage est dicile à déplacer ou ne se déplace pas lorsque le Bouton de
mise en marche est en position En marche (DRIVE/ON), s'assurer que la base du COUTEAU
ÉPLUCHEUR À TORSION ELECTRIQUE DU STYLE DES ANNÉES 50 est propre et qu'il n'y
a aucun morceau de pomme de terre. L'amidon des pommes de terre devient collant
lorsqu'elles sont épluchées et le mouvement du Bras d'épluchage devient dicile. Une
grosse pomme de terre peut faire vibrer le Bras d'épluchage. Si c'est le cas, il faut prendre
une pomme de terre moins grosse sinon vous risquez d'endommager l'appareil.
NETTOYAGE ET ENTRETIEN
1. S'assurer que le Bouton de mise en marche est en position Arrêt (Twist/OFF).
2. Débrancher l'appareil de la prise de courant.
3. Laver toutes les pièces mobiles dans l'eau chaude savonneuse. Rincer et sécher.
4. Essuyer le socle avec un chion humide, non abrasif, puis sécher.
5. Lorsque toutes les pièces sont propres et nettoyer, ranger la Lame à spiraler, la Lame à
râper nement, la Lame à râper moyennement, la Fourchette à Découper/Fourchette
à éplucher et le Cordon d'alimentation dans le Compartiment de rangement.
REMARQUE : Pour éviter que la prise du moteur se mouille, ne
jamais immerger le Socle dans quelque liquide que ce soit. Ne mettre
aucune pièce au lave-vaisselle. Toujours laver à la main.
An de prolonger la durée de vie de votre COUTEAU ÉPLUCHEUR À
TORSION ELECTRIQUE DU STYLE DES ANNÉES 50, bien suivre les
consignes de nettoyage ci-dessus après chaque usage.
Page 25

23
FRANÇAIS
23
RECETTES
Terminer vos créations du COUTEAU ÉPLUCHEUR À TORSION ELECTRIQUE DU
STYLE DES ANNÉES 50 dans le four, la friteuse, le déshydrateur ou le micro-ondes.
Dès que la cuisson est à votre goût, saupoudrée de sel, d'assaisonnement cajun,
de fromage parmesan ou avec votre propre mélange d'assaisonnement!
Goûter quelques-unes de ces délicieuses recettes :
CROUSTILLES BARBECUE EN SPIRALES
• 1 grosse pomme
de terre
• 1/2 c. à thé de paprika
• 1/2 c. à thé de sel d'ail
• 1/4 c. à thé de sucre
• 1/4 c. à thé d'oignon
en poudre
• 1/8 c. à thé de
moutarde moulu
• 1/4 c. à thé de
poudre de chili
• Une pincée de
poivre de Cayenne
• 1,1 l (1 pte)
d'eau glacée
• Huile de Canola
pour la friteuse
Suivre les consignes CROUSTILLES EN BROCHETTE
de la page 6 pour préparer la pomme de terre.
Garder la pomme de terre sur la tige à brochette,
la submerger dans un grand bol d'eau
glacée pendant au moins 30 minutes.
Mettre tous les assaisonnements et épices dans un petit bol.
Sécher la pomme de terre et la mettre dans la friteuse. La
pomme de terre est prête quand elle est brun dorée.
Mettre ensuite la pomme de terre sur des
essuie-tout et saupoudrer uniformément
d'assaisonnement de barbecue sur les croustilles.
Savourez immédiatement.
Une portion.
GALETTE DE POMME DE TERRE RÂPÉE
• 2 œufs
• 2 c. à soupe de
farine tout usage
• 1/4 c. à thé de
poudre à pâte
• 1/2 c. à thé de sel
• 1/4 c. à thé de poivre
• 6 pommes de
terre moyennes,
pelées et râpées
• 1/2 tasse d'oignon
finement haché
• 1/4 tasse d'huile
végétale
À l'aide de Lame à râper nement ou de la Lame à
râper moyennement, suivre les consignes pour RÂPER
de la page 7 pour préparer la pomme de terre.
Dans un grand bol, battre ensemble les œufs,
la farine, la poudre de pâte, le sel et le poivre.
Ajouter les pommes de terre et l'oignon.
Chauer l'huile dans une grande poêle à feu moyen.
Par fournée, déposer une cuillère à soupe d'une boule
bien tassée du mélange de pomme de terre dans
la poêle. Appuyer pour l'aplatir. Cuire environ
3 minutes de chaque côté, jusqu'à ce
qu'elle soit dorée et croustillante.
Égoutter sur des essuie-tout.
Six portions.
Page 26

24
FRANÇAIS
24
POMMES DE TERRE AU FOUR CROUSTILLANTES
• 10 pommes
de terre jaunes
moyennes, pelées et
coupées en deux
• 2 c. à soupe
d'huile d'olive
• 1 c. à table de
beurre, fondu
• Sel de mer pour
saupoudrer
Suivre les consignes pour ÉPLUCHER à la page
8 pour préparer les pommes de terre.
Couper la pomme de terre épluchée en longueur.
Mettre les pommes de terre dans une
grande casserole d'eau froide.
Porter à ébullition à feu vif. Laisser bouillir durant 5
minutes, ensuite égoutter. Mettre les pommes de terre,
la surface plate vers le bas, dans un plateau sur des
essuie-tout. Laisser refroidir pendant 20 minutes.
Préchauer le four à 180 °C (350 °F). Badigeonner
2 grandes plaques de cuisson avec un peu d'huile
d'olive. Dans un petit bol, mélanger le beurre, 1/4
c. à thé de sel de mer et l'huile d'olive restante.
À l'aide d'une fourchette scariez en longueur
le côté courbé de la pomme de terre. Placez les
pommes de terre en une seule couche, côté plat
vers le bas, sur des plaques de cuisson.
Badigeonner les pommes de terre avec
du beurre/mélange d'huile.
Cuire au four durant 50 minutes ou jusqu'à ce qu'elles
soient bien dorées. Saupoudrer de sel de mer pour servir.
Cinq portions.
POMMES DE TERRE RISSOLÉES CLASSIQUES
• 2 pommes de
terre Russet,
pelées et râpées
• 2 c. à table de
beurre clarifié
• 1 pincée de paprika
ou au goût
• 1 pincée de poivre de
Cayenne ou au goût
• Sel et poivre noir
moulu ou au goût
Utiliser une Lame à râper nement, éplucher et
râper simultanément les pommes de terre en
suivant les consignes pour RÂPER de la page 7.
Mettre les pommes de terre râpées dans un grand
bol rempli d'eau froide. Remuer jusqu'à ce que l'eau
soit laiteuse, changer l'eau et recouvrir les pommes
à nouveau avec de l'eau fraîche froide. Remuer à
nouveau pour dissoudre l'excès d'amidon. Jeter toute
l'eau des pommes de terre, sécher à l'aide d'essuietout, et les essorez pour éliminer l'excès d'humidité.
Chauer du beurre clarié dans une grande poêle
anti-adhésive. Badigeonner les pommes de terre
râpées avec du beurre chaud et assaisonner de
sel, poivre noir, poivre de Cayenne et paprika.
Cuire les pommes de terre, environ 5 minutes,
jusqu'à ce qu'une croûte dorée se forme au bas.
Laisser encore cuire 5 minutes jusqu'à ce que les
pommes de terre soient dorées partout.
Deux portions.
Page 27

25
FRANÇAIS
25
OIGNONS EN FORME DE PAILLES
• 2 tasses de babeurre
• 2 gros oignons
doux, râpés
• 2 tasses de farine
tout usage
• 2 c. à soupe de
semoule de maïs
• 1 c. à soupe de sel
• 1 c. à soupe de
poivre noir moulu
• 2 c. à thé de poivre
de cayenne
• 1/2 c. à thé de paprika
• 1,1 l (1 pte) d'huile
végétale à friture,
ou selon le besoin
Suivre les consignes pour RÂPER de la page 7, en
utilisant soit une Lame à râper nement ou une Lame
à râper moyennement pour préparer les oignons.
Verser du babeurre dans le bol. Verser les oignons
râpés dans le babeurre, couvrir le bol avec de la
cellophane, et réfrigérer durant une heure.
Chauer l'huile dans une friteuse ou une
grande casserole à 200 °C (400 °F).
Mélanger au fouet farine, semoule de maïs, sel, poivre
noir, poivre de Cayenne, et paprika dans un bol.
Par fournée, retirer les oignons du babeurre, laisser
l'excès de liquide s'égoutter, mettre les oignons
dans le mélange de farine et bien mélanger. Secouer
tout excès de farine du mélange des oignons.
Cuire les rondelles d'oignons dans l'huile
préchauée jusqu'à ce que les rondelles
deviennent dorées, soit 3 à 4 minutes.
Sortir les rondelles avec une écumoire et les mettre
un essuie-tout doublée pour éponger l'huile.
Huit portions.
CROUSTILLES DE ZUCCHINIS AU PARMESAN EN BROCHETTE
• Huile végétale
pour friture
• 1 tasse de Panko
• 1/2 tasse de
Parmesan râpé
• 2 zucchinis, spiralés
coupés en brochette
• 1/2 de tasse de
farine tout usage
• 2 gros œufs, battus
Suivre les consignes des CROUSTILLES EN BROCHETTE
de la page 6 pour préparer les zucchinis.
Ajouter de l'huile végétale dans la friteuse
et mettre le feu à moyen-élevé.
Dans un grand bol, mélanger du Panko
et du Parmesan; réserver.
Par fournée, saupoudrer chaque croustille de zucchini
en brochette de farine, tremper dans des œufs,
ensuite saupoudrer avec le mélange de Panko,
appuyer soigneusement pour les enrober.
Mettre les zucchinis dans la friteuse, un à la fois, et cuire
jusqu'à ce qu'ils soient uniformément dorés et croustillants.
Les mettre sur une assiette recouverte d'essuie-tout.
Quatre portions.
Page 28

26
FRANÇAIS
26
RETOURS ET GARANTIE
SI VOTRE APPAREIL NE FONCTIONNE PAS OU S'IL EST ENDOMMAGÉ QUAND VOUS LE RETIREZ
DE LA BOÎTE, VEUILLEZ LE RETOURNER IMMÉDIATEMENT À L'ENDROIT OÙ IL A ÉTÉ ACHETÉ.
COUTEAU ÉPLUCHEUR À TORSION ELECTRIQUE DU STYLE DES ANNÉES 50 / PT300RETRORED
Pour toute question, communiquer par courriel ou au numéro de téléphone du service à
la clientèle, entre 08 h 00 et 17 h 00, du lundi au vendredi, heure normale du Centre.
Distribué par :
Nostalgia Products LLC
1471 Partnership Dr.
Green Bay, WI 54304-5685
Service à la clientèle
Téléphone : (920) 347-9122
Site Web : www.nostalgiaproducts.com
Demande pour le service à la clientèle
Pour soumettre une demande au service à la clientèle, rendez vous au www.nostalgiaproducts.com puis
remplissez le formulaire de demande au service à la clientèle puis cliquez sur le bouton Soumettre.
Un représentant vous contactera dès que possible.
Conditions de garantie du produit
Le groupe Nostalgia Products LLC (référé tel « l’Entreprise ») garantit que pour une période d’un
(1) an en date d’achat, ce produit est sans défaut de matériel et de fabrication selon une utilisation
normale à domicile, seulement si le fonctionnement et l’entretien du produit sont conforment aux
directives fournies. À titre de réparation exclusive et entière sous cette garantie, l’Entreprise pourra
à sa discrétion, réparer ou remplacer le produit défectueux, voire émettre un remboursement du
produit durant la période couverte sous garantie. Cette garantie n’est disponible seulement qu’à
l’acheteur d’origine du produit, en date d’achat au détail dudit produit et sera valide uniquement
avec le reçu de caisse d’origine, à titre de preuve d’achat, lequel est requis pour obtenir les bienfaits
reliés à cette garantie. Toute réclamation doit être rapportée à l’attention de l’Entreprise dans la
fenêtre de la période de la garantie, sans dépasser 30 jours à défaut de performance. Cette garantie
ne couvre pas l’usure normale ou dommage cause par l'expédition, la mauvaise manipulation, la
mauvaise utilisation, les accidents, les modications, les mauvaises pièces de remplacement, voire
toute autre utilisation anormale du produit à domicile. Il est possible que vous ayez à retourner le
produit (avec les frais de retour prépayés par vous) pour une inspection et une évaluation. Les frais
des coûts de retour ne sont pas remboursables. L'Entreprise n’est aucunement responsable pour les
retours endommagés ou perdus en transit. Autrement que spéciquement permit selon les directives
de fonctionnement, cette garantie s’applique à une utilisation à domicile à d'intérieur seulement.
An d'obtenir un service couvert sous cette garantie, veuillez contacter l'Entreprise au numéro de
téléphone inclut ci-haut ou en remplissant le formulaire de demande au service à la clientele, sur le
site www.nostalgiaproducts.com. La garantie est valide seulement aux États-Unis et au Canada.
Cette garantie prévaut toute autre garantie, expresse ou implicite incluant les garanties de qualité
marchande ou ayant une aptitude pour une intention en particulier, lesquelles sont exclues selon la
loi. Sous aucun prétexte l’Entreprise ne pourra être tenue responsable pour tout dommage indirect,
accidentel, conséquentiel ou spécial provenant de ou en relativité avec ce produit ou son utilisation.
Certains états, provinces ou juridictions n'allouent pas l'exclusion ou la limitation de tels dommages
accidentels ou conséquentiels, donc l'exclusion ou limitation suscitée peut ne pas s'appliquer à vous.
Cette garantie ne s’applique pas à la merchandise de renaissance.
Veuillez lire les directives de fonctionnement attentivement. Ne pas se
conformer aux directives de fonctionnement annulera cette garantie.
Pour plus d’informations, visitez notre site Web à www.nostalgiaproducts.com.
Aimez-nous sur Facebook à l’adresse www.facebook.com / NostalgiaElectrics.
Suivez nos conseils sur Pinterest à www.pinterest.com / nostalgiaelctrx.
Tweet avec nous sur Twitter à l’adresse www.twitter.com / NostalgiaElctrx.
Page 29

27
ESPAÑOL
27
¡Convierta todos los días en una esta!
Visite www.nostalgiaproducts.com para
ver más productos divertidos.
CONTENIDO
PRECAUCIONES IMPORTANTES . . . . . . . . . . . . . . . . . . . . . . . . . . 28
MEDIDAS DE SEGURIDAD IMPORTANTES . . . . . . . . . . . . . . . . . . . . 28
INTRODUCCIÓN . . . . . . . . . . . . . . . . . . . . . . . . . . . . . . . . . . . . 29
PIEZAS Y ENSAMBLAJE . . . . . . . . . . . . . . . . . . . . . . . . . . . . . . . 30
FUNCIONAMIENTO . . . . . . . . . . . . . . . . . . . . . . . . . . . . . . . . . . 31
CONSEJOS ÚTILES . . . . . . . . . . . . . . . . . . . . . . . . . . . . . . . . . . . 34
LIMPIEZA Y MANTENIMIENTO . . . . . . . . . . . . . . . . . . . . . . . . . . . 34
RECETAS . . . . . . . . . . . . . . . . . . . . . . . . . . . . . . . . . . . . . . . . . 35
DEVOLUCIONES Y GARANTÍA . . . . . . . . . . . . . . . . . . . . . . . . . . . 38
SEGURIDAD
Especicaciones del electrodoméstico:
120 Voltios, 60 Hertz
15 Watts, aprobado por ETL
ESTE PRODUCTO ES PARA USAR SOLAMENTE EN TOMAS DE CORRIENTE DE 120 VCA.
Your safety and the safety of others is very important.
We have provided many important safety messages in this manual and
on your appliance. Always read and obey all safety messages.
This is the safety alert symbol.
This symbol alerts you to potential hazards that
can kill or hurt you and others.
All safety messages will follow the safety alert symbol.
All safety messages will tell you what the potential
hazard is, tell you how to reduce the chance of injury, and tell you
what can happen if the instructions are not followed.
Page 30

28
ESPAÑOL
28
PRECAUCIONES IMPORTANTES
1. NUNCA sumerja el motor o el enchufe en agua.
2. No lo utilice NUNCA cerca del agua.
3. No utilice NUNCA una esponja o un paño abrasivo con el aparato.
4. No utilice NUNCA un estropajo en el aparato.
5. No deje NUNCA el aparato desatendido mientras esté en funcionamiento.
6. Desenchufe la unidad de la red cuando no lo esté utilizando,
antes de colocar o retirar piezas y durante su limpieza.
7. NO manipule este aparato con un cable o enchufe dañados, ni si funciona incorrectamente.
8. NO lo coloque en un lavavajillas.
9. Las cuchillas están MUY AFILADAS. Tenga SUMO CUIDADO cuando manipule este aparato.
10. Manténgalo fuera del alcance de los niños.
11. Este aparato NO ES UN JUGUETE.
12. Este aparato no debe ser operado nunca por niños o personas
con limitaciones cognitivas que no estén supervisados.
13. Se debe supervisar a los niños mientras estén cerca del aparato
para asegurarse de que no jueguen con el mismo.
MEDIDAS DE SEGURIDAD IMPORTANTES
Cuando utilice aparatos eléctricos debe seguir siempre las
precauciones básicas de seguridad, entre las que se incluyen:
1. Lea todas las instrucciones antes de utilizar este aparato.
2. Mantenga las manos alejadas del mecanismo de la cuchilla.
3. NO toque las partes móviles.
4. Como medida de protección contra el riesgo de descarga eléctrica, no
sumerja el cable, los enchufes o el motor en agua ni en otros líquidos.
5. Cuando cualquier aparato se utilice cerca de niños, es necesaria una supervisión estrecha.
6. Desenchufe el aparato de la red cuando no lo esté utilizando,
antes de retirar piezas y antes de su limpieza.
7. NO utilice ningún aparato con el cable o el enchufe dañados, ni si el
aparato se ha dañado de cualquier manera. Devuelva el aparato al
taller de reparación más cercano para su examen o reparación.
8. El fabricante no recomienda el uso de implementos accesorios. El
uso de implementos accesorios puede provocar lesiones.
9. NO lo utilice en exteriores.
10. Posicione el aparato tan cerca de la toma de corriente como sea
posible para evitar lesiones por tropezar con el cable.
11. NO lo coloque sobre ni cerca de una hornilla de gas ni
eléctrica, ni dentro de un horno caliente.
Page 31

29
ESPAÑOL
29
12. Revise el aparato para ver si tiene objetos extraños antes del uso.
13. NO utilice el aparato para otro uso que no sea el cual para el que está destinado.
14. NUNCA sitúe los dedos ni coloque utensilios en las áreas de alimentación o descarga.
15. NO presione el botón de Impulsar/Torcer cuando el aparato no esté listo para utilizar.
16. Un aparato que esté conectado a una toma de corriente no debe
dejarse sin atención mientras esté funcionando.
17. Se proporciona un cable de alimentación corto para reducir el
riesgo de enredarse o tropezar con un cable más largo.
18. Pueden usarse cables de alimentación desmontables
más largos si se tiene cuidado al utilizarlos.
19. Las características nominales del cable de extensión
deben ser al menos iguales a las del aparato.
20. Este aparato tiene un enchufe polarizado (una clavija es más ancha que la otra).
Para reducir el riesgo de descarga eléctrica, este enchufe se ha diseñado para
introducirse en una toma de corriente polarizada solo en una posición.
¡GUARDE ESTAS INSTRUCCIONES!
INTRODUCCIÓN
¡Gracias por comprar el ELÉCTRICO TWISTER Y PEELER EN ESTILO DE 50S de Nostalgia™!
Ahora puede disfrutar de una multitud de bocadillos pelados, en espiral y en trozos
que también toda la familia disfrutará. El ELÉCTRICO TWISTER Y PEELER EN ESTILO DE
50S incluye hojas cortantes que funcionan muy bien con una gran variedad de frutas
y verduras, así que puede disfrutar de papas, manzanas, calabacines y mucho más.
¡Diviértase, sea creativo y disfrute el ELÉCTRICO TWISTER Y PEELER EN ESTILO DE 50S!
Incluye:
• Cuchilla en espiral, cuchilla para trozos pequeños y cuchilla para trozos
medianos, perfectas para obtener papas peladas, en espiral y en trozos.
• Compartimiento de almacenamiento conveniente para cable,
cuchilla en espiral, cuchilla para trozos pequeños, cuchilla para
trozos medianos, tenedor para pelar y tenedor para cortar
• 10 pinchos de bambú
Page 32

30
ESPAÑOL
30
PIEZAS Y ENSAMBLAJE
PIEZAS
Botón de encendido
Impulsar/Enc. Torcer/Apag.
ENSAMBLAJE
El ELÉCTRICO TWISTER Y PEELER EN ESTILO DE 50S viene totalmente armado al
retirarse de la caja. La cuchilla en espiral, la cuchilla para trozos pequeños, la cuchilla
para trozos medianos, el tenedor para cortar y el tenedor para pelar serán las únicas
piezas sueltas, y se pueden encontrar del compartimiento de almacenamiento.
Prepárelo para utilizar por primera vez al lavar a fondo la cuchilla en espiral, la
cuchilla para trozos pequeños, la cuchilla para trozos medianos, el tenedor para
cortar y el tenedor para pelar en agua caliente y jabonosa y séquela bien. Tenga
MUCHO CUIDADO al manipular las cuchillas, ya que están muy aladas y
pueden causar lesiones si no se manejan correctamente. NO sumerja la base
en agua. Para limpiar la base, cuando sea necesario, utilice un paño húmedo
para limpiar el exterior y luego séquela con un paño limpio y no abrasivo.
Carcasa
del motor
Botón de
encendido
Compartimiento de
almacenamiento
Cuchilla en
espiral
Cuchilla
para trozos
pequeños
Cuchilla
para trozos
medianos
Cuchilla
para pelar
Brazo para pelar
Tenedor
para pelar
Tenedor
para cortar
Liberación del embrague
Montura de
la cuchilla
Liberación del
brazo para pelar
Base
Montura
del tenedor
Page 33

31
ESPAÑOL
31
FUNCIONAMIENTO
¡Ahora que ya ha limpiado y reensamblado el ELÉCTRICO TWISTER Y PEELER
EN ESTILO DE 50S es fácil y divertido cortar en espiral y en trozos!
NOTA: Utilizar el tenedor para cortar, el tenedor para pelar y la cuchilla es
sumamente importante. El uso incorrecto puede dañar el aparato.
CORTAR EN TROZOS
1. A n de preparar EL ELÉCTRICO TWISTER Y PEELER EN ESTILO DE 50S, mantenga pulsado
el botón de liberación del embrague y mueva el brazo para pelar al extremo más alejado
de la montura del tenedor. Asegúrese de que la liberación del brazo para pelar esté
en posición de descenso. NOTA: Si desea al mismo tiempo pelar y cortar en trozos,
asegúrese de que la liberación del brazo para pelar esté en posición de ascenso.
2. Conecte el tenedor para cortar a la montura del tenedor al alinear las
muescas del tenedor para cortar con las ranuras en la montura del tenedor,
luego tuerza el tenedor para cortar en sentido horario para jar.
3. Siga la sección de “INSTALAR CUCHILLAS A LA MONTURA DE CUCHIILLAS”
en la página 8 para instalar la cuchilla para trozos pequeños o la
cuchilla para trozos medianos a la montura de la cuchilla.
4. Presione el extremo de la papa en el centro del tenedor para cortar.
5. Cuando esté listo para pelar, deslice el botón de encendido a Impulsar/
Encender y la cuchilla cortar trozos triturar la papa.
6. Cuando haya terminado de triturar, deslice el botón de encendido a Torcer/Apagar.
7. Retire con cuidado el resto de papa del ELÉCTRICO TWISTER Y PEELER EN ESTILO DE 50S.
8. Repita los pasos 1 a 8 para triturar papas adicionales.
9. Cuando haya terminado de usar el ELÉCTRICO TWISTER Y PEELER EN ESTILO DE 50S, separe
el tenedor para cortar al girar en sentido antihorario de la montura del tenedor.
PELAR
1. A n de preparar EL ELÉCTRICO TWISTER Y PEELER EN ESTILO DE 50S,
mantenga pulsado el botón de liberación del embrague y deslice el brazo
para pelar al extremo más alejado de la montura del tenedor.
2. Con cuidado, empuje el extremo de la papa en los puntos del tenedor para pelar,
asegurándose de que esté centrada. Luego, instale el tenedor para pelar a la montura
del tenedor al alinear las muescas del tenedor para pelar a las ranuras de la montura
del tenedor. Tuerza el tenedor para pelar en sentido horario para jarlo en su lugar.
3. Mueva la liberación del brazo para pelar metálica a la posición de ascenso
para que el brazo para pelar se pueda mover libremente.
4. Cuando esté listo para pelar, deslice el botón de encendido a Impulsar/
Encender y el brazo para pelar comenzará a pelar la papa.
5. Cuando haya terminado de pelar, deslice el botón de encendido a Torcer/Apagar.
6. Devuelva el brazo para pelar a su posición inicial y retire con cuidado
el tenedor para pelar y la papa pelada de la montura del tenedor.
Deslice la papa fuera de los puntos del tenedor para pelar.
7. Repita los pasos 1 a 5 para pelar papas adicionales.
8. Cuando haya terminado de usar el ELÉCTRICO TWISTER Y PEELER EN ESTILO DE 50S,
separe el tenedor para pelar al girar en sentido antihorario de la montura del tenedor.
Page 34

32
ESPAÑOL
32
CORTAR EN ESPIRAL
1. A n de preparar EL ELÉCTRICO TWISTER Y PEELER EN ESTILO DE 50S,
mantenga pulsado el botón de liberación del embrague y mueva el brazo
para pelar al extremo más alejado de la montura del tenedor. Asegúrese de
que la liberación del brazo para pelar esté en posición de descenso.
2. Conecte el tenedor para cortar a la montura del tenedor al alinear las
muescas del tenedor para cortar con las ranuras en la montura del tenedor,
luego tuerza el tenedor para cortar en sentido horario para jar.
3. Siga la sección de “INSTALAR CUCHILLAS A LA MONTURA DE CUCHIILLAS” en
la página 8 para instalar la cuchilla en espiral a la montura de la cuchilla.
4. Presione el extremo de la papa en el centro del tenedor para cortar.
5. Cuando esté listo, deslice el botón de encendido a Impulsar/
Encender y la cuchilla en espiral para cortar la papa.
6. Cuando haya terminado de cortar en espiral, deslice el botón de encendido a Torcer/Apagar.
7. Retire el resto de las papas cortadas del tenedor para cortar y la papa cortada
en espiral del ELÉCTRICO TWISTER Y PEELER EN ESTILO DE 50S.
8. Repita los pasos 1 a 8 para cortar en espiral papas adicionales.
9. Cuando haya terminado de usar el ELÉCTRICO TWISTER Y PEELER EN ESTILO DE 50S,
separe el tenedor para cortar al girar en sentido antihorario de la montura del tenedor.
ESPIRAL EN UN PALO
1. A n de preparar EL ELÉCTRICO TWISTER Y PEELER EN ESTILO DE 50S,
mantenga pulsado el botón de liberación del embrague y mueva el brazo
para pelar al extremo más alejado de la montura del tenedor. Asegúrese de
que la liberación del brazo para pelar esté en posición de descenso.
2. Conecte el tenedor para cortar a la montura del tenedor
al alinear las muescas del tenedor para cortar con las
ranuras en la montura del tenedor, luego tuerza el
tenedor para cortar en sentido horario para jar.
3. Siga la sección de “INSTALAR CUCHILLAS A LA
MONTURA DE CUCHIILLAS” en la página 8 para instalar
la cuchilla en espiral a la montura de la cuchilla.
4. Luego, perfore con cuidado el centro de la papa,
longitudinalmente, con el extremo puntiagudo
del pincho de bambú. Pare cuando el extremo
puntiagudo del pincho de bambú llegue al extremo de la patata.
5. Enrosque el extremo visible del pincho de bambú a través del agujero cerca de la parte
superior de la cuchilla en espiral y recorte con muescas en la parte superior del panel
nal. Centre y presione el extremo de la papa en el centro del tenedor para cortar.
6. Cuando esté listo para pelar, deslice el botón de encendido a Impulsar/
Encender y la cuchilla en espiral para cortar en espiral la papa.
7. Cuando haya terminado de cortar en espiral, deslice el botón de encendido a Torcer/Apagar.
8. Retire con cuidado la papa del ELÉCTRICO TWISTER Y PEELER EN ESTILO
DE 50S y acomode los espirales de papas en el pincho de bambú.
9. Repita los pasos 1 a 8 para cortar en espiral papas adicionales.
10. Cuando haya terminado de usar el ELÉCTRICO TWISTER Y PEELER EN ESTILO DE 50S, separe
el tenedor para cortar al girar en sentido antihorario de la montura del tenedor.
Cuando haya terminado de utilizar el ELÉCTRICO TWISTER Y PEELER EN ESTILO
DE 50S, siga la sección sobre “RETIRAR LAS CUCHILLAS DE LA MONTURA DE LA
CUCHILLA” en la página 8 para retirar las cuchillas de la montura de la cuchilla.
Page 35

33
ESPAÑOL
33
INSTALACIÓN DE LAS CUCHILLAS A LA MONTURA DE LA CUCHILLA
¡TENGA MUCHO CUIDADO cuando manipule todas las cuchillas! Están
muy aladas y pueden causar lesiones si no se usan correctamente.
4. Al jarse, la cuchilla hará “clic” y quedará
en posición vertical.
3. Al mismo tiempo empuje la parte
superior de la cuchilla hacia atrás mientras
empuja la parte inferior de la cuchilla
hacia la montura del tenedor para que
encaje en su sitio. Algunos pueden
encontrar más fácil asegurar con las dos
manos ambos lados de la cuchilla.
1. Tome nota de las muescas en el
montaje de la cuchilla. Asegúrese de
que la liberación del brazo para pelar
esté en posición de descenso.
2. Incline y deslice la cuchilla elegida
entre las dos muescas en el brazo de
montaje de la cuchilla como se muestra a
continuación.
RETIRAR CUCHILLAS DE LA MONTURA
NOTA: Una vez instalada, la cuchilla será
difícil de retirar. Retirar la cuchilla requiere
más presión que la instalación. Algunos
pueden encontrar más fácil retirar con las
dos manos ambos lados de la cuchilla.
1. Al mismo tiempo empuje la parte inferior
de la cuchilla hacia atrás mientras empuja
la parte superior de la cuchilla hacia
la montura del tenedor para retirar. La
cuchilla hará “clic” cuando la retire.
Page 36

34
ESPAÑOL
34
CONSEJOS ÚTILES
ESCOGER LAS FRUTAS Y VERDURAS
El ELÉCTRICO TWISTER Y PEELER EN ESTILO DE 50S funciona mejor con frutas
y verduras que sean rmes, sin manchas, y con forma simétrica. Evite utilizar
frutas y verduras blandas. Las frutas y verduras blandas serán difíciles de
pelar y quedar en el mismo lugar en el tenedor para cortar o pelar.
¡Trate de utilizar el ELÉCTRICO TWISTER Y PEELER EN ESTILO DE 50S con papas
dulces, manzanas, remolachas, calabacines, pepinos, y mucho más!
PELE Y CORTE EN ESPIRAL O EN TROZOS AL MISMO TIEMPO
Ahorre tiempo al pelar al mismo tiempo que corta en trozos o en espiral. Mientras sigue
los pasos para cortar en espiral o en trozos, sólo asegúrese de que la liberación del brazo
para pelar esté en posición de ascenso para que el brazo pueda moverse libremente.
PELAR DEMASIADO O NO LO SUFICIENTE
Si la cuchilla para pelar está demorando mucho en pelar o no pela lo suciente, quizás
tenga que ajustar la cuchilla para pelar. Por lo general, la cuchilla para pelar funciona
mejor cuando se ajusta a 1 ⁄8 de pulgada de la cabeza del brazo para pelar. Para ajustar la
cuchilla para pelar, aoje un poco los tornillos. La cuchilla se puede mover hacia delante
para pelar más o hacia atrás para pelar menos. Apriete rmemente los tornillos después de
haber hecho los ajustes. Hallar el resultado deseado puede requerir algunas pruebas y más
ajustes de la cuchilla. NOTA: ¡Tenga cuidado al ajustar ya que la cuchilla está bien alada!
VIBRACIÓN Y ATASCAMIENTO DEL BRAZO PARA PELAR
Si resulta difícil de mover el brazo para pelar o éste no se mueve cuando el botón de
encendido se ha girado a Impulsar/encender, asegúrese de que el ELÉCTRICO TWISTER
Y PEELER EN ESTILO DE 50S esté limpio y sin papas cortadas en trozos. El almidón en las
papas puede volverse pegajoso al pelar y hacer que el movimiento del brazo para pelar
sea difícil. Una papa particularmente densa también puede causar que el brazo para pelar
vibre. Si esto sucede, una papa menos densa debe utilizarse, sino, podrá dañar el aparato.
LIMPIEZA Y MANTENIMIENTO
1. Asegúrese de que el botón de encendido esté en la posición de
Torcer/Apagar. Desconecte la unidad de la toma eléctrica.
2. Lave todas las piezas sueltas con agua tibia y jabón. Enjuáguelas y séquelas.
3. Limpie la base con un paño húmedo no abrasivo y a continuación séquela.
4. Cuando todas las piezas estén limpias y secas, coloque la cuchilla en espiral, la cuchilla
para trozos pequeños, la cuchilla para trozos medianos, el tenedor para cortar, el tenedor
para pelar y el cable de alimentación en el compartimiento de almacenamiento.
NOTA: Para evitar que el enchufe del motor se seque, nunca sumerja la base en
ningún líquido. No coloque las piezas en el lavavajillas. Siempre lávelas a mano.
Para prolongar la vida del ELÉCTRICO TWISTER Y PEELER EN ESTILO DE 50S,
asegúrese de seguir las instrucciones de limpieza tras cada uso.
Page 37

35
ESPAÑOL
35
RECETAS
Haga sus creaciones con el ELÉCTRICO TWISTER Y PEELER EN ESTILO DE 50S en un
horno, freidora, deshidratador o un microondas. ¡Una vez cocinado a su gusto, añada
sal, sazonador cajún, queso parmesano, o su propia innovación de condimentos!
Pruebe algunas de estas recetas de gran sabor:
PAPAS FRITAS DE BOLSA CON SABOR A BARBACOA Y EN ESPIRAL
• 1 papa grande
• 1/2 cucharadita
de pimentón
• 1/2 cucharadita
de sal con ajo
• 1/4 cucharadita
de azúcar
• 1/4 cucharadita
de ajo en polvo
• 1/8 de cucharadita
de mostaza molida
• 1/4 cucharadita de
chile en polvo
• Pizca de pimienta
de cayena
• 1 cuarto de
agua helada
• Aceite de canola,
para freidora
Siga las indicaciones de PAPAS FRITAS DE BOLSA EN
UN PALO en la página 6 para preparar la papa.
Al mantener la papa en la parrilla, sumerja
las papas en un recipiente grande con agua
helada durante al menos 30 minutos.
En un tazón pequeño, combine todos
los condimentos y especias.
Seque bien las papas y añádalas a la freidora. La papa
estará lista cuando tenga un color chocolate con dorado.
Transera las papas a las toallas de papel y esparza
uniformemente el condimento de barbacoa en las papas.
Disfrútelas de una vez.
Da una ración.
PANQUEQUES DE PAPAS TRITURADAS
• 2 huevos
• 2 cucharadas de
harina para todo uso
• 1/4 cucharadita de
polvo para hornear
• 1/2 cucharadita de sal
• 1/4 cucharadita
de pimienta
• 6 papas medianas,
peladas y trituradas
• 1/2 taza de cebolla
finamente picada
• 1/4 taza de
aceite vegetal
Con la cuchilla para trozos pequeños o la cuchilla
para trozos medianos, siga las instrucciones de
TRITURAR en la página 7 para preparar las papas.
En un tazón grande, bata los huevos, la harina, el polvo para
hornear, la sal y la pimienta. Mezcle las papas y cebollas.
Caliente el aceite en una sartén grande a fuego medio.
En los lotes, deje caer las cucharadas con
mezcla de papas en la sartén. Presiónelas para
aplanarlas. Cocinar unos 3 minutos por cada
lado, hasta que estén doradas y crujientes.
Drenar en toallas de papel.
Da seis porciones.
Page 38

36
ESPAÑOL
36
PAPAS AL HORNO CRUJIENTES
• 10 papas amarillas
medianas, peladas
y divididas
• 2 cucharadas de
aceite de oliva
• 1 cucharada de
mantequilla derretida
• Sal marina para regar
Siga las instrucciones de PELAR en la
página 8 para preparar las papas.
Corte las papas peladas longitudinalmente.
Coloque las papas en una olla grande con agua fría.
Póngalas a hervir a fuego alto. Hervir durante 5 minutos
y luego drenar. Coloque las papas con la cara plana
hacia abajo en una bandeja forrada con toallas de papel.
Déjelas reposar durante 20 minutos para que se enfríen.
Precaliente el horno a 350ºF (180ºC). Con una brocha
aplique un poco de aceite de oliva a 2 bandejas para
hornear. Mezcle la mantequilla, 1/4 cucharita sal marina
y el aceite de oliva restante en un recipiente pequeño.
Utilice un tenedor para raspar el lado curvo de la papa
longitudinalmente. Coloque las papas en una sola capa con
el lado plano hacia abajo en las bandejas para hornear.
Con una brocha, aplique mantequilla
o mezcla de aceite a las papas.
Cocinar en el horno durante 50 minutos o hasta que
estén doradas. Riégueles sal marina para servir.
Da 5 porciones.
PAPAS PICADAS CLÁSICAS
• 2 papas rojizas,
peladas y trituradas
• 2 cucharaditas de
mantequilla aclarada
• 1 pizca de pimentón,
o al gusto
• 1 pizca de pimienta
de cayena, o al gusto
• Sal y pimienta negra
molida al gusto
Con la cuchilla para trozos pequeños, al mismo
tiempo pele y triture las papas al seguir las
indicaciones de TRITURAR en la página 7.
Coloque las papas en trozos un recipiente grande
lleno de agua fría. Revuelva hasta que el agua
esté turbia, drene y cubra las papas con agua
fría. Revuelva otra vez para disolver el exceso de
almidón. Drene las papas bien, séquelas con una
toalla de papel, y escurra el exceso de humedad.
Caliente la mantequilla aclarada en una sartén grande
antiadherente a fuego medio. Espolvoree las patatas
en trozos con mantequilla caliente y sazónelas con sal,
pimienta negra, pimienta de cayena y pimentón.
Cocine las papas hasta formar una costra dorada en la
parte inferior, al menos 5 minutos. Siga cocinando y
revuelva hasta que las papas estén totalmente doradas,
al menos más de 5 minutos. Da dos porciones.
Page 39

37
ESPAÑOL
37
AROS DE CEBOLLA
• 2 tazas de suero
de mantequilla
•
•2cebollasgrandes
trituradas
• •2tazasdeharina
para todo uso
• •2cucharadasde
harina de maíz
• •1cucharadadesal
• •1cucharada
de pimienta
negra molida
• •2cucharaditasde
pimiento de cayena
• •1/2cucharadita
de pimentón
• •1cuartodeaceite
vegetal para freír o
como sea necesario
Siga las instrucciones de TRITURAR en la página 7 usando
ya sea la cuchilla para trozos pequeños o la cuchilla
para trozos medianos, para preparar las cebollas.
Vierta el suero de mantequilla en un tazón. Coloque
la cebolla triturada en el suero de mantequilla, cubra
el tazón con papel plástico y refrigérela por 1 hora.
Caliente el aceite en una freidora o sartén
grande a 400 grados F (200 grados C).
Bata la harina, la harina de maíz, la sal, la pimienta
negra, pimienta de cayena y el pimentón en un tazón.
Al trabajar en lotes, retire las cebollas del suero de
mantequilla, deje que el exceso de líquido escurra, coloque
las cebollas en la mezcla de harina y revuelva para cubrir.
Deshágase del exceso de mezcla de harina con cebollas.
Cocine los aros de cebolla en el aceite precalentado
hasta que estén dorados, de 3 a 4 minutos.
Transera los anillos con una cuchara ranurada a un
plato cubierto de toallas de papel para drenarlos.
Da ocho porciones.
PAPAS FRITAS DE BOLSA CON QUESO PARMESANO Y CALABACÍN EN UN PALO
• Aceite vegetal
para freidora
• 1 taza de Panko
• 1/2 taza de queso
parmesano rallado
• 2 calabacines
cortados en espiral
en un palo
• 1/2 taza de harina
para todo uso
• 2 huevos grandes,
batidos
Siga las indicaciones de PAPAS FRITAS DE BOLSA EN UN
PALO en la página 6 para preparar los calabacines.
Añada aceite vegetal a la freidora y deje que
pase de llama media a llama alta.
En un tazón grande, combine el
Panko y el queso y repártalo.
Al trabajar en lotes, rebose las papas fritas de bolsa
con calabacines en un palo con harina, sumérjalas en
los huevos, luego rebóselas en la mezcla de Panko,
presionándolas con cuidado para cubrirlas.
Añada calabacines a la freidora, uno a la vez, y cocine
hasta que estén crujientes y dorados uniformemente.
Transéralos al plato cubierto con toallas de papel.
Da cuatro porciones.
Page 40

38
ESPAÑOL
38
DEVOLUCIONES Y GARANTÍA
SI LA UNIDAD NO FUNCIONA O ESTÁ DAÑADA AL SACARLA POR PRIMERA VEZ
DE LA CAJA, DEVUÉLVALA AL LUGAR DE COMPRA INMEDIATAMENTE.
ELÉCTRICO TWISTER Y PEELER EN ESTILO DE 50S / PT300RETRORED
Si tiene preguntas, contacte con nosotros por correo electrónico o por el número
telefónico de servicio al cliente que aparece a continuación en el horario de
8:00 AM a 5:00 PM, de lunes a viernes, Hora Estándar del Este.
Distribuida por:
Nostalgia Products LLC
1471 Partnership Dr.
Green Bay, WI 54304-5685
Servicio al cliente
Teléfono: (920) 347-9122
Web: www.nostalgiaproducts.com
Solicitud de servicio al cliente
Para enviar una solicitud al Servicio al Cliente, vaya a www.nostalgiaproducts.com, llene
el formulario de Solicitud de Servicio al Cliente y haga clic en el botón Enviar.
Un representante le contactará tan pronto como sea posible.
Términos de garantía del producto
Po este medio, Nostalgia Products LLC (la “Compañía”) garantiza que por un período de un (1) año a
partir de la fecha de compra original, este producto estará sin defectos en cuanto a materiales y mano
de obra en uso normal en casa, siempre que el producto se maneje y mantenga de acuerdo con las
instrucciones de manejo. Como único y exclusivo remedio en virtud de esta garantía, la Compañía, a
su discreción, podrá optar por reparar o sustituir el producto que se encuentre defectuoso, o emitir un
reembolso por el producto durante el período de garantía. Esta garantía sólo está disponible para el
comprador original minorista del producto a partir de la fecha inicial de compra al por menor, y sólo es
válida con el recibo de compra original, y como prueba de la fecha de compra, es necesario obtener los
benecios de la garantía. Todos los reclamos de garantía deben hacerse a la atención de la Compañía
dentro del período de garantía y no más tarde que 30 días desde la imposibilidad de realizarlo. Esta
garantía no cubre el desgaste normal o daños ocasionados por el embarque, malos manejos, mal uso,
accidentes, alteración, piezas de cambio incorrectas, o algo distinto al uso doméstico normal. Es posible
que deba devolver el producto (con los gastos de envío pagados por usted) para inspección y evaluación.
Los costos de envío no son reembolsables. La empresa no se hace responsable por devoluciones
dañadas o perdidas en tránsito. A menos que se indique lo contrario especícamente permitido por
las instrucciones de manejo, esta garantía sólo se aplica al uso en interiores de las viviendas. Para
realizar una reparación bajo esta garantía, comuníquese con la Compañía mediante el número de
teléfono indicado anteriormente o al llenar el formulario de consulta para el servicio de Atención al
Cliente en www.nostalgiaproduct s.com. El período de garantía sólo es válido en EE.UU. y Canadá.
Esta garantía está en lugar de cualquier otra garantía, expresa o implícita, incluso las garantías de
comerciabilidad y conveniencia para un propósito en particular, que quedan excluidas en la medida
permitida por la ley. En ningún caso la compañía será responsable de cualquier daño indirecto, incidental,
consecuente, especial o daños que surjan o estén relacionados con este producto o la utilización del
mismo. Algunos estados, provincias o corregimientos no permiten la exclusión o la limitación de daños
incidentales o consecuentes, por lo que la exclusión o la limitación anterior quizás no se aplique a usted.
Esta garantía no se aplica a mercancía reelaborada.
Lea las instrucciones de manejo cuidadosamente. El incumplimiento
de las instrucciones de manejo anulará esta garantía.
Para obtener más información, visítenos en línea en www.nostalgiaproducts.com.
Me Gusta en Facebook en www.facebook.com / NostalgiaElectrics.
Siga nuestros consejos sobre Pinterest en www.pinterest.com / nostalgiaelctrx.
Tweet con nosotros en Twitter en www.twitter.com / NostalgiaElctrx.
Page 41

 Loading...