

Page 1

All products are trademarks of Nostalgia Products LLC.
Worldwide design & utility patented or patents pending.
© 2018 Nostalgia Products LLC.
www.nostalgiaproducts.com
(rev. 03/19/18 TK)
Page 2

BSET300
SERIES
3-in-1 Breakfast Station
Estacion ÓN de Desayuno 3 en 1
Machine À Petit-DÉjeunder 3 en Un
Instruction Manual
Manual de Instrucciones
Manuel d'utilisation
Page 3

Page 4
Make everyday a party!
Visit www.nostalgiaproducts.com for more fun products.
CONTENTS
SAFETY . . . . . . . . . . . . . . . . . . . . . . . . . . . . . . . . . . . . . . . . . 2
IMPORTANT SAFEGUARDS . . . . . . . . . . . . . . . . . . . . . . . . . . . . . 3
ADDITIONAL IMPORTANT SAFEGUARDS . . . . . . . . . . . . . . . . . . . . 3
INTRODUCTION . . . . . . . . . . . . . . . . . . . . . . . . . . . . . . . . . . . . 5
PARTS & ASSEMBLY . . . . . . . . . . . . . . . . . . . . . . . . . . . . . . . . . . 5
HOW TO OPERATE . . . . . . . . . . . . . . . . . . . . . . . . . . . . . . . . . . 7
HELPFUL TIPS . . . . . . . . . . . . . . . . . . . . . . . . . . . . . . . . . . . . . 8
CLEANING & MAINTENANCE . . . . . . . . . . . . . . . . . . . . . . . . . . . . 8
RECIPES . . . . . . . . . . . . . . . . . . . . . . . . . . . . . . . . . . . . . . . . . 9
RETURNS & WARRANTY . . . . . . . . . . . . . . . . . . . . . . . . . . . . . . . 10
SAFETY
ENGLISH
Your safety and the safety of others is very important.
We have provided many important safety messages in this manual and
on your appliance. Always read and obey all safety messages.
This is the safety alert symbol.
This symbol alerts you to potential hazards that can
cause serious injury to you and others.
All safety messages will follow the safety alert symbol.
All safety messages will tell you what the potential hazard is, tell you how to reduce the
chance of injury, and tell you what can happen if the instructions are not followed.
Appliance Specications:
120 Volts, 60 Hertz, 1500 Watts
HOUSEHOLD USE ONLY
THIS PRODUCT IS FOR USE IN 120V AC OUTLET ONLY.
Refer to www.nostalgiaproducts.com/user-manuals/ for the most updated manual.
2
Page 5

IMPORTANT SAFEGUARDS
A person who has not read and understood all operating and safety instructions
is not qualied to operate this appliance. All users of this appliance must read and
understand this Instruction Manual before operating or cleaning this appliance.
When using electrical appliances, basic safety precautions
ENGLISH
should always be followed, including:
1. Read all instructions before operating this appliance.
2. DO NOT TOUCH the hot surfaces. Use handles or knobs.
3. This appliance is NOT A TOY.
4. Unsupervised young children and cognitively challenged
individuals should never operate this appliance.
5. Close supervision is necessary when any appliance is used by or near children.
6. To protect against electrical shock do not immerse cord, plug
or any part of this unit in water or other liquids.
7. Unplug from outlet when not in use, before removing parts and before cleaning.
Allow to cool before putting on or taking o any parts, and before cleaning.
8. DO NOT operate any appliance with a damaged cord or plug, or after the appliance
malfunctions, or if the appliance has been damaged in any manner. Return the
appliance to the nearest repair shop for examination, repair or adjustment.
9. The manufacturer does not recommend the use of accessory attachments other than
what is provided by the manufacturer. Use of attachments may cause injuries.
10. DO NOT use the appliance for other than its intended use.
11. DO NOT use outdoors. FOR HOUSEHOLD USE ONLY.
12. DO NOT place on or near a hot gas or electric burner, or in a heated oven.
13. DO NOT let cord hang over edge of table or counter, or touch hot surfaces.
14. NEVER leave unit unattended while in use or when plugged into an outlet.
15. Extreme caution must be used when moving an appliance containing hot food.
16. Always attach plug to appliance rst, then plug cord in the wall outlet. To
disconnect, turn any control to "o," then remove plug from wall outlet.
ADDITIONAL IMPORTANT SAFEGUARDS
Operating Safety Precautions
1. DO NOT touch hot surfaces. Use handles or knobs.
2. Extreme caution must be used when moving an appliance
containing hot oil or other hot liquids.
3. Scalding may occur if the lid of coee maker is opened during the brewing cycles.
4. The container is designed for use with this appliance. It must never be used on a range top.
5. DO NOT set a hot container on a wet or cold surface.
6. DO NOT use a cracked container or a container with a loose or weakened handle.
7. Oversize foods or metal utensils must not be inserted in a toaster
oven as they may create a re or risk of electrical shock.
3
Page 6

8. A re may occur if the toaster oven is covered or touching ammable
material, including curtains, draperies, walls and the like, when in operation.
DO NOT store any item on top of the appliance when in operation.
9. Extreme caution should be exercised when using containers
constructed of other than metal or glass.
10. DO NOT store any materials, other than manufacturers
recommended accessories, in this oven when not in use.
11. DO NOT place any of the following materials in the oven:
paper, cardboard, plastic, and the like.
12. DO NOT cover crumb tray or any part of the oven with metal
foil. This will cause overheating of the oven.
13. Use extreme caution when removing tray or disposing of hot grease.
Instructions for the Electrical Cord and Plug
1. This appliance has a polarized plug (one blade is wider than the other). To reduce the
risk of electrical shock, this plug is intended to t into a polarized outlet only one way.
If the plug does not t fully into the outlet, reverse the plug. If it still does not t,
contact a qualied electrician. Do not attempt to modify the plug in any way.
2. A short power supply cord is provided to reduce the risk resulting
from becoming entangled or tripping over a long cord.
3. If a long detachable power-supply cord or extension cord is used:
• Extension cords can be used if care is exercised in their use.
• The marked electrical rating of the cord or extension cord should
be at least as great as the electrical rating of the appliance.
• When using a longer cord or extension cord, make sure that
the cord does not drape over a countertop or tabletop where
it can be pulled on or tripped over unintentionally.
4. The manufacturer does not recommend using this machine in countries that do not
support 120V AC even if a voltage adapter, transformer, or converter is in use.
ENGLISH
SAVE THESE INSTRUCTIONS!
INTRODUCTION
Thank you for purchasing the 3-IN-1 BREAKFAST STATION from Nostalgia™! The 3-IN-1
BREAKFAST STATION allows you to make hot and delicious breakfast meals and coee all
in one unit! Use the included toaster oven for toasting bread, buns, bagels and more. Grill
pancakes, sausages, bacon, or eggs on the griddle while your bread is toasting and coee
is brewing! With the 3-IN-1 BREAKFAST STATION, simple meals are ready in minutes!
4
Page 7
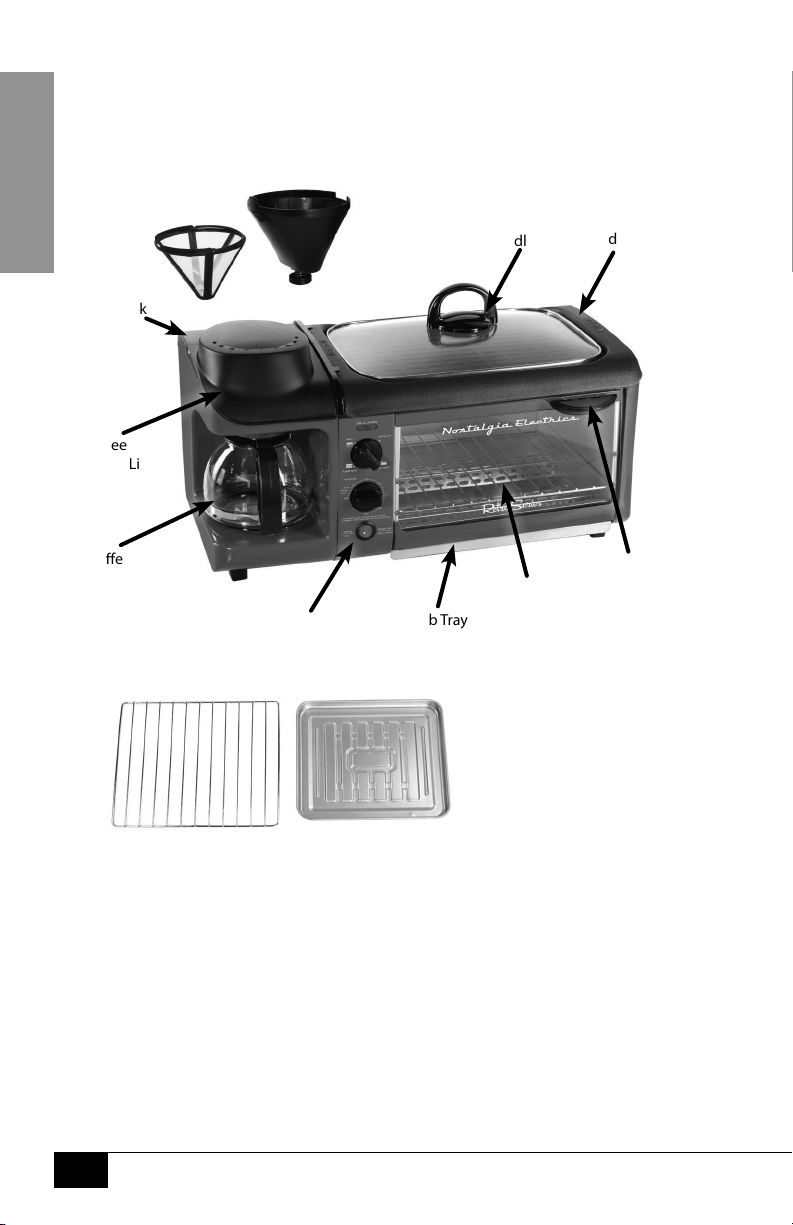
PARTS & ASSEMBLY
PARTS
Your 3-IN-1 BREAKFAST STATION requires little assembly.
ENGLISH
Water Tank
Coee
Maker Lid
Coee Filter
Filter Basket
Griddle Lid
& Handle
Removeable
Nonstick
Griddle Plate
Coee Pot
For use in Toaster Oven:
Wire Rack
Control Panel
Crumb Tray
Oven Tray
Toaster
Oven
Oven Door
& Handle
5
Page 8

COFFEE MAKER
1. Place Coee Filter inside of Filter Basket.
2. Lift Coee Maker Lid
3. Place both inside of Coee Maker.
CONTROL PANEL
POWER LIGHT:
Oven with Grill indicator
ENGLISH
FUNCTION SWITCH:
Turn dial to the desired setting:
GRILL, TOAST/BAKE, WARM/
HEAT, or OVEN OFF.
TIMER:
Turn the knob clockwise to switch
on the appliance and then set
the desired amount of cooking
time (0-30 minutes). When the
set time is reached, a chime bell
will be heard and the appliance
will shut o automatically.
SELECTOR SWITCH:
Turn the Selector Switch to the
desired setting: COFFEE / 3 in 1,
or COFFEE OFF / Grill/Oven.
To switch o the oven, turn the Timer to "OFF"
To switch o the coee maker, turn the
Selector Switch to "COFFEE OFF"
6
Page 9

HOW TO OPERATE
• Before rst use, remove all accessories including Coee Pot, Coee
Filter, Nonstick Griddle Plate and Trays and wash with clean water to
remove any debris. Dry parts thoroughly and reassemble.
• Place the 3-IN-1 BREAKFAST STATION on a stable surface near an
ENGLISH
electrical outlet before using to cook or brew coee.
• Always make sure that the cord is away from any water source.
• Plug the cord into an electrical socket.
TOASTER OVEN
1. For optimal Bake performance, turn the Function Switch to
Bake and preheat appliance for 4-5 minutes.
2. Once appliance is preheated, turn the Function Selector to the desired position.
• Reheat-Warm Mode: Only the lower heating element will heat up to
bake, which allows you to reheat food without roasting it.
• Bake-Toast Mode: Both heating elements heat up to bake and roast the food.
• Broil-Grill Mode: Only the upper heating element heats up in order
to roast the food, or heat up the Nonstick Griddle Plate.
3. Place the food to be cooked on the Wire Rack. If food contains oil, grease
or juices, make sure that Oven Tray is in place on Wire Rack rst.
4. Turn the Timer to the required cooking time. The pilot light
will come on, indicating that the oven is heating.
5. If you are cooking food for less than 5 minutes, rst turn the Timer past
the 5 minute mark and then back to the desired cooking time.
6. A bell will ring to signal the end of the cooking cycle.
The appliance will switch o automatically.
7. When cooking cycle has nished, turn the Function Selector to
OVEN OFF, open the Oven Door and remove the food from the Wire
Rack and/or Oven Tray using an oven mitt or pot holder.
8. Unplug appliance when nished and let it cool completely.
NONSTICK GRIDDLE
1. Apply a thin coat of vegetable oil to surface of Nonstick Griddle Plate to protect nish.
2. Turn Function Selector to Broil-Grill mode to begin heating
Nonstick Griddle Plate. Allow to preheat for 3-5 minutes.
3. When preheated, begin to cook breakfast meat, eggs, silver dollar pancakes or
desired food item. Cooking time will vary depending on the items being cooked.
4. When nished cooking, turn Function Selector to OVEN OFF
position and remove food using a rubber spatula.
5. NEVER use a metal spatula, fork or other utensil to remove food,
as this could scratch and damage the nonstick coating.
6. Unplug appliance and allow to cool completely before
cleaning or removing Nonstick Griddle Plate.
7
Page 10

COFFEE MAKER
1. Put desired amount of coee grounds into Coee Filter
and place Coee Filter inside of Filter Basket.
2. Pour desired amount of clean, cold water into the Water Tank.
Never exceed the maximum level indicated.
3. Make sure that Coee Pot is on burner.
4. Close Coee Maker Lid and ip Selector Switch to the COFFEE/3 in 1 position.
5. While coee is brewing, DO NOT open Coee Maker Lid as this could cause scalding.
6. When coee has nished brewing, ip Selector Switch to COFFEE OFF position.
7. Unplug appliance when nished and allow hot plate beneath
Coee Pot to cool completely before cleaning.
8. Coee maker is equipped with a non-drip valve that will automatically
operate to stop drops of coee dripping onto the hotplate. However, if any
coee splashes or drips onto the hot plate beneath the Coee Pot, clean it
with a dry, non-abrasive cloth after appliance has cooled completely.
HELPFUL TIPS
BURNING/SMOKING
If the machine is burning or smoking during cooking, turn all knobs
and switches to the OFF position to end the cooking cycles.
Smoking may also be caused by excess crumbs or grease stuck inside the machine.
To prevent smoking, make sure to empty and clean the Crumb Tray after each use.
NONSTICK SURFACE
It is normal for appliances with nonstick coating to emit a slight odor and smoke
during the rst few uses. The odor and smoking should dissipate with normal usage.
Remember to always coat nonstick surface with vegetable oil
before each use to protect the nonstick nish.
ENGLISH
CLEANING & MAINTENANCE
Make sure the unit is unplugged before cleaning. Allow all parts to COOL to the
touch, especially the Toaster Oven, Griddle Plate, Coee Pot and Crumb Tray.
To prolong the life of your 3-IN-1 BREAKFAST STATION, please follow these simple
instructions for maintenance. Never place the appliance in a dishwasher.
• Make sure the 3-IN-1 BREAKFAST STATION is unplugged and
completely cooled before storing or cleaning.
• Remove Griddle Plate, Wire Rack and Crumb Tray. Wash them using warm, soapy water
and a non-abrasive sponge or cloth. Dry thoroughly with a dry, non-abrasive cloth.
• Clean outer surface of the 3-IN-1 BREAKFAST STATION with a dry, nonabrasive cloth when it is unplugged and completely cooled.
• Clean interior of the Toaster Oven with a damp (not wet), non-abrasive cloth. DO NOT use a
scouring pad on the interior of the Toaster Oven. Dry thoroughly with a non-abrasive cloth.
8
Page 11

• Clean the Glass Door of the Toaster Oven with glass cleaner or mild detergent
and a damp, non-abrasive cloth. DO NOT use an abrasive cloth or scouring pad as
they may scratch the glass. Dry thoroughly using a dry, non-abrasive cloth.
• When cleaning the coee lter and coee funnel, open the lid to the coee
maker and hold each side of the coee funnel and pull straight up.
• Wash Coee Filter and Coee Funnel in warm, soapy water with a non-
ENGLISH
abrasive sponge or cloth. Dry thoroughly using a dry, non-abrasive cloth.
• Reassemble all parts after cleaning and drying them thoroughly.
• Do not operate Toaster Oven without at least one piece of bread in place.
• Never use the 3-IN-1 BREAKFAST STATION without the Griddle Plate and Crumb Tray in place.
• Store 3-IN-1 BREAKFAST STATION in a cool, dry place. Always store indoors. NEVER
store appliance without unplugging and allowing to cool completely rst.
• DO NOT wrap cord tightly around the appliance as this
could loosen the cord or cause it break.
RECIPES
Use your 3-IN-1 BREAKFAST STATION for a quick, easy-to-serve meal:
• A Variety of Sausages and Patties (Pork, Beef, Turkey, Veggie, or Chicken)
• Slider Burgers & Buns
• Breakfast Sandwiches
• Bacon, Eggs & Toast
• Silver Dollar Pancakes
• Bagels and English Muns
and much more!
9
Page 12

RETURNS & WARRANTY
SHOULD YOUR UNIT NOT WORK OR IF DAMAGED WHEN YOU FIRST TAKE IT OUT OF
THE BOX, PLEASE RETURN IT TO THE PLACE OF PURCHASE IMMEDIATELY.
3-IN-1 BREAKFAST STATION / BSET300 SERIES
Should you have any questions, please contact us via email or at the customer service number listed
below between the hours of 8:00 AM and 5:00 PM, Monday through Friday, Central Standard Time.
Distributed by:
Nostalgia Products LLC
1471 Partnership Dr.
Green Bay, WI 54304-5685
Customer Service
Phone: (920) 347-9122
Web: www.nostalgiaproducts.com
Customer Service Inquiry
To submit a Customer Service inquiry, go to www.nostalgiaproducts.com and ll
out the Customer Service Inquiry form and click the Submit button.
A representative will contact you as soon as possible.
Product Warranty Terms
Nostalgia Products LLC (the “Company”) hereby warrants that for a period of one (1) year from the
date of original purchase, this product will be free of defects in material and workmanship under
normal home use, provided that the product is operated and maintained in accordance with the
operating instructions. As the sole and exclusive remedy under this warranty, the Company will
at its discretion either repair or replace the product found to be defective, or issue a refund on the
product during the warranty period. This warranty is only available to the original retail purchaser of
the product from the date of initial retail purchase, and is only valid with the original sales receipt, as
proof of purchase date is required to obtain warranty benets. All warranty claims must be brought
to the attention of the Company within the warranty period and no later than 30 days of the failure
to perform. This warranty does not cover normal wear or damage caused by shipping, mishandling,
misuse, accident, alteration, improper replacement parts, or other than ordinary household use.
You may be required to return the product (with shipping prepaid by you) for inspection and
evaluation. Return shipping costs are not refundable. The Company is not responsible for returns
damaged or lost in transit. Unless otherwise specically permitted by the operating instructions, this
warranty applies to indoor household use only. In order to obtain service under this warranty, please
contact the Company at the telephone number listed above or by lling out the Customer Service
Inquiry Form located at www.nostalgiaproducts.com. Warranty valid only in USA and Canada.
This warranty is in lieu of all other warranties, expressed or implied, including warranties of
merchantability and tness for a particular purpose, which are hereby excluded to the extent
permitted by law. In no event shall the Company be liable for any indirect, incidental, consequential,
or special damages arising out of or in connection with this product or the use thereof. Some
states, provinces or jurisdictions do not permit the exclusion or limitation of incidental or
consequential damages, so the foregoing exclusion or limitation may not apply to you.
This warranty does not apply to re-manufactured merchandise.
Please read the operating instructions carefully. Failure to comply
with the operating instructions will void this warranty.
For more information, visit us online at www.nostalgiaproducts.com.
Like us on Facebook at www.facebook.com/NostalgiaElectrics.
Follow our boards on Pinterest at www.pinterest.com/nostalgiaelctrx.
Tweet along with us on Twitter at www.twitter.com/NostalgiaElctrx.
ENGLISH
10
Page 13

¡Convierta todos los días en una etsa!
Visite www.nostalgiaproducts.com para ver más productos divertidos.
CONTENIDO
SEGURIDAD . . . . . . . . . . . . . . . . . . . . . . . . . . . . . . . . . . . . . . 11
PROTECCIONES IMPORTANTES . . . . . . . . . . . . . . . . . . . . . . . . . . 12
PROTECCIONES IMPORTANTES ADICIONALES . . . . . . . . . . . . . . . . . 12
INTRODUCCIÓN . . . . . . . . . . . . . . . . . . . . . . . . . . . . . . . . . . . . 14
PIEZAS Y ENSAMBLAJE . . . . . . . . . . . . . . . . . . . . . . . . . . . . . . . . 14
CÓMO FUNCIONA . . . . . . . . . . . . . . . . . . . . . . . . . . . . . . . . . . 16
CONSEJOS ÚTILES . . . . . . . . . . . . . . . . . . . . . . . . . . . . . . . . . . 17
LIMPIEZA Y MANTENIMIENTO . . . . . . . . . . . . . . . . . . . . . . . . . . . 17
RECETAS . . . . . . . . . . . . . . . . . . . . . . . . . . . . . . . . . . . . . . . . . 18
DEVOLUCIONES Y GARANTÍA . . . . . . . . . . . . . . . . . . . . . . . . . . . 19
SEGURIDAD
ESPAÑOL
Su seguridad y la de otras personas es muy importante.
Hemos proporcionado numerosos mensajes de seguridad importantes en este manual
y en su electrodoméstico. Siempre lea y obedezca todos los mensajes de seguridad.
Todos los mensajes de seguridad estarán antecedidos por el símbolo de alerta.
Todos los mensajes de seguridad le dirán de qué peligro potencial se trata, cómo reducir
la posibilidad de lesiones y qué puede ocurrir si no se obedecen las instrucciones.
Especicaciones del electrodoméstico:
120 Voltios, 60 Hercios, 1500 Vatios
USO DOMÉSTICO SOLAMENTE
ESTE PRODUCTO ES PARA USO EN SALIDA 120V AC SOLAMENTE.
Visite www.nostalgiaproducts.com/user-manuals/ para ver el manual más actualizado.
11
11
Este es el símbolo de alerta de seguridad.
Este símbolo le avisa de los peligros potenciales
que pueden matar o herir a otros.
Page 14

PROTECCIONES IMPORTANTES
Una persona que no haya leído y comprendido todas las instrucciones
de uso y seguridad no está calicada para utilizar este aparato. Todos
los usuarios de este dispositivo deben leer y comprender este Manual
de instrucciones antes de utilizar o limpiar este aparato.
Cuando utiliza aparatos eléctricos, siempre se deben seguir algunas
medidas básicas de seguridad que incluyen las siguientes:
1. Lea todas las instrucciones antes de utilizar este aparato.
2. NO TOQUE las supercies calientes. Use agarraderas o mangos.
3. Este aparato NO ES UN JUGUETE.
4. Sin supervisión los niños y las personas con discapacidad
intelectual nunca deben usar este aparato.
5. Es necesaria una supervisión estricta cuando los niños utilicen
el aparato o cuando se encuentren a su alrededor.
6. Como medida de protección contra el riesgo de descarga eléctrica, no sumerja el
cable, los enchufes ni ninguna otra parte de la unidad en agua ni en otros líquidos.
7. Desenchufe el aparato de la red cuando no lo esté utilizando, antes
de retirar piezas y antes de su limpieza. Déjelo enfriar antes de colocar
o retirar cualquiera de las piezas, y antes de la limpieza.
8. NO utilice ningún aparato con el cable o el enchufe dañados, ni si el aparato
tiene desperfectos o SI se ha dañado de cualquier manera. Devolver el
aparato al taller de reparación más cercano para su reparación o ajuste.
9. El fabricante no recomienda el uso de otros aditamentos o accesorios diferentes a los
proporcionados por el fabricante. El uso de accesorios puede provocar lesiones.
10. NO utilice el aparato para otro uso que no sea el cual para el que está destinado.
11. NO lo utilice en exteriores. ÚNICAMENTE PARA USO INTERIOR
12. NO coloque el aparato sobre o cerca de un fogón de gas
o eléctrico o dentro de un horno caliente.
13. NO permita que el cable cuelgue sobre el borde de la mesa o
del mostrador, ni que toque supercies calientes.
14. NUNCA deje la unidad desatendida mientras esté en uso o
cuando esté enchufada a una toma de corriente.
15. Debe ser extremadamente cuidadoso al mover cualquier aparato con comida caliente.
16. Siempre conecte primero el enchufe al aparato, luego enchufe el
cable a la toma de corriente. Para desconectar, mueva todos los
controles a “o” y luego retire el enchufe del tomacorriente.
ESPAÑOL
PROTECCIONES IMPORTANTES ADICIONALES
Precauciones de seguridad operativa
1. NO toque las supercies calientes. Use agarraderas o mangos.
2. Debe ser extremadamente cuidadoso al mover un aparato
que contenga aceite u otros líquidos calientes.
3. Si se abre la tapa de la cafetera durante los ciclos de preparación
del café podrán producirse quemaduras.
12
12
Page 15

4. El recipiente está diseñado para usarse con este aparato.
Nunca se debe utilizar en un rango superior.
5. NO coloque un recipiente caliente sobre una supercie fría o húmeda.
6. NO utilice un recipiente rajado o un recipiente con una agarradera oja o debilitada.
7. Los alimentos muy grandes o utensilios de metal no deben insertarse en un
horno tostador, ya que pueden crear incendios o descargas eléctricas.
8. Puede ocurrir un incendio si el horno tostador se cubre o tiene contacto
con material inamable, incluyendo cortinas, cortinajes, paredes y similares,
cuando están en funcionamiento. NO almacene ningún elemento en
la parte superior del aparato cuando esté en funcionamiento.
9. Hay que tener sumo cuidado al utilizar recipientes con
materiales que sean distintos al metal o al vidrio.
10. NO almacene ningún otro material distinto al de los accesorios recomendados
por el fabricante en este horno cuando no esté en uso.
11. NO coloque ninguno de los materiales siguientes en el horno: papel, cartón, plástico, etc.
12. NO cubra la bandeja de migas ni ninguna parte del horno con hojas
de metal. Esto causará sobrecalentamiento del horno.
13. Tenga mucho cuidado cuando retire la bandeja o elimine la grasa caliente.
Instrucciones para el cable eléctrico y el enchufe
1. El aparato tiene un enchufe polarizado (una patita más ancha). Se diseñó para
reducir el riesgo de descarga eléctrica, dado que entra en un tomacorriente
polarizado solo en una posición. Si el enchufe no entra bien en la toma
de corriente, déle la vuelta. Si aún así no entra,comuníquese con un
electricista calicado. No modique el enchufe de ninguna manera.
2. Se provee un cable de alimentación corto para reducir el riesgo
resultantede enredarse o tropezar con un cable largo.
3. Si se utiliza un cable alargador o un cable de alimentación más largo:
ESPAÑOL
• Unos cables de extensión se pueden utilizar si se tiene cuidado con su uso.
• Las características nominales del grupo de cables o del cable de
extensión deben ser al menos iguales a las del aparato.
• Cuando se utiliza un cable largo o cable de extensión, asegúrese de
que el cable no sobresalga de la encimera ni una mesa ya que se
puede halar o tropezarse con el cable involuntariamente.
4. El fabricante no recomienda el uso de esta máquina en países que no admiten 120V
CA incluso si se está usando un adaptador, transformador o convertidor de voltaje.
¡GUARDE ESTAS INSTRUCCIONES!
INTRODUCCIÓN
¡Gracias por comprar la ESTACIÓN DE DESAYUNO 3 en 1 de Nostalgia™! ¡La ESTACIÓN
DE DESAYUNO 3 en 1 le permite elaborar comida y café para obtener desayunos
calientes y deliciosos, todo en uno! Incluye un horno tostador para tostar pan, bollos,
panecillos y mucho más. Cocine panqueques en miniatura, salchichas, empanadas o
huevos en la plancha mientras tuesta pan y prepara café fresco, ¡todo al mismo tiempo!
¡Con la ESTACIÓN DE DESAYUNO 3 en 1 tendrá comidas simples listas en minutos!
13
13
Page 16

PIEZAS Y ENSAMBLAJE
PARTES
Su ESTACIÓN DE DESAYUNO 3 en 1 requiere poca ensamblaje.
Cesta del
Filtro
Filtro de Café
Tanque
de Agua
Tapa de la
Cafetera
Tapa y Manija
de la Parrilla
Placa de la Parrilla
Antiadherente
Removible
ESPAÑOL
Vasija
de Café
Panel de Control
Para uso en horno tostador:
Parrilla
Bandeja de
Migas
Bandeja del Horno
Horno
Tostador
Puerta y
Manija del
Horno
14
14
Page 17

CAFETERA
1. PColoque el ltro de café dentro de la cesta del ltro.
2. Levante la tapa de la cafetera.
3. Coloque ambas piezas dentro de la cafetera
PANEL DE CONTROL
LUZ DE ENCENDIDO:
Horno con indicador de parrilla
ESPAÑOL
INTERRUPTOR DE FUNCIONES:
Gire el disco selector al ajuste
deseado: GRILL, TOAST/BAKE,
WARM/ HEAT, u OVEN OFF.
TEMPORIZADOR:
Gire la perilla en sentido horario para
encender el aparato y luego ajuste la
cantidad deseada de cocción (0-30
minutos). Cuando se haya alcanzado
el ajuste de tiempo, se escuchará
una campanilla y el aparato se
apagará automáticamente.
INTERRUPTOR SELECTOR:
Gire el interruptor selector al
ajuste deseado: COFFEE / 3 in 1,
o COFFEE OFF / Grill/Oven.
Para apagar el horno, gire el Temporizador en "OFF"
Para apagar la cafetera, gire el selector a "COFFEE OFF"
15
15
Page 18

CÓMO FUNCIONA
• Antes de utilizarlo por primera vez, retire todos los accesorios que incluyen vasija de café,
ltro de café, placa de la parrilla antiadherente y bandejas, y lavar con agua limpia para
eliminar cualquier resto de suciedad. Seque las piezas a fondo y vuelva a ensamblar.
• Coloque la ESTACIÓN DE DESAYUNO 3 EN 1 en una supercie estable
cerca de una toma eléctrica antes de cocinar o preparar café.
• Asegúrese siempre de que el cable esté alejado de cualquier fuente de agua.
• Conecte el cable en una toma de corriente.
HORNO TOSTADOR
1. Para obtener un rendimiento óptimo, gire el interruptor de funciones
para hornear y precalentar durante 4 ó 5 minutos.
2. Una vez que se haya precalentado el aparato, gire el
selector de funciones a la posición deseada.
• Modo Recalentar-Calentar: sólo el elemento calefactor inferior se calentará
para hornear, lo que permitirá recalentar la comida sin tostarla.
• Modo Hornear-Tostar: Ambos elementos calefactores se
calentarán para hornear y tostar la comida.
• Modo Asar-Emparrillar: sólo el elemento calefactor superior se calentará
para tostar la comida, o calentar la placa de la parrilla antiadherente.
3. Coloque la comida a cocinarse en la parrilla. Si el alimento contiene aceite, grasa o
jugos, asegúrese de que la bandeja del horno esté colocada primero en la parrilla.
4. Gire el temporizador al tiempo de cocción requerido. La luz piloto
se encenderá lo que indica que el horno está calentando.
5. Si está cocinando comida por menos de 5 minutos, gire primero el Temporizador más
allá de la marca de los 5 minutos y luego vuelva al tiempo de cocción deseado.
6. Una campanilla sonará para indicar el nal del ciclo de
cocción. El aparato se apagará automáticamente.
7. Cuando el ciclo de cocción haya terminado, gire el selector de funciones
a OVEN OFF, abra la puerta del horno y retire la comida de la parrilla y/o la
bandeja del horno con un guante para horno o un agarrador de ollas.
8. Desconecte el aparato cuando haya terminado y deje que se enfríe completamente.
PARRILLA ANTIADHERENTE
1. Aplique una capa delgada de aceite vegetal a la supercie de la
placa de la parrilla antiadherente para proteger el acabado.
2. Gire el selector de funciones al modo Asar-Emparrillar para empezar a calentar la placa
de la parrilla antiadherente. Permita que se precaliente durante 3 a 5 minutos.
3. Después de recalentarse, empiece a cocinar la carne de desayuno,
huevos, panqueques silver dollar o la comida deseada. El tiempo de
cocción variará dependiendo de la comida que se cocine.
4. Al terminar de cocinar, gire el selector de funciones a la posición
OVEN OFF y retire la comida con una espátula de caucho.
5. NUNCA utilice una espátula de metal, tenedor u otro utensilio para retirar
la comida ya que esto rayará o dañará la capa antiadherente.
ESPAÑOL
16
16
Page 19

6. Desconecte el aparato y permita que se enfríe completamente antes
de limpiar o retirar la placa de la parrilla antiadherente.
CAFETERA
1. Agregue la cantidad deseada de café molido en el ltro de
café y coloque el ltro de café en la cesta del ltro.
2. Vierta la cantidad deseada de agua limpia y fría en el tanque
de agua. Nunca exceda el nivel máximo indicado.
3. Asegúrese de que la vasija de café esté en el quemador.
4. Cierre la tapa de la cafetera y gire el interruptor selector a COFFEE/3 en la posición 1.
5. Mientras se esté preparando el café, NO abra la tapa de la
cafetera ya que esto podría causar quemaduras.
6. Cuando haya terminando de prepararse el café, gire el
interruptor selector a la posición COFFEE OFF.
7. Desenchufe el aparato cuando haya terminado y permita que se enfríe por completo
la placa que está debajo de la vasija de café antes de proceder a la limpieza.
8. La cafetera está provista de una válvula antigoteo que funcionará de forma automática
para detener el goteo de café sobre la placa caliente. Sin embargo, si algo de café se
derrama o gotea sobre la placa caliente debajo de la cafetera, límpielo con un paño
seco no abrasivo después de que el aparato se haya enfriado completamente.
CONSEJOS ÚTILES
FUEGO/HUMO
Si la máquina se está quemando o produciendo humo durante la cocción,
gire todas las perillas a la posición OFF al nal de los ciclos de cocción.
ESPAÑOL
El humo también puede producirse por el exceso de migas o grasa
pegada dentro de la máquina. Para evitar el humo, asegúrese de
vaciar y limpiar la bandeja de migas después de cada uso.
SUPERFICIE ANTIADHERENTE
Es normal que los aparatos con capa antiadherente emitan un olor extraño y humo
durante los primeros usos. El olor extraño y el humo se deben disipar con el uso normal.
Recuerde siempre cubrir la supercie de la capa antiadherente con aceite
vegetal antes de cada uso para proteger el acabado antiadherente.
LIMPIEZA Y MANTENIMIENTO
Asegúrese de que el aparato esté desconectado antes de limpiarlo. Permita
que las piezas se ENFRÍEN al tacto, especialmente el horno tostador,
la placa de la parrilla, la vasija de café y la bandeja de migas.
Para prolongar la vida de la ESTACIÓN DE DESAYUNO 3 EN 1, siga estas simples
instrucciones para su mantenimiento. No coloque nunca el aparato en un lavavajillas.
• Asegúrese de que la ESTACIÓN DE DESAYUNO 3 EN 1 esté desconectada
y se haya enfriado por completo antes de guardarla o limpiarla.
• Retire la placa de la parrilla, la parrilla y la bandeja de migas. Lávelos
17
17
Page 20

con agua tibia jabonosa y con un paño o una esponja no abrasivos.
Séquelo por completo con un paño seco, no abrasivo.
• Limpie la supercie exterior de la ESTACIÓN DE DESAYUNO 3 EN 1 con un
paño seco, no abrasivo cuando se desconecte y enfríe por completo.
• Limpie el interior del horno tostador con un paño húmedo (no
mojado) no abrasivo. No utilice estropajos en el interior del horno
tostador. Séquelo por completo con un paño no abrasivo.
• Limpie la puerta de vidrio del horno tostador con un limpiador de vidrio o un detergente
suave y un paño húmedo no abrasivo. NO utilice un paño abrasivo o un estropajo ya
que pueden rayar el vidrio. Séquelo por completo con un paño seco, no abrasivo.
• Para limpiar el ltro de café y el embudo de café, abra la tapa de la cafetera
y sujete cada lado del embudo de café y hale hacia arriba.
• Lave el ltro de café y el embudo de café con agua tibia jabonosa con una esponja
o un paño no abrasivos. Séquelo por completo con un paño seco, no abrasivo.
• Reensamble todas las piezas después de limpiarlas y secarlas por completo.
• No utilice el horno tostador sin al menos haber introducido un pedazo de pan.
• Nunca utilice la ESTACIÓN DE DESAYUNO 3 EN 1 sin haber
colocado la placa de la parrilla y la bandeja de migas.
• Guarde la ESTACIÓN DE DESAYUNO 3 EN 1 en un lugar frío y seco.
Siempre guárdelo en interiores. NUNCA guarde el aparato sin
desconectarlo y permitir primero que se enfríe completamente.
• NO enrolle el cable alrededor del aparato, ya que puede
aojar el cable o hacer que se rompa.
ESPAÑOL
RECETAS
Use su ESTACIÓN DE DESAYUNO 3 en 1 para hacer una comida rápida y fácil de servir:
• Una Variedad de Salchichas y Empanadas (de Cerdo, de Carne
Vacuna, de Pavo, Vegetarianas o de Pollo).
• Hamburguesas Caseras y Pan para Hamburguesas.
• Sándwiches para el Desayuno.
• Panceta, Huevos y Tostadas.
• Panqueques en Miniatura.
• Pancitos y Madalenas
¡Y mucho más!
18
18
Page 21

DEVOLUCIONES Y GARANTÍA
SI LA UNIDAD NO FUNCIONA O ESTÁ DAÑADA AL SACARLA POR PRIMERA VEZ
DE LA CAJA, DEVUÉLVALA AL LUGAR DE COMPRA INMEDIATAMENTE.
ESTACIÓN DE DESAYUNO 3 EN 1 / SERIE BSET300
Si tiene preguntas, contacte con nosotros por correo electrónico o por el número
telefónico de servicio al cliente que aparece a continuación en el horario de
8:00 AM a 5:00 PM, de lunes a viernes, Hora Estándar del Este.
Distribuida por:
Nostalgia Products LLC
1471 Partnership Dr.
Green Bay, WI 54304-5685
Servicio al cliente
Teléfono: (920) 347-9122
Web: www.nostalgiaproducts.com
Solicitud de servicio al cliente
Para enviar una solicitud al Servicio al Cliente, vaya a www.nostalgiaproducts.com, llene
el formulario de Solicitud de Servicio al Cliente y haga clic en el botón Enviar.
Un representante le contactará tan pronto como sea posible.
Términos de garantía del producto
Po este medio, Nostalgia Products LLC (la “Compañía”) garantiza que por un período de un (1) año a
partir de la fecha de compra original, este producto estará sin defectos en cuanto a materiales y mano
de obra en uso normal en casa, siempre que el producto se maneje y mantenga de acuerdo con las
instrucciones de manejo. Como único y exclusivo remedio en virtud de esta garantía, la Compañía, a
su discreción, podrá optar por reparar o sustituir el producto que se encuentre defectuoso, o emitir un
reembolso por el producto durante el período de garantía. Esta garantía sólo está disponible para el
comprador original minorista del producto a partir de la fecha inicial de compra al por menor, y sólo es
válida con el recibo de compra original, y como prueba de la fecha de compra, es necesario obtener los
ESPAÑOL
benecios de la garantía. Todos los reclamos de garantía deben hacerse a la atención de la Compañía
dentro del período de garantía y no más tarde que 30 días desde la imposibilidad de realizarlo. Esta
garantía no cubre el desgaste normal o daños ocasionados por el embarque, malos manejos, mal uso,
accidentes, alteración, piezas de cambio incorrectas, o algo distinto al uso doméstico normal. Es posible
que deba devolver el producto (con los gastos de envío pagados por usted) para inspección y evaluación.
Los costos de envío no son reembolsables. La empresa no se hace responsable por devoluciones
dañadas o perdidas en tránsito. A menos que se indique lo contrario especícamente permitido por
las instrucciones de manejo, esta garantía sólo se aplica al uso en interiores de las viviendas. Para
realizar una reparación bajo esta garantía, comuníquese con la Compañía mediante el número de
teléfono indicado anteriormente o al llenar el formulario de consulta para el servicio de Atención al
Cliente en www.nostalgiaproduct s.com. El período de garantía sólo es válido en EE.UU. y Canadá.
Esta garantía está en lugar de cualquier otra garantía, expresa o implícita, incluso las garantías de
comerciabilidad y conveniencia para un propósito en particular, que quedan excluidas en la medida
permitida por la ley. En ningún caso la compañía será responsable de cualquier daño indirecto, incidental,
consecuente, especial o daños que surjan o estén relacionados con este producto o la utilización del
mismo. Algunos estados, provincias o corregimientos no permiten la exclusión o la limitación de daños
incidentales o consecuentes, por lo que la exclusión o la limitación anterior quizás no se aplique a usted.
Esta garantía no se aplica a mercancía reelaborada.
Lea las instrucciones de manejo cuidadosamente. El incumplimiento
de las instrucciones de manejo anulará esta garantía.
Para obtener más información, visítenos en línea en www.nostalgiaproducts.com.
Me Gusta en Facebook en www.facebook.com / NostalgiaElectrics.
Siga nuestros consejos sobre Pinterest en www.pinterest.com / nostalgiaelctrx.
Tweet con nosotros en Twitter en www.twitter.com / NostalgiaElctrx.
19
19
Page 22

Faire une fête tous les jours!
Visiter le site Web www.nostalgiaproducts.com pour d’autres
produits agréables.
TABLE DES MATIÈRES
SÉCURITÉ . . . . . . . . . . . . . . . . . . . . . . . . . . . . . . . . . . . . . . . . 20
PRÉCAUTIONS IMPORTANTES . . . . . . . . . . . . . . . . . . . . . . . . . . . 21
PRÉCAUTIONS IMPORTANTES ADDITIONNELLES . . . . . . . . . . . . . . . 21
INTRODUCTION . . . . . . . . . . . . . . . . . . . . . . . . . . . . . . . . . . . . 23
PIÈCES ET ASSEMBLAGE . . . . . . . . . . . . . . . . . . . . . . . . . . . . . . . 23
COMMENT FAIRE FONCTIONNER . . . . . . . . . . . . . . . . . . . . . . . . . 25
CONSEILS PRATIQUES . . . . . . . . . . . . . . . . . . . . . . . . . . . . . . . . 26
NETTOYAGE ET ENTRETIEN . . . . . . . . . . . . . . . . . . . . . . . . . . . . . 26
RECETTES . . . . . . . . . . . . . . . . . . . . . . . . . . . . . . . . . . . . . . . . 27
RETOURS ET GARANTIE . . . . . . . . . . . . . . . . . . . . . . . . . . . . . . . 28
SÉCURITÉ
Votre sécurité tout comme celle des autres est primordiale.
Ce manuel renferme plusieurs avis importants sur la sécurité lors de l’utilisation
de votre appareil. Lire le manuel et conformez-vous aux avis contre-indiqués.
Ceci représente le symbole d'avertissement pour votre sécurité.
Ce symbole vous signale les dangers potentiels qui
peuvent blessures graves à vous et à d'autres.
Ce symbole d'alerte à la sécurité suivra tous les avis relatifs à la sécurité.
Tous les avis sécuritaires indiqueront le danger potentiel exact, la façon
dont vous pouvez réduire vos chances de blessure et vous indiquerons les
conséquences potentielles si vous ne suivez pas ces instructions à la lettre.
Spécications des Appareils :
120 volts, 60 Hz, 1500 watts
USAGE DOMESTIQUE SEULEMENT
CE PRODUIT EST POUR UNE UTILISATION EN 120V AC SORTIE SEULEMENT.
Reportez-vous à www.nostalgiaproducts.com/user-manuals/ pour la version la plus récente.
20
20
FRANÇAIS
Page 23

PRÉCAUTIONS IMPORTANTES
Une personne n'ayant pas lu et compris toutes les instructions de
fonctionnement et de sécurité n'est pas qualiée pour faire fonctionner cet
appareil. Tous les utilisateurs de cet appareil doivent lire et comprendre
ce mode d'emploi avant d'utiliser ou de nettoyer cet appareil.
Lorsque l'on utilise un appareil électrique, il faut toujours
respecter des précautions de base, y compris celles-ci :
1. Lisez toutes les instructions avant d'utiliser cet appareil.
2. NE PAS TOUCHER les surfaces chaudes. Utiliser les poignées ou les boutons.
3. Cet appareil n'est PAS UN JOUET.
4. Les jeunes enfants non supervisés et les individus ayant une décience
cognitive ne devraient jamais faire fonctionner cet appareil.
5. Une surveillance étroite est nécessaire lorsqu’un appareil
est utilisé par ou à proximité d’enfants.
6. Pour protéger contre les chocs électriques ne pas submerger le cordon, la
che ou aucune pièce de cet appareil dans l'eau ou d'autres liquides.
7. Débranchez l'appareil lorsqu'il ne sert pas, avant de retirer des pièces et avant le nettoyage.
Laisser refroidir avant de mettre ou d'enlever des pièces et avant le nettoyage.
8. NE PAS utiliser un appareil avec un cordon ou une che électrique
endommagés ou après un mauvais fonctionnement de l'appareil ou s'il a
été endommagé d'une manière quelconque. Retournez l'appareil à l'atelier
de réparation le plus proche pour un examen, réparation ou réglage.
9. Le fabricant ne recommande pas l'utilisation d'accessoires autres que ce qui est
prévu par le fabricant. L'utilisation d'accessoires peut causer des blessures.
10. NE PAS utiliser cet appareil pour toute autre utilisation pour laquelle il n’a pas été conçu.
11. N'utilisez PAS l'appareil à l'extérieur. POUR UN USAGE DOMESTIQUE UNIQUEMENT.
12. NE PAS placer sur ou près d'un brûleur à gaz ou électrique ou dans
un four chaué. 1. NE PAS mettre en lave-vaisselle.
13. NE laissez PAS le cordon pendre sur le bord de la table ou
du comptoir, ni toucher les surfaces chaudes.
14. NE laissez JAMAIS l'unité sans surveillance lorsqu'il est en
service ou une fois branché à une prise électrique.
15. Une extrême prudence doit être utilisée pour déplacer
un appareil contenant des liquides chauds.
16. Toujours brancher l'appareil en premier, puis brancher le cordon dans
la prise murale. Pour débrancher l’appareil, mettre tous les boutons à la
position « arrêt », puis débrancher la che de la prise murale.
PRÉCAUTIONS IMPORTANTES ADDITIONNEL
Instructions et précautions de sécurité
1. NE touchez PAS aux surfaces chaudes. Utiliser les poignées ou les boutons.
2. Soyez extrêmement prudent pour déplacer un appareil contenant des liquides chauds.
3. Un échaudage peut se produire si le couvercle de la machine
à café est ouvert pendant les cycles d’infusion.
4. Le récipient est conçu pour une utilisation avec cet appareil.
FRANÇAIS
Il ne doit jamais servir sur une cuisinière.
21
21
Page 24

5. NE PAS placer un récipient chaud sur une surface mouillée ou froide.
6. NE PAS utiliser un récipient ssuré ou un récipient ayant une poignée lâche ou fragile.
7. Aliments grandes dimensions ni des ustensiles en métal ne doivent pas être insérés dans un
four grille-pain car ils pourraient provoquer un incendie ou un risque de choc électrique.
8. Il y a un risque d'incendie si la grille est couverte ou touche un matériau inammable, y
compris les rideaux, tentures, les murs et autres, lors du fonctionnement. NE PAS mettre
aucun article quelconque sur le dessus de l'appareil lorsque celui-ci fonctionne.
9. Soyez extrêmement prudent lorsque vous utilisez des
contenants fabriqués de métal ou de verre.
10. NE PAS mettre aucuns autres matériaux dans ce four, autres que les accessoires
recommandés par les fabricants, lorsque celui-ci n'est pas en fonction.
11. NE PAS placer l’un des matériaux suivants dans le four : papier, carton, plastique et autres.
12. Ne PAS couvrir le ramasse-miettes ou n’importe quelle partie du four
avec une feuille de métal. Cela provoque une surchaue du four.
13. Soyez très prudent pour enlever le plateau ou pour jeter les graisses chaudes.
Instructions pour le cordon électrique et la prise
1. Cet appareil a une che polarisée (une lame est plus large que l'autre). Pour réduire le
risque de choc électrique, cette che est conçue pour s’insérer dans une prise polarisée
d’une seule façon. Si vous n’arrivez pas à insérer entièrement la che dans la prise,
branchez-la dans l’autre sens. Si elle ne s’enfonce toujours pas, contactez un
électricien qualié. Ne pas tenter de modier la che de quelque façon que ce soit.
2. Un cordon d'alimentation court est fourni an de réduire les risques
d'enchevêtrement ou les risques de trébucher sur un cordon plus long.
3. Si un cordon d'alimentation amovible ou une rallonge est utilisée :
• Rallonges électriques peuvent être utilisées avec prudence.
• Les caractéristiques électriques du câble ou de la rallonge doivent être
au moins aussi grandes que la puissance nominale de l’appareil.
• Lorsque vous utilisez une corde plus longue ou rallonge électrique,
assurez-vous que celle-ci ne pende pas au-delà du comptoir ou
d'une table où elle peut faire trébucher ou être tirée.
4. Le fabricant ne recommande pas l’utilisation de cette machine dans les
pays qui ne supportent pas les tensions de 120V AC, même si un adaptateur
de tension, un transformateur ou un convertisseur est utilisé.
CONSERVEZ CES INSTRUCTIONS !
INTRODUCTION
Merci d'avoir acheté la MACHINE À PETIT DÉJEUNER 3 EN UN de NostalgiaMC ! La MACHINE
À PETIT DÉJEUNER 3 EN UN permet de faire un délicieux petit déjeuner chaud et un café
avec un seul appareil ! Il comprend un four grille-pain pour faire griller le pain, les brioches,
les bagels et plus. Faire griller des crêpes américaines, des saucisses, des galettes ou des
œufs sur la plaque de cuisson pendant que le pain grille et le café infuse ! Avec la MACHINE
À PETIT DÉJEUNER 3 EN UN, de simples repas sont prêts en quelques minutes seulement !
FRANÇAIS
22
22
Page 25

PIÈCES ET ASSEMBLAGE
PIÈCES
Votre CONSOLE POUR PETIT-DÉJEUNER 3 EN 1 nécessite un petit peu d'assemblage.
Panier-Filtre
Filtre de Café
Réservoir
d'eau
Couvercle de
la Cafetière
Couvercle de
Grille et Poignée
Plaque
Amovible
Antiadhésive
Pot à Café
Pour une utilisation dans le four-grilloir :
FRANÇAIS
Grille
Panneau de
commande
Ramasse-miettes
Plaque de cuisson
Fourgrilloir
Porte et Poignée
du Four
23
23
Page 26

CAFETIÈRE
1. Mettre le ltre à café dans le panier ltre.
2. Soulever le couvercle de la cafetière
3. Mettre les deux dans la cafetière.
PANNEAU DE COMMANDE
VOYANT D'ALIMENTATION :
Four avec indicateur de Grill
COMMUTATEUR DE FONCTION :
Tourner le BOUTON à la position
désirée : GRILLER, GRILLER /
CUIRE, RÉCHAUFFER / CHAUFFER,
ou ARRÊTER LE FOUR .
MINUTERIE:
Tourner le bouton dans le sens
horaire pour allumer l'appareil,
puis choisir le temps de cuisson
(0 à 30 minutes). Lorsque le
temps de cuisson est atteint, vous
entendrez la sonnette et l'appareil
va s'éteindre automatiquement.
COMMUTATEUR DE SÉLECTION :
Tourner le commutateur de sélection
à la position désirée : CAFÉ / 3 EN 1,
ou ARRÊTER CAFÉ / grille / four.
Pour éteindre le four, mettre la minuterie à « OFF » (arrêt)
Pour arrêter la cafetière, mettre le commutateur
de sélection à « ARRÊT CAFÉ » (COFFEE OFF)
FRANÇAIS
24
24
Page 27

COMMENT FAIRE FONCTIONNER
• Avant la première utilisation, retirer tous les accessoires y compris la Cafetière, le Filtre
à café, la Plaque de cuisson antiadhésive et les Plateaux pour les laver avec de l'eau
propre et enlever tous les débris. Assécher soigneusement les pièces, puis les reposer.
• Mettre la MACHINE À PETIT DÉJEUNER 3 EN 1 sur une surface stable à proximité d'une
prise de courant avant de l'utiliser pour faire cuire des aliments ou infuser du café.
• Toujours s'assurer que le cordon est éloigné de quelque source d'eau.
• Brancher le cordon dans une prise électrique.
FOURGRILLOIR
1. Pour une bonne cuisson, mettre le commutateur fonction à
cuire et préchauer l'appareil pendant 4-5 minutes.
2. Dès que l'appareil est préchaué, mettre le sélecteur de fonction à la position désirée.
• Mode réchauer-chauer : Seulement l'élément du bas chauera pour la
cuisson,ce qui vous permet de réchauer les aliments sans les brûler.
• Mode cuisson-griller : Les deux éléments chauent pour cuire et griller les aliments.
• Mode dorer-griller : Seulement l'élément du dessus chaue pour
griller les aliments, ou chauer la plaque antiadhésive.
3. Mettre les aliments à cuire sur la grille. Si les aliments contiennent de l'huile, de
la graisse ou du jus, s'assurer que la plaque de cuisson est posée sur la grille.
4. Mettre la minuterie selon le temps de cuisson requis. La veilleuse
s'allumera pour indiquer que le four est chaud.
5. Si vous cuisez des aliments pour moins de 5 minutes, réglez d'abord la minuterie
à plus de 5 minutes, et après revenez au temps de cuisson souhaitée.
6. Une sonnerie vous indiquera que la cuisson est terminée.
L'appareil s'arrêtera automatiquement.
7. Lorsque la cuisson est terminée, mettre le sélecteur de fonction à ARRÊT
FOUR (OVEN OFF), ouvrir la porte du four et retirer les aliments du grille et/
ou du plateau à four en utilisant une mitaine pour four ou une poignée.
8. Débrancher l'appareil quand vous avez terminé et laisser refroidir complètement.
PLAQUE ANTIDHÉSIVE
1. Appliquer une petite couche d'huile végétale sur une plaque antiadhésive pour la protéger.
2. Mettre le sélecteur de fonction au mode griller pour commencer à chauer
la plaque antiadhésive. Laisser pré-réchauer pendant 3 à 5 minutes.
3. Quand il est préchaué, commencer à cuire la viande du petitdéjeuner, les œufs, les pancakes américains ou les aliments désirés.
Le temps de cuisson variera selon les aliments à cuire.
4. Quand les aliments sont cuits, mettre la fonction du sélecteur à la position
ARRÊT FOUR (OVEN OFF) et enlever les aliments à l'aide d'une spatule.
5. JAMAIS utiliser une spatule en métal, une fourchette ou un autre ustensile pour enlever
les aliments, car ils pourraient grier ou endommager la couche antiadhésive.
6. Débrancher l'appareil et laisser refroidir complètement avant
FRANÇAIS
de le nettoyer ou d'enlever la plaque antiadhésive.
25
25
Page 28

CAFETIÈRE
1. Mettre la quantité désirée de café moulu dans le ltre à
café et le mettre à l'intérieur du panier ltre.
2. Verser la quantité désirée d'eau propre et froide dans le réservoir.
Ne jamais dépasser le niveau maximal indiqué.
3. S'assurer que le pot de café est sur le réchaud.
4. Fermer le couvercle de la cafetière et mettre le commutateur
de sélection à la position de CAFÉ / 3 en 1.
5. Pendant que le café coule, NE PAS ouvrir le couvercle de
la cafetière, car vous pourriez vous brûler.
6. Quand le café a terminé de couler, mettre le commutateur de
sélection en position CAFÉ ARRÊT (COFFEE OFF).
7. Débrancher l'appareil quand vous avez terminé et laisser refroidir complètement
la plaque chaude en dessous du pot de café avant de nettoyer.
8. La cafetière est équipée d'une soupape antigoutte qui fonctionne automatiquement
pour arrêter les gouttes de café qui s'égoutte sur la plaque chauante. Toutefois,si le
café a éclaboussé ou a dégoutté sur la plaque chaude sous la cafetière, nettoyez-la
avec un chion sec, non abrasif après que l'appareil soit complètement refroidi.
CONSEILS PRATIQUES
BRÛLÉES / FUMÉE
Si l'appareil brûle ou fume durant la cuisson, tourner tous les boutons
et appuyer sur le bouton STOP pour arrêter le cycle de cuisson.
La fumée peut-être causée par un excès de miettes coincées et de l'huile dans l'appareil.
Pour éviter de la fumée, vider et nettoyer le ramasse-miettes après chaque usage.
SURFACE ANTIADHÉSIVE
Il est normal pour les appareils avec revêtement antiahhésive de
dégager une légère odeur et fumée pendant les premières utilisations.
L'odeur et la fumée devraient disparaître avec l'usage normal.
Toujours se rappeler de mettre une couche d'huile végétale sur la surface
antiadhésive avant chaque utilisation pour protéger le ni antiadhésif.
NETTOYAGE ET ENTRETIEN
Débrancher l'appareil avant de le nettoyer. Laisser refroidir au toucher toutes les
parties, surtout le four-grilloir, la plaque, le pot de café et le ramasse-miettes.
Pour prolonger la durée de vie de LA CONSOLE POUR PETIT-DÉJEUNER 3 EN 1, suivre
ces consignes simples pour l'entretien. NE JAMAIS mettre l'appareil au lave-vaisselle.
• S'assurer que LA CONSOLE POUR PETIT-DÉJEUNER 3 EN 1 soit débranchée
et complètement refroidie avant de le ranger ou de le laver.
• Retirer la plaque, la grille et le ramasse-miettes. Les laver à l'eau chaude savonneuse
avec un chion non abrasif. Essuyer complètement avec un chion sec non abrasif.
• Nettoyer la surface extérieure de LA CONSOLE POUR PETIT-DÉJEUNER 3 EN 1 avec un
FRANÇAIS
26
26
Page 29

chion sec et non abrasif quand l'appareil est débranché et complètement refroidi.
• Nettoyer l'intérieur du four-grilloir avec un chion humide (pas mouillé)
et non abrasif. NE PAS utiliser un tampon à récurer à l'intérieur du fourgrilloir. Essuyer complètement avec un chion non abrasif.
• Nettoyer la vitre de la porte du four-grilloir avec un nettoyant à vitres ou un détergent
doux et un chion humide et non abrasif. NE PAS utiliser un chion abrasif ou un tampon à
récurer, car il pourrait grier la vitre. Essuyer complètement avec un chion sec non abrasif.
• Lors du nettoyage du ltre à café et de l'entonnoir, ouvrir le couvercle de
la cafetière et tenir chaque côté de l'entonnoir et tirer vers le haut.
• Laver le ltre à café et l'entonnoir à l'eau chaude savonneuse avec une éponge non
abrasive ou un chion. Essuyer complètement avec un chion sec non abrasif.
• Rassembler toutes les pièces après le nettoyage et après les avoir complètement essuyées.
• Ne pas faire fonctionner le four-grilloir sans mettre au moins une tranche de pain.
• Ne jamais utiliser LA CONSOLE DE PETIT-DÉJEUNER 3 EN 1
sans la plaque et le ramasse-miettes en place.
• Ranger LA CONSOLE POUR LE PETIT-DÉJEUNER 3 EN 1 dans un
endroit frais et sec. Toujours ranger à l'intérieur. NE JAMAIS ranger
l'appareil sans qu'il soit débranché et complètement refroidi.
• NE PAS serrer le cordon autour de l'appareil, car il pourrait se desserrer ou casser.
RECETTES
Utiliser la MACHINE À PETIT DÉJEUNER 3 EN 1 pour un repas rapide, facile à servir :
• Une variété de saucisses et de galettes (porc, b œuf, dinde, légumes ou poulet)
• Hamburgers et petits pains
• Sandwichs petit-déjeuner
• Bacon, œufs et rôties
• Crêpes américaines
• Bagels et muns anglais
et bien plus encore !
FRANÇAIS
27
27
Page 30

RETOURS ET GARANTIE
SI VOTRE APPAREIL NE FONCTIONNE PAS OU S'IL EST ENDOMMAGÉ QUAND VOUS LE RETIREZ
DE LA BOÎTE, VEUILLEZ LE RETOURNER IMMÉDIATEMENT À L'ENDROIT OÙ IL A ÉTÉ ACHETÉ.
MACHINE À PETIT DÉJEUNER 3 EN 1/ SÉRIE BSET300
Pour toute question, communiquer par courriel ou au numéro de téléphone du service à
la clientèle, entre 08 h 00 et 17 h 00, du lundi au vendredi, heure normale du Centre.
Distribué par :
Nostalgia Products LLC
1471 Partnership Dr.
Green Bay, WI 54304-5685
Service à la clientèle
Téléphone : (920) 347-9122
Site Web : www.nostalgiaproducts.com
Demande pour le service à la clientèle
Pour soumettre une demande au service à la clientèle, rendez vous au www.nostalgiaproducts.com puis
remplissez le formulaire de demande au service à la clientèle puis cliquez sur le bouton Soumettre.
Un représentant vous contactera dès que possible.
Conditions de garantie du produit
Le groupe Nostalgia Products LLC (référé tel « l’Entreprise ») garantit que pour une période d’un
(1) an en date d’achat, ce produit est sans défaut de matériel et de fabrication selon une utilisation
normale à domicile, seulement si le fonctionnement et l’entretien du produit sont conforment aux
directives fournies. À titre de réparation exclusive et entière sous cette garantie, l’Entreprise pourra
à sa discrétion, réparer ou remplacer le produit défectueux, voire émettre un remboursement du
produit durant la période couverte sous garantie. Cette garantie n’est disponible seulement qu’à
l’acheteur d’origine du produit, en date d’achat au détail dudit produit et sera valide uniquement
avec le reçu de caisse d’origine, à titre de preuve d’achat, lequel est requis pour obtenir les bienfaits
reliés à cette garantie. Toute réclamation doit être rapportée à l’attention de l’Entreprise dans la
fenêtre de la période de la garantie, sans dépasser 30 jours à défaut de performance. Cette garantie
ne couvre pas l’usure normale ou dommage cause par l'expédition, la mauvaise manipulation, la
mauvaise utilisation, les accidents, les modications, les mauvaises pièces de remplacement, voire
toute autre utilisation anormale du produit à domicile. Il est possible que vous ayez à retourner le
produit (avec les frais de retour prépayés par vous) pour une inspection et une évaluation. Les frais
des coûts de retour ne sont pas remboursables. L'Entreprise n’est aucunement responsable pour les
retours endommagés ou perdus en transit. Autrement que spéciquement permit selon les directives
de fonctionnement, cette garantie s’applique à une utilisation à domicile à d'intérieur seulement.
An d'obtenir un service couvert sous cette garantie, veuillez contacter l'Entreprise au numéro de
téléphone inclut ci-haut ou en remplissant le formulaire de demande au service à la clientele, sur le
site www.nostalgiaproducts.com. La garantie est valide seulement aux États-Unis et au Canada.
Cette garantie prévaut toute autre garantie, expresse ou implicite incluant les garanties de qualité
marchande ou ayant une aptitude pour une intention en particulier, lesquelles sont exclues selon la
loi. Sous aucun prétexte l’Entreprise ne pourra être tenue responsable pour tout dommage indirect,
accidentel, conséquentiel ou spécial provenant de ou en relativité avec ce produit ou son utilisation.
Certains états, provinces ou juridictions n'allouent pas l'exclusion ou la limitation de tels dommages
accidentels ou conséquentiels, donc l'exclusion ou limitation suscitée peut ne pas s'appliquer à vous.
Cette garantie ne s’applique pas à la merchandise de renaissance.
Veuillez lire les directives de fonctionnement attentivement. Ne pas se
conformer aux directives de fonctionnement annulera cette garantie.
Pour plus d’informations, visitez notre site Web à www.nostalgiaproducts.com.
Aimez-nous sur Facebook à l’adresse www.facebook.com / NostalgiaElectrics.
Suivez nos conseils sur Pinterest à www.pinterest.com / nostalgiaelctrx.
Tweet avec nous sur Twitter à l’adresse www.twitter.com / NostalgiaElctrx.
FRANÇAIS
28
28
Page 31

 Loading...