

Page 1

All products are trademarks of Nostalgia Products LLC.
Worldwide design & utility patented or patents pending.
© 2019 Nostalgia Products LLC.
www.nostalgiaproducts.com
(rev. 04/19/19 SN)
Page 2

PC530CTRR
2.5 Oz. Popcorn Cart
Carrito de palomitas de maíz
Chariot de maïs soué
Instructions and Recipes
Instrucciones y recetas
Consignes et recettes
Page 3

Page 4
Make every day a party!
Visit www.nostalgiaproducts.com for more fun products.
CONTENTS
SAFETY . . . . . . . . . . . . . . . . . . . . . . . . . . . . . . . . . . . . . . . . . 2
IMPORTANT SAFEGUARDS . . . . . . . . . . . . . . . . . . . . . . . . . . . . . 3
ADDITIONAL IMPORTANT SAFEGUARDS . . . . . . . . . . . . . . . . . . . . 3
INTRODUCTION . . . . . . . . . . . . . . . . . . . . . . . . . . . . . . . . . . . . 4
PARTS & ASSEMBLY . . . . . . . . . . . . . . . . . . . . . . . . . . . . . . . . . . 5
HOW TO OPERATE . . . . . . . . . . . . . . . . . . . . . . . . . . . . . . . . . . 11
HELPFUL TIPS . . . . . . . . . . . . . . . . . . . . . . . . . . . . . . . . . . . . . 12
CLEANING & MAINTENANCE . . . . . . . . . . . . . . . . . . . . . . . . . . . 13
RECIPES . . . . . . . . . . . . . . . . . . . . . . . . . . . . . . . . . . . . . . . . . 14
RETURNS & WARRANTY . . . . . . . . . . . . . . . . . . . . . . . . . . . . . . . 16
SAFETY
Your safety and the safety of others is very important.
We have provided many important safety messages in this manual and
on your appliance. Always read and obey all safety messages.
This is the safety alert symbol.
This symbol alerts you to potential hazards that can
cause serious injury to you and others.
All safety messages will follow the safety alert symbol.
All safety messages will tell you what the potential hazard is, tell you how to reduce the
chance of injury, and tell you what can happen if the instructions are not followed.
ENGLISH
Appliance Specications:
120 Volts, 60 Hz
300 Watts
THIS PRODUCT IS FOR USE IN 120V AC OUTLET ONLY.
Refer to www.nostalgiaproducts.com/user-manuals/ for the most updated manual.
2
Page 5

IMPORTANT SAFEGUARDS
A person who has not read and understood all operating and safety instructions
is not qualied to operate this appliance. All users of this appliance must read and
understand this Instruction Manual before operating or cleaning this appliance.
When using electrical appliances, basic safety precautions
ENGLISH
should always be followed, including:
1. Read all instructions before operating this appliance.
2. DO NOT TOUCH the hot surfaces. Use handles or knobs.
3. This appliance is NOT A TOY.
4. Unsupervised young children and cognitively challenged
individuals should never operate this appliance.
5. Close supervision is necessary when any appliance is used by or near children.
6. To protect against electrical shock do not immerse cord, plug
or any part of this unit in water or other liquids.
7. Unplug from outlet when not in use, before removing parts and before cleaning.
Allow to cool before putting on or taking o any parts, and before cleaning.
8. DO NOT operate any appliance with a damaged cord or plug, or after the appliance
malfunctions, or if the appliance has been damaged in any manner. Return the
appliance to the nearest repair shop for examination, repair or adjustment.
9. The manufacturer does not recommend the use of accessory attachments other than
what is provided by the manufacturer. Use of attachments may cause injuries.
10. DO NOT use the appliance for other than its intended use.
11. DO NOT use outdoors. FOR HOUSEHOLD USE ONLY.
12. DO NOT place on or near a hot gas or electric burner, or in a heated oven.
13. DO NOT let cord hang over edge of table or counter, or touch hot surfaces.
14. NEVER leave unit unattended while in use or when plugged into an outlet.
15. Extreme caution must be used when moving an appliance containing hot food.
16. Always attach plug to appliance rst, then plug cord in the wall outlet. To
disconnect, turn any control to "o," then remove plug from wall outlet.
ADDITIONAL IMPORTANT SAFEGUARDS
Operating Safety Precautions
1. DO NOT touch kettle and keep door of main unit closed while
operating. Kettle gets VERY HOT during operation.
2. Ensure the Kettle is properly attached to brackets before operating
and that the motor plug is plugged into the Kettle.
3. Check Kettle for presence of foreign objects prior to use.
4. DO NOT place butter, seasonings, or anything other than popcorn kernels and oil into
the Kettle. Use of these substances may cause hazards and may damage the unit.
5. DO NOT operate unit without oil as the popcorn kernels may burn or smoke.
6. DO NOT leave Kettle motor running once popping has ceased.
3
Page 6

7. Exercise caution when emptying popcorn. Always use Crank Handle
to empty popcorn, and make sure the unit is over a countertop so
that residual hot oil running out will not cause burns.
8. DO NOT use the appliance for other than its intended use.
Instructions for the Electrical Cord and Plug
1. ELECTRICAL SHOCK HAZARD: Failure to follow these instructions
can result in death, re, or electrical shock.
• Plug into a grounded 3 prong outlet.
• DO NOT remove ground prong.
• DO NOT use an adapter.
• DO NOT use an extension cord.
2. This unit MUST be grounded. In the event of an electrical short circuit, grounding
reduces the risk of electric shock by providing an escape wire for the electric current.
This unit is equipped with a cord having a grounding wire with a grounding plug.
The plug must be plugged into an outlet that is properly installed and grounded.
3. WARNING: Improper use of the grounding plug can result in a risk of electric
shock. If the plug does not t fully into the outlet, contact a qualied
electrician. Do not attempt to modify the plug in any way.
4. A short power supply cord is provided to reduce the risk resulting
from becoming entangled or tripping over a long cord.
5. The manufacturer does not recommend using this machine in countries that do not
support 120V AC even if a voltage adapter, transformer, or converter is in use.
SAVE THESE INSTRUCTIONS!
ENGLISH
INTRODUCTION
Thank you for purchasing the Nostalgia™ 2.5 OZ. POPCORN CART. This 47" tall vendor-style
popcorn cart will be the hit of every party. Enjoy up to ten cups of hot, fresh, kettle cooked
popcorn per batch. It features a large, stainless steel kettle with a built-in stirring system.
There is a compartment in the base of the unit to store supplies, making it easy to keep
the cart well stocked and organized. The 2.5 OZ. POPCORN CART has an easy-to-clean
design, and its accessible height makes serving a snap with old-fashioned style to spare.
4
Page 7

PARTS & ASSEMBLY
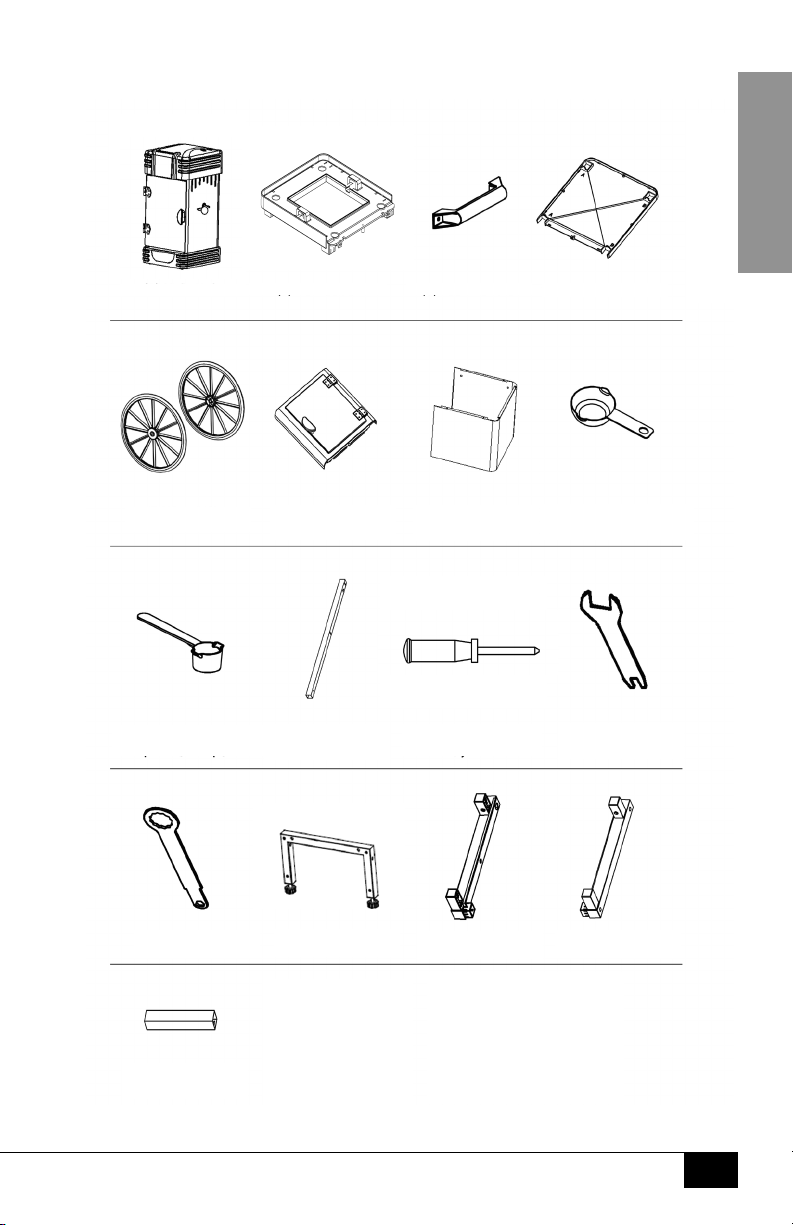
Hardware
ENGLISH
#1 Bolt (55mm)
Qty. 4
#3 Screw (10mm)
Qty. 2
#7 Locking Washer
(6mm)
Qty. 2
#4 Screw (8mm)
Qty. 22
#8 Nut Cap
Qty. 4
#2 Bolt (65mm)
Qty. 2
#5 Flat Washer
(8mm)
Qty. 2
#9 Nut
Qty. 2
#6 Flat Washer
(6mm)
Qty. 2
#10 Nut Cap
Qty. 2
#11 Locking Washer
5
(3mm)
Qty. 2
Page 8
Parts
ENGLISH
(A) Main Unit
(E) Wheel (2)
(H2) Oil Measuring
Spoon (1 Tbsp.)
(B) Top Cover (C) Push Handle
(F) Door
(I) Support Bar (4)
(G) Storage
Compartment
(J) Screw Driver
(D) Bottom Plate
(H1) Kernel Measuring
Cup (2-oz.)
(K1) Wrench
(K2) Wrench
(O) Back Cross Bar
(L) Legs
(M) Left Bar
(P) Screw Driver
(N) Right Bar
6
Page 9
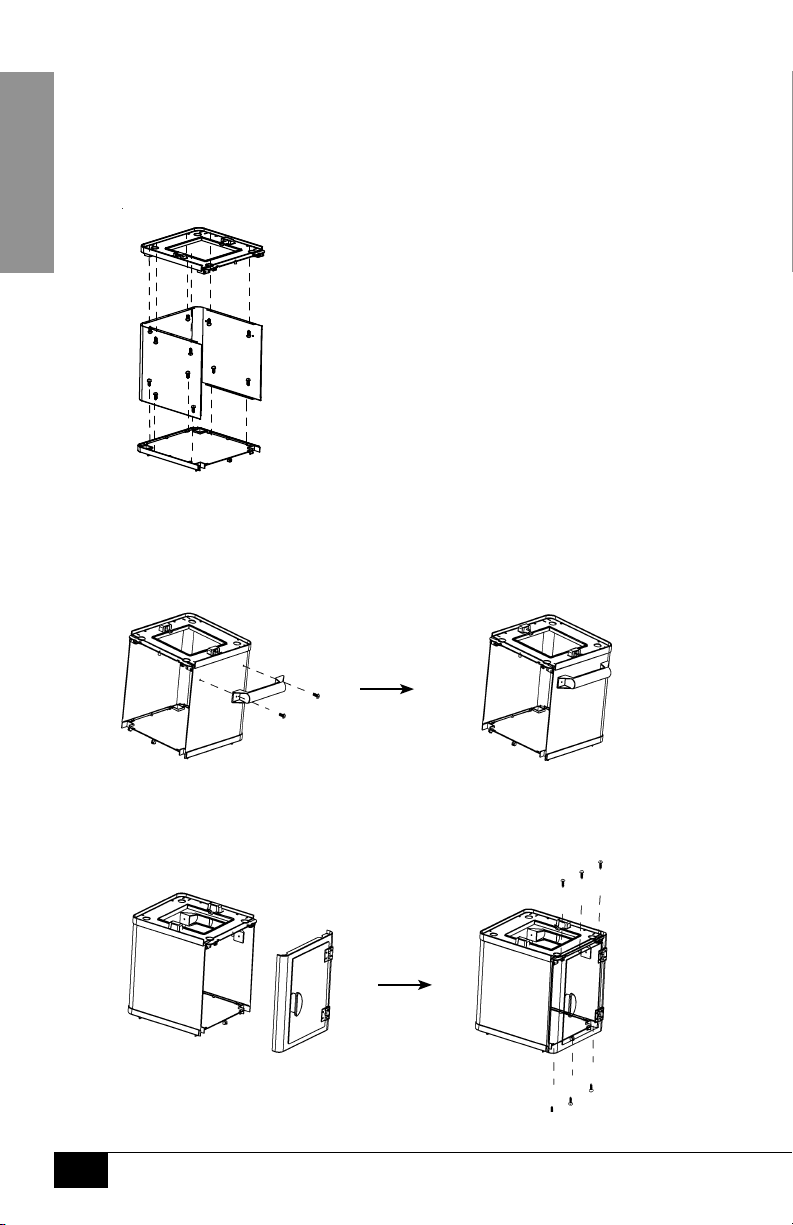
Assembly
Use provided tools for assembly: Wrench (K1), Wrench (K2), and Screw Driver (J).
1. Use 12 #4 Screws to assemble Top Cover (B), Bottom Plate (D) and Storage
Compartment (G) together. Make sure that the "X" on the Bottom Plate
is facing DOWN and the at edge of the Top Cover faces forward.
ENGLISH
2. Attach Push Handle (C) and Storage Compartment (G) using two #3
Screws, two #11 Locking Washers and two #9 Nuts. Use Screws to attach
Push Handle to exterior of Storage Compartment. Use Locking Washers
and Nuts on interior of Storage Compartment to secure Push Handle.
3. Lift the upper piece of the Top Cover to t the Door (F) into place. Use six #4
Screws to attach the Door (F) to the main compartment assembly in Step 2.
7
Page 10

4. Connect one Wheel (E) and the Left Bar (M) with a #2 Bolt, a #5
Flat Washer, a #6 Flat Washer, a #7 Locking Washer, and a #10 Nut
Cap. Repeat process with second wheel and Right Bar (N).
5. Use one #4 Screw to attach a Support Bar (I) to one of the wheel assemblies.
Repeat process using the second wheel assembly and second Support Bar (I).
ENGLISH
6. Use the Back Cross Bar (O) to connect the wheel and support bar assemblies.
8
Page 11

Assembly of Base Support & Wheels (continued)
7. Use two #1 Bolts and two #8 Nut Caps to connect the Legs (L) to the wheel structure.
ENGLISH
8. Use two #1 Bolts and two #8 Nut Caps to attach
both Support Bars (I) to Step 7 assembly.
9. Use two #4 Screws to attach the Support Bar (I) to the wheel structure.
9
Page 12
10. Attach the assembled Storage Compartment (G) parts to the wheels/legs
assembly. Push Storage Compartment (G) down until it is t into place.
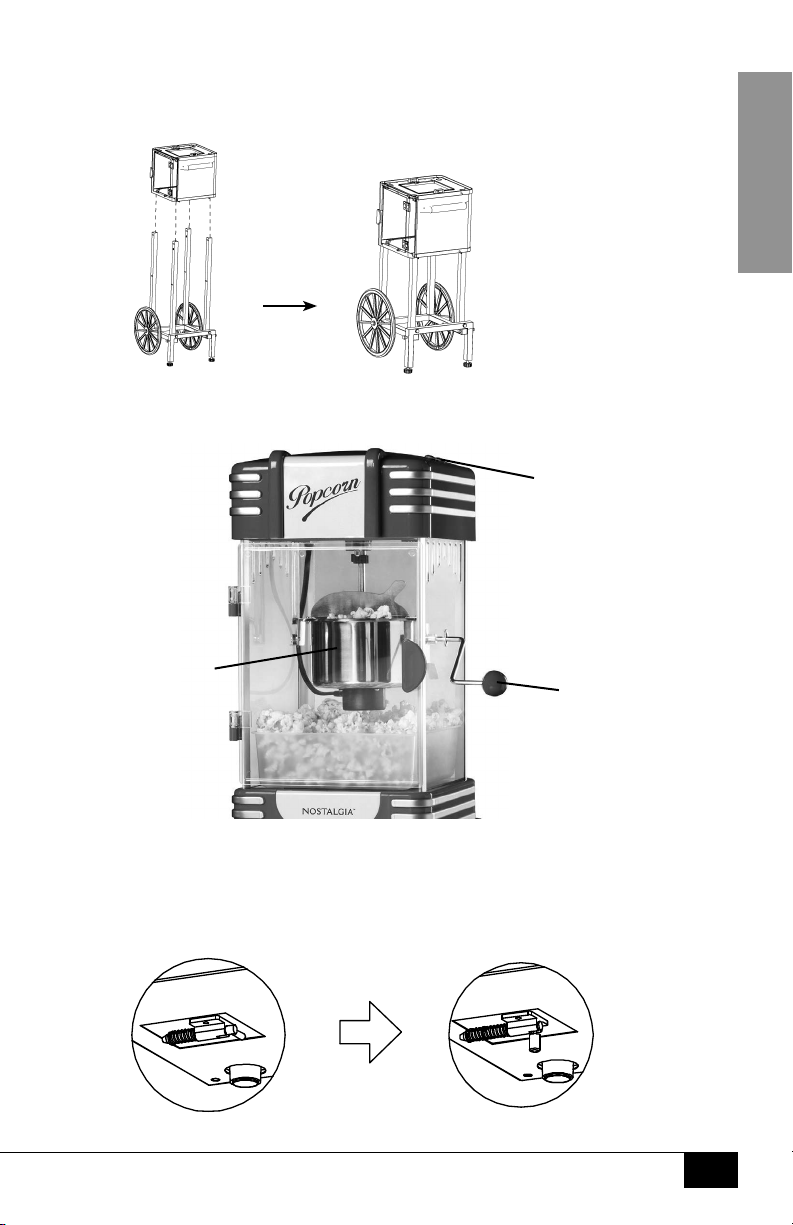
Assembly of Main Unit
ON / OFF / LIGHT Switch
ENGLISH
Stainless Steel Kettle
Crank Handle
• Place Main Unit (A) onto the top of the Storage Compartment (B).
• Ensure that the two inserting pins underneath the Main Unit (A) line up correctly so that
Main Unit (A) can be locked under the beam of the Storage Compartment (C) (see gure 1).
• Place the kettle into the support brackets and connect the power cord at the
base. Insert the crank handle and turn counter-clockwise to attach.
10
Page 13

HOW TO OPERATE
Before rst use, clean the inside of the unit by wiping with a moist, non-abrasive
sponge, towel or cloth and then wipe with a non-abrasive dry towel. Wipe down the
inside of the Kettle and be sure it is properly placed in the brackets before starting.
1. First, nd a at surface near an electrical outlet before starting. Make sure your cord
ENGLISH
is away from any water source. It is acceptable to use an extension cord if needed.
2. Gather your popcorn making supplies: popcorn, seasonings, bowls or bags for holding
the popcorn, cooking oil, Kernel Measuring Cup (H1) and Oil Measuring Spoon (H2).
(Kernel Measuring Cup and Oil Measuring Spoon are included with your unit.)
3. Plug in the appliance while switch is ipped to OFF position.
4. Make sure Kettle is properly secured in support brackets.
5. Make sure Kettle motor is fully plugged into the outlet located on the bottom
side of the kettle. NOTE: Kettle will not heat if plug is not fully inserted.
6. Turn appliance ON by ipping the switch on the top of the machine (see illustration above
for location of switches). Allow the appliance to run 3-5 minutes to heat up Kettle.
7. Turn unit OFF.
8. Use the Oil Measuring Spoon (H2) supplied to add 1 tablespoon of your favorite popcorn
cooking oil to the Kettle. For best popping results, it is suggested to use vegetable oil.
9. Add popcorn kernels to the Kettle using supplied Kernel Measuring Cup (H1).
NOTE: If you are using pre-measured packages of corn kernels or popcorn making
kits, you must still measure out the corn kernels and oil using the supplied Kernel
Measuring Cup (H1) and Oil Measuring Spoon (H2). Always follow this rule: 1 Tbsp. oil
+ 2-oz. popcorn = 8 cups popcorn. (DO NOT exceed 2.5 oz. of popcorn kernels.)
10. Turn the unit ON and close the door. In no time at all, you will hear the popping begin. Fresh,
hot popcorn will begin to burst out of the ip lids on the Kettle - just like at the theater!
11. Use your Popcorn Scoop to scoop and serve.
11
Page 14

HELPFUL TIPS
NEVER leave the unit unattended while operating.
SMOKING
If your POPCORN CART begins to smoke during cooking, it may be due to grease build up.
In order to reduce smoking, make sure that you clean the inside of the Kettle between uses.
POPCORN
The POPCORN CART is designed for all regular and premium brands of
popping corn. Yellow corn generally pops better than white corn, while
some brands of kernels have a harder outer shell and may result in fewer
popped kernels. Try dierent brands to nd which you like best.
If you notice you are experiencing a lot of unpopped kernels, try adding
more oil to the Kettle. More oil may help pop more kernels.
Always use fresh popcorn. Dried out, stale, or old popcorn pops poorly
as it has lost its moisture content and may scorch. We recommend
storing popcorn in an airtight container in a cool place.
Occasionally popcorn does not pop. This is usually the result of environmental factors
such as freshness and moisture content of the popcorn, or variances of popcorn
type. Unpopped kernels do not necessarily indicate a defect in the appliance.
When lling the Kernel Measuring Cup, make sure to not ll above the marked line.
Underlling can cause less kernels to pop and more unpopped kernels to come out of the
unit. Overlling can cause popped corn to burn and smoke, as it will overll the Kettle.
SEASONING
For more buttery popcorn or when adding seasonings, a spritz of olive oil,
water or butter will allow the seasonings to better stick to the popcorn.
ENGLISH
IMPORTANT: DO NOT place butter, seasonings, or anything other than popcorn kernels
into the popcorn Kettle. Use of these substances may cause hazards and may damage the
unit.
12
Page 15

CLEANING & MAINTENANCE
1. Make sure appliance is unplugged and COMPLETELY COOLED before cleaning. Unplug
the outer plug to the outlet as well as the Kettle motor plug inside the Main Unit (A).
2. Use slightly damp, non-abrasive sponge, towel or cloth to wipe down the inside
and outside of Main Unit (A), then wipe with a non-abrasive towel to dry.
3. Unplug Kettle motor and remove Kettle from support brackets.
ENGLISH
4. Take Kettle out of the Main Unit (A). After removing Kettle from
Main Unit (A), ll 2/3 of Kettle with hot, soapy water.
5. Let the Kettle sit for 15 – 20 minutes to cut the grease. (Time may vary – use
your own judgment depending on the amount of cleaning necessary.)
6. Empty water. If necessary, use the scrubber side of a
cleaning sponge to scrub inside of Kettle.
7. Rinse inside carefully and dry.
8. Wipe outside of Kettle with damp cloth and dry.
NOTE: To protect the motor plug from getting wet, never immerse the Kettle in
any liquid. Never place any parts in the dishwasher. Always wash by hand.
13
Page 16

RECIPES
The 2.5 OZ. POPCORN CART makes hot, fresh, theater style popcorn
anytime! Enjoy your freshly popped corn in a variety of ways:
• Regular theater style popcorn – add butter and salt.
• Add a pinch of sugar and salt to popcorn for a sweet kettle corn taste.
• Flavored popcorn – add seasoning from any gourmet popcorn seasoning kit.
• Try some of these fun recipes
NOTE: 1 Gallon = 16 Cups
PARMESAN POPCORN
• ½ Cup Popcorn
(1 gallon popped)
• 1 Tsp. Garlic Powder
• 3 Green Onions,
finely chopped
• ½ Tsp. Cracked
Pepper
• 1 Tsp. Sea Salt
• 1 Cup Parmesan
Cheese, grated (more
or less to taste)
• 3 Tbsp. Olive
Oil, heated
Pop corn kernels using the 2.5 OZ. POPCORN
CART as directed under HOW TO OPERATE.
Combine garlic powder, green onions, cracked
pepper, sea salt and parmesan cheese. Set aside.
In a large mixing bowl, drizzle hot olive oil over popcorn.
Toss until well coated.
Slowly add in dry ingredients while continuously
stirring popcorn until well coated.
You may also shake the dry ingredients over
popcorn in a large paper or muslin bag.
ENGLISH
TRADITIONAL POPCORN BALLS
• ½ Cup Popcorn
(1 gallon popped)
• ½ Cup Corn Syrup
• ½ Cup Granulated
Sugar
• ½ Tsp. Salt
• 1 Stick of Butter,
softened
Pop corn kernels using the 2.5 OZ. POPCORN
CART as directed under HOW TO OPERATE.
Mix corn syrup, sugar and salt together in pot and
dissolve over medium heat for about 3 minutes.
Add popcorn to pot, stirring and tossing consistently
until popcorn is evenly coated at low heat.
Remove from heat.
Use softened butter to form balls while
popcorn mixture is still warm.
Wrap individual balls in plastic wrap, tie
and store at room temperature.
14
Page 17

CHUNKY MONKEY
• ½ Cup Popcorn
(16 gallon popped)
• 1 (12-oz.) Bag
Semi-Sweet
Chocolate Chips
ENGLISH
• 1 (12-oz.) Bag Peanut
Butter Morsels
• 1 (4.2-oz.) Bag
Banana Chips, broken
into small pieces
• 1 (11-oz.) Bag Peanuts
POPCORN PEPPERMINT BARK
• ½ Cup Popcorn
(1 gallon popped)
• 1 (12-oz.) Bag
Semi-Sweet or Dark
Chocolate Chips
• 1¼ Cup Peppermint
Sticks, crushed
Pop corn kernels using the 2.5 OZ. POPCORN
CART as directed under HOW TO OPERATE.
Melt chocolate chips and peanut butter morsels
over stove, as packaging recommends.
Line cookie sheet with wax paper.
Toss together popcorn and banana chips.
Spread popcorn and banana chip mixture
evenly over cookie sheet.
Drizzle melted chocolate and peanut butter
mixture over popcorn and banana chips.
Sprinkle peanuts over chocolate and peanut butter mixture.
Allow to cool.
When chocolate and peanut butter has hardened,
break up the Chunky Monkey into pieces.
Can be stored in plastic freezer bags.
Pop corn kernels using the 2.5 OZ. POPCORN
CART as directed under HOW TO OPERATE.
Melt chocolate chips over stove, as packaging recommends.
Line cookie sheet with wax paper.
Spread popcorn evenly over cookie sheet.
Drizzle melted chocolate over popcorn.
Sprinkle crushed peppermints over chocolate.
Allow to cool.
When chocolate has hardened, break up
Popcorn Peppermint Bark into pieces.
Can be stored in plastic freezer bags.
15
Page 18

RETURNS & WARRANTY
SHOULD YOUR UNIT NOT WORK OR IF DAMAGED WHEN YOU FIRST TAKE IT OUT OF
THE BOX, PLEASE RETURN IT TO THE PLACE OF PURCHASE IMMEDIATELY.
2.5 OZ. POPCORN CART / PC530CTRR
Should you have any questions, please contact us via email or at the customer service number listed
below between the hours of 8:00 AM and 5:00 PM, Monday through Friday, Central Standard Time.
Distributed by:
Nostalgia Products LLC
1471 Partnership Dr.
Green Bay, WI 54304-5685
Customer Service
Phone: (920) 347-9122
Web: www.nostalgiaproducts.com
Customer Service Inquiry
To submit a Customer Service inquiry, go to www.nostalgiaproducts.com and ll
out the Customer Service Inquiry form and click the Submit button.
A representative will contact you as soon as possible.
Product Warranty Terms
Nostalgia Products LLC (the “Company”) hereby warrants that for a period of one (1) year from the
date of original purchase, this product will be free of defects in material and workmanship under
normal home use, provided that the product is operated and maintained in accordance with the
operating instructions. As the sole and exclusive remedy under this warranty, the Company will
at its discretion either repair or replace the product found to be defective, or issue a refund on the
product during the warranty period. This warranty is only available to the original retail purchaser of
the product from the date of initial retail purchase, and is only valid with the original sales receipt, as
proof of purchase date is required to obtain warranty benets. All warranty claims must be brought
to the attention of the Company within the warranty period and no later than 30 days of the failure
to perform. This warranty does not cover normal wear or damage caused by shipping, mishandling,
misuse, accident, alteration, improper replacement parts, or other than ordinary household use.
You may be required to return the product (with shipping prepaid by you) for inspection and
evaluation. Return shipping costs are not refundable. The Company is not responsible for returns
damaged or lost in transit. Unless otherwise specically permitted by the operating instructions, this
warranty applies to indoor household use only. In order to obtain service under this warranty, please
contact the Company at the telephone number listed above or by lling out the Customer Service
Inquiry Form located at www.nostalgiaproducts.com. Warranty valid only in USA and Canada.
This warranty is in lieu of all other warranties, expressed or implied, including warranties of
merchantability and tness for a particular purpose, which are hereby excluded to the extent
permitted by law. In no event shall the Company be liable for any indirect, incidental, consequential,
or special damages arising out of or in connection with this product or the use thereof. Some
states, provinces or jurisdictions do not permit the exclusion or limitation of incidental or
consequential damages, so the foregoing exclusion or limitation may not apply to you.
This warranty does not apply to re-manufactured merchandise.
Please read the operating instructions carefully. Failure to comply
with the operating instructions will void this warranty.
For more information, visit us online at www.nostalgiaproducts.com.
Like us on Facebook at www.facebook.com/NostalgiaElectrics.
Follow our boards on Pinterest at www.pinterest.com/nostalgiaelctrx.
Tweet along with us on Twitter at www.twitter.com/NostalgiaElctrx.
ENGLISH
16
Page 19

¡Haga de cada día una esta!
Visite www.nostalgiaproducts.com para
ver más productos divertidos.
CONTENIDO
SEGURIDAD . . . . . . . . . . . . . . . . . . . . . . . . . . . . . . . . . . . . . . . 17
SALVAGUARDIAS IMPORTANTES . . . . . . . . . . . . . . . . . . . . . . . . . . 18
SALVAGUARDIAS IMPORTANTES ADICIONALES . . . . . . . . . . . . . . . . 18
INTRODUCCIÓN . . . . . . . . . . . . . . . . . . . . . . . . . . . . . . . . . . . . 19
PARTES Y ENSAMBLAJE . . . . . . . . . . . . . . . . . . . . . . . . . . . . . . . 20
CÓMO FUNCIONA . . . . . . . . . . . . . . . . . . . . . . . . . . . . . . . . . . . 26
CONSEJOS ÚTILES . . . . . . . . . . . . . . . . . . . . . . . . . . . . . . . . . . . 27
LIMPIEZA Y MANTENIMIENTO . . . . . . . . . . . . . . . . . . . . . . . . . . . 28
RECETAS . . . . . . . . . . . . . . . . . . . . . . . . . . . . . . . . . . . . . . . . . 29
DEVOLUCIONES Y GARANTÍA . . . . . . . . . . . . . . . . . . . . . . . . . . . . 31
SEGURIDAD
ESPAÑOL
Su seguridad y la de otras personas es muy importante.
Hemos proporcionado numerosos mensajes de seguridad importantes en este manual
y en su electrodoméstico. Siempre lea y obedezca todos los mensajes de seguridad.
Todos los mensajes de seguridad estarán antecedidos por el símbolo de alerta.
Todos los mensajes de seguridad le dirán de qué peligro potencial se trata, cómo reducir
la posibilidad de lesiones y qué puede ocurrir si no se obedecen las instrucciones.
Especicaciones del electrodoméstico:
120 Voltios, 60 Hz
300 Watts
ESTE PRODUCTO ES PARA USAR SOLAMENTE EN TOMAS DE CORRIENTE DE 120 VCA.
Visite www.nostalgiaproducts.com/user-manuals/ para ver el manual más actualizado.
17
17
Este es el símbolo de alerta de seguridad.
Este símbolo le avisa de los peligros potenciales
que pueden matar o herir a otros.
Page 20

SALVAGUARDIAS IMPORTANTES
Una persona que no haya leído y comprendido todas las instrucciones
de uso y seguridad no está calicada para utilizar este aparato. Todos
los usuarios de este dispositivo deben leer y comprender este Manual
de instrucciones antes de utilizar o limpiar este aparato.
Cuando utiliza aparatos eléctricos, siempre se deben seguir algunas
medidas básicas de seguridad que incluyen las siguientes:
1. Lea todas las instrucciones antes de utilizar este aparato.
2. NO TOQUE las supercies calientes. Use agarraderas o mangos.
3. Este aparato NO ES UN JUGUETE.
4. Los niños pequeños sin supervisión y las personas con limitación
cognitiva nunca deben utilizar este aparato.
5. Una supervisión estricta se requiere cuando un aparato se use por niños o cerca de ellos.
6. Como medida de protección contra el riesgo de descarga eléctrica, no sumerja el
cable, los enchufes ni ninguna otra parte de la unidad en agua ni en otros líquidos.
7. Desconéctelo del tomacorriente cuando no esté en uso, antes de
retirar piezas y antes de la limpieza. Déjelo enfriar antes de colocar
o retirar cualquiera de las piezas, y antes de la limpieza.
8. NO utilice ningún aparato con el cable o el enchufe dañados, ni si el aparato
tiene desperfectos o SI se ha dañado de cualquier manera. Devolver el
aparato al taller de reparación más cercano para su reparación o ajuste.
9. El fabricante no recomienda el uso de otros aditamentos o accesorios diferentes a los
proporcionados por el fabricante. El uso de accesorios puede provocar lesiones.
10. NO utilice el aparato para otros usos que no haya sido diseñado.
11. NO utilice el aparato al aire libre. SOLO PARA USO DOMÉSTICO.
12. NO lo coloque sobre o cerca de una hornilla eléctrica o gas caliente, o en un horno caliente.
13. NO permita que el cable cuelgue sobre el borde de la mesa o
del mostrador, ni que toque supercies calientes.
14. NUNCA deje la unidad desatendida mientras esté en uso o
cuando esté enchufada a una toma de corriente.
15. Debe ser extremadamente cuidadoso al mover cualquier aparato con comida caliente.
16. Siempre conecte primero el enchufe al aparato, luego enchufe el cable
a la toma de corriente. Para desconectar, mueva todos los controles
a “apagar” y luego retire el enchufe del tomacorriente.
ESPAÑOL
SALVAGUARDIAS IMPORTANTES ADICIONALES
Precauciones de seguridad operativa
1. NO toque el caldero y mantenga la puerta de la unidad principal cerrada mientras
funciona. El calder se vuelve MUY CALIENTE durante el funcionamiento.
2. Asegúrese de que el caldero esté correctamente conectado a los soportes
antes de utilizarlo y que el enchufe del motor esté conectado al caldero.
3. Revise el caldero para ver si tiene objetos extraños antes del uso.
4. NO coloque mantequilla, condimentos, o cualquier cosa aparte de
pepitas de palomitas de maíz, en la Cámara de explosiones. El uso
de estas sustancias puede ser peligroso y dañar la unidad.
18
18
Page 21

5. NO use la unidad sin aceite ya que las pepitas de palomitas
de maíz pueden provocar quemaduras o humo.
6. NO deje el motor del caldero encendido cuando hayan terminado las explosiones.
7. Tenga cuidado al vaciar las palomitas de maíz. Siempre use la manivela para
vaciar las palomitas de mazí y asegúrese de que la unidad esté en una encimera
para que el aceite caliente residual que sale no cause quemaduras.
8. NO utilice el aparato para otro uso que no sea el cual para el que está destinado.
Instrucciones para el cable eléctrico y el enchufe
1. RIESGO DE DESCARGA ELÉCTRICA: El incumplimiento de estas instrucciones
puede resultar en la muerte, incendio o descarga eléctrica.
• Enchufe en un tomacorrientes de 3 patas con conexión a tierra.
• NO retire la patilla de conexión de tierra.
• NO utilice un adaptador.
• NO utilice un cable de extensión.
2. La unidad DEBE conectarse a tierra. En caso de un corto circuito, la conexión
a tierra reduce el riesgo de descarga eléctrica al proporcionar un cable de
escape para la corriente eléctrica. Esta unidad está provista de un cable
que tiene un cable a tierra con un enchufe a tierra. Se debe enchufar en un
tomacorriente de pared instalado apropiadamente y conectado a tierra.
3. ADVERTENCIA: El uso incorrecto de la toma de tierra puede resultar en riesgo de sufrir
una descarga eléctrica. Si el enchufe no entra completo en el tomacorriente, contacte
a un electricista calicado. No trate de modicar el enchufe de ninguna manera.
4. Se provee un cable de alimentación corto para reducir el riesgo
resultante de enredarse o tropezar con un cable largo.
El fabricante no recomienda el uso de esta máquina en países que no admiten 120V
CA incluso si se está usando un adaptador, transformador o convertidor de voltaje.
ESPAÑOL
¡GUARDE ESTAS INSTRUCCIONES!
INTRODUCCIÓN
Gracias por comprar el CARRITO PARA PALOMITAS DE MAÍZ por Nostalgia™. ¡Este carrito
de palomitas de maíz estilo vendedor de 47” de alto será el éxito de cada esta! Disfrute
hasta diez tazas de palomitas de maíz calientes y frescas cocinadas en el caldero por cada
lote. Cuenta con un caldero grande de acero inoxidable con un sistema de agitación
integrado. Hay un compartimento en la base de la unidad para guardar suministros, lo que
permite que sea más fácil mantener el carrito bien abastecido y organizado. El CARRITO
PARA PALOMITAS DE MAÍZ cuenta con un diseño fácil de limpiar, y su altura accesible
hace que las servidas sean en un instante con un estilo a la antigua para disponer.
19
19
Page 22

PARTES Y ENSAMBLAJE
Accesorios
Perno No. 1
(55mm) Cant. 4
Tornillo No.
3 (10mm)
Cant. 2
Arandela de seguridad
No. 7 (6mm)
Cant. 2
Tornillo No.
4 (8mm)
Cant. 22
Tuerca ciega No. 8
Cant. 4
Perno No. 2
(65mm) Cant. 2
Arandela plana
No. 5 (8mm)
Cant. 2
Tuerca No. 9
Cant.2
Arandela plana No.6
(6mm)
Cant. 2
Tuerca ciega No. 10
Cant.2
ESPAÑOL
Arandela de seguridad
No. 11 (3mm)
Cant. 2
20
20
Page 23

Piezas
(A) Unidad
principal
(E) Rueda (2)
ESPAÑOL
(H2) Cucharón
para medir aceite
(1 cucharada)
(B) Tapa superior (C) Agarradera
(F) Puerta
(I) Barra de
soporte (4)
para empujar
(G) Compartimiento
de almacenamiento
(J) Destornillador
(D) Placa inferior
(H1) Taza para
medición de
granos (2 onzas)
(K1) Llave
21
21
(K2) Llave
(O) Barra cruzada
trasera
(L) Patas
(M) Barra izquierda
(P) Screw Driver
(N) Barra derecha
Page 24

Ensamblaje
Use las herramientas provistas para ensamblaje: Llave
(K1), Llave (K2), y destornillador (J).
1. Utilice 12 tornillos No. 4 para ensamblar la tapa superior (B), la placa inferior
(D) y el compartimiento de almacenaje (G). Asegúrese de que la “X” en la placa
inferior esté hacia ABAJO y el borde plano de la tapa superior esté hacia delante.
2. Coloque la agarradera para empujar (C) y el compartimiento de
almacenaje (G) mediante dos tornillos No. 3, dos arandelas de seguridad
No. 11 y dos tuercas No. 9. Utilice tornillos para sujetar la agarradera para
empujar al exterior del compartimiento de almacenamiento. Utilice
arandelas de seguridad y tuercas en el interior de compartimiento de
almacenamiento para asegurar la agarradera para empujar.
ESPAÑOL
3. Levante la pieza superior de la tapa superior para que encaje la
puerta (F) en su lugar. Utilice seis tornillos No. 4 para jar la puerta
(F) al ensamblaje del compartimento principal en el Paso 2.
22
22
Page 25

6. Conecte una rueda (E) y la barra izquierda (M) con un perno No. 2, una arandela
plana No. 5, una arandela plana No. 6, una arandela de seguridad No. 7, y una
tuerca ciega No. 10. Repita el proceso con la segunda rueda y la barra derecha (N).
5. Utilice un tornillo No. 4 para jar una barra de soporte (I) a uno de los
ensamblajes de las ruedas. Repita el proceso mediante el segundo
ensamblaje de la rueda y la segunda barra de soporte (I).
ESPAÑOL
6. Utilice la barra cruzada trasera (O) para conectar los
ensamblajes de las ruedas y las barras de soporte.
23
23
Page 26

Ensamblaje del soporte de la base y las ruedas (continuación)
7. Utilice dos pernos No. 1 y dos tuercas ciegas No. 8 para
conectar las patas (L) a la estructura de la rueda.
8. Utilice dos pernos No. 1 y tuercas ciegas No. 8 para unir ambas
barras de soporte (I) para el ensamblaje del Paso 7.
ESPAÑOL
9. Utilice dos tornillos No. 4 para jar la barra de
soporte (I) a la estructura de la rueda.
24
24
Page 27

10. Conecte las partes del compartimiento de almacenamiento (G) al
ensamblaje de las ruedas/patas. Empuje hacia abajo el compartimiento
de almacenamiento (G) hasta que encaje en su lugar.
Ensamblaje de la unidad principal
Caldero de acero
inoxidable
ESPAÑOL
Interruptor de
encender/apagar/luz
Manivela de arranque
• Coloque la Unidad principal (A) en la parte superior del
Compartimiento de almacenamiento (B).
• Asegúrese de que los dos pasadores de inserción de la parte inferior de la Unidad
principal (A) se alineen correctamente, de manera que la Unidad principal (A) pueda
jarse bajo la viga del Compartimiento de almacenamiento (C) (vea la gura 1).
• Coloque el caldero dentro de los soportes y conecte el cable de alimentación en la
base. Inserte la manivela de arranque y gírela en sentido antihorario para conectarla.
25
25
Page 28

CÓMO FUNCIONA
Antes del primer uso, limpie el interior de la unidad con una esponja, toalla o paño no
abrasivos húmedos y entonces séquelo con una toalla seca no abrasiva. Limpie el interior del
caldero y asegúrese de que esté correctamente colocado en los soportes antes de comenzar.
1. Primero, encuentre una supercie nivelada cerca de una toma de
corriente. Asegúrese de que cable esté alejado de cualquier fuente
de agua. Si es necesario, use un cable de extensión.
2. Recopile los suministros para hacer palomitas de maíz: maíz para palomitas,
cubo o tazón para mantener las palomitas de maíz, aceite para cocinar, taza para
medición de granos (H1) y cucharón para medir aceite (H2). (La taza para medición
de granos y el cucharón para medir aceite se incluyen con la unidad).
3. Conecte el aparato mientras que el interruptor esté colocado en la posición OFF.
4. Asegúrese de que el caldero esté debidamente asegurado en los soportes.
5. Asegúrese de que el motor del caldero esté totalmente conectado a la toma situada en la
parte inferior del caldero.
NOTA: El caldero no calentará si no se ha insertado totalmente el enchufe.
6. ENCIENDA el aparato volteando el interruptor de la parte superior de la máquina
(consulte la ilustración anterior para ver la ubicación de los interruptores).
Permita que el aparato funcione de 3 a 5 minutos para calentar el caldero.
7. Apague la unidad.
8. Utilice el cucharón para medir aceite (H2) provisto para añadir una cucharada
de su aceite favorito para cocinar palomitas de maíz en el caldero. Para
obtener mejores palomitas explotadas, se sugiere usar aceite vegetal.
9. Añada palomitas de maíz al caldero con la taza para medición de granos (H1).
NOTA: Si está usando paquetes previamente medidos de granos de maíz o paquetes
para hacer palomitas de maíz, todavía debe medir los granos de maíz y el aceite
con la taza para medición de granos (H1) y el cucharón para medir aceite (H2).
Siempre siga esta regla: 1 cucharada de aceite + 2 onzas de granos = 8 tazas de
palomitas de maíz. (NO exceda las 2.5 onzas de granos de palomitas de maíz.)
10. Encienda la unidad y cierre la puerta. En breve escuchará las explosiones.
Las palomitas de maíz, frescas y calientes, comenzarán a brotar por
las tapas abatibles del caldero, ¡igual que en el teatro!
11. Utilice el cucharón para palomitas de maíz para recoger y servir.
ESPAÑOL
26
26
Page 29

CONSEJOS ÚTILES
NUNCA deje la unidad sin supervisión mientras está en uso.
FUMAR
Si el CARRITO PARA PALOMITAS DE MAÍZ comienza a producir humo al cocinar,
puede deberse a acumulación de grasa. Con el n de reducir la producción
de humo, asegúrese de limpiar el interior del caldero entre usos.
PALOMITA DE MAÍZ
El CARRITO PARA PALOMITAS DE MAÍZ está diseñado para todas las marcas premium y
regulares de maíz para explotar. El maíz amarillo generalmente explota mejor que el maíz
blanco, mientras que algunas marcas de pepitas tienen una cáscara dura y pueden resultar
en menos granos explotados. Pruebe marcas diferentes para encontrar la que más le gusta.
Si nota que se están produciendo un montón de pepitas sin explotar, intente añadir
más aceite al caldero. Más de aceite puede ayudar a explotar más pepitas.
Siempre utilice palomitas de maíz frescas. Palomitas de maíz secas,
rancias o viejas no explotan bien ya que han perdido su contenido de
humedad y se pueden quemar. Recomendamos guardar las palomitas
de maíz en un recipiente hermético en un lugar fresco.
Ocasionalmente, las palomitas de maíz no explotan. Este suele ser el resultado
de factores medioambientales tales como frescura y el contenido de humedad
de las palomitas de maíz, o las variaciones del tipo de palomitas de maíz. Las
pepitas no explotadas no necesariamente indican un defecto en el aparato.
Al llenar la taza medidora de pepitas, asegúrese de no sobrellenar sobre la línea
marcada. El sobrellenado puede producir menos pepitas explotadas y más
ESPAÑOL
pepitas no explotadas que salen de la unidad. El sobrellenado puede producir
humo y palomitas de maíz quemadas, ya que sobrellenará el caldero.
CONDIMENTOS
Para obtener más palomitas de maíz con mantequilla o al agregar
condimentos, un poco de aceite de oliva, agua o mantequilla permitirá
que los condimentos se adhieran mejor a las palomitas de maíz.
IMPORTANTE: NO coloque aceite, mantequilla, condimentos, o cualquier cosa aparte
de pepitas de palomitas de maíz, en el caldero de palomitas de maíz. El uso de estas
sustancias puede ser peligroso y dañar la unidad.
27
27
Page 30

LIMPIEZA Y MANTENIMIENTO
1. Asegúrese de que el aparato esté desenchufado y se haya ENFRIADO
COMPLETAMENTE antes de limpiarlo. Desenchufe el conector externo a la salida
así como el enchufe del motor del caldero en la Unidad Principal (A).
2. Utilice una esponja algo húmeda y no abrasiva o un paño para limpiar el interior y el
exterior de la Unidad Principal (A), luego limpie con un paño no abrasivo para que se seque.
3. Desenchufe el motor del caldero y retire el caldero de los soportes.
4. Retire el caldero de la unidad principal (A). Después de retirar el caldero de la
unidad principal (A), llene el caldero 2/3 con agua caliente y jabonosa.
5. Deje que el caldero se asiente durante 15 a 20 minutos para cortar la grasa. (El tiempo
puede variar - utilice su propio criterio en función de la cantidad de limpieza necesaria.)
6. Elimine el agua. Si es necesario, use el estropajo de una esponja
de limpieza para fregar dentro del caldero.
7. Enjuague con cuidado el interior y séquelo.
8. Limpie el exterior del caldero con un paño húmedo y séquelo.
NOTA: Para evitar que el enchufe del motor se seque, nunca sumerja el caldero en
ningún líquido. No coloque las piezas en el lavavajillas. Siempre lávelas a mano.
ESPAÑOL
28
28
Page 31

RECETAS
¡El CARRITO PARA PALOMITAS DE MAÍZ RETRO SERIES™ hace palomitas de
maíz calientes y frescas como las del cine en cualquier momento! Disfrute
de las palomitas de maíz recién hechas en una variedad de formas:
• Palomitas de maíz regulares como las del cine - añada mantequilla y sal.
• Añada una pizca de azúcar y sal a las palomitas para un sabor a maíz dulce y salado.
• Palomitas con sabor – añada condimentos de cualquier
grupo de condimentos gourmet para palomitas.
• Pruebe algunas de estas divertidas recetas:
NOTA: 1 Galón = 16 Tazas
PALOMITAS DE MAÍZ CON QUESO PARMESANO
• ½ taza de palomitas
de maíz (1 galón
explotadas)
• 1 cucharilla de
ajo en polvo
• 3 cebollas verdes,
picadas namente
• ½ cucharilla de
pimienta molida
• 1 cucharilla de
sal marina
• 1 tazas de queso
parmesano,
ESPAÑOL
rallado (más o
menos al sabor)
• 3 cucharadas de
aceite de oliva,
calentado
Prepare los granos de palomitas de maíz mediante el
CARRITO PARA PALOMITAS DE MAÍZ como se indica.
Combine ajo en polvo, cebollas verdes, pimienta
machacada, sal marina y queso parmesano. Retírelo.
En un tazón grande, rocíe aceite de oliva
caliente sobre las palomitas.
Revuelva hasta que quede bien cubierto.
Agregue lentamente los ingredientes secos
mientras revuelve continuamente las rosetas
hasta que queden bien cubiertas.
También puede revolver los ingredientes secos sobre
las palomitas en una bolsa de papel o percal grande.
BOLAS DE PALOMITAS DE MAÍZ TRADICIONALES
• ½ taza de palomitas
de maíz (1 galón
explotadas)
• ½ taza de sirope
de maíz
• ½ taza de azúcar
granulada
• ½ cucharilla de sal
• 1 barra de
mantequilla,
suavizada
29
29
Prepare los granos de palomitas de maíz mediante el
CARRITO PARA PALOMITAS DE MAÍZ como se indica.
Mezcle el sirope de maíz, el azúcar y la sal, en una olla y
disuélvalos a fuego medio durante unos 3 minutos.
Añada palomitas a la olla, revuelva constantemente
hasta que las palomitas queden cubiertas
uniformemente a fuego lento.
Retire del calor.
Utilice mantequilla suave para formar bolas mientras
que la mezcla de palomitas aún está caliente.
Envuelva cada bola en plástico, amárrela y
guárdela a temperatura ambiente.
Page 32

MONO RECHONCHO
• ½ taza de palomitas
de maíz (1 galón
explotadas)
• 1 bolsa de trozos de
chocolate semidulces
(12 onzas)
• 1 bolsas de trozos
de mantequilla de
maní (12 onzas)
• 1 bolsa de trozos
de guineo (4.2
onzas), separados
en pedacitos
• 1 bolsa de maníes
(11 onzas)
PALOMITAS DE MAÍZ CON TROZOS DE HIERBABUENA
• ½ taza de palomitas
de maíz (1 galón
explotadas)
• 1 bolsa de trozos de
chocolate semidulces
(12 onzas)
• 1¼ tazas de barras
de menta, trituradas
Prepare los granos de palomitas de maíz mediante el
CARRITO PARA PALOMITAS DE MAÍZ como se indica.
Derrita los trozos de chocolate y los trozos de mantequilla
de maní en la estufa, como se recomienda en el embalaje.
Cubra la bandeja de cocinar galletas con papel cera.
Mezcle las palomitas con los trozos de guineo.
Riegue la mezcla de palomitas y trozos de guineo
uniformemente sobre la bandeja para cocinar galletas.
Rocíe el chocolate derretido y le mezcla de mantequilla
de maní sobre las palomitas y los trozos de guineo.
Riegue los maníes sobre la mezcla de
chocolate y mantequilla de maní.
Permita que se enfríe.
Cuando el chocolate y la mantequilla de maní se hayan
endurecido, separe en pedazos al Mono Rechoncho.
Puede guardarse en bolsas de plástico para congelador.
Prepare los granos de palomitas de maíz mediante el
CARRITO PARA PALOMITAS DE MAÍZ como se indica.
Derrita los trozos de chocolate en la estufa,
como se recomienda en el embalaje.
Cubra la bandeja de cocinar galletas con papel cera.
Riegue las palomitas uniformemente sobre
la bandeja para cocinar galletas.
Riegue el chocolate derretido sobre las palomitas.
Riegue las hierbabuenas trituradas sobre el chocolate.
Permita que se enfríe.
Cuando el chocolate se haya endurecido, separe
en pedazos la corteza de hierbabuena.
Puede guardarse en bolsas de plástico para congelador.
ESPAÑOL
30
30
Page 33

DEVOLUCIONES Y GARANTÍA
SI LA UNIDAD NO FUNCIONA O ESTÁ DAÑADA AL SACARLA POR PRIMERA VEZ
DE LA CAJA, DEVUÉLVALA AL LUGAR DE COMPRA INMEDIATAMENTE.
CARRITO DE PALOMITAS DE MAÍZ / PC530CTRR
Si tiene preguntas, contacte con nosotros por correo electrónico o por el número
telefónico de servicio al cliente que aparece a continuación en el horario de
8:00 AM a 5:00 PM, de lunes a viernes, Hora Estándar del Este.
Distribuida por:
Nostalgia Products LLC
1471 Partnership Dr.
Green Bay, WI 54304-5685
Servicio al cliente
Teléfono: (920) 347-9122
Web: www.nostalgiaproducts.com
Solicitud de servicio al cliente
Para enviar una solicitud al Servicio al Cliente, vaya a www.nostalgiaproducts.com, llene
el formulario de Solicitud de Servicio al Cliente y haga clic en el botón Enviar.
Un representante le contactará tan pronto como sea posible.
Términos de garantía del producto
Po este medio, Nostalgia Products LLC (la “Compañía”) garantiza que por un período de un (1) año a
partir de la fecha de compra original, este producto estará sin defectos en cuanto a materiales y mano
de obra en uso normal en casa, siempre que el producto se maneje y mantenga de acuerdo con las
instrucciones de manejo. Como único y exclusivo remedio en virtud de esta garantía, la Compañía, a
su discreción, podrá optar por reparar o sustituir el producto que se encuentre defectuoso, o emitir un
reembolso por el producto durante el período de garantía. Esta garantía sólo está disponible para el
comprador original minorista del producto a partir de la fecha inicial de compra al por menor, y sólo es
ESPAÑOL
válida con el recibo de compra original, y como prueba de la fecha de compra, es necesario obtener los
benecios de la garantía. Todos los reclamos de garantía deben hacerse a la atención de la Compañía
dentro del período de garantía y no más tarde que 30 días desde la imposibilidad de realizarlo. Esta
garantía no cubre el desgaste normal o daños ocasionados por el embarque, malos manejos, mal uso,
accidentes, alteración, piezas de cambio incorrectas, o algo distinto al uso doméstico normal. Es posible
que deba devolver el producto (con los gastos de envío pagados por usted) para inspección y evaluación.
Los costos de envío no son reembolsables. La empresa no se hace responsable por devoluciones
dañadas o perdidas en tránsito. A menos que se indique lo contrario especícamente permitido por
las instrucciones de manejo, esta garantía sólo se aplica al uso en interiores de las viviendas. Para
realizar una reparación bajo esta garantía, comuníquese con la Compañía mediante el número de
teléfono indicado anteriormente o al llenar el formulario de consulta para el servicio de Atención al
Cliente en www.nostalgiaproduct s.com. El período de garantía sólo es válido en EE.UU. y Canadá.
Esta garantía está en lugar de cualquier otra garantía, expresa o implícita, incluso las garantías de
comerciabilidad y conveniencia para un propósito en particular, que quedan excluidas en la medida
permitida por la ley. En ningún caso la compañía será responsable de cualquier daño indirecto, incidental,
consecuente, especial o daños que surjan o estén relacionados con este producto o la utilización del
mismo. Algunos estados, provincias o corregimientos no permiten la exclusión o la limitación de daños
incidentales o consecuentes, por lo que la exclusión o la limitación anterior quizás no se aplique a usted.
Esta garantía no se aplica a mercancía reelaborada.
Lea las instrucciones de manejo cuidadosamente. El incumplimiento
de las instrucciones de manejo anulará esta garantía.
Para obtener más información, visítenos en línea en www.nostalgiaproducts.com.
Me Gusta en Facebook en www.facebook.com / NostalgiaElectrics.
Siga nuestros consejos sobre Pinterest en www.pinterest.com / nostalgiaelctrx.
Tweet con nosotros en Twitter en www.twitter.com / NostalgiaElctrx.
31
31
Page 34

Faites de chaque jour une fête!
Visiter le site Web www.nostalgiaproducts.
com pour d'autres produits amusants.
TABLE DES MATIÈRES
SÉCURITÉ . . . . . . . . . . . . . . . . . . . . . . . . . . . . . . . . . . . . . . . . 32
PRÉCAUTIONS IMPORTANTES . . . . . . . . . . . . . . . . . . . . . . . . . . . 33
PRÉCAUTIONS IMPORTANTES ADDITIONNEL . . . . . . . . . . . . . . . . . . 33
INTRODUCTION . . . . . . . . . . . . . . . . . . . . . . . . . . . . . . . . . . . . 34
PIÈCES ET ASSEMBLAGE . . . . . . . . . . . . . . . . . . . . . . . . . . . . . . . 35
MODE DE FONCTIONNEMENT . . . . . . . . . . . . . . . . . . . . . . . . . . . 41
CONSEILS UTILES . . . . . . . . . . . . . . . . . . . . . . . . . . . . . . . . . . . 42
NETTOYAGE ET ENTRETIEN . . . . . . . . . . . . . . . . . . . . . . . . . . . . . 43
RECETTES . . . . . . . . . . . . . . . . . . . . . . . . . . . . . . . . . . . . . . . . 44
RETOURS ET GARANTIE . . . . . . . . . . . . . . . . . . . . . . . . . . . . . . . 46
SÉCURITÉ
Votre sécurité et celle des autres sont très importantes.
De nombreux messages importants de sécurité se trouvent dans le présent manuel
et sur votre appareil. Toujours lire et respecter toutes les consignes de sécurité.
Ceci est le symbole d'avertissement de sécurité.
Ce symbole vous signale les dangers potentiels qui
peuvent blessures graves à vous et à d'autres.
Tous les messages de sécurité suivront le symbole d'avertissement de sécurité.
Tous les messages de sécurité indiqueront le danger potentiel et la façon de réduire
le risque de blessure et ce qui peut arriver si les consignes ne sont pas suivies.
Fiche technique de l'appareil :
120 Volts, 60 Hz
300 W
CE PRODUIT DOIT ÊTRE BRANCHÉ UNIQUEMENT DANS UNE PRISE DE COURANT DE 120 V CA.
Reportez-vous à www.nostalgiaproducts.com/user-manuals/
pour la version la plus récente.
32
32
FRANÇAIS
Page 35

PRÉCAUTIONS IMPORTANTES
Une personne n'ayant pas lu et compris toutes les instructions de
fonctionnement et de sécurité n'est pas qualiée pour faire fonctionner cet
appareil. Tous les utilisateurs de cet appareil doivent lire et comprendre
ce mode d'emploi avant d'utiliser ou de nettoyer cet appareil.
Lorsque l'on utilise un appareil électrique, il faut toujours
respecter des précautions de base, y compris celles-ci :
1. Lisez toutes les instructions avant d'utiliser cet appareil.
2. NE PAS TOUCHER les surfaces chaudes. Utiliser les poignées ou les boutons.
3. Cet appareil n'est PAS UN JOUET.
4. Les jeunes enfants non supervisés et les individus ayant une décience
cognitive ne devraient jamais faire fonctionner cet appareil.
5. Une surveillance étroite est nécessaire lorsqu’un appareil
est utilisé par ou à proximité d’enfants.
6. Pour protéger contre les chocs électriques ne pas submerger le cordon, la
che ou aucune pièce de cet appareil dans l'eau ou d'autres liquides.
7. Débranchez l'appareil lorsqu'il ne sert pas, avant de retirer des pièces et avant le nettoyage.
Laisser refroidir avant de mettre ou d'enlever des pièces et avant le nettoyage.
8. NE PAS utiliser un appareil avec un cordon ou une che électrique
endommagés ou après un mauvais fonctionnement de l'appareil ou s'il a
été endommagé d'une manière quelconque. Retournez l'appareil à l'atelier
de réparation le plus proche pour un examen, réparation ou réglage.
9. Le fabricant ne recommande pas l'utilisation d'accessoires autres que ce qui est
prévu par le fabricant. L'utilisation d'accessoires peut causer des blessures.
10. NE PAS utiliser cet appareil pour toute autre utilisation pour laquelle il n’a pas été conçu.
11. N'utilisez PAS l'appareil à l'extérieur. POUR UN USAGE DOMESTIQUE UNIQUEMENT.
12. NE PAS placer sur ou près d'un brûleur à gaz ou électrique ou dans
un four chaué. 1. NE PAS mettre en lave-vaisselle.
13. NE laissez PAS le cordon pendre sur le bord de la table ou
du comptoir, ni toucher les surfaces chaudes.
14. NE laissez JAMAIS l'unité sans surveillance lorsqu'il est en
service ou une fois branché à une prise électrique.
15. Une extrême prudence doit être utilisée pour déplacer
un appareil contenant des liquides chauds.
16. Toujours brancher l'appareil en premier, puis brancher le cordon dans
la prise murale. Pour débrancher l’appareil, mettre tous les boutons à la
position « arrêt », puis débrancher la che de la prise murale.
PRÉCAUTIONS IMPORTANTES ADDITIONNEL
Mesures de sécurité pour le fonctionnement
1. NE PAS toucher à la marmite et gardez la porte de l'appareil fermée durant le
fonctionnement. La marmite deviendra TRÈS CHAUDE durant le fonctionnement.
2. Assurez-vous que la marmite est bien attachée aux supports avant de
FRANÇAIS
la mettre en marche et que le moteur est branché à la marmite.
33
33
Page 36

3. Vériez en cas d'objets étrangers dans la marmite avant de l'utiliser.
4. NE PAS mettre du beurre, des assaisonnements ou autres que des
grains de maïs et de l'huile dans la marmite. L'utilisation de toutes autres
substances peut causer des dangers et peut endommager l'appareil.
5. NE PAS faire fonctionner la machine sans l'huile car les
grains de maïs pourraient brûler voire fumer.
6. NE PAS laisser le moteur de la marmite fonctionner une fois que le maïs a cessé d'éclater.
7. Soyez prudent lorsque vous videz le maïs éclaté. Toujours utiliser la manivelle
pour vider le maïs éclaté et assurez-vous que l'appareil est au-dessus d'un
comptoir an que l'huile chaude résiduelle s'écoulant ne brûle rien.
8. N'employez PAS l'appareil pour une autre utilisation
que celle pour laquelle elle à été conçue.
Instructions pour le cordon électrique et la prise
1. RISQUE DE DÉCHARGE ÉLECTRIQUE : Ne pas suivre ces instructions
peut entraîner la mort, un incendie ou une électrocution.
• Branchez dans une prise à 3 ches.
• NE retirez PAS la che de la mise à la terre.
• N'utilisez PAS d'adaptateur.
• N'utilisez PAS une rallonge.
2. Cet appareil DOIT être mis à la terre. Dans le cas d’un court-circuit électrique,
la mise à la terre réduit le risque de choc électrique en orant un l
d’échappement pour le courant électrique. Cet appareil est équipé d’un cordon
muni d’un l de mise à la terre avec une che de mise à la terre. La che doit
être branchée sur une prise correctement installée et mise à la terre.
3. AVERTISSEMENT : Une mauvaise utilisation de la prise de mise à la terre peut entraîner un
risque d’électrocution. Si la che n’entre pas complètement dans la prise, contactez un
électricien qualié. Ne pas tenter de modier la che de quelque façon que ce soit.
4. Un court cordon d'alimentation est fourni pour réduire les risques
d'enchevêtrement ou risques de trébucher sur un cordon plus long.
Le fabricant ne recommande pas l’utilisation de cette machine dans les
pays qui ne supportent pas les tensions de 120V AC, même si un adaptateur
de tension, un transformateur ou un convertisseur est utilisé.
CONSERVER CES CONSIGNES!
INTRODUCTION
Merci d'avoir acheté le CHARIOT À MAÏS SOUFFLÉ de Nostalgia™. Ce chariot de
1,2 m (47 po) de hauteur rappelle les chariots des vendeurs ambulants et aura
beaucoup de succès dans chacune de vos fêtes. Déguster jusqu'à dix tasses de maïs
soué chaud et frais par utilisation. Il comprend une grande marmite en inox et
un système de brasage intégré. Il y a un compartiment à la base de l'appareil pour
ranger les fournitures, ce qui permet de garder le chariot bien approvisionné et
organisé. LE CHARIOT À MAÏS SOUFFLÉ est facile à nettoyer grâce à sa conception
et accessible par sa hauteur ce qui facilite le service dans un style vieillot.
FRANÇAIS
34
34
Page 37

PIÈCES ET ASSEMBLAGE
Matériel
Boulon nº 1 (55 mm)
Qté 4
Vis nº 3 (10 mm)
Qté 2
Rondelle de blocage
nº 7 (6 mm)
Qté 2
Vis nº 4 (8 mm)
Qté 22
Écrou borgne nº 8
Qté 4
Boulon nº 2 (65 mm)
Qté 2
Rondelle
plate nº 5 (8 mm)
Qté 2
Écrou nº 9
Qté 2
Rondelle plate nº 6
(6 mm)
Qté 2
Écrou borgne nº 10
Qté 2
Rondelle de blocage
nº 11 (3 mm)
FRANÇAIS
35
35
Qté 2
Page 38

Pièces
(A) Appareil
principal
(E) Roue (2)
(H2) Cuillère à
mesurer l'huile (1
cuillère à soupe)
(B) Plaque du dessus (C) Poignée-
(F) Portes
(I) Barre de
soutien(4)
poussoir
(G) Compartiment
de rangement
(J) Tournevis
(D) Plaque du fond
(H1) Tasse à mesurer
le maïs (2-oz.)
(K1) Clé
(K2) Clé
(O) Barre
transversale arrière
(L) Pieds
(M) Barre de
gauche
(P) Screw Driver
(N) Barre de droite
FRANÇAIS
36
36
Page 39

Assemblage
Se servir des outils fournis pour l'assemblage : Clé (K1), clé (K2), et tournevis (J).
1. Utiliser 12 vis nº 4 pour assembler le Couvercle supérieur (B), la
Plaque du fond (D) et le Compartiment de rangement (G). S'assurer
que le « X » de la Plaque du fond est orienté vers le bas et le
bord plat du Couvercle supérieur est orienté vers l'avant.
2. Installer la Poignée-poussoir (C) au Compartiment de rangement (G) à
l'aide de deux vis nº 3, deux rondelles de blocage nº 11 et deux écrous nº
9. Utiliser des vis pour xer la Poignée-poussoir vers l'extérieur du
Compartiment de rangement. Utiliser les rondelles de blocage et les
écrous du côté intérieur du Compartiment de rangement pour xer la
Poignée-poussoir.
3. Soulever la pièce du dessus du Couvercle supérieur pour xer
la porte (F) en place. Utiliser 6 vis nº 4 pour xer la Porte (F)
au Comportement principal assemblée à l'Étape 2.
FRANÇAIS
37
37
Page 40

4. Installer une Roue (E) et la Barre de gauche (M) à l'aide d'un
boulon nº 2, une rondelle plate nº 5, une rondelle plate nº 6, une
rondelle de blocage nº 7 et un écrou borgne nº 10. Répéter la
même étape pour la seconde roue et la Barre de droite (N).
5. Utiliser une vis nº 4 pour xer la Barre de soutien à une des
roues équipées. Répéter la même étape pour la deuxième
roue équipée et pour la seconde Barre de soutien (I).
6. Utiliser la Barre transversale arrière (O) pour installer
la roue et la Barre de soutien équipée.
FRANÇAIS
38
38
Page 41

Assemblage du Support de base et des roues (suite)
7. Utiliser deux écrous nº 1 et deux écrous borgnes nº 8 pour
assembler les Pieds (L) à la structure de la roue.
8. Utiliser deux écrous nº 1 et deux écrous borgnes nº 8 pour
xer les deux Barres de soutien (I) assemblé à l'étape 7.
9. Utiliser deux vis nº 4 pour xer la Barre de soutien (I) à la structure de la roue.
FRANÇAIS
39
39
Page 42

10. Installer les parties du Compartiment de rangement assemblé
(G) aux roues/pieds équipés. Pousser le Compartiment de
rangement (G) vers le bas jusqu'à ce qu'il soit en place.
Assemblage de l'appareil principal
Commutateur ON/
OFF (MARCHE/
ARRÊT) de lumière
Marmite en inox
Manivelle
• Poser l'Appareil principal (A) sur le dessus du Compartiment de rangement (B).
• S'assurer que les deux goupilles d'insertion à la base de l'Appareil principal (A)
s'alignent correctement de manière à ce que l'Appareil principal (A) puisse se
verrouiller sous la barre du Compartiment de rangement (C) (voir gure 1).
• Mettre la Marmite dans les supports et brancher le cordon à la base.
Insérer la manivelle et tourner dans le sens antihoraire pour xer.
FRANÇAIS
40
40
Page 43

MODE DE FONCTIONNEMENT
Avant son utilisation, nettoyer l'intérieur de l'appareil en l'essuyant à l'aide d'une
éponge, d'une serviette ou d'un chion non abrasif, humide, puis l'assécher à
l'aide d'une serviette sèche, non abrasive. Essuyer l'intérieur de la Marmite et
s'assurer qu'elle est correctement posée sur les supports avant le démarrage.
1. Avant de démarrer, trouver une surface plane près d'une prise de
courant. S'assurer que le cordon électrique est éloigné de toute source
d'eau. L'utilisation d'une rallonge est permise, en cas de besoin.
2. Rassembler les articles nécessaires pour faire le maïs soué : maïs,
assaisonnements, bols ou sacs pour le maïs soué, huile de cuisson, Tasse
à mesurer le maïs (H1) et cuillère à mesurer l'huile (H2). (La Tasse à mesurer
le maïs et la cuillère à mesurer l'huile sont incluses avec l'appareil).
3. Brancher l'appareil alors qu'il est à la position OFF (arrêt).
4. S'assurer que la Marmite est xée solidement aux supports.
5. S'assurer que le moteur de la Marmite est branché dans la prise située sur le côté inférieur
de la Marmite.
REMARQUE : La Marmite ne chauera pas tant que la prise n'est pas bien insérée.
6. Mettre l'appareil à la position ON (marche) en appuyant sur l'interrupteur qui se
trouve sur le dessus de l'appareil (voir l'illustration ci-dessus pour l'emplacement des
interrupteurs). Laisser l'appareil fonctionner 3 à 5 minutes pour réchauer la Marmite.
7. Arrêter (OFF) l'appareil.
8. Utiliser la Cuillère à mesurer l'huile (H2) fournie pour ajouter 1 cuillère à
soupe de votre huile préférée au maïs soué dans la Marmite. Il est conseillé
d'utiliser de l'huile végétale pour obtenir un meilleur résultat.
9. Ajouter des grains de maïs à la Marmite à l'aide de la Tasse à mesurer le maïs (H1).
REMARQUE : Si vous utilisez des paquets pré-mesurés de grains de maïs soué ou
des kits pour faire du maïs soué, vous devez toujours mesurer la quantité de grains
de maïs et d'huile à l'aide de la Tasse à mesurer le maïs (H1) et la Cuillère à mesurer
l'huile (H2) fournies. Toujours faire ce qui suit : 1 c à soupe d'huile + 57 ml (2 oz) de
maïs = 8 tasses de maïs soué. (NE PAS dépasser (2,5 oz) de grains de maïs soué.)
10. Mettre en fonction (ON) l'appareil et fermer la porte. En un rien de temps,
l'éclatement du maïs débutera. Du maïs frais et chaud commencera
à sortir des rabats de la marmite - comme au cinéma!
11. Utiliser votre Godet à maïs pour servir.
FRANÇAIS
41
41
Page 44

CONSEILS UTILES
Ne jamais laisser l'unité sans surveillance lorsqu'il est en fonction.
CHAUFFAGE
Si votre CHARIOT À MAÏS ÉCLATÉ D’ANTAN commence à fumer pendant la
cuisson cela peut être dû à la graisse accumulée. An de réduire la fumée
s'assurer de nettoyer l'intérieur du chaudron entre les utilisations.
MAÏS ÉCLATÉ
Le CHARIOT À MAÏS ÉCLATÉ D’ANTAN est conçu pour toutes les marques d'appareil
à faire éclater le maïs régulières et de meilleure qualité. Le maïs jaune éclate
généralement mieux que le maïs blanc tandis que certaines marques de grains ont
une coquille extérieure plus dure et cela peut résulter en moins de grains éclatés.
Essayer diérentes marques pour trouver ce qui vous convient le mieux.
Si vous remarquez que vous obtenez beaucoup de grains non éclatés, essayer d'ajouter
plus d'huile à cuisson au chaudron. Plus d'huile peut aider à faire éclater plus de grains.
Toujours utiliser du maïs à éclater frais. Séché, rassis ou vieux le maïs soué éclate
mal car il a perdu sa teneur en humidité et peut brûler. Nous recommandons
d'entreposer le maïs soué dans un récipient hermétique dans un endroit frais.
De temps en temps le maïs éclaté n'éclate pas. Cela est généralement le résultat
de facteurs environnementaux tels que la fraîcheur et la teneur en humidité
du maïs soué ou les diérences dans les types de maïs soué. Des grains
non éclatés ne signient pas nécessairement un défaut de l'appareil.
Lors du remplissage de la tasse à mesurer les grains, s'assurer de ne pas remplir au-dessus
de la ligne marquée. Un remplissage insusant peut faire qu'il y a moins de grains
à éclater et plus de grains non éclatés qui sortiront de l'appareil. Le sur-remplissage
peut faire que le maïs soué brûle et fume puisqu' il surcharge le chaudron.
ASSAISONNEMENTS
Pour un maïs soué à plus de saveur de beurre ou quand on ajoute les
assaisonnements, une giclée d'huile d'olive, eau ou beurre permettront
aux assaisonnements de mieux coller au maïs éclaté.
IMPORTANT: NE PAS placer le beurre, les assaisonnements ou autre chose que les
grains de maïs soué dans le chaudron à maïs soué. L'utilisation de ces matières peut
provoquer des dangers et peut endommager l'appareil.
FRANÇAIS
42
42
Page 45

NETTOYAGE ET ENTRETIEN
1. S'assurer que l'appareil est débranché et COMPLÈTEMENT FROID avant
de le nettoyer. Débrancher la prise extérieure de la prise murale ainsi que
celle du moteur de la Marmite à l'intérieur de l'appareil principal (A).
2. Utiliser une éponge, une serviette ou un chion légèrement humide, non
abrasif(ve) pour essuyer l'intérieur et l'extérieur de l'Appareil principal
(A), puis l'assécher à l'aide d'une serviette sèche non abrasive.
3. Débrancher le moteur de la Marmite, puis retirer la Marmite des supports.
4. Retirer la Marmite de l'Appareil principal (A). Après avoir retiré la Marmite de
l'Appareil principal, remplir la Marmite aux 2/3 avec de l'eau chaude savonneuse.
5. Laisser la Marmite 15 à 20 minutes se dégraisser. (Le temps peut varier –
se servir de son jugement quant au nettoyage à être eectué).
6. Vider l'eau. S'il y a lieu, utiliser le côté rugueux de l'éponge
pour frotter l'intérieur de la marmite.
7. Rincer l'intérieur soigneusement, puis assécher.
8. Essuyer l'extérieur de la Marmite avec un chion humide, puis assécher.
REMARQUE : Pour éviter que la prise du moteur se mouille, ne jamais
plonger la Marmite dans quelques liquides que ce soient. Ne mettre
aucune pièce au lave-vaisselle. Toujours laver à la main.
FRANÇAIS
43
43
Page 46

RECETTES
Le CHARIOT À MAÏS SOUFFLÉ fait du maïs soué chaud n'importe quand, comme si
vous étiez au cinéma! Déguster votre maïs soué, fraîchement fait de diverses façons :
• Maïs soué comme au cinéma – ajouter du beurre et du sel.
• Ajouter une pincée de sucre et de sel au maïs soué pour donner un petit goût sucré.
• Maïs soué aromatisé – ajouter les assaisonnements de votre
kit d'assaisonnement à maïs soué pour gourmet.
• Goûter quelques-unes de ces recettes amusantes :
REMARQUE : 4,5 l (1 gallon) = 16 tasses
MAÏS SOUFFLÉS AU PARMESAN
• ½ tasse de
maïs soué
• (4,5 l (1 gallon) de
maïs éclatés)
• 1 c. à thé poudre d'ail
• 3 oignons verts,
nement coupés
• ½ c. à thé de
poivre concassé
• 1 c. à thé sel de mer
• 1 tasse de parmesan
râpé (plus ou moins
selon le goût)
• 3 c. à soupe d'huile
d'olive chaude
Faire éclater les grains de maïs en utilisant
votre CHARIOT À MAÏS tel qu'indiqué dans la
section COMMENT FAIRE FONCTIONNER.
Combiner la poudre d'ail, les oignons verts, le poivre
concassé, le sel de mer et le parmesan. Mettre de côté.
Dans un grand bol à mélanger, verser l'huile
d'olive chaude sur le maïs soué.
Mélanger jusqu'à ce qu'il soit bien imprégné.
Ajouter doucement des ingrédients secs
tout en mélangeant comme il faut.
Vous pouvez également saupoudrer les
ingrédients secs sur le maïs soué dans un
grand sac de papier et secouer le tout.
BOULES DE MAÏS SOUFFLÉ
• ½ tasse de maïs
soué (4,5 l (1 gallon)
de maïs éclatés)
• ½ tasse de sirop
de maïs
• ½ tasse de sucre
granulé
• ½ c. à thé de sel
• 1 morceau de
beurre ramolli
Faire éclater les grains de maïs en utilisant
votre CHARIOT À MAÏS tel qu'indiqué dans la
section COMMENT FAIRE FONCTIONNER.
Mélanger le sirop de maïs, le sucre et le
sel dans une casserole et dissoudre à feu
moyen pendant environ 3 minutes.
Ajouter le maïs à éclater dans la casserole et
mélanger jusqu'à ce que le maïs soué soit
enrobé d'une manière égale, à feu doux.
Enlever du feu.
Utiliser le beurre ramolli pour faire des boules alors
que le mélange de maïs soué est encore chaud.
Emballer les boules individuellement dans un sac en
plastique, attacher et ranger à température ambiante.
FRANÇAIS
44
44
Page 47

SINGE JOUFFLU
• ½ tasse de maïs
soué(4,5 l (1 gallon)
de maïs éclatés)
• 1 (340 g ou 12 oz)
sac de brisures de
chocolat mi-sucré
• 1 (340 g ou 12 oz) sac
de beurre d'arachide
en morceaux
• 1 (119 g ou 4,2 oz)
sac de croustilles de
bananes, émiettées
• 1 (312 g u 11 oz)
sac d'arachides
ÉCORCE AU MAÏS SOUFFLÉ ET À LA MENTHE
• ½ 2 tasse de maïs
soué (4,5 l (1 gallon)
de maïs éclatés)
• 1 (340 g ou 12 oz) sac
de grains de chocolat
mi-sucré ou noir
• 1¼ tasses de
bâtons de menthe
poivrée, concassés
Faire éclater les grains de maïs en utilisant
votre CHARIOT À MAÏS tel qu'indiqué dans la
section COMMENT FAIRE FONCTIONNER.
Faire fondre les grains de chocolat et les
morceaux de beurre d'arachide sur le poêle,
comme mentionné sur l'emballage.
Tapisser une plaque à biscuits de papier ciré.
Mélanger le maïs soué et les chips de banane.
Étaler le maïs soué et le mélange des chips de
bananes uniformément sur la plaque à biscuits.
Mettre un let de chocolat fondu et le mélange de beurre
d'arachide sur le maïs soué et les chips de bananes.
Saupoudrer les arachides sur le chocolat
et le mélange de beurre d'arachide.
Laisser refroidir.
Lorsque le chocolat et le beurre d'arachide ont refroidi
et durci, couper le Chunky Monkey en morceaux.
Peut être conservé dans des sacs à congélation.
Faire éclater les grains de maïs en utilisant
votre CHARIOT À MAÏStel qu'indiqué dans la
section COMMENT FAIRE FONCTIONNER.
Faire fondre les brisures de chocolat sur une
poêle, comme mentionné sur l'emballage.
Tapisser une plaque à biscuits de papier ciré.
Étaler le maïs soué sur la plaque à biscuits.
Mettre un let de chocolat fondu sur le maïs soué.
Saupoudrer la menthe poivrée sur le chocolat.
Laisser refroidir.
Lorsque le chocolat a refroidi et durci, briser l'écorce
au maïs soué et à la menthe en morceaux.
Peut être conservé dans des sacs à congélation.
FRANÇAIS
45
45
Page 48

RETOURS ET GARANTIE
SI VOTRE APPAREIL NE FONCTIONNE PAS OU S'IL EST ENDOMMAGÉ QUAND VOUS LE RETIREZ
DE LA BOÎTE, VEUILLEZ LE RETOURNER IMMÉDIATEMENT À L'ENDROIT OÙ IL A ÉTÉ ACHETÉ.
CHARIOT DE MAÏS SOUFFLÉ / PC530CTRR
Pour toute question, communiquer par courriel ou au numéro de téléphone du service à
la clientèle, entre 08 h 00 et 17 h 00, du lundi au vendredi, heure normale du Centre.
Distribué par :
Nostalgia Products LLC
1471 Partnership Dr.
Green Bay, WI 54304-5685
Service à la clientèle
Téléphone : (920) 347-9122
Site Web : www.nostalgiaproducts.com
Demande pour le service à la clientèle
Pour soumettre une demande au service à la clientèle, rendez vous au www.nostalgiaproducts.com puis
remplissez le formulaire de demande au service à la clientèle puis cliquez sur le bouton Soumettre.
Un représentant vous contactera dès que possible.
Conditions de garantie du produit
Le groupe Nostalgia Products LLC (référé tel « l’Entreprise ») garantit que pour une période d’un
(1) an en date d’achat, ce produit est sans défaut de matériel et de fabrication selon une utilisation
normale à domicile, seulement si le fonctionnement et l’entretien du produit sont conforment aux
directives fournies. À titre de réparation exclusive et entière sous cette garantie, l’Entreprise pourra
à sa discrétion, réparer ou remplacer le produit défectueux, voire émettre un remboursement du
produit durant la période couverte sous garantie. Cette garantie n’est disponible seulement qu’à
l’acheteur d’origine du produit, en date d’achat au détail dudit produit et sera valide uniquement
avec le reçu de caisse d’origine, à titre de preuve d’achat, lequel est requis pour obtenir les bienfaits
reliés à cette garantie. Toute réclamation doit être rapportée à l’attention de l’Entreprise dans la
fenêtre de la période de la garantie, sans dépasser 30 jours à défaut de performance. Cette garantie
ne couvre pas l’usure normale ou dommage cause par l'expédition, la mauvaise manipulation, la
mauvaise utilisation, les accidents, les modications, les mauvaises pièces de remplacement, voire
toute autre utilisation anormale du produit à domicile. Il est possible que vous ayez à retourner le
produit (avec les frais de retour prépayés par vous) pour une inspection et une évaluation. Les frais
des coûts de retour ne sont pas remboursables. L'Entreprise n’est aucunement responsable pour les
retours endommagés ou perdus en transit. Autrement que spéciquement permit selon les directives
de fonctionnement, cette garantie s’applique à une utilisation à domicile à d'intérieur seulement.
An d'obtenir un service couvert sous cette garantie, veuillez contacter l'Entreprise au numéro de
téléphone inclut ci-haut ou en remplissant le formulaire de demande au service à la clientele, sur le
site www.nostalgiaproducts.com. La garantie est valide seulement aux États-Unis et au Canada.
Cette garantie prévaut toute autre garantie, expresse ou implicite incluant les garanties de qualité
marchande ou ayant une aptitude pour une intention en particulier, lesquelles sont exclues selon la
loi. Sous aucun prétexte l’Entreprise ne pourra être tenue responsable pour tout dommage indirect,
accidentel, conséquentiel ou spécial provenant de ou en relativité avec ce produit ou son utilisation.
Certains états, provinces ou juridictions n'allouent pas l'exclusion ou la limitation de tels dommages
accidentels ou conséquentiels, donc l'exclusion ou limitation suscitée peut ne pas s'appliquer à vous.
Cette garantie ne s’applique pas à la merchandise de renaissance.
Veuillez lire les directives de fonctionnement attentivement. Ne pas se
conformer aux directives de fonctionnement annulera cette garantie.
Pour plus d’informations, visitez notre site Web à www.nostalgiaproducts.com.
Aimez-nous sur Facebook à l’adresse www.facebook.com / NostalgiaElectrics.
Suivez nos conseils sur Pinterest à www.pinterest.com / nostalgiaelctrx.
Tweet avec nous sur Twitter à l’adresse www.twitter.com / NostalgiaElctrx.
FRANÇAIS
46
46
Page 49

 Loading...