

Page 1

All products are trademarks of Nostalgia Products LLC.
Worldwide design & utility patented or patents pending.
© 2018 Nostalgia Products LLC.
www.nostalgiaproducts.com
(rev. 03/21/18 NW)
Page 2
MSB1AQ
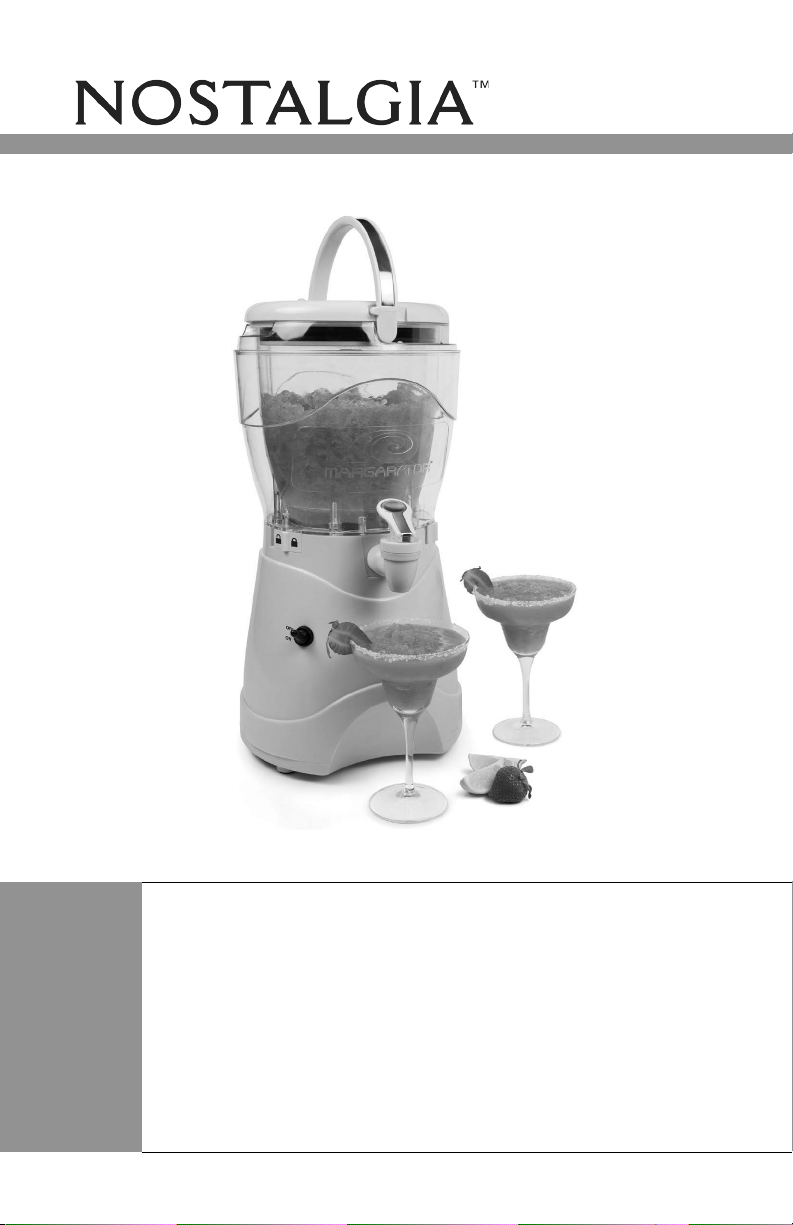
Margarita & Slush Machine
Machine à Margarita
Fábrica de Margaritas
Instructions and Recipes
Instructions et Recettes
Instrucciones y Recetas
Page 3

Page 4
Make every day a party!
Visit www.nostalgiaproducts.com for more fun products.
CONTENTS
SAFETY . . . . . . . . . . . . . . . . . . . . . . . . . . . . . . . . . . . . . . . . . 2
IMPORTANT SAFEGUARDS . . . . . . . . . . . . . . . . . . . . . . . . . . . . . 3
ADDITIONAL IMPORTANT SAFEGUARDS . . . . . . . . . . . . . . . . . . . . . 3
INTRODUCTION . . . . . . . . . . . . . . . . . . . . . . . . . . . . . . . . . . . . 4
PARTS & ASSEMBLY . . . . . . . . . . . . . . . . . . . . . . . . . . . . . . . . . . 5
HOW TO OPERATE . . . . . . . . . . . . . . . . . . . . . . . . . . . . . . . . . . 6
HELPFUL TIPS . . . . . . . . . . . . . . . . . . . . . . . . . . . . . . . . . . . . . 8
CLEANING & MAINTENANCE . . . . . . . . . . . . . . . . . . . . . . . . . . . . 8
RECIPES . . . . . . . . . . . . . . . . . . . . . . . . . . . . . . . . . . . . . . . . . 9
RETURNS & WARRANTY . . . . . . . . . . . . . . . . . . . . . . . . . . . . . . . 12
SAFETY
ENGLISH
Your safety and the safety of others is very important.
We have provided many important safety messages in this manual and
on your appliance. Always read and obey all safety messages.
This is the safety alert symbol.
This symbol alerts you to potential hazards that can
cause serious injury to you and others.
All safety messages will follow the safety alert symbol.
All safety messages will tell you what the potential hazard is, tell you how to reduce the
chance of injury, and tell you what can happen if the instructions are not followed.
Appliance Specications:
120 Volts, 60 Hz
150 Watts
THIS PRODUCT IS FOR USE IN 120V AC OUTLET ONLY.
Refer to www.nostalgiaproducts.com/user-manuals/ for the most updated manual.
2
Page 5

IMPORTANT SAFEGUARDS
A person who has not read and understood all operating and safety instructions
is not qualied to operate this appliance. All users of this appliance must read and
understand this Instruction Manual before operating or cleaning this appliance.
When using electrical appliances, basic safety precautions
ENGLISH
should always be followed, including:
1. Read all instructions before operating this appliance.
2. DO NOT TOUCH the hot surfaces. Use handles or knobs.
3. This appliance is NOT A TOY.
4. Unsupervised young children and cognitively challenged
individuals should never operate this appliance.
5. Close supervision is necessary when any appliance is used by or near children.
6. To protect against electrical shock do not immerse cord, plug
or any part of this unit in water or other liquids.
7. Unplug from outlet when not in use, before removing parts and before cleaning.
Allow to cool before putting on or taking o any parts, and before cleaning.
8. DO NOT operate any appliance with a damaged cord or plug, or after the appliance
malfunctions, or if the appliance has been damaged in any manner. Return the
appliance to the nearest repair shop for examination, repair or adjustment.
9. The manufacturer does not recommend the use of accessory attachments other than
what is provided by the manufacturer. Use of attachments may cause injuries.
10. DO NOT use the appliance for other than its intended use.
11. DO NOT use outdoors. FOR HOUSEHOLD USE ONLY.
12. DO NOT place on or near a hot gas or electric burner, or in a heated oven.
13. DO NOT put in dishwasher.
14. DO NOT let cord hang over edge of table or counter, or touch not surfaces.
15. NEVER leave unit unattended while in use or when plugged into an outlet.
16. Extreme caution must be used when moving an appliance containing hot food or liquid.
17. Always attach plug to appliance rst, then plug cord in the wall outlet. To
disconnect, turn any control to "o," then remove plug from wall outlet.
ADDITIONAL IMPORTANT SAFEGUARDS
Operating Safety Precautions
1. NEVER put ngers or utensils into feed or discharge areas.
2. Keep hands and utensils out of container while unit is in operation to
reduce the risk of severe personal injury or damage to the appliance.
3. DO NOT remove lid while in use. Always operate appliance with lid in place.
4. DO NOT add anything to the container while the appliance is operating.
5. This unit must be on a level surface to operate properly.
6. Make sure the container is properly attached to the base before turning on unit.
3
Page 6

7. Check inside of the Blending Chamber for foreign objects prior to use.
8. Make sure the Blending Chamber is properly attached to the Base before turning on unit.
Instructions for the Electrical Cord and Plug
1. This appliance has a polarized plug (one blade is wider than the other). To reduce the
risk of electrical shock, this plug is intended to t into a polarized outlet only one way.
If the plug does not t fully into the outlet, reverse the plug. If it still does not t,
contact a qualied electrician. Do not attempt to modify the plug in any way.
2. A short power supply cord is provided to reduce the risk resulting
from becoming entangled or tripping over a long cord.
3. If a long detachable power-supply cord or extension cord is used:
• Extension cords can be used if care is exercised in their use.
• The marked electrical rating of the cord or extension cord should
be at least as great as the electrical rating of the appliance.
• When using a longer cord or extension cord, make sure that
the cord does not drape over a countertop or tabletop where
it can be pulled on or tripped over unintentionally.
4. The manufacturer does not recommend using this machine in countries that do not
support 120V AC even if a voltage adapter, transformer, or converter is in use.
SAVE THESE INSTRUCTIONS!
INTRODUCTION
Thank you for purchasing the MARGARITA & SLUSH MACHINE from
Nostalgia™! The MARGARITA & SLUSH MACHINE is a frozen drink
machine that will add thirst-quenching fun to any occasion!
The MARGARITA & SLUSH MACHINE uses crushed ice or small ice cubes from
your freezer. It not only makes fantastic margaritas, but can also mix up batches
of your other favorite frozen drinks such as daiquiris and slushes for the kids!
This machine is designed for kitchen or home bar use but can also be used
in places such as family rooms, dorm rooms, oces and club houses.
Features include:
• Patented dual swivel system that pulverizes and shaves ice,
dispensing consistently smooth frozen drinks
• Insulated container holds up to 128 ounces of your favorite frozen beverage
• Blending Chamber detaches from Base for easy clean up
• Convenient Cord Storage
ENGLISH
4
Page 7
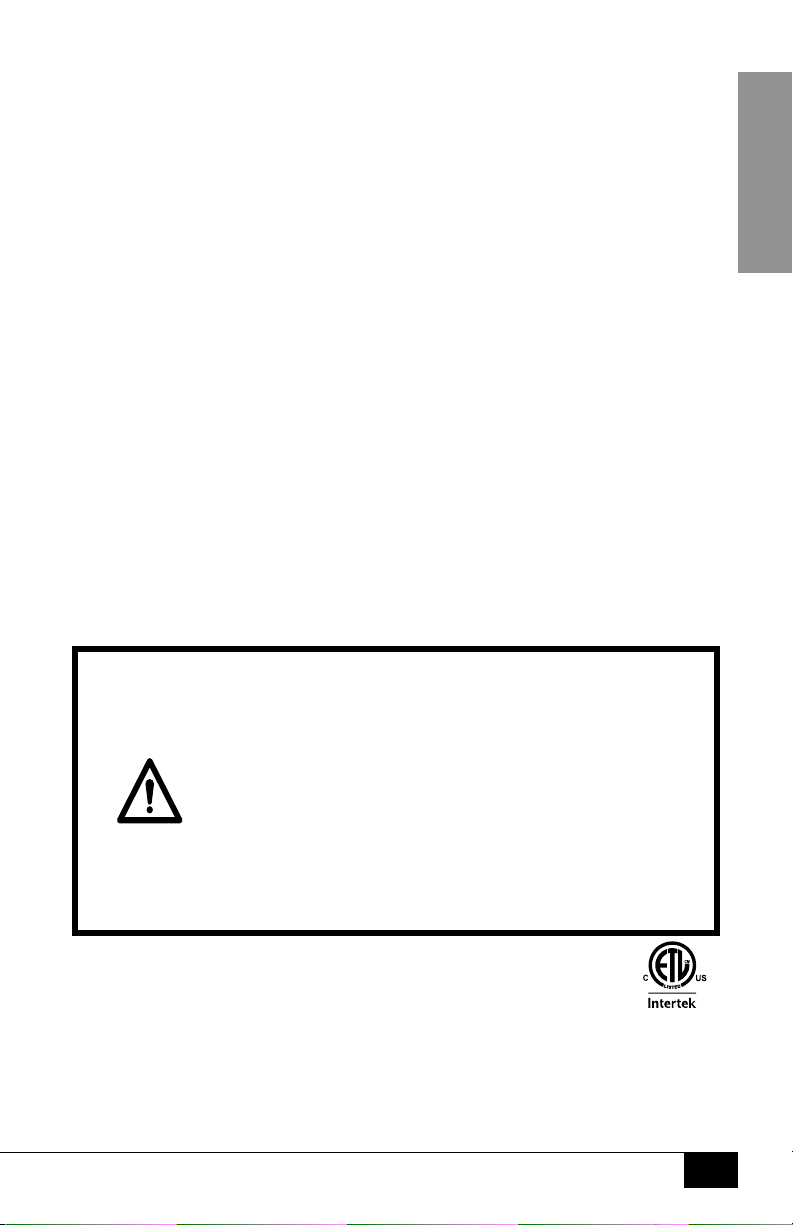
PARTS & ASSEMBLY
PARTS
ENGLISH
Grinding Cage
Lid
Cord Location
The cord storage is located at the base of the unit:
Blending Chamber
Base
Spout
Clear Window
ASSEMBLY
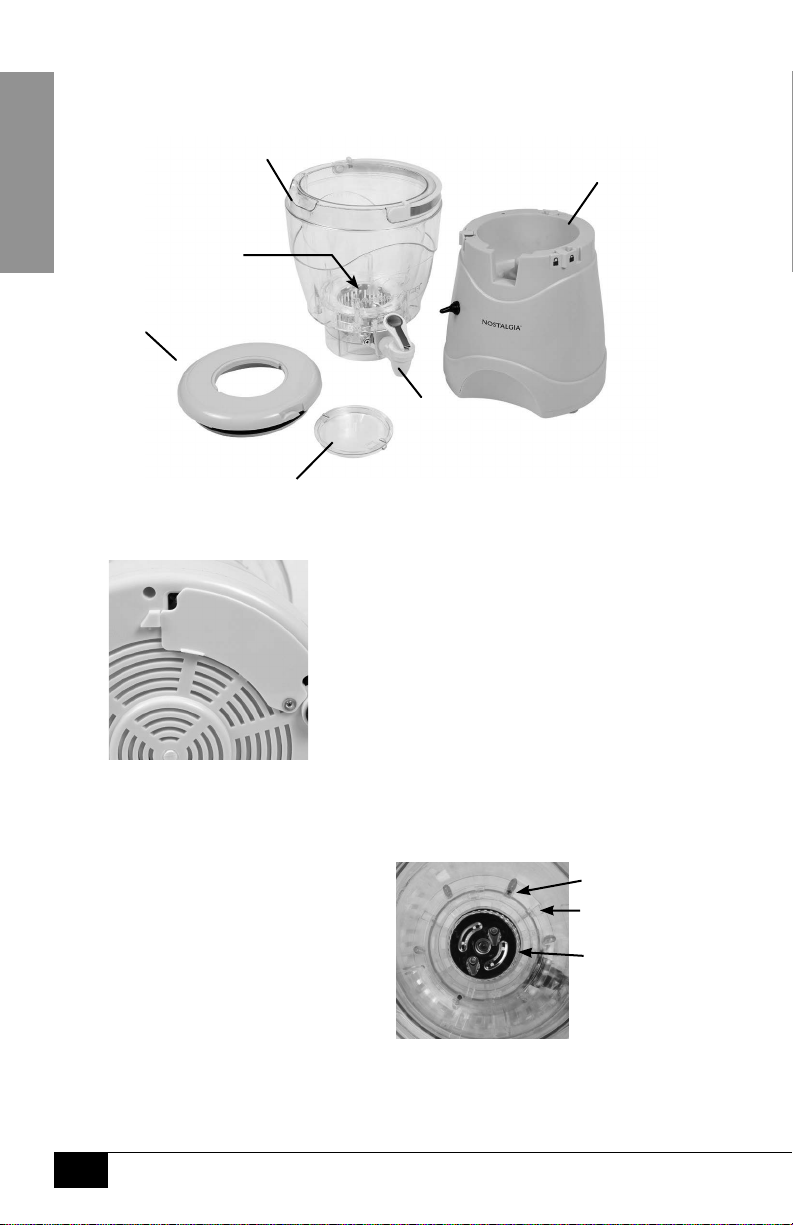
Attaching and Removing the Grinding Cage
It is very important that the Grinding Cage is assembled properly in order for
the unit to work.
1. The Grinding Cage is attached to
the inside of the Blending Chamber
with a round Plastic Collar.
2. Place the Grinding Cage with the
smooth end (opposite of end
with three tabs) into the Plastic
Collar and twist until the notch of
the Grinding Cage locks into the
protrusion on the Plastic Collar.
3. Turn the assembled Grinding Cage with Plastic Collar over, so Plastic Collar
is on the top to insert into the base of Blending Chamber.
5
Screws
Plastic Collar
Grinder
Page 8
4. Looking down into the interior of the Blending Chamber, you will see two
stainless steel screws. This is where the clips attached to the Plastic Collar
lock the grinding mechanism down.
5. When putting the Plastic Collar into position, align
the Tabs with the indents in the base of the Blending
Chamber. With rm but gentle pressure, press the
Plastic Collar down until the Clips “click” into place.
6. Once everything is in place, make sure the Clips are
pushed inward toward the screws to lock the unit into
position and lift slightly to ensure the Grinding Cage
is locked into position properly and will not release.
Lock and unlock Clips carefully to avoid breaking.
NOTE: IF THE PLASTIC COLLAR IS NOT LOCKED PROPERLY
THE UNIT WILL GRIND BUT WILL NOT DISPENSE.
Now you are ready to enjoy cold, refreshing margaritas
and drinks from your MARGARATOR PLUS!
Plastic Collar
Clips
Tabs
HOW TO OPERATE
1. Before rst use, remove all packaging materials and detach Blending Chamber from
Base by sliding the three UNLOCK/LOCK switches to the UNLOCK position.
2. Pour warm, soapy water into the Blending Chamber and
dispense all of the soapy water through the Spout.
3. After dispensing all warm, soapy water, rinse by pouring clean water
into the Blending Chamber and dispense clean water through the Spout
until no soapy residue remains and water comes out clean.
4. Wipe down the MARGARITA & SLUSH MACHINE exterior with a clean, nonabrasive cloth or sponge. Dry interior and exterior thoroughly with dry,
non-abrasive cloth or sponge. DO NOT put the Base in water.
5. After drying, rmly attach Blending Chamber to Base by placing the Blending Chamber on
top of the Base so that Spout faces forward and slide the three LOCK/UNLOCK switches to
the LOCK position.
IMPORTANT: Before operating, take extra care to ensure all switches
are in the LOCK position to avoid damaging the unit.
6. If Blending Chamber is attached properly, it will be aligned
with Base so that the Spout is over the Drip Tray.
7. Find a stable surface near an electrical outlet before starting. Make sure the
cord is away from any water source. It is acceptable
to use an extension cord if needed.
8. DO NOT place the MARGARITA & SLUSH MACHINE
near the edge of a table or countertop.
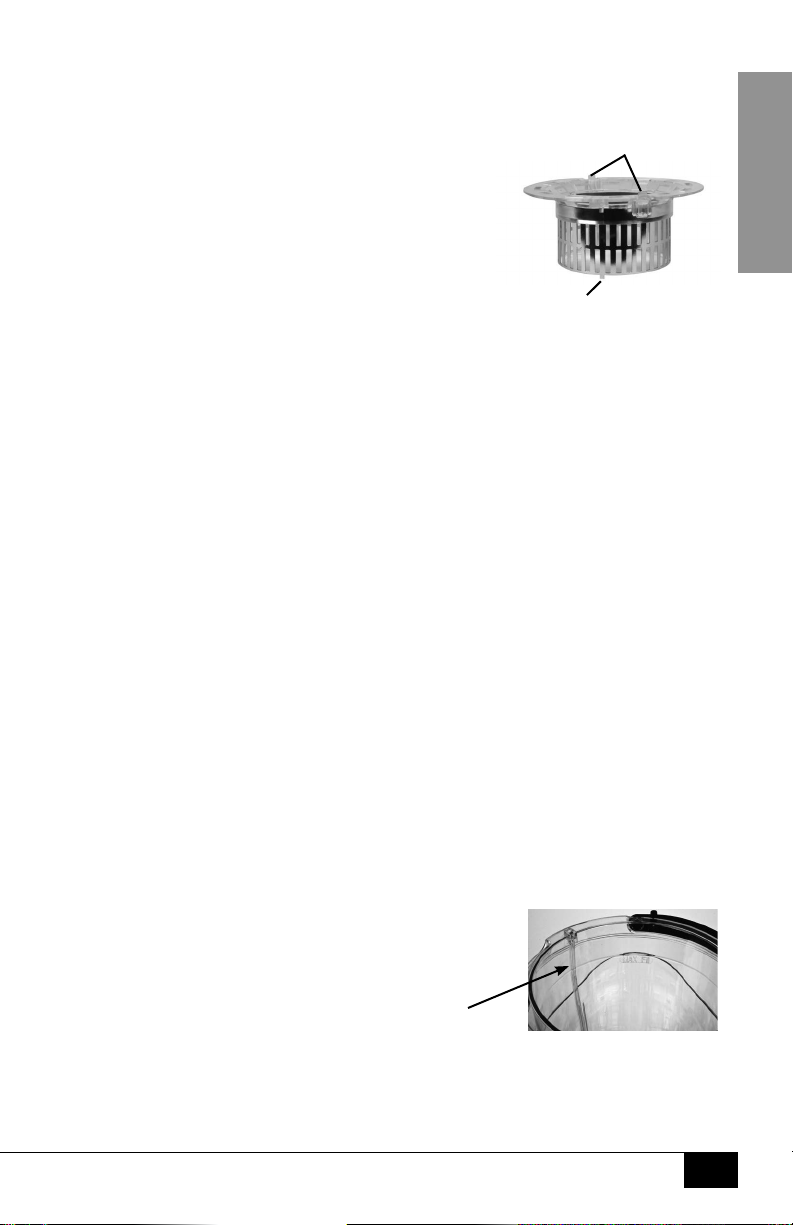
9. Fill the Blending Chamber with ice and ingredients to
the Max Fill line. DO NOT exceed the Max Fill line.
10. To make a batch of margaritas, ll Blending Chamber with ice up to the
Max Fill line and then pour three parts concentrated mix (approximately 45
oz.) to 1 part Tequila (approximately 15 oz.). For a slushier mix, less liquid or
more ice is recommended. It is NOT recommended that you use fruit.
ENGLISH
6
Page 9
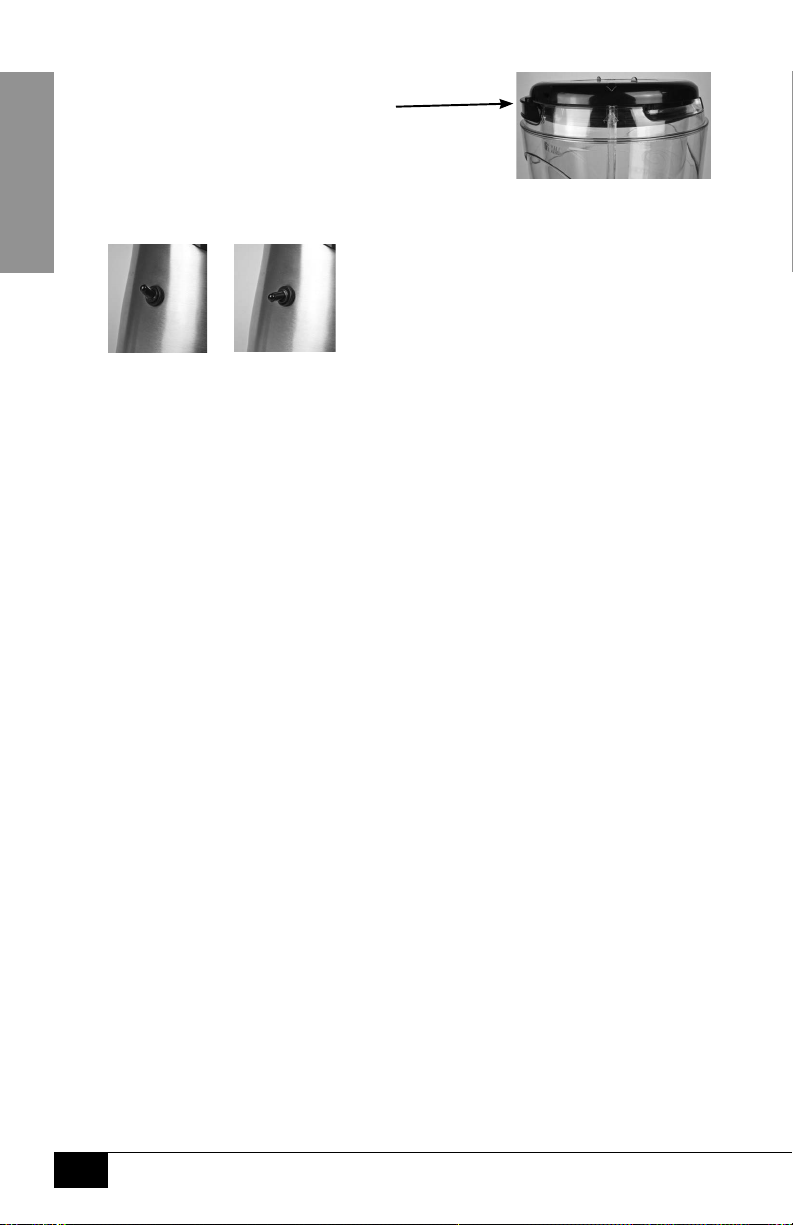
11. Place Lid on unit and line up arrows on
Lid and Blending Chamber. This is a safety
feature and the unit will not turn on
without the Lid in the correct position.
12. You can add additional liquid at
any time by opening the Clear
Window in the Lid. Add more liquid after mixing to reach desired consistency.
ENGLISH
13. Plug in unit and turn ON by ipping the switch downward to ON position.
OFF ON
14. Blend for approximately 10 minutes or until mixture has reached the desired consistency.
15. While the unit is still on, place glass underneath the Spout and dispense the beverage
by lifting the Spout handle up. It is recommended to place a towel or other cloth on the
table or countertop underneath the Spout to protect against any drips. NOTE: the Spout
has a locking upright position for lling multiple drink glasses or a pitcher of drinks.
16. If the Spout drips after dispensing, place a glass or container underneath Spout and open
and close the valve by pushing down on the Spout Handle once or twice quickly. Small
ice chips can sometimes get caught in the gasket, preventing it from closing completely.
17. Turn o the unit when desired consistency is achieved and it will
keep your beverage cold until ready to dispense again.
18. Always dispense beverage with the appliance turned ON. Allow the unit to
run for 8 seconds to mix before dispensing if unit has been sitting. When
you have nished, turn side knob to OFF position and unplug unit.
7
Page 10

HELPFUL TIPS
UNIT IS NOT TURNING ON
• If the unit is not turning on, make sure that it is fully and properly plugged into the outlet.
• Blending Chamber must be rmly attached to Base or unit will not turn on.
BEVERAGE IS NOT DISPENSING
• Add more liquid to Blending Chamber if vacuum occurs around shaving cage during use.
• If the beverage is not dispensing, make sure that the Grinding Cage did not get loose.
• Make sure that there is enough liquid left inside.
• Make sure that switch is ipped up to the ON position.
• Make sure that there aren't any ice chips stuck inside the Spout. Open and close
the valve by pushing down on the Spout Handle once or twice quickly.
CLEANING & MAINTENANCE
1. After using your MARGARITA & SLUSH MACHINE, disconnect from
electrical outlet. Remove plug by gripping the plug body and pulling
out of the outlet. Never yank or twist cord to unplug the unit.
2. Dispense all remaining liquid from the Blending Chamber.
3. Remove Blending Chamber from Base and ll Blending Chamber with clean
water. Dispense all of the water through the Spout until liquid runs clear.
4. Wipe inside and outside of Blending Chamber with a wet, non-abrasive
cloth or sponge and dry thoroughly with a soft, non-abrasive towel.
5. Wipe Base with a dry, non-abrasive cloth.
6. DO NOT submerge Blending Chamber or Base in water. When
needed, use a damp, non-abrasive cloth to wipe exterior.
7. DO NOT put any parts in the dishwasher.
8. Once washing and drying is complete, reassemble your MARGARITA & SLUSH
MACHINE. Wind the cord and return to the convenient storage location in the bottom
of the Base. Now your MARGARITA & SLUSH MACHINE is ready to use again.
9. To prolong the life of your MARGARITA & SLUSH MACHINE, be sure to follow
the cleaning instructions after every use and make sure that the Spout is
ushed thoroughly while washing the unit to prevent build up.
10. You may need to occasionally remove and clean the Grinding Cage. Refer to
the directions in the Parts & Assembly section to perform this function.
ENGLISH
8
Page 11

RECIPES
Use your imagination to create many dierent drinks with your MARGARITA
& SLUSH MACHINE. Here, you will nd several recipes. You can adjust the
ingredients to your particular taste, or create your own – so have fun!
The following recipes are based on a single serving size. To make multiple servings (up to
ENGLISH
16 8oz servings), multiply each ingridient measurement by the desired number of servings.
1 SHOT = 1½ ounces (45 ml)
1 CUP = 5.33 Shots (239.85 ml)
BASIC MARGARITA
• 2 Shots Tequila
• 1 Shot Triple Sec
• 1½ Cups
Margarita Mix
• 1 Shot Freshly
Squeezed Lime Juice
• Salt & Lime Wedge
for Garnishing
STRAWBERRY MANGO MARGARITA
• 1 Shot Tequila
• 5 oz. Mango Juice
• 3 oz. Strawberry juice
• Salt for Rimming
Glass (optional)
Serves one
Serves one
ORANGE JULIUS SLUSH
• 2½-oz. Rum
• 12-oz. Orange Juice
• 2¼-oz. Vodka
STRAWBERRY DAIQUIRI SLUSH
• 12-oz. Strawberry
juice
• 11/3 Cup Light
Corn Syrup
• 2/3 Cup White Rum
• 3 Tbsp. Fresh
Lime Juice
• Lime Slices for
Garnishing
9
Serves two
Serves four
Page 12

BANANA DAIQUIRI
• 1½ Cups White Rum
• 1½ Cup Triple Sec
• 1/2 cup Banana
liqueur
• 12-oz. Lime Juice
• ½ Cup Sugar
• 12-oz. Citrus Soda
APRICOT SMOOTHIE
• 2-oz. White Rum
• 1-oz. Triple Sec
• 26-oz. Apricot Juice
• ½-oz. Cream
KAHLUA COLADA
• 1½-oz. Kahlua
• ½-oz. Rum
• 2¼-oz. Coconut
Cream
• 2¼-oz. Pineapple
Juice
• ½-oz. Cream
Serves 16
Serves two
Serves one
ENGLISH
GINGER FRUIT SLUSH
• 6-oz. Ginger Ale
• 6-oz. Orange Juice
• 1/2 cup Banana
liqueur
• 12-oz. Pineapple Juice
RUM SLUSH
• 1½ Cups Light Rum
• 12-oz. Lime Juice
• 12-oz. Lemon Juice
• 24-oz. Citrus Soda
Serves four
Serves 16
10
Page 13

RETURNS & WARRANTY
SHOULD YOUR UNIT NOT WORK OR IF DAMAGED WHEN YOU FIRST TAKE IT OUT OF
THE BOX, PLEASE RETURN IT TO THE PLACE OF PURCHASE IMMEDIATELY.
MARGARITA & SLUSH MACHINE / MSB1AQ
Should you have any questions, please contact us via email or at the customer service number listed
ENGLISH
below between the hours of 8:00 AM and 5:00 PM, Monday through Friday, Central Standard Time.
Distributed by:
Nostalgia Products LLC
1471 Partnership Dr.
Green Bay, WI 54304-5685
Customer Service
Phone: (920) 347-9122
Web: www.nostalgiaproducts.com
Customer Service Inquiry
To submit a Customer Service inquiry, go to www.nostalgiaproducts.com and ll
out the Customer Service Inquiry form and click the Submit button.
A representative will contact you as soon as possible.
Product Warranty Terms
Nostalgia Products LLC (the “Company”) hereby warrants that for a period of one (1) year from the
date of original purchase, this product will be free of defects in material and workmanship under
normal home use, provided that the product is operated and maintained in accordance with the
operating instructions. As the sole and exclusive remedy under this warranty, the Company will
at its discretion either repair or replace the product found to be defective, or issue a refund on the
product during the warranty period. This warranty is only available to the original retail purchaser of
the product from the date of initial retail purchase, and is only valid with the original sales receipt, as
proof of purchase date is required to obtain warranty benets. All warranty claims must be brought
to the attention of the Company within the warranty period and no later than 30 days of the failure
to perform. This warranty does not cover normal wear or damage caused by shipping, mishandling,
misuse, accident, alteration, improper replacement parts, or other than ordinary household use.
You may be required to return the product (with shipping prepaid by you) for inspection and
evaluation. Return shipping costs are not refundable. The Company is not responsible for returns
damaged or lost in transit. Unless otherwise specically permitted by the operating instructions, this
warranty applies to indoor household use only. In order to obtain service under this warranty, please
contact the Company at the telephone number listed above or by lling out the Customer Service
Inquiry Form located at www.nostalgiaproducts.com. Warranty valid only in USA and Canada.
This warranty is in lieu of all other warranties, expressed or implied, including warranties of
merchantability and tness for a particular purpose, which are hereby excluded to the extent
permitted by law. In no event shall the Company be liable for any indirect, incidental, consequential,
or special damages arising out of or in connection with this product or the use thereof. Some
states, provinces or jurisdictions do not permit the exclusion or limitation of incidental or
consequential damages, so the foregoing exclusion or limitation may not apply to you.
This warranty does not apply to re-manufactured merchandise.
Please read the operating instructions carefully. Failure to comply
with the operating instructions will void this warranty.
For more information, visit us online at www.nostalgiaproducts.com.
Like us on Facebook at www.facebook.com/NostalgiaElectrics.
Follow our boards on Pinterest at www.pinterest.com/nostalgiaelctrx.
Tweet along with us on Twitter at www.twitter.com/NostalgiaElctrx.
11
Page 14

Faire une fête tous les jours!
Visiter le site Web www.nostalgiaproducts.com pour
d’autres produits agréables.
TABLE DES MATIÈRES
SÉCURITÉ . . . . . . . . . . . . . . . . . . . . . . . . . . . . . . . . . . . . . . . . 12
PRÉCAUTIONS IMPORTANTES . . . . . . . . . . . . . . . . . . . . . . . . . . . 13
PRÉCAUTIONS IMPORTANTES ADDITIONNEL . . . . . . . . . . . . . . . . . 13
INTRODUCTION . . . . . . . . . . . . . . . . . . . . . . . . . . . . . . . . . . . . 14
PIÈCES ET ASSEMBLAGE . . . . . . . . . . . . . . . . . . . . . . . . . . . . . . . 15
COMMENT FAIRE FONCTIONNER . . . . . . . . . . . . . . . . . . . . . . . . . 16
CONSEILS PRATIQUES . . . . . . . . . . . . . . . . . . . . . . . . . . . . . . . . 18
NETTOYAGE ET ENTRETIEN . . . . . . . . . . . . . . . . . . . . . . . . . . . . . 18
RECETTES . . . . . . . . . . . . . . . . . . . . . . . . . . . . . . . . . . . . . . . . 19
RETOURS ET GARANTIE . . . . . . . . . . . . . . . . . . . . . . . . . . . . . . . 22
SÉCURITÉ
Votre sécurité tout comme celle des autres est primordiale.
Ce manuel renferme plusieurs avis importants sur la sécurité lors de l’utilisation
de votre appareil. Lire le manuel et conformez-vous aux avis contre-indiqués.
Ceci représente le symbole d'avertissement pour votre sécurité.
Ce symbole vous signale les dangers potentiels qui
peuvent blessures graves à vous et à d'autres.
Ce symbole d'alerte à la sécurité suivra tous les avis relatifs à la sécurité.
Tous les avis sécuritaires indiqueront le danger potentiel exact, la façon
dont vous pouvez réduire vos chances de blessure et vous indiquerons les
conséquences potentielles si vous ne suivez pas ces instructions à la lettre.
Spécications des Appareils:
120 Volts, 60 Hz
150 Watts
CE PRODUIT DOIT ÊTRE UTILISÉ UNIQUEMENT DANS UNE PRISE DE COURANT DE 120 V CA.
Reportez-vous à www.nostalgiaproducts.com/user-manuals/
pour la version la plus récente.
FRANÇAIS
12
12
Page 15

PRÉCAUTIONS IMPORTANTES
Une personne n'ayant pas lu et compris toutes les instructions de
fonctionnement et de sécurité n'est pas qualiée pour faire fonctionner cet
appareil. Tous les utilisateurs de cet appareil doivent lire et comprendre
ce mode d'emploi avant d'utiliser ou de nettoyer cet appareil.
Lorsque l'on utilise un appareil électrique, il faut toujours
respecter des précautions de base, y compris celles-ci :
1. Lisez toutes les instructions avant d'utiliser cet appareil.
2. NE TOUCHEZ PAS aux surfaces chaudes. Utilisez les poignées ou les boutons.
3. Cet appareil N'EST PAS UN JOUET.
4. Les jeunes enfants non supervisés ainsi que les personnes intellectuellement
atteintes ne doivent jamais faire fonctionner cet appareil.
5. Une surveillance accrue est nécessaire lorsque tout appareil
est utilisé par ou à proximité d'enfants.
6. Pour protéger contre les chocs électriques ne pas submerger le cordon, la
che ou une partie de cet appareil dans l'eau ou d'autres liquides.
7. Toujours débrancher la prise lorsque l'appareil n'est pas en fonctionnement,
avant de retirer les pièces et faire le nettoyage. Laisser refroidir avant de
remettre ou de retirer les pièces et avant de faire le nettoyage.
8. NE PAS utiliser l'appareil ayant un cordon ou une che électrique endommagée, ni
suivant un mauvais fonctionnement ou une détérioration quelconque de l'appareil.
Retournez-le à l’atelier de réparation le plus proche pour examen, réparation ou réglage.
9. Le fabricant ne recommande pas l’utilisation d’accessoires autres que ceux
fournis par le fabricant. L'utilisation d’accessoires peut causer des blessures.
10. N'employez PAS l'appareil à d'autres ns que son usage prévu.
11. N’utilisez PAS l'appareil à l'extérieur. UNIQUEMENT POUR USAGE DOMESTIQUE.
FRANÇAIS
12. NA PAS placer sur ou près d'un brûleur à gaz ou électrique ou dans un four chaué.
13. NE JAMAIS laisser le cordon dépasser sur le côté d'une table
ou d'un comptoir ou toucher les surfaces chaudes.
14. NE JAMAIS laisser l'appareil sans surveillance tout en cours
d’utilisation ou lorsqu’il est branché sur une prise.
15. Toujours brancher la prise de l’appareil tout d’abord, puis branchez dans
la prise murale. Pour débrancher l’appareil, remettre tous les boutons en
mode « arrêt » (o), puis débranchez la che de la prise murale.
PRÉCAUTIONS IMPORTANTES ADDITIONNEL
Précautions pour un fonctionnement sécuritaire
1. NE JAMAIS mettre les doigts ou des ustensiles dans les zones d'alimentation ou de décharge.
2. Garder les mains et les ustensiles hors du contenant lorsque l’appareil est en
fonction pour réduire le risque de blessure grave ou d'abîmer l'appareil.
3. NE PAS enlever le couvercle quand l'appareil fonctionne. Toujours
faire fonctionner l'appareil avec son couvercle.
4. NE RIEN ajouter au contenant pendant que l’appareil fonctionne.
5. Cette unité doit être sur une surface plane pour fonctionner correctement.
13
13
Page 16

6. S’assurer que le réservoir est bien posé sur le socle avant de démarrer l'appareil.
7. Vérier qu'aucun objet étranger ne se trouve dans le
Réservoir à crème glacée avant son utilisation.
8. S'assurer que le Réservoir à crème glacée est bien posé
sue le Socle avant de démarrer l'appareil.
Directives pour le cordon électrique et la che
1. Cet appareil a une che polarisée (une lame est plus large que l'autre). Pour réduire le
risque de choc électrique, cette che est conçue pour tenir dans une prise polarisée
que dans un sens. Si vous n’arrivez pas à insérer entièrement la che dans la
prise, branchez-la dans l’autre sens. Si elle ne s’enfonce toujours pas, contactez
un électricien qualié. Ne pas tenter de modier la che d'aucune façon.
2. Un cordon d'alimentation court est fourni pour réduire les risques
d'enchevêtrement ou risques de trébucher sur un cordon plus long.
3. Si une longue corde ou une rallonge électrique détachable est utilisée :
• Rallonges électriques peuvent être utilisées avec prudence.
• Les caractéristiques électriques du câble ou de la rallonge doivent être
au moins aussi grandes que la puissance nominale de l’appareil.
• Lorsque vous utilisez une corde plus longue ou rallonge électrique,
assurez-vous que celle-ci ne pende pas au-delà du comptoir ou
d'une table où elle peut faire trébucher ou être tirée.
4. Le fabricant ne recommande pas d'utiliser cette machine dans les
pays qui ne prend pas en charge 120V AC même si un adaptateur
de tension, transformateur ou convertisseur est utilisé.
CONSERVEZ CES INSTRUCTIONS!
FRANÇAIS
INTRODUCTION
Merci d'avoir acheté la MACHINE À MARGARITA de NostalgiaMC!
La MACHINE À MARGARITA est une machine à boisson glacée qui
procurera un plaisir désaltérant quelle que soit l'occasion!
La MACHINE À MAREGARITA utilise de la glace concassée ou de petits glaçons du
congélateur. Elle permet non seulement de faire de fantastiques margaritas, mais
aussi de mélanger diérentes boissons glacées de son choix, telles que les daïquiris
et les barbotines aux fruits pour les enfants! Cette machine est conçue pour une
utilisation dans la cuisine ou le bar de la maison, mais peut aussi être utilisée dans
des endroits comme les salles familiales, les dortoirs, les bureaux et les pavillons.
Les fonctionnalités comprennent :
• Le système breveté à double pivot qui pulvérise et pile la glace,
pour des boissons glacées toujours onctueuses.
• Le récipient isotherme peut contenir jusqu'à 3,5 L (128
onces) de boisson glacée de son choix
• Le Mélangeur transparent se sépare du Socle pour en faciliter le nettoyage
• Rangement pratique du cordon
14
14
Page 17

PIÈCES ET ASSEMBLAGE
Mélangeur
Broyeur en inox
Couvercle
Bec verseur
Hublot transparent
Emplacement du cordon
Le rangement du cordon se trouve sur le socle de l'appareil :
Socle
FRANÇAIS
Pose et dépose du Broyeur
Le Broyeur en inox doit être assemblé correctement pour que l'appareil fonctionne.
1. Le Broyeur en inox est xe à
l'intérieur du Mélangeur avec une
Bague en plastique ronde.
2. Poser le Broyeur en inox avec l'extrémité lisse
(extrémité opposée avec trois onglets) dans
la Bague en plastique, puis tourner jusqu'à
ce que le cran du Broyeur en inox se bloque
dans la saillie de la Bague en plastique.
3. Retourner le Broyeur
en inox avec la Bague en plastique, de sorte que la Bague en plastique
soit sur le dessus an de l'insérer dans la base du Mélangeur.
4. Regardant vers le bas à l'intérieur du Mélangeur, il y a deux vis en inox. Les clips
xés à la Bague en plastique verrouillent en place le mécanisme de broyage.
5. Au moment de positionner la Bague en plastique, aligner les Onglets avec les cavités
15
15
Vis
Bague en
plastique
Broyeur en inox
Page 18

dans la base du Mélangeur. Appuyer fermement,
mais doucement, sur la Bague en plastique
jusqu'à ce que les Clips « cliquent » en place.
6. Une fois que tout serra en place, s'assurer que les
Clips sont enfoncés vers les vis, à l'intérieur, pour
bloquer l'appareil en position, puis le soulever
légèrement pour que le Broyeur en inox soit verrouillé
correctement et qu'il ne se détache pas. Verrouiller,
puis déverrouiller les Clips pour éviter les bris.
REMARQUE : SI LA BAGUE EN PLASTIQUE N'EST PAS VERROUILLÉE
CORRECTEMENT L'APPAREIL BROIERA, MAIS RIEN NE VERSERA.
Maintenant, déguster des margaritas et des boissons rafraîchissantes
et glacées avec la MACHINE À MAREGARITA!
Clips en
plastique
Onglets
COMMENT FAIRE FONCTIONNER
1. Avant la première utilisation, enlever tous les matériaux d'emballage et
détacher le Mélangeur du Socle en faisant glisser les trois interrupteurs de
VERROUILLAGE/DÉVERROUILLAGE à la position DÉVERROUILLAGE.
2. Verser l'eau chaude savonneuse dans le Mélangeur, puis
verser toute l'eau savonneuse par le Bec verseur.
3. Après avoir versé toute l'eau savonneuse, rincer en versant de l'eau propre
dans le Mélangeur, puis faire sortir l'eau propre par le Bec verseur jusqu'à ce
qu'il ne reste plus aucun résidu de savon et que l'eau en ressorte propre.
4. Essuyer l'extérieur de la MACHINE À MAREGARITA avec un chion ou une éponge
non abrasi(f)ve, propre. Assécher soigneusement l'intérieur ou l'extérieur avec un
chion ou une éponge non abrasi(f)ve, propre. NE PAS plonger le Socle dans l'eau.
5. Une fois séchée, xer solidement le Mélangeur au Socle en plaçant celui-ci sur le dessus du
Socle de sorte que le Bec verseur pointe vers l'avant, puis faire glisse les trois interrupteurs
de VERROUILLAGE/DÉVERROUILLAGE à la position VERROUILLAGE.
IMPORTANT: Avant de commencer, faire très attention pour vous assurer que tous
les interrupteurs sont en position LOCK pour éviter d'endommager l'appareil.
6. Lorsque le Mélangeur sera correctement xé, il sera aligné avec le Socle de
sorte que le Bec verseur se trouvera au-dessus du Ramasse-goutte.
7. Trouver une surface stable, à proximité d'une prise de courant avant de
commencer. S'assurer que le cordon est éloigné de toute source d'eau.
L'utilisation d'une rallonge est acceptable, le cas échéant.
8. NE PAS placer la MACHINE À MAREGARITA près d'un bord de table
ou d'un dessus de comptoir.
9. Remplir le Mélangeur avec la glace et les ingrédients
jusqu'à la ligne Max Fill (remplissage maximal). NE PAS
dépasser la ligne Max Fill (remplissage maximal).
10. Pour faire un lot de margaritas, remplir le Mélangeur
avec de la glace jusqu'à la ligne Max Fill (remplissage
maximal), puis verser trois parties du mélange concentré (environ 1,3 L/45 oz) par
partie de tequila (environ 15 oz). Pour un mélange plus neigeux, moins de liquide
ou de glace est recommandé(e). L'utilisation de fruits n'est pas recommandée.
FRANÇAIS
16
16
Page 19

11. Mettre le Couvercle sur l'appareil, puis
aligner les èches sur le Couvercle et le
Mélangeur. Il s'agit d'un dispositif de sécurité,
et l'appareil s'allumera seulement lorsque
le Couvercle sera à la bonne position.
12. Ouvrir en tout temps le
Hublot transparent du Couvercle pour ajouter plus de liquide. Ajouter plus
de liquide une fois que le mélange atteindra la consistance désirée.
13. Brancher et allumer l'appareil en faisant glisser l'interrupteur
vers le haut, à la position ON (marche).
OFF ON
14. Mélanger pendant environ 10 minutes ou jusqu'à obtenir la consistance désirée.
15. Alors que l'appareil est toujours allumé, mettre un verre sous le Bec verseur, puis verser
la boisson en relevant la poignée du Bec verseur. Placer préférablement une serviette
ou autre chion sur la table ou le dessus du comptoir sous le Bec verseur pour ramasser
les gouttes. REMARQUE : Le Bec verseur comporte une position de verrouillage
verticale pour le remplissage de plusieurs verres ou pichets avec de la boisson.
16. Si le Bec verseur continue de s'égoutter après de versement, placer un verre ou un
récipient sous le Bec verseur, puis fermer le robinet en abaissant rapidement la Poignée
du Bec verseur une ou deux fois. De petits morceaux de glace peuvent parfois se
coincer dans le joint d'étanchéité, l'empêchant de se refermer complètement.
17. Éteindre l'appareil une fois la consistance désirée obtenue; il
FRANÇAIS
gardera la boisson froide jusqu'au moment de la verser.
18. Toujours verser la boisson lorsque l'appareil est allumé. Laisser l'appareil
fonctionner pendant 8 secondes pour mélanger avant de verser si
l'appareil est demeuré fermé. Une fois le versement terminé, tourner le
bouton latéral à la position OFF (arrêt), puis débrancher l'appareil.
17
17
Page 20

CONSEILS PRATIQUES
L'APPAREIL NE S'ALLUME PAS
• Si l'appareil ne s'allume pas, s'assurer qu'il est complètement
et correctement branché dans la prise de courant.
• Le Mélangeur doit être solidement xé au Socle, sinon l'appareil ne se mettra pas en marche.
AUCUNE BOISSON N'EST VERSÉE
• Ajouter plus de liquide au Mélangeur si un vide se produit
autour du Broyeur en cours d'utilisation.
• Si aucune boisson n'est versée, s'assurer que le Broyeur en inox ne s'est pas desserré.
• S'assurer qu'il y a susamment de liquide à l'intérieur.
• S'assurer que l'interrupteur est vers le haut, à la position ON (marche).
• S'assurer qu'il n'y a aucun morceau de glace coincé à l'intérieur du Bec verseur. Ouvrir et
fermer le robinet en abaissant rapidement la poignée du Bec verseur une ou deux fois.
NETTOYAGE ET ENTRETIEN
1. Après avoir utilisé la MACHINE À MAREGARITA, la débrancher de la prise de
courant. Retirer la che en la saisissant par le corps et en la retirant de la prise de
courant. Ne jamais tirer sur le cordon ou le tordre pour débrancher l'appareil.
2. Verser tout le liquide restant du Mélangeur.
3. Retirer le Mélangeur du Socle, puis le remplir avec de l'eau propre. Faire
sortir toute l'eau par le Bec verseur jusqu'à ce que le liquide soit clair.
4. Essuyer l'intérieur et à l'extérieur du Mélangeur avec un chion ou une éponge non abrasi(f)
ve, humide, puis assécher soigneusement à l'aide d'une serviette non abrasive, douce.
5. Assécher soigneusement le Socle à l'aide d'un chion non abrasif, sec.
6. NE PAS immerger le Mélangeur ou le Socle dans l'eau. Le cas échéant, utiliser un
chion non abrasif, humide, pour essuyer l'extérieur, puis assécher soigneusement.
7. NE PAS mettre quelque pièce au lave-vaisselle.
8. Une fois le lavage et l'essuyage terminés, reposer la MACHINE À MAREGARITA. Enrouler
le cordon et le remettre à l'emplacement de rangement pratique dans le fond du
Socle. Maintenant, la MACHINE À MAREGARITA peut être utilisée à nouveau.
9. Pour prolonger la durée de vie de la MACHINE À MAREGARITA, suivre attentivement
les consignes de nettoyage après chaque utilisation et s'assurer que le Bec verseur
est rincé au moment de laver l'appareil pour empêcher quelque accumulation.
10. NE JAMAIS utiliser de produit nettoyant ou de serviette abrasi(f)ve sur le
Socle an de maintenir le ni original en inox et d'éviter les rayures.
11. De temps à autre déposer et nettoyer préférablement le Broyeur en inox. Consulter
les consignes à la section Pièces et assemblage pour la marche à suivre
FRANÇAIS
18
18
Page 21

RECETTES
Laisser aller l'imagination pour créer diérentes boissons à l'aide de la MACHINE À
MAREGARITA. Voici quelques recettes. Ajuster les ingrédients au goût ou créer une
recette à partir de ses propres ingrédients - quel plaisir agréable! S'il s'agit d'une recette
de boisson pour une personne, la MACHINE À MAREGARITA peut faire 16 boissons de
227 mL (8 oz); se rappeler d'adapter la recette en fonction du nombre de personnes!
Pour chaque recette ci-dessous, ajouter de 110 à 225 mL (4 à 8 oz) au Mélangeur
pour chaque portion. Les recettes peuvent être adaptées au goût de chacun.
1 MESURE = 40 mL (11/2 oz)
240 mL (1 TASSE) = 5,33 mesures
MARGARITA CLASSIQUE
• 2 mesures de tequila
• 1 mesure de triple-sec
• 360 mL (1 ½ tasse) de
mélange à margarita
• 1 mesure de jus de
lime fraîchement
pressée
• Sel et quartier de lime
comme garniture
Portion : 1
FRANÇAIS
MARGARITA À LA MANGUE ET À LA FRAISE
• 1 mesure de tequila
• 140 mL (5 oz) de
jus de mangue
• 3 fraises fraîches,
en quartiers
• Sel pour le bord du
verre (en option)
BARBOTINE À L'ORANGE JULIUS
• 70 mL (2 ½ oz)
de rhum
• 340 mL (12 oz) de
jus d'orange
• 65 mL (2 ¼ oz)
de vodka
19
19
Portion : 1
Portion : 2
Page 22

BARBOTINE DAÏQUIRI À LA FRAISE AVEC MELON MIEL
• 360 mL (1 ½ tasse)
de rhum blanc
• 360 mL (1 ½ tasse)
de triple-sec
• de 3 à 4 bananes,
coupées en tranches
de 2,5 cm (1 po)
• 340 mL (12 oz)
de jus de lime
• 120 g (½ tasse)
de sucre
• 340 mL (12 oz) de
boisson gazeuse
aux agrumes
DAÏQUIRI À LA BANANE
• 1½ Cups White Rum
• 1½ Cup Triple Sec
• 1/2 cup Banana
liqueur
• 12-oz. Lime Juice
• ½ Cup Sugar
• 12-oz. Citrus Soda
Serves four
Portion : 16
FRANÇAIS
FRAPPÉ À L'ABRICOT
• 60 mL (2 oz) de
rhum blanc
• 30 mL (1 oz) de
triple-sec
• 150 mL (5 oz) de
jus d'abricot
• 15 mL (½ oz)
de crème
Portion : 2
20
20
Page 23

KAHLUA COLADA
• 45 mL (1 ½ oz)
de Kalua
• 15 mL (½ oz) de rhum
• 65 mL (2 ¼ oz)
de crème de
noix de coco
• 65 mL (2 ¼ oz) de
jus d'ananas
• 15 mL (½ oz)
de crème
BARBOTINE AUX FRUITS ET AU GINGEMBRE
• 170 mL (6 oz) de
boisson gazeuse
Ginger Ale
• 170 mL (6 oz) de
jus d'orange
• 2 bananes, tranchées
• 1 boîte de conserve
(340 mL/12 oz)
d'ananas écrasé,
dans son jus
Portion : 1
Portion : 4
FRANÇAIS
BARBOTINE AU RHUM
• 360 mL (1 ½ tasse)
de rhum léger
• 340 mL (12 oz)
de jus de lime
• 340 mL (12 oz)
jus de citron
• 680 mL (24 oz) de
boisson gazeuse
aux agrumes
21
21
Portion : 16
Page 24

RETOURS ET GARANTIE
SI VOTRE APPAREIL NE FONCTIONNE PAS OU S'IL EST ENDOMMAGÉ QUAND VOUS LE RETIREZ
DE LA BOÎTE, VEUILLEZ LE RETOURNER IMMÉDIATEMENT À L'ENDROIT OÙ IL A ÉTÉ ACHETÉ.
MACHINE À MARGARITA EN INOX / SÉRIE MSB600
Pour toute question, communiquer par courriel ou au numéro de téléphone du service à
la clientèle, entre 08 h 00 et 17 h 00, du lundi au vendredi, heure normale du Centre.
Distribué par :
Nostalgia Products LLC
1471 Partnership Dr.
Green Bay, WI 54304-5685
Service à la clientèle
Téléphone : (920) 347-9122
Site Web : www.nostalgiaproducts.com
Demande pour le service à la clientèle
Pour soumettre une demande au service à la clientèle, rendez vous au www.nostalgiaproducts.com puis
remplissez le formulaire de demande au service à la clientèle puis cliquez sur le bouton Soumettre.
Un représentant vous contactera dès que possible.
Conditions de garantie du produit
Le groupe Nostalgia Products LLC (référé tel « l’Entreprise ») garantit que pour une période d’un
(1) an en date d’achat, ce produit est sans défaut de matériel et de fabrication selon une utilisation
normale à domicile, seulement si le fonctionnement et l’entretien du produit sont conforment aux
directives fournies. À titre de réparation exclusive et entière sous cette garantie, l’Entreprise pourra
à sa discrétion, réparer ou remplacer le produit défectueux, voire émettre un remboursement du
produit durant la période couverte sous garantie. Cette garantie n’est disponible seulement qu’à
l’acheteur d’origine du produit, en date d’achat au détail dudit produit et sera valide uniquement
avec le reçu de caisse d’origine, à titre de preuve d’achat, lequel est requis pour obtenir les bienfaits
reliés à cette garantie. Toute réclamation doit être rapportée à l’attention de l’Entreprise dans la
fenêtre de la période de la garantie, sans dépasser 30 jours à défaut de performance. Cette garantie
ne couvre pas l’usure normale ou dommage cause par l'expédition, la mauvaise manipulation, la
mauvaise utilisation, les accidents, les modications, les mauvaises pièces de remplacement, voire
toute autre utilisation anormale du produit à domicile. Il est possible que vous ayez à retourner le
produit (avec les frais de retour prépayés par vous) pour une inspection et une évaluation. Les frais
des coûts de retour ne sont pas remboursables. L'Entreprise n’est aucunement responsable pour les
retours endommagés ou perdus en transit. Autrement que spéciquement permit selon les directives
de fonctionnement, cette garantie s’applique à une utilisation à domicile à d'intérieur seulement.
An d'obtenir un service couvert sous cette garantie, veuillez contacter l'Entreprise au numéro de
téléphone inclut ci-haut ou en remplissant le formulaire de demande au service à la clientele, sur le
site www.nostalgiaproducts.com. La garantie est valide seulement aux États-Unis et au Canada.
Cette garantie prévaut toute autre garantie, expresse ou implicite incluant les garanties de qualité
marchande ou ayant une aptitude pour une intention en particulier, lesquelles sont exclues selon la
loi. Sous aucun prétexte l’Entreprise ne pourra être tenue responsable pour tout dommage indirect,
accidentel, conséquentiel ou spécial provenant de ou en relativité avec ce produit ou son utilisation.
Certains états, provinces ou juridictions n'allouent pas l'exclusion ou la limitation de tels dommages
accidentels ou conséquentiels, donc l'exclusion ou limitation suscitée peut ne pas s'appliquer à vous.
Cette garantie ne s’applique pas à la merchandise de renaissance.
Veuillez lire les directives de fonctionnement attentivement. Ne pas se
conformer aux directives de fonctionnement annulera cette garantie.
Pour plus d’informations, visitez notre site Web à www.nostalgiaproducts.com.
Aimez-nous sur Facebook à l’adresse www.facebook.com / NostalgiaElectrics.
Suivez nos conseils sur Pinterest à www.pinterest.com / nostalgiaelctrx.
Tweet avec nous sur Twitter à l’adresse www.twitter.com / NostalgiaElctrx.
FRANÇAIS
22
22
Page 25

¡Convierta todos los días en una etsa!
Visite www.nostalgiaproducts.com para
ver más productos divertidos.
CONTENIDO
SEGURIDAD . . . . . . . . . . . . . . . . . . . . . . . . . . . . . . . . . . . . . . . 23
SALVAGARDIAS IMPORTANTES . . . . . . . . . . . . . . . . . . . . . . . . . . . 24
SALVAGARDIAS IMPORTANTES ADICIONALES . . . . . . . . . . . . . . . . . 24
INTRODUCCIÓN . . . . . . . . . . . . . . . . . . . . . . . . . . . . . . . . . . . . 25
PARTES Y ENSAMBLAJE . . . . . . . . . . . . . . . . . . . . . . . . . . . . . . . 26
CÓMO FUNCIONA . . . . . . . . . . . . . . . . . . . . . . . . . . . . . . . . . . . 27
CONSEJOS ÚTILES . . . . . . . . . . . . . . . . . . . . . . . . . . . . . . . . . . . 29
LIMPIEZA Y MANTENIMIENTO . . . . . . . . . . . . . . . . . . . . . . . . . . . 29
RECETAS . . . . . . . . . . . . . . . . . . . . . . . . . . . . . . . . . . . . . . . . . 30
DEVOLUCIONES Y GARANTÍA . . . . . . . . . . . . . . . . . . . . . . . . . . . . 34
SEGURIDAD
Su seguridad y la de otras personas es muy importante.
Hemos proporcionado numerosos mensajes de seguridad importantes en este manual
y en su electrodoméstico. Siempre lea y obedezca todos los mensajes de seguridad.
Todos los mensajes de seguridad estarán antecedidos por el símbolo de alerta.
Todos los mensajes de seguridad le dirán de qué peligro potencial se trata, cómo reducir
la posibilidad de lesiones y qué puede ocurrir si no se obedecen las instrucciones.
Especicaciones del electrodoméstico:
120 Volts, 60 Hz
150 Watts
ESTE PRODUCTO ES PARA USAR SOLAMENTE EN TOMAS DE CORRIENTE DE 120 VCA.
ESPAÑOL
Visite www.nostalgiaproducts.com/user-manuals/ para ver el manual más actualizado.
23
23
Este es el símbolo de alerta de seguridad.
Este símbolo le avisa de los peligros potenciales
que pueden matar o herir a otros.
Page 26

SALVAGUARDIAS IMPORTANTES
Una persona que no haya leído y comprendido todas las instrucciones
de uso y seguridad no está calicada para utilizar este aparato. Todos
los usuarios de este dispositivo deben leer y comprender este Manual
de instrucciones antes de utilizar o limpiar este aparato.
Cuando utiliza aparatos eléctricos, siempre se deben seguir algunas
medidas básicas de seguridad que incluyen las siguientes:
1. Lea todas las instrucciones antes de utilizar este aparato.
2. NO TOQUE las supercies calientes. Use agarraderas o mangos.
3. Este aparato NO ES UN JUGUETE.
4. Los niños pequeños sin supervisión y las personas con limitación
cognitiva nunca deben utilizar este aparato.
5. Una supervisión estricta se requiere cuando un aparato se use por niños o cerca de ellos.
6. Como medida de protección contra el riesgo de descarga eléctrica, no sumerja el
cable, los enchufes ni ninguna otra parte de la unidad en agua ni en otros líquidos.
7. Desconéctelo del tomacorriente cuando no esté en uso, antes de
retirar piezas y antes de la limpieza. Déjelo enfriar antes de colocar
o retirar cualquiera de las piezas, y antes de la limpieza.
8. NO utilice ningún aparato con el cable o el enchufe dañados, ni si el aparato
tiene desperfectos o SI se ha dañado de cualquier manera. Devolver el
aparato al taller de reparación más cercano para su reparación o ajuste.
9. El fabricante no recomienda el uso de otros aditamentos o accesorios diferentes a los
proporcionados por el fabricante. El uso de accesorios puede provocar lesiones.
10. NO utilice el aparato para otros usos que no haya sido diseñado.
11. NO utilice el aparato al aire libre. SOLO PARA USO DOMÉSTICO.
12. NO lo coloque sobre o cerca de una hornilla eléctrica o gas caliente, o en un horno caliente.
13. NO lo coloque en un lavavajillas.
14. NO permita que el cable cuelgue sobre el borde de la mesa o
del mostrador, ni que toque supercies calientes.
15. NUNCA deje la unidad desatendida mientras esté en uso o
cuando esté enchufada a una toma de corriente.
16. Debe ser extremadamente cuidadoso al mover cualquier aparato con comida caliente.
17. Siempre conecte primero el enchufe al aparato, luego enchufe el cable
a la toma de corriente. Para desconectar, mueva todos los controles
a “apagar” y luego retire el enchufe del tomacorriente.
SALVAGUARDIAS IMPORTANTES ADICIONALES
Precauciones de seguridad operativa
1. NUNCA ponga los dedos ni coloque utensilios en las áreas de alimentación o descarga.
2. Mantenga las manos y los utensilios fuera del recipiente mientras la unidad está en
funcionamiento para reducir el riesgo de lesiones graves o daños en el aparato.
3. NO retire la tapa mientras esté en uso. Siempre haga
funcionar el aparato con la tapa en su lugar.
ESPAÑOL
24
24
Page 27

4. NO añada nada al recipiente mientras el aparato esté en funcionamiento.
5. Esta unidad debe estar en una supercie nivelada para que funcione bien.
6. Asegúrese de colocar correctamente el recipiente en la base antes de encender la unidad.
7. Revise dentro de la cámara de mezclas para ver si tiene objetos extraños antes del uso.
8. Asegúrese de colocar correctamente la cámara de mezcla
en la base antes de encender la unidad.
Instrucciones para el cable eléctrico y el enchufe
1. Este aparato tiene una patita polarizada (un patita más ancha que la otra). Para
reducir el riesgo de descarga eléctrica, este enchufe está diseñado para entrar en el
tomacorriente polarizado solo en una posición. Si el enchufe no entra completamente
en el tomacorriente, invierta el enchufe. Si aún así no entra, comuníquese con un
electricista calicado. No trate de modicar el enchufe de ninguna manera.
2. Un cable de alimentación corto se provee para reducir el riesgo
resultante de enredarse o tropezarse con un cable largo.
3. Si se utiliza un cable alargador o un cable de alimentación más largo:
• Unos cables de extensión se pueden utilizar si se tiene cuidado con su uso.
• Las características nominales del grupo de cables o del cable de
extensión deben ser al menos iguales a las del aparato.
• Cuando se utiliza un cable largo o cable de extensión, asegúrese de
que el cable no sobresalga de la encimera ni una mesa ya que se
puede halar o tropezarse con el cable involuntariamente.
4. El fabricante no recomienda el uso de esta máquina en países que no admiten 120V
CA incluso si se está usando un adaptador, transformador o convertidor de voltaje.
¡GUARDE ESTAS INSTRUCCIONES!
INTRODUCCIÓN
¡Gracias por comprar la FÁBRICA DE MARGARITASde Nostalgia™! La
FÁBRICA DE MARGARITASes una máquina de bebidas heladas que
aportará diversión al combatir la sed ¡en cualquier ocasión!
La FÁBRICA DE MARGARITASutiliza hielo partido o pequeños cubos de hielo de
su freezer. ¡No sólo prepara fantásticos margaritas, sino que también prepara
otras mezclas y sus bebidas heladas favoritas como por ejemplo daiquiris y jugos
para los niños! Esta máquina está diseñada para ser utilizada en la cocina o en
un bar hogareño pero también puede utilizarse en lugares como por ejemplo
estar familiar, habitaciones de residencias estudiantiles, ocinas y clubes.
Sus características son:
• Sistema patentado de doble giro que pulveriza y pica el hielo,
brindando tragos helados consistentemente parejos
• El contenedor aislado tiene capacidad de hasta 128 onzas
(3,8 litros) de su bebida congelada favorita
• El Recipiente se separa de la Base para su fácil limpieza
• Práctico Guardado del Cable
ESPAÑOL
25
25
Page 28

PARTES & ENSEMBLAJE
Vaso Mezclador
Recipiente Moledor
Tapa
Ventana Transparente
Ubicación del Cable
El cable se encuentra guardado en la base de la unidad:
Base
Pico
Cómo Sujetar y Retirar el Recipiente Moledor
Es muy importante que el Recipiente Moledor de Acero Inoxidable
esté bien armado para que la unidad funcione.
1. El Recipiente Moledor de Acero Inoxidable
se encuentra sujeto al interior del Vaso
Mezclador con un Collar Plástico redondo.
2. Coloque el Recipiente Moledor de
Acero Inoxidable con el extremo plano
(opuesto al extremo que tiene tres
pestañas) en el Collar Plástico y gire
hasta que la muesca del Recipiente
Moledor de Acero Inoxidable se trabe
en la protuberancia del Collar Plástico.
3. Gire el Recipiente Moledor de Acero Inoxidable armado con el Collar
Plástico puesto, para que el Collar Plástico se encuentre en la parte
de arriba para insertarlo a la base de la Vaso Mezclador.
Tornillos
Collar Plástico
Moledor de
Acero Inoxidable
ESPAÑOL
26
26
Page 29

4. Si observa el interior del Vaso Mezclador, verá dos tornillos de acero inoxidable. Aquí
es donde se sujetan las clavijas al Collar Plástico para trabar el mecanismo moledor.
5. Cuando coloque el Collar Plástico en su lugar,
ponga en línea las Pestañas con los dientes en
la base del Vaso Mezclador. Presione rme pero
suavemente el Collar Plástico hacia abajo hasta
que las clavijas “hagan clic” en su lugar.
6. Una vez que todo esté en su lugar, asegúrese de
que las Clavijas hayan sido empujadas dentro
de los tornillos para trabar la unidad en su
lugar y levante levemente para asegurarse de
que el Recipiente Moledor de Acero Inoxidable
esté realmente trabado en su posición adecuada y no se vaya a salir. Trabe
y destrabe las Clavijas con cuidado, para evitar que se rompan.
NOTA: SI EL COLLAR PLÁSTICO NO ESTÁ BIEN TRABADO,
LA UNIDAD MOLERÁ PERO NO DISPENSARÁ.
Ya está listo para disfrutar frescos y refrescantes margaritas y bebidas
con su FÁBRICA DE MARGARITAS DE ACERO INOXIDABLE!
Clavijas
Pestañas
CÓMO FUNCIONA
1. Antes de utilizarlo por primera vez, retire todos los materiales del embalaje y
retire el Vaso Mezclador de la Base deslizando los tres interruptores UNLOCK/
LOCK (DESTRABAR/TRABAR) en la posición UNLOCK (DESTRABAR).
2. Vierta agua con jabón en el Vaso Mezclador y dispense
toda el agua con jabón a través del Pico.
3. Luego de dispensar toda el agua tibia con jabón, limpie vertiendo
agua limpia en el Vaso Mezclador y dispense agua limpia por el Pico
hasta que no queden residuos de jabón y el agua salga limpia.
4. Limpie el exterior de la FÁBRICA DE MARGARITAScon un paño o esponja
limpios, no abrasivos. Seque muy bien el interior y el exterior con un
paño o esponja secos, no abrasivos. NO coloque la Base en agua.
5. Luego de secar, sujete con rmeza el Vaso Mezclador a la Base colocando el Vaso Mezclador
sobre la Base para que el Pico quede mirando hacia adelante y deslice los tres interruptores
LOCK/UNLOCK (DESTRABAR/TRABAR) a la posición LOCK (TRABAR).
IMPORTANTE: Antes de utilizar, tener un cuidado especial para asegurar que todos
los interruptores están en la posición LOCK para evitar dañar la unidad.
6. Si el Vaso Mezclador está bien sujeto, estará alineado a la Base para
que el Pico se encuentre sobre la Bandeja de Goteo.
7. Encuentre una supercie estable cerca de un tomacorriente eléctrico.
Asegúrese de que el cable esté alejado de cualquier fuente de
agua. Se puede utilizar un prolongador si es necesario.
8. NO apoye la FÁBRICA DE MARGARITAScerca
del borde de una mesa o de la mesada.
9. Llene el Vaso Mezclador con hielo y los
ESPAÑOL
ingredientes, hasta la línea de llenado máximo.
NO exceda la línea de llenado máximo.
27
27
Page 30

10. Para preparar una tanda de margaritas, llene el Vaso Mezclador con hielo
hasta la línea de Llenado Máximo y vierta tres partes de mezcla concentrada
(aproximadamente 45 onzas – 1,3 litros) en 1 parte de Tequila (aproximadamente
15 onzas – 430 cm3). Para obtener una mezcla con más aguanieve, se recomienda
usar menos líquido o más hielo. NO se recomienda el uso de frutas.
11. Coloque la Tapa sobre la unidad y ponga en línea las
echas de la Tapa con el Vaso Mezclador. Ésta es una
medida de seguridad, la unidad no se encenderá si
la Tapa no se encuentra en la posición correcta.
12. Podrá agregar más líquido en
cualquier momento abriendo la Ventana Transparente de la Tapa. Agregue
más líquido luego de mezclar, para llegar a la consistencia deseada.
13. Enchufe la unidad y ENCIÉNDALA llevando la perilla hacia
arriba a la posición ON (ENCENDIDO).
OFF ON
14. Bata durante aproximadamente 10 minutos o hasta que la
mezcla haya alcanzado la consistencia deseada.
15. Mientras la unidad aún está encendida, coloque una copa debajo del Pico y dispense
la bebida levantando la manija del Pico. Se recomienda que coloque una toalla u otro
paño sobre la mesa o mesada, debajo del Pico, para protegerla de goteos. NOTA: el
Pico tiene una posición de traba hacia arriba para llenar varias copas o una jarra.
16. Si el Pico gotea luego de dispensar, coloque un vaso o contenedor debajo
del Pico y abra y cierre la válvula empujando la Manija del Pico hacia abajo
una o dos veces, rápidamente. A veces se pueden atascar pequeños trocitos
de hielo en la junta, evitando que se pueda cerrar completamente.
17. Apague la unidad cuando se haya alcanzado la consistencia deseada y sus
bebidas se mantendrán frías hasta que esté listo para volver a dispensar.
18. Siempre dispense bebidas con el aparato Encendido. Si la unidad ha estado parada,
déjela funcionar durante 8 segundos para mezclar antes de dispensar. Cuando haya
terminado, gire la perilla a la posición OFF (Apagado) y desenchufe la unidad.
ESPAÑOL
28
28
Page 31

CONSEJOS ÚTILES
LA UNIDAD NO ENCIENDE
• Si la unidad no enciende, asegúrese de que esté bien enchufada en el tomacorriente.
• El Vaso Mezclador deberá estar sujeto rmemente a la Base,
de lo contrario la unidad no se encenderá.
NO DISPENSA BEBIDAS
• Agregue más líquido al Vaso Mezclador si se genera un vacío
alrededor del recipiente para picar durante su uso.
• Si no salen las bebidas, asegúrese de que el Recipiente
Moledor de Acero Inoxidable no se haya soltado.
• Asegúrese de que quede suciente líquido adentro.
• Asegúrese de que el interruptor esté arriba, en posición ON (Encendido).
• Asegúrese de que no haya quedado nada de hielo atascado dentro del Pico. Abra y cierre
la válvula presionando hacia abajo la Manija del Pico una o dos veces rápidamente.
LIMPIEZA Y MANTENIMIENTO
1. Luego de utilizar su FÁBRICA DE MARGARITAS DE ACERO INOXIDABLE, desconéctela del
tomacorriente eléctrico. Desenchufe tomando el enchufe del cuerpo y sacándolo hacia
afuera del tomacorriente. Nunca gire ni tire del cable para desenchufar la unidad.
2. Dispense todo el líquido restante del Vaso Mezclador.
3. Retire el Vaso Mezclador de la Base y llene el Vaso Mezclador con agua limpia.
Dispense toda el agua a través del Pico hasta que el líquido salga transparente.
4. Limpie la parte interior y exterior del Vaso Mezclador con un paño o esponja
húmedos, no abrasivos y seque bien con una toalla suave, no abrasiva.
5. Limpie la Base con un paño seco, no abrasivo.
6. NO sumerja el Vaso Mezclador ni la Base en agua. Cuando sea necesario,
use un paño húmedo, no abrasivo para limpiar el exterior.
7. NO coloque ninguna parte en el lavavajillas.
8. Una vez completado el lavado y el secado, vuelva a armar su FÁBRICA DE MARGARITAS DE
ACERO INOXIDABLE. Enrosque el cable y regréselo a la práctica ubicación de guardado en
la parte inferior de la Base. Ahora su FÁBRICA DE MARGARITASestá lista para volver a usar.
9. Para prolongar la vida de su FÁBRICA DE MARGARITAS DE ACERO INOXIDABLE, asegúrese
de seguir las instrucciones de limpieza luego de cada uso y asegúrese de que pase mucho
líquido por el Pico mientras lava la unidad, para evitar que queden residuos en su interior.
10. NUNCA use limpiadores ni toallas abrasivos en la Base, para mantener
la terminación original de acero inoxidable y evitar ralladuras.
11. Ocasionalmente es posible que necesite retirar y limpiar el Recipiente Moledor de Acero
Inoxidable. Diríjase a las instrucciones de la sección Partes y Armado para realizar esta tarea
ESPAÑOL
29
29
Page 32

RECETAS
Utilice su imaginación para crear diferentes tragos con su FÁBRICA DE MARGARITAS
DE ACERO INOXIDABLE. Aquí encontrará varias recetas. Puede modicar
los ingredientes para adaptarlos a su gusto personal o crear tragos propios
para ¡divertirse! Si cuenta con la receta para preparar un solo trago, tenga en
cuenta que su FÁBRICA DE MARGARITAStiene capacidad para 16 tragos de 8
onzas (240 cm3), recuerde ajustar sus recetas acorde a estas cantidades
Para cada receta a continuación, agregue entre 4 y 8 onzas (100 a 200 cm3) de hielo
al Vaso Mezclador para cada trago. Las recetas podrán ajustarse a su gusto.
1 MEDIDA = 1½ onzas (45 ml)
1 COPA = 5.33 Medidas (239,85 ml))
MARGARITA BÁSICA
• 2 Medidas de Tequila
Para Uno
• 1 Medida de Triple Sec
• 1½ Copas de Mezcla
para Margaritas
• 1 Medida de Jugo
de Lima Recién
Exprimida
• Una Porción de Sal y
Lima para Decorar
Para Uno
MARGARITA DE FRESAS Y MANGO
• 1 medida de Tequila
Para Uno
• 5 onzas (150 cm3)
de Jugo de Mango
• 3 Fresas Frescas
16-onzas (450
gramos), Cortadas
en Cuartos
• Sal para el Borde del
Vaso (opcional)
Para uno
ESPAÑOL
30
30
Page 33

JUGO DE NARANJA JULIUS
• 2½ onzas (75 cm3) de
Ron Para Uno
• 12 onzas (350 cm3)
de Jugo de Naranja
• 2¼ onzas (70
cm3) de Vodka
NIEVE DE DAIQUIRI DE FRESAS CON ROCÍO DE MIEL
• 1 Paquete de 12
Onzas (340 grs.) de
Fresas Congeladas,
Sin Endulzar
• 1¹/3 copa de Jarabe
de Maíz Suave
• ²/3 copa de
Ron Blanco
• 3 cucharadas de
Jugo de Lima Fresca
• ½ Rocío de Miel
Fresco, Sin Semillas y
Cortado en Cubos de
½ pulgada (1,5 cm)
• Rodajas de Lima
para Decorar
Para dos
Para cuatro
DAIQUIRI DE BANANA
• 1½ Tazas de
Ron Blanco
• 1½ Tazas de Triple Sec
• 3-4 Bananas, cortadas
en rodajas de 1"
• 12 onzas (350 cm3)
de jugo de lima
• ½ Taza de Azúcar
• 12 onzas (350 cm3)
de Gaseosa Citrus
ESPAÑOL
31
31
Para 16
Page 34

BATIDO DE DAMASCO
• 2 onzas (60 cm3) de
Ron Blanco
Para Uno
• 1 onza (30 cm3)
de Triple Sec
• 26 onzas (750 cm3)
de Jugo de Damasco
• ½ onza (15 cm3)
de Crema
KAHLUA COLADA
• 1½ onza (45 cm3) de
Kahlua
Para Uno
• ½ onza (15
cm3) de Ron
• 2¼ onzas (70 cm3)
de Crema de Coco
• 2¼ onzas (70 cm3)
de Jugo de Ananás
• ½ onza (15 cm3)
de Crema
NIEVE DE FRUTA DE JENGIBRE
• 6 onzas (180 cm3) de
Ginger Ale
Para Uno
• 6 onzas (180 cm3)
de Jugo de Naranja
• 2 Bananas, en
Rebanadas
• 1 Lata de 12-onzas
(340 grs.) de Ananás
en Cubos en su Jugo
Para dos
Para uno
Para cuatro
ESPAÑOL
32
32
Page 35

NIEVE DE FRUTOS DEL BOSQUE
• 5 Fresas
Para Uno
• ¾ taza de Arándanos
• ½ taza de Duraznos,
en Rebanadas
• 6 onzas (180 cm3)
de Jugo de Naranja
• ¼ de taza de Azúcar
• 2 cucharadas de
Jugo de Limón
BATIDO DE RON
• 1½ Tazas de
Ron Suave
• 12 onzas (350 cm3)
de Jugo de Lima
• 12 onzas (350 cm3)
de Jugo de Limón
• 24 onzas (700 cm3)
de Gaseosa Citrus
Para cuatro
Para 16
ESPAÑOL
33
33
Page 36

DEVOLUCIONES Y GARANTÍA
SI LA UNIDAD NO FUNCIONA O ESTÁ DAÑADA AL SACARLA POR PRIMERA VEZ
DE LA CAJA, DEVUÉLVALA AL LUGAR DE COMPRA INMEDIATAMENTE.
FÁBRICA DE MARGARITAS / SERIE MSB1AQ
Si tiene preguntas, contacte con nosotros por correo electrónico o por el número
telefónico de servicio al cliente que aparece a continuación en el horario de
8:00 AM a 5:00 PM, de lunes a viernes, Hora Estándar del Este.
Distribuida por:
Nostalgia Products LLC
1471 Partnership Dr.
Green Bay, WI 54304-5685
Servicio al cliente
Teléfono: (920) 347-9122
Web: www.nostalgiaproducts.com
Solicitud de servicio al cliente
Para enviar una solicitud al Servicio al Cliente, vaya a www.nostalgiaproducts.com, llene
el formulario de Solicitud de Servicio al Cliente y haga clic en el botón Enviar.
Un representante le contactará tan pronto como sea posible.
Términos de garantía del producto
Po este medio, Nostalgia Products LLC (la “Compañía”) garantiza que por un período de un (1) año a
partir de la fecha de compra original, este producto estará sin defectos en cuanto a materiales y mano
de obra en uso normal en casa, siempre que el producto se maneje y mantenga de acuerdo con las
instrucciones de manejo. Como único y exclusivo remedio en virtud de esta garantía, la Compañía, a
su discreción, podrá optar por reparar o sustituir el producto que se encuentre defectuoso, o emitir un
reembolso por el producto durante el período de garantía. Esta garantía sólo está disponible para el
comprador original minorista del producto a partir de la fecha inicial de compra al por menor, y sólo es
válida con el recibo de compra original, y como prueba de la fecha de compra, es necesario obtener los
benecios de la garantía. Todos los reclamos de garantía deben hacerse a la atención de la Compañía
dentro del período de garantía y no más tarde que 30 días desde la imposibilidad de realizarlo. Esta
garantía no cubre el desgaste normal o daños ocasionados por el embarque, malos manejos, mal uso,
accidentes, alteración, piezas de cambio incorrectas, o algo distinto al uso doméstico normal. Es posible
que deba devolver el producto (con los gastos de envío pagados por usted) para inspección y evaluación.
Los costos de envío no son reembolsables. La empresa no se hace responsable por devoluciones
dañadas o perdidas en tránsito. A menos que se indique lo contrario especícamente permitido por
las instrucciones de manejo, esta garantía sólo se aplica al uso en interiores de las viviendas. Para
realizar una reparación bajo esta garantía, comuníquese con la Compañía mediante el número de
teléfono indicado anteriormente o al llenar el formulario de consulta para el servicio de Atención al
Cliente en www.nostalgiaproduct s.com. El período de garantía sólo es válido en EE.UU. y Canadá.
Esta garantía está en lugar de cualquier otra garantía, expresa o implícita, incluso las garantías de
comerciabilidad y conveniencia para un propósito en particular, que quedan excluidas en la medida
permitida por la ley. En ningún caso la compañía será responsable de cualquier daño indirecto, incidental,
consecuente, especial o daños que surjan o estén relacionados con este producto o la utilización del
mismo. Algunos estados, provincias o corregimientos no permiten la exclusión o la limitación de daños
incidentales o consecuentes, por lo que la exclusión o la limitación anterior quizás no se aplique a usted.
Esta garantía no se aplica a mercancía reelaborada.
Lea las instrucciones de manejo cuidadosamente. El incumplimiento
de las instrucciones de manejo anulará esta garantía.
Para obtener más información, visítenos en línea en www.nostalgiaproducts.com.
Me Gusta en Facebook en www.facebook.com / NostalgiaElectrics.
Siga nuestros consejos sobre Pinterest en www.pinterest.com / nostalgiaelctrx.
Tweet con nosotros en Twitter en www.twitter.com / NostalgiaElctrx.
ESPAÑOL
34
34
Page 37

 Loading...