

Page 1

All products are trademarks of Nostalgia Products LLC.
Worldwide design & utility patented or patents pending.
© 2014 Nostalgia Products LLC.
www.nostalgiaproducts.com
(rev. 12/09/14)
Page 2
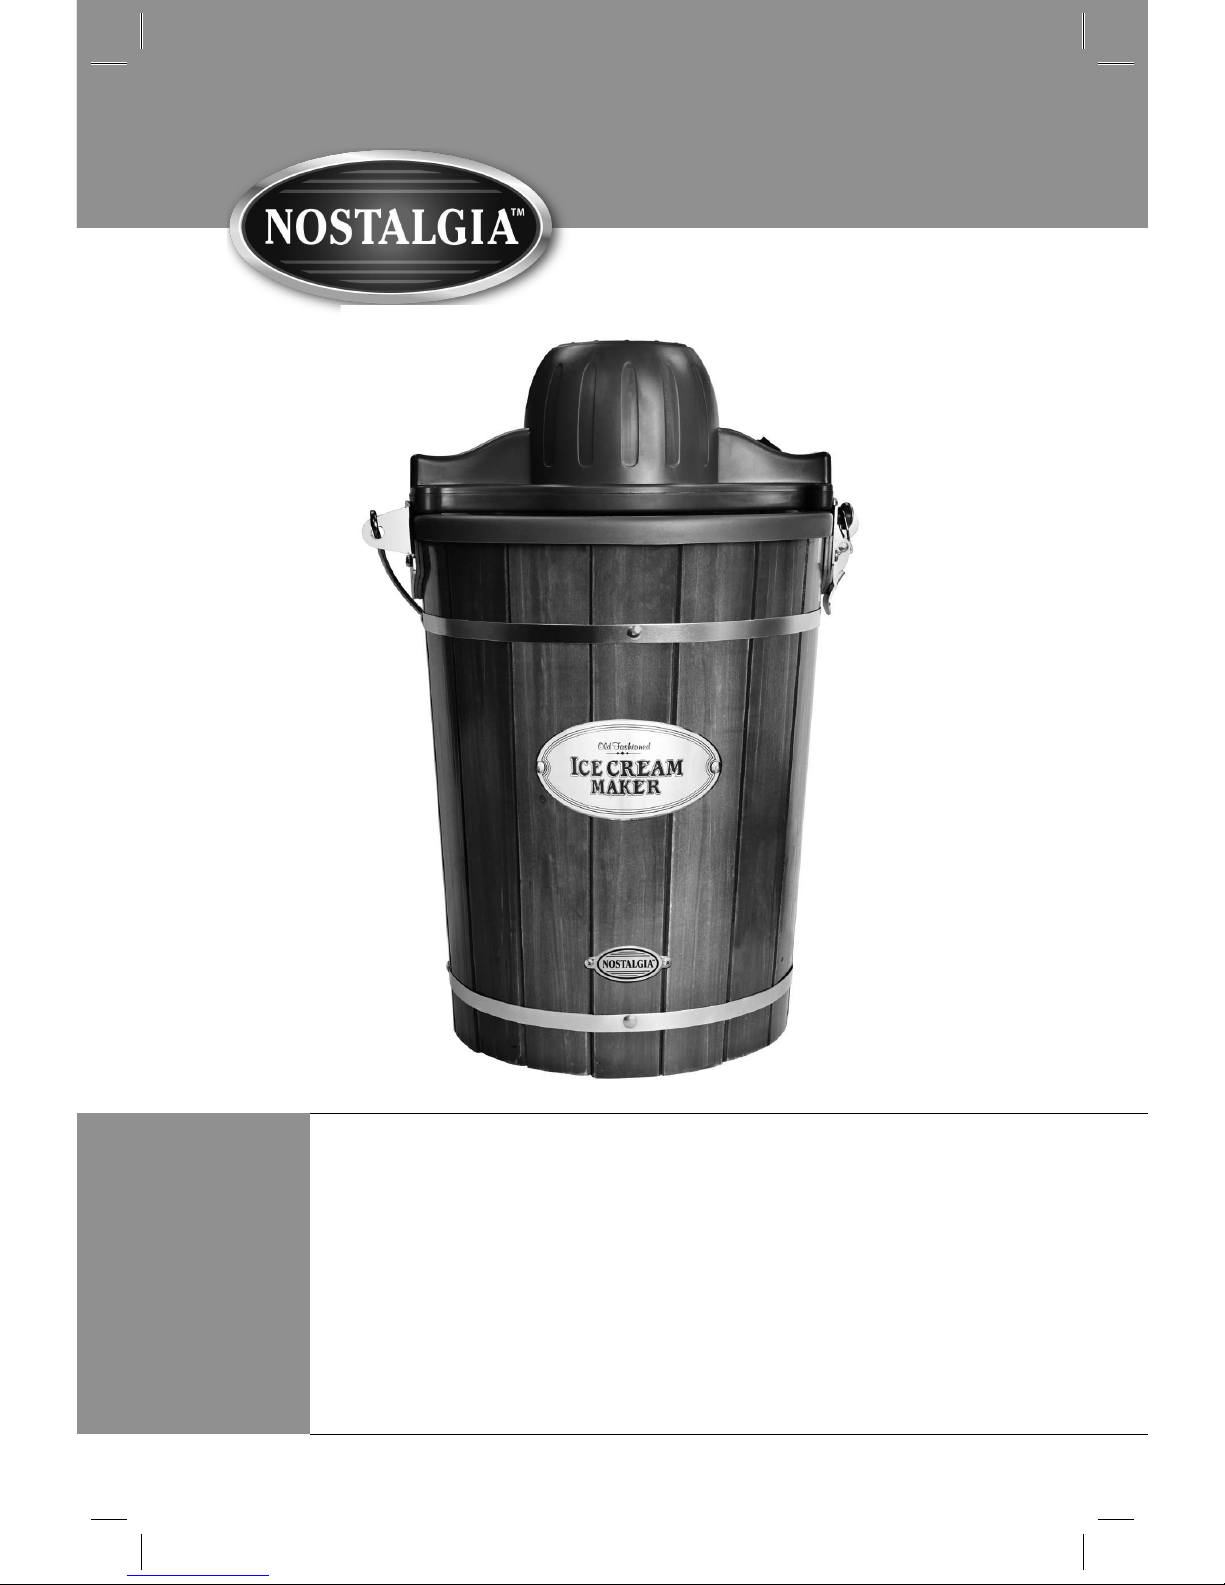
ICMP600WD
Vintage Collection™ Old Fashioned 6-Quart Ice Cream Maker
Sorbetière d'antan de 6,8 l (12 pte) Vintage Collection™
Vintage Collection™ Máquina de Helado de 6 Cuartos Tradicional
Instructions and Recipes
Consignes et Recettes
Instrucciones y Recetas
Page 3

Page 4
ENGLISH
2
Make every day a party!
Visit www.nostalgiaelectrics.com for more fun products.
CONTENTS
IMPORTANT PRECAUTIONS . . . . . . . . . . . . . . . . . . . . . . . . . . . . . 3
IMPORTANT SAFEGUARDS . . . . . . . . . . . . . . . . . . . . . . . . . . . . . 3
INTRODUCTION . . . . . . . . . . . . . . . . . . . . . . . . . . . . . . . . . . . . 4
PARTS & ASSEMBLY . . . . . . . . . . . . . . . . . . . . . . . . . . . . . . . . . . 5
HOW TO OPERATE . . . . . . . . . . . . . . . . . . . . . . . . . . . . . . . . . . 6
HELPFUL TIPS . . . . . . . . . . . . . . . . . . . . . . . . . . . . . . . . . . . . . 7
CLEANING & MAINTENANCE . . . . . . . . . . . . . . . . . . . . . . . . . . . . 8
RECIPES . . . . . . . . . . . . . . . . . . . . . . . . . . . . . . . . . . . . . . . . . 9
RETURNS & WARRANTY . . . . . . . . . . . . . . . . . . . . . . . . . . . . . . . 14
SAFETY
Appliance Specications:
120 Volts, 60 Hz
50 Watts, CE Approved
THIS PRODUCT IS FOR USE IN 120 V OUTTLET ONLY.
Your safety and the safety of others is very important.
We have provided many important safety messages in this manual and
on your appliance. Always read and obey all safety messages.
This is the safety alert symbol.
This symbol alerts you to potential hazards that
can kill or hurt you and others.
All safety messages will follow the safety alert symbol.
All safety messages will tell you what the potential hazard is, tell you how to reduce the
chance of injury, and tell you what can happen if the instructions are not followed.
Page 5

ENGLISH
3
IMPORTANT PRECAUTIONS
1. NEVER immerse in water.
2. NEVER use near water.
3. NEVER use an abrasive sponge or cloth on the unit.
4. NEVER leave unit unattended while in use.
5. NEVER add nuts, candy, fruit or other chunky ingredients to the unit.
They may prevent ice cream from churning properly.
6. Unplug unit from outlet when not in use and when cleaning.
7. DO NOT operate this appliance with a damaged cord or plug
or in the event the appliance ever malfunctions.
8. DO NOT put in dishwasher.
9. Keep out of reach of children.
10. This appliance is NOT A TOY.
11. This appliance is not intended for use by unsupervised young
children or cognitively challenged individuals.
12. Young children should be supervised while product is in use
to ensure that they do not play with the appliance.
IMPORTANT SAFEGUARDS
When using electrical appliances, basic safety precautions should always be
followed, including:
1. Read all instructions before operating this appliance.
2. To protect against electrical shock do not immerse cord, plug
or any part of this unit in water or other liquids.
3. Close supervision is necessary when any appliance is used by or near children.
4. To avoid re or shock hazard, or damage to the unit, this unit should
be plugged into a standard 120 Volt AC outlet ONLY.
5. Unplug from outlet when not in use and before removing parts for cleaning.
6. DO NOT operate any appliance with a damaged cord or plug or if the
appliance has been damaged in any manner. Return the appliance
to the nearest repair shop for examination or repair.
7. The manufacturer does not recommend the use of accessory
attachments. Use of attachments may cause injuries.
8. NEVER operate the unit dry. Always have ice cream mixture
inside of the container while plugged in.
9. DO NOT use hot oil or hot liquids in the Bucket. Always chill mixture before churning.
10. DO NOT use outdoors. FOR HOUSEHOLD USE ONLY.
11. DO NOT let the cord touch hot surfaces.
12. DO NOT place on or near a hot gas or electric burner, or in a heated oven.
Page 6

ENGLISH
4
13. This unit must be on a level surface to operate properly.
14. DO NOT use this appliance for other than its intended use.
15. DO NOT leave unit unattended while in use or when plugged into an outlet.
16. A short power supply cord is provided to reduce the risk resulting
from becoming entangled or tripping over a long cord.
17. Extension cord can be used if care is exercised in use.
18. The marked electrical rating of an extension cord should be at
least as great as the electrical rating of the appliance.
19. This product is equipped with a two round pin plug. To reduce the risk of electrical
shock, this plug is intended to t into a standard 120 Volt AC outlet. If the plug does
not t fully into the outlet, you may need a reversing apparatus to t the plug or
contact a qualied electrician. Do not attempt to modify the plug itself in any way.
20. DO NOT put hands or any foreign objects into this appliance
while it is plugged in and operating.
SAVE THESE INSTRUCTIONS!
INTRODUCTION
Thank you for purchasing the VINTAGE COLLECTION™ OLD FASHIONED 6-QUART ICE CREAM
MAKER from Nostalgia™. This ice cream maker provides a homemade ice cream experience
with modern convenience. Simply place the aluminum canister lled with ingredients in the
center of the bucket, ll the bucket with ice, and the electric motor does the churning for
you. Soon, delicious ice cream is ready to serve! Makes six quarts of ice cream per batch.
Page 7
ENGLISH
5
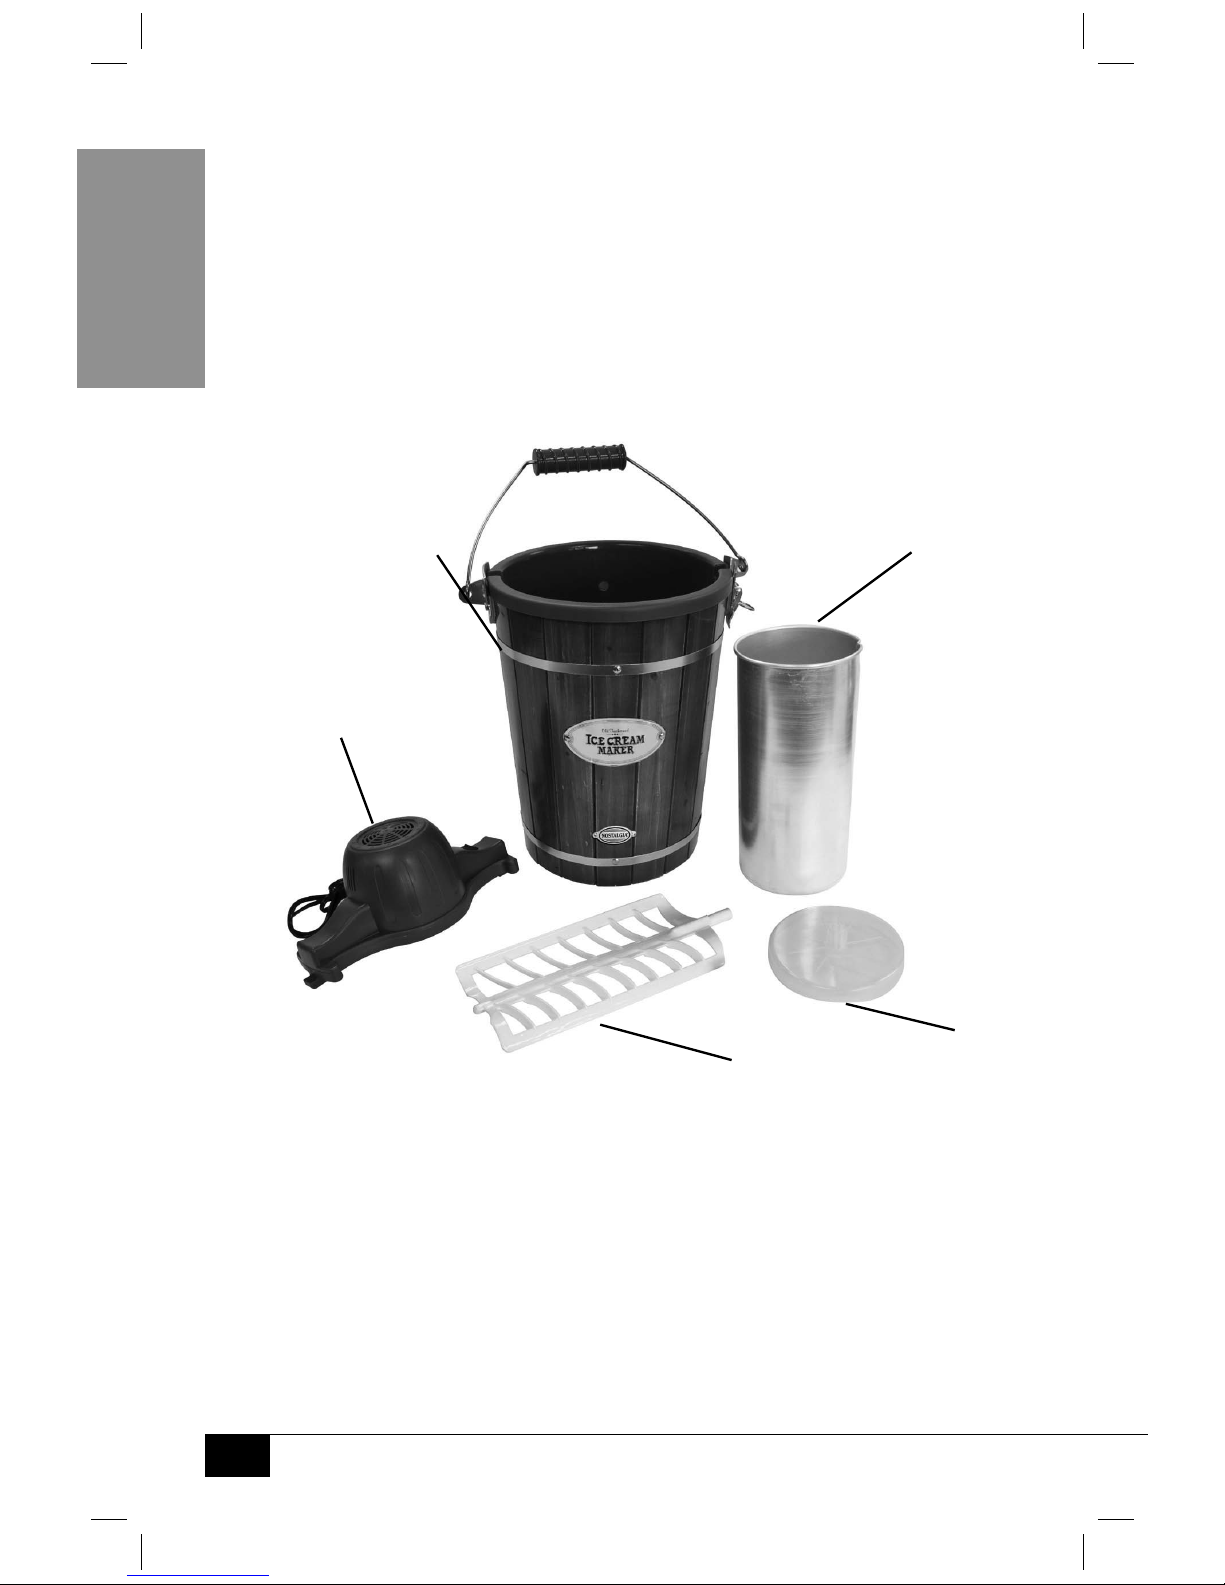
PARTS & ASSEMBLY
Take the VINTAGE COLLECTION™ OLD FASHIONED 6-QUART ICE CREAM
MAKER out of the box and wash the Bucket, Canister, Lid and all accessories
(except for Electric Motor and plug) with warm, soapy water.
Carefully wipe down the Electric Motor with a slightly damp, non-abrasive cloth
or sponge. NEVER immerse the Electric Motor in water. Dry thoroughly.
Now you are ready to enjoy creamy, delicious ice cream from your VINTAGE
COLLECTION™ OLD FASHIONED 6-QUART ICE CREAM MAKER.
Wood Bucket
Canister
Dasher
Lid
Electric
Motor
Page 8

ENGLISH
6
HOW TO OPERATE
1. First, nd a stable surface near an electrical outlet before starting. Make sure the cord
is away from any water source. It is acceptable to use an extension cord if needed.
2. Chill ice cream Canister until cold to the touch. Fill wood bucket 3/4 full with water
and let sit for 20 minutes. This will allow wood to swell up so the salt brine solution
does not leak out during the churning process. Discard water after 20 minutes.
3. Pour chilled ice cream mixture into the chilled Canister. Make sure that you do not
ll Canister more than ²/3 full, as mixture will expand during freezing process.
4. Insert the Dasher into the Canister and make sure the bottom of the
Dasher is properly aligned in the center of the Canister.
5. Place the Lid on the Canister, then place the Canister into the plastic
stabilizing support in the bottom center of the Wood Bucket.
6. Slide the rectangular end of the Electric Motor into the rectangular hole on the rim of the
bucket. The opposite end of the crank will drop into the open end where the latch is.
7. Gently lift the latch so that the wire goes over the rounded end of the motor. You may
need to rotate the Canister by hand so that the Lid ts into the Electric Motor.
8. Before adding ice, be sure that the ice you put into the bucket is broken into small,
rough pieces. You may use a mallet or hammer to break into smaller pieces if
needed. For each batch of ice cream, expect to use 1-2 medium bags of ice.
9. Fill the Wood Bucket with a small layer of ice (about 8 cups)
evenly distributed around the base of the Canister.
10. Cover the rst layer of ice evenly with a layer of rock salt (about ½ cup). Regular
table salt or kosher salt can also be used. Salt is necessary for the freezing process.
It may take a total of 2 - 4 cups of salt to freeze ice cream mixture properly (1lb.
salt = 2 cups / 2 lbs. salt = 4 cups). The more salt that you use, the better.
11. Repeat steps 10 and 11, layering the ice and salt until it reaches the top of
the Canister. Stop when the top of the mixture reaches the bottom of the
drainage hole on the side of the Wood Bucket. Adding more ice may cause the
mixture to leak out of the drainage hole. NOTE: As the ice melts down 2 to 3
inches, you may add more ice and more rock salt to the Wood Bucket.
12. Plug the power cord attached to the Electric Motor into
an outlet, then turn on the Electric Motor.
13. As the Canister turns, stir and mix the salt and ice together every 10-15
minutes, or as needed, while the ice cream maker is in use. NOTE: During the
churning process, the Canister turns; the Dasher remains stationary.
14. Turn o and unplug Electric Motor once ice cream has churned for about
30 minutes, or once the Electric Motor has stopped. If the motor stops
prematurely, turn it o, break up any ice blockages, and start again.
15. With one hand on the Canister Lid, remove the Electric Motor from the
Bucket. Be careful as the Canister may oat in the ice water.
16. Clear the ice and salt away from the top of the Canister. Wipe carefully
to remove the salt and water before removing the cover. Take the
Dasher out and scrape o excess ice cream with a spatula.
17. Transfer ice cream to a freezer-safe container and freeze, or serve straight from the
Canister. Lid and Lid Cap are included for the option of storing the Canister in the freezer.
Page 9

ENGLISH
7
HELPFUL TIPS
NEVER leave the unit unattended while operating.
Taste
Finished ice cream will always taste less sweet than the initial mixture. You
may adjust the amount of sugar in the recipe to suit your taste.
Articial sweeteners may be used in place of sugar. Use
the following measurements for reference:
• 1 packet of sweetener = 2 tsp. of sugar
• 6 packets of sweetener = ¼ cup of sugar
• 8 packets of sweetener = ¹/3 cup of sugar
• 12 packets of sweetener = ½ cup of sugar
Texture
To ensure that ice crystals do not form in ice cream mixture, do not stop
the churning process at any time until the ice cream is ready.
If the texture of ice cream is hard or grainy, make sure that you do not have too
much rock salt in the ice water. Too much salt can cause the mixture to freeze
too quickly, which can also cause ice crystals to form in the ice cream.
Consistency
Homemade ice cream generally has a thick, milkshake texture. If you
prefer a thicker or rmer consistency try one of the following:
• Remove the Dasher and place the Lid and Cap on the
Canister. Place Canister in freezer to harden.
• Remove the Dasher and add more ice to the ice-salt mixture. Cover
with a towel and let sit until ice cream becomes rm.
• Too little salt may inhibit the freezing of the ice cream mixture. Try adding more salt.
• Recipes that call for alcohol may inhibit the freezing process. Be sure to
add any alcohol during the last few minutes of the freezing cycle.
Jamming
If the Dasher gets jammed or the Electric Motor stops prematurely, try the following:
• Ice may cause a blockage in the Wood Bucket. Turn o the Electric Motor
and make sure that the ice is broken up into small pieces.
• Make sure that the consistency of the ice cream is not thicker
than soft serve ice cream or the Dasher may get stuck.
• Ice Cream recipes that include hard ingredients like nuts or chocolate
chips may cause the Dasher to become lodged in the Canister. DO
NOT add hard ingredients until the churning process is done.
• DO NOT stop the churning process until ice cream is nished. Stopping in the middle of the
process can cause the ice cream to harden and restrict the movement of the Dasher.
Page 10

ENGLISH
8
Freezing
• Add up to one cup of cold water to the ice-salt mixture to speed up the freezing process.
• DO NOT operate the unit longer than required. If after 30 minutes the
mixture has not yet achieved the slush consistency or has thawed again, do
not continue. Possible reasons for mixture not chilling or freezing:
• The Canister was not cold enough. Try adding more ice and salt. Salt
is a critical part of the freezing process and you will need plenty of
salt added to the ice for the ice cream to freeze properly.
• The mixture was too warm. Make sure that the ingredients that you add are chilled and
not warm, lukewarm or of room temperature before adding to the Canister.
Leaking
• To prevent leaking, ll the Wood Bucket ¾ full with water and let sit for 20
minutes. This will allow the wood to swell up so that the salt brine solution does
not leak out during the churning process. Discard water after 20 minutes.
CLEANING & MAINTENANCE
1. Make sure the Electric Motor is turned o and the unit is unplugged.
2. Remove Electric Motor and wipe with slightly damp, non-abrasive cloth.
NEVER immerse the Electric Motor in water or any other liquid.
3. Wash Bucket in warm, soapy water to thoroughly remove
all salt water residue. Dry thoroughly.
4. Wash Canister, Lid and Dasher in warm, soapy water and dry thoroughly.
DO NOT replace Lid until the Canister is completely dry.
5. DO NOT use harsh or abrasive cleaners.
6. DO NOT place Canister or any other parts in a dishwasher. Hand wash only.
7. DO NOT freeze the Canister when it is wet.
Page 11

ENGLISH
9
RECIPES
The VINTAGE COLLECTION™ OLD FASHIONED 6-QUART ICE CREAM MAKER
makes rich, creamy ice cream anytime! Try these delicious recipes and tips:
• To reduce the risk of salmonella poisoning caused by raw eggs, heat
mixtures with eggs to a temperature of 160° F, but DO NOT bring to a
boil. You may also use pasteurized eggs in place of raw eggs.
• Be sure to add ice cream mixture to Canister and chill for 30 minutes prior to use.
• For ice cream recipes that require cooking, it is recommended that you cook one
day in advance. The mixture will then have time to cool completely and expand.
EASY CHOCOLATE ICE CREAM
• 9 Cups Milk
• 6 ¾ Large Cans
Condensed Milk
• 1 cup, 7 Tbsp. Cocoa
In a large mixing bowl, combine milk and condensed milk.
Dissolve the cocoa in a bit of hot water.
Once dissolved, stir cocoa into the milk
mixture until completely blended.
Pour ingredients into the Canister and follow
directions in HOW TO OPERATE section.
Do not ll the Canister more than ²/
3 full, as
the mixture will expand during freezing.
EASY VANILLA ICE CREAM
• 9 Cups Cream
• 6 ¾ Cups Half
and Half
• 3
3/8
Cup Sugar
• 2¼ Tbsp. Vanilla
Combine all ingredients in Canister.
Do not ll the Canister more than ²/3 full, as
the mixture will expand during freezing.
Stir well until sugar has dissolved.
Freeze until Canister is cold to touch.
Follow directions in HOW TO OPERATE section.
Page 12

ENGLISH
10
RICH & CREAMY CHOCOLATE ICE CREAM
• 4 Cups Granulated
Sugar
• 3 Tsp Corn Starch
• ¾ Tsp Salt
• 9 Cups Milk
• 6 Eggs, beaten
• 9 Squares Semi-Sweet
Chocolate, melted
• 3 Tbsp. Vanilla Extract
• 2
Cups Half and Half
• 3 Cups Whipping
Cream
Mix the sugar, corn starch, and salt in a
large saucepan over medium heat.
Slowly pour in the milk, stirring constantly
until the milk begins to simmer.
Very slowly add the beaten eggs and continue to stir.
Reduce heat to low and cook until mixture thickens slightly.
Slowly stir in the melted chocolate and whisk until
all chocolate is combined and mixture is smooth.
Slowly add vanilla, half and half, and whipping cream.
Pour into a large glass bowl and refrigerate for 2-4 hours
or until mixture has chilled. Remove from refrigerator.
Pour ingredients into the Canister and follow
directions in HOW TO OPERATE section.
Do not ll the Canister more than ²/3 full, as
the mixture will expand during freezing.
OLD FASHIONED VANILLA ICE CREAM
• 3 Cups Granulated
Sugar
• 2 ¼ Tbsp. Corn Starch
•
3/8
Tsp Salt
• 10 ½ Cups Milk
• 7 Eggs, beaten
• 2¼ Tbsp. Vanilla
• 2¼ Cups Half and Half
• 4
1/8
Cups Heavy
Cream
Mix the sugar, corn starch, and salt in a
large saucepan over medium heat.
Slowly pour in the milk while stirring constantly.
Very slowly add the beaten eggs and continue to stir.
Reduce heat to low and cook until mixture thickens slightly.
Slowly add vanilla, half and half and heavy cream.
Pour into a large glass bowl and refrigerate for 2-4 hours
or until mixture has chilled. Remove from refrigerator.
Pour mixture into the Canister and follow
directions in the HOW TO OPERATE section.
Do not ll the Canister more than ²/3 full, as
the mixture will expand during freezing.
Page 13

ENGLISH
11
COOKIE DOUGH ICE CREAM
• 9 Large Eggs
• 3
3/8
Cups Sugar
• 9 Cups Heavy Cream
• 4 ½ Cups Milk
• 1 ½ Cup Mini
Chocolate Chips
• 1 ½ Cup Chocolate
Chip Cookie Dough,
crumbled into
small pieces
Place the cookie dough and the chocolate chips
in a separate bowl. Cover and chill until cold.
Whisk the eggs in a mixing bowl 1-2
minutes until light and uy.
Slowly add sugar, whisking until completely blended.
Slowly add cream and milk and whisk until blended.
Pour mixture into the Canister and follow
directions in the HOW TO OPERATE section.
Do not ll the Canister more than ²/3 full, as
the mixture will expand during freezing.
When the mixture has nished churning, add cookie
dough and chocolate chips and stir in evenly.
ROCKY ROAD ICE CREAM
• 1 ½ (14-oz.)
Can Sweetened
Condensed Milk
• ¾ Cup Unsweetened
Cocoa Powder
• 3 Cups Heavy Cream
• 1½Cup Light Cream
• 1 ½ Tbsp. Vanilla
Extract
• ¾ Cup Chopped
Pecans
• 1½Cup Miniature
Marshmallows
In a medium saucepan over low heat, cook and
stir condensed milk and cocoa until smooth
and slightly thickened (about 5 minutes).
Remove from heat and allow to cool slightly. Stir
in heavy cream, light cream and vanilla.
Refrigerate until cold.
Pour mixture into the Canister and follow
directions in the HOW TO OPERATE section.
Do not ll the Canister more than ²/
3 full, as
the mixture will expand during freezing.
When mixture has nished churning, add
pecans and marshmallows. Stir in evenly.
Page 14

ENGLISH
12
PEANUT BUTTER CHOCOLATE CHIP ICE CREAM
• 2 ²/
3 Cups
Granulated Sugar
• ¾ Tsp Salt
• 3 Tbsp. Corn Starch
• 9 Cups Milk
• 6 Eggs, beaten
• 1 ½ Cup Peanut
Butter or Melted
Peanut Butter Morsels
• 2¼ Tsp Vanilla
• 2 Cups Half and Half
• 3 Cups Heavy Cream
• 2¼ Cup Chocolate
Chips
Mix the sugar, salt and corn starch in a
large saucepan over medium heat.
Slowly pour in the milk while stirring constantly.
Very slowly, add the beaten eggs and continue to stir.
Reduce heat to low and cook until mixture thickens slightly.
Slowly stir in peanut butter and whisk until all peanut
butter is combined and mixture is smooth.
Slowly add vanilla, half and half, and heavy cream.
Pour mixture into a large glass bowl and refrigerate for 2-4
hours or until mixture has chilled. Remove from refrigerator.
Pour mixture into the Canister and follow
directions in the HOW TO OPERATE section.
Do not ll the Canister more than ²/3 full, as
the mixture will expand during freezing.
When mixture has nished churning, add
chocolate chips and stir evenly.
COFFEE ICE CREAM
• 9 Cups Cream
• 6 ¾ Cups Half
and Half
• 3
3/8
Cup Sugar
• 6 ¾ Tbsp. Instant
Coee Powder
Combine all ingredients in a large bowl.
Stir well until both sugar and instant
coee powder have dissolved.
Add mixture to Canister. Do not ll the Canister more
than ²/3 full, as the mixture will expand during freezing.
Freeze until Canister is cold to touch.
Follow directions in HOW TO OPERATE section.
Page 15

ENGLISH
13
BERRY SORBET
• 3 (12-oz.) Bags of
Frozen Mixed Berries
• 1 ½ Cup Apple Juice
• 1 ½ Cup Water
• 3 Cups Granulated
Sugar
• ½
Cup Fresh
Lemon Juice
• 6 Cups Cranberry
& Raspberry
Juice Mixture
Finely purée the berries in a blender
with apple juice and water.
Strain mixture into a large saucepan to
remove seeds. Discard seeds.
Add sugar to the seedless berry mixture, bring to
a boil for 3-4 minutes. Stir in remaining juices.
Pour into a large glass bowl and refrigerate for 2-4 hours.
Pour mixture into the Canister and follow
directions in the HOW TO OPERATE section.
Do not ll the Canister more than ²/3 full, as
the mixture will expand during freezing.
PINEAPPLE SORBET
• 3 (12-oz.) Bags of
Frozen Pineapple
• 1 ½ Cup Apple Juice
• 1 ½ Cup Water
• 3 Cups Granulated
Sugar
• ¾ Cup Fresh
Lemon Juice
• 6 ¾ Cups
Pineapple Juice
Finely purée the pineapple in a blender
with apple juice and water.
Strain mixture into a large saucepan
to get a smooth consistency.
Add sugar to the pineapple mixture, bring to a
boil for 3-4 minutes. Stir in remaining juices.
Pour into a large glass bowl and refrigerate for 2-4 hours.
Pour mixture into the Canister and follow
directions in the HOW TO OPERATE section.
Do not ll the Canister more than ²/
3 full, as
the mixture will expand during freezing.
Page 16

ENGLISH
14
RETURNS & WARRANTY
SHOULD YOUR UNIT NOT WORK OR IF DAMAGED WHEN YOU FIRST TAKE IT OUT OF
THE BOX, PLEASE RETURN IT TO THE PLACE OF PURCHASE IMMEDIATELY.
VINTAGE COLLECTION ™ OLD FASHIONED 6-QUART ICE CREAM MAKER / ICMP600WD
Should you have any questions, please contact us via email or at the customer service number listed
below between the hours of 8:00 AM and 5:00 PM, Monday through Friday, Central Standard Time.
Distributed by:
Nostalgia Products LLC
1471 Partnership Dr.
Green Bay, WI 54304-5685
Customer Service
Phone: (920) 347-9122
Web: www.nostalgiaproducts.com
Customer Service Inquiry
To submit a Customer Service inquiry, go to www.nostalgiaproducts.com and ll
out the Customer Service Inquiry form and click the Submit button.
A representative will contact you as soon as possible.
Product Warranty Terms
Nostalgia Products LLC (the “Company”) hereby warrants that for a period of one (1) year from the
date of original purchase, this product will be free of defects in material and workmanship under
normal home use, provided that the product is operated and maintained in accordance with the
operating instructions. As the sole and exclusive remedy under this warranty, the Company will
at its discretion either repair or replace the product found to be defective, or issue a refund on the
product during the warranty period. This warranty is only available to the original retail purchaser of
the product from the date of initial retail purchase, and is only valid with the original sales receipt, as
proof of purchase date is required to obtain warranty benets. All warranty claims must be brought
to the attention of the Company within the warranty period and no later than 30 days of the failure
to perform. This warranty does not cover normal wear or damage caused by shipping, mishandling,
misuse, accident, alteration, improper replacement parts, or other than ordinary household use.
You may be required to return the product (with shipping prepaid by you) for inspection and
evaluation. Return shipping costs are not refundable. The Company is not responsible for returns
damaged or lost in transit. Unless otherwise specically permitted by the operating instructions, this
warranty applies to indoor household use only. In order to obtain service under this warranty, please
contact the Company at the telephone number listed above or by lling out the Customer Service
Inquiry Form located at www.nostalgiaproducts.com. Warranty valid only in USA and Canada.
This warranty is in lieu of all other warranties, expressed or implied, including warranties of
merchantability and tness for a particular purpose, which are hereby excluded to the extent
permitted by law. In no event shall the Company be liable for any indirect, incidental, consequential,
or special damages arising out of or in connection with this product or the use thereof. Some
states, provinces or jurisdictions do not permit the exclusion or limitation of incidental or
consequential damages, so the foregoing exclusion or limitation may not apply to you.
This warranty does not apply to re-manufactured merchandise.
Please read the operating instructions carefully. Failure to comply
with the operating instructions will void this warranty.
For more information, visit us online at www.nostalgiaproducts.com.
Like us on Facebook at www.facebook.com/NostalgiaElectrics.
Follow our boards on Pinterest at www.pinterest.com/nostalgiaelctrx.
Tweet along with us on Twitter at www.twitter.com/NostalgiaElctrx.
Page 17

15
FRANÇAIS
15
Faites de chaque jour une fête!
Visiter le site Web www.nostalgiaproducts.com pour d'autres
produits amusants.
TABLE DES MATIÈRES
IMPORTANTES MESURES DE PRÉCAUTION . . . . . . . . . . . . . . . . . . . 16
IMPORTANTES MISES EN GARDE . . . . . . . . . . . . . . . . . . . . . . . . . 16
INTRODUCTION . . . . . . . . . . . . . . . . . . . . . . . . . . . . . . . . . . . . 17
PIÈCES ET ASSEMBLAGE . . . . . . . . . . . . . . . . . . . . . . . . . . . . . . . 18
MODE DE FONCTIONNEMENT . . . . . . . . . . . . . . . . . . . . . . . . . . . 19
CONSEILS UTILES . . . . . . . . . . . . . . . . . . . . . . . . . . . . . . . . . . . 20
NETTOYAGE ET ENTRETIEN . . . . . . . . . . . . . . . . . . . . . . . . . . . . . 21
RECETTES . . . . . . . . . . . . . . . . . . . . . . . . . . . . . . . . . . . . . . . . 22
RETOURS ET GARANTIE . . . . . . . . . . . . . . . . . . . . . . . . . . . . . . . 27
SÉCURITÉ
Fiche technique de l'appareil :
120 V, 60 Hz
50 W, homologué par CE
CE PRODUIT DOIT ÊTRE BRANCHÉ UNIQUEMENT DANS UNE PRISE DE COURANT DE 120 V.
Votre sécurité et celle des autres sont très importantes.
De nombreux messages importants de sécurité se trouvent dans le présent manuel
et sur votre appareil. Toujours lire et respecter toute les consignes de sécurité.
Ceci est le symbole d'avertissement de sécurité.
Ce symbole avertit des risques potentiels qui
présentent un danger pour votre vie et celle des autres.
Tous les messages de sécurité suivront le symbole d'avertissement de sécurité.
Tous les messages de sécurité indiqueront le danger potentiel et la façon de réduire
le risque de blessure et ce qui peut arriver si les consignes ne sont pas suivies.
Page 18

16
FRANÇAIS
16
IMPORTANTES MESURES DE PRÉCAUTION
1. NE JAMAIS plonger dans l'eau.
2. NE JAMAIS utiliser près d'une source d'eau.
3. NE JAMAIS utiliser une éponge ou un chion abrasif sur l'appareil.
4. NE JAMAIS laisser l'appareil sans surveillance pendant le fonctionnement.
5. NE JAMAIS ajouter de noix, de bonbons, de fruits ou d'ingrédients en morceaux dans
l'appareil. Ils pourraient empêcher la crème glacée de baratter correctement.
6. Débrancher la prise de l'appareil lorsqu'il n'est pas utilisé et lors du nettoyage.
7. NE JAMAIS utiliser cet appareil avec un cordon ou une prise
endommagée, ou si l'appareil fonctionne mal.
8. NE PAS mettre dans le lave-vaisselle.
9. Garder hors de la portée des enfants.
10. Cet appareil n'est PAS UN JOUET.
11. Les enfants laissés sans surveillance et les personnes ayant une
décience cognitive ne devraient jamais utiliser cet appareil.
12. Les jeunes enfants ne devraient pas être laissés sans surveillance pendant que
l'appareil est en fonction et pour s'assurer qu'ils ne jouent pas avec l'appareil.
IMPORTANTES MISES EN GARDE
Des mesures de précaution de base devraient toujours être suivies au moment de
l'utilisation d'un appareil électrique, notamment :
1. Lire toutes les consignes avant d'utiliser l'appareil.
2. Pour éviter de s'électrocuter, ne pas immerger le cordon électrique,
la prise ou l'appareil dans l'eau ou tout autre liquide.
3. Une surveillance étroite des enfants est nécessaire lorsqu'un
appareil électrique quelconque est utilisé à leur proximité.
4. Pour éviter tout risque d'incendie ou de décharge électrique, ou risque d'endommager
l'appareil, celui-ci devrait être branché dans une prise de 120 V CA UNIQUEMENT.
5. Débrancher l'appareil de la prise électrique lorsqu'il n'est pas utilisé
et au moment de retirer des pièces pour le nettoyer.
6. NE PAS utiliser l'appareil avec un cordon ou une prise endommagée ni si
l'appareil est endommagé de quelque façon que ce soit. Retourner l'appareil
à l'atelier de réparation le plus près pour qu'il soit révisé ou réparé.
7. Le fabricant ne recommande pas l'utilisation d'accessoires. L'utilisation
de quelques accessoires pourraient provoquer des blessures.
8. NE JAMAIS faire fonctionner l'appareil à vide. Toujours avoir le mélange de
crème glacée à l'intérieur du Récipient lorsque l'appareil est branché.
9. NE PAS utiliser de l'huile chaude ou des liquides chauds dans le
Godet. Toujours réfrigérer le mélange avant du baratter.
10. NE PAS utiliser à l'extérieur. POUR USAGE DOMESTIQUE SEULEMENT.
Page 19

17
FRANÇAIS
17
11. NE PAS laisser le cordon toucher des surfaces chaudes.
12. NE PAS placer sur un brûleur à gaz ou électrique ou à sa proximité, ou dans un four chaud.
13. Cet appareil doit être posé sur une surface plane pour bien fonctionner.
14. NE JAMAIS utiliser cet appareil pour un usage autre que celui auquel il est destiné.
15. NE PAS laisser l'appareil sans surveillance lorsqu'il fonctionne
ou lorsqu'il est branché dans une prise de courant.
16. Un cordon électrique court est fourni pour réduire le risque de
s'emmêler ou de trébucher sur un long cordon.
17. Une rallonge peut être utilisée avec prudence.
18. La capacité électrique d'une rallonge doit être supérieure
ou égale à la puissance électrique de l'appareil.
19. Cet appareil est muni de dux ches rondes. Pour réduire tout risque d'électrocution,
cette che est conçue pour se brancher dans une prise 120 V AC. Si la che n'entre pas
complètement dans la prise, vous pouvez avoir besoin d'un adaptateur pour le brancher
ou contacter un électricien agréé. Ne pas tenter de modier la che de quelque façon.
20. NE PAS mettre ses mains ou d'autres objets dans cet
appareil lorsqu'il est branché et en fonction.
CONSERVER CES CONSIGNES!
INTRODUCTION
Merci d'avoir acheté la SORBETIÈRE D'ANTAN DE 6,8 l (12 pte) VINTAGE COLLECTION™
de Nostalgia ™. Cette sorbetière vous permet de faire de la crème glacée maison
dans un confort moderne. Mettre le Récipient avec tous les ingrédients dans le
centre du Godet, remplir le Godet avec de la glace, et le moteur électrique se
chargera du barattage à votre place. Bientôt, une délicieuse crème glacée sera
prête à être servie. Fabrique 6,8 l (12 pte) de crème glacée par fournée.
Page 20

18
FRANÇAIS
18
PIÈCES ET ASSEMBLAGE
Enlever la SORBETIÈRE D'ANTAN DE 6,8 l (12 pte) VINTAGE COLLECTION™ de
la boîte et laver le Godet, le Récipient, le Couvercle et tous les accessoires
(sauf le moteur électrique) avec de l'eau tiède savonneuse.
Essuyer le moteur électrique avec un chion humide non abrasif ou une
éponge. NE JAMAIS plonger le moteur électrique dans l'eau. Bien sécher.
Vous êtes n prêt à déguster une savoureuse crème glacée onctueuse de
votre SORBETIÈRE D'ANTAN DE 6,8 l (12pte) VINTAGE COLLECTION™.
Godet en bois
Récipient
Agitateur
Couvercle
Moteur
électrique
Page 21

19
FRANÇAIS
19
MODE DE FONCTIONNEMENT
1. Avant tout, trouver une surface stable à proximité d'une prise de courant
avant de commencer. S'assurer que le cordon électrique est éloigné de toute
source d'eau. L'utilisation d'une rallonge est permise, en cas de besoin.
2. Réfrigérer le Récipient de crème glacée jusqu'à ce qu'il soit froid au toucher.
Remplir le Godet en bois aux 3/4 avec de l'eau et laisser reposer environ 20
minutes. Ceci permettra au bois de goner an que la solution saline ne coule
pas pendant le processus de barattage. Jeter l'eau après 20 minutes.
3. Verser le mélange de crème glacée dans le Récipient froid. S'assurer de ne pas remplir le
Récipient à plus du ²/3, étant donné que le mélange va se dilater durant la congélation.
4. Insérer l'Agitateur dans le Récipient et s'assurer que le bas de
l'Agitateur soit bien aligné avec le centre du Récipient.
5. Mettre le Couvercle sur le Récipient, ensuite placer le Récipient dans le support
stabilisateur de plastique dans le bas du centre du Godet en bois.
6. Glisser l'extrémité rectangulaire du moteur électrique dans le trou
rectangulaire autour du Godet. L'extrémité opposée de la manivelle
rentrera dans l'extrémité qui est ouverte là ou se trouve le loquet.
7. Soulever délicatement le loquet de sorte que le l passe au-dessus du bout
arrondi du moteur. Vous devrez peut-être faire pivoter manuellement le
Récipient an que le Couvercle s'insère dans le moteur électrique.
8. Avant d'ajouter la glace, s'assurer que la glace que vous mettez dans le Godet
est concassée en petits morceaux. Vous pouvez utiliser un maillet ou un
marteau pour la casser en petits morceaux si nécessaire. Pour chaque fournée
de crème glacée, vous aurez besoin d'un ou deux sacs moyens de glace.
9. Remplir le Godet avec une petite couche de glace (environ 8 tasses)
uniformément distribuée autour de la base du Récipient.
10. Couvrir la première couche de glace uniformément avec une couche de sel gemme (environ
½ tasse). Vous pouvez également vous servir de sel de table ordinaire ou de sel kosher. Le sel
est nécessaire pour le procédé de congélation.
2 à 4 tasses de sel pourraient être nécessaires pour que le mélange
de crème glacée gèle correctement (1 lb de sel = 2 tasses / 2 lb
de sel = 4 tasses). Plus vous utilisez de sel, mieux c'est.
11. Répéter les étapes 10 et 11, couche de glace et de sel jusqu'à remplir le Récipient.
Arrêter lorsque le haut du mélange atteint le bas de l'orice de vidange sur le
côté du Godet en bois. Ajouter plus de glace pourrait faire couler le mélange de
l'orice de vidange. REMARQUE : Étant donné que la glace fond de 2 à 3 pouces,
vous pouvez ajouter plus de glace et de sel gemme dans le Godet en bois.
12. Brancher le cordon d'alimentation du moteur électrique dans la prise et l'allumer.
13. Alors que le Récipient tourne, remue et mélange le sel et la glace toutes les 1015 minutes, ou au besoin, pendant que la sorbetière est en fonction. REMARQUE
: Durant le procédé de barattage, le Récipient tourne et l'Agitateur reste xe.
14. Éteindre et débrancher le moteur électrique dès que la crème glacée a été barattée
pendant environ 30 minutes, ou lorsque le moteur électrique s'arrête. Si le moteur ge
prématurément, le fermer, briser toutes les obstructions faites par la glace, et le redémarrer.
15. Avec une main sur le Couvercle du Récipient, enlever le Godet du moteur
électrique. Attention, le Récipient pourrait otter dans l'eau glacée.
Page 22

20
FRANÇAIS
20
16. Enlever la glace et le sel du dessus du Récipient. Essuyer soigneusement
pour enlever le sel et l'eau avant d'enlever le Couvercle. Retirer
l'Agitateur et racler l'excès de crème glacée avec une spatule.
17. Transvaser la crème glacée dans un contenant pouvant aller au congélateur et
congeler ou servir directement du Récipient. Couvercle et bouchon du Couvercle
sont inclus au cas où vous souhaiteriez congeler directement le Récipient.
CONSEILS UTILES
NE JAMAIS laisser l'appareil sans surveillance lorsqu'il est utilisé.
Goût
La crème glacée, une fois terminée, sera toujours moins sucrée que le mélange
initial. Ajuster la quantité de sucre de la recette selon votre goût.
Le sucre peut être remplacé par les édulcorants articiels.
Utiliser les mesures suivantes comme référence :
• un sachet d'édulcorant = 2 cuillères à thé de sucre
• 6 sachets d'édulcorant = ¼ de tasse de sucre
• 8 sachets d'édulcorant = ¹/3 de tasse de sucre
• 12 sachets d'édulcorant = ½ de tasse de sucre
Texture
Pour s'assurer que les cristaux de glace ne se forment pas dans le mélange de crème
glacée, n'arrêter à aucun moment le brassage jusqu'à ce que la glace soit prête.
Si la texture de la crème glacée est dur ou granuleuse, assurez-vous
que vous n'avez pas mis trop de sel gemme dans l'eau glacée. Trop de
sel peut faire geler le mélange trop rapidement, ce qui peut également
provoquer une formation de cristaux de glace dans la crème glacée.
Consistance
La crème glacée faite maison a généralement une texture épaisse comme un lait fouetté.
Si vous préférez une consistance plus épaisse ou ferme, essayez un des conseils suivants :
• Enlever l'Agitateur et poser le Couvercle et le Capuchon sur le Récipient.
Mettre le Récipient dans le congélateur pour durcir.
• Enlever l'Agitateur et ajouter de la glace au mélange glace-sel. Couvrir avec une
serviette et laisser reposer jusqu'à ce que la crème glacée devient ferme.
• Trop peu de sel peut empêcher au mélange de crème
glacée de geler. Essayer de rajouter plus de sel.
• Des recettes qui nécessitent de l'alcool peuvent empêcher le processus de congélation.
S'assurer d'ajouter l'alcool seulement au dernier moment du cycle de congélation.
Blocage
Si l'Agitateur se bloque ou que le moteur électrique se ge prématurément, essayez ceci :
• La glace peut obstruer le Godet en bois. Éteindre le moteur électrique
et s'assurer que la glace est cassée en petits morceaux.
• S'assurer que la consistance de la crème glacée ne soit pas plus épaisse
Page 23

21
FRANÇAIS
21
que la crème glacée molle ou que l'Agitateur soit coincé.
• Les recettes de crème glacée qui incluent des ingrédients durs comme
des noix ou de pépites de chocolats peuvent bloquer l'Agitateur dans le
Récipient. NE PAS ajouter d'ingrédients durs avant la n du barattage.
• NE PAS interrompre le barattage tant que la crème glacée n'est pas
prête. Arrêter l'appareil au milieu du processus pourrait faire durcir la
crème glacée et restreindre les mouvements de l'Agitateur.
Gel
• Ajouter une tasse d'eau froide dans le mélange glacesel pour accélérer le processus de congélation.
• NE PAS faire fonctionner l'appareil plus longtemps que nécessaire. Si le mélange n'a
pas la consistance de purée de glace ou a encore fondu après 30 minutes, arrêter.
Les raisons possibles pourquoi le mélange ne se refroidi pas ou ne gèle pas :
• Le Récipient n'était pas assez froid. Essayer de rajouter de la glace et du sel. Le
sel est une partie essentielle du processus de congélation et vous devrez en
ajouter beaucoup à la glace pour que la crème glacée gèle correctement.
• Le mélange était trop chaud. S'assurer que les ingrédients ajoutés dans le
Récipient soient réfrigérés et non chauds, tièdes ou à la température ambiante.
Fuite
• Pour éviter toute fuite, remplir le Godet en bois au ¾ avec de l'eau et laisser reposer
environ 20 minutes. Ceci permettra au bois de goner an que la solution saline
ne coule pas pendant le processus de barattage. Jeter l'eau après 20 minutes.
NETTOYAGE ET ENTRETIEN
1. S'assurer que le moteur électrique est arrêté et l'appareil débranché.
2. Retirer le moteur électrique et essuyer avec un chion légèrement humide et non
abrasif. NE JAMAIS immerger le moteur électrique dans l'eau ou dans un autre liquide.
3. Laver le Godet dans de l'eau chaude savonneuse an d'enlever
toute l'eau salée qui serait encore restée. Bien sécher.
4. Laver le Récipient, le Couvercle et l'Agitateur avec de l'eau tiède savonneuse et bien les
sécher. NE PAS remettre le Couvercle avant que le Récipient soit complètement sec.
5. NE PAS utiliser des nettoyants agressifs ou abrasifs.
6. NE PAS mettre le Récipient ou d'autres pièces dans le lavevaisselle. Laver uniquement à la main.
7. NE PAS congeler le Récipient mouillé.
Page 24

22
FRANÇAIS
22
RECETTES
LA SORBETIÈRE D'ANTAN DE 6,8 l (12 pte) VINTAGE COLLECTION™
fabrique, quand vous voulez, une crème glacée riche et onctueuse!
Essayer à ces délicieuses recettes et les conseils :
• An de réduire le risque d’empoisonnement par la salmonelle causée
par les œufs crus, chauer les mélanges comprenant des œufs à une
température de 71 °C (160 °F), mais SANS amener à ébullition. Vous pouvez
également utiliser des œufs pasteurisés à la place des œufs crus.
• S'assurer d'ajouter le mélange de la crème glacée dans le Récipient
et laisser refroidir durant 30 minutes avant de s'en servir.
• Pour les recettes de crème glacée qui nécessitent une cuisson, il est
suggéré de les faire un jour d'avance. Ainsi le mélange aura le temps
de refroidir complètement et de prendre de l'expansion.
CRÈME GLACÉE FACILE AU CHOCOLAT
• 9 tasses de lait entier
• 6 ¾ grandes boîtes
de lait condensé
• 1 tasse, 7 c. à
soupe de cacao
Dans un grand bol, mélanger le lait et le lait condensé.
Dissoudre le cacao dans un peu d'eau chaude.
Dès que le cacao est dissout, le verser dans
le mélange du lait et bien l'incorporer.
Verser les ingrédients dans le Récipient et suivre les
indications dans la section MODE DE FONCTIONNEMENT.
S'assurer de ne pas remplir le Récipient à plus des ²/3, étant
donné que le mélange va se dilater durant la congélation.
CRÈME GLACÉE FACILE À LA VANILLE
• 9 tasses de crème
• 6 ¾ tasses de
moitié-moitié
• 3
3
/ tasses de sucre
• 2¼ c. à soupe
de vanille
Mélanger tous les ingrédients dans le Récipient.
S'assurer de ne pas remplir le Récipient à plus des ²/3, étant
donné que le mélange va se dilater durant la congélation.
Bien mélangé jusqu'à ce que le sucre soit fondu.
Congeler jusqu'à ce que le Récipient soit froid au toucher.
Suivre les directives dans la section
MODE DE FONCTIONNEMENT.
Page 25

23
FRANÇAIS
23
CRÈME GLACÉE RICHE ET ONCTUEUSE AU CHOCOLAT
• 4 tasses de sucre
cristallisé
• 3 c. à thé de
fécule de maïs
• ¾ c. à thé de sel
• 9 tasses de lait entier
• 6 œufs, battus
• 9 carrés de chocolat
mi-sucré, fondus
• 3 c. à soupe d'extrait
de vanille
• 2 tasses de
moitié-moitié
• 3 tasses de crème
à fouetter
Mélanger le sucre, la fécule de maïs, et le sel
dans une grande casserole à feu moyen.
Verser doucement le lait, constamment remuer
jusqu'à ce que le lait commence à mijoter.
Ajouter très doucement les œufs
battus et continuer à remuer.
Réduire le feu et laisser cuire jusqu'à ce
que le mélange s'épaississe un peu.
Remuer lentement le chocolat fondu et
fouetter jusqu'à ce que le chocolat soit bien
combiné et que le mélange soit lisse.
Ajouter doucement la vanille, le lait moitiémoitié et la crème à fouetter.
Verser dans un grand bol en verre et réfrigérer
pendant 2 à 4 heures ou jusqu'à ce que le
mélange soit froid. Enlever du réfrigérateur.
Verser les ingrédients dans le Récipient et suivre les
indications dans la section MODE DE FONCTIONNEMENT.
S'assurer de ne pas remplir le Récipient à plus des ²/3, étant
donné que le mélange va se dilater durant la congélation.
CRÈME GLACÉE À LA VANILLE À L'ANCIENNE
• 3 tasses de sucre
cristallisé
• 2 ¼ c. à soupe de
fécule de maïs
• 3/8 c. à thé de sel
• 10 ½ tasses de lait
• 7 œufs, battus
• 2 ¼ c. à soupe
de vanille
• 2 ¼ tasses de
moitié-moitié
• 4 1/8 tasses de
crème extra-grasse
Mélanger le sucre, la fécule de maïs, et le sel
dans une grande casserole à feu moyen.
Verser doucement le lait tout en continuant à remuer.
Ajouter très doucement les œufs
battus et continuer à remuer.
Réduire le feu et laisser cuire jusqu'à ce
que le mélange s'épaississe un peu.
Ajouter doucement la vanille, le lait moitiémoitié et la crème extra-grasse.
Verser dans un grand bol en verre et réfrigérer
pendant 2 à 4 heures ou jusqu'à ce que le
mélange soit froid. Enlever du réfrigérateur.
Verser le mélange dans le Récipient et suivre les indications
dans la section MODE DE FONCTIONNEMENT.
S'assurer de ne pas remplir le Récipient à plus des ²/3, étant
donné que le mélange va se dilater durant la congélation.
Page 26

24
FRANÇAIS
24
CRÈME GLACÉE À LA BRISURE DE BISCUITS
• 9 gros œufs
• 3 3/8 tasses de sucre
• 9 tasses de crème
extra-grasse
• 4 ½ tasses de lait
• 1 ½ tasses de mini
brisures de chocolat
• 1 ½ tasses de biscuits
aux brisures de
chocolat, émietté
en petits morceaux
Mettre les brisures de biscuits et de chocolat dans un bol
séparé. Couvrir et réfrigérer jusqu'à ce qu'elle soit froide.
Battre les œufs dans un bol à mélanger une à deux
minutes jusqu'à ce qu'ils deviennent moelleux et légers.
Ajouter doucement le sucre tout en fouettant
jusqu'à ce que le tout soit bien mélangé.
Ajouter doucement la crème et le lait et continuer à
battre jusqu'à ce que le tout soit bien mélangé.
Verser le mélange dans le Récipient et suivre les indications
dans la section MODE DE FONCTIONNEMENT.
S'assurer de ne pas remplir le Récipient à plus des ²/3, étant
donné que le mélange va se dilater durant la congélation.
Lorsque le barattage du mélange est terminé,
ajouter brisures de biscuits et les de chocolat,
mélanger ensuite uniformément.
CRÈME GLACÉE ROCKY ROAD
• 1 ½ (397 g ou 14
oz) de lait en boîte
condensé sucré
• ¾ de tasse de poudre
de cacao non sucrée
• 3 tasses de crème
extra-grasse
• 1½ tasses de
crème légère
• 1 ½ c. à soupe
d'extrait de vanille
• ¾ tasse de pacanes
hachées
• 1½ tasses de mini
guimauves
Dans une casserole moyenne à basse température, cuire
et brasser le lait condensé et le cacao jusqu'à ce que le
tout soit lisse et légèrement épaissi (environ 5 minutes).
Enlever du feu et laisser légèrement refroidir. Mélanger
la crème extra-grasse, la crème légère et la vanille.
Réfrigérer jusqu'à ce que le mélange soit froid.
Verser le mélange dans le Récipient et suivre les indications
dans la section MODE DE FONCTIONNEMENT.
S'assurer de ne pas remplir le Récipient à plus des ²/3, étant
donné que le mélange va se dilater durant la congélation.
Lorsque le barattage du mélange est terminé, ajouter les
pacanes et les guimauves. Mélanger uniformément.
Page 27

25
FRANÇAIS
25
CRÈME GLACÉE AUX BRISURES DE CHOCOLAT ET BEURRE D'ARACHIDES
• 2 ²/3 tasses de
sucre cristallisé
• ¾ c. à thé de sel
• 3 c. à soupe de
fécule de maïs
• 9 tasses de lait entier
• 6 œufs, battus
• 1 ½ tasses de beurre
d'arachides ou de
morceaux de beurre
d'arachides fondu
• 2 ¼ c. à soupe
de vanille
• 2 tasses de
moitié-moitié
• 3 tasses de crème
extra-grasse
• 2 ¼ tasses de brisures
de chocolat
Mélanger le sucre, le sel et la fécule de maïs
dans une grande casserole à feu moyen.
Verser doucement le lait tout en continuant à remuer.
Ajouter très doucement les œufs
battus et continuer à remuer.
Réduire le feu et laisser cuire jusqu'à ce
que le mélange s'épaississe un peu.
Lentement incorporer le beurre d'arachide et
fouetter jusqu'à ce que tout le beurre d'arachide
soit combiné et que le mélange soit lisse.
Ajouter doucement la vanille, le lait moitiémoitié et la crème extra-grasse.
Verser le mélange dans un grand bol en verre et
réfrigérer pendant 2 à 4 heures ou jusqu'à ce que
le mélange soit froid. Enlever du réfrigérateur.
Verser le mélange dans le Récipient et suivre les indications
dans la section MODE DE FONCTIONNEMENT.
S'assurer de ne pas remplir le Récipient à plus des ²/3, étant
donné que le mélange va se dilater durant la congélation.
Lorsque le barattage du mélange est terminé, ajouter
les brisures de chocolat et mélanger uniformément.
CRÈME GLACÉE AU CAFÉ
• 9 tasses de crème
• 6 ¾ tasses de
moitié-moitié
• 3 3/8 tasses de sucre
• 6 ¾ c. à soupe
de poudre de
café soluble
Mélanger tous les ingrédients dans un grand bol.
Bien mélanger jusqu'à ce que le sucre et la
poudre de café soluble soient dissouts.
Ajouter le mélange dans le Récipient. S'assurer de ne
pas remplir le Récipient à plus des ²/3, étant donné
que le mélange va se dilater durant la congélation.
Congeler jusqu'à ce que le Récipient soit froid au toucher.
Suivre les directives dans la section
MODE DE FONCTIONNEMENT.
Page 28

26
FRANÇAIS
26
SORBET AUX BAIES
• 3 (340 g ou 12 oz)
sacs de mélanges
de baies congelées
• 1 ½ tasses de jus
de pomme
• 1 ½ tasses d'eau
• 3 tasses de sucre
cristallisé
• ½ tasse de jus
de citron frais
• 6 tasses de jus de
canneberges et
framboises mélangés
Réduire en purée les baies dans un malaxeur
avec du jus de pomme et de l'eau.
Égoutter le mélange dans une grande casserole
pour enlever les pépins. Jeter les pépins.
Ajouter du sucre au mélange de baies sans pépins, amener
à ébullition durant 3 à 4 minutes. Incorporer le reste des jus.
Verser dans un grand bol en verre et
réfrigérer pendant 2 à 4 heures.
Verser le mélange dans le Récipient et suivre les indications
dans la section MODE DE FONCTIONNEMENT.
S'assurer de ne pas remplir le Récipient à plus des ²/3, étant
donné que le mélange va se dilater durant la congélation.
SORBET À L'ANANAS
• 3 (340 g ou 12
oz) sacs d'ananas
congelé
• 1 ½ tasses de jus
de pomme
• 1 ½ tasses d'eau
• 3 tasses de sucre
cristallisé
• ¾ tasse de jus
de citron frais
• 6 ¾ tasses de
jus d'ananas
Réduire en purée l'ananas dans un malaxeur
avec du jus de pomme et de l'eau.
Égoutter le mélange dans une grande casserole
pour avoir une consistance lisse.
Ajouter du sucre au mélange d'ananas, amener à ébullition
durant 3 à 4 minutes. Incorporer le reste des jus.
Verser dans un grand bol en verre et
réfrigérer pendant 2 à 4 heures.
Verser le mélange dans le Récipient et suivre les indications
dans la section MODE DE FONCTIONNEMENT.
S'assurer de ne pas remplir le Récipient à plus des ²/3, étant
donné que le mélange va se dilater durant la congélation.
Page 29

27
FRANÇAIS
27
RETOURS ET GARANTIE
SI VOTRE APPAREIL NE FONCTIONNE PAS OU S'IL EST ENDOMMAGÉ QUAND VOUS LE RETIREZ
DE LA BOÎTE, VEUILLEZ LE RETOURNER IMMÉDIATEMENT À L'ENDROIT OÙ IL A ÉTÉ ACHETÉ.
SORBETIÈRE D'ANTAN DE 6,8 l (12 pte) VINTAGE COLLECTION / ICMP600WD
Pour toute question, communiquer par courriel ou au numéro de téléphone du service à
la clientèle, entre 08 h 00 et 17 h 00, du lundi au vendredi, heure normale du Centre.
Distribué par :
Nostalgia Products LLC
1471 Partnership Dr.
Green Bay, WI 54304-5685
Service à la clientèle
Téléphone : (920) 347-9122
Site Web : www.nostalgiaproducts.com
Demande pour le service à la clientèle
Pour soumettre une demande au service à la clientèle, rendez vous au www.nostalgiaproducts.com puis
remplissez le formulaire de demande au service à la clientèle puis cliquez sur le bouton Soumettre.
Un représentant vous contactera dès que possible.
Conditions de garantie du produit
Le groupe Nostalgia Products LLC (référé tel « l’Entreprise ») garantit que pour une période d’un
(1) an en date d’achat, ce produit est sans défaut de matériel et de fabrication selon une utilisation
normale à domicile, seulement si le fonctionnement et l’entretien du produit sont conforment aux
directives fournies. À titre de réparation exclusive et entière sous cette garantie, l’Entreprise pourra
à sa discrétion, réparer ou remplacer le produit défectueux, voire émettre un remboursement du
produit durant la période couverte sous garantie. Cette garantie n’est disponible seulement qu’à
l’acheteur d’origine du produit, en date d’achat au détail dudit produit et sera valide uniquement
avec le reçu de caisse d’origine, à titre de preuve d’achat, lequel est requis pour obtenir les bienfaits
reliés à cette garantie. Toute réclamation doit être rapportée à l’attention de l’Entreprise dans la
fenêtre de la période de la garantie, sans dépasser 30 jours à défaut de performance. Cette garantie
ne couvre pas l’usure normale ou dommage cause par l'expédition, la mauvaise manipulation, la
mauvaise utilisation, les accidents, les modications, les mauvaises pièces de remplacement, voire
toute autre utilisation anormale du produit à domicile. Il est possible que vous ayez à retourner le
produit (avec les frais de retour prépayés par vous) pour une inspection et une évaluation. Les frais
des coûts de retour ne sont pas remboursables. L'Entreprise n’est aucunement responsable pour les
retours endommagés ou perdus en transit. Autrement que spéciquement permit selon les directives
de fonctionnement, cette garantie s’applique à une utilisation à domicile à d'intérieur seulement.
An d'obtenir un service couvert sous cette garantie, veuillez contacter l'Entreprise au numéro de
téléphone inclut ci-haut ou en remplissant le formulaire de demande au service à la clientele, sur le
site www.nostalgiaproducts.com. La garantie est valide seulement aux États-Unis et au Canada.
Cette garantie prévaut toute autre garantie, expresse ou implicite incluant les garanties de qualité
marchande ou ayant une aptitude pour une intention en particulier, lesquelles sont exclues selon la
loi. Sous aucun prétexte l’Entreprise ne pourra être tenue responsable pour tout dommage indirect,
accidentel, conséquentiel ou spécial provenant de ou en relativité avec ce produit ou son utilisation.
Certains états, provinces ou juridictions n'allouent pas l'exclusion ou la limitation de tels dommages
accidentels ou conséquentiels, donc l'exclusion ou limitation suscitée peut ne pas s'appliquer à vous.
Cette garantie ne s’applique pas à la merchandise de renaissance.
Veuillez lire les directives de fonctionnement attentivement. Ne pas se
conformer aux directives de fonctionnement annulera cette garantie.
Pour plus d’informations, visitez notre site Web à www.nostalgiaproducts.com.
Aimez-nous sur Facebook à l’adresse www.facebook.com / NostalgiaElectrics.
Suivez nos conseils sur Pinterest à www.pinterest.com / nostalgiaelctrx.
Tweet avec nous sur Twitter à l’adresse www.twitter.com / NostalgiaElctrx.
Page 30

28
ESPAÑOL
28
¡Haga de cada día una esta!
Visite www.nostalgiaproducts.com para
ver más productos divertidos.
CONTENIDO
PRECAUCIONES IMPORTANTES . . . . . . . . . . . . . . . . . . . . . . . . . . 29
PROTECCIONES IMPORTANTES . . . . . . . . . . . . . . . . . . . . . . . . . . 29
INTRODUCCIÓN . . . . . . . . . . . . . . . . . . . . . . . . . . . . . . . . . . . . 30
PARTES Y ENSAMBLAJE . . . . . . . . . . . . . . . . . . . . . . . . . . . . . . . 31
FUNCIONAMIENTO . . . . . . . . . . . . . . . . . . . . . . . . . . . . . . . . . . 32
CONSEJOS ÚTILES . . . . . . . . . . . . . . . . . . . . . . . . . . . . . . . . . . 33
LIMPIEZA Y MANTENIMIENTO . . . . . . . . . . . . . . . . . . . . . . . . . . . 34
RECETAS . . . . . . . . . . . . . . . . . . . . . . . . . . . . . . . . . . . . . . . . . 35
DEVOLUCIONES Y GARANTÍA . . . . . . . . . . . . . . . . . . . . . . . . . . . 40
SEGURIDAD
Especicaciones del electrodoméstico:
120 Voltios, 60 Hz
50 Watts, aprobado por CE
ESTE PRODUCTO ES PARA USAR SOLAMENTE EN TOMAS DE CORRIENTE DE 120 V.
Su seguridad y la de otras personas es muy importante.
Hemos proporcionado numerosos mensajes de seguridad importantes en este manual
y en su electrodoméstico. Siempre lea y obedezca todos los mensajes de seguridad.
Este es el símbolo de alerta de seguridad.
Este símbolo le avisa de peligros potenciales que podrían
causar la muerte o lesionarle a usted y a otros.
Todos los mensajes de seguridad estarán antecedidos por el símbolo de alerta.
Todos los mensajes de seguridad le dirán de qué peligro potencial se trata, cómo reducir
la posibilidad de lesiones y qué puede ocurrir si no se obedecen las instrucciones.
Page 31

29
ESPAÑOL
29
PRECAUCIONES IMPORTANTES
1. No lo sumerja NUNCA en agua.
2. No lo utilice NUNCA cerca del agua.
3. No utilice NUNCA una esponja o un paño abrasivo en la unidad.
4. No deje NUNCA la unidad desatendida mientras esté en funcionamiento.
5. NUNCA añada nueces, dulces, frutas u otros ingredientes en trozos a la
unidad. Pueden impedir que el helado se bata correctamente.
6. Desenchufe la unidad de la red cuando no la esté utilizando y para limpiarla.
7. NO opere este aparato con un cable o enchufe dañados,
o en caso de que funcione incorrectamente.
8. NO lo coloque en un lavavajillas.
9. Manténgalo fuera del alcance de los niños.
10. Este aparato NO ES UN JUGUETE.
11. Este aparato no se ha diseñado para que lo utilicen niños ni
personas con dicultades de aprendizaje sin supervisión.
12. Se debe supervisar a los niños mientras se utilice el producto
para asegurarse de que no jueguen con el aparato.
PROTECCIONES IMPORTANTES
Cuando utiliza aparatos eléctricos, siempre se deben seguir algunas medidas
básicas de seguridad que incluyen las siguientes:
1. Lea todas las instrucciones antes de utilizar este aparato.
2. Como medida de protección contra el riesgo de descarga eléctrica, no sumerja el
cable, los enchufes ni ninguna otra parte de la unidad en agua ni en otros líquidos.
3. Es necesaria una supervisión estricta cuando los niños utilicen
el aparato o cuando se encuentren a su alrededor.
4. Para evitar los riesgos de incendios o de descargas eléctricas, así como daños a la unidad,
este aparato debe conectarse SOLAMENTE en una toma de corriente de 120 VCA estándar.
5. Desenchufe el aparato de la red cuando no lo esté utilizando
y antes de desmontarlo para limpiarlo.
6. NO utilice ningún aparato con el cable o el enchufe dañados, ni si el
aparato se ha dañado de cualquier manera. Devuelva el aparato al
taller de reparación más cercano para su examen o reparación.
7. El fabricante no recomienda el uso de implementos accesorios.
El uso de implementos puede provocar lesiones.
8. NUNCA utilice la unidad estando seca. Siempre tenga una mezcla de
helado en el recipiente mientras esté enchufada la unidad.
9. NO utilice aceite caliente o líquidos calientes en el cubo.
Siempre enfríe la mezcla antes de batirla.
10. NO lo utilice en exteriores. SÓLO PARA USO DOMÉSTICO.
Page 32

30
ESPAÑOL
30
11. NO permita que el cable toque supercies calientes.
12. NO coloque el aparato sobre o cerca de un fogón de gas
o eléctrico o dentro de un horno caliente.
13. Esta unidad debe estar en una supercie nivelada para que funcione bien.
14. NO utilice este aparato para otro uso que no sea el cual para el que está destinado.
15. NO deje la unidad desatendida mientras esté en uso o
cuando esté enchufada a una toma de corriente.
16. Se proporciona un cable de alimentación corto para reducir el
riesgo de enredarse o tropezar con un cable más largo.
17. Un cable de extensión se puede utilizar si se tiene cuidado con su uso.
18. Las características nominales del cable de extensión
deben ser al menos iguales a las del aparato.
19. Este producto está equipado con un enchufe de dos clavijas. Para reducir el riesgo de
descarga eléctrica, este enchufe se ha diseñado para introducirse en una toma de corriente
estándar de 120 VCA. Si el enchufe no encaja completamente en la toma, es posible que
necesite un aparato de inversión para que encaje el enchufe o comuníquese con un
electricista calicado. No intente modicar el enchufe por su cuenta de ninguna forma.
20. NO coloque las manos ni ningún objeto extraño en este
aparato mientras esté conectado y funcionando.
¡GUARDE ESTAS INSTRUCCIONES!
INTRODUCCIÓN
Gracias por comprar la MÁQUINA DE HELADO DE 6 CUARTOS TRADICIONAL de
VINTAGE COLLECTION™ de Nostalgia Electrics™. Esta máquina de helados provee
una experiencia de de hacer helados caseros y comodidades modernas. Solo hay
que colocar el envase de aluminio lleno de ingredientes en el centro del cubo,
llenar el cubo con hielo, y que el motor eléctrico bata para usted. ¡Pronto tendrá
un delicioso helado listo para servir! Hace seis cuartos de helado por lote.
Page 33

31
ESPAÑOL
31
PARTES Y ENSAMBLAJE
Retire la MÁQUINA DE HELADO DE 6 CUARTOS TRADICIONAL de VINTAGE
COLLECTION™ de la caja y lave el cubo, el envase, la tapa y todos los accesorios
(excepto el motor eléctrico y el enchufe) con agua tibia y jabonosa.
Limpie con cuidado el motor eléctrico con un paño algo húmedo no abrasivo o
una esponja. NUNCA sumerja el motor eléctrico en agua. Seque a fondo.
Ahora usted está listo para disfrutar de helados cremosos y deliciosos de la
MÁQUINA DE HELADO DE 6 CUARTOS TRADICIONAL de VINTAGE COLLECTION™.
Cubo de madera
Envase
Batidor
Tapa
Motor
eléctrico
Page 34

32
ESPAÑOL
32
FUNCIONAMIENTO
1. Primero, encuentre una supercie estable cerca de una toma de corriente. Asegúrese de que
el cable esté alejado de cualquier fuente de agua. Si es necesario, use un cable de extensión.
2. Enfríe el envase de helado hasta que esté frío al tacto. Llene el cubo de madera
hasta 3/4 con agua y déjelo reposar durante 20 minutos. Esto permitirá que
la madera se hinche para que la solución de salmuera no se salga durante
el proceso de batido. Deseche el agua después de 20 minutos.
3. Vierta la mezcla de helado refrigerada en el envase enfriado. Asegúrese
de no llenar el envase a más de ²/3 de su capacidad, ya que la
mezcla se expandirá durante el proceso de congelación.
4. Inserte el batidor en el envase y asegúrese de que la parte inferior
del batidor esté bien alineado en el centro del envase.
5. Coloque la tapa en el envase, luego coloque el envase en el soporte
estabilizador de plástico en el centro inferior del cubo de madera.
6. Deslice el extremo rectangular del motor eléctrico en el agujero
rectangular en el borde del cubo. El extremo opuesto de la manivela
se situará en el extremo abierto donde está el cierre.
7. Levante el cierre con cuidado para que el cable pase sobre el extremo
redondeado del motor. Puede que tenga que girar el envase con
la mano para que la tapa encaje en el motor eléctrico.
8. Antes de agregar hielo, asegúrese de que el hielo colocado en el cubo se rompa en trozos
pequeños. Puede utilizar un mazo o un martillo para romper en pedazos más pequeños
si es necesario. Para cada lote de helados, espere utilizar 1 a 2 bolsas medianas de hielo.
9. Llene el cubo de madera con una pequeña capa de hielo (casi 8 tazas)
distribuidas uniformemente alrededor de la base del envase.
10. Cubra la primera capa de hielo uniformemente con una capa de sal de roca (casi ½ taza).
Regular table salt or kosher salt can also be used. La sal es necesaria para el proceso de
congelación.
Puede tomar un total de 2 a 4 tazas de sal para congelar bien la mezcla de helado
(1 lb. de sal = 2 tazas / 2 lbs. de sal = 4 tazas). Mientras más sal utilice, mejor.
11. Repita los pasos 10 y 11, cubriendo el hielo con sal hasta que llegue a la parte superior
del envase. Pare cuando la parte superior de la mezcla alcance la parte inferior del oricio
de drenaje en la parte lateral del cubo de madera. Añadir más hielo puede causar que
la mezcla se escape por el oricio de drenaje. NOTA: A medida que el hielo se derrita
de 2 a 3 pulgadas, puede añadir más hielo y más sal de roca al cubo de madera.
12. Enchufe el cable de alimentación conectado al motor eléctrico
en una toma, luego encienda el motor eléctrico.
13. A medida que gira el envase, revuelva y mezcle la sal y el hielo cada 10 a 15 minutos,
o cuando sea necesario, mientras que la máquina de helados esté en uso. NOTA:
Durante el proceso de batido, el envase gira y el batidor permanece inmóvil.
14. Apague y desenchufe el motor eléctrico una vez de haber batido el helado durante
unos 30 minutos, o una vez que haya parado el motor eléctrico. Si el motor se detiene
antes de tiempo, apáguelo, rompa cualquier bloqueo de hielo, y empiece de nuevo.
15. Con una mano en la tapa del envase, retire el motor eléctrico del cubo.
Tenga cuidado ya que el recipiente puede otar en el agua helada.
16. Limpie el hielo y la sal de la parte superior del envase. Limpie con
cuidado para eliminar la sal y el agua antes de retirar la tapa. Retire
los batidores y raspe el exceso de helado con una espátula.
17. Transera el helado a un envase que pueda congelarse y congélelo,
o sírvalo directamente del envase. La tapa y cubierta se incluyen
para la opción de almacenar el envase en el congelador.
Page 35

33
ESPAÑOL
33
CONSEJOS ÚTILES
NUNCA deje la unidad sin supervisión mientras está en uso.
Sabor
El helado terminado siempre tendrá un sabor menos dulce que la mezcla
inicial. Usted puede ajustar la cantidad de azúcar en la receta a su gusto.
Edulcorantes articiales pueden usarse en lugar del azúcar.
Utilice las medidas siguientes para referencia:
• 1 paquete de edulcorante = 2 cucharadas de azúcar
• 6 paquetes de edulcorante = ¼ de taza de azúcar
• 8 paquetes de edulcorante = de taza de azúcar
• 12 paquetes de edulcorante = ½ de taza de azúcar
Textura
Para asegurar que no se formen cristales de hielo en la mezcla del helado, no
detenga el proceso de batido en ningún momento hasta que el helado esté listo.
Si la textura del helado es dura o granulosa, asegúrese de no tener demasiada sal de roca
en el agua helada. Demasiada sal puede causar que la mezcla se congele demasiado
rápido, lo que también puede causar que se formen cristales de hielo en el helado.
Consistencia
Los helados caseros generalmente tienen una textura espesa y de batido. Si
preere una consistencia más espesa o más rme, pruebe uno de lo siguiente:
• Retire el batidor y coloque la tapa y la cubierta en el envase. Coloque
el envase en el congelador para que se endurezca.
• Retire el batidor y añada más hielo en la mezcla de hielo y sal. Cúbrala con
una toalla y déjela reposar hasta que el helado se haga más rme.
• Muy poca sal también puede inhibir la congelación de la
mezcla de helado. Trate de añadir más sal.
• Las recetas que requieren alcohol pueden inhibir el proceso de congelación.
Asegúrese de añadir alcohol durante los últimos minutos del ciclo de congelación.
Atascamiento
Si el batidor se atasca o el motor eléctrico se detiene antes de tiempo, intente lo siguiente:
• El hielo puede causar un bloqueo en el cubo de madera. Apague el motor
eléctrico y asegúrese de que el hielo se rompa en trozos pequeños.
• Asegúrese de que la consistencia del helado no sea más espesa que
el helado servido suave ya que el batidor puede atascarse.
• Las recetas de helado que incluyen ingredientes duros como nueces o trocitos
de chocolate pueden hacer que el batidor se atasque en el envase. NO agregue
ingredientes duros hasta haber terminado el proceso de batido.
• NO detenga el proceso de batido hasta que el helado esté listo. Detenerse en el medio del
proceso puede causar que el helado se endurezca y restrinja el movimiento del batidor.
Congelación
Page 36

34
ESPAÑOL
34
• Añada una taza de agua fría a la mezcla de hielo y sal
para acelerar el proceso de congelación.
• NO utilice la unidad más allá de lo necesario. Si después de 30 minutos la mezcla no ha
alcanzado aún la consistencia aguanieve o se ha descongelado de nuevo, no continúe.
Las posibles razones de porqué una mezcla no se está enfriando o congelando:
• El envase no estuvo lo bastante frío. Trate de añadir más hielo y sal. La sal
es una parte crítica del proceso de congelación y usted tendrá que añadir
bastante sal al hielo para que el helado se congele correctamente.
• La mezcla estuvo muy tibia. Asegúrese de que los ingredientes que agrega estén
enfriados y no calientes, tibios o a temperatura ambiente antes de añadirlos al envase.
Fuga
• Para evitar fugas, llene el cubo de madera a ¾ con agua y déjelo reposar durante 20
minutos. Esto permitirá que la madera se hinche para que la solución de salmuera no
se salga durante el proceso de batido. Deseche el agua después de 20 minutos.
LIMPIEZA Y MANTENIMIENTO
1. Asegúrese de que el motor eléctrico esté apagado y la unidad esté desconectada.
2. Retire del motor eléctrico y límpielo con un paño ligeramente húmedo, no
abrasivo. NUNCA sumerja el motor eléctrico en agua o cualquier otro líquido.\
3. Lave el cubo con agua tibia y jabonosa para eliminar completamente
todos los residuos de agua salada. Seque a fondo.
4. Lave el envase, la tapa y el batidor con agua tibia y jabonosa y séquelo bien.
NO reemplace la tapa hasta que el envase esté completamente seco.
5. NO utilice limpiadores fuertes o abrasivos.
6. NO coloque el envase ni ningunas otras piezas en el lavavajillas. Solo lave a mano.
7. NO congele el envase cuando esté mojado.
Page 37

35
ESPAÑOL
35
RECETAS
¡La MÁQUINA DE HELADO DE 6 CUARTOS TRADICIONAL de VINTAGE COLLECTION™ hace
helado rico y cremoso en cualquier momento! Pruebe estas deliciosas recetas y consejos:
• Para reducir el riesgo de intoxicación por salmonela causado por huevos crudos,
caliente las mezclas con huevos a una temperatura de 160°F, pero NO las lleve a
ebullición. También puede utilizar huevos pasteurizados en lugar de huevos crudos.
• Asegúrese de añadir mezcla de helado al envase y refrigérela por 30 minutos antes de usar.
• Para recetas de helados que requieran cocción, se recomienda cocinar con un día de
antelación. Luego habrá tiempo para que la mezcla enfríe completamente y se expanda.
HELADO DE CHOCOLATE FÁCIL
• 9 tazas de leche
• 6 ¾ latas grandes de
leche condensada
• 1 taza, 7 cucharadas
de cacao
En un tazón grande, combine la leche
y la leche condensada.
Disuelva el cacao en un poco de agua caliente.
Una vez disuelto, revuelva el cacao en la mezcla de
leche hasta que esté completamente mezclado.
Vierta los ingredientes en el envase y siga las
instrucciones dadas en la sección FUNCIONAMIENTO.
No llene el envase más de los ²/3, ya que la
mezcla se expandirá durante la congelación.
HELADO DE VAINILLA FÁCIL
• 9 tazas de crema
• 6 ¾ tazas mitad
y mitad
• 3 3/8 taza de azúcar
• 2¼ cucharadas
de vainilla
Combine todos los ingredientes en el envase.
No llene el envase más de los ²/3, ya que la
mezcla se expandirá durante la congelación.
Revuelva bien hasta que el azúcar se haya disuelto.
Congele hasta que el envase esté frío al tacto.
Siga alas direcciones en la sección FUNCIONAMIENTO.
Page 38

36
ESPAÑOL
36
HELADO DE CHOCOLATE RICO Y CREMOSO
• 4 tazas de azúcar
granulada
• 3 cucharaditas de
almidón de maíz
• ¾ cucharadita de sal
• 9 tazas de leche
• 6 huevos batidos
• 9 escuadras
semidulces
Chocolate, derretido
• 3 cucharadas de
extracto de vainilla
• 2 tazas mitad y mitad
• 3 tazas de crema
de batir
Mezcle el azúcar, el almidón de maíz y la sal
en una olla grande a fuego medio.
Vierta lentamente la leche, revolviendo constantemente
hasta que la leche empiece a hervir a fuego lento.
Añada los huevos batidos muy lentamente
y continúe revolviendo.
Reduzca a fuego lento y cocine hasta que
la mezcla espese ligeramente.
Revuelva lentamente el chocolate derretido y bata hasta
combinar todo el chocolate y la mezcla esté suave.
Añada lentamente la vainilla, la mitad
y mitad y la crema de batir.
Vierta la mezcla en un tazón de cristal grande y
refrigérela de 2 a 4 horas o hasta que la mezcla
se haya enfriado. Retírela del refrigerador.
Vierta los ingredientes en el envase y siga las
instrucciones dadas en la sección FUNCIONAMIENTO.
No llene el envase más de los ²/3, ya que la
mezcla se expandirá durante la congelación.
HELADO DE VAINILLA TRADICIONAL
• 3 tazas de azúcar
granulada
• 2 ¼ cucharadita de
almidón de maíz
• 3/8 cucharadita de sal
• 10 ½ tazas de leche
• 7 huevos batidos
• 2 ¼ cucharadas
de vainilla
• 2 ¼ tazas mitad
y mitad
• 4 1/8 taza de
crema de leche
Mezcle el azúcar, el almidón de maíz y la sal
en una olla grande a fuego medio.
Vierta la leche lentamente sin dejar
de revolver constantemente.
Añada los huevos batidos muy lentamente
y continúe revolviendo.
Reduzca a fuego lento y cocine hasta que
la mezcla espese ligeramente.
Añada lentamente la vainilla, la mitad
y mitad y la crema de leche.
Vierta la mezcla en un tazón de cristal grande y
refrigérela de 2 a 4 horas o hasta que la mezcla
se haya enfriado. Retírela del refrigerador.
Vierta la mezcla en el envase y siga las instrucciones
dadas en la sección FUNCIONAMIENTO.
No llene el envase más de los ²/3, ya que la
mezcla se expandirá durante la congelación.
Page 39

37
ESPAÑOL
37
HELADO CON MASA DE GALLETAS
• 9 huevos grandes
• 3 3/8 taza de azúcar
• 9 tazas de crema
de leche
• 4 ½ tazas de leche
• 1 ½ taza de mini
trozos de chocolate
• 1 ½ taza con masa de
galletas de trozos de
chocolate, divididos
en pedacitos
Coloque la masa para galletas y los trozos de chocolate en
un tazón aparte. Cúbrala y refrigérela hasta que se enfríe.
Bata los huevos en un tazón para mezclar de 1 a 2
minutos hasta que estén suaves y esponjosos.
Añada lentamente el azúcar, bata hasta
que esté completamente mezclado.
Añada lentamente la crema y la leche
y bata hasta mezclarlos.
Vierta la mezcla en el envase y siga las instrucciones
dadas en la sección FUNCIONAMIENTO.
No llene el envase más de los ²/3, ya que la
mezcla se expandirá durante la congelación.
Cuando haya terminando de batir la mezcla, añada la masa
de galletas y trozos de chocolate y revuelva uniformemente.
HELADO CROCANTE
• 1 ½ (14 onzas) lata
de leche condensada
endulzada
• ¾ taza de polvo de
cacao sin endulzar
• 3 tazas de crema
de leche
• 1 ½ taza de
crema ligera
• 1 ½ cucharada de
extracto de vainilla
• ¾ taza de nueces
en trozos
• 1 ½ taza de
malvaviscos
miniatura
En un sartén mediano a fuego lento, cocine y revuelva
la leche condensada y el cacao hasta que la mezcla
esté suave y ligeramente espesa (unos 5 minutos).
Retírela del calor y deje que se enfríe ligeramente.
Revuelva la crema de leche, la crema ligera y la vainilla.
Refrigere hasta que se enfríe.
Vierta la mezcla en el envase y siga las instrucciones
dadas en la sección FUNCIONAMIENTO.
No llene el envase más de los ²/3, ya que la
mezcla se expandirá durante la congelación.
Cuando la mezcla se haya terminado de batir, añada las
nueces y los malvaviscos. Revuelva uniformemente.
Page 40

38
ESPAÑOL
38
HELADO DE TROZOS DE CHOCOLATE Y MANTEQUILLA DE MANÍ
• 2 ²/3 tazas de
azúcar granulada
• ¾ cucharadita de sal
• 3 cucharadas de
almidón de maíz
• 9 tazas de leche
• 6 huevos batidos
• 1 ½ taza de
mantequilla de
maní o bocados
de mantequilla de
maní derretidas
• 2 ¼ cucharaditas
de vanilla
• 2 tazas mitad y mitad
• 3 tazas de crema
de leche
• 2 ¼ tazas de trozos
de chocolate
Mezcle el azúcar, la sal y el almidón de maíz
en una olla grande a fuego medio.
Vierta la leche lentamente sin dejar
de revolver constantemente.
Añada los huevos batidos muy lentamente
y continúe revolviendo.
Reduzca a fuego lento y cocine hasta que
la mezcla espese ligeramente.
Revuelva lentamente la mantequilla de maní
y bata hasta combinar toda la mantequilla
de maní y la mezcla esté suave.
Añada lentamente la vainilla, la mitad
y mitad y la crema de leche.
Vierta la mezcla en un tazón de cristal grande y
refrigérela de 2 a 4 horas o hasta que la mezcla
se haya enfriado. Retírela del refrigerador.
Vierta la mezcla en el envase y siga las instrucciones
dadas en la sección FUNCIONAMIENTO.
No llene el envase más de los ²/3, ya que la
mezcla se expandirá durante la congelación.
Cuando la mezcla se haya batido, añada trozos
de chocolate y mezcle uniformemente.
HELADO DE CAFÉ
• 9 tazas de crema
• 6 ¾ tazas mitad
y mitad
• 3 3/8 taza de azúcar
• 6 ¾ cucharada de
café instantáneo
en polvo
Combine todos los ingredientes en un tazón grande.
Revuelva bien hasta que tanto el azúcar como el
café instantáneo en polvo se hayan disuelto.
Añada la mezcla al envase. No llene el envase más de los
²/3, ya que la mezcla se expandirá durante la congelación.
Congele hasta que el envase esté frío al tacto.
Siga las direcciones en la sección FUNCIONAMIENTO.
Page 41

39
ESPAÑOL
39
SORBETO DE MORA
• 3 (12 onzas) bolsas
de moras mixtas
congeladas
• 1 ½ taza de jugo
de manzana
• 1 ½ taza de agua
• 3 tazas de azúcar
granulada
• ½ taza de jugo
de limón fresco
• 6 tazas de mezcla de
jugo de arándano
y frambuesa
Finamente convierta en puré las moras en una
batidora con jugo de manzana y agua.
Cuele la mezcla en una olla grande para
eliminar las semillas. Discard seeds.
Añada azúcar a la mezcla de moras sin semillas, hiérvala
de 3 a 4 minutos. Revuelva los jugos restantes.
Vierta la mezcla en un gran tazón de
vidrio y refrigérela de 2 a 4 horas.
Vierta la mezcla en el envase y siga las instrucciones
dadas en la sección FUNCIONAMIENTO.
No llene el envase más de los ²/3, ya que la
mezcla se expandirá durante la congelación.
SORBETO DE PIÑA
• 3(12 onzas) bolsas
de piña congelada
• 1 ½ taza de jugo
de manzana
• 1 ½ taza de agua
• 3 tazas de azúcar
granulada
• ¾ taza de jugo
de limón fresco
• 6 ¾ tazas de
jugo de piña
Finamente convierta en puré la piña en una
batidora con jugo de manzana y agua.
Cuele la mezcla en una olla grande para
lograr una consistencia uniforme.
Añada azúcar a la mezcla de piña, hiérvala de 3
a 4 minutos. Revuelva los jugos restantes.
Vierta la mezcla en un gran tazón de
vidrio y refrigérela de 2 a 4 horas.
Vierta la mezcla en el envase y siga las instrucciones
dadas en la sección FUNCIONAMIENTO.
No llene el envase más de los ²/3, ya que la
mezcla se expandirá durante la congelación.
Page 42

40
ESPAÑOL
40
DEVOLUCIONES Y GARANTÍA
SI LA UNIDAD NO FUNCIONA O ESTÁ DAÑADA AL SACARLA POR PRIMERA VEZ
DE LA CAJA, DEVUÉLVALA AL LUGAR DE COMPRA INMEDIATAMENTE.
MÁQUINA DE HELADO DE 6 CUARTOS TRADICIONAL DE VINTAGE COLLECTION / ICMP600WD
Si tiene preguntas, contacte con nosotros por correo electrónico o por el número
telefónico de servicio al cliente que aparece a continuación en el horario de
8:00 AM a 5:00 PM, de lunes a viernes, Hora Estándar del Este.
Distribuida por:
Nostalgia Products LLC
1471 Partnership Dr.
Green Bay, WI 54304-5685
Servicio al cliente
Teléfono: (920) 347-9122
Web: www.nostalgiaproducts.com
Solicitud de servicio al cliente
Para enviar una solicitud al Servicio al Cliente, vaya a www.nostalgiaproducts.com, llene
el formulario de Solicitud de Servicio al Cliente y haga clic en el botón Enviar.
Un representante le contactará tan pronto como sea posible.
Términos de garantía del producto
Po este medio, Nostalgia Products LLC (la “Compañía”) garantiza que por un período de un (1) año a
partir de la fecha de compra original, este producto estará sin defectos en cuanto a materiales y mano
de obra en uso normal en casa, siempre que el producto se maneje y mantenga de acuerdo con las
instrucciones de manejo. Como único y exclusivo remedio en virtud de esta garantía, la Compañía, a
su discreción, podrá optar por reparar o sustituir el producto que se encuentre defectuoso, o emitir un
reembolso por el producto durante el período de garantía. Esta garantía sólo está disponible para el
comprador original minorista del producto a partir de la fecha inicial de compra al por menor, y sólo es
válida con el recibo de compra original, y como prueba de la fecha de compra, es necesario obtener los
benecios de la garantía. Todos los reclamos de garantía deben hacerse a la atención de la Compañía
dentro del período de garantía y no más tarde que 30 días desde la imposibilidad de realizarlo. Esta
garantía no cubre el desgaste normal o daños ocasionados por el embarque, malos manejos, mal uso,
accidentes, alteración, piezas de cambio incorrectas, o algo distinto al uso doméstico normal. Es posible
que deba devolver el producto (con los gastos de envío pagados por usted) para inspección y evaluación.
Los costos de envío no son reembolsables. La empresa no se hace responsable por devoluciones
dañadas o perdidas en tránsito. A menos que se indique lo contrario especícamente permitido por
las instrucciones de manejo, esta garantía sólo se aplica al uso en interiores de las viviendas. Para
realizar una reparación bajo esta garantía, comuníquese con la Compañía mediante el número de
teléfono indicado anteriormente o al llenar el formulario de consulta para el servicio de Atención al
Cliente en www.nostalgiaproduct s.com. El período de garantía sólo es válido en EE.UU. y Canadá.
Esta garantía está en lugar de cualquier otra garantía, expresa o implícita, incluso las garantías de
comerciabilidad y conveniencia para un propósito en particular, que quedan excluidas en la medida
permitida por la ley. En ningún caso la compañía será responsable de cualquier daño indirecto, incidental,
consecuente, especial o daños que surjan o estén relacionados con este producto o la utilización del
mismo. Algunos estados, provincias o corregimientos no permiten la exclusión o la limitación de daños
incidentales o consecuentes, por lo que la exclusión o la limitación anterior quizás no se aplique a usted.
Esta garantía no se aplica a mercancía reelaborada.
Lea las instrucciones de manejo cuidadosamente. El incumplimiento
de las instrucciones de manejo anulará esta garantía.
Para obtener más información, visítenos en línea en www.nostalgiaproducts.com.
Me Gusta en Facebook en www.facebook.com / NostalgiaElectrics.
Siga nuestros consejos sobre Pinterest en www.pinterest.com / nostalgiaelctrx.
Tweet con nosotros en Twitter en www.twitter.com / NostalgiaElctrx.
Page 43

 Loading...