

Page 1

All products are trademarks of Nostalgia Products LLC.
Worldwide design & utility patented or patents pending.
© 2017 Nostalgia Products LLC.
www.nostalgiaproducts.com
(rev. 07/17/17 TL)
Page 2

CBD5
HomeCraft™ Beer Growler
Barril de cerveza HomeCraft™
Cruchon pour bière HomeCraft™
Instructions and Recipes
Instrucciones y recetas
Instructions et recettes
CBG64
Page 3

Page 4

ENGLISH
2
Make every day a party!
Visit www.nostalgiaproducts.com for more fun products.
CONTENTS
SAFETY . . . . . . . . . . . . . . . . . . . . . . . . . . . . . . . . . . . . . . . . . 2
IMPORTANT SAFEGUARDS . . . . . . . . . . . . . . . . . . . . . . . . . . . . . 3
ADDITIONAL IMPORTANT SAFEGUARDS . . . . . . . . . . . . . . . . . . . . 3
INTRODUCTION . . . . . . . . . . . . . . . . . . . . . . . . . . . . . . . . . . . . 5
PARTS & ASSEMBLY . . . . . . . . . . . . . . . . . . . . . . . . . . . . . . . . . . 6
HOW TO OPERATE . . . . . . . . . . . . . . . . . . . . . . . . . . . . . . . . . . 8
HELPFUL TIPS . . . . . . . . . . . . . . . . . . . . . . . . . . . . . . . . . . . . . 10
CLEANING & MAINTENANCE . . . . . . . . . . . . . . . . . . . . . . . . . . . . 11
RECIPES . . . . . . . . . . . . . . . . . . . . . . . . . . . . . . . . . . . . . . . . . 11
RETURNS & WARRANTY . . . . . . . . . . . . . . . . . . . . . . . . . . . . . . . 12
SAFETY
Refer to www.nostalgiaproducts.com/user-manuals/ for the most updated manual.
Your safety and the safety of others is very important.
We have provided many important safety messages in this manual and
on your appliance. Always read and obey all safety messages.
This is the safety alert symbol.
This symbol alerts you to potential hazards that can
cause serious injury to you and others.
All safety messages will follow the safety alert symbol.
All safety messages will tell you what the potential hazard is, tell you how to reduce the
chance of injury, and tell you what can happen if the instructions are not followed.
Page 5
ENGLISH
3
IMPORTANT SAFEGUARDS
A person who has not read and understood all operating and safety instructions
is not qualied to operate this appliance. All users of this appliance must read and
understand this Instruction Manual before operating or cleaning this appliance.
1. Read all instructions before operating this appliance.
2. DO NOT TOUCH the hot surfaces. Use handles or knobs.
3. This appliance is NOT A TOY.
4. Keep out of reach of children.
5. Unsupervised young children and cognitively challenged
individuals should never operate this appliance.
6. Close supervision is necessary when any appliance is used by or near children.
7. Do not operate this unit when parts are missing or broken.
8. The manufacturer does not recommend the use of accessory attachments other than
what is provided by the manufacturer. Use of attachments may cause injuries.
9. DO NOT use the appliance for other than its intended use.
10. DO NOT use outdoors. FOR HOUSEHOLD USE ONLY.
11. DO NOT place on or near a hot gas or electric burner, or in a heated oven.
12. DO NOT put any parts of this appliance in dishwasher.
ADDITIONAL IMPORTANT SAFEGUARDS
Operating Safety Precautions
1. This appliance is designed for use by responsible adults of legal drinking age.
2. Never place the appliance under direct sunlight, and avoid any other heat source.
3. To ensure proper ventilation, this appliance should not be recessed or built
into an enclosed cabinet. It is designed for freestanding assembly only.
4. Do not operate your appliance in the presence of explosive fumes.
CO2 (Carbon Dioxide) Gas
1. DO NOT remove the CO2 cartridge from unit until CO2 cartridge is completely empty.
2. Always keep CO2 cartridges away from heat. Store extra
cartridges in a cool, dry place (preferably 70°F/20°C).
3. DO NOT use the CO2 cartridge if the room temperature is over 120°F
(49°C). Failure to do so can result in explosion or injury. Escaping CO2
gas can cause frostbite if allowed to come in contact with skin.
4. CO2 gas can be dangerous! CO2 cartridges contain high-pressure compressed
gas, which can be hazardous if not handled properly. Make sure you read and
understand all the procedures for the CO2 cartridge before installation.
5. Never connect the CO2 cartridge directly to the beer keg.
6. Always follow the correct procedures when changing the CO2 cartridge.
Page 6

ENGLISH
4
7. ALWAYS ventilate and leave the area immediately if CO2 leakage has occurred.
8. Never drop or throw a CO2 cartridge.
9. Never attempt to rell a CO2 cartridge.
SAVE THESE INSTRUCTIONS!
Page 7

ENGLISH
5
INTRODUCTION
Congratulations! You are now the proud owner of your very own HOMECRAFT™
BEER GROWLER from Nostalgia™! This 64 oz. growler comes with a twist-on cap and
is double-wall vacuum-insulated to keep your beer cold and spill-free wherever
your adventures may take you. The side handle makes carrying, relling and
pouring an easy task, while the quick-connect regulator attaches and releases
quickly without losing carbonation. Equipped with a CO2 cartridge system,
this system will keep your beer fresh for up to 30 thirst-quenching days.
• 64 oz. (2 L) capacity
• Quick-connect regulator attached & releases quickly while maintaining carbonation
• Pressure gauge (0-60 PSI)
• Double-wall vacuum-insulated to keep beverage cold up to 24 hours
• Simple pull tap dispensing is spring loaded for easy pouring
• Growler cap with double silicone rings to ensure growler remains sealed & spill-free
• Side handle allows for easy carrying, relling & pouring
• Compatible with food grade 16g threaded CO2 or N2 cartridges (3 included)
• Food grade stainless steel is light weight & very durable
Page 8
ENGLISH
6
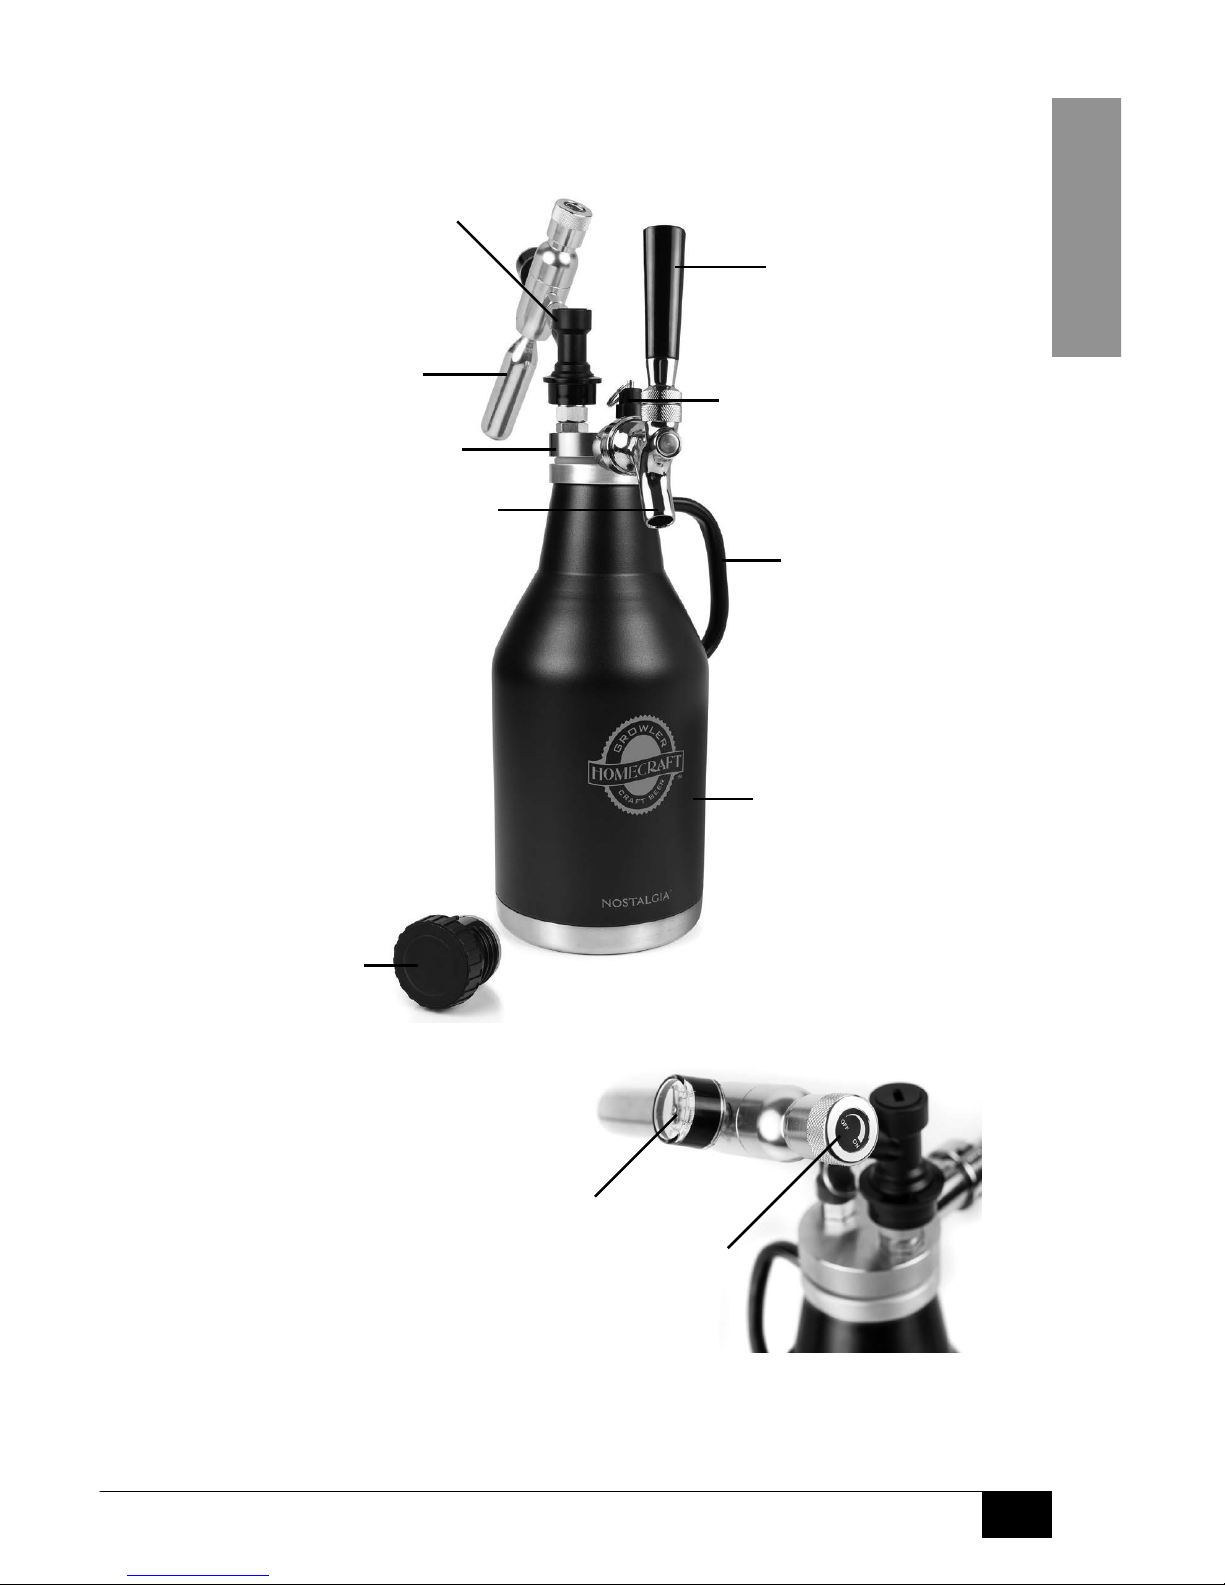
PARTS & ASSEMBLY
PARTS
Pressure
Dial
Pressure
Gauge
Threaded
16g CO2
Cartridges (3)
Tap Faucet
Carrying
Handle
Growler
Tap
Handle
Pressure Relief
Valve (PRV)
Growler Cap
Quick-Connect
Regulator
Dispenser Cap
Page 9

ENGLISH
7
BASIC ASSEMBLY
2
Lift up the collar at the bottom of the Regulator
(as shown), then lower and press onto the
receiver. Release the collar to complete the
connection. Gently pull up on the Regulator
to ensure the connection is secure.
collar
receiver
Regulator
3
If the Tap Handle is not already attached, screw
the Tap Handle clockwise onto the Tap Faucet.
Tap Handle
1
Fasten the Dispenser Cap or Growler Cap to the
mouth of the growler by twisting clockwise.
Dispenser Cap
Page 10
ENGLISH
8
HOW TO OPERATE
FILLING THE GROWLER
1. Follow the directions under CLEANING & MAINTENANCE to
thoroughly clean your growler before lling.
2. Your growler can be lled at your favorite local craft brewery, or with your own homebrew.
3. When lling from a tap, we recommend using a down tube to ll the growler from the
bottom up. This will reduce foaming and minimizes contact between the beer and oxygen.
4. Fill the growler until the beer reaches the "64 OZ" ll line marked on the outside of the
growler.
NOTE: There may be some foam on top of the beer, and this is okay.
DISPENSING FROM THE GROWLER
1. Ensure the Pressure Dial is turned to the OFF position by
turning the dial all the way counter-clockwise.
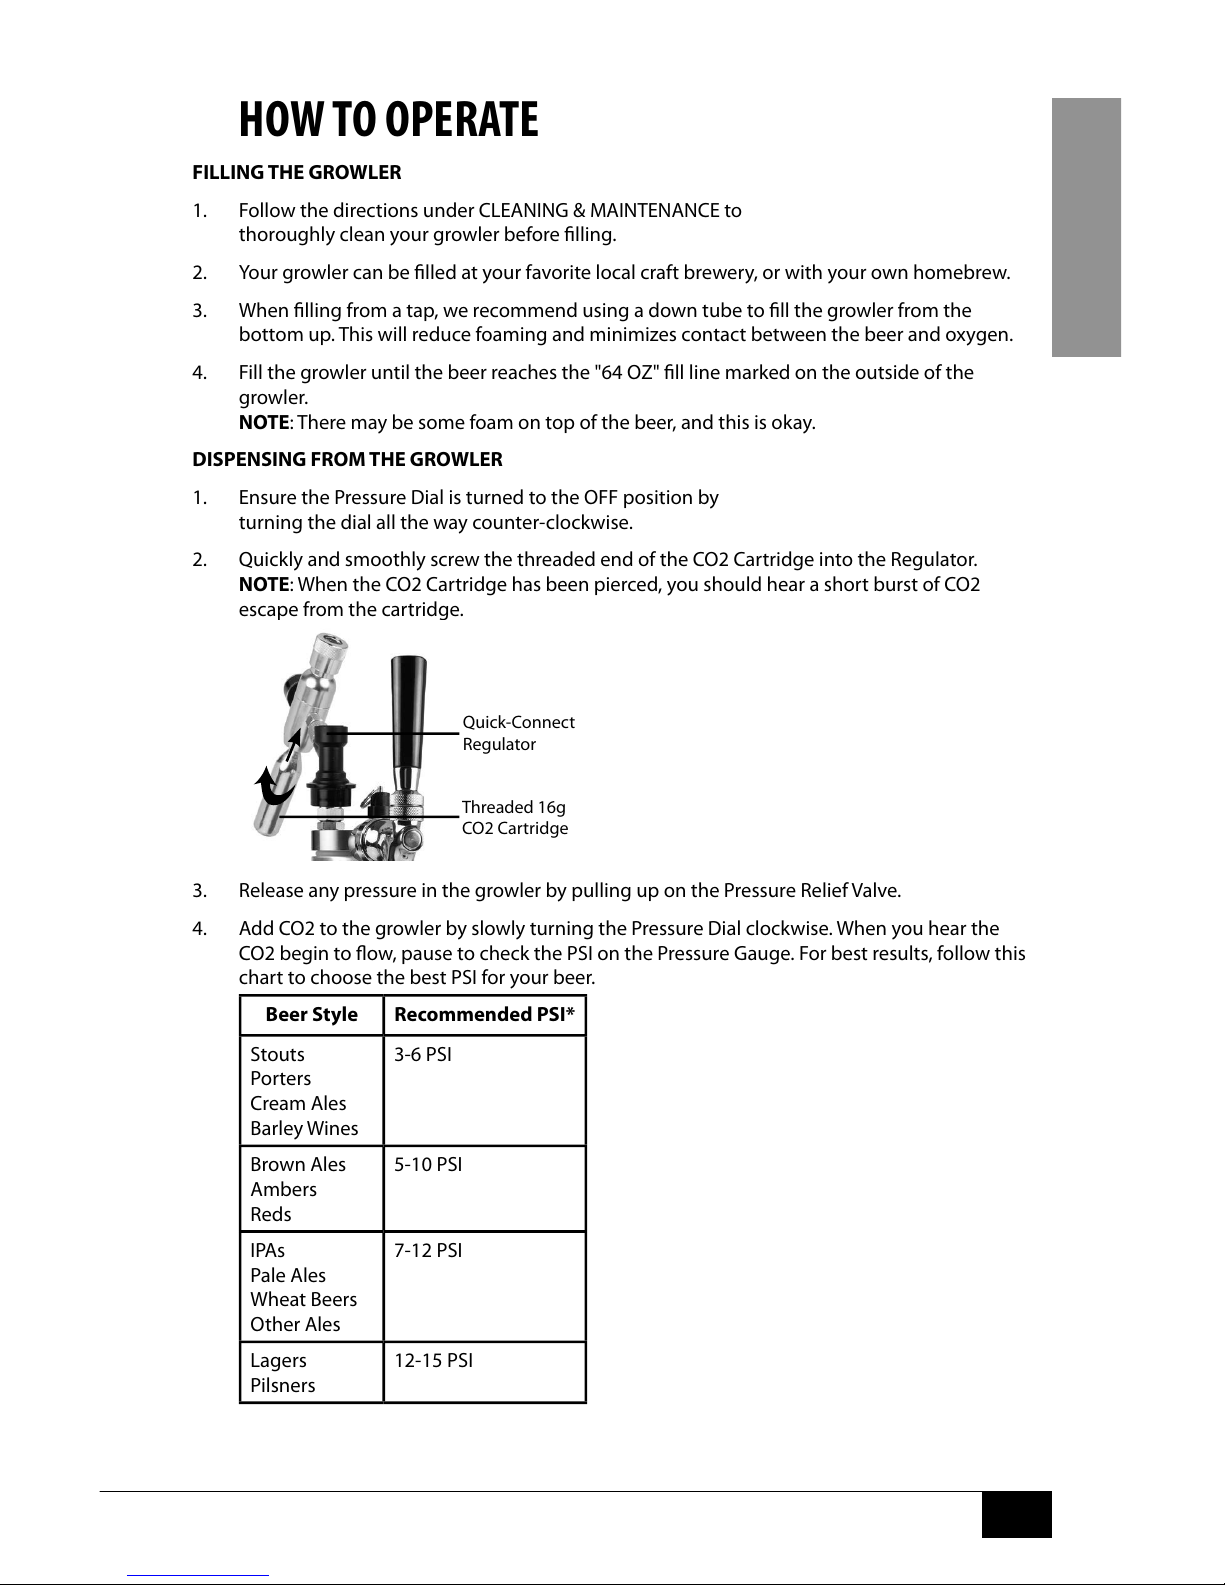
2. Quickly and smoothly screw the threaded end of the CO2 Cartridge into the Regulator.
NOTE: When the CO2 Cartridge has been pierced, you should hear a short burst of CO2
escape from the cartridge.
Threaded 16g
CO2 Cartridge
Quick-Connect
Regulator
3. Release any pressure in the growler by pulling up on the Pressure Relief Valve.
4. Add CO2 to the growler by slowly turning the Pressure Dial clockwise. When you hear the
CO2 begin to ow, pause to check the PSI on the Pressure Gauge. For best results, follow this
chart to choose the best PSI for your beer.
Beer Style Recommended PSI*
Stouts
Porters
Cream Ales
Barley Wines
3-6 PSI
Brown Ales
Ambers
Reds
5-10 PSI
IPAs
Pale Ales
Wheat Beers
Other Ales
7-12 PSI
Lagers
Pilsners
12-15 PSI
* Keep in mind this is just
a guide and you can
always experiment to
suit your own taste!
Page 11

ENGLISH
9
5. If the PSI is higher than you would like, turn the Pressure Gauge to the o position, then
pull the Pressure Relief Valve to release all CO2 from the growler. Add CO2 to the growler
again by slowly turning the Pressure Dial clockwise until your desired PSI is reached.
6. When the Pressure Gauge is set to your desired PSI, it's time to pour a beer!
POURING DRAFT BEER
1. Start with a clean glass.
2. Hold the glass at a 45° angle about 1 inch below the Tap Faucet.
3. Pull the Tap Handle forward to completely open the ow of beer.
4. Continue holding the glass 45° and allow the beer to ow down
the side of the glass until the glass is about half full.
5. Once the glass is half full, continue pouring while you gently tilt the
glass upright and pour down the center of the glass. Ideally, this will
create about a 1 inch head of foam as you nish the pour.
6. Quickly put the Tap Handle back into the original upright position.
NOTE: If a beer pour foams more than expected, let the beer rest until the
head calms down, and then nish your pour. This prevents beer waste.
7. If the beer does not have enough foam for your liking, slowly increase the CO2 pressure until
the desired PSI. DO NOT increase the CO2 pressure too quickly or your beer may dispense
too quickly and with too much foam.
PRO TIP:
When the regulator is open, CO2 will continue owing into the keg. This may
result in a surplus of pressure owing into the keg, and may be a cause of foamy beer. If
you experience foamy beer, simply ll the keg with CO2, then turn the Pressure Dial fully
counter-clockwise to the OFF position. As more beer is dispensed, add small amounts of
CO2 into the keg to displace the dispensed beer, then turn the Pressure Dial back to OFF.
8. Lastly, drink up and enjoy!
REPLACING CO2 CARTRIDGES
1. When the CO2 Cartridge has depleated all CO2, it's time to replace it with a new one.
2. Ensure the Pressure Dial is turned OFF, pull the Pressure Relief Valve, then remove the old
CO2 Cartridge by turning counter-clockwise.
PRO TIP: If your hands are sensitive to cold, avoid touching the old CO2 Cartridge with your
skin. You may want to use a cloth to remove the old cartridge.
CAUTION: Be sure the threaded end of the CO2 Cartridge is pointed away
from you before removing. Leftover CO2 gas escaping from the regulator
outlet is very cold! Keep your hands and body away from the discharge.
3. Quickly and smoothly screw the threaded end of the new CO2 Cartridge into the Regulator.
NOTE: When the CO2 Cartridge has been pierced, you should
hear a short burst of CO2 escape from the cartridge.
Page 12

ENGLISH
10
HELPFUL TIPS
Pouring Draft Beer
1. Start with a clean glass.
2. Hold the glass at a 45° angle about 1 inch below the Tap Faucet.
3. Pull the Tap Handle forward to completely open the ow of beer.
4. Continue holding the glass at 45° and allow the beer to ow
down the side of the glass until the glass is half full.
5. Once glass is half full, continue pouring while you gently tilt the
glass upright and pour down the center of the glass. Ideally, this
will create about a 1" head of foam as you nish the pour.
6. Quickly put the Tap Handle back into the original upright position.
NOTE: If a beer pour foams more than expected, let the beer rest until the
head calms down, and then nish your pour. This prevents beer waste.
Prevent Foamy Beer
• Chill the beer. Warm beer is more likely to cause foamy beer. Allow your beer to chill in the
refrigerator for several hours before consuming. The recommended temperature is 37°F
• Pour into a clean glass. Reside in an unclean glass can disrupt the pour and taste
of your beer. Follow the directions on Pouring Draft Beer to perfect your pour.
• Adjust down your CO2 pressure.
• Do not shake or jostle the growler. Too much agitation of the growler
can create foamy pours. If the growler has been shaken or jostled, allow
the growler to rest and settle for about an hour before pouring.
• Foamy beer may also be caused by a faulty seal or connection between the keg and the
main unit. Make sure all connections are secure, well tightened and correctly placed.
CO2 Regulator Knob
• When the regulator is open, CO2 will continue owing into the keg. This may result in
a surplus of pressure owing into the keg, and may be a cause of foamy beer. If you
experience foamy beer, simply ll the keg with CO2, then turn the Regulator Knob
to the OFF position. As more beer is dispensed, add small amounts of CO2 into the
keg to displace the dispensed beer, then turn the Regulator Knob back to OFF.
Storage
• While your growler is double-walled and vacuum insulated to ensure your
beverage stays cold for up to 24 hours, it also ts neatly into many refrigerator
side door shelves. To save space in your refrigerator, remove the QuickConnect Regulator and Tap Handle before placing in your refrigerator.
Page 13

ENGLISH
11
CLEANING & MAINTENANCE
DO NOT use soap or put the growler in a dishwasher. The residue leftover
from soap can cling to the vessel and leave behind an unpleasant taste.
AFTER EVERY USE:
1. Remove the Growler Cap or Dispenser Cap, then pour out
any extra beer (there shouldn't be much).
2. Fill the growler about half way with warm tap water.
3. Place the palm of your hand over the mouth of the growler, then give it a good
swirl and shake. Be careful to not shake water out of the mouth of the growler.
4. Repeat this two more times.
5. Next, unscrew the silicone tube from the bottom of the Dispenser Cap by twisting clockwise.
6. Fill the growler once more with warm water, then screw the
Dispenser Cap (minus silicone tube) back onto the growler.
7. Dispense the warm water through the Tap Faucet:
» If you have CO2 remaining in the CO2 Cartridge, use the CO2 to
dispense the warm water. Simply open the Tap Handle and the
water will dispense until the pressure drops to zero.
» If there is no pressure left to dispense water, remove the Quick-Connect
Regulator, then simply turn the growler upside down and open the
Tap Handle to allow the water to run through the Tap Faucet.
8. Remove the Dispenser Cap and dump out any remaining water.
9. Rinse and drain warm water through the Tap Faucet two more times.
10. Soak the Dispenser Cap (minus Quick-Connect Regulator),
Growler Cap and silicone tube in warm water.
11. Drain the growler upside down until completely dry. Allow all
extra parts to completely dry before reassembling.
DEEP CLEANING:
1. If your growler has any funky odors or foreign smells, ll your growler
half way with hot water and add 1 tablespoon of baking soda.
2. Screw the Dispenser Cap onto the growler, then shake vigorously for 30 seconds.
3. Dispense baking soda/water solution through the Tap Faucet:
» If you have CO2 remaining in the CO2 Cartridge, use the CO2
to dispense the solution. Simply open the Tap Handle and the
solution will dispense until the pressure drops to zero.
» If there is no pressure left to dispense the solution, remove the Quick-
Connect Regulator, then simply turn the growler upside down and open
the Tap Handle to allow the solution to run through the Tap Faucet.
4. Follow these steps two more times, once with hot water, then once with cold
water. Be sure to swirl each rinse cycle to remove all leftover baking soda.
5. Drain the growler upside down until completely dry.
RECIPES
Craft beer doesn't have to be the only thing you dispense from
your BEER GROWLER. Try your favorite soda pop, or whip up and
dispense your favorite cocktails! Have fun and stay thirsty!
Page 14

ENGLISH
12
RETURNS & WARRANTY
SHOULD YOUR UNIT NOT WORK OR IF DAMAGED WHEN YOU FIRST TAKE IT OUT OF
THE BOX, PLEASE RETURN IT TO THE PLACE OF PURCHASE IMMEDIATELY.
HOMECRAFT™ BEER GROWLER / CBG64
Should you have any questions, please contact us via email or at the customer service number listed
below between the hours of 8:00 AM and 5:00 PM, Monday through Friday, Central Standard Time.
Distributed by:
Nostalgia Products LLC
1471 Partnership Dr.
Green Bay, WI 54304-5685
Customer Service
Phone: (920) 347-9122
Web: www.nostalgiaproducts.com
Customer Service Inquiry
To submit a Customer Service inquiry, go to www.nostalgiaproducts.com and ll
out the Customer Service Inquiry form and click the Submit button.
A representative will contact you as soon as possible.
Product Warranty Terms
Nostalgia Products LLC (the “Company”) hereby warrants that for a period of one (1) year from the
date of original purchase, this product will be free of defects in material and workmanship under
normal home use, provided that the product is operated and maintained in accordance with the
operating instructions. As the sole and exclusive remedy under this warranty, the Company will
at its discretion either repair or replace the product found to be defective, or issue a refund on the
product during the warranty period. This warranty is only available to the original retail purchaser of
the product from the date of initial retail purchase, and is only valid with the original sales receipt, as
proof of purchase date is required to obtain warranty benets. All warranty claims must be brought
to the attention of the Company within the warranty period and no later than 30 days of the failure
to perform. This warranty does not cover normal wear or damage caused by shipping, mishandling,
misuse, accident, alteration, improper replacement parts, or other than ordinary household use.
You may be required to return the product (with shipping prepaid by you) for inspection and
evaluation. Return shipping costs are not refundable. The Company is not responsible for returns
damaged or lost in transit. Unless otherwise specically permitted by the operating instructions, this
warranty applies to indoor household use only. In order to obtain service under this warranty, please
contact the Company at the telephone number listed above or by lling out the Customer Service
Inquiry Form located at www.nostalgiaproducts.com. Warranty valid only in USA and Canada.
This warranty is in lieu of all other warranties, expressed or implied, including warranties of
merchantability and tness for a particular purpose, which are hereby excluded to the extent
permitted by law. In no event shall the Company be liable for any indirect, incidental, consequential,
or special damages arising out of or in connection with this product or the use thereof. Some
states, provinces or jurisdictions do not permit the exclusion or limitation of incidental or
consequential damages, so the foregoing exclusion or limitation may not apply to you.
This warranty does not apply to re-manufactured merchandise.
Please read the operating instructions carefully. Failure to comply
with the operating instructions will void this warranty.
For more information, visit us online at www.nostalgiaproducts.com.
Like us on Facebook at www.facebook.com/NostalgiaElectrics.
Follow our boards on Pinterest at www.pinterest.com/nostalgiaelctrx.
Tweet along with us on Twitter at www.twitter.com/NostalgiaElctrx.
Page 15

13
ESPAÑOL
13
¡Haga de cada día una esta!
Visite www.nostalgiaproducts.com para
ver más productos divertidos.
CONTENIDO
SEGURIDAD . . . . . . . . . . . . . . . . . . . . . . . . . . . . . . . . . . . . . . 13
PROTECCIONES IMPORTANTES . . . . . . . . . . . . . . . . . . . . . . . . . . 14
PROTECCIONES IMPORTANTES ADICIONALES . . . . . . . . . . . . . . . . . 14
INTRODUCCIÓN . . . . . . . . . . . . . . . . . . . . . . . . . . . . . . . . . . . . 16
PIEZAS Y ENSAMBLAJE . . . . . . . . . . . . . . . . . . . . . . . . . . . . . . . 17
CÓMO FUNCIONA . . . . . . . . . . . . . . . . . . . . . . . . . . . . . . . . . . 19
CONSEJOS ÚTILES . . . . . . . . . . . . . . . . . . . . . . . . . . . . . . . . . . 21
LIMPIEZA Y MANTENIMIENTO . . . . . . . . . . . . . . . . . . . . . . . . . . . 22
RECETAS . . . . . . . . . . . . . . . . . . . . . . . . . . . . . . . . . . . . . . . . . 22
DEVOLUCIONES Y GARANTÍA . . . . . . . . . . . . . . . . . . . . . . . . . . . 23
SEGURIDAD
Visite www.nostalgiaproducts.com/user-manuals/ para ver el manual más actualizado.
Su seguridad y la de otras personas es muy importante.
Hemos dado muchos mensajes de seguridad importantes en este manual y
en el aparato. Siempre lea y obedezca todos los mensajes de seguridad.
Este es el símbolo de alerta de seguridad.
Este símbolo le avisa de los peligros potenciales que
pueden provocar serias lesiones a usted y a otros.
Todos los mensajes de seguridad estarán antecedidos por el símbolo de alerta.
Todos los mensajes de seguridad le indicarán cuál es el peligro potencial, cómo
reducir la posibilidad de lesiones, y qué puede suceder si no sigue las instrucciones.
Page 16

14
ESPAÑOL
14
PROTECCIONES IMPORTANTES
Una persona que no haya leído y comprendido todas las instrucciones
de uso y seguridad no está calicada para utilizar este aparato. Todos
los usuarios de este dispositivo deben leer y comprender este Manual
de instrucciones antes de utilizar o limpiar este aparato.
1. Lea todas las instrucciones antes de utilizar este aparato.
2. NO TOQUE las supercies calientes. Use agarraderas o mangos.
3. Este aparato NO ES UN JUGUETE.
4. Manténgalo fuera del alcance de los niños.
5. Sin supervisión los niños y las personas con discapacidad
intelectualnunca deben usar este aparato.
6. Es necesaria una supervisión estricta cuando los niños utilicen
el aparato o cuando se encuentren a su alrededor.
7. No haga funcionar la unidad si están faltando piezas o si están rotas.
8. El fabricante no recomienda el uso de otros aditamentos o accesorios diferentes a los
proporcionados por el fabricante. El uso de accesorios puede provocar lesiones.
9. NO utilice el aparato para otro uso que no sea el cual para el que está destinado.
10. NO lo utilice en exteriores. ÚNICAMENTE PARA USO INTERIOR.
11. NO lo coloque sobre o cerca de una hornilla eléctrica o gas caliente, o en un horno caliente.
12. NO coloque ninguna pieza de este aparato en un lavavajillas.
PROTECCIONES IMPORTANTES ADICIONALES
Precauciones de seguridad operativa
1. Este aparato está destinado a ser usado por adultos responsables
con edad legal para el consumo de alcohol.
2. Nunca coloque el aparato bajo la luz directa del sol, y evite toda otra fuente de calor.
3. Para asegurar una ventilación apropiada, este aparato no debe empotrarse o integrarse
en un gabinete cerrado. Sólo está diseñado para un montaje independiente.
4. NO utilice el aparato en presencia de vapores explosivos.
Gas CO2 (dióxido de carbono)
1. NO retire el cartucho de CO2 de la unidad hasta que el
cartucho de CO2 esté completamente vacío
2. Siempre mantenga los cartuchos de CO2 lejos del calor. Almacene los cartuchos
adicionales en un lugar fresco y seco (preferiblemente a 70°F/20°C).
3. NO use el cartucho de CO2 si la temperatura de la sala es superior a 120°F (49°C).
No hacerlo puede resultar en una explosión o causar lesiones. El gas CO2 que
se escapa puede causar congelamiento si entra en contacto con la piel.
4. ¡El gas de CO2 puede ser peligroso! Los cartuchos de CO2 contienen gas comprimido de
alta presión, que pueden ser peligrosos si no se manejan adecuadamente. Asegúrese de
Page 17

15
ESPAÑOL
15
leer y comprender todos los procedimientos del cilindro de CO2 antes de la instalación.
5. Nunca debe conectar el cartucho de CO2 directamente al barril de cerveza.
6. Siempre siga los procedimientos correctos al cambiar el cilindro de CO2.
7. SIEMPRE ventile y abandone la zona inmediatamente si se ha producido una fuga de CO2.
8. Nunca deje caer o tire el cartucho de CO2.
9. Nunca intente recargar un cartucho de CO2.
¡GUARDE ESTAS INSTRUCCIONES!
Page 18

16
ESPAÑOL
16
INTRODUCCIÓN
¡Felicitaciones! ¡Usted es ahora el orgulloso propietario de su propio BARRIL DE
CERVEZA HOMECRAFT™ de Nostalgia™! Este barril de 64 oz. viene con una tapa a
rosca y está asilado por vacío con paredes dobles para manter fría la cerveza, libre de
derrames, donde sea que lo lleven sus aventuras. El mango lateral facilita el transporte,
llenado y vertido, al tiempo que el regulador de conexión rápida se conecta y extraer
fácilmente sin perder la carbonación. Equipada con un sistema con cartucho de CO2,
esta unidad mantendrá su cerveza fresca por hasta 30 días para calmar la sed.
• Capacidad de 64 oz. (2 L)
• Regulador de conexión rápida que se coloca y libera fácilmente,
al tiempo que mantiene la carbonación
• Indicador de presión (0-60 PSI)
• Aislamiento por vacío de doble pared para mantener frías las bebidas por hasta 24 horas
• El sistema simple de dispensado con canilla manual está
activado por resorte para un vertido sencillo
• Tapa del barril con doble anillo de silicona para segurar que el barril se selle y no se derrame
• El mango lateral conveniente permite un transporte, recarga y vertido sencillos
• Compatible con cartuchos de CO2 o N2 roscados de 16
g con grado de alimentos (3 incluidos)
• El acero inoxidable con grado de alimentos es ligero y muy durable
Page 19

17
ESPAÑOL
17
PIEZAS Y ENSAMBLAJE
PIEZAS
Indicador
de presión
Regulador de
presión
Cartuchos
roscados de 16 g
de CO2 (3)
Grifo de la llave
Mango de
transporte
Tambor
Mango de la
canilla
Válvula de
alivio de presión
(PRV)
Tapa del
tambor
Regulador de
conexión rápida
Tapa del dispensador
Page 20

18
ESPAÑOL
18
ENSAMBLAJE BÁSICO
2
Levante el cuello enla parte inferior del regulador
(como se muestra) y luego baje y presione sobre
el receptor. Libere el cuello para completar
la conexión. Suavemente tire del regulador
para vericar que la conexión esté rme.
cuello
receptor
Regulador
3
Si el mango de la llave no está conectado,
atornille el mango de la llave en sentido
horario en el grifo de la llave.
Mango de
la llave
1
Ajuste la tapa del dispensador o la tapa del barril
en la boca del barril girando en sentido horario.
Tapa del dispensador
Page 21

19
ESPAÑOL
19
CÓMO FUNCIONA
LLENADO DEL TAMBOR
1. Siga las indicaciones según la sección de LIMPIEZA Y MANTENIMIENTO
para limpiar boen el tambor antes de llenarlo.
2. El tambor se puede llenar en su cervecería artesanal local
favorita, o con su propia cerveza casera.
3. Al llenar de una llave, recomendamos usar un tubo descendente para
llenar elt ambor de abajo hacia arriba. Esto reducirá la formación de
espuma y minimizará el contacto entre la cerveza y el oxígeno.
4. Llene el tambor hasta que la cerveza llegue a la línea de llenado "64 OZ" marcada en el
exterior del tambor.
NOTA: Puede formarse cierta espuma en la parte superior de la cerveza, y es correcto.
DISPENSADO DEL TAMBOR
1. Verique que el indicador de presión esté en la posición de APAGADO
girando el indicador por completo en sentido antihorario.
2. Atornille de forma rápida y suave el extremo roscado del cartucho de CO2 en el regulador.
NOTA: Cuando se ha perforado el cartucho de CO2, escuchará una breve explosión por el
escape de CO2 del cartucho.
Cartucho roscado
de CO2 de 16 g
Regulador de
conexión rápida
3. Libere la presión en el tambor tirando de la válvula de alivio de presión hacia arriba.
4. Agregue CO2 al tambor girando lentamente el indicador de presión ensentido horario.
Cuando escuche que el CO2 comienza a uir, deténgase para comprobar la PSI en el
indicador de presión. Para obtener mejores resultados, siga este cuadro para elegir la mejor
PSI para su cerveza.
Estilo de cerveza PSI recomendada*
Cerveza Negra
Cerveza Porter
Cervezas Cremosas
Vinos Barley
3-6 PSI
Cervezas Marrones
Cervezas ÁMbar
Cervezas Rojas
5-10 PSI
Ipa
Cervezas Pálidas
Cervezas Batidas
Otras Cervezas
7-12 PSI
Lager
Pilsner
12-15 PSI
* Recuerde que esta es tan
solo una guía y siempre
puede experimentar para
ajustarse a su propio gusto.
Page 22

20
ESPAÑOL
20
5. Si la PSI es mayor de lo que desea, gire el indicador de presión a la posición
de apagado, luego tire d ela válvula de alivio de presión para liberar todo el
CO2 del tambor. Agregue CO2 al tambor nuevamente girando el indicador
de presión en sentido horario hasta alcanzar su PSI deseado.
6. Cuando el indicador de presión se ajusta a su PSI deseada, ¡es hora de servir una cerveza!
CÓMO SERVIR CERVEZA ARTESANAL
1. Comience con un vaso limpio.
2. Sostenga el vaso en un ángulo de 45° a 1 pulgada por debajo del grifo de la llave.
3. Mueva el mango de la llave hacia adelante para abrir por completo el ujo de cerveza.
4. Continúe sosteniendo el vaso a 45° y permita que la cerveza uya
por el lado dle vaso hasta que el vaso esté medio lleno.
5. Una vez que el vaso está medio lleno, continúe sirviendo mientras inclina
suavemente el vaso verticalmente y sirve en el centro del vaso. Idealmente,
esto creará una supercie de 1 pulgada de espuma al terminar de servir.
6. Mueva rápidamente el mango de la llave nuevamente a la posición vertical original.
NOTA: Si la cerveza forma más espuma de la esperada, deje asentar la cerveza hasta
que la espuma baje, y luego termine de servir. Esto impide el desperdicio de cerveza.
7. Si la cerveza no tiene suciente espuma de su agrado, aumente lentamente la presión de
CO2 hasta la PSI deseada. NO aumente la presión de CO2 demasiado rápido o su cerveza
puede dispensarse demasiado rápido y con demasiada espuma.
SUGERENCIA PROFESIONAL:
Cuando el regulador está abierto, el CO2 continuará
uyendo en el barril. Esto puede resultar en un excesoi de presión que uye hacia
el barril, y puede causar cerveza con mucha espuma. Si experimenta cerveza con
mucha espuma, simplemente llene el barril con CO2, luego gire el indicador de
presión en sentido antihorario a la posición de APAGADO. A medida que se dispensa
más cerveza, agregue peqeuñas cantidades de CO2 en el barril para desplazar la
cerveza dispensada, luego gire el indicador de presión nuevamente a APAGADO.
8. ¡Finalmente, beba y disfrute!
REEMPLAZO DE LOS CARTUCHOS DE CO2
1. Cuando el cartucho de CO2 se ha agotado, es hora de reemplazarlo por uno nuevo.
2. Verique que el indicador de presión esté en la posición de APAGADO, tire de la válvula de
alivio de presión, luego extraiga el cartucho de CO2 girando en sentido antihorario.
SUGERENCIA PROFESIONAL: If your hands are sensitive to cold, avoid touching the old
CO2 Cartridge with your skin. You may want to use a cloth to remove the old cartridge.
PRECAUCIÓN: Asegúrese de que el extremo roscado del cartucho de CO2 no apunte
hacia usted antes de extraerlo. ¡El gas CO2 restante que escapa de la salida del
regulador es muy frío! Mantenga las manos y el cuerpo alejados de la descarga.
3. Atornille de forma rápida y suave el extremo roscado del nuevo cartucho de CO2 en el
regulador.
NOTA: Cuando se ha perforado el cartucho de CO2, escuchará una
breve explosión por el escape de CO2 del cartucho.
Page 23

21
ESPAÑOL
21
CONSEJOS ÚTILES
Cómo servir cerveza artesanal
1. Start with a clean glass.
2. Sostenga el vaso en un ángulo de 45° a 1 pulgada por debajo del grifo de la llave.
3. Mueva el mango de la llave hacia adelante para abrir por completo el ujo de cerveza.
4. Continúe sosteniendo el vaso a 45° y permita que la cerveza uya
por el lado dle vaso hasta que el vaso esté medio lleno.
5. Una vez que el vaso está medio lleno, continúe sirviendo mientras inclina
suavemente el vaso verticalmente y sirve en el centro del vaso. Idealmente,
esto creará una supercie de 1" de espuma al terminar de servir.
6. Mueva rápidamente el mango de la llave nuevamente a la posición vertical original.
NOTA: Si la cerveza forma más espuma de la esperada, deje asentar la cerveza hasta
que la espuma baje, y luego termine de servir. Esto impide el desperdicio de cerveza.
Prevenga la cerveza espumosa
• Enfríe la cerveza. La cerveza caliente tiene una mayor probabilidad de
formar espuma. Deje enfriar la cerveza en el refrigerador por varias horas
antes de consumirla. La temperatura recomendada es de 37 °F
• Sirva con un vaso limpio. Los residuos en un vaso sucio pueden
interferir con el servido y el sabor de su cerveza. Siga las direcciones
para Servir cerveza artesanal para perfeccionar su bebida.
• Reduzca la presión de CO2.
• No agite ni empuje el tambor. Demasiada agitación del tambor
puede crear cerveza espumosa. Si el tambor se agita o empuja, deje
reposar y asentar por alrededor de una hora antes de servir.
• La cerveza espumosa también puede ser ocasionada por un sello o una conexión
defectuosa entre el barril y la unidad principal. Asegúrese de que todas las
conexiones estén rmes, bien ajustadas y colocadas correctamente.
Perilla reguladora de CO2
• Cuando el regulador está abierto, el CO2 continuará uyendo en el barril. Esto puede
resultar en un excesoi de presión que uye hacia el barril, y puede causar cerveza con
mucha espuma. Si experimenta cerveza con mucha espuma, simplemente llene el barril
con CO2, luego gire la perilla reguladora a la posición de APAGADO. A medida que se
dispensa más cerveza, agregue peqeuñas cantidades de CO2 en el barril para desplazar
la cerveza dispensada, luego gire la perilla reguladora nuevamente a APAGADO.
Almacenamiento
• Si bien su tambor tiene pared doble y aislamiento por vacío para garantizar que su bebida
se mantenga fría por hasta 24 horas, también puede colocarse en el estante de la puerta
lateral de numerosos refrigeradores. Para ahorrar espacio en el refrigerador, retire el
regulador de conexión rápida y la llave del grifo antes de colocarlo en el refrigerador.
Page 24

22
ESPAÑOL
22
LIMPIEZA Y MANTENIMIENTO
NO use jabón ni coloque el tambor en el lavavajillas. El resto residual de
jabón puede adherirse al recipiente y dejar un sabor desagradable.
DESPUÉS DE CADA USO:
1. Retire la tapa del tambor o la tapa del dispensador, luego vierta
la cerveza restante (no debería quedar mucha).
2. Llene el tambor hasta la mitad con agua de la canilla tibia.
3. Coloque la palma de la mano sobre la boca del tambor, luego sacúdalo.
Tenga cuidado de no salpicar agua por la boca del tambor.
4. Repita este procedimiento dos veces más.
5. Luego, desatornille el tubo de silicona de la parte inferior de la
tapa del dispensador girando en sentido horario.
6. Llene el tambor una vez más con agua tibia, luego atornille la tapa del
dispensador (menos el tubo de silicona) nuevamente en el tambor.
7. Dispense el agua tibia por la llave del grifo:
» Si tiene CO2 restante en el cartucho de CO2, use el CO2 para dispensar el agua tibia.
Simplemente abra la llave del grifo y el agua saldrá hasta que presión caiga a cero.
» Si no queda presión para dispensar el agua, retire el regulador de
conexión rápida y luego simplemente invierta el tambor y abra la llave
del grifo para permitir que el agua salga por la llave del grifo.
8. Retire la tapa del dispensador y vierta el agua restante.
9. Enjuague y drene el agua tibia por la llave del grifo otras dos veces.
10. sumerja la tapa del dispensador (menor el regulador de conexión
rápida), la tapa del tambor y el tubo de silicona en agua tibia.
11. Drene el tambor invertido hasta que esté completamente seco. Permita que
las partes adicionales se sequen por completo antes de reensamblar.
LIMPIEZA PROFUNDA:
1. Si el tambor tiene olores desagradables o extraños, llene el tambor hasta
la mitad con agua caliente y agregue 1 cucharada de bicarbonato.
2. Atornille la tapa del dispensador en el tambor, luego agite vigorosamente por 30 segundos.
3. Dispense la solución de bicarbonato/agua por la llave del grifo:
» Si tiene CO2 restante en el cartucho de CO2, use el CO2 para dispensar la solución.
Simplemente abra la llave del grifo y la solución saldrá hasta que presión caiga a cero.
» Si no queda presión para dispensar la solución, retire el regulador de
conexión rápida y luego simplemente invierta el tambor y abra la llave
del grifo para permitir que la solución salga por la llave del grifo.
4. Siga estos pasos otras dos veces, una vez con agua caliente y otra vez con agua fría.
Asegúrese de agitar cada ciclo de enjuague para eliminar todos los restos de bicarbonato.
5. Drene el tambor invertido hasta que esté completamente seco.
RECETAS
La cerveza artesanal no necesita ser lo único que sirva del TAMBOR DE CERVEZA. ¡Pruebe su
gaseosa favorita o mezcle y sirva sus cocteles favoritos! ¡Diviértase y manténgase sediento!
Page 25

23
ESPAÑOL
23
DEVOLUCIONES Y GARANTÍA
SI LA UNIDAD NO FUNCIONA O ESTÁ DAÑADA AL SACARLA POR PRIMERA VEZ
DE LA CAJA, DEVUÉLVALA AL LUGAR DE COMPRA INMEDIATAMENTE.
TAMBOR DE CERVEZA HOMECRAFT™ / CBG64
Si tiene preguntas, contacte con nosotros por correo electrónico o por el número
telefónico de servicio al cliente que aparece a continuación en el horario de
8:00 AM a 5:00 PM, de lunes a viernes, Hora Estándar del Este.
Distribuida por:
Nostalgia Products LLC
1471 Partnership Dr.
Green Bay, WI 54304-5685
Servicio al cliente
Teléfono: (920) 347-9122
Web: www.nostalgiaproducts.com
Solicitud de servicio al cliente
Para enviar una solicitud al Servicio al Cliente, vaya a www.nostalgiaproducts.com, llene
el formulario de Solicitud de Servicio al Cliente y haga clic en el botón Enviar.
Un representante le contactará tan pronto como sea posible.
Términos de garantía del producto
Po este medio, Nostalgia Products LLC (la “Compañía”) garantiza que por un período de un (1) año a
partir de la fecha de compra original, este producto estará sin defectos en cuanto a materiales y mano
de obra en uso normal en casa, siempre que el producto se maneje y mantenga de acuerdo con las
instrucciones de manejo. Como único y exclusivo remedio en virtud de esta garantía, la Compañía, a
su discreción, podrá optar por reparar o sustituir el producto que se encuentre defectuoso, o emitir un
reembolso por el producto durante el período de garantía. Esta garantía sólo está disponible para el
comprador original minorista del producto a partir de la fecha inicial de compra al por menor, y sólo es
válida con el recibo de compra original, y como prueba de la fecha de compra, es necesario obtener los
benecios de la garantía. Todos los reclamos de garantía deben hacerse a la atención de la Compañía
dentro del período de garantía y no más tarde que 30 días desde la imposibilidad de realizarlo. Esta
garantía no cubre el desgaste normal o daños ocasionados por el embarque, malos manejos, mal uso,
accidentes, alteración, piezas de cambio incorrectas, o algo distinto al uso doméstico normal. Es posible
que deba devolver el producto (con los gastos de envío pagados por usted) para inspección y evaluación.
Los costos de envío no son reembolsables. La empresa no se hace responsable por devoluciones
dañadas o perdidas en tránsito. A menos que se indique lo contrario especícamente permitido por
las instrucciones de manejo, esta garantía sólo se aplica al uso en interiores de las viviendas. Para
realizar una reparación bajo esta garantía, comuníquese con la Compañía mediante el número de
teléfono indicado anteriormente o al llenar el formulario de consulta para el servicio de Atención al
Cliente en www.nostalgiaproduct s.com. El período de garantía sólo es válido en EE.UU. y Canadá.
Esta garantía está en lugar de cualquier otra garantía, expresa o implícita, incluso las garantías de
comerciabilidad y conveniencia para un propósito en particular, que quedan excluidas en la medida
permitida por la ley. En ningún caso la compañía será responsable de cualquier daño indirecto, incidental,
consecuente, especial o daños que surjan o estén relacionados con este producto o la utilización del
mismo. Algunos estados, provincias o corregimientos no permiten la exclusión o la limitación de daños
incidentales o consecuentes, por lo que la exclusión o la limitación anterior quizás no se aplique a usted.
Esta garantía no se aplica a mercancía reelaborada.
Lea las instrucciones de manejo cuidadosamente. El incumplimiento
de las instrucciones de manejo anulará esta garantía.
Para obtener más información, visítenos en línea en www.nostalgiaproducts.com.
Me Gusta en Facebook en www.facebook.com / NostalgiaElectrics.
Siga nuestros consejos sobre Pinterest en www.pinterest.com / nostalgiaelctrx.
Tweet con nosotros en Twitter en www.twitter.com / NostalgiaElctrx.
Page 26

24
FRANÇAIS
24
Faire que chaque jour soit une fête !
Visitez le www.nostalgiaproducts.com
pour plus de produits amusants.
CONTENTS
SÉCURITÉ . . . . . . . . . . . . . . . . . . . . . . . . . . . . . . . . . . . . . . . . 24
PRÉCAUTIONS IMPORTANTES . . . . . . . . . . . . . . . . . . . . . . . . . . . 25
PRÉCAUTIONS IMPORTANTES ADDITIONNELLES . . . . . . . . . . . . . . . 25
INTRODUCTION . . . . . . . . . . . . . . . . . . . . . . . . . . . . . . . . . . . . 27
PIÈCES ET ASSEMBLAGE . . . . . . . . . . . . . . . . . . . . . . . . . . . . . . . 28
COMMENT FAIRE FONCTIONNER . . . . . . . . . . . . . . . . . . . . . . . . . 30
CONSEILS UTILES . . . . . . . . . . . . . . . . . . . . . . . . . . . . . . . . . . . 32
NETTOYAGE ET ENTRETIEN . . . . . . . . . . . . . . . . . . . . . . . . . . . . . 33
RECETTES . . . . . . . . . . . . . . . . . . . . . . . . . . . . . . . . . . . . . . . . 33
RETOURS ET GARANTIE . . . . . . . . . . . . . . . . . . . . . . . . . . . . . . . 34
SÉCURITÉ
Se reporter au site www.nostalgiaproducts.com/user-manuals/
pour la version la plus récente.
Votre sécurité est très importante, ainsi que celle des autres.
Nous avons fourni de nombreux messages de sécurité importants dans ce manuel
et sur votre appareil. Toujours lire et respecter les consignes de sécurité.
Ceci est le symbole d'alerte de sécurité.
Ce symbole vous signale les dangers potentiels qui peuvent
causer des blessures graves pour vous et les autres.
Tous les messages de sécurité suivront le symbole d'alerte de sécurité.
Tous les messages de sécurité vous diront quel est le danger potentiel
et vous diront comment réduire le risque de blessure et vous diront
ce qui peut arriver si les instructions ne sont pas suivies.
Page 27

25
FRANÇAIS
25
PRÉCAUTIONS IMPORTANTES
Une personne qui n'a pas lu et compris toutes les instructions de
fonctionnement et de sécurité n'est pas qualiée pour faire fonctionner cet
appareil. Tous les utilisateurs de cet appareil doivent lire et comprendre
ce mode d'emploi avant d'utiliser ou de nettoyer cet appareil.
1. Lisez toutes les instructions avant d'utiliser cet appareil.
2. NE TOUCHEZ PAS aux surfaces chaudes. Utiliser les poignées ou les cadrans.
3. Cet appareil N'EST PAS UN JOUET.
4. Ne pas laisser à la portée des enfants.
5. Les jeunes enfants non supervisés ainsi que les personnes intellectuellement
atteintes ne doivent jamais faire fonctionner cet appareil.
6. Une surveillance étroite est nécessaire lorsque tout appareil
est utilisé par ou à proximité des enfants.
7. Ne pas utiliser cet unité lorsque les pièces sont manquantes ou brisées.
8. Le fabricant ne recommande pas l’utilisation d’accessoires autres que ceux
fournis par le fabricant. L'utilisation d’accessoires peut causer des blessures.
9. N'employez PAS l'appareil pour une autre utilisation
que celle pour laquelle elle à été conçue.
10. NE PAS utiliser l'appareil à l'extérieur. UNIQUEMENT POUR USAGE DOMESTIQUE.
11. NA PAS placer sur ou près d'un brûleur à gaz ou électrique ou dans un four chaué.
12. NE PAS mettre aucunes des pièces de cet appareil au lave-vaisselle.
PRÉCAUTIONS IMPORTANTES ADDITIONNEL
Précautions pour un fonctionnement sécuritaire
1. This appliance is designed for use by responsible adults of legal drinking age.
2. Ne jamais placer l’appareil en plein soleil et éviter toutes autres sources de chaleur.
3. Pour assurer une bonne aération, cet appareil ne doit être encastré ou construit
dans un meuble fermé. Il est conçu pour montage autoportant seulement.
4. N’utilisez pas votre appareil en présence de vapeurs explosives.
CO2 (dioxyde de carbone) gaz
1. NE PAS retirer la cartouche de CO2 de l’appareil jusqu’à ce la
cartouche de CO2 ne soit complètement vide.
2. Gardez toujours les cartouches de CO2 loin des sources de chaleur. Entreposez les
cartouches supplémentaires dans un endroit frais et sec (de préférence à 70° F / 20° C).
3. NE PAS utiliser la cartouche CO2 si la température ambiante est supérieure à 120° F (49°
C). Faute de quoi cela pourrait entraîner des blessures voire une explosion. Les gaz CO2
s'échappant peuvent causer des engelures si ceux-ci entrent en contact avec la peau.
4. Les gaz CO2 peuvent être dangereux ! Les cartouches de CO2 peuvent contenir des
gaz sous haute-pression suite à une mauvaise manipulation. Assurez-vous de bien
Page 28

26
FRANÇAIS
26
comprendre toutes les procédures des cartouches de CO2 avant l'installation.
5. Ne jamais brancher la cartouche de CO2 directement dans le baril de bière.
6. Toujours suivre les procédures correctement pour changer les cartouches de CO2.
7. TOUJOURS aérer et quitter la zone immédiatement si une fuite de CO2 a eu lieu.
8. Ne jamais échapper ni lancer les cartouches de CO2.
9. Ne jamais essayer de recharger une cartouche de CO2.
CONSERVEZ CES INSTRUCTIONS !
Page 29

27
FRANÇAIS
27
INTRODUCTION
Félicitations ! Vous êtes maintenant l’heureux propriétaire de votre propre CRUCHE
DE BIÈRE HOMECRAFT™ NostalgiaTM ! Cette cruche de 1,89 L comprend un bouchon
à vis et une paroi double à isolation sous-vide pour garder votre bière froide et sans
déversement peu importe où vous allez. La poignée du côté la rend facile à porter, remplir
et déverser, tandis que le régulateur de raccordement s’attache et s’enlève rapidement
tout en conservant une carbonisation constante. Équipé d’un système à cartouches
de CO2, ce système conservera vos bières fraîches jusqu'à 30 jours désaltérant.
• Capacité 1,89 L
• Régulateur de raccordement facile s'attache et s'enlève rapidement
tout en conservant une carbonisation constante
• Manomètre (0-60 lb/po2)
• Paroi double isolante sous vide an de garder les boissons froides jusqu’à 24 heures
• Distribution à onglet simple à ressort pour un versement facile
• Le bouchon de la cruche a de double anneaux silicone pour assurer
que la cruche demeure scellé et sans déversement
• Une poignée latérale permet de transporter, remplir et verser facilement
• Compatible avec des cartouches de CO2 ou de N2 letées
de 16 g de qualité alimentaire (3 incluses)
• Acier inoxydable de qualité alimentaire est léger et très durable
Page 30

28
FRANÇAIS
28
PIÈCES ET ASSEMBLAGE
PIÈCES
Pression
Cadran
Pression
Manomètre
Fileté 16 g CO2
Cartouches (3)
Robinet
Transport
Poignée
Cruche
Robinet
Poignée
Décharge de pression
Vanne (PRV)
Bouchon de
cruche
Raccordement
facile Régulateur
Bouchon de
distribution
Page 31

29
FRANÇAIS
29
ASSEMBLAGE DE BASE
2
Soulevez le collet au bas du régulateur
(tel qu’illustré), puis baissez et appuyez
sur le récepteur. Lâchez le collet pour
compléter la connection. Tirez doucement
vers le haut sur le régulateur pour assurer
que la connection est sécure.
collet
récepteur
Régulateur
3
Si la poignée du robinet n’est pas déjà
attachée, visez la poignée du robinet
du sens horaire sur le robinet.
Poignée à fût
1
Attachez le bouchon de distribution ou
le bouchon de la cruche à la bouche de la
cruche en visant du sens contre horaire.
Bouchon de
distribution
Page 32

30
FRANÇAIS
30
COMMENT FAIRE FONCTIONNER
REMPLIR LA CRUCHE
1. Suivez les instructions sous la rubrique NETTOYAGE ET ENTRETIEN
pour complètement nettoyer votre cruche avant de la remplir.
2. Votre cruche peut être remplie à votre brasserie artisanale
préférée ou avec votre bière maison.
3. Lorsque vous remplissez d’un robinet, nous recommandons d’utiliser
un tube pour remplir la cruche du bas vers le haut. Cela réduira la
mousse et minimise le contact entre la bière et l’oxygène.
4. Remplissez la cruche jusqu’à ce que la bière atteigne la ligne de « 1,89 L » indiquée sur
l’extérieur de la cruche.
REMARQUE : Il se peut qu’il y aille de la mousse sur le haut de la bière et c’est bien.
DISTRIBUER DE LA CRUCHE
1. Assurez que le cadran de pression est en position ÉTEINTE et
tournant le cadran jusqu’au bout du sens contre horaire.
2. Visez rapidement et lissement le bout leté de la cartouche CO2 dans le régulateur.
REMARQUE : Lorsque la cartouche de CO2 a été percée, vous devriez entendre une courte
fuite de gaz CO2 s'échapper de la cartouche.
Fileté 16 g
Cartouche de CO2
Raccordement facile
Régulateur
3. Faites échappez aucune pression dans la cruche et tirant vers
le haut sur la vanne de relâchement de pression.
4. Ajoutez le CO2 à la cruche et tournant lentement le cadran de pression du sens horaire.
Quand vous entendez le CO2 commencer à fuire, arrêtez et vériez la livre par pouce carré
sur le manomètre. Pour le meilleur résultat, suivez ce tableau pour choisir la meilleure livre
par pouce carré de votre bière.
Style de bière Recommandation de
livre par pouce carré*
Stouts
Porters
Cream Ales
Vins à l'orge
3-6 lb/po2
Ales brunes
Ambers
Rouges
5-10 lb/po2
IPAs
Ales pâles
Bières de blé
Autres ales
7-12 lb/po2
Lagers
Pilsners
12-15 lb/po2
* Gardez en tête que c’est
seulement un guide et vous
pouvez toujours expérimenter
pour votre propre goût !
Page 33

31
FRANÇAIS
31
5. Si la livre par pouce carrée est plus haute que vous le voulez, tournez le cadran de pression à
la position ÉTTEINTE, puis tirez la vanne de relâchement de pression pour laisser sortir tout
le CO2 de la cruche. Ajoutez le CO2 à la cruche de nouveau et tournant lentement le cadran
de pression du sens horaire jusqu’à ce que la livre par pouce carrée désirée soit atteinte.
6. Quand le cadran de pression est xé à la livre par pouce
carré, c’est le temps de verser votre bière !
VERSER LA BIÈRE EN FÛT
1. Commencez avec un verre propre.
2. Tenir le verre à un angle de 45°environ 1 pouce sous le robinet de la bière en fût.
3. Tirez sur la poignée en fût pour ouvrir complètement le débit de bière.
4. Maintenez toujours le verre à 45° et laissez la bière s’écouler sur la paroi
du côté du verre jusqu’à ce que celui-ci soit environ à moitié plein.
5. Une fois que le verre est à moitié plein, continuez de verser doucement la bière
tout en diminuant l'inclinaison du verre à une position debout puis verser
le reste dans le centre du verre. Idéalement, cela créera environ 1 pouce de
tête de mousse lorsque vous aurez terminé de verser la bière en fût.
6. Remettez rapidement la poignée du fût dans sa position initiale debout.
REMARQUE : Si vous cumulez plus de mousse dans la bière que prévu, laissez
la bière reposer quelques instants jusqu'à ce que la mousse soit inerte puis
nissez de verser la bière dans le verre. Cela empêche les déchets de bière.
7. Si la bière n’a pas assez de mousse selon vos préférences, augmentez légèrement la pression
de CO2 jusqu’à la livre par pouce carré désirée. N'augmentez PAS la pression de CO2 trop
rapidement car votre bière pourrait se verser trop rapidement et avec trop de mousse.
CONSEIL DE PRO :
Lorsque le régulateur est ouvert, le CO2 continuera de couler
dans le baril. Ceci pourrait occasionner un surplus de pression s'écoulant dans le
baril et pourrait causer un surplus de mousse dans la bière. Si vous éprouvez une
bière trop mousseuse, remplissez simplement baril de CO2, puis tournez le cadran
de pression du sens contre horaire à la position ÉTEINTE. Comme plus de bière
est versé, ajoutez de petites quantités de CO2 dans le baril pour déplacer la bière
déversée, puis tournez le cadran de pression à la position ÉTEINTE à nouveau.
8. Buvez-le et appréciez-le !
REMPLACER LES CARTOUCHES DE CO2
1. Quand la cartouche de CO2 est vidée de tout son CO2, c’est le temps de la remplacer.
2. Assurez que le cadran de pression est à la position ÉTTEINTE tirez la vanne de relâchement
de pression, puis enlevez la vieille cartouche de CO2 en tournant du sens contre horaire.
CONSEIL DE PRO : Si vos mains sont sensibles au froid, évitez de toucher la cartouche CO2
avec votre peau. Vous voudrez peut-être utiliser un chion pour enlever la vieille cartouche.
MISE EN GARDE : Assurez-vous que le bout leté de la cartouche CO2 n’est pas pointé
vers vous avant de l’enlever. Les restant de gaz CO2 qui s’échappent de la sortie du
régulateur est très froid ! Gardez vos mains et votre corps éloignés de la décharge.
3. Visez rapidement et lissement le bout leté de la nouvelle cartouche CO2 dans le régulateur.
REMARQUE : Lorsque la cartouche de CO2 a été percée, vous devriez
entendre une courte fuite de gaz CO2 s'échapper de la cartouche.
Page 34

32
FRANÇAIS
32
CONSEILS UTILES
Verser la bière en fût
1. Commencez avec un verre propre.
2. Tenir le verre à un angle de 45°environ 1 pouce sous le robinet de la bière en fût.
3. Tirez sur la poignée en fût pour ouvrir complètement le débit de bière.
4. Maintenez toujours le verre à 45° et laissez la bière s’écouler sur la paroi
du côté du verre jusqu'à ce que celui-ci soit à moitié plein.
5. Une fois que le verre est à moitié plein, continuez de verser doucement la bière
tout en diminuant l'inclinaison du verre à une position debout puis verser
le reste dans le centre du verre. Idéalement, cela créera environ 1 pouce de
tête de mousse lorsque vous aurez terminé de verser la bière en fût.
6. Remettez rapidement la poignée du fût dans sa position initiale debout.
REMARQUE : Si vous cumulez plus de mousse dans la bière que prévu, laissez
la bière reposer quelques instants jusqu'à ce que la mousse soit inerte puis
nissez de verser la bière dans le verre. Cela empêche les déchets de bière.
Éviter une bière trop mousseuse
• Refroidir la bière. Une bière chaude ou tablette est plus susceptible de causer une
bière mousseuse. Permettez à votre bière de refroidir dans le réfrigérateur pour
plusieurs heures avant de consommer. La température recommandée est de 37° F
• Versez dans un verre propre. Les résidus d'un verre malpropre pourraient
aecter le débit et le goût de votre bière. Suivez les indications sur Comment
verser de la bière en fût an de perfectionner votre déversement.
• Ajustez votre pression de CO2 à la baisse.
• Évitez de brasser ou agiter la cruche. Trop d’agitation de la cruche pourrait
faire verser trop de mousse. Si la cruche a été brassé ou agité, laissez la
cruche se reposer pour environ une heure avant de le verser.
• Une bière mousseuse peut également faire suite à des sceaux défectueux
entre le baril et l'appareil principal. Assurez-vous que toutes les
connexions soient sécurisées, bien serrés et bien placées.
Cadran régulateur de CO2
• Lorsque le régulateur est ouvert, le CO2 continuera de couler dans le baril. Ceci pourrait
occasionner un surplus de pression s'écoulant dans le baril et pourrait causer un surplus de
mousse dans la bière. Si vous éprouvez une bière trop mousseuse, remplissez simplement
baril de CO2, puis tournez le cadran du régulateur à la position ÉTEINTE. Comme plus
de bière est versé, ajoutez de petites quantités de CO2 dans le baril pour déplacer la
bière déversée, puis tournez le cadran du régulateur à la position ÉTEINTE à nouveau.
Entreposage
• Alors que la cruche a une double paroi a isolation sous vide pour assurer que
votre boisson demeure froide pour jusqu’à 24 heures, elle peut aussi tenir
facilement dans beaucoup de portes de réfrigérateurs. Pour sauver de l’espace
dans votre réfrigérateur, enlevez le régulateur de raccordement facile et la
poignée de robinet avant de placer la cruche dans votre réfrigérateur.
Page 35

33
FRANÇAIS
33
NETTOYAGE ET ENTRETIEN
NE PAS utiliser de savon ou mettre la cruche dans le lave-vaisselle. Le résidu
laissé par le savon peut s’attacher au vaisseau et laisser un mauvais goût.
APRÈS CHAQUE UTILISATION :
1. Enlevez le bouchon de la cruche ou le bouchon de distribution, pour
vider la bière qui reste (il ne devra pas y en avoir beaucoup).
2. Remplissez la cruche environ à moitié avec de l’eau du robinet tiède.
3. Placez la paume de votre main sur la bouche de la cruche, puis bien agiter.
Faites attention de ne pas agiter l’eau hors de la bouche de la cruche.
4. Répéter ceci deux fois.
5. Ensuite, dévisser le tube en silicone du bas du bouchon
de distribution en tournant du sens horaire.
6. Remplissez la cruche encore une fois d’eau tiède, et visser le bouchon de
distribution (sans le tube des silicone) de nouveau dans la cruche
7. Distribuez l’eau tiède par le robinet :
» Si vous avez encore du CO2 dans la cartouche de CO2, utilisez le CO2
pour distribuer l’eau tiède. Vous n’avez qu’a ouvrir la poignée du robinet
et l’eau sera distribuer jusqu’à ce que la pression diminue à zéro.
» S’il n’y a pas de pression qui reste pour distribuer l’eau, enlevez le régulateur
de raccordement facile, puis simplement tourner la cruche à l’envers et ouvrez
la poignée du robinet pour permettre à l’eau de couler dans le robinet.
8. Enlever le bouchon de distribution et vider l’eau qui reste.
9. Rinsez et videz l’eau tiède par le robinet deux autres fois.
10. Trempez le bouchon de distribution (sans le régulateur de raccordement
facile), le bouchon de la cruche et le tube de silicone dans de l’eau tiède.
11. Videz la cruche à l’envers jusqu’à ce qu’elle soit complètement sèche. Laisser
sécher complètement tous les pièces extra avant de les réassembler.
NETTOYAGE PROFOND :
1. Si votre cruche à une odeur étrange, remplissez votre cruche à la moitié avec
de l’eau chaude et ajoutez une cuillère à table de bicarbonate de soude.
2. Vissez le bouchon de distribution, puis agiter vigoureusement pour 30 secondes.
3. Distribuez la solution de bicarbonate de soude et d’eau par le robinet :
» Si vous avez encore du CO2 dans la cartouche de CO2, utilisez le CO2 pour
distribuer la solution. Vous n’avez qu’a ouvrir la poignée du robinet et la
solution sera distribuer jusqu’à ce que la pression diminue à zéro.
» S’il n’y a pas de pression qui reste pour distribuer la solution, enlevez le régulateur
de raccordement facile, puis simplement tourner la cruche à l’envers et ouvrez
la poignée du robinet pour permettre à la solution de couler dans le robinet.
4. Suivez ces étapes deux autres fois, une fois avec de l’eau chaude, puis
une fois avec de l’eau froide. Assurez vous d’agiter chaque cycle de
rinçage pour enlever tout le bicarbonate de soude qui reste.
5. Videz la cruche à l’envers jusqu’à ce qu’elle soit complètement sèche.
RECETTES
La bière artisanale n’a pas besoin d’être la seule chose que vous distribuez
dans votre CRUCHE DE BIÈRE. Essayez votre boisson gazeuse préférée ou
mélangez et distribuez vos cocktails préférés ! Amusez-vous et buvez !
Page 36

34
FRANÇAIS
34
RETOURS ET GARANTIE
SI VOTRE APPAREIL NE FONCTIONNE PAS OU S'IL EST ENDOMMAGÉ QUAND VOUS LE RETIREZ
DE LA BOÎTE, VEUILLEZ LE RETOURNER IMMÉDIATEMENT À L'ENDROIT OÙ IL A ÉTÉ ACHETÉ.
CRUCHE DE BIÈRE HOMEECRAFT™ / CBG64
Pour toute question, communiquer par courriel ou au numéro de téléphone du service à
la clientèle, entre 08 h 00 et 17 h 00, du lundi au vendredi, heure normale du Centre.
Distribué par :
Nostalgia Products LLC
1471 Partnership Dr.
Green Bay, WI 54304-5685
Service à la clientèle
Téléphone : (920) 347-9122
Site Web : www.nostalgiaproducts.com
Demande pour le service à la clientèle
Pour soumettre une demande au service à la clientèle, rendez vous au www.nostalgiaproducts.com puis
remplissez le formulaire de demande au service à la clientèle puis cliquez sur le bouton Soumettre.
Un représentant vous contactera dès que possible.
Conditions de garantie du produit
Le groupe Nostalgia Products LLC (référé tel « l’Entreprise ») garantit que pour une période d’un
(1) an en date d’achat, ce produit est sans défaut de matériel et de fabrication selon une utilisation
normale à domicile, seulement si le fonctionnement et l’entretien du produit sont conforment aux
directives fournies. À titre de réparation exclusive et entière sous cette garantie, l’Entreprise pourra
à sa discrétion, réparer ou remplacer le produit défectueux, voire émettre un remboursement du
produit durant la période couverte sous garantie. Cette garantie n’est disponible seulement qu’à
l’acheteur d’origine du produit, en date d’achat au détail dudit produit et sera valide uniquement
avec le reçu de caisse d’origine, à titre de preuve d’achat, lequel est requis pour obtenir les bienfaits
reliés à cette garantie. Toute réclamation doit être rapportée à l’attention de l’Entreprise dans la
fenêtre de la période de la garantie, sans dépasser 30 jours à défaut de performance. Cette garantie
ne couvre pas l’usure normale ou dommage cause par l'expédition, la mauvaise manipulation, la
mauvaise utilisation, les accidents, les modications, les mauvaises pièces de remplacement, voire
toute autre utilisation anormale du produit à domicile. Il est possible que vous ayez à retourner le
produit (avec les frais de retour prépayés par vous) pour une inspection et une évaluation. Les frais
des coûts de retour ne sont pas remboursables. L'Entreprise n’est aucunement responsable pour les
retours endommagés ou perdus en transit. Autrement que spéciquement permit selon les directives
de fonctionnement, cette garantie s’applique à une utilisation à domicile à d'intérieur seulement.
An d'obtenir un service couvert sous cette garantie, veuillez contacter l'Entreprise au numéro de
téléphone inclut ci-haut ou en remplissant le formulaire de demande au service à la clientele, sur le
site www.nostalgiaproducts.com. La garantie est valide seulement aux États-Unis et au Canada.
Cette garantie prévaut toute autre garantie, expresse ou implicite incluant les garanties de qualité
marchande ou ayant une aptitude pour une intention en particulier, lesquelles sont exclues selon la
loi. Sous aucun prétexte l’Entreprise ne pourra être tenue responsable pour tout dommage indirect,
accidentel, conséquentiel ou spécial provenant de ou en relativité avec ce produit ou son utilisation.
Certains états, provinces ou juridictions n'allouent pas l'exclusion ou la limitation de tels dommages
accidentels ou conséquentiels, donc l'exclusion ou limitation suscitée peut ne pas s'appliquer à vous.
Cette garantie ne s’applique pas à la merchandise de renaissance.
Veuillez lire les directives de fonctionnement attentivement. Ne pas se
conformer aux directives de fonctionnement annulera cette garantie.
Pour plus d’informations, visitez notre site Web à www.nostalgiaproducts.com.
Aimez-nous sur Facebook à l’adresse www.facebook.com / NostalgiaElectrics.
Suivez nos conseils sur Pinterest à www.pinterest.com / nostalgiaelctrx.
Tweet avec nous sur Twitter à l’adresse www.twitter.com / NostalgiaElctrx.
Page 37

 Loading...