

Page 1

All products are trademarks of Nostalgia Products LLC.
Worldwide design & utility patented or patents pending.
© 2016 Nostalgia Products LLC.
www.nostalgiaproducts.com
(rev. 07/26/16 NW)
Page 2
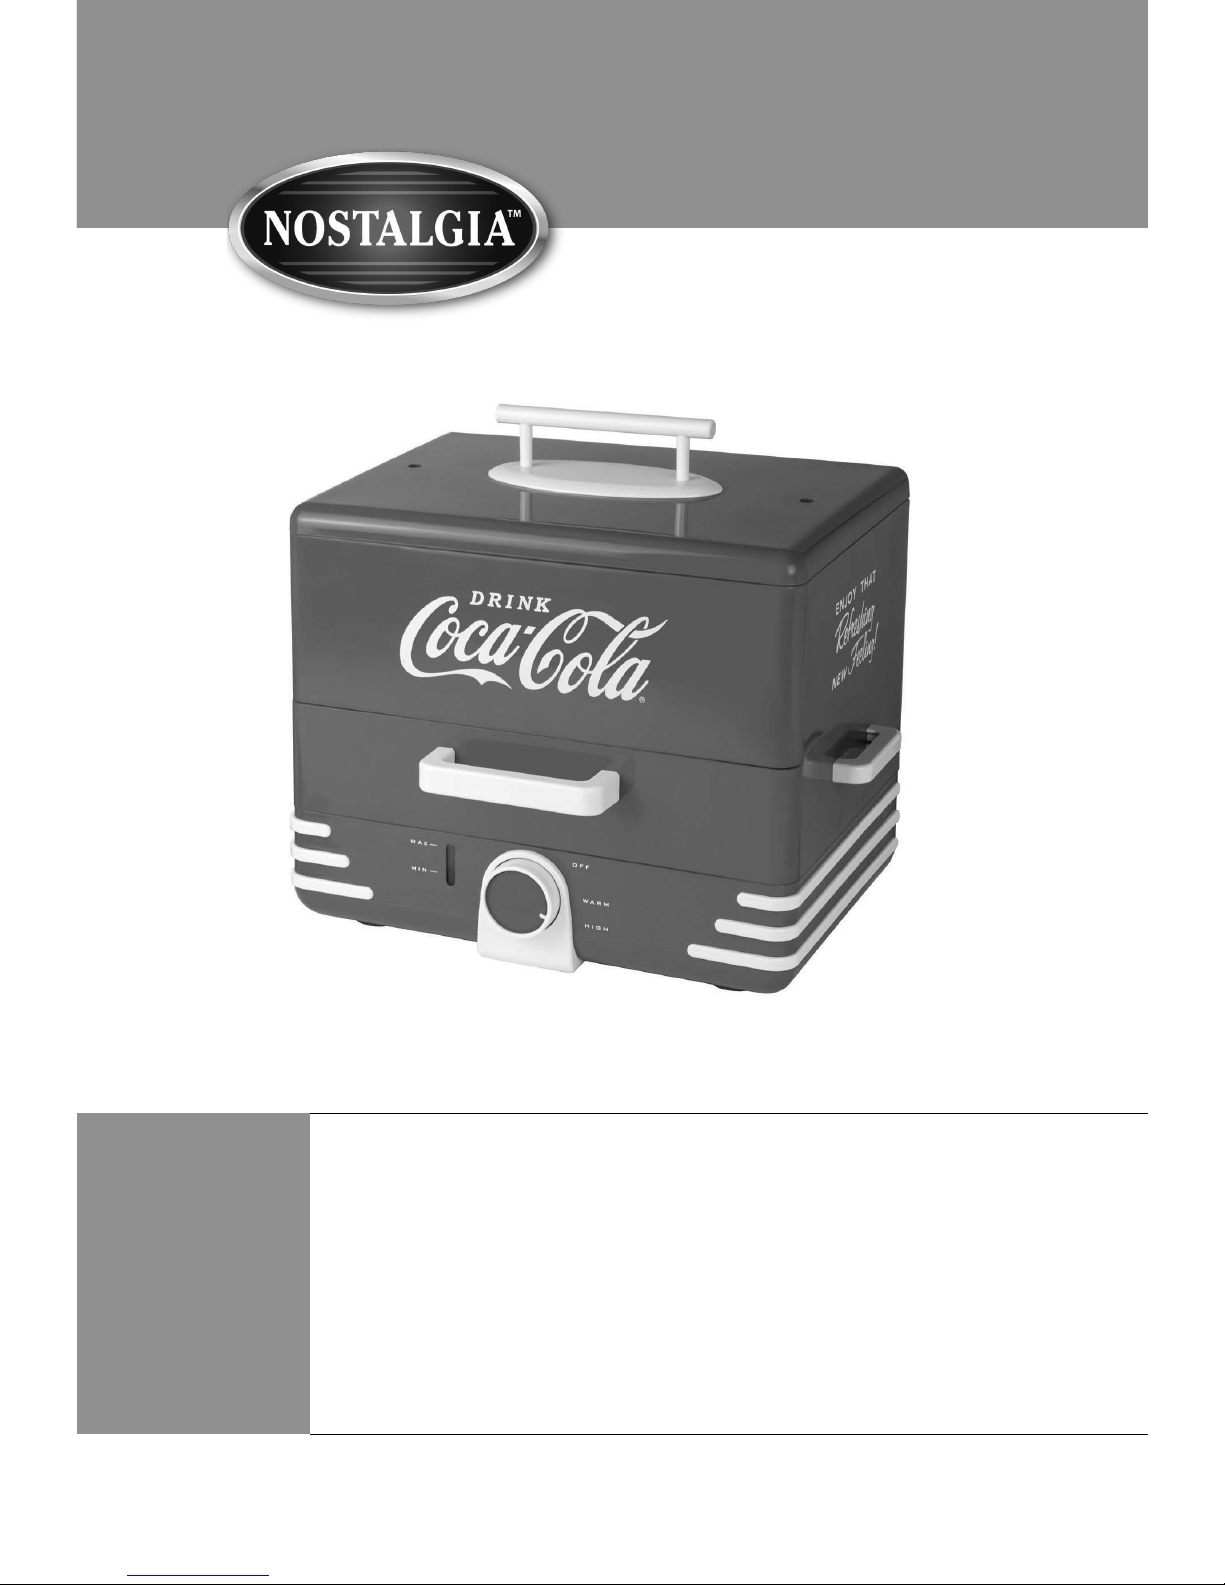
HDS248COKE
Coca-Cola® Hot Dog Steamer
Four à vapeur pour chiens-chauds
Vaporera para Perros Calientes
Instructions and Recipes
Directives et recettes
Instrucciones y Recetas
Page 3

Page 4
ENGLISH
2
Make everyday a party!
Visit www.nostalgiaproducts.com for more fun products.
CONTENTS
SAFETY . . . . . . . . . . . . . . . . . . . . . . . . . . . . . . . . . . . . . . . . . 2
IMPORTANT PRECAUTIONS . . . . . . . . . . . . . . . . . . . . . . . . . . . . . 3
IMPORTANT SAFEGUARDS . . . . . . . . . . . . . . . . . . . . . . . . . . . . . 3
INTRODUCTION . . . . . . . . . . . . . . . . . . . . . . . . . . . . . . . . . . . . 4
PARTS & ASSEMBLY . . . . . . . . . . . . . . . . . . . . . . . . . . . . . . . . . . 5
HOW TO OPERATE . . . . . . . . . . . . . . . . . . . . . . . . . . . . . . . . . . 6
HELPFUL TIPS . . . . . . . . . . . . . . . . . . . . . . . . . . . . . . . . . . . . . 6
CLEANING & MAINTENANCE . . . . . . . . . . . . . . . . . . . . . . . . . . . 7
RECIPES . . . . . . . . . . . . . . . . . . . . . . . . . . . . . . . . . . . . . . . . . 7
RETURNS & WARRANTY . . . . . . . . . . . . . . . . . . . . . . . . . . . . . . . 8
SAFETY
Appliance Specications:
120 Volts, 60 Hertz
600 Watts
THIS PRODUCT IS FOR USE IN 120V AC OUTLET ONLY.
Refer to www.nostalgiaproducts.com/user-manuals/ for the most updated manual.
Your safety and the safety of others are very important.
We have provided many important safety messages in this manual and
on your appliance. Always read and obey all safety messages.
This is the safety alert symbol.
This symbol alerts you to potential hazards that
can kill or hurt you and others.
All safety messages will follow the safety alert symbol.
All safety messages will tell you what the potential hazard is, tell you how to reduce the
chance of injury, and tell you what can happen if the instructions are not followed.
Page 5

ENGLISH
3
IMPORTANT PRECAUTIONS
1. NEVER immerse base in water.
2. NEVER use near water.
3. NEVER use an abrasive sponge or cloth on the unit.
4. NEVER use a scouring pad on the appliance.
5. NEVER leave appliance unattended while in use.
6. NEVER place anything other than what is being cooked on the appliance.
7. Unplug unit from outlet when not in use and during cleaning.
8. DO NOT operate this appliance with a damaged cord or
plug, nor if the appliance ever malfunctions.
9. DO NOT place Base in a dishwasher.
10. Keep out of reach of children.
11. This appliance is NOT A TOY.
12. Unsupervised young children and cognitively challenged
individuals should never operate this appliance.
13. Young children should be supervised while in proximity of the
appliance to ensure that they do not play with it.
IMPORTANT SAFEGUARDS
Basic safety precautions should always be followed when using
electrical appliances, including the following:
1. Read all instructions before operating this appliance.
2. Avoid contact with moving parts.
3. To protect against electrical shock do not immerse cord, plug or
any part of this appliance in water or other liquids.
4. Close supervision is necessary when any appliance is used near children.
5. Unplug from outlet when not in use, before removing parts and before cleaning.
6. DO NOT operate any appliance with a damaged cord or plug, nor if
the appliance has been damaged in any manner. Return the appliance
to the nearest repair shop for examination or repair.
7. The manufacturer does not recommend the use of accessory
attachments. Use of accessory attachments may cause injuries.
8. DO NOT use outdoors.
9. Position the appliance as close to the outlet as possible
to prevent injury due to tripping over cord.
10. DO NOT place on or near a hot gas or electric burner, nor in a heated oven.
11. Extreme caution must be used when moving this appliance.
12. DO NOT use the appliance for other than its intended use.
Page 6

ENGLISH
4
13. An appliance that is plugged into an outlet should not be left unattended while in operation.
14. Check unit for presence of foreign objects prior to use.
15. A short power supply cord is provided to reduce the risk resulting
from becoming entangled or tripping over a long cord.
16. Longer detachable power supply cords can be used if care is exercised in their use.
17. The marked electrical rating of an extension cord should be at
least as great as the electrical rating of the appliance.
18. This appliance has a polarized plug (one blade is wider than the other). To reduce
the risk of electrical shock, this plug is intended to t into a polarized outlet only one
way. If the plug does not t fully into the outlet, reverse the plug. If it still does not
t, contact a qualied electrician. Do not attempt to modify the plug in any way.
SAVE THESE INSTRUCTIONS!
INTRODUCTION
Thank you for purchasing the COCA-COLA® HOT DOG STEAMER from Nostalgia!
Now you can steam hot dogs and buns to delicious perfection in minutes! Great
for small parties and gatherings, this compact unit holds up to 24 hot dogs and
12 buns at a time. It's also great for steaming a variety of other foods!
Features include:
• Holds up to 24 hot dogs and 12 buns at a time
• Includes separate steaming trays for hot dogs and buns
• Three position cooking dial: O-Warm-High
• Easy-view water level indicator
• Entire unit disassembles for easy cleaning
• Hidden cord wrap for tidy storage
Page 7
ENGLISH
5
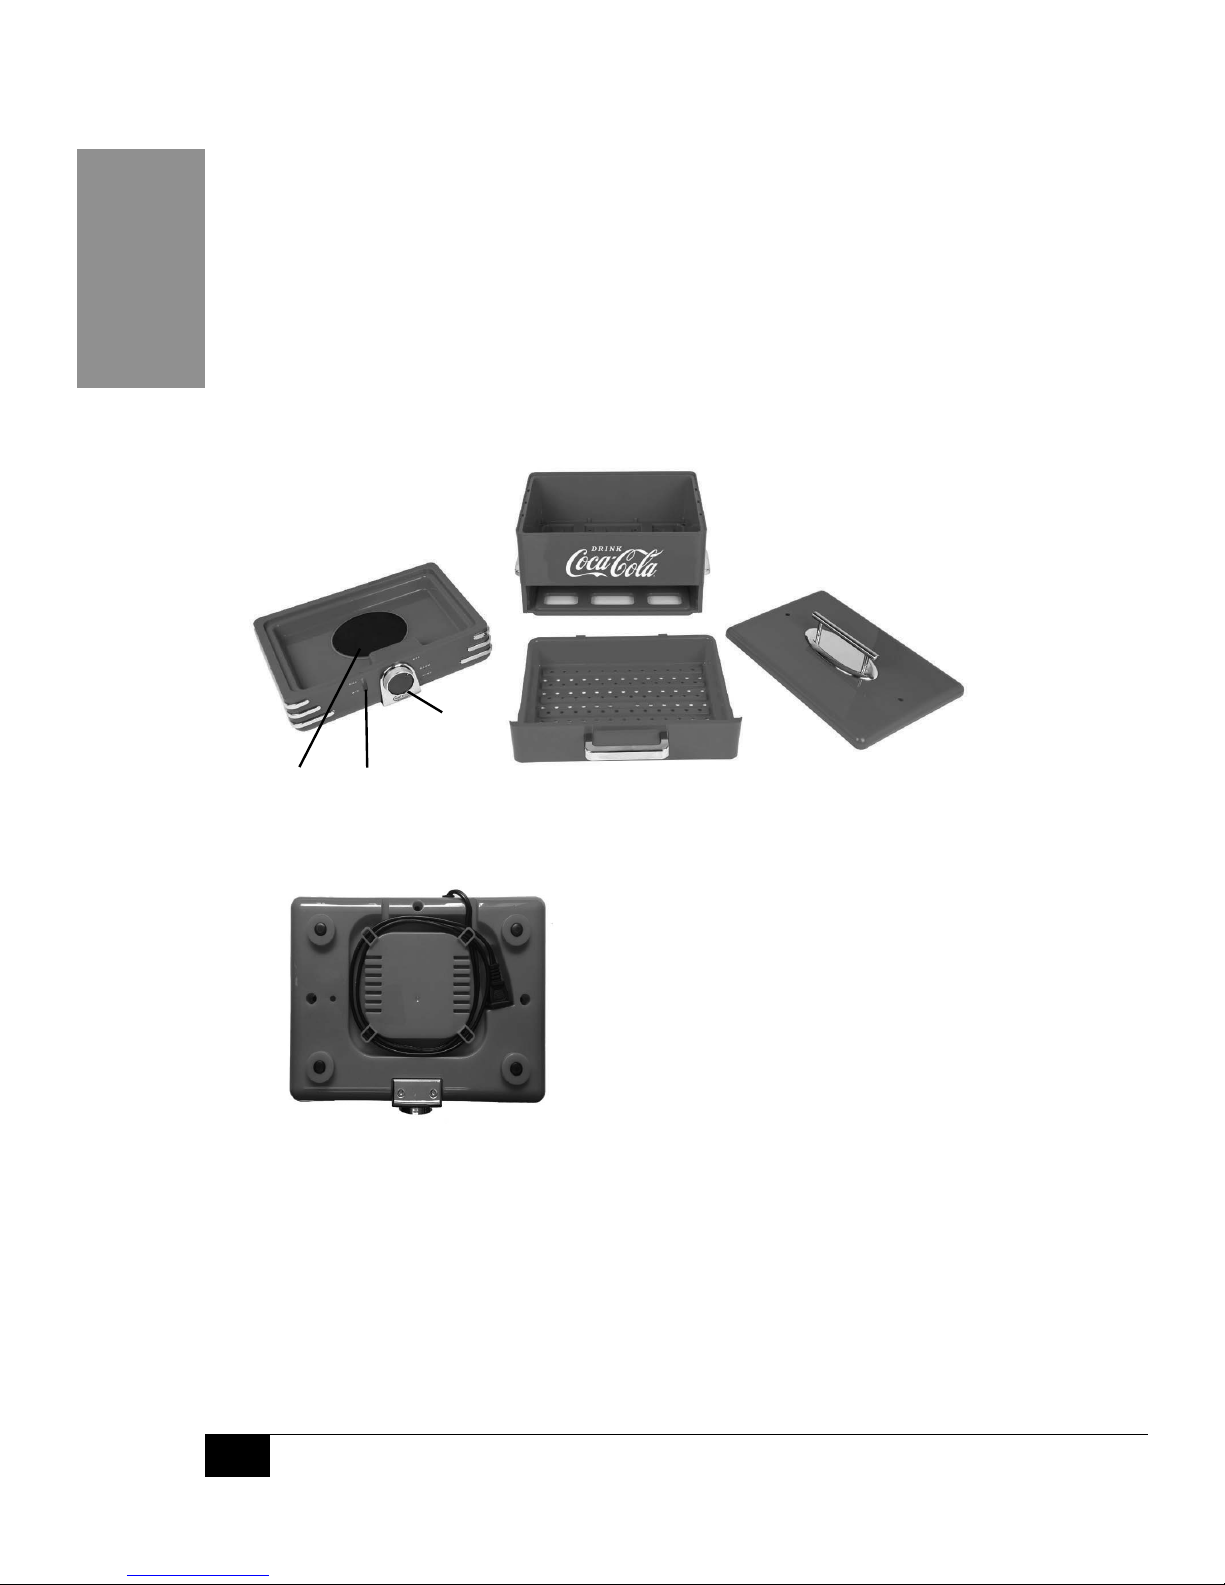
PARTS & ASSEMBLY
ASSEMBLY
To assemble your HOT DOG STEAMER, follow the simple steps below:
1. Place the Steaming Tray on a stable surface.
2. Stack the Bun Warming Tray on top of the Steaming Tray.
3. Place the Top Lid on to the top of the Bun Warming Tray.
4. Lastly, slide the Hot Dog Tray into the front opening of the Bun Warming Tray.
CORD STORAGE
Top Lid
Steaming Tray
Control
Dial
Hot Dog Tray
Bun Warming Tray
Heating
Element
Water Level
Indicator
Page 8

ENGLISH
6
HOW TO OPERATE
Before using your HOT DOG STEAMER, follow the cleaning directions
found in the CLEANING & MAINTENANCE section.
1. Place the unit on a stable surface near an electrical outlet before starting.
2. Fill the Steaming Tray with cold water up to the desired level. Ensure that the water level
does not exceed the MAX ll line and does not fall below the MIN ll line on the Water Level
Indicator.
NOTE: Depending on how long you use your unit, you may need
to periodically rell the Steaming Tray with water.
3. Place up to 24 hot dogs in the Hot Dog Tray and close the tray. Place up to
12 hot dog buns in the Bun Warming Tray and cover with the Top Lid.
4. Turn the Control Dial to HIGH to begin steaming hot dogs. Depending on the number of hot
dogs in the tray, hot dogs may take 15-20 minutes to fully steam.
NOTE: Periodically check hot dogs and hot dog buns to see if adequately cooked.
5. When hot dogs and buns are ready, carefully remove the Top Lid and pull open the Hot Dog
Tray using an oven mitt. Using cooking tongs, take out a bun and ll with a hot dog.
CAUTION: Use EXTREME CAUTION when opening steamer and serving! Hot
steam and hot water escaping from the unit may cause scalding.
6. Once hot dogs are fully steamed, keep warm by turning the Control Dial to WARM.
HELPFUL TIPS
• Make sure there is always a sucient amount of water left in the Steamer
Tray, especially when making numerous batches of hot dogs.
• For best results, do not overll the Hot Dog Tray or the Bun Warming Tray.
• If the red power indicator light does not come on after turning the dial to the ON
position, check the electrical plug to make sure it is fully plugged into outlet.
Page 9

ENGLISH
7
CLEANING & MAINTENANCE
Make sure the unit is unplugged before cleaning. Allow all parts
to COOL to the touch, especially the Heating Element.
Before rst use and continuing after each use, be sure to wipe the Hot Dog Tray, Bun
Warming Tray, Top Lid and Steaming Tray with a damp cloth and dry thoroughly. When more
concentrated cleaning is necessary, wash the Hot Dog Tray, Bun Warming Tray and Top Lid in
warm soapy water, rinse, and dry thoroughly.
CAUTION: Never immerse Steaming Tray in water or other liquid!
To prolong the life of your HOT DOG STEAMER, hand-washing
parts is advised. Dishwasher use is not recommended.
RECIPES
Steam a variety food items with your HOT DOG STEAMER for a quick, easy-to-serve meal:
• Variety of hot dogs and wieners (beef, turkey, veggie, or chicken)
• Sausage Links
• Vegetables
• Fish
• Pastrami slices
• And more!
Page 10

ENGLISH
8
RETURNS & WARRANTY
SHOULD YOUR UNIT NOT WORK OR IF DAMAGED WHEN YOU FIRST TAKE IT OUT OF
THE BOX, PLEASE RETURN IT TO THE PLACE OF PURCHASE IMMEDIATELY.
COCA-COLA® HOT DOG STEAMER / HDS248COKE
Should you have any questions, please contact us via email or at the customer service number listed
below between the hours of 8:00 AM and 5:00 PM, Monday through Friday, Central Standard Time.
Distributed by:
Nostalgia Products LLC
1471 Partnership Dr.
Green Bay, WI 54304-5685
Customer Service
Phone: (920) 347-9122
Web: www.nostalgiaproducts.com
Customer Service Inquiry
To submit a Customer Service inquiry, go to www.nostalgiaproducts.com and ll
out the Customer Service Inquiry form and click the Submit button.
A representative will contact you as soon as possible.
Product Warranty Terms
Nostalgia Products LLC (the “Company”) hereby warrants that for a period of one (1) year from the
date of original purchase, this product will be free of defects in material and workmanship under
normal home use, provided that the product is operated and maintained in accordance with the
operating instructions. As the sole and exclusive remedy under this warranty, the Company will
at its discretion either repair or replace the product found to be defective, or issue a refund on the
product during the warranty period. This warranty is only available to the original retail purchaser of
the product from the date of initial retail purchase, and is only valid with the original sales receipt, as
proof of purchase date is required to obtain warranty benets. All warranty claims must be brought
to the attention of the Company within the warranty period and no later than 30 days of the failure
to perform. This warranty does not cover normal wear or damage caused by shipping, mishandling,
misuse, accident, alteration, improper replacement parts, or other than ordinary household use.
You may be required to return the product (with shipping prepaid by you) for inspection and
evaluation. Return shipping costs are not refundable. The Company is not responsible for returns
damaged or lost in transit. Unless otherwise specically permitted by the operating instructions, this
warranty applies to indoor household use only. In order to obtain service under this warranty, please
contact the Company at the telephone number listed above or by lling out the Customer Service
Inquiry Form located at www.nostalgiaproducts.com. Warranty valid only in USA and Canada.
This warranty is in lieu of all other warranties, expressed or implied, including warranties of
merchantability and tness for a particular purpose, which are hereby excluded to the extent
permitted by law. In no event shall the Company be liable for any indirect, incidental, consequential,
or special damages arising out of or in connection with this product or the use thereof. Some
states, provinces or jurisdictions do not permit the exclusion or limitation of incidental or
consequential damages, so the foregoing exclusion or limitation may not apply to you.
This warranty does not apply to re-manufactured merchandise.
Please read the operating instructions carefully. Failure to comply
with the operating instructions will void this warranty.
For more information, visit us online at www.nostalgiaproducts.com.
Like us on Facebook at www.facebook.com/NostalgiaElectrics.
Follow our boards on Pinterest at www.pinterest.com/nostalgiaelctrx.
Tweet along with us on Twitter at www.twitter.com/NostalgiaElctrx.
Page 11

9
FRANÇAIS
9
Faire une fête tous les jours!
Visiter le site Web www.nostalgiaproducts.com
pour d’autres produits agréables.
TABLE DES MATIÈRES
SÉCURITÉ . . . . . . . . . . . . . . . . . . . . . . . . . . . . . . . . . . . . . . . . 9
PRÉCAUTIONS IMPORTANTES . . . . . . . . . . . . . . . . . . . . . . . . . . . 10
CONSIGNES DE SÉCURITÉ IMPORTANTES . . . . . . . . . . . . . . . . . . . . 10
INTRODUCTION . . . . . . . . . . . . . . . . . . . . . . . . . . . . . . . . . . . . 11
PIÈCES ET ASSEMBLAGE . . . . . . . . . . . . . . . . . . . . . . . . . . . . . . . 12
COMMENT FAIRE FONCTIONNER . . . . . . . . . . . . . . . . . . . . . . . . . 13
CONSEILS UTILES . . . . . . . . . . . . . . . . . . . . . . . . . . . . . . . . . . . 13
NETTOYAGE ET ENTRETIEN . . . . . . . . . . . . . . . . . . . . . . . . . . . . . 14
RECETTES . . . . . . . . . . . . . . . . . . . . . . . . . . . . . . . . . . . . . . . . 14
RETOURS ET GARANTIE . . . . . . . . . . . . . . . . . . . . . . . . . . . . . . . 15
SÉCURITÉ
Spécications de l'appareil :
120 Volts, 60 Hertz
600 Watts,
CE PRODUIT EST UTILISE DANS UNE SORTIE DE 120V AC SEULEMENT.
Se référer au site www.nostalgiaproducts.com/user-manuals/
pour la version la plus récente.
Votre sécurité et celle des autres sont très importantes.
Nous avons fourni de nombreux messages de sécurité importants dans ce manuel
et sur votre appareil. Toujours lire et respecter les consignes de sécurité.
Ceci est le symbole d'alerte de sécurité.
Ce symbole vous signale les dangers potentiels qui
peuvent blessures graves à vous et à d'autres.
Tous les messages de sécurité suivront le symbole d'alerte de sécurité.
Tous les messages de sécurité vous diront quel est le danger potentiel
et vous diront comment réduire le risque de blessure et vous diront
ce qui peut arriver si les instructions ne sont pas suivies.
Page 12

10
FRANÇAIS
10
PRÉCAUTIONS IMPORTANTES
1. NE JAMAIS plonger la base dans l’eau.
2. NE JAMAIS utiliser près de l'eau.
3. Ne jamais utiliser un chion ou une éponge abrasive sur le couvercle ou la Base.
4. NE JAMAIS utiliser un tampon à récurer sur l’appareil.
5. NE JAMAIS laisser l'appareil sans surveillance pendant l'utilisation.
6. NE plongez rien d'autreque ce qui est à cuire sur l’appareil.
7. Débranchez l'unité de la prise en cas de non utilisation et pendant le nettoyage.
8. N’utilisez pas cet appareil avec un cordon d'alimentation ou une
che endommagée, ni si jamais l'appareil est défectueux.
9. NE PAS mettre la Base au lave-vaisselle.
10. Gardez hors de la portée des enfants.
11. Cet appareil n'est PAS UN JOUET.
12. Les enfants en bas âge sans surveillance et les individus ayant une décience
cognitive ne devraient jamais faire fonctionner cet appareil.
13. Les jeunes enfants devraient être supervisés en tout temps lorsqu'ils sont
à proximité de l'appareil an de s'assurer qu'ils ne jouent pas avec.
CONSIGNES DE SÉCURITÉ IMPORTANTES
Les précautions de sécurité de base devraient toujours être suivies et respectées
lors de l'utilisation d'appareils électriques, incluant les directives suivantes :
1. Lisez toutes les instructions avant d'utiliser cet appareil.
2. Évitez tout contact avec les pièces mobiles.
3. Pour protéger contre les chocs électriques ne pas submerger le cordon, la che
ou n’importe quelle partie de cet appareil dans l’eau ou d'autres liquides.
4. Une surveillance étroite est nécessaire lorsque l'appareil est utilisé à proximité des enfants.
5. Débranchez l'appareil lorsqu'il ne sert pas, avant de retirer des pièces et avant le nettoyage.
6. NE PAS utiliser un appareil si le cordon ou la che, ni si l’appareil a été
endommagé d'une manière quelconque. Retourner l’appareil à l’atelier
de réparation le plus proche pour un examen ou une réparation.
7. Le fabricant ne conseille pas d'utiliser des pièces de raccords.
Utilisation d 'accessoires peut causer des blessures.
8. NE PAS utiliser à l'extérieur.
9. Positionnez l’appareil le plus près de la prise que possible an de
prévenir toute blessure suite au trébuchement sur le cordon.
10. NE PAS placer sur ou près d'un brûleur à gaz ou électrique ou dans un four chaué.
11. Une extrême prudence doit être utilisée lors du déplacement de cet appareil.
12. NE PAS utiliser cet appareil pour toute autre utilisation que celle pour laquelle il a été conçu.
Page 13

11
FRANÇAIS
11
13. Un appareil qui est branché sur une prise électrique de ne devrait pas
être laissé sans surveillance pendant son fonctionnement.
14. Vérier les rouleaux en acier inoxydable pour la présence
de corps étrangers avant de les utiliser.
15. Un cordon d’alimentation court est fourni an de réduire les risques
de s'entremêler ou de trébucher sur un cordon plutôt long.
16. De plus longues rallonges électriques amovibles peuvent
être utilisées si celles-ci sont utilisées avec soin.
17. Les caractéristiques électriques d’une rallonge doivent être au moins
aussi grandes que la puissance nominale de l’appareil.
18. Cet appareil a une che polarisée (une lame est plus large que l'autre). Pour réduire la
le risque de choc électrique, cette che est conçue pour s’adapter d'une seule manière
à une seule prise de courant polarisée. Si vous n’arrivez pas à insérer entièrement la
che dans la prise, branchez-la dans l’autre sens. Si elle ne s’enfonce toujours pas,
contactez un électricien qualié. Ne pas tenter de modier la che d'aucune façon.
CONSERVEZ CES INSTRUCTIONS!
INTRODUCTION
Nous vous remercions d'avoir acheté le RÉCHAUD À VAPEUR POUR CHIENS-CHAUDS de
Nostalgia ! Maintenant vous vous pourrez cuire vos saucisses et vos pains à la vapeur
parfaitement en quelques minutes seulement ! Idéal pour les rassemblements et les petites
fêtes , cet appareil compact peut contenir jusqu'à 24 saucisses et 12 pains à chiens-chauds
à la fois. Il est également idéal pour une variété d’autres aliments cuits à la vapeur !
Les fonctionnalités comprennent les éléments suivants :
• Peut contenir jusqu'à 24 saucisses et 12 pains à chiens-chauds à la fois
• Comprend des plateaux vapeur séparés pour les saucisses et les pains
• Cadran de cuisson à trois positions : Éteint-Réchaué-Très chaud
• Indicateur de niveau d'eau facile à voir
• L'appareil en entier se démonte pour un nettoyage facile
• Range-cordon caché pour un entreposage facile
Page 14
12
FRANÇAIS
12
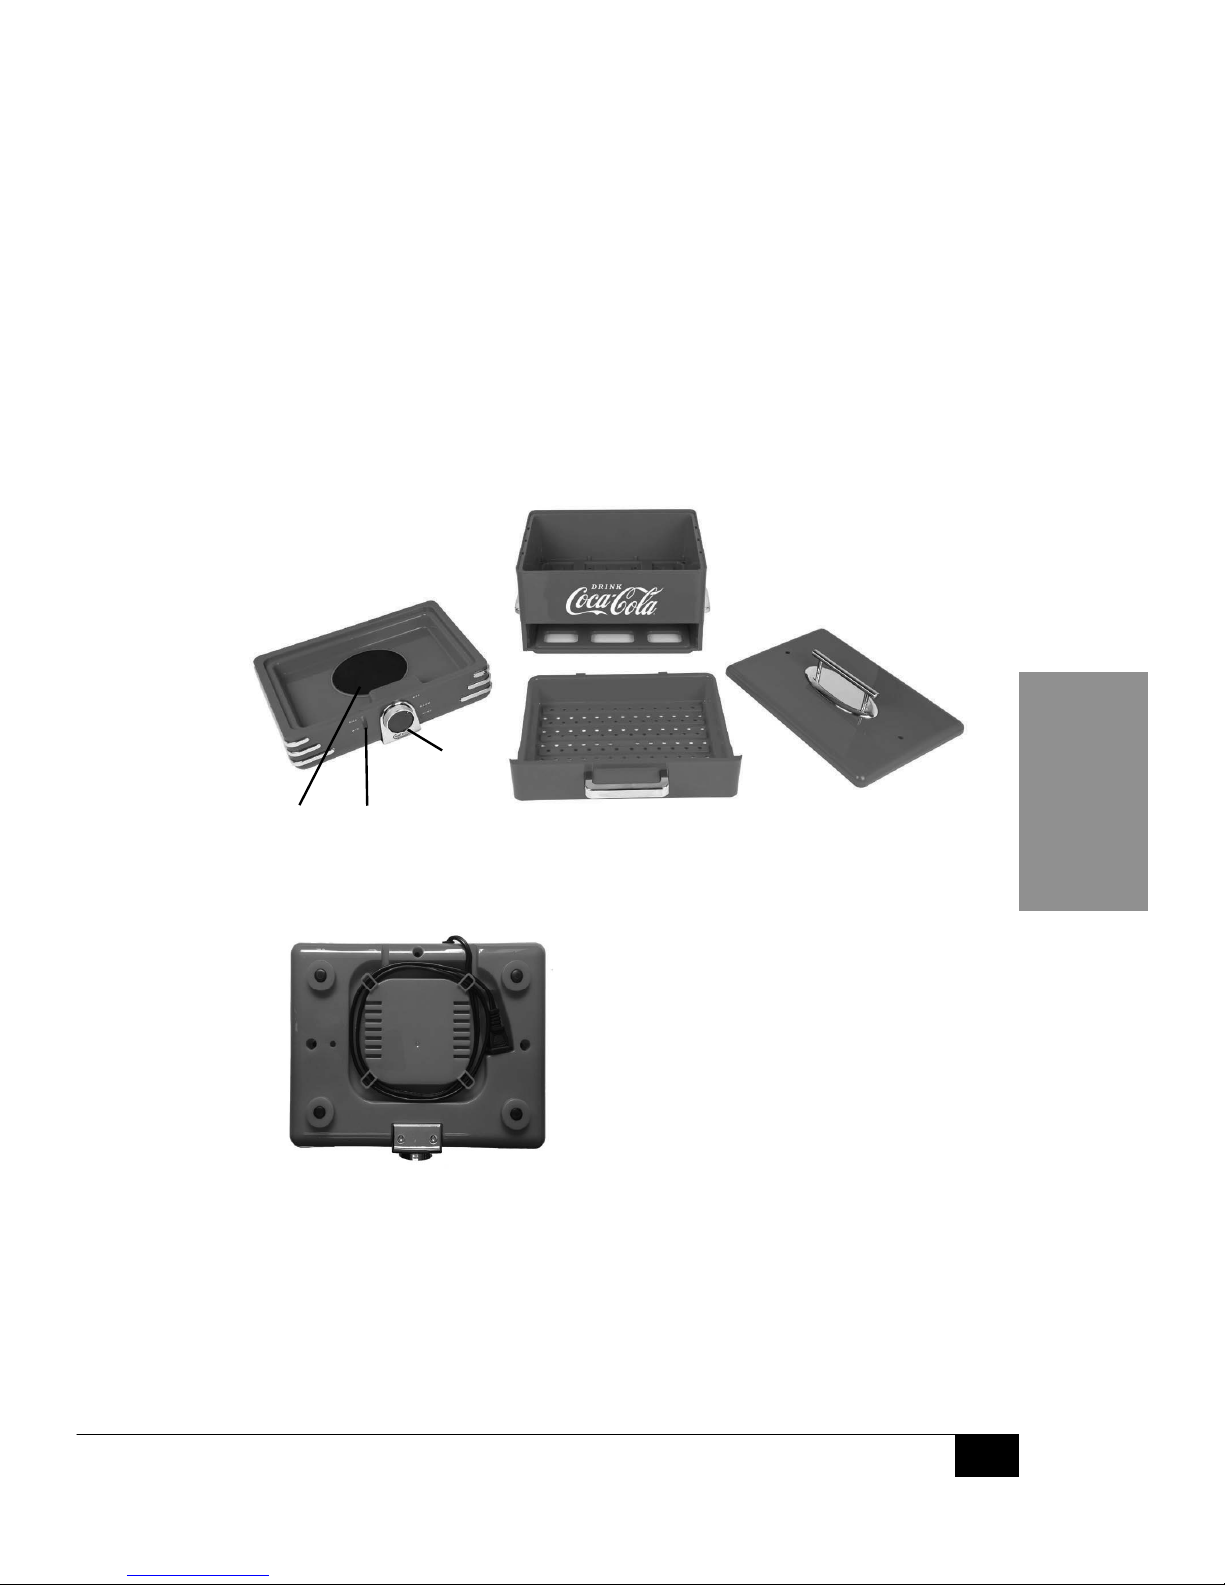
PIÈCES ET ASSEMBLAGE
ASSEMBLAGE
Pour assembler votre RÉCHAUD À VAPEUR POUR CHIENSCHAUDS, suivez les étapes ci-dessous :
1. Placer le plat de cuisson à la vapeur sur une surface stable.
2. Placez le plateau-réchaud à pains sur le dessus du plateau à vapeur.
3. Placez le couvercle du haut sur le dessus du plateau de réchauement à pains.
4. Enn, faites glisser le plateau à chiens-chauds dans
l’ouverture frontale du plateau-réchaud à pains.
RANGEMENT DU CORDON
Couvercle
supérieur
Plateau de cuisson
à la vapeur
Contrôle
Cadran
Plateau pour
chiens-chauds
Plateau-réchaud à pains
Chauage
Elément
Plateau
Niveau d’eau
Indicateur
Page 15

13
FRANÇAIS
13
COMMENT FAIRE FONCTIONNER
Avant d’utiliser votre RÉCHAUD VAPEUR À CHIENS-CHAUDS, suivez les indications
pour le nettoyage retrouvées dans la section Nettoyage et entretien.
1. Placez l’appareil sur une surface stable près d’une prise de courant avant de commencer.
2. Remplissez le plateau de cuisson à la vapeur d’eau froide jusqu’au niveau désiré. Veiller à ce
que le niveau d’eau ne dépasse pas la ligne de remplissage MAX et ne soit pas en-dessous
de la ligne de remplissage MIN du niveau d’eau indicateur.
REMARQUE : Selon la durée que vous utilisez votre appareil, vous
devez remplir régulièrement le bac à vapeur d’eau.
3. Placez jusqu'à 24 saucisses à chiens-chauds dans le bac à chiens-chauds
puis fermez le tiroir. Placez jusqu'à 12 pains à chiens-chauds dans le
plateau-réchaud pour pains et couvrez avec le couvercle.
4. Tourner le cadran de réglage à ÉLEVÉ pour commencer la cuisson à la vapeur des chienschauds. Selon le nombre de chiens-chauds dans le plateau, ceux-ci peuvent prendre de 15 à
20 minutes à cuire complètement.
REMARQUE : Vérier périodiquement les saucisses et les
pains pour voir s"ils sont susamment cuits.
5. Lorsque les saucisses et les pains sont cuits, soigneusement retirer le couvercle du haut et
ouvrir le plateau à chiens-chauds avec des mitaines pour le four. À l’aide de pinces à cuisson,
retirez un pain et y mettre une saucisse.
MISE EN GARDE: Soyez TRÈS PRUDENT lorsque vous ouvrez le réchaud à vapeur pour
le service ! De la vapeur très chaude s'échappera de l'appareil pouvant vous brûler.
6. Une fois que les chiens-chauds sont entièrement cuits à la vapeur, gardezles chauds en tournant le cadran de réglage à RÉCHAUFFÉ.
CONSEILS UTILES
• Assurez-vous qu’il y a toujours une quantité susante d’eau restant dans le
platreau à vapeur , surtout si vous devez cuire plusieurs chiens-chauds.
• Pour de meilleurs résultats, ne pas trop remplir le bac à
chiens-chauds ou le plateau-réchaud à pains.
• Si l'indicateur rouge ne s’allume pas après avoir tourné le cadran à la position
ALLUMÉE , vériez la che électrique pour s’assurer qu'elle est bien branchée.
Page 16

14
FRANÇAIS
14
NETTOYAGE ET ENTRETIEN
S’assurer que l’appareil est débranché avant de le nettoyer. Laissez toutes
les pièces REFROIDIR complètement, surtout l'élément chauant.
Avant la première utilisation et après chaque utilisation par la suite, assurez-vous d'essuyer
le plateau à chiens-chauds, le plateau-réchaud, le couvercle et le plateau-vapeur à l'aide
d'un linge humide puis asséchez-les entièrement. Lorsqu'un nettoyage plus rigoureux et
nécessaire, lavez le plateau à chiens-chauds, le plateau-réchaud à pains et le couvercle dans
de l'eau chaude savonneuse, rincez-les puis asséchez-les entièrement.
MISE EN GARDE: Ne jamais submerger le plateau-vapeur dans l’eau ou d'autres liquides !
An de prolonger la vie de votre RÉCHAUD-VAPEUR À CHIENS-CHAUDS, il est conseillé
de laver à la main chaque pièce. L'utilisation du lave-vaisselle n’est pas recommandée.
RECETTES
Cuisez à la vapeur une variété d'aliments avec votre RÉCHAUD
VAPEUR À CHIENS-CHAUDS, pour un repas facile et rapide :
• Une variété de saucisses et saucisses à chiens-chauds (boeur, dinde, végé ou poulet)
• Saucisses
• Légumes
• Poisson
• Tranches de pastrami
• Et bien plus !
Page 17

15
FRANÇAIS
15
RETOURS ET GARANTIE
SI VOTRE APPAREIL NE FONCTIONNE PAS OU S'IL EST ENDOMMAGÉ QUAND VOUS LE RETIREZ
DE LA BOÎTE, VEUILLEZ LE RETOURNER IMMÉDIATEMENT À L'ENDROIT OÙ IL A ÉTÉ ACHETÉ.
RÉCHAUD-VAPEUR POUR CHIENS-CHAUDS / HDS248COKE
Pour toute question, communiquer par courriel ou au numéro de téléphone du service à
la clientèle, entre 08 h 00 et 17 h 00, du lundi au vendredi, heure normale du Centre.
Distribué par :
Nostalgia Products LLC
1471 Partnership Dr.
Green Bay, WI 54304-5685
Service à la clientèle
Téléphone : (920) 347-9122
Site Web : www.nostalgiaproducts.com
Demande pour le service à la clientèle
Pour soumettre une demande au service à la clientèle, rendez vous au www.nostalgiaproducts.com puis
remplissez le formulaire de demande au service à la clientèle puis cliquez sur le bouton Soumettre.
Un représentant vous contactera dès que possible.
Conditions de garantie du produit
Le groupe Nostalgia Products LLC (référé tel « l’Entreprise ») garantit que pour une période d’un
(1) an en date d’achat, ce produit est sans défaut de matériel et de fabrication selon une utilisation
normale à domicile, seulement si le fonctionnement et l’entretien du produit sont conforment aux
directives fournies. À titre de réparation exclusive et entière sous cette garantie, l’Entreprise pourra
à sa discrétion, réparer ou remplacer le produit défectueux, voire émettre un remboursement du
produit durant la période couverte sous garantie. Cette garantie n’est disponible seulement qu’à
l’acheteur d’origine du produit, en date d’achat au détail dudit produit et sera valide uniquement
avec le reçu de caisse d’origine, à titre de preuve d’achat, lequel est requis pour obtenir les bienfaits
reliés à cette garantie. Toute réclamation doit être rapportée à l’attention de l’Entreprise dans la
fenêtre de la période de la garantie, sans dépasser 30 jours à défaut de performance. Cette garantie
ne couvre pas l’usure normale ou dommage cause par l'expédition, la mauvaise manipulation, la
mauvaise utilisation, les accidents, les modications, les mauvaises pièces de remplacement, voire
toute autre utilisation anormale du produit à domicile. Il est possible que vous ayez à retourner le
produit (avec les frais de retour prépayés par vous) pour une inspection et une évaluation. Les frais
des coûts de retour ne sont pas remboursables. L'Entreprise n’est aucunement responsable pour les
retours endommagés ou perdus en transit. Autrement que spéciquement permit selon les directives
de fonctionnement, cette garantie s’applique à une utilisation à domicile à d'intérieur seulement.
An d'obtenir un service couvert sous cette garantie, veuillez contacter l'Entreprise au numéro de
téléphone inclut ci-haut ou en remplissant le formulaire de demande au service à la clientele, sur le
site www.nostalgiaproducts.com. La garantie est valide seulement aux États-Unis et au Canada.
Cette garantie prévaut toute autre garantie, expresse ou implicite incluant les garanties de qualité
marchande ou ayant une aptitude pour une intention en particulier, lesquelles sont exclues selon la
loi. Sous aucun prétexte l’Entreprise ne pourra être tenue responsable pour tout dommage indirect,
accidentel, conséquentiel ou spécial provenant de ou en relativité avec ce produit ou son utilisation.
Certains états, provinces ou juridictions n'allouent pas l'exclusion ou la limitation de tels dommages
accidentels ou conséquentiels, donc l'exclusion ou limitation suscitée peut ne pas s'appliquer à vous.
Cette garantie ne s’applique pas à la merchandise de renaissance.
Veuillez lire les directives de fonctionnement attentivement. Ne pas se
conformer aux directives de fonctionnement annulera cette garantie.
Pour plus d’informations, visitez notre site Web à www.nostalgiaproducts.com.
Aimez-nous sur Facebook à l’adresse www.facebook.com / NostalgiaElectrics.
Suivez nos conseils sur Pinterest à www.pinterest.com / nostalgiaelctrx.
Tweet avec nous sur Twitter à l’adresse www.twitter.com / NostalgiaElctrx.
Page 18

16
ESPAÑOL
16
¡Convierta todos los días en una esta!
Visite www.nostalgiaproducts.com para
ver más productos divertidos.
CONTENIDO
SEGURIDAD . . . . . . . . . . . . . . . . . . . . . . . . . . . . . . . . . . . . . . 16
PRECAUCIONES IMPORTANTES . . . . . . . . . . . . . . . . . . . . . . . . . . 17
PROTECCIONES IMPORTANTES . . . . . . . . . . . . . . . . . . . . . . . . . . 17
INTRODUCCIÓN . . . . . . . . . . . . . . . . . . . . . . . . . . . . . . . . . . . . 18
PIEZAS Y ENSAMBLAJE . . . . . . . . . . . . . . . . . . . . . . . . . . . . . . . 19
CÓMO UTILIZAR . . . . . . . . . . . . . . . . . . . . . . . . . . . . . . . . . . . . 20
CONSEJOS ÚTILES . . . . . . . . . . . . . . . . . . . . . . . . . . . . . . . . . . 20
LIMPIEZA Y MANTENIMIENTO . . . . . . . . . . . . . . . . . . . . . . . . . . . 21
RECETAS . . . . . . . . . . . . . . . . . . . . . . . . . . . . . . . . . . . . . . . . . 21
DEVOLUCIONES Y GARANTÍA . . . . . . . . . . . . . . . . . . . . . . . . . . . 22
SEGURIDAD
Especicaciones del aparato:
120 Voltios, 60 Hertz
600 Vatios
ESTE PRODUCTO ES PARA USAR SOLAMENTE EN UN
TOMACORRIENTE DE 120 VCA.
Visite www.nostalgiaproducts.com/user-manuals/ para ver el manual más actualizado.
Su seguridad y la de los demás son muy importantes.
Hemos dado muchos mensajes de seguridad importantes en este manual y en
el aparato. Siempre lea y cumpla con todos los mensajes de seguridad.
Este es el símbolo de alerta de seguridad.
Este símbolo le avisa de los peligros potenciales
que pueden matar o herir a otros.
Todos los mensajes de seguridad seguirán al símbolo de alerta de seguridad.
Todos los mensajes de seguridad le indicarán cuál es el peligro potencial, cómo
reducir la posibilidad de lesiones, y qué puede suceder si no sigue las instrucciones.
Page 19

17
ESPAÑOL
17
PRECAUCIONES IMPORTANTES
1. NUNCA sumerja la base en agua.
2. NUNCA lo utilice cerca de agua.
3. NUNCA utilice una esponja o paño abrasivos en la cubierta ni en la base.
4. NUNCA utilice estropajos en el aparato.
5. NUNCA deje el aparato desatendido mientras esté en uso.
6. NUNCA introduzca nada diferente de lo que está cocinando en el aparato.
7. Desenchufe la unidad del tomacorriente cuando no la esté utilizando y para limpiarla.
8. NO utilice este aparato con un cable o enchufe dañados, ni si el aparato funciona mal.
9. NO coloque la base en un lavavajillas.
10. Manténgalo fuera del alcance de los niños.
11. Este aparato NO ES UN JUGUETE.
12. Sin supervisión los niños y las personas con discapacidad
intelectual nunca deben usar este aparato.
13. Debe supervisar a los niños mientras estén cerca del aparato para evitar que jueguen con él.
PROTECCIONES IMPORTANTES
Cuando utilice aparatos eléctricos debe seguir siempre las
precauciones básicas de seguridad, entre las que se incluyen:
1. Lea todas las instrucciones antes de utilizar este aparato.
2. Evite el contacto con partes en movimiento.
3. Para protegerse contra descargas eléctricas no sumerja el cable, el enchufe
ni ninguna parte de este aparato en agua ni en otros líquidos.
4. Supervise estrictamente cualquier aparato cuando lo utilice cerca de niños.
5. Desconéctelo del tomacorriente cuando no esté en uso,
antes de retirar piezas y antes de la limpieza.
6. NO utilice ningún aparato con un cable o enchufe dañados, ni si el
aparato se ha dañado de cualquier manera. Devuelva el aparato al
taller de reparación más cercano para revisarlo o repararlo.
7. El fabricante no recomienda el uso de implementos accesorios. El
uso de implementos accesorios puede provocar lesiones.
8. NO utilice el aparato al aire libre.
9. Coloque el aparato lo más cerca posible del tomacorriente
para evitar lesiones por tropezar con el cable.
10. NO lo coloque cerca de una hornilla caliente eléctrica o de gas, ni en un horno caliente.
11. Se debe tener mucho cuidado al mover el aparato.
12. NO utilice el aparato para usos no previstos.
13. Ningún aparato debe dejarse desatendido durante su funcionamiento.
Page 20

18
ESPAÑOL
18
14. Antes del uso revise los rodillos de acero inoxidable para ver si tienen objetos extraños.
15. Se provee un cable de alimentación corto para reducir el riesgo
resultante de enredarse o tropezar con un cable largo.
16. Puede usar cables de extensión más largos si tiene cuidado con su uso.
17. La clasicación eléctrica marcada en un cable de extensión debe ser
como mínimo tan alta como la clasicación eléctrica del aparato.
18. Este aparato tiene un enchufe polarizado (una patita más ancha que la otra).
Para reducir el riesgo de descarga eléctrica, el enchufe está diseñado para entrar
en un tomacorriente polarizado solo en una posición. Si el enchufe no entra
completo en el tomacorriente, inviértalo. Si aún así no entra, comuníquese con
un electricista calicado. No modique el enchufe de ninguna manera.
¡GUARDE ESTAS INSTRUCCIONES!
INTRODUCCIÓN
¡Gracias por comprar la VAPORERA DE PERROS CALIENTES de Nostalgia!
¡Ahora puede cocinar al vapor los perros calientes y los panes en minutos con
exquisita perfección! Genial para pequeñas estas y reuniones, esta unidad
compacta puede contener hasta 24 perros calientes y 12 panes a la vez.
¡También es estupenda para cocer al vapor muchos otros alimentos!
Incluye:
• Hacer hasta 24 perros calientes y 12 panes a la vez
• Bandejas separadas para cocer al vapor para los perros calientes y los panes
• Tres posiciones para cocinar: Apagado, Medio y Alto
• Indicador de nivel de agua fácil de ver
• Toda la unidad se desensambla para facilitar la limpieza
• Cordón envuelto y oculto para guardarlo ordenado
Page 21

19
ESPAÑOL
19
PIEZAS Y ENSAMBLAJE
ENSAMBLAJE
Para ensamblar su VAPORERA DE PERROS CALIENTES, siga los sencillos pasos a continuación:
1. Coloque la bandeja de cocer al vapor en una supercie estable.
2. Apile la bandeja de calentar panes encima de la bandeja de cocer al vapor.
3. Coloque la tapa superior encima de la bandeja de calentar panes.
4. Finalmente, deslice la bandeja de perros calientes en la
abertura frontal de la bandeja de calentar panes.
ALMACENAMIENTO DEL CABLE
Tapa superior
Bandeja de
cocer al vapor
Dial de
Control
Bandeja de
perros calientes
Bandeja de calentar
Elemento de
Calentamiento
Indicador de
nivel de agua
Page 22

20
ESPAÑOL
20
CÓMO UTILIZAR
Antes de usar su VAPORERA DE PERROS CALIENTES, siga las indicaciones de
limpieza que aparecen en la sección LIMPIEZA Y MANTENIMIENTO.
1. Antes de comenzar coloque la unidad en una supercie estable cerca del tomacorriente.
2. Llene la bandeja de cocer al vapor con agua fría hasta el nivel deseado. Asegúrese de que
el nivel del agua no sobrepase la línea de llenado MÁX ni esté por debajo de la línea de
llenado MÍN en el indicador de nivel de agua.
NOTA: En dependencia del tiempo que use su unidad, pudiera necesitar
rellenar periódicamente con agua la bandeja de cocer al vapor.
3. Coloque hasta 24 perros calientes en la bandeja de perros calientes
y cierre la bandeja. Coloque hasta 12 panes para perros calientes en
la bandeja de calentar panes y cúbrala con la tapa superior.
4. Gire el dial de control a ALTO para comenzar a cocinar los perros calientes. En dependencia
de la cantidad de perros calientes en la bandeja, los perros calientes pueden demorar 15-20
minutos para estar listos.
NOTA: Compruebe periódicamente los perros calientes
y los panes para ver si están bien cocidos.
5. Cuando los perros calientes y los panes estén listos, retire con cuidado la tapa superior y con
un guante de cocina tire de la bandeja de perros calientes para abrirla. Con pinzas de cocina,
saque un pan y póngale un perro caliente.
PRECAUCIÓN: ¡Tenga PRECAUCIÓN EXTREMA cuando abra la vaporera y cuando
sirva! Puede quemarse con el vapor y el agua calientes que escapan de la unidad.
6. Cuando los perros calientes estén completamente cocidos, para
mantenerlos calientes gire el dial de control a Medio.
CONSEJOS ÚTILES
• Asegúrese de que siempre quede una cantidad suciente de agua en la bandeja de la
vaporera, especialmente cuando esté cociendo varias tandas de perros calientes.
• Para mejores resultados, no llene demasiado la bandeja de
perros calientes ni la bandeja de calentar panes.
• Si la luz roja del indicador de encendido no se ilumina después de
girar el dial a la posición de ENCENDIDO, revise el enchufe y asegúrese
de que entró completamente en el tomacorriente.
Page 23

21
ESPAÑOL
21
LIMPIEZA Y MANTENIMIENTO
Asegúrese de que el aparato esté desconectado antes de limpiarlo. Deje que todas
las partes se ENFRÍEN para tocarlas, especialmente el elemento de calentamiento.
Antes del primer uso y después de cada uso, asegúrese de limpiar la bandeja de perros
calientes, la bandeja de calentar panes, la tapa superior y la bandeja de cocer al vapor
con un paño húmedo y séquelas bien después. Cuando sea necesaria una limpieza más
completa, friegue la bandeja de perros calientes, la bandeja de calentar panes y la tapa
superior con agua jabonosa tibia, enjuáguelas, y séquelas bien después.
PRECAUCIÓN: ¡Nunca sumerja la bandeja de cocer al vapor en agua ni en otro líquido!
Para extender la vida útil de su VAPORERA DE PERROS CALIENTES, se recomienda
fregar a mano las piezas. No se recomienda el uso de un lavavajillas.
RECETAS
Cocine al vapor diversos productos alimenticios con su VAPORERA DE
PERROS CALIENTES para preparar una comida rápida y fácil de servir:
• Diversos perros calientes y salchichas (de carne de res, de pavo, de vegetales, o de pollo)
• Sartas de embutidos
• Vegetales
• Pescado
• Rodajas de pastrami
• ¡Y más!
Page 24

22
ESPAÑOL
22
DEVOLUCIONES Y GARANTÍA
SI LA UNIDAD NO FUNCIONA O ESTÁ DAÑADA AL SACARLA POR PRIMERA VEZ
DE LA CAJA, DEVUÉLVALA AL LUGAR DE COMPRA INMEDIATAMENTE.
VAPORERA DE PERROS CALIENTES / HDS248COKE
Si tiene preguntas, contacte con nosotros por correo electrónico o por el número
telefónico de servicio al cliente que aparece a continuación en el horario de
8:00 AM a 5:00 PM, de lunes a viernes, Hora Estándar del Este.
Distribuida por:
Nostalgia Products LLC
1471 Partnership Dr.
Green Bay, WI 54304-5685
Servicio al cliente
Teléfono: (920) 347-9122
Web: www.nostalgiaproducts.com
Solicitud de servicio al cliente
Para enviar una solicitud al Servicio al Cliente, vaya a www.nostalgiaproducts.com, llene
el formulario de Solicitud de Servicio al Cliente y haga clic en el botón Enviar.
Un representante le contactará tan pronto como sea posible.
Términos de garantía del producto
Po este medio, Nostalgia Products LLC (la “Compañía”) garantiza que por un período de un (1) año a
partir de la fecha de compra original, este producto estará sin defectos en cuanto a materiales y mano
de obra en uso normal en casa, siempre que el producto se maneje y mantenga de acuerdo con las
instrucciones de manejo. Como único y exclusivo remedio en virtud de esta garantía, la Compañía, a
su discreción, podrá optar por reparar o sustituir el producto que se encuentre defectuoso, o emitir un
reembolso por el producto durante el período de garantía. Esta garantía sólo está disponible para el
comprador original minorista del producto a partir de la fecha inicial de compra al por menor, y sólo es
válida con el recibo de compra original, y como prueba de la fecha de compra, es necesario obtener los
benecios de la garantía. Todos los reclamos de garantía deben hacerse a la atención de la Compañía
dentro del período de garantía y no más tarde que 30 días desde la imposibilidad de realizarlo. Esta
garantía no cubre el desgaste normal o daños ocasionados por el embarque, malos manejos, mal uso,
accidentes, alteración, piezas de cambio incorrectas, o algo distinto al uso doméstico normal. Es posible
que deba devolver el producto (con los gastos de envío pagados por usted) para inspección y evaluación.
Los costos de envío no son reembolsables. La empresa no se hace responsable por devoluciones
dañadas o perdidas en tránsito. A menos que se indique lo contrario especícamente permitido por
las instrucciones de manejo, esta garantía sólo se aplica al uso en interiores de las viviendas. Para
realizar una reparación bajo esta garantía, comuníquese con la Compañía mediante el número de
teléfono indicado anteriormente o al llenar el formulario de consulta para el servicio de Atención al
Cliente en www.nostalgiaproduct s.com. El período de garantía sólo es válido en EE.UU. y Canadá.
Esta garantía está en lugar de cualquier otra garantía, expresa o implícita, incluso las garantías de
comerciabilidad y conveniencia para un propósito en particular, que quedan excluidas en la medida
permitida por la ley. En ningún caso la compañía será responsable de cualquier daño indirecto, incidental,
consecuente, especial o daños que surjan o estén relacionados con este producto o la utilización del
mismo. Algunos estados, provincias o corregimientos no permiten la exclusión o la limitación de daños
incidentales o consecuentes, por lo que la exclusión o la limitación anterior quizás no se aplique a usted.
Esta garantía no se aplica a mercancía reelaborada.
Lea las instrucciones de manejo cuidadosamente. El incumplimiento
de las instrucciones de manejo anulará esta garantía.
Para obtener más información, visítenos en línea en www.nostalgiaproducts.com.
Me Gusta en Facebook en www.facebook.com / NostalgiaElectrics.
Siga nuestros consejos sobre Pinterest en www.pinterest.com / nostalgiaelctrx.
Tweet con nosotros en Twitter en www.twitter.com / NostalgiaElctrx.
Page 25

 Loading...