

Page 1

All products are trademarks of Nostalgia Products Group, LLC.
Worldwide design & utility patented or patents pending.
© 2010 Nostalgia Products Group, LLC.
www.nostalgiaelectrics.com
(rev. 11/04/10)
Page 2
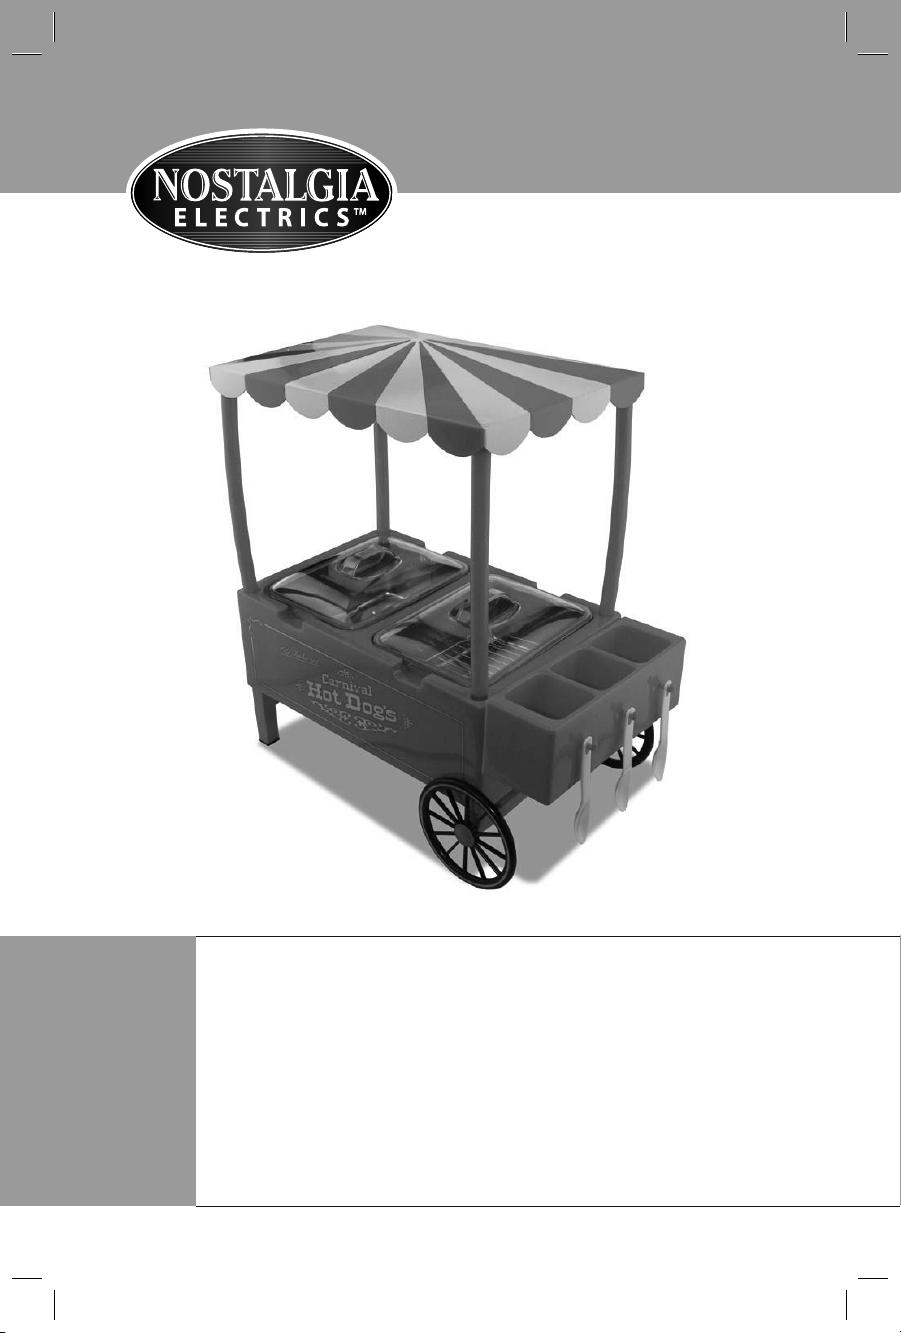
HDM503
OLD FASHIONED HOT DOG CART
Instructions and Recipes
Page 3

Page 4
CONTENTS
IMPORTANT PRECAUTIONS . . . . . . . . . . . . . . . . . 3
IMPORTANT SAFEGUARDS . . . . . . . . . . . . . . . . . . 3
INTRODUCTION . . . . . . . . . . . . . . . . . . . . . . . . 4
PARTS & ASSEMBLY . . . . . . . . . . . . . . . . . . . . . . 5
HOW TO OPERATE . . . . . . . . . . . . . . . . . . . . . . . 6
HELPFUL TIPS . . . . . . . . . . . . . . . . . . . . . . . . . 7
CLEANING & MAINTENANCE . . . . . . . . . . . . . . . . . 7
RECIPES . . . . . . . . . . . . . . . . . . . . . . . . . . . . 8
RETURNS & WARRANTY . . . . . . . . . . . . . . . . . . . . 10
SAFETY
Your safety and the safety of others are very important.
We have provided many important safety messages in this manual and
on your appliance. Always read and obey all safety messages.
This is the safety alert symbol.
This symbol alerts you to potential hazards
that can kill or hurt you and others.
All safety messages will follow the safety alert symbol.
All safety messages will tell you what the potential hazard
is, tell you how to reduce the chance of injury, and tell you
what can happen if the instructions are not followed.
ENGLISH
Appliance Specifications:
120 Volts, 60 Hertz
500 Watts
2
Page 5

ENGLISH
3
IMPORTANT PRECAUTIONS
NEVER immerse base in water.1.
NEVER use near water.2.
NEVER use an abrasive sponge or cloth on the Canopy or Base.3.
NEVER use a scouring pad on the appliance.4.
NEVER leave appliance unattended while in use.5.
NEVER place anything other than what is being cooked on the appliance.6.
Unplug unit from outlet when not in use and during cleaning.7.
DO NOT operate this appliance with a damaged cord or 8.
plug, nor if the appliance ever malfunctions.
DO NOT place Base in a dishwasher.9.
Keep out of reach of children. 10.
This appliance is NOT A TOY.11.
Unsupervised young children and cognitively challenged 12.
individuals should never operate this appliance.
Young children should be supervised while in proximity of the 13.
appliance to ensure that they do not play with it.
IMPORTANT SAFEGUARDS
Basic safety precautions should always be followed when
using electrical appliances, including the following:
Read all instructions before operating this appliance.1.
Avoid contact with moving parts.2.
To protect against electrical shock do not immerse cord, plug 3.
or any part of this appliance in water or other liquids.
4.
Close supervision is necessary when any appliance is used near children.
Unplug from outlet when not in use, before removing parts and before cleaning.5.
DO NOT operate any appliance with a damaged cord or plug, 6.
nor if the appliance has been damaged in any manner. Return the
appliance to the nearest repair shop for examination or repair.
7.
The manufacturer does not recommend the use of accessory
attachments. Use of accessory attachments may cause injuries.
DO NOT use outdoors.8.
Position the appliance as close to the outlet as possible 9.
to prevent injury due to tripping over cord.
10.
DO NOT place on or near a hot gas or electric burner, nor in a heated oven.
Extreme caution must be used when moving any appliance with hot food.11.
DO NOT use the appliance for other than its intended use.12.
Page 6

ENGLISH
4
An appliance that is plugged into an outlet should 13.
not be left unattended while in operation.
Check trays for presence of foreign objects prior to use.
14.
DO NOT put anything other than food that is intended for cooking in the trays.15.
A short power supply cord is provided to reduce the risk resulting 16.
from becoming entangled or tripping over a long cord.
17.
Longer detachable power supply cords can be used if care is exercised in their use.
The marked electrical rating of an extension cord should be at 18.
least as great as the electrical rating of the appliance.
This appliance has a polarized plug (one blade is wider than
19.
the other). To reduce the risk of electrical shock, this plug is
intended to fit into a polarized outlet only one way.
Save these instructions!20.
INTRODUCTION
The HOT DOG CART boils hot dogs and steams buns just like the big, vendor
hot dog carts. A condiment tray on the side has compartments for keeping
your favorite hot dog toppings such as sauerkraut, cheese and relish. It's a
great all-in-one solution for serving hot dogs anytime! The HOT DOG CART
can also be used for warming chili and sauces, taco meat, gravy and more.
Features Include:
Canopy Top•
Bun Warmer with Clear Lid•
Hot Dog Boiler/Steamer with Clear Lid•
Three Condiment Trays with Three Spoons•
Page 7
ENGLISH
5
PARTS & ASSEMBLY
ASSEMBLY
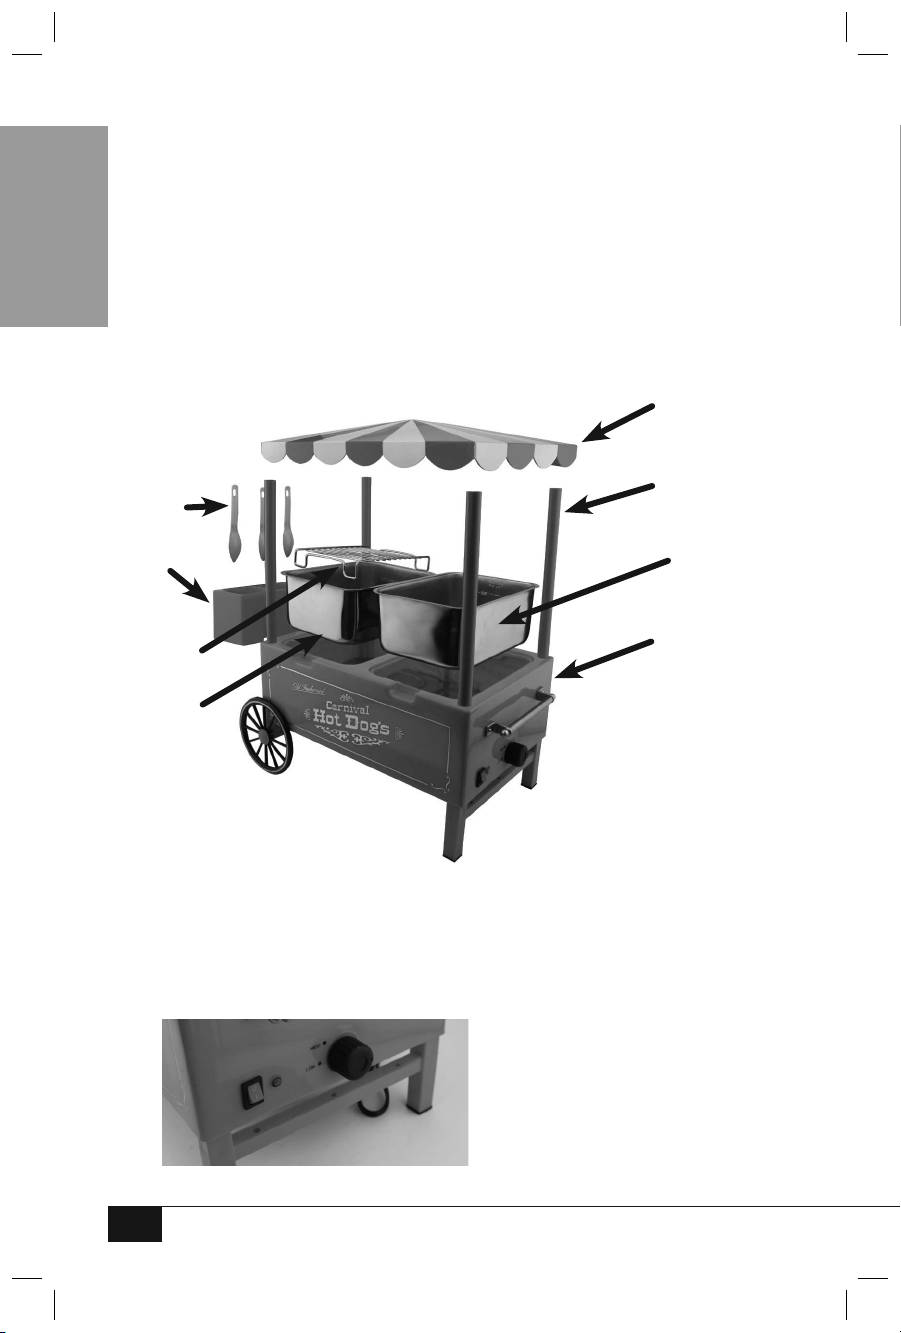
Your HOT DOG CART requires very little assembly.
Simply place Steaming Tray and Hot Dog Boiling Tray in the Base. •
Put Steaming Rack on top of Steaming Tray.•
Slide Condiment Tray into side of Base and hang Spoons on Condiment Tray.•
Fit the four Canopy Poles into the holes in each corner of the Base. •
Insert the Drip Tray into the slot at the back of the unit.•
Attach the Canopy Top to the Canopy Poles.•
Spoons
Canopy Top
Canopy Poles
Condiment
Trays
Steaming
Rack
Steaming
Tray
POWER SWITCH & TEMPERATURE CONTROL
ON/OFF Switch•
Power Light•
Temperature Control (Low / Med / High)•
HIGH on Hot Dog Boiling Tray = 212˚ / HIGH on Steaming Tray = 165˚ to 185˚
Hot Dog
Boiling Tray
Base
Page 8

ENGLISH
6
HOW TO OPERATE
Place the HOT DOG CART on a stable surface near •
an electrical outlet before starting.
Make sure that Steaming Tray and Hot Dog Boiling Tray are properly inserted.•
Make sure the switch is turned to the OFF position. Plug in unit. •
Always make sure that the cord is away from any water source. •
It is acceptable to use an extension cord if necessary.
Flip switch to ON position. The red power indicator light should come on. •
Temperature setting is adjustable using the thermostat knob located •
near the ON/OFF switch. Adjust to desired temperature setting.
Add warm water to heating pan, which is on the side closest to the •
thermostat knob. See below for water measurements. Fill lines
will be marked inside the pan. Cooking times may vary.
STEAMING HOT DOGS
Add 1 to 2 cups warm water. Add 6 - 8 hot dogs or more (depending on size).
Cook on HIGH for approximately 10 – to 15 minutes to steam. Do not remove lid
during steaming. If you remove lid, the hot dogs will take much longer to cook.
BOILING
Boiling is the most efficient way to cook hot dogs. The original hot dog
carts boiled hot dogs and most still do. To boil hot dogs, add 2 to 3 cups
warm water. Add 6 - 8 hot dogs or more (depending on size). Cook on HIGH
for approximately 12 to 20 minutes to boil. The more hot dogs and water
you add, the longer it will take to boil. After hot dogs have cooked, turn
thermostat to LOW for keeping warm and maintaining temperature.
WARMING CHILI OR SAUCES
Once the hot dogs have cooked to near boiling. Lower thermostat to MEDIUM.
Then add chili or sauces to warming pan. This will prevent scorching. When
hot dogs & chili or sauce is done, turn thermostat to LOW to keep warm.
By following these simple instructions, your HOT DOG CART
will be fun for friends, family and kids of all ages!
STEAMING BUNS
Add ½ cup warm water to steaming pan, which is on the opposite side from
the thermostat knob. Place 4 – 6 buns (depending on size) on the steaming
rack in the steaming pan, and then cover. Buns will be perfectly steamed
in approximately 5 minutes. (Steaming time may vary.) After steaming,
remove lid to prevent moisture on lid from dripping and soaking buns.
Page 9

ENGLISH
7
HELPFUL TIPS
POWER LIGHT
If the red power indicator light does not come on after flipping the switch to the
ON position, check the electrical plug to make sure it is fully plugged into outlet.
COOKING
For best results, add hot water to start. Do not over fill the
trays. Always leave room for the lid to fit comfortably.
CLEANING & MAINTENANCE
Make sure the unit is unplugged before cleaning. Allow all •
parts to COOL to the touch, especially the trays.
Remove Steaming Rack, Steaming Tray, Hot Dog •
Boiling Tray, Condiment Trays and Spoons.
Canopy Poles and Canopy also remove easily for cleaning.•
Wash all parts in warm, soapy water, rinse and dry. •
Wipe down Base with soft, non-abrasive cloth. •
To prolong the life of your HOT DOG CART, hand-washing parts is advised. •
Dishwasher use is not recommended. Never place the Base in a dishwasher.
Page 10

ENGLISH
8
RECIPES
Use a variety food items with your HOT DOG
CART for a quick, easy-to-serve meal:
A Variety of Regular-Sized Hot Dogs and Wieners •
(Beef, Turkey, Veggie, or Chicken)
Foot-Long Hot Dogs•
Sausage Links•
Chili•
Gravy and Sauces•
CONEY ISLAND DOGS
Topping:
½ Pound •
Ground Beef
½ Cup Chopped •
Onion
1 Minced Clove •
of Garlic
8 oz. Can •
Tomato Sauce
1 Tsp. Chili Powder•
½ Tsp. •
Worcestershire
Sauce
1 Pound Hot Dogs•
Fry beef, onions, and garlic in
large skillet until brown.
Drain fat.
Add tomato sauce, chili powder and
Worcestershire sauce and heat thoroughly.
Serve hot as a topping on your favorite cooked
hot dogs prepared in your HOT DOG CART.
You can cook hot dogs in the heating pan of the cart
while you keep your mixture warm in the other pan.
Yield: 4 Servings
TAPAS CALIENTES
Topping:
¹• /3 Cup Mesquite
Flavored
Barbeque Sauce
¹• /3 Cup Chunky
Salsa
1 4-Oz. Can •
Chopped Green
Chiles, Drained
½ Cup Shredded •
Mexican Cheese
Blend
1 Small Jalepeño, •
Seeded and
Chopped
While the hot dogs are boiling in the Hot Dog Boiling
Tray, combine barbecue sauce and salsa together
in the Steaming Tray and cook until hot or bubbly.
Place cooked hot dogs in buns and top each
with 1 Tbsp. of salsa mixture, 1 Tbsp. green
chiles and 1 Tbsp. shredded cheese.
OPTIONAL: broil hot dogs just until
cheese is melted, then sprinkle chopped
jalapeno on top of the melted cheese.
Yield: 6-8 Servings
Page 11

ENGLISH
9
VEGETARIAN CHILI DOGS
Topping:
3 Tbsp. Olive Oil•
1½ Cups •
Chopped Onion
8 Large Garlic •
Cloves, Chopped
2 19 oz. Cans Red •
Kidney Beans
1 19 oz. Can •
Black Beans
1 19 oz. Can •
White Beans
¼ Cup Taco •
Seasoning
1 Tsp. Dried Basil•
½ Tsp. Dried •
Oregano
½ Tsp. Dried •
Thyme
1 15 oz. Can •
Tomato Sauce
3 Cups Vegetable •
Broth
1 6 oz. Can •
Tomato Paste
Heat oil in heavy saucepan over medium-high heat.
Add onions and garlic.
Saute about 8 minutes or until onions are translucent.
Add beans, taco seasoning, basil,
oregano, and thyme. Stir 2 minutes.
Mix in tomato sauce, vegetable
broth and tomato paste.
Simmer until thickened to desired
consistency, stirring occasionally to prevent
sticking, about 1 and a half hours.
Season to taste with salt and pepper.
Cook soy dogs (vegetarian hot dogs) in
HOT DOG CART and steam buns.
Serve chili hot as a topping on your cooked
soy dogs prepared in your HOT DOG CART.
BEANLESS CHILI
½ Pound •
Ground Beef
½ Onion, Chopped•
1 Minced Clove •
of Garlic
½ Tsp. Cumin•
½ Tsp. Oregano•
19 oz. Stewed •
Tomatoes
1 Tbsp. Chili •
Powder
2 Tbsp. •
Worcestershire
Sauce
Stir fry beef, onions, and garlic in
large skillet until evenly brown.
Drain excess grease and move to a large stock pot.
Season with chili powder, oregano and cumin.
Add salt and pepper and hot sauce to taste.
Stir in tomatoes and Worcestershire sauce.
Bring to a boil, then reduce heat to low and
simmer for an hour, sitrring occasionally.
Serve hot as a topping on your favorite cooked
hot dogs prepared in your HOT DOG CART.
Yield: 6 Servings
Page 12

ENGLISH
10
RETURNS & WARRANTY
SHOULD YOUR UNIT NOT WORK OR IS DAMAGED WHEN
YOU FIRST TAKE IT OUT OF THE BOX, PLEASE RETURN
IT TO THE PLACE OF PURCHASE IMMEDIATELY.
HOT DOG CART / HDM503
Should you have any questions, please contact us via email or at the
customer service number listed below between the hours of 8:00 AM
and 5:00 PM, Monday through Friday, Central Standard Time.
Distributed by:
Nostalgia Products Group LLC
1471 Partnership Dr.
Green Bay, WI 54304-5685
Customer Service
Phone: (920) 347-9122
Web: www.nostalgiaelectrics.com
Customer Service Inquiry
To submit a Customer Service inquiry, go to www.nostalgiaelectrics.com and
fill out the Customer Service Inquiry form and click the Submit button.
A representative will contact you as soon as possible.
This appliance is designed and built to provide many years of satisfactory
performance under normal household use. The distributor pledges to the
original owner that should there be any defects in material or workmanship
during the first 90 days of purchase, we will repair or replace the unit at
our option. Our pledge does not apply to damages caused by shipping,
mishandling or unit being dropped. A product deemed defective either from
manufacturing or being mishandled is up to the distributor’s discretion.
In order to obtain service under this warranty, please contact Nostalgia
Products Group, LLC at the telephone number listed above or by filling out
the Customer Service Inquiry Form located at www.nostalgiaelectrics.com.
This warranty does not apply to re-manufactured merchandise.
Please read these instructions carefully. Failure to comply with these instructions,
damages caused by improper replacement parts, abuse or misuse will void this
pledge to you and is being made in place of all other expressed warranties.
 Loading...