

Page 1

All products are trademarks of Nostalgia Products LLC.
Worldwide design & utility patented or patents pending.
© 2017 Nostalgia Products LLC.
www.nostalgiaproducts.com
(rev. 05/30/17 ICD)
Page 2
FDM1
Frozen Dessert Machine
Máquina para postres helados
Machine pour faire des desserts glacés
Instruction Manual
Manual de instrucciones
Manuel d’utilisation
Page 3

Page 4
ENGLISH
2
Make every day a party!
Visit www.nostalgiaproducts.com for more fun products.
CONTENTS
SAFETY . . . . . . . . . . . . . . . . . . . . . . . . . . . . . . . . . . . . . . . . . 2
IMPORTANT SAFEGUARDS . . . . . . . . . . . . . . . . . . . . . . . . . . . . . 3
ADDITIONAL IMPORTANT SAFEGUARDS . . . . . . . . . . . . . . . . . . . . 3
INTRODUCTION . . . . . . . . . . . . . . . . . . . . . . . . . . . . . . . . . . . . 5
PARTS . . . . . . . . . . . . . . . . . . . . . . . . . . . . . . . . . . . . . . . . . . 6
ASSEMBLY . . . . . . . . . . . . . . . . . . . . . . . . . . . . . . . . . . . . . . . 7
HOW TO OPERATE . . . . . . . . . . . . . . . . . . . . . . . . . . . . . . . . . . 9
HELPFUL TIPS . . . . . . . . . . . . . . . . . . . . . . . . . . . . . . . . . . . . . 11
CLEANING & MAINTENANCE . . . . . . . . . . . . . . . . . . . . . . . . . . . . 12
RETURNS & WARRANTY . . . . . . . . . . . . . . . . . . . . . . . . . . . . . . . 14
SAFETY
Appliance Specications:
120 Volts, 60 Hz, 600 Watts
Refrigerant: R134a
THIS PRODUCT IS FOR USE IN 120V AC OUTLET ONLY.
Refer to www.nostalgiaproducts.com/user-manuals/ for the most updated manual.
Your safety and the safety of others is very important.
We have provided many important safety messages in this manual and
on your appliance. Always read and obey all safety messages.
This is the safety alert symbol.
This symbol alerts you to potential hazards that can
cause serious injury to you and others.
All safety messages will follow the safety alert symbol.
All safety messages will tell you what the potential hazard is, tell you how to reduce the
chance of injury, and tell you what can happen if the instructions are not followed.
Page 5

ENGLISH
3
IMPORTANT SAFEGUARDS
A person who has not read and understood all operating and safety instructions
is not qualied to operate this appliance. All users of this appliance must read and
understand this Instruction Manual before operating or cleaning this appliance.
When using electrical appliances, basic safety precautions
should always be followed, including:
1. Read all instructions before operating this appliance.
2. DO NOT TOUCH the hot surfaces. Use handles or knobs.
3. This appliance is NOT A TOY.
4. Unsupervised young children and cognitively challenged
individuals should never operate this appliance.
5. Close supervision is necessary when any appliance is used by or near children.
6. To protect against electrical shock do not immerse cord, plug
or any part of this unit in water or other liquids.
7. Unplug from outlet when not in use, before removing parts and before cleaning.
Allow to cool before putting on or taking o any parts, and before cleaning.
8. DO NOT operate any appliance with a damaged cord or plug, or after the appliance
malfunctions, or if the appliance has been damaged in any manner. Return the
appliance to the nearest repair shop for examination, repair or adjustment.
9. The manufacturer does not recommend the use of accessory attachments other than
what is provided by the manufacturer. Use of attachments may cause injuries.
10. DO NOT use the appliance for other than its intended use.
11. DO NOT use outdoors. FOR HOUSEHOLD USE ONLY.
12. DO NOT place on or near a hot gas or electric burner, or in a heated oven.
13. DO NOT let cord hang over edge of table or counter, or touch hot surfaces.
14. NEVER leave unit unattended while in use or when plugged into an outlet.
15. Always attach plug to appliance rst, then plug cord in the wall outlet. To
disconnect, turn any control to "o," then remove plug from wall outlet.
ADDITIONAL IMPORTANT SAFEGUARDS
Operating Safety Precautions
1. During Transportation, the machine may have been placed on its side or upside
down resulting in the refrigerant and oil separating from the compressor. To
avoid damage, place upright for 24 hours before turning the power on.
2. NEVER lay the unit on its side or upside down. Unit should remain upright at
all times. Anytime the unit has been turned on its side or upside down, you
will need to put it in the upright position and wait 24 hours before using.
3. This unit must be on a level surface to operate properly.
4. Check Freezing Cylinder for presence of foreign objects prior to use.
Page 6

ENGLISH
4
Instructions for the Electrical Cord and Plug
1. ELECTRICAL SHOCK HAZARD: Failure to follow these instructions
can result in death, re, or electrical shock.
• Plug into a grounded 3 prong outlet.
• DO NOT remove ground prong.
• DO NOT use an adapter.
• DO NOT use an extension cord.
2. This unit MUST be grounded. In the event of an electrical short circuit, grounding
reduces the risk of electric shock by providing an escape wire for the electric current.
This unit is equipped with a cord having a grounding wire with a grounding plug.
The plug must be plugged into an outlet that is properly installed and grounded.
3. WARNING: Improper use of the grounding plug can result in a risk of electric
shock. If the plug does not t fully into the outlet, contact a qualied
electrician. Do not attempt to modify the plug in any way.
4. A short power supply cord is provided to reduce the risk resulting
from becoming entangled or tripping over a long cord.
5. The manufacturer does not recommend using this machine in countries that do not support
120V AC even if a voltage adapter, transformer, or converter is in use.
SAVE THESE INSTRUCTIONS!
Page 7
ENGLISH
5
INTRODUCTION
Congratulations on your purchase of the FROZEN DESSERT MACHINE from Nostalgia!
Now you're ready to delight your family and friends with an assortment of soft serve
ice cream, milkshakes, frozen yogurt, gelato, slush drinks, adult beverages and more!
Features include:
• Makes 1 quart of frozen dessert in minutes
• Horizontal-style auger dispensing system
• Powerful compressor & refrigeration system quickly makes your favorite frozen desserts
• Dispensing sensor
• 30-setting LED control panel
• Integrated cleaning function for easy cleanup
• Stainless steel drip tray
• Chrome accents
• See RECIPE BOOK for a number of great desserts!
Page 8

ENGLISH
6
PARTS
Control Panel
Time Setting
Up/Down
Start/Stop
Ingredient
Funnel
Auger
Control
Panel
Drip Tray
ON/OFF
Power Switch
(underneath
side of unit)
Dispensing
Sensor
Dispensing
Handle
Ingredient
Chute
Ingredient
Chute Lid
Silicone
Gasket
Freezing
Cylinder
Dispenser
Cover
Dispensing
Spout
Dispensing
Swirl Cap
Cleaning
Brushes
Locking Pin
Page 9
ENGLISH
7
ASSEMBLY
Before assembling, be sure to get your FROZEN DESSERT MAKER washed and ready to
make delicious desserts. Follow the steps under CLEANING & MAINTENANCE to clean.
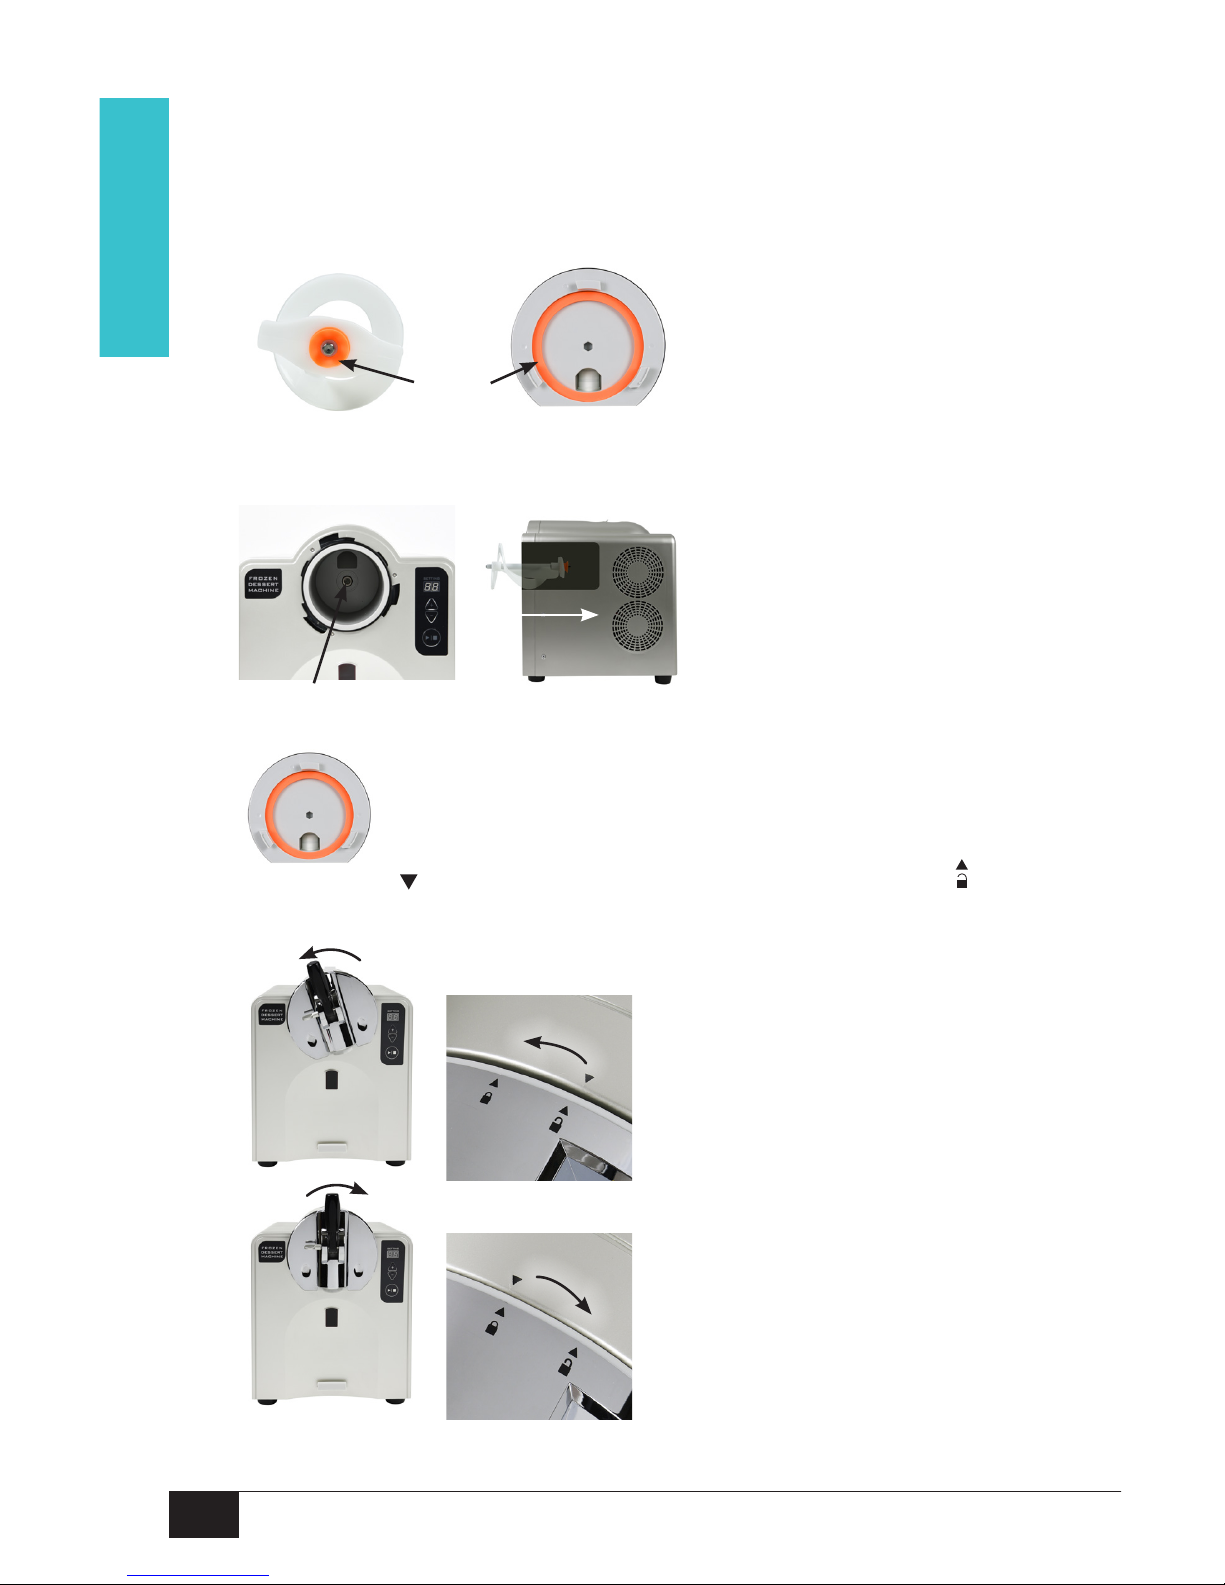
1. To create a better seal, lightly coat the bright orange Silicone Gaskets on the end of the
Auger and inside the Dispenser Cover with butter or cooking oil.
2. Insert the Silicone Gasket end of the Auger into the Freezing Cylinder. Make sure the
hexagonal shaft and Silicone Gasket of the Auger is seated into the back of the Freezing
Cylinder.
3. Place the Silicone Gasket back into the interior of the Dispenser Cover.
4. Line up the arrow ( ) located on the top of the front panel with the unlock symbol ( ) on
the Dispenser Cover. Twist the Dispenser Cover clockwise to secure onto the front panel.
Silicone
Gaskets
Hexagonal shaft
LOCKED
UNLOCKED
Page 10
ENGLISH
8
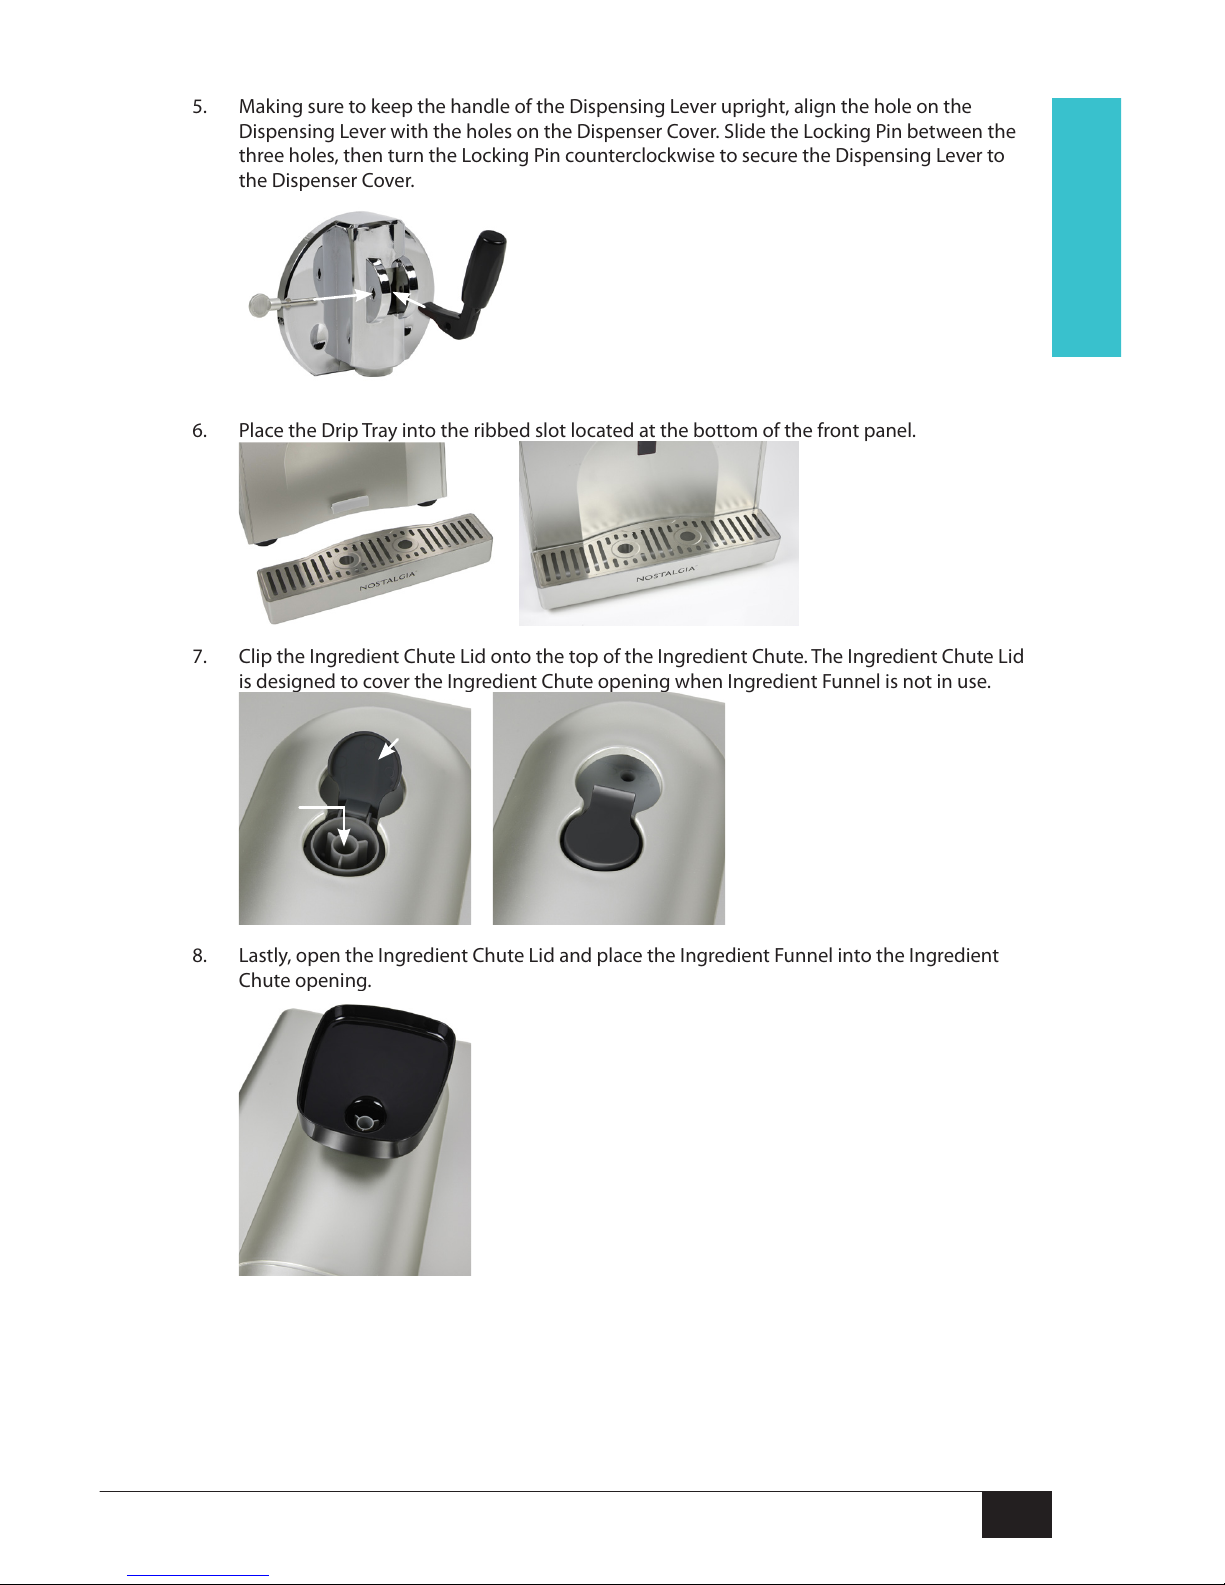
5. Making sure to keep the handle of the Dispensing Lever upright, align the hole on the
Dispensing Lever with the holes on the Dispenser Cover. Slide the Locking Pin between the
three holes, then turn the Locking Pin counterclockwise to secure the Dispensing Lever to
the Dispenser Cover.
6. Place the Drip Tray into the ribbed slot located at the bottom of the front panel.
7. Clip the Ingredient Chute Lid onto the top of the Ingredient Chute. The Ingredient Chute Lid
is designed to cover the Ingredient Chute opening when Ingredient Funnel is not in use.
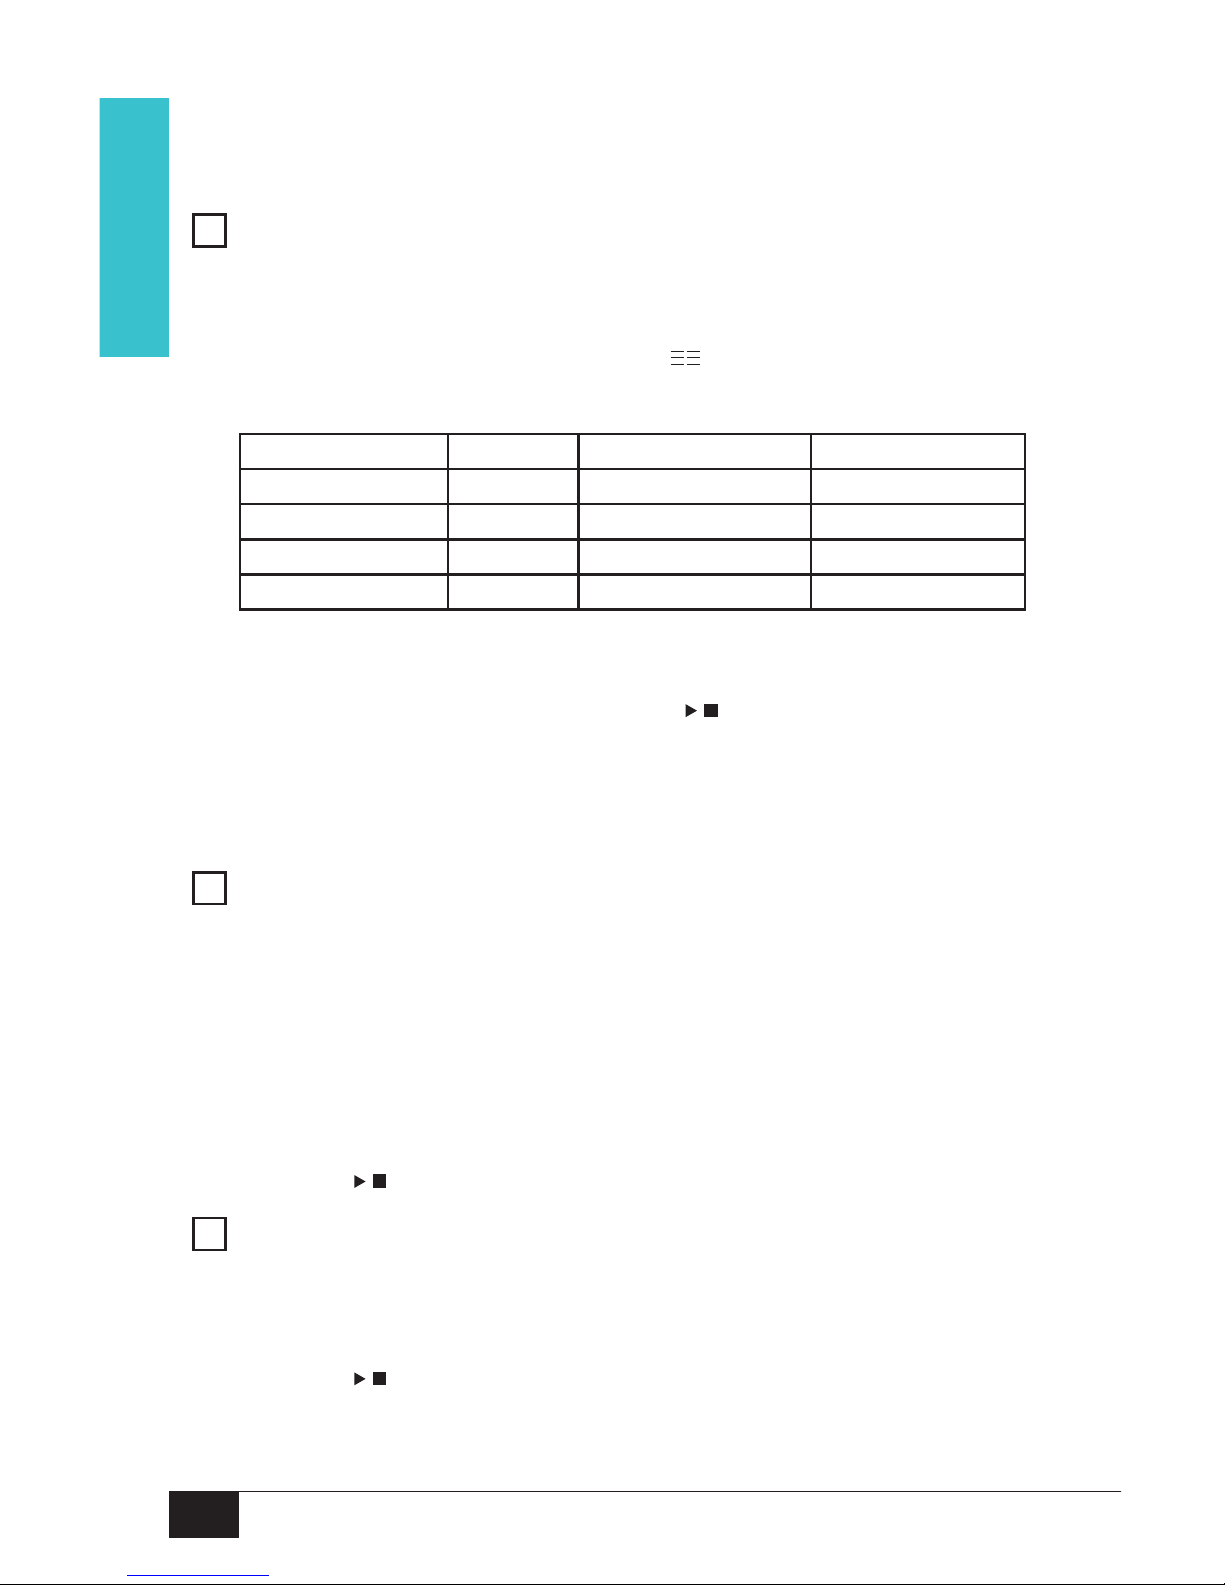
8. Lastly, open the Ingredient Chute Lid and place the Ingredient Funnel into the Ingredient
Chute opening.
Ingredient
Chute Lid
Ingredient
Chute
OPEN CLOSED
Page 11
ENGLISH
9
HOW TO OPERATE
Before using your FROZEN DESSERT MACHINE, be sure you read and
understand all outlined steps under HOW TO OPERATE.
1
FREEZE MODE : Make a dessert.
1. Choose and prepare your recipe as per the directions. See the included
RECIPE BOOK for a number of fun recipes and ideas!
2. Turn the unit ON by toggling the ON/OFF Power Switch located underneath
the side of the unit. The Control Panel will display " ".
3. Press the UP or DOWN arrow on the Control Panel to correspond with the suggested Dessert
Code number below based on the type of dessert.
Dessert Type Setting Recommended Setting Max Recipe Capacity
Soft Serve Ice Cream 13 to 18 min 17 min 750 mL (26 oz.)
Slush Drink 8 to 12 min 9 min 1000 mL (34 oz.)
Alcoholic Beverage 12 to 14 min 14 min 1000 mL (34 oz.)
Iced Drink 4 to 6 min 5 min 1000 mL (34 oz.)
4. Pour your liquid mix into the unit via the Ingredient Funnel.
NOTE: Do not add chunks of food, such as fruit, nuts or candies, into the Ingredient Funnel
or Freezing Cylinder. Food chunks may become lodged in the Auger and damage the unit.
5. To start the freezing process, press the START/STOP ( / ) button. This will turn on the
compressor and the Auger will begin to stir. The Control Panel will count down in 1 minute
intervals from the time entered until the display shows "00".
NOTE: If the Freezing Cylinder is warmer or colder than average, the Control Panel
will automatically increase or decrease the time needed to make the dessert.
6. When your dessert is ready for dispensing, the unit will beep 15 times.
2a
DISPENSE MODE : Enjoy your dessert now.
1. When ready to dispense, the Control Panel will display "00". Hold a cup under the Dispenser
Spout. This will activate the Dispensing Sensor located beneath the Dispenser Spout, which
turns on the compressor and allows the Auger to begin stirring your frozen dessert.
NOTE: Your hand or a solid color cup is required to activate the sensor before dispensing.
Clear cups may not activate the Dispensing Sensor.
PRO TIP: Remove the Dispensing Swirl Cap for better dispensing of slush drinks.
2. Pull the Dispensing Handle downward to dispense the nal product into your cup. Once
dispensed, push the Dispensing Handle back into the original upright position and remove
your hand from in front of the Dispensing Sensor.
NOTE: If your dessert is too liquidy and needs more time to freeze, hold the
START/STOP ( / ) button for two seconds to add 2 minutes of time.
2b
KEEP FRESH MODE : Enjoy your dessert later.
KEEP FRESH MODE keeps the nished product ready for dispensing. When your
frozen dessert is ready, the unit automatically goes into KEEP FRESH MODE. In this
mode, the compressor turns on for 1 minute, then turns o for 5 minutes.
NOTE: If your dessert is too liquidy and needs more time to refreeze, hold the
START/STOP ( / ) button for two seconds to add 2 minutes of time.
Page 12

ENGLISH
10
3
CLEANING MODE : Try a new recipe or clean up after you're done.
After each use, be sure to dispense any remaining dessert from the Freezing Cylinder
before disassembling the unit for further cleaning. Know that all dessert has been
dispensed when pulling the Dispensing Handle no longer produces dessert.
The CLEANING MODE has two cycles.
Cleaning Cycle 1:
1. To place the unit in CLEANING MODE, press the START/STOP
( / ) button on the control panel, then press the UP or DOWN arrow
on the Control Panel until the Control Panel displays " ".
2. Pour 500 to 800 ml (2 to 3 cups) of fresh water into the
Freezing Cylinder via the Ingredient Funnel.
3. Press the START/STOP ( / ) button to begin the short cleaning process. The Freezing
Cylinder will begin to warm, while the Control Panel begins counting down from "03" to " ".
4. Allow the unit to run for about 30 seconds, then empty the water from the
Freezing Cylinder into a bowl or bucket, and dispose of the old water.
5. While the unit is still running, add 500 to 800 ml (2 to 3 cups) of hot, soapy water into the
Freezing Cylinder via the Ingredient Funnel, then allow the unit to run for about 30 seconds.
6. Empty the soapy water from the Freezing Cylinder into a bowl or bucket, and dispose of the
old water.
NOTE: If you need more time, press the START/STOP button to stop the
current cleaning cycle and the Control Panel will display " ". Press the
START/STOP button again and the cleaning cycle will reset to "03".
7. When Cleaning Cycle 1 is complete, the unit will beep
15 times to indicate the end of the cycle.
Cleaning Cycle 2:
1. Pour 500 to 800 ml (2 to 3 cups) of fresh water into the Freezing Cylinder
via the Ingredient Funnel. Press the START/STOP ( / ) button, and the
Control Panel will begin counting down from "01" to "00".
2. Allow the water to stir for several seconds, then empty the water
into a bowl or bucket, and dispose of the old water.
3. Continue cycling fresh water through the unit until all soap has been rinsed from the
Freezing Cylinder.
NOTE: If you need more time, press the START/STOP button to stop the
current cleaning cycle and the Control Panel will display " ". Press the
START/STOP button again and the cleaning cycle will reset to "01".
4. When Cleaning Cycle 2 is complete, the unit will beep
15 times to indicate the end of the cycle.
5. Now you're ready to try another delicious recipe!
For further cleaning directions, proceed to the CLEANING
& MAINTENANCE section of this manual.
4
CANCEL MODE : Cancel any mode at any time.
To cancel any MODE, simply press the START/STOP ( / ) button on the Control Panel. The
unit will immediately stop that MODE and the Control Panel will display the last number
setting. You may add or subtract time using the UP or DOWN arrows.
NOTE: You will not be able to dispense dessert after engaging CANCEL MODE. To dispense,
press the START/STOP button to add two minutes of time. Dispense after the unit beeps.
Page 13

ENGLISH
11
HELPFUL TIPS
LARGE GROUPS & PARTIES
When serving a large group or party, it can be best to prepare a large
amount of your dessert recipe ahead of time. When the rst batch is
gone, simply pour another measure of your mix into the unit.
SOFT SERVE ICE CREAM RECIPES
Keep in mind that custard-based recipes, as well as recipes that call for heavy
cream or whipping cream, tend to yield a thick, creamy ice cream texture that may
make dispensing dicult with this soft serve machine. For this reason, recipes with
heavy cream or whipping cream are not recommended for use in this machine.
However, you may substitute heavy cream or whipping cream with whole milk
or half and half to produce a more easily dispensable soft serve dessert.
In addition, recipes calling for heavy cream or whipping cream may require two or
more cleaning cycles due to the thick, dense consistency produced by these recipes.
As ice cream mix freezes, it expands. To ensure you do not overll, do not pour
more than 26 oz. (750 ml) of ice cream mix into the unit at one time.
SLUSH RECIPES
Slush recipes must include sugar in order to freeze. For this reason, diet
sodas, sugar-free juices, and the like may not be used with this unit.
ALCOHOLIC RECIPES
Alcohol may be added to almost any recipe. However, keep in mind that alcohol does
not freeze and a recipe may require additional time to create the right consistency.
DISPENSING
When dispensing, clear cups will not activate the Dispensing Sensor. Use
your hand or a solid color cup to activate the sensor before dispensing.
If after dispensing you nd that additional time is needed, hold the
START/STOP ( / ) button for two seconds to add two additional minutes of time.
LUBRICATION RECOMMENDATION
The Auger and Dispenser Cover have silicone gaskets to prevent leaking and create
a better seal. To increase the life of the seals and avoid them from running dry, it is
recommended to occasionally apply butter or cooking oil onto the silicone gasket surfaces.
Page 14

ENGLISH
12
CLEANING & MAINTENANCE
After each use, be sure to dispense any remaining dessert from the Freezing Cylinder
before disassembling the unit for further cleaning. Know that all dessert has been
dispensed when pulling the Dispensing Handle no longer produces dessert.
The CLEANING MODE has two cycles.
Cleaning Cycle 1:
1. To place the unit in CLEANING MODE, press the START/STOP
( / ) button on the control panel, then press the UP or DOWN arrow
on the Control Panel until the Control Panel displays " ".
2. Pour 500 to 800 ml (2 to 3 cups) of fresh water into the
Freezing Cylinder via the Ingredient Funnel.
3. Press the START/STOP ( / ) button to begin the short cleaning process. The Freezing
Cylinder will begin to warm, while the Control Panel begins counting down from "03" to " ".
4. Allow the unit to run for about 30 seconds, then empty the water from the
Freezing Cylinder into a bowl or bucket, and dispose of the old water.
5. While the unit is still running, add 500 to 800 ml (2 to 3 cups) of hot, soapy water into the
Freezing Cylinder via the Ingredient Funnel, then allow the unit to run for about 30 seconds.
6. Empty the soapy water from the Freezing Cylinder into a
bowl or bucket, and dispose of the old water.
7. When Cleaning Cycle 1 is complete, the unit will beep
15 times to indicate the end of the cycle.
Cleaning Cycle 2:
1. Pour 500 to 800 ml (2 to 3 cups) of fresh water into the Freezing Cylinder
via the Ingredient Funnel. Press the START/STOP ( / ) button, and the
Control Panel will begin counting down from "01" to "00".
2. Allow the water to stir for several seconds, then empty the water
into a bowl or bucket, and dispose of the old water.
3. Continue cycling fresh water through the unit until all soap
has been rinsed from the Freezing Cylinder.
4. When Cleaning Cycle 2 is complete, the unit will beep
15 times to indicate the end of the cycle.
5. Toggle the ON/OFF Power Switch to turn o the unit.
NOTE: Due to the high fat content, recipes calling for heavy cream
or whipping cream may require two or more cleaning cycles due to
the thick, dense consistency produced by these recipes.
Page 15

ENGLISH
13
CLEANING REMOVABLE PARTS
1. Disconnect the unit from the electrical outlet.
2. Remove the Ingredient Funnel, Dispenser Cover, and Auger from the unit.
NOTE: Excess water may remain in the Freezing Cylinder after cleaning cycle. To
prevent water spills, place a bowl under the Dispenser Cover before removing.
3. Dismantle the Auger for cleaning.
Pull the ends of the Auger
to remove the inner
pole from the Auger.
Separate the inner pole
from the Auger.
Pull the bright orange Silicone
Gasket o the Auger end.
4. Turn the Locking Pin clockwise to unlock and remove the Dispensing Handle from the
Dispenser Cover.
5. Dismantle the Dispenser Cover.
Separate the back of the
Dispenser Cover by sliding
downward, then lifting
away from the front.
Front
Back
Twist o the Dispensing
Swirl Cap, then pull
the plunger out of the
Dispenser Spout.
Plunger
Dispensing
Swirl Cap
6. Wash all parts with warm, soapy water, and then dry with a soft, non-abrasive cloth.
7. Use the included Cleaning Brushes to clean hard to reach areas,
like the Ingredient Chute and Dispenser Spout.
8. Wipe dry the Freezing Cylinder interior with a soft, non-abrasive cloth or paper towel.
9. As needed, use a damp, non-abrasive cloth to wipe the
exterior of the unit, and then dry thoroughly.
10. IMPORTANT! Never immerse the base of the unit in water.
Now your FROZEN DESSERT MACHINE is clean and ready to make
another delicious batch of your favorite frozen dessert!
A
A
B
B
C
Page 16

ENGLISH
14
RETURNS & WARRANTY
SHOULD YOUR UNIT NOT WORK OR IF DAMAGED WHEN YOU FIRST TAKE IT OUT OF
THE BOX, PLEASE RETURN IT TO THE PLACE OF PURCHASE IMMEDIATELY.
FROZEN DESSERT MACHINE / FDM1
Should you have any questions, please contact us via email or at the customer service number listed
below between the hours of 8:00 AM and 5:00 PM, Monday through Friday, Central Standard Time.
Distributed by:
Nostalgia Products LLC
1471 Partnership Dr.
Green Bay, WI 54304-5685
Customer Service
Phone: (920) 347-9122
Web: www.nostalgiaproducts.com
Customer Service Inquiry
To submit a Customer Service inquiry, go to www.nostalgiaproducts.com and ll
out the Customer Service Inquiry form and click the Submit button.
A representative will contact you as soon as possible.
Product Warranty Terms
Nostalgia Products LLC (the “Company”) hereby warrants that for a period of one (1) year from the
date of original purchase, this product will be free of defects in material and workmanship under
normal home use, provided that the product is operated and maintained in accordance with the
operating instructions. As the sole and exclusive remedy under this warranty, the Company will
at its discretion either repair or replace the product found to be defective, or issue a refund on the
product during the warranty period. This warranty is only available to the original retail purchaser of
the product from the date of initial retail purchase, and is only valid with the original sales receipt, as
proof of purchase date is required to obtain warranty benets. All warranty claims must be brought
to the attention of the Company within the warranty period and no later than 30 days of the failure
to perform. This warranty does not cover normal wear or damage caused by shipping, mishandling,
misuse, accident, alteration, improper replacement parts, or other than ordinary household use.
You may be required to return the product (with shipping prepaid by you) for inspection and
evaluation. Return shipping costs are not refundable. The Company is not responsible for returns
damaged or lost in transit. Unless otherwise specically permitted by the operating instructions, this
warranty applies to indoor household use only. In order to obtain service under this warranty, please
contact the Company at the telephone number listed above or by lling out the Customer Service
Inquiry Form located at www.nostalgiaproducts.com. Warranty valid only in USA and Canada.
This warranty is in lieu of all other warranties, expressed or implied, including warranties of
merchantability and tness for a particular purpose, which are hereby excluded to the extent
permitted by law. In no event shall the Company be liable for any indirect, incidental, consequential,
or special damages arising out of or in connection with this product or the use thereof. Some
states, provinces or jurisdictions do not permit the exclusion or limitation of incidental or
consequential damages, so the foregoing exclusion or limitation may not apply to you.
This warranty does not apply to re-manufactured merchandise.
Please read the operating instructions carefully. Failure to comply
with the operating instructions will void this warranty.
For more information, visit us online at www.nostalgiaproducts.com.
Like us on Facebook at www.facebook.com/NostalgiaElectrics.
Follow our boards on Pinterest at www.pinterest.com/nostalgiaelctrx.
Tweet along with us on Twitter at www.twitter.com/NostalgiaElctrx.
Page 17

15
ESPAÑOL
15
¡Haga de cada día una esta!
Visite www.nostalgiaproducts.com para
ver más productos divertidos.
CONTENIDO
SEGURIDAD . . . . . . . . . . . . . . . . . . . . . . . . . . . . . . . . . . . . . . . 15
PROTECCIONES IMPORTANTES . . . . . . . . . . . . . . . . . . . . . . . . . . 16
PROTECCIONES IMPORTANTES ADICIONALES . . . . . . . . . . . . . . . . . 16
INTRODUCCIÓN . . . . . . . . . . . . . . . . . . . . . . . . . . . . . . . . . . . . 18
PARTES . . . . . . . . . . . . . . . . . . . . . . . . . . . . . . . . . . . . . . . . . . 19
ENSAMBLAJE . . . . . . . . . . . . . . . . . . . . . . . . . . . . . . . . . . . . . . 20
CÓMO UTILIZAR . . . . . . . . . . . . . . . . . . . . . . . . . . . . . . . . . . . . 22
CONSEJOS ÚTILES . . . . . . . . . . . . . . . . . . . . . . . . . . . . . . . . . . 24
LIMPIEZA Y MANTENIMIENTO . . . . . . . . . . . . . . . . . . . . . . . . . . . 25
DEVOLUCIONES Y GARANTÍA . . . . . . . . . . . . . . . . . . . . . . . . . . . 27
SEGURIDAD
Especicaciones del electrodoméstico:
120 Volts, 60 Hz, 600 Watts
Refrigerante: R134a
ESTE PRODUCTO ES PARA USAR SOLAMENTE EN UN TOMACORRIENTE DE 120 VCA.
Visite www.nostalgiaproducts.com/user-manuals/ para ver el manual más actualizado.
Su seguridad y la de otras personas es muy importante.
Hemos dado muchos mensajes de seguridad importantes en este manual y
en el aparato. Siempre lea y obedezca todos los mensajes de seguridad .
Este es el símbolo de alerta de seguridad.
Este símbolo le avisa de los peligros potenciales que
pueden provocar serias lesiones a usted y a otros.
Todos los mensajes de seguridad estarán antecedidos por el símbolo de alerta.
Todos los mensajes de seguridad le indicarán cuál es el peligro potencial, cómo
reducir la posibilidad de lesiones, y qué puede suceder si no sigue las instrucciones.
Page 18

16
ESPAÑOL
16
PROTECCIONES IMPORTANTES
Una persona que no haya leído y comprendido todas las instrucciones
de uso y seguridad no está calicada para utilizar este aparato. Todos
los usuarios de este dispositivo deben leer y comprender este Manual
de instrucciones antes de utilizar o limpiar este aparato.
Cuando utiliza aparatos eléctricos, siempre se deben seguir algunas
medidas básicas de seguridad que incluyen las siguientes:
1. Lea todas las instrucciones antes de utilizar este aparato.
2. NO TOQUE las supercies calientes. Use agarraderas o mangos.
3. Este aparato NO ES UN JUGUETE.
4. Los niños pequeños sin supervisión y las personas con limitación
cognitiva nunca deben utilizar este aparato.
5. Una supervisión estricta se requiere cuando un aparato se use por niños o cerca de ellos.
6. Como medida de protección contra el riesgo de descarga eléctrica, no sumerja el
cable, los enchufes ni ninguna otra parte de la unidad en agua ni en otros líquidos.
7. Desconéctelo del tomacorriente cuando no esté en uso, antes de
retirar piezas y antes de la limpieza. Déjelo enfriar antes de colocar
o retirar cualquiera de las piezas, y antes de la limpieza.
8. NO utilice ningún aparato con el cable o el enchufe dañados, ni si el aparato
tiene desperfectos o SI se ha dañado de cualquier manera. Devolver el
aparato al taller de reparación más cercano para su reparación o ajuste.
9. El fabricante no recomienda el uso de otros aditamentos o accesorios diferentes a los
proporcionados por el fabricante. El uso de accesorios puede provocar lesiones.
10. NO utilice el aparato para otros usos que no haya sido diseñado.
11. NO utilice el aparato al aire libre. SOLO PARA USO DOMÉSTICO.
12. NO lo coloque sobre o cerca de una hornilla eléctrica o gas caliente, o en un horno caliente.
13. NO permita que el cable cuelgue sobre el borde de la mesa o
del mostrador, ni que toque supercies calientes.
14. NUNCA deje la unidad desatendida mientras esté en uso o
cuando esté enchufada a una toma de corriente.
15. Debe ser extremadamente cuidadoso al mover cualquier aparato con comida caliente.
16. Siempre conecte primero el enchufe al aparato, luego enchufe el cable
a la toma de corriente. Para desconectar, mueva todos los controles
a “apagar” y luego retire el enchufe del tomacorriente.
PROTECCIONES IMPORTANTES ADICIONALES
Precauciones de seguridad operativa
1. Durante el transporte, la máquina puede haber sido apoyada de costado o al
revés, resultando en que el refrigerante y el aceite se separen del compresor.
Para evitar daños, coloque vertical por 24 horas antes de encenderla.
2. NUNCA apoye la unidad de costado ni al revés. La unidad debe permanecer
vertical en todo momento. Cada vez que la unidad se apoye de costado o al revés,
deberá colocarla en posición vertical y esperar 24 horas antes de usarla.
3. Esta unidad debe estar en una supercie nivelada para que funcione bien.
Page 19

17
ESPAÑOL
17
4. Compruebe el cilindro de congelamiento para detectar la
presencia de objetos extraños antes de usar.
Instrucciones para el cable y el enchufe eléctrico
1. RIESGO DE DESCARGA ELÉCTRICA: El incumplimiento de estas instrucciones
puede resultar en la muerte, incendio o descarga eléctrica.
• Enchufe en un tomacorrientes de 3 patas con conexión a tierra.
• NO retire la patilla de conexión de tierra.
• NO utilice un adaptador.
• NO utilice un cable de extensión.
2. La unidad DEBE conectarse a tierra. En caso de un corto circuito, la conexión
a tierra reduce el riesgo de descarga eléctrica al proporcionar un cable de
escape para la corriente eléctrica. Esta unidad está provista de un cable
que tiene un cable a tierra con un enchufe a tierra. Se debe enchufar en un
tomacorriente de pared instalado apropiadamente y conectado a tierra.
3. ADVERTENCIA: El uso incorrecto de la toma de tierra puede resultar en riesgo de sufrir
una descarga eléctrica. Si el enchufe no entra completo en el tomacorriente, contacte
a un electricista calicado. No trate de modicar el enchufe de ninguna manera.
4. Se provee un cable de alimentación corto para reducir el riesgo
resultante de enredarse o tropezar con un cable largo.
5. El fabricante no recomienda el uso de esta máquina en países que no admiten 120V
CA incluso si se está usando un adaptador, transformador o convertidor de voltaje.
GUARDE ESTAS INSTRUCCIONES!
Page 20

18
ESPAÑOL
18
INTRODUCCIÓN
¡Felicitaciones por su compra de la MÁQUINA PARA POSTRES HELADOS de Nostalgia!
¡Ahora está listo para deleitar a su familia y amigos con una variedad de helado suave,
batidos de leche, yogurt helado, gelato, bebidas granizadas, bebidas para adultos y más!
Las características incluyen:
• Prepara 1 cuarto de postre helado en minutos
• Sistema de dispensado con barrena de estilo horizontal
• El potente compresor y sistema de refrigeración prepara
rápidamente sus postres helados favoritos
• Sensor de dispensado
• Panel de control con LED de 30 ajustes
• Función integrada de limpieza para una limpieza sencilla
• Bandeja de goteo de acero inoxidable
• Decoraciones cromadas
• ¡Vea el LIBRO DE RECETAS para varios postres deliciosos!
Page 21

19
ESPAÑOL
19
PARTES
Panel de Control
Ajuste de hora
Arriba/Abajo
Inicio/Detención
Chimenea de
ingredientes
Barrena
Panel de
control
Bandeja de goteo
Interruptor de
ENCENDIDO/
APAGADO (lado
inferior de la
unidad)
Sensor de
dispensado
Mango de
dispensado
Pico de
dispensado
Tapa de la
chimenea de
ingredientes
Junta de
silicona
Cilindro de
congelamiento
Cubierta del
dispensador
Pico del
dispensador
Tapa giratoria
de dispensado
Cepillos de
limpieza
Clavija de
bloqueo
Page 22

20
ESPAÑOL
20
ENSAMBLAJE
Antes de ensamblar, asegúrese de lavar y preparar su MÁQUINA PARA
POSTRES HELADOS para preparar deliciosos postres. Siga los pasos
según la sección de LIMPIEZA Y MANTENIMIENTO para limpiar.
1. Para crear un mejor sello, recubra levemente las juntas de silicona naranja brillante en el extremo
de la barrena y en el interior de la cubierta del dispensador con manteca o aceite de cocina.
2. Inserte el extremo de la barrena de la junta de silicona en el cilindro de congelamiento.
Asegúrese de que el eje hexagonal y la junta de silicona de la barrena se asienten en la parte
posterior del cilindro de congelamiento.
3. Coloque la junta de silicona nuevamente en el interior de la cubierta dle dispensador.
4. Alinee la echa ( ) ubicada en la parte superior del panel delantero con el símbolo de
desbloqueo ( ) en la cubierta del dispensador. Gire la cubierta del dispensador en sentido
horario para sujetarla en el panel delantero.
Hexagonal shaft
Juntas de
silicona
BLOQUEADO
DESBLOQUEADO
Page 23

21
ESPAÑOL
21
5. Asegurándose de mantener el mango de la palanca de dispensado vertical, alinee el oricio
en la palanca de dispensado con los oricios en la cubierta del dispensador. Deslice la clavija
de bloqueo entre los tres oricios, luego gire la clavija de bloqueo en sentido antihorario
para sujetar la palanca de dispensado a la cubierta del dispensador.
6. Coloque la bandeja de goteo en la ranura texturada ubicada en la parte inferior del panel
delantero.
7. Sujete la tapa de la chimenea de ingredientes a la parte superior de la chimenea de
ingredientes. La tapa de la chimenea de ingredientes está diseñada para cubrir la abertura
de la chimenea de ingredientes cuando la chimenea de ingredientes no está en uso.
8. Finalmente, abrea la tapa de la chimenea de ingredientes y coloque la chimenea de
ingredientes en la abertura de la chimenea de ingredientes.
Tapa de la
chimenea de
ingredientes
Chimenea de
ingredientes
ABIERTA CERRADA
Page 24

22
ESPAÑOL
22
CÓMO FUNCIONA
Antes de usar su MÁQUINA PARA POSTRES HELADOS, asegúrese de leer y
comprender todos los pasos que se describen en la sección CÓMO FUNCIONA.
1
MODO DE CONGELAMIENTO : Prepare un postre.
1. Seleccione y prepare su receta de acuerdo con las instrucciones. ¡Vea el LIBRO
DE RECETAS incluido para una gran cantidad de recetas e ideas divertidas!
2. ENCIENDA la unidad girando el interruptor de ENCENDIDO/APAGADO ubicado
debajo del lateral de la unidad. El Panel de Control mostrará " ".
3. Presione la echa hacia ARRIBA o ABAJO en el Panel de Control para que corresponda con el
número de código de postre a continuación, de acuerdo con el tipo de postre.
Tipo de postre Ajuste Ajuste recomendado Capacidad máxima
de la receta
Helado de mezcla suave 13 a 18 min 17 min 750 mL (26 oz.)
Bebida granizada 8 a 12 min 9 min 1000 mL (34 oz.)
Bebida alcohólica 12 a 14 min 14 min 1000 mL (34 oz.)
Bebida helada 4 a 6 min 5 min 1000 mL (34 oz.)
4. Vierta la mezcla líquida en la unidad por la chimenea de ingredientes.
NOTA: No agregue trozos de alimentos, como frutas, nueces o dulces, en
la chimenea de ingredientes ni en el cilindro de congelamiento. Los trozos
de alimentos pueden trabarse en la barrena y dañar la unidad.
5. Para comenzar el proceso de congelamiento, persione el botón AINICIO/DETENCIÓN ( / ).
De esta forma se encenderá el compresor y la barrena comenzará a girar. El Panel de Control
realizará conteos descendentes en intervalos de 1 minuto a partir del tiempo ingresado
hasta que la pantalla muestre "00".
NOTA: Si el cilindro de congelamiento está más caliente o más
frío que el promedio, el Panel de Control aumentará o reducirá
automáticamente el tiempo necesario para preparar el postre.
6. Cuando su postre esté listo para dispensar, la unidad emitirá 15 tonos.
2a
MODO DE DISPENSADO : Disfrute su postre ahora.
1. Cuando esté listo para dispensar, el Panel de Control mostrará "00". Sostenga una taza
debajo del pico del dispensador. Esto activará el sensor de dispensado ubicado debajo
del pico del dispensador, que enciende el compresor y permite que la barrena comience a
mezclar su postre helado.
NOTA: Se requiere la mano o una taza de color sólido para activar el sensor antes de
dispensar. Las tazas transparentes no activan el sensor de dispensado.
SUGERENCIA PROFESIONAL: Retire la tapa giratoria de
dispensado para dispensar mejor bebidas granizadas.
2. Tire de la manija de dispensado hacia abajo para dispensar el producto nal en la taza. Una
vez dispensado, presione la manija de dispensado nuevamente a la posición vertical original
y retire la mano de adelante del sensor de dispensado.
NOTA: Si el postre es demasiado líquido y necesita más tiempo para
congelarse, mantenga presionado el botón de INICIO/DETENCIÓN ( / )
por dos segundos para agregar 2 minutos de tiempo.
2b
MODO PARA MANTENER FRÍO : Disfrute su postre más tarde.
El MODO PARA MANTENER FRÍO mantiene el producto terminado listo para
dispensar. Cuando su postre helado esté listo, la unidad automáticamente
pasa al MODO PARA MANTENER FRÍO. En este modo, el compresor
se enciende por 1 minuto, luego se apaga por 5 minutos.
Page 25

23
ESPAÑOL
23
NOTA: Si el postre es demasiado líquido y necesita más tiempo para congelarse, mantenga
presionado el botón de INICIO/DETENCIÓN ( / ) por dos segundos para agregar 2 minutos
de tiempo.
3
MODO DE LIMPIEZA : Intente una nueva receta o limpie al nalizar.
Después de cada uso, asegúrese de dispensar el postre restante del cilindro de
congelamiento antes de desensamblar la unidad para su limpieza. Verique que se haya
dispensado todo el postre presionando la manija de dipensado sin que salga postre.
El MODO DE LIMPIEZAA tiene dos ciclos.
Ciclo de limpieza 1:
1. Para colocar la unidad en el MODO DE LIMPIEZA, presione el botón INICIO/
DETENCIÓN ( / ) en el panel de control, luego presione la echa hacia ARRIBA o
ABAJO en el Panel del Control hasta que el Panel de Control muestre " ".
2. Vierta 500 a 800 ml (2 a 3 tazas) de agua limpia en el cilindro de
congelamiento a través de la chimenea para ingredientes.
3. Presione el botón INICIO/DETENCIÓN ( / ) para comenzar el proceso corto
de limpieza. El cilindro de congelamiento comenzará a calentarse, mientras
que el Panel de Control comienza el conteo desdendente de "03" a " ".
4. Deje funcionar la unidad por unos 30 segundos, luego vacíe el agua del cilindro
de congelamiento en un recipiente o balde, y deseche el agua usada.
5. Mientras la unidad aún funciona, agregue 500 a 800 ml (2 a 3 tazas) de agua
jabonosa caliente en el cilindro de congelamiento a través de la chimenea de
ingredientes, luego deje funcionar la unidad por unos 30 segundos.
6. Vacíe el agua jabonosa del cilindro de congelamiento en un
recipiente o balde y deseche el agua usada.
7. Cuando el ciclo 1 de limpieza se ha completado, la unidad
emitirá 15 tonos para indicar el nal del ciclo.
Ciclo de limpieza 2:
1. Vierta 500 a 800 ml (2 a 3 tazas) de agua limpia en el cilindro de congelamiento
a través de la chimenea para ingredientes. Presione el botón INICIO/DETENCIÓN
( / ) y el Panel de Control comenzará el conteo descendente de "01" a "00".
2. Deje que el agua se mezcle por varios segundos, luego vacíe el agua del cilindro
de congelamiento en un recipiente o balde, y deseche el agua usada.
3. Continúe circulando agua fresca por la unidad hasta que se
enjuague todo el jabón del cilindro de congelamiento.
4. Cuando el ciclo 2 de limpieza se ha completado, la unidad
emitirá 15 tonos para indicar el nal del ciclo.
5. ¡Ahora está listo para probar otra receta deliciosa!
Para ver más instrucciones de limpieza, consulte la sección
de LIMPIEZA Y MANTENIMIENTO de este manual.
4
CANCELAR MODO : Cancele cualquier modo en cualquier momento.
Para cancelar cualquier MODO, simplemente presione el botón de INICIO/DETENCIÓN ( / )
en el Panel de Control. La unidad detendrá de inmediato ese MODO y el Panel de Control
mostrará el último ajuste de número. Puede agregar o quitar tiempo usando las echas
ARRIBA o ABAJO.
NOTA: No podrá dispensar postre después de accionar CANCELAR MODO.
Para dispensar, presione el botón de INICIO/DETENCIÓN para agregar dos
minutos de tiempo. Dispense después de que la unidad emite un tono.
Page 26

24
ESPAÑOL
24
CONSEJOS ÚTILES
GRUPOS GRANDES Y FIESTAS
Al servir a un grupo grande o en una esta, puede ser mejor preparar una
gran cantidad de receta del postre con anticipación. Cuando termina el
primer lote, simplemente vierta otra medida de su mezcla en la unidad.
RECETAS DE HELADO DE MEZCLA SUAVE
Recuerde que las recetas basadas en crema pastelera, así como las recetas que requieren
crema espesa o crema batida, tienden a producir una textura de helado espeso y cremoso
que puede dicultar el dispensado con esta máquina para servir mezclas suaves. Por este
motivo, no se recomiendan recetas con crema espesa o crema batida para usar en esta
máquina. Sin embargo, puede reemplazar la crema espesa o la crema batida por leche
entera o leche con crema para preparar un postre de mezcla suave más fácil de dispensar.
Asimismo, las recetas que requieren crema espesa o crema batida pueden requerir dos o
más ciclos de limpieza debido a la consistencia espesa y densa producida por estas recetas.
Cuando la congela la mezcla de helado, se expande. Para asegurarse de no llenar en
exceso, no vierta más de 26 oz. (750 ml) de mezcla de helado en la unidad a la vez.
RECETAS DE GRANIZADO
Las recetas de granizado deben incluir azúcar para congelarse. Por este motivo, las
gaseosas de dieta, jugos sin azúcar y bebidas similares no pueden usarse con esta unidad.
RECETAS CON ALCOHOL
Se puede agregar alcohol a casi cualquier receta. Sin embargo,
recuerde que el alcohol no se congela y una receta puede requerir
tiempo adicional para crear la consistencia adecuada.
DISPENSADO
Al dispensar, las tazas transparentes no activarán el sensor de dispensado. Use la
mano o una taza de color sólido para activar el sensor antes de dispensar.
Si después de dispensar, encuentra que se requiere un tiempo
adicional, mantenga presionado el botón de INICIO/DETENCIÓN ( / )
por dos segundos para agregar dos minutos adicionales.
RECOMENDACIÓN DE LUBRICACIÓN
La barrena y la cubierta del dispensador tienen juntas de silicona para
prevenir las fugas y crear un sello mejor. Para aumentar la duración de los
sellos y evitar que funcionen en seco, se recomienda aplicar ocaisonalmente
manteca o aceite de cocina en las supercies de la junta de silicona.
Page 27

25
ESPAÑOL
25
LIMPIEZA Y MANTENIMIENTO
Después de cada uso, asegúrese de dispensar el postre restante del cilindro de
congelamiento antes de desensamblar la unidad para su limpieza. Verique que se haya
dispensado todo el postre presionando la manija de dipensado sin que salga postre.
El MODO DE LIMPIEZAA tiene dos ciclos.
Ciclo de limpieza 1:
1. Para colocar la unidad en el MODO DE LIMPIEZA, presione el botón INICIO/
DETENCIÓN ( / ) en el panel de control, luego presione la echa hacia ARRIBA o
ABAJO en el Panel del Control hasta que el Panel de Control muestre " ".
2. Vierta 500 a 800 ml (2 a 3 tazas) de agua limpia en el cilindro de
congelamiento a través de la chimenea para ingredientes.
3. Presione el botón INICIO/DETENCIÓN ( / ) para comenzar el proceso corto
de limpieza. El cilindro de congelamiento comenzará a calentarse, mientras
que el Panel de Control comienza el conteo desdendente de "03" a " ".
4. Deje funcionar la unidad por unos 30 segundos, luego vacíe el agua del cilindro
de congelamiento en un recipiente o balde, y deseche el agua usada.
5. Mientras la unidad aún funciona, agregue 500 a 800 ml (2 a 3 tazas) de agua
jabonosa caliente en el cilindro de congelamiento a través de la chimenea de
ingredientes, luego deje funcionar la unidad por unos 30 segundos.
6. Vacíe el agua jabonosa del cilindro de congelamiento en un
recipiente o balde y deseche el agua usada.
7. Cuando el ciclo 1 de limpieza se ha completado, la unidad
emitirá 15 tonos para indicar el nal del ciclo.
Ciclo de limpieza 2:
1. Vierta 500 a 800 ml (2 a 3 tazas) de agua limpia en el cilindro de congelamiento
a través de la chimenea para ingredientes. Presione el botón INICIO/DETENCIÓN
( / ) y el Panel de Control comenzará el conteo descendente de "01" a "00".
2. Deje que el agua se mezcle por varios segundos, luego vacíe el agua del cilindro
de congelamiento en un recipiente o balde, y deseche el agua usada.
3. Continúe circulando agua fresca por la unidad hasta que se
enjuague todo el jabón del cilindro de congelamiento.
4. Cuando el ciclo 2 de limpieza se ha completado, la unidad
emitirá 15 tonos para indicar el nal del ciclo.
5. Accione el interruptor de ENCENDIDO/APAGADO para apagar la unidad.
NOTA: Debido al alto contenido de grasa, las recetas que requieren crema
espesa o crema batida pueden requerir dos o más ciclos de limpieza
debido a la consistencia espesa y densa producida por estas recetas.
Page 28

26
ESPAÑOL
26
LIMPIEZA DE PARTES REMOVIBLES
1. Desconecte la unidad del tomacorriente eléctrico.
2. Retire la chimenea de ingredientes, la barrena y la cubierta del dispensador de la unidad.
NOTA: El exceso de agua puede permanecer en el Cilindro de Congelación
después del ciclo de limpieza. Para evitar derrames de agua, coloque un
recipiente debajo de la cubierta del dispensador antes de quitarlo.
3. Desmonte la barrena para limpiarla.
Tire de los extremos de la
barrena para retirar el eje
interno de la barrena.
Separe el eje interno
de la barrena.
Tire de la junta de silicona
naranja brillante del
extremo de la barrena.
4. Gire la clavija de bloqueo en sentido horario para desbloquear y retire la manija de
dispensado de la cubierta del dispensador.
5. Desmantele la cubierta del dispensador.
Separe la parte posterior de
la cubierta del dispensador
deslizando hacia abajo, luego
levante alejando del frente.
Frente
Atrás
Gire la tapa giratoria de
dispensado, luego tire del
émbolo para retirarlo del
pico del dispensador.
Émbolo
Tapa giratoria
de dispensado
6. Lave todas las partes con agua tibia jabonosa y luego seque con un paño suave, no abrasivo.
7. Use los cepillos de limpieza incluidos para limpiar áreas difíciles de alcanzar,
como la chimenea para ingredientes y el pico del dispensador.
8. Seque el interior del cilindro de congelamiento con un
paño suave, no abrasivo, o una toalla de papel.
9. Cuando sea necesario, utilice un paño húmedo, que no sea abrasivo
para limpiar el exterior de la unidad y luego seque bien.
10. ¡IMPORTANTE! Nunca sumerja la base de la unidad en agua.
¡Ahora su MÁQUINA PARA POSTRES HELADOS está limpia y lista para
preparar otro lote delicioso de su postre helado favorito!
A
A
B
B
C
Page 29

27
ESPAÑOL
27
DEVOLUCIONES Y GARANTÍA
SI LA UNIDAD NO FUNCIONA O ESTÁ DAÑADA AL SACARLA POR PRIMERA VEZ
DE LA CAJA, DEVUÉLVALA AL LUGAR DE COMPRA INMEDIATAMENTE.
MÁQUINA PARA POSTRES HELADOS / FDM1
Si tiene preguntas, contacte con nosotros por correo electrónico o por el número
telefónico de servicio al cliente que aparece a continuación en el horario de
8:00 AM a 5:00 PM, de lunes a viernes, Hora Estándar del Este.
Distribuida por:
Nostalgia Products LLC
1471 Partnership Dr.
Green Bay, WI 54304-5685
Servicio al cliente
Teléfono: (920) 347-9122
Web: www.nostalgiaproducts.com
Solicitud de servicio al cliente
Para enviar una solicitud al Servicio al Cliente, vaya a www.nostalgiaproducts.com, llene
el formulario de Solicitud de Servicio al Cliente y haga clic en el botón Enviar.
Un representante le contactará tan pronto como sea posible.
Términos de garantía del producto
Po este medio, Nostalgia Products LLC (la “Compañía”) garantiza que por un período de un (1) año a
partir de la fecha de compra original, este producto estará sin defectos en cuanto a materiales y mano
de obra en uso normal en casa, siempre que el producto se maneje y mantenga de acuerdo con las
instrucciones de manejo. Como único y exclusivo remedio en virtud de esta garantía, la Compañía, a
su discreción, podrá optar por reparar o sustituir el producto que se encuentre defectuoso, o emitir un
reembolso por el producto durante el período de garantía. Esta garantía sólo está disponible para el
comprador original minorista del producto a partir de la fecha inicial de compra al por menor, y sólo es
válida con el recibo de compra original, y como prueba de la fecha de compra, es necesario obtener los
benecios de la garantía. Todos los reclamos de garantía deben hacerse a la atención de la Compañía
dentro del período de garantía y no más tarde que 30 días desde la imposibilidad de realizarlo. Esta
garantía no cubre el desgaste normal o daños ocasionados por el embarque, malos manejos, mal uso,
accidentes, alteración, piezas de cambio incorrectas, o algo distinto al uso doméstico normal. Es posible
que deba devolver el producto (con los gastos de envío pagados por usted) para inspección y evaluación.
Los costos de envío no son reembolsables. La empresa no se hace responsable por devoluciones
dañadas o perdidas en tránsito. A menos que se indique lo contrario especícamente permitido por
las instrucciones de manejo, esta garantía sólo se aplica al uso en interiores de las viviendas. Para
realizar una reparación bajo esta garantía, comuníquese con la Compañía mediante el número de
teléfono indicado anteriormente o al llenar el formulario de consulta para el servicio de Atención al
Cliente en www.nostalgiaproduct s.com. El período de garantía sólo es válido en EE.UU. y Canadá.
Esta garantía está en lugar de cualquier otra garantía, expresa o implícita, incluso las garantías de
comerciabilidad y conveniencia para un propósito en particular, que quedan excluidas en la medida
permitida por la ley. En ningún caso la compañía será responsable de cualquier daño indirecto, incidental,
consecuente, especial o daños que surjan o estén relacionados con este producto o la utilización del
mismo. Algunos estados, provincias o corregimientos no permiten la exclusión o la limitación de daños
incidentales o consecuentes, por lo que la exclusión o la limitación anterior quizás no se aplique a usted.
Esta garantía no se aplica a mercancía reelaborada.
Lea las instrucciones de manejo cuidadosamente. El incumplimiento
de las instrucciones de manejo anulará esta garantía.
Para obtener más información, visítenos en línea en www.nostalgiaproducts.com.
Me Gusta en Facebook en www.facebook.com / NostalgiaElectrics.
Siga nuestros consejos sobre Pinterest en www.pinterest.com / nostalgiaelctrx.
Tweet con nosotros en Twitter en www.twitter.com / NostalgiaElctrx.
Page 30

28
FRANÇAIS
28
Faire une fête tous les jours!
Visiter le site Web www.nostalgiaproducts.com
pour d’autres produits agréables.
CONTENTS
SÉCURITÉ . . . . . . . . . . . . . . . . . . . . . . . . . . . . . . . . . . . . . . . . 28
PRÉCAUTIONS IMPORTANTES . . . . . . . . . . . . . . . . . . . . . . . . . . . 29
PRÉCAUTIONS IMPORTANTES ADDITIONNELLES . . . . . . . . . . . . . . . 29
INTRODUCTION . . . . . . . . . . . . . . . . . . . . . . . . . . . . . . . . . . . . 31
PIÈCES . . . . . . . . . . . . . . . . . . . . . . . . . . . . . . . . . . . . . . . . . . 32
ASSEMBLAGE . . . . . . . . . . . . . . . . . . . . . . . . . . . . . . . . . . . . . . 33
COMMENT FAIRE FONCTIONNER . . . . . . . . . . . . . . . . . . . . . . . . . 35
CONSEILS UTILES . . . . . . . . . . . . . . . . . . . . . . . . . . . . . . . . . . . 38
NETTOYAGE ET ENTRETIEN . . . . . . . . . . . . . . . . . . . . . . . . . . . . . 39
RETOURS ET GARANTIE . . . . . . . . . . . . . . . . . . . . . . . . . . . . . . . 41
SÉCURITÉ
Caractéristiques d'appareils :
120 Volts, 60 Hz, 600 Watts
Réfrigérant : R134a
CE PRODUIT EST UTILISÉ DANS SORTIE ÉLECTRIQUE DE 120V AC SEULEMENT.
Reportez-vous à www.nostalgiaproducts.com/user-manuals/
pour la version la plus récente.
Votre sûreté et la sûreté de d'autres est très importante.
Nous avons fourni beaucoup de messages importants sur la sécurité dans ce manuel
et sur votre appareil. Toujours lire et suivre les messages de sécurité inclus.
Ceci est le symbole d'alerte à la sécurité.
Ce symbole vous alerte des risques de danger potentiels pouvant
causer de graves blessures à vous et d'autres personnes.
Tous les messages de sûreté suivront le symbole d'alerte de sécurité.
Tous les messages de sûreté vous indiqueront ce qui est le risque en tant que
tel, vous diront comment réduire la chance des dommages et vous indiqueront
ce qui peut se produire si les directives sont omises d'être suivies.
Page 31

29
FRANÇAIS
29
PRÉCAUTIONS IMPORTANTES
Une personne n'ayant pas lu et compris toutes les instructions de
fonctionnement et de sécurité n'est pas qualiée pour faire fonctionner cet
appareil. Tous les utilisateurs de cet appareil doivent lire et comprendre
ce mode d'emploi avant d'utiliser ou de nettoyer cet appareil.
Lorsque l'on utilise un appareil électrique, il faut toujours
respecter des précautions de base, y compris celles-ci :
1. Lisez toutes les instructions avant d'utiliser cet appareil.
2. NE PAS TOUCHER les surfaces chaudes. Utiliser les poignées ou les boutons.
3. Cet appareil n'est PAS UN JOUET.
4. Les jeunes enfants non supervisés et les individus ayant une décience
cognitive ne devraient jamais faire fonctionner cet appareil.
5. Une surveillance étroite est nécessaire lorsqu’un appareil
est utilisé par ou à proximité d’enfants.
6. Pour protéger contre les chocs électriques ne pas submerger le cordon, la
che ou aucune pièce de cet appareil dans l'eau ou d'autres liquides.
7. Débranchez l'appareil lorsqu'il ne sert pas, avant de retirer des pièces et avant le nettoyage.
Laisser refroidir avant de mettre ou d'enlever des pièces et avant le nettoyage.
8. NE PAS utiliser un appareil avec un cordon ou une che électrique
endommagés ou après un mauvais fonctionnement de l'appareil ou s'il a
été endommagé d'une manière quelconque. Retournez l'appareil à l'atelier
de réparation le plus proche pour un examen, réparation ou réglage.
9. Le fabricant ne recommande pas l'utilisation d'accessoires autres que ce qui est
prévu par le fabricant. L'utilisation d'accessoires peut causer des blessures.
10. NE PAS utiliser cet appareil pour toute autre utilisation pour laquelle il n’a pas été conçu.
11. N'utilisez PAS l'appareil à l'extérieur. POUR UN USAGE DOMESTIQUE UNIQUEMENT.
12. NE PAS placer sur ou près d'un brûleur à gaz ou électrique ou dans
un four chaué. 1. NE PAS mettre en lave-vaisselle.
13. NE laissez PAS le cordon pendre sur le bord de la table ou
du comptoir, ni toucher les surfaces chaudes.
14. NE laissez JAMAIS l'unité sans surveillance lorsqu'il est en
service ou une fois branché à une prise électrique.
15. Une extrême prudence doit être utilisée pour déplacer
un appareil contenant des liquides chauds.
16. Toujours brancher l'appareil en premier, puis brancher le cordon dans
la prise murale. Pour débrancher l’appareil, mettre tous les boutons à la
position « arrêt », puis débrancher la che de la prise murale.
PRÉCAUTIONS IMPORTANTES ADDITIONNEL
Mesures de sécurité pour le fonctionnement
1. Pendant le transport, l'appareil peut avoir été placé sur le côté ou tête en bas ce
qui en résulte que le liquide réfrigérant et l’huile se séparent du compresseur.
Pour éviter tout dommage potentiel, placez l'appareil dans une position
debout pour une période de 24 heures avant de le mettre en marche.
2. NE JAMAIS poser l’appareil sur le côté ou à l’envers. L'appareil devrait demeurer
dans une position debout en tout temps. Toutes les fois que l'appareil sera
positionné dans une position sur le côté ou à l'envers, vous devrez le remettre
Page 32

30
FRANÇAIS
30
en position debout et attendre la période de 24 heures avant de l'utiliser.
3. Cet appareil doit être positionné sur une surface au niveau
(plane) an de fonctionner adéquatement.
4. Vériez le cylindre de congélation pour toute présence d'objets étrangers avant d'utiliser.
Instructions pour le cordon électrique et la prise
1. RISQUE DE DÉCHARGE ÉLECTRIQUE : Ne pas suivre ces instructions
peut entraîner la mort, un incendie ou une électrocution.
• Branchez dans une prise à 3 ches.
• NE retirez PAS la che de la mise à la terre.
• N'utilisez PAS d'adaptateur.
• N'utilisez PAS une rallonge.
2. Cet appareil DOIT être mis à la terre. Dans le cas d’un court-circuit électrique,
la mise à la terre réduit le risque de choc électrique en orant un l
d’échappement pour le courant électrique. Cet appareil est équipé d’un cordon
muni d’un l de mise à la terre avec une che de mise à la terre. La che doit
être branchée sur une prise correctement installée et mise à la terre.
3. AVERTISSEMENT : Une mauvaise utilisation de la prise de mise à la terre peut entraîner un
risque d’électrocution. Si la che n’entre pas complètement dans la prise, contactez un
électricien qualié. Ne pas tenter de modier la che de quelque façon que ce soit.
4. Un court cordon d'alimentation est fourni pour réduire les risques
d'enchevêtrement ou risques de trébucher sur un cordon plus long.
5. Le fabricant ne recommande pas l’utilisation de cette machine dans les
pays qui ne supportent pas les tensions de 120V AC, même si un adaptateur
de tension, un transformateur ou un convertisseur est utilisé.
CONSERVEZ CES INSTRUCTIONS !
Page 33

31
FRANÇAIS
31
INTRODUCTION
Félicitations pour votre achat de l'APPAREIL POUR FAIRE DES DESSERTS
CONGELÉS de Nostalgia ! Maintenant vous êtes prêt à ravir votre famille
et vos amis avec un assortiment de crèmes glacées molles, laits frappés,
yogourts glacés, glaces, barbotines, boissons pour adultes et plus !
Les caractéristiques comprennent les éléments suivants :
• Donne 1 Quarts de dessert glacé en quelques minutes
• Système de distribution par vis sans n horizontal
• Puissant système de réfrigération et compresseur fait
rapidement vos desserts congelés préférés
• Capteur de débit
• Panneau de commande DEL à 30-réglages
• Fonction intégrée de nettoyage pour un nettoyage facile
• Plateau acier inoxydable
• Accentuée de chrome
• Voir le LIVRE DE RECETTES pour un certain nombre de desserts délicieux !
Page 34

32
FRANÇAIS
32
PIÈCES
Panneau de conguration
Réglage de l'heure
Haut/bas
Démarrer/arrêter
Ingrédient
Entonnoir
Vis sans n
Contrôle
Panneau
Ramasse-gouttes
Interrupteur
d’alimentation
MARCHE/ARRÊT
(en dessous du
côté de l’appareil)
Distribution
Capteur
Distribution
Poignée
Ingrédient
Chute de
déversement
Ingrédient
Couvercle de
déversement
Silicone
Joint
Congélation
Cylindre
Distributeur
Couvrir
Distribution
Buse
Distribution
Capuchon en
tourbillon
Nettoyage
Brosses
Goupille de
verrouillage
Page 35

33
FRANÇAIS
33
ASSEMBLAGE
Avant d’assembler, soyez certain d’obtenir votre MACHINE POUR FAIRE VOS
DESSERTS CONGELÉS, lavés et prêts à faire de délicieux desserts. Suivez les étapes
sous la rubrique NETTOYAGE ET ENTRETIEN pour nettoyer votre appareil.
1. Pour créer une meilleure étanchéité, enduire légèrement les joints de Silicone oranges vifs
à l’extrémité de la vis sans n et à l’intérieur du distributeur couvrir avec du beurre ou huile
de cuisson.
2. Insérez l'embout du joint de silicone de la vis sans n dans le cylindre de réfrigération
Assurez-vous que la tige hexagonale et le joint de Silicone de la vis sans n sont positionnés
à l'arrière du cylindre de réfrigération.
3. Remettre le joint de Silicone à l’intérieur du couvercle du distributeur.
4. Alignez la èche ( ) située sur le dessus de la façade du panneau avec le symbole de
déverrouillage ( ) sur le couvercle du distributeur. Tournez le couvercle du distributeur vers
la droite pour xer sur le panneau avant.
Tige hexagonale
Silicone
Joints
VERROUILLÉ
DÉVEROUILLÉ
Page 36

34
FRANÇAIS
34
5. En veillant à garder la poignée du levier de distribution verticale, alignez le trou sur le levier
de distribution avec les trous situés sur le couvercle du distributeur. Glissez la goupille de
verrouillage entre les trois trous, puis tournez la goupille de verrouillage vers la gauche pour
xer le levier de distribution vers le couvercle du distributeur.
6. Placer le plateau ramasse-gouttes dans la fente nervurée située au bas du panneau avant.
7. Clipser le couvercle de la chute à ingrédients sur le dessus de la chute à ingrédients.
Le couvercle de la chute à ingrédients est conçu pour couvrir l'ouverture de la chute à
ingrédients lorsque l'entonnoir à ingrédients n’est pas utilisé.
8. En dernier lieu, ouvrez le couvercle de la chute à ingrédients puis placez l’entonnoir à
ingrédients l'ouverture de la chute à ingrédients.
Ingrédient
Couvercle de
déversement
Ingrédient
Chute de
déversement
OUVERT FERMÉ
Page 37

35
FRANÇAIS
35
COMMENT FAIRE FONCTIONNER
Avant d’utiliser votre MACHINE POUR DESSERTS CONGELÉS, assurez-vous que vous lisiez
et compreniez que toutes les étapes sous la rubrique COMMENT FAIRE FONCTIONNER.
1
MODE CONGÉLATION : Faire un dessert.
1. Choisir et préparer votre recette selon les directives indiquées. Voir le LIVRE DE
RECETTES inclus pour un certain nombre d'idées et recettes amusantes !
2. Allumez l'appareil à ALLUMÉ en tournant l'interrupteur ALLUME/ÉTEINT
situé sous le côté de l'appareil. Le panneau de contrôle ache « ».
3. Appuyez sur la èche HAUT ou BAS sur le panneau de contrôle, laquelle correspond avec le
numéro du code du dessert suggéré, selon le type de dessert désiré.
Type de dessert Réglage Réglage recommandé Capacité maximale
des recettes
Crème glacée molle 13 à 18 min 17 min 750 mL (26 onces)
Barbotine 8 à 12 min 9 min 1000 mL (34 onces)
Boisson alcoolique 12 à 14 min 14 min 1000 mL (34 onces)
Boisson glacée 4 à 6 min 5 min 1000 mL (34 onces)
4. Versez votre mélange liquide dans l'appareil par l'intermédiaire de l'entonnoir à ingrédients.
REMARQUE : N'ajoutez pas les morceaux d'aliments, tels des fruits, des noix ni de
sucreries dans l'entonnoir à ingrédients ni dans le cylindre de réfrigération. Les
morceaux peuvent se loger dans la vis sans n et endommager l'appareil.
5. Pour démarrer le processus de congélation, appuyez sur la touche MARCHE/ARRÊT ( / ).
Ceci mettra le compresseur en marche et la vis sans n commencera à baratter. Le panneau
de commande comptera des intervalles d'une (1) minute à rebours à partir du temps initial
entré jusqu'à ce celui-ci arrive à « 00 ».
REMARQUE : Si le cylindre de réfrigération est plus chaud ou plus froid
que la moyenne, le panneau de commande augmentera ou diminuera
automatiquement le temps nécessaire pour faire le dessert.
6. Lorsque votre dessert est prêt pour la distribution, l’appareil émet un bip sonore de 15
répétitions.
2a
MODE DE DISTRIBUTION : Appréciez votre dessert maintenant.
1. Lorsque l'appareil est prêt pour distribuer, le panneau de commande indiquera « 00 ». Tenez
une tasse sous le bec distributeur. Ceci activera le capteur de distribution situé sous le bec
distributeur, lequel allumera le compresseur et permettra à la vis sans n de débuter le
barattage de votre dessert congelé.
REMARQUE: Votre main ou une tasse de couleur solide est requise pour activer le capteur
avant de démarrer la distribution. Les tasses transparentes n'activeront pas le capteur de
distribution.
CONSEIL DE PRO: Retirez le capuchon en tourbillon pour
une meilleure distribution des barbotines.
2. Tirez vers le bas sur la poignée de distribution an que le produit nal soit distribué dans
votre récipient. Une fois le produit distribué, remontez la poignée à sa position initiale et
enlevez votre main de devant le capteur de distribution.
REMARQUE : Si votre dessert est d'une texture trop liquide et nécessite plus de temps de
congélation, tenez la touche MARCHE/ARRÊT ( / ) pendant deux secondes pour ajouter 2
minutes de temps.
Page 38

36
FRANÇAIS
36
2b
MODE GARDEZ LA FRAÎCHEUR : Protez de votre dessert plus tard.
Le MODE GARDEZ LA FRAÎCHEUR conserve le produit nal prêt pour la distribution.
Lorsque votre dessert glacé est prêt, l’appareil passe automatiquement
en MODE GARDEZ LA FRAÎCHEUR. Dans ce mode, le compresseur se met
en marche pendant 1 minute, puis s’éteint pendant 5 minutes.
REMARQUE : Si votre dessert est d'une texture trop liquide et nécessite plus de temps de
congélation, tenez la touche MARCHE/ARRÊT ( / ) pendant deux secondes pour ajouter 2
minutes de temps.
3
MODE NETTOYAGE : Try a new recipe or clean up after you're done.
Essayer une nouvelle recette ou nettoyer après que vous avez terminé.
Après chaque utilisation, assurez-vous de distribuer toute la quantité de dessert
restante du cylindre de réfrigération avant de démonter l’appareil pour un nettoyage
en profondeur. Sachez que toute la quantité de dessert a été distribuée lorsque
vous tirez sur la poignée de distribution et que plus de dessert n'en sort.
Le MODE NETTOYAGE comporte deux cycles.
Cycle de nettoyage 1 :
1. Pour mettre l'appareil en MODE NETTOYAGE, appuyez sur la touche
MARCHE/ARRÊT ( / ) sur le panneau de commande, puis appuyez sur
la èche HAUT ou BAS jusqu'à ce que le panneau ache « ».
2. Versez entre 500 à 800 ml (2 à 3 tasses) d’eau dans le cylindre
de réfrigération via l’entonnoir à ingrédients.
3. Appuyez sur le bouton MARCHE/ARRÊT ( / ) pour commencer le processus de
nettoyage rapide. Le cylindre de réfrigération commencera à réchauer, tandis
que le panneau de commande débutera la compte à rebours de « 03 » à « ».
4. Laisser l’appareil fonctionner pendant environ 30 secondes, puis vider l’eau du
cylindre de réfrigération dans un bol ou un seau et jeter l'ancienne eau.
5. Lorsque l'appareil est toujours en fonction, ajoutez de 500 à 800 ml (2 à 3 tasses)
d’eau chaude et savonneuse dans le cylindre de réfrigération via l’entonnoir à
ingrédients, puis laissez l'appareil fonctionner encore une 30 de secondes.
6. Videz l'eau savonneuse du cylindre de réfrigération dans
un bol ou un seau puis jetez l'ancienne eau.
7. Lorsque le Cycle de nettoyage 1 est terminé, l’appareil émet
un bip sonore 15 fois pour indiquer la n du cycle.
Cycle de nettoyage 2 :
1. Versez entre 500 à 800 ml (2 à 3 tasses) d’eau dans le cylindre de réfrigération
via l’entonnoir à ingrédients. Appuyez sur le bouton MARCHE/ARRÊT
( / ) et le panneau de contrôle commencera le compte à rebours de « 01 » à « 00 ».
2. Laisser l’appareil baratter pour quelques secondes, puis vider l’eau du cylindre
de réfrigération dans un bol ou un seau et jeter l'ancienne eau.
3. Continuer le cyclisme d’eau douce à l'intérieur de l'appareil jusqu'à
ce que tout le savon soit rincé du cylindre de réfrigération.
4. Lorsque le Cycle de nettoyage 2 est terminé, l’appareil émet
Page 39

37
FRANÇAIS
37
un bip sonore 15 fois pour indiquer la n du cycle.
5. Maintenant vous êtes prêt à essayer une autre recette délicieuse !
Pour de plus amples directives de nettoyage, veuillez consulter
la rubrique NETTOYAGE ET ENTRETIEN de ce manuel.
4
MODE ANNULER : Annuler n’importe quel mode à tout moment.
Pour annuler n'importe quel MODE, appuyez simplement sur le bouton MARCHE/ARRÊT
( / ) sur le panneau de commande. L'appareil arrêtera immédiatement le MODE dans
lequel il est puis le panneau de commande achera le dernier ajuste de numéro. Vous
pouvez ajouter ou soustraire du temps en utilisant les èches en haut ou vers le bas.
REMARQUE : Vous ne pourrez pas distribuer aucun produit dès que vous aurez mis
le MODE ANNULER. Pour distribuer, appuyez sur le bouton MARCHE/ARRÊT pour
ajouter deux minutes de temps. Distribuez après les signaux sonores de l'appareil.
Page 40

38
FRANÇAIS
38
CONSEILS UTILES
GROUPES NOMBREUX ET FÊTES
Lorsque vous servez des groupes nombreux et des fêtes, il serait préférable de préparer à
l'avance une grande quantité de votre recette de dessert à l'avance. Lorsque la première
coulée est prête, versez simplement une autre mesure de votre mélange dans l'appareil.
RECETTES DE CRÈME GLACÉE MOLLE
Soyez conscient que les recettes à base de crème pâtissière tout comme les recettes
qui requièrent de la crème à fouetter ou grasse, donnent une texture plus crémeuse
et épaisse pouvant rendre la distribution du produit plus dicile avec cette machine
pour crème glacée molle. Pour cette raison, des recettes avec de la crème grasse ou
de la crème à fouetter ne sont pas recommandées un usage dans cette machine.
Toutefois, vous pouvez remplacer la crème grasse ou crème à fouetter avec du lait
entier ou du moitié-moitié pour produire un dessert de texture plus liquide.
En outre, les recettes appelant une crème grasse ou crème à fouetter
peuvent exiger deux ou plusieurs cycles de nettoyage en raison de
la consistance épaisse et dense produites par ces recettes.
Lorsque le mélange de crème glacée congèle, celui-ci prend de l'expansion.
Pour s’assurer que vous ne remplissez pas trop, ne pas verser plus de 26
on. (750 ml) de crème glacée dans l'appareil en une seule fois.
RECETTES DE BARBOTINES
Les recettes de barbotines doivent inclurent du sucre an de pouvoir se
congeler. Pour cette raison, les boissons gazeuses diètes, les jus de fruits
sans sucre et autres ne peuvent pas être utilisés avec cet appareil.
RECETTES ALCOOLISÉES
De l’alcool peut être ajouté à presque n’importe quelle recette.
Toutefois, n’oubliez pas que l’alcool ne gèle pas et une recette peut
nécessiter un délai supplémentaire pour créer la bonne texture.
DISTRIBUTION
Lors de la distribution, les tasses claires n’activeront pas le capteur de
distribution. Votre main ou une tasse de couleur solide est requise
pour activer le capteur avant de démarrer la distribution.
Si après la distribution, vous trouvez qu’un délai supplémentaire est nécessaire, maintenez le
bouton MARCHE/ARRÊT ( / ) pendant deux secondes pour ajouter deux minutes de temps.
RECOMMANDATION DE LUBRIFICATION
La vis sans n et le couvercle de distribution ont des joints en silicone empêchant
les fuites et créant une meilleure étanchéité. Pour que les joints durent plus
longtemps et éviter qu'ils ne sèchent, il est recommandé d'appliquer une fois de
temps en temps du beurre ou de l'huile sur la surfaces des joints en silicone.
Page 41

39
FRANÇAIS
39
NETTOYAGE ET ENTRETIEN
Après chaque utilisation, assurez-vous de distribuer toute la quantité de dessert
restante du cylindre de réfrigération avant de démonter l’appareil pour un nettoyage
en profondeur. Sachez que toute la quantité de dessert a été distribuée lorsque
vous tirez sur la poignée de distribution et que plus de dessert n'en sort.
Le MODE NETTOYAGE comporte deux cycles.
Cycle de nettoyage 1 :
1. Pour mettre l'appareil en MODE NETTOYAGE, appuyez sur la touche
MARCHE/ARRÊT ( / ) sur le panneau de commande, puis appuyez sur
la èche HAUT ou BAS jusqu'à ce que le panneau ache « ».
2. Versez entre 500 à 800 ml (2 à 3 tasses) d’eau dans le cylindre
de réfrigération via l’entonnoir à ingrédients.
3. Appuyez sur le bouton MARCHE/ARRÊT ( / ) pour commencer le processus de
nettoyage rapide. Le cylindre de réfrigération commencera à réchauer, tandis
que le panneau de commande débutera la compte à rebours de « 03 » à « ».
4. Laisser l’appareil fonctionner pendant environ 30 secondes, puis vider l’eau du
cylindre de réfrigération dans un bol ou un seau et jeter l'ancienne eau.
5. Lorsque l'appareil est toujours en fonction, ajoutez de 500 à 800 ml (2 à 3 tasses)
d’eau chaude et savonneuse dans le cylindre de réfrigération via l’entonnoir à
ingrédients, puis laissez l'appareil fonctionner encore une 30 de secondes.
6. Videz l'eau savonneuse du cylindre de réfrigération dans
un bol ou un seau puis jetez l'ancienne eau.
7. Lorsque le Cycle de nettoyage 1 est terminé, l’appareil émet
un bip sonore 15 fois pour indiquer la n du cycle.
Cycle de nettoyage 2 :
1. Versez entre 500 à 800 ml (2 à 3 tasses) d’eau dans le cylindre de réfrigération
via l’entonnoir à ingrédients. Appuyez sur le bouton MARCHE/ARRÊT
( / ) et le panneau de contrôle commencera le compte à rebours de « 01 » à « 00 ».
2. Laisser l’appareil baratter pour quelques secondes, puis vider l’eau du cylindre
de réfrigération dans un bol ou un seau et jeter l'ancienne eau.
3. Continuer le cyclisme d’eau douce à l'intérieur de l'appareil jusqu'à
ce que tout le savon soit rincé du cylindre de réfrigération.
4. Lorsque le Cycle de nettoyage 2 est terminé, l’appareil émet
un bip sonore 15 fois pour indiquer la n du cycle.
5. Maintenant vous êtes prêt à essayer une autre recette délicieuse !
REMARQUE : En outre, les recettes riches en gras, appelant pour une crème
grasse ou crème à fouetter peuvent exiger deux ou plusieurs cycles de nettoyage
en raison de la consistance épaisse et dense produites par ces recettes.
Page 42

40
FRANÇAIS
40
NETTOYAGE DE PIÈCES AMOVIBLES
1. Débranchez l’appareil de la prise électrique.
2. Retirez l'entonnoir à ingrédients, la vis sans n et le couvercle du distributeur de l'appareil.
REMARQUE: Un excès d'eau peut rester dans le cylindre de congélation
après le cycle de nettoyage. Pour éviter les déversements d'eau, placez
un bol sous le couvercle du distributeur avant de le retirer.
3. Démonter l'Auger pour le nettoyage.
Tirer sur les extrémités de
la vis sans n pour enlever
le pôle interne de la vis.
Séparer le pôle
interne de la vis.
Tirer le joint de Silicone
orange éclatant à l’extrémité
de la vis sans n.
4. Tournez la goupille de verrouillage vers la droite pour déverrouiller et retirer la poignée de
distribution du couvercle de distribution.
5. Démonter le couvercle du distributeur.
Séparer l'endos du couvercle
du distributeur en le
glissant vers le bas, puis le
soulevant loin de l'avant.
Avant
Derrière
Dévisser le capuchon en
tourbillon, puis retirer
le piston plongeur hors
du bec de distribution.
Piston
plongeur
Distribution Capuchon
en tourbillon
6. Lavez toutes les pièces avec de l’eau chaude savonneuse
et sécher avec un chion doux et non abrasif.
7. Utiliser les brosses de nettoyage incluses pour nettoyer aux endroits diciles
à atteindre, tels la Chute à ingrédients et le bec de distribution.
8. Essuyez l’intérieur du cylindre de réfrigération avec un chion
doux et non abrasif ou du papier essuie-tout.
9. En cas de besoin, utiliser un chion humide non abrasif pour
essuyer l'extérieur, ensuite le sécher soigneusement.
10. IMPORTANT ! Ne plongez jamais la base de l’appareil dans l’eau.
Votre MACHINE POUR FAIRE DES DESSERTS GLACÉS est maintenant prête
pour faire une autre coulée délicieuse de votre dessert glacé favori !
A
A
B
B
C
Page 43

41
FRANÇAIS
41
RETOURS ET GARANTIE
SI VOTRE APPAREIL NE FONCTIONNE PAS OU S'IL EST ENDOMMAGÉ QUAND VOUS LE RETIREZ
DE LA BOÎTE, VEUILLEZ LE RETOURNER IMMÉDIATEMENT À L'ENDROIT OÙ IL A ÉTÉ ACHETÉ.
MACHINE POUR FAIRE DES DESSERTS GLACÉS / FDM1
Pour toute question, communiquer par courriel ou au numéro de téléphone du service à
la clientèle, entre 08 h 00 et 17 h 00, du lundi au vendredi, heure normale du Centre.
Distribué par :
Nostalgia Products LLC
1471 Partnership Dr.
Green Bay, WI 54304-5685
Service à la clientèle
Téléphone : (920) 347-9122
Site Web : www.nostalgiaproducts.com
Demande pour le service à la clientèle
Pour soumettre une demande au service à la clientèle, rendez vous au www.nostalgiaproducts.com puis
remplissez le formulaire de demande au service à la clientèle puis cliquez sur le bouton Soumettre.
Un représentant vous contactera dès que possible.
Conditions de garantie du produit
Le groupe Nostalgia Products LLC (référé tel « l’Entreprise ») garantit que pour une période d’un
(1) an en date d’achat, ce produit est sans défaut de matériel et de fabrication selon une utilisation
normale à domicile, seulement si le fonctionnement et l’entretien du produit sont conforment aux
directives fournies. À titre de réparation exclusive et entière sous cette garantie, l’Entreprise pourra
à sa discrétion, réparer ou remplacer le produit défectueux, voire émettre un remboursement du
produit durant la période couverte sous garantie. Cette garantie n’est disponible seulement qu’à
l’acheteur d’origine du produit, en date d’achat au détail dudit produit et sera valide uniquement
avec le reçu de caisse d’origine, à titre de preuve d’achat, lequel est requis pour obtenir les bienfaits
reliés à cette garantie. Toute réclamation doit être rapportée à l’attention de l’Entreprise dans la
fenêtre de la période de la garantie, sans dépasser 30 jours à défaut de performance. Cette garantie
ne couvre pas l’usure normale ou dommage cause par l'expédition, la mauvaise manipulation, la
mauvaise utilisation, les accidents, les modications, les mauvaises pièces de remplacement, voire
toute autre utilisation anormale du produit à domicile. Il est possible que vous ayez à retourner le
produit (avec les frais de retour prépayés par vous) pour une inspection et une évaluation. Les frais
des coûts de retour ne sont pas remboursables. L'Entreprise n’est aucunement responsable pour les
retours endommagés ou perdus en transit. Autrement que spéciquement permit selon les directives
de fonctionnement, cette garantie s’applique à une utilisation à domicile à d'intérieur seulement.
An d'obtenir un service couvert sous cette garantie, veuillez contacter l'Entreprise au numéro de
téléphone inclut ci-haut ou en remplissant le formulaire de demande au service à la clientele, sur le
site www.nostalgiaproducts.com. La garantie est valide seulement aux États-Unis et au Canada.
Cette garantie prévaut toute autre garantie, expresse ou implicite incluant les garanties de qualité
marchande ou ayant une aptitude pour une intention en particulier, lesquelles sont exclues selon la
loi. Sous aucun prétexte l’Entreprise ne pourra être tenue responsable pour tout dommage indirect,
accidentel, conséquentiel ou spécial provenant de ou en relativité avec ce produit ou son utilisation.
Certains états, provinces ou juridictions n'allouent pas l'exclusion ou la limitation de tels dommages
accidentels ou conséquentiels, donc l'exclusion ou limitation suscitée peut ne pas s'appliquer à vous.
Cette garantie ne s’applique pas à la merchandise de renaissance.
Veuillez lire les directives de fonctionnement attentivement. Ne pas se
conformer aux directives de fonctionnement annulera cette garantie.
Pour plus d’informations, visitez notre site Web à www.nostalgiaproducts.com.
Aimez-nous sur Facebook à l’adresse www.facebook.com / NostalgiaElectrics.
Suivez nos conseils sur Pinterest à www.pinterest.com / nostalgiaelctrx.
Tweet avec nous sur Twitter à l’adresse www.twitter.com / NostalgiaElctrx.
Page 44

 Loading...