

Page 1
All products are trademarks of Nostalgia Products LLC.
Worldwide design & utility patented or patents pending.
© 2017 Nostalgia Products LLC.
www.nostalgiaproducts.com
(rev. 01/16/17 NW)
Page 2
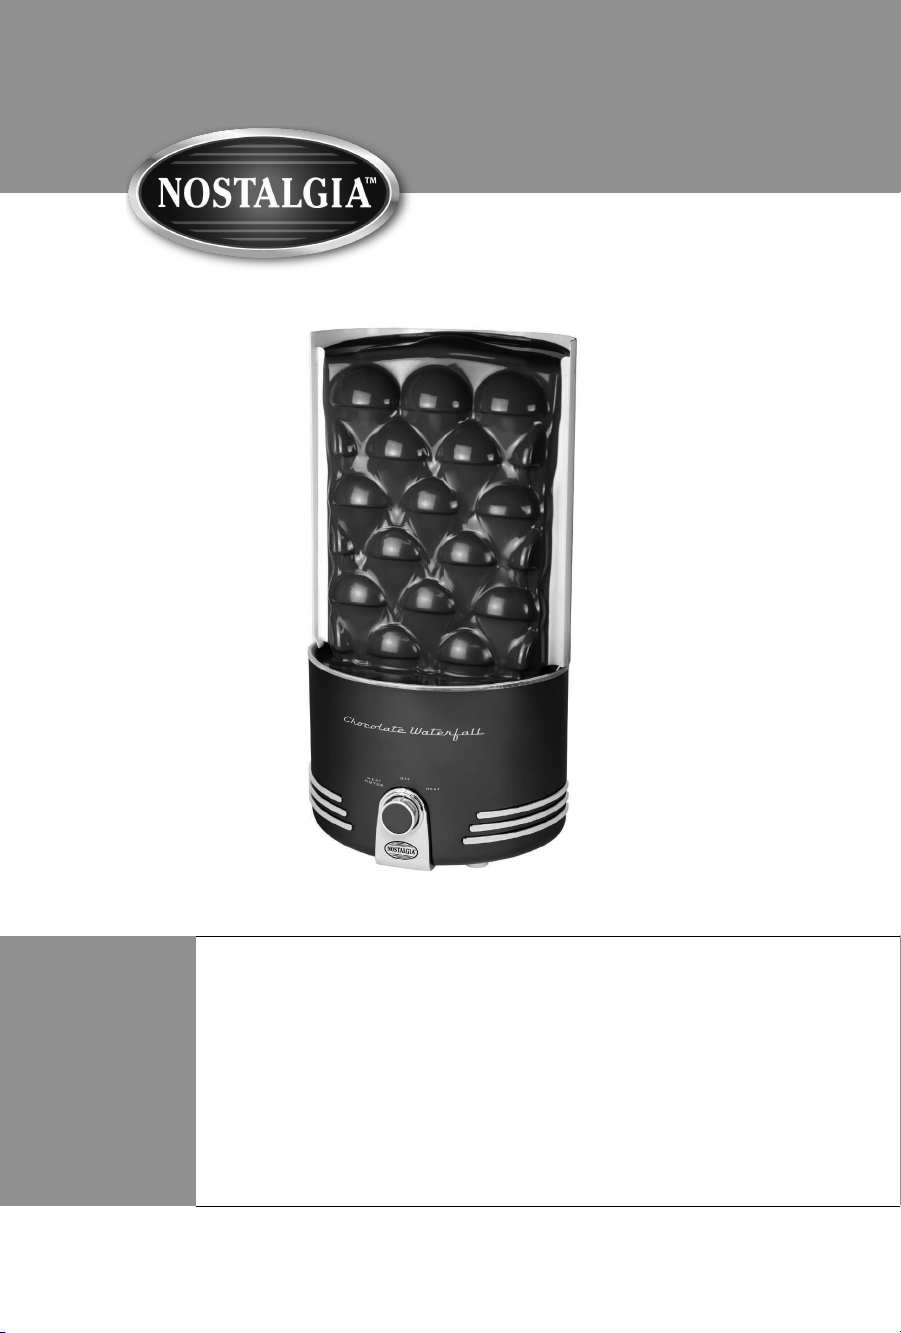
CWF48RR
Chocolate Waterfall
Cascada de Chocolate
Instructions and Recipes
Instrucciones y recetas
Page 3

Page 4
Make every day a party!
Visit www.nostalgiaproducts.com for more fun products.
CONTENTS
SAFETY . . . . . . . . . . . . . . . . . . . . . . . . . . . . . . . . . . . . . . . . . . .2
IMPORTANT PRECAUTIONS . . . . . . . . . . . . . . . . . . . . . . . . . . . . . . 3
IMPORTANT SAFEGUARDS . . . . . . . . . . . . . . . . . . . . . . . . . . . . . . 3
INTRODUCTION . . . . . . . . . . . . . . . . . . . . . . . . . . . . . . . . . . . . . 4
PARTS & ASSEMBLY . . . . . . . . . . . . . . . . . . . . . . . . . . . . . . . . . . .5
HOW TO OPERATE . . . . . . . . . . . . . . . . . . . . . . . . . . . . . . . . . . . .6
HELPFUL TIPS . . . . . . . . . . . . . . . . . . . . . . . . . . . . . . . . . . . . . . .7
DISPOSAL . . . . . . . . . . . . . . . . . . . . . . . . . . . . . . . . . . . . . . . . . 7
CLEANING & MAINTENANCE . . . . . . . . . . . . . . . . . . . . . . . . . . . . .8
RECIPES . . . . . . . . . . . . . . . . . . . . . . . . . . . . . . . . . . . . . . . . . . 9
ENGLISH
SAFETY
Your safety and the safety of others is very important.
We have provided many important safety messages in this manual and
on your appliance. Always read and obey all safety messages.
This is the safety alert symbol.
This symbol alerts you to potential hazards that
can kill or hurt you and others.
All safety messages will follow the safety alert symbol.
All safety messages will tell you what the potential hazard is, tell you how to reduce the
chance of injury, and tell you what can happen if the instructions are not followed.
Appliance Specications:
120 Volts, 60 Hz
180 Watts
2
Page 5

IMPORTANT PRECAUTIONS
1. NEVER use a scouring pad on the unit.
2. NEVER leave unit unattended while in use.
3. NEVER place anything other than the intended ingredients in the base bowl.
4. NEVER use near water.
ENGLISH
5. NEVER touch tower with ngers while machine is on, nor while it is still hot.
6. Unplug unit from outlet when not in use and when cleaning.
7. DO NOT operate this appliance with a damaged cord or plug
or in the event the appliance ever malfunctions.
8. DO NOT put Base in dishwasher.
9. This appliance can be used by children aged 8 years and above and persons
with reduced physical, sensory or mental capabilities or lack of experience
and knowledge if they have been given supervision or instruction concerning
use of the appliance in a safe way and understand the hazards involved
10. This appliance is NOT A TOY.
11. Children shall not play with the appliance.
12. Cleaning and user maintenance shall not be made by children without supervision.
IMPORTANT SAFEGUARDS
When using electrical appliances, basic safety precautions
should always be followed, including:
1. Read all instructions before operating this appliance.
2. DO NOT TOUCH moving parts.
3. To protect against electrical shock do not immerse cord, plug
or any part of the Base in water or other liquids.
4. Close supervision is necessary when any appliance is used by or near children.
5. Unplug from outlet when not in use and before removing parts for cleaning.
6. DO NOT operate any appliance with a damaged cord or plug or if the
appliance has been damaged in any manner. Return the appliance
to the nearest repair shop for examination or repair.
7. The manufacturer does not recommend the use of accessory
attachments. Use of attachments may cause injuries.
8. DO NOT use outdoors.
9. DO NOT let the cord touch hot surfaces.
10. DO NOT place on or near a hot gas or electric burner, or in a heated oven.
11. Extreme caution must be used when moving this appliance.
12. This unit must be on a level surface to operate properly.
13. DO NOT use this appliance for other than its intended use.
3
Page 6

14. DO NOT leave unit unattended while in use or when plugged in to an outlet.
15. DO NOT assemble the Auger or Tower while the motor is running.
Make sure unit is unplugged before assembling.
16. DO NOT heat chocolate over 110o F as warping of the towers may occur.
17. Heating Element will get hot. Avoid contact until fully cooled.
18. A short power supply cord is provided to reduce the risk resulting
from becoming entangled or tripping over a long cord.
19. Extension cord can be used if care is exercised in use.
20. The marked electrical rating of an extension cord should be at
least as great as the electrical rating of the appliance.
21. Keep hands and foreign objects out of the fountain while it is running. Regularly check
the Bowl to make sure that it is clear of chunks of fruit, etc. as they will clog the base of the
Tower and the chocolate will not ow properly.
SAVE THESE INSTRUCTIONS!
INTRODUCTION
Create a wall of sweetness that delivers a touch of fun and elegance to any occasion with
the CHOCOLATE WATERFALL! The auger delivers the chocolate to the top of the waterfall,
then ows down, ready to be paired with fruit pieces, breads, pretzels, and more.
Try the following:
• 3 pound capacity
• Auger delivers chocolate to the top of the waterfall
• Turn-dial controls for motor and heat
• Heated base keeps chocolate owing
• Chrome accents
• Use with chocolate, barbecue sauces, cheese, and liqueurs
• Perfect for dipping fruit pieces, breads, pretzels, marshmallows, and more!
• BPA free
ENGLISH
4
Page 7
ENGLISH
PARTS & ASSEMBLY
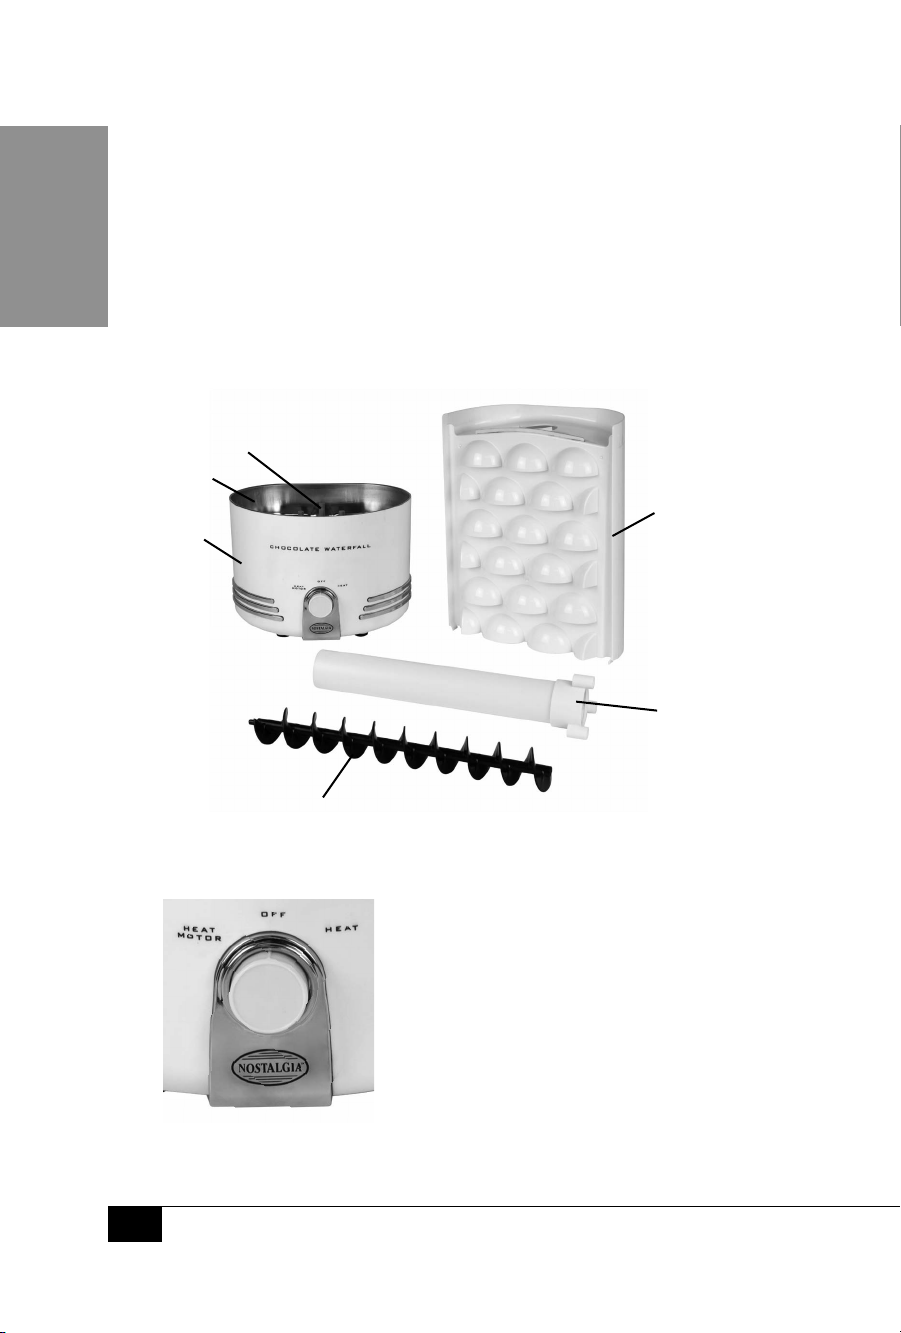
Your CHOCOLATE WATERFALL requires little assembly. Prior to use,
wipe out Bowl with a damp cloth and dry. Wash Auger, Chocolate
Wall, and Tower Cylinder in warm soapy water, rinse, then dry.
After cleaning, return the Auger to the Base Pin. Place the Tower Cylinder over
the Auger and secure to the Base by aligning with the pins. Then align the hole
of the Chocolate Wall with the Tower Cylinder and place on the base.
Do not attempt to place Auger, Chocolate Wall, or Tower Cylinders on
Base or remove from Base while the motor is running. Make sure the
Tower Cylinders are tted on the pins in the Base properly.
Base Pins
Bowl
Chocolate
Base
Wall
Tower
Cylinder
Auger
SWITCH POSITIONS
Left: Heat Motor / Top: OFF / Right: Heat
5
Page 8

HOW TO OPERATE
1. First, nd a stable surface near an electrical outlet before starting. Unit must be level
to operate properly and to create the desired owing eect. Make sure your cord is
away from any water source. If needed, it is acceptable to use an extension cord.
2. Turn the switch on the right to start the heater on the CHOCOLATE WATERFALL. Let
the unit warm up for at least 3 – 5 minutes before adding melted chocolate.
3. While the machine is warming up, get a microwaveable bowl. Fill
bowl with three pounds of chocolate chips (48 ounces) and 1 ½ cups
of oil. You may need to add more oil to ensure proper ow.
4. Place in microwave for 2½ minutes. When done, stir chocolate. If necessary, continue
to warm chocolate in microwave until melting is complete (another 2 to 2½ minutes).
DO NOT heat chocolate over 110o F as warping of the wall may occur.
5. Never add cool or cold liquids to the melted chocolate
in the fountain as this will stop the ow.
6. Chocolate needs to be completely melted and of thin consistency to allow
proper ow. Use a large spoon to test the consistency of the chocolate. If the
chocolate drips too thickly from the spoon, add more oil to the mixture.
7. Once the chocolate is completely melted and of proper consistency, turn
the motor switch on the CHOCOLATE WATERFALL to the HEAT MOTOR
position, so the motor and the heater are running at the same time.
8. Carefully pour the melted chocolate into the Bowl at the base of the Chocolate
Wall. The melted chocolate should be drawn under the Tower Cylinder and
carried up the Tower by the Auger. Chocolate should then begin to ow from
the top of the Tower and cascade evenly down the Chocolate Wall.
9. The CHOCOLATE WATERFALL must be level to ensure proper sheeting of the chocolate.
Be careful not to drop pieces of food into the Bowl which clogs the ow of chocolate.
10. IMPORTANT! To achieve an even and consistent ow of chocolate, use the leveling feet
beneath the base of the unit to slightly tilt the chocolate waterfall forward, backward, left
or right. By carefully adjusting the leveling feet, it will allow the chocolate to ow uniformly
over the waterfall.
NOTE: As the amount of chocolate lessens, you may need to readjust
the leveling feet to adjust for an even ow of chocolate.
ENGLISH
6
Page 9
HELPFUL TIPS
• IMPORTANT! To achieve an even and consistent ow, use the leveling feet
beneath the base of the unit to slightly tilt the chocolate waterfall back.
This will allow the chocolate to ow uniformly over the waterfall.
• If chocolate begins to drip instead of ow down the Tower, the chocolate is too thick.
Thin the chocolate by adding vegetable oil. Also, make sure that the unit is level.
ENGLISH
• If the chocolate is owing unevenly, the unit is not level. Make sure that the
unit is on a level surface so that the chocolate is evenly distributed.
• If the ow is intermittent, interrupted or not owing properly, check to see if there are
chunks of food in the Bowl of the Base that may be clogging the chocolate ow.
• Never add cool or cold liquid to the CHOCOLATE WATERFALL
as this will stop the ow of the fountain.
• DO NOT heat chocolate over 110o F as warping of the Chocolate Wall may occur.
• IMPORTANT! To achieve an even and consistent ow of chocolate, use the leveling feet
beneath the base of the unit to slightly tilt the chocolate waterfall forward, backward, left
or right. By carefully adjusting the leveling feet, it will allow the chocolate to ow uniformly
over the waterfall.
NOTE: As the amount of chocolate lessens, you may need to readjust
the leveling feet to adjust for an even ow of chocolate.
• To experience the full eect of the CHOCOALTE WATERFALL, we do not
recommend operating the unit using less than 2 pounds of chocolate.
Replace unit with more chocolate as the chocolate level drops.
Adding Oil
• As a general rule, add 4 oz. of oil for every 1 pound of chocolate. Some kinds
of chocolate may require more oil, depending on the butter fat content of
the chocolate. If needed, slowly add more oil to the chocolate until a good
consistency is achieved. The higher the butter fat content of the chocolate,
the less oil that will be required for a smooth ow of chocolate.
DISPOSAL
When the time comes to eliminate this product, please consider the environmental
impact and take it to a recognised recycling facility instead of disposing it
with general household waste. Take the equipment to a waste disposal site.
Plastic and metal parts that are used in the construction of this appliance can
be separated into pure grade which allow recycling. Ask your service centre
for details. Everyone of us can participate in environmental protection.
7
Page 10
CLEANING & MAINTENANCE
To prolong the life of your CHOCOLATE WATERFALL be sure to follow cleaning instructions
after every use. Never use anything abrasive on the base to maintain the original nish.
1. Make sure unit is unplugged before cleaning. Allow parts to COOL
to the touch. Tower, Auger, and Base can get VERY HOT!
2. Before rst use and continuing after each use, be sure to wash the Chocolate
Wall and Auger thoroughly. AVOID washing parts in the dishwasher.
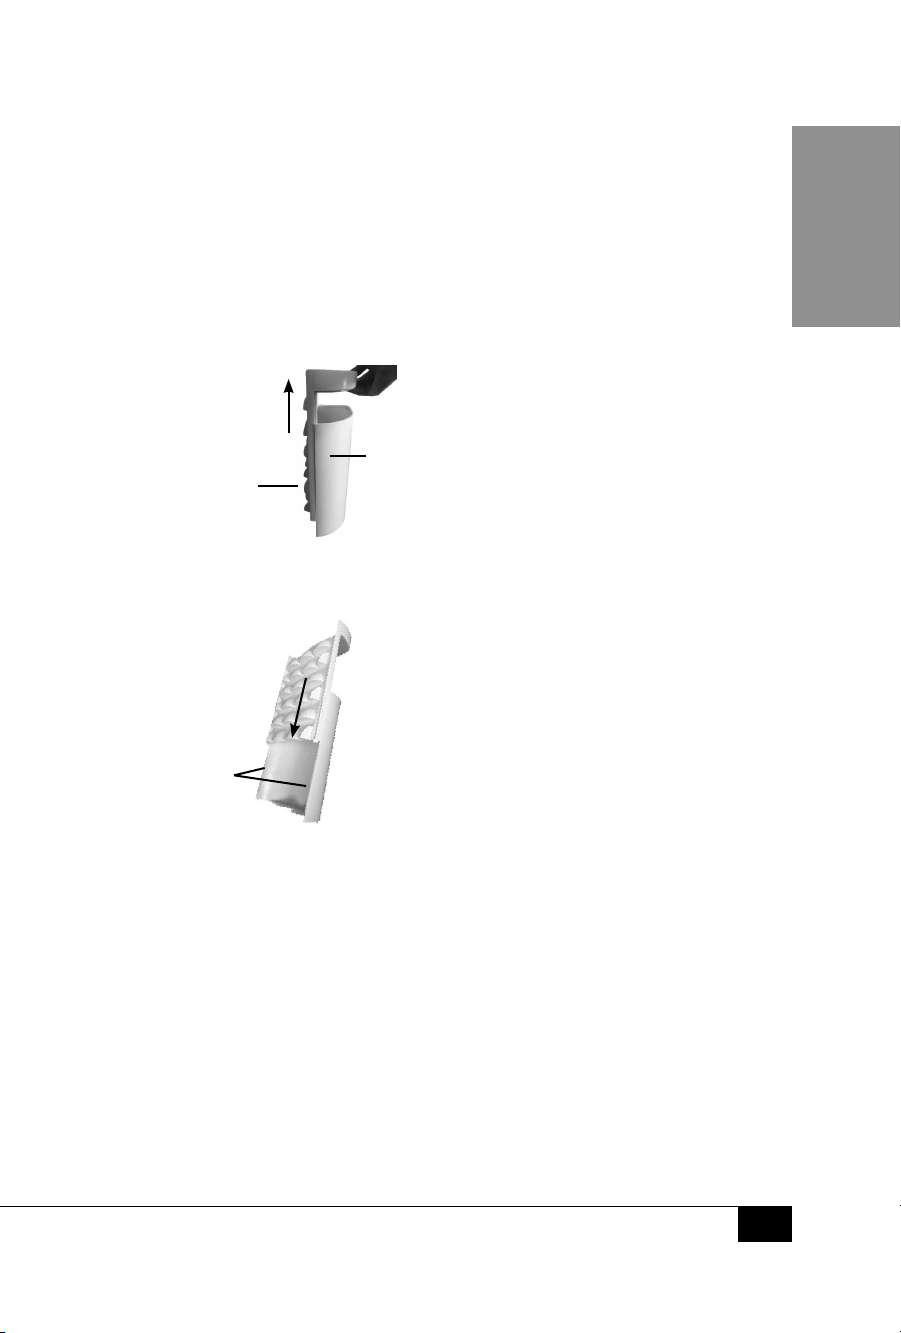
3. To disassemble the Chocolate Wall, separate the face of the Chocolate Wall from the back of
the wall by sliding the face upward from the top of the unit.
Face of
Chocolate Wall
4. To reassemble the Chocolate Wall, simply slide the face of the wall onto the back of the
wall. Align the sides of the face of the wall with the tracks on the inside of the back wall to
properly reassemble the Chocolate Wall.
Align with
tracks
Back of
Chocolate Wall
ENGLISH
5. To make cleaning of the CHOCOLATE WATERFALL easier, carefully remove the
Chocolate Wall and Auger (after cooling) and wipe o remaining chocolate
with paper towels. Wash in warm, soapy water, rinse and dry.
6. Carefully pour out as much remaining chocolate from the Bowl as
possible. Use non-abrasive, damp sponge or cloth to wipe clean the
rest of the unit. Then, wipe with a non-abrasive towel to dry.
DO NOT POUR OUT EXCESS OR LEFTOVER CHOCOLATE DOWN ANY DRAIN. POUR
INTO A PLASTIC BAG OR DISPOSABLE CONTAINER THEN PUT INTO THE GARBAGE.
8
Page 11

RECIPES
For best results, chocolate should contain 60% cocoa. Any higher percentage
of cocoa will require the addition of vegetable oil to thin out the mixture.
DO NOT ADD ANY COLD LIQUIDS TO FOUNTAIN DURING OPERATION.
This will cause your mixture to thicken and not ow properly.
ENGLISH
Enhance the avor of your chocolate using liqueurs.
Try these delectable chocolate creations:
Orange Chocolate:
Orange Liqueur or Orange Concentrate
Chocolate Hazelnut:
Hazelnut Liqueur
Coee Chocolate:
Amaretto
Mint Chocolate:
Crème de Menthe
Chocolate Macaroon:
Crème de Coconut
Chocolate Liqueur:
Any Brand of Chocolate Liqueur
To burn the alcohol o of the liqueur:
• Prior to mixing the liqueur with the chocolate, measure ¼ cup of liqueur
(more or less depending on taste) and pour into a small cooking pot.
• Cook the liqueur on the stove top and bringing to a boil.
• Mix the liqueur with choice of chocolate before adding to the CHOCOLATE WATERFALL.
You can also melt cheese to create a cheese fondue fountain. Dip grapes, apples, breads,
shrimp, crackers, and pretzels – use your imagination! In order to use cheese, just prepare
the cheese as you would for a regular fondue pot by diluting it with white wine or cream to
keep it liquid, enabling it to ow through the tower. Powdered cheese may be used as well.
Barbeque sauces may also be used. Try your favorite barbeque sauce and dip cooked
chicken cubes, beef/steak cubes, pork cubes or shrimp. Just keep in mind the consistency of
the sauce needs to be thin! Use wine, liquor or other liquids to thin the sauce.
9
Page 12
¡Convierta todos los días en una esta!
Visite www.nostalgiaproducts.com para
ver más productos divertidos.
CONTENIDO
SEGURIDAD . . . . . . . . . . . . . . . . . . . . . . . . . . . . . . . . . . . . . . . 10
PRECAUCIONES IMPORTANTES . . . . . . . . . . . . . . . . . . . . . . . . . . 11
IMPORTANTES MEDIDAS DE SEGURIDAD . . . . . . . . . . . . . . . . . . . . 11
INTRODUCCIÓN . . . . . . . . . . . . . . . . . . . . . . . . . . . . . . . . . . . . 12
PARTES Y MONTAJE . . . . . . . . . . . . . . . . . . . . . . . . . . . . . . . . . . 13
FUNCIONAMIENTO . . . . . . . . . . . . . . . . . . . . . . . . . . . . . . . . . . 14
CONSEJOS ÚTILES . . . . . . . . . . . . . . . . . . . . . . . . . . . . . . . . . . . 15
RECICLAJE . . . . . . . . . . . . . . . . . . . . . . . . . . . . . . . . . . . . . . . . 15
LIMPIEZA Y MANTENIMIENTO . . . . . . . . . . . . . . . . . . . . . . . . . . . 16
RECETAS . . . . . . . . . . . . . . . . . . . . . . . . . . . . . . . . . . . . . . . . . 17
ESPAÑOL
SEGURIDAD
Su seguridad y la de los demás son muy importantes.
Hemos incluido numerosos avisos de seguridad importantes en este manual
y en el aparato. Lea y cumpla siempre todos los avisos de seguridad.
Este es el símbolo de advertencia de seguridad.
Este símbolo le avisa de posibles peligros que podrían poner en
riesgo su vida o su integridad física, o la de otras personas.
Todos los mensajes de seguridad aparecen junto al símbolo de advertencia de seguridad.
Todos los mensajes de seguridad le indicarán cuáles son los peligros potenciales, cómo
reducir el riesgo de lesiones y lo que puede ocurrir si no sigue las instrucciones.
Especicaciones del aparato:
120 V, 60 Hz
180 W
10
10
Page 13

PRECAUCIONES IMPORTANTES
1. NO utilice ningún estropajo con este aparato.
2. NUNCA deje el aparato sin vigilar cuando esté en funcionamiento.
3. NO ponga en el recipiente nada que no sean los ingredientes previstos.
4. NO lo utilice cerca del agua.
5. NO toque la torre con los dedos mientras la máquina esté encendida o esté todavía caliente.
6. Desenchufe el aparato de la toma de corriente cuando no lo use o cuando vaya a limpiarlo.
7. NO utilice el aparato con el cable o el enchufe dañados, ni
después de que se haya producido alguna avería.
8. NO lo lave en el lavavajillas.
9. Este aparato pueden utilizarlo los niños a partir de 8 años y las personas con capacidades
físicas, sensoriales o mentales reducidas o con falta de experiencia y conocimientos, si
están supervisados por un adulto o si se les ha proporcionado las instrucciones apropiadas
sobre el uso del aparato de una manera segura y comprenden los peligros que implica.
10. Este aparato NO es un JUGUETE.
11. Los niños no deben jugar con el aparato.
12. La limpieza y el mantenimiento no deben realizarlo los niños sin supervisión.
IMPORTANTES MEDIDAS DE SEGURIDAD
Cuando use aparatos eléctricos, debe seguir las medidas
básicas de seguridad, incluidas las siguientes:
1. Lea todas las instrucciones antes de utilizar el aparato.
ESPAÑOL
2. NO TOQUE las piezas móviles.
3. Para evitar el riesgo de descargas eléctricas no sumerja el cable, el
enchufe ni ninguna parte de la base en agua u otros líquidos.
4. Preste especial atención cuando el aparato lo utilicen los niños o esté cerca de ellos.
5. Desenchúfelo de la toma de corriente cuando no vaya a
utilizarlo y antes de quitar piezas para limpiarlo.
6. NO utilice ningún aparato con el cable o el enchufe dañados o si ha sufrido algún tipo de
daño. Devuelva el aparato al servicio técnico más cercano para su revisión o reparación.
7. El fabricante recomienda que no se utilicen accesorios distintos de lo que
se proporcionan. El uso de otros accesorios puede causar lesiones.
8. NO lo use al aire libre.
9. EVITE que el cable toque las supercies calientes.
10. NO coloque el aparato cerca de fuentes de calor o placas eléctricas, ni en un horno caliente.
11. Extreme las precauciones cuando mueva el aparato.
12. El aparato debe estar sobre una supercie plana para que funcione correctamente.
13. NO utilice el aparato para otro uso distinto al indicado.
11
11
Page 14

14. NO deje el aparato sin vigilar cuando esté en funcionamiento o enchufado.
15. NO monte la barrena o la torre mientras el motor esté funcionando.
Asegúrese de que la unidad esté desenchufada antes de montarla.
16. NO caliente el chocolate a más de 43,3 oC (110 oF) para evitar que la torre se deforme.
17. La resistencia se calienta. Evite el contacto hasta que se haya enfriado completamente.
18. Se proporciona un cable de alimentación corto para reducir el riesgo de enredos o tropiezos.
19. Puede usar un alargador si lo utiliza adecuadamente.
20. El voltaje marcado en el alargador debe ser al menos del mismo
tamaño que la potencia eléctrica del aparato.
21. Mantenga las manos y los objetos extraños lejos de la fuente mientras esté en uso. Revise
regularmente el recipiente para asegurarse de que no haya trozos de fruta, pulpa, etc., ya
que podrían atascar la fuente y el chocolate no uiría adecuadamente.
¡GUARDE ESTAS INSTRUCCIONES!
INTRODUCCIÓN
¡Cree una pared dulce y proporcione un toque de diversión y elegancia a cualquier
ocasión con la CASCADA DE CHOCOLATE! La barrena transporta el chocolate a
la parte superior de la cascada y luego uye hacia abajo. ¡Moje trozos de fruta,
pan, galletas saladas (tipo pretzel) y otros alimentos en el chocolate.
Pruebe lo siguiente:
• 1,36 kg de capacidad
• La barrena transporta el chocolate a la parte superior de la cascada
• Gire el selector de control a motor térmico
• La base se calienta y hace que uya el chocolate
• Relieve cromado
• Úsela con chocolate, salsas barbacoa, queso y licores
• ¡Perfecto para mojar trozos de fruta, pan, galletas saladas (tipo pretzel), nubes y más!
• No contiene BPA
ESPAÑOL
12
12
Page 15
PARTES Y MONTAJE
La CASCADA DE CHOCOLATE requiere poco montaje. Antes de utilizarla,
limpie la parte exterior de la base con un trapo húmedo y luego,
séquela. Lave la barrena, la pared de chocolate y el cilindro de la torre
con agua tibia y jabón, enjuague las piezas y, luego, séquelas.
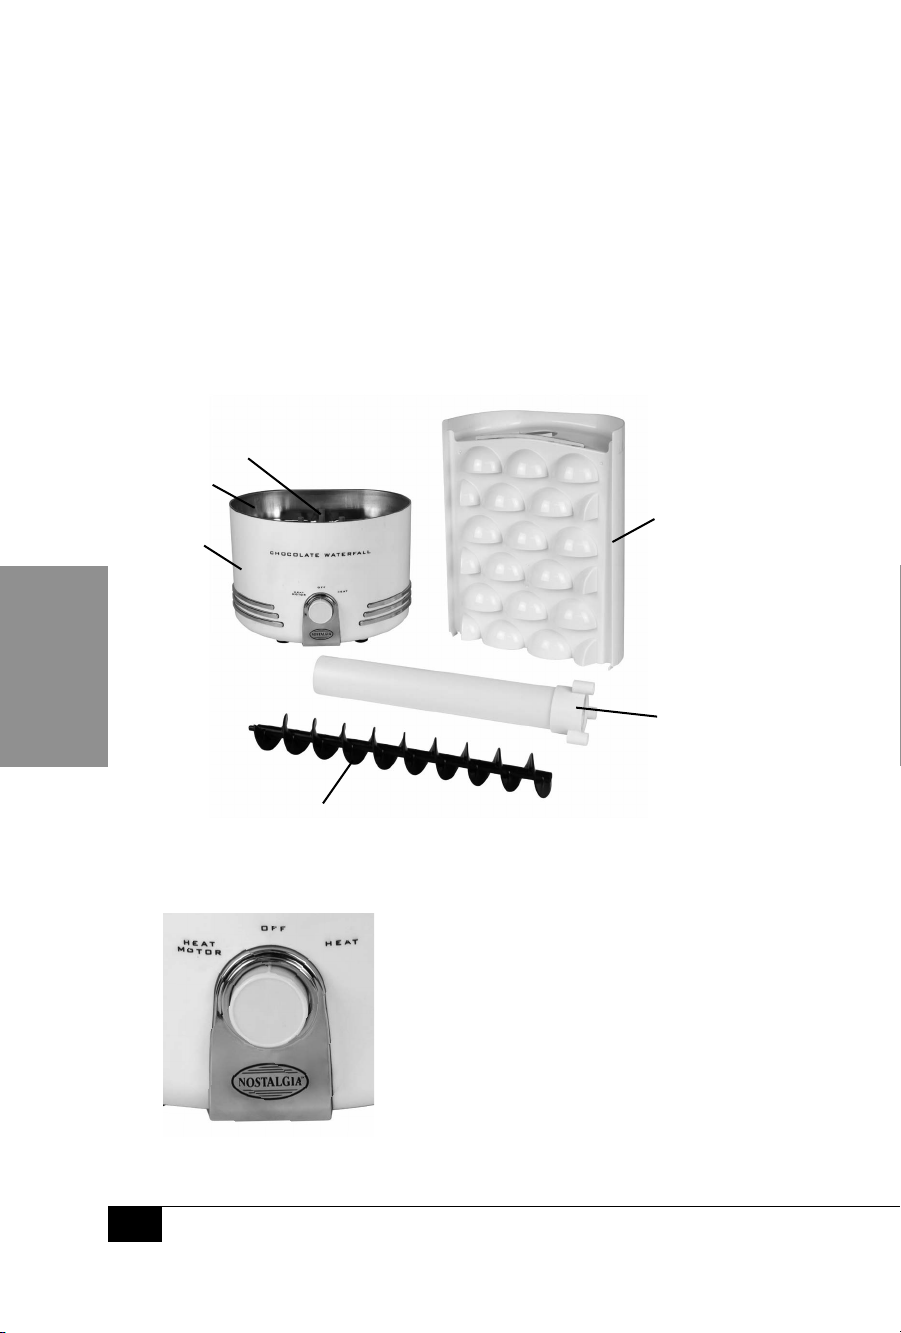
Después de limpiarlas, enganche la barrena en el conector de la base. Coloque el cilindro de
la torre sobre la barrena y fííelo a la base alineándolo con los conectores. Luego introduzca
el cilindro de la torre por el oricio de la pared de chocolate y colóquela en la base.
No intente colocar la barrena, la pared de chocolate o el cilindro de la torre en la
base o retirarlos de la base mientras el motor esté funcionando. Asegúrese de que
el cilindro de la torre coincide correctamente con los conectores de la base.
Conectores de la base
Recipiente
Pared de
Base
chocolate
ESPAÑOL
POSICIONES DEL INTERRUPTOR
Izquierda: Motor térmico / Arriba: APAGADO / Derecha: Calor
13
13
Cilindro de
la torre
Barrena
Page 16

FUNCIONAMIENTO
1. Primero, encuentre una supercie estable cerca de una toma de corriente antes
de empezar. La unidad debe estar nivelada para que funcione correctamente y
para que cree el efecto de uidez deseado. Asegúrese de que el cable esté lejos
de cualquier fuente de agua. Puede utilizar un alargador si lo necesita.
2. Gire el interruptor a la derecha para que la CASCADA DE CHOCOLATE
comience a calentarse. Deje que la unidad se caliente durante al
menos 3 o 5 minutos antes de agregar el chocolate derretido.
3. Mientras que la máquina se está calentando, busque un recipiente para microondas.
Llene el recipiente con 1,36 kg de chocolate en trozos (1360 g) y 1 taza y media de aceite.
Puede que necesite añadir más aceite para asegurarse de que el ujo es el adecuado.
4. Métalo en el microondas durante dos minutos y medio. Cuando termine, mueva el
chocolate. Si es necesario, continúe calentando el chocolate en el microondas hasta
que esté completamente derretido (entre 2 minutos y 2 minutos y medio). NO caliente
el chocolate a más de 43,3oC (110 oF) para evitar que la pared se deforme.
5. No añada líquidos fríos al chocolate derretido en la fuente, ya que esto detendría el ujo.
6. El chocolate tiene que estar totalmente derretido y tener una textura na para que el ujo
sea adecuado. Utilice una cuchara grande para probar la consistencia del chocolate. Si al
gotear el chocolate de la cuchara es demasiado espeso, añada más aceite a la mezcla.
7. Una vez que el chocolate se haya derretido y tenga la consistencia adecuada,
gire el interruptor a la posición MOTOR TÉRMICO en la CASCADA DE CHOCOLATE,
de esa forma, el motor y el calentador funcionan al mismo tiempo.
8. Con cuidado, vierta el chocolate derretido en el recipiente de la base de la pared de
chocolate. La barrena subirá el chocolate derretido por el cilindro de la torre hasta
la parte superior. Entonces, el chocolate empezará a uir desde la parte superior
de la torre uniformemente, en forma de cascada, por la pared de chocolate.
9. La CASCADA DE CHOCOLATE debe mantenerse nivelada para que el
chocolate uya adecuadamente. Tenga cuidado de que no caigan trozos de
comida en el recipiente, ya que podría obstruir el ujo de chocolate.
10. ¡IMPORTANTE! Para lograr un ujo de chocolate uniforme y consistente, use las patas
niveladoras que hay debajo de la base para inclinar la cascada de chocolate ligeramente
hacia adelante, atrás, izquierda o derecha. Al ajustar con cuidado las patas niveladoras,
permitirá que el chocolate uya uniformemente por la cascada.
NOTA: Cuando disminuya la cantidad de chocolate, puede que necesite volver a
ajustar las patas niveladoras para obtener un ujo de chocolate uniforme.
ESPAÑOL
14
14
Page 17
CONSEJOS ÚTILES
• ¡IMPORTANTE! Para lograr un ujo uniforme y consistente, use las patas niveladoras
que hay debajo de la base para inclinar la cascada de chocolate ligeramente hacia
atrás. Esto permitirá que el chocolate uya uniformemente por la cascada.
• Si el chocolate comienza a gotear en vez de uir por la torre, es porque el
chocolate está demasiado espeso. Diluya el chocolate añadiendo aceite
vegetal. También, asegúrese de que la unidad esté nivelada.
• Si el chocolate uye de forma irregular, la unidad no está nivelada. Asegúrese de que la
unidad está sobre una supercie plana para que el chocolate se distribuya uniformemente.
• Si el ujo es intermitente, interrumpido o no uye adecuadamente,
compruebe que no haya trozos de comida en el recipiente de la
base que puedan estar obstruyendo el ujo de chocolate.
• No agregue líquidos fríos a la CASCADA DE CHOCOLATE,
ya que esto detendrá el ujo de la fuente.
• NO caliente el chocolate a más de 43,3oC (110 oF) para
evitar que la pared de chocolate se deforme.
• ¡IMPORTANTE! Para lograr un ujo de chocolate uniforme y consistente, use las
patas niveladoras que hay debajo de la base para inclinar la cascada de chocolate
ligeramente hacia adelante, atrás, izquierda o derecha. Al ajustar con cuidado las
patas niveladoras, permitirá que el chocolate uya uniformemente por la cascada.
NOTA: Cuando disminuya la cantidad de chocolate, puede que necesite volver a
ajustar las patas niveladoras para obtener un ujo de chocolate uniforme.
• Para disfrutar plenamente de la CASCADA DE CHOCOLATE, le recomendamos
que no utilice la unidad con menos de 900 g de chocolate. Añada más
chocolate a la máquina cuando descienda el nivel de chocolate.
Añada aceite
• Como regla general, agregue 120 ml de aceite por cada 450 g de chocolate. Algunos tipos
ESPAÑOL
de chocolate pueden requerir más aceite, según el contenido de grasa de mantequilla
del chocolate. Si es necesario, añada poco a poco más aceite al chocolate hasta lograr
la consistencia adecuada. Cuanto mayor sea el contenido de grasa de mantequilla del
chocolate, menos aceite necesitará para obtener un ujo de chocolate uniforme.
RECICLAJE
15
15
Al nal de la vida útil del producto, por favor, tenga en cuenta el impacto ambiental.
No lo tire junto con los demás residuos domésticos, llévelo a un centro de recogida
para su reciclaje. Las piezas de plástico y de metal que se utilizan en la fabricación
de este aparato se pueden separar para su reciclaje. Infórmese en un centro de
servicios. Todos podemos colaborar en la protección del medio ambiente.
Page 18
LIMPIEZA Y MANTENIMIENTO
Para prolongar la vida de su CASCADA DE CHOCOLATE, asegúrese de seguir
las instrucciones de limpieza después de cada uso. No utilice ningún producto
abrasivo para limpiar la base, de esa forma mantendrá el acabado original.
1. Asegúrese de que la unidad está desenchufada antes de limpiarla. Deje que se ENFRÍE
antes de tocarla. ¡La torre, la barrena y la base pueden estar MUY CALIENTES!
2. Antes de utilizar la máquina por primera vez y después de cada uso, asegúrese de lavar
bien la pared de chocolate y la barrena. NO lave ninguna pieza en el lavavajillas.
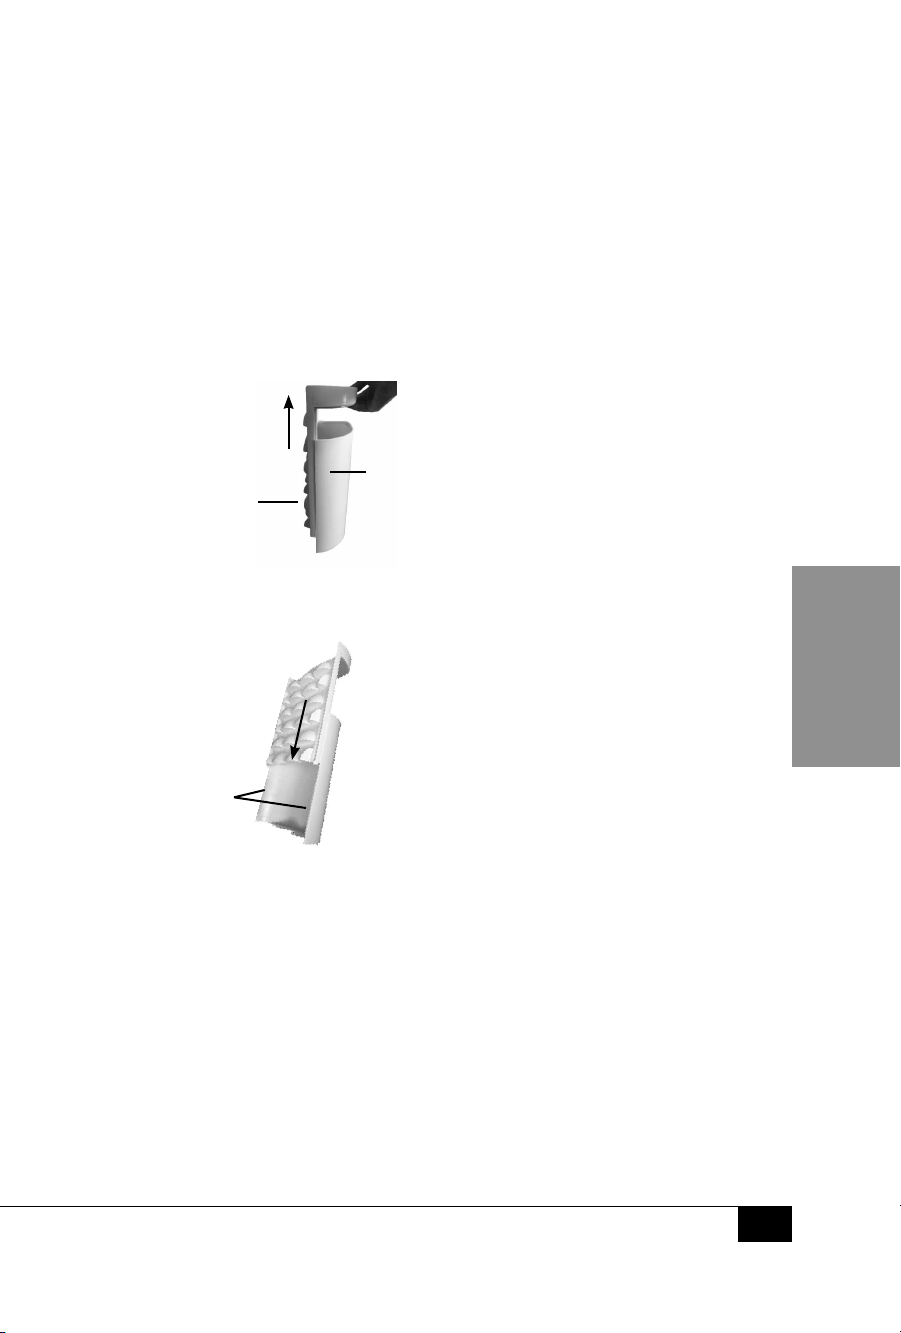
3. Para desmontar la pared de chocolate, separe el frontal de la pared de chocolate de la parte
posterior deslizándolo hacia arriba.
Frontal de
la pared de
chocolate
Parte posterior de la
pared de chocolate
4. Para volver a montar la pared de chocolate, simplemente deslice el frontal por la parte
posterior de la pared. Alinee los lados del frontal con las ranuras interiores de la pared
posterior para volver a montar correctamente la pared de chocolate.
Align with
tracks
5. Para facilitar la limpieza de la CASCADA DE CHOCOLATE, quite con cuidado la pared
de chocolate y la barrena (después de enfriarse) y limpie el chocolate restante con
servilletas de papel. Lave las piezas con agua tibia, enjuáguelas y séquelas.
6. Con cuidado, retire del recipiente todo el chocolate que sea posible.
Utilice una esponja o paño no abrasivo húmedo para limpiar el resto
de la unidad. Luego, séquela con un paño no abrasivo.
NO DESECHE EL CHOCOLATE SOBRANTE POR NINGÚN DESAGÜE. VIÉRTALO EN UNA BOLSA
DE PLÁSTICO O EN UN ENVASE DESECHABLE Y LUEGO DEPOSÍTELO EN LA BASURA.
ESPAÑOL
16
16
Page 19

RECETAS
Para obtener mejores resultados, el chocolate debe contener un 60% de cacao.
Un porcentaje de cacao mayor necesitará más aceite vegetal para diluir la mezcla.
NO AÑADA LÍQUIDOS FRÍOS A LA FUENTE MIENTRAS ESTÉ FUNCIONANDO.
Esto haría que la mezcla se espesara y no uyera correctamente.
Realce el sabor del chocolate con licores. Pruebe estas deliciosas creaciones:
Chocolate de naranja:
Licor de naranja o concentrado de naranja
Chocolate de avellana:
Licor de avellana
Chocolate de café:
Amaretto
Chocolate de menta:
Crema de menta
Macaron de chocolate:
Crema de coco
Licor de chocolate:
Cualquier marca de licor de chocolate
Para quemar el alcohol del licor:
• Antes de mezclar el licor con el chocolate, mida 1/4 de taza de licor (más
o menos, dependiendo del gusto) y viértalo en una olla pequeña.
• Ponga el licor al fuego y déjelo que hierva.
• Mezcle el licor con el chocolate antes de ponerlo en la CASCADA DE CHOCOLATE.
ESPAÑOL
También puede derretir queso para crear una fuente de fondue de queso. Moje
uvas, manzanas, pan, gambas, galletas saladas (tipo cracker y pretzel). ¡Use su
imaginación! Para poder utilizar queso, solo tiene que preparar el queso como lo
haría para una fondue habitual; dilúyalo con vino blanco o nata para mantenerlo
líquido y que pueda uir por la torre. También puede usar queso en polvo.
Otro ingrediente que puede utilizar es salsa barbacoa. Pruebe la cascada con su salsa
barbacoa favorita y sumerja los dados, ya cocinados, de diferentes tipos de carne: pollo,
ternera, cerdo; o incluso gambas. ¡Solo debe tener en cuenta que la consistencia de la salsa
tiene que ser na! Utilice vino, licores u otros líquidos para diluir la salsa.
17
17
Page 20

 Loading...