

Page 1

All products are trademarks of Nostalgia Products LLC.
Worldwide design & utility patented or patents pending.
© 2017 Nostalgia Products LLC.
www.nostalgiaproducts.com
(rev. 06/29/17 WL)
Page 2
ICMWH
Coca-Cola® Automatic Ice Cube Maker
Máquina de Cubitos de Hielo Automática
Machine à Glaçons Automatique
Instructions and Recipes
Instrucciones y Recetas
Instructions et Recettes
ICMCOKE
Page 3

Page 4
ENGLISH
2
Make every day a party!
Visit www.nostalgiaproducts.com for more fun products.
CONTENTS
SAFETY . . . . . . . . . . . . . . . . . . . . . . . . . . . . . . . . . . . . . . . . . 2
IMPORTANT SAFEGUARDS . . . . . . . . . . . . . . . . . . . . . . . . . . . . . 3
ADDITIONAL IMPORTANT SAFEGUARDS . . . . . . . . . . . . . . . . . . . . 3
INTRODUCTION . . . . . . . . . . . . . . . . . . . . . . . . . . . . . . . . . . . . 4
PARTS & ASSEMBLY . . . . . . . . . . . . . . . . . . . . . . . . . . . . . . . . . . 5
HOW TO OPERATE . . . . . . . . . . . . . . . . . . . . . . . . . . . . . . . . . . 6
HELPFUL TIPS . . . . . . . . . . . . . . . . . . . . . . . . . . . . . . . . . . . . . 7
CLEANING & MAINTENANCE . . . . . . . . . . . . . . . . . . . . . . . . . . . 7
RECIPES . . . . . . . . . . . . . . . . . . . . . . . . . . . . . . . . . . . . . . . . . 8
RETURNS & WARRANTY . . . . . . . . . . . . . . . . . . . . . . . . . . . . . . . 10
SAFETY
Appliance Specications:
110-120 Volts, 60 Hz, 120 Watts, 2 Amps
Refrigerant R134a
THIS PRODUCT IS FOR USE IN 120V AC OUTLET ONLY.
Refer to www.nostalgiaproducts.com/user-manuals/ for the most updated manual.
Your safety and the safety of others are very important.
We have provided many important safety messages in this manual and
on your appliance. Always read and obey all safety messages.
This is the safety alert symbol.
This symbol alerts you to potential hazards that can
cause serious injury to you and others.
All safety messages will follow the safety alert symbol.
All safety messages will tell you what the potential hazard is, tell you how to reduce the
chance of injury, and tell you what can happen if the instructions are not followed.
Page 5
ENGLISH
3
IMPORTANT SAFEGUARDS
A person who has not read and understood all operating and safety instructions
is not qualied to operate this appliance. All users of this appliance must read and
understand this Instruction Manual before operating or cleaning this appliance.
When using electrical appliances, basic safety precautions
should always be followed, including:
1. Read all instructions before operating this appliance.
2. DO NOT TOUCH the hot surfaces. Use handles or knobs.
3. This appliance is NOT A TOY.
4. Unsupervised young children and cognitively challenged
individuals should never operate this appliance.
5. Close supervision is necessary when any appliance is used by or near children.
6. To protect against electrical shock do not immerse cord, plug
or any part of this unit in water or other liquids.
7. Unplug from outlet when not in use, before removing parts and before cleaning.
Allow to cool before putting on or taking o any parts, and before cleaning.
8. DO NOT operate any appliance with a damaged cord or plug, or after the appliance
malfunctions, or if the appliance has been damaged in any manner. Return the
appliance to the nearest repair shop for examination, repair or adjustment.
9. The manufacturer does not recommend the use of accessory attachments other than
what is provided by the manufacturer. Use of attachments may cause injuries.
10. DO NOT use the appliance for other than its intended use.
11. DO NOT use outdoors. FOR HOUSEHOLD USE ONLY.
12. DO NOT place on or near a hot gas or electric burner, or in a heated oven.
13. DO NOT let cord hang over edge of table or counter, or touch hot surfaces.
14. NEVER leave unit unattended while in use or when plugged into an outlet.
15. Extreme caution must be used when moving an appliance containing hot food.
16. Always attach plug to appliance rst, then plug cord in the wall outlet. To
disconnect, turn any control to "o," then remove plug from wall outlet.
ADDITIONAL IMPORTANT SAFEGUARDS
Operating Safety Precautions
1. DO NOT touch the Evaporator while the unit is in use or during
the ice making process. This could cause severe burns.
2. DO NOT clean unit with ammable liquids. The fumes can create a re hazard or explosion.
3. Check Ice Hopper for presence of foreign objects prior to use.
4. DO NOT turn unit upside down while in use, or when lled with ice.
Instructions for the Electrical Cord and Plug
1. This appliance has a polarized plug (one blade is wider than the other). To reduce the
risk of electrical shock, this plug is intended to t into a polarized outlet only one way.
If the plug does not t fully into the outlet, reverse the plug. If it still does not t,
Page 6

ENGLISH
4
contact a qualied electrician. Do not attempt to modify the plug in any way.
2. A short power supply cord is provided to reduce the risk resulting
from becoming entangled or tripping over a long cord.
3. If a long detachable power-supply cord or extension cord is used:
• Extension cords can be used if care is exercised in their use.
• The marked electrical rating of the cord or extension cord should
be at least as great as the electrical rating of the appliance.
• When using a longer cord or extension cord, make sure that
the cord does not drape over a countertop or tabletop where
it can be pulled on or tripped over unintentionally.
4. The manufacturer does not recommend using this machine in countries that do not support
120V AC even if a voltage adapter, transformer, or converter is in use.
SAVE THESE INSTRUCTIONS!
INTRODUCTION
Congratulations! You are now a proud owner of the COCA-COLA® AUTOMATIC ICE
CUBE MAKER from Nostalgia™! This stylish and portable ice maker combines the
classic look of your favorite soda with the functionality of a modern appliance. With its
intuitive, easy-to-use design, you'll be making perfect ice cubes soon after you plug
in your new appliance. Perfect for the kitchen, club houses, home bars, and more!
Features:
• Makes up to 26 lbs. of ice per day
• Produces 9 ice cubes every 7-15 minutes
• Water tank capacity: 2.1 liters
• Ice basket capacity: 1.32 liters
• Multiple ice cube sizes: small and large
• Control panel with LED indicator lights
• Compact and elegant design
• Transparent lid for easy viewing
• Removable ice basket
• Includes ice scoop
• Refrigerant: R134A
Page 7
ENGLISH
5
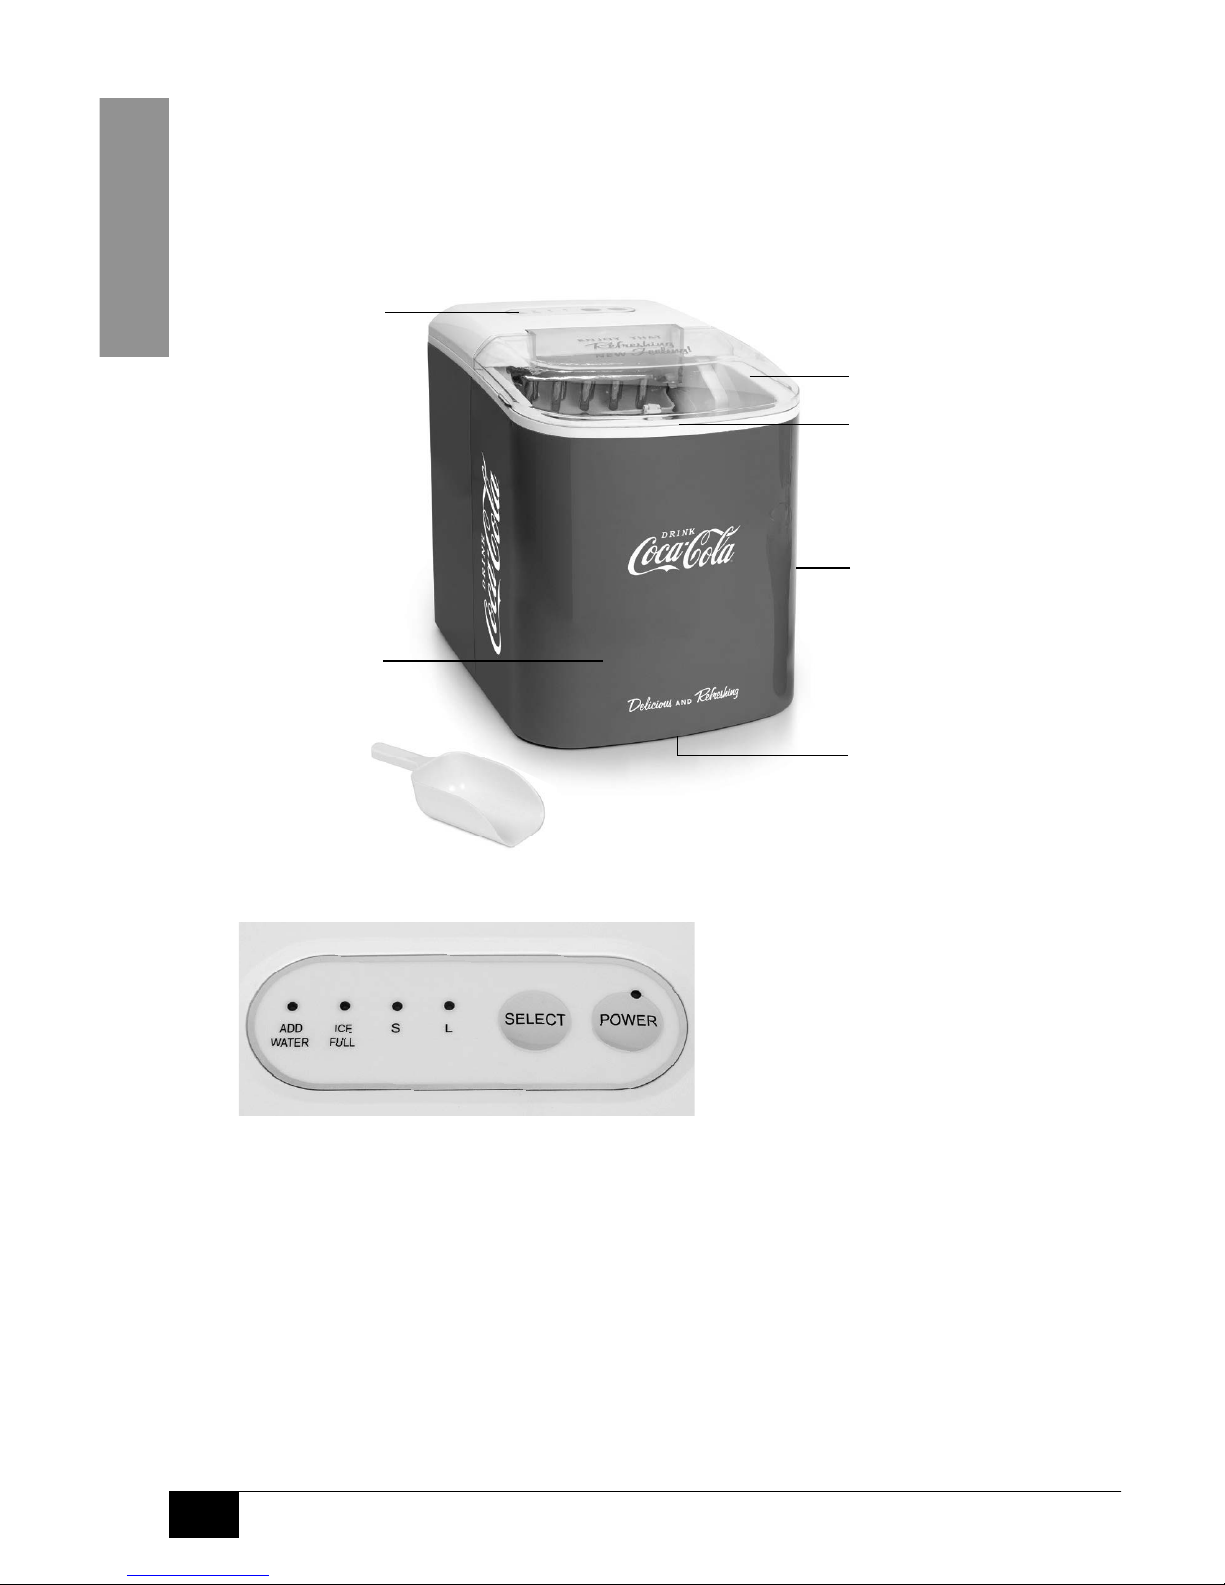
PARTS & ASSEMBLY
Before rst use, be sure to remove all interior and exterior packaging, and follow
the steps under CLEANING & MAINTENANCE to properly clean your unit.
LED Control Panel
ADD WATER = illuminates when time to add water to Water Reservoir
ICE FULL = illuminates when Ice Basket is full
S = Small ice cube indicator
L = Large ice cube indicator
SELECT = press to select size of ice cubes
POWER = press button to turn unit ON/OFF
Clear Lid
Ice Basket
Water Reservoir
Water Drain Plug
Ventilation
LED Control Panel
Ice Scoop
Page 8
ENGLISH
6
HOW TO OPERATE
BEFORE FIRST USE
1. Follow the steps under CLEANING & MAINTENANCE before using this unit.
2. Place the unit on a at, level surface in a location that is protected from
direct sunlight and other sources of heat (i.e. stove, furnace, radiator). Ensure
there is at least four inches of empty space on all sides of the unit.
3. Allow one hour for the refrigerant uid to settle before plugging
the cord into an electrical outlet for the rst time.
USING YOUR ICE CUBE MAKER
1. Open the Clear Lid to remove the Ice Basket and pour water into the Water
Resevoir. Keep the water level below the MAX level mark. If water levels exceed
the MAX level mark, drain any excess water by removing the Water Drain Plug.
2. Press the POWER button on the LED Control Panel to begin the ice-making cycle.
3. Select the desired size of the ice cubes by pressing the SELECT button. If the
room temperature is lower than 60°F (16°C), it is recommended to select
the small-sized ice cubes in order to keep ice from sticking together.
4. Each ice-making cycle lasts 6 to 15 minutes, depending on the size of the
ice cube selected and the ambient temperature of the room. In extremely
hot temperatures, ice-making time may vary considerably.
5. While the ice maker is on, check the water level periodically. If the water pump is unable
to pump water, the unit will stop automatically and the Add Water light will illuminate.
6. If the water level is low, press the POWER button to turn the unit OFF, ll water up to
the MAX level mark and press the POWER button again to turn ON the unit again.
7. The unit automatically stops working when the Ice Basket
is full and the ICE FULL light will illuminate.
8. To ensure a reasonable hygiene level, change the water in the Water Reservoir
every 24 hours. If the unit isn’t in use, drain all water left in the Water Reservoir.
IMPORTANT NOTE: In the event that the power is disconnected during the ice making
cycle or that the LED lights on the Control Panel are blinking, press the POWER button
to stop the ice making cycle. Unplug the unit from the electrical outlet. Allow the
unit to sit for a few minutes to let it warm up and allow ice to fall from the evaporator
ngers. Empty the Water Tray and wait three minutes before restarting the unit.
DO NOT touch the Evaporator while the unit is in use or during the ice making
process. This could cause severe burns.
Page 9

ENGLISH
7
HELPFUL TIPS
ADD WATER INDICATOR
If the Add Water Indicator comes on, try the following:
• Turn o the unit, add water, and press the POWER button again to restart the unit.
• There may be too much ice. Turn o the Ice Maker, remove some ice from the Ice Basket.
ICE CUBES STICK TOGETHER
• The ice cycle may be too long. Stop the Ice Maker, then restart it when the ice
cubes melt. Select the smaller sized ice cubes using the SELECT button.
• The water temperature in the Water Resevoir may be too low. Change the water in
the Water Resevoir. The room temperature should be set between 45˚ F - 90˚ F.
ICE MAKER NOT WORKING
If the ice-making cycle seems to be running properly,
but no ice is being made, try the following:
• The ambient temperature or water temperature in Water Resevoir may
be too high. The unit must be in an environment below 90˚ F. Try pouring
colder water (between 45˚ F - 90˚ F) into the Water Resevoir.
• If changing the water or allowing the unit to cool does not work, there may
be a leakage of the refrigerant uid, or a pipe in the cooling system may be
blocked. Please take your ice maker to a qualied technician for repair.
LED LIGHTS
• If the LED lights on the Control Panel are blinking, there may be a disruption in the
power source. Press the POWER button to stop the ice-making cycle. Let the ice maker
sit for several minutes to let it warm up and allow ice to fall from the evaporator
ngers. Empty the Water Tray and wait three minutes before restarting the unit.
CLEANING & MAINTENANCE
Your AUTOMATIC ICE CUBE MAKER should be cleaned after each use. Following
these steps will help to maintain the unit and add to longevity.
1. Unplug the unit from the electrical outlet.
2. Remove the Ice Basket, then clean the Ice Basket and Ice Scoop using warm,
soapy water, and a soft cloth. Wipe dry with a non-abrasive, dry towel.
3. Clean the interior and exterior of the unit using warm,
soapy water, and a non-abrasive towel.
4. Drain the interior water by unplugging the Water Drain Plug on the bottom of the unit.
5. Dry the interior and exterior with a soft, non-abrasive cloth.
6. If the unit has not been in use for a long time, always open the Water Drain
Plug and completely drain the water from the Water Reservoir.
Page 10

ENGLISH
8
RECIPES
Your AUTOMATIC ICE CUBE MAKER can be used to instantly make ice cubes to be for a
variety of beverages. Here are some delicious beverages that you can make at home.
MUDDY WATER
• 1 Bottle Coca-Cola
• 1 Bottle Orange Juice
• Ice
Fill 1/4 of each glass with ice made with
your AUTOMATIC ICE CUBE MAKER.
Pour orange juice until the glass is half full, or to taste.
Pour Coca-Cola until glass is full.
Stir well.
ROY ROGERS
• 6-8 oz. Coca-Cola
• 1/4 oz. grenadine
• Maraschino cherries
• Ice
Fill glasses with ice from your AUTOMATIC ICE CUBE MAKER.
Add in Coca-Cola and grenadine.
Stir well.
Add maraschino cherry as garnish.
ALL AMERICAN
• 1 oz. Bourbon
Whiskey
• 1 oz. Southern
Comfort
• 2 oz. Coca-Cola
Fill glass half way with ice from your
AUTOMATIC ICE CUBE MAKER.
Combine Bourbon Whiskey, Southern
Comfort and Coca-Cola in glass.
Stir thoroughly.
Page 11

ENGLISH
9
VANILLA COKE
• 1 oz. Vodka
• 1 oz. Vanilla Schnapps
• Coca-Cola to taste
Fill tall glass with ice from your
AUTOMATIC ICE CUBE MAKER.
Combine vodka and vanilla schnapps in glass. Stir.
Add Coca-Cola until glass is full or to taste.
TEXAS TEA
• 3/4 oz. Vodka
• 3/4 oz. Rum
• 3/4 oz. Gin
• 3/4 oz. Triple Sec
• 3/4 oz. Tequila
• 1 1/2 oz. Sour Mix
• splash of
Orange Juice
• Coca-Cola to taste
Combine vodka, rum, gin, triple sec, tequila and sour mix
and shake with ice from your AUTOMATIC ICE CUBE MAKER.
Pour into glass.
Add in orange juice and Coca-Cola to taste.
Page 12

ENGLISH
10
RETURNS & WARRANTY
SHOULD YOUR UNIT NOT WORK OR IF DAMAGED WHEN YOU FIRST TAKE IT OUT OF
THE BOX, PLEASE RETURN IT TO THE PLACE OF PURCHASE IMMEDIATELY.
COCA-COLA® AUTOMATIC ICE CUBE MAKER / ICMCOKE
Should you have any questions, please contact us via email or at the customer service number listed
below between the hours of 8:00 AM and 5:00 PM, Monday through Friday, Central Standard Time.
Distributed by:
Nostalgia Products LLC
1471 Partnership Dr.
Green Bay, WI 54304-5685
Customer Service
Phone: (920) 347-9122
Web: www.nostalgiaproducts.com
Customer Service Inquiry
To submit a Customer Service inquiry, go to www.nostalgiaproducts.com and ll
out the Customer Service Inquiry form and click the Submit button.
A representative will contact you as soon as possible.
Product Warranty Terms
Nostalgia Products LLC (the “Company”) hereby warrants that for a period of one (1) year from the
date of original purchase, this product will be free of defects in material and workmanship under
normal home use, provided that the product is operated and maintained in accordance with the
operating instructions. As the sole and exclusive remedy under this warranty, the Company will
at its discretion either repair or replace the product found to be defective, or issue a refund on the
product during the warranty period. This warranty is only available to the original retail purchaser of
the product from the date of initial retail purchase, and is only valid with the original sales receipt, as
proof of purchase date is required to obtain warranty benets. All warranty claims must be brought
to the attention of the Company within the warranty period and no later than 30 days of the failure
to perform. This warranty does not cover normal wear or damage caused by shipping, mishandling,
misuse, accident, alteration, improper replacement parts, or other than ordinary household use.
You may be required to return the product (with shipping prepaid by you) for inspection and
evaluation. Return shipping costs are not refundable. The Company is not responsible for returns
damaged or lost in transit. Unless otherwise specically permitted by the operating instructions, this
warranty applies to indoor household use only. In order to obtain service under this warranty, please
contact the Company at the telephone number listed above or by lling out the Customer Service
Inquiry Form located at www.nostalgiaproducts.com. Warranty valid only in USA and Canada.
This warranty is in lieu of all other warranties, expressed or implied, including warranties of
merchantability and tness for a particular purpose, which are hereby excluded to the extent
permitted by law. In no event shall the Company be liable for any indirect, incidental, consequential,
or special damages arising out of or in connection with this product or the use thereof. Some
states, provinces or jurisdictions do not permit the exclusion or limitation of incidental or
consequential damages, so the foregoing exclusion or limitation may not apply to you.
This warranty does not apply to re-manufactured merchandise.
Please read the operating instructions carefully. Failure to comply
with the operating instructions will void this warranty.
For more information, visit us online at www.nostalgiaproducts.com.
Like us on Facebook at www.facebook.com/NostalgiaElectrics.
Follow our boards on Pinterest at www.pinterest.com/nostalgiaelctrx.
Tweet along with us on Twitter at www.twitter.com/NostalgiaElctrx.
Page 13

11
ESPAÑOL
11
SEGURIDAD
Especicaciones del electrodoméstico:
110-120 Volts, 60 Hz, 120 Watts, 2 Amps
Refrigerante R134a
ESTE PRODUCTO SÓLO DEBE USARSE CON UN TOMACORRIENTE DE 120V AC.
Visite www.nostalgiaproducts.com/user-manuals/ para ver el manual más actualizado.
¡Convierta todos los días en una etsa!
Visite www.nostalgiaproducts.com para
ver más productos divertidos.
CONTENIDO
SEGURIDAD . . . . . . . . . . . . . . . . . . . . . . . . . . . . . . . . . . . . . . 11
SALVAGUARDIAS IMPORTANTES . . . . . . . . . . . . . . . . . . . . . . . . . . 12
SALVAGUARDIAS IMPORTANTES ADICIONALES . . . . . . . . . . . . . . . .12
INTRODUCCIÓN . . . . . . . . . . . . . . . . . . . . . . . . . . . . . . . . . . . . 13
PIEZAS Y ENSAMBLE . . . . . . . . . . . . . . . . . . . . . . . . . . . . . . . . .14
CÓMO UTILIZAR . . . . . . . . . . . . . . . . . . . . . . . . . . . . . . . . . . . . 15
CONSEJOS ÚTILES . . . . . . . . . . . . . . . . . . . . . . . . . . . . . . . . . . . 16
LIMPIEZA Y MANTENIMIENTO . . . . . . . . . . . . . . . . . . . . . . . . . . .16
RECETAS . . . . . . . . . . . . . . . . . . . . . . . . . . . . . . . . . . . . . . . . . 17
DEVOLUCIONES Y GARANTÍA . . . . . . . . . . . . . . . . . . . . . . . . . . . . 19
Su seguridad y la de los demás son muy importantes.
Hemos proporcionado numerosos mensajes de seguridad importantes en este manual
y en su electrodoméstico. Siempre lea y obedezca todos los mensajes de seguridad.
Este es el símbolo de alerta de seguridad.
Este símbolo le avisa de los peligros potenciales
que pueden matar o herir a otros.
Todos los mensajes de seguridad estarán antecedidos por el símbolo de alerta.
Todos los mensajes de seguridad le dirán de qué peligro potencial se trata, cómo reducir
la posibilidad de lesiones y qué puede ocurrir si no se obedecen las instrucciones.
Page 14

12
ESPAÑOL
12
SALVAGUARDIAS IMPORTANTES
Una persona que no haya leído y comprendido todas las instrucciones
de uso y seguridad no está calicada para utilizar este aparato. Todos
los usuarios de este dispositivo deben leer y comprender este Manual
de instrucciones antes de utilizar o limpiar este aparato.
Cuando utiliza aparatos eléctricos, siempre se deben seguir algunas
medidas básicas de seguridad que incluyen las siguientes:
1. Lea todas las instrucciones antes de utilizar este aparato.
2. NO TOQUE las supercies calientes. Use agarraderas o mangos.
3. Este aparato NO ES UN JUGUETE.
4. Los niños pequeños sin supervisión y las personas con limitación
cognitiva nunca deben utilizar este aparato.
5. Una supervisión estricta se requiere cuando un aparato se use por niños o cerca de ellos.
6. Como medida de protección contra el riesgo de descarga eléctrica, no sumerja el
cable, los enchufes ni ninguna otra parte de la unidad en agua ni en otros líquidos.
7. Desconéctelo del tomacorriente cuando no esté en uso, antes de
retirar piezas y antes de la limpieza. Déjelo enfriar antes de colocar
o retirar cualquiera de las piezas, y antes de la limpieza.
8. NO utilice ningún aparato con el cable o el enchufe dañados, ni si el aparato
tiene desperfectos o SI se ha dañado de cualquier manera. Devolver el
aparato al taller de reparación más cercano para su reparación o ajuste.
9. El fabricante no recomienda el uso de otros aditamentos o accesorios diferentes a los
proporcionados por el fabricante. El uso de accesorios puede provocar lesiones.
10. NO utilice el aparato para otros usos que no haya sido diseñado.
11. NO utilice el aparato al aire libre. SOLO PARA USO DOMÉSTICO.
12. NO lo coloque sobre o cerca de una hornilla eléctrica o gas caliente, o en un horno caliente.
13. NO permita que el cable cuelgue sobre el borde de la mesa o
del mostrador, ni que toque supercies calientes.
14. NUNCA deje la unidad desatendida mientras esté en uso o
cuando esté enchufada a una toma de corriente.
15. Debe ser extremadamente cuidadoso al mover cualquier aparato con comida caliente.
16. Siempre conecte primero el enchufe al aparato, luego enchufe el cable
a la toma de corriente. Para desconectar, mueva todos los controles
a “apagar” y luego retire el enchufe del tomacorriente.
SALVAGUARDIAS IMPORTANTES ADICIONALES
Precauciones de seguridad operativa
1. NO toque el evaporador mientras la unidad está en uso o durante el proceso
de producción de hielo. Esto podría causar quemaduras graves.
2. Revise el interior del elemento de calefacción que está debajo de la 2. NO limpie la unidad
con líquidos inamables. Los humos pueden crear un riesgo de incendio o explosión.
3. Antes del uso, revise la tolva de hielo para ver si tiene objetos extraños.
4. NO vire la unidad boca abajo mientras esté en uso, o cuando esté llena de hielo.
Page 15

13
ESPAÑOL
13
Instrucciones para el cable eléctrico y el enchufe
1. El aparato tiene un enchufe polarizado (una patita más ancha). Se diseñó para
reducir el riesgo de descarga eléctrica, dado que entra en un tomacorriente
polarizado solo en una posición. Si el enchufe no entra bien en la toma
de corriente, déle la vuelta. Si aún así no entra,comuníquese con un
electricista calicado. No modique el enchufe de ninguna manera.
2. Se provee un cable de alimentación corto para reducir el riesgo
resultantede enredarse o tropezar con un cable largo.
3. Si se utiliza un cable alargador o un cable de alimentación más largo:
• Unos cables de extensión se pueden utilizar si se tiene cuidado con su uso.
• Las características nominales del grupo de cables o del cable de
extensión deben ser al menos iguales a las del aparato.
• Cuando se utiliza un cable largo o cable de extensión, asegúrese de
que el cable no sobresalga de la encimera ni una mesa ya que se
puede halar o tropezarse con el cable involuntariamente.
4. El fabricante no recomienda el uso de esta máquina en países que no admiten 120V
CA incluso si se está usando un adaptador, transformador o convertidor de voltaje.
¡GUARDE ESTAS INSTRUCCIONES!
INTRODUCCIÓN
¡Felicitaciones! ¡Usted es ahora un orgulloso propietario de la MÁQUINA DE CUBITOS DE
HIELO AUTOMÁTICA de Nostalgia™! Esta máquina de hielo elegante y portátil combina el
estilo clásico de su soda favorita con la funcionalidad de un aparato moderno. Gracias a su
diseño intuitivo y fácil de usar, podrá hacer cubitos de hielo perfecto tan pronto después de
conectar su aparato nuevo. ¡Ideal para la cocina, salones de clubes, bares del hogar y más!
Características:
• Prepara hasta 26 lb. de hielo por día
• Produce 9 cubos de hielo cada 7-15 minutos
• Capacidad del tanque de agua: 2,1 litros
• Capacidad de la canasta de hielo: 1,32 litros
• Tamaños múltiples de cubos de hielo: pequeños y grandes
• Panel de control con luces indicadoras LED
• Diseño compacto y elegante
• Tapa transparente para una visión sencilla
• Canasta de hielo removible
• Incluye cuchara para hielo
• Refrigerante: R134A
Page 16

14
ESPAÑOL
14
PIEZAS Y ENSAMBLAJE
Retire todos los embalajes interiores y exteriores. Siga todos los
pasos de LIMPIEZA Y MANTENIMIENTO antes de usar.
Cubierta Transparente
Cesta de hielo
Depósito de Agua
Tapa de drenaje
de agua
Salida de aire
Panel de
control LED
Pala para hielo
Panel de control LED
AGREGAR AGUA = se iluminará cuando haya que agregar agua al depósito de agua
HIELO COMPLETO = se encenderá cuando la cesta de hielo esté llena
S = Indicador de cubo de hielo pequeña
L = Indicador de cubo de hielo grande
SELECCIÓN = pulse para elegir el tamaño de los cubitos de hielo
ENCENDIDO = presione el botón para encender / apagar
Page 17

15
ESPAÑOL
15
CÓMO FUNCIONA
ANTES DEL PRIMER USO
1. Siga todos los pasos de LIMPIEZA Y MANTENIMIENTO antes de usar.
2. Coloque la unidad sobre una supercie plana. Evite la luz directa del
sol y otras fuentes de calor. Asegúrese de que haya al menos cuatro
pulgadas de espacio vacío en todos los lados de la unidad.
3. Deje pasar una hora para que el líquido refrigerante se asiente antes de
enchufar el cable en una toma de corriente eléctrica por primera vez.
USO DE LA MÁQUINA AUTOMÁTICA PARA PREPARAR HIELO
1. Abra la tapa, retire la cesta de hielo y vierta agua en el depósito de agua. Mantenga el nivel
de agua por debajo de la marca de nivel.
2. Pulse el botón de corriente Encendido/Apagado en el Panel
de Control para iniciar el ciclo de hacer hielo.
3. Elija el tamaño deseado de los cubitos de hielo al pulsar el botón Tamaño del
hielo. Si la temperatura ambiente es inferior a 16°C (60 °F), se recomienda que elija
cubitos de hielo pequeños o medianos para evitar que se pegue junto el hielo.
4. El hielo ciclo de hacer hielo dura de 6 a 15 minutos, según el tamaño de la
selección del cubito de hielo y la temperatura ambiente. A temperaturas muy
calientes, el tiempo de hacer hielo puede variar considerablemente.
5. Mientras que la máquina de hielo esté encendida, verique el nivel
de agua periódicamente. Si la bomba de agua no puede inyectar
agua, la MÁQUINA DE CUBITOS DE HIELO AUTOMÁTICA se detendrá
automáticamente, y la luz indicadora de Agregar agua se encenderá.
6. Pulse el botón de corriente Encendido/Apagado para apagar la unidad, llénela de agua
hasta la marca de nivel y pulse el botón de corriente de nuevo para encenderla otra vez.
7. La MÁQUINA AUTOMÁTICA PARA PREPARAR HIELO dejará de funcionar automáticamente
cuando la cesta de hielo esté llena y se encienda la luz indicadora del hielo.
8. Cambie el agua en el depósito de agua cada 24 horas, a n de garantizar un nivel de
higiene razonable. Si la unidad no está en uso, drene toda el agua en el depósito.
NOTA IMPORTANTE: En caso de que desactive la corriente en la MÁQUINA DE CUBITOS
DE HIELO AUTOMÁTICA durante el ciclo de hacer hielo o cuando las luces LED en el
Panel de control estén destellando, pulse el botón de corriente Encendido/Apagado
para detener el ciclo de hacer hielo. Desconecte la unidad de la fuente de alimentación.
Deje que la MÁQUINA DE CUBITOS DE HIELO AUTOMÁTICA se asiente durante unos
minutos para que se caliente y permita que caiga el hielo de los dedos del evaporador.
Vacíe la bandeja de agua y espere tres minutos antes de volver a arrancar la unidad.
NO toque el evaporador mientras la unidad esté en uso o durante el proceso de
hacer hielo. Esto podría causar quemaduras graves.
Page 18

16
ESPAÑOL
16
CONSEJOS ÚTILES
INDICADOR DE AGREGAR AGUA
Si el indicador de Agregar agua se enciende, intente lo siguiente:
• Apague la maquina de hielo, agregue agua y pulse el botón
de encendido nuevamente para reiniciar la unidad.
• Puede que haya mucho hielo. Apague la máquina de
hielo, retire algo de hielo de la cesta de hielo.
CUBITOS DE HIELO PEGADOS
• El hielo ciclo puede ser muy largo. Detenga la máquina de hielo
y reiníciela cuando se derritan los cubitos. Elija cubitos de hielo
de tamaño pequeño con el botón Tamaño del hielo.
• La temperatura del agua en el depósito de agua puede ser muy baja. Cambiar el
agua en el depósito de agua. La temperatura debe estar entre 45° F - 90° F.
LA MÁQUINA DE HIELO NO FUNCIONA
Si el ciclo de hacer hielo parece funcionar adecuadamente,
pero no hay hielo, intente lo siguiente:
• La temperatura ambiente o temperatura del agua en la reserva de agua puede
ser muy alta. La máquina de hielo debe estar en un ambiente inferior a 90° F.
Pruebe vertiendo agua fría (entre 45° F - 90° F) en el depósito de agua.
• Si cambiar el agua o dejar que se enfríe la máquina de hielo no funciona, es posible que
haya una fuga de uido refrigerante o un tubo en el sistema de enfriamiento puede estar
bloqueado. Por favor, lleve la máquina de hielo a un técnico calicado para reparación.
LUCES LED
• Si las luces LED en el Panel de control destellan, es posible que haya una interrupción
en la fuente de alimentación. Pulse el botón de corriente Encendido/Apagado para
detener el ciclo de hacer hielo. Deje que la máquina de hielo se asiente durante unos
minutos para que se caliente y permita que caiga el hielo de los dedos del evaporador.
Vacíe la bandeja de agua y espere tres minutos antes de volver a arrancar la unidad.
LIMPIEZA Y MANTENIMIENTO
La MÁQUINA DE CUBITOS DE HIELO COCA-COLA® se debe limpiar después
de cada uso. Esto ayudará a mantener la unidad por un largo período.
• Desenchufe la unidad.
• Retire la cesta de hielo.
• Limpie el interior con un paño suave con agua caliente mezclada con un jabón suave.
• Use agua caliente para lavar el interior y drene el agua al retirar el tapón de drenaje.
• La parte exterior de la MÁQUINA DE CUBITOS DE HIELO AUTOMÁTICA debe limpiarse
regularmente con un paño suave con un jabón suave mezclado con agua tibia.
• Seque el interior y el exterior con una toalla o paño suave no abrasivo.
• Si la máquina no está en uso durante un largo tiempo, siempre abra el tapón
de drenaje de agua y drene completamente el agua del depósito de agua.
Page 19

17
ESPAÑOL
17
RECETAS
La MÁQUINA DE CUBITOS DE HIELO AUTOMÁTICA se puede utilizar para
hacer instantáneamente cubitos de hielo que se usarán para una variedad de
bebidas. Aquí están algunas deliciosas bebidas que puede hacer en casa.
AGUA TURBIA
• 1 botella de
Coca-Cola
• 1 botella de jugo
de naranja
• Hielo
Llene 1/4 de cada vaso con hielo hecho por la
MÁQUINA DE CUBITOS DE HIELO AUTOMÁTICA.
Vierta el jugo de naranja hasta llenar
a la mitad el vaso, o al gusto.
Vierta la Coca-Cola hasta llenar el vaso.
Revuelva bien.
ROY ROGERS
• 6-8 onzas de
Coca-Cola
• 1/4 onza de
granadina
• Cerezas Maraschino
• Hielo
Llene los vasos con hielo de la MÁQUINA
DE CUBITOS DE HIELO AUTOMÁTICA.
Añada la Coca-Cola y la granadina.
Revuelva bien.
Coloque la cereza maraschino como adorno.
Page 20

18
ESPAÑOL
18
BIEN AMERICANO
• 1 onza de Whiskey
Borbón
• 1 onza de Southern
Comfort
• 2 onzas de Coca-Cola
Llene el vaso con hielo a la mitas de la MÁQUINA
DE CUBITOS DE HIELO AUTOMÁTICA.
Mezcle el Whiskey Borbón, el Southern
Comfort y la Coca-Cola en el vaso.
Revuelva completamente.
COCA-COLA CON VAINILLA
• 1 onza de Vodka
• 1 onza de schnapps
de vainilla
• Coca-Cola al gusto
Llene los vasos altos con hielo de la MÁQUINA
DE CUBITOS DE HIELO AUTOMÁTICA.
Mezcle el vodka y el schnapps de
vainilla en el vaso. Revuelva.
Añada Coca-Cola hasta que el vaso esté lleno o al gusto.
TE DE TEXAS
• 3/4 onza de Vodka
• 3/4 onza de ron
• 3/4 onza de Gin
• 3/4 de onza de
Triple Sec
• 3/4 oz. de tequila
• 1 1/2 onzas de
mezcla amarga
• Salpicón de jugo
de naranja
• Coca-Cola al gusto
Mezcle el vodka, el ron, el gin, el triple sec, el tequila y la
mezcla amarga y revuélvalo con el hielo de la MÁQUINA
DE CUBITOS DE HIELO AUTOMÁTICA. Viértalos en el vaso.
Añada jugo de naranja y Coca-Cola al gusto.
Page 21

19
ESPAÑOL
19
DEVOLUCIONES Y GARANTÍA
SI LA UNIDAD NO FUNCIONA O ESTÁ DAÑADA AL SACARLA POR PRIMERA VEZ
DE LA CAJA, DEVUÉLVALA AL LUGAR DE COMPRA INMEDIATAMENTE.
MÁQUINA DE CUBITOS DE HIELO AUTOMÁTICA / ICMCOKE
Si tiene preguntas, contacte con nosotros por correo electrónico o por el número
telefónico de servicio al cliente que aparece a continuación en el horario de
8:00 AM a 5:00 PM, de lunes a viernes, Hora Estándar del Este.
Distribuida por:
Nostalgia Products LLC
1471 Partnership Dr.
Green Bay, WI 54304-5685
Servicio al cliente
Teléfono: (920) 347-9122
Web: www.nostalgiaproducts.com
Solicitud de servicio al cliente
Para enviar una solicitud al Servicio al Cliente, vaya a www.nostalgiaproducts.com, llene
el formulario de Solicitud de Servicio al Cliente y haga clic en el botón Enviar.
Un representante le contactará tan pronto como sea posible.
Términos de garantía del producto
Po este medio, Nostalgia Products LLC (la “Compañía”) garantiza que por un período de un (1) año a
partir de la fecha de compra original, este producto estará sin defectos en cuanto a materiales y mano
de obra en uso normal en casa, siempre que el producto se maneje y mantenga de acuerdo con las
instrucciones de manejo. Como único y exclusivo remedio en virtud de esta garantía, la Compañía, a
su discreción, podrá optar por reparar o sustituir el producto que se encuentre defectuoso, o emitir un
reembolso por el producto durante el período de garantía. Esta garantía sólo está disponible para el
comprador original minorista del producto a partir de la fecha inicial de compra al por menor, y sólo es
válida con el recibo de compra original, y como prueba de la fecha de compra, es necesario obtener los
benecios de la garantía. Todos los reclamos de garantía deben hacerse a la atención de la Compañía
dentro del período de garantía y no más tarde que 30 días desde la imposibilidad de realizarlo. Esta
garantía no cubre el desgaste normal o daños ocasionados por el embarque, malos manejos, mal uso,
accidentes, alteración, piezas de cambio incorrectas, o algo distinto al uso doméstico normal. Es posible
que deba devolver el producto (con los gastos de envío pagados por usted) para inspección y evaluación.
Los costos de envío no son reembolsables. La empresa no se hace responsable por devoluciones
dañadas o perdidas en tránsito. A menos que se indique lo contrario especícamente permitido por
las instrucciones de manejo, esta garantía sólo se aplica al uso en interiores de las viviendas. Para
realizar una reparación bajo esta garantía, comuníquese con la Compañía mediante el número de
teléfono indicado anteriormente o al llenar el formulario de consulta para el servicio de Atención al
Cliente en www.nostalgiaproduct s.com. El período de garantía sólo es válido en EE.UU. y Canadá.
Esta garantía está en lugar de cualquier otra garantía, expresa o implícita, incluso las garantías de
comerciabilidad y conveniencia para un propósito en particular, que quedan excluidas en la medida
permitida por la ley. En ningún caso la compañía será responsable de cualquier daño indirecto, incidental,
consecuente, especial o daños que surjan o estén relacionados con este producto o la utilización del
mismo. Algunos estados, provincias o corregimientos no permiten la exclusión o la limitación de daños
incidentales o consecuentes, por lo que la exclusión o la limitación anterior quizás no se aplique a usted.
Esta garantía no se aplica a mercancía reelaborada.
Lea las instrucciones de manejo cuidadosamente. El incumplimiento
de las instrucciones de manejo anulará esta garantía.
Para obtener más información, visítenos en línea en www.nostalgiaproducts.com.
Me Gusta en Facebook en www.facebook.com / NostalgiaElectrics.
Siga nuestros consejos sobre Pinterest en www.pinterest.com / nostalgiaelctrx.
Tweet con nosotros en Twitter en www.twitter.com / NostalgiaElctrx.
Page 22

20
20
FRANÇAIS
Faire une fête tous les jours!
Visiter le site Web www.nostalgiaproducts.com pour d’autres
produits agréables.
TABLE DES MATIÈRES
SÉCURITÉ . . . . . . . . . . . . . . . . . . . . . . . . . . . . . . . . . . . . . . . . 20
PRÉCAUTIONS IMPORTANTES . . . . . . . . . . . . . . . . . . . . . . . . . . . 21
PRÉCAUTIONS IMPORTANTES ADDITIONNEL . . . . . . . . . . . . . . . . . . 21
INTRODUCTION . . . . . . . . . . . . . . . . . . . . . . . . . . . . . . . . . . . . 22
PIÈCES ET ASSEMBLAGE . . . . . . . . . . . . . . . . . . . . . . . . . . . . . . . 23
COMMENT FAIRE FONCTIONNER . . . . . . . . . . . . . . . . . . . . . . . . . 24
CONSEILS UTILES . . . . . . . . . . . . . . . . . . . . . . . . . . . . . . . . . . . 25
NETTOYAGE ET ENTRETIEN . . . . . . . . . . . . . . . . . . . . . . . . . . . . . 25
RECETTES . . . . . . . . . . . . . . . . . . . . . . . . . . . . . . . . . . . . . . . . 26
RETOURS ET GARANTIE . . . . . . . . . . . . . . . . . . . . . . . . . . . . . . . 28
SÉCURITÉ
Spécications de l'appareil :
110-120 Volts, 60 Hertz, 120 Watts, 2 Amps
Réfrigérant R134a
CE PRODUIT EST UTILISÉ DANS SORTIE ÉLECTRIQUE DE 120V AC SEULEMENT.
Reportez-vous à www.nostalgiaproducts.com/user-manuals/
pour la version la plus récente.
Votre sécurité tout comme celle des autres est importante.
Ce manuel contient plusieurs avis importants sur la sécurité lors de l’utilisation
de votre appareil. Lire le manuel et se conformer aux avis contre-indiqués.
Ceci représente le symbole d'avertissement pour votre sécurité.
Ce symbole vous signale les dangers potentiels qui
peuvent blessures graves à vous et à d'autres.
Ce symbole d'alerte à la sécurité suivra tous les avis relatifs à la sécurité.
Tous les avis sécuritaires indiqueront le danger potentiel, la façon dont
vous pouvez réduire vos chances de blessure et vous indiqueront les
conséquences potentielles si vous ne suivez pas ces instructions.
Page 23

21
FRANÇAIS
21
FRANÇAIS
PRÉCAUTIONS IMPORTANTES
Une personne n'ayant pas lu et compris toutes les instructions de
fonctionnement et de sécurité n'est pas qualiée pour faire fonctionner cet
appareil. Tous les utilisateurs de cet appareil doivent lire et comprendre
ce mode d'emploi avant d'utiliser ou de nettoyer cet appareil.
Lorsque l'on utilise un appareil électrique, il faut toujours
respecter des précautions de base, y compris celles-ci :
1. Lisez toutes les instructions avant d'utiliser cet appareil.
2. NE PAS TOUCHER les surfaces chaudes. Utiliser les poignées ou les boutons.
3. Cet appareil n'est PAS UN JOUET.
4. Les jeunes enfants non supervisés et les individus ayant une décience
cognitive ne devraient jamais faire fonctionner cet appareil.
5. Une surveillance étroite est nécessaire lorsqu’un appareil
est utilisé par ou à proximité d’enfants.
6. Pour protéger contre les chocs électriques ne pas submerger le cordon, la
che ou aucune pièce de cet appareil dans l'eau ou d'autres liquides.
7. Débranchez l'appareil lorsqu'il ne sert pas, avant de retirer des pièces et avant le nettoyage.
Laisser refroidir avant de mettre ou d'enlever des pièces et avant le nettoyage.
8. NE PAS utiliser un appareil avec un cordon ou une che électrique
endommagés ou après un mauvais fonctionnement de l'appareil ou s'il a
été endommagé d'une manière quelconque. Retournez l'appareil à l'atelier
de réparation le plus proche pour un examen, réparation ou réglage.
9. Le fabricant ne recommande pas l'utilisation d'accessoires autres que ce qui est
prévu par le fabricant. L'utilisation d'accessoires peut causer des blessures.
10. NE PAS utiliser cet appareil pour toute autre utilisation pour laquelle il n’a pas été conçu.
11. N'utilisez PAS l'appareil à l'extérieur. POUR UN USAGE DOMESTIQUE UNIQUEMENT.
12. NE PAS placer sur ou près d'un brûleur à gaz ou électrique ou dans
un four chaué. 1. NE PAS mettre en lave-vaisselle.
13. NE laissez PAS le cordon pendre sur le bord de la table ou
du comptoir, ni toucher les surfaces chaudes.
14. NE laissez JAMAIS l'unité sans surveillance lorsqu'il est en
service ou une fois branché à une prise électrique.
15. Une extrême prudence doit être utilisée pour déplacer
un appareil contenant des liquides chauds.
16. Toujours brancher l'appareil en premier, puis brancher le cordon dans
la prise murale. Pour débrancher l’appareil, mettre tous les boutons à la
position « arrêt », puis débrancher la che de la prise murale.
PRÉCAUTIONS IMPORTANTES ADDITIONNEL
Mesures de sécurité pour le fonctionnement
1. NE PAS toucher l'Évaporateur pendant que l'appareil est en fonction ou durant le
processus de fabrication de la glace. Cela pourrait provoquer de graves brûlures.
2. NE PAS nettoyer l'appareil avec des liquides inammables. Les
vapeurs peuvent créer un danger d'incendie ou d'explosion.
3. Vériez qu'il n'y a aucun corps étranger dans la trémie à glaçons avant son utilisation.
Page 24

22
22
FRANÇAIS
4. NE PAS retourner l'appareil quand il est utilisé ou rempli de glaçons.
Instructions pour le cordon électrique et la che
1. Cet appareil a une che polarisée (une lame est plus large que l'autre). Pour réduire le
risque de choc électrique, cette che est conçue pour s’insérer dans une prise polarisée,
d’une seule façon. Si vous n’arrivez pas à insérer entièrement la che dans la prise,
branchez-la dans l’autre sens. Si elle ne s’enfonce toujours pas, contactez un
électricien qualié. Ne pas tenter de modier la che de quelque façon que ce soit.
2. Un court cordon d'alimentation est fourni pour réduire les risques
d'enchevêtrement ou risques de trébucher sur un cordon plus long.
3. Si un cordon d'alimentation amovible ou une rallonge est utilisée :
• Les rallonges électriques peuvent être utilisées avec prudence.
• Les caractéristiques électriques du câble ou de la rallonge doivent être
au moins aussi grandes que la puissance nominale de l’appareil.
• Lorsque vous utilisez un cordon plus longue ou rallonge électrique,
assurez-vous que celle-ci ne pende pas au-delà du comptoir ou
d'une table où elle peut faire trébucher ou être tirée.
4. Le fabricant ne recommande pas l’utilisation de cette machine dans les pays qui
ne supportent pas les tensions de 120V AC, même si un adaptateur de tension, un
transformateur ou un convertisseur est utilisé.
CONSERVEZ CES INSTRUCTIONS!
INTRODUCTION
Félicitations ! Vous êtes maintenant un er propriétaire de la MACHINE À GLAÇONS
AUTOMATIQUE NostalgiaMC ! Cette machine à glaçons élégante et portative allie l'aspect
classique de votre boisson gazeuse préférée avec la fonctionnalité d'un appareil moderne.
Avec son concept intuitif, facile à utiliser, vous ferez de parfaits glaçons dès que votre nouvel
appareil sera branché ! Parfait pour la cuisine, pavillon-club, bars à domicile et plus encore !
Caractéristiques :
• Fabrique jusqu'à 26 livres de glaçons par jour
• Produit 9 glaçons toutes les 7 à 15 minutes
• Capacité du réservoir d'eau : 2,1 litres
• capacité de panier de glace : 1,32 litres
• Plusieurs dimensions de cube de glace : petits et grands
• Panneau de commande avec voyants lumineux
• Concept compact et élégant
• Couvercle transparent pour faciliter la visualisation
• Panier de glace amovible
• Comprend la pelle à glace
• Réfrigérant : 134A
Page 25

23
FRANÇAIS
23
FRANÇAIS
PIÈCES ET ASSEMBLAGE
Retirer l'emballage extérieur et intérieur. Suivez toutes les étapes
de NETTOYAGE ET ENTRETIEN avant de l'utiliser.
Couvercle
transparente
Panier à glaçons
Réservoir d'eau
Bouchon de
vidange d'eau
Sortie d'air
Panneau de
commande LED
Pelle à glaçons
Panneau de commande LED
RAJOUTER DE L'EAU = s'allume quand il faut rajouter de l'eau dans le réservoir
LE VOYANT DE GLAÇONS = s'allume quand le panier est plein
S = indicateur de glaçon pour petit
L = indicateur de cube de glace pour grande
SÉLECT = pousser pour choisir la taille des cubes de glaçons
PUISSANCE = Appuyez sur le bouton pour ARRÊT/MARCHE
Page 26
24
24
FRANÇAIS
COMMENT FAIRE FONCTIONNER
AVANT LA PREMIÈRE UTILISATION :
1. Suivez toutes les étapes de NETTOYAGE ET ENTRETIEN avant de l'utiliser.
2. Placez l'appareil sur une surface plane. Évitez la lumière du soleil
directe et d'autres sources de chaleur. Assurez-vous qu'il ya au moins
quatre pouces d'espace vide sur tous les côtés de l'appareil.
3. Une heure plus tard pour le réfrigérant liquide se dépose avant de brancher
le cordon dans une prise de courant pour la première fois.
UTILISATION DE VOTRE MACHINE AUTOMATIQUE POUR FAIRE DE GLAÇONS
1. Ouvrir le couvercle, enlever le panier de glaçons et verser l'eau dans le réservoir. Garder le
niveau d'eau en dessous de la marque de niveau.
2. Appuyer sur le bouton « MARCHE/ARRÊT » du panneau de commande
pour commencer le cycle de fabrication de glaçons.
3. Choisir la taille des cubes de glaçons en poussant sur le bouton « Taille de glaçons
». Si la température ambiante est sous 60°F (16°C), on recommande de choisir
les petits ou moyens cubes de glaçons an d'éviter qu'ils collent ensemble.
4. Le cycle de fabrication de glaçons est de 6 à 15 minutes, selon la taille des
cubes sélectionnée et la température ambiante. Lors de température très
chaude, le temps de fabrication peut considérablement varier.
5. Lorsque la machine à glaçons est allumée, vérier le niveau d'eau périodiquement. Si
la pompe d'eau ne peut pas injecter d'eau, la MACHINE À GLAÇONS AUTOMATIQUE
s'arrêtera automatiquement, et le voyant pour ajouter l'eau s'allumera.
6. Appuyer sur le bouton « MARCHE/ARRÊT » pour arrêter l'unité, remplir
d'eau jusqu'à la marque de niveau et appuyer à nouveau sur le bouton
« MARCHE/ARRÊT » pour que l'appareil se mette en MARCHE.
7. La MACHINE À GLAÇONS AUTOMATIQUE s'arrêtera automatiquement lorsque
le panier à glaçons est plein et le voyant pour glaçons s'allumera.
8. Changer l'eau toutes les 24 heures dans le réservoir pour avoir une hygiène
raisonnable. Si l'appareil n'est pas utilisé, vider toute l'eau du réservoir.
REMARQUE IMPORTANTE: Au cas où la MACHINE À GLAÇONS AUTOMATIQUE
serait débranchée pendant le cycle de fabrication de glaçons ou que les lumières
DEL clignotent sur le tableau de commande, appuyer sur le bouton « MARCHE/
ARRÊT » pour interrompre le cycle de glaçons. Débrancher l'appareil de la prise
de courant. Laisser la MACHINE À GLAÇONS AUTOMATIQUE se reposer quelques
minutes, se réchauer et permettre à la glace de tomber des bandes de l'évaporateur.
Vider le plateau d'eau et attendre trois minutes avant de rebrancher l'unité.
NE PAS TOUCHER l'évaporateur pendant que l'appareil fonctionne ou pendant la
fabrication des glaçons. Cela pourrait provoquer de graves brûlures.
Page 27

25
FRANÇAIS
25
FRANÇAIS
CONSEILS PRATIQUES
VOYANT « AJOUTER DE L'EAU »
Si le voyant « ajoutez de l'eau » s'allume, essayer ce qui suit:
• Arrêter la machine à glaçons, ajouter de l'eau et appuyer
sur le bouton pour redémarrer l'appareil.
• Il se peut qu'il y ait trop de glaçons. Arrêter la machine,
enlever quelques glaçons du panier.
CUBES DE GLAÇONS COLLÉS ENSEMBLE
• Le cycle de glaçons pourrait être trop long. Arrêter la machine, et
redémarrer lorsque les cubes de glaçons seront fondus. Choisir la taille
des glaçons en poussant sur le bouton « Taille de glaçons ».
• La température de l'eau dans le réservoir pourrait être trop basse. Changer
l'eau du réservoir. La température devrait être réglée entre 45°F à 90°F.
LA MACHINE À GLAÇONS NE FONCTIONNE PAS
Si le cycle de la machine à glaçons semble bien fonctionner,
mais ne fabrique pas de glaçons, essayer ce qui suit:
• La température ambiante ou la température de l'eau dans le réservoir pourrait être trop
haute. La machine à glaçons doit être dans un environnement où la température est
moins de 90°F. Essayer de mettre de l'eau plus froide (entre 45°F à 90°F) dans le réservoir.
• Si changement d'eau ou le refroidissement de la machine à glaçons ne
fonctionne pas, il se peut qu'il y ait une fuite du uide réfrigérant, ou un
tuyau du système de refroidissement pourrait être bloqué. Veuillez amener
la machine à glaçons chez un technicien qualié pour la réparer.
VOYANTS DEL
• Si les voyants DEL du panneau de commande clignotent, il se peut qu'il ait eu
une panne de courant. Appuyer sur le bouton « MARCHE/ARRÊT » pour arrêter le
cycle de fabrication de glaçons. Laisser la machine à glaçons se reposer quelques
minutes, se réchauer et permettre à la glace de tomber des bandes de l'évaporateur.
Vider le plateau d'eau et attendre trois minutes avant de rebrancher l'unité.
NETTOYAGE ET ENTRETIEN
Nettoyer votre MACHINE À GLAÇONS AUTOMATIQUE après chaque
usage. Ceci aidera à prolonger la durée de vie de votre appareil.
• Débrancher l'appareil.
• Retirer le panier à glaçons et le nettoyer.
• Nettoyer l'intérieur avec un chion doux en utilisant de
l'eau tiède mélangée à un détergent doux.
• Rincer avec de l'eau tiède les pièces intérieures, et vider
l'eau en enlevant le bouchon de vidange d'eau.
• L'extérieur de la MACHINE À GLAÇONS AUTOMATIQUE devrait être nettoyé régulièrement
avec un chion doux en utilisant un détergent doux mélangé à de l'eau tiède.
• Sécher l'intérieur et l'extérieur avec un chion doux non-abrasif ou une serviette.
• Si la machine n'est pas utilisée pendant longtemps, toujours ouvrir le
bouchon de vidange d'eau et vider complètement l'eau du réservoir.
Page 28

26
26
FRANÇAIS
RECETTES
Votre MACHINE À GLAÇONS AUTOMATIQUE peut être utilisée pour faire
instantanément des cubes à glaçons pour une variété de boissons. Voici
quelques boissons délicieuses que vous pouvez faire à la maison.
L'EAU BOUEUSE
• 1 Bouteille de
Coca-Cola
• 1 Bouteille de
jus d'orange
• Glace
Remplir le quart du verre avec des glaçons de
la MACHINE À GLAÇONS AUTOMATIQUE.
Verser du jus d'orange jusqu'à la
moitié du verre, ou au goût.
Verser du Coca-Cola jusqu'à ce que le verre soit rempli.
Bien mélanger.
ROY ROGERS
• 6-8 oz Coca-Cola
• 1/4 oz sirop de
grenadine
• Cerises au marasquin
• Glace
Remplir les verres avec des glaçons de la
MACHINE À GLAÇONS AUTOMATIQUE.
Ajouter le Coca-Cola et le sirop de grenadine.
Bien mélanger.
Ajouter un cerise au marasquin pour décorer.
Page 29

27
FRANÇAIS
27
FRANÇAIS
TOUT AMÉRICAIN
• 1 oz Bourbon
• 1 oz Southern
Comfort
• 2 oz Coca-Cola
Remplir la moitié du verre avec des glaçons de
la MACHINE À GLAÇONS AUTOMATIQUE.
Mettre du Bourbon, Southern Comfort
et du Coca-Cola dans un verre.
Bien mélanger.
COKE VANILLE
• 1 oz Vodka
• 1 oz Schnaps Vanille
• Coca-Cola au goût
Remplir un grand verre avec des glaçons de la
MACHINE À GLAÇONS AUTOMATIQUE.
Mettre la vodka et le schnaps vanille
dans un verre. Mélanger.
Verser du Coca-Cola jusqu'à ce que le
verre soit rempli ou au goût.
TEXAS THÉ
• 3/4 oz Vodka
• 3/4 oz Rhum
• 3/4 oz Gin
• 3/4 oz Triple Sec
• 3/4 oz Tequila
• 1 1/2 oz Préparation
pour coquetel
• Soupçon de jus
d'orange
• Coca-Cola au goût
Mettre vodka, rhum, gin, triple sec, tequila et la préparation
pour coquetel puis agiter avec des glaçons de la MACHINE
À GLAÇONS AUTOMATIQUE. Verser dans des verres.
Ajouter du jus d'orange et du Coca-Cola au goût.
Page 30

28
28
FRANÇAIS
RETOURS ET GARANTIE
SI VOTRE APPAREIL NE FONCTIONNE PAS OU S'IL EST ENDOMMAGÉ QUAND VOUS LE RETIREZ
DE LA BOÎTE, VEUILLEZ LE RETOURNER IMMÉDIATEMENT À L'ENDROIT OÙ IL A ÉTÉ ACHETÉ.
MACHINE À GLAÇONS AUTOMATIQUE / ICMCOKE
Pour toute question, communiquer par courriel ou au numéro de téléphone du service à
la clientèle, entre 08 h 00 et 17 h 00, du lundi au vendredi, heure normale du Centre.
Distribué par :
Nostalgia Products LLC
1471 Partnership Dr.
Green Bay, WI 54304-5685
Service à la clientèle
Téléphone : (920) 347-9122
Site Web : www.nostalgiaproducts.com
Demande pour le service à la clientèle
Pour soumettre une demande au service à la clientèle, rendez vous au www.nostalgiaproducts.com puis
remplissez le formulaire de demande au service à la clientèle puis cliquez sur le bouton Soumettre.
Un représentant vous contactera dès que possible.
Conditions de garantie du produit
Le groupe Nostalgia Products LLC (référé tel « l’Entreprise ») garantit que pour une période d’un
(1) an en date d’achat, ce produit est sans défaut de matériel et de fabrication selon une utilisation
normale à domicile, seulement si le fonctionnement et l’entretien du produit sont conforment aux
directives fournies. À titre de réparation exclusive et entière sous cette garantie, l’Entreprise pourra
à sa discrétion, réparer ou remplacer le produit défectueux, voire émettre un remboursement du
produit durant la période couverte sous garantie. Cette garantie n’est disponible seulement qu’à
l’acheteur d’origine du produit, en date d’achat au détail dudit produit et sera valide uniquement
avec le reçu de caisse d’origine, à titre de preuve d’achat, lequel est requis pour obtenir les bienfaits
reliés à cette garantie. Toute réclamation doit être rapportée à l’attention de l’Entreprise dans la
fenêtre de la période de la garantie, sans dépasser 30 jours à défaut de performance. Cette garantie
ne couvre pas l’usure normale ou dommage cause par l'expédition, la mauvaise manipulation, la
mauvaise utilisation, les accidents, les modications, les mauvaises pièces de remplacement, voire
toute autre utilisation anormale du produit à domicile. Il est possible que vous ayez à retourner le
produit (avec les frais de retour prépayés par vous) pour une inspection et une évaluation. Les frais
des coûts de retour ne sont pas remboursables. L'Entreprise n’est aucunement responsable pour les
retours endommagés ou perdus en transit. Autrement que spéciquement permit selon les directives
de fonctionnement, cette garantie s’applique à une utilisation à domicile à d'intérieur seulement.
An d'obtenir un service couvert sous cette garantie, veuillez contacter l'Entreprise au numéro de
téléphone inclut ci-haut ou en remplissant le formulaire de demande au service à la clientele, sur le
site www.nostalgiaproducts.com. La garantie est valide seulement aux États-Unis et au Canada.
Cette garantie prévaut toute autre garantie, expresse ou implicite incluant les garanties de qualité
marchande ou ayant une aptitude pour une intention en particulier, lesquelles sont exclues selon la
loi. Sous aucun prétexte l’Entreprise ne pourra être tenue responsable pour tout dommage indirect,
accidentel, conséquentiel ou spécial provenant de ou en relativité avec ce produit ou son utilisation.
Certains états, provinces ou juridictions n'allouent pas l'exclusion ou la limitation de tels dommages
accidentels ou conséquentiels, donc l'exclusion ou limitation suscitée peut ne pas s'appliquer à vous.
Cette garantie ne s’applique pas à la merchandise de renaissance.
Veuillez lire les directives de fonctionnement attentivement. Ne pas se
conformer aux directives de fonctionnement annulera cette garantie.
Pour plus d’informations, visitez notre site Web à www.nostalgiaproducts.com.
Aimez-nous sur Facebook à l’adresse www.facebook.com / NostalgiaElectrics.
Suivez nos conseils sur Pinterest à www.pinterest.com / nostalgiaelctrx.
Tweet avec nous sur Twitter à l’adresse www.twitter.com / NostalgiaElctrx.
Page 31

 Loading...