

Page 1

All products are trademarks of Nostalgia Products LLC.
Worldwide design & utility patented or patents pending.
© 2017 Nostalgia Products LLC.
www.nostalgiaproducts.com
(rev. 02/22/17 NW)
Page 2
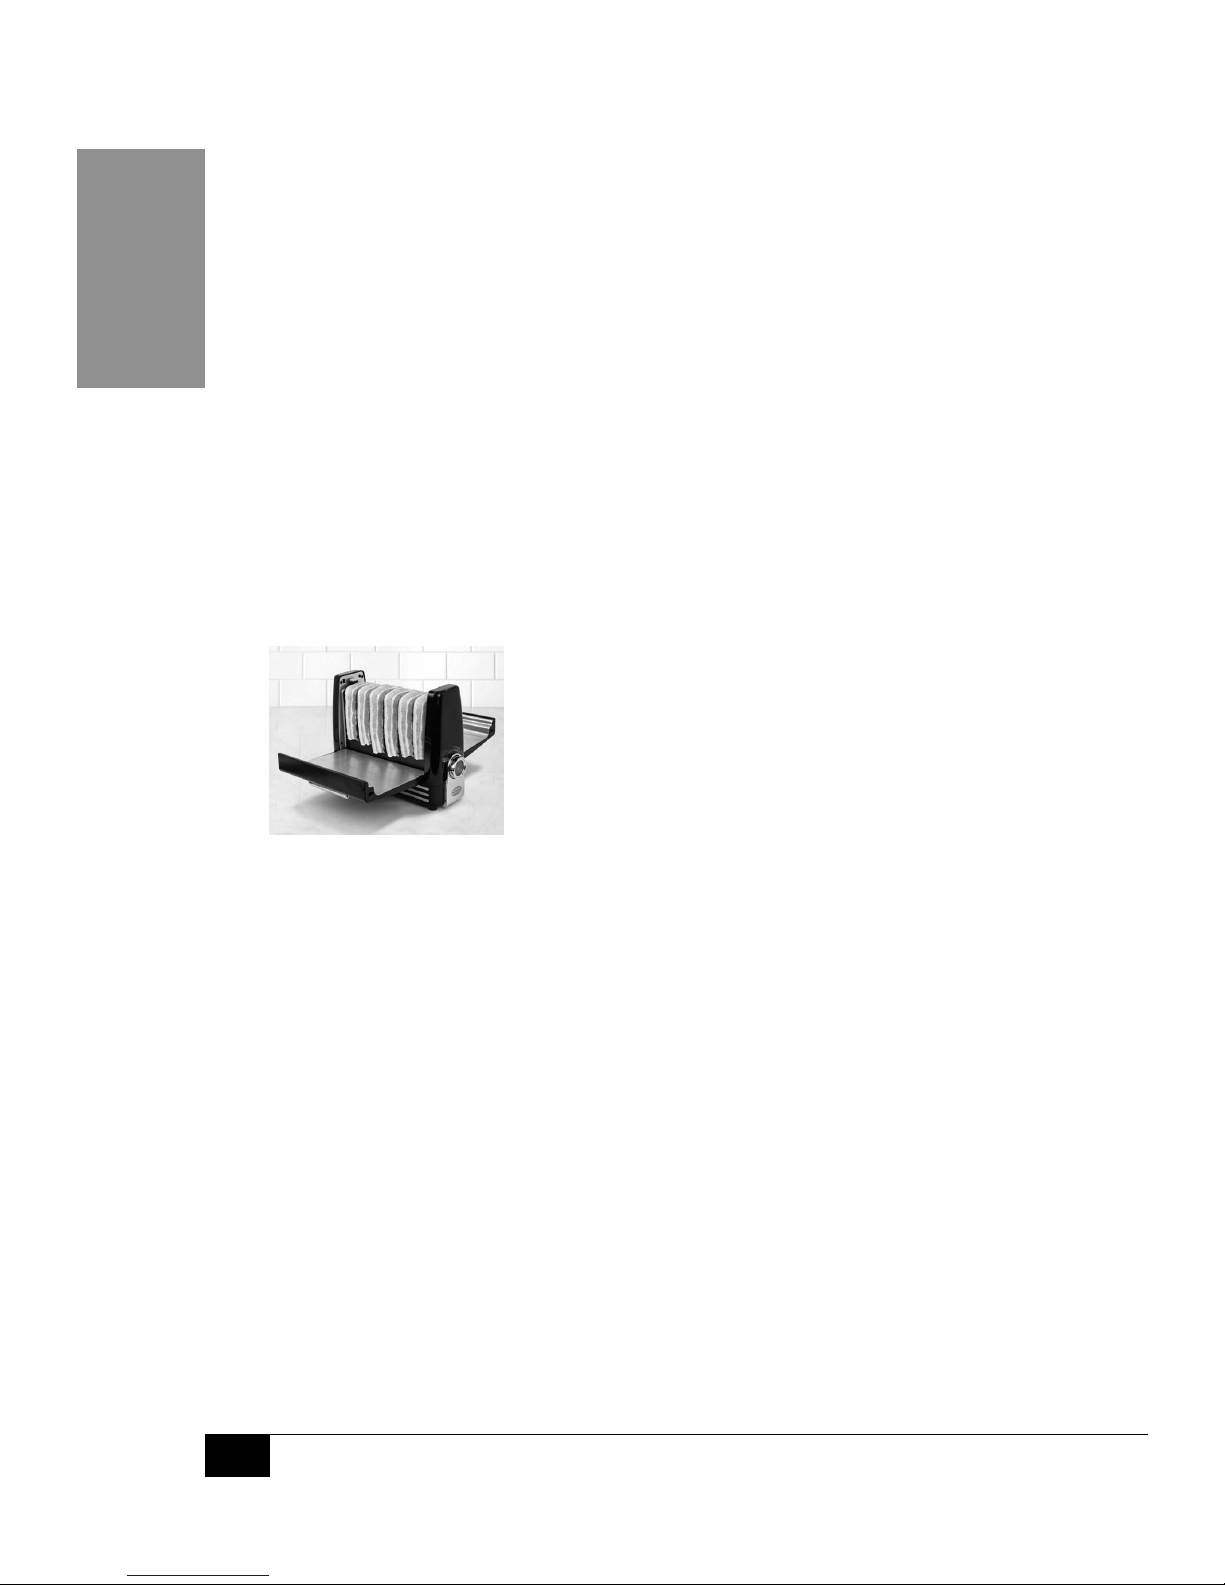
BCN6BK
Bacon Express™
Instructions and Recipes
Instrucciones y recetas
Instructions et Recettes
Page 3

Page 4
ENGLISH
2
Make everyday a party!
Visit www.nostalgiaproducts.com for more fun products.
CONTENTS
SAFETY . . . . . . . . . . . . . . . . . . . . . . . . . . . . . . . . . . . . . . . . . 2
IMPORTANT PRECAUTIONS . . . . . . . . . . . . . . . . . . . . . . . . . . . . . 3
IMPORTANT SAFEGUARDS . . . . . . . . . . . . . . . . . . . . . . . . . . . . . 3
INTRODUCTION . . . . . . . . . . . . . . . . . . . . . . . . . . . . . . . . . . . . 4
PARTS & ASSEMBLY . . . . . . . . . . . . . . . . . . . . . . . . . . . . . . . . . . 5
HOW TO OPERATE . . . . . . . . . . . . . . . . . . . . . . . . . . . . . . . . . . 7
HELPFUL TIPS . . . . . . . . . . . . . . . . . . . . . . . . . . . . . . . . . . . . . 8
CLEANING & MAINTENANCE . . . . . . . . . . . . . . . . . . . . . . . . . . . . 8
RECIPES . . . . . . . . . . . . . . . . . . . . . . . . . . . . . . . . . . . . . . . . . 8
RETURNS & WARRANTY . . . . . . . . . . . . . . . . . . . . . . . . . . . . . . . 9
SAFETY
Appliance Specications:
120 Volts, 60 Hz
1200 Watts
THIS PRODUCT IS FOR USE IN 120V AC OUTLET ONLY.
Refer to www.nostalgiaproducts.com/user-manuals/ for the most updated manual.
Your safety and the safety of others is very important.
We have provided many important safety messages in this manual and
on your appliance. Always read and obey all safety messages.
This is the safety alert symbol.
This symbol alerts you to potential hazards that can
cause serious injury to you and others.
All safety messages will follow the safety alert symbol.
All safety messages will tell you what the potential hazard is, tell you how to reduce the
chance of injury, and tell you what can happen if the instructions are not followed.
Page 5

ENGLISH
3
IMPORTANT PRECAUTIONS
1. NEVER immerse in water.
2. NEVER use near water.
3. NEVER use an abrasive sponge or cloth on the unit.
4. NEVER leave unit unattended while in use.
5. Unplug unit from outlet when not in use and when cleaning.
6. DO NOT operate this appliance with a damaged cord or plug
or in the event the appliance ever malfunctions.
7. DO NOT put in dishwasher.
8. Keep out of reach of children.
9. This appliance is NOT A TOY.
10. This appliance is not intended for use by unsupervised young
children or cognitively challenged individuals.
11. Young children should be supervised while product is in use
to ensure that they do not play with the appliance.
IMPORTANT SAFEGUARDS
When using electrical appliances, basic safety precautions
should always be followed, including:
1. Read all instructions before operating this appliance.
2. To protect against electrical shock do not immerse cord, plug
or any part of this unit in water or other liquids.
3. Close supervision is necessary when any appliance is used by or near children.
4. To avoid re or shock hazard, or damage to the unit, this unit should
be plugged into a polarized 120 Volt AC outlet ONLY.
5. Unplug from outlet when not in use and before removing parts for cleaning.
6. DO NOT operate any appliance with a damaged cord or plug or if the
appliance has been damaged in any manner. Return the appliance
to the nearest repair shop for examination or repair.
7. The manufacturer does not recommend the use of accessory
attachments. Use of attachments may cause injuries.
8. DO NOT use outdoors.
9. DO NOT let the cord touch hot surfaces.
10. DO NOT place on or near a hot gas or electric burner, or in a heated oven.
11. This unit must be on a level surface to operate properly.
12. DO NOT use this appliance for other than its intended use.
13. DO NOT leave unit unattended while in use or when plugged into an outlet.
14. A short power supply cord is provided to reduce the risk resulting
Page 6

ENGLISH
4
from becoming entangled or tripping over a long cord.
15. Extension cord can be used if care is exercised in use.
16. The marked electrical rating of an extension cord should be at
least as great as the electrical rating of the appliance.
17. This appliance has a polarized plug (one blade is wider than the other). To reduce the
risk of electrical shock, this plug is intended to t into a polarized outlet only one way.
18. DO NOT put hands or any foreign objects into this appliance
while it is plugged in and operating.
SAVE THESE INSTRUCTIONS!
INTRODUCTION
Thank you for purchasing the BACON EXPRESS™ from Nostalgia™! This easy-touse appliance is a healthier way to cook bacon to delicious perfection. Easily cook
up to 6 strips of regular or thick-cut bacon just minutes - no need to ip!
Features include:
• Cooks up to 6 strips of regular or thick-cut bacon in minutes
• Vertical cooking drains away grease
• Removable non-stick cooking plate and insulated door liners allow for easy cleanup
• Slide-out drip tray catches bacon grease
• Illuminated cooking dial with crispiness selector
• Cool touch handles
• Chrome accents
Page 7
ENGLISH
5
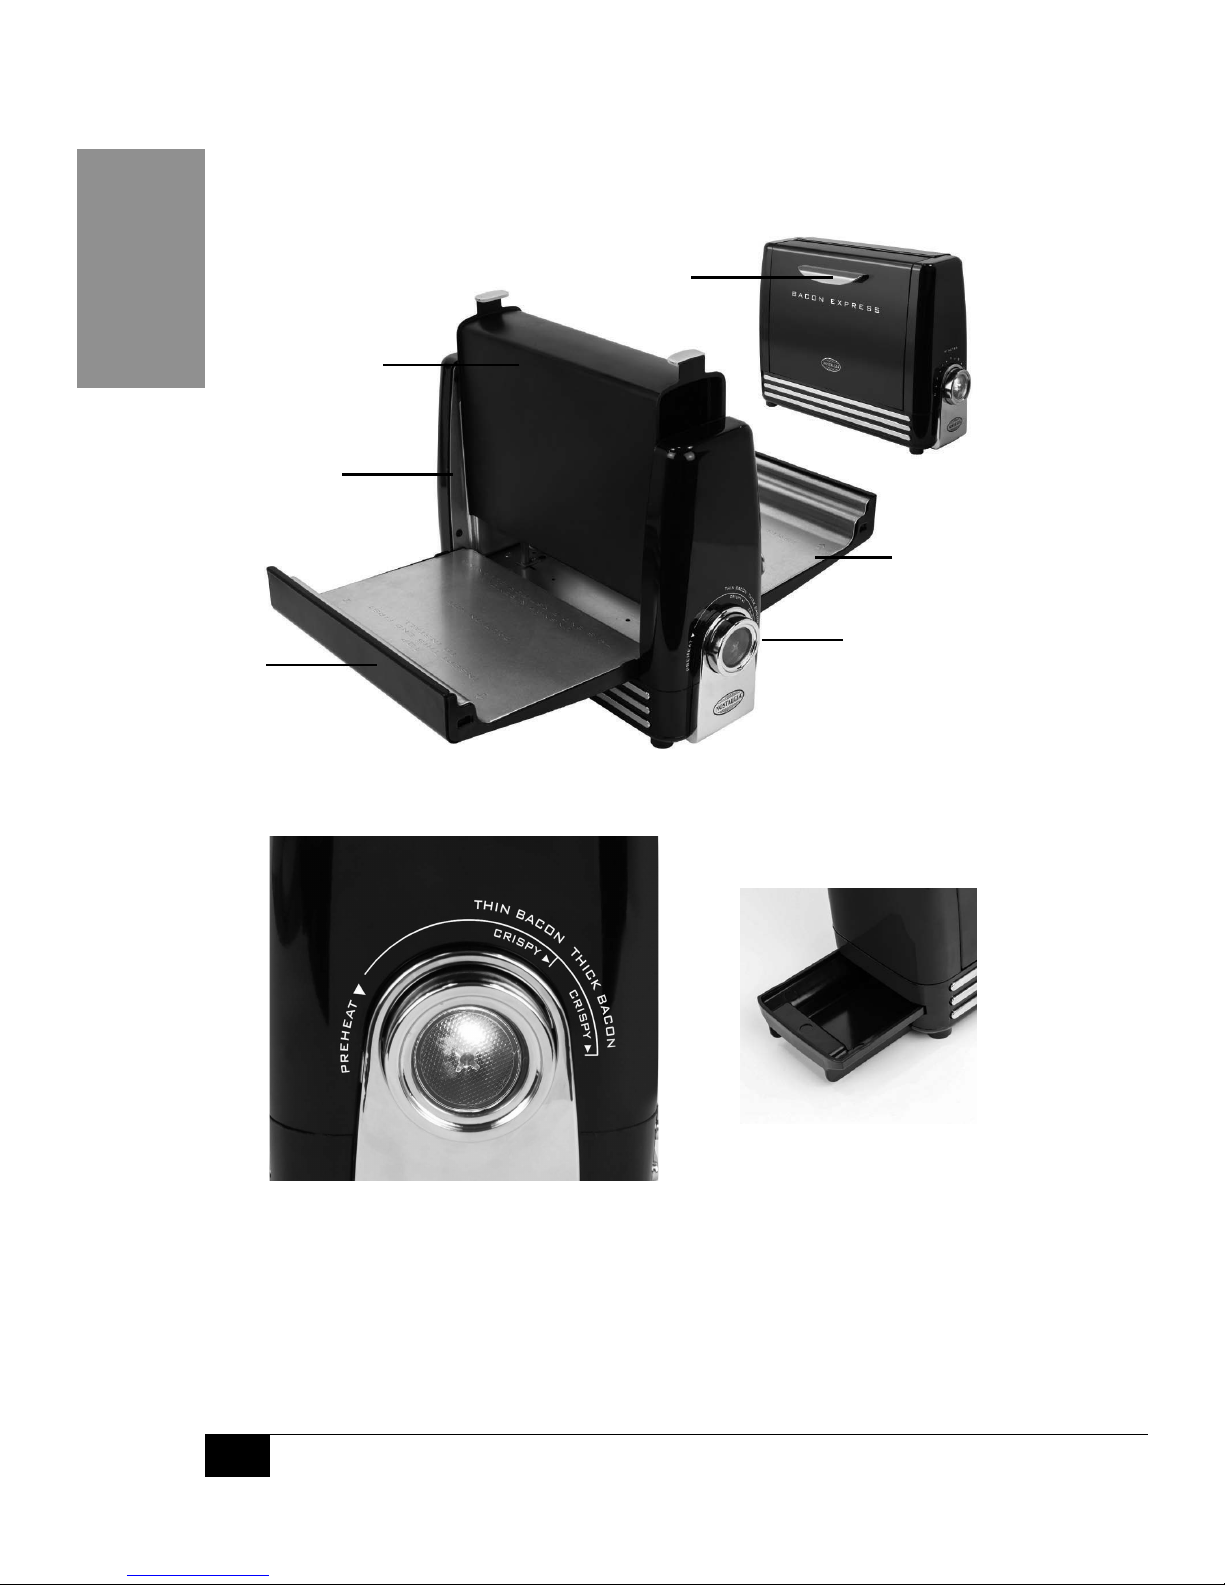
PARTS & ASSEMBLY
PARTS
Cooking Dial Drip Tray
Power Button/
Cooking Dial
Main Unit
Door
Insulated
Door Plates
Non-Stick
Cooking Plate
Cool Touch
Handles
Page 8
ENGLISH
6
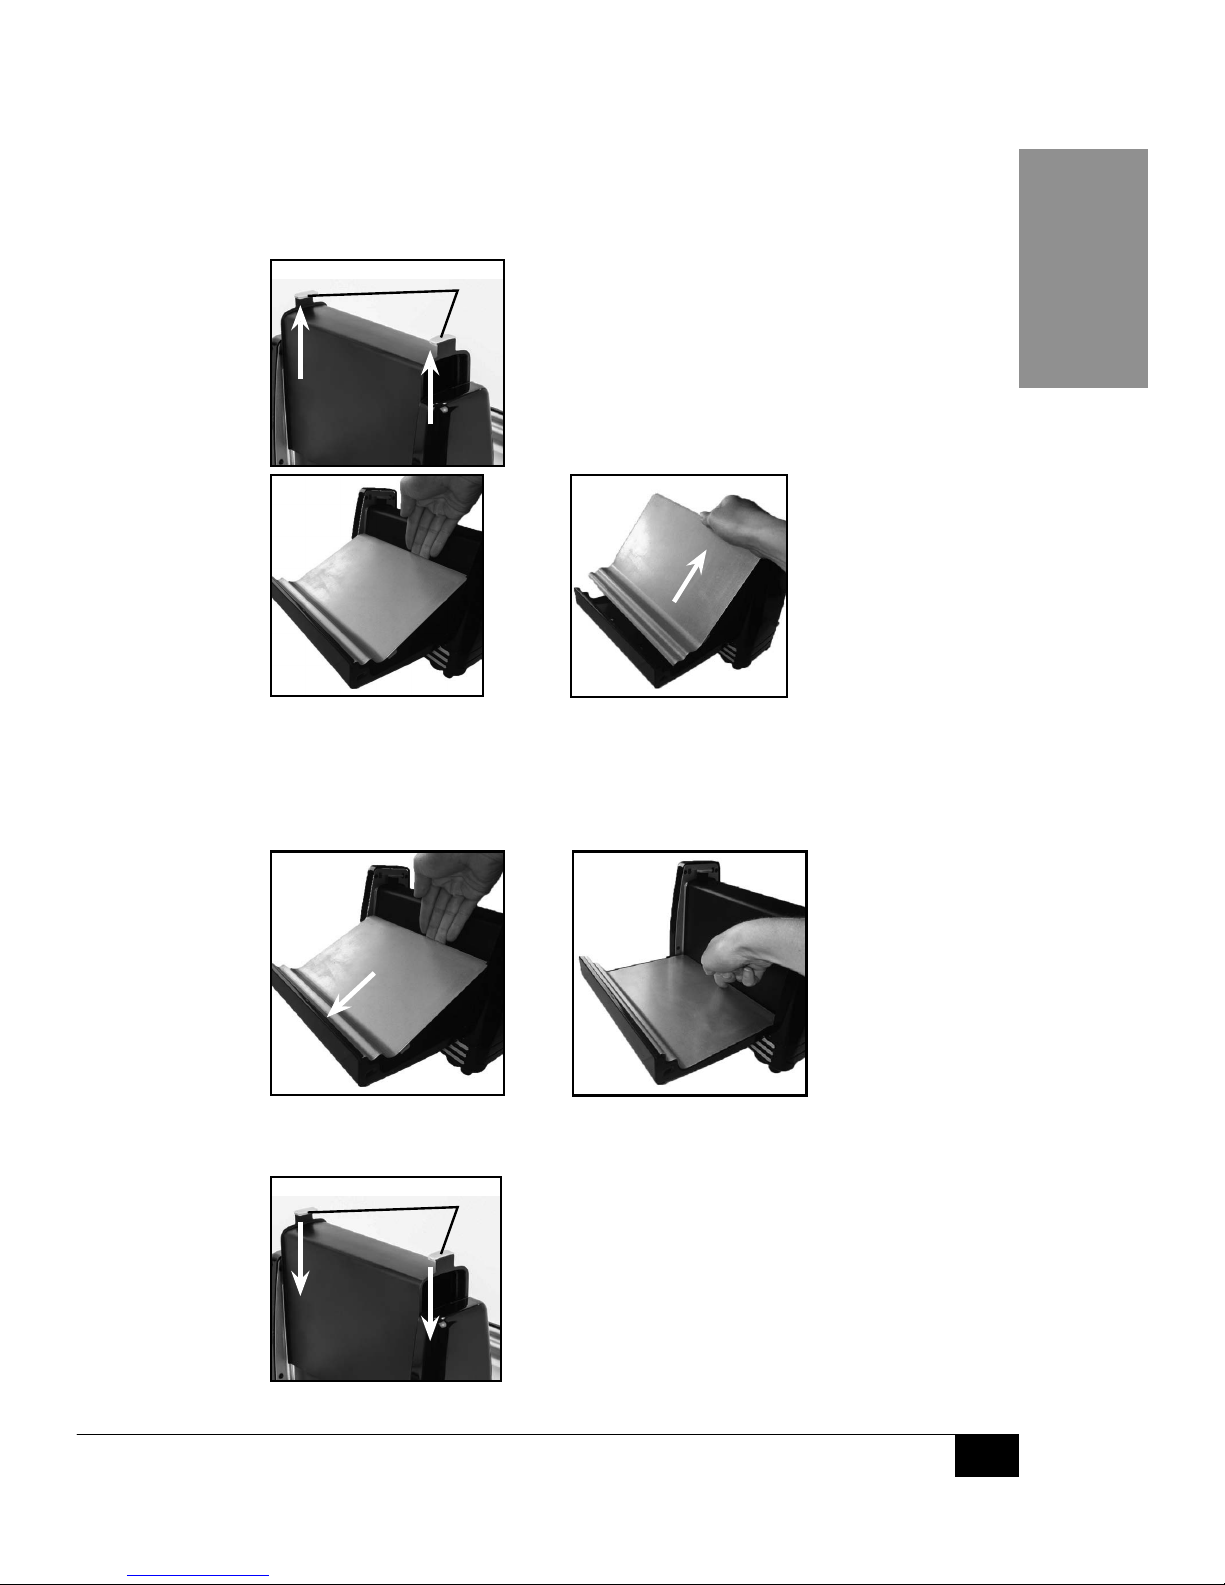
REMOVING / REPLACING DOOR PLATES
NOTE: Some may find it easiest to remove and replace door plates by positioning the unit
so that the doors face towards them, as opposed to the sideways images shown below.
Removing the Door Plates
Tabs
1
Remove the Cooking Plate by
pulling up on the tabs.
Replacing the Door Plates
1
2
Using INSERT THIS END FIRST imprinted
on the Door Plate as a guide, insert the
Door Plate into the top of the Door.
Snap the bottom of the Door
Plate into the Door.
Tabs
3
Replace the Cooking Plate by
pushing down on the tabs.
2
3
Pull up on the edge of the Door Plate
nearest to the Cooking Plate. The
edge is held in place by a magnet,
and some may nd it easiest to use a
plastic utensil to pull up on the edge.
Simply lift the Door Plate up
and out from the Door.
Page 9
ENGLISH
7
HOW TO OPERATE
First, nd a stable surface near an electrical outlet. Make sure the cord is away from
any water source, and that the Cooking Plate and Door Plates are properly in place.
1. Plug the cord into the electrical outlet.
2. Preheat the unit by turning the Cooking Dial to Preheat. Press the Power Button to
begin the preheat cycle. While preheating, the Power Button will illuminate blue.
3. When done preheating, the Cooking Dial will beep 10
times and the Power Button will extinguish.
4. Carefully pull open the Doors using the Cool Touch Handles.
CAUTION: Doors will be hot! Ensure ngers and hands do not
touch Doors. If needed, use an oven mitt to open.
5. Drape up to 6 strips of bacon, evenly spaced, over the Cooking Plate. The number of bacon
strips to t on the unit may vary based on the thickness and width of each strip.
COOKING TIP: For best results, do not overlap bacon strips.
COOKING TIP: Unit is recommended for use with regular-cut and store-bought thick-cut
bacon. Some meat market or specialty-cut bacon may be too thick for this unit.
CAUTION: DO NOT put bacon in unit without Cooking Plate/Door Plates in place. Grease
from the bacon may cause the unit to malfunction.
6. Use the Cool Touch Handles to close the Doors.
7. According to the thickness of the bacon and preferred crispness,
turn the Cooking Dial to the desired setting.
8. Press the Power Button to begin the cooking cycle. While
cooking the Power Button will illuminate blue.
9. When the cooking cycle has ended, the Cooking Dial will beep
10 times and the Power Button will extinguish.
10. Carefully open the Doors using the Cool Touch Handles, and check that the bacon is cooked
completely and to your liking. If desired, ip the bacon and cook for several more minutes.
CAUTION: Steam is generated during use that could cause burns or
other injury. Stay clear of the steam when opening the Doors.
11. Remove bacon from the Cooking Plate using tongs or fork.
NOTE: It is recommened that you use plastic or wooden utensils when removing bacon.
Over time, metal utensils may damage the non-stick cooking surface of the Cooking Plate.
12. Before cooking more bacon, check the Drip Tray to ensure it does not need to be emptied.
NOTE: Avoid grease spills by always checking the Drip Tray before moving the unit. If the
Drip Tray is full, properly dispose of grease prior to moving the unit.
Page 10

ENGLISH
8
HELPFUL TIPS
Smoking
If the unit begins to smoke during cooking, it may be due to grease build up. In order to
reduce smoking, make sure that you clean the Cooking Plate and Door Plates between uses.
Cooking Tips
• For best results, make sure bacon does not overlap and strips
are evenly spaced. Bacon will shrink when cooked.
• Unit is recommended for use with regular-cut and store-bought thick-cut bacon.
NOTE: Some meat market or specialty-cut bacon may be too thick for this unit.
• Depending on the type of bacon, if bacon is too long and touching the Door
Plates, the ends of the bacon may need to be trimmed in order to t onto the
Cooking Plate. Use a knife or kitchen scissors to cut the ends of the bacon.
• For certain types of bacon, some may be benecial to ip the
bacon during the last 1-3 minutes of cooking.
CLEANING & MAINTENANCE
Before cleaning the BACON EXPRESS, ensure that the Drip Tray is free of
grease, the unit is unplugged and all parts are cool to the touch.
NOTE: NEVER immerse the Main Unit in water or any other liquid. DO NOT use
harsh or abrasive cleaners. Cooking Plate and Door Plates are dishwasher safe.
1. Remove the Cooking Plate and Door Plates by following the
directions outlined in the PARTS & ASSEMBLY section.
2. Wash the Cooking Plate, Door Plates and Drip Tray in warm, soapy water and dry thoroughly.
3. Wipe the Main Unit, exterior of the Doors and Cool Touch
Handles with a slightly damp, non-abrasive cloth.
4. Replace the Cooking Plate and Door Plates by following the
directions outlined in the PARTS & ASSEMBLY section.
5. Replace the Drip Tray.
RECIPES
Use your BACON EXPRESS to create a variety of delicious meals, snacks and
treats! Try adding bacon to your next salad, make a batch of cheesy bacon
popcorn, or make a BLT sandwich. The possibilities are endless!
Page 11

ENGLISH
9
RETURNS & WARRANTY
SHOULD YOUR UNIT NOT WORK OR IF DAMAGED WHEN YOU FIRST TAKE IT OUT OF
THE BOX, PLEASE RETURN IT TO THE PLACE OF PURCHASE IMMEDIATELY.
BACON EXPRESS / BCN6BK
Should you have any questions, please contact us via email or at the customer service number listed
below between the hours of 8:00 AM and 5:00 PM, Monday through Friday, Central Standard Time.
Distributed by:
Nostalgia Products LLC
1471 Partnership Dr.
Green Bay, WI 54304-5685
Customer Service
Phone: (920) 347-9122
Web: www.nostalgiaproducts.com
Customer Service Inquiry
To submit a Customer Service inquiry, go to www.nostalgiaproducts.com and ll
out the Customer Service Inquiry form and click the Submit button.
A representative will contact you as soon as possible.
Product Warranty Terms
Nostalgia Products LLC (the “Company”) hereby warrants that for a period of one (1) year from the
date of original purchase, this product will be free of defects in material and workmanship under
normal home use, provided that the product is operated and maintained in accordance with the
operating instructions. As the sole and exclusive remedy under this warranty, the Company will
at its discretion either repair or replace the product found to be defective, or issue a refund on the
product during the warranty period. This warranty is only available to the original retail purchaser of
the product from the date of initial retail purchase, and is only valid with the original sales receipt, as
proof of purchase date is required to obtain warranty benets. All warranty claims must be brought
to the attention of the Company within the warranty period and no later than 30 days of the failure
to perform. This warranty does not cover normal wear or damage caused by shipping, mishandling,
misuse, accident, alteration, improper replacement parts, or other than ordinary household use.
You may be required to return the product (with shipping prepaid by you) for inspection and
evaluation. Return shipping costs are not refundable. The Company is not responsible for returns
damaged or lost in transit. Unless otherwise specically permitted by the operating instructions, this
warranty applies to indoor household use only. In order to obtain service under this warranty, please
contact the Company at the telephone number listed above or by lling out the Customer Service
Inquiry Form located at www.nostalgiaproducts.com. Warranty valid only in USA and Canada.
This warranty is in lieu of all other warranties, expressed or implied, including warranties of
merchantability and tness for a particular purpose, which are hereby excluded to the extent
permitted by law. In no event shall the Company be liable for any indirect, incidental, consequential,
or special damages arising out of or in connection with this product or the use thereof. Some
states, provinces or jurisdictions do not permit the exclusion or limitation of incidental or
consequential damages, so the foregoing exclusion or limitation may not apply to you.
This warranty does not apply to re-manufactured merchandise.
Please read the operating instructions carefully. Failure to comply
with the operating instructions will void this warranty.
For more information, visit us online at www.nostalgiaproducts.com.
Like us on Facebook at www.facebook.com/NostalgiaElectrics.
Follow our boards on Pinterest at www.pinterest.com/nostalgiaelctrx.
Tweet along with us on Twitter at www.twitter.com/NostalgiaElctrx.
Page 12

10
ESPAÑOL
10
¡Convierta todos los días en una esta!
Visite www.nostalgiaproducts.com
para productos más divertidos.
CONTENIDO
SEGURIDAD . . . . . . . . . . . . . . . . . . . . . . . . . . . . . . . . . . . . . . 10
PRECAUCIONES IMPORTANTES . . . . . . . . . . . . . . . . . . . . . . . . . . 11
PROTECCIONES IMPORTANTES . . . . . . . . . . . . . . . . . . . . . . . . . . 11
INTRODUCCIÓN . . . . . . . . . . . . . . . . . . . . . . . . . . . . . . . . . . . . 12
PIEZAS Y ENSAMBLAJE . . . . . . . . . . . . . . . . . . . . . . . . . . . . . . . 13
CÓMO UTILIZAR . . . . . . . . . . . . . . . . . . . . . . . . . . . . . . . . . . . . 15
CONSEJOS ÚTILES . . . . . . . . . . . . . . . . . . . . . . . . . . . . . . . . . . 16
LIMPIEZA Y MANTENIMIENTO . . . . . . . . . . . . . . . . . . . . . . . . . . . 16
RECETAS . . . . . . . . . . . . . . . . . . . . . . . . . . . . . . . . . . . . . . . . . 16
DEVOLUCIONES Y GARANTÍA . . . . . . . . . . . . . . . . . . . . . . . . . . . 17
SEGURIDAD
Especificaciones del aparato:
120 voltios, 60 Hz
1200 vatios
ESTE PRODUCTO ES PARA USAR SOLAMENTE EN TOMAS DE CORRIENTE DE 120 VCA.
Visite www.nostalgiaproducts.com/user-manuals/ para ver el manual más actualizado.
Su seguridad y la seguridad de los demás es muy importante.
Hemos dado muchos mensajes de seguridad importantes en este manual y en
el aparato. Siempre lea y cumpla con todos los mensajes de seguridad.
Este es el símbolo de alerta de seguridad.
Este símbolo le avisa de los peligros potenciales
que pueden matar o herir a otros.
Todos los mensajes de seguridad seguirán al símbolo de alerta de seguridad.
Todos los mensajes de seguridad le indicarán qué tanto es el peligro potencial, cómo
reducir la posibilidad de lesiones, y qué puede suceder si no se siguen las instrucciones.
Page 13

11
ESPAÑOL
11
PRECAUCIONES IMPORTANTES
1. NUNCA la sumerja en agua.
2. NUNCA lo utilice cerca de agua.
3. No utilice NUNCA una esponja o un paño abrasivo en la unidad.
4. No deje NUNCA la unidad desatendida mientras está en funcionamiento.
5. Desenchufe la unidad de la red cuando no la está utilizando y para limpiarla.
6. NO opere este aparato con un cable o enchufe dañados,
o en caso de que funcione incorrectamente.
7. NO lo coloque en un lavavajillas.
8. Manténgalo alejado de los niños.
9. Este aparato NO ES UN JUGUETE.
10. Este aparato no se ha diseñado para que lo utilicen niños ni
personas con dicultades de aprendizaje sin supervisión.
11. Se debe supervisar a los niños mientras se utilice el producto
para asegurarse de que no jueguen con el aparato.
PROTECCIONES IMPORTANTES
Cuando utiliza aparatos eléctricos, siempre se deben seguir algunas
medidas básicas de seguridad que incluyen las siguientes:
1. Lea todas las instrucciones antes de utilizar este aparato.
2. Como medida de protección contra el riesgo de descarga eléctrica, no sumerja el
cable, los enchufes ni ninguna otra parte de la unidad en agua ni en otros líquidos.
3. Una supervisión estricta se requiere cuando un aparato se use por niños o cerca de ellos.
4. Para evitar riesgos de incendio, descargas eléctricas, o daños a la unidad, la misma
solo debe conectarse a un tomacorriente de 120 voltios de CA polarizado.
5. Desenchufe el aparato de la red cuando no lo está utilizando
y antes de desmontarlo para limpiarlo.
6. NO utilice ningún aparato con el cable o el enchufe dañados, ni si el
aparato se ha dañado de cualquier manera. Devolver el aparato al taller
de reparación más cercano para su examen o reparación.
7. El fabricante no recomienda el uso de accesorios de sujeción.
El uso de accesorios puede provocar lesiones.
8. NUNCA utilice la unidad estando seca. Siempre tenga una mezcla de
batido en el recipiente mientras está enchufada la unidad.
9. NO utilice el aparato al aire libre.
10. NO permita que el cable toque supercies calientes.
11. NO lo coloque sobre o cerca de una hornilla eléctrica o gas caliente, o en un horno caliente.
12. Esta unidad debe estar en una supercie nivelada para que funcione bien.
13. NO utilice este aparato para otro uso que no sea el cual para el que está destinado.
Page 14

12
ESPAÑOL
12
14. NO deje la unidad desatendida mientras está en uso o
cuando está enchufada a una toma de corriente.
15. Un cable de alimentación corto se provee para reducir el riesgo
resultante de enredarse o tropezarse con un cable largo.
16. Un cable de extensión se puede utilizar si se tiene cuidado con su uso.
17. La clasicación eléctrica marcada en un cable de extensión debe ser
al menos equivalente a la clasicación eléctrica del aparato.
18. Este aparato tiene una patita polarizada (un patita más ancha que la otra).
Para reducir el riesgo de descarga eléctrica, este enchufe está diseñado
para entrar en el tomacorriente polarizado solo en una posición.
19. NO coloque las manos ni ningún objeto extraño en este
aparato mientras esté conectado y funcionando.
¡GUARDE ESTAS INSTRUCCIONES!
INTRODUCCIÓN
¡Gracias por adquirir el BACON EXPRESS™ de Nostalgia™! Este aparato fácil de usar es una
forma más saludable de cocinar tocino a una perfección deliciosa. ¡Cocine fácilmente hasta
6 tiras de tocino cortado normal o grueso en unos pocos minutos, ¡no necesita voltearlas!
Sus funciones incluyen:
• Cocina hasta 6 tiras de tocino regular o grueso en minutos
• La cocción vertical drena la grasa
• La placa de cocción antiadherente y removible, y los revestimientos
aislados de la puerta favorecen la limpieza fácil
• La bandeja de goteo deslizable recoge la grasa del tocino
• Dial de cocción con selector de textura crujiente e iluminado
• Agarraderas frías al tacto
• Decoraciones cromadas
Page 15

13
ESPAÑOL
13
PIEZAS Y ENSAMBLAJE
PARTES
Indicador de Cocción Bandeja de Goteo
Botón de
Encendido/
Indicador de
Cocción
Unidad
Puerta
Placas de la
Puerta Aisladas
Placa de cocción
antiadherente
Agarraderas
fría al tacto
Page 16

14
ESPAÑOL
14
EXTRACCIÓN / SUSTITUCIÓN DE LAS PLACAS DE PUERTA
NOTA: Algunas personas encontrarán que es más fácil quitar o reemplazar
las placas de la puerta mirando las puertas hacia sí mismas, en lugar
de las imágenes laterales que se muestran a continuación.
Extracción de las Placas de la Puerta
Sustitución de las placas de puerta
2
3
Tire del borde de la Placa de la
Puerta más cercano a la Placa de
Cocción. El borde se sostiene en
su lugar con un imán, y algunas
personas encuentran más sencillo
usar un utensilio de plástico para
tirar del borde hacia arriba.
Simplemente levante la Placa
de la Puerta hacia arriba y
sepárela de la Puerta.
1
2
Usando la inscripción INSERTAR ESTE
EXTREMO PRIMERO en la Placa de la
Puerta como guía, inserte la Placa de la
Puerta en la parte superior de la Puerta.
Presione la parte inferior de la Placa
de la Puerta sobre la Puerta.
Pestaña
3
Vuelva a colocar la placa de cocción
empujando hacia abajo las pestañas.
Pestaña
1
Quite la Placa de Cocción tirando
de las pestañas hacia arriba.
Page 17

15
ESPAÑOL
15
CÓMO UTILIZAR
Primero, encuentre una supercie estable cerca de una toma de corriente.
Asegúrese de que el cable esté alejado de una fuente de agua, y que la Placa
de Cocción y las Placas de la Puerta estén colocadas correctamente.
1. Conecte el cable en una toma de corriente.
2. Precaliente la unidad girando el Indicador de Cocción a Precalentar. Presione
el botón de Encendido para comenzar el ciclo de precalentamiento.
Mientras precalienta, el Botón de Encendido se iluminará en azul.
3. Al nalizar el precalentamiento, el Indicador de Cocción sonará
10 veces y el Botón de Encendido se apagará.
4. Con cuidado abra las Puertas usando las Agarraderas Frías al Tacto.
PRECAUCIÓN: ¡Las puertas estarán calientes! Asegúrese de no tocar las Puertas
con los dedos o las manos. De ser necesario, use una agarradera para abrir.
5. Coloque 6 tiras de tocino, con una separación uniforme, sobre la Placa de Cocción. El
número de tiras de tocino para colocar en la unidad puede variar de acuerdo con el espesor
y ancho de cada tira.
SUGERENCIA DE COCCIÓN: Para obtener mejores resultados, no
sobrecargue con tiras de tocino.
SUGERENCIA DE COCCIÓN: Unidad se recomienda para uso
con tocino regular, y tocino grueso comprado en la tienda.
Tocino de algunos carniceria puede ser demasiado grueso para
esta unidad.
PRECAUCIÓN: NO coloque el tocino en la
unidad sin la Placa de Cocción/Placas de la
Puerta en su lugar. La grasa del tocino puede causar fallas en la unidad.
6. Use las Agarraderas Frías al Tacto para cerrar las Puertas.
7. De acuerdo con el espesor del tocino y el punto deseado de cocción,
gire el Indicador de Cocción al nivel de cocción deseado.
8. Presione el Botón Encendido para comenzar el ciclo de cocción.
Mientras cocina, el Botón de Encendido se iluminará en azul.
9. Al nalizar el ciclo de cocción, el Indicador de Cocción sonará
10 veces y el Botón de Encendido se apagará.
10. Con cuidado abra las Puertas usando las Agarraderas Frías al Tacto, y compruebe que el
tocino se haya cocinado por completo a su gusto. Si lo desea, voltee el tocino y cocina por
varios minutos más.
PRECAUCIÓN: Se genera vapor durante el uso, que podría causar quemaduras
u otras lesiones. Manténgase alejado del vapor al abrir las Puertas.
11. Retire el tocino de la Placa de Cocción usando pinzas o un tenedor.
NOTA: Se recomienda usar utensilios de plástico o madera al retirar el
tocino. Con el paso del tiempo, los utensilios de metal pueden dañar la
supercie anti-adherente de cocción de la Placa de Cocción.
12. Antes de cocinar más tocino, compruebe la Bandeja de Drenaje para vericar que no
necesite vaciarse.
NOTA: Evite los derrames de grasa comprobando siempre la Bandeja de Drenaje antes de
mover la unidad. Si la Bandeja de Drenaje está llena, deseche correctamente la grasa antes
de mover la unidad.
Page 18

16
ESPAÑOL
16
CONSEJOS ÚTILES
Humo
Si la unidad comienza a producir humo al cocinar, puede deberse a
acumulación de grasa. Con el n de reducir la producción de humo, asegúrese
de limpiar la Placa de Cocción y las Placas de la Puerta entre usos
Consejos para la cocción
• Para obtener mejores resultados, asegúrese de que el tocino no se superponga y
las tiras tengan una separación uniforme. El tocino se reducirá al cocinarse.
• Unidad se recomienda para uso con tocino regular, y tocino grueso comprado en la tienda.
NOTA: Tocino de algunos carniceria puede ser demasiado grueso para esta unidad.
• De acuerdo con el tipo de tocino, si el tocino es demasiado largo y toca las Placas de la
Puerta, los extremos del tocino pueden necesitar recortarse para colocarlo en la Placa
de Cocción. Use un cuchillo o tijeras de cocina para cortar los extremos del tocino.
• Para ciertos tipos de tocino, puede ser útil dar vuelta el tocino
durante los últimos 1-3 minutos de cocción.
LIMPIEZA Y MANTENIMIENTO
Antes de limpiar el BACON EXPRESS™, asegúrese de que la Bandeja de Drenaje esté
libre de grasa, la unidad esté desenchufada y todas las partes estén frías al tacto.
NOTA: NUNCA sumerja la unidad principal en agua o cualquier otro
líquido. NO utilice limpiadores fuertes o abrasivos. La Placa de Cocción
y las Placas de la Puerta pueden colocarse en el lavavajillas.
1. Quite la Placa de Cocción y las Placas de la Puerta Aisladas
siguiendo las instrucciones bajo CÓMO UTILIZAR.
2. Lave la Placa de Cocción, las Placas de la Puerta y la Bandeja
de Drenaje en agua tibia con jabón y seque bien.
3. Limpie la Unidad Principal, el exterior de las Puertas y las Agarraderas
Frías al Tacto con un paño no abrasivo, ligeramente húmedo.
4. Sustitución de la Placa de Cocción y las Placas de la Puerta Aisladas
siguiendo las instrucciones bajo CÓMO UTILIZAR.
5. Sustitución de la Bandeja de Drenaje.
RECETAS
Utilice el TOCINO EXPRESS para crear una variedad de deliciosas comidas, snacks
y golosinas! Añadir el tocino a su próxima ensalada, hacer un lote de palomitas de
maíz con queso tocino, o hacer un sándwich BLT. ¡Las posibilidades son innitas!
Page 19

17
ESPAÑOL
17
DEVOLUCIONES Y GARANTÍA
SI LA UNIDAD NO FUNCIONA O ESTÁ DAÑADA AL SACARLA POR PRIMERA VEZ
DE LA CAJA, DEVUÉLVALA AL LUGAR DE COMPRA INMEDIATAMENTE.
BACON EXPRESS™ / BCN6BK
Si tiene preguntas, contacte con nosotros por correo electrónico o por el número
telefónico de servicio al cliente que aparece a continuación en el horario de
8:00 AM a 5:00 PM, de lunes a viernes, Hora Estándar del Este.
Distribuida por:
Nostalgia Products LLC
1471 Partnership Dr.
Green Bay, WI 54304-5685
Servicio al cliente
Teléfono: (920) 347-9122
Web: www.nostalgiaproducts.com
Solicitud de servicio al cliente
Para enviar una solicitud al Servicio al Cliente, vaya a www.nostalgiaproducts.com, llene
el formulario de Solicitud de Servicio al Cliente y haga clic en el botón Enviar.
Un representante le contactará tan pronto como sea posible.
Términos de garantía del producto
Po este medio, Nostalgia Products LLC (la “Compañía”) garantiza que por un período de un (1) año a
partir de la fecha de compra original, este producto estará sin defectos en cuanto a materiales y mano
de obra en uso normal en casa, siempre que el producto se maneje y mantenga de acuerdo con las
instrucciones de manejo. Como único y exclusivo remedio en virtud de esta garantía, la Compañía, a
su discreción, podrá optar por reparar o sustituir el producto que se encuentre defectuoso, o emitir un
reembolso por el producto durante el período de garantía. Esta garantía sólo está disponible para el
comprador original minorista del producto a partir de la fecha inicial de compra al por menor, y sólo es
válida con el recibo de compra original, y como prueba de la fecha de compra, es necesario obtener los
benecios de la garantía. Todos los reclamos de garantía deben hacerse a la atención de la Compañía
dentro del período de garantía y no más tarde que 30 días desde la imposibilidad de realizarlo. Esta
garantía no cubre el desgaste normal o daños ocasionados por el embarque, malos manejos, mal uso,
accidentes, alteración, piezas de cambio incorrectas, o algo distinto al uso doméstico normal. Es posible
que deba devolver el producto (con los gastos de envío pagados por usted) para inspección y evaluación.
Los costos de envío no son reembolsables. La empresa no se hace responsable por devoluciones
dañadas o perdidas en tránsito. A menos que se indique lo contrario especícamente permitido por
las instrucciones de manejo, esta garantía sólo se aplica al uso en interiores de las viviendas. Para
realizar una reparación bajo esta garantía, comuníquese con la Compañía mediante el número de
teléfono indicado anteriormente o al llenar el formulario de consulta para el servicio de Atención al
Cliente en www.nostalgiaproduct s.com. El período de garantía sólo es válido en EE.UU. y Canadá.
Esta garantía está en lugar de cualquier otra garantía, expresa o implícita, incluso las garantías de
comerciabilidad y conveniencia para un propósito en particular, que quedan excluidas en la medida
permitida por la ley. En ningún caso la compañía será responsable de cualquier daño indirecto, incidental,
consecuente, especial o daños que surjan o estén relacionados con este producto o la utilización del
mismo. Algunos estados, provincias o corregimientos no permiten la exclusión o la limitación de daños
incidentales o consecuentes, por lo que la exclusión o la limitación anterior quizás no se aplique a usted.
Esta garantía no se aplica a mercancía reelaborada.
Lea las instrucciones de manejo cuidadosamente. El incumplimiento
de las instrucciones de manejo anulará esta garantía.
Para obtener más información, visítenos en línea en www.nostalgiaproducts.com.
Me Gusta en Facebook en www.facebook.com / NostalgiaElectrics.
Siga nuestros consejos sobre Pinterest en www.pinterest.com / nostalgiaelctrx.
Tweet con nosotros en Twitter en www.twitter.com / NostalgiaElctrx.
Page 20

18
FRANÇAIS
18
Faire de tous les jours une fête!
Visiter www.nostalgiaproducts.com
pour plus de produits amusants.
TABLE DES MATIÈRES
SÉCURITÉ . . . . . . . . . . . . . . . . . . . . . . . . . . . . . . . . . . . . . . . . 18
PRÉCAUTIONS IMPORTANTES . . . . . . . . . . . . . . . . . . . . . . . . . . . 19
GARANTIES IMPORTANTES . . . . . . . . . . . . . . . . . . . . . . . . . . . . . 19
INTRODUCTION . . . . . . . . . . . . . . . . . . . . . . . . . . . . . . . . . . . . 20
PIÈCES ET ASSEMBLAGE . . . . . . . . . . . . . . . . . . . . . . . . . . . . . . . 21
COMMENT FAIRE FONCTIONNER . . . . . . . . . . . . . . . . . . . . . . . . . 23
CONSEILS UTILES . . . . . . . . . . . . . . . . . . . . . . . . . . . . . . . . . . . 24
NETTOYAGE ET ENTRETIEN . . . . . . . . . . . . . . . . . . . . . . . . . . . . . 24
RECETTES . . . . . . . . . . . . . . . . . . . . . . . . . . . . . . . . . . . . . . . . 24
RETOURS ET GARANTIE . . . . . . . . . . . . . . . . . . . . . . . . . . . . . . . 25
SÉCURITÉ
Spécifications de l'appareil :
120 Volts, 60 Hz
1200 Watts
CE PRODUIT EST POUR UTILISATION DANS UNE PRISE 120V AC SEULEMENT.
Se référer au site www.nostalgiaproducts.com/user-manuals/ pour
la version la plus récente.pour la version la plus récente.
Votre sécurité et la sécurité des autres est très importante.
Nous avons fourni beaucoup de messages importants de sécurité dans ce manuel
et sur votre appareil. Toujours lire et respecter les consignes de sécurité.
C'est le symbole d'alerte de sécurité.
Ce symbole vous signale les dangers potentiels qui peuvent
causer de sérieuses blessures à vous et aux autres.
Tous les messages de sécurité suivront le symbole d'alerte de sécurité.
Tous les messages de sécurité vous indiqueront quel est le danger
potentiel et vous diront comment réduire le risque de blessure, et vous
dire aussi ce qui peut arriver si les instructions ne sont pas suivies.
Page 21

19
FRANÇAIS
19
PRÉCAUTIONS IMPORTANTES
1. NE JAMAIS submerger dans l'eau.
2. NE JAMAIS utiliser près de l'eau.
3. NE JAMAIS utiliser une éponge ou un tissu abrasifs sur l'appareil.
4. NE JAMAIS laisser l'appareil sans surveillance en cours d'utilisation.
5. Débrancher l'appareil de la prise lorsqu'il n'est pas en utilisation et pendant le nettoyage.
6. NE PAS utiliser cet appareil avec un cordon ou une che endommagée,
ou dans le cas où l'appareil a un mauvais fonctionnement.
7. NE PAS placer dans le lave-vaisselle.
8. Garder hors de la portée des enfants.
9. Cet appareil n'est PAS UN JOUET.
10. Cet appareil n'est pas prévu à l'usage des jeunes enfants sans
surveillance ou des individus avec dicultés cognitives.
11. Les jeunes enfants doivent être surveillés lorsque le produit est
utilisé an de s'assurer qu'ils ne jouent pas avec l'appareil.
GARANTIES IMPORTANTES
Lors de l'utilisation d'appareils électriques, des précautions de
base doivent toujours être respectées, y compris :
1. Lire toutes les instructions avant d'opérer cet appareil.
2. Pour protéger contre les chocs électriques ne pas immerger le cordon, la
che ou une partie de cet appareil dans l'eau ou d'autres liquides.
3. Une surveillance étroite est nécessaire quand n'importe
quel appareil est utilisé par ou près des enfants.
4. Pour éviter un incendie ou un choc électrique, ou des dommages à l'appareil, cet
appareil doit être branché sur une prise polarisée de 120 Volts AC UNIQUEMENT.
5. Débrancher l'appareil de la prise lorsqu'il n'est pas utilisé et
avant de retirer des pièces pour le nettoyage.
6. NE PAS utiliser tout appareil avec un cordon ou une che endommagée,
ou si l'appareil a été endommagé de quelque façon. Retourner l'appareil
à l'atelier de réparation le plus proche pour examen ou réparation.
7. Le fabricant ne recommande pas l'utilisation des accessoires, pièces
jointes. L'utilisation des accessoires peut causer des blessures.
8. NE JAMAIS opérer l'appareil à sec. Toujours avoir le mélange à lait
fouetté à l'intérieur du récipient lorsqu'il est branché.
9. NE PAS utiliser à l'extérieur.
10. NE PAS laisser le cordon toucher les surfaces chaudes.
11. NE PAS placer sur ou près d'un brûleur à gaz ou électrique, ou dans un four chaué.
12. Cette unité doit être sur une surface plane pour fonctionner correctement.
Page 22

20
FRANÇAIS
20
13. NE PAS UTILISER cet appareil pour autre chose que pour l'usage prévue.
14. NE PAS laisser l'unité sans surveillance lorsqu'en service ou une fois branché à une prise.
15. Un cordon d'alimentation court est fourni an de réduire tout risque
de s'enfarger ou de s'entremêler dans un long cordon.
16. Une rallonge peut être utilisée si les précautions d'usage sont exercées pendant l'utilisation.
17. La tension nominale d'un cordon de rallonge doit être au moins
aussi grande que la puissance électrique de l'appareil.
18. Cet appareil possède une prise polarisée (une lame est plus large que
l'autre). Pour réduire le risque de décharge électrique, cette prise est
prévue pour s'adapter dans une prise polarisée d'une seule façon.
19. NE PAS mettre les mains ou aucun objet étranger dans cet appareil
pendant son branchement et son fonctionnement.
CONSERVER CES INSTRUCTIONS!
INTRODUCTION
Merci d'acheter le BACON EXPRESS™ de Nostalgia™ ! Cet appareil facile à
utiliser est une façon plus saine de faire cuire le bacon à une perfection
délicieuse. Cuit facilement jusqu'à 6 tranches de bacon régulier ou à
coupe épaisse en quelques minutes - pas besoin de retourner !
Les caractéristiques incluent :
• Cuit jusqu'à 6 tranches de bacon régulier ou épais coupé en quelques minutes
• La cuisson verticale draine la graisse
• La plaque de cuisson antiadhésive amovible et des doublures
de portes isolées permettent un nettoyage facile
• Plateau d'égouttement coulissant ramasse la graisse de bacon
• Un cadran lumineux avec sélecteur de croustillance
• Poignées de contact froides
• Accents chromés
Page 23

21
FRANÇAIS
21
PIÈCES ET ASSEMBLAGE
PIÈCES
Cadran pour la Cuisson Plateau d'égouttement
Bouton
d'alimentation/
cadran pour
la cuisson
Unité
principale
Porte
Plaques de
porte isolées
Non-Stick
Cooking Plate
Poignées de
contact froides
Page 24

22
FRANÇAIS
22
ENLEVER / REMPLACER LES PLAQUES DE PORTE
REMARQUE: Certaines personnes trouveront le plus facile d'enlever ou
de remplacer les plaques de porte en faisant face aux portes vers euxmêmes, au lieu des images latérales montrées ci-dessous.
Enlever les plaques de porte
Remplacer les plaques de porte
2
3
Tirer vers le haut sur le bord de la
plaque de porte la plus près du
plat à cuire. Le bord est tenu en
place par un aimant, et certains
peuvent trouver plus facile
d'utiliser un ustensile en plastique
pour tirer le bord vers le haut.
Il sut de soulever la plaque de porte
vers le haut et de la sortir de la porte.
1
2
En utilisant l'instruction INSÉRER CE BOUT
EN PREMIER imprimée sur la plaque
de la porte comme un guide, insérer la
plaque de porte dans le haut de la porte.
Enclencher le bas de la plaque
de porte dans la porte.
Languettes
3
Remplacer la plaque de cuisson
en appuyant sur les onglets.
Languettes
1
Enlever la plaque à cuisson en tirant
vers le haut sur les languettes.
Page 25

23
FRANÇAIS
23
COMMENT FAIRE FONCTIONNER
En premier lieu, trouver une surface stable près d'une prise électrique.
S'assurer que le cordon est éloigné de n'importe quelle source d'eau,
que la plaque de cuisson et plaques de porte sont bien en place.
1. Brancher la corde à la prise électrique.
2. Préchauer l'unité en tournant le cadran à cuisson à Préchauer. Appuyer
sur le bouton d'alimentation pour commencer le cycle de préchauage.
Tout en préchauant, le bouton d'alimentation s'illuminera en bleu.
3. Quand le préchauage est terminé, le cadran à cuisson émet un
bip 10 fois et le bouton de l'alimentation s'éteindra.
4. Tirer avec précaution pour ouvrir les portes à l'aide des poignées contact froides.
AVERTISSEMENT : Les portes seront chaudes! S'assurer que les doigts et les mains
ne touchent pas les portes. Si nécessaire, utiliser une mitaine à four pour ouvrir.
5. Accrocher jusqu'à 6 tranches de bacon, espacés régulièrement, sur la plaque de cuisson.
Le nombre de tranches de bacon à placer sur l'unité peut changer basé sur l'épaisseur et la
largeur de chaque tranche.
CONSEIL CULINAIRE : Pour de meilleurs résultats, ne pas faire
chevaucher les tranches de bacon.
CONSEIL CULINAIRE : L'unité est recommandée pour l'usage
avec le lard régulier, et le bacon épais acheté dans le magasin.
Certains morceaux de viande ou de bacon coupé en spécialité
peuvent être trop épais pour cette unité.
AVERTISSEMENT : NE PAS mettre le bacon dans l'unité
sans que la plaque de cuisson/plaques de portes
soient en place. La graisse du bacon peut causer un mauvais fonctionnement.
6. Utiliser les poignées de contact froides pour fermer les portes.
7. Selon l'épaisseur du bacon et de la croustillance préférée, tourner
le cadran à cuisson au temps de cuisson désiré.
8. Appuyer sur le bouton d'alimentation pour commencer le cycle de cuisson.
Pendant la cuisson le bouton d'alimentation s'allumera en bleu.
9. Quand la cuisson est terminée, le cadran à cuisson émet un bip
10 fois et le bouton de l'alimentation s'éteindra.
10. Ouvrir soigneusement les portes à l'aide des poignées de contact froides, et vérier que
le bacon est complètement cuit et à votre goût. Si désiré, retournez le bacon et faire cuire
pendant plusieurs minutes.
AVERTISSEMENT : Une vapeur se produit lors de l'utilisation ce qui pourrait causer des
brûlures ou d'autres blessures. Rester éloigné de la vapeur quand vous ouvrez les portes.
11. Enlever le bacon de la plaque à cuisson en utilisant les pinces ou la fourchette.
REMARQUE : Il est recommandé d'utiliser des ustensiles en plastique ou en
bois pour enlever le bacon. Au l du temps, des ustensiles en métal peuvent
endommager la surface de cuisson antiadhésive de la plaque de cuisson.
12. Avant de faire cuire plus de bacon, vérier le plateau d'égouttement an de s'assurer qu'il
n'a pas besoin d'être vidé.
REMARQUE : Éviter les déversements de graisse en vériant toujours le plateau
d'égouttement avant de déplacer l'appareil. Si le plateau d'égouttement est plein, disposer
correctement de la graisse avant de déplacer l'appareil.
Page 26

24
FRANÇAIS
24
CONSEILS UTILES
Fumée
Si l'appareil commence à fumer pendant la cuisson, cela peut être dû à
une accumulation de graisse. An de réduire la fumée, voir à nettoyer les
plaques à cuisson et les plaques de portes entre les utilisations.
Conseils culinaires
• Pour de meilleurs résultats, s'assurer que le bacon ne se chevauche pas et que
les tranches sont également espacées. Le bacon se rétrécira quand cuit.
• L'unité est recommandée pour l'usage avec le lard régulier, et le bacon épais acheté dans le
magasin.
REMARQUE: Certains morceaux de viande ou de bacon coupé
en spécialité peuvent être trop épais pour cette unité.
• Selon le type de bacon, si le bacon est trop long et touche les plaques des portes, les
extrémités du bacon peuvent avoir besoin d'être taillées an d'être placé sur le plat à
cuisson. Employer un couteau ou ciseaux de cuisine pour couper les extrémités du bacon.
• Pour certains types de bacon, il peut être bénéque de retourner
le bacon pendant les dernières 1-3 minutes de cuisson.
NETTOYAGE ET ENTRETIEN
Avant de nettoyer le BACON EXPRESS, s'assurer que le plateau d'égouttement est exempt
de graisse, que l'unité est débranchée et que toutes les pièces sont froides au contact.
REMARQUE: NE JAMAIS immerger l'unité principale dans l'eau ou dans
tout autre liquide. NE PAS employer des décapants durs ou abrasifs. La
plaque de cuisson et les plaques de porte vont au lave-vaisselle.
1. Enlever la plaque de cuisson et plaques de porte en suivant les instructions
décrites dans la section COMMENT FAIRE FONCTIONNER.
2. Laver la plaque de cuisson, les plaques de porte et le plateau d'égouttement
dans de l'eau chaude et savonneuse et assécher complètement.
3. Essuyer l'unité principale, l'extérieur des portes et les poignées de
contact froides avec un tissu légèrement humide et non-abrasif.
4. Remplacer la plaque de cuisson et plaques de porte en suivant les
instructions décrites dans la section PIÈCES ET ENSEMBLE.
5. Remplacer le plateau d'égouttement.
RECIPES
Utilisez votre BACON EXPRESS pour créer une variété de délicieux repas, des collations
et des friandises! Essayez d'ajouter du bacon à votre prochaine salade, faire un lot de
fromage de bacon pop-corn, ou faire un sandwich BLT. Les possibilités sont innies!
Page 27

25
FRANÇAIS
25
RETOURS ET GARANTIE
SI VOTRE APPAREIL NE FONCTIONNE PAS OU S'IL EST ENDOMMAGÉ QUAND VOUS LE RETIREZ
DE LA BOÎTE, VEUILLEZ LE RETOURNER IMMÉDIATEMENT À L'ENDROIT OÙ IL A ÉTÉ ACHETÉ.
BACON EXPRESS / BCN6BK
Pour toute question, communiquer par courriel ou au numéro de téléphone du service à
la clientèle, entre 08 h 00 et 17 h 00, du lundi au vendredi, heure normale du Centre.
Distribué par :
Nostalgia Products LLC
1471 Partnership Dr.
Green Bay, WI 54304-5685
Service à la clientèle
Téléphone : (920) 347-9122
Site Web : www.nostalgiaproducts.com
Demande pour le service à la clientèle
Pour soumettre une demande au service à la clientèle, rendez vous au www.nostalgiaproducts.com puis
remplissez le formulaire de demande au service à la clientèle puis cliquez sur le bouton Soumettre.
Un représentant vous contactera dès que possible.
Conditions de garantie du produit
Le groupe Nostalgia Products LLC (référé tel « l’Entreprise ») garantit que pour une période d’un
(1) an en date d’achat, ce produit est sans défaut de matériel et de fabrication selon une utilisation
normale à domicile, seulement si le fonctionnement et l’entretien du produit sont conforment aux
directives fournies. À titre de réparation exclusive et entière sous cette garantie, l’Entreprise pourra
à sa discrétion, réparer ou remplacer le produit défectueux, voire émettre un remboursement du
produit durant la période couverte sous garantie. Cette garantie n’est disponible seulement qu’à
l’acheteur d’origine du produit, en date d’achat au détail dudit produit et sera valide uniquement
avec le reçu de caisse d’origine, à titre de preuve d’achat, lequel est requis pour obtenir les bienfaits
reliés à cette garantie. Toute réclamation doit être rapportée à l’attention de l’Entreprise dans la
fenêtre de la période de la garantie, sans dépasser 30 jours à défaut de performance. Cette garantie
ne couvre pas l’usure normale ou dommage cause par l'expédition, la mauvaise manipulation, la
mauvaise utilisation, les accidents, les modications, les mauvaises pièces de remplacement, voire
toute autre utilisation anormale du produit à domicile. Il est possible que vous ayez à retourner le
produit (avec les frais de retour prépayés par vous) pour une inspection et une évaluation. Les frais
des coûts de retour ne sont pas remboursables. L'Entreprise n’est aucunement responsable pour les
retours endommagés ou perdus en transit. Autrement que spéciquement permit selon les directives
de fonctionnement, cette garantie s’applique à une utilisation à domicile à d'intérieur seulement.
An d'obtenir un service couvert sous cette garantie, veuillez contacter l'Entreprise au numéro de
téléphone inclut ci-haut ou en remplissant le formulaire de demande au service à la clientele, sur le
site www.nostalgiaproducts.com. La garantie est valide seulement aux États-Unis et au Canada.
Cette garantie prévaut toute autre garantie, expresse ou implicite incluant les garanties de qualité
marchande ou ayant une aptitude pour une intention en particulier, lesquelles sont exclues selon la
loi. Sous aucun prétexte l’Entreprise ne pourra être tenue responsable pour tout dommage indirect,
accidentel, conséquentiel ou spécial provenant de ou en relativité avec ce produit ou son utilisation.
Certains états, provinces ou juridictions n'allouent pas l'exclusion ou la limitation de tels dommages
accidentels ou conséquentiels, donc l'exclusion ou limitation suscitée peut ne pas s'appliquer à vous.
Cette garantie ne s’applique pas à la merchandise de renaissance.
Veuillez lire les directives de fonctionnement attentivement. Ne pas se
conformer aux directives de fonctionnement annulera cette garantie.
Pour plus d’informations, visitez notre site Web à www.nostalgiaproducts.com.
Aimez-nous sur Facebook à l’adresse www.facebook.com / NostalgiaElectrics.
Suivez nos conseils sur Pinterest à www.pinterest.com / nostalgiaelctrx.
Tweet avec nous sur Twitter à l’adresse www.twitter.com / NostalgiaElctrx.
Page 28

 Loading...