

Page 1
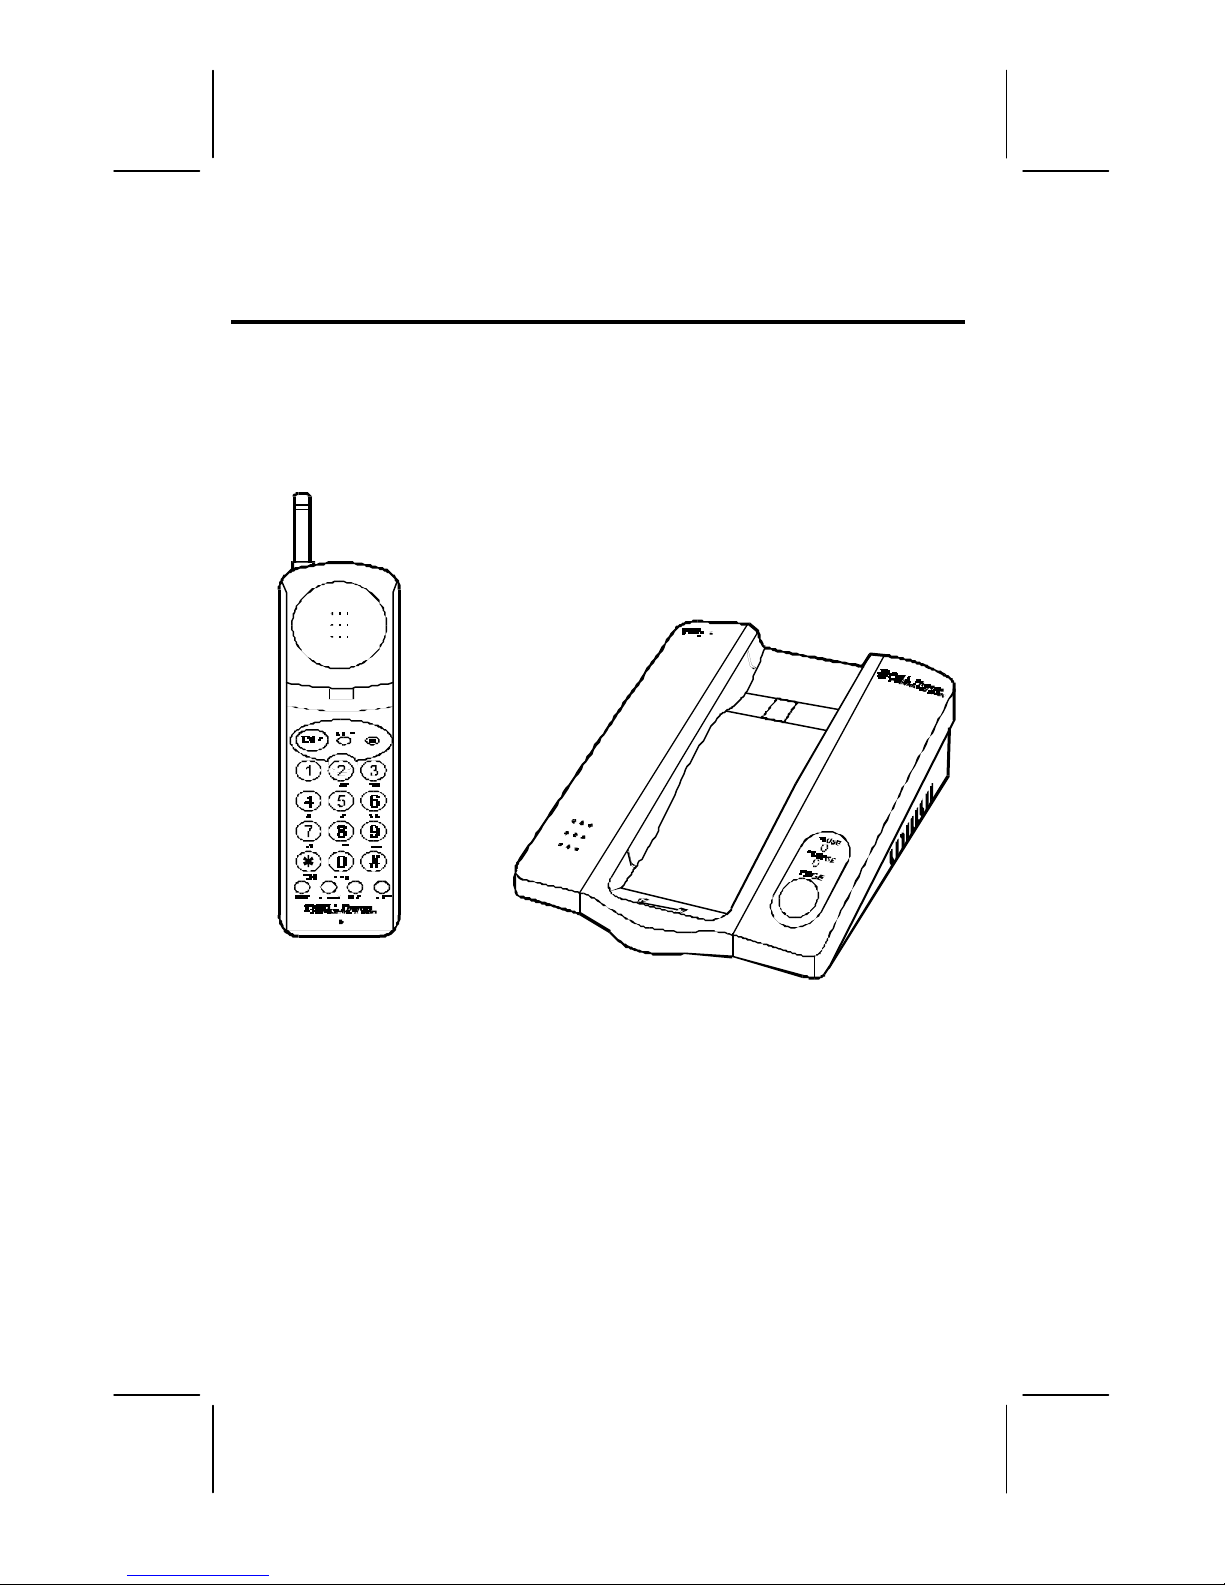
Excursion
®
39202
Congratulations on your selection of the Excursion® 39202 from
Northwestern Bell Phones. This quality cordless telephone, like
all Genuine BELL® products, has been designed to give you
many years of continuous service and represents the best value
1 05278B-2
OWNER’S MANUAL # 39202 ver. 05278B-2
PAGE # 1 English Version
Page 2
for your money. It requires little maintenance and is easy to
setup and operate.
IMPORTANT SERVICE INFORMATION
Read this manual before attempting to setup or use this instrument. It contains important
information regarding safe installation and use. Keep this manual for future reference.
Also save the carton, packing and proof of purchase to simplify and accelerate any needed
action. If you need assistance or service, call (800) 888-8990 between 8:00 a.m. and 4:30 p.m.
Pacific Standard Time, Monday through Friday. You can also visit our web site at:
http://www.nwbphones.com for technical support and information on our other products.
WARNING
TO PREVENT FIRE OR SHOCK HAZARD, DO NOT EXPOSE THIS PRODUCT TO RAIN
OR ANY TYPE OF EXCESS MOISTURE. IF ACCIDENTALLY DROPPED INTO WATER,
THE AC ADAPTOR SHOULD IMMEDIATELY BE UNPLUGGED FROM THE WALL
ALONG WITH THE TELEPHONE LINE CORD.
THIS SYMBOL IS INTENDED TO ALERT THE USER OF
THE PRESENCE OF IMPORTANT OPERATING AND
MAINTENANCE (SERVICING) INSTRUCTIONS IN THE
OWNER'S MANUAL.
®
Excursion
39202
CARTON CONTENTS
• Excursion® 39202 Handset and Base Unit
• AC Adaptor (Class II, DC 9V, 300 mA, CT:POS)
• Belt Clip
• Telephone Line Cords (Long & Short)
• Rechargeable Ni-Cad Battery (3.6 V, 600 mAh)
• Wall Mount Bracket
• User’s Manual
05278B-2 2
OWNER’S MANUAL# 39202 ver. 05278B-2
PAGE # 2 English Version
Page 3

• Warranty Card
• Accessory Order Form
SAVE THESE INSTUCTIONS
IMPORTANT SAFETY
INSTRUCTIONS
When using your telephone equipment,
basic safety precautions should always
be followed to reduce the risk of fire,
electric shock, and injury to persons,
including the following:
1. Read and understand all
instructions.
2. Follow all warnings and instructions
marked on the product.
3. Unplug this product from the wall
outlet before cleaning. Do not use
liquid cleaners or aerosol cleaners.
Use a damp cloth for cleaning.
4. Do not use this product near water,
for example, near a bathtub, wash
bowl, kitchen sink, or laundry tub, in
a wet basement or near a swimming
pool.
5. Do not place this product on an
unstable cart, stand, or table. The
product may fall, causing serious
damage to the product.
6. Slots and openings in the cabinet
and the back or bottom are provided
for ventilation, to protect it from
overheating. These openings
should never be blocked or covered.
The openings should never be
blocked by placing the product on
the bed, sofa, rug, or other similar
surface. This product should never
be placed near or over a radiator or
heat register. This product should
not be placed in a built-in
installation unless proper ventilation
is provided.
7. This product should be operated
only from the type of power source
indicated on the marking label. If
you are not sure of the type of
power supply to your home, consult
your dealer or local power company.
8. Do not allow anything to rest on the
power cord. Do not locate this
product where the cord will be
abused by persons walking on it.
9. Do not overload wall outlets and
extension cords as this can result in
the risk of fire or electric shock.
10. Never push objects of any kind into
this product through cabinet slots
as they may touch dangerous
voltage points or short out parts
that could result in a risk of fire or
electric shock. Never spill liquid of
any kind on the product.
11. To reduce the risk of electric shock,
do not disassemble this product, but
take it to a qualified service
contractor when some service or
repair work is required. Opening or
removing covers may expose you to
dangerous voltages or other risks.
Incorrect reassembly can cause
electric shock when the appliance is
subsequently used.
12. Unplug this product from the wall
outlet and refer servicing to
qualified service personnel under
the following conditions:
A. When the power supply cord
or plug is damaged or frayed.
B. If liquid has been spilled into
the product.
C. If the product has been
exposed to rain or water.
D. If the product does not operate
normally by following the
3 05278B-2
OWNER’S MANUAL # 39202 ver. 05278B-2
PAGE # 3 English Version
Page 4

operating instructions. Adjust
only those controls that are
covered by the operating
instructions. Improper
adjustments of other controls
may result in damage and will
often require extensive work
by a qualified technician to
restore the product to normal
operation.
E. If the product has been
dropped or the cabinet has
been damaged.
F. If the product exhibits a
distinctive change in
performance.
13. Avoid using a telephone (other than
a cordless type) during an electrical
storm. There may be a remote risk of
electric shock from lightning.
14. Do not use the telephone to report a
gas leak in the vicinity of the leak.
SAVE THESE INSTRUCTIONS
INSTALLATION
PRECAUTIONS
1. Never install telephone wiring
during a lightning storm.
2. Never install telephone jacks in wet
locations unless the jack is
specifically designed for wet
locations.
3. Never touch uninsulated telephone
wires or terminals unless the
telephone line has been
disconnected at the network
interface.
4. Use caution when installing or
modifying telephone lines.
MAINTENANCE
1. Use a damp cloth to clean the plastic
cabinet. A mild soap will help to
remove grease or oil. Never use
polish, solvents, abrasives or strong
detergents since these can damage
the finish.
2. Your phone should be situated away
from heat sources such as radiators,
heaters, stoves or any other
appliance that produces heat.
CAUTION
To reduce the risk of fire or injury to
persons, read and follow these
instructions:
1. Use only the battery specified in
this manual.
2. Do not dispose of the battery in a
fire. The cell may explode. Check
with local codes for possible special
disposal instructions.
3. Do not open or destroy the battery.
Released electrolyte is corrosive and
may cause damage to the eyes or
skin. It may be toxic if swallowed.
4. Exercise care in handling the battery
in order not to short the battery with
conducting material such as rings,
bracelets and keys. The battery or
conductor may overheat and cause
burns.
5. Recharge only the battery provided
with or identified for use with this
product. The battery may leak
corrosive electrolyte or explode if it
is not the correct type.
6. Do not attempt to rejuvenate the
battery provided with or identified
for use with this product by heating
them. Sudden release of the battery
electrolyte may occur causing burns
or irritation to eyes or skin.
7. When inserting the battery into this
product, the proper polarity or
direction must be observed.
Reverse insertion of batteries can
05278B-2 4
OWNER’S MANUAL# 39202 ver. 05278B-2
PAGE # 4 English Version
Page 5
o
conditions: (1) This device may not cause harmful interference, and (2) this device must
accept any interference received, including interference that may cause undesired operation.
Changes or modifications not expressly approved in writing by Northwestern Bell Phones may
Some cordless phones operate at frequencies that may cause interference to nearby TVs and VCRs;
prevent such interference, the base of the cordless phone should not be placed near
or on top of a TV or VCR; and, if interference is experienced, moving the cordless telephone
AC ADAPTOR: USE ONLY WITH CLASS 2 TRANSFORMER, RATED OUTPUT DC9V, 300 mA.
cause charging that may result in
leakage or explosion.
8. Do not store this product, or the
battery provided with or identified
for use with this product, in hightemperature areas. Batteries that are
stored in a freezer or refrigerator for
the purpose of extending shelf life
should be stabilized at room
temperature prior to use after cold
storage.
9. Disconnect telephone lines before
installing the battery.
FCC NOTICE
The FCC requires that you be advised of
certain requirements involving the use of
this telephone.
1. This telephone is hearing aid
compatible.
2. This equipment complies with Part
68 of the FCC rules. On the bottom
of this equipment is a label that
contains, among other information,
the FCC registration number and
Ringer Equivalence Number (REN)
for this equipment. If requested,
provide this information to your
telephone company.
3. The REN is useful to determine the
quantity of devices you may
connect to your telephone line and
still have all of those devices ring
when your number is called. In
most, but not all areas, the sum of
the RENs of all devices should not
exceed five (5.0). To be certain of the
number of devices you may connect
to your line, as determined by the
REN, you should call your local
telephone company to determine the
maximum REN for your calling area.
4. If your telephone causes harm to the
telephone network, the telephone
company may discontinue your
service temporarily. If possible, they
will notify you in advance. But if
advance notice is not practical, you
will be notified as soon as possible.
You will be advised of your right to
file a complaint with the FCC.
5. Your telephone company may make
changes to its facilities, equipment,
operations or procedures that could
affect the proper operation of your
equipment. If they do, you will be
given advance notice so as to give
you an opportunity to maintain
uninterrupted service.
6. If you experience trouble with the
telephone, please contact VTC
Service & Manufacturing CO. Inc. at
(800) 888-8990 or write to: VTC
customer Service, 16988 Gale Ave.,
City of Industry, CA 91745 for
repair/warranty information. The
telephone company may ask you to
disconnect this equipment from the
network until the problem has been
corrected or you are sure that the
equipment is not malfunctioning.
7. This equipment may not be used on
coin service provided by the
telephone company. Connection to
party lines is subject to state tariffs.
(Contact your state public utility
commission or corporation
commission for information.).
This device complies with Part 15 of the FCC Rules. Operation is subject to the following tw
Privacy of communications may not be insured when using this phone.
void the user’s authority to operate this equipment.
5 05278B-2
to minimize or
farther away from the TV or VCR will often reduce or eliminate the interference
OWNER’S MANUAL # 39202 ver. 05278B-2
PAGE # 5 English Version
Page 6

TABLE OF CONTENTS
IMPORTANT SERVICE INFORMATION _____________________________________________ 2
WARNING _____________________________________________________________________ 2
CARTON CONTENTS_____________________________________________________________ 2
IMPORTANT SAFETY INSTRUCTIONS_______________________________________________ 3
INSTALLATION PRECAUT IONS ____________________________________________________ 4
MAINTENANCE _________________________________________________________________ 4
CAUTION______________________________________________________________________ 4
FCC NOTICE ____________________________________________________________________ 5
EXCURSION® 39202 CONTROLS DIAGRAM ________________________________________________ 7
DESCRIPTIONS__________________________________________________________________ 8
PRE-INSTALLATION NOT ES______________________________________________________ 9
Installation _____________________________________________________________________ 9
POWER CONNECTION ___________________________________________________________ 10
TELEPHONE OPERATION___________________________________________________________ 10
Tone / Pulse(T/P) Dialing________________________________________________________ 10
Setting the Ringer Mode (Handset) _________________________________________________ 11
Placing a Call _________________________________________________________________ 11
To Receive a Call _____________________________________________________________ 11
Ending a Call __________________________________________________________________ 11
Last Number Redial_____________________________________________________________ 11
Flash _______________________________________________________________________ 11
Channel Selection (60 Channels)__________________________________________________ 11
Memory Dialing ______________________________________________________________ 12
Pause Function _______________________________________________________________ 12
Mute _______________________________________________________________________ 12
Page _______________________________________________________________________ 12
Low Battery Warning__________________________________________________________ 12
Out of Range Detection_________________________________________________________ 13
TECHNICAL INFORMATION _____________________________________________________ 13
Improving Cordless Reception____________________________________________________ 13
OPERATING RANGE____________________________________________________________ 14
GLOSSARY OF TERMS __________________________________________________________ 14
TROUBLESHOOTING____________________________________________________________ 16
05278B-2 6
OWNER’S MANUAL# 39202 ver. 05278B-2
PAGE # 6 English Version
Page 7
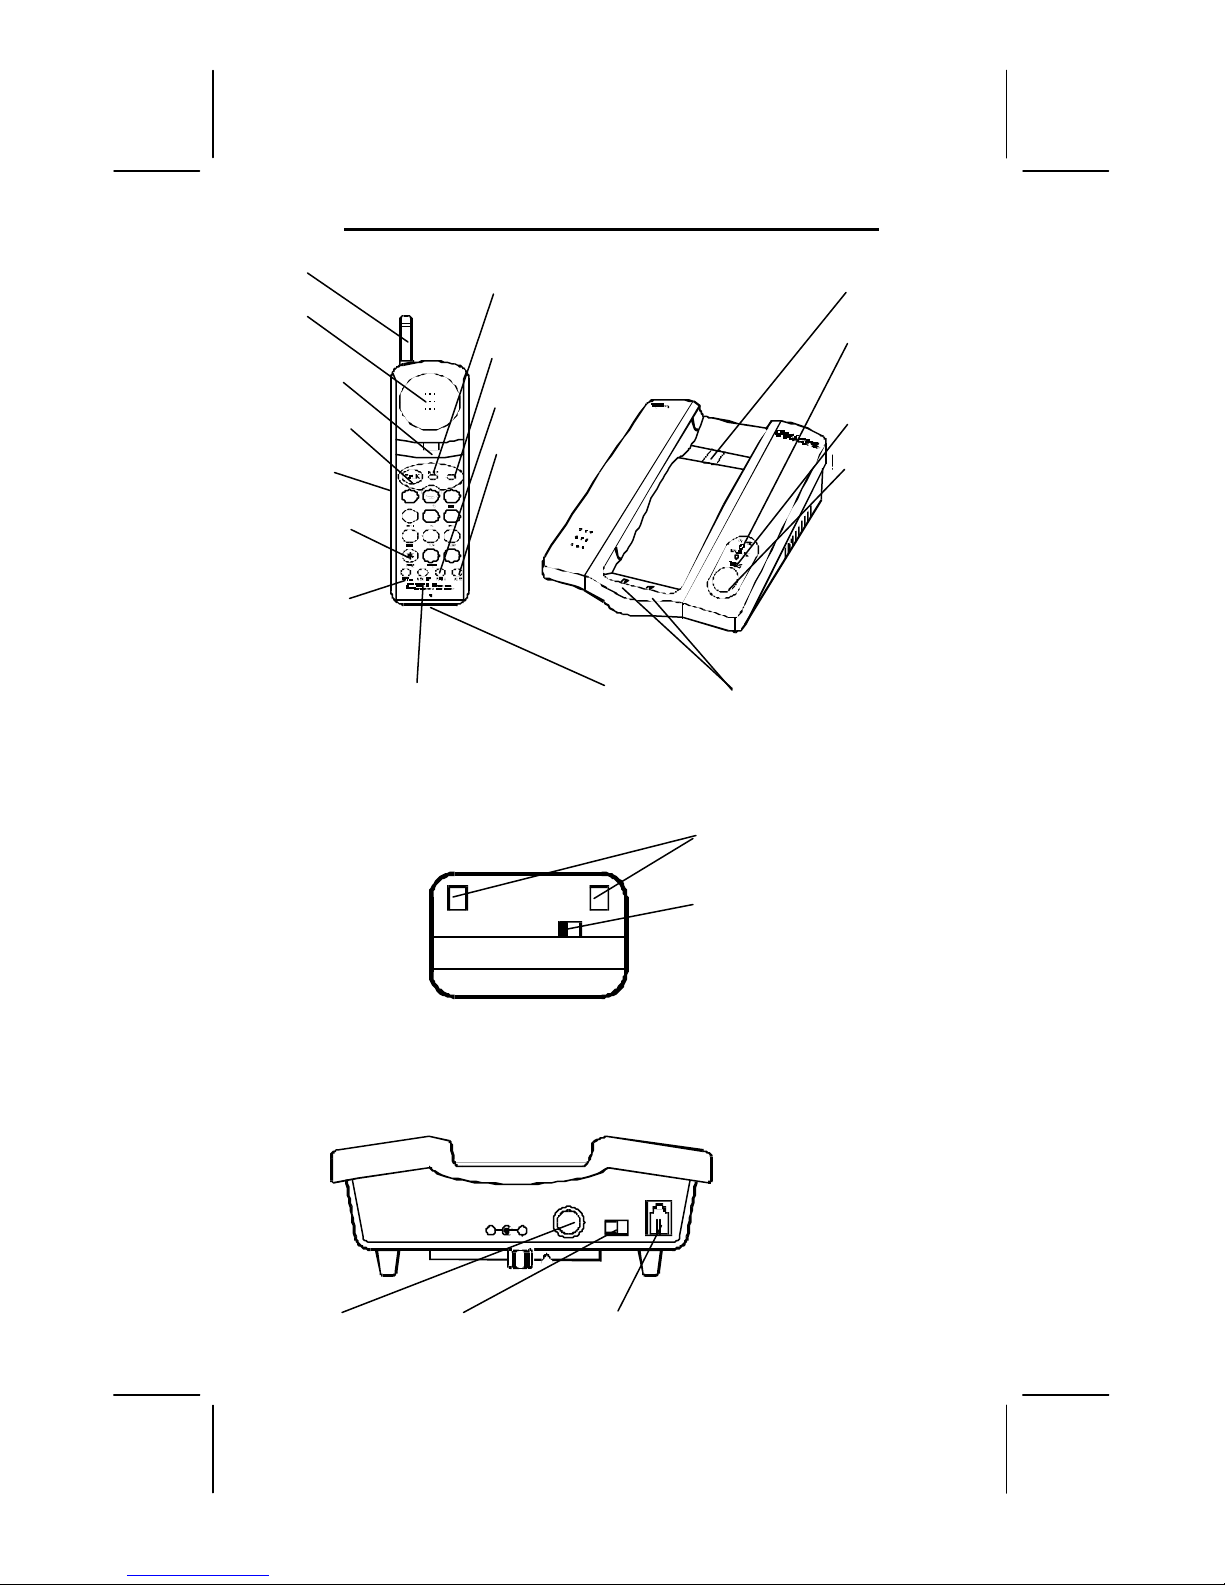
Antenna
Receiver
Handset
Retainer Slot
TALK Button
Headphone
Jack
TONE Button
RE/PA
(Redial/Pause
) Button
EXCURSION® 39202 CONTROLS DIAGRAM
IN USE LED
Indicator
CH (Channel)
Button
FLASH Button
MUTE Button
CH
2 31
5 64
8 97
0 #
MEMORY Button Microphone Charge Terminals
Handset (Rear
STANDBYSAVE
ON
Charge
Contacts
STAND BY
SAVE ON
Handset
Retainer Tab
IN USE LED
Indicator
CHARGE LED
Indicator
PAGE Button
DC9V Jack T/P (Tone/Pulse) TEL LINE Jack
7 05278B-2
Switch
OWNER’S MANUAL # 39202 ver. 05278B-2
PAGE # 7 English Version
Base Unit
(Rear view)
Use only with Class 2
Power Source 9VDC 300 mA
- +
9VDC
TEL.
T/P
Page 8

DESCRIPTIONS
HANDSET CONTROLS:
Belt Retainer Clip - For added
convenience, a handset belt clip is
included for portabilty.
Channel (CH) Button - Allows you to
manually select one of the 60 operating
channels when you experience
interference on the handset.
Charge contacts - Used for battery
charging. We recommend that you clean
these contacts periodically with an
alcohol-dampened cloth or cotton swab.
FLASH Button - Momentarily hangs up
the phone to access custom calling
features such as Call Waiting or ThreeWay Calling provided by your local
phone company.
Handset retainer slot - Allows you to
hang the handset on the base while in
the wall mount position.
IN USE LED indicator - Flashes while
the handset auto-scans, turns on when
the handset is in use, and turns off when
you end a call.
MEMORY button - Used for storing/
retrieving phone numbers to/from the 10
memory locations.
MUTE button - Allows you to
temporarily disable the handset
microphone.
RE/PA button - Automatically dials the
last phone number dialed up to 32 digits.
Also allows you to insert a 4 second
delay between dialed numbers in PABX
systems or long distance services.
SAVE ON/STANDBY Switch (Located
at the bottom of Handset) –Used to
05278B-2 8
OWNER’S MANUAL# 39202 ver. 05278B-2
PAGE # 8 English Version
disable the ringer on the handset and
activate the battery saving function. Set
on STANDBY for normal use, and SAVE
ON for battery saving function.
TALK button - Press this button to place
a call, answer a call, or end a call.
TONE (*) button- Pressing the star (*)
button provides tone dialing while using
a pulse dial service to access automated
banking services or any other service
requiring tone dialing.
BASE UNIT CONTROLS:
Charge Terminals - Used for battery
charging. We recommend that you clean
these contacts periodically with an
alcohol-moistened cloth or cotton swab.
CHARGE LED in dicator - Turns on
when the base unit is charging the
handset. Turns off when the handset is
removed from its cradle.
DC 9V jack (Located at rear of Base
Unit) -A jack located on the rear side of
the base unit used for connecting the
AC adaptor to the base unit.
Handset retainer tab - If the base unit is
to be placed in the wall mount position,
the handset retainer tab must be pulled
out, so that the tab allows the handset to
hang onto the base unit.
PAGE button - Allows you to locate the
handset when it is not on the base.
TONE/PULSE (T/P) switch (Located at
rear of Base Unit) - Allows you to set
the dialing setting to either Tone or Pulse
(rotary) dialing.
Wall Mount Bracket - Allows you to
mount the phone on the wall.
Page 9
Wall
nting
Slots
PRE-INSTALLATION
NOTES
• Ensure that the rechargeable Ni-Cad
battery pack is installed inside the
handset battery compartment.
• Set the STANDBY/SAVE ON switch
on the handset to the STANDBY
position for normal use.
• It is strongly recommended that the
Ni-Cad battery be fully charged for
at least 12 hours before initial use.
INSTALLATION
CAUTION: USE ONLY THE NICKEL
CADMIUM (Ni-Cad) BATTERY TYPE
INCLUDED WITH THIS UNIT. USE OF
OTHER BATTERY TYPES MAY CAUSE
INJURIES OR DAMAGE.
Desktop Use
1. Set the unit on the selected desktop
and connect the telephone line cord
to the TEL. line jack on the rear of
the base unit.
2. Connect the opposite end of
telephone line cord to the telephone
modular jack.
Wall Use
(with a standard AT&T or GTE modular wall
jack)
1. Connect the short telephone line
cord to the TEL. line jack on rear of
the base unit.
2. Install and attach the wall mount
bracket onto the bottom of the base.
3. Connect the opposite end of the
telephone line cord to the telephone
modular wall jack .
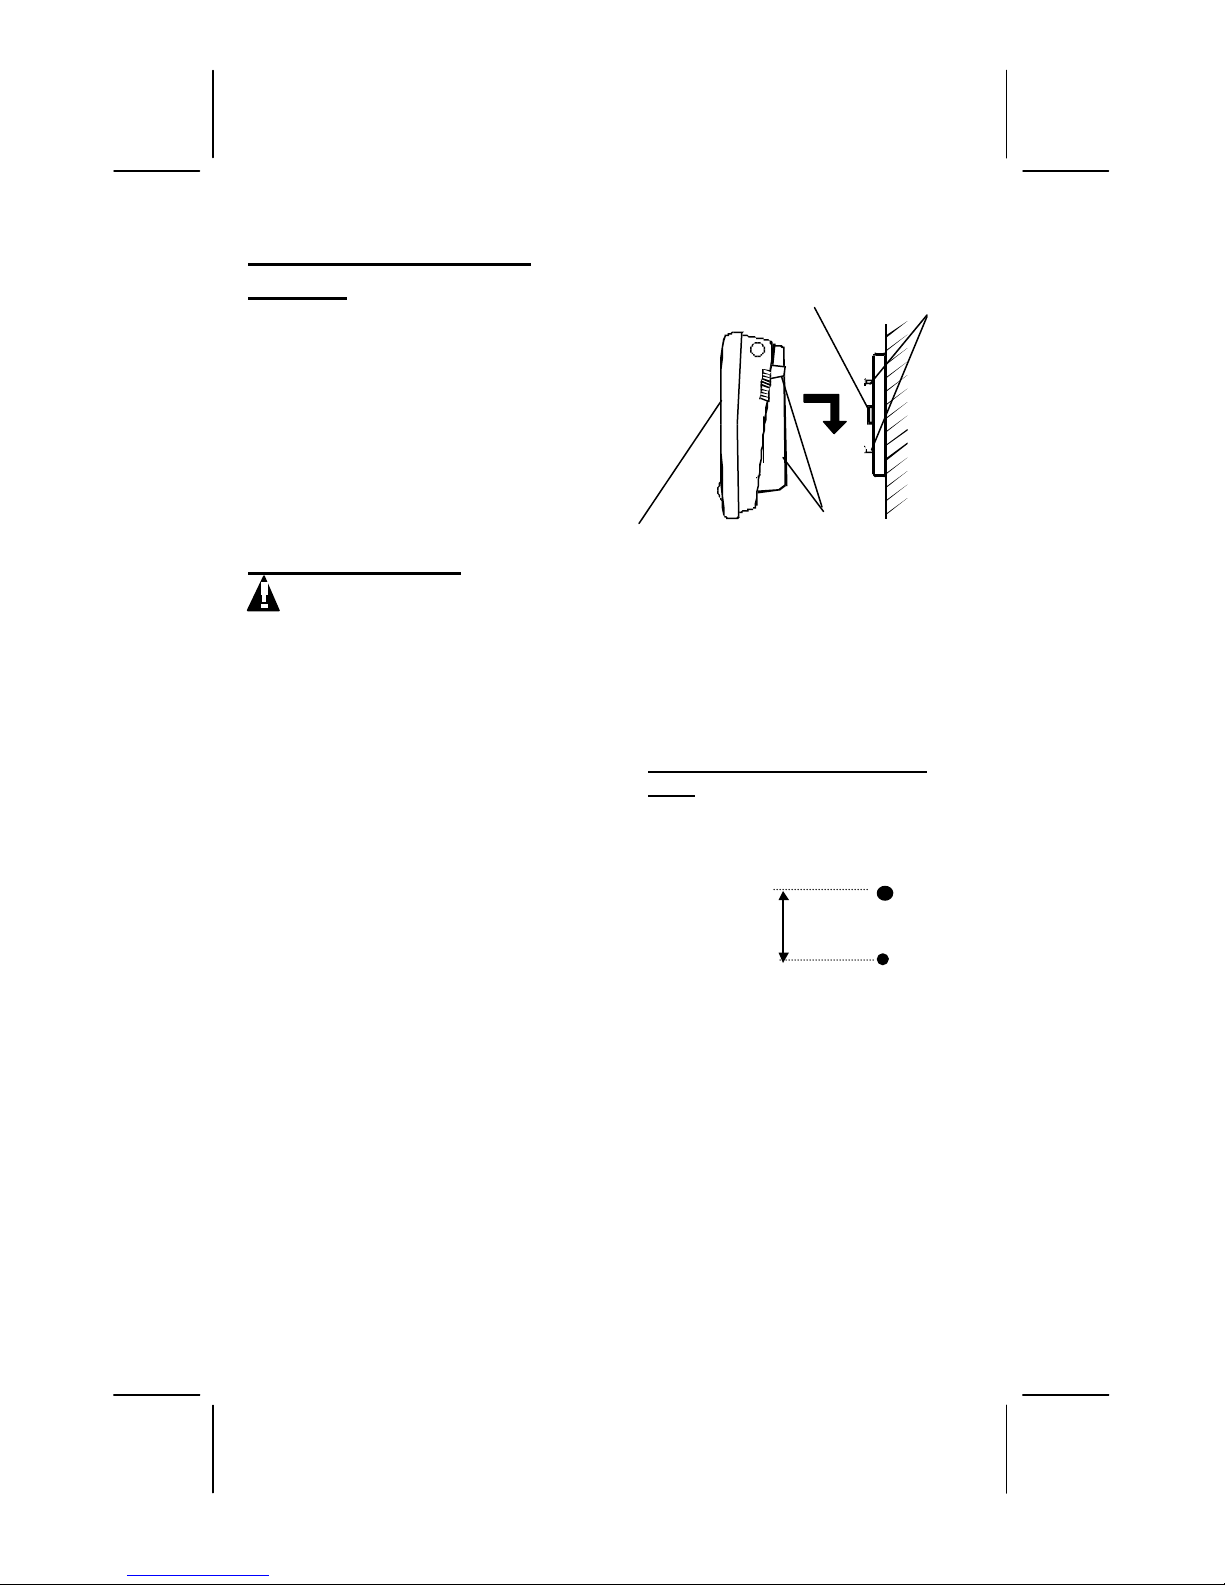
4. Align the wall mounting slots with
the studs located on the modular
wall plate and slide the base down
to lock in place. See figure 1. below.
9 05278B-2
OWNER’S MANUAL # 39202 ver. 05278B-2
PAGE # 9 English Version
Telephone
Modular
Wall Jack
Studs
Base Unit
(Side View)
Wall
Mount
Bracket
Mou
(Figure 1)
NOTE: If you do not have a standard
modular wall jack, have a qualified
technician mount one on the wall.
Wall Mounting (No Standard Wall
Jack) Drill two holes with a vertical
distance between the two marked
positions of 315/16
″ (100mm) as shown in
figure 2.
315/16
″
(100mm)
(Figure 2)
1. Drive a screw into each of the holes.
Tighten them to the end of the screw lines,
only leaving the smooth part of the screw
head outside the wall.
2. Hang the unit onto the screws, then
slide it down firmly to fasten the
base securely.
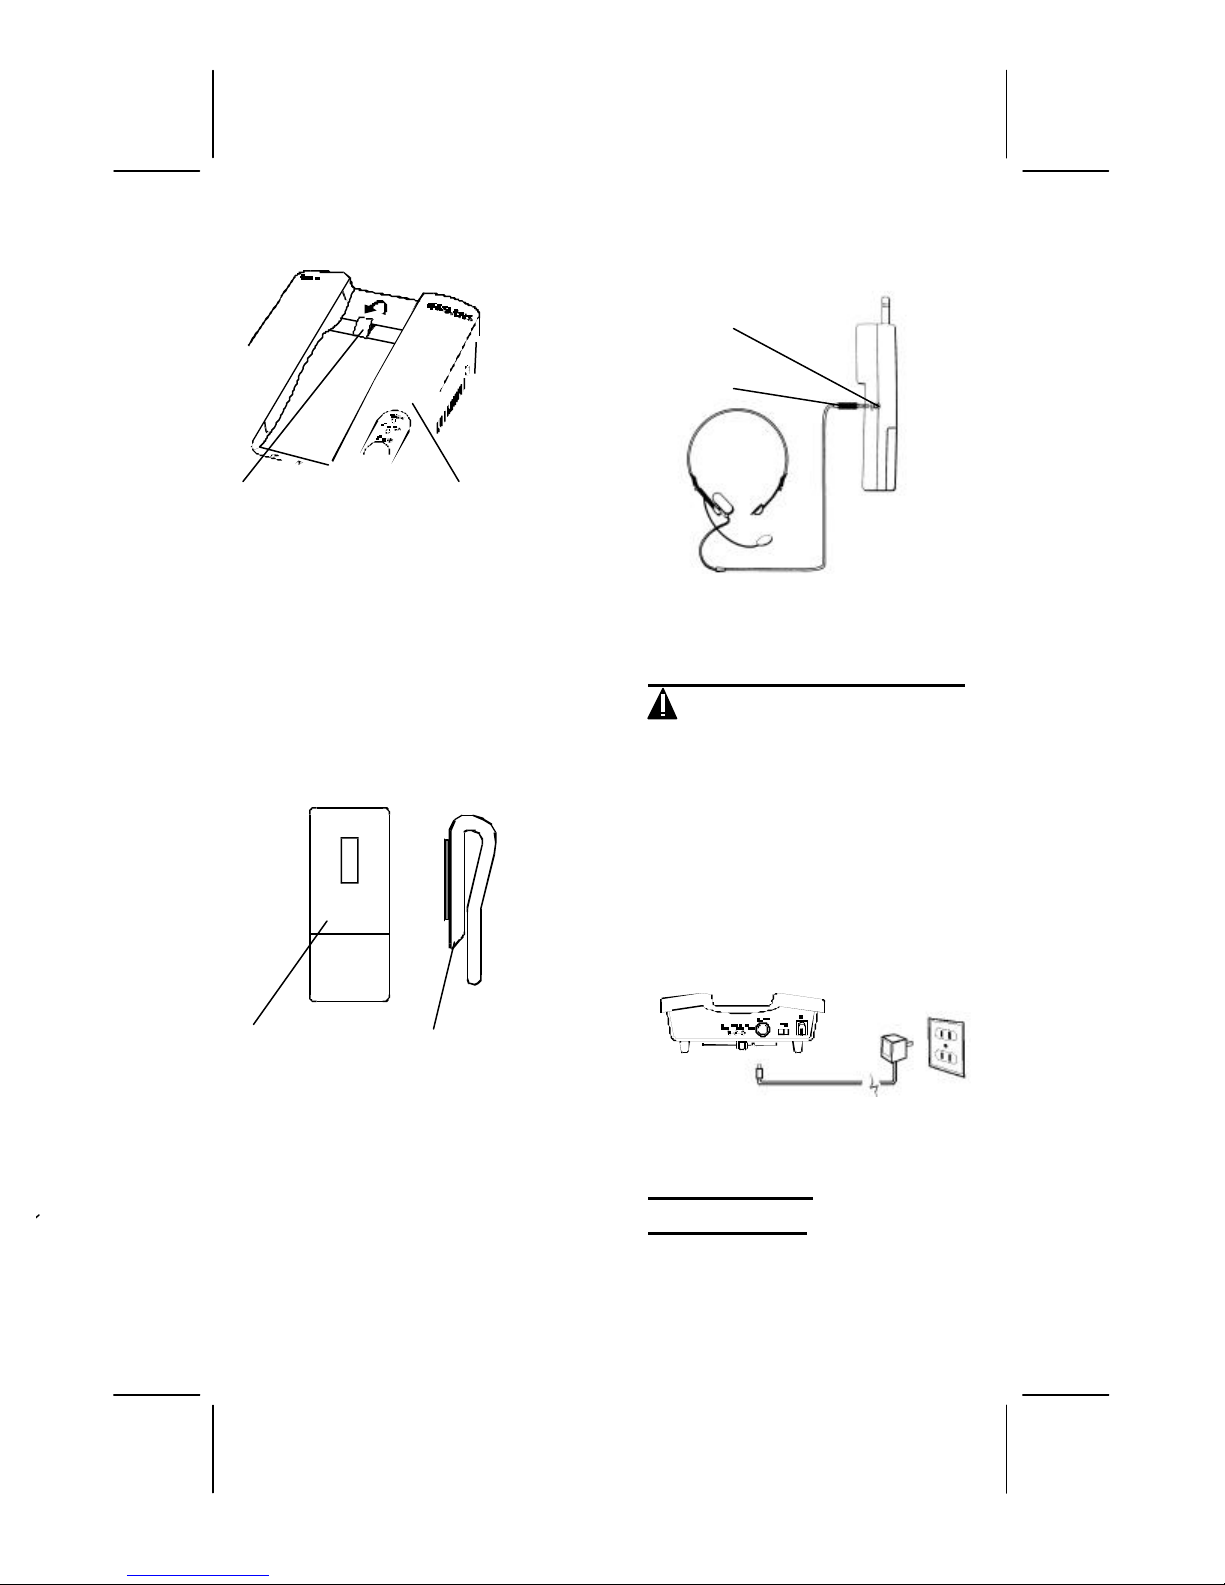
Handset Retainer Tab Setup
If the base unit is to be placed in the wall
mount position, the handset retainer tab
must be pulled out so that the tab allows
Page 10
Handset Retainer Tab Base
the handset to hang onto the base unit,
as shown in figure 3.
(Figure 3)
Belt Clip Instructions
1. Wipe clean the back of the handset
where the belt clip is to be applied.
2. Remove paper backing from
adhesive strip.
3. Position the clip as shown below.
4. Do not use the belt clip until the
adhesive sets fully in three hours.
Handset (Rear View) Belt Clip
(Figure 4)
Connecting the Headset to the Handset
For hands free conversation, a headset
(not included) can be connected to the
headset jack as shown. The handset
receiver and microphone are disabled
then the headset in connected. See
figure 5.
• Press the TALK button or
appropriate line to answer or place a
05278B-2 10
OWNER’S MANUAL# 39202 ver. 05278B-2
PAGE # 10 English Version
call using the headset. Refer to the
manufacture’s headset manual for
more details.
Headset Jack
Headset Plug
(2.5mm)
(Figure 5)
POWER CONNECTION
CAUTION: Use only with Class II
AC Adaptor with a rating of AC 120V
input, DC 9V, 300 mA output with a
center tip that is positive. The adaptor
plug should correctly fit the base unit’s
DC 9V jack .
1. Plug the AC adaptor into a standard
AC outlet.
2. Connect the small adaptor plug into
the DC 9V jack on the rear of the
base.
(Figure 6)
TELEPHONE
OPERATION
Tone / Pulse (T/P) Dialing
• If your home is equipped with tone
dialing service, set the Tone / Pulse
(T/P) switch to Tone (T) position.
Page 11

• If you have a pulse(rotary) dialing
service, set the Tone / Pulse (T/P)
switch to Pulse (P) position.
Mixed Dialing (Temporary Tone Dialing
If you only have pulse (rotary dialing)
service in your area and want to access
Tone services, set the TONE/PULSE
switch to the PULSE position. Dial the
desired number and when tone signals
are required press the TONE (*) button
once. Subsequent digits will be dialed in
tone. Dialing will reset to PULSE when
handset is returned on-hook.
Setting the Ringer Mode (Handset)
You can set the handset to the following
settings:
• RINGER ON - The handset rings
when receiving incoming calls.
This setting allows you to place
and receive calls.
NOTES:
• For normal use, always set the
RINGER switch to the RINGER
ON position.
• The handset will not ring or
receive a page while in RINGER
OFF setting.
Placing a Call
1. Pick up the handset and press the
TALK button. The Excursion® 39202
will automatically scan for the best
channel available, as indicated by
the flashing handset IN USE LED
indicator.
2. Once it finds a clear channel, the IN
USE LED indicator will light solid
and a dial tone can be heard. You
can then dial the desired phone
number on the handset keypad.
To Receive a Call
If the handset is on the base
• Since the Excursion 39202 features
“Auto-Answer,” when an incoming
call is received and the handset is
lifted from the base unit, the handset
will automatically answer the call
without the TALK button being
pressed.
If the handset is not on the base:
• Press the TALK button on the
handset and start conversation with
the caller.
NOTE: Make sure that the handset
STANDBY/SAVE ON switch is in the
STANDBY position.
Ending a Call
Upon completion of a call, you can hang
up the Excursion® 39202 by returning the
handset back into its cradle on the base
unit (this feature is also called AutoStandby), or by pressing the TALK
button on the handset.
Last Num ber Redial
The last number redial feature may be
used to dial the last number called (up to
32 digits).
1. Press the TALK button and listen
for the dial tone.
2. Press the RE/PA button. The phone
number dialed previously will be
dialed out automatically.
Flash
Pressing the FLASH button (while the
phone line is in use) momentarily hangs
up the phone to access custom calling
features such as Call Waiting or ThreeWay Calling provided by your local
phone company. For other Custom
Calling features, refer to the instructions
provided by your local phone company.
Channel Selection (60 Channels)
Channel Scan (Auto-Scan)
• If you are receiving a call or dialing
out and TALK is pressed, the
Excursion® 39202 auto-scans for the
best channel available.
11 05278B-2
OWNER’S MANUAL # 39202 ver. 05278B-2
PAGE # 11 English Version
Page 12

Channel Scan (Manual Scan)
If the existing channel becomes noisy or
starts having interference, press the
Channel (CH) button on the handset.
The Excursion® 39202 will automatically
scan for the best channel available.
NOTE: It takes about 2 seconds for the
unit to scan to the next clear channel.
Memory Dialing
You can store and recall up to 10
frequently called telephone numbers in
memory(up to 22 digits).
Storing Telephone Numbers into
Memory
1. Ensure that the handset is in
standby (the phone is hung up).
2. Press the MEMORY button on the
handset.
3. Enter the phone number to be stored
into memory.
4. Press the MEMORY button again.
5. Press the desired one-digit memory
location (from 0 to 9).
6. To store more phone numbers or
modify existing numbers in memory,
repeat steps 1-6.
NOTE : Refer to the Pause Function
section for storing pauses.
Dialing a Number Stored from
1. Pick up the handset and press the
TALK button.
2. Press the MEMORY button.
3. Press the desired one-digit memory
location (from 0 to 9).
NOTE: If you have difficulty storing or
recalling numbers from memory, refer to
the “Troubleshooting” chart of this user
manual.
Changing Stored Phone Numbers
• Follow the steps described in
“Storing Telephone Numbers into
• The new phone number will
automatically replace the previous
one.
Pause Function
If you need a pause in the memory
dialing sequence, you can store a four second pause in the number you are
storing into memory. To insert a pause,
press the RE/PA button once for a 4
second pause while storing a phone
number into memory. For longer pauses,
press the RE/PA button a few more
times.
Mute
When the MUTE button is held down
during a phone conversation, you will
hear the caller, but the caller will not hear
you.
1. Press and hold the MUTE button to
temporarily disable the handset
microphone.
2. Relase the MUTE button to enable
the handset microphone.
Page
This feature allows you to locate the
handset when it is not on the base,
should it be misplaced or lost.
1. Press the PAGE button on the base
unit. The IN USE LED indicator on
both units will flash.
2. The handset will start beeping to
allow you locate the handset.
Low Battery Warning
• When the handset battery voltage
level is low, the handset will beep
twice every 1 minute and the
handset IN USE LED indicator
will flash.
• The call will be disconnected after
about 4 minutes. Return the
handset to its cradle on the base
to rechanrge.
05278B-2 12
OWNER’S MANUAL# 39202 ver. 05278B-2
PAGE # 12 English Version
Page 13

1 Million Combination Security
The Excursion® 39202 uses a digital
coding security system to prevent
unauthorized use of your telephone line
by other cordless phones nearby. The
Excursion® 39202 has 1 million possible
security code combinations. Each
combination of the code is randomly
generated every time the handset is
picked up.
Resetting Security Code and Channel
Information
Communication between the handset
and the base unit may not be possible in
any of the following situations:
• After a power failure.
• After relocating the base unit by
disconnecting the AC adaptor.
• After replacing the handset battery.
• The handset goes out of range from
the base unit.
To reset, place the handset on the
charge cradle of the base unit for five
seconds, a beep will be heard.
Out of Range Detection
The Excursion® 39202 is equipped with
an Out of Range detection system. If
you go too far away from the base
during a call the handset may lose link
with the base. When this happens, the
handset will beep several times every 5
seconds.
If you hear this warning signal, you
should come closer to the base unit.
TECHNICAL
INFORMATION
This cordless phone uses radio
frequencies to allow mobility. There are
certain difficulties in using radio
frequencies with a cordless telephone.
While these are normal, the following
could affect the operation of your
system.
Noise
Electric pulse noise is present in most
homes at one time or another. This noise
is most intense during electrical storms.
Certain kinds of electric equipment such
as light dimmers, fluorescent bulbs,
motors, and fans also generate noise
pulses. Because radio frequencies are
susceptible to these noise pulses, you
may occasionally hear them in your
handset. Generally they are a minor
annoyance and should not be
interpreted as a defect in your system.
Range
Because radio frequencies are used,
location of the base unit can affect
operating range. Try several locations in
your home or business and pick the one
that gives you the clearest signal.
Interference
Some electronic devices operate in
and/or generate interference near the
operating frequencies of your cordless
telephone. While several protection
circuits are used to prevent unwanted
signals, there may be periods when these
unwanted signals cause interference. If
interference occurs frequently, it can be
minimized by relocating the base unit.
You can check for interference before
selecting the final base unit location by
plugging in the phone.
Improving Cordless Reception
Follow these guidelines to improve
cordless sound quality:
• Select an area to install the
Excursion® 39202 where it is closest
to the center of your home or office.
This will improve the operating
range of the unit.
13 05278B-2
OWNER’S MANUAL # 39202 ver. 05278B-2
PAGE # 13 English Version
Page 14

• Keep the Excursion® 39202 base unit
away from electrical equipment.
Radio Frequency Interference (RFI)
is sometimes generated by these
appliances, which can cause a
degradation in cordless reception.
• Keep the handset batteries charged
as much as possible. Weak handset
batteries can limit the range of
cordless operation.
Maximizing Ni-Cad Battery Life
Repeated use or recharge of Ni-Cad
batteries without periodic full discharge
results in reduced useable charge time.
When you notice the usable charge
duration decreasing, fully discharge the
Ni-Cad battery and recharge as
described.
Discharging
Unplug the telephone line cord from the
Excursion® 39202.
1. Make sure that the AC Adaptor is
connected.
2. Press the TALK button of the
handset (IN USE indicator should
light).
3. Place the handset out of the base
cradle to start discharging.
4. Once the IN USE indicator starts
flashing, it means that the battery
level is low. Let it fully discharge
for 12 hours. Once the Ni-Cad
battery is fully discharged, you may
now charge the battery to its full
capacity.
5. Discharge and charge the Ni-Cad
battery again once you notice a
decrease in the useable charge time.
CAUTION: Do not discharge the Ni-Cad
battery by shorting its positive and
negative terminals together. An
explosion may occur, causing possible
injury.
Charging
1. Make sure the AC adaptor and
telephone line cord is connected to
the Excursion® 39202.
2. Place the handset on the base
cradle. The CHARGE indicator will
light steadily.
3. Leave the handset charging on the
base for 12 hours continuously to
get a maximum charge.
4. The Excursion® 39202 is now ready
for regular use.
OPERATING RANGE
The phone operates at the maximum
radio frequency allowed by the Federal
Communications Commission (FCC).
Even so, the maximum operating range
may be limited because of conditions like
weather, construction of the building,
and interference from other sources.
GLOSSARY OF TERMS
Automatic Digital Security Coding -A
digital code security system (up to 1
million random code combinations) that
is automatically generated to prevent use
of your telephone line by other cordless
phones nearby.
Auto-Scan - Upon picking up the
handset and pressing the TALK button,
the Excursion® 39202 automatically scans
for the best channel. There are 60
channels available.
Auto-Standby - The handset
automatically goes into the standby
setting (on-hook) when the handset is
returned to the base unit.
Compander Noise Reduction- Reduces
background noise.
Flash - If you subscribe to phone
company special services like Call
Waiting or Call Forwarding, pressing the
05278B-2 14
OWNER’S MANUAL# 39202 ver. 05278B-2
PAGE # 14 English Version
Page 15

FLASH button will momentarily hang up
the phone to access these services.
Hearing Aid Compatible – Allows
hearing aid devices to function properly
while using the handset.
Mixed Dialing (Temporary Tone
Dialing) - The Excursion® 39202 can
provide tone dialing while using a pulse
dial service to access automated banking
services or any other service requiring
tone dialing.
Ringer Equivalence Number (REN) -
This is a number located underneath the
base of your phone(s) or phone-related
device. The REN is used to determine
how many phones can be connected to
the same telephone line while still having
all those devices ring when you receive a
call. In most areas, but not all areas, the
REN total of all devices should not
exceed five (5). Call your local phone
company to determine the maximum REN
for your calling area.
15 05278B-2
OWNER’S MANUAL # 39202 ver. 05278B-2
PAGE # 15 English Version
Page 16
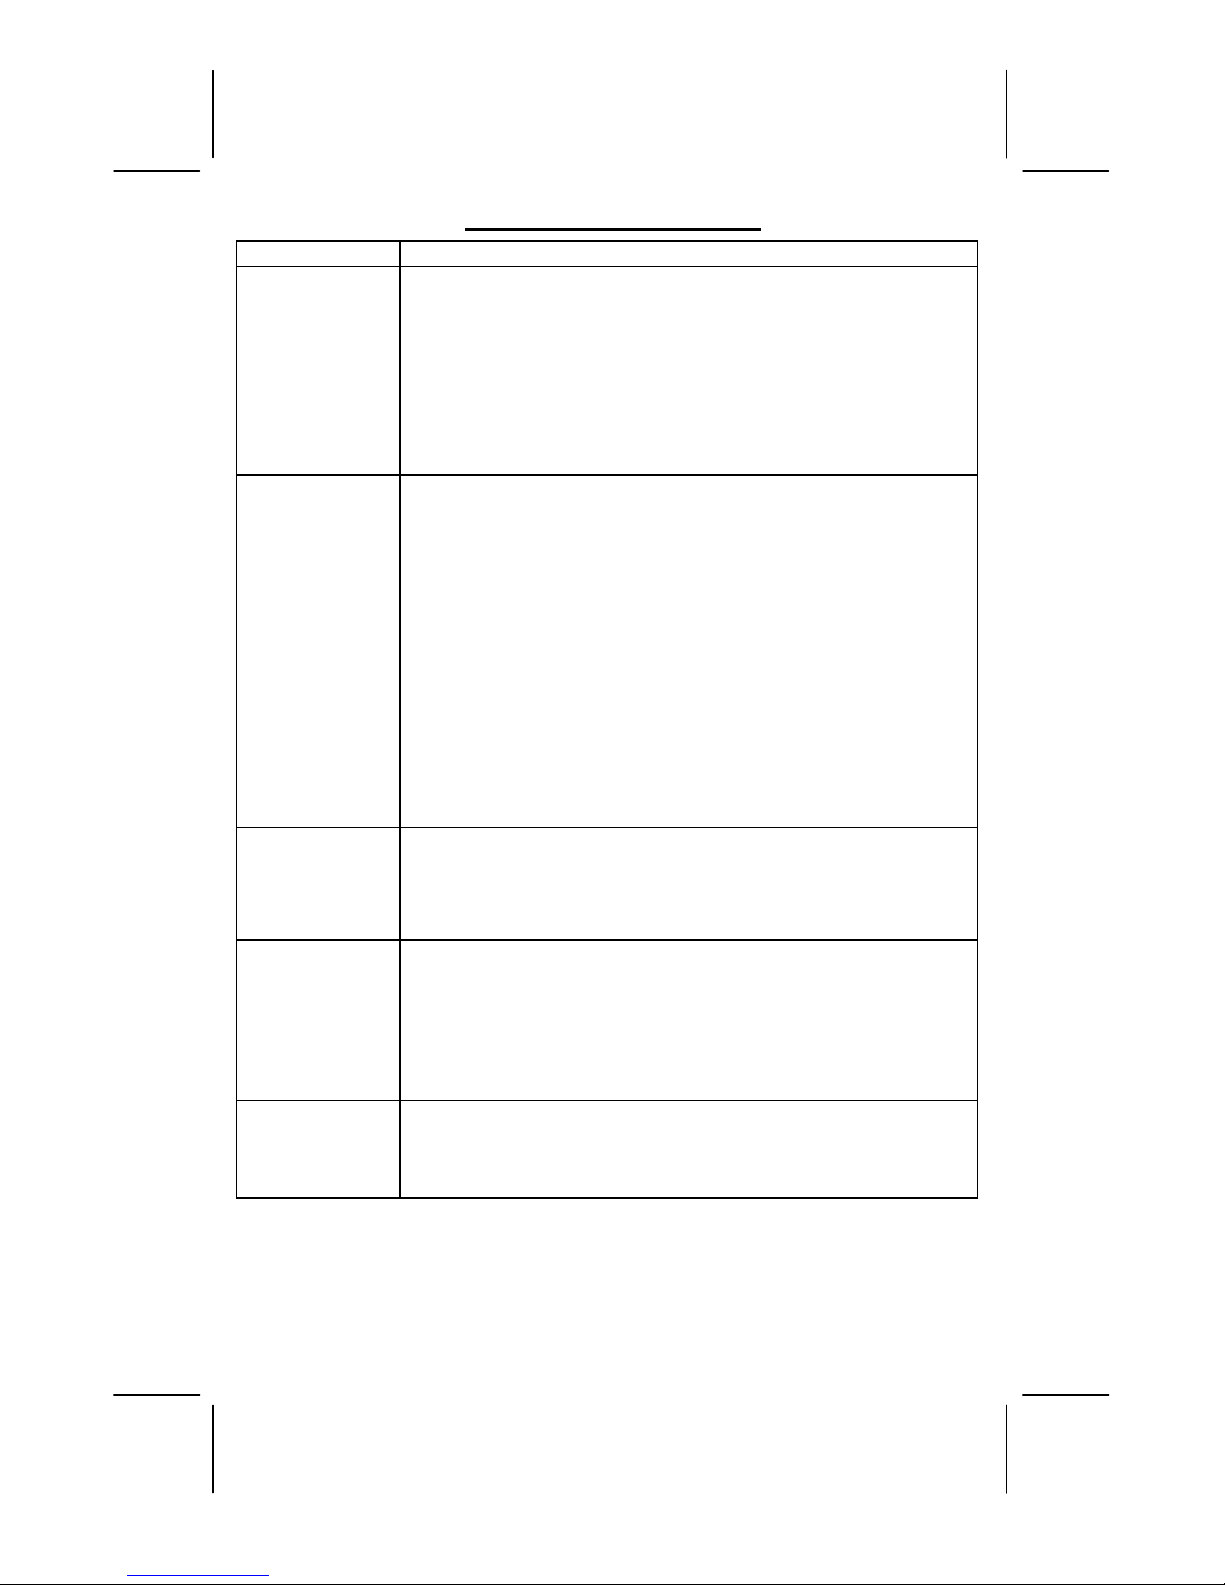
TROUBLESHOOTING
SYMPTOM SOLUTION
No dial tone
• Check to see if the Ni-Cad battery is properly connected inside
the handset battery compartment.
• Make sure that the adaptor plug is connected to the base unit.
• Check for the telephone line cord connections. Ensure that both
connectors are plugged securely on the jacks.
• Test the phone at a different telephone wall jack and listen for a
dial tone.
• Test a different phone in the wall jack and listen for a dial tone.
Handset will not
ring
• Check the handset STANDBY/SAVE ON switch. It may be in the
SAVE ON position, this setting disables the handset ringer. Set
the switch to STANDBY for normal use.
• The phone or another phone connected to the same line may be
in the off-hook (in-use) position. Place the phone in the onhook (hung-up) position to receive incoming calls.
• Try a different phone; if the problem still exists, the fault is not
with the unit.
• Look for the Ringer Equivalence Number (REN) number printed
underneath your phone(s). Sum up the total REN numbers for all
the phones or answering machines connected to your telephone
line. Your phone(s) may not ring if the REN total exceeds five
(5). Please call your local company to determine the maximum
REN for your calling area.
Static • The Ni-Cad battery might be weak. Allow the Ni-Cad battery to
charge fully before using.
• Try a different phone; if the problem still exists, the fault is not
with the unit.
Cannot dial out • Press the TALK button on the handset and listen for a dial tone
before dialing out.
• Are you in a rotary only area? Move the TONE / PULSE switch
to PULSE.
• Try a different phone in the jack. If the problem persists, the
fault is not in the 39202.
The handset
does not stay on
the base unit in
wall use position
• The handset retainer tab must be pulled out to allow the handset
to hang on to the base unit in the wall mount position. Refer to
the “Handset Retainer Tab Installation” for more details.
05278B-2 16
OWNER’S MANUAL# 39202 ver. 05278B-2
PAGE # 16 English Version
Page 17
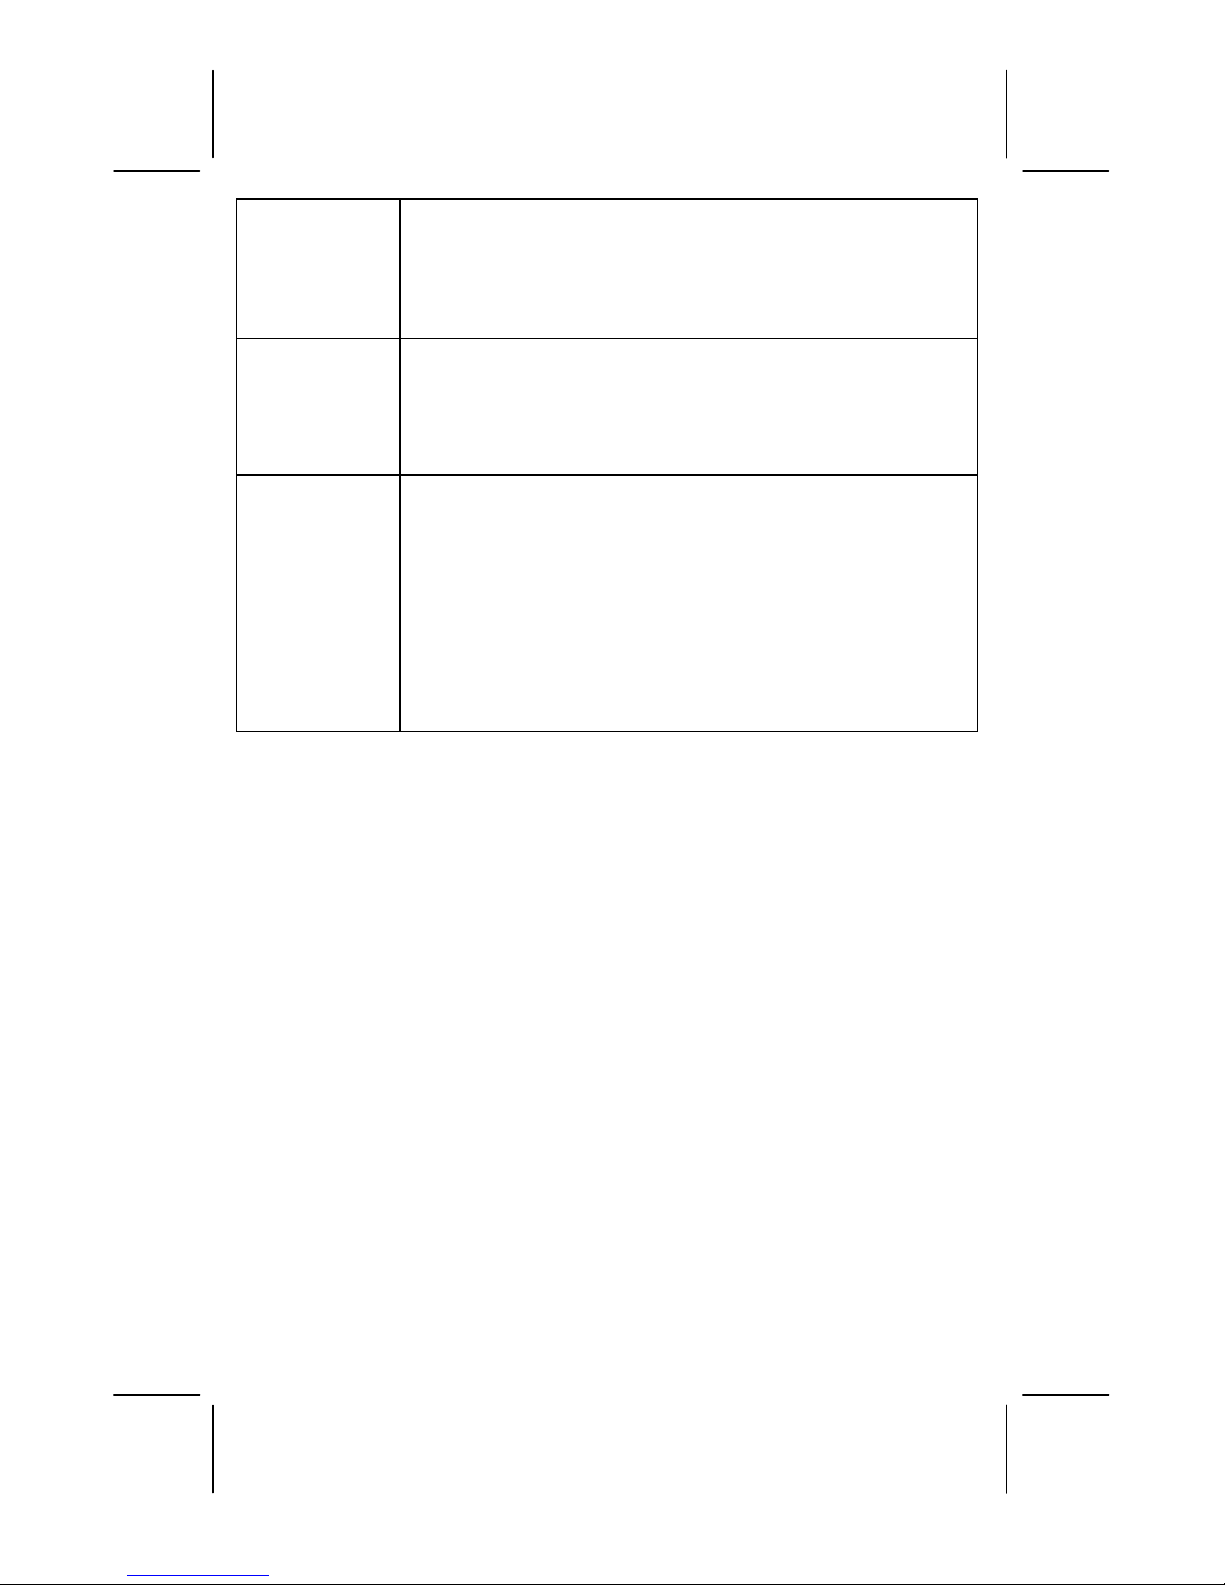
Memory feature
does not work
No link between
the base and
handset.
The unit locks up
and becomes
inoperable
• Make sure that the unit is in the standby (hung up) before
storing a phone number.
• The maximum number of digits that you can store for each
memory location is 22 digits. See the “Memory Dialing” section
for more details.
• You may have taken the handset at a distance away from the
base that is beyond its normal operating range. Refer the section
“Operating Range” in the manual for more details.
• Place handset back in the cradle for 5 seconds to reset the unit’s
security code.
• In the unlikely event that the unit locks up and becomes
inoperable, you can reset the system by momentarily
disconnecting and reconnecting the handset battery.
Afterwards, return the handset to its cradle on the base unit for
at least 5 seconds to reset the security code before using the
unit.
• Should a power outage occur while the handset is away from the
base unit, the handset must be returned to its cradle on the base
unit for at least five seconds to reset the security code when
power is resumed.
17 05278B-2
OWNER’S MANUAL # 39202 ver. 05278B-2
PAGE # 17 English Version
Page 18

PAGE # 18 English Version
NOTES:
05278B-2 18
OWNER’S MANUAL# 39202 ver. 05278B-2
Page 19

NOTES:
19 05278B-2
OWNER’S MANUAL# 39202 ver. 05278B-2
PAGE # 19 English Version
Page 20

PAGE # 20 English Version
05278B-2 20
OWNER’S MANUAL# 39202 ver. 05278B-2
Page 21

Distributed Exclusively Worldwide by Unical Enterprises, Inc., Industry, California, USA
39202K/05278B-2
21 05278B-2
OWNER’S MANUAL# 39202 ver. 05278B-2
PAGE # 21 English Version
 Loading...