

Page 1
www.northsta rnav.com
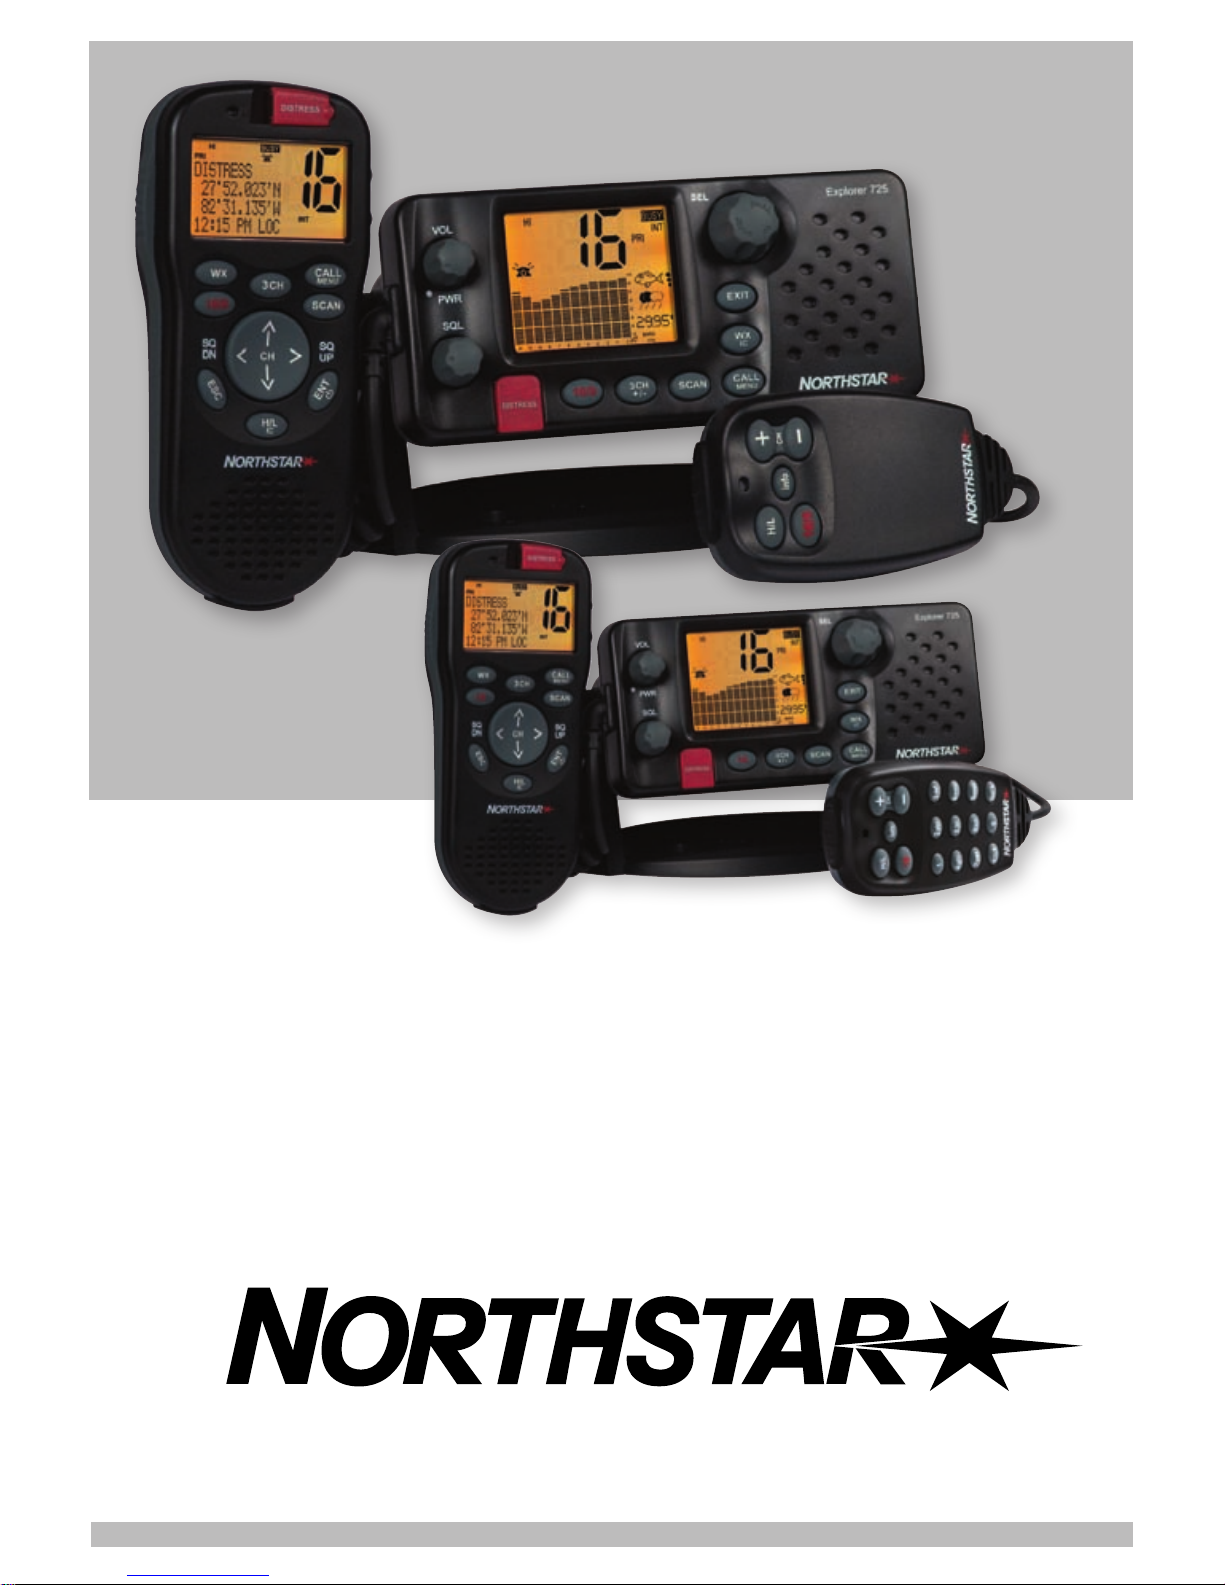
Explorer 725 / 705
VHF Marine Radio
Quickstart Guide
Page 2

This Quickstart Guide is to be used with the Northstar Explorer 721
VHF Radio Installation and Operation Manual. The Explorer 721 and
Explorer 725 function identically except for where noted in this QSG.
Consult the Installation and Operation Manual for further information
on the options described in this Quickstart Guide, and for information
on other options; including radio setup and different DSC call types
and options, troubleshooting, and channel charts.
Page 3
FCC Statement
Note: This equipment has been tested and found to comply with the limits for a Class B digital
device, pursuant to Part 15 of the FCC Rules. These limits are designed to provide reasonable
protection against harmful interference in a normal installation. This equipment generates,
uses and can radiate radio frequency energy and, if not installed and used in accordance with
the instructions, may cause harmful interference to radio communications. However, there is
no guarantee that interference will not occur in a particular installation. If this equipment does
cause harmful interference to radio or television reception, which can be determined by turning
the equipment off and on, the user is encouraged to try to correct the interference by one or
more of the following measures:
Reorient or relocate the receiving antenna.
Increase the separation between the equipment and receiver.
Connect the equipment into an output on a circuit different from that to which the receiver
is connected.
Consult the dealer or an experienced technician for help.
A shielded cable must be used when connecting a peripheral to the serial ports.
Industry Canada
Operation is subject to the following two conditions: (1) this device may not cause
interference, and (2) this device must accept any interference, including interference that may
cause undesired operation of the device.
It is the owner’s sole responsibility to install and use the instrument in such a manner that will
not cause accidents, personal injury or property damage.
Navico Holding AS. and its subsidiaries, branches and affiliates disclaim all liability for any
use of this product in a way that may cause accidents, damage or that may violate the law.
Governing Language: This statement, any instruction manuals, user guides and other
information relating to the product (Documentation) may be translated to, or has been
translated from, another language (Translation). In the event of any conflict between any
Translation of Documentation, the English language version of the Documentation will be the
official version of the Documentation.
This manual represents the product at the time of printing. Navico Holding AS. and its
subsidiaries, branches and affiliates reserve the right to make changes to specifications
without notice.
Copyright © 2008 Navico Holding AS. Northstar™ is a registered trademark of Navico Holding
AS.
Page 4
Check out your Explorer 725/705 model
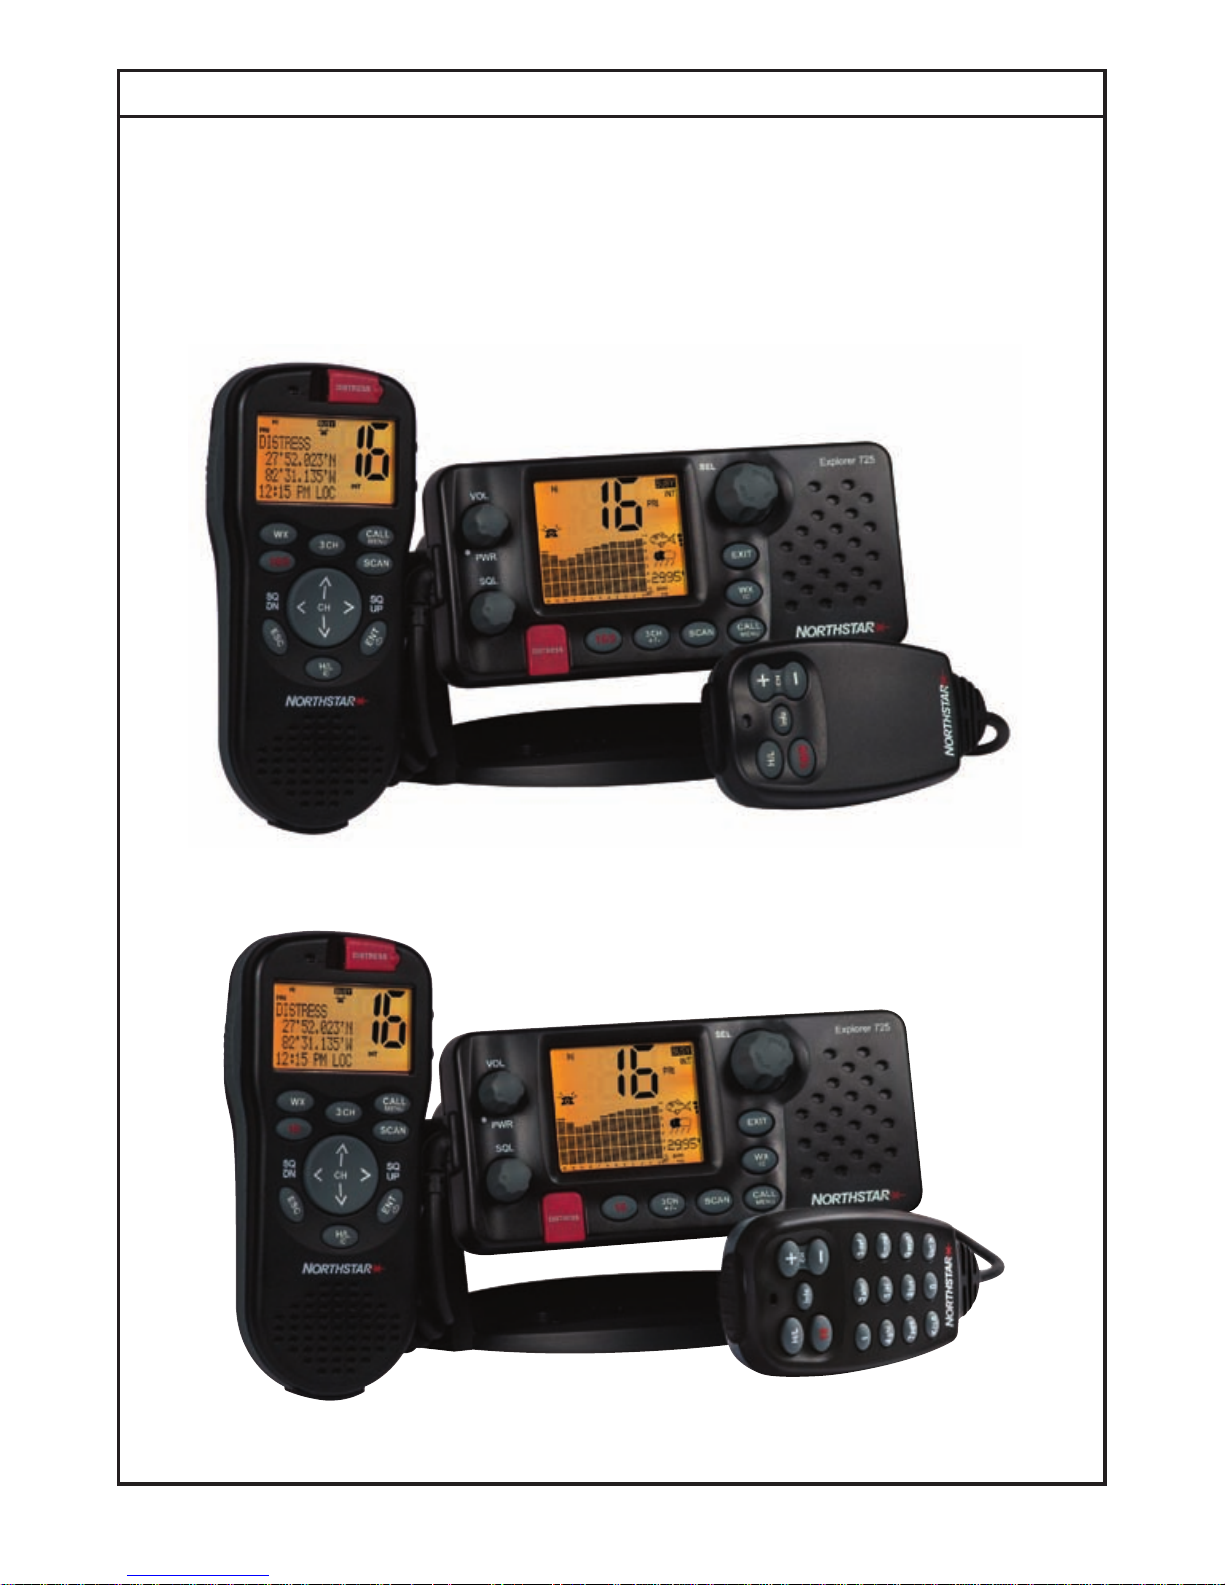
There are slight variations in the keys between the Explorer 725US and 725EU models, and some
features are not available on both models.
An optional handset can also be purchased and used with your Explorer 725. There are two
versions - the Northstar 705US handset (for use with the Northstar 725US model) and the Northstar
705EU handset (for use with the Northstar 725EU model).
This Quickstart Guide covers BOTH models of the Explorer 725, with or without the optional
handsets.
Northstar Explorer 725EU pictured with 705EU optional handset
Northstar Explorer 725US pictured with 705US optional handset
Page 5
Northstar Explorer 725/705 Quickstart Guide
5
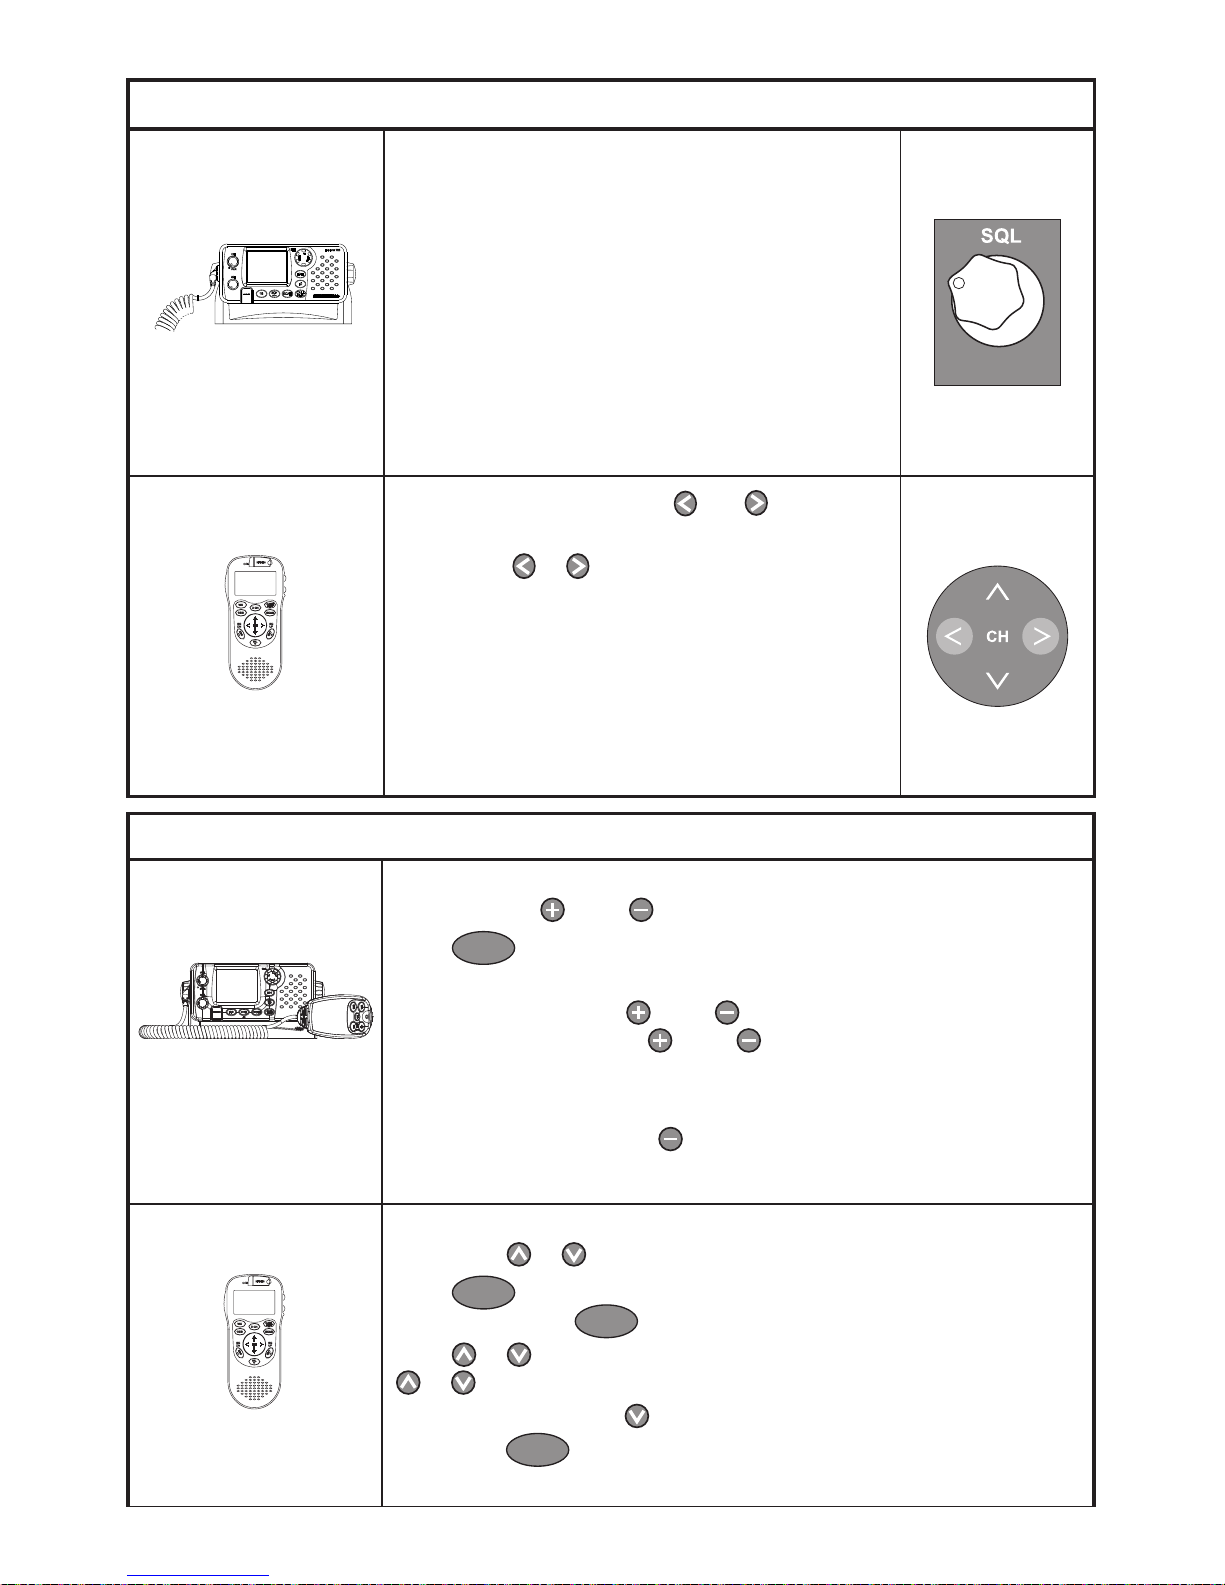
Turn the unit ON/OFF and adjust the volume
Base Unit
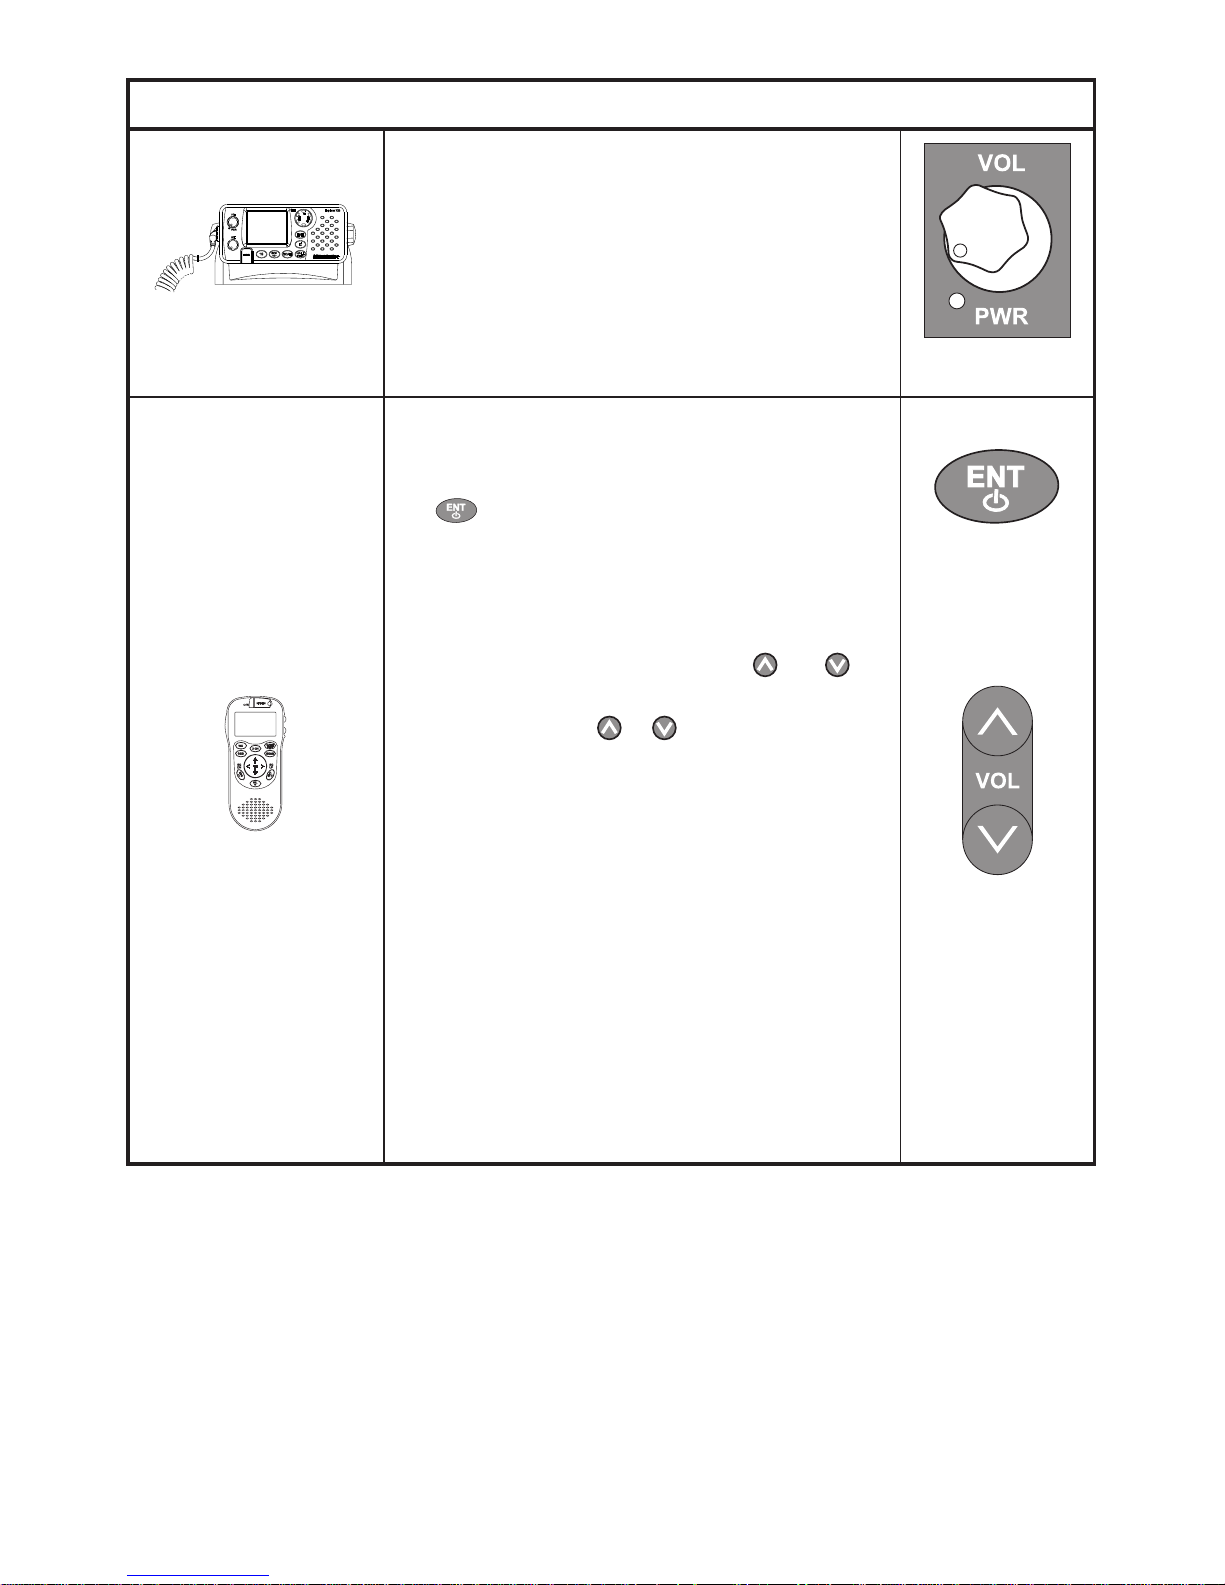
1 To turn the base unit ON, turn the VOL knob
clockwise. Turn counter-clockwise to turn the
base OFF.
2 Continue to turn until a comfortable volume
is reached on the base speaker.
Optional Handset
1. Ensure the handset is fully charged, and the
base unit is turned ON.
2. To turn the handset ON, press and hold the
button. To turn the handset OFF, press
and hold again until the unit turns off.
3. When turned on, the handset will search for
the base unit and establish the wireless link.
This should take only a few seconds.
4. Adjust the volume with the VOL
and
keys on the righthand side of the handset.
Hold down VOL
or to rapidly increase
or decrease the volume or press quickly to
step through the 8 different volume levels.
This will not change the volume on the base
unit speaker.
NOTE: The optional Handset functions with the
base unit. It can not operate on it’s own. Ensure
the base unit is turned ON when using the
handset.
NOTE - FIRST TIME USE: the handset must
first be Subscribed to the 725 base unit - this
function only needs to be performed once.
See “Subscribing the Handset to the Base unit”
section for details.
Page 6
Northstar Explorer 725/705 Quickstart Guide
6
Adjust the Squelch
Base Unit
1 Turn the SQL knob fully counterclockwise so
that random noise is heard.
2 Turn SQL slowly clockwise until the random
noise disappears.
3 Make another 1/4 turn clockwise for best
reception in normal open sea conditions.
In areas of high noise (eg close to large cities)
reception may improve if sensitivity is reduced.
Try turning SQL slowly clockwise or use the
LOCAL setting (see the Installation and Operation
Manual).
Optional Handset
Adjust the squelch with the and keys on
the handset.
Hold down
or to rapidly increase or
decrease the squelch or press quickly to step
through the 8 different squelch levels. The
squelch setting on the base unit will temporarily
change to match.
When you put the handset back ON hook, the
base unit squelch setting takes precedence
again.
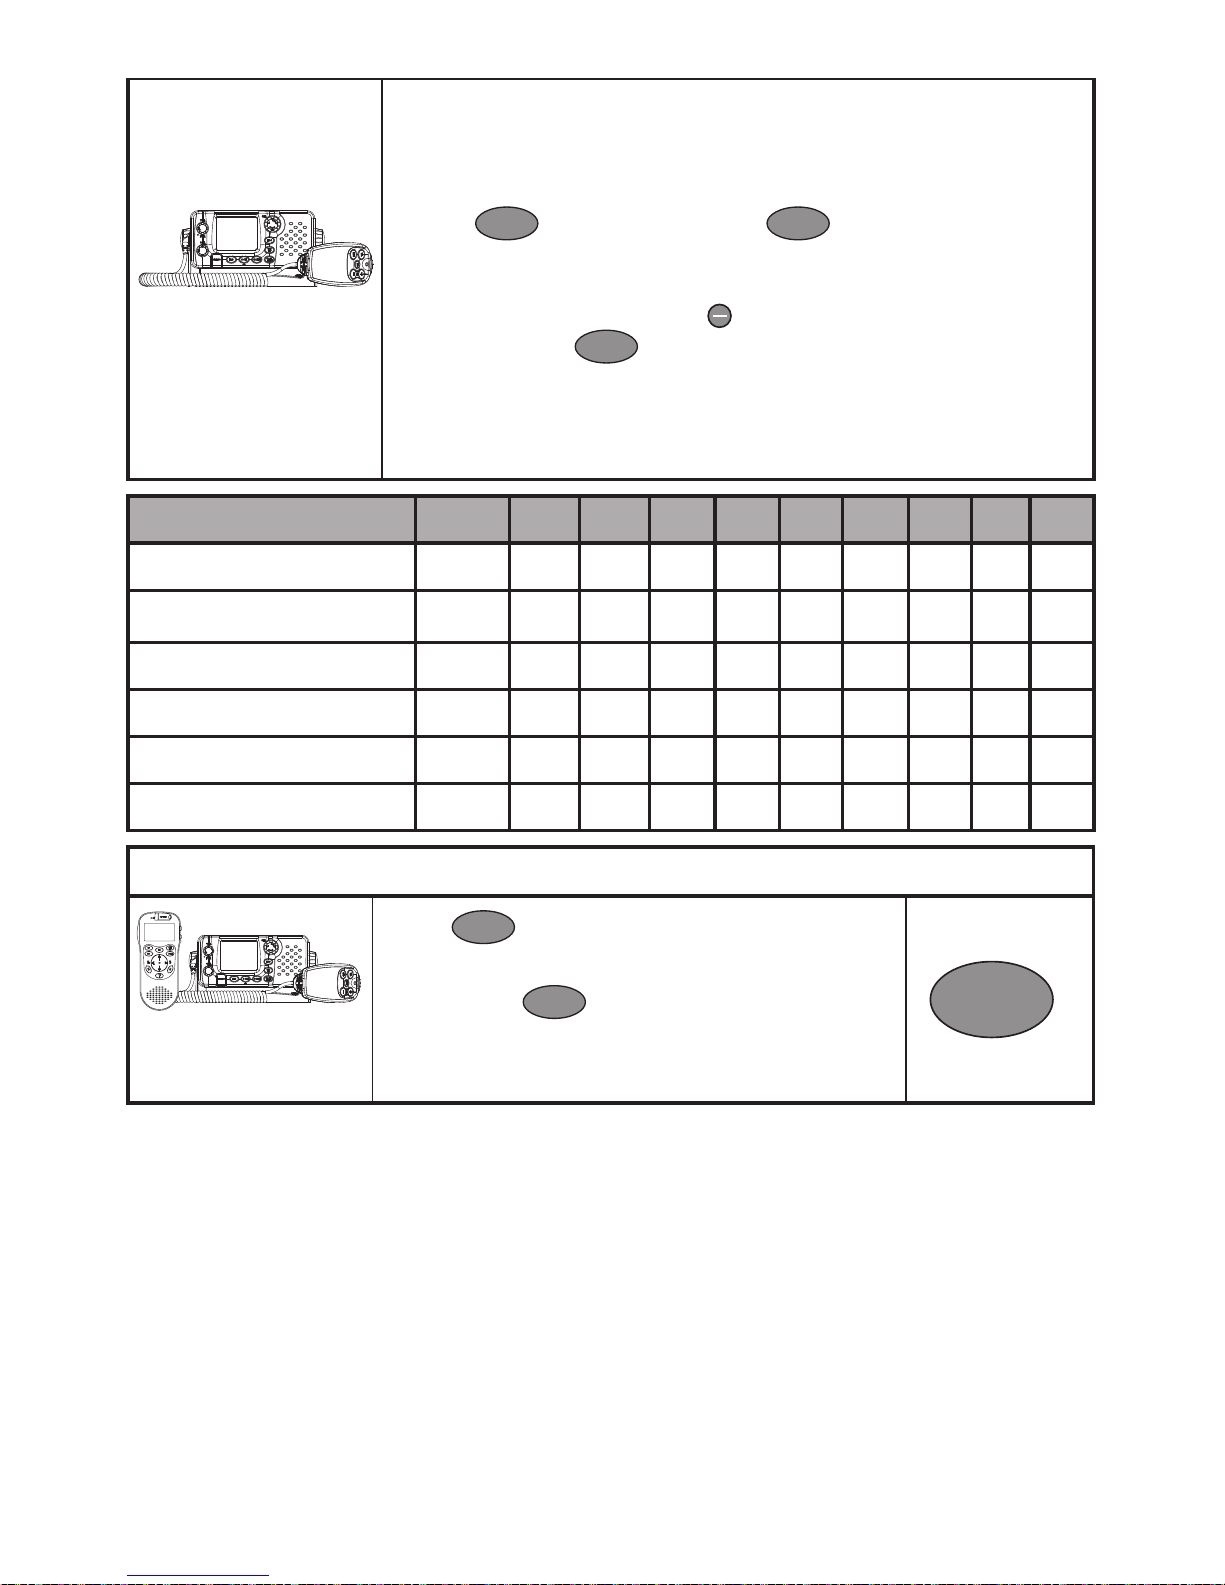
Enter Data and Correct Errors
721US Base Unit and
Microphone
Only 4 menu items can be displayed on the base unit LCD at any one
time. Press CH
or CH to scroll through a menu listing.
Press
ESC
to return to the previous menu screen without saving
changes OR press the rotary knob to confirm changes.
To enter data, press CH
or CH to step through the alphabet and
numbers. Hold down CH or CH to scroll rapidly.
You can also use the rotary knob to step through the alphabet and
numbers, then press the knob to confirm each selection.
To correct errors, press CH
then select the < backup character on
the LCD. Press the rotary knob to backup one space at a time.
Optional Handset
Only 4 menu items can be displayed on the handset LCD at any one
time. Press or to scroll through a menu listing.
Press
ESC
to return to the previous menu screen without saving
changes OR press
ENT
to confirm changes.
Press
or to step through the alphabet and numbers. Hold down
or to scroll rapidly.
To correct errors, press then select the < backup character on the
LCD. Press
ENT
to backup one space at a time.
Page 7
Northstar Explorer 725/705 Quickstart Guide
7
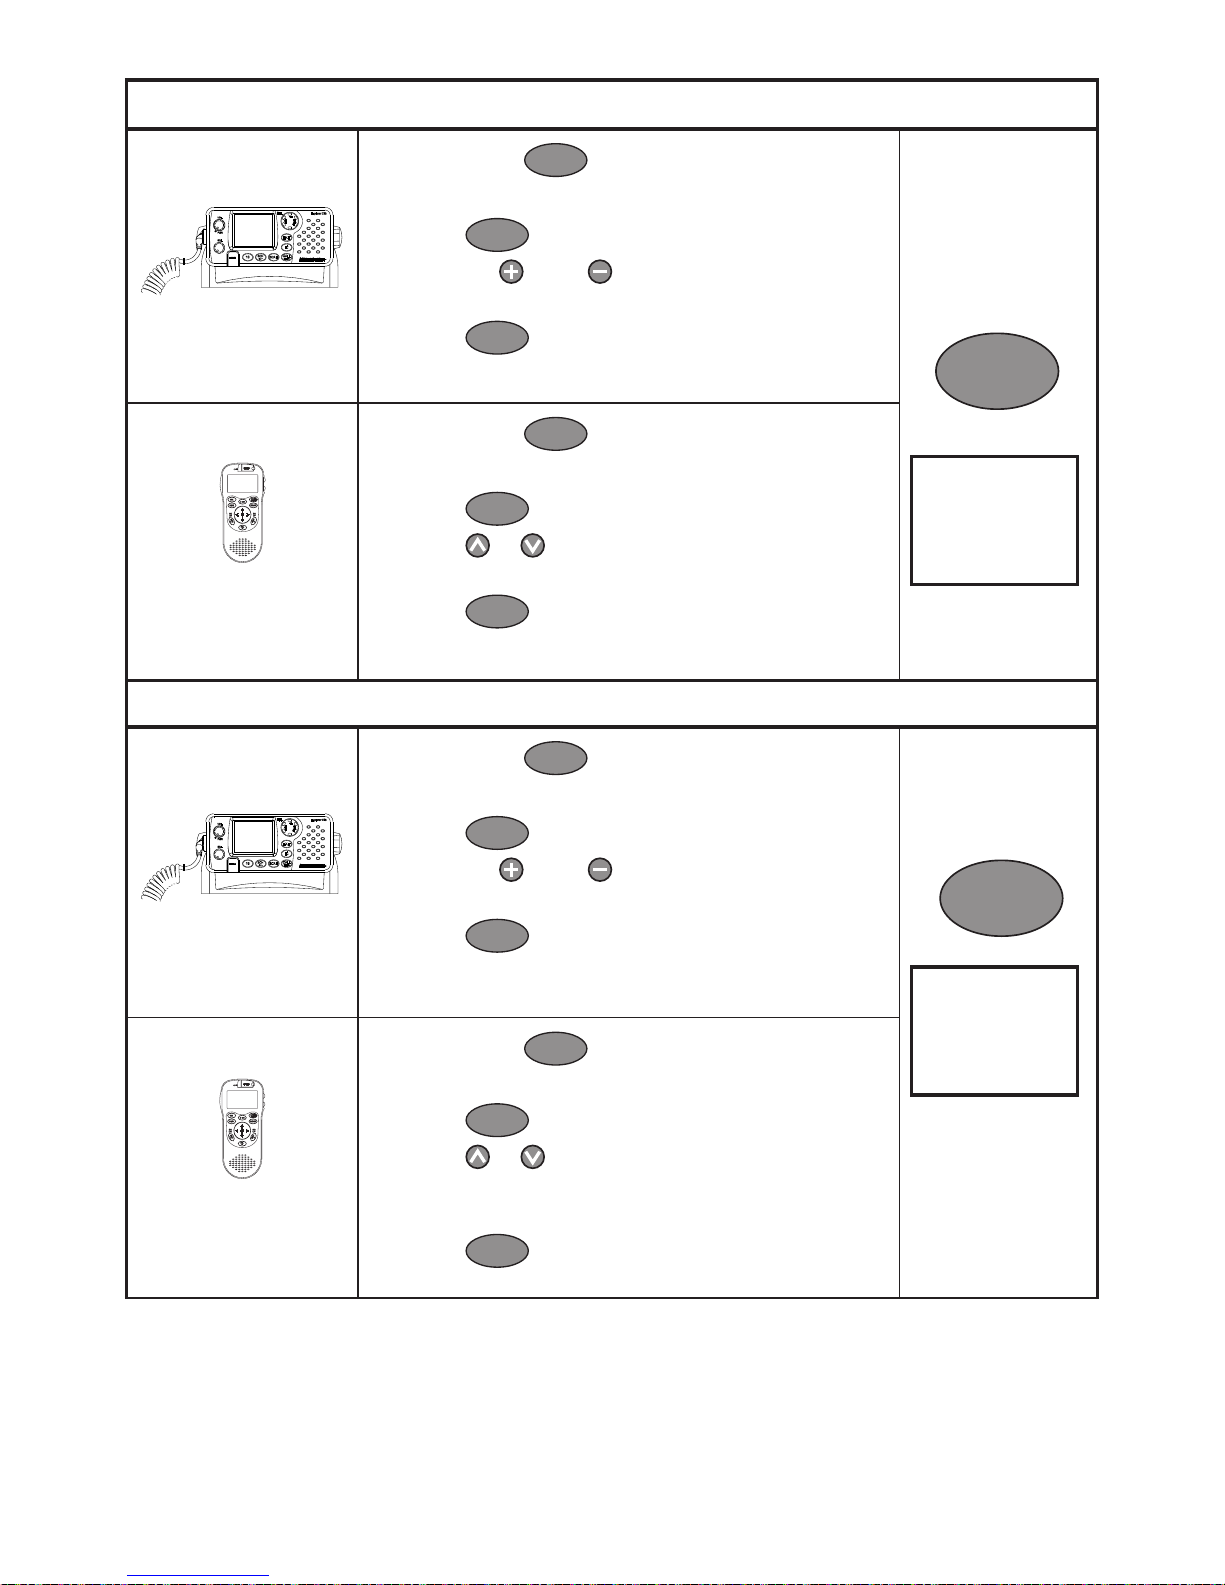
721EU Base Unit and
Microphone
Enter Data using Alpha-mic (721EU only): To enter data, use the
alpha-numeric keypad on the microphone to enter the channel
numbers and names directly. Each key has functionality shown
below.
Use the
CLR
key to backup and the
ENT
key to confirm, or just
wait for the cursor to advance automatically to the next position
when entering data (similar to mobile phone operation).
To correct data errors, press CH
then select the < backup character
on the LCD. Press
ENT
to backup one space at a time.
705EU Microphone Key 0 1 2 3 4 5 6 7 8 9
Normal and Menu Mode 0 1 2 3 4 5 6 7 8 9
Edit Mode Push 1 0 1 2 3 4 5 6 7 8 9
Edit Mode Push 2 Space - A D G J M P T W
Edit Mode Push 3 ( . B E H K N Q U X
Edit Mode Push 4 ) “ C F I L O R V Y
Edit Mode Push 5 % / ? ! : # “ S & Z
Select the Radio Menu or the DSC Call Menu
Base Unit and
Optional Handset
PRESS
CALL
MENU
to show the DSC CALL Menu.
HOLD DOWN
CALL
MENU
to show the Radio Menu.
CALL
MENU
Page 8
Northstar Explorer 725/705 Quickstart Guide
8
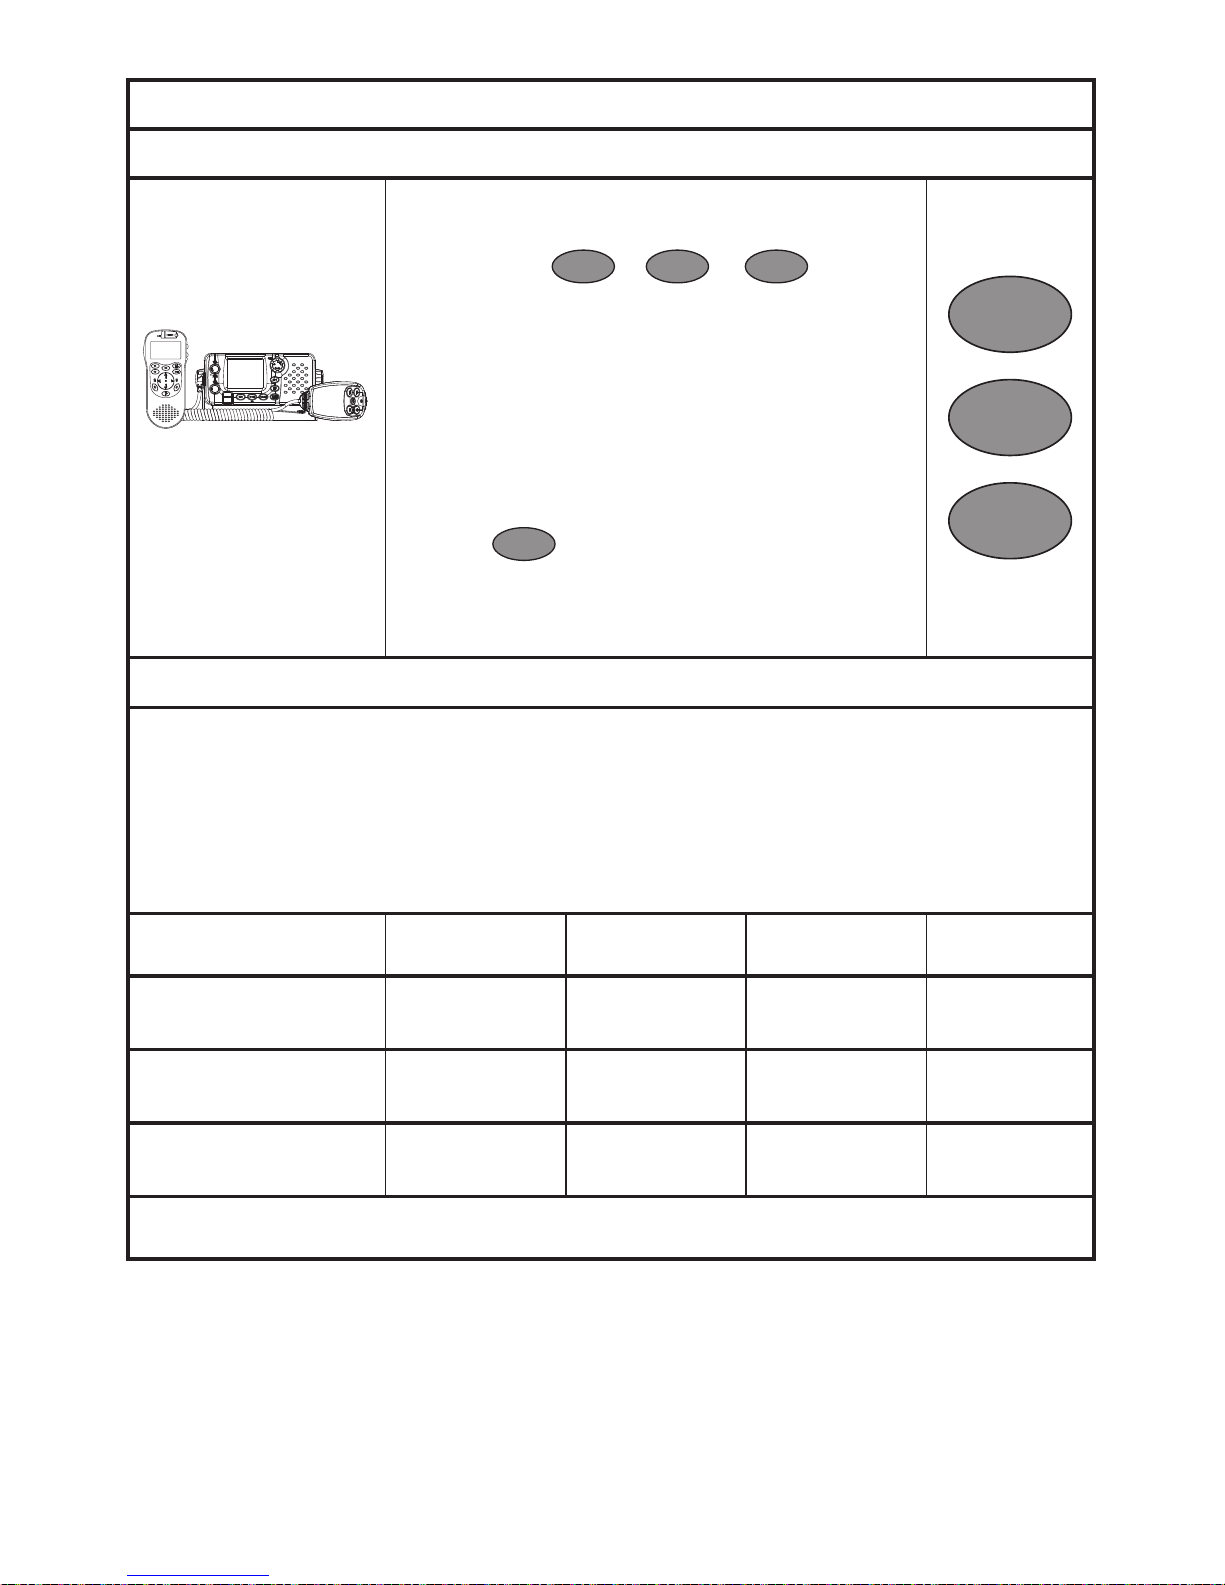
Set the Backlighting Levels
Base Unit
1 Hold down
CALL
MENU
to show the Radio Menu.
2 Scroll through the menu listing to BACKLIGHT.
3 Press
ENT
or push the rotary knob.
4 Press CH or CH to select the desired
backlight level. There are 8 levels.
5 Press
ENT
or push the rotary knob to store the
setting.
Optional Handset
1 Hold down
CALL
MENU
to show the Radio Menu.
2 Scroll through the menu listing to BACKLIGHT.
3 Press
ENT
.
4 Press or to select the desired backlight
level. There are 8 levels.
5 Press
ENT
to store the setting.
Set the Contrast Levels
Base Unit
1 Hold down
CALL
MENU
to show the Radio Menu.
2 Scroll through the menu listing to CONTRAST.
3 Press
ENT
or push the rotary knob.
4 Press CH or CH to select the desired
contrast level. There are 8 levels.
5 Press
ENT
or push the rotary knob to store
the setting.
Optional Handset
1 Hold down
CALL
MENU
to show the Radio Menu.
2 Scroll through the menu listing to CONTRAST.
3 Press
ENT
.
4 Press or to select the desired contrast
level.
There are 8 levels.
5 Press
ENT
to store the setting.
MENU SELECT
BUDDY LIST
LOCAL/DIST
>BACKLIGHT
CALL
MENU
MENU SELECT
LOCAL/DIST
BACKLIGHT
>CONTRAST
CALL
MENU
Page 9
Northstar Explorer 725/705 Quickstart Guide
9
How the microphone and optional handset work together
Use the Intercom or Conference mode
Base Unit and Optional
Handset
The Intercom mode works ONLY when one or two
optional handset(s) are installed.
1 Hold down
WX
IC
or
IC
or
H/L
IC
to enter
INTERCOM or CONFERENCE mode. Conference
mode is only available when 2 handsets are
connected, and is used to connect all 3 units
together. This disables the radio receiver
except for incoming DSC calls.
2 The intercom calls the other unit as detailed in
the following table.
3 Press PTT when invited.
4 Press
ESC
to exit the INTERCOM mode, insert
separate row for Handset Intercom mode.
5 For operation of the IC key see below.
WX
IC
IC
H/L
IC
Using the IC key
The function of these modes will vary depending on the number of VHF705 handsets
connected:
· If no Handsets are connected, pressing the IC key will generate an error beep.
· If one handset is connected, pressing the IC key will enter Intercom mode.
· If two handsets are connected pressing the IC key the operation will be as follows:
IC Key 1st press 2nd press 3rd press 4th press
Main unit (MU) Intercom
with HS1
Intercom
with HS2
Conference Repeat cycle
1st handset (HS1) Intercom
with MU
Intercom
with
HS2
Conference Repeat cycle
2nd handset (HS2) Intercom
with MU
Intercom
with HS1
Conference Repeat cycle
Note: in this mode you must press ENT key to select the mode
Page 10
Northstar Explorer 725/705 Quickstart Guide
10
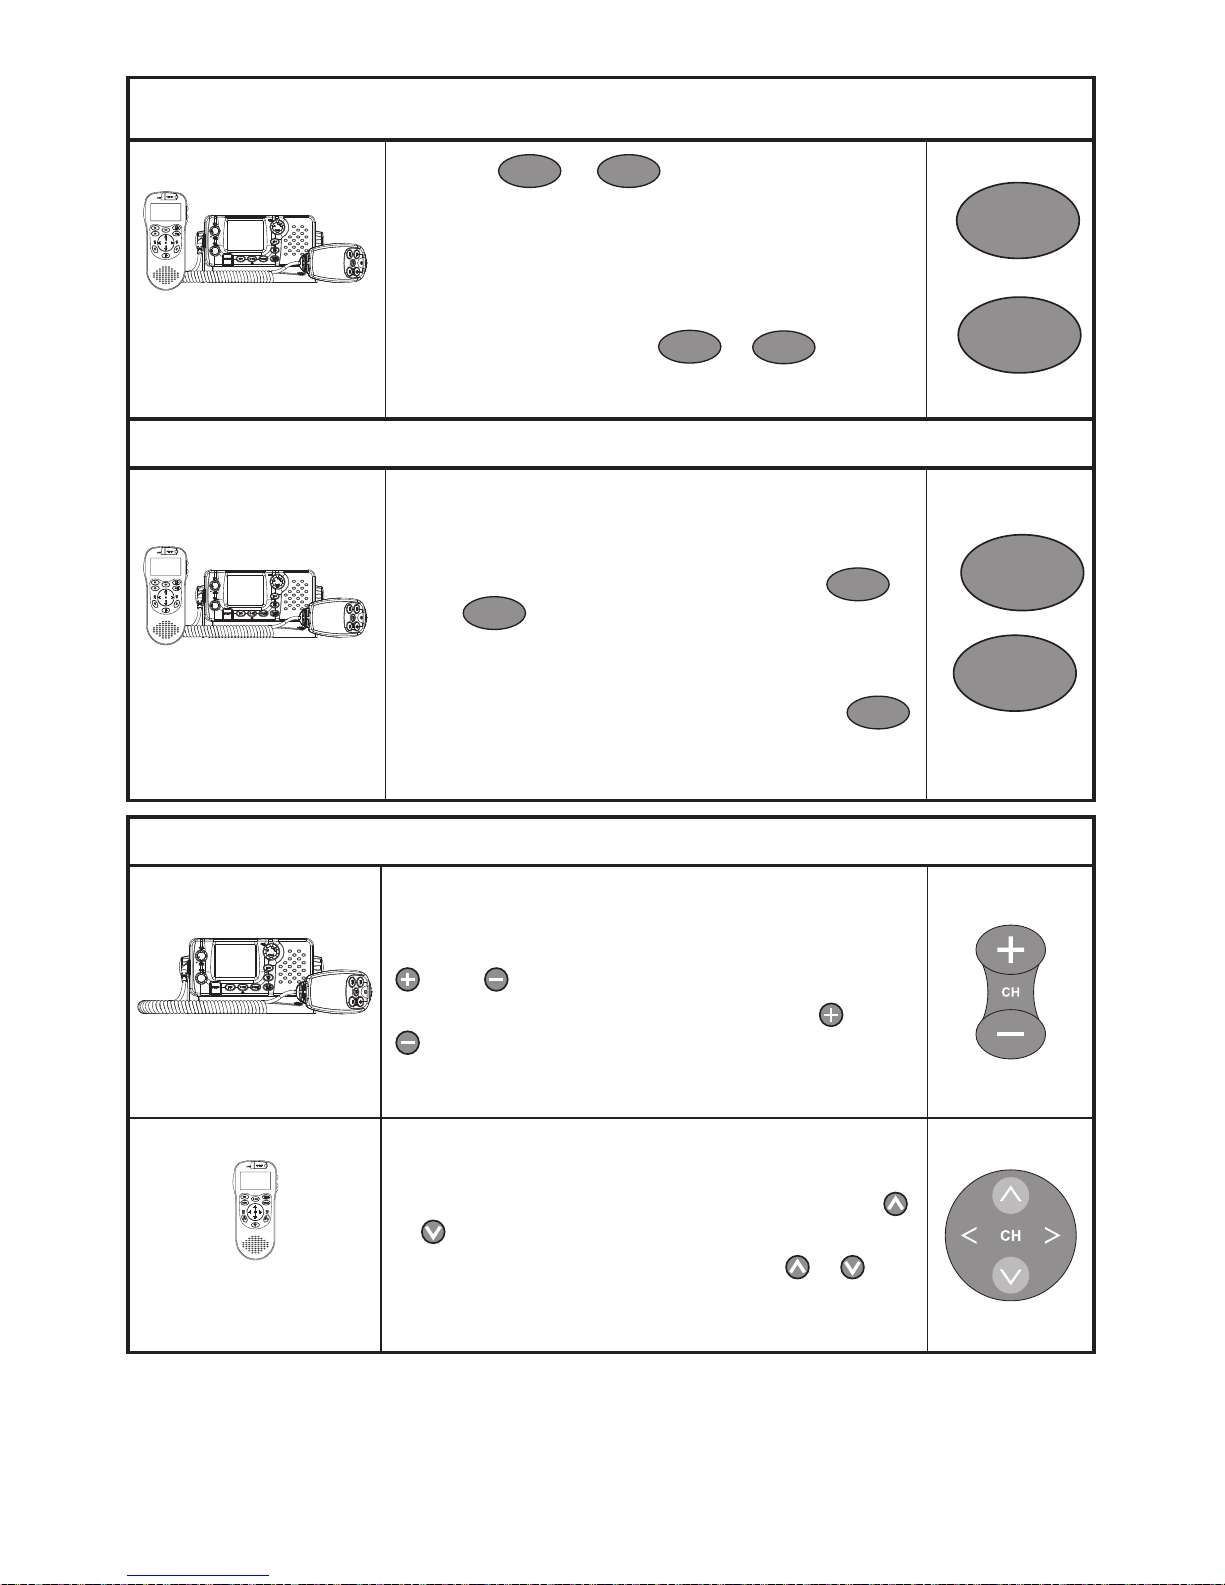
High and Low Power
Microphone and
Optional Handset
1 Press
H/L
or
H/L
IC
to toggle between HI
(High) and LO (Low) (25W or 1W) transmission
power for the entire channel bank. A beep
sounds and the selection is shown on the LCD.
2 If HI power cannot be used with a particular
channel, the annunciator automatically goes to
LO power. If you press
H/L
IC
or
H/L
again, an
error beep sounds.
Priority Channel
Base Unit, Microphone
and Optional Handset
Channel 16 and HI power are automatically selected
at power up.
1 If you’re on a working channel and want to check
the priority channel for traffic, just press
16
or
16/9
.
2 Press again to recall your working channel.
NOTE: On the 725US ONLY the priority channel can be
set to Channel 09. To set this, just hold down
16/9
until Channel 09 appears on the LCD.
16/9
Channel Select
Base Unit and
Microphone
The working channel is shown in BIG numbers on
the LCD of the base unit.
To step through the channels one at a time, press CH
or CH to display each channel.
To change channels rapidly, hold down CH or CH
to scroll through the channels.
You can also use the rotary knob to select a channel.
Optional Handset
The working channel is shown in BIG numbers on
the LCD of the optional handset.
To step through the channels one at a time, press
or to display each channel.
To change channels rapidly, hold down or on
the optional handset to scroll through the channels.
H/L
IC
H/L
16
Page 11
Northstar Explorer 725/705 Quickstart Guide
11
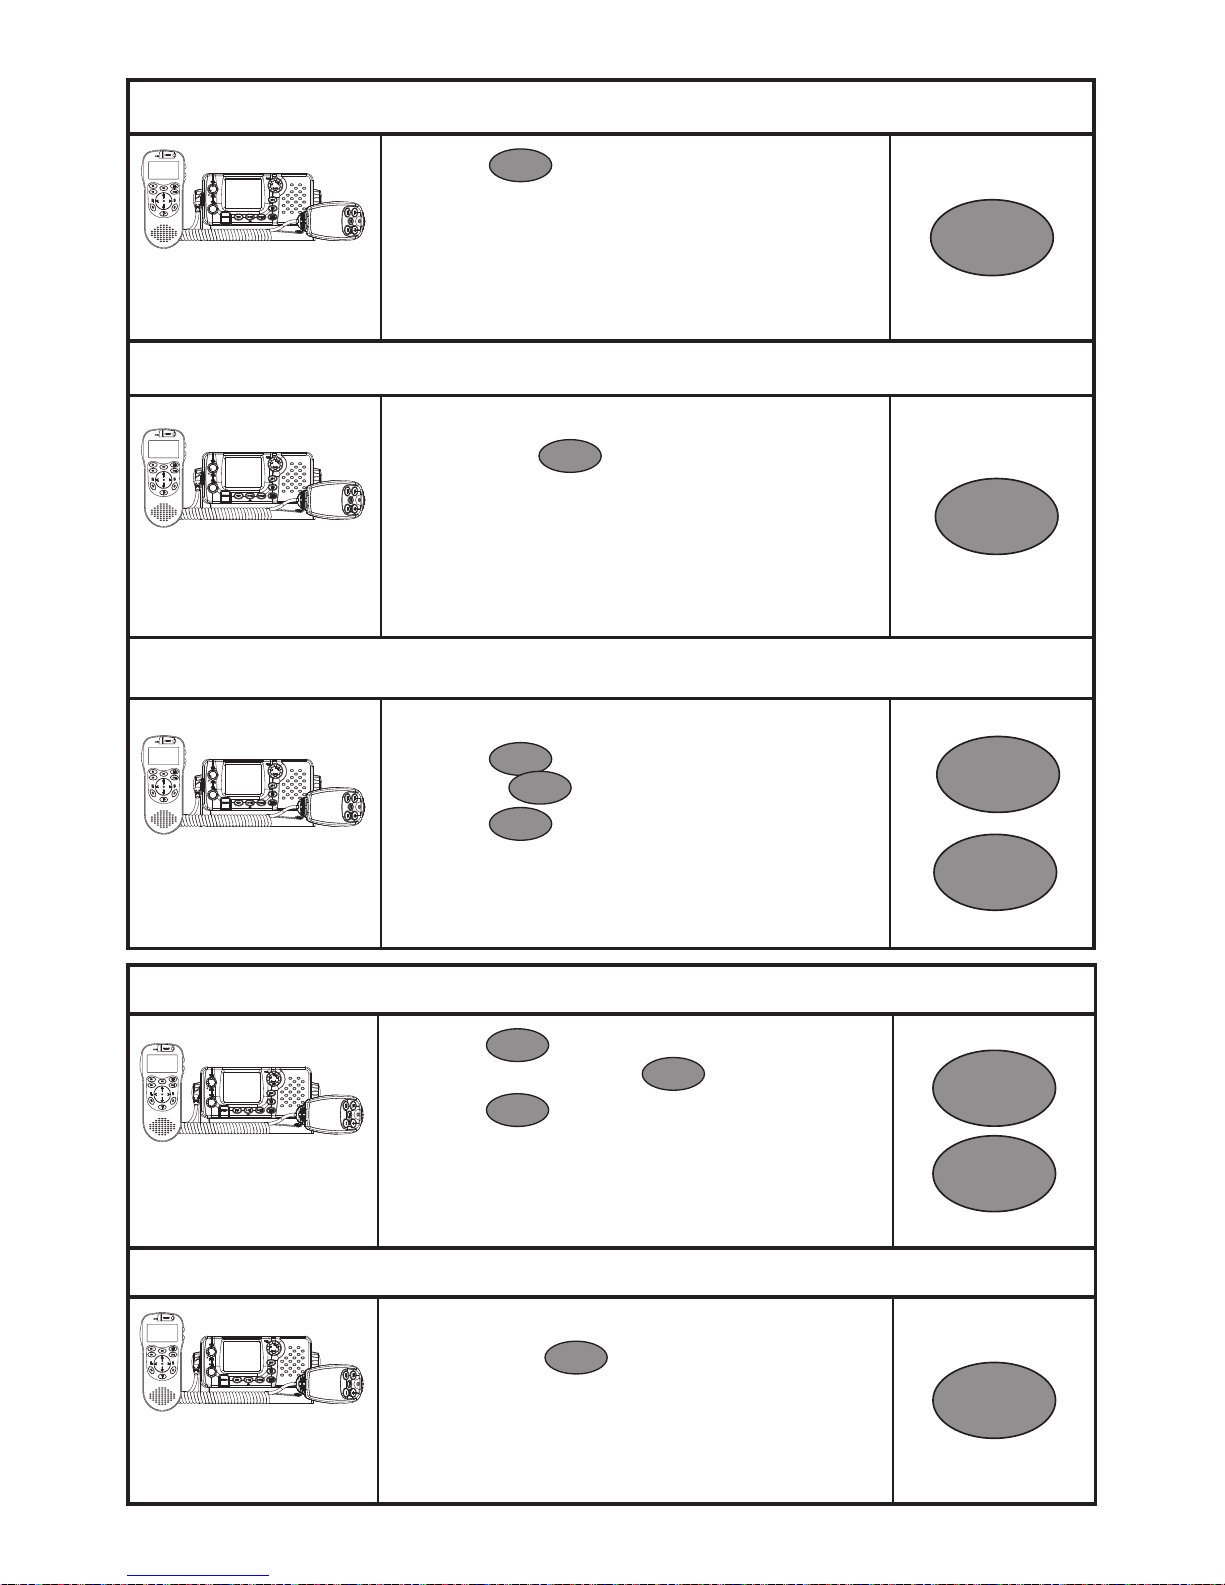
Select a Favorite Channel
Base Unit and
Optional Handset
1 Press
3CH
to toggle through each of the
three favorite channels until the desired
channel is shown.
3CH
Store 3 Favorite Channels
Base Unit and
Optional Handset
1 Select the channel.
2 Hold down
3CH
to store this channel as your
first favorite channel, CH1.
3 Repeat to store your second favorite channel
as CH2.
4 Repeat again to store your third favorite
channel as CH3.
3CH
Scan/Stop Scanning a Favorite Channel
Base Unit and
Optional Handset
1 Select the favorite channel.
2 Press
3CH
then immediately press and
release
SCAN
.
3 Press
SCAN
again to stop.
3CH
SCAN
Scan all 3 Favorite Channels
Base Unit and
Optional Handset
1 Press
3CH
then immediately
press and hold down
SCAN
.
2 Press
SCAN
again to stop.
3CH
SCAN
Delete a Favorite Channel
Base Unit and
Optional Handset
1 Select the favorite channel.
2 Hold down
3CH
until a confirmation
message appears on the LCD.
3 Select YES to delete.
3CH
Page 12
Northstar Explorer 725/705 Quickstart Guide
12
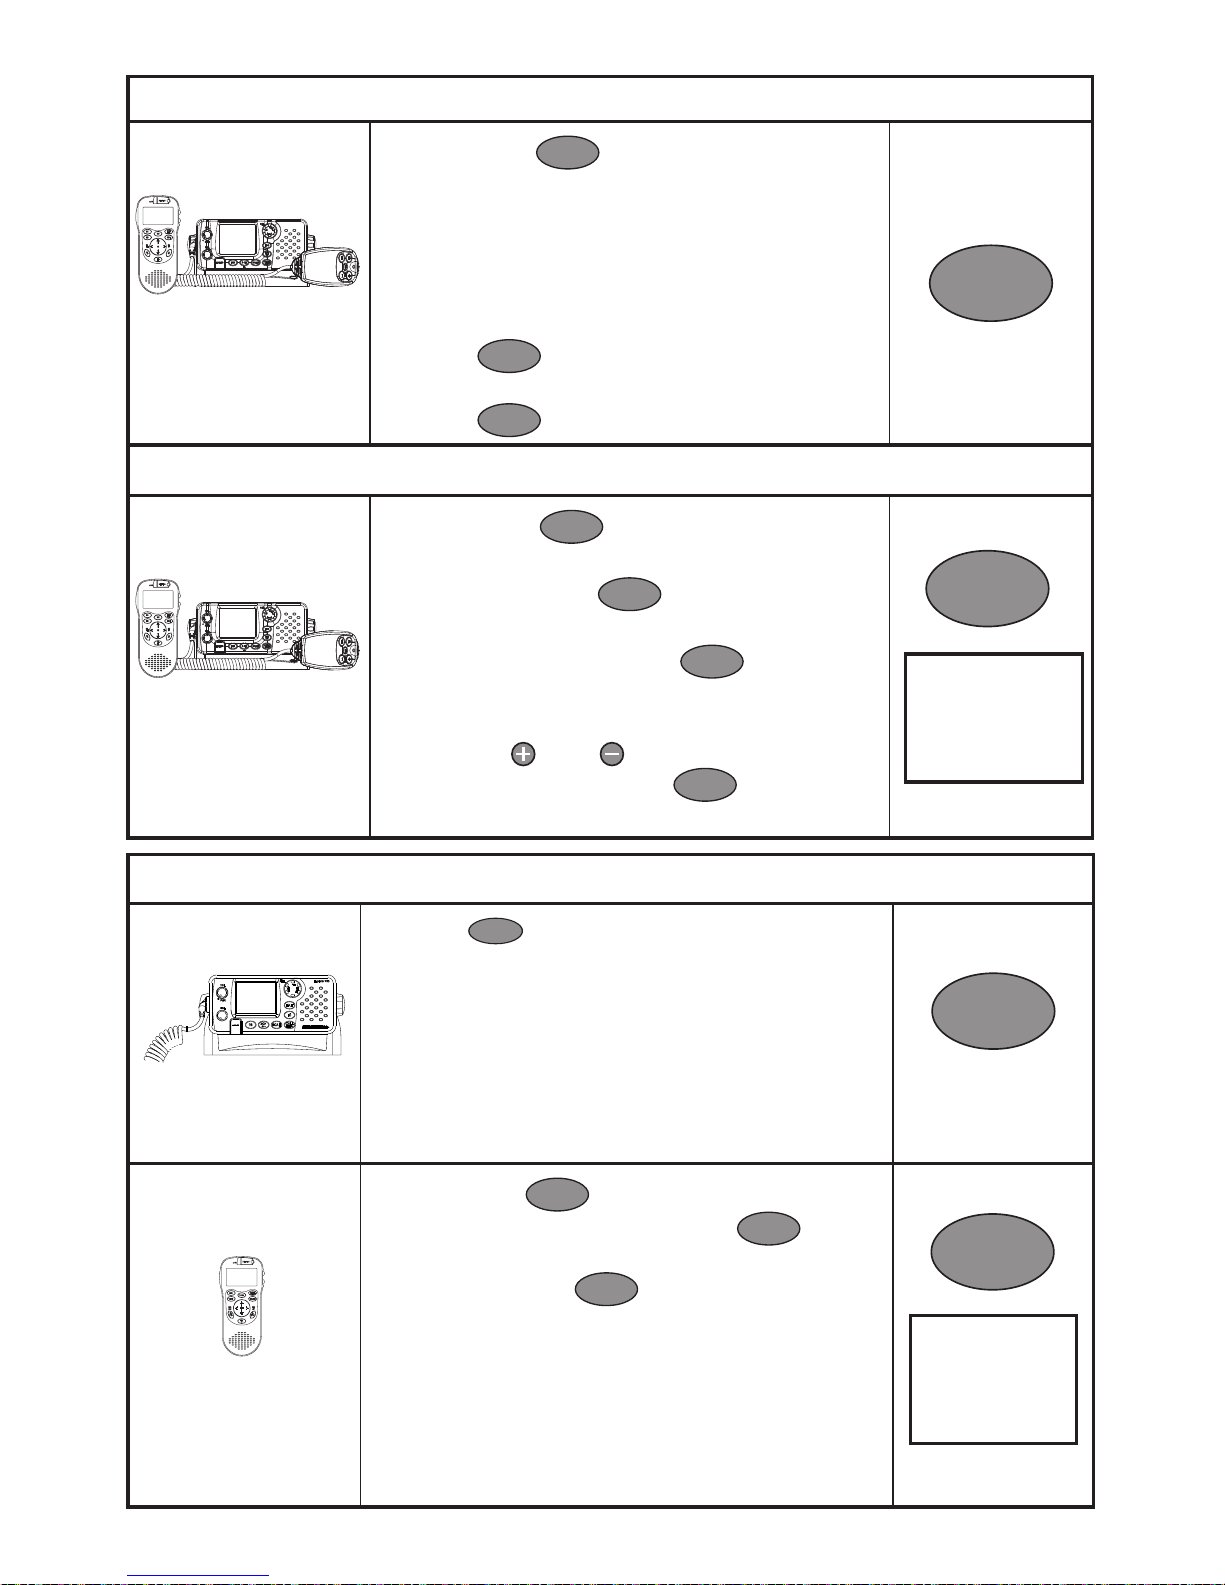
Select ALL SCAN mode
Base Unit and
Optional Handset
1 Hold down
SCAN
to start scanning all
channels (and the priority channel every 1.5
seconds).
NOTE: In some European countries, scanning
is not allowed.
When a signal is received, scanning stops at
that channel and BUSY appears on the LCD.
Press
ENT
to skip over an ‘always busy’
channel and resume scanning.
2 Press
SCAN
to stop at the current channel.
SCAN
Select the Channel Bank (725US ONLY)
Base Unit and
Optional Handset
1 Hold down
CALL
MENU
to show the Radio Menu.
2 Scroll through the menu listing to RADIO
SETUP then press
ENT
or push the rotary
knob.
3 The cursor is at UIC. Press
ENT
or push the
rotary knob to display a choice of channel
banks.
4 Press CH or CH to select the desired
channel bank, then press
ENT
or push the
rotary knob to confirm.
RADIO SETUP
>UIC
CH NAME
RING VOLUME
CALL
MENU
Show the weather and fishing information
Base Unit
1 Press
Info
.
2 A histogram of the barometric pressure
readings over the past 24 hours is shown on
the base unit LCD, with a digital readout of the
current temperature.
The Happy Fish indicator bars show the
likelihood of good fishing.
The weather icon shows the weather forecast.
Info
Optional Handset
1 Hold down
CALL
MENU
to show the Radio Menu.
2 The cursor is at INFO DATA. Press
ENT
to
select this.
3 Select ON. Press
ENT
.
4 The current barometric pressure and
temperature are shown as digital readouts.
SNR is shown when handset is OFF HOOK
The Happy Fish indicator bars, when triggered,
show the likelihood of good fishing.
The weather icon shows the weather forecast.
CALL
MENU
MENU SELECT
>INFO DATA
BUDDY LIST
LOCAL/DIST
Page 13
Northstar Explorer 725/705 Quickstart Guide
13
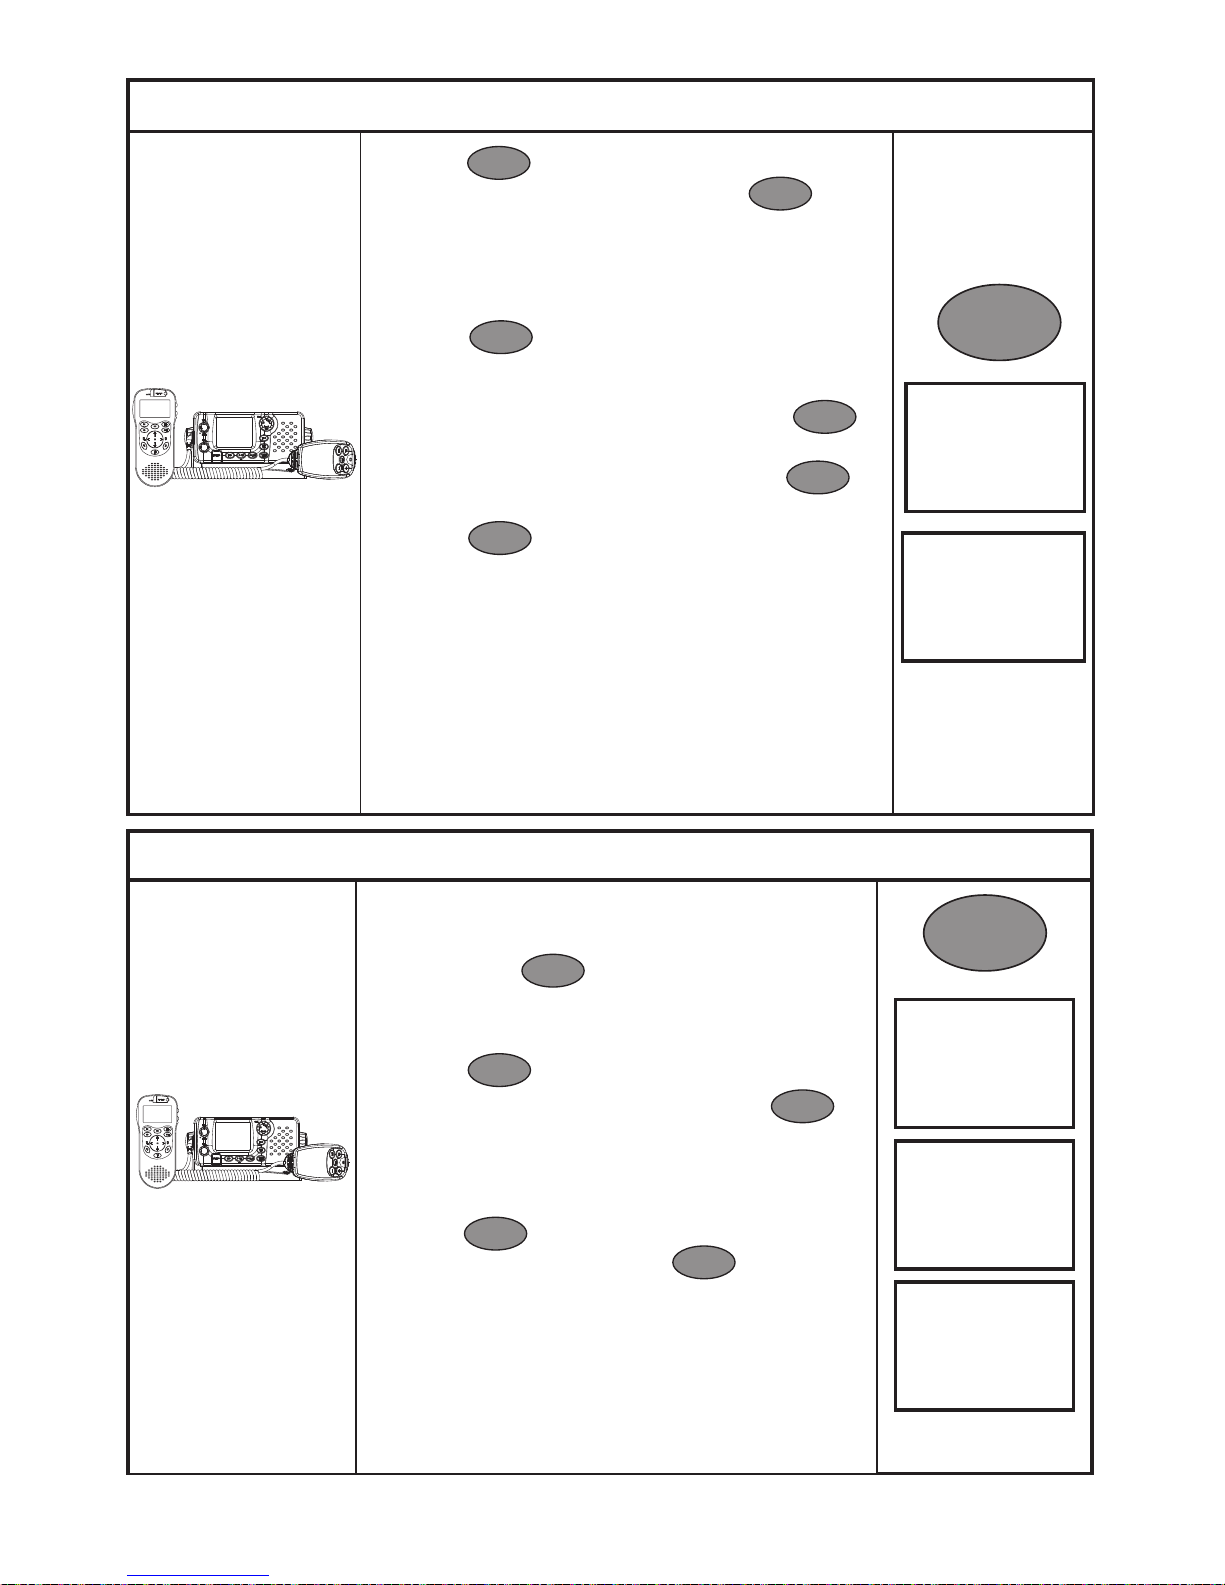
Make a call to an individual
Base Unit and
Optional Handset
1 Press
CALL
MENU
to show the DSC CALL Menu.
2 The cursor is at INDIVIDUAL. Press
ENT
or
push the rotary knob.
3 Select either:
MANUAL NEW to call someone who’s not in
your buddy list, then enter their MMSI and
press
ENT
or push the rotary knob.
or
scroll through the buddy list to find name of
the buddy you want to call, then press
ENT
or push the rotary knob.
4 Select the working channel and press
ENT
or push the rotary knob.
5 Press
ENT
or push the rotary knob again to
send the call. The call will be acknowledged
when it is received and the working channel is
automatically selected.
6 Press PTT to talk; release PTT to receive a reply.
NOTE: DSC calling is disabled until you enter a
legal USER MMSI number. This also applies to ATIS
inland waterway operation in European countries.
See the Installation and Operation Manual to
perform this ONCE-ONLY setup.
DSC CALL
>INDIVIDUAL
LAST CALL
GROUP
INDIVIDUAL
>MANUAL NEW
BUDDY 1
BUDDY 2
CALL
MENU
Create your Buddy List
Base Unit and
Optional Handset
You can store the names and MMSIs of 20
individuals in your buddy list.
1 Hold down
CALL
MENU
to show the Radio Menu.
2 Scroll through the menu listing, if necessary,
to BUDDY LIST.
3 Press
ENT
or push the rotary knob.
4 The cursor is at MANUAL NEW. Press
ENT
or
push the rotary knob.
5 Enter the buddy name (maximum of 12
characters) and the MMSI.
6 Press
ENT
or push the rotary knob when
you’re finished, then press
ENT
or push
the rotary knob again to store the new
buddy name. The new buddy name appears
immediately in your buddy list.
7 Repeat the procedure to store another buddy
name.
>ENTER NAME
__________
ENTER MMSI
__________
BUDDY LIST
>MANUAL NEW
NAME
123456789
>STORE?
CANCEL
CALL
MENU
Page 14
Northstar Explorer 725/705 Quickstart Guide
14
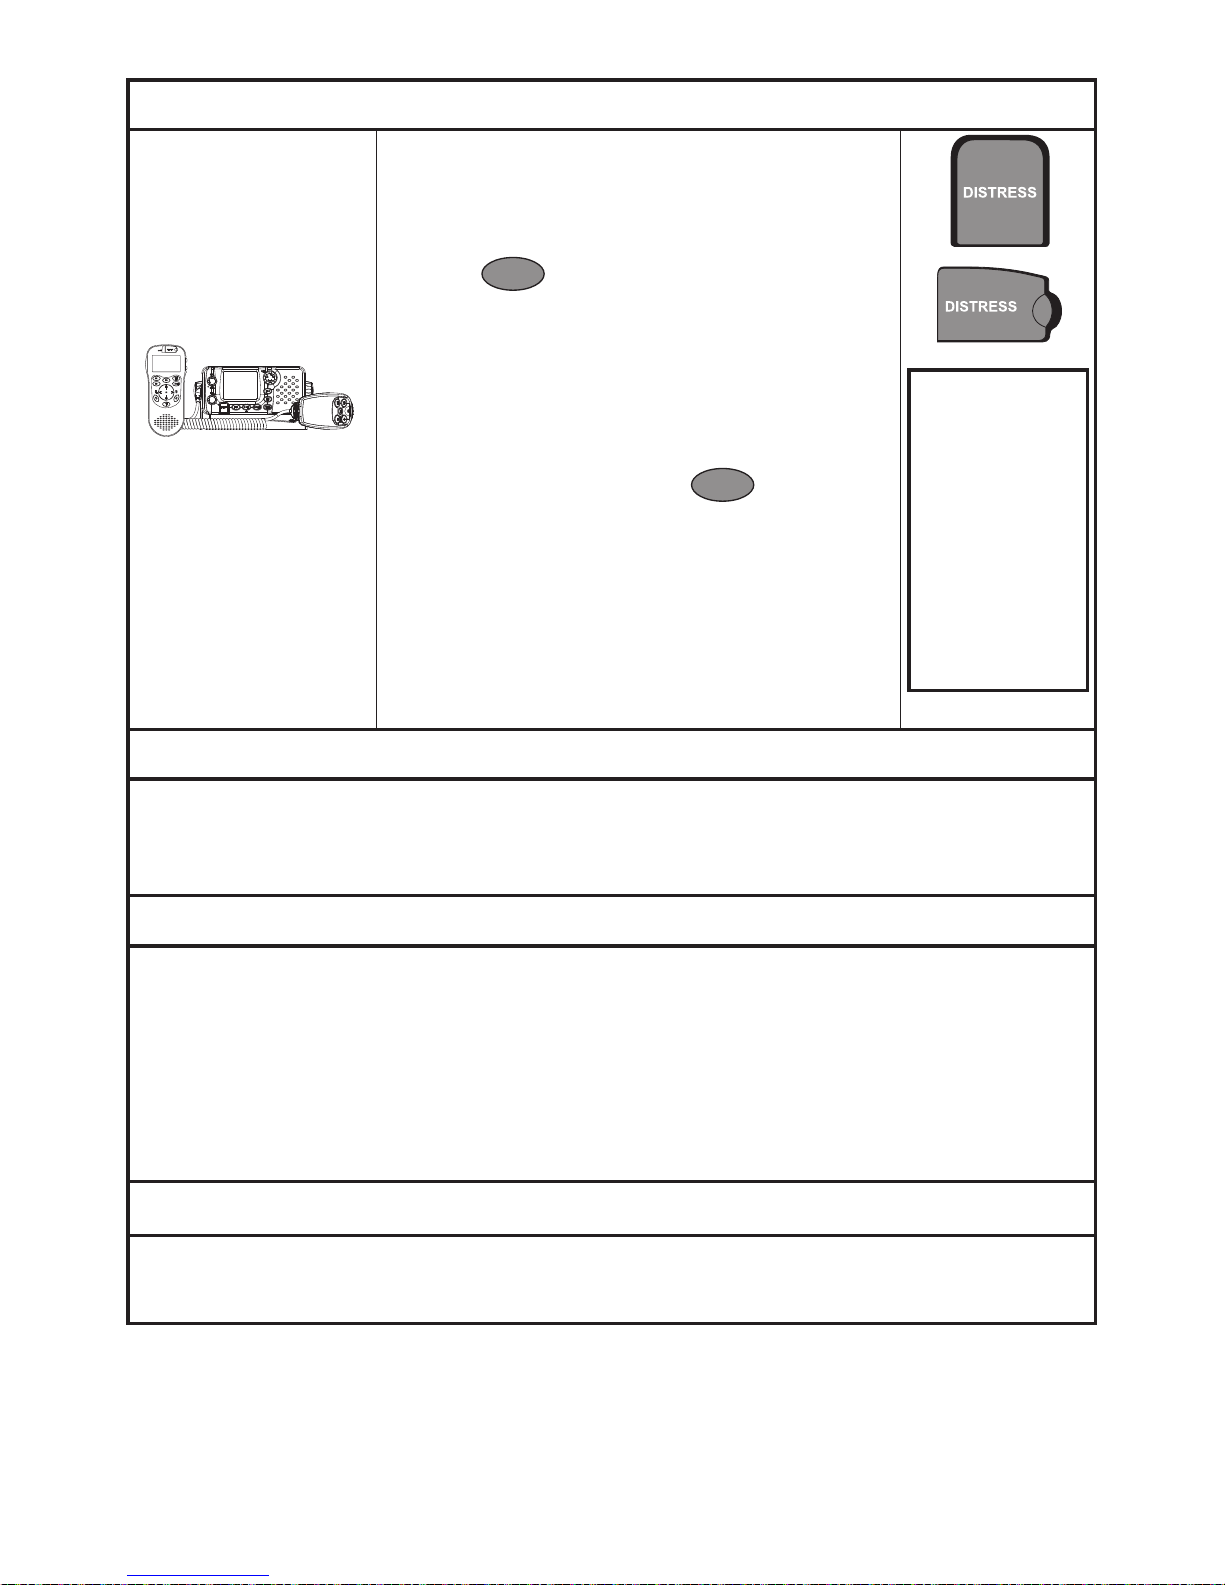
Make a DSC Distress Call
Base Unit and
Optional Handset
1 Open the red DISTRESS cover.
If time is available to specify the nature of the
distress, press and release the DISTRESS key to
show the categories. Scroll to your category then
press
ENT
or push the rotary knob.
2 Hold down the DISTRESS key for about 3
seconds until you see the message DISTRESS
CALL SENT on the LCD.
3 The LCD flashes and loud beeps sound. The
distress call is repeated automatically every
few minutes until an acknowledgement is
received or until you press
ESC
to cancel it.
Receiving a Distress Acknowledgement from a coast station
1 The radio automatically cancels your distress call and tunes to CH16.
2 Press PTT to talk with the Coast Guard.
Receiving a Distress Call
An alert sounds and the Explorer 725 automatically tunes to CH16.
1 Press any key to stop the alert.
2 Make voice contact on CH16 and lend assistance if needed.
Position and time data and the vessel’s MMSI are shown on the LCD, and the data is recorded in
the DISTRESS CALL LOG.
Receiving a Distress Relay
1 An alert sounds. Press any key to stop the alert.
2 Maintain a listening watch on CH16 and standby to lend assistance.
>UNDEFINED
FIRE
FLOODING
COLLISION
GROUNDING
LISTING
SINKING
ADRIFT
ABANDONED
PIRACY
OVERBOARD
Page 15
Northstar Explorer 725/705 Quickstart Guide
15
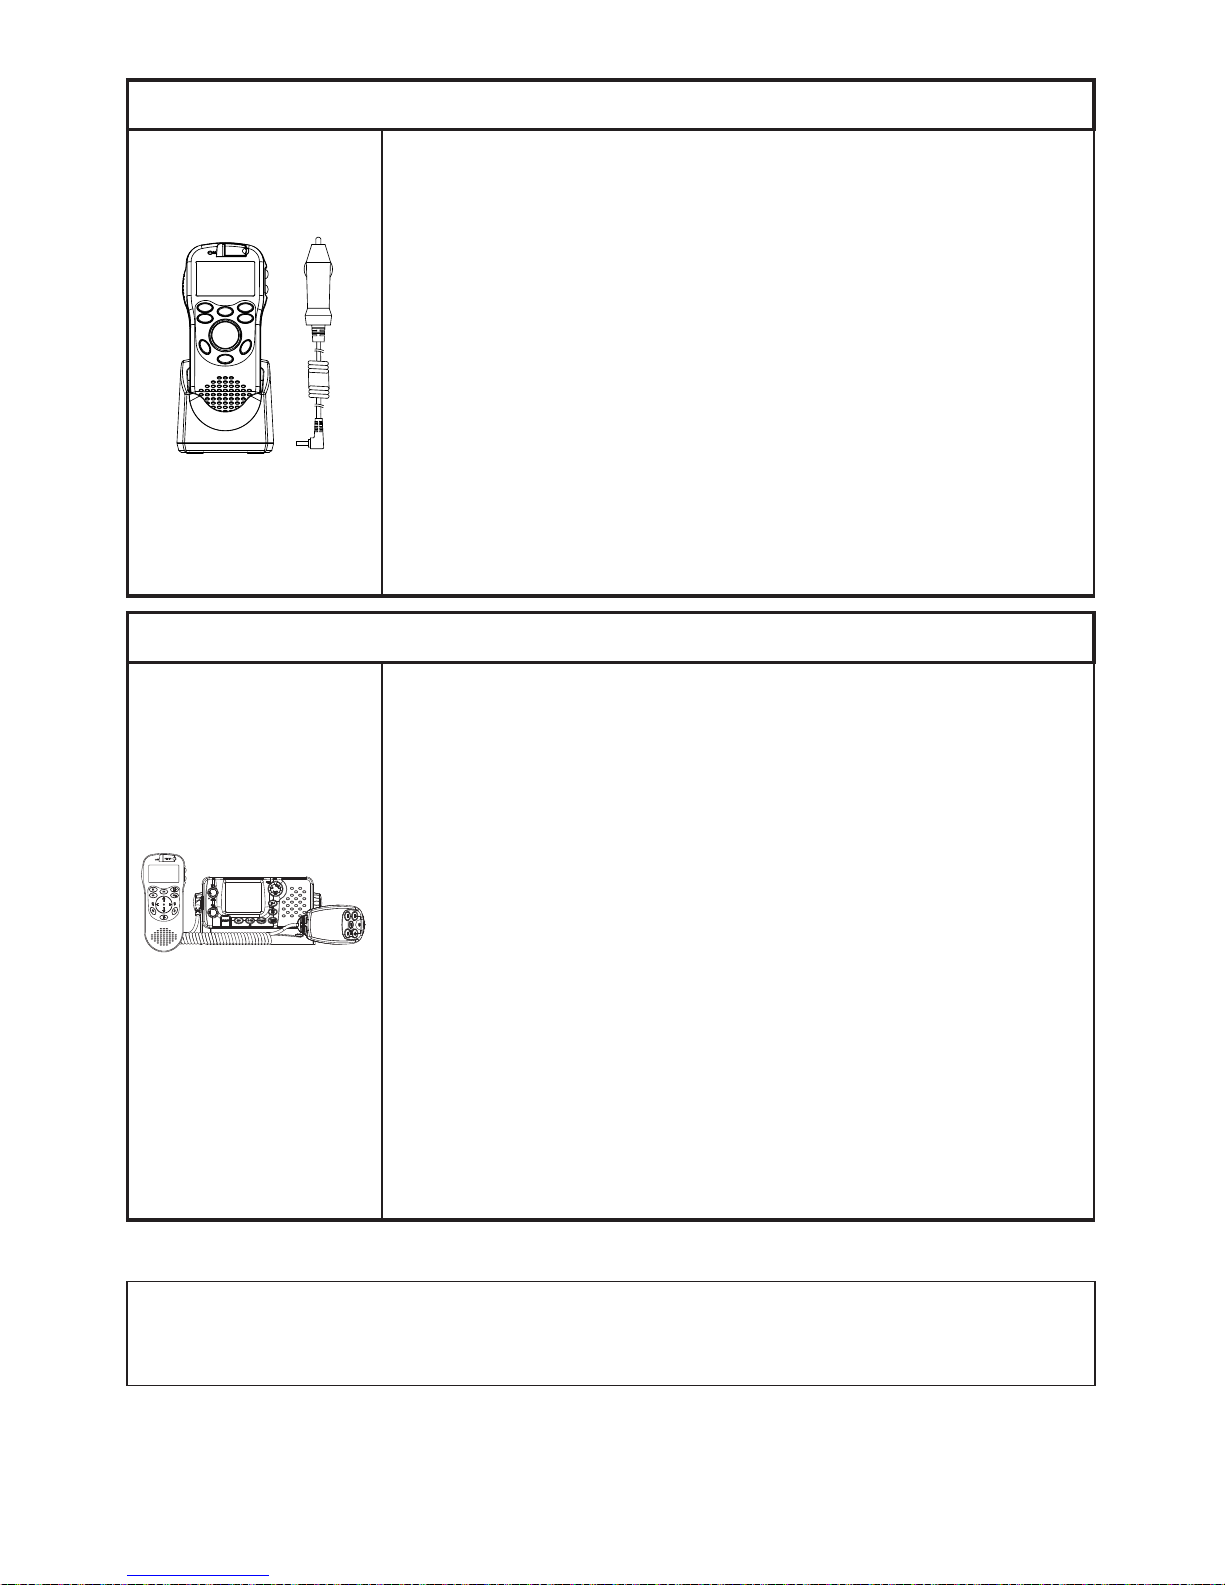
Charging your 705 Handset
Optional Handset
To charge the handset:
1. Connect 12VDC source to the handset charger cradle
2. Place the handset into the charger cradle. The handset display
will show the text: “POWER ON CONNECTING” and then
“CHARGING”
3. Leave on charge for at least 3 hours.
4. When the battery is fully charged, the display text will change to
“BATTERY FULL”
5. The handset can remain in the charger.
To check the handset battery level:
1. Press and hold the ESC key
2. The LCD will display the battery level with 1 to 4 bars:
1=Needs charging; 2-3=normal operation; 4=Fully charged.
Subscribing the 705 handset to the 725 base unit
Base and Optional
Handset
Subscribing the Handset to the Base unit:
1. Ensure the handset is fully charged
2. Turn the base unit ON
3. Select “Subscribe” on the base unit Radio Setup menu
4. Turn the handset ON; you must be within operational range of
the base unit
5. The handset will display “Success”, and then operate normally
with the base unit.
To Un-Subscribe the Handset from the Base unit:
1. You may wish to un-subscribe a handset from your base unit to
use on another base unit.
2. On the base unit, select “Handset”, “Clear Code” and “Yes” from
the setup menu.
3. After a few seconds, the handset will display “Search Host” and
no longer be subscribed to the base unit.
4. The handset can subscribed to another base unit if needed.
For further information on these and other options, including radio setup and dierent
DSC call types and options, troubleshooting, and channel charts, refer to the Northstar
Explorer 721 VHF Radio Installation and Operation Manual.
Page 16

Designed in New Zealand
Made in China
MN000828A-G
FOR FURTHER CONTACT DETAILS GO TO:
www.navico.com
1177
 Loading...