

Page 1

M1108L
ITEM NUMBER: 1108, 1109, 1114
®
SERIAL NUMBER: _____________________
Owner’s Manual
Instructions for Assembly, Testing, Operation, Servicing,
& Storage
22, 30, 37-Ton Log Splitters: Outdoor hydraulic powered
machine that splits wood logs.
WARNING
READ and UNDERSTAND this manual completely before using log splitter.
All operators of this equipment must read and completely understand all safety information, operating instructions,
maintenance and storage instructions. Failure to properly operate and maintain the log splitter could result in serious injury
to the operator and bystanders from moving parts that can crush or cut, flying objects, burns, fire or explosion, escaping
high pressure hydraulic fluid, or carbon monoxide poisoning in particular, be aware of the following hazards.
Crush and Cut Hazards
Moving parts can crush and cut hands and fingers. Keep hands clear of endplate, wedge, logs, and log strippers while
splitting.
High Pressure Hydraulic Fluid Hazards
High fluid pressures and temperatures are developed in hydraulic log splitters. Hydraulic fluid escaping through even a
pin-size hole opening can puncture skin and cause severe blood poisoning. Inspect hydrauli c system regularly for
possible leaks. Never check for leaks with your hand while the system is pressurized. Seek medical attention
immediately if injured by escaping fluid.
Fire Hazards
• If your log splitter is intended for use near an ignitable forest, brush, or grassy covered land, the engine exhaust should
be equipped with a spark arrestor. See the “Specifications” section of this manual to determine if your splitter already
has a spark arrestor. If not equipped, call NorthStar Product Support for ordering information.
Keep a fire extinguisher with you that is rated for ordinary combustibles and flammable liquids.
•
STOP!
ADD OIL TO ENGINE BEFORE USING: Engine is shipped without
ADD HYDRAULIC OIL: Your log splitter was shipped without
manual for instructions on filling the hydraulic reservoir
INSPECT COMPONENTS: Closely inspect to make sure no components are missing or damaged.
See Initial Unpacking & Set-up for instructions and for whom to contact to report missing or damaged parts.
Any Questions, Comments, Problems or Parts Orders
Call NorthStar Product Support 1-800-270-0810
1
oil. DO NOT start log splitter without first adding oil.
hydraulic oil. Refer to Periodic Maintenance section of this
Page 2

Hazard Signal Word Definitions
2
Page 3

Table of Contents
About Your Log Splitter........................................................................................................... 4
Safety Label Locations............................................................................................................. 5
Machine Components Identification........................................................................................7
Initial Set-up............................................................................................................................. 8
Optional 4-Way Wedge Wings ................................................................................................ 10
Moving & Towing to the Job Site............................................................................................ 11
Before Each Use:
Step One: Inspection/Maintenance................................................................................. 14
Step Two: Refueling....................................................................................................... 16
Step Three: Work site Selection & Set-up .................................................................... 17
Splitting Operation...................................................................................................................19
Storage......................................................................................................................................24
Periodic Maintenance............................................................................................................... 25
Troubleshooting........................................................................................................................ 26
Specifications ........................................................................................................................... 27
Parts Breakdown – Exploded View.......................................................................................... 28
Summary of Important Safety Information for Operation .......................................................30
Assembly Instructions.............................................................................................................. 35
3
Page 4

About Your Log Splitter
Thank you for purchasing your NorthStar log splitter!
About Your Log Splitter:
This log splitter is a machine designed to split wood logs using a hydraulically powered moving wedge.
The log splitter’s gasoline engine is used to pressurize the hydraulic system.
This log splitter is designed to split logs lengthwise with the grain only.
Your splitter can be used in either a vertical or horizontal splitting position:
• When the splitter is set up to operate in the horizontal splitting position, a log is placed on the
horizontal beam and the wedge moves horizontally into the end of the log to split it.
• When the splitter is set up to operate in the vertical splitting position, the log is placed on the
endplate, upright on its end, and the wedge moves down into the top of the log to split it.
The horizontal splitting position is used for lighter logs that can be easily loaded onto the beam. The
vertical splitting position is used for heavier logs that are difficult to load onto the beam.
The technical specifications for your log splitter are provided in the Specifications section of this
manual.
WARNING
This log splitter uses a high-pressure hydraulic system to generate a very strong splitting
force.
Read the manual completely before using the machine to understand how to safely operate
and maintain it.
Follow all safety precautions presented throughout this manual. A summary of important safety
information can be found at the end of this manual.
Contact NorthStar Product Support at 1-800-270-0810 for any questions about the appropriate
use of this log splitter and/or optional accessories.
Warranty Registration:
Please fill out and submit the warranty registration card so that we have your contact information for any
future product literature or replacement parts you may need.
Attention: All Rental Companies and Private Owners who loan
this equipment to others!
All persons to whom you rent/loan the log splitter must have access to and read this manual. Keep this owner’s
manual with the splitter at all times and advise all persons who will operate the machine to read it. You must
provide instruction on how to safely operate the splitter and remain available to answer any questions a
renter/borrower might have.
4
Page 5

Safety Label Locations
10
6
3
1
Reference # Part # Description
1 39259 Warning Decal
2 777887 Splitter Operating Instruction Decal
3 777890 Fire Hazard Warning Decal
4 777891 Hydraulic Fluid Warning Decal
5 777892 Moving/Towing Decal
6 778593 Outrigger Leg Decal
7 778597 Horizontal Lock Decal
8 778609 Control Decal
9 778610 Log Splitter Warning Decal
10 778714 Vertical Lock Decal
11 778717 Log Stripper Decal
Always make sure safety labels are in good condition. If a safety label is missing or not legible, order new
labels or unsafe operation could result.
11
9
4
5
8
2
7
6
Fig 02403
5
Page 6

WARNING
POISONOUS GAS
This product's use gives off carbon
monoxide, an odorless gas that can
kill you.
ONLY use outdoors and away
from air intakes.
NEVER use inside homes, garages,
or sheds. EVEN IF you run a fan or
open doors and windows.
See product manual for more details.
©2005 Northern Tool + Equipment Co. 1-800-270-0810
Safety Label Locations
PN 39259
ESCAPING HIGH PRESSURE HYDRAULIC FLUID HAZARD
High fluid pressures and temperatures are developed in the
hydraulic system. Hydraulic fluid escaping through even a pin-size
hole opening can puncture skin and cause blood poisoning.
Inspect hydraulic system regularly for leaks
Never check for leaks with your hand while system is pressurized.
©2005 Northern Tool + Equipment Co. 1-800-270-0810
Seek medical attention immediately if injured by escaping fluid.
WARNING
PN 777891
SPLIT CONTROL LEVER OPERATION
HORIZONTAL
LOCK
PN 778597
6
VERTICAL
LOCK
PN 778714
Page 7
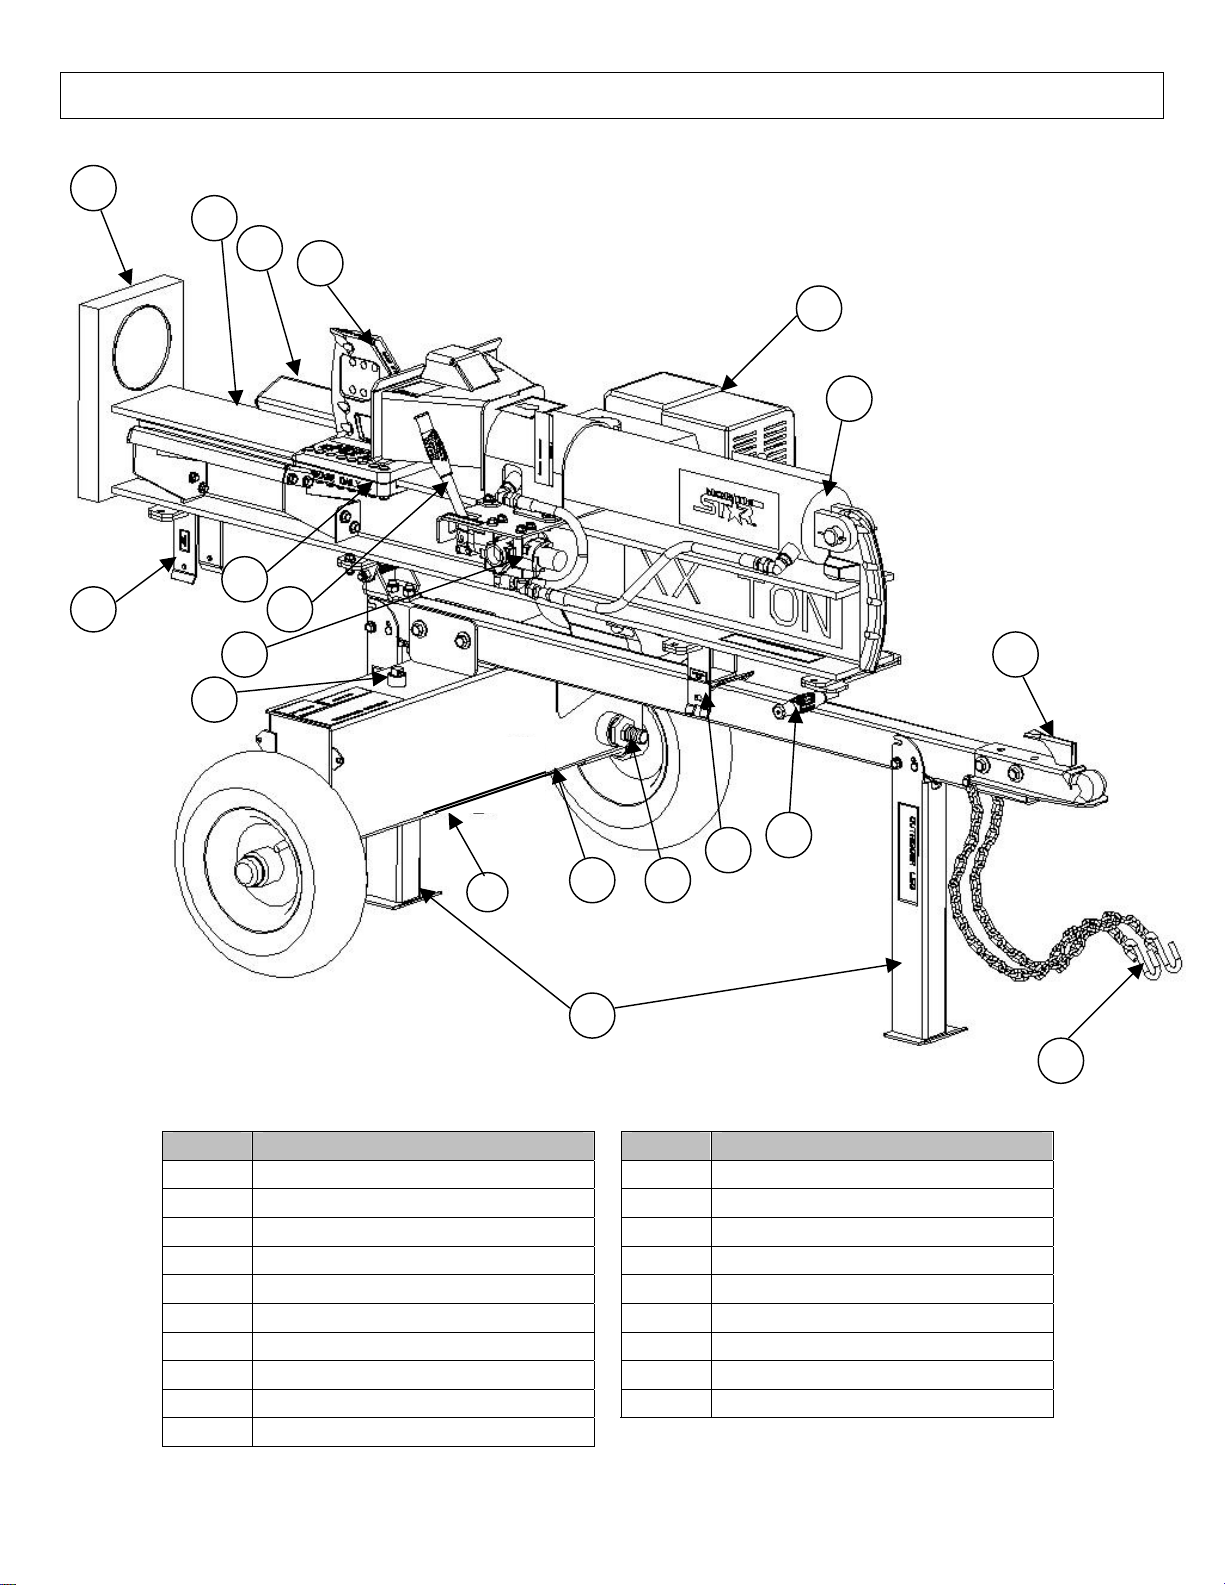
Machine Component Identification
11
18
10
9
8
13
4
19
6
7
5
3
Fig 02407
20
14
12
2
15
1
17
Ref # Description Ref # Description
1 2” Ball Coupler 11 Endplate
2 Horizontal Lock 12 Outrigger Legs
3 Lifting Handle 13 Engine
4 Cylinder 14 Hydraulic Tank
5 Hydraulic Oil Dipstick 15 Suction Strainer
6 Split Control Lever 17 Safety Chains
7 Control Valve 18 Vertical Lock
8 Wedge 19 Grease Zerks
9 Log Cradle 20 Drain Plug
10 Beam
7
Page 8

Engine is shipped without oil. DO NOT start the engine before adding oil.
See Assembly Instructions section of this manual to assemble the log splitter before
set-up.
Step One:
Inspect Log
Splitter
Components.
Initial Set-Up
IMPORTANT!
Closely inspect all log splitter components.
(See Machine Components section of this manual for diagram of components.)
• If you have missing components, contact Product Support at 1-800-270-0810.
• If you have damaged components, contact the Freight Company that delivered the unit
and file a claim.
Step Two:
Add Oil to Engine
Step Three:
Add Hydraulic Oil
to Reservoir
Add oil to the engine. Using a funnel. Add SAE 10W-30 oil up to the FULL mark
on the dipstick. (See engine Owner’s Manual for oil capacity and location of fill cap.)
WARNING: High fluid pressures and temperatures are developed in hydraulic log
splitters. Hydraulic fluid escaping through a pin hole sized opening can burn or
puncture skin, resulting in wounds that could cause blood poisoning, infection,
disability, gangrene, amputation, or death. Therefore, the following instructions
should be heeded at all times when inspecting or servicing the hydraulic components
of the log splitter.
• NEVER check for leaks with your hand. Leaks can be located by holding a piece of
cardboard or wood (at least two feet long) with your hand at one end and passing the
other end over the suspected area (wear eye protection). Look for discoloration of the
cardboard or wood.
• NEVER adjust the pressure of the pump or valve.
• If injured by escaping fluid, no matter how small the wound is, see a doctor at once. A
typical injection injury may be a small wound that does not look serious. However,
severe infection or reaction can result if proper medical treatment is not administered
immediately by a doctor who is familiar with injection injuries.
1. Remove hydraulic oil dipstick.
2. Refer to the Specifications section for approximate hydraulic oil capacity.
3. Fill reservoir with 10 wt AW32, ASLE H-150, or ISO 32 oil. Use a funnel
4. Replace hydraulic oil dipstick.
5. Start engine and use control valve handle to extend and retract wedge 5 (five) times
to remove air from the high pressure lines.
6. With wedge retracted, check oil level again. Fill if necessary.
WARNING: NEVER remove the hydraulic oil fill cap when the engine is
running or hot. Hot oil can escape causing severe burns. Allow log splitter to
cool completely before removing hydraulic oil fill cap.
Note:
If the log splitter will be run for long periods of time in outdoor temperatures
above 70F, we recommend changing the hydraulic oil to DEXTRON III.
8
Page 9

Initial Set-Up
Step Four:
Lubricate Keepers
WEDGE
Pump grease into grease zerks found under each keeper. This will help prevent
wear between the keepers and beam.
BEAM
Fig 02408
KEEPER
GREASE ZERK
9
Page 10
4-Way Wedge
Wings
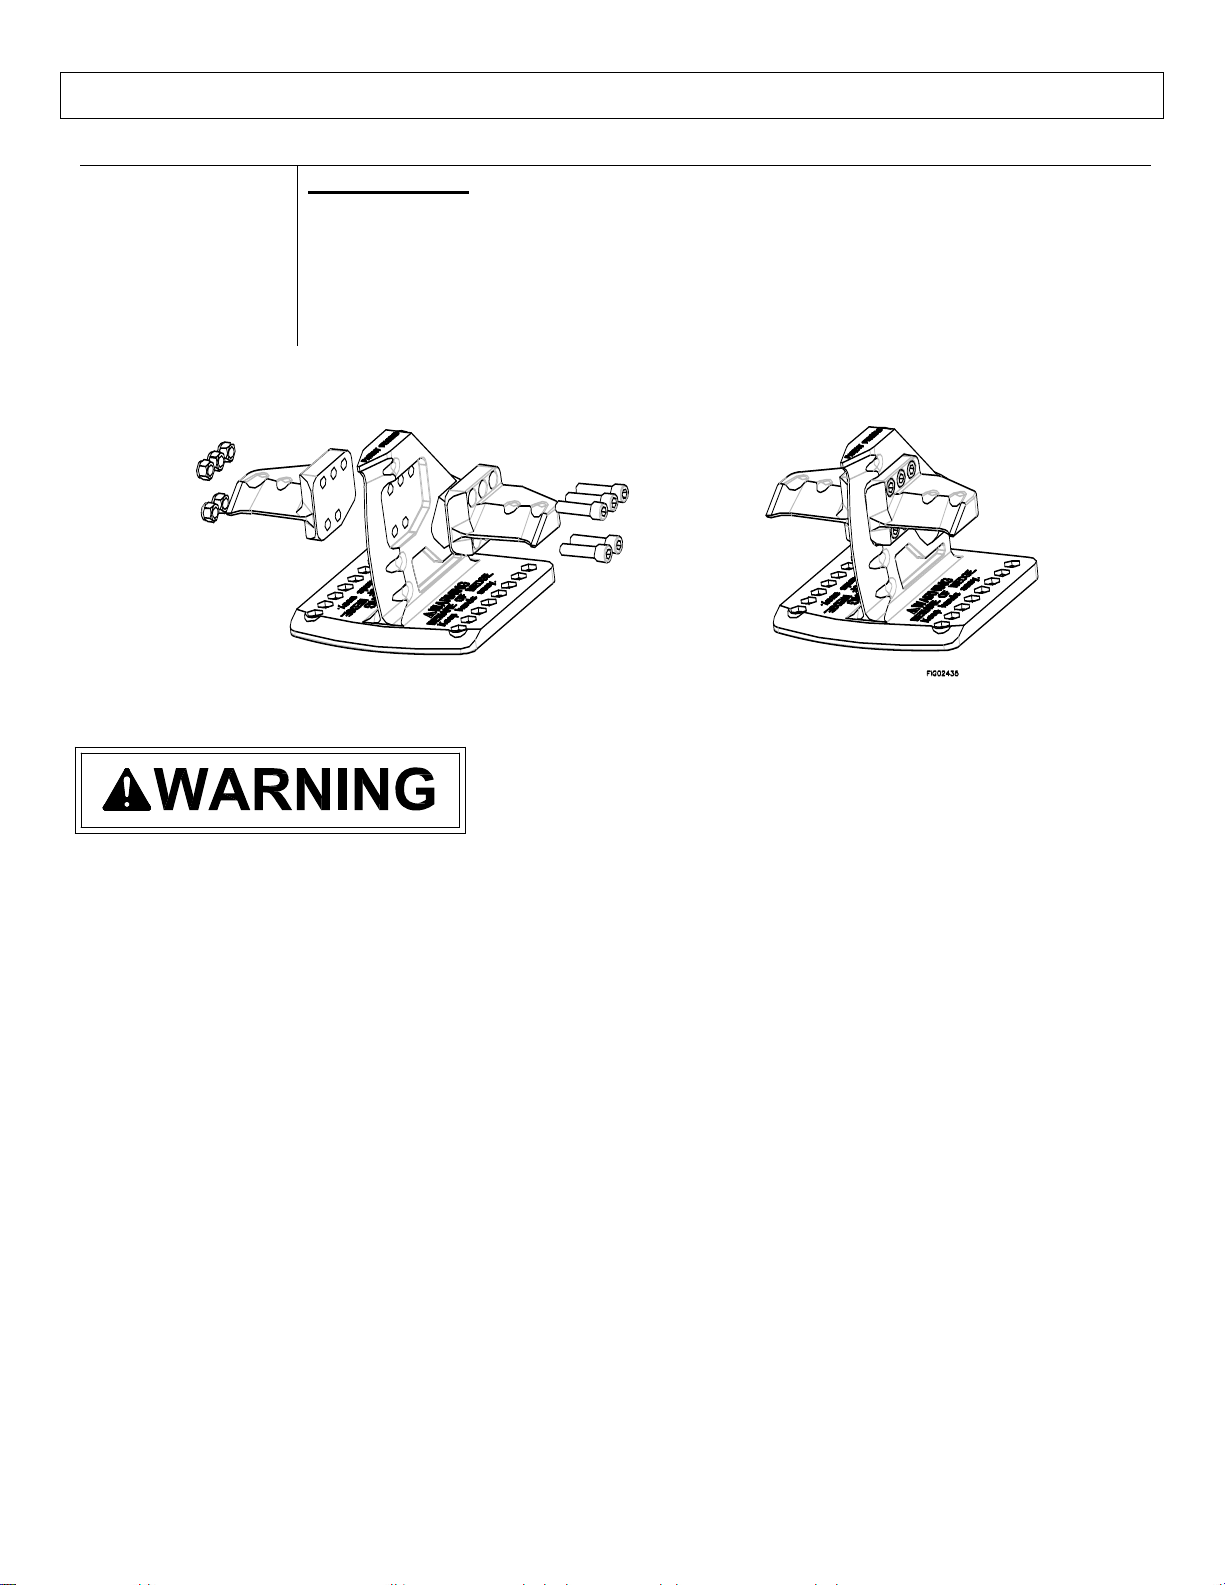
Optional 4-Way Wedge Wings
Wing Assembly
1. Unbox and identify components
2. Insert Nylon nuts into hex cutouts in wing
3. Position wings into proper locations on the wedge and bolt into position using supplied
bolts
4. Tighten the bolts with a 3/8
Exploded View
”
hex wrench
Assembled View
4-Way Wings create additional pinch points when the wedge is moving forward or
•
backwards. Keep hands clear of the wedge, wedge wings, and the log while the wedge is
moving. When the log is caught on the wedge do not use the auto-return feature. Retract
wedge manually, paying close attention so the log does not hit the engine or control valve.
Pay particular attention to stringy wood, such as elm, because it becomes lodged on the
•
wedge easily.
To order call: Northern Tool + Equipment at 1-800-556-7885
Item # 1143
10
Page 11

The log splitter is heavy. It can crush and cause serious injury if it rolls out of control or
tips over.
Follow the instructions below for safely moving and towing the log splitter.
Moving the log splitter:
1. Place in
Horizontal
position
Moving and Towing to the Job Site
WARNING
Make sure the log splitter is locked in the horizontal position with hitch pin
before moving
NEVER move log splitter when it is in vertical configuration because it will be
unstable and could tip.
.
2. Engine off.
3. Fuel valve off
(if equipped)
4. Lock:
• Front
outrigger leg
DOWN
• Rear
outrigger leg
UP
5. Move log splitter
to work site or
tow hitch
IMPORTANT: Make sure log splitter engine is off.
Never move the log splitter with its engine running.
Turn fuel valve off to prevent carburetor flooding and reduce the chance of fuel
leakage. Refer to Engine owner’s manual for fuel valve location.
Lock the front outrigger leg in the “DOWN” position and the rear support leg
in the “UP” position before you move the log splitter.
Lock front
Fig 02409
outrigger leg in the
down position
Lock rear
outrigger leg in
the up position
Move log splitter by hand either directly to chosen work site or to vehicle
hitch for towing.
(See Before Each Use: Step Three: instructions on selecting a work site)
Important Safety Instructions:
• Hills. Do not move the log splitter up or down hills by hand—use a towing
vehicle.
• No riding. Never allow anyone to sit or ride on the log splitter.
• No cargo. Never transport cargo or wood on the log splitter.
11
Page 12
Moving and Towing to the Job Site
Towing:
1. Read instructions Review towing safety instructions in your vehicle manual.
2. Check tires Make sure tires are fully inflated and in good repair.
WARNING:
• Do not over-inflate tires. Serious injury can occur if tire explodes.
• When seating a bead after repair, do not exceed 30 PSI. Pressures higher
than 30 PSI can cause the tire and wheel to rupture and explode.
3. Attach to hitch
(2” ball)
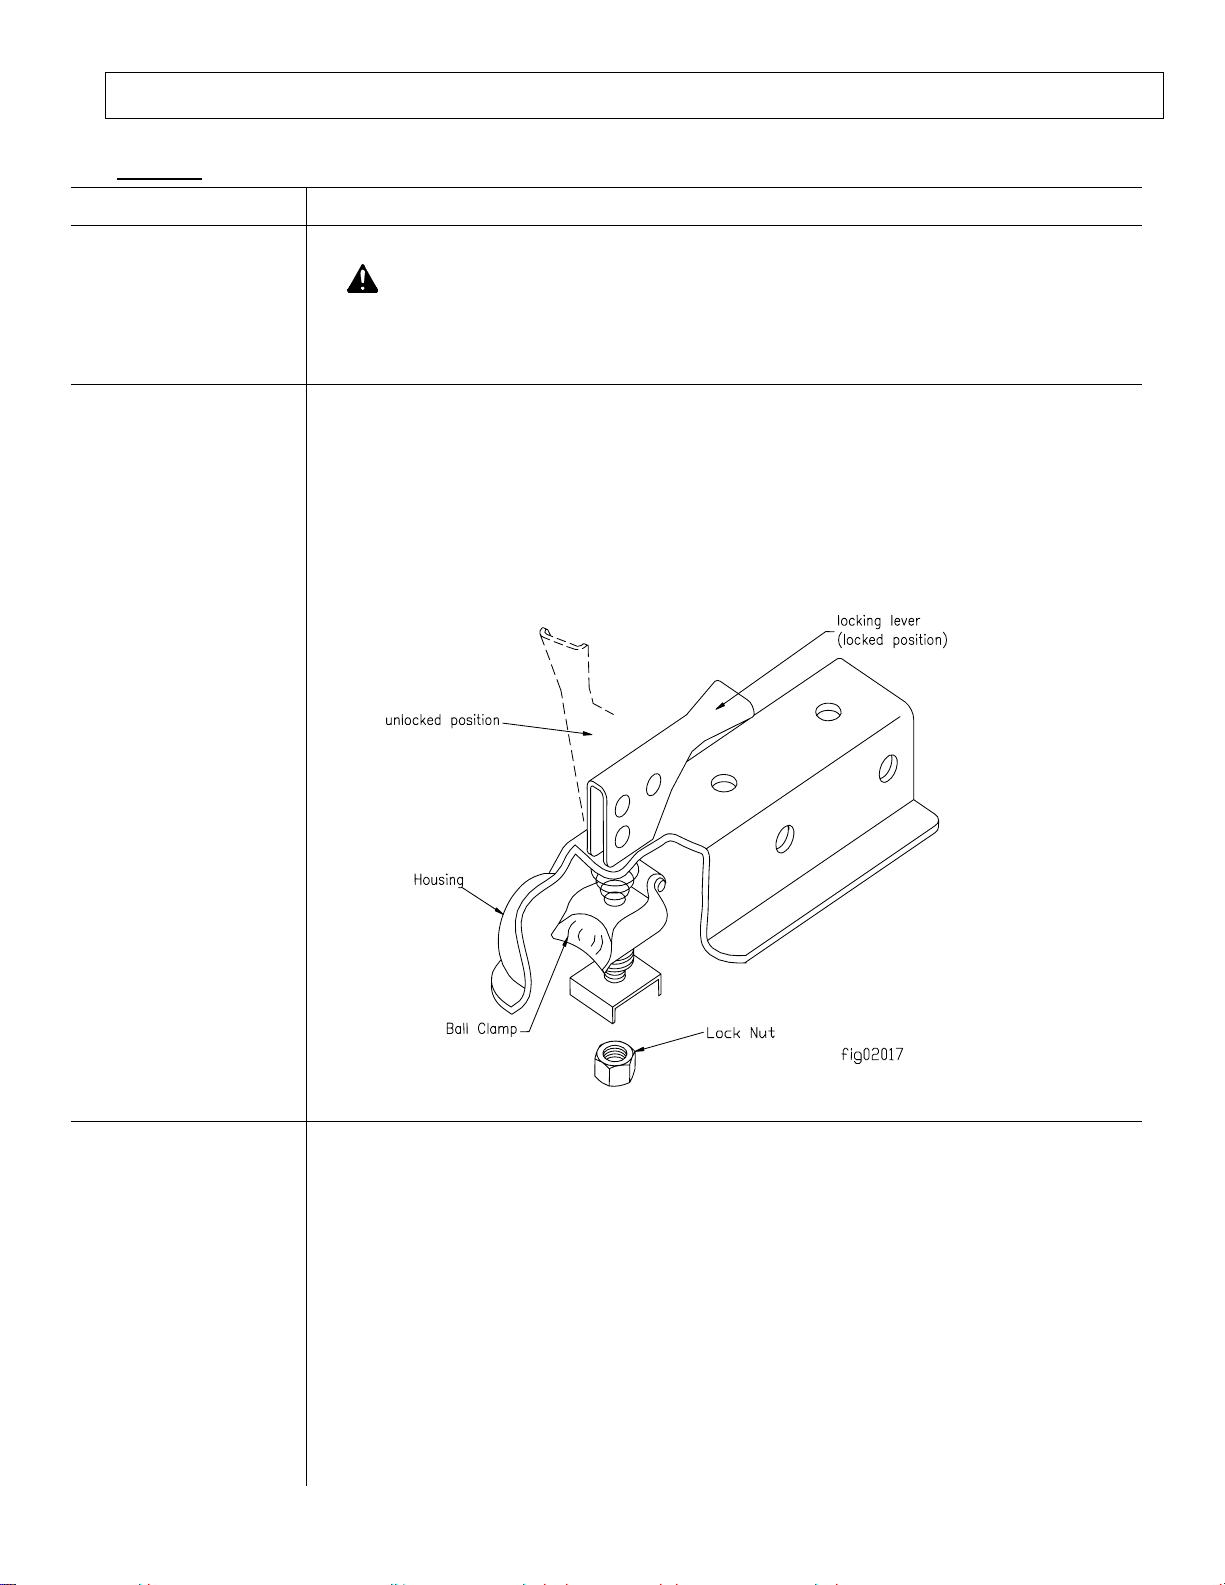
Attach log splitter to vehicle hitch
1. Attach log splitter’s coupler to a class 2 or higher hitch with 2” ball (only).
2. Adjust coupler to ball by raising locking lever and turning lock nut with fingers.
3. Proper adjustment is obtained when coupler is as tight as possible on ball and
locking lever can still be opened and closed.
Lock lever closed to secure the attachment. An optional locking pin or padlock
4.
may be inserted in the locking lever hole for extra security.
4. Attach safety
chains
Attach safety chains.
1. Two safety chains must be used while towing.
2. Cross safety chains under the coupler allowing only enough slack for vehicle
turns.
12
Page 13
Moving and Towing to the Job Site
p p
r
5. Put front
outrigger leg UP
6. Tow to desired
location
7. Lock front
outrigger leg down
& unhitch
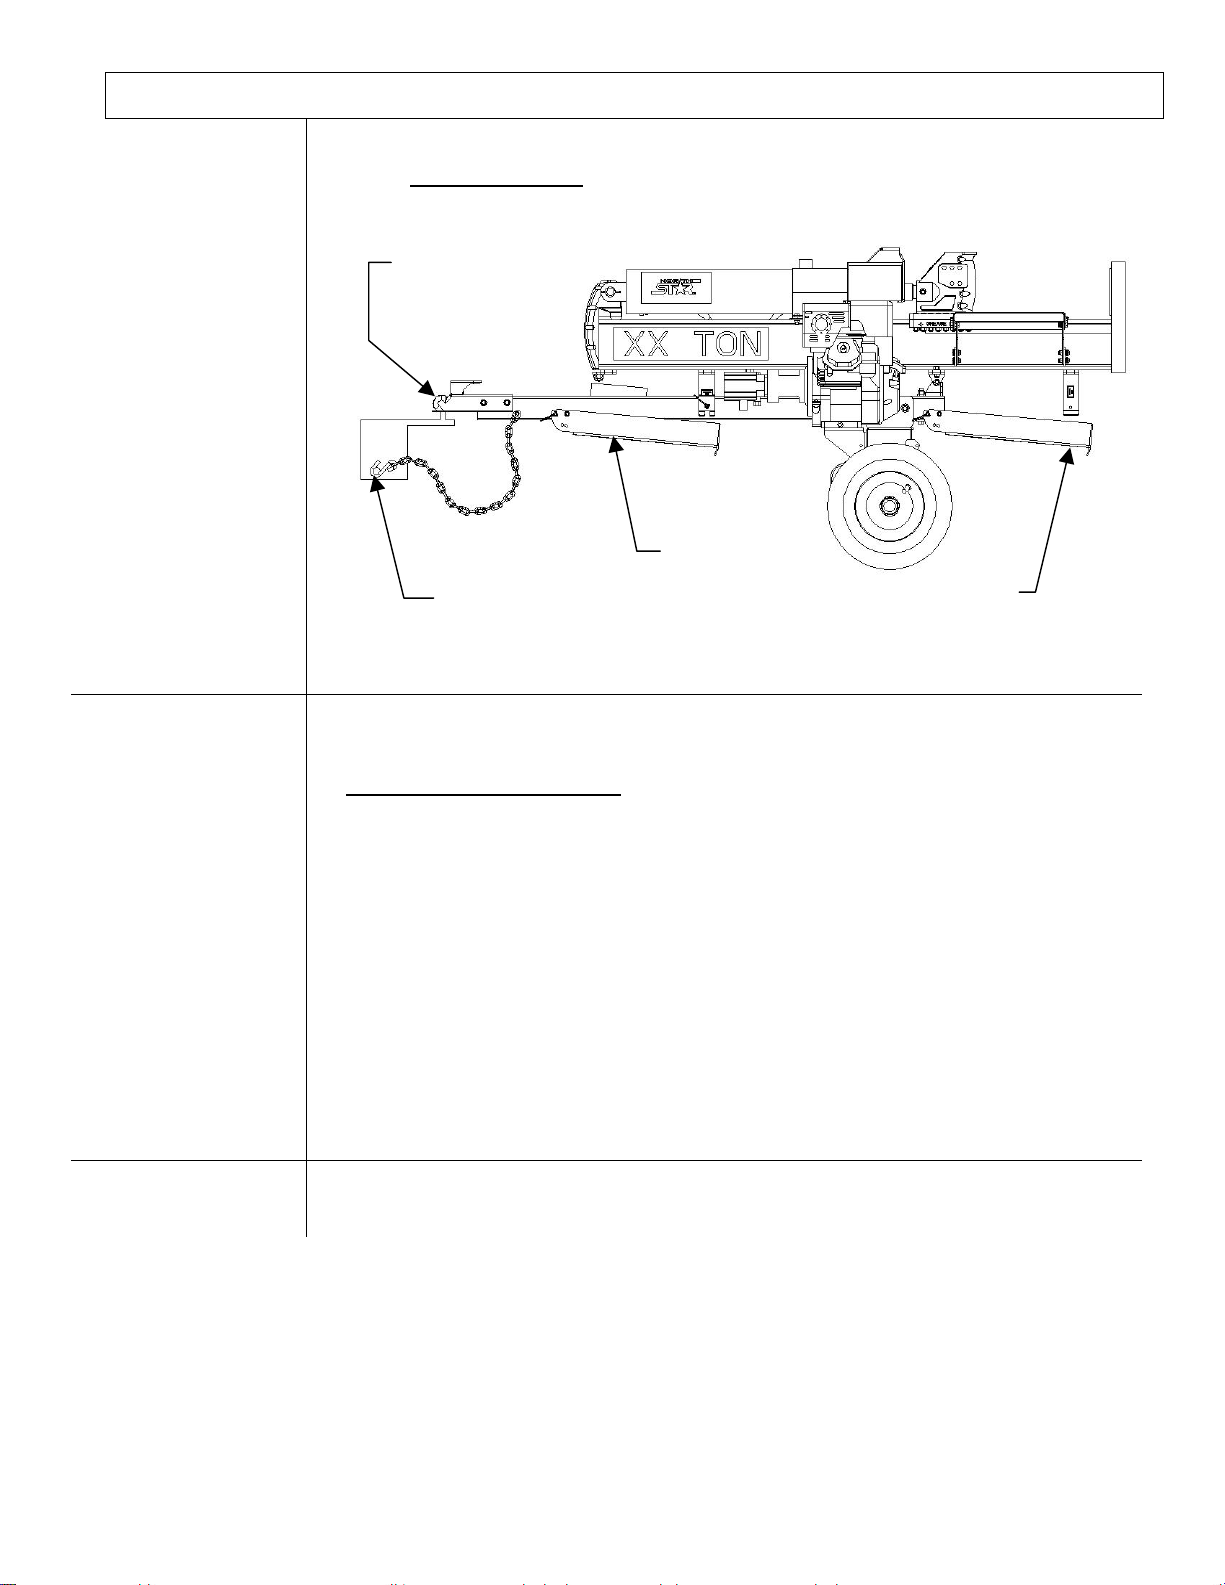
Move the front outrigger leg
must remain in the up position during towing.)
to the “UP” position and lock. (Both outrigger legs
Attach coupler to class 2
or higher hitch with 2”
ball. Latch Securely.
Hook both safety
chains to the towing
vehicle
Lock front
outrigger leg in the
u
osition
Lock rea
outrigger leg in the
up position
Tow log splitter carefully to desired work site.
(See Before Each Use section on selecting an appropriate work site)
Important safety instructions
• Added length. Be aware of the added length of the splitter.
• Speed limit. Never tow this log splitter over 45 mph. Faster speeds may
result in loss of control.
• Rough terrain. Drive slowly and take extra caution when traveling over
rough terrain.
• On public roads. If towing on a public road, make sure to comply with all
local, state, and federal towing requirements. It is the sole responsibility of
the purchaser to obtain licensing, trailer lights, safety chains or signage, as
needed to comply.
• Unattended. Turn off the towing vehicle before leaving the splitter
unattended.
• Under the influence. Never tow or operate this splitter while under the
influence of alcohol, drugs, or medication.
Lock front outrigger leg in the DOWN position and disconnect from vehicle.
NEVER operate log splitter while it is attached to the vehicle.
:
Fig 02410
13
Page 14

Before Each Use-Inspection / Maintenance
Step One: Inspect and maintain log splitter before each use
If the log splitter has been used previously, it must be inspected and maintained BEFORE EACH SUBSEQUENT USE.
WARNING
ALWAYS shut off the engine, disconnect the spark plug, and relieve system pressure before
inspecting, cleaning, adjusting, or repairing the splitter. Relieve system pressure by moving Split
Control Lever back and forth several times.
IMPORTANT:
If a part needs replacement, only use parts that meet the manufacturer’s specifications. Replacement parts that do not
meet specifications may result in a safety hazard or poor operation of the log splitter.
1. Engine off /
relieve pressure
2. Remove debris Remove debris from engine, muffler, and moving parts.
Perform all inspections/repairs with the engine off and hydraulic system pressure relieved.
1. Make sure engine is off and cool.
Disconnect the spark plug
2.
Relieve all hydraulic system pressure by moving the Split Control Lever back and forth
3.
several times.
1. Engine debris
. Debris on a hot engine can be a fire hazard. Clean debris and chaff from
engine cylinder head, cylinder head fins, blower housing rotating screen, and muffler
areas. Avoid contact with hot muffler.
2. Other debris
. Debris on moving parts can cause excess wear. Clear debris from the slide
beam, wedge, and endplate.
3. Fuel tank / lines Check fuel tank and fuel lines for leaks.
Any fuel leak is a fire hazard. Fix any fuel leaks before starting engine.
4. Mechanical parts
Check to be sure that all nuts and bolts are tight to make sure the log splitter is in safe
working condition.
Apply grease to grease zerks.
WEDGE
BEAM
KEEPER
Fig 02408
14
GREASE
ZERKS
Page 15

Before Each Use-Inspection / Maintenance
5. Hydraulic system Check the hydraulic system carefully:
1. Visually inspect all hoses, tubing, clamps/fittings, pump, and cylinder for cracks, fraying,
kinks, or other damage.
2. Check all components for oily residue, which may indicate a leak.
Do NOT operate the log splitter if there is any indication of damage or oily residue. Small leaks
in hydraulic lines can cause severe injuries and can also be an indication of catastrophic failure
in the near future. The life of hydraulic hoses may be from a few months to a few years,
depending on use and storage patterns.
WARNING: High fluid pressures and temperatures are developed in hydraulic log
splitters. Hydraulic fluid escaping through a pin hole sized opening can burn or
puncture skin, resulting in wounds that could cause blood poisoning, infection,
disability, gangrene, amputation, or death. Therefore, the following instructions should
be heeded at all times when inspecting or servicing the hydraulic components of the log
splitter:
• Stop the engine, disconnect the spark plug, and move all control valve handles back
and forth to relieve pressure before changing or adjusting hydraulic system
components such as hoses, tubing, fittings or other components.
• NEVER check for leaks with your hand. Leaks can be located by holding a piece of
cardboard or wood (at least two feet long) with your hand at one end and passing the
other end over the suspected area (wear eye protection). Look for discoloration of the
cardboard or wood.
• NEVER adjust the pressure setting of the pump or valve.
• If injured by escaping fluid, no matter how small the wound is, see a doctor at once.
A typical injection injury may be a small puncture wound that does not look serious.
However, severe infection or reaction can result if proper medical treatment is not
administered immediately by a doctor who is familiar with injection injuries.
6. Hydraulic oil level
7. Engine Inspect and perform engine maintenance as directed in the engine manual.
8. Spark arrestor
muffler
9. Tires Make sure tires are fully inflated and in good repair if you will be towing the splitter.
Check the hydraulic oil level using the dipstick. Fill as needed.
WARNING: NEVER remove the hydraulic oil dipstick when the engine is running or
hot. Hot oil can escape causing severe burns. Allow log splitter to cool completely
before removing hydraulic oil dipstick.
If the engine is equipped with a spark arrestor muffler, clean and inspect it regularly
(follow spark arrestor manufacturer’s service instructions).
Replace if damaged.
See tire sidewall for recommended tire pressure.
WARNING:
• Do not over-inflate tires. Serious injury can occur if tire explodes.
• When seating a bead after repair, do not exceed 30 PSI. Pressures higher than 30 PSI can
cause the tire and wheel to rupture and explode.
10. Shields / guards
Replace all guards and shields after servicing the log splitter.
15
Page 16

Before Each Use - Fueling
Step Two: Fueling
Gasoline is highly flammable and explosive. You can be burned or seriously injured when handling
fuel. Use extreme care when handling gasoline.
1. Engine off / cool
The engine must be off and allowed to cool at least two minutes before adding fuel.
WARNING: A running engine is hot enough to ignite fuel. Never add fuel or remove gas
cap if engine is running or still hot.
2. Outdoor location Fill fuel tank outdoors – never indoors.
WARNING: Gasoline vapors can ignite if they collect inside an enclosure. Explosion can
result.
WARNING
3. Remove gas cap Remove engine gas cap.
4. Add gasoline Add gasoline through fill opening from a UL-approved container.
Important Safety Instructions:
• Use approved container. NEVER pump fuel directly into engine at gas station. Static
charge can build and ignite fuel. Use a UL approved fuel container to transfer gas to the
engine.
• Don’t overfill. DO NOT overfill the gas tank. Allow at least 1/2” of empty space below
the fill neck to allow for fuel expansion
• Heat / flames / sparks. Stay away from sources of heat, flame, or sparks while adding
fuel.
5. Spills / splashes Clean up fuel spills /splashes immediately.
1. Move the log splitter away from spilled fuel on the ground.
2. Wipe fuel off engine and wait 5 minutes for excess fuel to evaporate before starting engine.
3. Gas soaked rags are flammable and should be disposed of properly.
4. If gasoline is spilled on your skin or clothes, change clothes and wash skin immediately.
6. Replace gas cap Replace gas cap securely before starting engine.
7. Gasoline storage Store extra gasoline in a cool, dry place in a UL approved, tightly sealed container.
16
Page 17

Before Each Use – Work Site Selection and Set-up
t
n
n
p
n
gg
Step Three: Work site selection and log splitter set-up
WARNING
It is important to select an appropriate work site and properly set up the log splitter in order to
minimize the risk of slips and falls, equipment rolling or tipping over, carbon monoxide poisoning,
and accidental fires.
1. Select location Select an appropriate location for operating the log splitter.
2. Fire precautions
Requirements
:
1. Dry-level surface with good footing. Stay clear of areas with mud, ice, tall grass, weeds,
brush, or snow.
2. Outdoors, away from air intakes.
WARNING: The running engine gives off carbon monoxide, a poisonous gas that can
kill you. You CANNOT smell it, see it, or taste it.
• ONLY run log splitter OUTDOORS and away from air intakes. NEVER run log splitter
inside homes, garages, sheds, or other buildings or semi-enclosed spaces. These spaces can
trap poisonous gases, EVEN if you run a fan or open windows.
• If you start to feel sick, dizzy, or weak while using the log splitter, shut off the engine and
get to fresh air RIGHT AWAY. See a doctor. You may have carbon monoxide poisoning.
Take the following precautions against fire:
1. IMPORTANT
grassy covered land, then engine must be equipped with a spark arrestor
: If your splitter will be used near any unimproved forest, brush, or
.
(See the “Specifications” section of this manual to determine if your splitter already has a
spark arrestor. Contact NorthStar Product Support at 1-800-270-0810 for information about
obtaining a spark arrestor for your log splitter if it is unequipped.)
2. Make sure you comply with applicable local, state and federal codes.
3. Keep a fire extinguisher available (classified for both ordinary combustibles & flammable
liquids) as a precautionary measure when operating the log splitter in dry areas.
3. Position splitter 7’
from any
combustibles or
flammable liquids
4. Lock both
outrigger legs
DOWN
5. Block wheels
6. Apply grease
Position muffler at least 7 ft. from combustible objects during operation.
Hot exhaust fumes from engine could cause fire. Also, hydraulic oil leaking or spraying on hot
engine can ignite.
Lock both the outrigger legs in the “DOWN” position.
Lock fron
outrigger leg i
the dow
ositio
outri
Lock rear
er leg in
the down
position
Block the wheels to prevent unintended movement of the log splitter.
Apply grease into grease zerks located under both keepers.
17
Page 18

Splitting Operation
WARNING
Before starting this log splitter, review the following instructions and safety information for safe
operation of the log splitter.
Failure to follow these rules may result in serious injury to the operator or bystanders from moving
parts that crush, cut, or entangle from flying objects, burns, fire, falling or tripping, or from carbon
monoxide poisoning.
General safety information:
• Read manual. Do not allow anyone to operate the log splitter who has not read the Owner’s Manual or has not
been instructed on the safe use of the splitter. The log splitter owner should instruct all operators in safe log
splitter operation.
• Age restrictions. Never allow anyone under 16 years old to operate the log splitter. Anyone 16 years and older
must be trained and supervised by a trained adult.
• Intended use. Log splitters should only be used for splitting wood logs, lengthwise with the grain. Do not use for
other purposes as unforeseen hazards may result.
• Modifications. Never modify or alter the log splitter in any way. Modifications can create serious safety
hazards and will void the warranty:
• Attachments. Never add attachments to the splitter, except for authorized accessories supplied by the
manufacturer with instructions for safe installation and use.
• Engine speed. The maximum engine speed is preset at a safe limit. Never attempt to modify the engine speed
setting to run at a higher speed.
• Fuel/exhaust system. NEVER modify or add to the exhaust system, fuel tanks, or fuel lines. Fire can result.
• Remote control. NEVER attach a rope, cable, or other remote device to the splitting control.
• Splitting wedge. NEVER attempt to change the height or speed of the splitting wedge.
• Pressure setting. NEVER increase the pressure setting of the pump or control valve.
• Safety equipment / controls. Always operate the log splitter with all safety equipment in place and in good
working order, and all controls properly adjusted for safe operation.
• Know how to stop. Be thoroughly familiar with all controls and with the proper use of the equipment. Know
how to stop the log splitter and relieve system pressures quickly if needed.
• Operating speed. Always operate the log splitter at the manufacturer’s recommended speed. The maximum
speed of the engine pump and wedge are preset within safe limits.
• Daylight only. Only use the log splitter in daylight so you can see what you are doing.
• Smoking / sparks. Never smoke while operating the log splitter, and never operate near sources of sparks or
flames.
• Under the influence. Never operate, or let anyone else operate, the log splitter while under the influence of
alcohol, drugs, or medication.
• Unattended. Never leave the machine unattended while the engine is running.
• Refueling. Never refuel the engine until it has cooled at least two minutes.
• Adjusting / repairing. Always make sure the engine is off before cleaning, repairing or adjusting the splitter,
except as recommended by the manufacturer. In addition, disconnect the spark plug and move all control handles
back and forth to relieve system pressure before changing or adjusting hydraulic system components such as
hoses, tubing, fittings or other components.
• Replace labels. Always make sure safety labels are in place and in good condition. If a safety label is missing or
not legible, order new labels because unsafe operation can result. Call 1-800-270-0810 to order new safety labels.
18
Page 19

Splitting Operation
g
k
H
1. Put on
protective
clothing /
gear
2. Lock & block Block the wheels to prevent unintended movement of the log splitter. Check that:
3. Set to
horizontal
or vertical:
a) Set to
Horizontal
position
Wear the following protective clothing and safety gear:
1) Eye protection. Always wear safety glasses or goggles when operating the machine. Pieces
of log may fly out and serious eye injury can occur.
2) Boots. Falling logs can crush feet. Always wear safety shoes or heavy boots when operating
or helping to load logs.
3) Gloves. Wear snug fitting gloves without drawstrings or loose cuffs.
4) Hearing protection. The use of earplugs or other hearing protection device is recommended.
5) No Loose / dangling. Loose or dangling apparel can become entangled in moving parts.
Never wear jewelry or loose-fitting clothing.
1) The outrigger legs are both
locked in the DOWN position.
2) The wheels are blocked.
Set log splitter into either the horizontal or vertical splitting position
The HORIZONTAL splitting position is used for lighter logs that can be easily loaded onto the beam.
The VERTICAL
onto the beam.
Note:
Musculoskeletal injury can result from lifting logs onto the log splitter if proper lifting techniques
are not used or the logs are too heavy for a person’s size, weight, or strength. In some cases, logs
as small as 8” in diameter and 14” in length may be heavier than what some persons should be
repeatedly lifting onto the splitter.
The use of the vertical splitting position can greatly reduce the need to lift logs onto the splitter.
Employers are advised to consider NIOSH lifting guidelines when assigning employees to log
splitting tasks for an extended period of time.
splitting position is used for light logs as well as heavy logs that are difficult to load
WARNING: NEVER change splitting positions with the engine running. You may
contact the muffler and receive serious burns.
Make sure beam is locked securely in the horizontal position by checking the horizontal lock.
Rear outrigger leg must be locked in horizontal splitting position.
orizontal Splitting Position
Rear outrigger le
Horizontal
Loc
Front outrigger leg
Fig 02412
19
Page 20

b) Set to
position
Vertical
Splitting Operation
1) Lock rear outrigger leg in down position.
2) Pull out horizontal lock catch pin, grasp lifting handle and lift beam until it rotates into
vertical position.
WARNING: Crush hazard. The beam is heavy – do not let it just drop. It could crush
fingers or cause damage to the splitter.
Lifting handle
Rear outrigger leg
Vertical lock
3) Lock in vertical position using catch pin through the vertical lock.
4) To return to horizontal position, unlock vertical position, grasp lifting handle and lower
beam carefully in a controlled manner until it rests on the tow bar, lock beam in the
horizontal position with catch pin.
Vertical Splitting Position
Fig 02413
Front outrigger leg
4. Start engine Start the engine.
See the engine owner’s manual for engine starting instructions.
NOTE:
a) Make sure the hydraulic oil is above 10°F before starting the engine. Cold hydraulic oil
can damage the hydraulic pump.
b) If outdoor air temperature is below 32°F, allow log splitter to warm up by extending and
returning the wedge several times before splitting wood.
WARNING:
Burns. To avoid burns, stay clear of hot muffler if you are starting a warm engine.
Carbon monoxide. The running engine gives off carbon monoxide, a poisonous gas
that can kill you. You CANNOT smell it, see it, or taste it. If you start to feel sick,
dizzy, or weak while using the log splitter, shut off the engine and get to fresh air
RIGHT AWAY. See a doctor. You may have carbon monoxide poisoning.
Other exhaust dangers. Engine exhaust, some of its constituents, and certain vehicle
components contain or emit chemicals known to the State of California to cause cancer, birth
defects, or other reproductive harm. Avoid inhalation of exhaust.
20
Page 21

5. Load log
Splitting Operation
Load log onto beam with a cut end against the endplate – positioned for a lengthwise cut.
Notes:
a) The log splitter is designed only
for cutting lengthwise with the grain, NOT for cutting
across the grain.
b) This log splitter is designed for cutting logs only up to a maximum of 16” in diameter and
25” long. Larger diameter logs could get stuck on the wedge and longer logs will not fit on
the beam.
Correct Log Orientation Incorrect Log Orientation
WARNING: ALWAYS keep hands and feet away from the endplate, wedge, and partially
split logs while loading, operating and unloading the log splitter.
Important safety instructions:
• Hold bark side. Hold the bark side of logs when loading or positioning, never the ends.
Never place your hands or any part of your body between a log and any part of the log
splitter.
NOTE for vertical position loading: Place the log on the endplate and turn it until it leans
against the beam and is stable. If the log is too big or oddly shaped, stabilize the log with
wooden shims between the log and endplate or ground. DO NOT use your leg or knee to
stabilize the log. NEVER stabilize the log by placing your hand on top of the log.
• Wedge moving. NEVER load or unload logs while the wedge is moving.
• Straddling / reaching across. Never straddle, reach across, or step over the beam while the
engine is running and the log splitter is in the horizontal position. You could trip, actuate
the controls, and get seriously injured.
• Unsplit log pile. Do not pile logs to be split in a place that will make you reach across the
log splitter in order to load them.
• Square log ends. Logs that are not cut square can slide out while splitting and become a
safety hazard or cause excessive force to log splitter components. Use a chainsaw to cut
logs square on each end before attempting to split them.
• Single log. Never attempt to split more than one log at a time. Pieces of log can
unexpectedly be thrown from the machine causing serious injury.
• Split along grain. Do not use the log splitter to split logs across the grain. Doing so will
damage the log splitter and could also cause pieces of log to be thrown, injuring the operator
or bystanders.
• Changing splitting position. Do not change splitting positions (horizontal/vertical) with
the engine running. You may contact the muffler and receive serious burns. Be careful to
avoid contact with hot muffler even after the engine is turned off.
FIG02218
21
Page 22

6. Extend
wedge
Splitting Operation
Move Split Control Lever toward endplate to extend wedge and split log.
Important safety instructions:
• Operator position. ALWAYS operate the log splitter from the manufacturer’s indicated
OPERATOR POSITION. (See diagram above.) Other positions are unsafe because they
can increase the risk of injury from crushing, cutting, flying objects, or burns.
• Remove hands. Remove both hands from log before activating Split Control Lever.
• Hand activate. Use only your hand to operate the Split Control Lever. Never use any
other body part, or a rope, cable, or other remote device to actuate the control.
• Second person. Many accidents occur when there is more than one person involved in
loading and operating the log splitter. Only one person should operate the controls. If a
second person is assisting in loading logs, the operator must NEVER actuate the Split
Control Lever until the assistant and all bystanders are at least 10 feet away. NEVER
allow an assistant to hold the log in place while the operator actuates the Split Control
Lever.
SPLIT CONTROL LEVER OPERATION
7. Stop wedge Release Split Control Lever to stop wedge movement when log is split.
WARNING: Cracks in logs can close quickly and pinch fingers. Keep fingers away from
any cracks that open in partially split logs.
SPLIT CONTROL LEVER OPERATION
22
8. Important
STUCK LOG
procedure
If a log does not split completely and becomes stuck on the wedge, follow the instructions
below to remove the log.
A log can become stuck to the wedge if the wedge becomes embedded in the log and the log
doesn’t split and separate. This can happen if the log is too stringy or tough to split completely.
A stuck log will move back with the wedge on the initial attempt to retract the wedge. If this
happens, retract the wedge completely to allow the splitter to strip the log from the wedge.
Keep hands clear of log and wedge while wedge is retracting.
Page 23

Splitting Operation
WARNING: NEVER attempt to remove a stuck log by:
• Modifying the splitter.
• Adding attachments to the splitter.
Personal injury could result from log or metal pieces flying out at high speed toward the
operator or bystanders, or the splitter could become damaged.
9. Return
wedge
Move Split Control Lever away from end plate to return wedge.
Once the control valve is actuated in the return direction, the wedge is designed to keep returning
by itself completely and then stop automatically.
WARNING:
Stay clear while the wedge is returning. It is still powerful enough on the return stroke to cause
serious injury.
10. Remove split
wood
11. After use 1. Turn off engine.
Remove split wood from area.
Move each log away from log splitter after it is split. Split logs left near the log splitter are a trip
hazard.
2. Remove engine debris.
Debris on a hot engine can be a fire hazard. After the engine is off, clean debris and chaff from
engine cylinder head, cylinder head fins, blower housing rotating screen, and muffler areas.
SPLIT CONTROL LEVER OPERATION
WARNING: Avoid contact with hot muffler.
3. Return to horizontal position.
If in the vertical position, return log splitter to the horizontal position for greater stability and to
prepare for transportation. Avoid contact with hot muffler.
23
Page 24

Storage
WARNING
Gasoline vapors can ignite and cause a fire. Select a well-ventilated storage away from
sources of heat, flame, or sparks.
Follow the instructions below for storing your log splitter between uses
1. Retract wedge Retract the wedge completely to keep the rod protected from corrosion.
2. Cool Allow the machine to cool 5 minutes before storing.
3. Wipe with oily rag Wipe the beam and wedge with an oily rag to prevent corrosion.
4. Engine manual Refer to the engine manual for proper engine storage instructions.
WARNING: A hot engine can be a fire hazard.
CAUTION: Gasoline will oxidize and deteriorate in storage. Old gasoline in
the engine will cause hard starting and leave gum deposits that can clog the
fuel systems. Deterioration problems may occur within a few months, or even
less if gasoline was not fresh when you filled the tank.
Short-Term Storage:
1. Consider adding a fuel stabilizer to extend fuel storage life.
2. Leave the fuel valve lever in the OFF position to reduce the possibility of
fuel leakage.
Long-Term Storage: (between infrequent uses and at end of season)
Drain the fuel tank and carburetor as instructed in the engine owner’s manual.
Important Safety Instructions
• Always drain fuel from tank in outdoor, well-ventilated area.
• Stay away from sources of heat, flame, or sparks while handling fuel.
• Clean up fuel spills/splashes immediately.
.
5. Splitter storage location Store the log splitter in a location away from corrosive material, sources
of heat, open flames, sparks or pilot lights.
WARNING: Never store log splitter inside where there is a source of
heat or an open flame, spark or pilot light – such as water heaters, space
heaters,
furnaces, clothes dryers, or other gas appliances – EVEN IF the log
splitter’s gas tank is empty, residual gasoline vapors could ignite.
6. Gasoline
storage
NOTE:
Store gasoline in a cool, dry place in an UL approved tightly sealed container.
explosion can result.
Do not store the log splitter near fertilizer or any other corrosive
material.
WARNING: Gasoline vapors can ignite if they collect inside an enclosure and
24
Page 25

Periodic Maintenance
In addition to the maintenance performed with each use, periodic maintenance should also be performed
according to the following schedule.
WARNING
ALWAYS shut off the engine, disconnect the spark plug, and relieve system pressure before
cleaning, adjusting, or repairing the splitter. Relieve system pressure by moving Split Control
Lever back and forth several times.
IMPORTANT:
If a part needs replacement only use parts that meets the manufacturer’s specifications. Replacement parts that do
not meet specifications may result in a safety hazard or poor operation of the log splitter.
1. Engine
maintenance
Perform engine maintenance as specified in engine owner’s manual.
2. Hydraulic Oil
Change
Change Hydraulic Oil Annually or Every 100 Hours.
WARNING: High fluid pressures and temperatures are developed in hydraulic log
splitters. Hydraulic fluid escaping through a pin hole sized opening can burn or puncture
skin, resulting in wounds that could cause blood poisoning, infection, disability, gangrene,
amputation, or death. Therefore, the following instructions should be heeded at all times
when inspecting or servicing the hydraulic components of the log splitter.
• NEVER check for leaks with your hand. Leaks can be located by holding a piece of
cardboard or wood (at least two feet long) with your hand at one end and passing the
other end over the suspected area (wear eye protection). Look for discoloration of the
cardboard or wood.
• NEVER adjust the pressure of the pump or valve.
• If injured by escaping fluid, no matter how small the wound is, see a doctor at once. A
typical injection injury may be a small wound that does not look serious. However,
severe infection or reaction can result if proper medical treatment is not administered
immediately by a doctor who is familiar with injection injuries.
1. Use 10wt AW32, ASLE H-150, or ISO32 oil.
2. Relieve hydraulic system pressure by moving Split Control Lever back and forth
several times.
3. Remove hydraulic oil dipstick.
3. Spark arrestor
muffler
WARNING: NEVER remove the hydraulic oil dipstick when the engine is running
or hot. Hot oil can escape causing severe burns. Allow the log splitter to cool
completely before removing hydraulic oil dipstick.
4. Remove the drain plug from the hydraulic tank to drain the hydraulic oil into a 10
gallon pan.
5. Remove suction strainer and wipe off debris with a dry cloth.
6. Fill the hydraulic tank with wedge retracted.
7. Dispose of used oil at an oil-recycling center. Used hydraulic oil is hazardous waste.
8. Extend and retract wedge 5 (five) times to purge air from the system.
9. Check hydraulic oil level and fill if necessary.
If the engine is equipped with a spark arrestor muffler, clean and inspect it regularly
(follow manufacturer’s service instructions). Replace if damaged.
25
Page 26

Troubleshooting
WARNING
Before troubleshooting or attempting to service, read the following safety instructions to avoid serious injury
to the operator or bystanders from moving parts that can crush or cut, burns, fire or explosion, or escaping
high pressure hydraulic fluid.
Important Safety Instructions:
1. Engine off. Always make sure the engine is off before cleaning, repairing or adjusting the splitter, except as
recommended by the manufacturer.
2. Hydraulic safety. High fluid pressures and temperatures are developed in the hydraulic log splitters.
Hydraulic fluid escaping through a pin hole sized opening can burn or
puncture skin, resulting in wounds that could cause blood poisoning, infection, disability, gangrene,
amputation, or death. Therefore, the following instructions should be heeded at all times when inspecting or
servicing the hydraulic components of the log splitter:
• Stop the engine, disconnect the spark plug, and move all control valve handles back and forth to relieve
pressure before changing or adjusting hydraulic components such as hoses, tubing, fittings, or other
components.
• Do not remove the hydraulic oil fill cap when the engine is running. Hot oil can escape causing severe
burns. Allow the log splitter to cool completely before removing the hydraulic oil fill cap.
• Do not adjust the pressure setting to the pump or valve.
• Do not check for leaks with your hands. Leaks can be located by holding a piece of cardboard or wood (at
least 2 feet long) with your hand at one end and passing the other end suspected area (wear eye
protection). Look for discoloration of the cardboard or wood.
• If injured by escaping fluid, no matter how small the wound is, see a doctor at once. A typical injection
injury may be a small puncture that does not look serious. However, severe infection or reaction can
result if proper medical treatment is not administered immediately by a doctor who is familiar will
injection injuries.
Problem
Wedge will not move Solution: A,D,E,H,J
Slow wedge speed when extending or retracting Solution: A,B,C,H,I,K
Wood will not split or splits extremely slow Solution: A,B,C,F,I,K
Engine bogs down during splitting Solution: G
Engine stalls under low load condition Solution: D,E
Cause
A- Insufficient oil to pump Check oil level in reservoir
B- Air in oil Check oil level in reservoir, check for leaks in the suction
C- Excessive pump inlet vacuum Check pump inlet hose for blockage or kinks
D- Blocked hydraulic lines Flush and clean the splitter hydraulic system
E- Blocked control valve Flush and clean the splitter hydraulic system
F- Low control valve setting Adjust control valve with a pressure gauge
G- High control valve setting Adjust control valve with a pressure gauge
H- Damaged control valve Return control valve for authorized repair
I- Internal control valve leak Return control valve for authorized repair
J- Damaged cylinder piston Return cylinder for authorized repair
K- Internally damaged cylinder Return cylinder for authorized repair
Solution
line
Any Questions, Comments, Problems or Parts Orders
Call NorthStar Product Support 1-800-270-0810
26
Page 27

Specifications
1108, 1109, 1114
Hydraulic Fluid Type…………. 10wt AW32, ASLE H-150, or ISO32
Coupler Size…………………… 2” Ball
Maximum Towing Speed……… 45 MPH
Maximum Log Length ............... 25 in
Hydraulic Cylinder Stroke ......... 24 in
Overall Dimensions ................... 89”L x 43”W x 41”H
Flow……………………………
Pressure………………………..
Hydraulic Oil Capacity………..
Hydraulic Cylinder Bore………
Spark Arrestor…………………
Fuel Valve……………………..
Dry Weight…………………….
Tonnage………………………..
1108 1109 1114
11 GPM 11 GPM 16 GPM
3000 PSI 3500 PSI 3500 PSI
8 GAL. 8.5 GAL. 9 GAL.
4” 4.5” 5”
No No Yes
No Yes Yes
490 lb 530 lb 565 lb
22 TON 30 TON 37 TON
The manufacturer reserves the right to make improvements in design
and/or changes in specifications at any time without incurring any
obligation to install them on units previously sold.
Any Questions, Comments, Problems or Parts Orders
Call NorthStar Product Support 1-800-270-0810
27
Page 28

Parts Breakdown – Exploded View 1108, 1109, 1114 – Rev L
28
Page 29

Parts Breakdown – Exploded View 1108, 1109, 1114 – Rev L
Item Part No. Description Qty. Model Item Part No. Description Qty. Model
1 82140 1/8” x 2” COTTER PIN 4 ALL 34 3002 ½” COUPLING 1 ALL
2 124A DUST CAP 2 ALL
3 777124 AXLE NUT 2 ALL
4 777799 WHEEL 2 ALL 37 778592 CYLINDER ANCHOR PIN 1 ALL
5 778844 WHEEL WASHER 2 ALL 38 778827 O-RING BOSS X NPT ELBOW 4 ALL
6 780265 AXLE/TANK 1 ALL 39 778642 O-RING BOSS X H B ELBOW 1 ALL
7 778424 DIPSTICK 1 ALL
8 778498 CATCH PIN 3 ALL
9 778876 OUTRIGGER LEG 2 ALL 41 778885 HANDLE 1 ALL
10 778403 TOWBAR 1 ALL 42 778343 HORIZONTAL BEAM LOCK 1 ALL
11 779324 TIP-UP PIVOT 1 ALL 43 1130 SAFETY CHAIN 2 ALL
12 778578 VERTICAL BEAM LOCK 1 ALL 44 38587 2” COUPLER 1 ALL
778619
14
778619
15 778615 46” RETURN LINE 1 ALL
784032
784033
16
784034
18 779174 LOG CRADLE SUPPORT 4 ALL
19 778431
20 783521 BEAM 1 ALL 52 31094 #14S BRASS WASHER 2 1109, 1114
21 7 78873 8mm GREASE ZERK 4 ALL 53 778808 IDLE CONTROL BASE 1 1109, 1114
22 82115 7/16-14 NYLON NUT 17 ALL 54 31095 ¼ NYLON WASHER 1 1109, 1114
23 778380 WEDGE KEEPER, LEFT 1 ALL 55 37991 EXTENSION SPRING 1 1109, 1114
24 82258 7/16-14 X 2 ¼” SHCS 1 ALL 56 778470 IDLE CONTROL ARM 1 1109, 1114
25 82114 7/16-14 X 2” HHCS GRD 8 16 ALL 57 82058 ¼” X ¼” SHOULDER BOLT 1 1109, 1114
26 778321 WEDGE 1 ALL 58 778831 O-RING X SWIV. FEM. NPT 1 ALL
27 778723 WEDGE KEEPER, RIGHT 1 ALL 59 778618 ½” MALE NPT HP HOSE 1 ALL
781151
781152
28
781153
778736
29
778735
778734
60599
30
60590
39115
31
32 3009 COUPLING INSERT 1 ALL 66 30511 DRAIN PLUG 1 ALL
33
3005
3007
3030
779683
½” NPT HP HOSE
½” NPT HP HOSE
CONTROL VALVE 1
LOG CRADLE FACE
PLATE
4 X 24” CYLINDER
4.5 X 24” CYLINDER
5 X 24” CYLINDER
LOG STRIPPER
HONDA GC160, 5.0 HP
HONDA GX160, 5.5 HP
HONDA GX270, 9.0 HP
¾” COUPLING
1” COUPLING
PUMP MOUNT BRACKET 1
1 ALL 45
1108
1109 47 4011 4” SUCTION STRAINER 1 ALL
1114 48 778829 ¾” NPT X ¾” HB ELBOW 1 ALL
1 ALL 51 82065 #10-24 NYLON NUT 1 1109, 1114
1108
1
1109
1114
1108
1
1109
1114
1108
1
1109
1114
1 1 1108,1109
1114
1108,1109
1114
68
13
1012
35
1056
778616
40
778634
17141
777835
5267
46
38050
49 777835 13/16” – 1 ¾” HOSE CLAMP 2 ALL
60 50RAS8 ½” M X ½” F SWIVEL NPT 1 ALL
61 778709 MUFFLER DEFLECTOR 1 1108
62 38477 IDLE CONTROL CABLE 1 1109, 1114
778513
63
778512
778511
64 STNS4 NORTHSTAR DECAL
65 779331 LOG CRADLE WELDMENT 1 ALL
67 779681 GUARD IN SERT FOR 779683 2 1114
39116
39129
11 GPM 2-STAGE PUMP
16 GPM 2-STAGE PUMP
¾” SUCTION HOSE
1” SUCTION HOSE
½” HOSE CLAMP
13/16” – 1 ¾” HOSE CLAMP
¾” MPT X ¾” HB
¾” MPT X 1” HB
22 TON DECAL
30 TON DECAL
37 TON DECAL
SPARK ARRESTOR
SPARK ARRESTOR SCREW
20.5”
1108, 1109
1
18”
2 2 1108, 1109
1 1 1108, 1109
2
2
1
1
1114
1108, 1109
1114
1114
1114
1108
1109
1114
ALL
1114
1114
29
Page 30

Summary of Important Safety Information for Operation
WARNING
Carefully read and make sure you understand the following safety information before using the log splitter.
Improper use or maintenance of the log splitter can result in serious injury to the operator or bystanders from
moving parts that can crush or cut, flying objects, burns, fire or explosion, escaping high pressure hydraulic
fluid, or carbon monoxide poisoning.
• Read Manual. Read this operator’s manual and the engine Owner’s Manual completely before attempting to use
the log splitter. Serious injury or death can result if safety instructions are not followed.
• Instruct operators. The log splitter owner should instruct all operators in safe log splitter operation.
• Intended use. Log splitters should only be used for splitting wood logs, lengthwise with the grain. Do not use for
other purposes, as unforeseen hazards may result.
Never modify or alter the log splitter in any way. Modifications can create serious safety hazards and will
void the warranty.
• Attachments. Never add attachments to the splitter, except for authorized accessories supplied by the manufacturer
with instructions for safe installation and use.
• Engine Speed. The maximum engine speed is preset at a safe limit. Never attempt to modify the engine speed
setting to run at a higher speed.
• Fuel/Exhaust system. NEVER modify or add to the exhaust system, fuel tanks, or fuel lines. Fire can result.
• Remote Control. NEVER attach a rope, cable, or other remote device to the splitting control.
• Splitting Wedge. NEVER attempt to change the height or speed of the splitting wedge.
• Pressure Setting. NEVER increase the pressure setting of the pump or control valve.
• Untrained Operators. Do not allow anyone to operate the log splitter who has not read the owner’s manual or
been instructed on the safe use of the splitter.
• Minimum Operator Age. Never allow anyone under age 16 to operate the log splitter. Anyone 16 years of age
and older must be trained and supervised by a trained adult.
Safety in Moving and Towing the Log Splitter
Introduction
Prohibition Against Modifications
Operator Restrictions
WARNING
The log splitter is very heavy. It can cause serious injury if it rolls out of control or tips over.
Follow the safety instructions below for safely moving the log splitter.
General safety while Moving
• Horizontal position. Make sure the log splitter is secured in the horizontal position before moving the log splitter.
DO NOT move the log splitter when it is in the vertical position because it will be unstable and could tip.
• Hills. Do not move the log splitter up or down hills by hand – use a towing vehicle.
• Engine off. Never move the log splitter with its engine running.
• No riding. Never allow anyone to sit or ride on the log splitter.
No cargo. Never transport cargo or wood on the log splitter.
•
Safety During Towing
• Read instructions. Review towing safety instructions in your towing vehicle manual.
• Securely attached. Be sure the log splitter is securely attached to the towing vehicle before towing.
30
Page 31

Summary of Important Safety Information for Operation
• Tires. Be sure the tires are fully inflated and in good repair before towing the log splitter. When adding air to the
tires, do not over-inflate – serious injury could occur if tire explodes.
• Added length. Be aware of the added length of the splitter.
• Speed Limit. Never tow this log splitter over 45 mph. Faster speeds may result in loss of control.
• Rough terrain. Be extra cautious and drive slowly when traveling over rough terrain.
• Under the influence. Never tow this splitter while under the influence of alcohol, drugs, or medication.
• On public roads. If towing on a public road, make sure to comply with all local, state, and federal towing
requirements. It is the sole responsibility of the purchaser to obtain licensing, trailer lights, safety chains or signage,
as needed to comply.
• Unattended. Turn off the towing vehicle before leaving the splitter unattended.
• Disconnect before operate. Do not use the log splitter while it is connected to the towing vehicle.
Safety – Before Use
Read/instruct
• Read manual. Do not allow anyone to operate the log splitter who has not read the owner’s manual or has not been
instructed on the safe use of the splitter.
• Review safety rules. Before starting this log splitter, review the “Rules for Safe operation.” Failure to follow these
rules may result in serious injury to the operator or bystanders.
• Know how to stop. Be thoroughly familiar with all controls and proper use of the equipment. Know how to stop
the splitter and relieve system pressures quickly if needed.
Personal protective equipment
• Eye protection. Always wear safety glasses or goggles when operating the machine. Pieces of log may fly out and
serious eye injury can occur.
• Boots. Falling logs can crush feet. Always wear safety shoes or heavy boots when operating or helping to load
logs.
• Loose/dangling. Loose or dangling apparel can become entangled in moving parts. Never wear jewelry or loose-
fitting clothing.
• Gloves. Wear snug fitting gloves without drawstrings or loose cuffs.
• Hearing Protection. The use of earplugs or other hearing protection device is recommended.
Safety During Inspection/Maintenance
Always inspect your log splitter before each use, and repair as needed, to keep it in safe working condition:
• Engine off. Always make sure the engine is off before cleaning, repairing or adjusting the splitter, except as
recommended by the manufacturer.
• Engine debris. Debris on a hot engine can be a fire hazard. With the engine off, clean debris and chaff from engine
cylinder head, cylinder head fins, blower housing rotating screen, and muffler areas. Avoid contact with hot
muffler
• Other debris. Debris on moving parts can cause excess wear. With the splitter engine off, clear debris from
moving parts.
• Fuel tank / lines. Before each use, check fuel tank and fuel lines for leaks. Any fuel leak is a fire hazard. Fix any
fuel leaks before starting engine.
• Mechanical parts. Check to be sure that all nuts and bolts are tight to make sure the log splitter is in safe working
condition.
• Hydraulic system. Check the hydraulic system (hoses, tubing, clamps/fittings, pump, and cylinder) carefully
before each use. Do not operate the log splitter with frayed, kinked, cracked or damaged hydraulic hoses, fittings, or
tubing, or if oily residue is observed on any of the components. High fluid pressures and temperatures are
developed in the log splitter. Hydraulic fluid escaping through a pin hole sized opening can burn or puncture skin,
resulting in wounds that could cause blood poisoning, infection, disability, gangrene, amputation, or death.
Therefore, the following instructions should be heeded at all times when inspecting or servicing the hydraulic
components of the log splitter:
.
ο Do not remove the hydraulic oil dipstick when the engine is running. Hot oil can escape causing severe
burns. Allow log splitter to cool completely before removing hydraulic oil dipstick.
ο Do not adjust the pressure setting of the pump or valve.
31
Page 32

Summary of Important Safety Information for Operation
ο Do not check for leaks with your hand. Leaks can be located by holding a piece of cardboard or wood (at least
two feet long) with your hand at one end and passing the other end over the suspected area (wear eye
protection). Look for discoloration of the cardboard or wood.
ο Stop the engine, disconnect the spark plug, and move all control valve handles back and forth to relieve
pressure before changing or adjusting hydraulic system components such as hoses, tubing, fittings or other
components.
ο If injured by escaping fluid, no matter how small the wound is, see a doctor at once. A typical injection injury
may be a small puncture wound that does not look serious. However, severe infection or reaction can result if
proper medical treatment is not administered immediately by a doctor who is familiar with injection injuries.
• Spark arrestor muffler. If the engine is equipped with a spark arrestor muffler, clean and inspect it regularly
(follow manufacturer’s service instructions). Replace if damaged.
• Tires. Be sure tires are fully inflated and in good repair before towing the splitter. When adding air to tires, do not
over-inflate -- serious injury could occur if tire explodes.
Guards / shields. Make sure all guards and shields are replaced after servicing the log splitter.
•
• Replacement parts. If a part needs replacement, only use parts that meet the manufacturer’s specifications.
Replacement parts that do not meet specifications may result in a safety hazard or poor operation of the log splitter.
Safety During Fueling
• Gasoline is highly flammable and explosive. You can be burned or seriously injured when handling fuel. Use
extreme care when handling gasoline:
• Fuel outdoors. Fill fuel tank outdoors – never indoors. Gasoline vapors can ignite if they collect inside an
enclosure. Explosion can result.
• Use approved container. Never pump fuel directly into engine at gas station. Static charge can build and ignite
fuel. Use an UL approved fuel container to transfer gas to the engine.
• Running / hot engine. A running engine is hot enough to ignite fuel. Never add fuel or remove gas cap if engine is
running or still hot. Stop the engine and allow to cool at least two minutes before adding fuel.
• Heat / flames / sparks. Stay away from sources of heat, flame, or sparks while adding fuel.
• Don’t overfill. DO NOT overfill the gas tank. Allow at least 1/2” of empty space below the fill neck to allow for
fuel expansion.
• Replace cap. Replace gas cap securely before starting engine.
• Spills. Clean up fuel spills immediately. Move log splitter away from spilled fuel on the ground. Wipe fuel off
engine and wait 5 minutes for excess fuel to evaporate before starting engine. Gas soaked rags should be disposed
of properly.
• On skin / clothes. If gasoline is spilled on your skin or clothes, change clothes and wash skin immediately.
• Gasoline storage. Store gasoline in a cool, dry place in an UL approved, tightly sealed container.
Safety in Work Site Selection
• Spark arrestor. If your splitter will be used near any unimproved forest, brush, or grassy covered land, then engine
should be equipped with a spark arrestor. See the “Specifications” section of this manual to determine if your
splitter already has a spark arrestor. Make sure you comply with applicable local, state and federal codes.
• Hot exhaust. Hot exhaust fumes from engine can cause fire. Position muffler at least 7’ from combustible objects
during operation.
• Fire extinguisher. Have a Class B fire extinguisher available as a precautionary measure when operating the log
splitter in dry areas.
• Level, dry surface. To prevent accidental falls and equipment tip over, make sure the splitter is situated on a dry,
level surface with good footing. Stay clear of areas with mud, ice, tall grass, weeds, brush, or snow.
• Block wheels. Always block the wheels to prevent unintended movement of the log splitter.
• Carbon monoxide. The running engine gives off carbon monoxide, a poisonous gas that can kill you. You
CANNOT smell it, see it, or taste it. ONLY run log splitter OUTDOORS and away from air intakes. NEVER run
log splitter inside homes, garages, sheds, or other semi-enclosed spaces. These spaces can trap poisonous gases,
EVEN if you run a fan or open windows. If you start to feel sick, dizzy, or weak while using the log splitter, shut
off the engine and get to fresh air RIGHT AWAY. See a doctor. You may have carbon monoxide poisoning.
32
Page 33

Summary of Important Safety Information for Operation
Safety – During Use
General Safety During Use
WARNING: Before starting this log splitter, review the following rules for safe operation. Failure to follow these
rules may result in serious injury to the operator or bystanders.
• Safety equipment / controls. Always operate the log splitter with all safety equipment in place and in good
working order, and all controls properly adjusted for safe operation.
• Operating speed. Always operate the log splitter at the manufacturer’s recommended speed. The maximum speed
of the engine, pump and wedge are preset within safe limits.
• Know how to stop. Be thoroughly familiar with all controls and with the proper use of the equipment. Know how
to stop the log splitter and relieve system pressures quickly if needed.
• Daylight only. Only use the log splitter in daylight so you can see what you are doing.
• Smoking / sparks. Never smoke while operating the log splitter, and never operate near sources of sparks or
flames.
• Hot muffler. If you are starting a warm engine, stay clear of muffler. It may still be hot enough to burn you.
• Unattended. Never leave the machine unattended while the engine is running.
• Under the influence. Never operate, or let anyone else operate, the log splitter while under the influence of
alcohol, drugs, or medication.
• Adjusting / repairing. Always make sure the engine is off before cleaning, repairing or adjusting the splitter,
except as recommended by the manufacturer. In addition, disconnect the spark plug and move all control handles
back and forth to relieve system pressure before changing or adjusting hydraulic system components such as hoses,
tubing, fittings or other components.
• Carbon monoxide. The running engine gives off carbon monoxide, a poisonous gas that can kill you. You
CANNOT smell it, see it, or taste it. If you start to feel sick, dizzy, or weak while using the log splitter, shut off the
engine and get to fresh air RIGHT AWAY. See a doctor. You may have carbon monoxide poisoning.
• Other exhaust dangers. Engine exhaust, some of its constituents, and certain vehicle components contain or emit
chemicals known to the State of California to cause cancer, birth defects, or other reproductive harm. Avoid
inhalation of exhaust.
Safety in Loading, Operating, and Unloading
• Square log ends. Logs that are not cut square can slide out while splitting and become a safety hazard or cause
excessive force to log splitter components. Use a chainsaw to cut logs square on each end before attempting to split
them.
• Single log. Never attempt to split more than one log at a time. Pieces of log can unexpectedly be thrown from the
machine causing serious injury.
• Split along grain. Do not use the log splitter to split logs across the grain. Doing so will damage the log splitter
and could also cause pieces of log to be thrown, injuring the operator or bystanders.
• Keep hands clear. ALWAYS keep hands and feet away from the endplate, wedge, and partially split logs while
loading, operating and unloading the log splitter.
• Operator position. ALWAYS operate the log splitter from the manufacturer’s indicated OPERATOR POSITION.
Other positions are unsafe because they can increase the risk of injury from crushing, cutting, flying objects, or
burns.
• Straddling / reaching across. Never straddle, reach across, or step over the beam while the engine is running and
the log splitter is in the horizontal position. You could trip, actuate the controls, and get seriously injured.
• Second person. Many accidents occur when there is more than one person involved in loading and operating the
log splitter. Only one person should operate the controls. If a second person is assisting in loading logs, the
operator must NEVER actuate the Split Control Lever until the assistant and all bystanders are at least 10 feet
away. NEVER allow an assistant to hold the log in place while the operator actuates the Split Control Lever.
• Loading/Unloading
• Unsplit log pile. Do not pile logs to be split in a place that will make you reach across the log splitter in order to
load them
Hold bark side. Hold the bark side of logs when loading or positioning, never the ends. Never place your hands or
•
any part of your body between a log and any part of the log splitter.
.
33
Page 34

Summary of Important Safety Information for Operation
• NOTE for vertical position loading: Place the log on the endplate and turn it until it leans against the beam and is
stable. If the log is too big or oddly shaped, stabilize the log with wooden shims between the log and endplate or
ground. DO NOT use your leg or knee to stabilize the log. NEVER stabilize the log by placing your hand on top of
the log.
Wedge moving. NEVER load or unload logs while the wedge is moving.
•
Cracks. Cracks in logs can close quickly and pinch fingers. Keep fingers away from any cracks that open in
•
partially split logs
Split log pile. Move each log away from log splitter after it is split. Split logs left near the log splitter are a trip
•
hazard
Remove hands. Remove both hands from log before activating Split Control Lever.
•
• Hand activate. Use only your hand to operate the Split Control Lever. Never use any other body part, or a rope,
cable, or other remote device to actuate the control.
• Returning wedge. Once the control valve is actuated in the return direction, the wedge is designed to keep
returning by itself completely and then stop automatically. Stay clear while the wedge is returning. It is still
powerful enough on the return stroke to cause serious injury.
• Log stuck on wedge. If a log does not split completely and becomes stuck on the wedge, follow the instructions
below to remove the log. A log can become stuck to the wedge if the wedge becomes embedded in the log and the
log doesn’t split and separate. This can happen if the log is too stringy or tough to split completely. A stuck log
will move back with the wedge on the initial attempt to retract the wedge. If this happens, retract the wedge
completely to allow the splitter to strip the log from the wedge. Keep hands clear of log and wedge while wedge is
retracting.
Personal injury could result from log or metal pieces flying out at high speed toward the operator or bystanders, or the
• Changing splitting position. Do not change splitting positions (horizontal/vertical) with the engine running.
•
• Return to horizontal. If in the vertical position, turn off engine and return log splitter to the horizontal position for
greater stability and to prepare for transportation. Avoid contact with hot muffler.
Remove engine debris. Debris on a hot engine can be a fire hazard. With the engine off, clean debris and chaff from
•
engine cylinder head, cylinder head fins, blower housing rotating screen, and muffler areas. Avoid contact with hot
muffler.
Let engine cool before storing. Let engine cool for at least five minutes before storing. A hot engine can be a fire
•
hazard.
Storage location. Store the log splitter in a location away from sources of heat, open flames, sparks or pilot lights –
•
such as water heaters, space heaters, furnaces, clothes dryers, or other gas appliances. Even if the log splitter’s gas
tank is empty, residual gasoline vapors could ignite.
Gasoline storage. Store extra gasoline in a cool, dry place in an UL approved, tightly sealed container. Gasoline
•
vapors can ignite if they collect inside an enclosure.
Periodic maintenance. Perform periodic maintenance as directed in this manual to keep the log splitter in safe
•
working condition.
.
.
WARNING: NEVER attempt to remove a stuck log by:
• Modifying the splitter.
• Adding attachments to the splitter.
splitter could become damaged.
You may contact the muffler and receive serious burns. Be careful to avoid contact with hot muffler even after
the engine is turned off.
Refueling. Never refuel the engine until it has cooled at least two minutes.
Safety – After use
34
Page 35

Assembly Instructions
k
n
Closely inspect all log splitter components.
If you have missing components, contact Product Support at 1-800-270-0810.
If you have damaged components, contact the Freight Company that delivered the unit and file a claim.
CAUTION! Heavy lifting required. Some of the components in these assembly instructions are heavy and cannot
be lifted by one person safely. Please plan on assembling this product when another person can be available to help out.
Tools needed: Adjustable wrenches Torque Wrench, Soft Faced Mallet, Flat Blade Screw Driver
Vertical
Beam Lock
Tow bar
Outrigger Leg
Large
Swivel
Fitting
Beam
Hydraulic
Hose
Engine
Retur
Line
Idle Control
Control Valve
(Installed)
Horizontal
Beam Loc
Handle
Dust Cap
Axle
Wheel
Cotter Pin
Wheel Washer
Axle Nut
Return Line
Fitting
Suction Hose
Outrigger Leg
35
Page 36

Assembly Instructions
* Not shown: Spark arrestor & screw, Item #1114 ONLY
36
Page 37

Assembly Instructions
r
t
t
d
g
t
n
Step 1
Remove shipping crate (red bumpers can
be thrown away, if equipped)
If there are rubber boots on the axles,
remove and discard them
Slide Wheel onto Axle with Valve Stem
facing out
Slide Outer Bearing onto Axle (outer
bearing may be shipped loose in parts bag
or loose inside wheel)
Outer bearing taper points into log splitter
Slide Wheel Washer onto Axle
Step 2
Thread Axle Nut onto Axle (hand tight)
Back Axle Nut off ¼ turn
Make sure Wheel spins freely
Insert Cotter Pin through hole in Axle
and bend it so Axle Nut cannot come off
Make sure Wheel spins freely
Tap Dust Cap onto Wheel with a soft
faced mallet
Repeat steps 1 and 2 for the other Wheel
Outer
Bearin
Wheel
Washe
Axle Nu
Cotter Pin
Axle Nu
Dust Cap
Axle with the
Rubber Boo
remove
Wheel
Valve Stem Out
Wheel
Step 3
Connect Towbar to Axle/Tank using (2)
Tank Bolts and (2) Tank nuts (already in
place)
Tighten Bolts to 90 lb-ft with a wrench
Cotter Pi
Bolt
Axle/Tank
Tow bar
Fig 02417
37
Page 38

Assembly Instructions
t
t
Step 4
Connect an Outrigger Leg to front of
Towbar using (1) Outrigger Leg Bolt and
(1) Outrigger Leg nut (already in place)
Use wrench to tighten nut until snug then
back off ½ turn
Insert Catch Pin to lock outrigger leg in
vertical position
Caution: Next step requires Outrigger
Leg locked in vertical position as shown
Step 5
Connect an Outrigger Leg to back of
Towbar using (1) Outrigger Leg Bolt and
(1) Outrigger Leg nut (already in place)
Use wrench to tighten nut until snug then
back off ½ turn
Insert Catch Pin to lock outrigger leg in
vertical position
Caution: Next step requires Outrigger
Leg locked in vertical position as shown
Bol
Bol
Catch Pin
Outrigger Leg
Catch Pin
Fig 02418
Tow bar
Fig 02419
Tow bar
Outrigger Leg
Step 6
Remove Beam from shipping pallet
Tip Beam up onto endplate as shown to
the right. Make sure a helper holds onto
the top of the Beam during the remainder
of this step. The beam is very heavy and
dangerous if it tips over
Connect Beam to the Towbar with (2)
Beam Bolts and (2) Beam nuts
Tighten Bolts to 37 lb-ft with a wrench
38
Bolt
Beam
Fig 02420
Tow bar
Page 39

Assembly Instructions
t
Step 7
Fasten Horizontal Beam Lock to Beam
using (2) Beam Bolts and (2) Beam nuts
Tighten Bolts to 37 lb-ft with a wrench
Fasten Handle to Beam as shown using
(2) Beam Bolts and (2) Beam nuts
Tighten Bolts to 37 lb-ft
Step 8
Lower Beam to horizontal position as
described in the SPLITTING
OPERATION section of the manual
Fasten Vertical Beam Lock to Beam
using (2) Beam Bolts and (2) Beam nuts
Tighten Bolts to 37 lb-ft
Handle
Bol
Bolt
Fig 02421
Bolt
Horizontal
beam lock
Fig 02422
Step 9a
Mount Engine to Axle/Tank using (4)
Engine Bolts and (4) Engine nuts
Tighten Bolts to 24 lb-ft
(Beam not shown for clarity)
Vertical
beam lock
Engine
Bolt
Axle/Tank
Fig 02423
39
Page 40

Assembly Instructions
Step 9b
Engine mounting pattern shown for
reference
Step 10
Slightly loosen Hose Clamp on loose end
of Suction Hose
Remove shipping plug from pump then
slide Suction Hose onto the bottom
fitting of the pump
Secure the Suction Hose with the Hose
Clamp
Install Spark Arrestor (Item #1114 only)
per Honda Engines Owner’s Manual
under Servicing your Honda engine.
1114
Pump Fitting
Hose Clamp
Suction Hose
1108 and
1109
Fig 02439
Fig 02424
Spark Arrestor
Step 11a
(Item #’s 1109 and 1114 models only)
Attach Idle Control Plate to Idle Control
Mount plate on the Beam using (2) Idle
Control Bolts and (2) Idle Control nuts
(already in place)
Idle Control
Fig 02425
Mount Plate
Bolt
Idle Control
Plate
40
Page 41

Assembly Instructions
Step 11b
(1109 and 1114 models only)
Tighten Idle Control Bolts to 20 lb-ft
with a wrench
Step 12
Thread the Return Line Fitting into the
hydraulic tank (Finger tight plus turn 1½
to 3 additional turns) and position the
hose barb up as shown
Idle Control
Mount Plate
Idle Control
Plate
Fig 02431
Step 13
Remove plugs from the (3) ports.
Thread the Small Swivel Fittings into
ports marked “A” and “B” on the Control
Valve.
Thread Hose Barb Fitting into Port
marked OUT on the Control Valve.
Tighten the Swivel Fittings and Hose
barb fitting finger tight and Orient the
Fittings as shown, Tighten the Nuts into
Control Valve with a Wrench to 44-54
lb-ft.
Swivel fitting
Port A
Fig 02436
Swivel fitting
Port B
Port marked OUT
Hose barb fitting
41
Page 42

Assembly Instructions
g
Mount Control Valve to Beam Plate
using (3) ¼-20 x 1-3/4” Valve Bolts and
(3) ¼-20 Nyloc Nuts.
Slightly loosen Hose Clamp on end of
the Return Line.
Slide the Return Line onto the Valve
Return Line Fitting
Tighten Hose Clamp
Step 14
Step 15
Beam Plate
Valve Bolts
Control
Valve
Nyloc nuts
Step 16
Install loose end of Hydraulic Hose with
Blue Mark to the Swivel Fitting in port
marked “B.”
Install loose end of Hydraulic Hose with
Yellow Mark to the Swivel Fitting in
port marked “A.”
Tighten the fitting connection to 47 lb-ft.
(No hydraulic sealant required)
Hose Clamp
Return Line
Port “A”
swivel fitting
Valve Return
Line Fitting
Hydraulic Hose w/ Yellow Mark
Hydraulic Hose w/ Blue Mark
Port “B” swivel
fittin
42
Page 43

Assembly Instructions
Remove the Plug on the outside of the
Control Valve
Thread the Large Swivel Fitting into the
Control Valve
(Tighten the Swivel Fitting finger tight
and orient the fitting down as shown,
then Tighten the Nut on the Swivel
Fitting into Control Valve with a wrench
to 44-54 lb-ft)
Step 17
Plug Replaced
with the
Lg Swivel Fitting
Step 18
Raise beam to vertical position as
described in the SPLITTING
OPERATION section of the manual
Slightly loosen Hose Clamp on to the
loose end of the Return line
Slide the loose end of the Return Line
onto the Return Line Fitting
Tighten Hose Clamp
Step 19
Install loose end of Hydraulic Hose into
the Large Swivel Fitting as shown and
tighten the fitting connection to 47 lb-ft
(No hydraulic sealant required)
Fig 02429
Return Line
Hose Clamp
Return Line
Fitting
Fig 02428
Hydraulic
Hose
Swivel
Fitting
43
Page 44

Assembly Instructions
Fill log splitter with hydraulic fluid as
outlined in the Initial Unpacking & SetUp section of the manual.
Fill engine with SAE 10W-30 as
recommended by the engine
manufacturer.
Step 19
44
Page 45

Limited Warranty
Dear Valued Customer:
The NorthStar Product you just purchased is built with the finest material and craftsmanship. Use this product properly
and enjoy the benefits from its high performance. By purchasing a NorthStar product, you show a desire for quality an d
durability.
Like all mechanical equipment this unit requires a due amount of care. Treat this unit like the high quality piece of
machinery it is. Neglect and improper handling may impair its performance. Please thoroughly read the instructions and
understand the operation before using your product.
Limited Warranty
NorthStar shall warranty any piece of equipment manufactured, or parts of equipment manufactured, to be free from
defects in material or workmanship for a period of 2 year from the date of purchase by user. This warranty applies to the
original purchaser of the equipment and is non transferable. Verification of purch ase is the responsibility of the buyer.
Parts will be replaced or repaired at no charge, except when the equipment has failed due to lack of proper maintenance.
Any misuse, abuse, alteration or improper installation or operations will void warranty. Determining whether a part is to
be replaced or repaired is the sole decision of NorthStar.
NOTE: Some services performed by parties other than NorthStar may void warranty.
This warranty covers parts only. It will not provide for replacement of complete products due to defective parts.
Components not manufactured by NorthStar such as engines are guaranteed by their manufacturer and can be serviced at
factory-authorized locations near you. Any costs incurred due to replacement or repair of items outside of a NorthStar
approved facility is the responsibility of the buyer and not covered under warranty. NorthStar can supply you with the
service center location in your area.
This warranty specifically excludes the following; failure of parts due to damage caused by accident, fire, flood,
windstorm, acts of God, applications not approved by NorthStar in writing, corrosion caused by chemicals, use of
replacement parts which do not conform to manufacturer’s specifications, and damage caused by vandalism. Additional
exclusions: loss of running time, inconvenience, loss of income, or loss of use, including any implied warranty of
merchantability of fitness for a specific use.
Warranty does not cover items subject to normal wear such as tires, receptacles or any part subject to direct physical
contact by the public. This warranty does not cover any personal injury or damage to surrounding property caused by
failure of any part.
This warranty is in lieu of any other warranty expressed or implied and NorthStar assumes no other responsibility or
liability outside that expressed within this warranty.
Please fill in the following information and have it on hand when you call in a warranty claim.
Customer Number: ______________________________________________________________
Date of Purchase: _________________________ ______________________________________
NorthStar Serial Number:_________________________________________________________
Item Number: __________________________________________________________________
45
Page 46

Manufactured by
Northern Tool + Equipment Co.,
2800 SouthCross Drive West
P.O. Box 1499 Burnsville, MN 55337-0499
®
46
 Loading...