

Page 1
Page 2
TROUBLESHOOTING GUIDE
PROBLEM
1. CONDENSATION
2. MILDEW
3. REPAIRING A TEAR
4. FAULTY ZIPPER
5. FLOOR CONDENSATION
SOLUTION
THIS IS CAUSED BY LOWER TEMPERATURES ON OUTSIDE OF PRODUCT COMBINED
WITH BODY HEAT ON INSIDE OF PRODUCT. WHEN THIS OCCURS, AVOID TOUCHING
WALLS TO REDUCE CONTACT LEAKAGE. LEAVING DOORS AND WINDOWS OPEN WILL
REDUCE CONDENSATION.
TO AVOID MILDEW, NEVER STORE YOUR PRODUCT WET OR DAMP. HOWEVER, IF
MILDEW OCCURS, USE A SOFT BRISTLE BRUSH OR SPONGE WITH MILD SOAP TO
CLEAN. LET DRY IN THE SUNLIGHT AND APPLY SEAM SEALER COMPOUND ON INSIDE
SEAMS.
PRODUCTS ARE MANUFACTURED WITH ZIPPERS WHICH, IF THE ZIPPER SEPARATES, IT
CAN BE FIXED BY MOVING THE SLIDER TO THE BEGINNING OF THE ZIPPER TAPE AND
REWORKING THE ZIPPER. IF THIS DOESN'T WORK, A REPLACEMENT ZIPPER MAY BE
ORDERED FROM OUR PARTS DEPARTMENT, AND MAY BE INSTALLED BY A REPAIR
SHOP IN YOUR AREA.
FOR SMALL TEARS USE A SELF-ADHESIVE PATCH KIT. WE RECOMMEND A REPAIR
SHOP FOR LARGER TEARS.
TO PREVENT FLOOR CONDENSATION USE A GROUND CLOTH. PLACING A GROUND
CLOTH UNDER YOUR PRODUCT WILL PROLONG ITS LIFE. GROUND CLOTH SIZE
SHOULD BE SLIGHTLY SMALLER THAN PRODUCT FLOOR SIZE.
PERHAPS WE'VE MISSED SOMETHING IN OUR TROUBLESHOOTING GUIDE. FEEL FREE TO GIVE US YOUR IDEAS ON
"TRICKS OF CAMPING", REPAIR PROCEDURES, FEATURES YOU'D LIKE TO SEE, OR OTHER RECOMMENDATIONS.
SEND THEM TO:
NORTHPOLE LIMITED
23 Town and Country Drive
Washington, MO 63090
(ONLY APPLICABLE ON PRODUCTS WITH FLOOR)
NOTICE!
FOR MISSING PARTS:
1-800-775-1965 or 1-800-366-1599
Page 3
A M e s s a g e T o O u r C u s t o m e r s
T h a n k y o u f o r p u r c h a s i n g a q u a l i t y p r o d u c t m a n u f a c t u r e d b y N o r t h P o l e L i m i t e d . A s t h e w o r l d l e a d e r i n o u t d o o r r e c r e a t i o n a l
p
r o d u c t s , w e p r i d e o u r s e l v e s i n d e l i v e r i n g h i g h q u a l i t y a n d c u s t o m e r f r i e n d l y p r o d u c t s . A s w i t h a n y n e w p r o d u c t , i t i s v e r y
i m p o r t a n t t o r e a d a l l t h e i n f o r m a t i o n o n s a f e t y , a s s e m b l y / d i s a s s e m b l y a n d c a r e o f y o u r n e w p u r c h a s e p r i o r t o u s a g e .
A s a v a l u e d c u s t o m e r , y o u r s a t i s f a c t i o n i s v e r y i m p o r t a n t t o u s . W e a t N o r t h P o l e L i m i t e d w e l c o m e y o u r f e e d b a c k a n d
l o o k f o r w a r d t o c o n t i n u i n g o u r r e l a t i o n s h i p w i t h t h e d e v e l o p m e n t o f n e w , i n n o v a t i v e p r o d u c t s t o s u i t y o u r n e e d s .
P l e a s e v i s i t y o u r f a v o r i t e r e t a i l e r f o r o t h e r q u a l i t y p r o d u c t s f r o m N o r t h P o l e L i m i t e d .
I M P O R T A N T : W e a d v i s e y o u t o a s s e m b l e t h i s p r o d u c t a t l e a s t o n c e a t h o m e b e f o r e g o i n g o n a t r i p t o e n s u r e t h a t y o u h a v e
a t t a i n e d a s a t i s f a c t o r y k n o w l e d g e o f t h e a s s e m b l y p r o c e s s . B e i n g f a m i l i a r w i t h y o u r p r o d u c t w i l l m a k e i t e a s i e r i f y o u h a v e
t o s e t u p i n t h e d a r k o r u n d e r a d v e r s e c o n d i t i o n s .
I M P O R T A N T S A F E T Y A N D T I P I N F O R M A T I O N
T O M A X I M I Z E T H E E N J O Y M E N T O F Y O U R P R O D U C T P L E A S E A S S E M B L E A N D U S E Y O U R P R O D U C T A S S A F E L Y A S
P O S S I B L E . T H E P U R P O S E O F T H E S A F E T Y A L E R T S Y M B O L I S T O C A L L Y O U R A T T E N T I O N T O P O S S I B L E
H A Z A R D S R E L A T I N G T O T H E U S E A N D A S S E M B L Y O F Y O U R P R O D U C T . T H E P U R P O S E O F T H E T I P S Y M B O L I S
T O C A L L Y O U R A T T E N T I O N T O S U G G E S T I O N S T H A T W I L L A S S I S T Y O U I N T H E A S S E M B L Y / D I S A S S E M B L Y P R O C E S S
A N D E N H A N C E Y O U R C A M P I N G E X P E R I E N C E . W H E N Y O U S E E T H E S E S Y M B O L S , P L E A S E C L O S E L Y F O L L O W T H E
I N F O R M A T I O N P R O V I D E D .
W A R N I N G
• KEEP ALL FLAME AND HEAT SOURCES AWAY FROM THIS TENT FABRIC. This fabric is not fireproof! It is made with
flame resistant fabric, which meets CPAI-84 specifications. The fabric may burn if left in continuous contact with any flame
source. The application of any foreign substance to the fabric may render the flame-resistant properties ineffective.
• Do not erect this product near an open flame.
• Never use any fuel burning, oxygen consuming devices, or any device that produces fumes (including, but not limited to
cooking stoves, lanterns, candles, hibachis, or heaters) in or around your product. Inhalation of fumes may result in
carbon monoxide poisoning, injury and/or death.
• This product is not waterproof!
• Your product is water repellent, however, during heavy rain some leakage may occur. Keep objects from touching the
inside, as objects may cause leakage at the point of contact.
• To prevent seam leakage (floor seams in particular), a seam sealer compound must be applied to the seams. Use
recommended water repellent compounds on our product. Read the label on any product before using. Questions?
Call our Customer Service number.
• Your recreational product is made from synthetic fabric that has been treated and is highly resistant to the sun’s Ultraviolet
(UV) light. No fabric can withstand prolonged exposure to sunlight. UV damage is not covered by the limited warranty.
• Do not spray or apply insecticide or pesticide on your product. It may damage UV resistant and/or water repellent
properties of your product. Any damage caused by applying insecticide or pesticide on your product is not covered
by the limited warranty.
• Our recreational products are constructed to rigid specifications. They are not made, however, for extreme weather,
climates, or environments. Modification, abuse and extreme weather are some conditions that may adversely affect
the structural integrity.
• Additional precautions may be necessary during inclement or “surprise” weather conditions. Here are some tips that
may help during these times:
Use guy lines to help secure your structure during periods of heavy winds.
Storms or steady rains may collect in water pockets on the roof. This will add weight, which can weaken the overall
structure causing the uprights to collapse. Maintain a watchful eye and remove any water accumulation that may occur.
• Your product must be stored dry. One of the easiest ways to damage your product is storing it while it is wet. Storing a
wet tent as short as 24 hours in warm weather is likely to cause mildew on the fabric. Once mildew sets in, the stains are
permanent. Stains cannot be removed without potential harm to the fabric coatings and are not covered by the limited
warranty.
• If you must close camp in the rain, open your product and set it up to allow it to dry as soon as possible. Even when your
product appears to be dry after use, it is always best to unfold and assure it is completely dry before storing. Hanging it
outside or even leaving loosely clumped in your house for a few days, turning it inside and out to assure it has dried
everywhere, can help prevent damage.
• This product is not machine washable. To clean product, use mild soap and let it dry thoroughly before storage.
Page 4
R
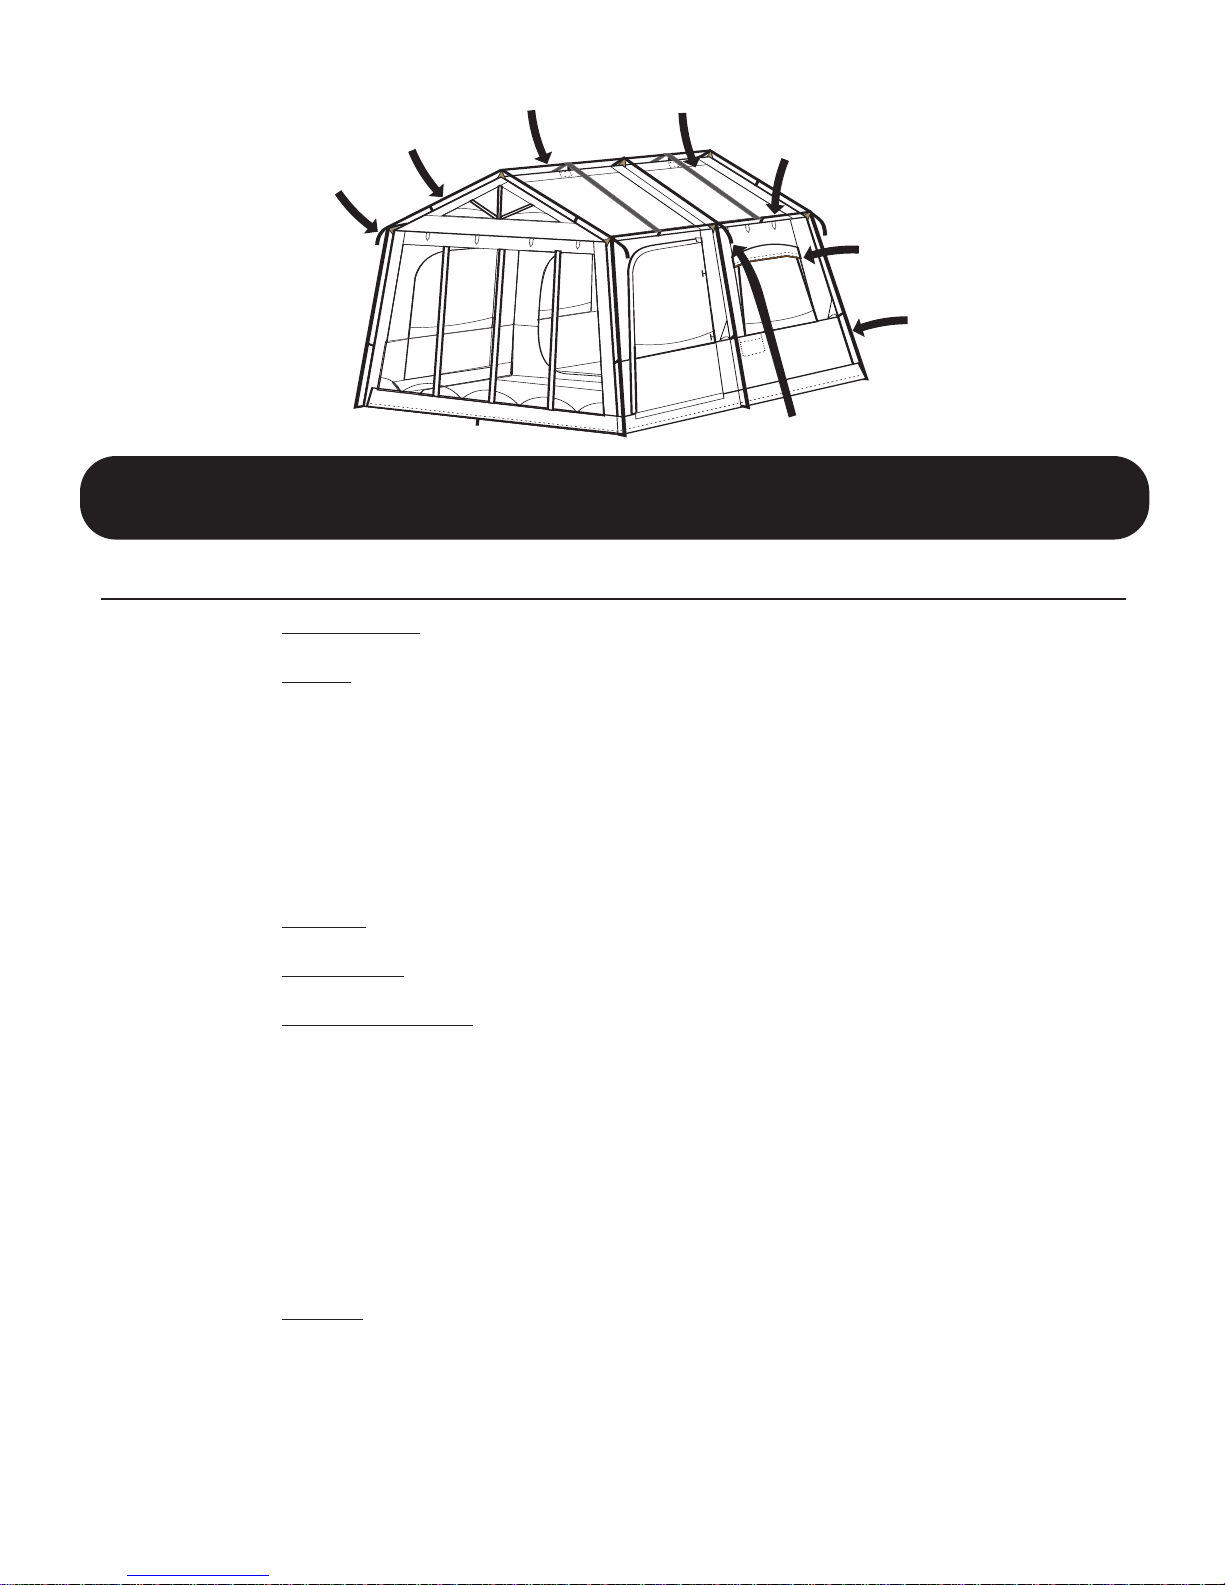
CRPL-373GR
RGPL-171GR
EPLC-28GR
STRP-307
SRPL-373GR
BWPL-25CR79
LPOL-171GR
EPLM-28GR
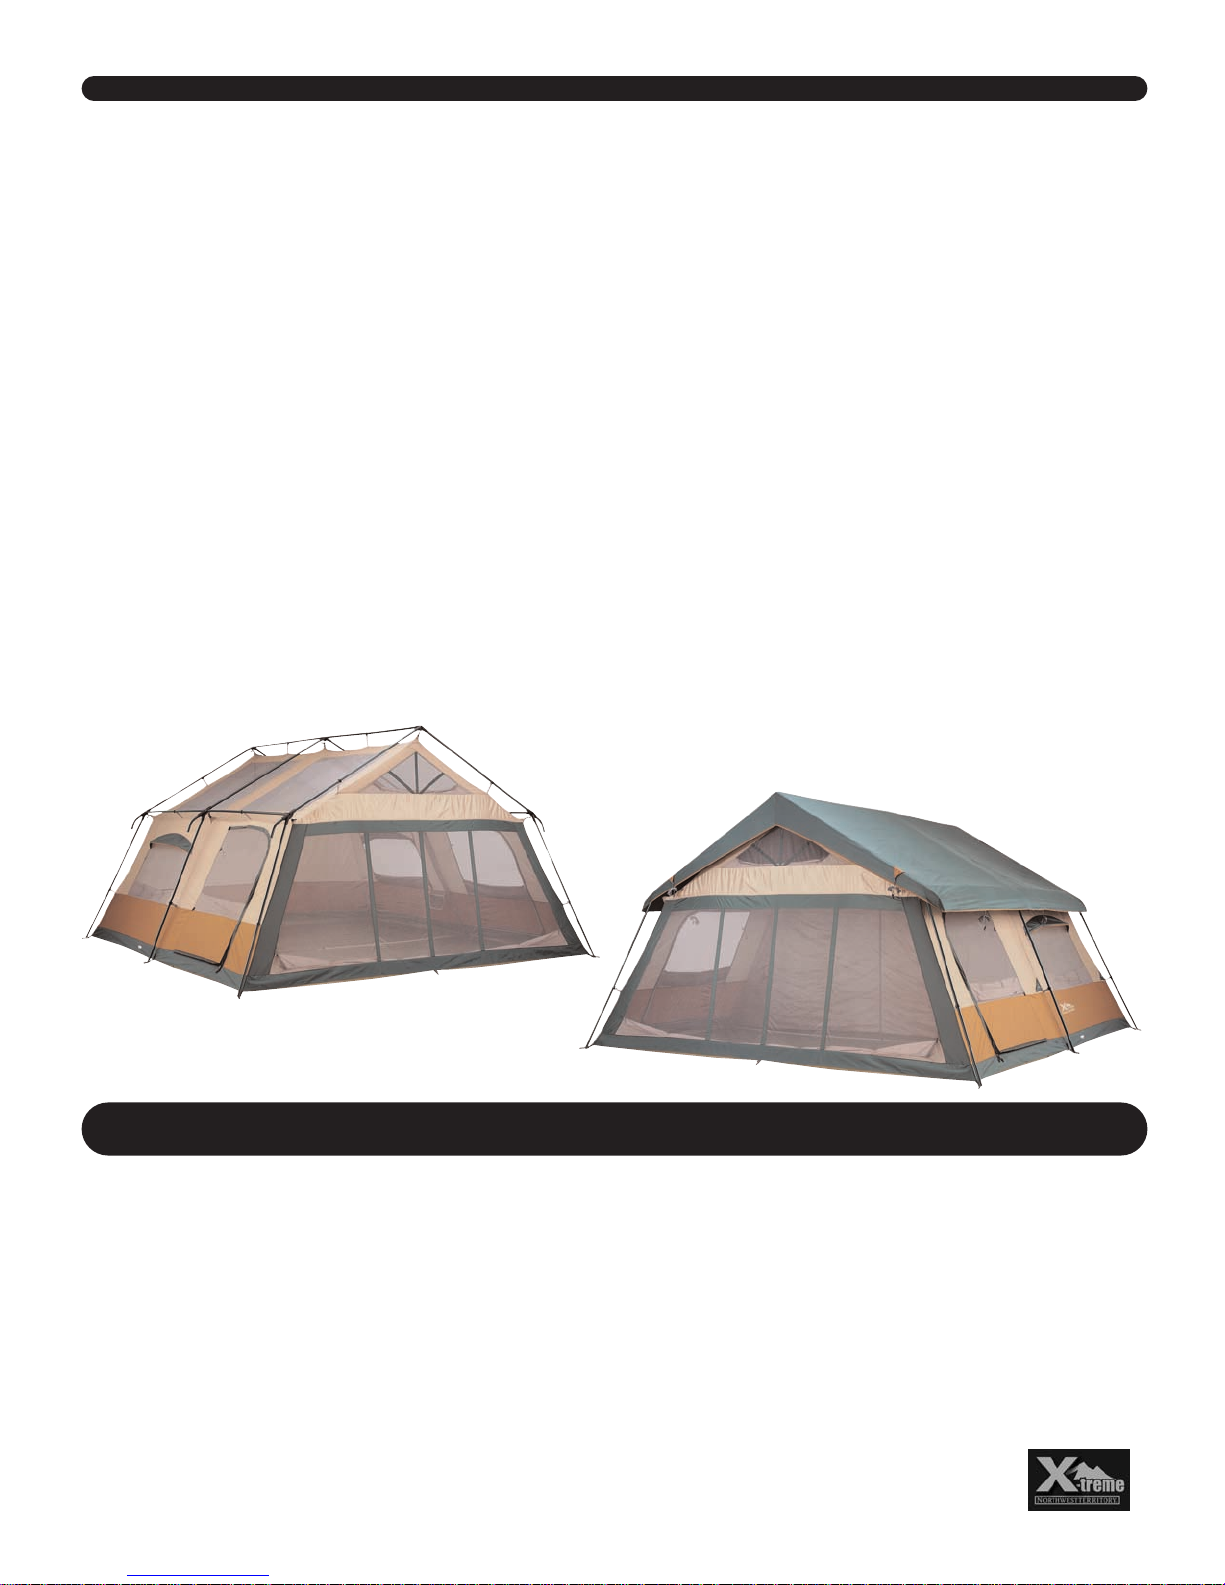
Model # 88-97-08 Vacation Cottage
14 ft. x 14 ft. x 92 in.
✔ QTY. DESCRIPTION PART NUMBER
FABRIC BODY
___ 1 Tent Body N/A
POLES
___ 1 Steel, chain-corded Center Roof Pole w/ R-Springs and Hubs- green CRPL-373GR
___ 2 Steel, chain-corded Side Roof Pole w/ R-springs &Hubs- green SRPL-373GR
___ 6 Steel, chain-corded Roof Gable Pole- green RGPL-171GR
___ 6 Steel, chain-corded Leg Pole w/ R-Springs- green LPOL-171GR
___ 2 Steel, curved Middle Eave Pole w/ R-Spring (spring on outside right)- green EPLM-28GR
___ 4 Steel, curved Corner Eave Pole w/ R-Spring (spring on outside left)- green EPLC-28GR
___ 2 Fiberglass, shock-corded Bay Window Pole w/ corners- black BWPL-25CR79
If you wish to order a complete set of poles, please use:
___
___ 1 Rainfly w/ webbing loops; green/ brown trim RFLY-GRBR06
___ 1 Carry Bag- w/wheels- navy CBAG-950NV
___
___ 2 4-Way Hub- left side (one to left of center on each SRPL pole) 4WAY-334-1
___ 2 4-Way Hub- right side (one to right of center on each SRPL pole) 4WAY-335-1
___
___
___
___ 2 Shelf; 3 Tier SHF3-12X15
___ 2 Support Strap with clips and slider STRP-307
___
___ 1 Stake Bag SBAG-16IN
___ 8 Guy Rope; 3M GROPE-3M
___ 1 Stake Set of Sixteen 9 in. plastic stakes SSET-16PL9IN
1 Pole Set of all Twenty-Three Steel & Fiberglass Poles- green/black PSET-GRBK
RAINFLY
CARRY BAG
UNIVERSAL PARTS
ay Hub- center side (one in center of each SRPL pole) 5WAY-333-1
2
5-W
2 3-Way Hub- gable top (one to front end and one on rear end of CRPL pole) 3WAY-120-4
1
1
1
4-Way Hub- gable middle (one in middle of CRPL pole) 4WAY-120-3
Remote Control Light Set;
ole Bag PBAG-46IN
P
2pc
LITERC
STAKES
view your parts list above to make sure all parts listed above have been included in your package.
Re
Call our TOLL FREE Numbers: 800 775-1965 or 800-366-1599 Monday-Friday 7am - 5pm CST
Mention your complete Model Number so that our Representative may assist you
Please do NOT return product to store.
!
Page 5
ASSEMBL
Y INSTRUCTIONS
THIS RECREATIONAL PRODUCT REQUIRES TWO ADULTS TO ASSEMBLE.
* Unless otherwise specified all instructions will be given assuming the assembler is facing the front opening of the tent.
Carefully fold out your poles, using caution to prevent snapping the shock-cording. Make sure each pole segment is “seated” into the next section
*
before flexing the pole during set-up.
STEP 1: Verify Package Contents
Verify package contents by emptying contents of
bag(s) and confirming all parts are included and
undamaged. Tip: Do this at home before you leave
on your trip.
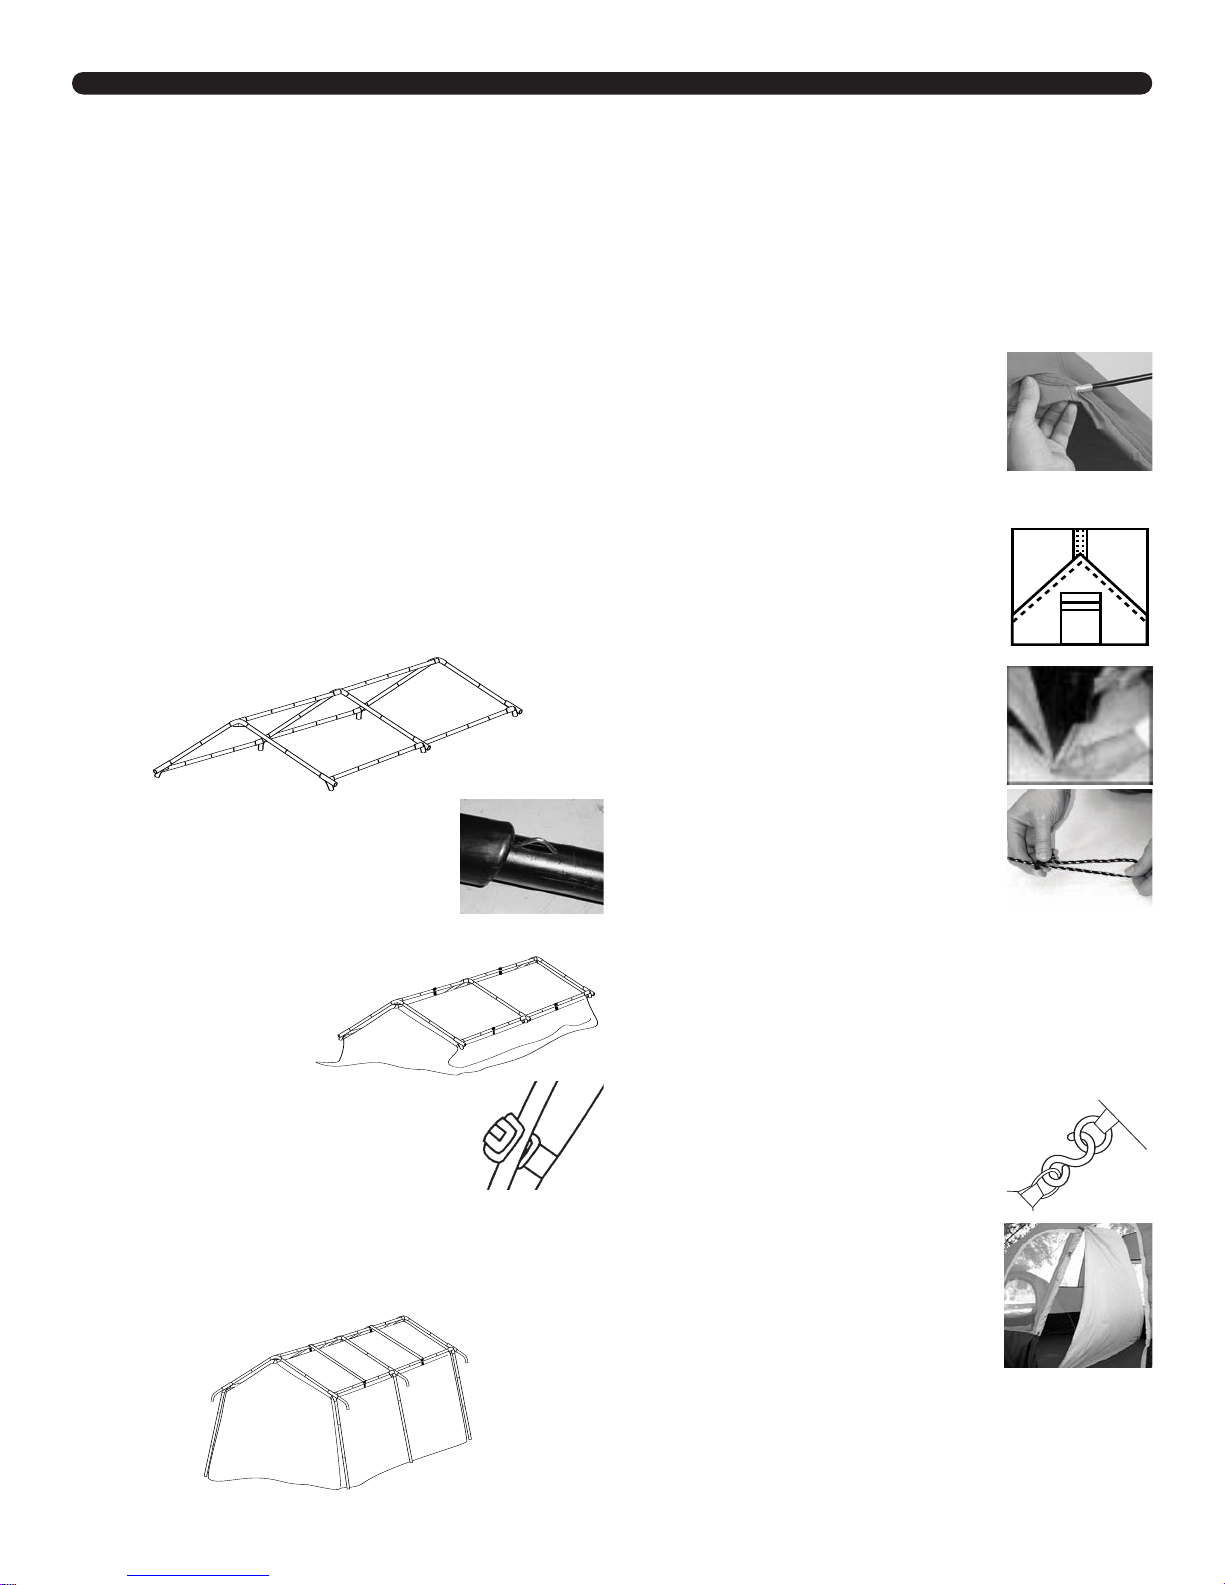
STEP 2: Assemble the Roof Poles
A) Select a smooth level site and spread out your
tent.
B) Lay all parts of structure out on a flat open area.
Extend tent poles, and sort into groups by style i.e.
roof gable poles, leg poles, eave poles, etc…. This
will simplify the assembly process.
C) Assemble roof ridge poles and attach hubs. Lock
poles into hubs by popping R-springs on poles into
slots on underside of hubs.
tion of hubs must be correct
TIP: Note that orienta-
.
D) Attach the gable poles to corresponding openings on hubs
.Important:
Make sure R-springs snap into hub
slots and poles are locked into place.
STEP 3: Set Up the Tent
A) Take tent fabric and
locate brass S-hooks
on peaks and roofline
of tent.
Attach S-hooks
to small holes on
underside of corresponding hubs
.
B) Snap Quick Clips (attached to tent
body) over roof ridge poles to shape
.
roof
C) Snap support straps in place over roof ridge
poles.
D) Insert leg poles into lower hub sockets. TIP:
Make sure end of leg pole with R-spring on it is the
one you are inserting into hub.
E) Insert opposite ends of leg poles onto pin-rings at
base of tent.
F) Insert curved eave poles into hubs, making sure
R-springs lock into hub slots.
G) Snap Quick Clips over leg poles.
H) Slide bay window poles through
bay window pole sleeves.
I) Secure poles to tent fabric using
nylon fasteners provided.
STEP 4: Attach the Rainfly
A) Drape rainfly over tent top.
B) Insert ends of eave poles into pole
pockets located on corners of rainfly.
STEP 5: Stake the Tent
A) Secure tent by driving stakes
through webbing loops located at
base of tent.
TIP: Make sure tent
floor is stretched tight as you stake it
down.
B) To secure guy lines, find the guy
line plastic slider and look for the portion of line opposite the knot. Pull this
portion, forming a loop (works just like
a slip knot!)
C) Extend guy line to ground and drive a stake
through the loop to secure.
Tip: make sure you drive
the stake through this loop to hold the guy line taut.
You can always slide the plastic slider toward the
product’
ame to readjust the tension.
s fr
Repeat f
or
remaining guy lines.
STEP 6: Add Accessor
ies
A) Attach shelf unit to tent by taking
S-hooks and attaching them to the
loops in the tent located at the back of
tent.
B) The divider has toggles on the
edges, which attach to fabric loops
inside tent.
To install divider, push
each toggle through its corresponding
loop.
Page 6
DISASSEMBLY INSTRUCTIONS
e sure all windows and doors are unzipped to disassemble.
* Mak
* Store all poles and stakes in their corresponding bags to prevent possible tearing or damage to fabric.
STEP 1: Remove the Stakes
Carefully remove stakes by pulling out the hook ends.
Tip: Do not pull or tug at the stake loops sewn onto the
f
abric body. Remove excess soil from the stakes and
store them in their bag.
STEP 2: Remove the Rainfly
A) Remove eave pole ends from pockets on corners of
rainfly.
B) Slide rainfly off tent and fold for storage.
STEP 3: Take Down the Divider Curtain
Unfasten divider toggles from fabric loops to take down
divider. Fold divider for storage.
STEP 4: Take Down the Bay Windows
A) Unfasten nylon fasteners that secure window poles to
tent fabric.
B) Remove window poles from pockets and slide poles
out by carefully pushing them through the sleeves away
from the end at which you are standing. Tip: By following
these instructions, you will minimize risk of damaging
poles and/or snapping shock-cording.
STEP 5: Take Down the Tent
A) Unfasten Quick Clips from tent frame.
B) Remove eave poles from hubs.
C) Remo
ets
ve leg poles from pin-rings and lower hub sock-
.
D) Detach S-hooks from hubs.
E) Disconnect all poles from hubs. Carefully fold poles
and store them in their bag.
STEP 6: Fold the Tent
Fold tent into rectangular shape the width of pole bag.
Lay pole bag at one end of tent and roll tightly together,
slowly squeezing air out as you go. You can roll rainfly
together with tent in this step. Store tent in carry bag
provided. (Following these instructions will make it easier to fit tent into bag.)
Limited 6 Month Warranty
If your product does not work properly because of a defect in materials or workmanship, NorthPole Limited will, for 6 months from the date of purchase, at its option
either (a) repair our product with new or refurbished parts, or (b) replace it with a new product. The decision to repair or replace will be made by NorthPole Limited.
NORTHPOLE LIMITED RESERVES THE RIGHT TO MAKE SUBSTITUTIONS TO WARRANTY CLAIMS IF PARTS ARE UNAVAILABLE OR OBSOLETE.
If repair is needed dur
paid, and place of purchase. Product will not be covered under warranty due to damages resulting from misuse, excessive or abusive usage, and/or inclement weather
conditions (i.e. wind storms, hurricanes, lightning storms, tornadoes). Acts of God resulting in damage to tent and its components are not covered under this limited warranty. In such event, the consumer assumes cost of needed parts. NorthPole Limited is not responsible for normal wear and tear, zipper exhaustion, or the natural breakdown
ials that occurs with e
in mater
UNDER NO CIRCUMSTANCES SHALL NORTHPOLE LIMITED BE LIABLE FOR ANY INCIDENTAL OR CONSEQUENTIAL DAMAGES. Some states do not allow the
xclusion or limitation of incidental or consequential damages
e
NORTHPOLE LIMITED EXPRESSLY EXCLUDES ALL WARRANTIES, INCLUDING, BUT NOT LIMITED TO, ANY IMPLIED WARRANTIES OF MERCHANTABILITY AND
FITNESS FOR A PARTICULAR PURPOSE. Some states do not allow the exclusion or limitation of implied warranties, so the above exclusion may not apply to you.
NOTWITHSTANDING ANYTHING TO THE CONTRARY, NORTHPOLE’S AGGREGATE LIABILITY, WHETHER IN CONTRACT OR TORT, SHALL BE LIMITED TO ACTUAL DIRECT MONEY DAMAGES IN AN AMOUNT NOT TO EXCEED THE PRICE PAID BY THE END-USER FOR THIS PRODUCT.
AIN WARRANTY SERVICE
O OBT
T
W
HO
authorized dealer as proof of purchase at time of call.
HOW TO ORDER REPLACEMENT PARTS: When ordering replacement parts, always include Model Number, Part Number, and Part Description.
ing the limited w
xtended use
Call toll free 1 (800) 775-1965 · Mon-Fri, 7:00 a.m. to 5:00 p.m. (Central Standard Time)
arr
.
:
iod, the purchaser will be required to fur
anty per
Call the toll free n
, so the abo
umber dur
nish a sales receipt as proof of purchase indicating date of purchase, amount
e limitation may not apply to you.
v
usiness hours mentioned below. You must have a copy of your purchase receipt from an
ing the b
 Loading...