

Page 1

Wireless Modem Router
Table of Contents
1. Wireless modem router installation ..................................................2
1.1 Equipments ...................................................................................2
1.2 Line filters installation ................................................................2
1.3 Connecting wireless modem router .......................................3
1.4 Configuring TCP/IP protocol ....................................................4
Windows 2000 and XP: .............................................................4
Windows Vista: .............................................................................6
1.5 Configuring gateway ...................................................................9
1.6 Troubleshooting .........................................................................10
1.7 Security ........................................................................................10
2. Configuring your mailbox ...................................................................15
2.1 Configuring Outlook Express .................................................15
2.2 Configuring Outlook 97 ..........................................................18
2.3 Configuring Outlook 2000/XP ...............................................21
2.4 Configuring Netscape 7.0 ........................................................24
2.5 Configuring Incredimail ............................................................29
2.6 Configuring Windows Mail 6.0 ...............................................32
3 Contacting us .........................................................................................36
4 Important Information .........................................................................36
Page 2
Hi-Speed Internet User Guide2
1.1 Equipement
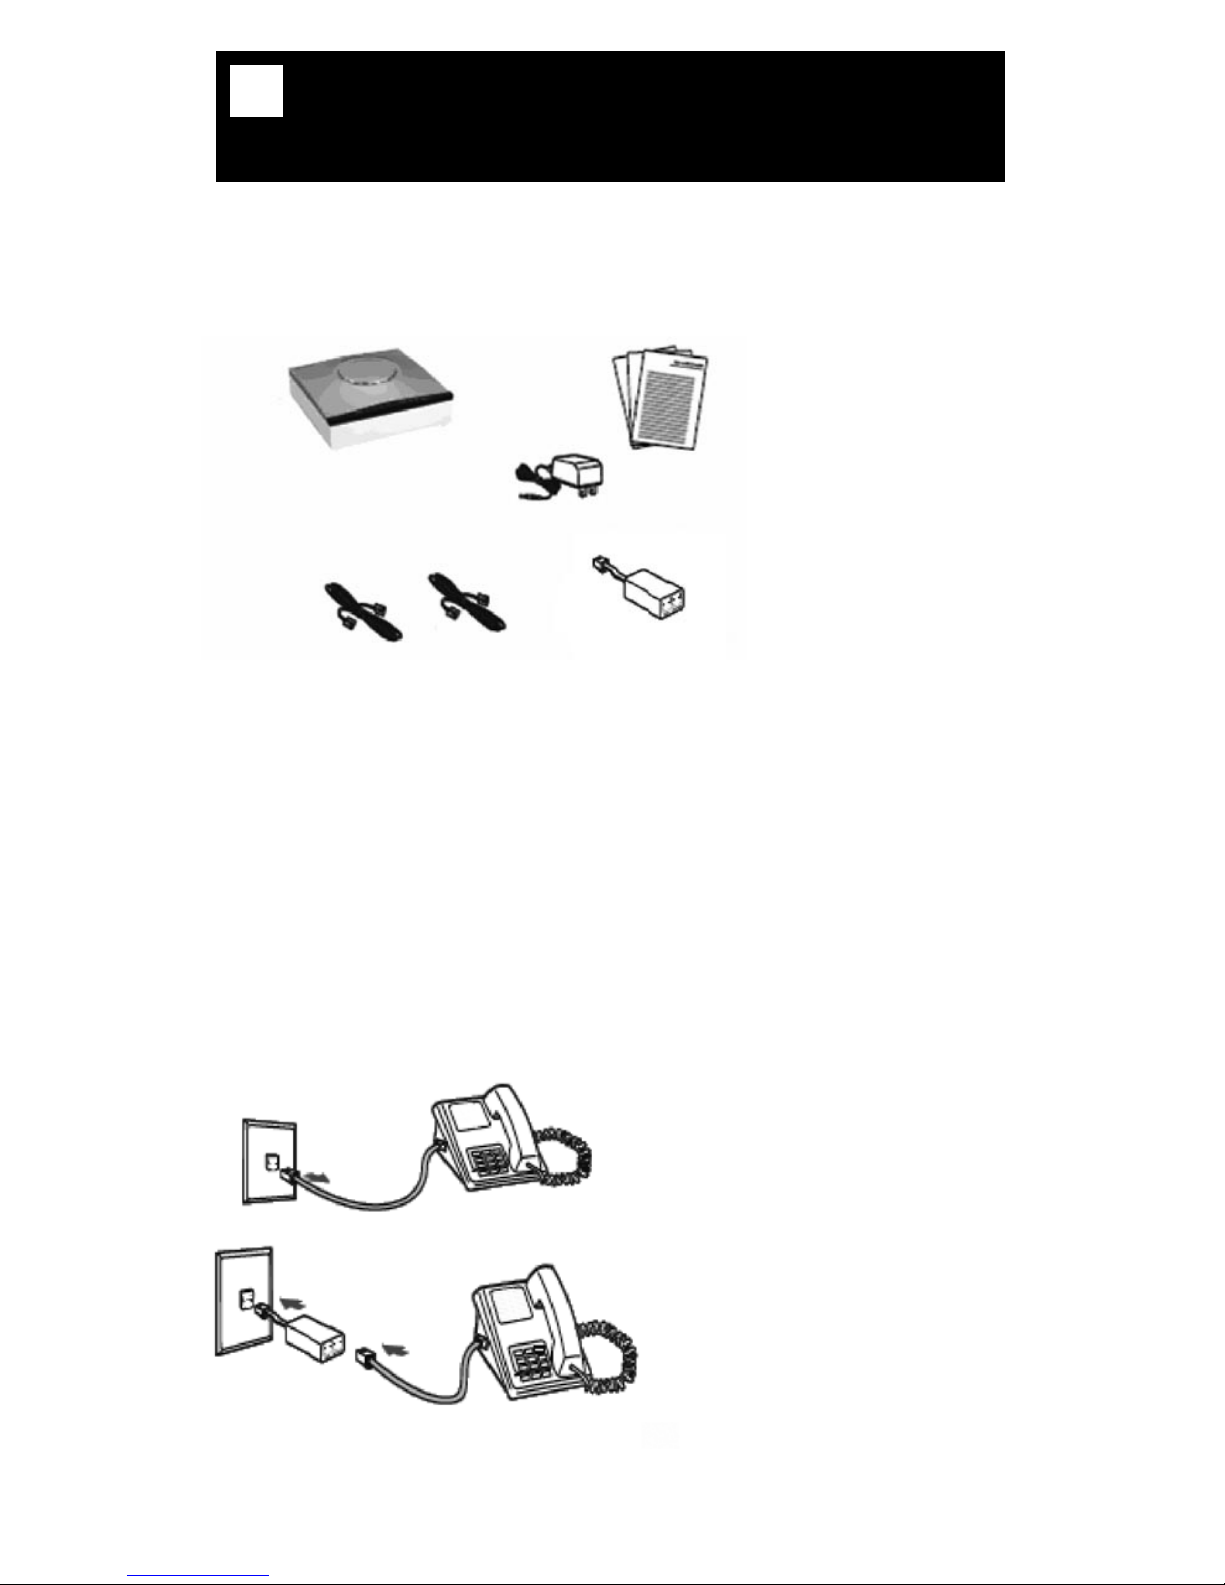
Verify that the following items came with your DSL kit:
1.2 Line filters installation
Devices such as fax machines, caller ID boxes, or phones or phones that share the same
phone line as your DSL account require a line filter. The line filter prevents noise from
disrupting the DSL signal on the phone line. Filters can be in the form of a stand-alone
line filter or a wall-mount filter.
* It is also possible to obtain wall-mount filter. To order this filter, please call NorthernTel
Customer Service Department at 1 800 360-8555.
1. Gigaset® Device
2. Documentation
3. Power supply
4. RJ-45 Ethernet cable
5. RJ-11 DSL cable
6. Line filters (2)
Stand-alone Line Filter
For each device that shares the DSL
phone line:
1. Unplug the device’s cord from
the phone jack.
2. Plug the filter into the
phone jack.
3. Plug the phone cord (or other
device cord) into the filter.
1. Wireless modem
router installation
1
2
3
4 5 6
Page 3
3Wireless Modem Router
1.3 Connecting wireless modem router
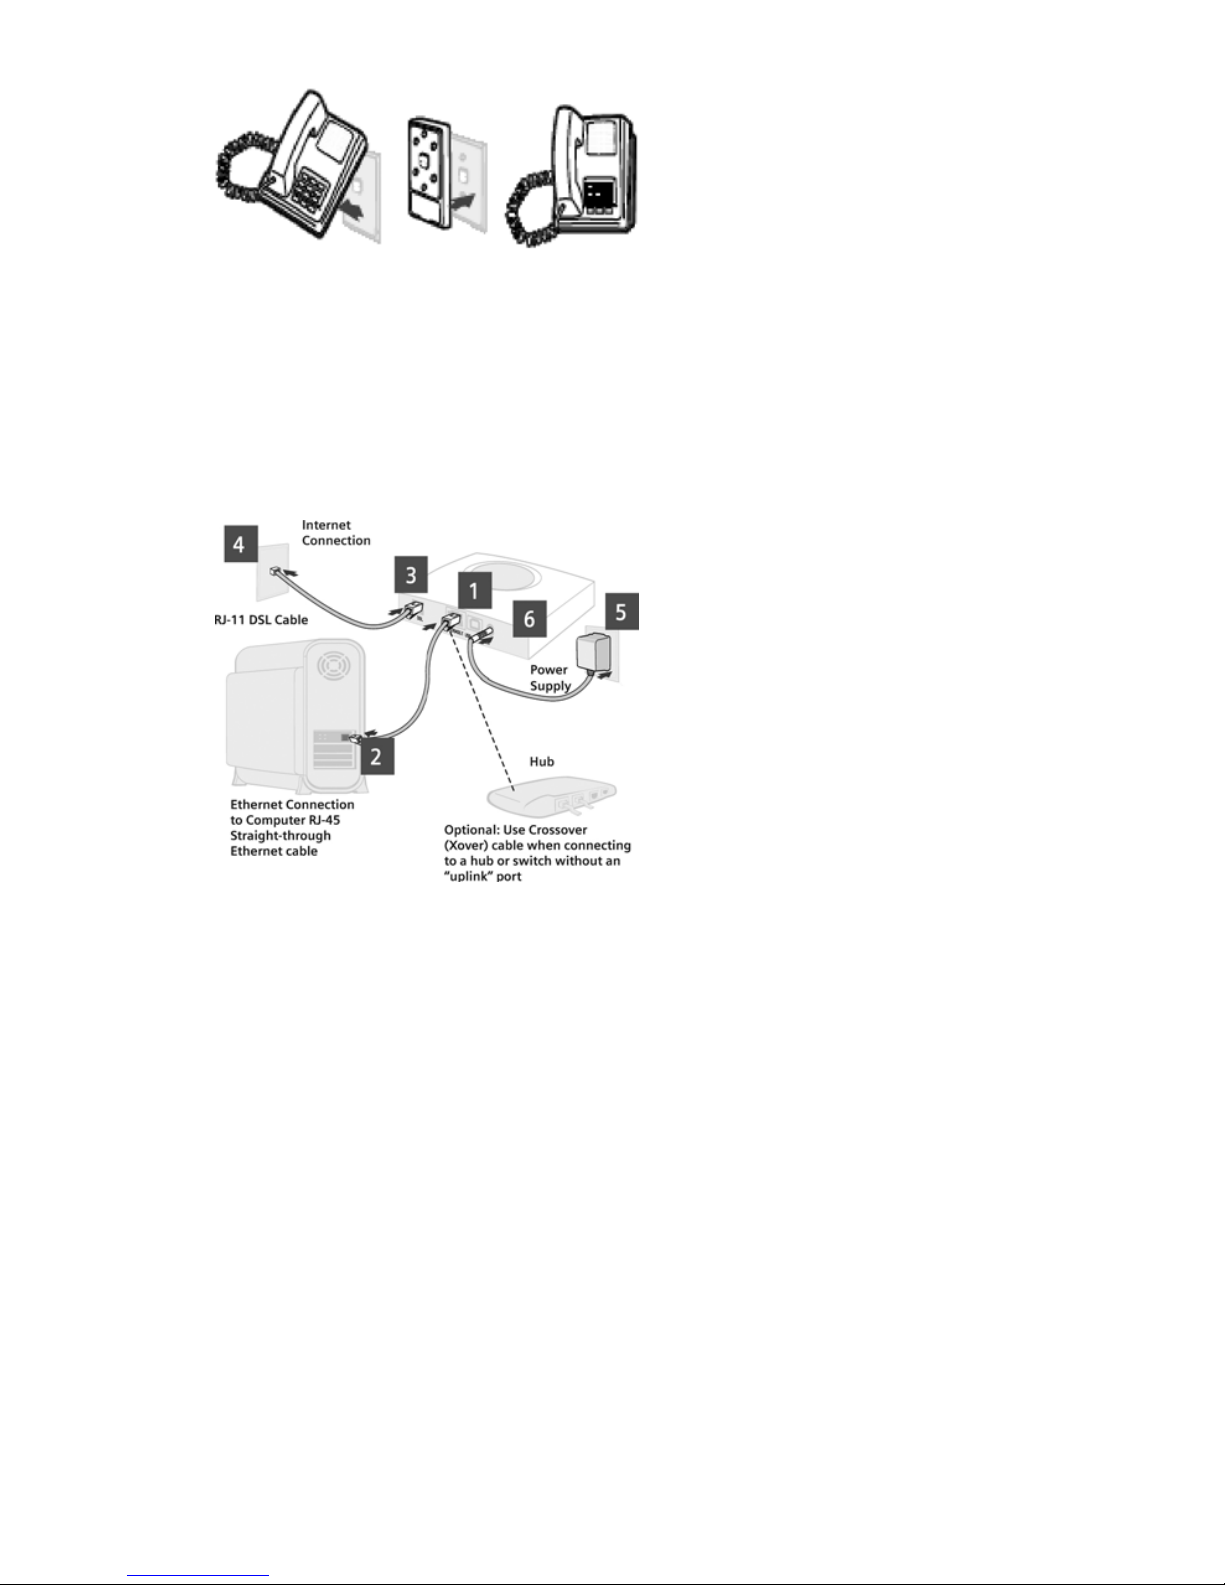
* Use Crossover cable when connecting to a hub or switch without an uplink port.
There is no software installation required when using an Ethernet connection.
Wall-mount Filter
For a wall-mounted phone, use a
wall-mount filter:
1. Remove the phone from the wall.
2. Connect the wall-mount filter to
the all plate.
3. Reconnect the phone.
Connection steps :
1. Connect the Ethernet cable
(RJ-45) to the Ethernet port
on the wireless modem router
(yellow port).
2. Connect the other end to the
Ethernet port on your computer.
3. Plug the DSL cable (RJ-11) into
the DSL port on the wireless
modem router (gray port).
4. Plug the other end of the
DSL cable (RJ-11) into the phone
jack.
5. Plug the power adapter into the
power outlet and the wireless
modem router (black port).
6. Ensure that the wireless modem
router is powered on.
The power switch is on the right
side of the back panel.
Page 4
Hi-Speed Internet User Guide4
1.4 Configuring TCP/IP protocol
The TCP/IP protocol must be installed, as this step enables you to be identified on the Internet.
Without this information, you will not be able to access the Internet. It is therefore important
that you make sure that the data you enter is accurate. Please refer to the
“Important Information” that you wrote down on the last page of this document.
Before configuring the IP address, make sure that the physical components are working
properly. The network interface card needs to have been configured and the modem installed in
order to do this.
Windows 2000 and XP:
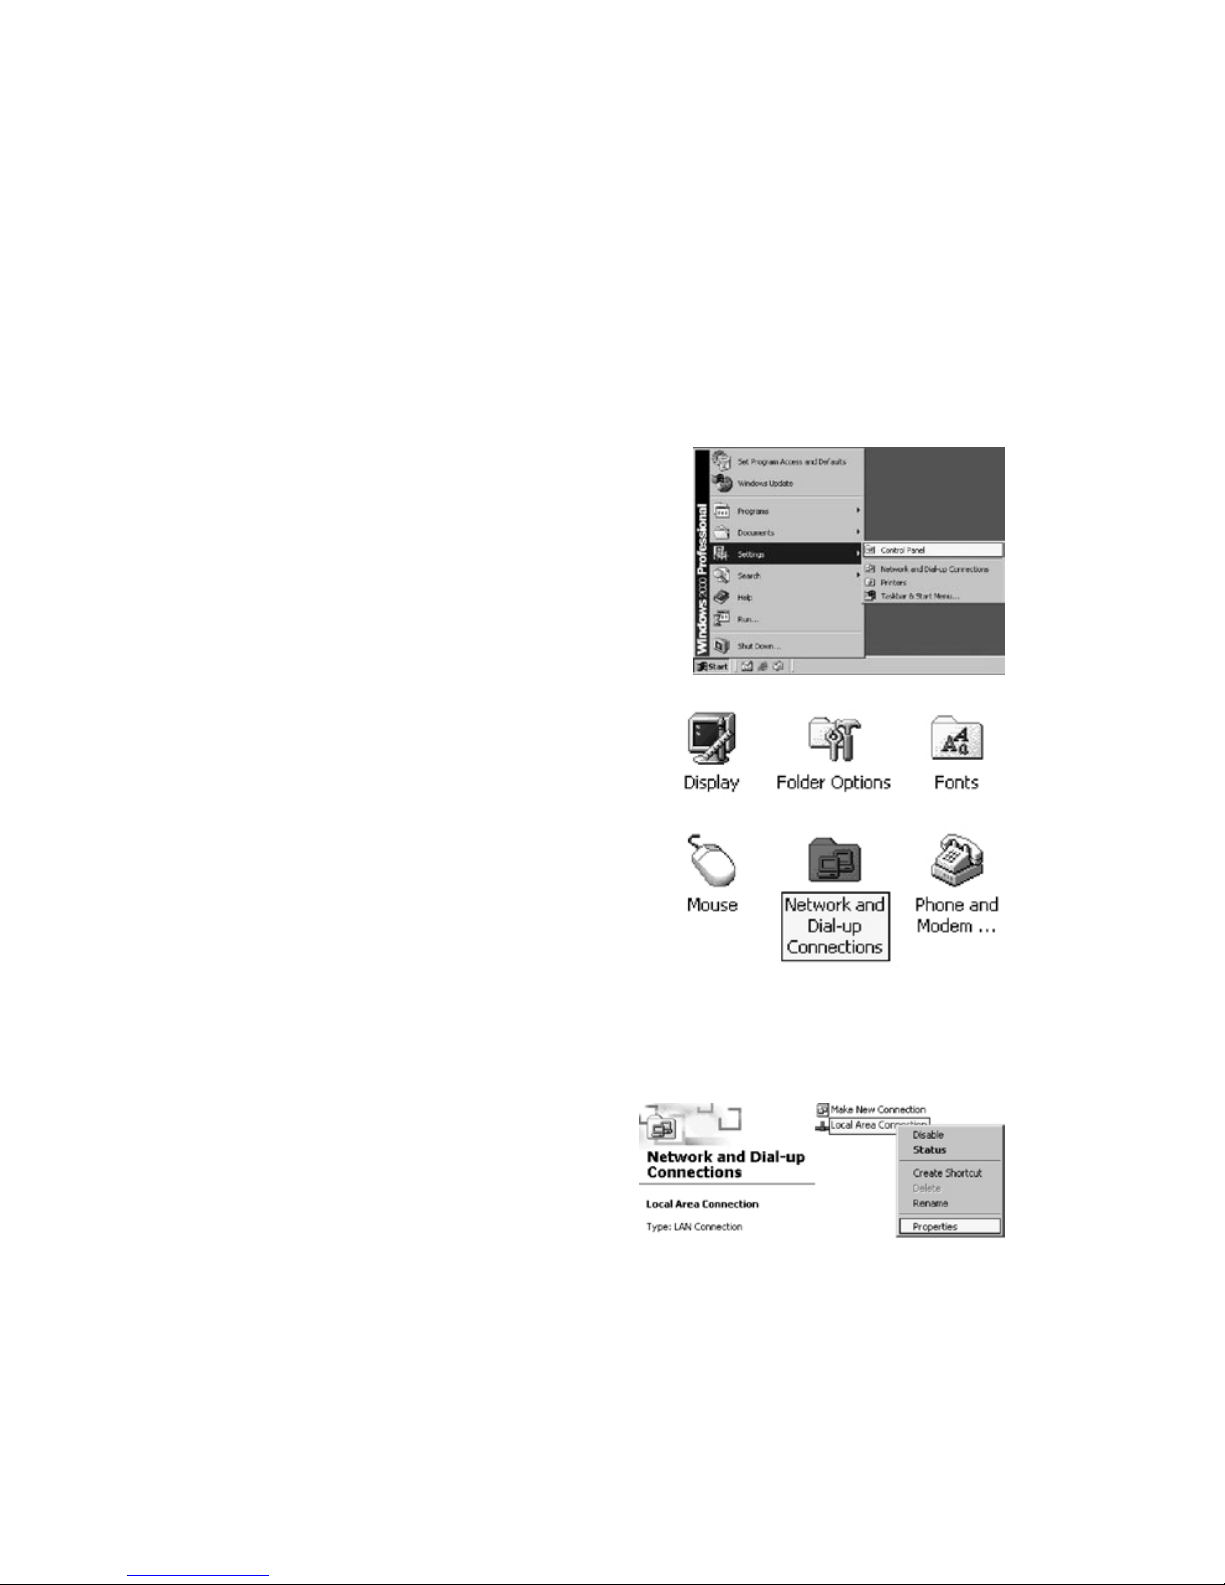
1. Click on Start > Settings > Control Panel.
2. Double-click on
“Network and Dial-up
Connections”.
3. Right-click on your
“Local Area Connection”.
Then click on Properties.
Page 5
5Wireless Modem Router
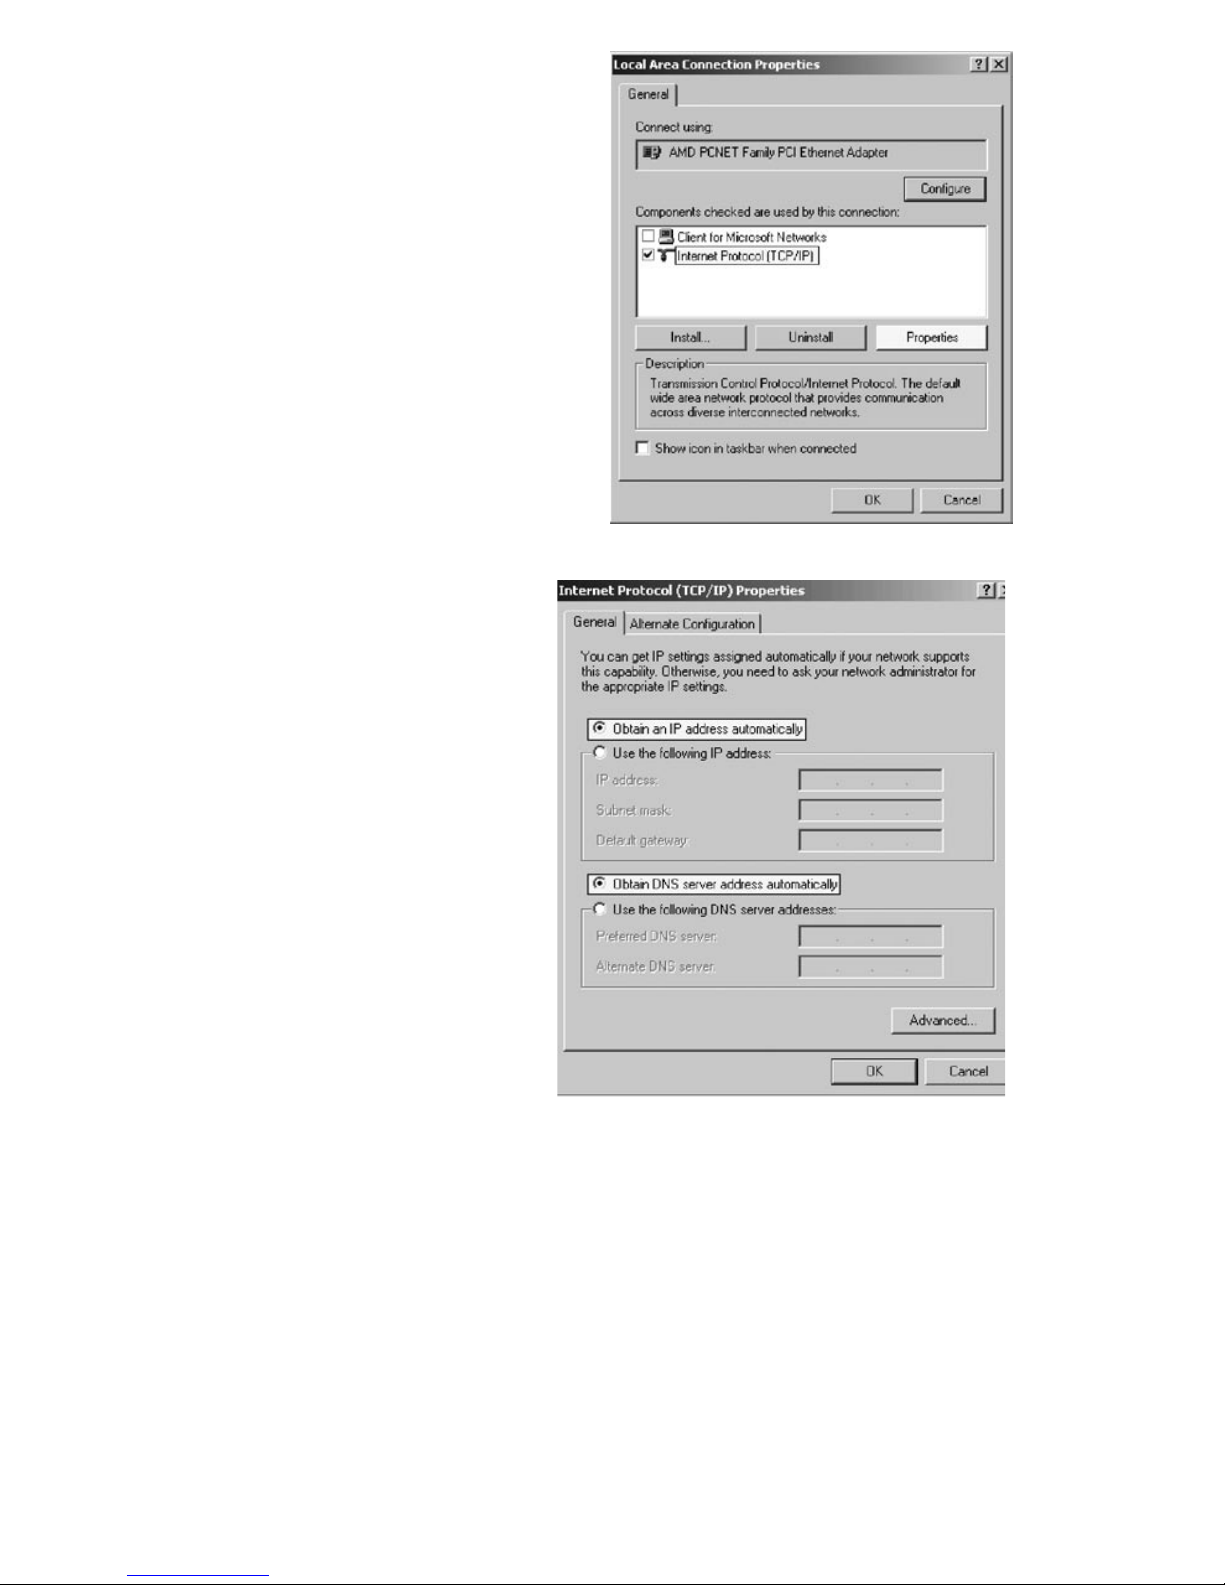
4. In the “Components”, select
“Internet Protocol (TCP/IP)”,
then click on Properties.
5. Your high speed connection
doesn’t need any special
configuration.
- Select “Obtain an IP address
automatically”.
- Select “Obtain DNS server
address automatically”.
The server will give out the neces-
sary IP addresses to allow access
to the Internet.
- Click on OK
Page 6
Hi-Speed Internet User Guide6
Windows Vista:
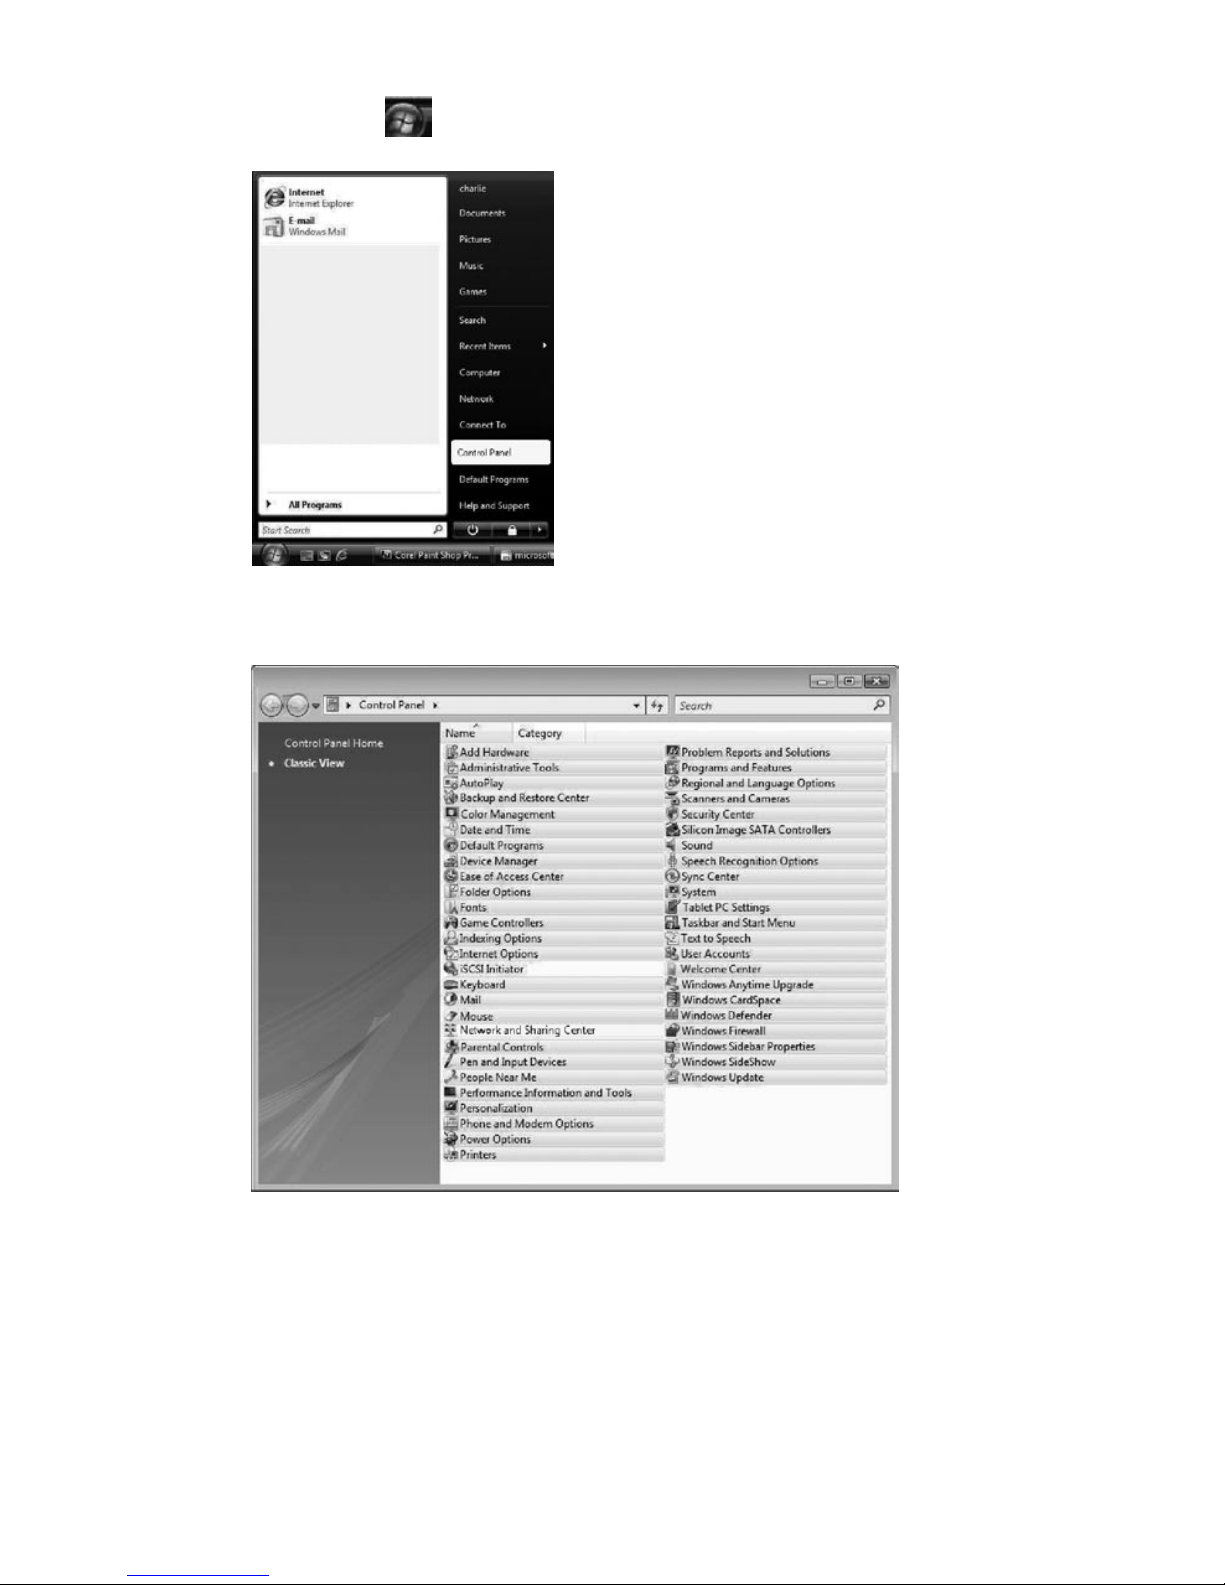
1. Click on Start ( ) > Control Panel.
2. Select Network and Sharing Center.
Page 7
7Wireless Modem Router
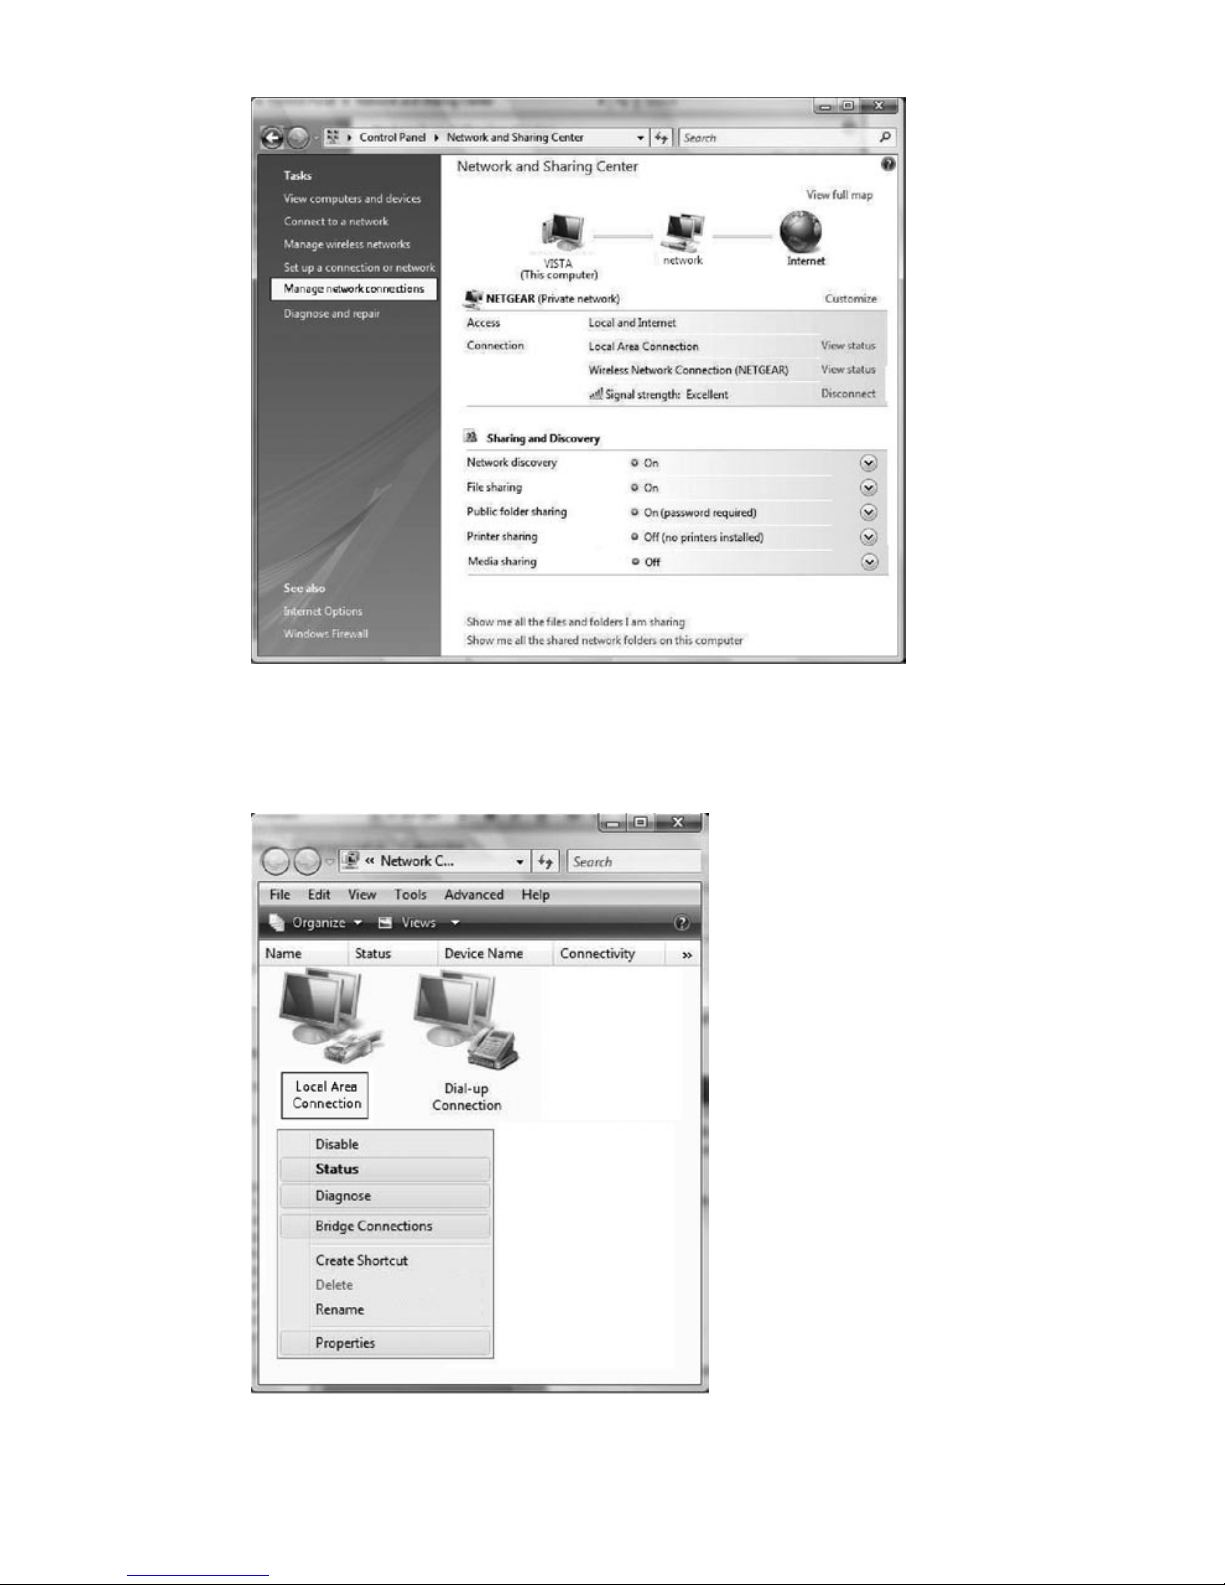
3. On the left menu, select Manage network connections.
4. Right-click on your ‘’ Local Area Connection’’. Then click on Properties.
Page 8
Hi-Speed Internet User Guide8
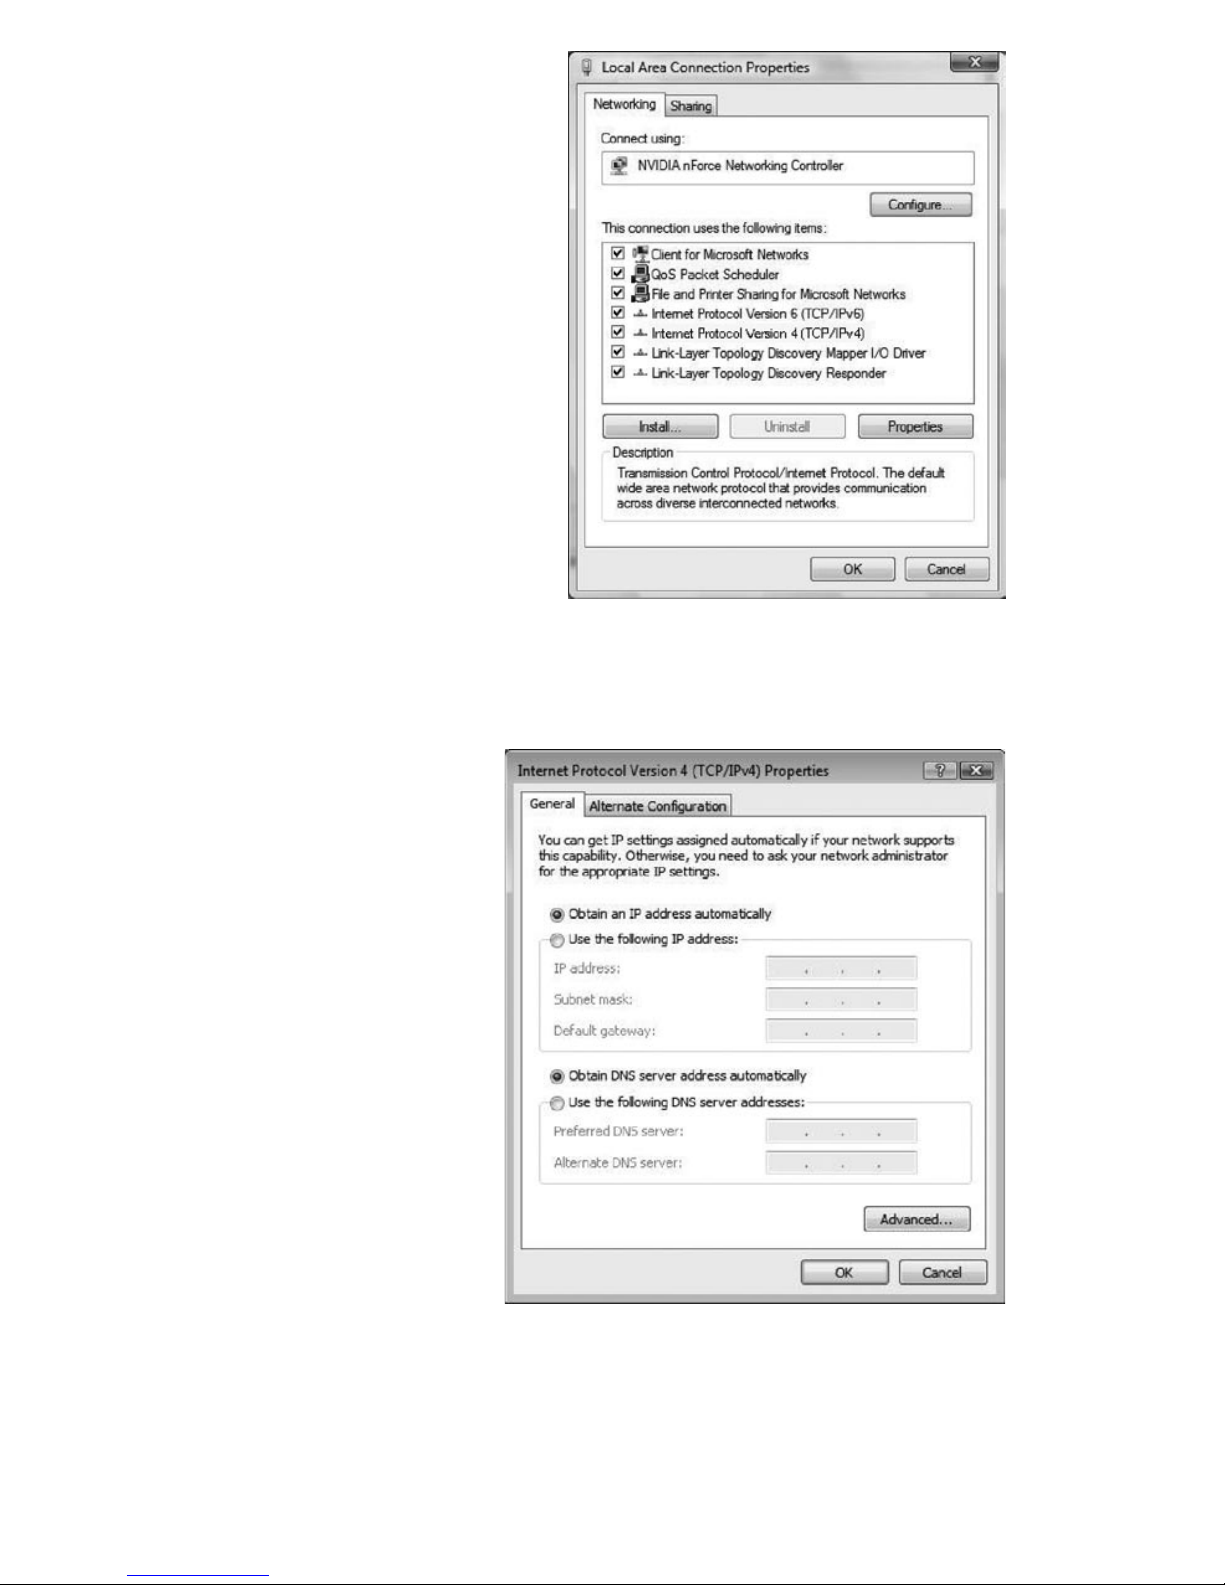
5. In the Networking tab, select
Internet Protocol Version 4 (TCP/
IPv4), then click on
Properties.
6. Your high speed connection
doesn’t need any special
configuration.
- Select “Obtain an IP
address automatically”.
- Select “Obtain DNS
server address automa tically”.
The server will give out
the necessary IP addresses to allow access to the
Internet.
- Click on OK
Page 9

9Wireless Modem Router
1.5 Configuring gateway
Now that your wireless modem router is connected and that your High speed Internet
is configured, you only have to configured your gateway that will allow you to use
several computers at the same time on the same High speed Internet account.
If your PC has not been connected to a broadband modem or other network device,
perform the PC configuration procedure below. Remember to restart each PC
when finished.
1. Start your Web Browser.
2. In the address bar, type http://192.168.254.254, then press Enter. The Gateway Setup
Wizard appears to guide you through the setup process. Please type your user name that
Customer Service Department gave you.
3. When you have completed the Gateway Setup Wizard, you can configure additional options on the Gateway.
Page 10

Hi-Speed Internet User Guide10
1.6 Troubleshooting
Here is a table that will help you to understand the indicator on your gateway.
1.7 Security
In order to protect your computer systems from unauthorized access, NorthernTel strongly
recommends enabling WPA-TKIP encryption with a password on your wireless network, no
more than 30 characters in length. This security mode is compatible with Windows XP or
subsequent operation systems. If you do not plan on using the wireless network, then we recommend disabling the wireless adapter on the router. Enabling the wireless adapter without
wireless security features turned on could potentially expose your systems to data
theft, viruses, spyware and other unauthorized access.
Configure the wireless network using this option. The wireless settings on the Gateway must
match those of any wireless clients on your network.
LED Off Green Blinking
Green
Blinking
Red/
Green
Red
Power Power is off Power is on Flash
write in
progress
nPOST in
progress
nPOST error
occured
(if persitent)
Ethernet
1-4
nPower not
applied
nNo link
Normal operation.
Link okay
User traffic
flowing in
either
direction
Wireless
nPower not
applied
nNo link
Normal operation.
Link okay
Wireless user
traffic flowing
in either
direction
DSL
nPower not
applied
nDSL signal
not
DSL line is
trained and ready
for traffic
Steady blinking
DSL line is
attemping to
train
Internet
nPower not
applied
nNo LAN
data activity
nDSL link and
WAN interface
are up
nWAN interface
has IP address
Activité
nPower not
applied
nNo WAN or
LAN activity
LAN user
traffic flowing
in either
direction.
Page 11
11Wireless Modem Router
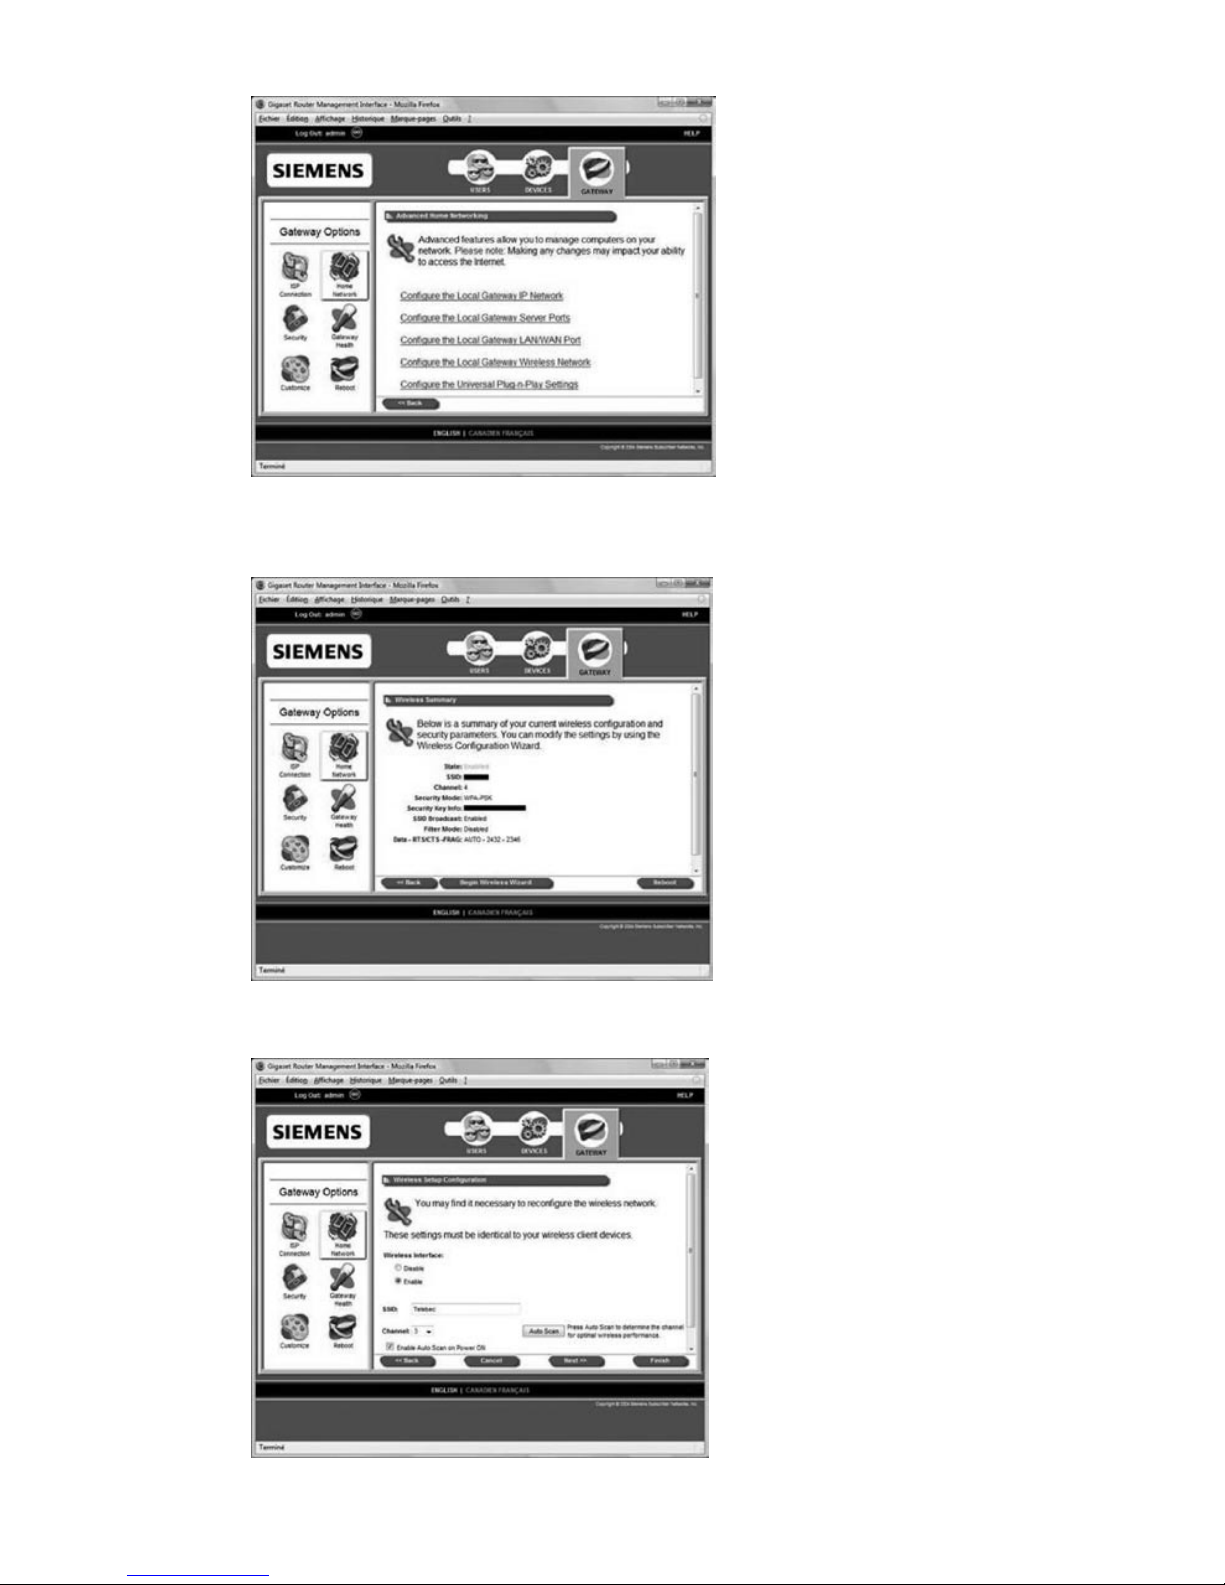
To configure the wireless network:
1. Click the Configure the Local SpeedStream Gateway Wireless Network hyperlink.
This displays the “Wireless Summary” window.
2. Click Begin Wireless Wizard. This displays the “Wireless Setup Configuration” window.
Page 12
Hi-Speed Internet User Guide12
3. Select Enable to enable the Wireless Interface.
4. Type your wireless network ID in SSID (Example: northerntel).
5. Optionally, select a channel ID from the Channel drop-down menu and click on
Enable Auto Scan on Power ON. This step is optional but is strongly recommended if
you experience interference or if you live in a heavily populated area (example: downtown
or near an office building). This way, if there is interference, your modem will choose
another channel.
6. Click Next.
7. Select WPA-TKIP from the Security Mode drop-down menu, as recommend by
NorthernTel.
Wireless Setup WPA-TKIP Option
To use the WPA-TKIP option:
1. From the “Wireless Security Configuration” window, select WPA-TKIP from the
Security Mode drop-down menu. If you check Enable SSID Broadcast, the detection of
your internet signal will be easier for non-authorized users, therefore it is recommended
you not activate the broadcast.
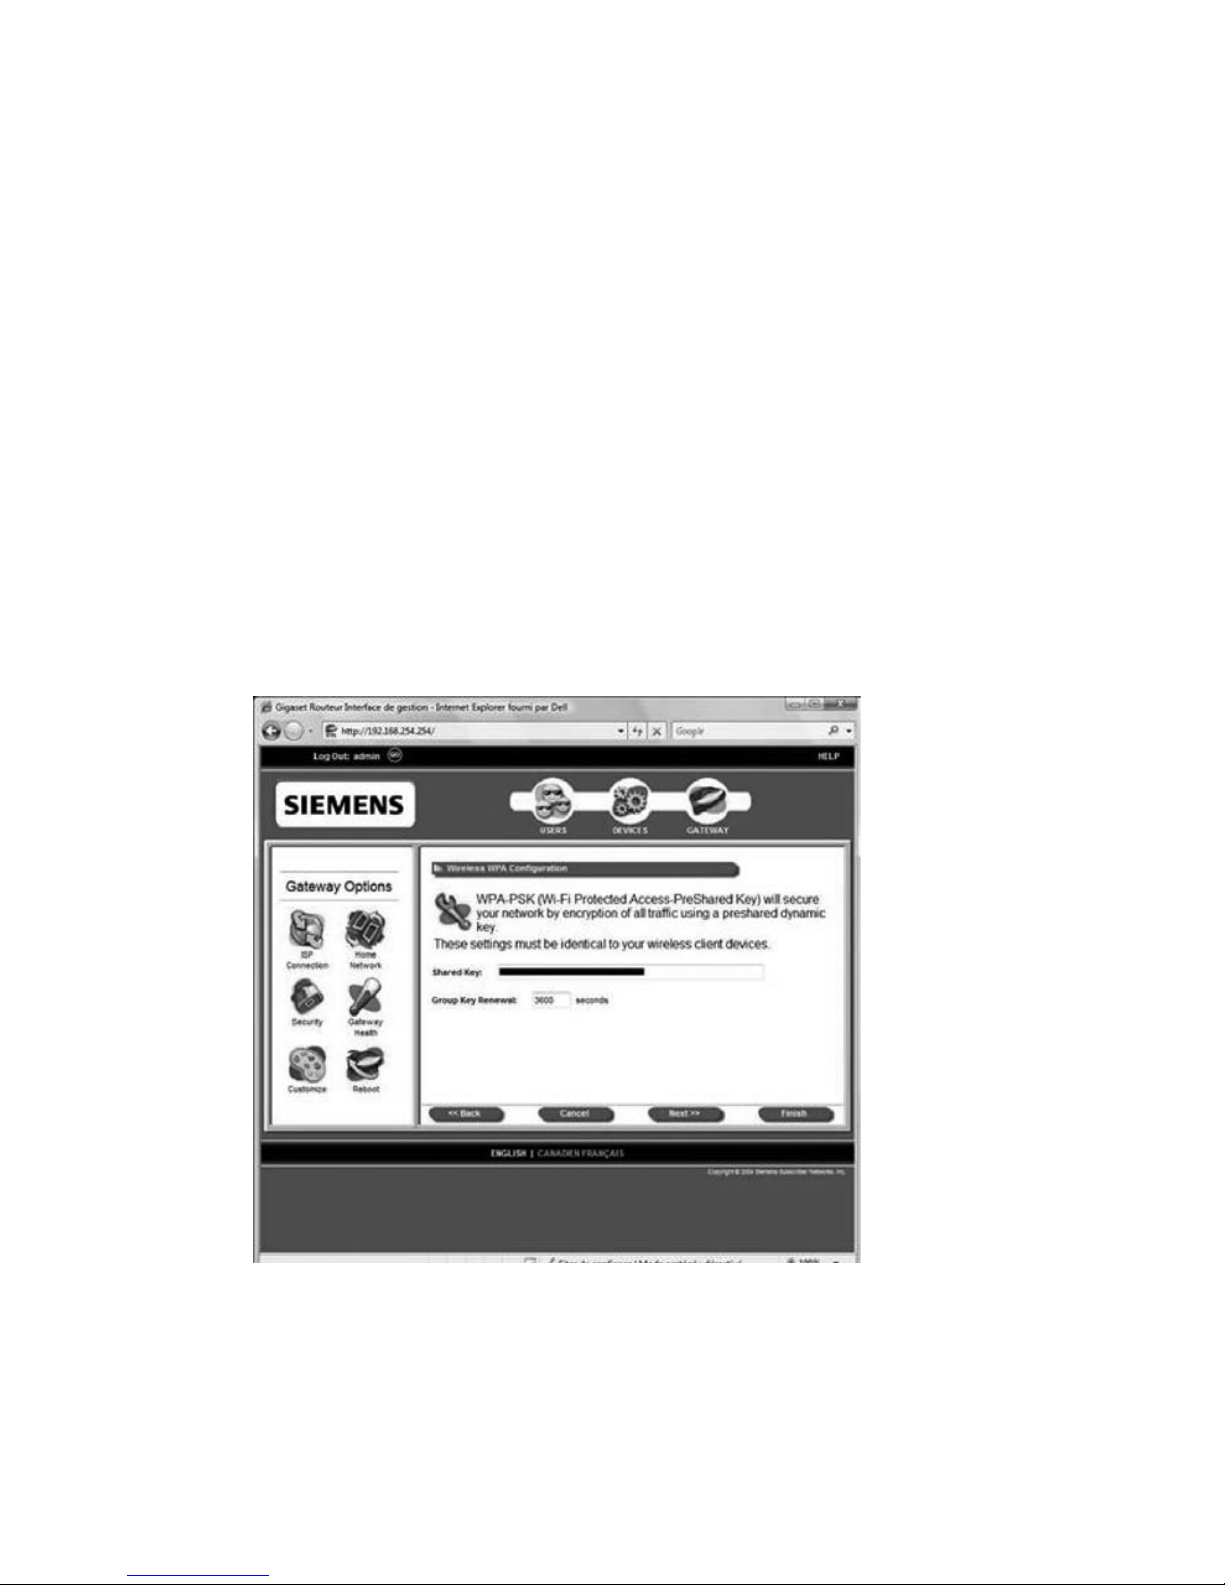
2. Click Next. This displays the “Wireless WPA Configuration” window.
3. Create a secret password with no more than 30 characters. This password needs to be
difficult to find for an external user, but easy to type for you.
4. Keep Group Key Renewal at 3600 seconds.
5. Click Next. This displays the “Wireless Filter Configuration” window.
Page 13
13Wireless Modem Router
Wireless Filter and Options Configuration
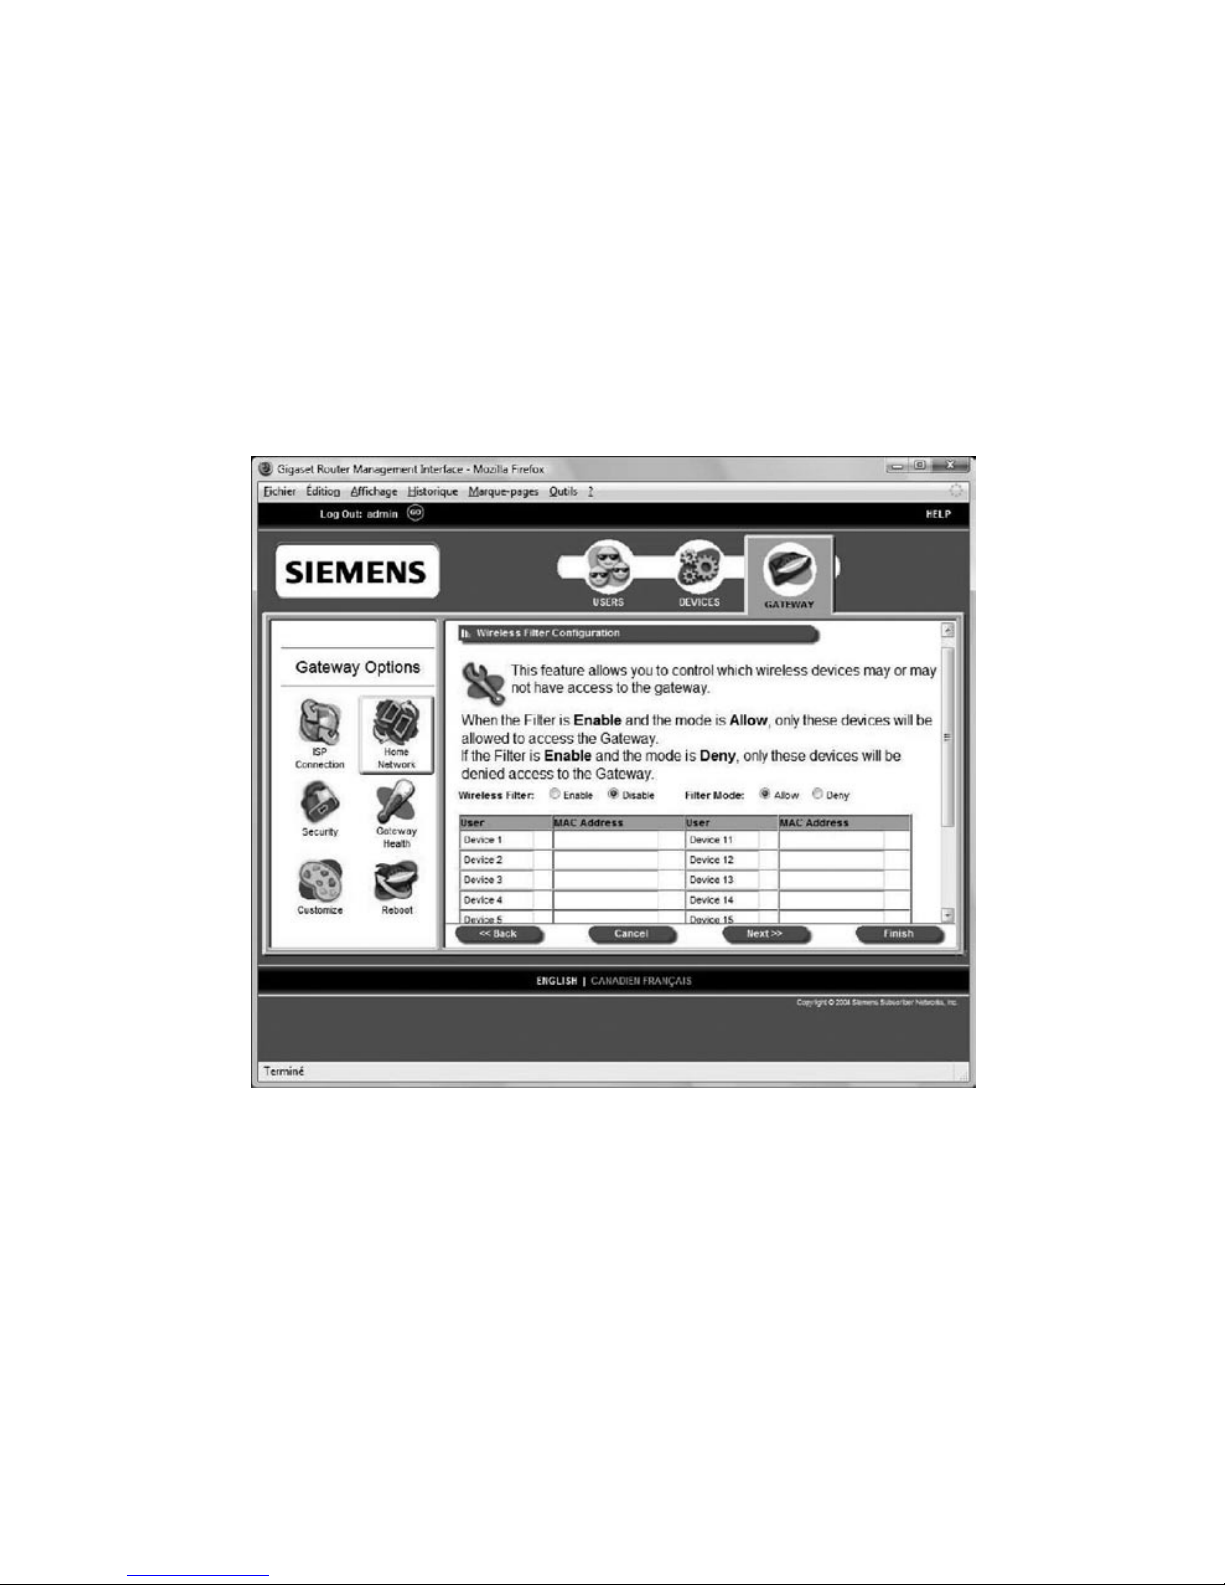
Control access to the Gateway of wireless devices based on the MAC address of the device
using the “Wireless Filter Configuration” window. A MAC (Media Access Control) address
refers to a hardware address that uniquely identifies each device of a network. Refer to the
user documentation for each device you wish to deny or allow access for a particular MAC
address.
To configure the wireless filter:
1. Select one of the following Wireless Filter options:
• Enable Enable wireless filtering.
• Disable Disable wireless filtering. If wireless filtering is disabled, all devices have
access to the Gateway.
2. If wireless filtering is enabled, select one of the following Filter Mode options:
•Allow Permits access to all the MAC addresses entered in the table.
•Deny Restricts Gateway access to all the MAC addresses entered in the table.
3. Type the MAC address in the MAC Address column next to each device you either want
to permit or restrict access.
Page 14
Hi-Speed Internet User Guide14
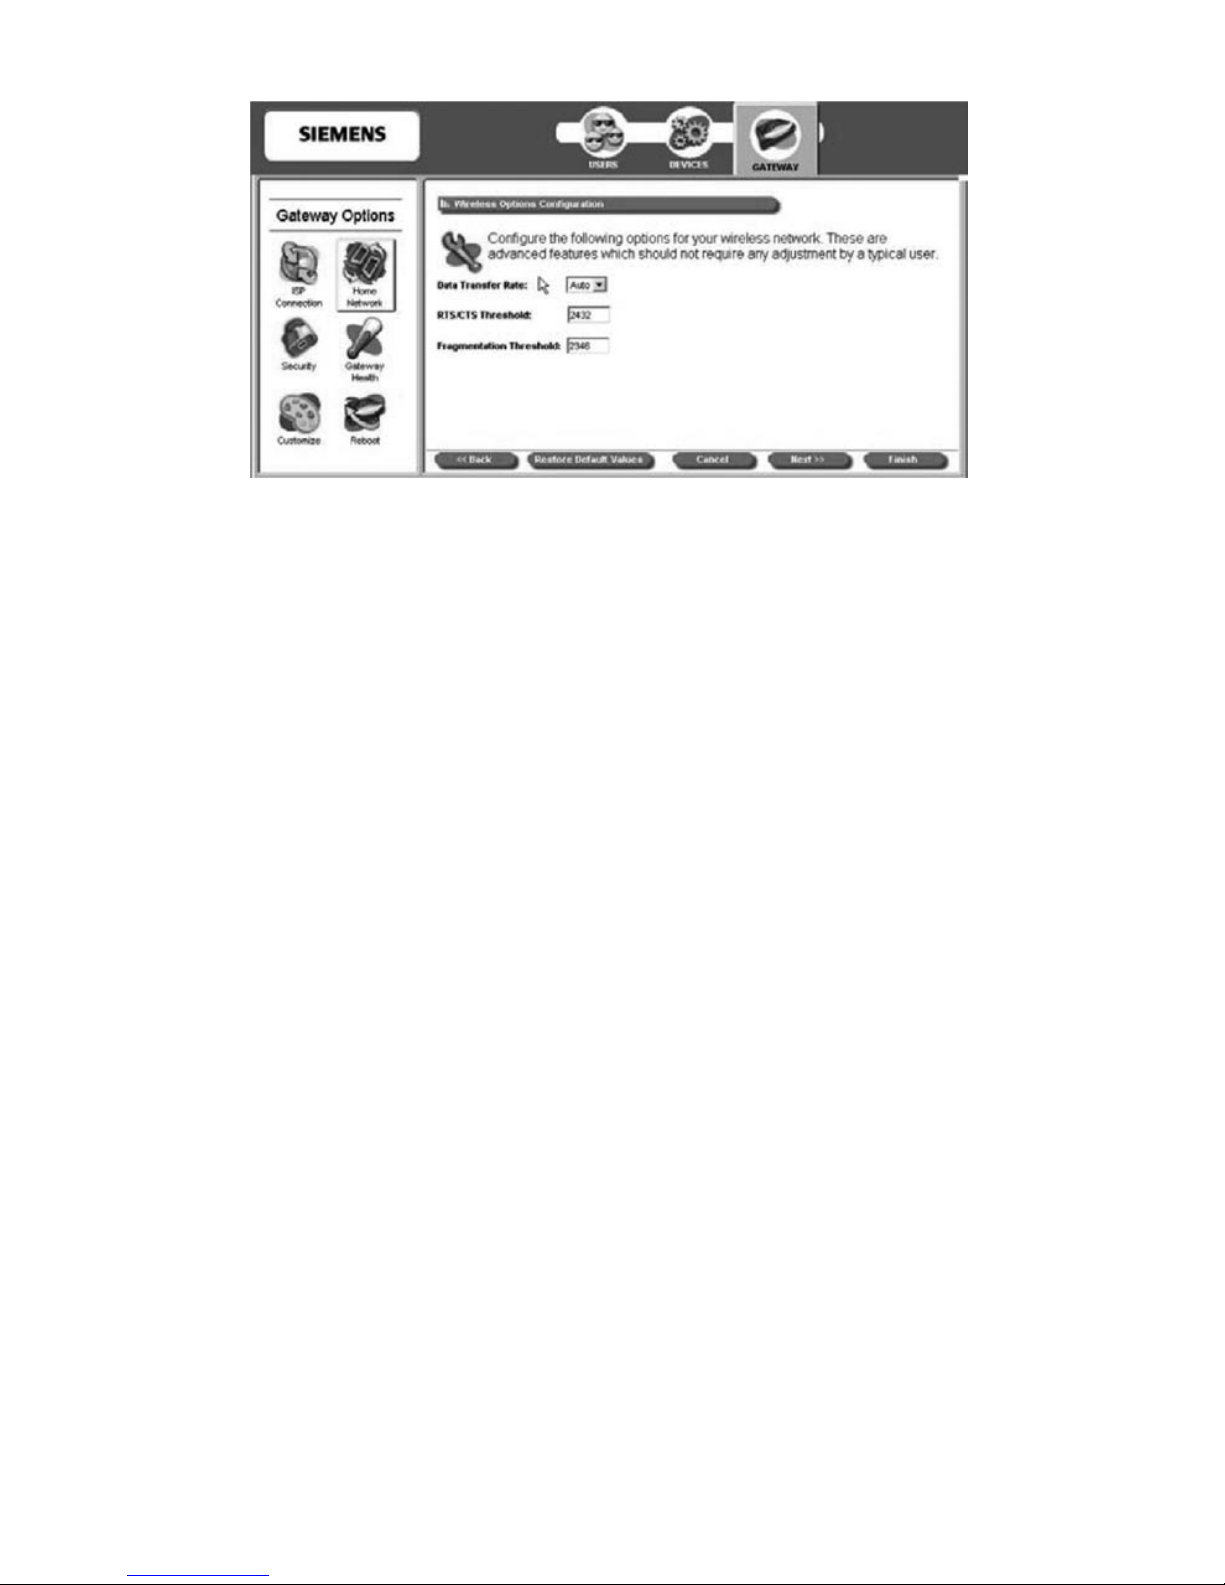
4. Click Next. This displays the “Wireless Options Configuration” window.
5. Optionally, configure the following items:
• Data Transfer Rate If a particular wireless client is unable to auto-negotiate a
connection to the Gateway, the data transfer rate may be set to a specific data rate
such as 11 Mbps for 802.11b wireless clients.
• RTS/CTS Threshold A group of wireless clients may experience difficulty communi-
cating with the Gateway without interrupting each other’s communications. If this
occurs, the RTS/CTS threshold may be set to a higher number to allow them each a
longer period in which to communicate with the Gateway before the priority is
switched to another wireless client wishing to transmit data.
• Fragmentation Threshold The fragmentation threshold may be lowered to
improve reliability in an excessively “noisy” wireless environment if changing channels
does not provide significant enough improvement.
If you wish to reset the options in the “Wireless Options Configuration” window, click
Restore Default Values. The system responds by restoring all the advanced features on
this page.
6. Click Next. This displays the “Wireless Wizard” finish window.
7. Click Finish to save the settings.
8. Click Reboot for your wireless configuration to take effect.
Page 15
15Wireless Modem Router
This section guides you through the various steps for setting up your mailbox.
2.1 Configuring Outlook Express
A new e-mail address has been created for you. Here is how to create your mailbox,
so that you are able to use your new e-mail address.
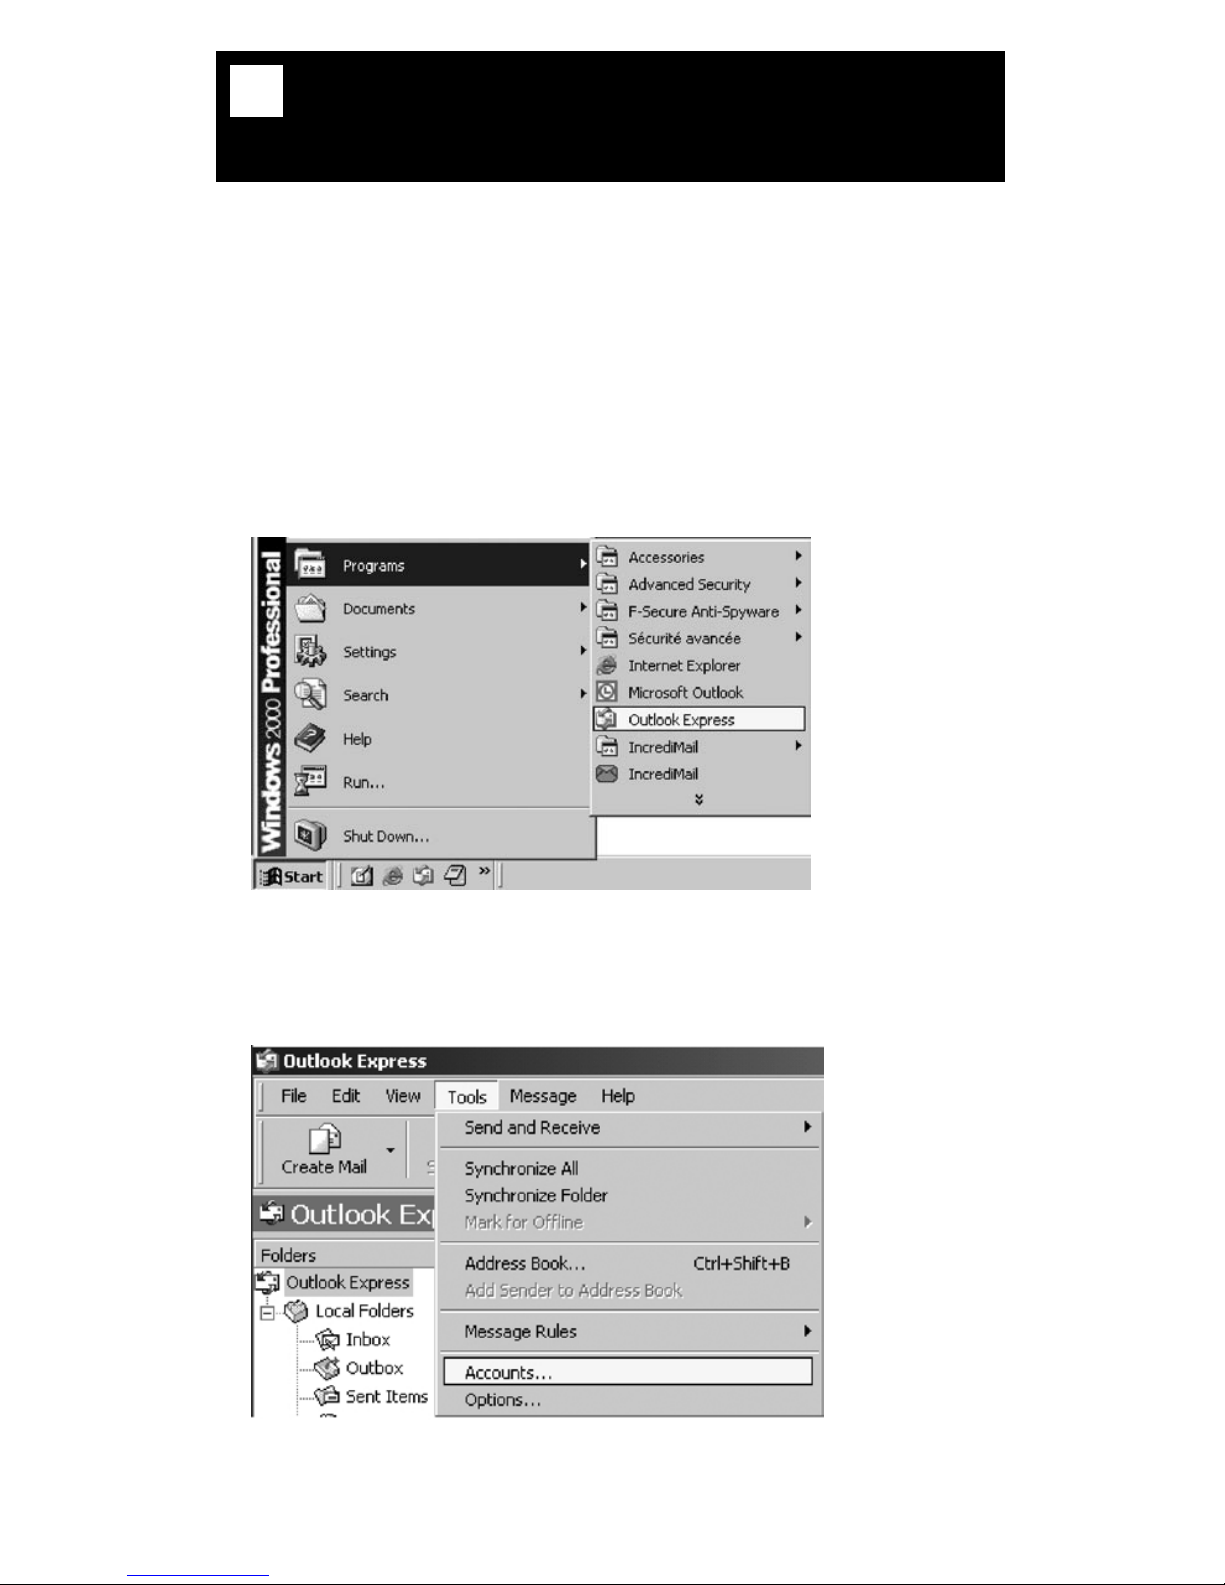
1. Click on Start > Programs > Outlook Express.
2. Click on Tools > Accounts.
2. Configuring your
mailbox
Page 16
Hi-Speed Internet User Guide16
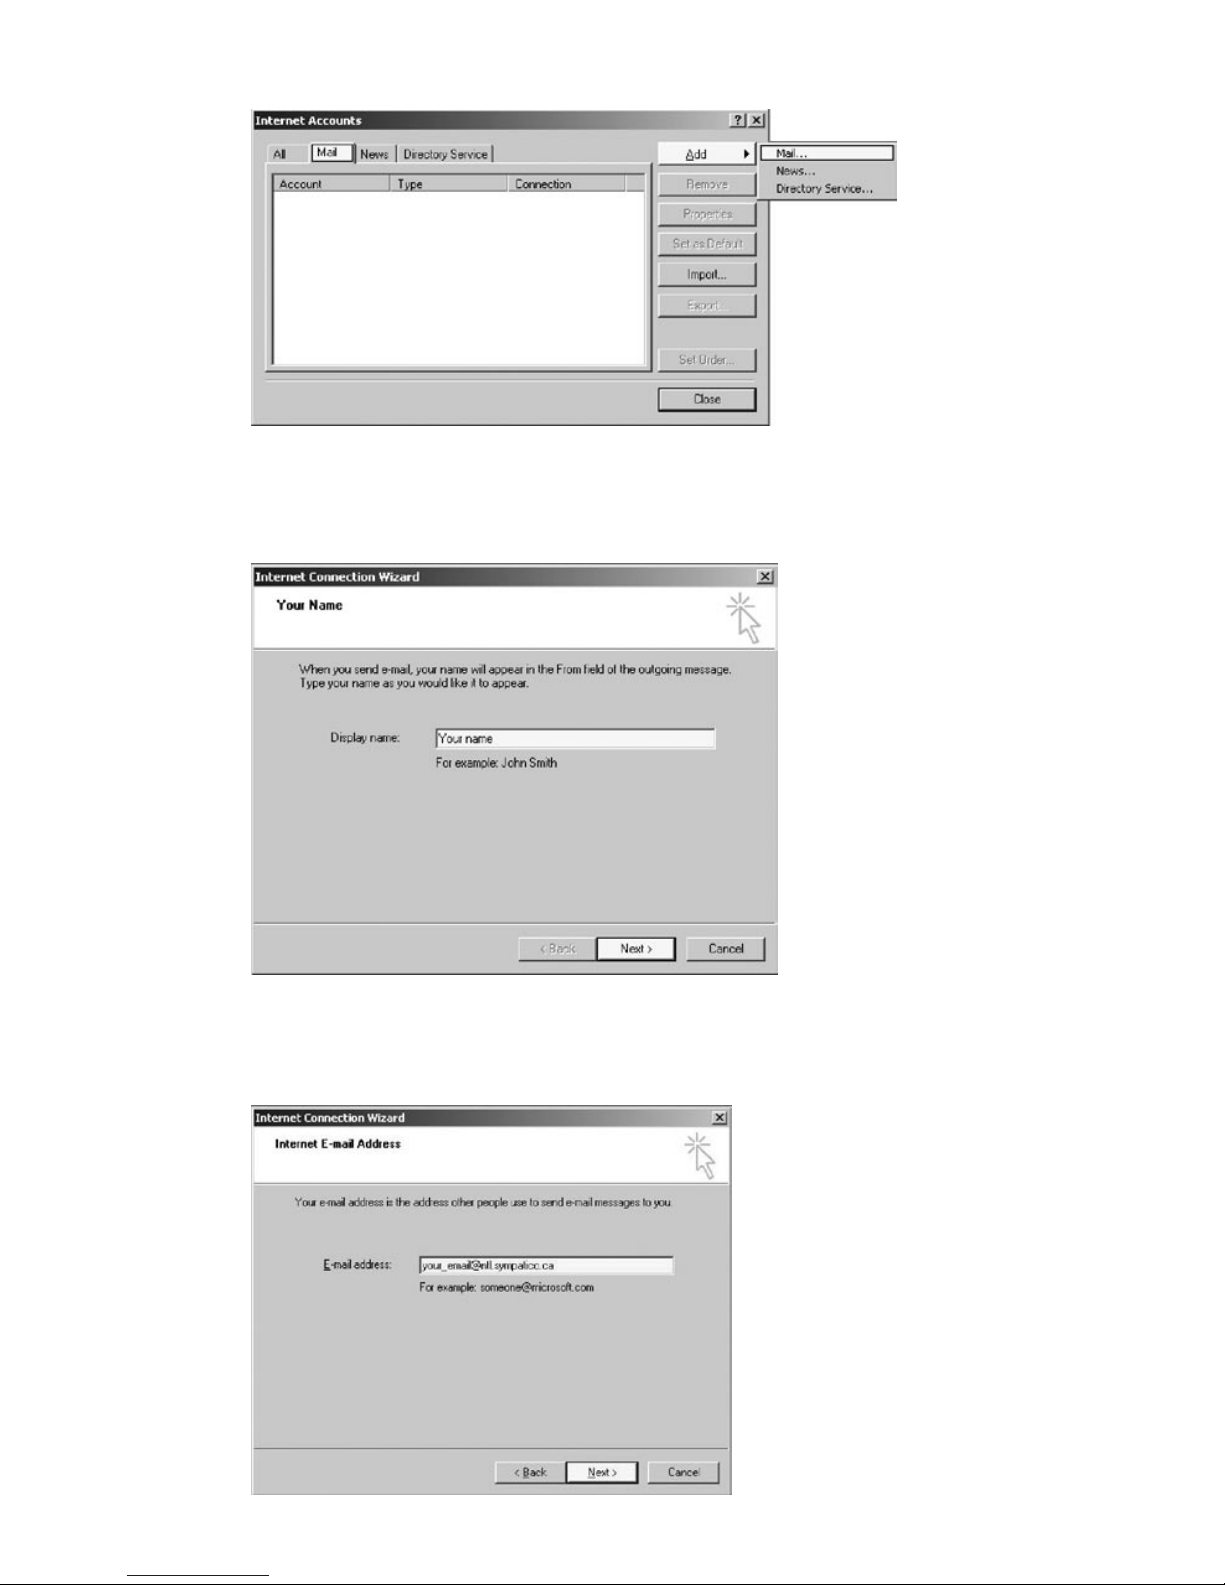
3. Click on the Mail tab > Add > Mail.
4. Enter your whole name. This name will appear in the emails you send.
5. Enter your email address. The one that the Customer Service Department gave you.
Page 17
17Wireless Modem Router
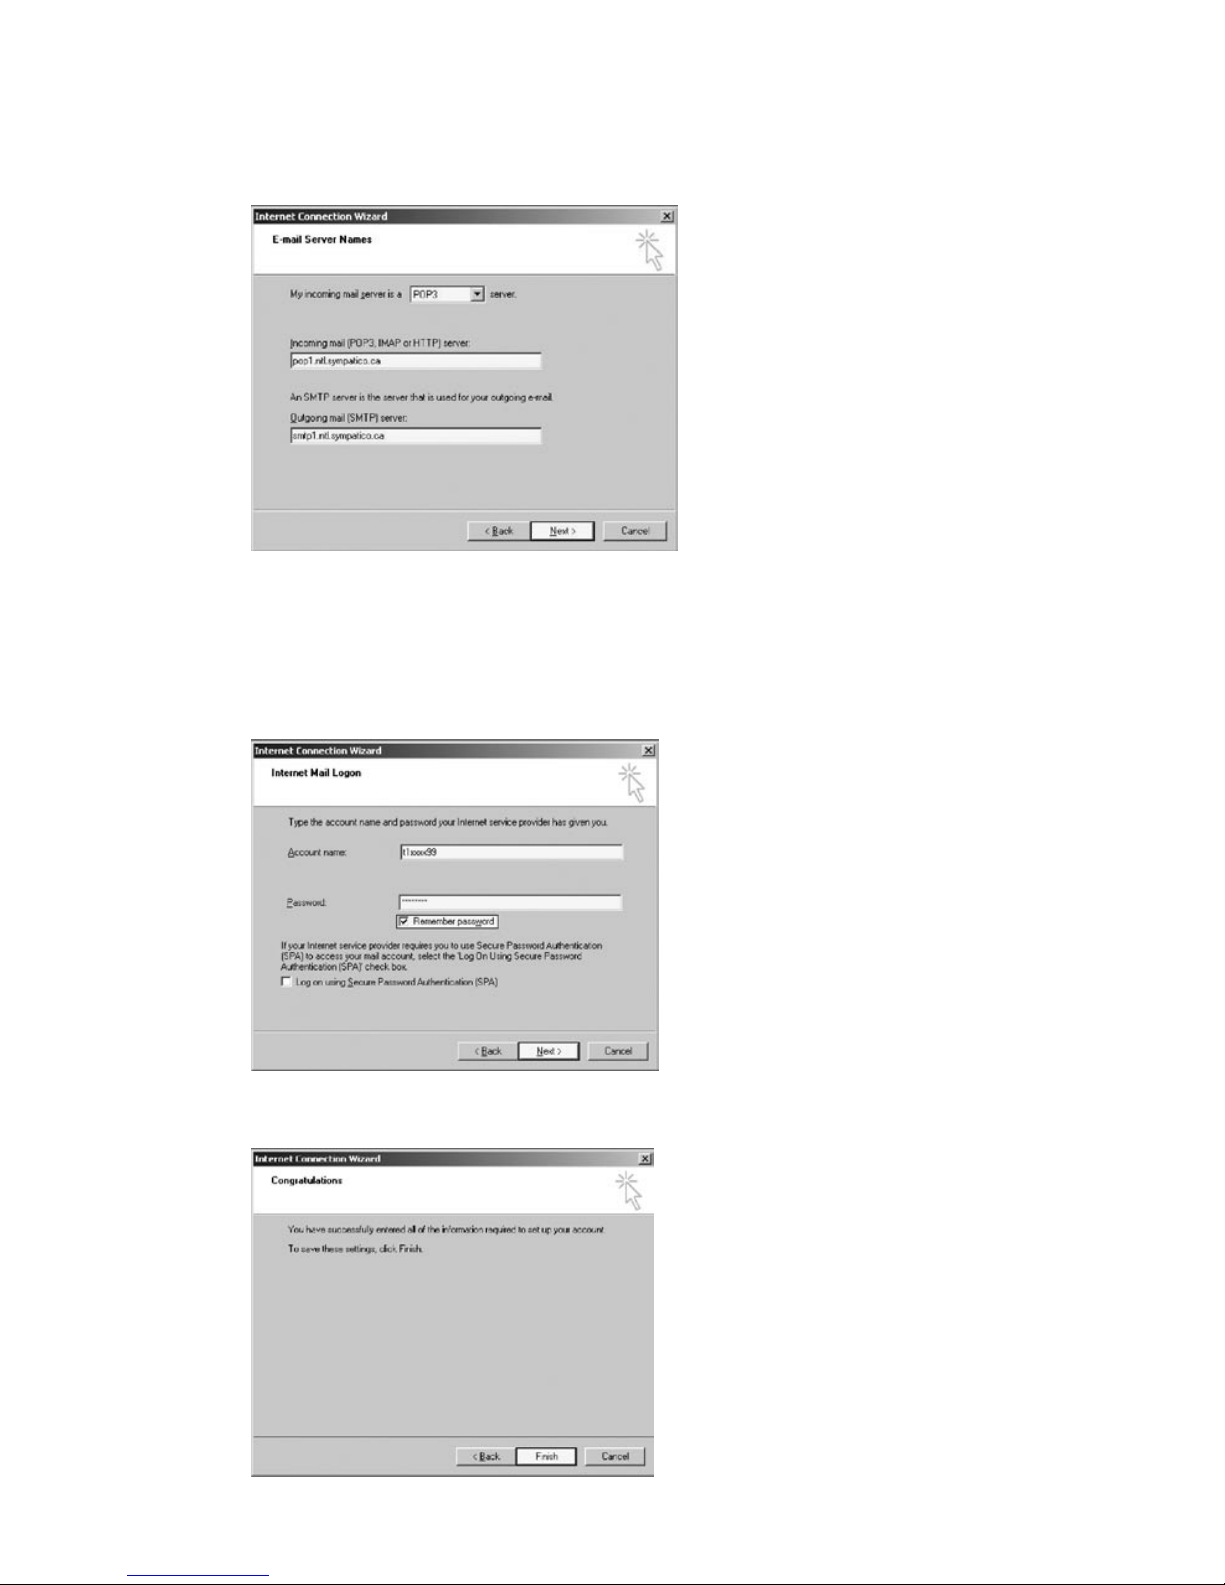
6. In this window:
- Select your incoming mail server type POP3.
- Type your Incoming mail server. Example: pop1.ntl.sympatico.ca
- Type your Outgoing mail server. Example: smtp1.ntl.sympatico.ca
Then click on Next.
7. In this window:
- Type your username. Example: t1xxxx99
- Type your password.
- You can also click “Remember password”.
Then click on Next.
8. Click on Finish.
Page 18
Hi-Speed Internet User Guide18
2.2 Configuring Outlook 97
A new e-mail address has been created for you. Here is how to create your mailbox,
so that you are able to use your new e-mail address.
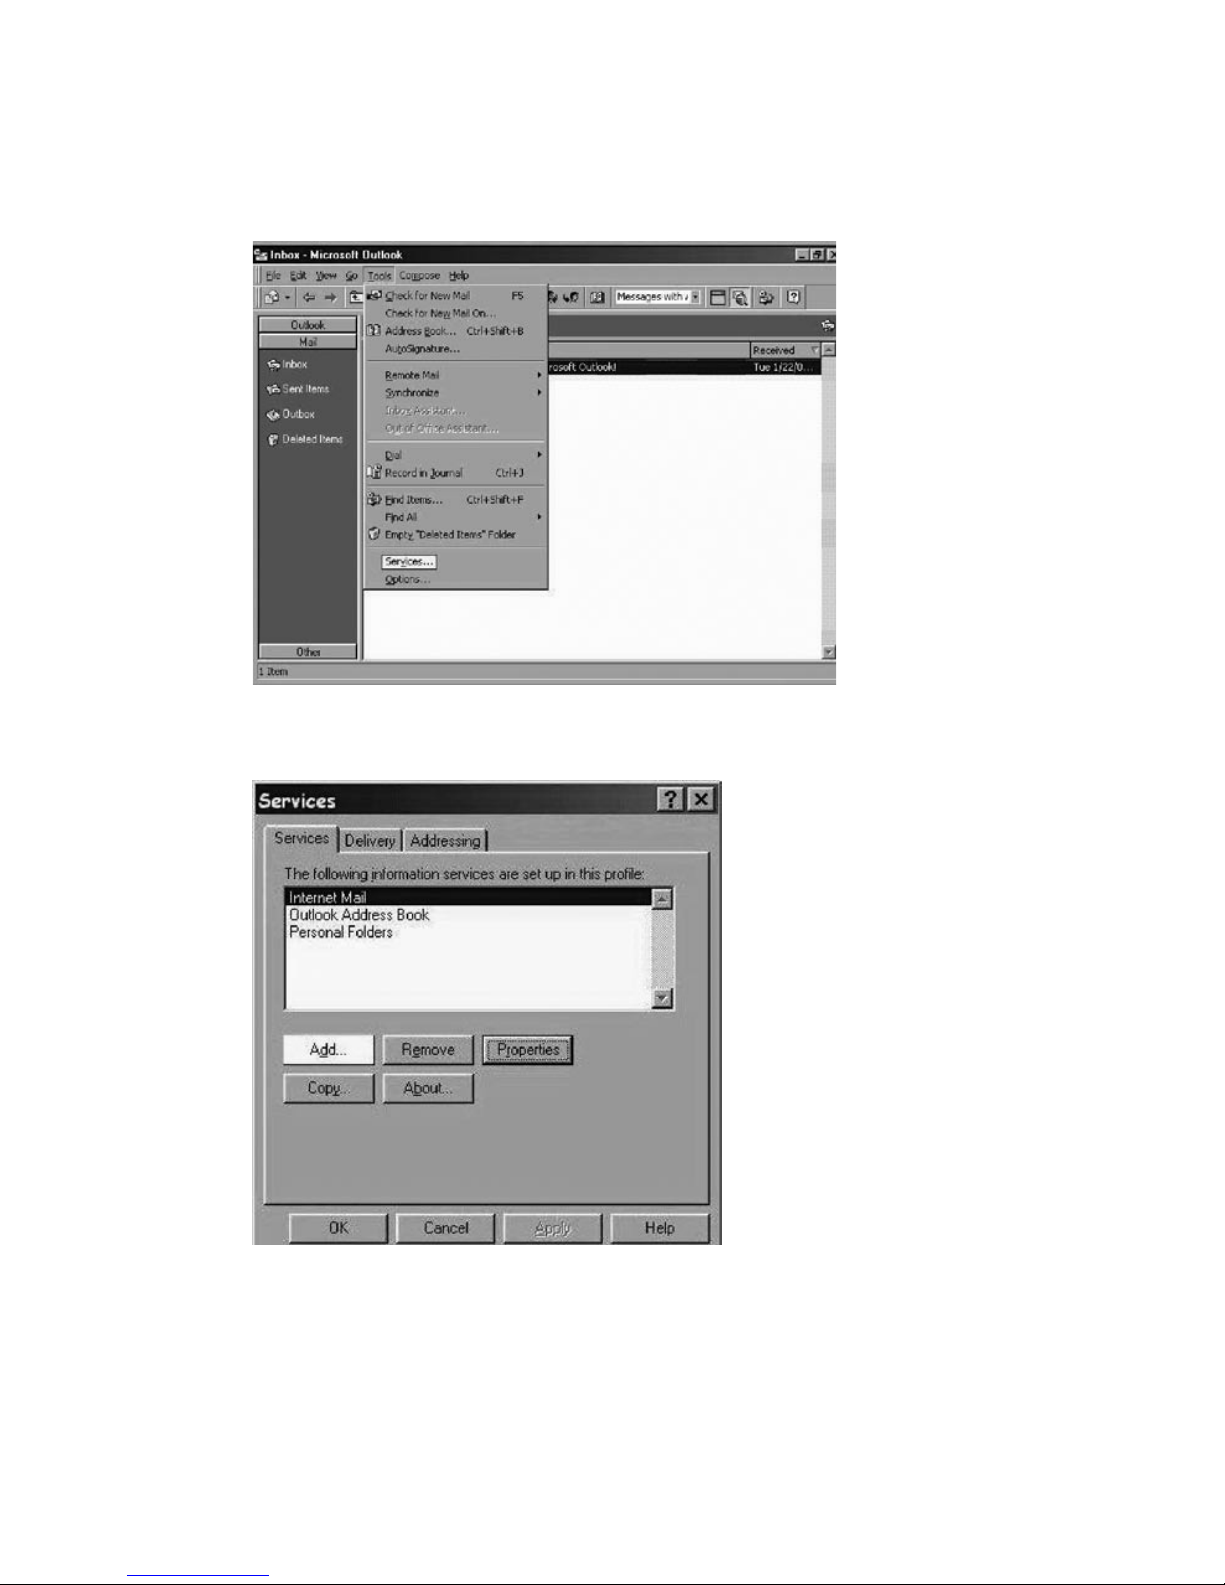
1. Open Outlook 97, click Tools > Services.
2. Click on Add.
Page 19
19Wireless Modem Router
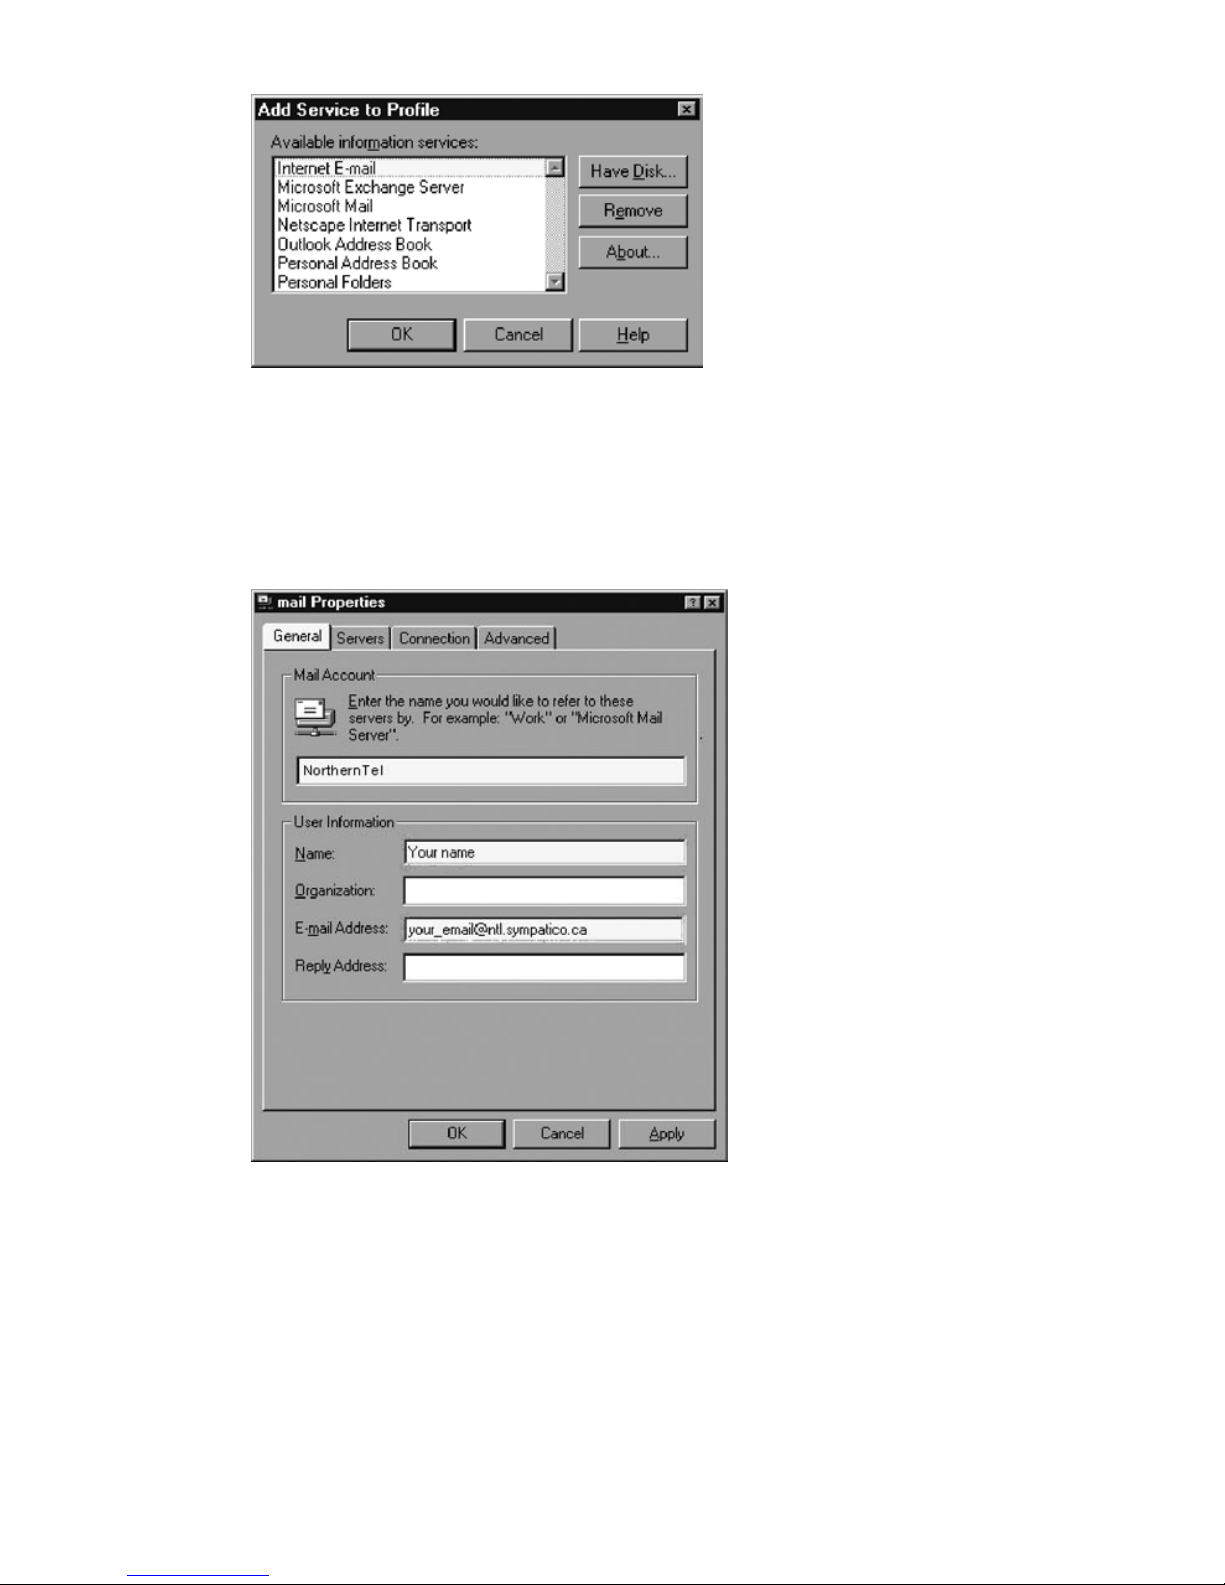
3. Select “Internet E-mail”, then click on OK.
4. In the General tab:
- Enter the name of the account. That’s how your account is named.
- Enter your name. This name will appear in the emails you send.
- Enter your e-mail address. The one the Customer Service Department gave you.
Page 20
Hi-Speed Internet User Guide20
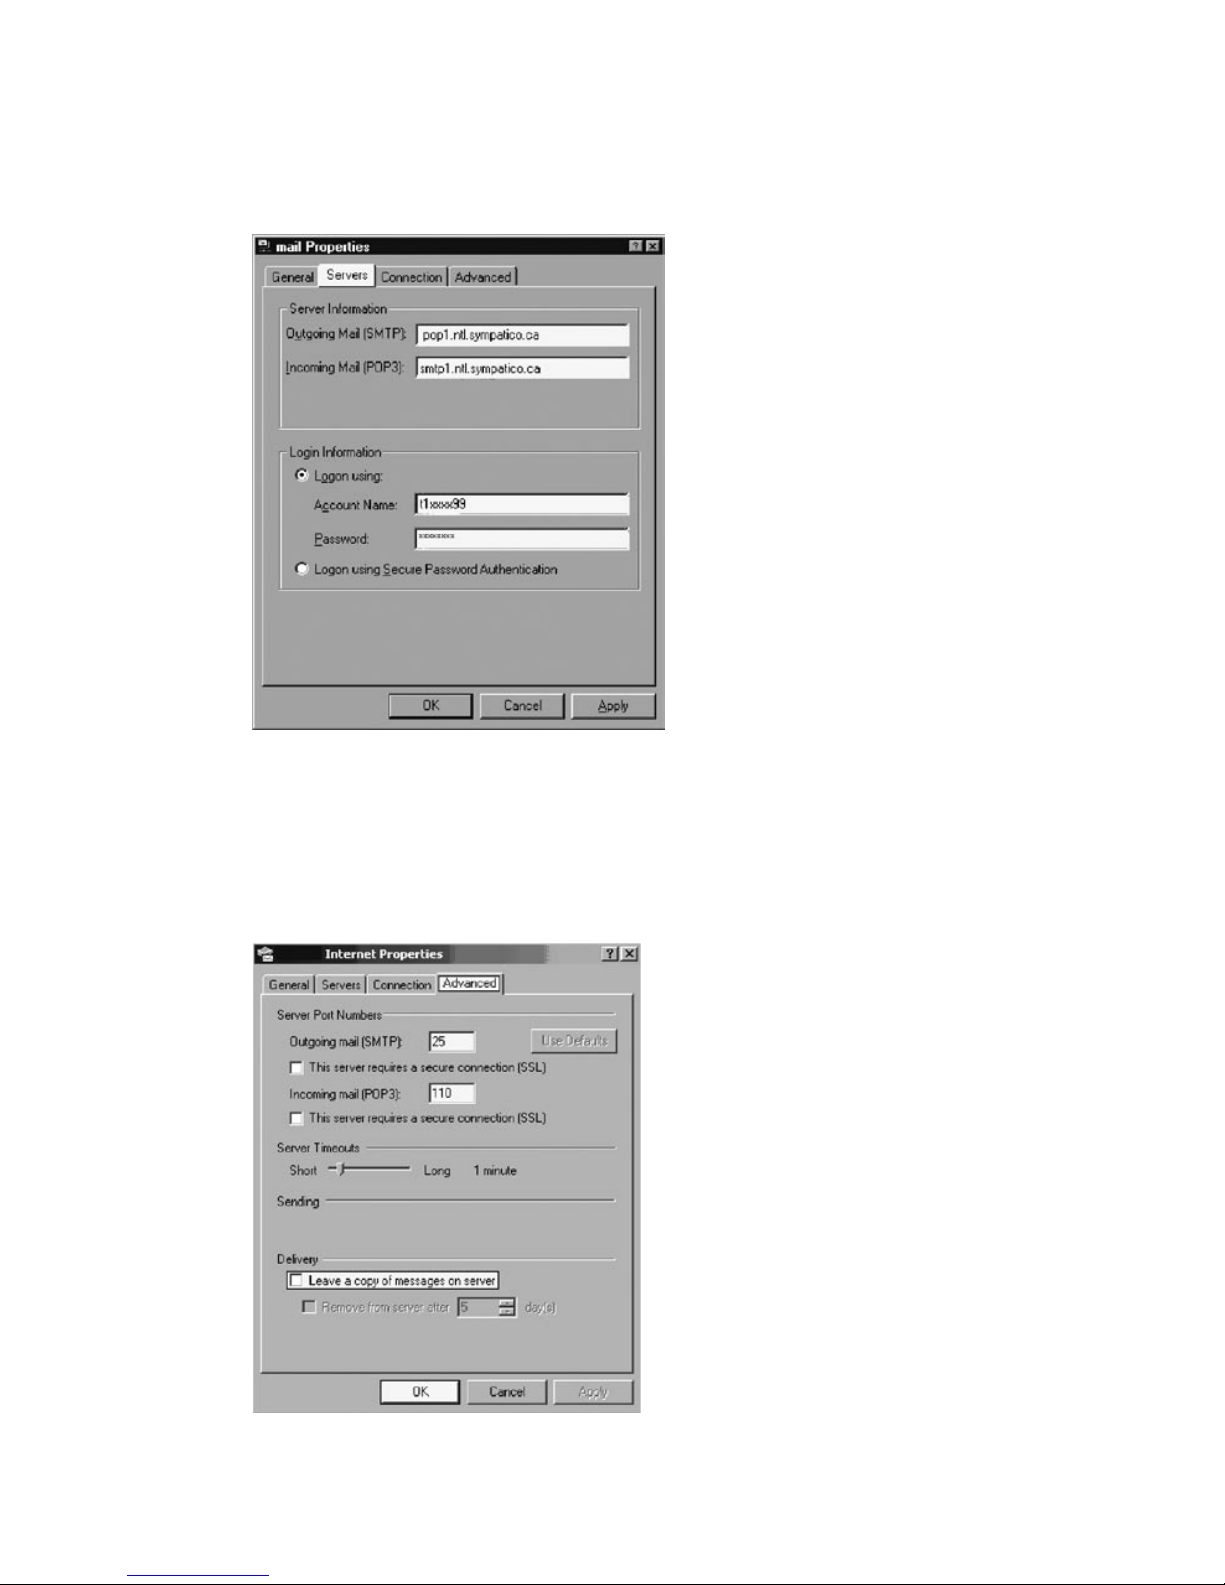
5. Click on the Servers tab:
- Enter the incoming mail server. Example: pop1.ntl.sympatico.ca
- Enter the outgoing mail server. Example: smtp1.ntl.sympatico.ca
- Enter your account name. Example: t1xxxx99 or b1xxxx99
- Enter your password.
6. Click on he Advanced tab:
- Confirm the outgoing mail port: 25
- Confirm the incoming mail port: 110
- If you check the option “Leave a copy of messages on server”, you also need to
check the option “Remove from server after”. This way, the server will always have a
respectable amount of space available.
- Click on OK
Page 21
21Wireless Modem Router
2.3 Configuring Outlook 2000/XP
A new e-mail address has been created for you. Here is how to create your mailbox,
so that you are able to use your new e-mail address.
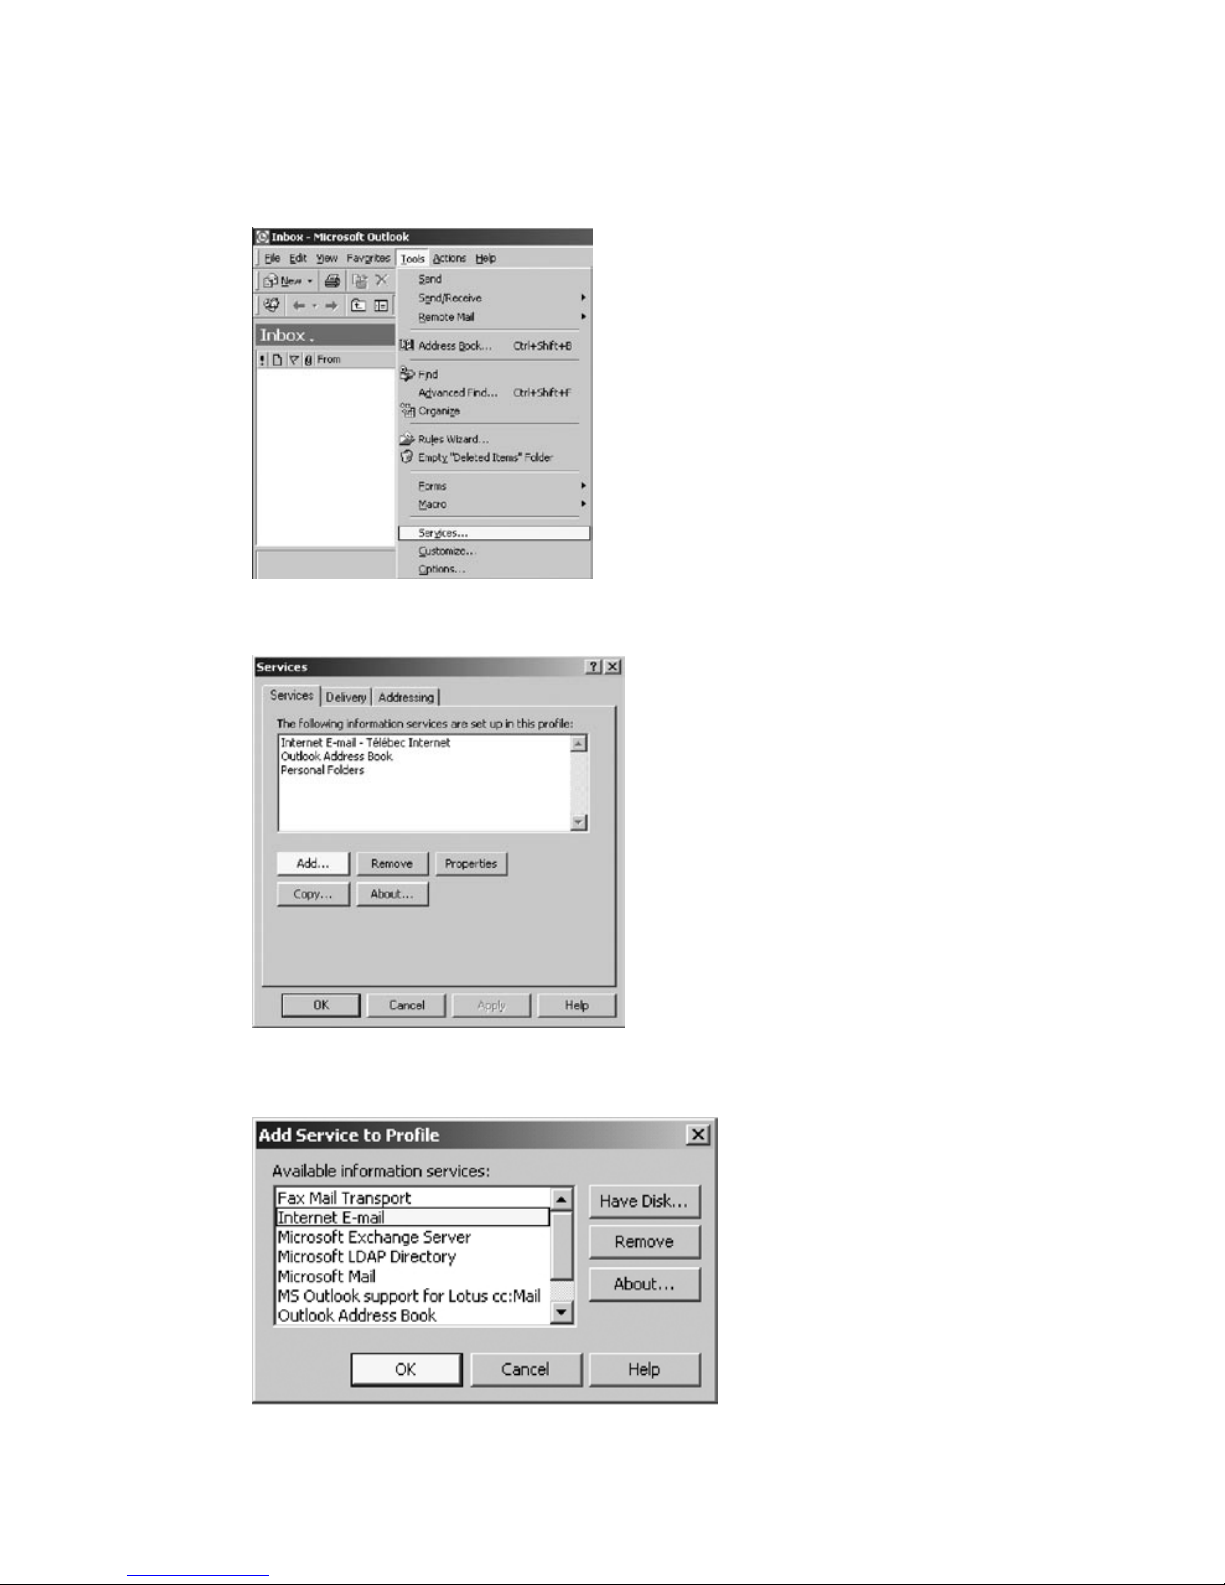
1. Open Outlook 2000/XP, click Tools > Services.
2. Click on Add.
3. Select “Internet E-mail”, then click on OK.
Page 22
Hi-Speed Internet User Guide22
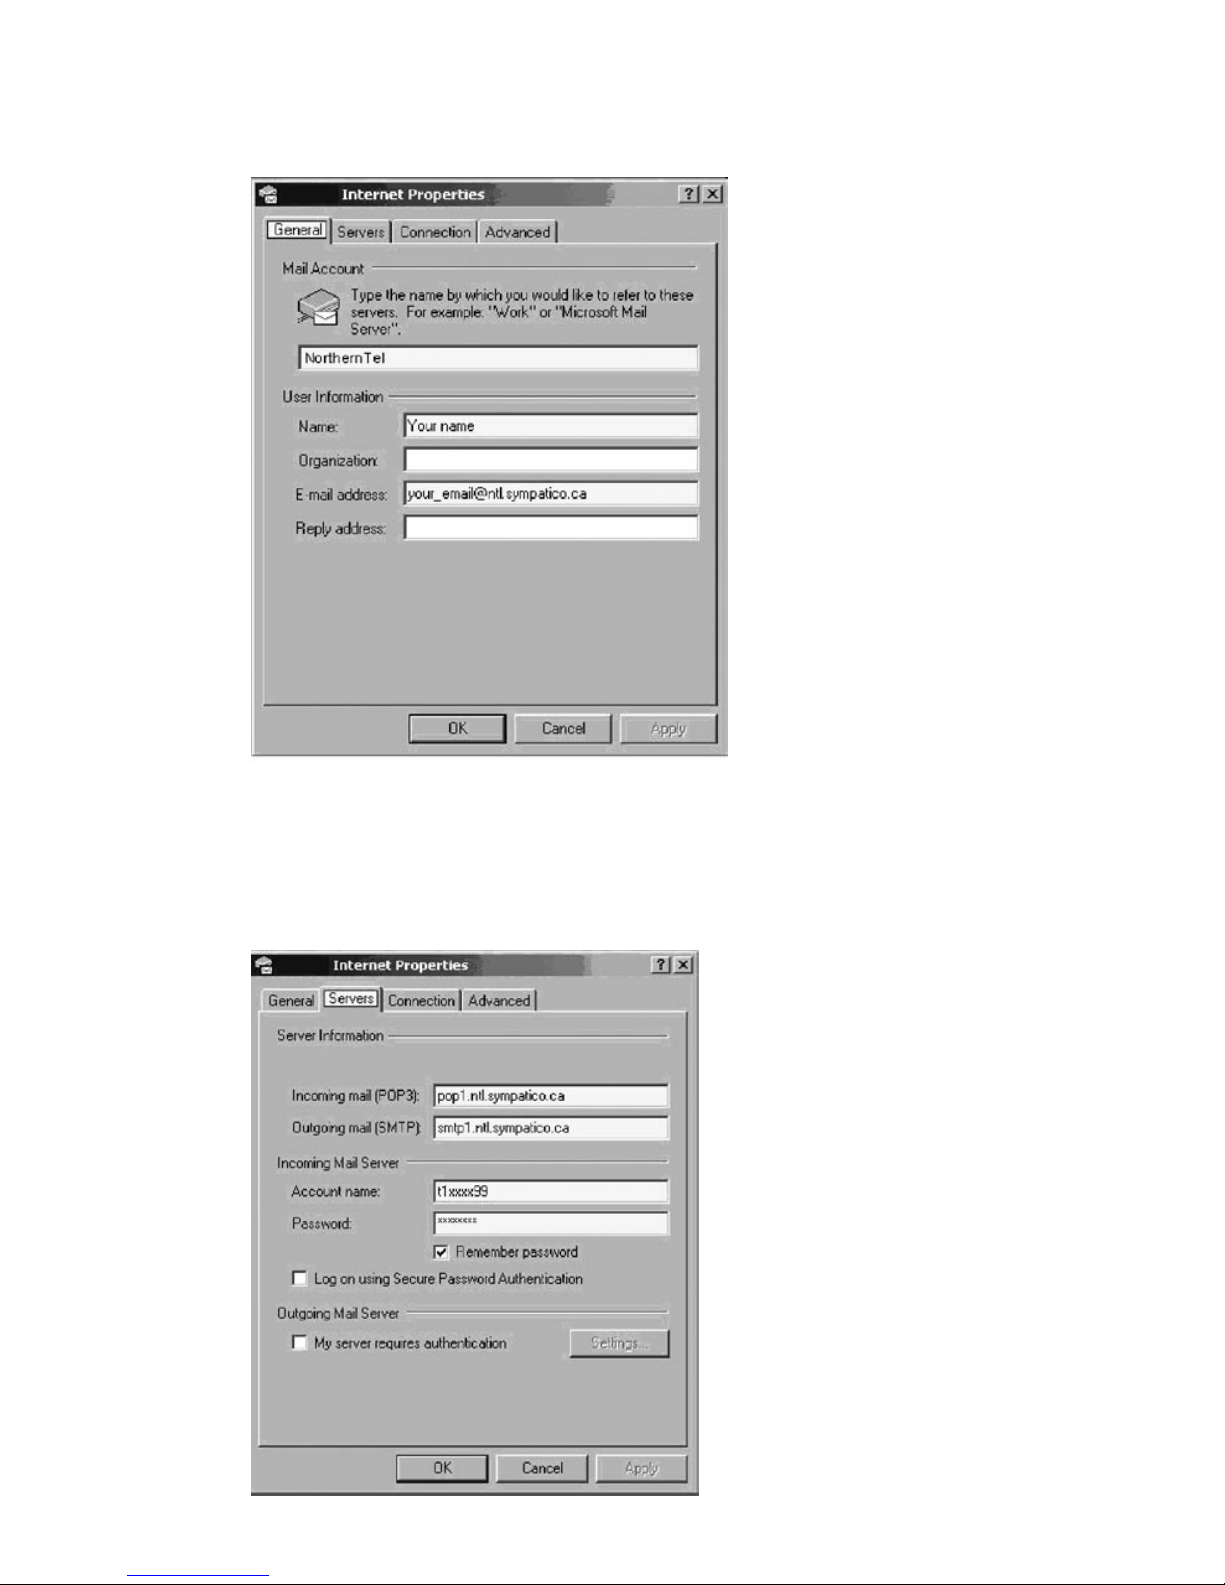
4. In the General tab:
- Enter the name of the account. That’s how your account is named.
- Enter your name. This name will appear in the emails you send.
- Enter your email address. The one the Customer Service Department gave you.
5. Click on the Servers tab:
- Enter the incoming mail server. Example: pop1.ntl.sympatico.ca
- Enter the outgoing mail server. Example: smtp1.ntl.sympatico.ca
- Enter your account name. Example: t1xxxx99 or b1xxxx99
- Enter your password.
Page 23
23Wireless Modem Router
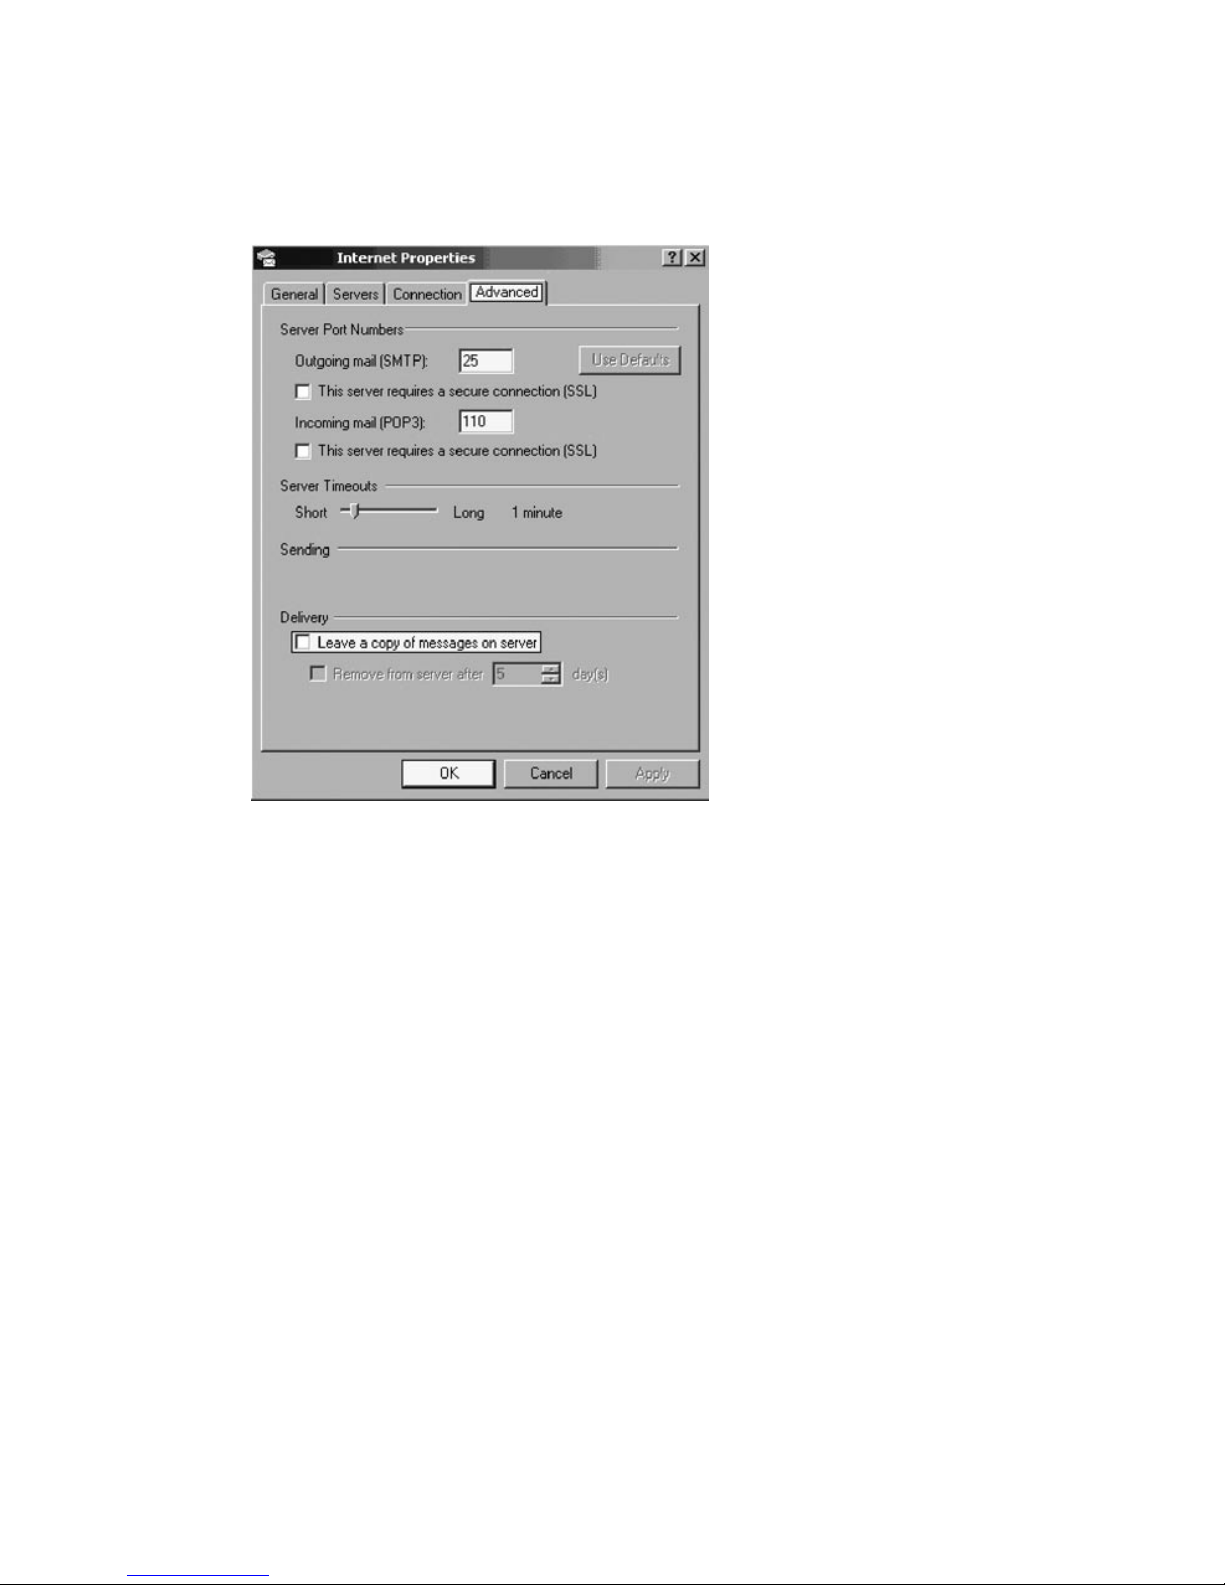
6. Click on the Advanced tab:
- Confirm the outgoing mail port: 25
- Confirm the incoming mail port: 110
- If you check the option “Leave a copy of messages on server”, you also need to
check the option “Remove from server after”. This way, the server will always have a
respectable amount of space available.
- Click on Ok.
Page 24
Hi-Speed Internet User Guide24
2.4 Configuring Netscape 7.0
A new e-mail address has been created for you. Here is how to create your mailbox,
so that you are able to use your new e-mail address.
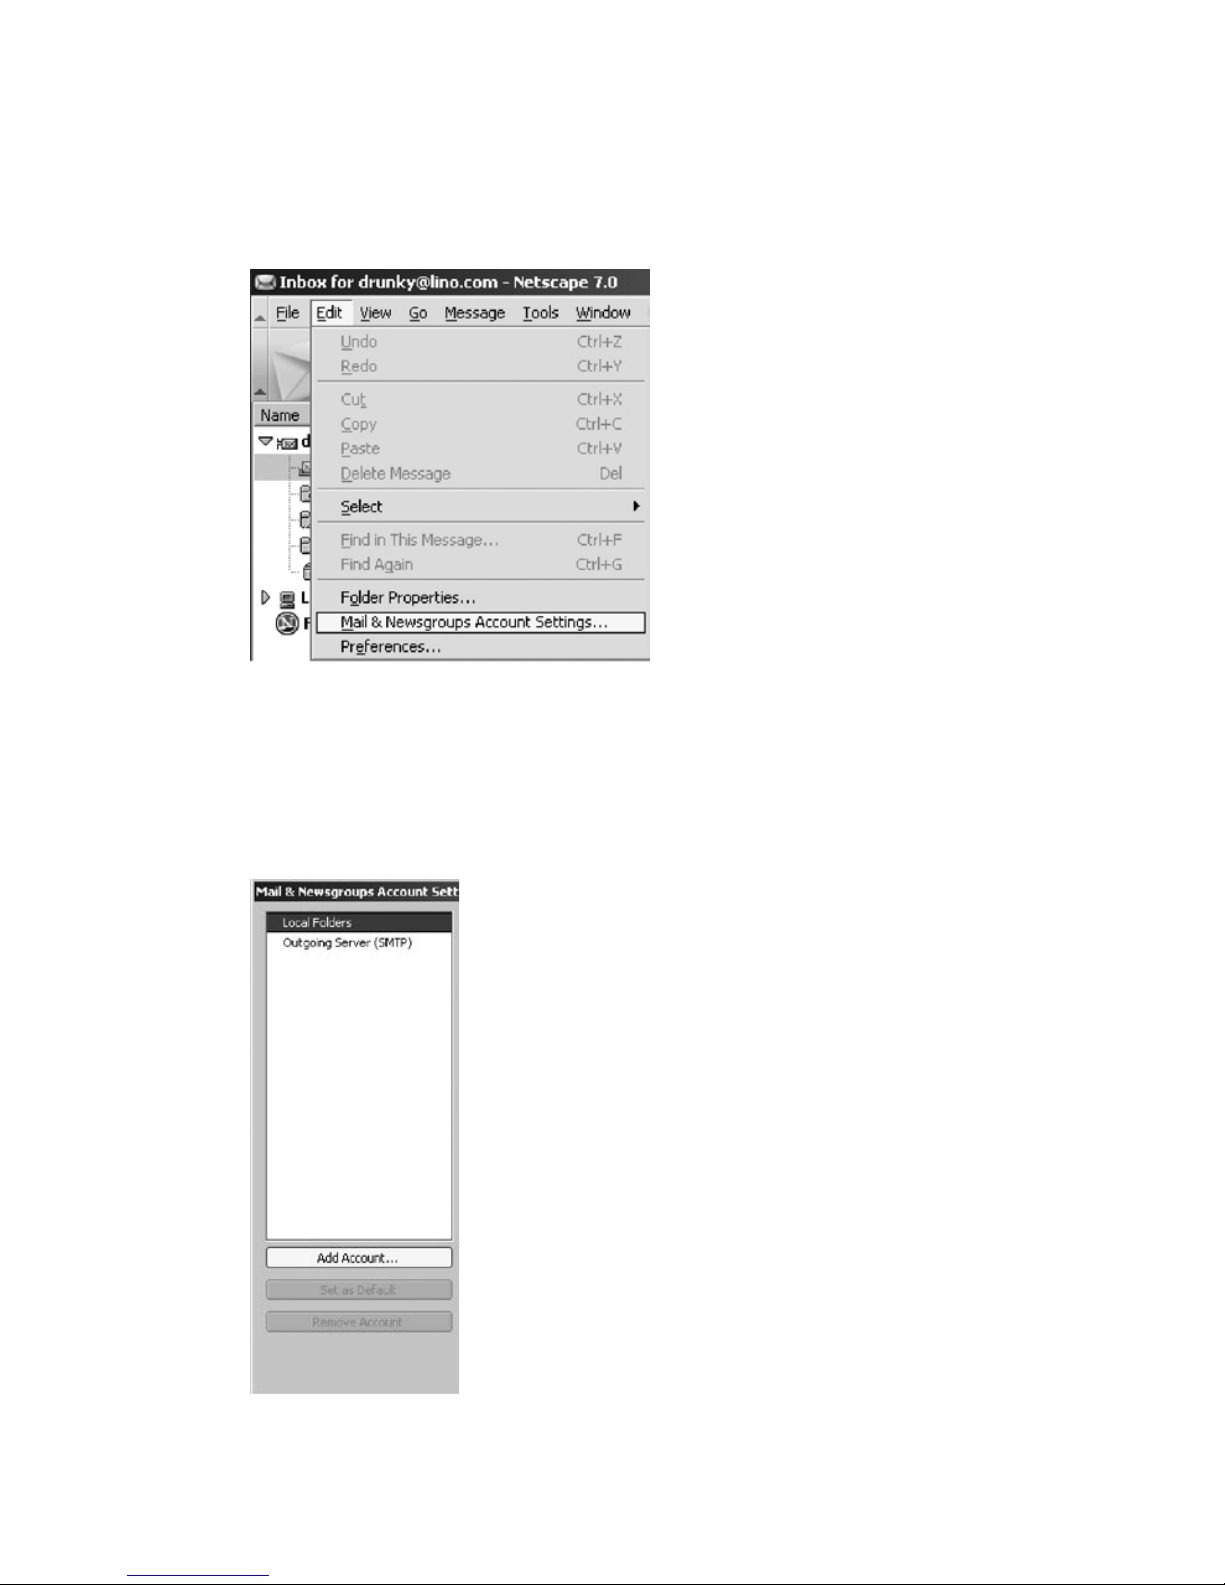
1. Open Netscape Mail 7. Then click on Edit > Mail & Newsgroup
Account Settings...
2. Click on Add Account...
Page 25
25Wireless Modem Router
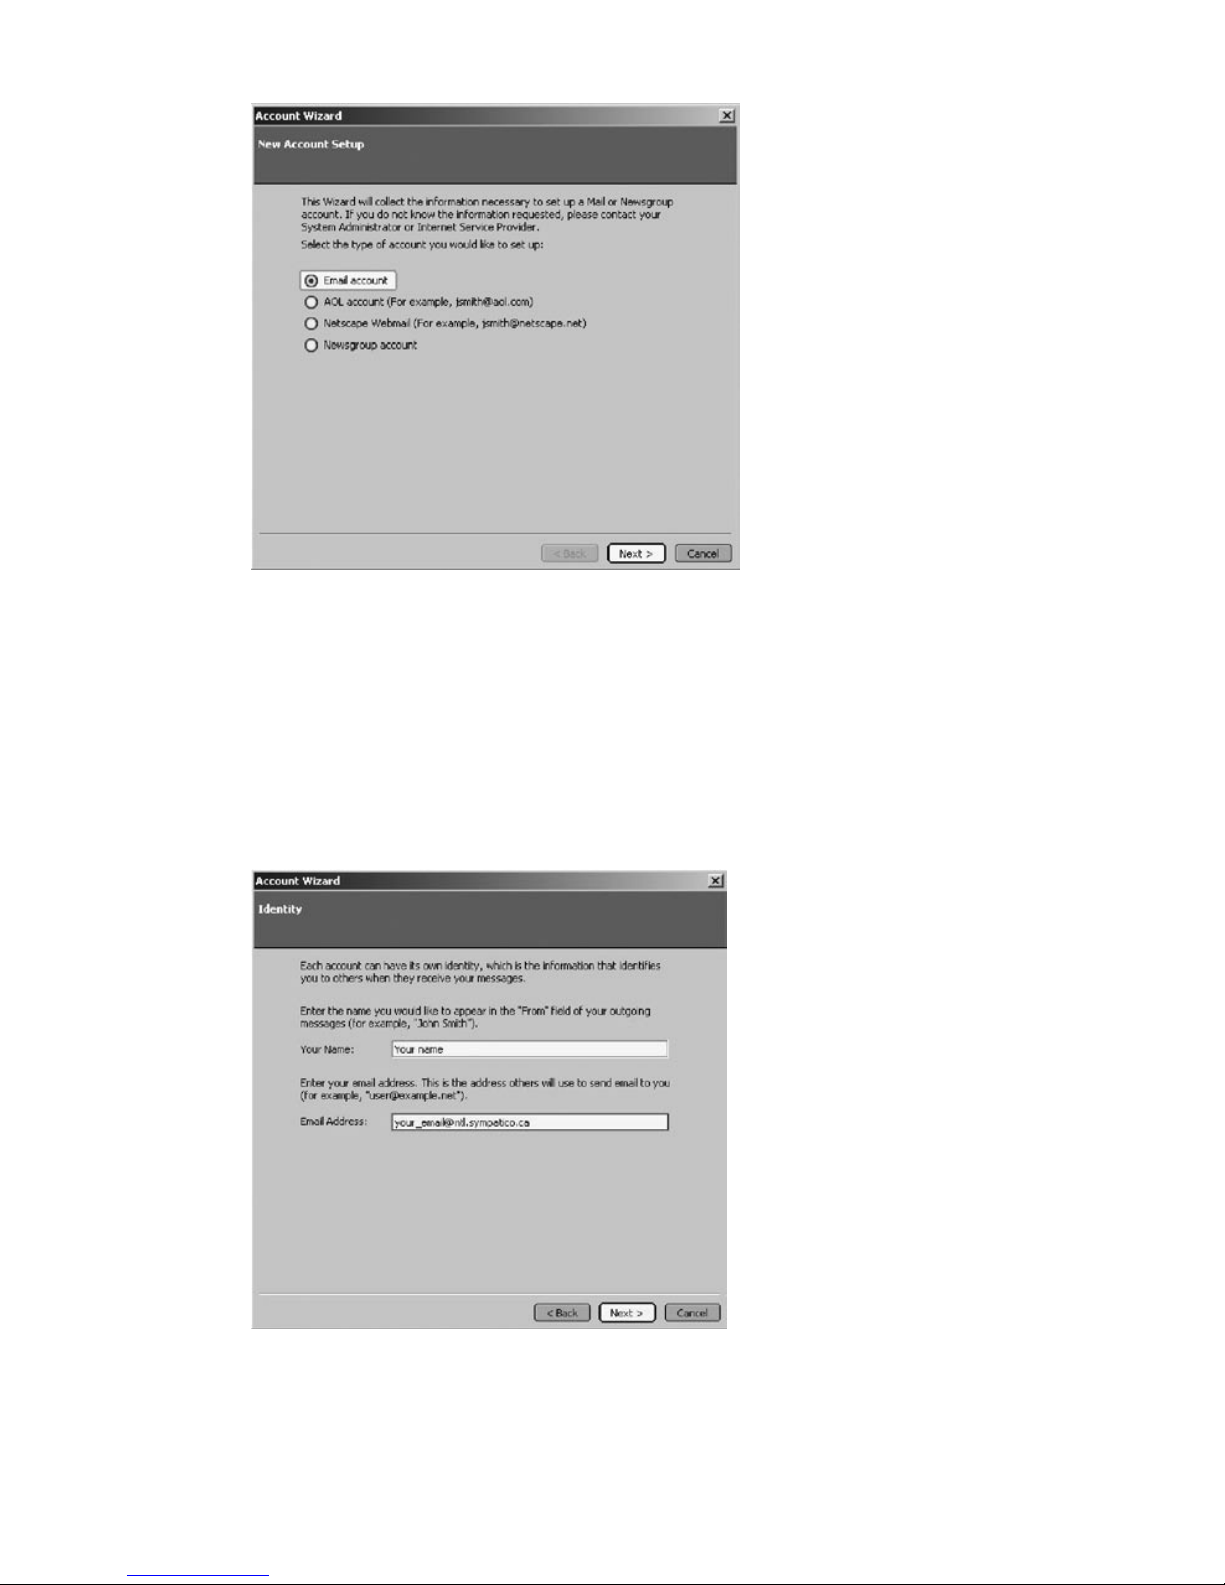
3. Select “Email account”, then click on Next.
4. In this window:
- Enter you name. This name will appear in the emails you send.
- Enter your email address. The one the Customer Service Department gave you.
Then click on Next.
Page 26
Hi-Speed Internet User Guide26
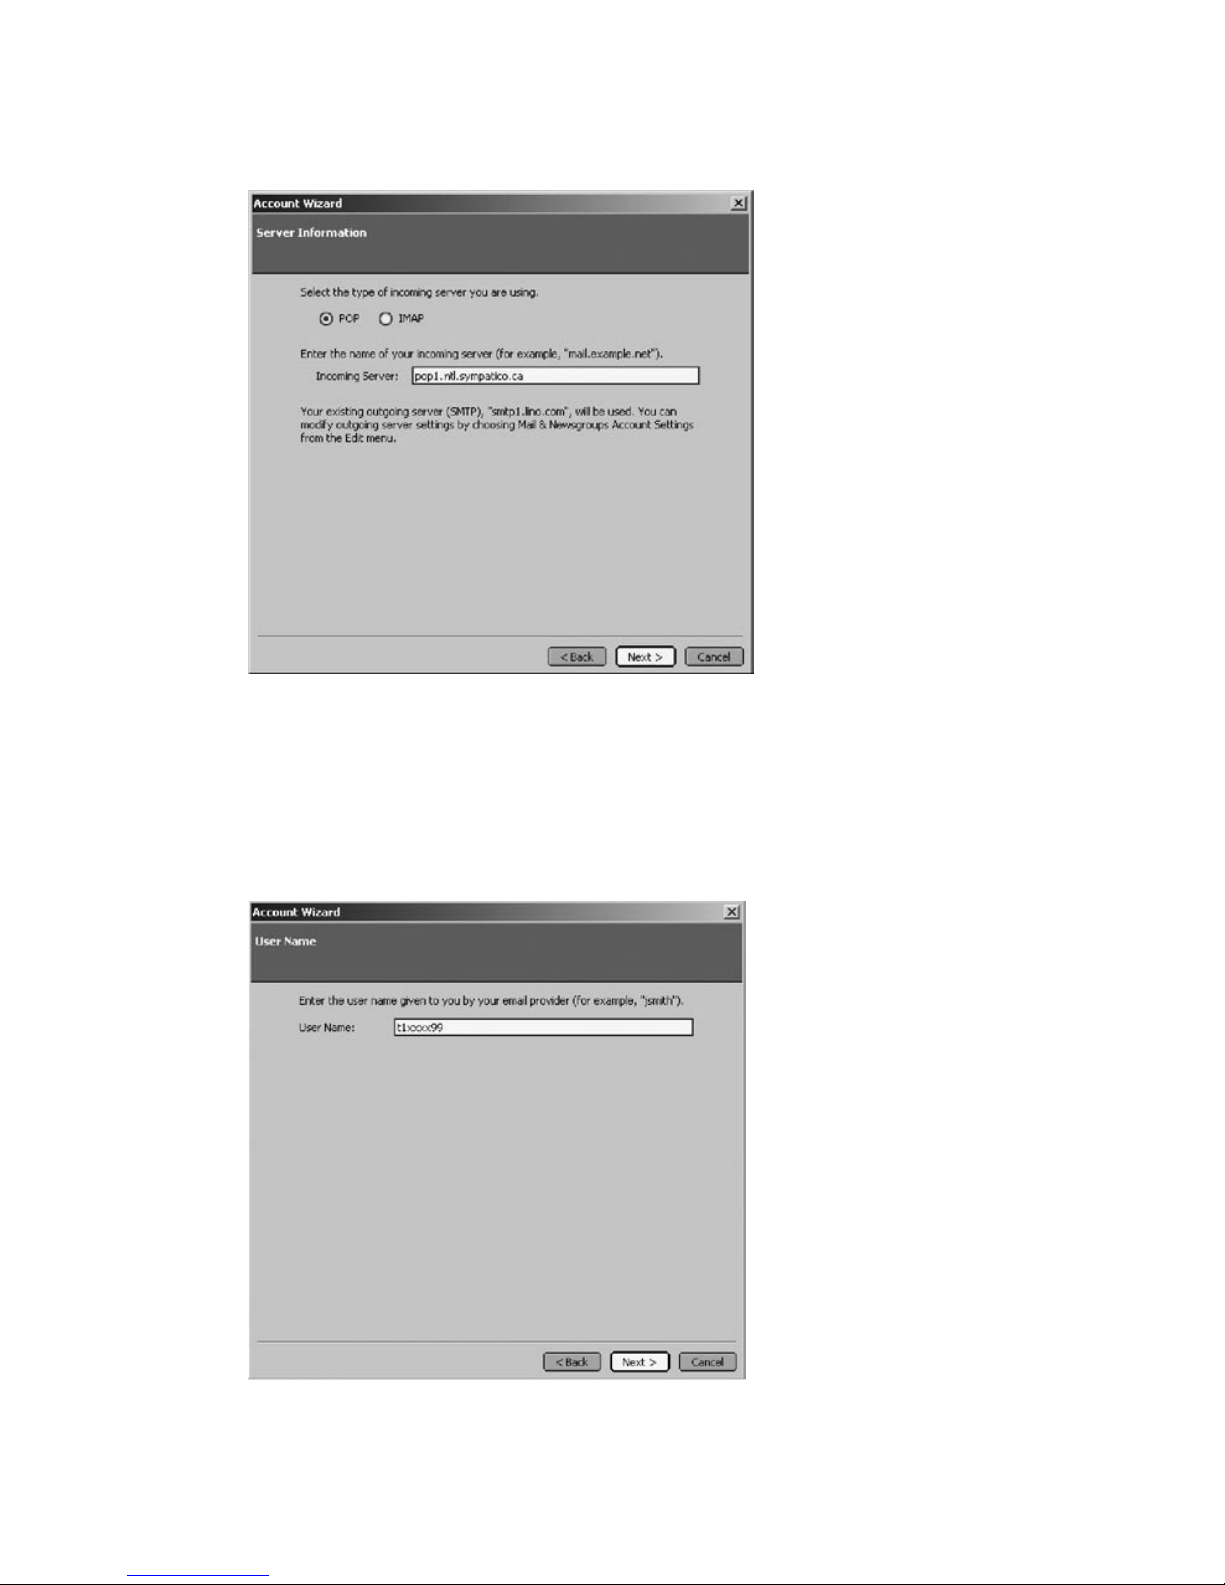
5. Enter the name of your incoming mail server. Example: pop1.ntl.sympatico.ca
The outgoing mail server will be verified at the end.
Then click on Next.
6. Enter your username. Example: t1xxxx99 or b1xxxx99
Then click on Next.
Page 27
27Wireless Modem Router
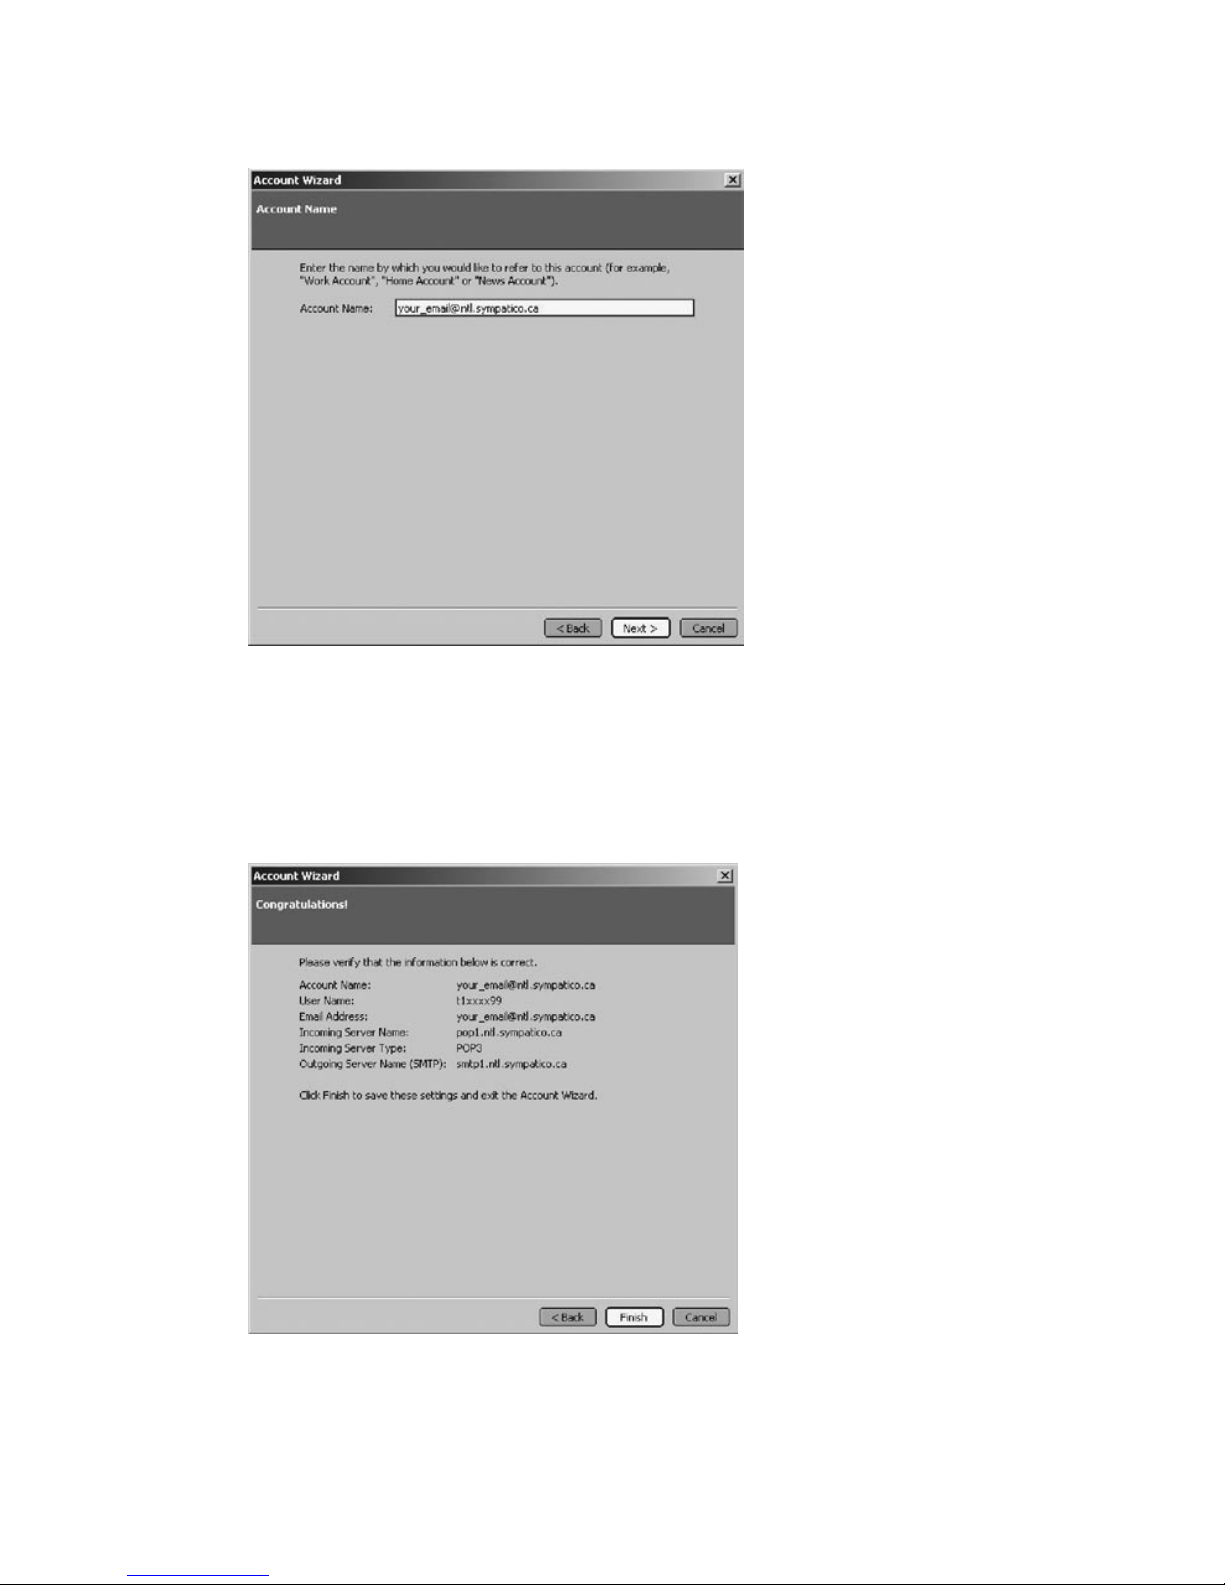
7. Enter your email address. The one the Customer Service Department gave you.
Then click on Next.
8. Here’s a summary of the account you have created. Click Finish.
Page 28
Hi-Speed Internet User Guide28
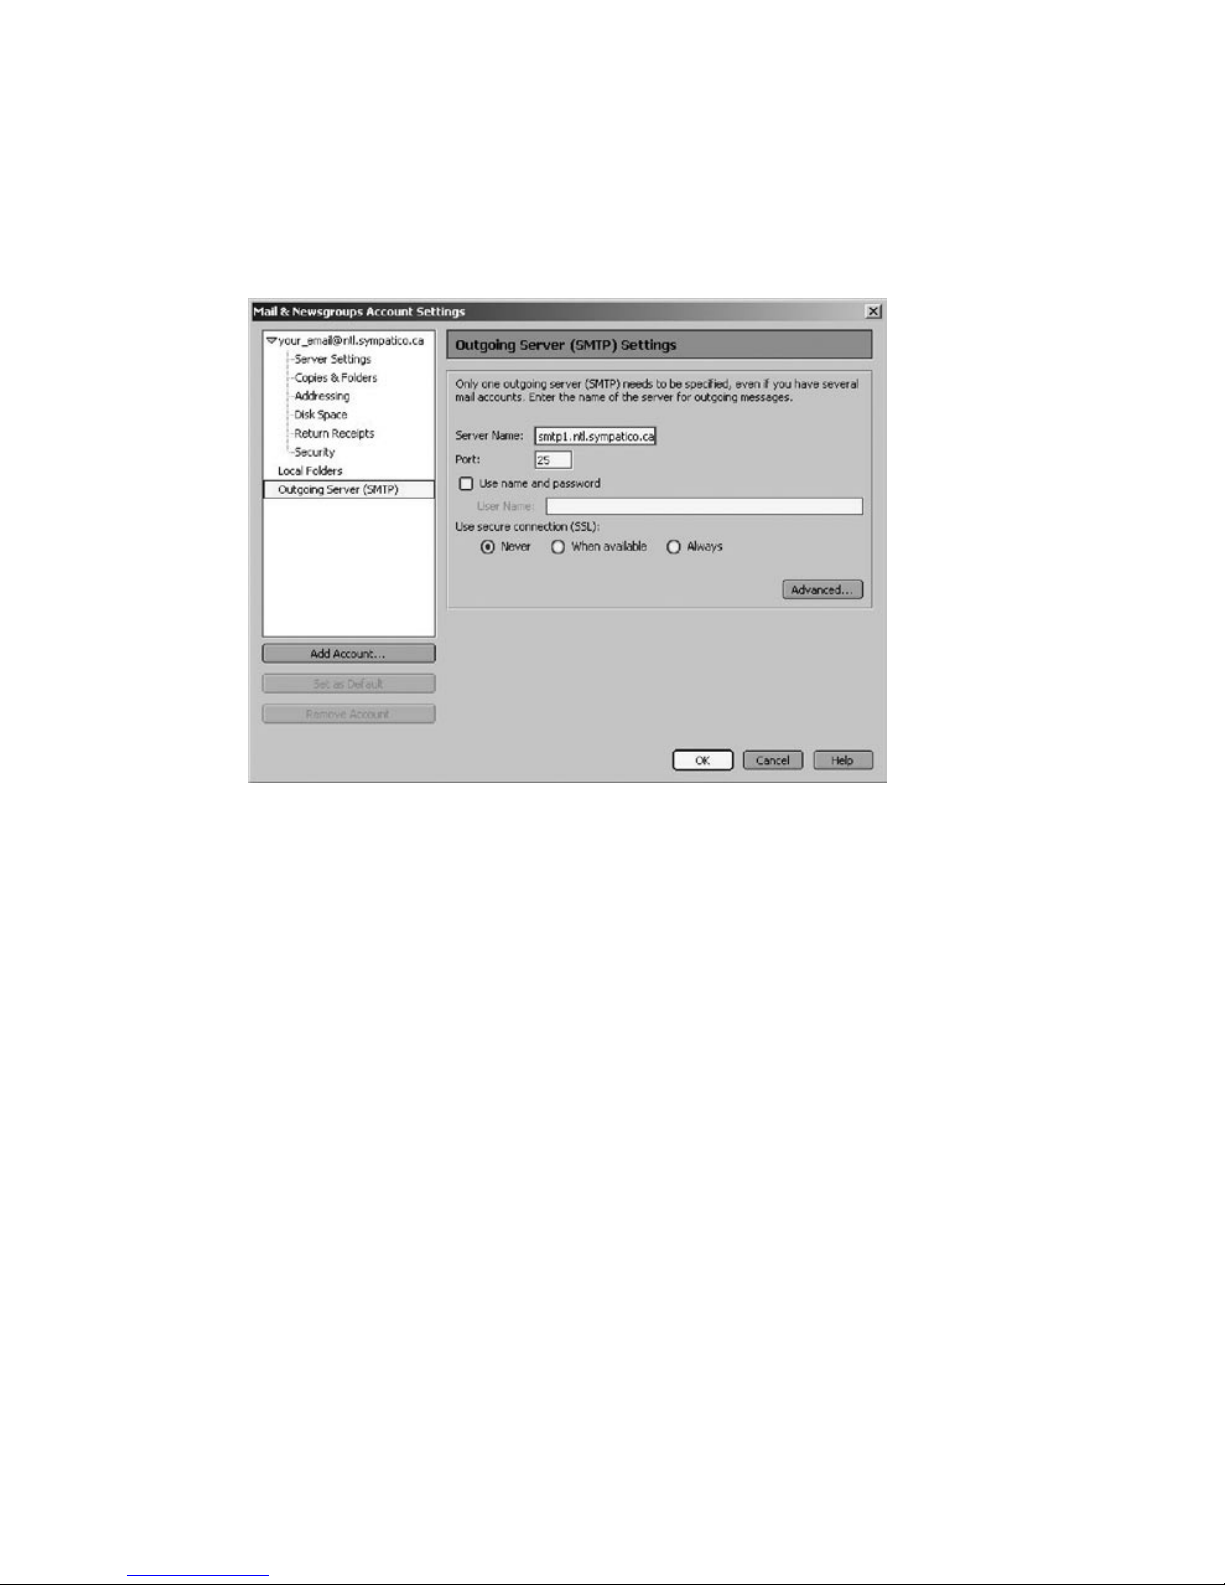
9. After creating the account, click on Outgoing Server (SMTP)
- Confirm your Outgoing Server. Example: smtp1.ntl.sympatico.ca
- Confirm the Outgoing Server Port: 25
- Delete what is in the “User Name” field. The outgoing mail server does not need
this information.
- Click on OK.
- There you go. You have just added your email account.
Page 29
29Wireless Modem Router
2.5 Configuring Incredimail
Here is how to create an e-mail box so that you are able to use your new e-mail address.
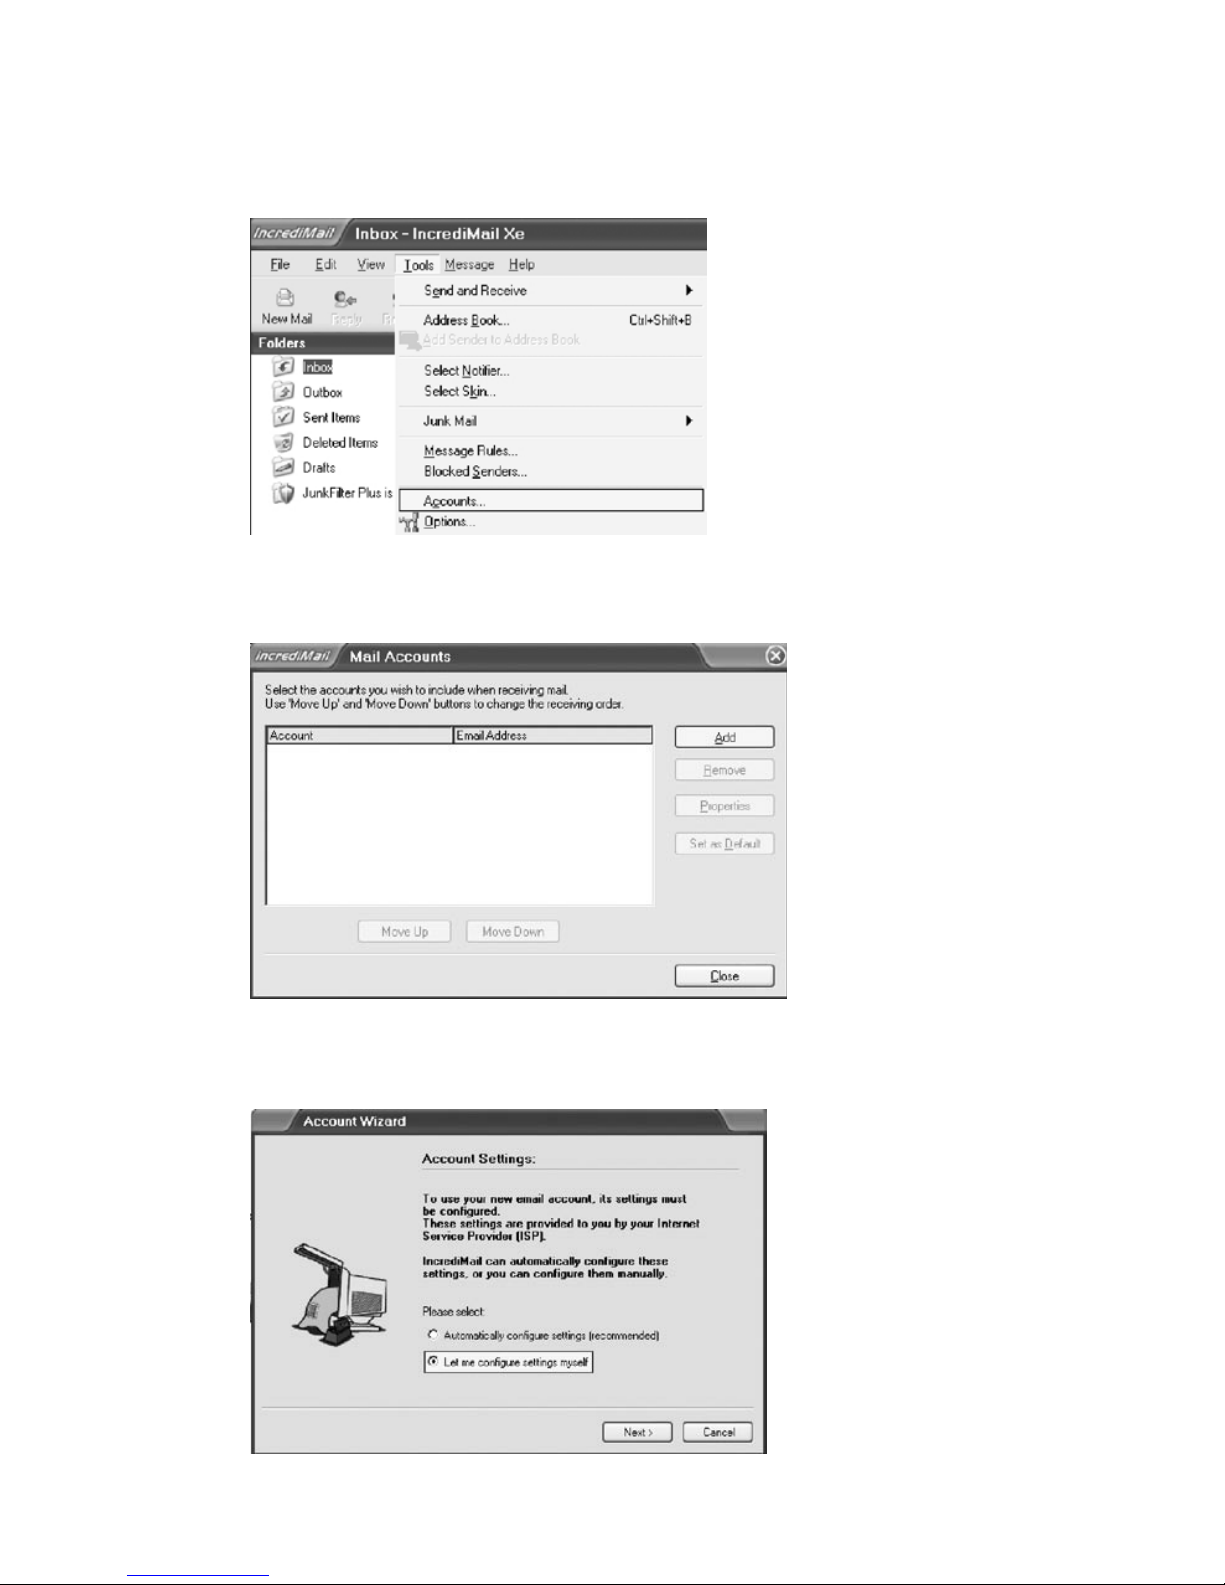
1. Open Incredimail. Then click on Tools > Accounts.
2. Click on Add.
3. Select the option “Let me configure settings myself”. Then click Next.
Page 30
Hi-Speed Internet User Guide30
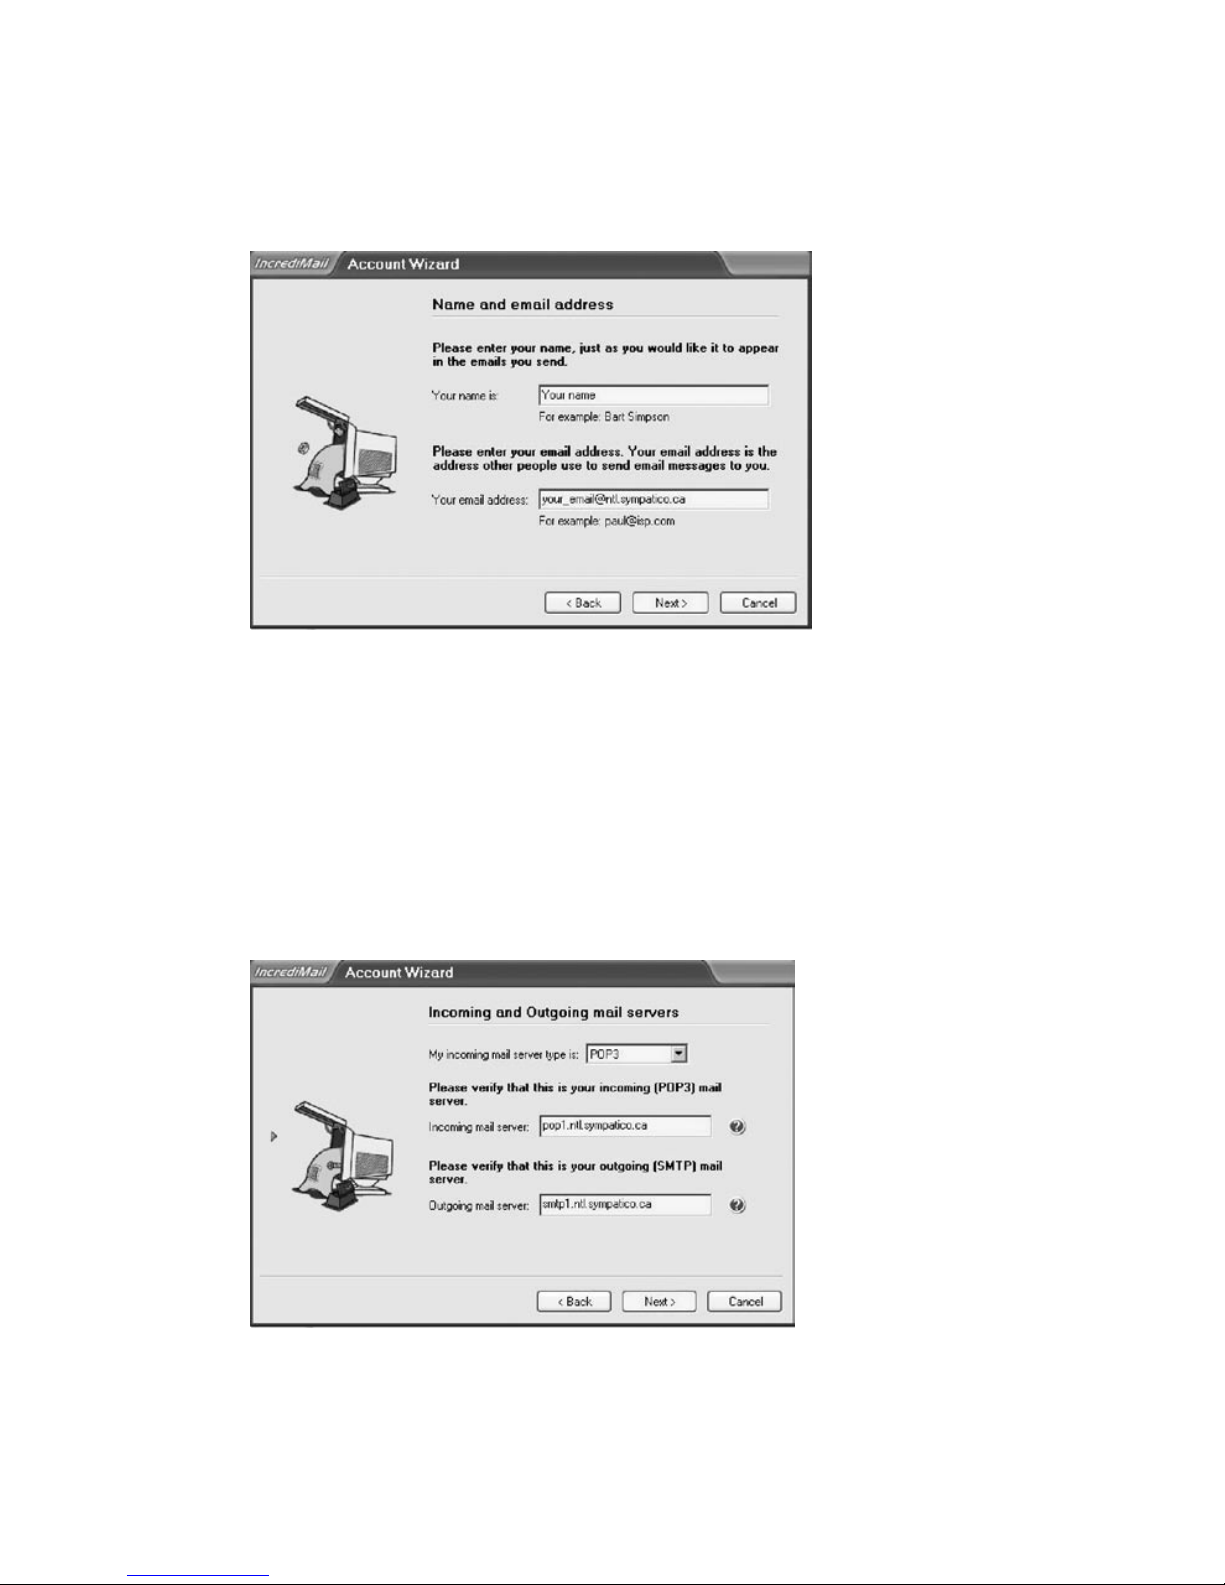
4. In this window:
- Enter your name. This name will appear in the emails you send.
- Enter your email address. The one the Customer Service Department gave you.
Then click on Next.
5. In this window:
- Select POP3 as your incoming mail server type.
- Enter your incoming mail server. Example: pop1.ntl.sympatico.ca
- Enter your outgoing mail server. Example: smtp1.ntl.sympatico.ca
Then click on Next.
Page 31
31Wireless Modem Router
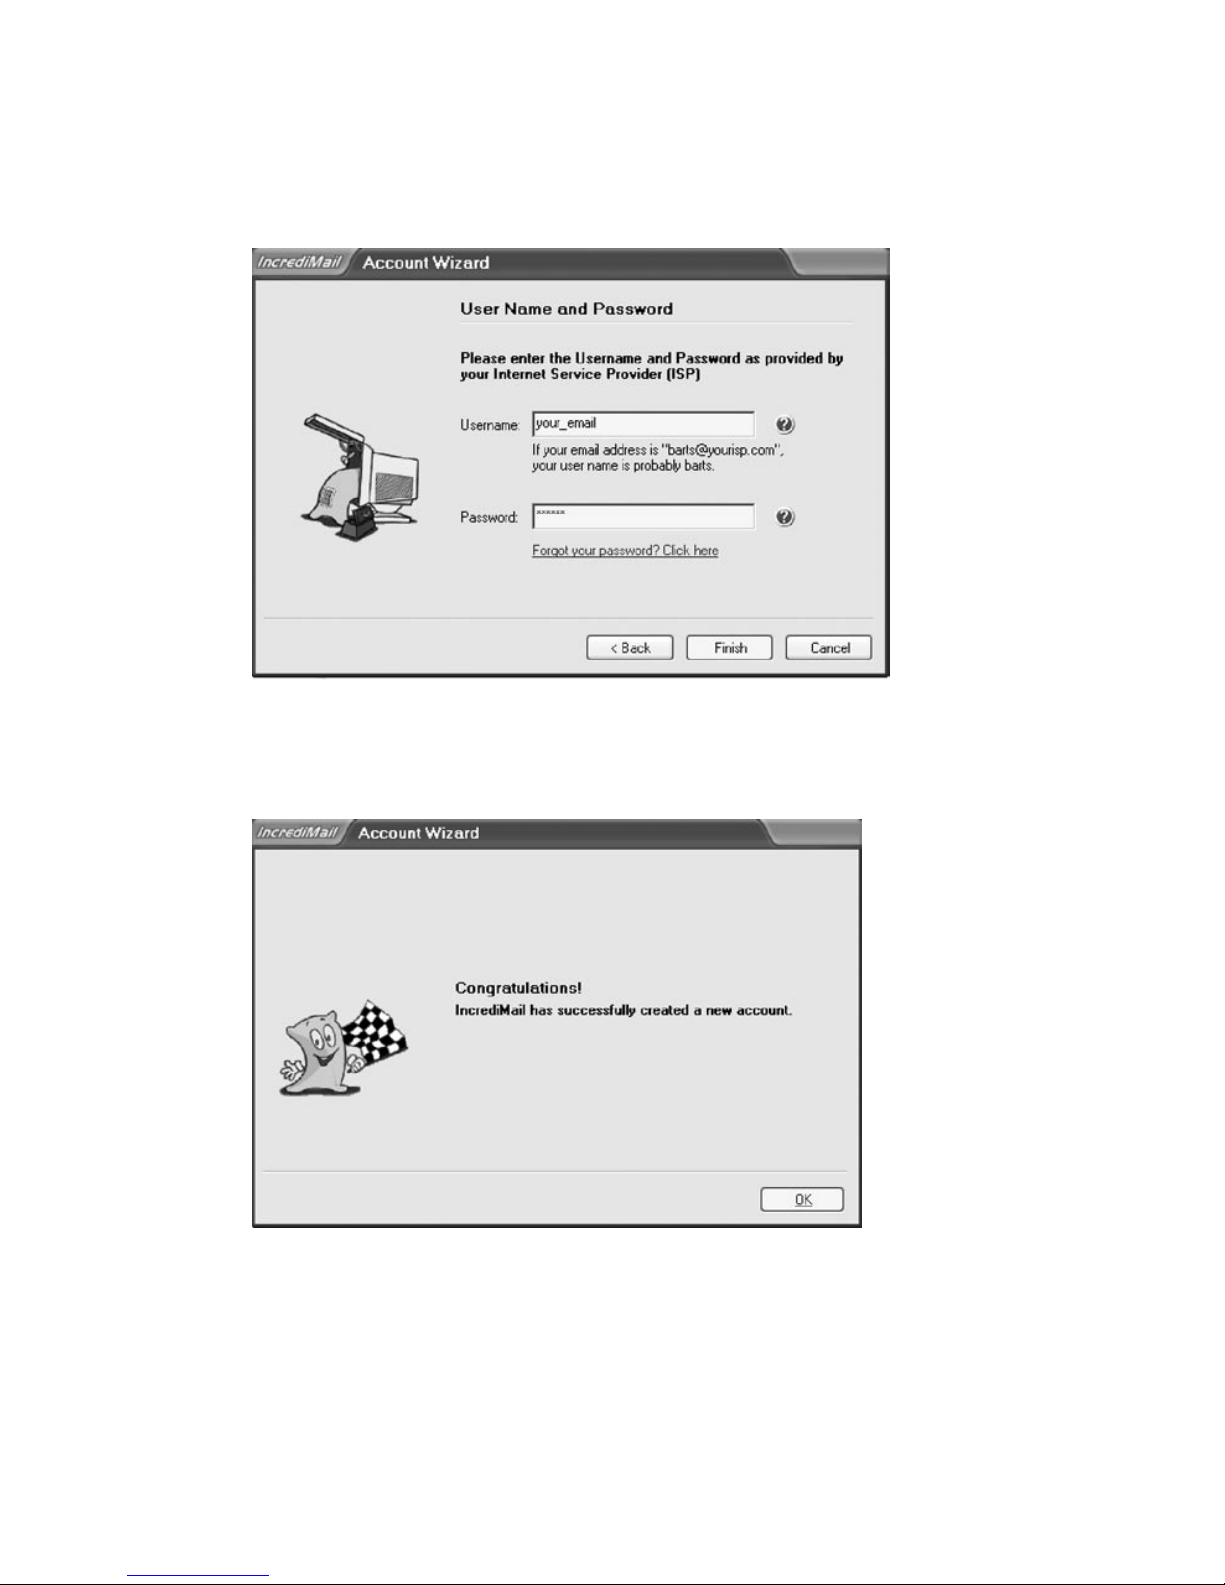
6. In this window:
- Enter your username. Example: t1xxxx99 or b1xxxx99
- Enter your password.
Then click on Finish.
7. There you go. You have just added your email account.
Page 32
Hi-Speed Internet User Guide32
2.6 Configuring Windows Mail 6.0
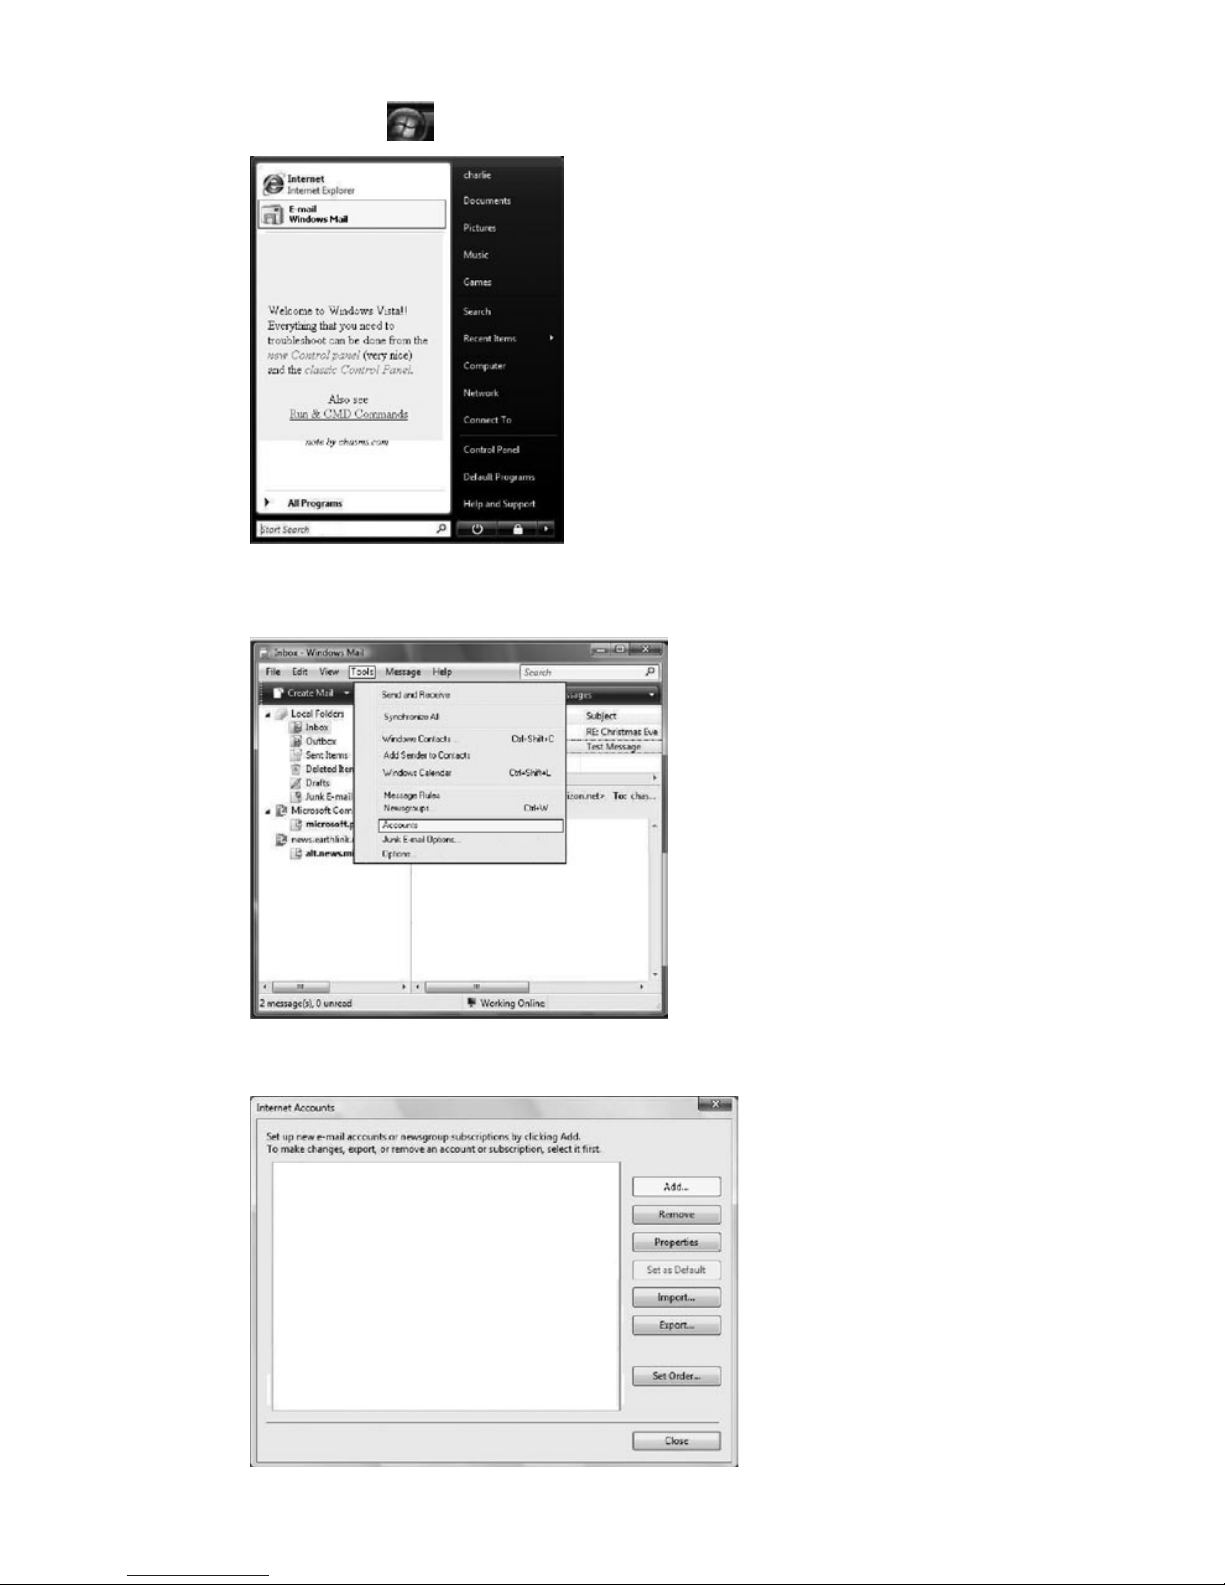
1. Click on Start ( ) , then click on E-mail Windows Mail.
2. Click on Tools > Accounts.
3. Click on Add…
Page 33
33Wireless Modem Router
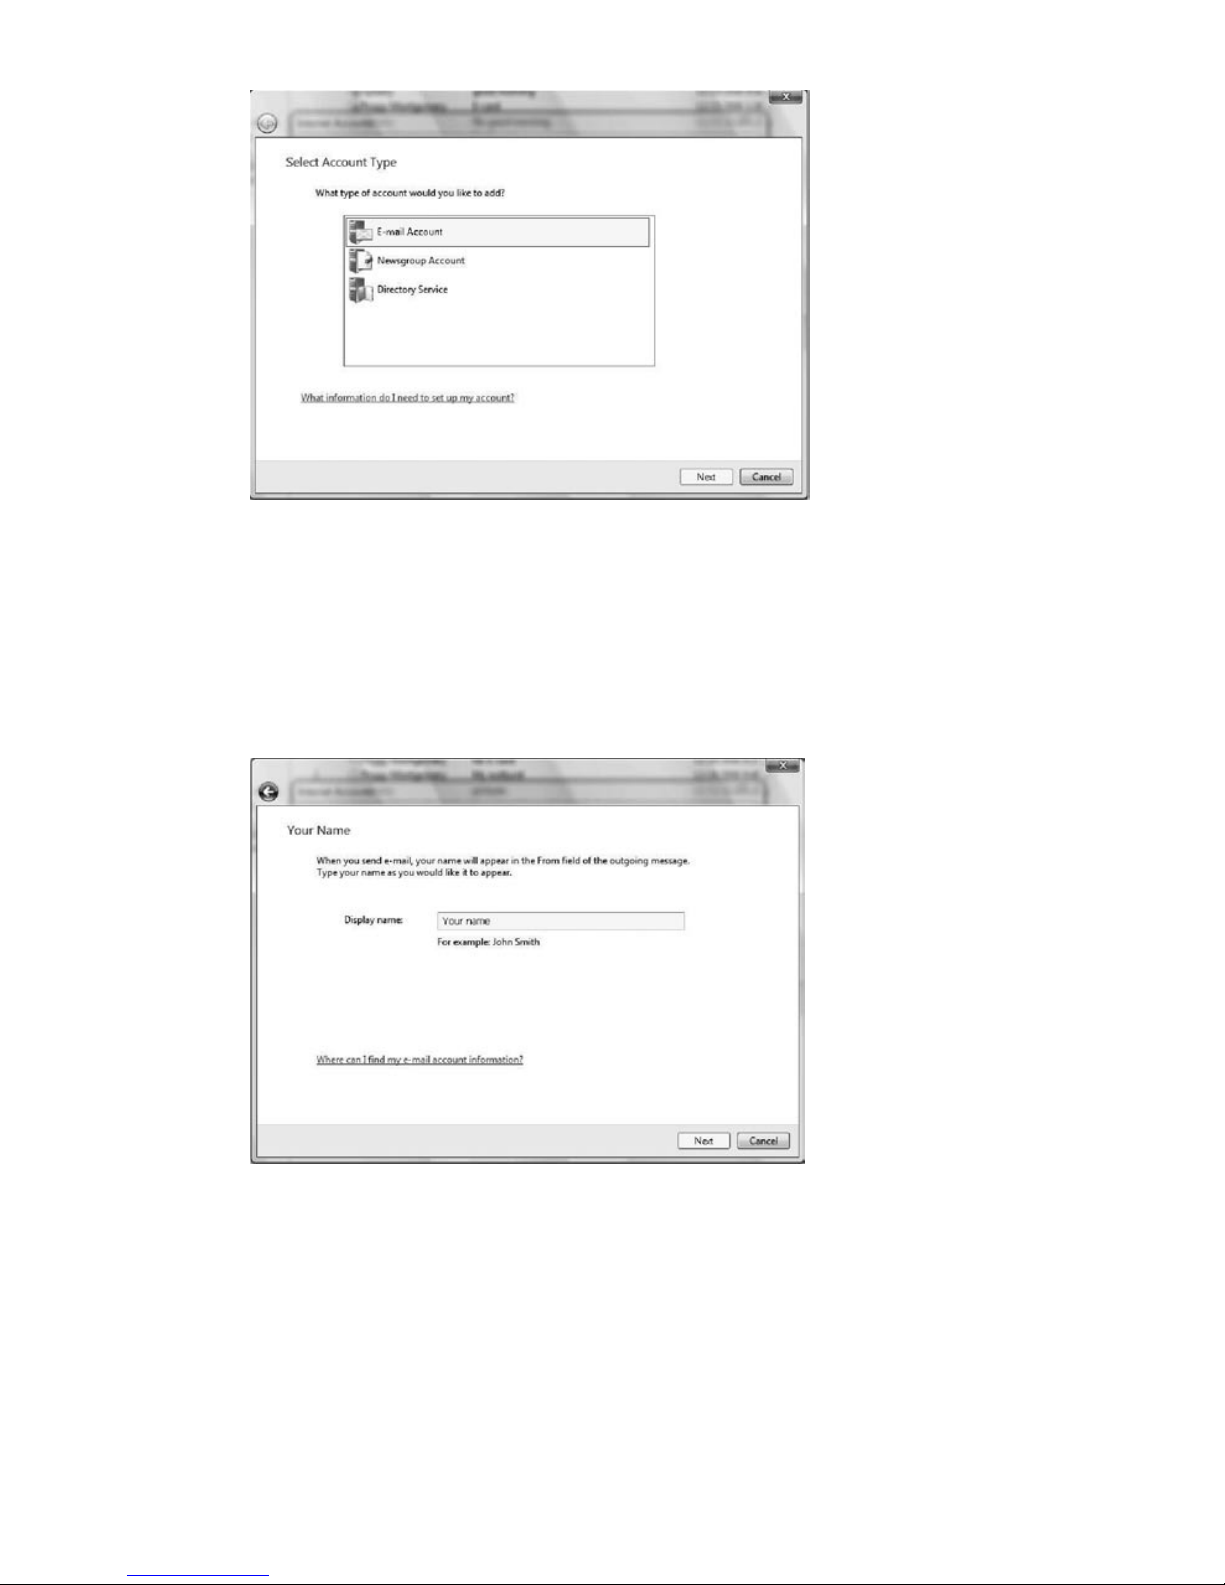
4. Select E-mail Account, then click on Next.
5. In this window:
- Enter your whole name. This name will appear in the emails you send.
- Click on Next.
Page 34
Hi-Speed Internet User Guide34
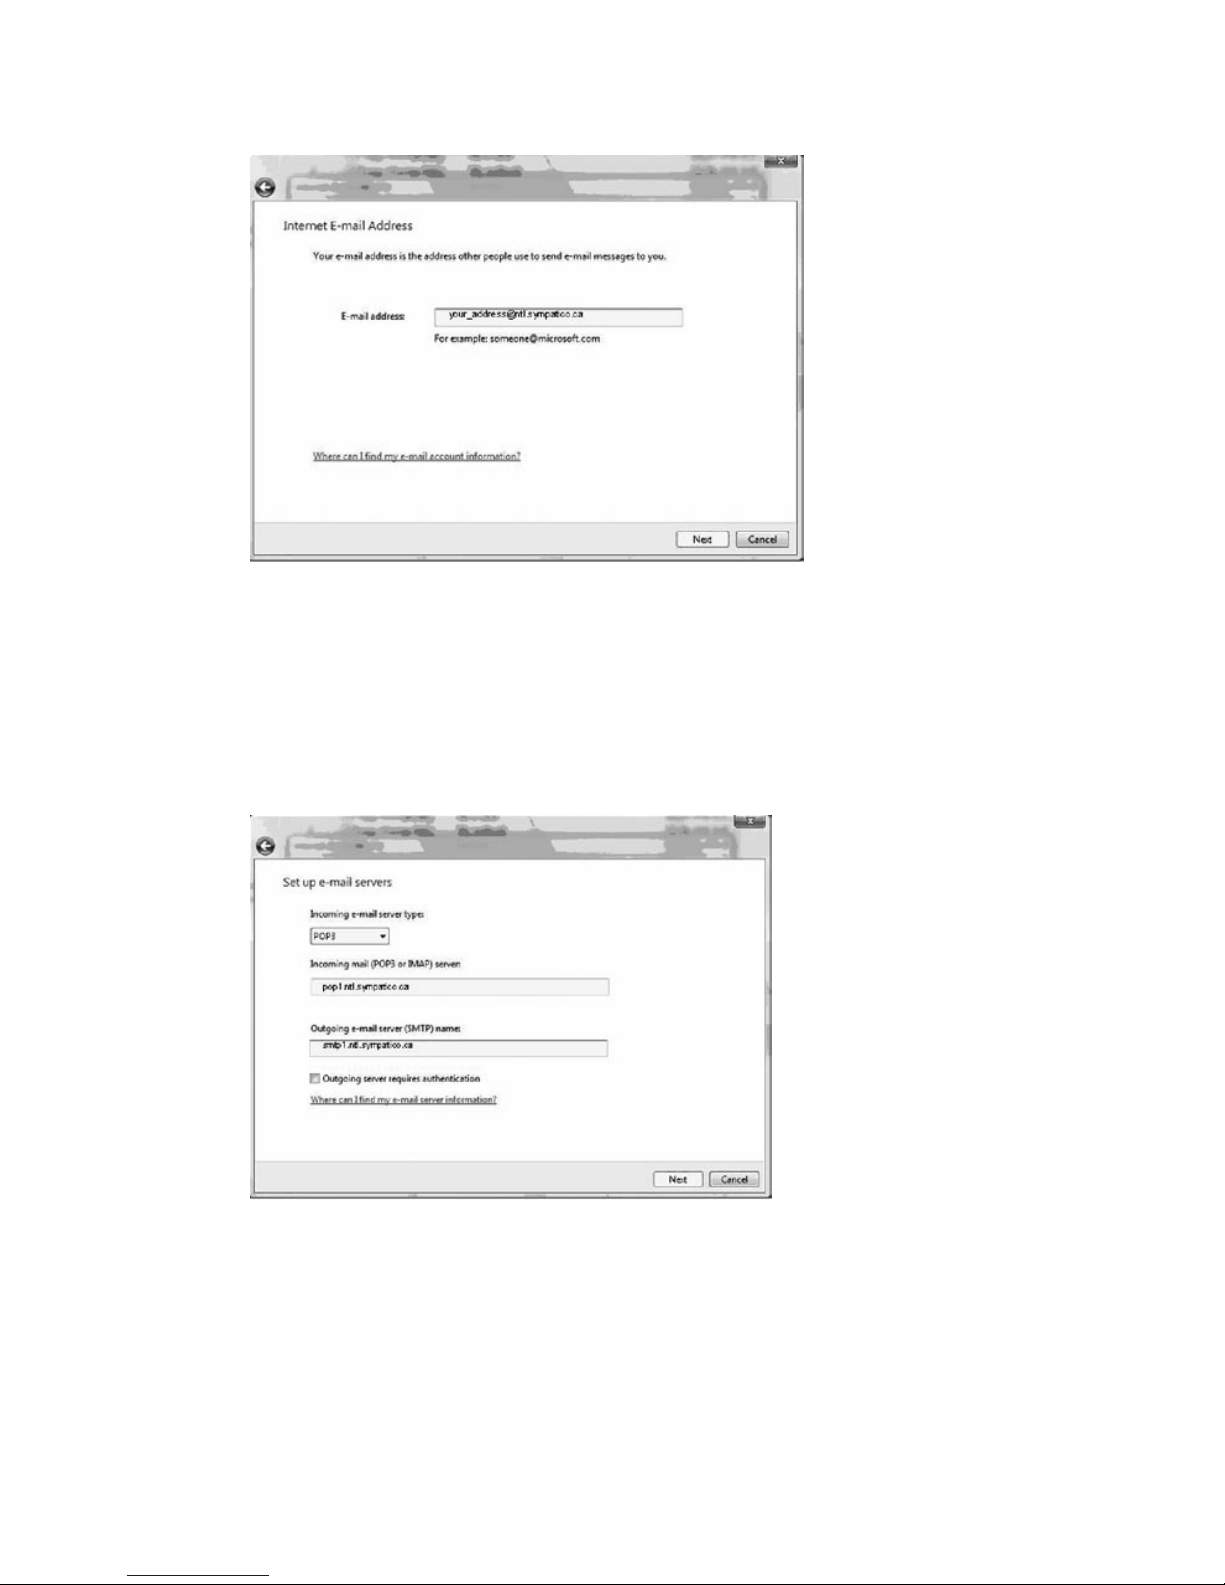
6. In this window:
- Enter your e-mail address. The one the Customer Service Department gave you.
- Click on Next.
7. In this window:
- Select POP3 as your incoming mail server type.
- Enter your incoming mail server. Example: pop1.ntl.sympatico.ca
- Enter your outgoing mail server. Example: smtp1.ntl.sympatico.ca
- Then click on Next.
Page 35
35Wireless Modem Router
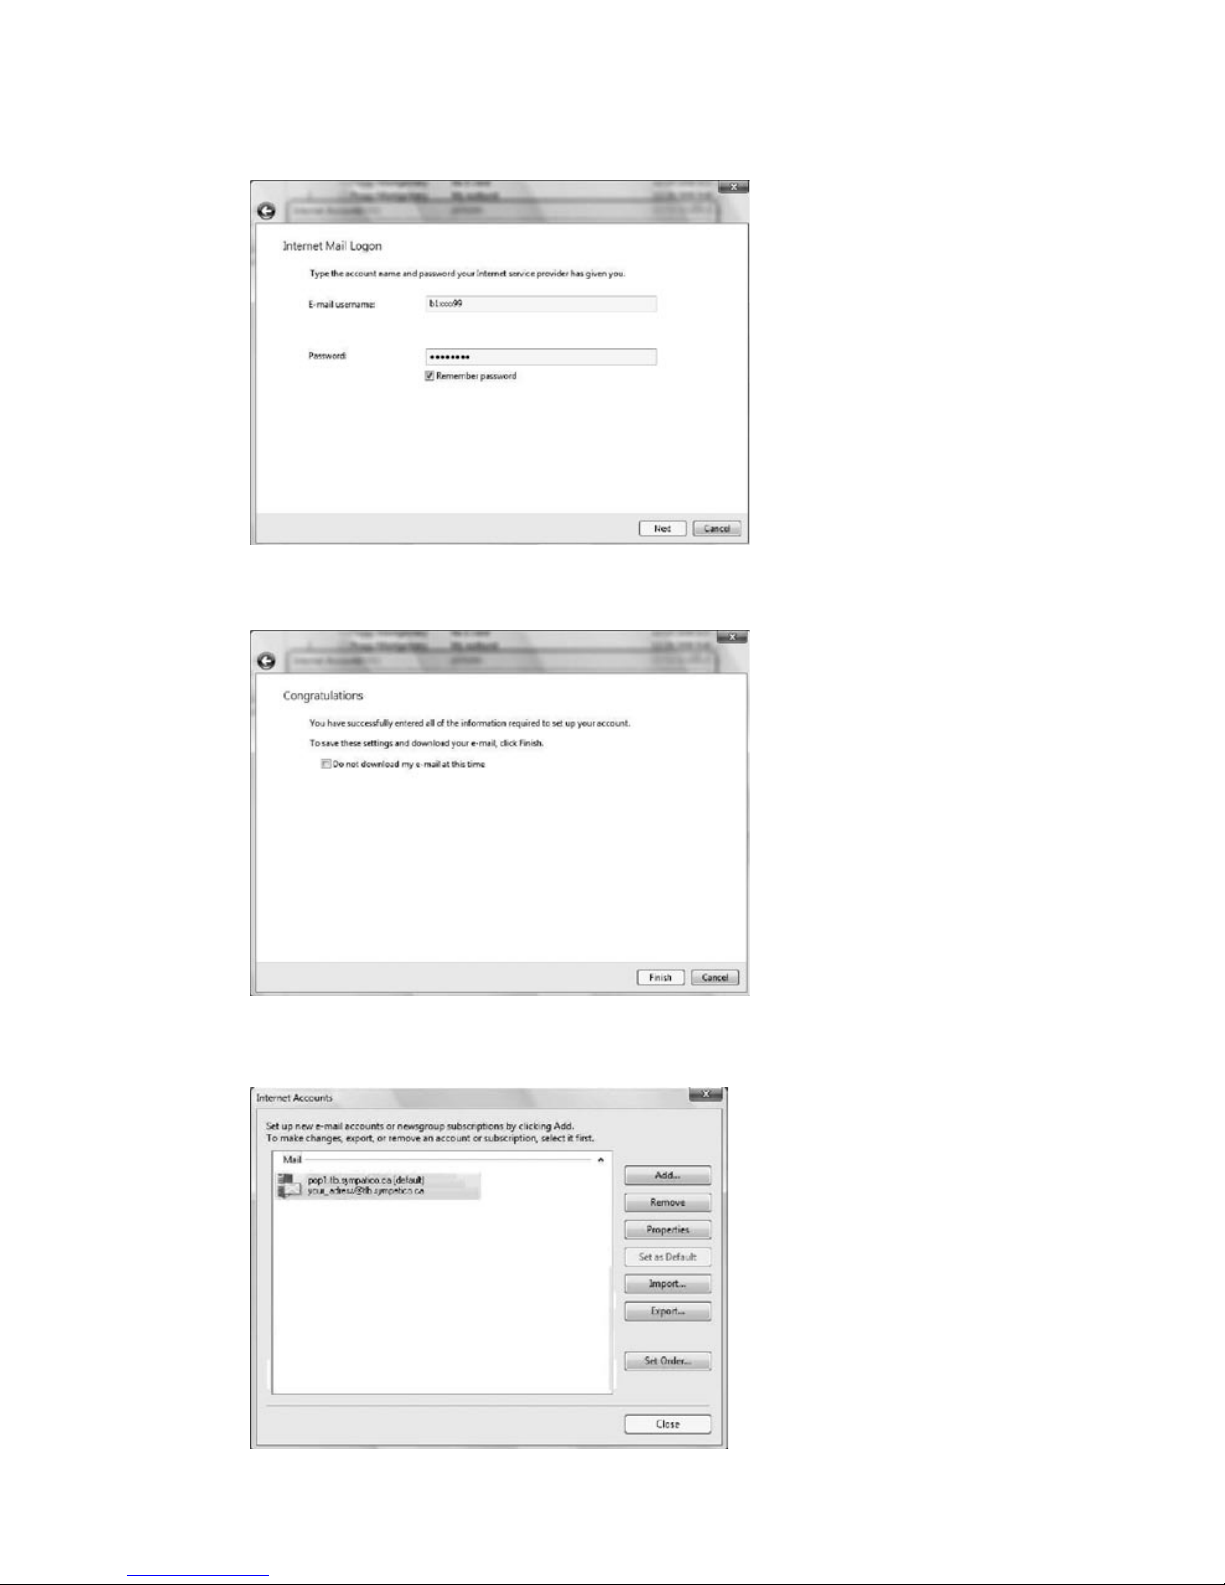
8. In this window:
- Enter your username. Example: t1xxxx99 or b1xxxx99
- Enter your password
- You can also check ‘’Remember password’’
9. Click on Finish.
10. Click on Close.
Page 36
Hi-Speed Internet User Guide36
Was this guide not able to answer some of your questions?
Consult our Technical Support section at www.northerntel.ca or call our Technical Support
service at 1 800 360-8555.
Domain name:
ntl.sympatico.ca
Outcoming mail server (SMTP):
smtp1.ntl.sympatico.ca
Incoming mail server (POP3):
pop1.ntl.sympatico.ca
User name:
Password:
Email address:
Siemens wireless modem router parameters
Password (modem router) :
SSID:
Encryption key:
You have the responsability to preserve this information for later use in a secured place.
Consult our Technical Support section at www.northerntel.ca or call our Technical Support
service at 1 800 360-8555.
3. Contacting us
4. Important Information
 Loading...