

Page 1
6.5 HP WATER PUMP
CALIFORNIA PROPOSITION 65
WARNING: You can create dust
when you cut, sand, drill or grind
materials such as wood, paint,
metal, concrete, cement, or other
masonry. This dust often
contains chemicals known to
cause cancer, birth defects, or
other reproductive harm. Wear
protective gear.
WARNING: This product or its
power cord may contain
chemicals, including lead,
known to the State of California
to cause cancer and birth
defects or other reproductive
harm. Wash hands after
handling.
Important!
When using equipment, a few
safety precautions must be
observed to avoid injuries and
damage. Please read the complete
operating manual with due care.
Keep this manual in a safe place,
so that the information is available
at all times. If you give the
equipment to any other person,
give them these operating
instructions as well. We accept no
liability for damage or
accidents which arise due to
non-observance of these
instructions and the safety
information herein.
SPECIFICATIONS
Engine: 4-stroke, single
cylinder
Max Output: 6.5 HP @ 3600
RPM
Fuel Tank: 1.6 Gal, Unleaded
Discharge Capacity: 264
gal/min
Max PSI: 45 PSI
Continuous Running Time: 2-
3 hours (actual time varies with
load)
Total head: 92 ft
Suction head: 26 ft
Oil type: SAE !0W-30
CAUTION:
FOR YOUR OWN SAFETY
READ INSTRUCTION
MANUAL COMPLETELY AND
CAREFULLY BEFORE
OPERATING. Failure to follow
all instructions as listed
below may result in electrical
shock, fire, and/or serious
personal injury.
CARBURETOR
MODIFICATION FOR
HIGH ALTITUDE USE
At a high altitude, the
standard carburetor air-fuel
mixture is too rich.
Performance will decrease
and fuel consumption will
increase. A very right mixture
will also cause damage to the
spark plug and cause hard
starting. Operation at an
altitude that is different from
the range in which this engine
was certified may increase
emissions when used for an
extended period of time.
High altitude performance
can be improved by specific
modifications to the
carburetor. If the engine is
always operated at altitudes
above 5,000 feet (1,500
meters), have a qualified
mechanic perform the
carburetor modification. This
engine will meet emission
standards when operated at a
high altitude with the
modifications for high altitude
use.
Model: 6795
Page 2

Even with a carburetor
modification, the engine horse
power will decrease about 3.5%
for each 1,000 foot (300 meter)
increase in altitude. The effect
of the altitude on the
horsepower will be greater if no
carburetor modification is made.
NOTE: When the carburetor
has been modified for high
altitude operation, the air-fuel
mixture will be too lean for low
altitude use. Operation at
altitudes below 5,000 feet
(1,500 meters) with a modified
carburetor may cause the
engine to overheat and result in
serious engine damage. For
use at low altitudes, have a
qualified mechanic return the
carburetor to its original factory
specifications.
SAFETY INSTRUCTIONS
1) This pump is designed to
only pump water that is not
intended to be consumed by
humans. Using the pump for
other uses can result in injury to
the operator or damage to the
pump and other property.
Pumping flammable liquids (ex:
gasoline or fuel oils) can result
in a fire or explosion that can
cause serious injury. Pumping
sea water, beverages, acids,
chemical solutions or any other
liquid that promotes corrosion
can damage the pump.
2) Know how to stop the pump
quickly and understand how to
operate all of the controls.
Never permit anyone to operate
the pump without proper
instructions.
3) Do not allow children to
operate the pump. Keep children
and pets away from the
operation area.
4) Do not wear loose clothing or
jewelry. Pull back long hair. Keep
your hair, clothing and gloves
away from moving parts.
5) Do not operate the pump in
explosive atmospheres such as
in the presence of flammable
liquids, gases or dust. The
engine creates sparks which may
ignite the dust or fumes.
6) Gasoline is extremely
flammable and gasoline vapors
can explode. Refuel the pump
outdoors and in a well ventilated
area. If any fuel is spilled, ensure
the area is dry before starting the
pump.
7) The muffler becomes very hot
during operation and remains hot
for a while after the engine stops.
Be careful not to touch the
muffler while it is hot. Allow the
engine to cool before storing the
pump indoors.
8) To prevent fire hazards and
provide adequate ventilation,
keep the pump at least three feet
away from walls and other
equipment during operation. Do
not place flammable objects
close to the pump.
9) Exhaust gas contains
poisonous carbon monoxide.
Avoid the inhalation of exhaust
gas. Never run the pump in a
closed garage or confined area.
10) Do not overload the pump.
Use the correct pump for your
application. It will perform the job
better and safer at the rate for
which it was designed.
BEFORE OPERATION
1) Check the condition of the
pump and for signs of damage.
Look for leaks of oil or gas. Check
that all nuts, bolts, screws,
connectors and clamps are tight.
Remove any excessive dirt or
debris, especially around the
engine muffler and recoil starter.
2) Check the suction and
discharge hoses. Ensure the
hoses are in proper condition and
free of cracks and damage.
Check the sealing washer in the
suction hose is in working order.
Ensure the hose connectors and
clamps are securely installed.
Ensure the strainer is in good
condition and is installed on the
suction hose.
3) Check the engine oil level.
Running the engine with low oil
can cause damage. An oil sensor
will automatically stop the engine
before the oil level falls below a
safe limit. To avoid an
unexpected shutdown, always
check the level before startup.
4) Check the air filter. A dirty filter
will restrict the air flow to the
Page 3
carburetor and reduce engine
performance.
5) Check the fuel level. Starting
with a full tank will help reduce
possible operating interruptions
for refueling.
OPERATION
Pump Placement
For best pump performance,
place the pump near the water
level and use hoses that are not
longer than necessary. This will
enable the pump to produce the
greatest output.
As the head (pumping height)
increases, the pump output
decreases. The length, type and
size of the suction discharge
hoses can also significantly
affect the pump’s output.
The discharge head is always
greater than the suction head
capability so it is important for
the suction head to be the
shorter part of the total head.
Minimizing the suction head
(placing the pump as near as
can be to water level) is also
very important for reducing selfpriming time (the time it takes
the pump to bring water the
distance of the suction head
during initial operation).
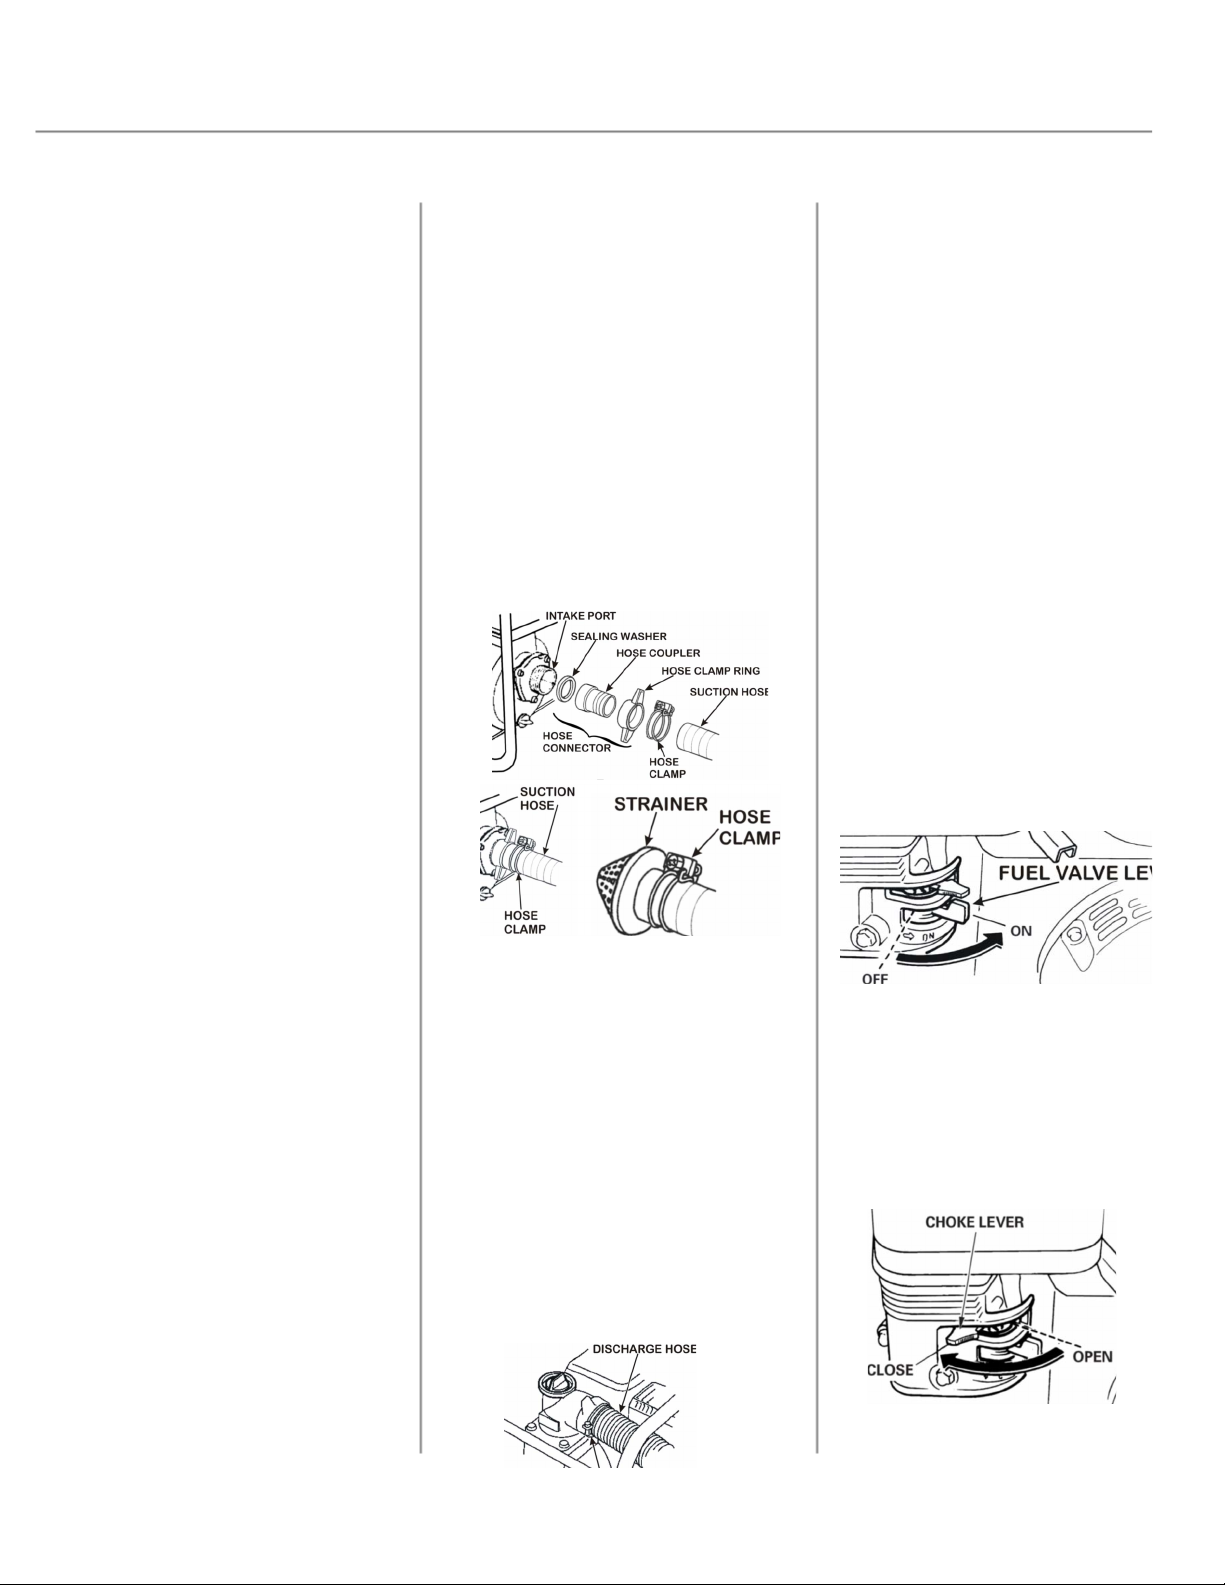
Suction Hose Installation
1) Use a hose clamp to securely
fasten the hose connector to the
suction hose
in order to prevent air leakage
and loss of suction. Verify that
the hose connector sealing
washer is in good condition.
2) Install the strainer on the other
end of the suction hose and
secure it with a hose clamp. The
strainer will help to prevent the
pump from becoming clogged or
damaged by debris.
3) Securely tighten the hose
connector on the pump suction
port.
Discharge Hose Installation
It is best to use a short, large
diameter hose. This will reduce
fluid friction and improve pump
output. A long or small diameter
hose will increase fluid friction
and reduce pump output.
Tighten the hose clamp securely
to prevent the discharge hose
from disconnecting under high
pressure.
Priming the Pump
Before starting the engine,
remove the filler cap from the
pump chamber and completely
fill the pump chamber with water.
Replace the filler cap and tighten
it securely.
NOTE: Operating the pump dry
will destroy the pump seal. If the
pump has been operated dry,
stop the engine immediately and
allow the pump to cool before
priming.
Starting the Engine
1) Prime the pump.
2) Move the fuel lever to the ON
position. It must be ON for the
engine to run.
3) To start a cold engine, move
the choke lever to the CLOSED
position. To restart a warm
engine, leave the choke lever in
the OPEN position.
Page 4
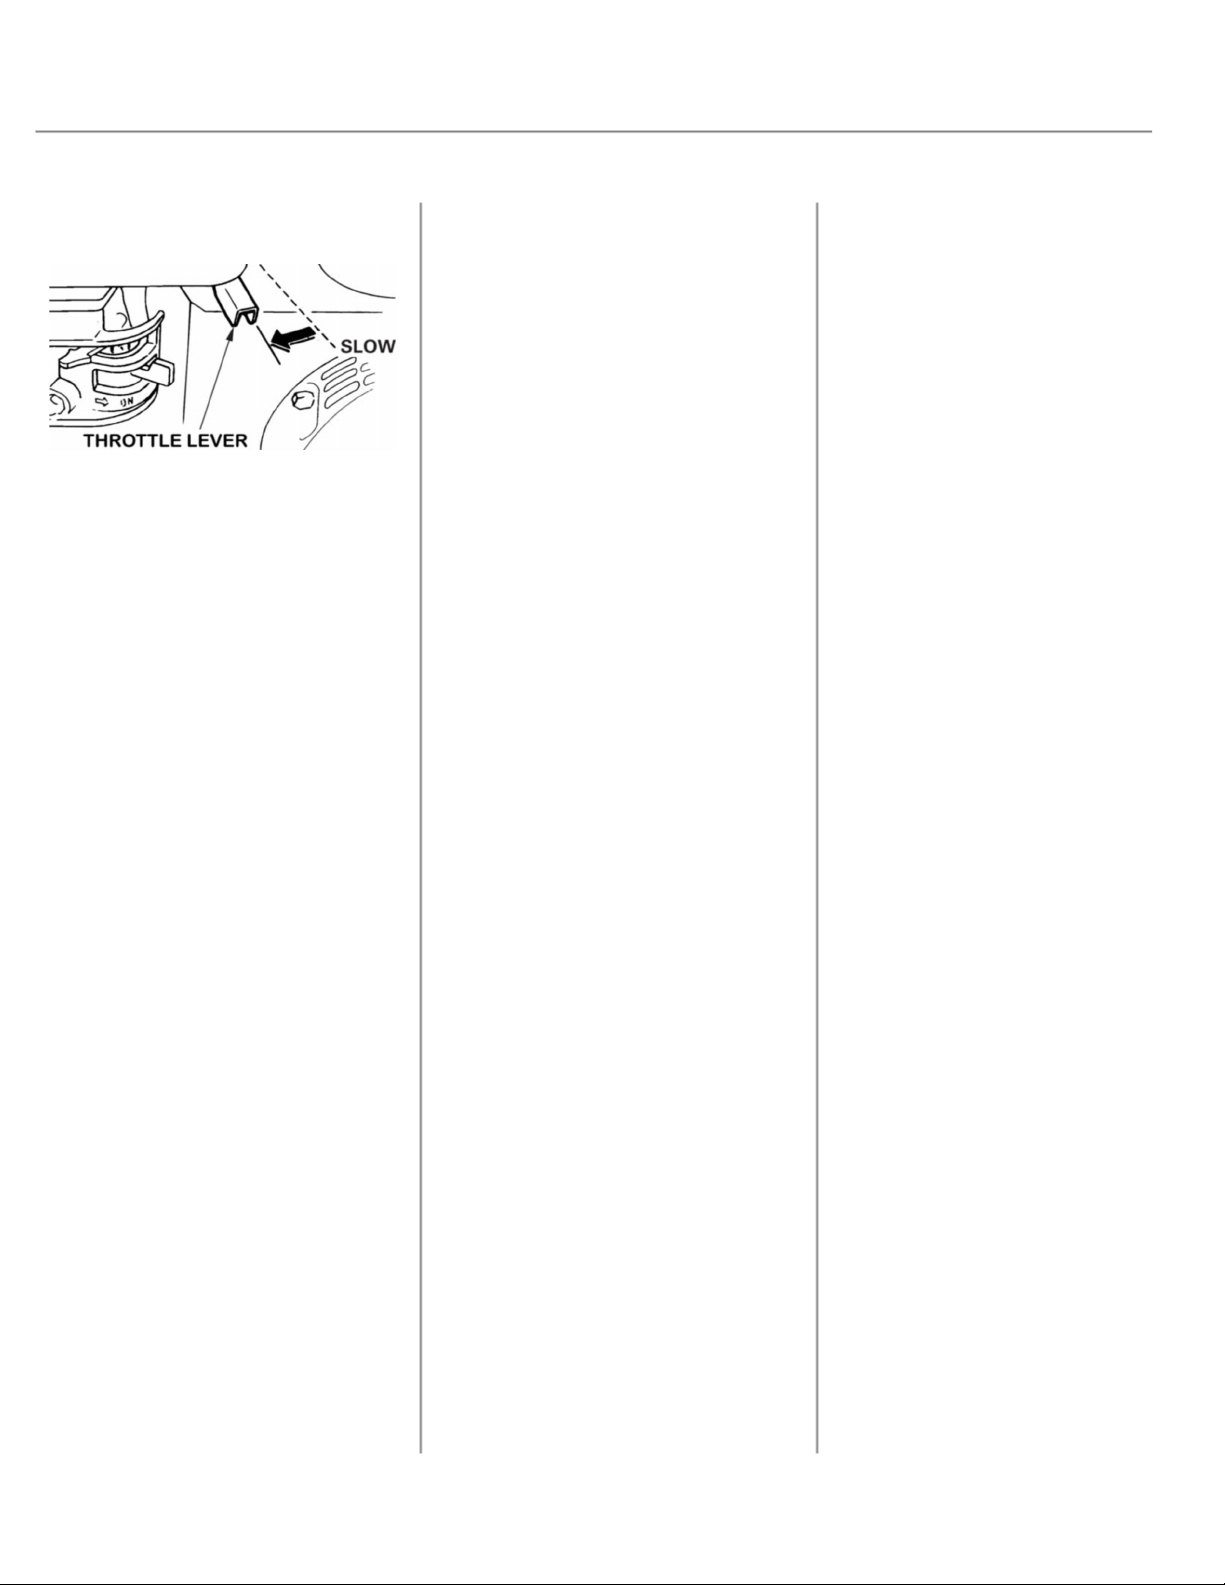
4) Move the throttle lever away
from the SLOW position, about
1/3 of the way towards the
FAST position.
5) Turn the engine switch to the
ON position.
6) Pull the recoil starter grip
lightly until resistance is felt,
then pull the grip briskly. Return
the starter grip gently.
7) If the choke lever has been
moved the closed position to
start the engine, gradually move
it to the open position as the
engine warms up.
Setting Engine Speed
Position the throttle lever for the
desired speed. Moving the
throttle lever to the left or right
will make the engine run faster
or slower.
After starting the engine, move
the throttle lever to the FAST
position and check the pump
output.
The pump output is controlled
by adjusting the engine speed.
Moving the throttle lever in the
FAST direction will increase
pump output and moving the
throttle lever in the SLOW
direction will decrease the pump
output.
Stopping the Engine
1) Move the throttle lever to the
SLOW position.
2) Turn the engine switch to the
OFF position.
3) Turn the fuel valve lever to the
OFF position.
When the pump is not in use,
leave the fuel valve lever in the
OFF position to prevent the
carburetor from flooding and to
reduce the chance of fuel
leakage.
After use, remove the drain plug
and drain the pump chamber.
Remove the filler camp and flush
the pump chamber then reinstall
the filler camp and drain plug.
MAINTENANCE
The maintenance schedule
applies to normal operating
conditions. If you operate your
pump in unusual conditions, such
as with a sustained high load or
high temperature operation, or
use in an un usually wet or dusty
conditions, the service period
may need to be shorter.
Before Performing Maintenance
Ensure the engine and exhaust
systems are completely cool
before touching.
Use non-flammable solvents
when cleaning parts.
Keep all sparks, flames and
cigarettes away from any fuel
related parts.
Each Use:
-Check engine oil level
-Check air filter
First month (or 20 hours):
-Change engine oil
Every 3 months (or 50 hours):
-Clean air filter
Every 6 months (or 100 hours):
-Change engine oil
-Clean air filter
-Clean sediment cup
-Check/adjust spark plug
Every year (or 300 hours):
-Replace air filter
REFUELING
WARNING: Gasoline is highly
flammable and explosive. Stop
the engine and keep heat, flame
and sparks away. Handle fuel
only outdoors. Wipe up spills
immediately.
With the engine stopped and on a
level surface, remove the tank
cap and check the fuel tank. Refill
the tank if the level is low. Do not
fill the tank completely. Fill it to
approximately one inch below the
top of the fuel tank. Ensure the
tank cap is tightened securely.
Refuel the pump in a wellventilated area before starting the
engine. If it has been running,
allow it to cool. Refuel carefully to
avoid spilling the fuel.
Page 5
Use unleaded gasoline with a
rating of 86 or higher. The
engine is certified to run on
unleaded gasoline.
Never use a stale,
contaminated or an oil/gasoline
mixture. Do not allow dirt or
water to enter the fuel tank.
Occasionally a light ‘knocking’
or ‘pinging’ may occur while
operating under heavy loads. If
the knocking or pinging
continues at a steady engine
speed and under normal load,
change brands or use a higher
octane gasoline. If it continues,
see an authorized mechanic.
NOTE: Running an engine with
persistent knocking and pinging
can cause damage to the
engine and is considered
misuse. The warranty does not
cover parts damaged by
misuse.
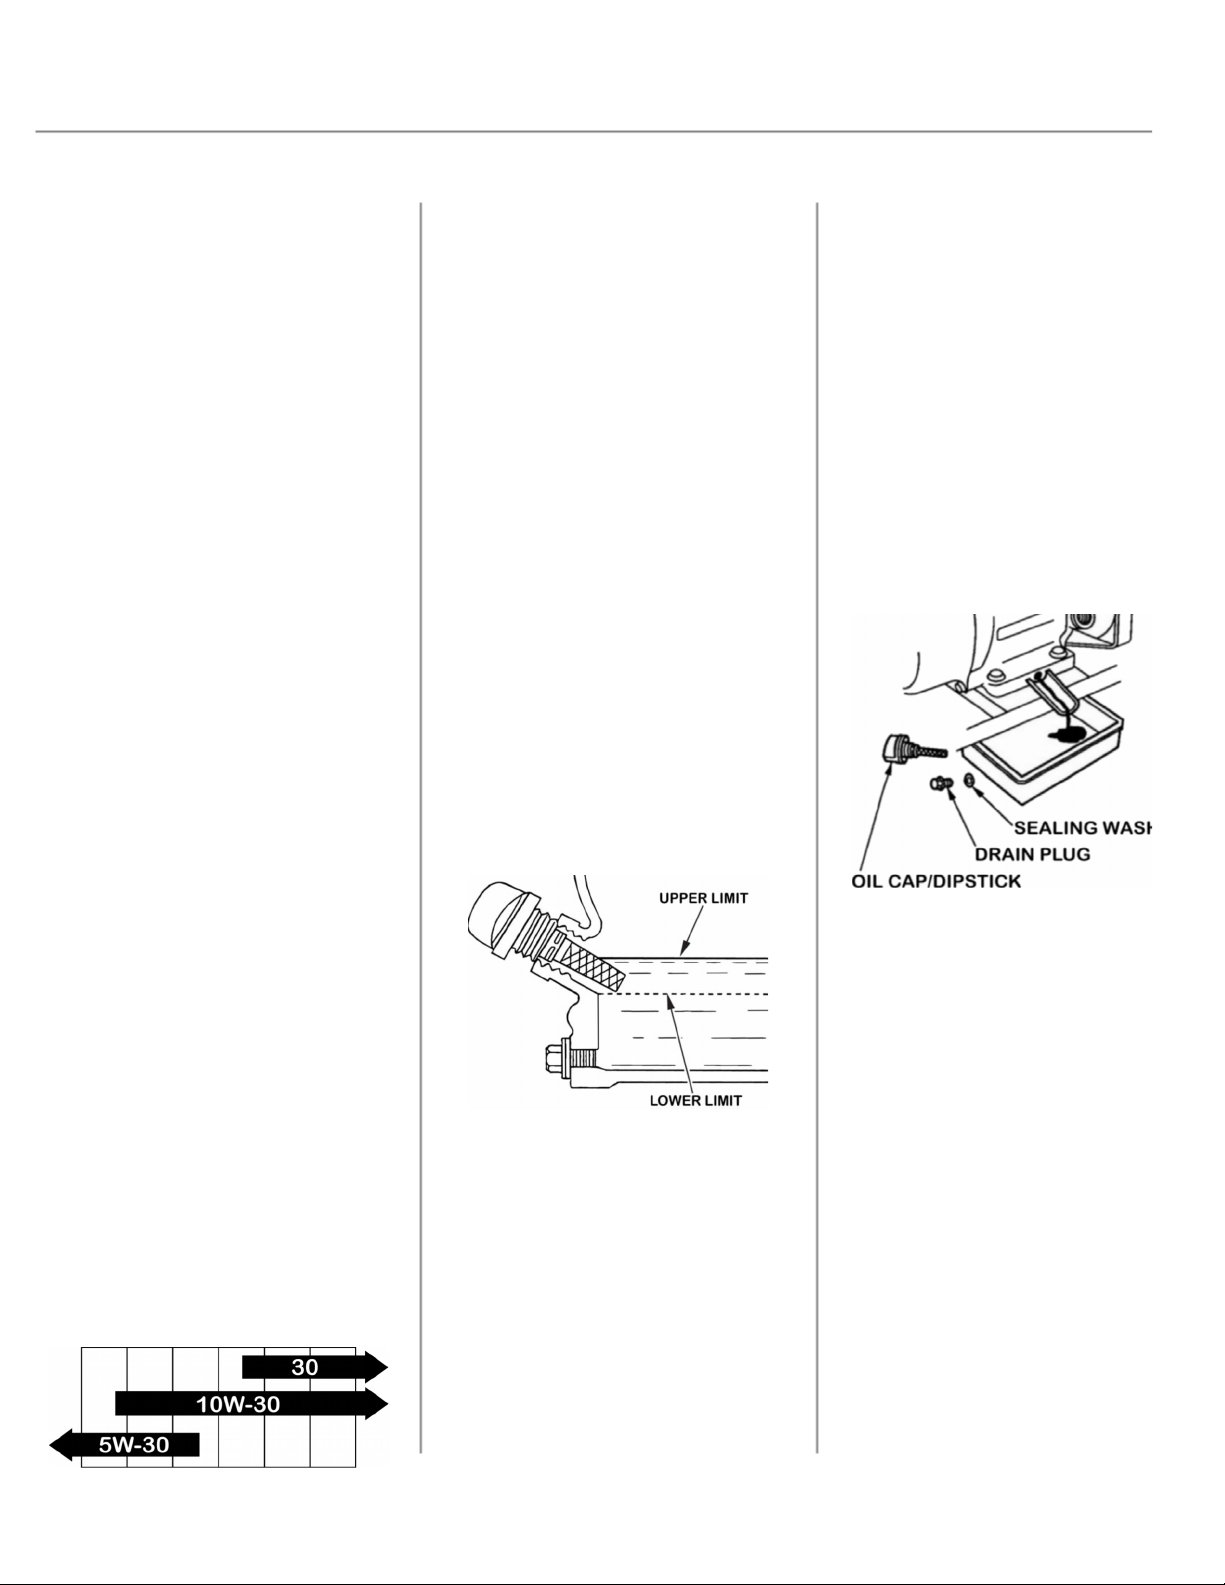
OIL
RECOMMENDATIONS
Use a 4-stroke automotive
detergent oil. SAE !0W-30 is
recommended. Other viscosities
shown in the chart may be used
when the average temperature
in the operating area is within
the recommended range.
OIL LEVEL CHECK
Check the engine oil level when
the engine is stopped, cooled
completely and on a level
surface.
1) Remove the filler cap/dipstick
and wipe it clean.
2) Insert and remove the dipstick
without screwing it into the filler
neck. Check the oil level shown
on the dipstick.
3) If the level is low, fill to the
edge of the filler hole with the
recommended oil.
4) Screw in the filler cap/dipstick
securely.
Running an engine with a low oil
level can cause engine damage.
OIL CHANGE
Drain the oil while the engine is
warm because it will drain quickly
and completely.
1) Place a suitable container
below the engine to catch the
used oil. Remove the filer
cap/dipstick, drain plug and
washer.
2) Allow the used oil to drain
completely and then reinstall the
drain plug, washer and tighten the
drain plug securely.
4) With the engine in a level
position, fill it to the outer edge of
the oil filler hole with the proper
oil.
NOTE: Please dispose of used
motor oil in a proper manner. Do
not throw it in the trash, pour it on
the ground or down a drain. Take
it in a sealed container to a
recycling center or service station.
AIR FILTER INSPECTION AND
SERVICE
1) Remove the wing nut and air
cleaner cover.
2) Remove the plastic grid from
the bottom of the cover.
3) Carefully remove the foam air
filter from the cover. Wash the
filter in warm, soapy water, rinse
and allow it to dry thoroughly.
4) Wipe dirt from the inside of the
air cleaner base and cover using
a moist rag. Be careful dirt does
not enter the air duct that leads to
the carburetor.
Page 6
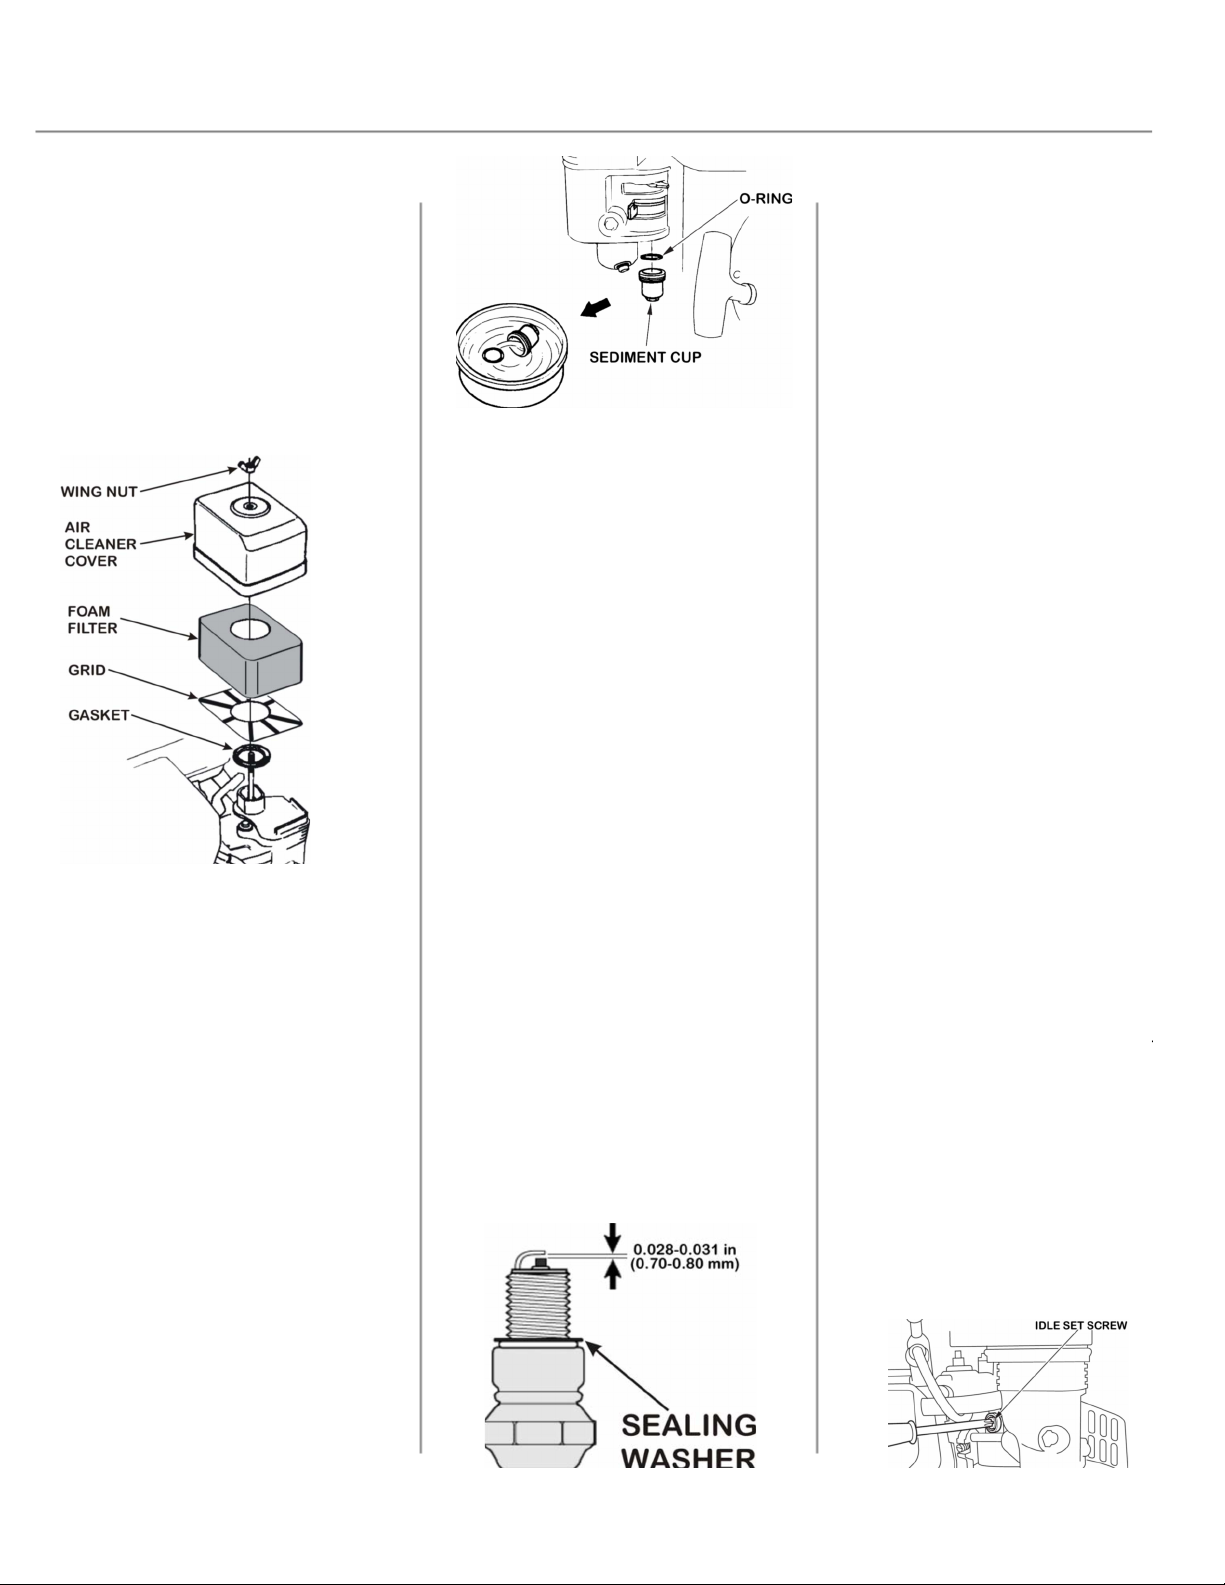
5) Insert the cleaned and dry or
new foam air filter in the cover
and
replace the plastic grid.
6) Reinstall the air cleaner
assembly. Ensure the gasket is
in place beneath the filter.
7) Tighten the air filter wing nut
securely.
SEDIMENT CUP
CLEANING
1) Ensure the fuel valve is in the
OFF position and then remove
the fuel sediment cup and Oring.
2) Wash the cup and O-ring in a
non flammable solvent and dry
them thoroughly.
3) Place the O-ring in the fuel
valve and install the sediment
cup. Tighten the sediment cup
securely.
4) Move the fuel valve to the
ON position and check for
leaks. Replace the O-ring if
SPARK PLUG SERVICE
Recommended spark plugs:
BPR6ES (NGK)
W20EPR-U (DENSO)
NOTE: An incorrect spark plug
can cause engine damage
1) Disconnect the spark plug cap
and remove any dirt from around
the spark plug area.
2) Remove the spark plug with a
13/16 inch spark plug wrench.
3) Inspect the spark plug.
Replace it if the electrodes are
worn or if the insulator is chipped
or cracked.
4) Measure the electrode gap
with a suitable gauge. The gap
should be 0.028-0.031 inches.
Correct the gap if necessary by
bending the electrode carefully.
5) Install the spark plug carefully
by hand to avoid cross threading.
6) After the plug is seated, tighten
with a 13/16 inch spark plug
wrench to compress the sealing
washer.
If reinstalling a spark plug, tighten
1/8-1/4 turn after the plug is
seated.
If installing a new plug, tighten 1/2
turn after the spark plug is seated.
7) Attach the spark plug cap.
NOTE: A loose spark plug can
overheat and damage the engine.
An over-tightened plug can
damage the threads in the
cylinder head.
IDLE SPEED ADJUSTMENT
1) Start the engine outdoors and
allow it to warm up to operating
temperature.
NOTE: Dry operation will damage
the pump seal. Ensure the pump
chamber is filled with water before
starting the engine.
2) Move the throttle lever to its
slowest position.
3) Turn the throttle top screw to
obtain the standard idle speed of
1,400 RPMs.
Page 7
STORING THE PUMP
CLEANING
1) If the engine has been
running, allow it to cool for at
least one half hour before
cleaning. Water contacting a hot
engine can cause damage.
2) Wash the engine and pump
by hand. Ensure water does not
enter the air cleaner or muffler
opening. Keep water away from
the controls and all other places
that are difficult to dry.
Do not use a garden hose or
pressure washing equipment to
clean the pump. Water can be
forced into the air cleaner or
muffler opening and cause
damage.
3) Wipe dry all accessible
surfaces.
4) Fill the pump chamber with
clean, fresh water. Start the
engine outdoors and let it run
until it reaches normal operating
temperature to evaporate any
external water.
NOTE: Dry operation will
damage the pump seal. Ensure
the pump chamber is filled with
water before starting the
engine.
5) Stop the engine and allow it
to cool.
6) Remove the pump drain plug
and flush the pump with clean,
fresh water. Allow the
water to drain from the pump
chamber and then reinstall the
drain plug.
FUEL
Gasoline oxidizes and
deteriorates in storage. It will
cause hard starting and leaves a
gum deposit that will clog the fuel
system. If the gasoline in your
engine deteriorates during
storage, you may need to have
the carburetor and other fuel
system components serviced or
replaced.
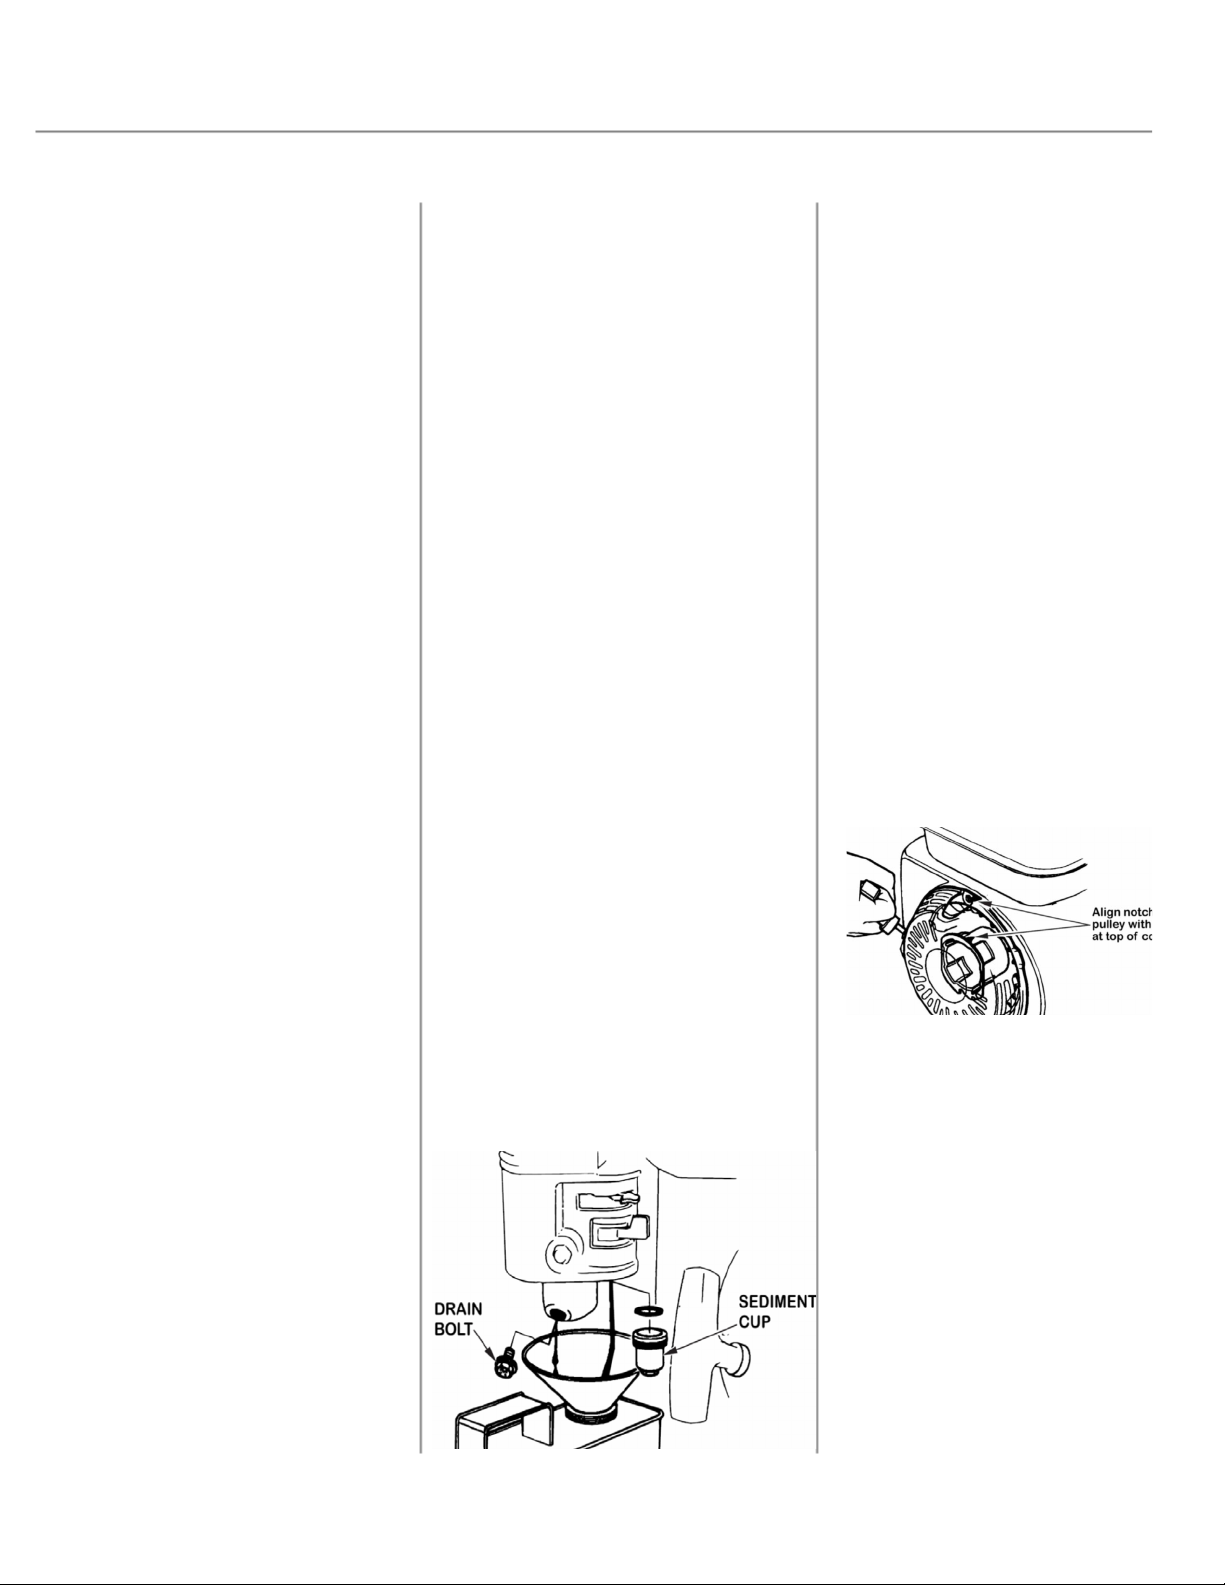
DRAINING THE FUEL TANK
AND CARBURETOR
1) Place an approved gasoline
container below the carburetor
and use a funnel to avoid spilling
fuel.
2) Remove the carburetor drain
bolt and sediment cup and then
move the fuel valve lever to the
ON position.
3) After all of the fuel has
drained, reinstall the drain bolt
and sediment cup and tighten
securely.
ENGINE OIL
1) Change the engine oil.
2) Remove the spark plug.
3) Pour a tablespoon of clean
engine oil into the cylinder.
4) Pull the starter rope several
times to distribute the oil in the
cylinder.
5) Reinstall the spark plug.
6) Pull the starter rope slowly
until resistance is felt and the
notch on the starter pulley aligns
with the hole at the top of the
recoil starter cover. This will
close the valves so moisture
cannot enter the engine cylinder.
Return the starter rope gently.
REMOVAL FROM
STORAGE
Check the pump as described in
the Before Operation portion of
this manual.
Fill the tank with fresh gasoline.
If the cylinder was coated with oil
during storage preparation, the
engine may smoke briefly at
startup. This is a normal
occurrence.
Page 8

North American Tool (NAT) Industries makes every effort to ensure that this product meets high
quality and durability standards. NAT warrants to the original retail consumer a 1-year limited warranty
from the date the product was purchased at retail and each product is free from defects in materials.
Warranty does not apply to defects due directly or indirectly to misuse, abuse, negligence or
accidents, repairs or alterations, or a lack of maintenance. NAT shall in no event be liable for death,
injuries to persons or property, or for incidental, special or consequential damages arising from the
use of our products. To receive service under warranty, the original manufacturer part must be
returned for examination by an authorized service center. Shipping and handling charges may apply. If
a defect is found, NAT will either repair or replace the product at its discretion.
DO NOT RETURN TO STORE
For Customer Service:
Email: [email protected] or Call 1-800-348-5004
Page 9
6.5 HP WATER PUMP
Model: 6795
 Loading...