

NORTH AMERICAN DRÄGER Drager Evita XL Intensive Care User manual

Evita
XL
Intensive Care Ventilator
Software 6.n
Instructions for Use
Emergency Care · OR/Anesthesia · Critical Care · Perinatal Care · Home Care
Because you care

Working with these Instructions for Use
Header line – the title...
of the main chapter.
The title of the specific sub-section is printed underneath the
main header – to help you find your way quickly from subject to
subject.
Page body...
the Instructions for Use
in combined text/illustrations. The information is expressed in
the form of practical actions, giving the user direct hands-on
experience in learning how to use the machine.
Left-hand column – the text...
provides explanations and instructs the user step-by-step in the
practical use of the product, with short, clear instructions in
easy-to-follow sequence.
Bullet points indicate separate actions. Where several actions
are described, numbers are used both to refer to the relevant
details in the illustrations and to specify the sequence of
actions.
Right-hand column – the illustrations...
provide the visual reference for the text and make it easier to
locate the various parts of the equipment. Elements mentioned
in the text are highlighted. Unnecessary details are avoided.
Screen displays prompt the user to proceed and confirm correct actions.
1
3
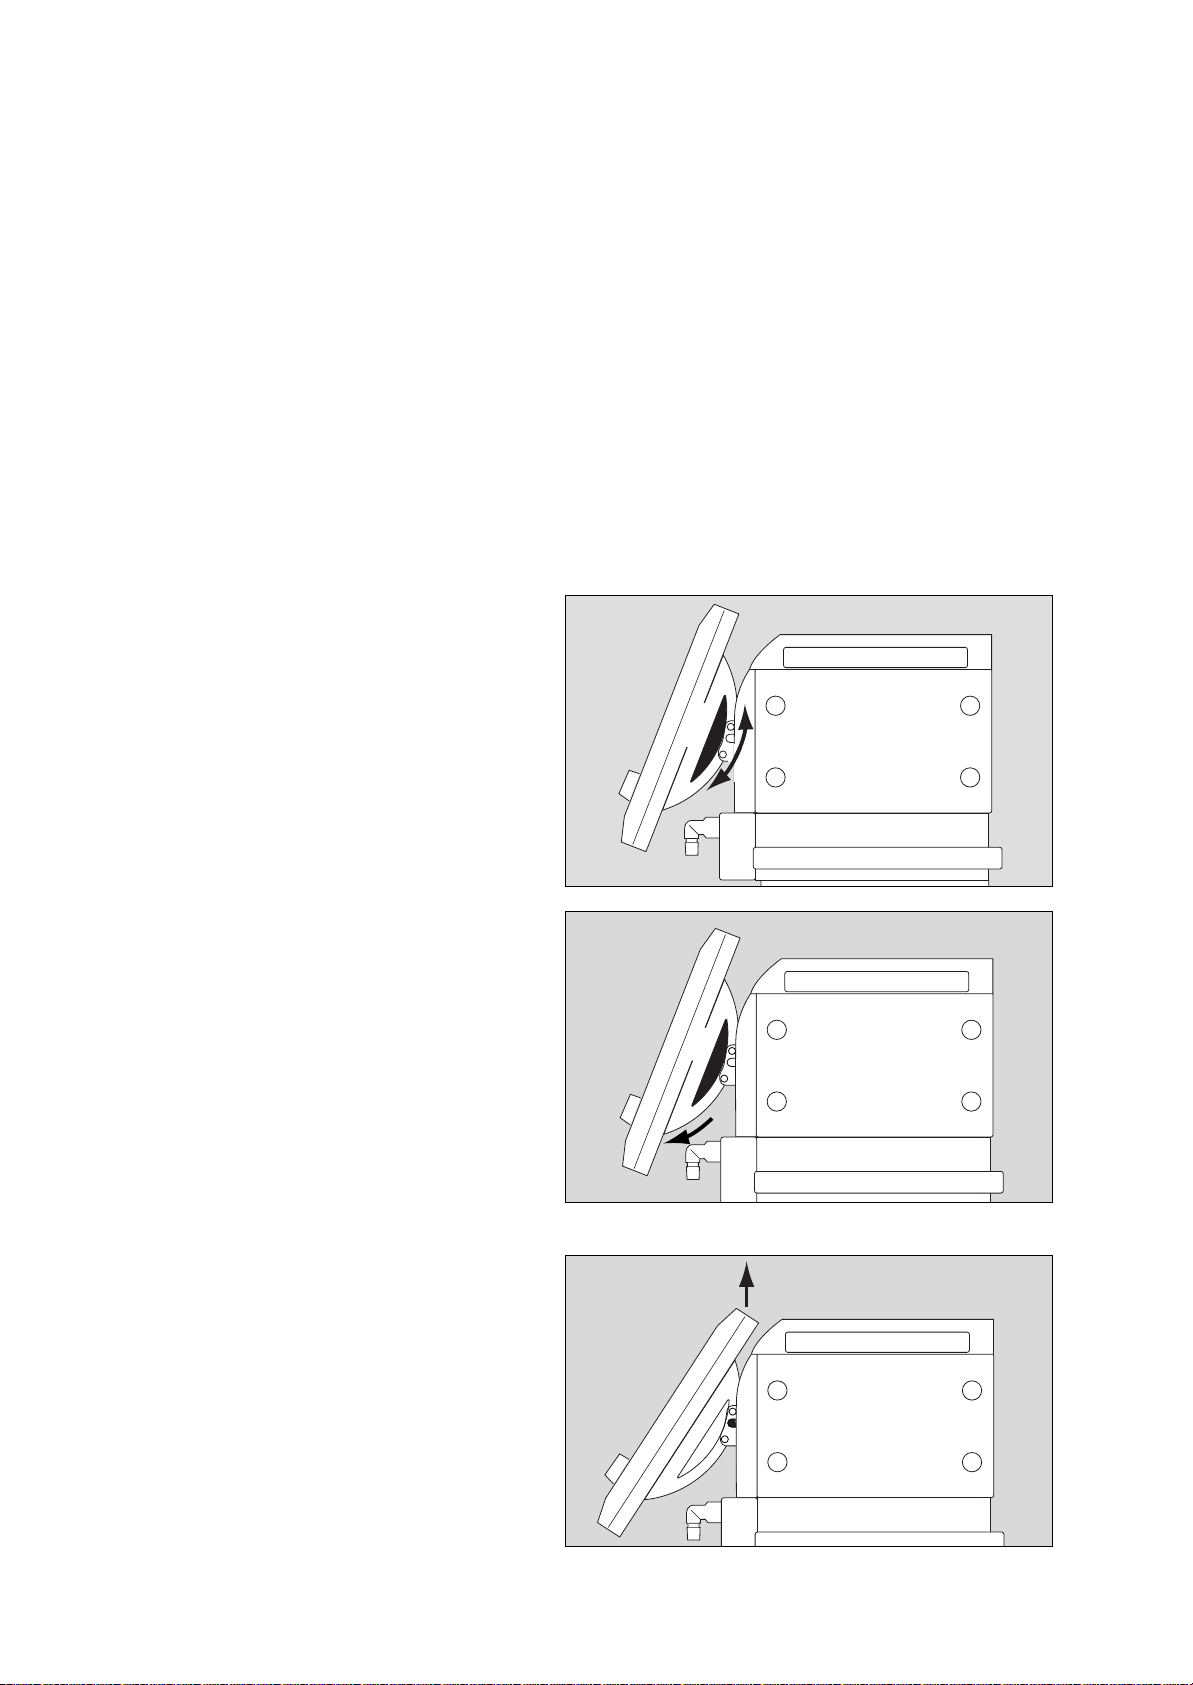
Preparing for use
Positioning the control unit
Preparing for use
●
Always use properly prepared parts, see "Preparing",
page 155.
●
Hospital infection control regulations must be observed.
Positioning the control unit
●
The control unit must not be stood up or leant against anything, nor may it be laid face downwards! It must always be
laid on its back when changing over.
Positioning on the unit
●
Hook the control unit into the mount on Evita
engages.
To adjust the position:
Press and hold the segments on the right and left, at the
same time tilting the control unit into the required position.
Positioning on the wall rail
Press and hold the segments on the right and left, tilting the
2
control unit down completely at the same time.
Press and hold the unlocking buttons on the right and left,
lifting the control unit out of the mount on Evita
same time.
●
Unwind the required length of cable.
●
Hook the control unit into the wall rail and
22
XL
until it
1
170
2
091
XL
at the
3
092
Instructions for Use Evita
XL
208
These Instructions for Use also apply to Evita
XL
Evita 4 and Evita 2 dura with the EvitaXL option.
as well as
2
Instructions for Use Evita
XL

Contents
Contents
For Your Safety and that of Your Patients
Intended Medical Application
Operating concept
Preparing for use
Operation
Configuration
Fault — Cause — Remedy
Preparing
5
7
11
21
43
125
143
155
Maintenance/Disposal
Mains power/DC power operation
Evita 4 Link
(optional) 177
What's what
Technical Data
Description
Index
165
169
183
187
207
247
Instructions for Use Evita
XL
3

4
Instructions for Use Evita
XL

For Your Safety and that of Your Patients
Safe use of the equipment
For Your Safety and that of Your
Patients
Strictly follow the Instructions for Use
Any use of the apparatus requires full understanding and strict
observation of these instructions. The apparatus is only to be
used for purposes specified here.
Maintenance
The apparatus must be inspected and serviced regularly
by trained service personnel at six monthly intervals.
Repair and general overhaul of the apparatus may only
be carried out by trained service personnel.
We recommend that a service contract be obtained with
DrägerService and that all repairs also be carried out by them.
Only authentic Dräger spare parts may be used for
maintenance.
Observe chapter "Maintenance Intervals".
Accessories
Do not use accessory parts other than those in the order list.
Even reusable accessories (e.g. after being prepared) have a
limited service life. Wear may be increased and the service life
reduced considerably by various factors when handling and
preparing them (e.g. disinfectant residues corroding the
material when autoclaving them). These parts must be
replaced if signs of wear become visible, such as cracks,
deformation, discoloration, peeling, etc.
Not for use in areas of explosion hazard
This apparatus is neither approved nor certified for use in
areas where combustible or explosive gas mixtures are likely
to occur.
Safe use of the equipment
This equipment must only be used under the supervision
of qualified medical staff, so that help is available
immediately if malfunctions occur.
This equipment must not be used with flammable gases
or anaesthetic agents. Danger of fire!
The equipment must not be used for nuclear resonance
tomography (MRT, NMR, NMI)!
This may impair correct functioning of the equipment and
endanger the patient.
The equipment must not be used in hyperbaric chambers!
This may impair correct functioning of the equipment and
endanger the patient.
Correct functioning of the equipment may be impaired
by operation of high-frequency electrosurgery units,
defibrillators or short-wave therapy equipment and
endanger the patient.
To ensure that EvitaXL cannot topple over, EvitaXL must
not be tilted more than 5o!
The following must be observed during transportation of
the ventilated patient.
EvitaXL must not be placed on the bed while transfer-
●
ring a patient.
EvitaXL must be secured so that it cannot topple over/
●
fall down.
Secure the accessories, see page 41.
●
Safe connection with other electrical equipment
Electrical connections to equipment which is not listed in
these Instructions for Use should only be made following
consultations with the respective manufacturers or an expert.
Liability for proper function or damage
The liability for the proper function of the apparatus is
irrevocably transferred to the owner or operator to the extent
that the apparatus is serviced or repaired by personnel not
employed or authorized by DrägerService or if the apparatus
is used in a manner not conforming to its intended use.
Dräger cannot be held responsible for damage caused by
non-compliance with the recommendations given above.
The warranty and liability provisions of the terms of sale
and delivery of Dräger are likewise not modified by the
recommendations given above.
Dräger Medical AG & Co. KGaA
Instructions for Use Evita
XL
When using EvitaXL in combination with other products
and during patient transfers, the equipment's owner must
ensure that it is adequately secured in accordance with
the relevant fundamental requirements of Directive
93/42/EEC.
Medicaments and other substances based on
inflammable solvents, such as alcohol, must not be used
in the patient system. Danger of fire!
Adequate ventilation must be ensured when using inflammable substances for disinfection.
5

For Your Safety and that of Your Patients
Safe use of the equipment
Do not use mobile telephones within 10 metres of
ventilators!
Mobile telephones may impair the functionality of electromedical equipment and endanger the patient*.
General information on electromagnetic compatibility
(EMC) according to the international EMC standard
IEC 60601-1-2: 2001
Medical electrical equipment needs special precautions
regarding electromagnetic compatibility (EMC) and needs to
be installed and put into service according to the EMC information provided in the technical documentation available
from DrägerService upon request.
Portable and mobile RF communications equipment can
affect medical electrical equipment.
Pins of connectors identified with the ESD warning symbol shall not be touched and not be connected unless ESD precautionary procedures are
used. Such precautionary procedures may
include antistatic clothing and shoes, the touch of a ground
stud before and during connecting the pins or the use of
electrically isolating and antistatic gloves. All staff involved in
the above shall receive instruction in these procedures.
Adequate ventilation monitoring
The following parameters are monitored by the built-in monitoring facilities of EvitaXL:
— Airway pressure P
AW
— Expiratory minute volume MV
— Inspiratory tidal volume, V
— Inspiratory O2 concentration FiO
Ti
2
— Inspiratory breathing gas temperature T
— Expiratory CO
2
concentration, etCO2 (optional)
— Apnoea time
— Tachypnoea
Changes in these parameters may be caused by:
— Acute changes in the patient's condition
— Incorrect settings and faulty handling
— Equipment malfunctions
— Failure of power and gas supplies
If a fault occurs in this equipment, separate measuring instru-
ments should be used.
During the O
2
Therapy, the monitoring functions of EvitaXL are
restricted. Monitoring of SpO2 and the pulse is only available
with the appropriate option.
*Dräger medical equipment meets the requirements for immunity to
interference in accordance with the specific product standards and
EN 60601-1-2 (IEC 60601-1-2).
Depending on the type of mobile telephone used and on the application situation, however, field strengths exceeding the values
specified in the applicable standards may develop in the immediate
vicinity of the mobile telephone and therefore lead to faults and malfunctions.
Back-up ventilation with an independent manual
ventilation device
If a fault is detected in EvitaXL so that its life-support functions
are no longer assured, ventilation using an independent ventilation device must be started without delay – if necessary with
PEEP and/or an increased inspiratory O2 concentration
(e.g. with the Resutator MR 100).
6
Instructions for Use Evita
XL

Intended Medical Application
Intended Medical Application
. . . . . . . . . . . . . . . . . . . . . . . . . . . . . . . . . . . . . . . . . . . . 8
Instructions for Use Evita
XL
7

Intended Medical Application
Intended Medical Application
EvitaXL – long-term ventilator for intensive care.
For adults, children and neonates.
For premature babies with the "NeoFlow" option.
With the following ventilation modes
IPPV (I
ntermittent Positive Pressure Ventilation)
Volume-controlled ventilation with fixed mandatory minute volume.
With the options:
— CPPV (
— PLV (
— AutoFlow
— IRV (
SIMV (S
Combines mechanical (volume-controlled) ventilation with
spontaneous breathing.
With the options:
— PLV (
— AutoFlow
C
ontinuous Positive Pressure Ventilation)
Controlled ventilation with continuous positive airway pressure
P
ressure Limited Ventilation)
Pressure limited constant-volume ventilation
®
for automatic regulation of "Insp. Flow" and "P
I
nversed Ratio Ventilation)
insp
"
Ventilation with inversed inspiration/expiration ratio.
ynchronized Intermittent Mandatory Ventilation)
P
ressure Limited Ventilation)
Pressure limited constant-volume ventilation
®
for automatic regulation of "Insp. Flow" and "P
insp
".
BIPAP* (Biphasic Positive Airway Pressure)
Pressure-controlled ventilation combined with free spontane-
ous breathing during the complete breathing cycle, and adjustable pressure increase to CPAP level.
BIPAP
Assist (Biphasic Positive Airway Pressure Assisted)
Pressure-controlled assisted ventilation.
APRV (Airway Pressure Release Ventilation)
Spontaneous breathing on two pressure levels with long time
ranges – independently adjustable.
PPS – Proportional Pressure Support (optional)
For differentiated proportional support of spontaneous breathing with pathological compliance and/or resistance.
ILV
Independent Lung Ventilation,
Separate, differentiated, synchronised ventilation with two
Evita units, independently ventilating each lung.
MMV (M
andatory Minute Volume Ventilation)
Spontaneous breathing with automatic adjustment of mandatory ventilation to the patient's minute volume requirement.
With the options:
— PLV (
P
ressure Limited Ventilation)
Pressure limited constant-volume ventilation
— AutoFlow
for automatic regulation of "Insp. Flow" and "P
SB (S
®
pontaneous Breathing)
insp
".
Spontaneous breathing at ambient pressure.
CPAP (Continuous Positive Airway Pressure)
Spontaneous breathing with positive airway pressure.
ASB (Assisted Spontaneous Breathing)
Pressure-assisted spontaneous breathing.
Supplements
Automatic Tube Compensation ATC (optional)
Can be used with all ventilation modes.
ATC Compensates for the resistance of the ETT or
Tracheal Tube.
Apnoea Ventilation
For switching over automatically to volume-controlled mandatory ventilation, if breathing stops.
If apnoea occurs, Evita
XL emits an alarm after the preset alarm
period (TApnoea >) and starts volume-controlled ventilation.
NIV mask ventilation (optional)
Non-invasive ventilation
For ventilation with a nasal or facial mask to support non-invasive ventilation of patients with spontaneous breathing.
Choice between mask ventilation and ordinary ventilation of
intubated patients.
*Licensed trademark
8
Instructions for Use Evita
XL

Intended Medical Application
Lung Protection Package (optional)
— QuickSet
Direct adjustment of setting,
— PressureLink
Linking of the PEEP/P
insp settings,
— Recruitment trends and
— Low Flow PV-Loop
Aid for performing Recruitment procedure and for the optimi-
sation of Ventilator settings.
Diagnostic functions
Intrinsic PEEP-measurement
For determining intrinsic PEEP and measuring trapped
volume.
Occlusion pressure measurement
For evaluating breathing drive during spontaneous breathing.
Negative Inspiratory Force NIF
For measuring the patient's maximum inspiratory effort following expiration.
DC power supply
Integrated DC power supply supplying EvitaXL with power
from two DC sources:
— Via two 12 V lead-gel batteries integrated in the DC power
supply,
and
— optionally via additional external 12 V or 24 V lead-gel
batteries.
For uninterrupted operation following failure of the mains
power supply, by automatically switching over to the external or
integrated battery.
For supplying power from the integrated batteries or additionally from external batteries during transport within the hospital.
Evita 4 Link (optional)
Interface card
For output of measured values, status messages and alarm
messages to on-line equipment for monitoring, documentation
or processing.
Monitoring:
Airway pressure P
AW
Expiratory minute volume MV
Inspiratory tidal volume V
Ti
Inspiratory O2 concentration FiO2
Inspiratory breathing gas temperature T
Apnoea time
Tachypnoea
Expiratory CO
2 concentration etCO2 (optional)
O
2 Therapy (optional)
Continuous flow application with adjustable O2 concentration
and adjustable flow for the O2 Therapy function for patients
with independent breathing and using oxygen masks.
SmartCare/PS (optional)
Knowledge-based system for automating clinical guidelines.
Automatic gas switch-over
In the event of a gas failure, the EvitaXL automatically switches
over to the remaining gas supply available.
Uses
On the intensive-care ward or in the recovery room.
While transferring ventilated patients within the hospital.
Instructions for Use EvitaXL 9

10 Instructions for Use EvitaXL

Operating concept
Operating concept . . . . . . . . . . . . . . . . . . . . . . . . . . . . . . . . . . . . . . . . . . . . . . . . . . . . 12
Control unit . . . . . . . . . . . . . . . . . . . . . . . . . . . . . . . . . . . . . . . . . . . . . . . . . . . . . . . . 12
The screen... . . . . . . . . . . . . . . . . . . . . . . . . . . . . . . . . . . . . . . . . . . . . . . . . . . . . . . . 13
Fixed function keys... . . . . . . . . . . . . . . . . . . . . . . . . . . . . . . . . . . . . . . . . . . . . . . . . 14
On-screen controls . . . . . . . . . . . . . . . . . . . . . . . . . . . . . . . . . . . . . . . . . . . . . . . . . . 14
Optional operating concept . . . . . . . . . . . . . . . . . . . . . . . . . . . . . . . . . . . . . . . . . . . . 18
QuickSet . . . . . . . . . . . . . . . . . . . . . . . . . . . . . . . . . . . . . . . . . . . . . . . . . . . . . . . . . . 18
PressureLink . . . . . . . . . . . . . . . . . . . . . . . . . . . . . . . . . . . . . . . . . . . . . . . . . . . . . . . 19
QuickSet + PressureLink . . . . . . . . . . . . . . . . . . . . . . . . . . . . . . . . . . . . . . . . . . . . 20
Instructions for Use EvitaXL 11
Operating concept
Control unit
Operating concept
Control unit
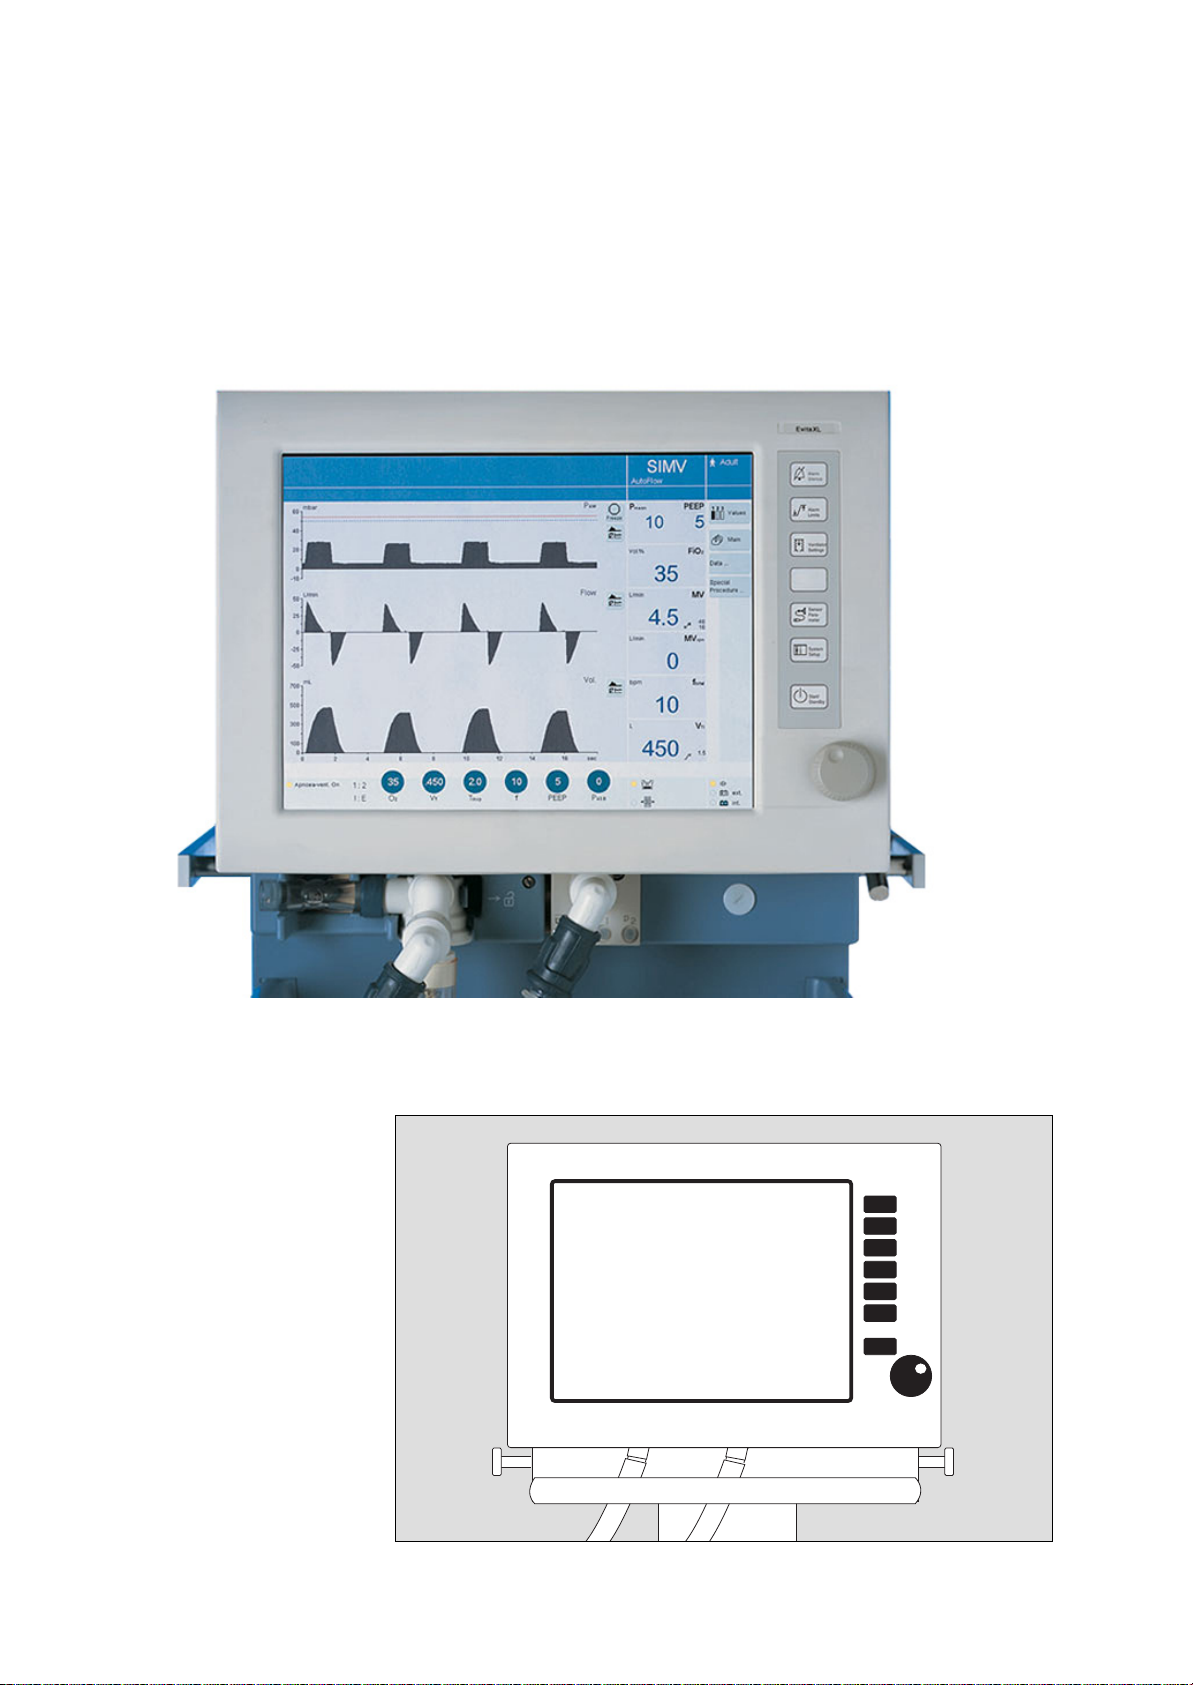
The control unit is characterised by the
small number of operating elements, its
Evita
clear layout and easy operation.
D
XL
Its main elements are:
1 Large screen with all the information
and controls needed for ventilation.
2 Fixed function keys beside the
1
2
screen – for rapid access to major
functions.
3 Central rotary knob for selecting and
confirming settings on the screen.
3
12 Instructions for Use EvitaXL
002
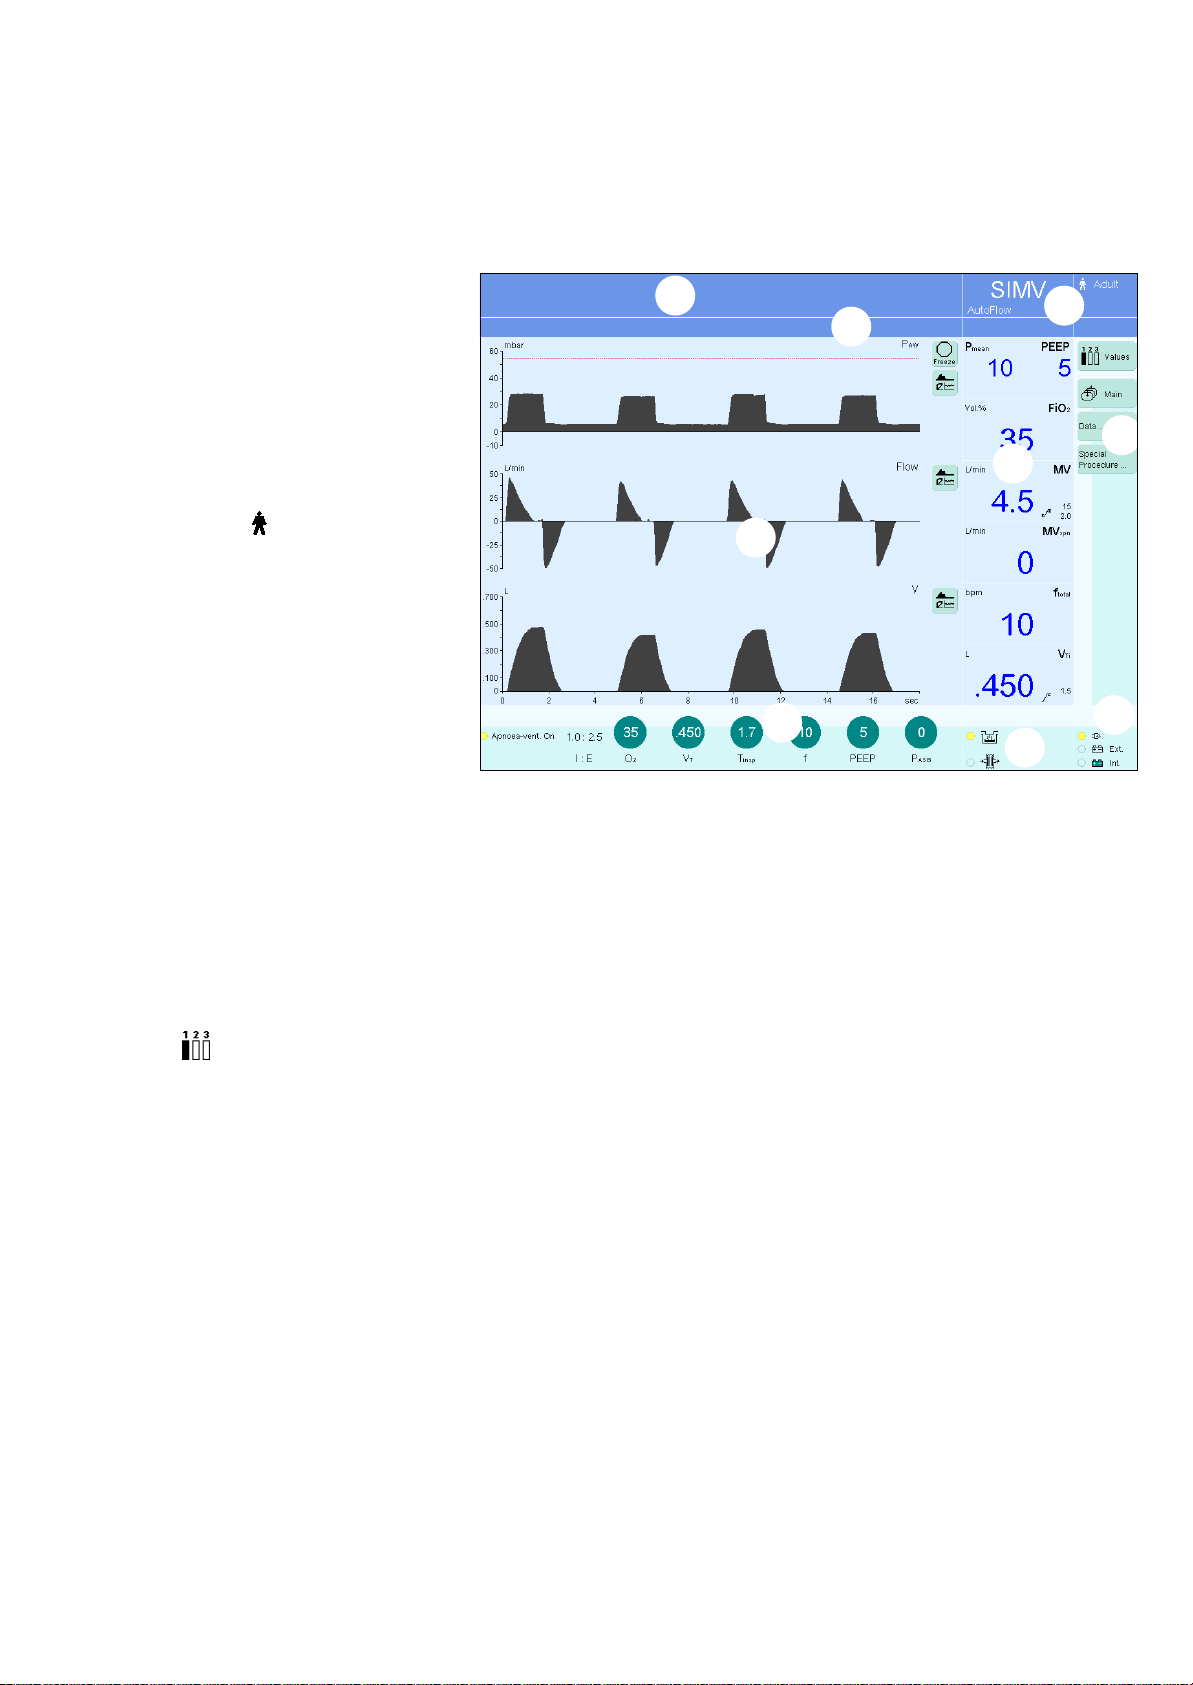
The screen...
Operating concept
The screen...
displays all the most important ventilation data at a glance.
The various screen pages have the same
layout with specific data always presented in the same place.
1 Alarm messages
2 Operator prompts
3 Therapy status with ventilation mode,
e.g. SIMV, ventilation mode supplements, e.g. AutoFlow
e.g. Adult for adults
4 Curves, loops and trends visualizing
the ventilation, e.g. the real-time
curves P
configured)
5 Presentation of ventilation parame-
ters for the active ventilation mode
and its supplements
6 Essential, measured ventilation val-
ues (can be configured)
7 Humidification type and status
8 Touch-sensitive screen keys for the
specific screen pages (can be
configured)
9 Power supply indication
AW (t), Flow (t), VT (t) (can be
®
, patient mode,
➀
➃
➄
➁
➅
➆
➂
➇
➈
096
To select a screen page:
● Touch the relevant screen key:
—»
? Main« to select the main
screen.
—» Values« to select a different
group of measured values in the field
for numerical values.
—»Data...« to display all measured val-
ues, the logbook or trends on an
additional card.
—»Special Procedure...« to select
additional functions, e.g. medicament
nebulisation and oxygenation for
bronchial suctioning.
Other screen keys can be configured
individually, see Configuration,
page 125.
Instructions for Use EvitaXL 13
Operating concept
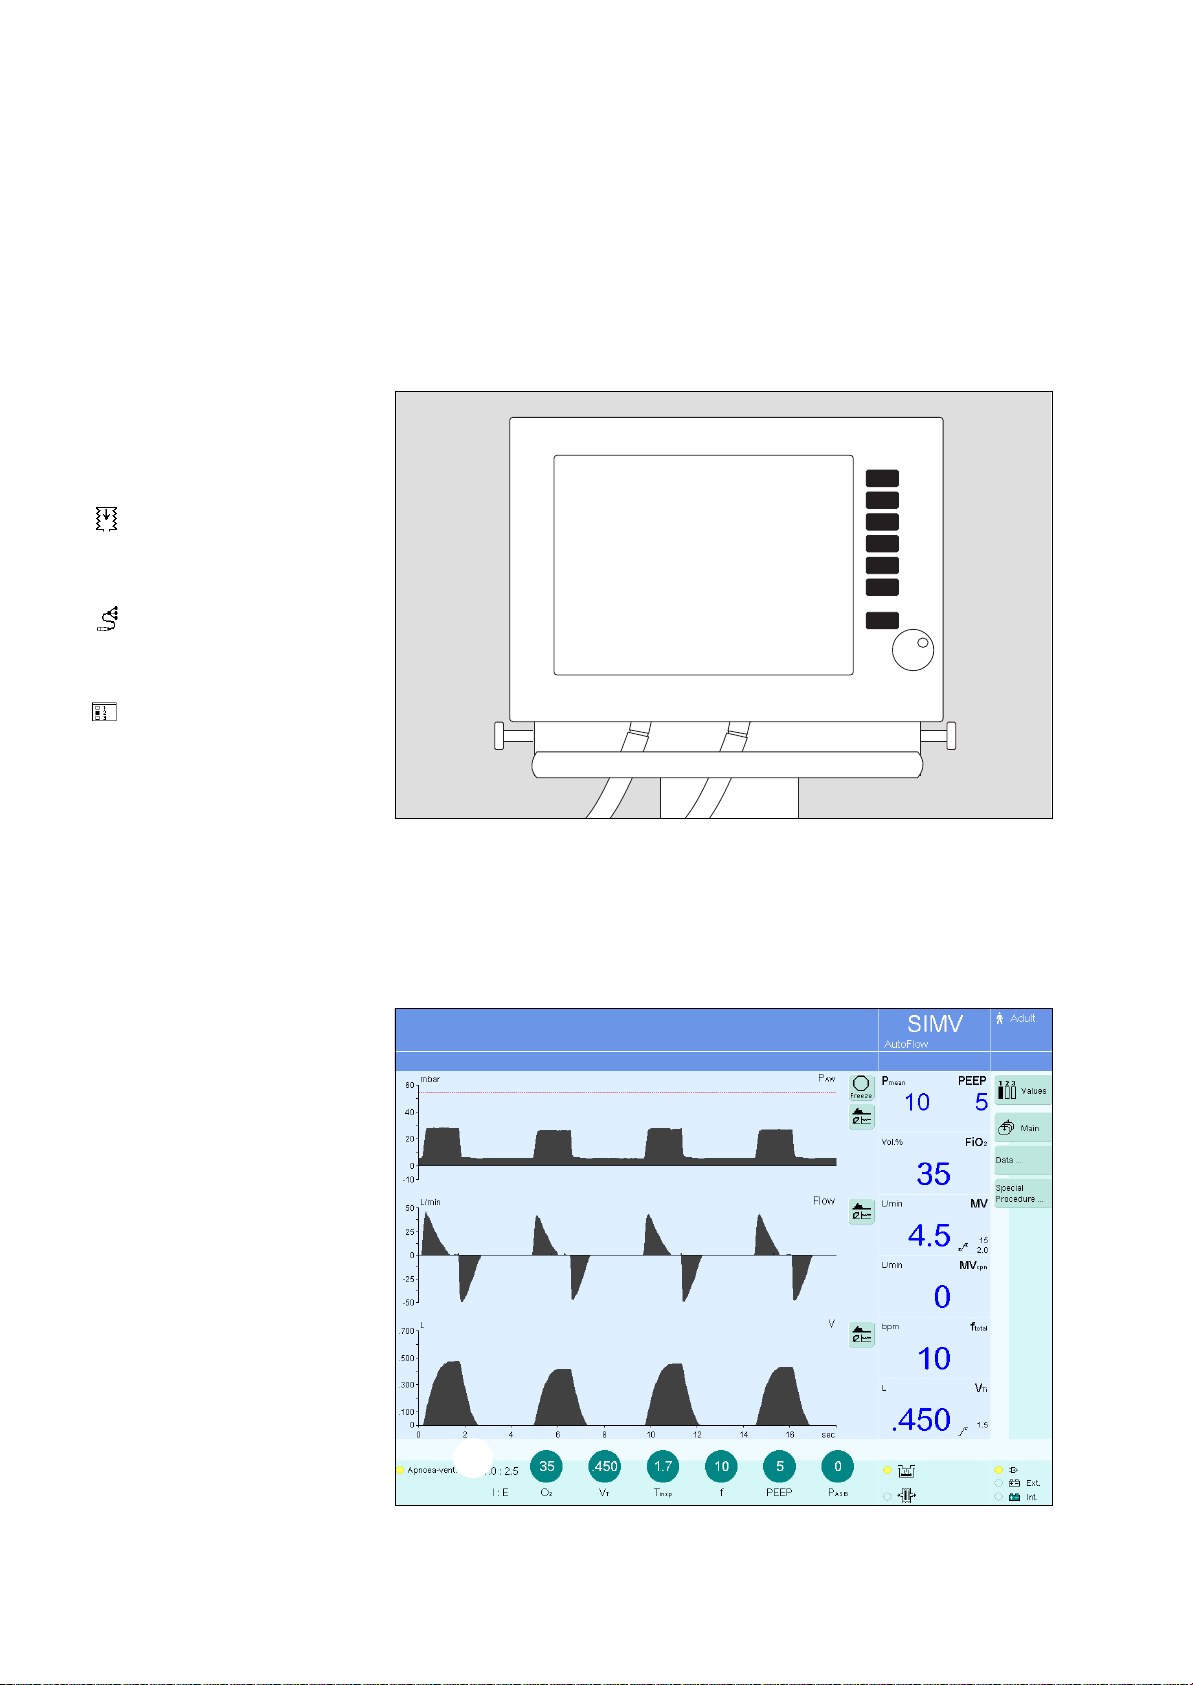
Fixed function keys...
On-screen controls
Fixed function keys...
are provided for rapid access to major
on-screen functions, such as selection
of the ventilation mode, setting the ventilation parameters or adjusting the alarm
limits:
1 »
g Alarm Silence« for suppressing
the acoustic alarm tone for two minutes.
2 »
_ Alarm Limits« for adjusting the
alarm limits.
3 » Ventilator Settings« for setting
the ventilation mode and ventilation
parameters.
4 Unassigned key for future functions
5 » Sensor Parameter« for calibrat-
ing the sensors and for activating/
deactivating the monitoring functions.
6 » System Setup« for configuring
system functions.
7 »
O Start/Standby« for selecting
standby mode or normal operation.
D
Evita
XL
1
2
3
4
5
6
7
030
On-screen controls
8 The ventilation parameters required
for the active ventilation mode are displayed by EvitaXL in a separate field
at the bottom of the main screen in
the form of virtual screen knobs with
the respective settings.
➇
096
14 Instructions for Use EvitaXL

To set the ventilation mode and ventilation parameters:
1 Press » Ventilator Settings«
or
● touch one of the virtual screen knobs
at the bottom of the screen.
D
Operating concept
On-screen controls
Evita
XL
1
Evita
XL displays the menu
»Ventilator Settings« in the bottom part
of the screen (example):
the screen knobs and screen keys are
displayed in the form of horizontal and
vertical tabs as on a file card.
— Horizontal screen keys for selecting
the ventilation mode.
— Vertical screen keys for selecting
additional settings.
001
097
Instructions for Use EvitaXL 15
Operating concept
067
On-screen controls
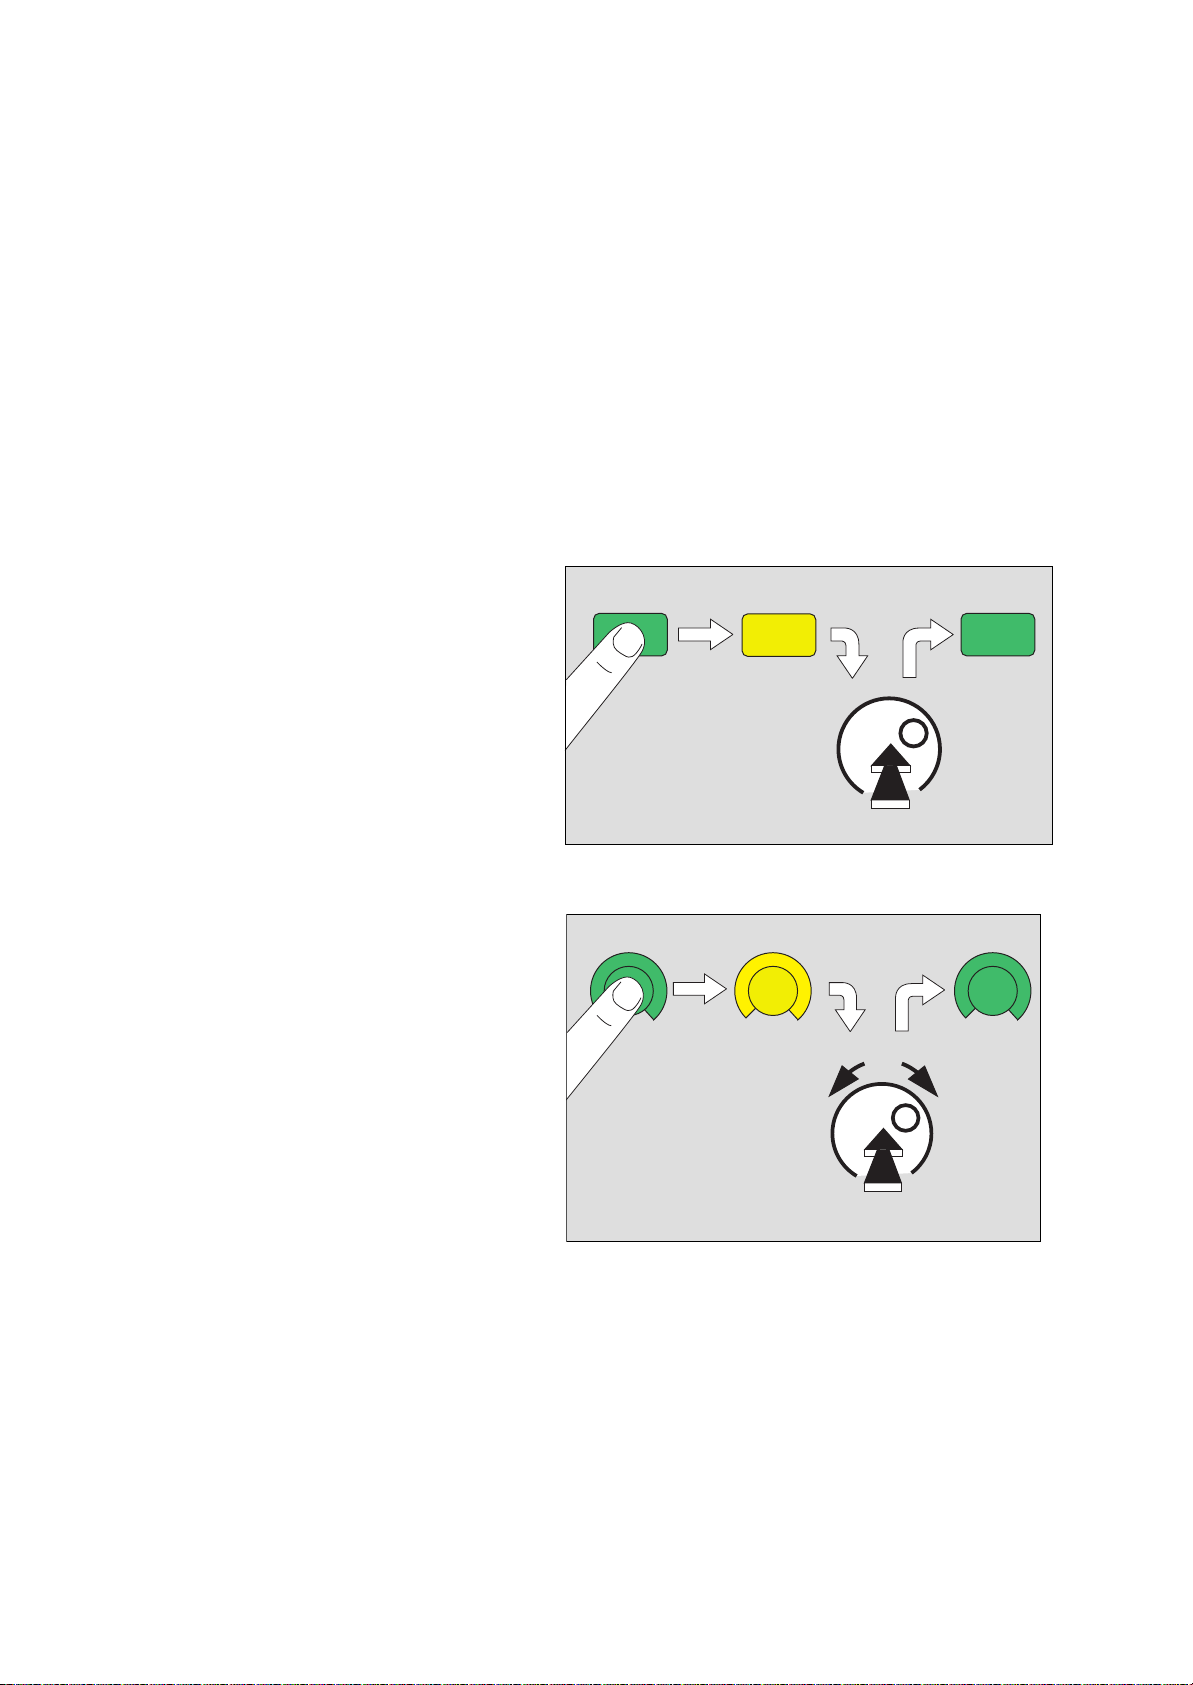
The touch-sensitive screen controls are used in the same way
as real keys and knobs:
Touching these controls with a fingertip is equivalent to pressing a key or taking hold of a knob.
Settings are made and confirmed by turning and pressing the
central rotary knob.
The status of the screen controls is indicated by colours:
grey = not available
yellow = available
pale green = available but not active
dark green = available and active
Screen keys:
1 select = touch,
2 screen key turns yellow,
3 confirm = press rotary knob,
4 screen key turns pale/dark green.
12 4
Screen knobs:
1 select = touch,
2 screen knob turns yellow,
3 set = turn rotary knob,
4 confirm = press rotary knob,
5 screen knob turns pale/dark green.
3
033
12 5
3
4
16 Instructions for Use EvitaXL

To set ventilation parameters directly:
On the main screen (example):
● Touch the required screen knob in
the row of screen knobs and settings
displayed.
— The menu »Ventilator Settings« is
displayed by Evita
XL. The selected
screen knob is already yellow and
can be adjusted directly.
Display (example):
● Set = turn central rotary knob, con-
firm = press central rotary knob.
The colour of the screen knob changes
to dark green – the setting is now effective.
Operating concept
On-screen controls
To view additional text information:
● Touch the screen key »?
q
«.
To quit the menu:
● Press the screen key »X«.
Arrows (
+) beside the scales on the
screen knobs indicate the initial values
valid when the equipment is switched
on. These values can be adjusted specifically as required by the hospital, see
Configuration, page 125.
098
Instructions for Use EvitaXL 17

Optional operating concept
QuickSet
Optional operating
concept
QuickSet*
Direct adjustment of PEEP or Pinsp
Direct adjustment of PEEP is possible in
all ventilation modes.
Direct adjustment of P
BIPAP and BIPAPAssist.
● Touch the screen key »PEEP« or
insp« in the respective ventilation
»P
mode.
● Depress rotary knob and hold down
for 3 secs.
The adjuster changes to green with a yellow edge. Direct adjustment is active.
● Keep rotary knob depressed and turn
it. Set »PEEP« or »Pinsp«.
The set value is now effective.
insp is possible in
On releasing the rotary knob, »PEEP« or
»Pinsp« can still be set directly:
● Depress again the rotary knob and
turn it.
Exceeding the standard setting range:
● Release rotary knob for a short
moment; the standard setting range
can be exceeded.
Set »PEEP« or »P
● Depress again the rotary knob and
insp«:
turn it.
222
*Lung Protection Package option
18 Instructions for Use EvitaXL

PressureLink*
Linked adjustment of PEEP and Pinsp
● Touch screen key »PEEP« or »Pinsp«.
● Touch screen key »Link PEEP/
Pinsp«.
● Set »PEEP« and »Pinsp« = turn rotary
knob. The values are adjusted simultaneously. The difference remains
constant.
● Confirm new settings = press rotary
knob.
Optional operating concept
PressureLink
225
*Lung Protection Package option
Instructions for Use EvitaXL 19

Optional operating concept
QuickSet + PressureLink
QuickSet + PressureLink*
Setting PEEP and Pinsp directly and
linked:
● Touch screen key »PEEP« or »Pinsp«.
● Touch screen key »Link PEEP/
Pinsp«.
● Depress rotary knob and hold down
for 3 secs.
The adjusters change to green with a
yellow edge. Direct adjustment is active.
● Keep rotary knob depressed and turn
it. Set »PEEP« and »Pinsp«.
The values are set simultaneously and
are immediately effective.
On releasing the rotary knob, »PEEP«
and »Pinsp« can still be set directly:
● Depress again the rotary knob and
turn it.
Exceeding the standard setting range:
● Release rotary knob for a short
moment; the standard setting range
can be exceeded.
Set »PEEP« and »P
● Depress again the rotary knob and
insp«:
turn it.
226
*Lung Protection Package option
20 Instructions for Use EvitaXL

Preparing for use
Preparing for use . . . . . . . . . . . . . . . . . . . . . . . . . . . . . . . . . . . . . . . . . . . . . . . . . . . . . . 22
Positioning the control unit . . . . . . . . . . . . . . . . . . . . . . . . . . . . . . . . . . . . . . . . . . . 22
Fitting the expiration valve . . . . . . . . . . . . . . . . . . . . . . . . . . . . . . . . . . . . . . . . . . . . 23
Fitting the flow sensor. . . . . . . . . . . . . . . . . . . . . . . . . . . . . . . . . . . . . . . . . . . . . . . . 23
Fitting O2 sensor capsule. . . . . . . . . . . . . . . . . . . . . . . . . . . . . . . . . . . . . . . . . . . . . 24
Using HME, bacterial filters and hose systems . . . . . . . . . . . . . . . . . . . . . . . . . . . 25
Ventilating adults and children. . . . . . . . . . . . . . . . . . . . . . . . . . . . . . . . . . . . . . . . . 26
Ventilating infants . . . . . . . . . . . . . . . . . . . . . . . . . . . . . . . . . . . . . . . . . . . . . . . . . . . 28
Fitting CO2 cuvette and CO2 sensor (optional) . . . . . . . . . . . . . . . . . . . . . . . . . . 29
Power supply and connections . . . . . . . . . . . . . . . . . . . . . . . . . . . . . . . . . . . . . . . . 30
Gas supply . . . . . . . . . . . . . . . . . . . . . . . . . . . . . . . . . . . . . . . . . . . . . . . . . . . . . . . . . 31
Connecting Evita Remote (optional) . . . . . . . . . . . . . . . . . . . . . . . . . . . . . . . . . . . . 31
Connecting the nurse call (optional). . . . . . . . . . . . . . . . . . . . . . . . . . . . . . . . . . . . 33
Device Check. . . . . . . . . . . . . . . . . . . . . . . . . . . . . . . . . . . . . . . . . . . . . . . . . . . . . . . 34
Leak test . . . . . . . . . . . . . . . . . . . . . . . . . . . . . . . . . . . . . . . . . . . . . . . . . . . . . . . . . . . 39
Entering the humidifier type . . . . . . . . . . . . . . . . . . . . . . . . . . . . . . . . . . . . . . . . . . . 40
Application mode Tube/Mask (optional) . . . . . . . . . . . . . . . . . . . . . . . . . . . . . . . . 40
Ventilation while transferring a patient within the hospital. . . . . . . . . . . . . . . . . . 41
Instructions for Use EvitaXL 21
Preparing for use
Positioning the control unit
Preparing for use
● Always use properly prepared parts, see "Preparing",
page 155.
● Hospital infection control regulations must be observed.
Positioning the control unit
● The control unit must not be stood up or leant against any-
thing, nor may it be laid face downwards! It must always be
laid on its back when changing over.
Positioning on the Evita
● Hook the control unit into the mount on EvitaXL until it
XL
engages.
To adjust the position:
1 Press and hold the segments on the right and left, at the
same time tilting the control unit into the required position.
Positioning on the wall rail
2 Press and hold the segments on the right and left, tilting the
control unit down completely at the same time.
1
170
2
3 Press and hold the unlocking buttons on the right and left,
lifting the control unit out of the mount on EvitaXL at the
same time.
● Unwind the required length of cable.
● Hook the control unit into the wall rail and
3
22 Instructions for Use EvitaXL
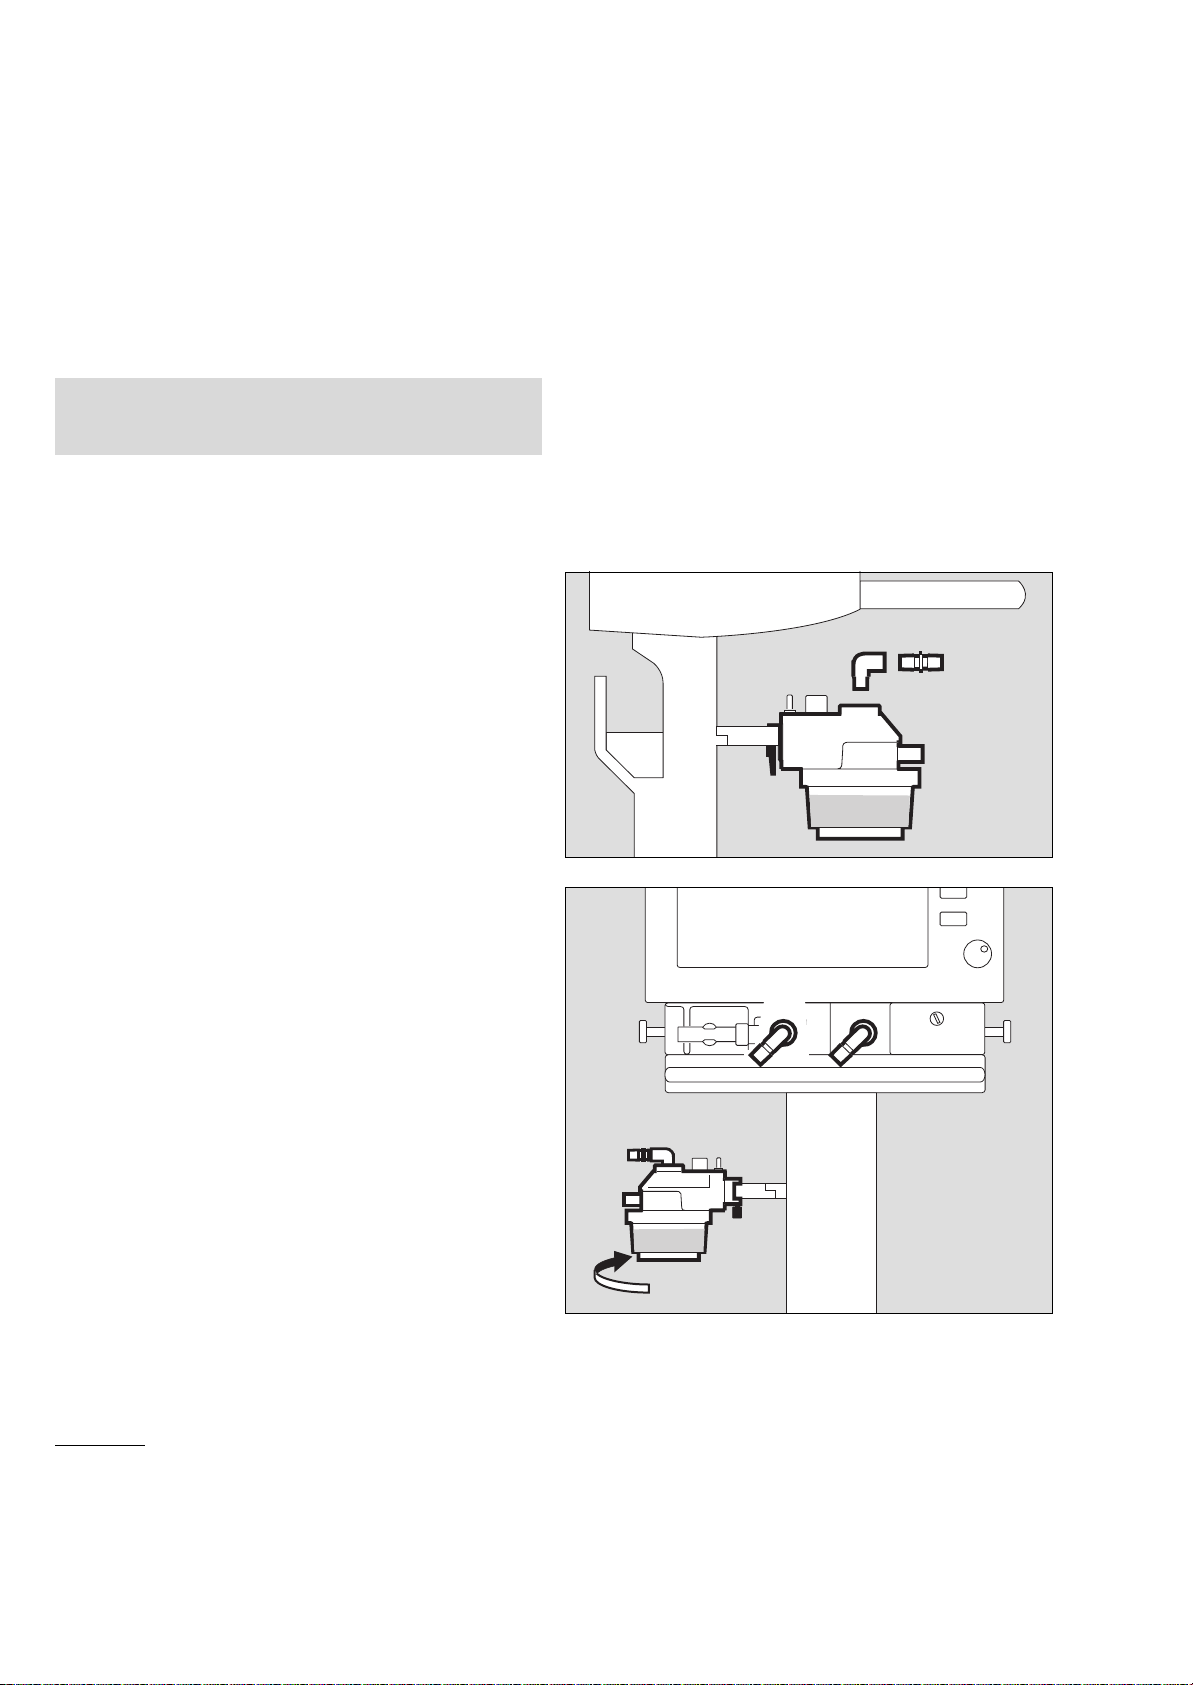
091
092

1 lock it in position = pull tab under the holder down and turn
it towards the wall rail.
Fitting the expiration valve
2 Tilt the control unit upwards, pressing the segments on the
right and left at the same time.
3 Push the expiration valve as far as it will go into the mount-
ing. Check that it is properly secured by gently pulling
the port.
Preparing for use
Fitting the expiration valve
Fitting the flow sensor
1
093
Fitting the flow sensor
4 Push socket to left as far as it will go.
5 Fit flow sensor – with the connector facing towards the ven-
tilator – into the mounting and push it into the socket as far
as it will go.
Then:
6 Push flow sensor to the right as far as it will go into the rub-
ber lip of the expiration valve.
2
3
068
4
069
6
Instructions for Use EvitaXL 23
5
070

Preparing for use
Fitting O2 sensor capsule
Fitting O2 sensor capsule
— when using the system for the first time
— when the display reads:
O
2 measurement inop
— when calibration can no longer be performed
● Ensure device is in standby or ventilator is switched off.
● Tilt the control unit upwards, pressing the segments on the
right and left at the same time.
1 Turn the inspiratory port to the left.
2 Use coin to loosen screw, and remove protective cover.
3 Loosen the two knurled screws and open the sensor
housing.
4 Remove old sensor capsule and fit a new capsule. The end
with the circular tracks remains visible.
3 Close the sensor housing securely with the two knurled
screws.
2 Screw protective cover back in place.
● Dispose of the used O2 sensor capsule, page 168.
4
3
1
2
071
24 Instructions for Use EvitaXL

Using HME, bacterial filters and hose systems*
Additional components in the breathing system or components which diverge from the standard hose system can considerably increase the inspiratory and expiratory breathing
resistance and exceed standard requirements.
Examples: Insp./exp. filters, HME**, coaxial hoses
In general, the Evita
effort made by the patient and is therefore not intended for the
use of insp./exp bacterial filters.
The use of bacterial filters or HMEs therefore requires particular care and monitoring by the user. Especially during medicament nebulisation and humidifying, the resistance of the
expiratory filter may increase gradually.
A higher breathing resistance leads to a greater breathing and
trigger effort during assisted ventilation. Under unfavourable
conditions, this can lead to an undesirable intrinsic PEEP. This
can be recognised by the fact that the expiratory flow does not
return to "0" at the end of expiration. If the PEEP is unacceptably high, it is indicated by the alarm »PEEP high !!!«. The cur-
rent PEEP is then approx. 8 mbar above the set PEEP. Check
and replace the bacterial filter or HME if they are the cause of
the PEEP alarm.
XL is designed to minimise the breathing
Preparing for use
Using HME, bacterial filters and hose systems
A breathing resistance in the patient connection cannot be
monitored directly by the ventilator. For this reason:
● Determine inspiratory and expiratory breathing resistance
in the patient system before ventilation in standby by means
of the device check.
● Check the condition of the patient and the ventilator's meas-
ured values for volume and resistance frequently.
● Observe the Instructions for Use for the HME, filter and
coaxial hose systems in use.
● Do not use an HME together with a medicament nebuliser
or breathing gas humidifier. This can lead to a greater
breathing resistance.
* Only applies to hose systems which are not described in these
Instructions for Use.
** Heat moisture exchanger
Instructions for Use EvitaXL 25
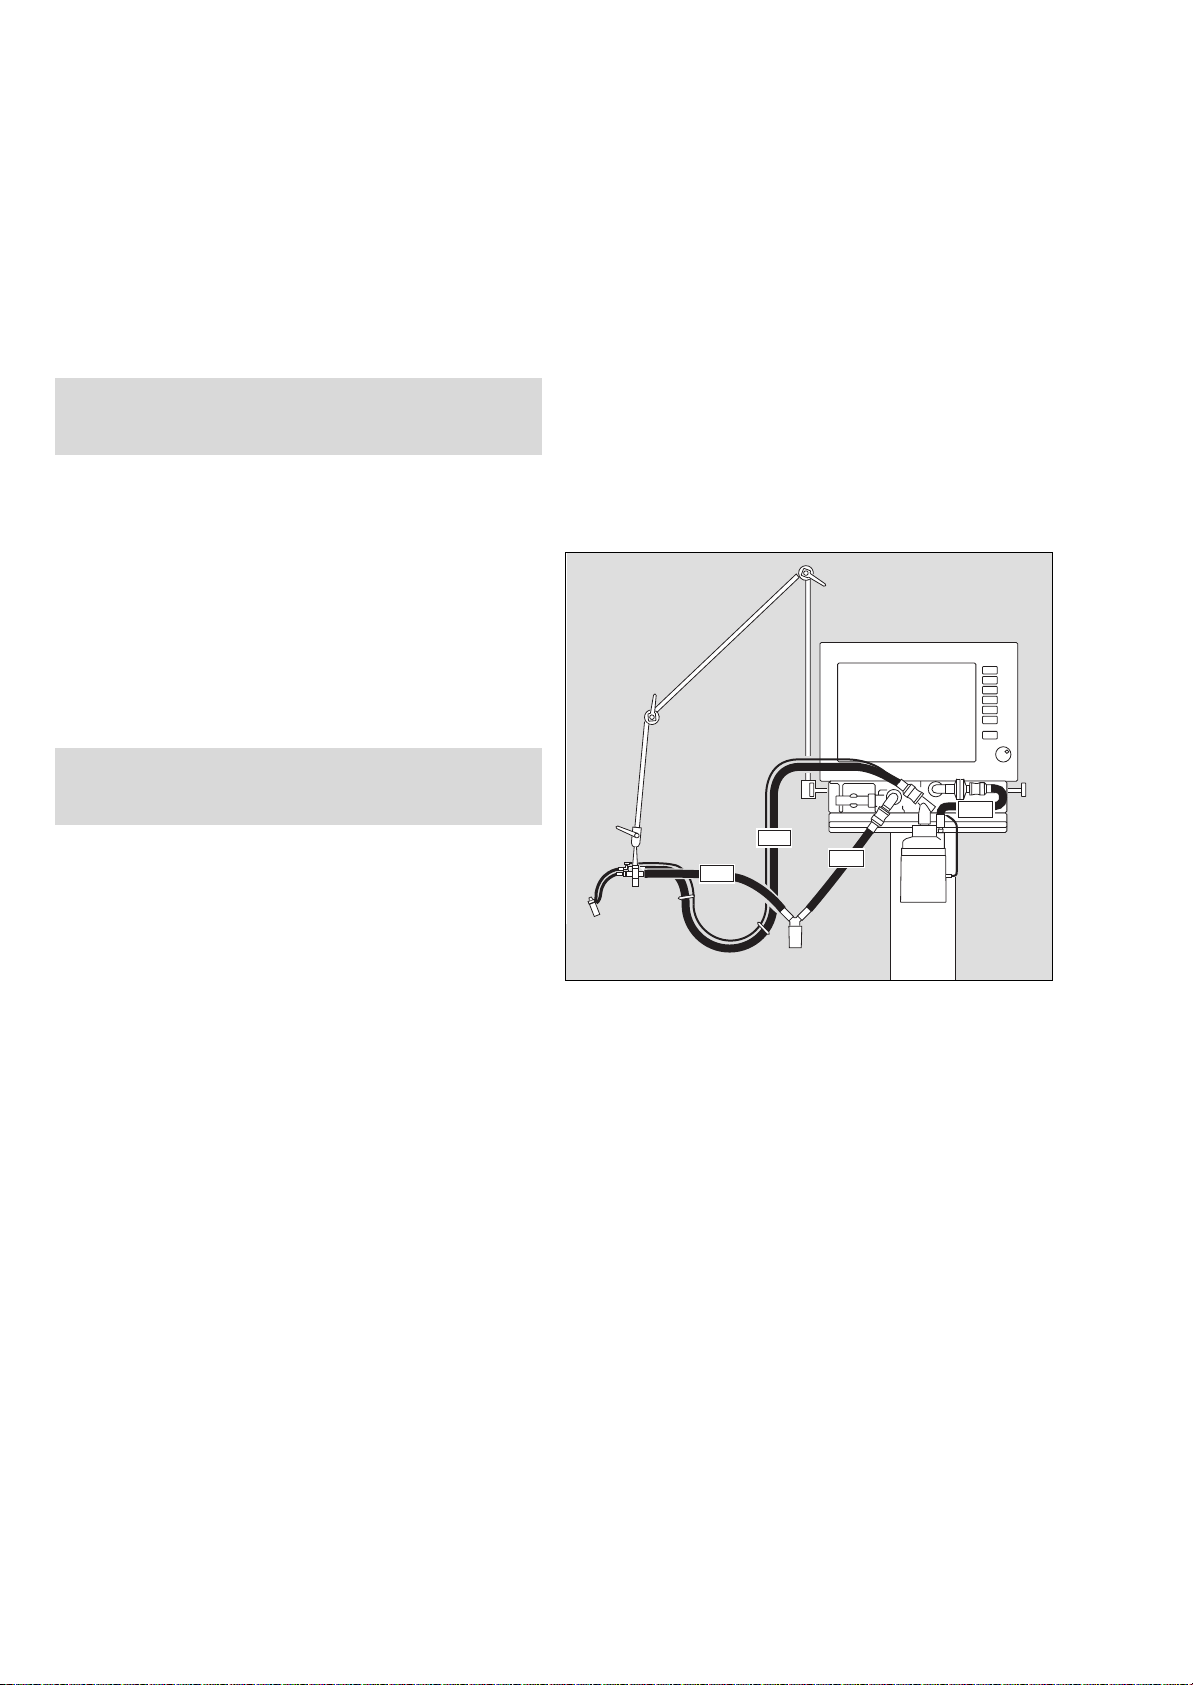
Preparing for use
Ventilating adults and children
Ventilating adults and children
● Set the ventilator to breathing gas humidifier, see page 40.
From 100 mL tidal volume V
Patient mode: »Adults«
● Do not use a heat and moisture exchanger at the same
time as a humidifier! Risk of increased breathing
resistance because of condensation.
Connecting Aquapor EL humidifier
Prepare Aquapor EL by following the relevant Instructions for
Use.
1 Hang Aquapor EL onto the rail and tighten the screws.
2 Insert elbow connector into Aquapor EL.
3 Insert the double connector into the elbow connector.
4 Fill the Aquapor EL bowl up to the upper filling mark with
sterile Aquadest.
T upwards:
3
2
1
Connecting ventilation hoses
● Do not use antistatic or conductive hoses*.
Depending on the desired position of the ventilator in relation
to the bed, the hinged arm can be fitted to either side of the
machine.
Attachment on left-hand side:
5 Turn both ports to the left.
6 Turn Aquapor EL to the left.
The following description applies when the ventilation hoses
have been attached on the left-hand side.
Whenever the ventilation hoses or humidifier have been
changed:
● Perform a leak test, page 39.
4
077
5
5
6
078
*DIN VDE 0750 section 215:
The use of anti-static or electrically conductive material in the
breathing system of the lung ventilator is not considered conducive
to greater safety. On the contrary, the use of these materials
increases the danger of electric shock to the patient and of fire due
to the presence of oxygen.
26 Instructions for Use EvitaXL

1 Hang the hinged arm from the rail on the left-hand side and
tighten screws.
● Fit the ventilation hoses. Check the hose lengths (metres).
2 Turn ports in direction of hoses.
3 Install water traps in vertical position.
4 Connect the Y-piece, with the rubber sleeve of the Y-piece
on the inspiratory side.
5 Insert the Y-piece in the opening of the hinged arm.
Preparing for use
Ventilating adults and children
D
1
0.4m
Evita XL
2
4
5
0.6m
0.6m
0.6m
0.4m
3
Fitting temperature sensor
6 Push sensor as far as it will go into the rubber sleeve on the
inspiratory side of the Y-piece. Align the Y-piece so that the
sensor is at the top in order to avoid condensation in the
sensor.
7 Attach the sensor cable with hose clips.
8 Insert the connector for the temperature sensor into the
socket »Temp « at the rear of Evita
XL.
079
6
7
072
8
Instructions for Use EvitaXL 27
080
Preparing for use
Ventilating infants
Ventilating infants
● Set the ventilator to breathing gas humidifier, see page 40.
Up to 300 mL tidal volume V
Patient mode: »Paediatric«
● Do not use a heat and moisture exchanger at the same
time as a humidifier! Risk of increased breathing
resistance because of condensation.
Fitting humidifier and ventilation hoses
● Prepare the "Fisher & Paykel MR 850" humidifier in accord-
ance with the separate Instructions for Use.
1 Clamp the humidifier to the stand under the apparatus and
screw firmly into place.
2 Clamp the articulated arm to the left-hand rail and screw
firmly into place.
● Fit the ventilation hoses. Check the hose lengths (metres).
3 Fit the water trap in the vertical position.
● Do not place any containers with liquid on or above the
ventilator!
Any leaking or spilled liquid could cause malfunctions!
Whenever the ventilation hoses or humidifier have been
changed:
● Perform a leak test, page 39.
T:
0.6m
1.1m
Evita
D
2
0.6m
XL
0.4m
1
3
083
28 Instructions for Use EvitaXL

Fitting CO2 cuvette and CO2 sensor (optional)
1 Fit the cuvette to the patient connection of the Y-piece, with
the cuvette windows facing the side.
2 Push the CO
ing towards EvitaXL.
2 sensor on to the cuvette, with the cable trail-
Preparing for use
Fitting CO2 cuvette and CO2 sensor (optional)
2
3 Insert the connector for the CO
socket on the rear of the ventilator.
1
073
2 sensor in the »CO2 «
3
081
Instructions for Use EvitaXL 29

Preparing for use
Power supply and connections
Power supply and connections
Electrical power supply
Either : 220 V to 240 V
or : 100 V to 127 V
● Insert the plug in the mains socket, the yellow indicator
lights up.
For operation with DC power supply and external battery
(optional)
● Connect optional external battery via cable, see "DC power
operation", page 170.
Note on the use of a socket strip for ancillary equipment
Connecting other equipment to the extension socket strip may
cause the patient leakage current to rise above the permitted
values if a protective earth conductor should fail. The risk of
electric shock cannot be excluded in such cases.
Temporary interruption of power supply
e.g. if hospital reserve power supply is activated.
Without optional Evita DC power supply:
During an interruption of the power supply, EvitaXL outputs a
continuous alarm tone for max. 2 minutes. The duration of this
alarm tone may be shorter if EvitaXL was switched on for less
than 15 minutes.
Evita
XL tolerates power interrupts lasting less than
10 milliseconds – without influencing ventilation.
In the case of power interrupts lasting longer than
10 milliseconds, the machine restarts with a short self-test lasting about 8 seconds – ventilation is continued with the same
values that were set before the power interruption. If a lower
alarm limit has been set for the minute volume, the »MV low !!!«
alarm is activated until the measured value has risen above the
lower alarm limit.
With optional Evita DC power supply:
See chapter "DC power operation", page 170.
Other equipment, e.g. printers, may only be connected to
the COM port if EvitaXL is connected to the mains power
supply via a mains power cable or if it has been earthed
via the earth connection on the back of Evita
XL.
Electric power may pose a hazard in all other cases.
30 Instructions for Use EvitaXL
 Loading...