

Page 1

Norstar TAPI Service Provider 4.3
Server Configuration Guide
••••••••••••••••
•
••••••••••••••••••••••••••••••••••••••••••••••••••
Page 2

Page 3

Table of contents 3
P0605043 Issue 01 Norstar TSP Server Configuration Guide
Table of contents
Introduction to Norstar TAPI Service Provider 4.3 5
How does Norstar TSP work? 5
Operating system requirements 7
Computer Telephony Adapter compatibility 7
Installing Norstar TSP on the Server 8
Server installation overview 8
Selecting a Windows NT Server / Windows 2000 Server PC 9
Setting up the Server as a member server in a domain 10
Assigning the TAPI_ADMIN user account administration privileges 10
TAPI on Windows 2000 Server / 2000 Advanced Server 12
Installing Microsoft TAPI 2.1 on the Windows NT Server 12
Installing TAPI 2.1 on Windows NT Server 4.0 12
Installing the CTA device on the Server 12
Installing Norsta r TSP 13
Verifying that Norstar TSP is installed 13
Adding server functionality to Norstar TSP 14
Configuring Norstar TSP on the Windows NT 4.0 Server 14
Enabling the Norstar TSP server 15
Adding Norstar TSP clients to the Norstar TSP server 16
Assigning a telephone to a Norstar TSP client 19
Deleting a line from a client 23
Configuring Norstar TSP on the Windows 2000 or Windows 2000
Advanced Servers 24
Enabling the Norstar TSP Server 24
Selecting the server 26
Adding Norstar TSP Clients to the Norstar TSP Server 27
Assigning a telephone to a Norstar TSP client 27
Installing Norstar TSP on client PCs 29
Client installation overview 29
Installing Microsoft TAPI 2.1 on client PCs 29
Installing TAPI 2.1 on Windows NT 4.0 Workstation 29
Installing TAPI 2.1 on Windows 95 30
Installing TAPI 2.1 on Windows 98 30
Configuring TAPI Client on a client PC 31
Configuring the network settings on the client PC 31
Registering with the Norstar TSP server 33
Page 4

4 Table of contents
Norstar TSP Server Configuration Guide P0605043 Issue 01
Setting the Dialing Properties 34
Viewing Norstar TSP information 42
Accessing the Norstar TSP Control Panel 42
Viewing the Norstar TSP version number 43
V iewing the Norstar TSP status 43
Viewing the connection information 43
Norstar TSP error messages 43
Using the Norstar CTI Diagnostics 44
Choosing the information you want to view 45
V iewing detailed information about Norstar TSP 46
V iewing information about the Norstar TSP software 46
Saving the information to a file 47
Deleting information from the log 47
Exiting from the Norstar CTE Diagnostics window 47
Troubleshooting 48
Troubleshooting while installing Norstar TSP 48
Troubleshooting after installing Norstar TSP 48
Norstar TSP tips 50
Starting Norstar TSP 50
Windows attempts to re-install the CTA 50
Appendix A – Using a Primary Domain Controller as a TAPI
Server 51
To set up the TAPI Server as a Primary Domain Controller 51
Appendix B - Reinstalling the older version of Microsoft TAPI 52
Windows 95 52
Windows NT 52
Glossary 53
List of acronyms 53
Glossary terms 53
Page 5

P0605043 Issue 01 Norstar TSP Server Configuration Guide
Introduction to Norstar TAPI Service
Provider 4.3
The Norstar Desktop Computer Telephony Integration (CTI) range of products
provides an interface between your personal computer (PC) and your Norstar
telephone system. With these products, you can use telephony applications on your
Windows® PC to control your Norstar telephone.
To use Norstar Desktop CTI, you require a hardware component and a software
component.
The hardware component of Norstar Desktop CTI is the Computer Telephony
Adapter (CTA). The CTA provides the physical connection between your PC and
your Norstar telephone system. Instructions on how to install your CT A device ar e
in the CTA Installation Guide.
The software component of Norstar Desktop CTI is Norstar TAPI Service Provider
(Nors tar TSP). Norst a r TSP work s with Mi c r osoft® TAPI and Windows® NT to
allow your telephony application to communicate with the CTA and control your
Norstar telephone.
In server configuration, Norstar TSP shares a single CTA with network users. This
allows users on your network to run telephony applications to control their Norstar
telephones.
How does Norstar TSP work?
Norstar TSP works with three other software components, each providing a
different function. The four software components are:
• Telephony application
Telephony applications are installed on client PCs. Norstar TSP users run
telephony applications to control their Norstar telephone. With this application,
Norstar TSP users give commands (such as answer telephone) to the Norstar
telephone system. The telephony application also displays messages (such as
telephone ringing) received from the Norstar telephone system. An example of
a telephony application is Norstar Personal Call Manager.
• Windows operating system
Windows is installed on the Server and the client PCs. Windows passes
commands from the telephony application to TAPI and messages from TAPI to
the telephony application.
Microsoft and Windo ws ar e registered trademarks of Microsoft Corporation .
Page 6
6 How does Norstar TSP work?
Norstar TSP Server Configuration Guide P0605043 Issue 01
• Microsoft Telephony Application Programming Interface (TAPI)
TAPI is installed on the Server and the client PCs. TAPI converts industry
standard commands received from Windows into a format that Norstar TSP can
understand. It also converts messages from the Norstar TSP into an industry
standard format and gives them to Windows.
• Norstar TSP
Norstar TSP is installed on the Server as a Windows NT service. Norstar TSP
receives commands from TAPI and converts them into a format that is
understood by the Norstar telephone system. It also r eceives messages from the
Norstar telephone system and converts them into a format that is understood by
TAPI. Messages are sent to and received from the Norstar telephone system
using the CTA.
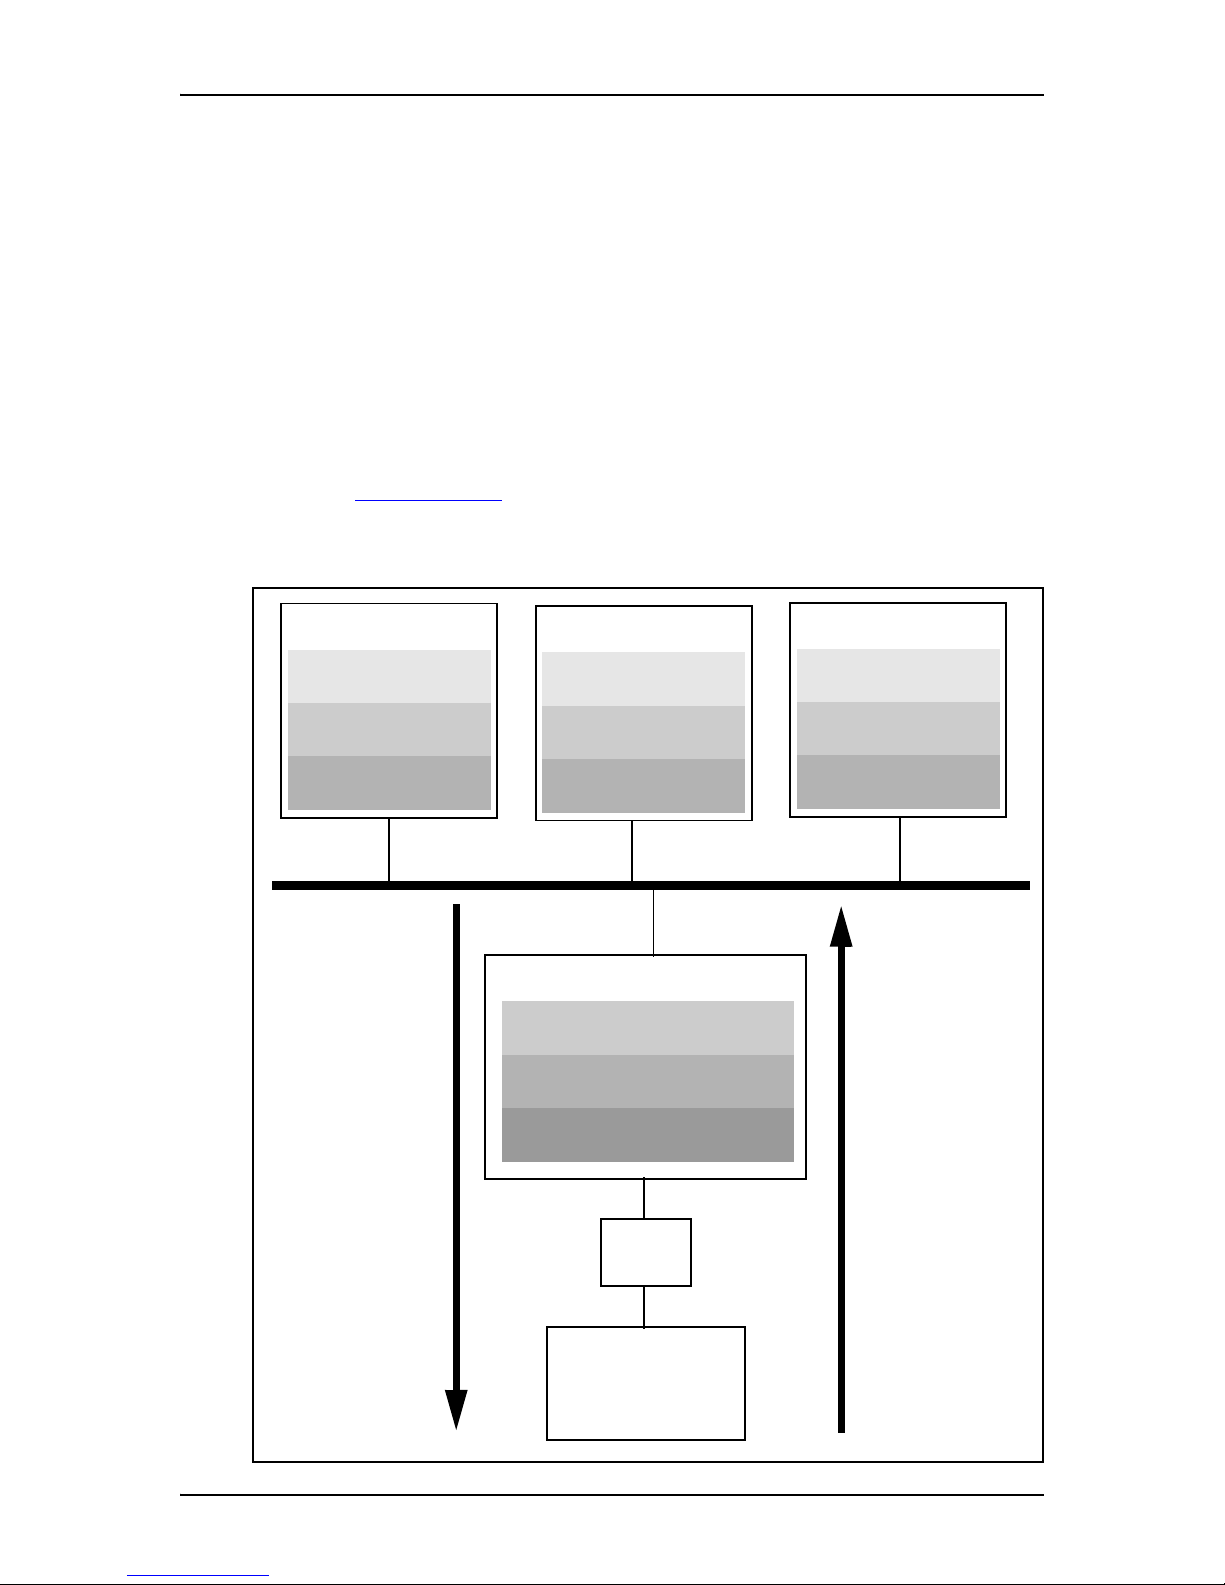
The figure TAPI overview shows how messages and commands are passed between
the client PCs and the Norstar telephone system.
TAPI overview
Microsoft Windows NT Se rver
Microsoft TAPI
Norsta r TS P
Server
Norstar
telephone
system
CTA
Telephony application
Microsoft Windows
Microsoft TAPI
Norstar TSP User PC
Telephony application
Microsoft Windows
Microsoft TAPI
Norstar TSP User PC
Telephony appli cation
Microsoft Windows
Microsoft TAPI
Norstar TSP User PC
Commands
from users
Respo n ses from
Norstar tele phone
system
Page 7

Operating system requ ire me nts 7
P0605043 Issue 01 Norstar TSP Server Configuration Guide
Operating system requirements
The Norstar TSP Server must be using Windows NT Server 4.0., Windows 2000
Server or Windows 2000 Advanced Server.
You must update Windows NT Server 4.0 with Service Pack 4 before you install
Norstar TSP. When you update Windows NT 4.0 with Service Pack 4, Microsoft
TAPI 2.1 is installed on your computer.
You must also install Microsoft TAPI 2.1 on all of the client PCs before installi ng
Norstar TSP. If you do not have TAPI 2.1 installed, refer to Installing Microsoft
TAPI 2.1 on client PCs on page 29 for instructions on how to install TAPI 2.1.
Computer Telephony Adapter compatibility
The Computer Telephony Adapter (CTA) is the device that connects the Server to
the Norstar telephone system. The chart below specifies which CTA devices are
compatible with Windows NT Server 4.0.
Windows NT Server 4.0 Windows 2000 Server
CTA 100 Yes Yes
CTA 150i No No
CTA 160i Yes Yes
CTA 200 (using serial port) Yes Yes
CTA 200 (using USB port) No No
CTA 500dm No No
Page 8

8 Operating system requirements
Norstar TSP Server Configuration Guide P0605043 Issue 01
Installing Norstar TSP on the Server
To use the Norstar TSP server functionality, you must install and configure
applications on the Server and then on the client PCs.
Server installation overview
1. Select an appropriate Windows NT Server or Windows 2000 Server or
Windows 2000 Advanced Server for your network.
For mo re i n formation, refer t o Selecting a Windows NT Server / Windows
2000 Server PC on page 9.
2. Set up the Server as a member server in a domain.
For mo re i n formation, refer t o Setting up the Server as a member server in a
domain on page 10.
3. Set up a TAPI domain account with administration privileges on the member
server.
For mo re i n formation, refer t o Assigning the TAPI_ADMIN user account
administration privileges on page 10.
4. Install Microsoft TAPI 2.1 on the Server.
For mo re i n formation, refer t o Installing Microsoft TAPI 2.1 on the Windows
NT Server on page 12.
Note: Windows 2000 Server and Windows 2000 Advanced Server already have
TAPI 3.0 installed.
5. Install a CTA on the Server.
For more information, refer to the installation guide that came with your CTA.
6. Install Norstar TSP on the Server.
For mo re i n formation, refer t o Installing Norstar TSP on page 13.
7. Verify that Norstar TSP installed correctly.
For mo re i n formation, refer t o Verifying that Norstar TSP is installed on page
13.
8. Upgrade Norstar TSP to add server functionality.
For mo re i n formation, refer t o Adding server functionality to Norstar TSP on
page 14.
9. Configure Norstar TSP on the Server.
For mo re i n formation, refer t o Configuring Norstar TSP on the Windows NT
4.0 Server on page 14.
10. Reboot the server.
Page 9

Selecting a Windows NT Server / Windows 2000 S erver PC 9
P0605043 Issue 01 Norstar TSP Server Configuration Guide
Selecting a Windows NT Server / Windows 2000 Server PC
A TAPI server can be configured on any Windows NT 4.0 server that has been
upgraded to Service Pack 4 or greater or on a Windows 2000 Server.
There are four types of Windows NT Servers:
• Primary Domain Controller (PDC)
• Backup Domain Controller (BDC)
• member server (a server which is a member of a domain but not a PDC or a
BDC)
We recommend that you use a member server in a Windows NT domain as the
TAPI server.
We also recommend that you do not use Primary Domain Controllers and Backup
Domain Controllers as the TAPI Server.
TAPI Server will run on a PDC. If you want to use a PDC, carefully review the
issues below. Consider how the following issues will affect your network before
installing TAPI Server. For additional information about installing TAPI Server on
a domain controller, refer toAppendix A – Using a Primary Domain Controller as a
TAPI Server on page 51.
Issues with installing TAPI Server on a domain controller
• You must reboot the Windows 2000 Server / Windows 2000 Advanced Server
after:
• adding users
• deleting users
• changing the TAPI admin account password
• changing the configuration of the Norstar Key Service Unit (KSU)
• You must reboot the Windows NT Server after:
• installing Microsoft’s TAPI server
• adding users
• deleting users
• changing the TAPI admin account password
• changing the configuration of the Norstar Key Service Unit (KSU)
• You must have administrator privileges for the domain to install Microsoft
TAPI server on a domain controller. Administrator privileges for a member
server are sufficient to install Microsoft TAP I server on a me mber server within
a domain. Therefore, installing Microsoft TAPI server on a member server
within a Windows domain is more secure and scaleable.
• Performance on the Domain Controller can be affected by the additional
demands of a TAPI server which provides D-Channel signaling for all users.
Page 10
10 Setting up th e Server as a me mber serv er in a domain
Norstar TSP Server Configuration Guide P0605043 Issue 01
Setting up the Server as a member server in a domain
To setup the Server as a member server:
1. If your Server is a standalone server, ask your network administrator to add
your standalone server to the domain. This changes your standalone server
into a member server.
2. Ask your network administrator to add a TAPI_ADMIN domain-account to
the domain. This TAPI_ADMIN domain-account is a user account used to
start and administer telephony services (TCMSETUP) on the member server.
Note: Any domain user account can be added to the member server’s local
administrator group and used to start the TCMSETUP application.
However, it is recommended that the account be unique to Norstar
TSP administration.
3. Ask your Network Administrator to ensure all of the TAPI users are in the
same domain as the TAPI domain-account.
Assigning the TAPI_ADMIN user account administration privileges
Use TAPI_ADMIN user account for all TAPI administration tasks. To assign the
user account administration privileges for this account:
1. Access the User Manager on your local PC.
2. Click the User menu and then click Select Domain.
3. Enter the name of the TAPI server and click the OK button.
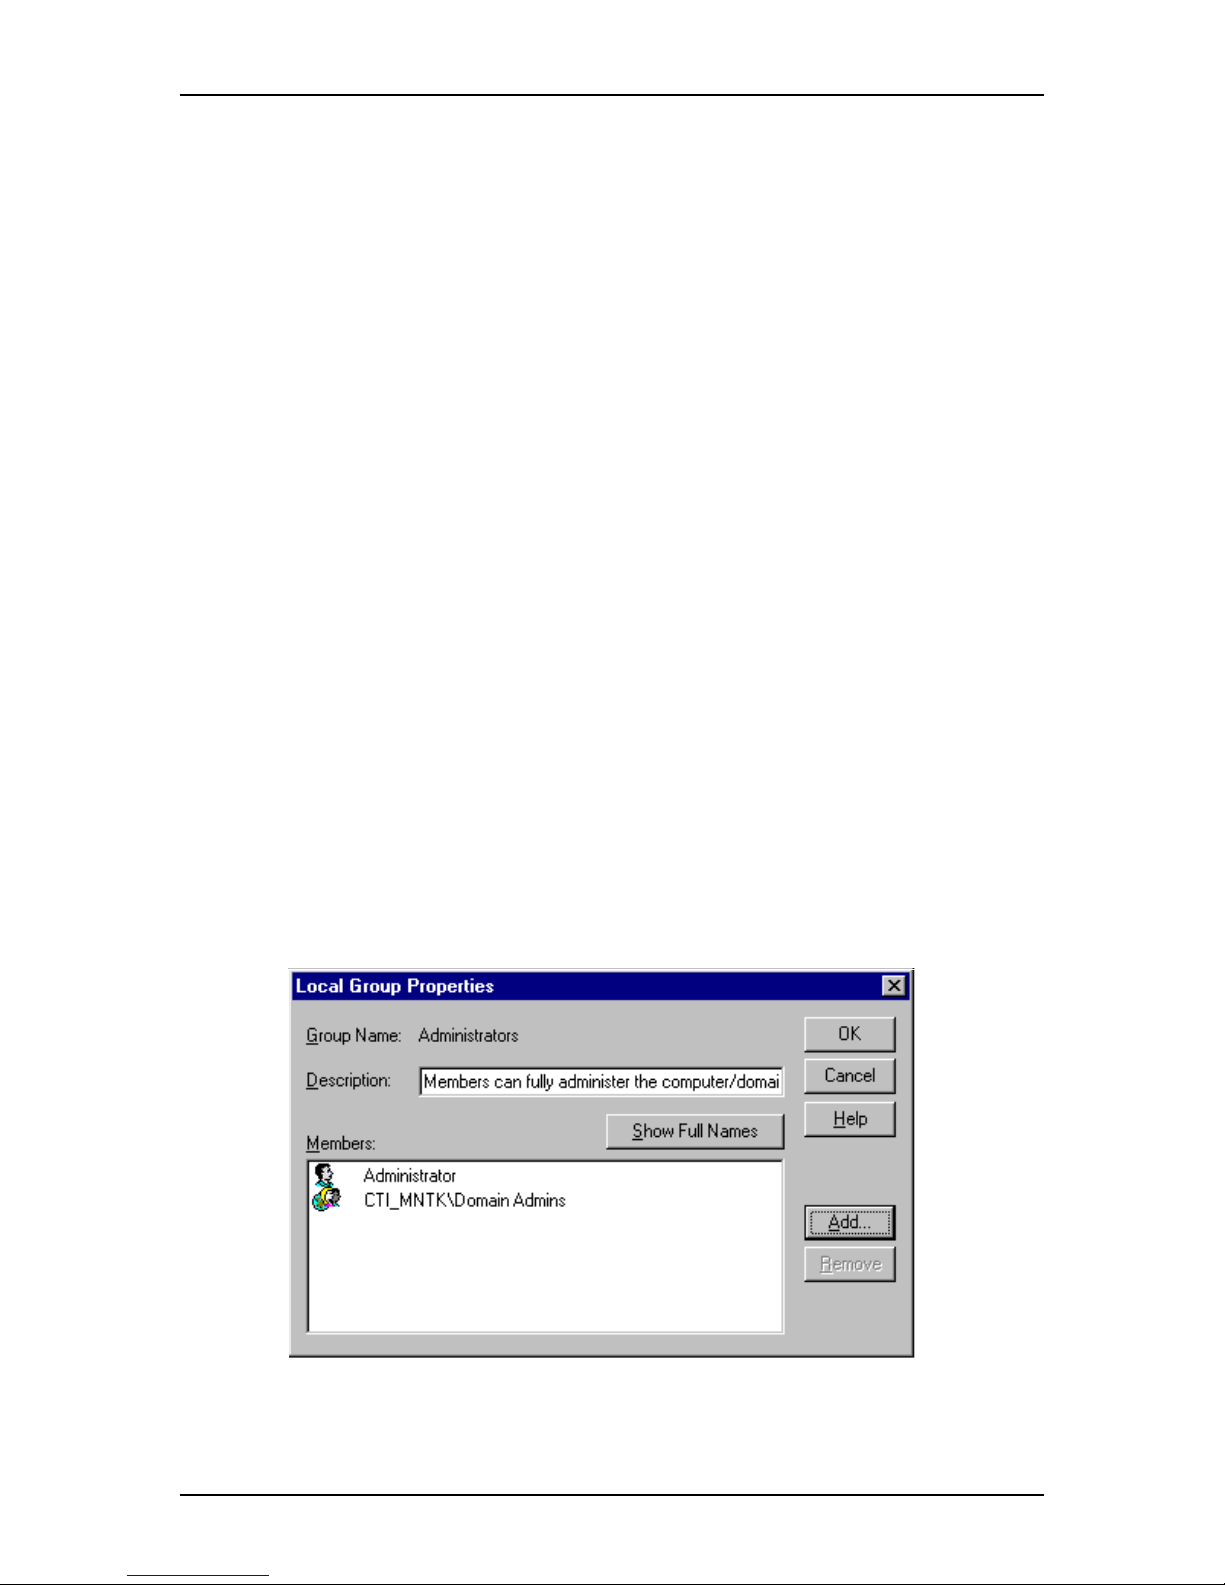
4. Double click Administrators at the bottom of the screen.
The Local Group Properties dialog box appears.
5. Click the Add button.
The Add Users and Groups dialog box appears.
Page 11

Assigning the TAPI_ADMIN us er ac count administrat ion privileges 11
P0605043 Issue 01 Norstar TSP Server Configuration Guide
6. Click the TAPI domain-account created by your Network Administrator.
7. Click the Add button.
8. Click the OK button.
The domain user TAPI_ADMIN is added as a member of the member-server
local admin group.
9. Click the OK button.
10. Log off of the server.
Page 12

12 TAPI on Windows 2000 Server / 2000 Advanced Server
Norstar TSP Server Configuration Guide P0605043 Issue 01
TAPI on Windows 2000 Server / 2000 Advanced Server
TAPI 3.0 is already installed on Windows 2000 Server and Windows 2000
Advanced Server.
Installing Microsoft TAPI 2.1 on the Windows NT Server
Microsoft TAPI 2.1 and its installation program are made by Microsoft
Corporation. Microsoft TAPI 2.1 provides the following features:
• full 32-bit architecture and backward compatibility with 16-bit TAPI
applications
• ability for Windows NT, Windows 9 8 and Windows 95 to be telephony clients
• ability for Windows NT Server to be a telephony server
You must install Microsoft TAPI 2.1 on the Server before you install Norstar TSP.
Installing TAPI 2.1 on Windows NT Server 4.0
To install Microsoft TAPI 2.1 on the Server, us e Windows NT 4. 0 Service Pack 4.
Service Pack 4 automatically adds TAPI 2.1 to Windows NT Server.
Important: TAPI 2.1 must be installed on Windows NT Server using Service
Pack 4. Service Pack 4 contains additional improvements to the Windows NT
Server telephony component that are required for Norstar TSP.
Windows NT 4.0 Service Pack 4 is available on the Microsoft web site. A copy of
Service Pack 4 is also included on the Personal Productivity Suite CD-ROM in the
directory NT4SP4.
Note: Dis tribution of 128 bit encryption outside of Nor th America is prohibited by
law. Therefore, the version of Service Pack 4 included on the Personal
Productivity Suite CD-ROM is not compatible with 128 bit encryption. If
your Windows NT 4.0 Server was installed with 128 bit encryption,
download Service Pack 4 from the Microsoft web site.
To install Service Pack 4, follow the instruction in the Readme.txt file included
with Service Pack 4.
Installing the CTA device on the Server
You must install the CTA device on the Server before you install Norstar TSP. For
instructions on installing the CTA device, refer to your CTA installation guide.
Page 13

Installing Norstar TSP 13
P0605043 Issue 01 Norstar TSP Server Configuration Guide
Installing Norstar TSP
Install Norstar TSP on the Server only. You do not have to install Norstar TSP on
the client PCs because they use the Norstar TSP installed on the Server.
Norstar TSP is included on the Personal Productivity Suite CD-ROM. To install
Norstar TSP:
1. Insert the Personal Productivity Suite CD-ROM into the CD drive of the
Server.
Note: If Auto Start is enabled on the CD drive, the initial window for
Personal Productivity Suite appears. Proceed to step 5.
2. Double click the My Computer icon.
3. Double click the CD drive icon.
4. Double click the Setup icon.
5. Follow the prompts on the screen.
Verifying that Norstar TSP is installed
Before you upgrade Norstar TSP to add server functionality, verify that Norstar
TSP and the CTA have been installed correctly.
To verify that Norstar TSP and the CTA are correctly installed:
1. Install Norstar Personal Call Manager.
Norstar Personal Call Manager is available on the Personal Productivity Suite
CD-ROM. To i nstall Norstar Personal Call M a nager, follow the instructions i n
the Personal Productivity Suite Installation Guide.
2. Start Norstar Personal Call Manager.
3. Make a test call using Norstar Personal Call Manager.
If the call is successful, the CTA and Norstar TSP are properly installed.
If the call is not successful, follow the procedures in Troubleshooting on page 48.
Page 14

14 Adding server functionality to Norstar TSP
Norstar TSP Server Configuration Guide P0605043 Issue 01
Adding server functionality to Norstar TSP
Norstar TSP is set to single user mode by default. You must upgrade Norstar TSP
before you can use server functionality. Server functionality allows Norstar TSP to
share the CTA connected to Server with other Norstar TSP users. To use the server
functionality, your computer must have a network connection and be running
Windows NT Server 4.0.
To add server functionality, use the Norstar TSP Authorization Code and the
Norstar TSP Site Code to obtain a Norstar TSP Security Key Code.
Your Norstar TSP Site Code is a temporary number t hat contains information about
the CTA device id and the number of station licenses installed. Therefore, the
Norstar TSP Site Code changes when the CTA device changes or when you upgrade
or attempt to upgrade the number of station licenses. This means that the Norstar
TSP Security Key Code is good for only one successful upgrade.
For information about upgrading to add server functionality, refer to the Norstar
TSP Station License Upgrade Guide.
Note: Under some conditions (e.g. a busy processor), rebooting the Server may
cause a Plug-and-Play re-enumeration of the CTA. If the CTA was
previously installed and functioning correctly, shutdown the Server and
restart. Do not re-ins tall the device. Re- installing will cause t he Norstar
TSP Security Code to expire.
Configuring Norstar TSP on the Windows NT 4.0 Server
You must configure the Norstar TSP Server before network users can use it to
access Norstar TSP. You configure the Server using the Telephony Control
Manager software.
The Telephony Control Manager (TCM) software is made by Microsoft
Corporation. This software consists of two applications: TCMSETUP and
TCMAPP. Use TCMSETUP to setup and enable/disable telephony services for the
client and the server. Use TCMAPP on the server to configure the associations
between Norstar sets and Windows domain user accounts.
Note: E nsure that Norstar TSP is installed, configured, and running before setting
up TCMAPP.
To configure the Norstar TSP server you must:
• enable the Norstar TSP Server
• add Norstar TSP clients to the Norstar TSP server
• assign telephones to Norstar TSP clients
Page 15
Configuring Norsta r TSP on the Windows NT 4.0 Server 15
P0605043 Issue 01 Norstar TSP Server Configuration Guide
Enabling the Norstar TSP server
The Norstar TSP server must be enabled before Norstar TSP clients can connect.
To enable the Norstar TSP server:
1. On the Server, click the Start button and then click Run.
The Run dialog box appears.
2. Enter TCMSETUP /s Domain\AdminAccnt password.
Note: In this step /s Domain\AdminAccnt password is used as an
example.
/s is a switch meaning Server.
Domain is the domain of which the TAPI server is a member.
AdminAccnt is the TAPI domain-account with local administrative
privileges.
Password is the password for the TAPI domain-account.
For example, tcmsetup /s CTI_MNTK\TAPI_ADMIN admin
3. Click the OK button.
A dialog box appears confirming that the Norstar TSP server has been
enabled.
4. Click the OK button.
Note: You can access a help screen for the TCMSETUP by entering TCMSETUP
with no parameters.
Disabling the Norstar TSP server
To disable the Norstar TSP server:
1. On the Server, click the Start button and then click Run.
The Run dialog box appears.
2. Enter TCMSETUP /S /D.
3. Click the OK button.
A dialog box appears confirming that the Norstar TSP server is disabled.
4. Click the OK button.
Page 16
16 Configuring Norstar TSP on the Windows NT 4.0 Server
Norstar TSP Server Configuration Guide P0605043 Issue 01
Adding Norstar TSP clien ts to the No rst ar TS P server
You need to register each Norstar TSP client with the Norstar TSP server. Only
clients registered with the Norstar TSP server will be allowed to use Norstar TSP.
Note: In many cases, there are a limited number of clients that can be registered
with the Norstar TSP server at one time. If you have more Norstar TSP
clients than you have Norstar TSP licenses, contact your Norstar
representative to obtain a Norstar TSP Station License Upgrade kit.
To add a Norstar TSP client:
1. On the Norstar TSP server, click the Start button.
2. Point to Settings and then click Control Panel.
3. Double click the Telephony icon.
The Dialing Properties dialog box appears.
4. Click the Telephony Drivers tab.
The Dialing Properties dialog box changes to show the installed telephony
drivers.
5. Click Norstar TAPI Service Provider.
6. Click the Configure button.
The Norstar TSP Control Panel dialog box appears.
Page 17
Configuring Norsta r TSP on the Windows NT 4.0 Server 17
P0605043 Issue 01 Norstar TSP Server Configuration Guide
7. Click the Configure button.
The TSP User Configuration dialog box appears.
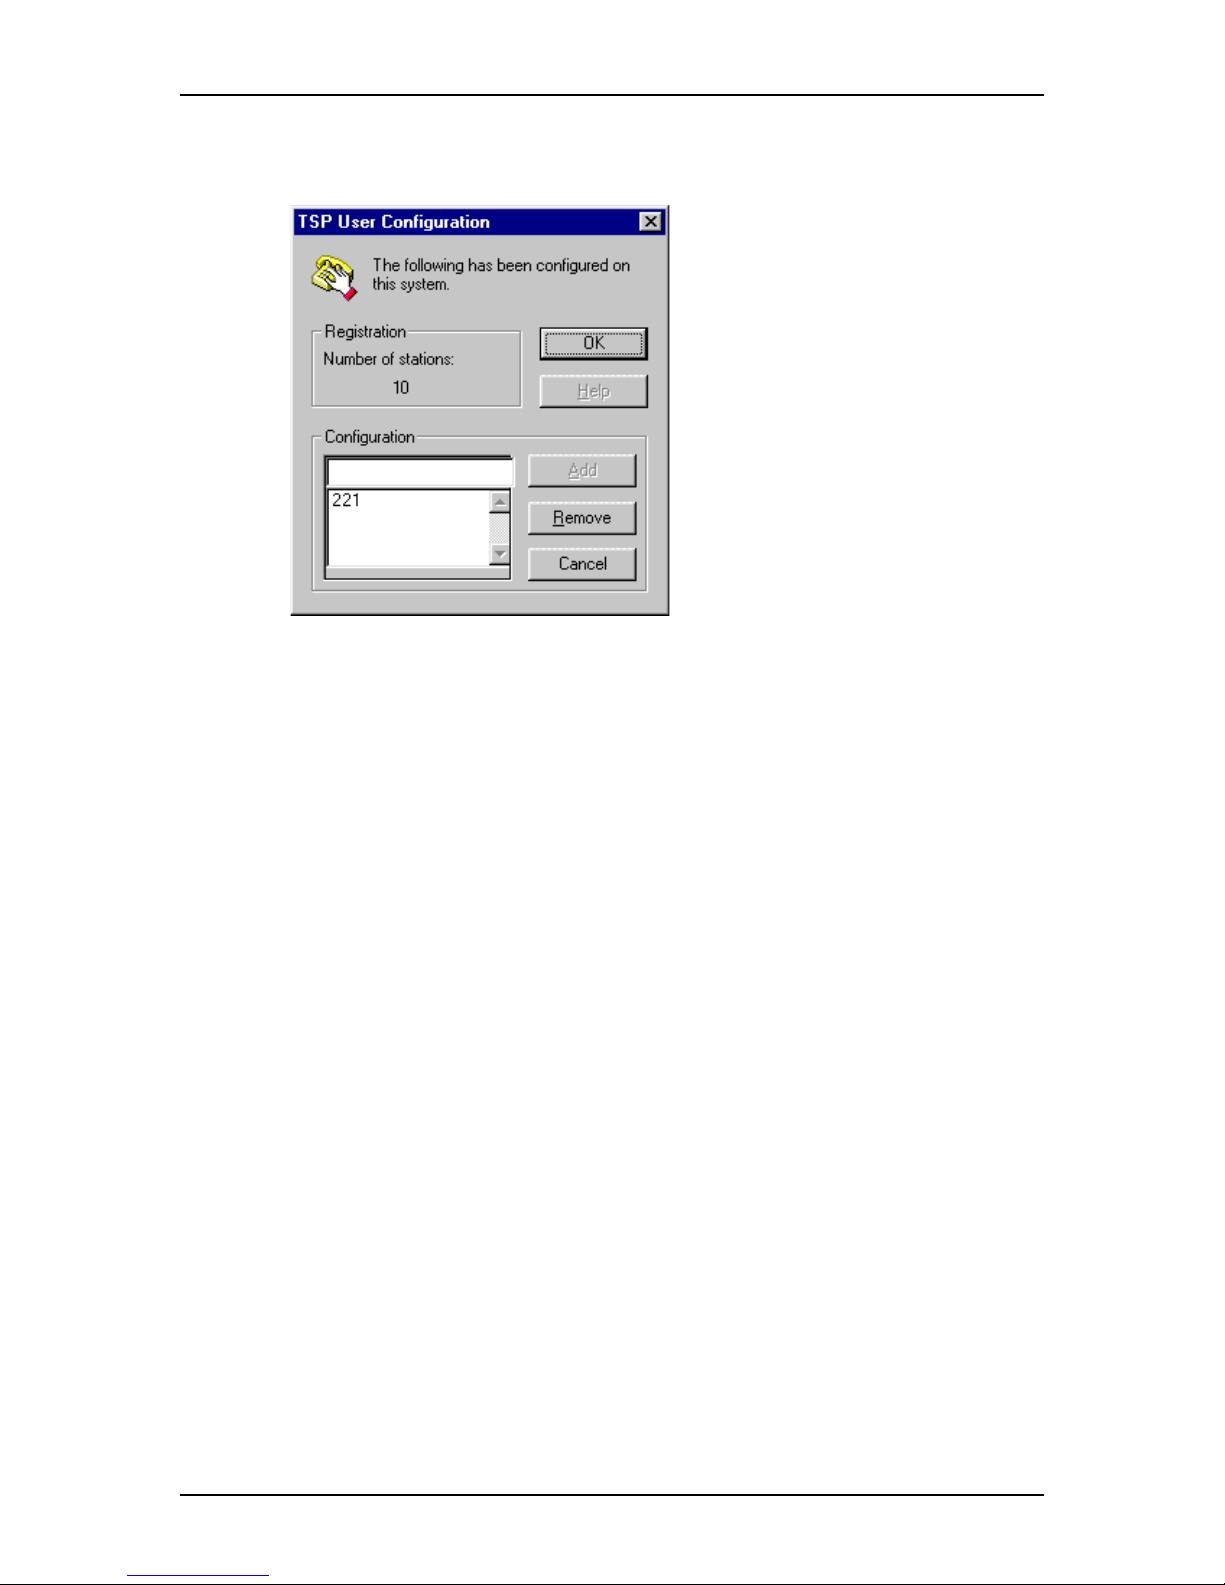
8. Click the Add button.
A list of extension numbers appears.
Note: I f the number of Norstar TSP cl ients equals the number of licenses you
have, the Add button will be grayed out.
9. Click the extension number you want to add and then click the OK button.
Add valid extension numbers only. Adding an invalid extension number will
cause Norstar TSP to function incorrectly.
When you are finished adding clients, close all of the dialog boxes associated with
Norstar TSP.
Remov ing N o rst a r T S P cl ie n ts fro m N o rs ta r T S P
In many cases, there is a limit to the number of Norstar TSP clients that can be
registered with the Norstar TSP server. If there is a Norstar TSP client that no longer
uses Norstar TSP, you can delete that client to allow another user to be registered.
To delete a Norstar TSP client:
1. On the Norstar TSP server, click the Start button.
2. Point to Settings and then click Control Panel.
3. Double click the Telephony icon.
The Dialing Properties dialog box appears.
4. Click the Telephony Drivers tab.
The Dialing Properties dialog box changes to show the installed telephony
drivers.
5. Click Norstar Telephony SP.
Page 18

18 Configuring Norstar TSP on the Windows NT 4.0 Server
Norstar TSP Server Configuration Guide P0605043 Issue 01
6. Click the Configure button.
The Norstar TSP Control Panel dialog box appears.
7. Click the Configure button.
The TSP User Configuration dialog box appears.
8. Click the extension number you want to delete.
9. Click the Remove button.
Note: If there are no clients to delete, the Remove button will be grayed out.
When you are finished adding clients, close all of the dialog boxes associated with
Norstar TSP.
Page 19

Configuring Norsta r TSP on the Windows NT 4.0 Server 19
P0605043 Issue 01 Norstar TSP Server Configuration Guide
Assigning a telephone to a Norstar TSP client
For each Norstar TSP client, you must as sign an extension number to their network
user ID. The Norstar TSP server uses this information to make sure the correct
telephone is controlled by a Norstar TSP client.
You assign the extension numbers to the network user IDs using the TCMAPP
utility. This utility is made by Microsoft Corporation. For additional information
about using the TCMAPP utility, refer to the documentation that came with
Windows NT Server.
Tip: Although a Norstar TSP client can log in on any PC on the network, the
extension number associated with that client does not change unless you
change it in the TCMAPP utility. This allows a Norstar TSP client to
receive TAPI messages for their telephone from any PC they log on to.
This also means that the TAPI messages a Norstar TSP client receives are
always for the telephone assigned to them, not necessarily the telephone
beside the PC they are using.
To assign a telephone to a Norstar TSP client:
1. On the Norstar TSP Server, click the Start button and then click Run.
2. Enter TCMAPP.
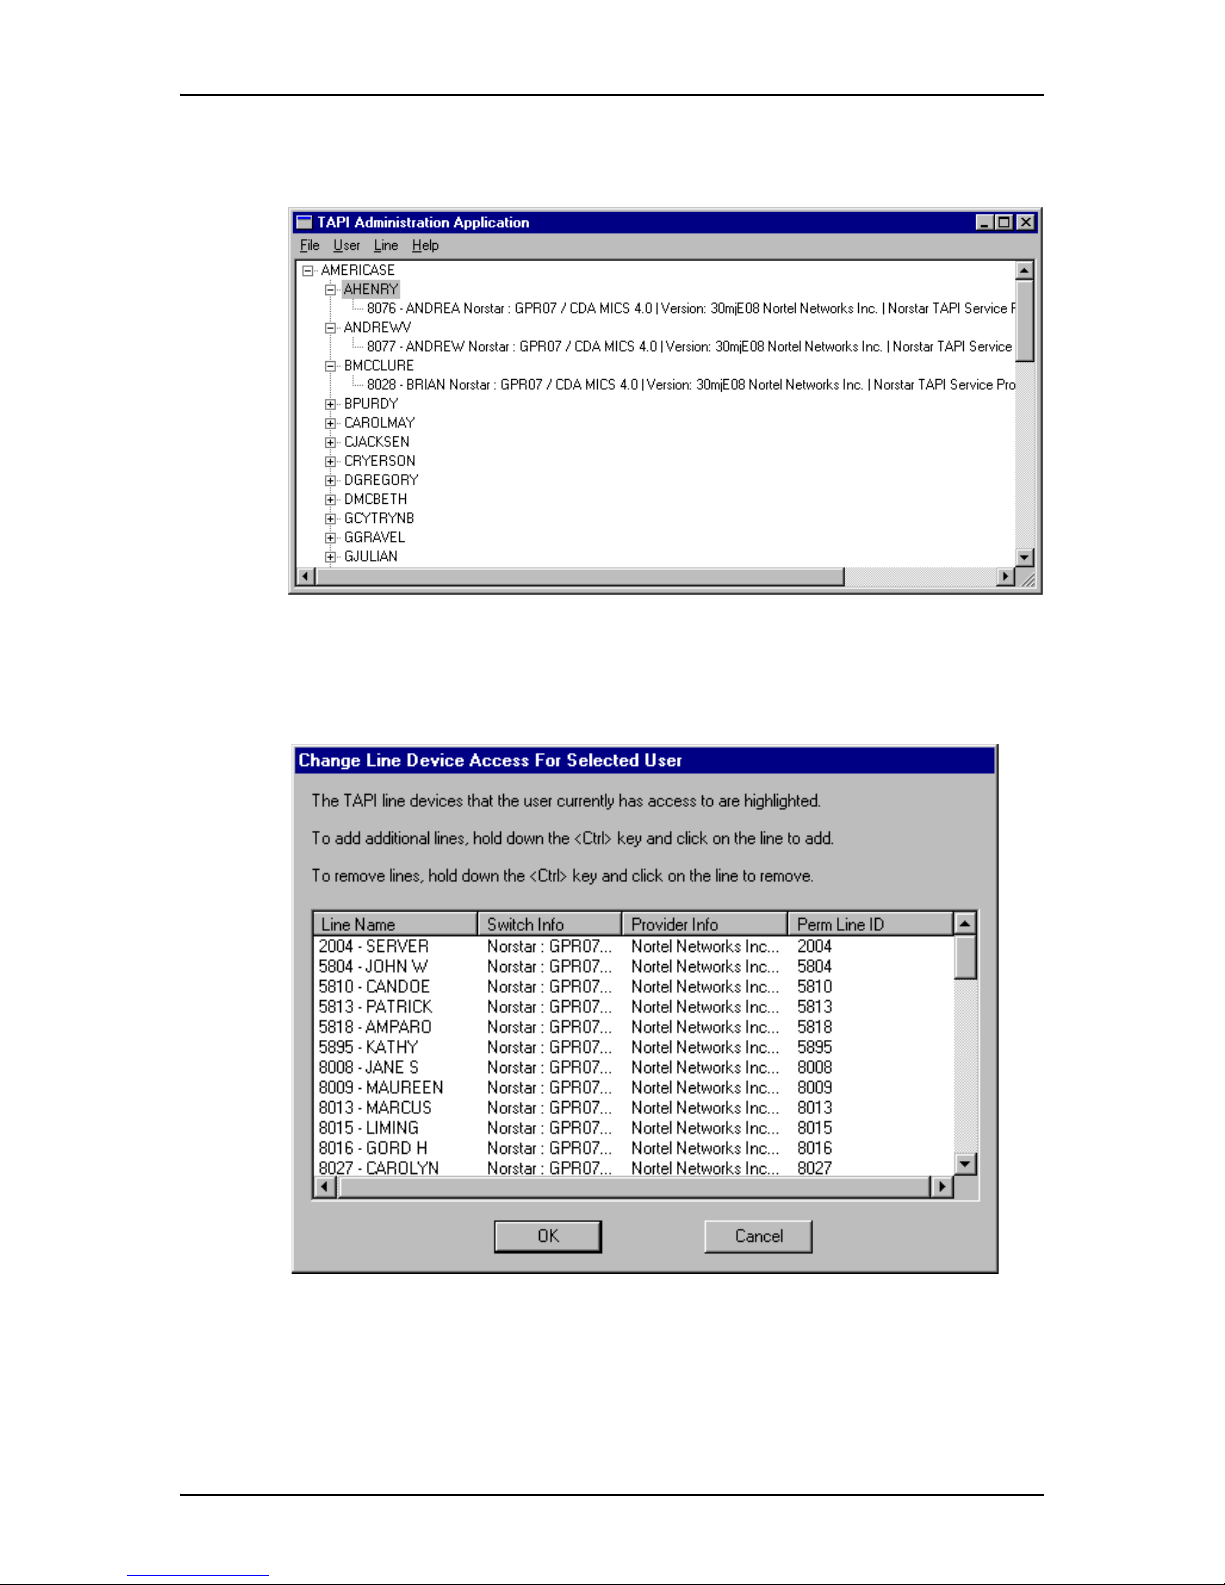
The TAPI Administration Application window appears.
Note: I n the example above:
SALTLAKE is the domain,
butte is a user domain account,
missoula is a user domain account.
Page 20

20 Configuring Norstar TSP on the Windows NT 4.0 Server
Norstar TSP Server Configuration Guide P0605043 Issue 01
3. Click the User menu and then click Add a User to this Telephony Server.
The Add Users and Groups dialog box appears.
4. Click the user domain account you want to add.
5. Click the Add button.
6. Repeat steps 4 and 5 for all of the use r domain accounts (Norstar TSP clients)
you want to add.
7. Click the OK button.
After you add all of the Norstar TSP clients, assign lines to these clients. For
information about assigning lines, refer to To assign lines to the Norstar TSP
clients.
Page 21
Configuring Norsta r TSP on the Windows NT 4.0 Server 21
P0605043 Issue 01 Norstar TSP Server Configuration Guide
To assign lines to the Norstar TSP clients
1. Ensure the TAPI Administration Application window is open.
2. Click on the user domain account you want to change.
3. Click the User menu and then click Change Selected User’s Line Access.
The Change Line Device Access for Selected User dialog box appears.
4. Click on the line or lines you want to add to the user domain account.
5. Click the OK button.
The line or lines you selected appear under the Client’s name in the window.
6. Repeat steps 2 to 5 for each Norstar TSP client that need lines assigned.
Page 22

22 Configuring Norstar TSP on the Windows NT 4.0 Server
Norstar TSP Server Configuration Guide P0605043 Issue 01
7. Click the File menu and then click Exit.
8. Click the Yes button to save the information.
9. Reboot the server.
Tips for the assignin g lines
Blank lines that appear in the TAPI line device list on the Change Line Device
Access for Selected User dialog box indicate errors on devices specified in the TSP
User Configuration dialog box. These errors include:
• an invalid extension number was specified
• an out-of-service extension number was specified
• an extension number entered is in-use by another application (such as voice
mail or ACD)
Within TCMAPP, the directory numbers specified in the TSP User Configuration
dialog box are processed in numerical order. When TCMAPP encounters an invalid
extension number, a blank line appears and TCMAPP continues processing. When
TCMAPP encounters out-of-service and in-use extension numbers, TCMAPP
returns and no information is displayed for the remaining lines. These blank lines
are placed at the top of the list.
Lines with problems can be determined by re-verifying the numbers or dialing the
numbers from a telephone.
To correct the blank lines due to invalid-extension-numbers or out-of-service
conditions, delete those lines from the TSP User Configuration dialog box. After
you re-boot the Server, these blank lines disappear.
To correct blank lines due to the in-use-by-another-application, wait for a while,
then re-enter the TCMAPP application. After a device has been identified it will not
cause further disruption to the installation.
Page 23
Configuring Norsta r TSP on the Windows NT 4.0 Server 23
P0605043 Issue 01 Norstar TSP Server Configuration Guide
Deleting a line from a client
To delete a line from a client:
1. On the Norstar TSP Server, click the Start button and then click Run.
2. Enter TCMAPP.
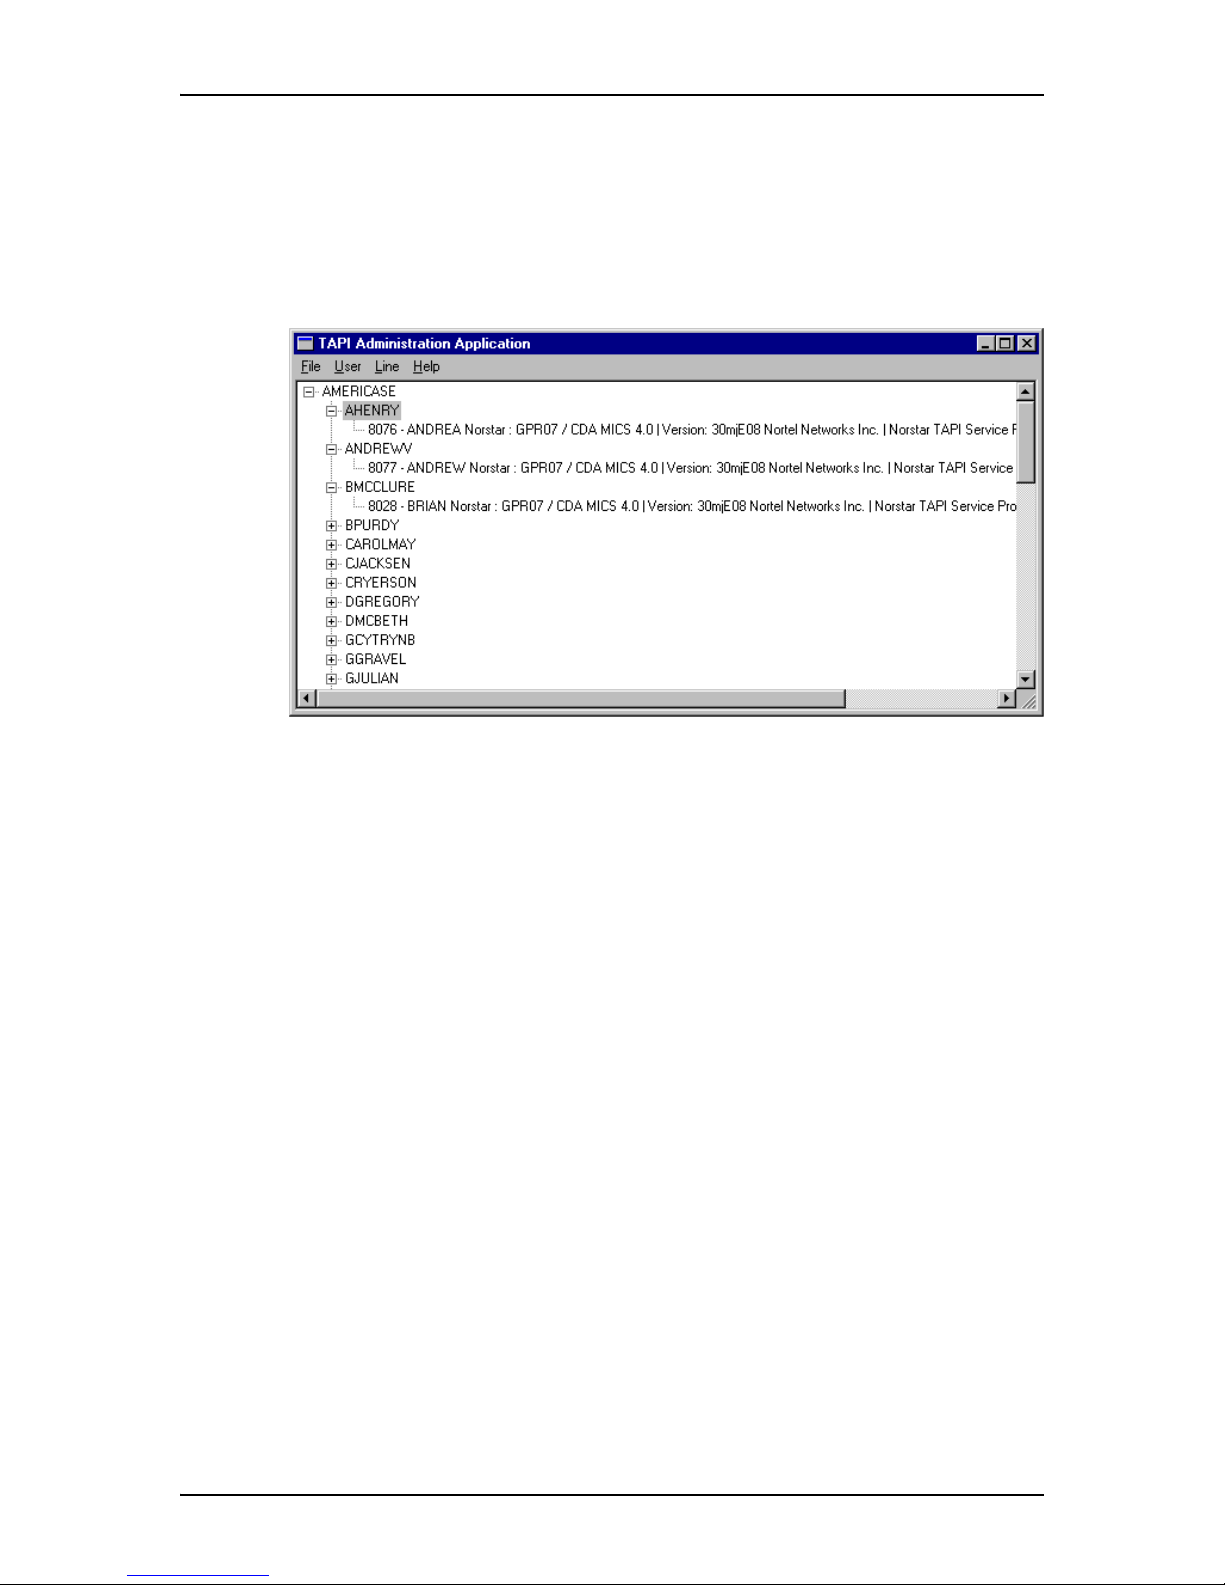
The TAPI Administration Application window appears.
3. Click on the Norstar TSP client.
4. Click on the line to delete.
5. Click the Line menu and then click Remove Selected Line.
6. Repeat steps 3 to 5 for each line you want to delete.
7. Click the File menu and then click Exit.
8. Click the Yes button to save the information.
9. Reboot the server.
Page 24

24 Enabling the Norstar TSP Server
Norstar TSP Server Configuration Guide P0605043 Issue 01
Configuring Norstar TSP on the Windows
2000 or Windows 2000 Advanced Servers
You must configure the Norstar TSP Server before network users can use it to
access Norstar TSP. You configure the Server using the Microsoft Management
Console.
To configure the Norstar TSP server you must:
• enable the Norstar TSP Server
• add Norstar TSP Clients to the Server
• assign telephones to Norstar TSP clients
Enabling the Norstar TSP Server
The Norstar TSP Server must be enabled before Norstar TSP Clients can connect.
To enable the Norstar TSP Server, follow these steps:
1. Click Start, click Run, type mmc, and then press Enter.
The Console<#> dialog appears:
2. From the top menu bar, click Console.
3. On the dropdown menu, click Add/Remove Snap-in.
Page 25

Enabling the Norstar TSP Server 25
P0605043 Issue 01 Norstar TSP Server Configuration Guide
The Add/Remove Snap-in dialog appears.
4. Click Add.
The Add Standalone Snap-in dialog appears.
5. Click Telephony.
Page 26

26 Enabling the Norstar TSP Server
Norstar TSP Server Configuration Guide P0605043 Issue 01
6. Click Add, and then click Close.
The telephony icon appears in the window on the Add/Remove Snap-in
dialog.
7. Click OK.
Selecting the server
Once the server has been specified, using the preceding procedure, you can select
the server to be managed on the Console screen.
1. In the Console Route dialog, click the key next to Telephony.
The list expands to show the available Telephony servers in the right frame.
2. Click on the server you want to manage.
3. On the top menu, click Action, the n cli c k Properties.
The Properties window for the selected server appears.
Page 27

Adding Norstar TSP Clients to the Norstar TSP Server 27
P0605043 Issue 01 Norstar TSP Server Configuration Guide
4. On the Setup tab, click on the Enable Telphony server check box to enable
the server.
Note: I f the Enable telephony server check box is unavailable, start the Telephony
service.
On your desktop, click Start, point to Settings, then click Control Panel.
Double-click on Administrative Tools.
Double-click on Services.
Right-click Telephony, then click Start.
5. After you enable the server, specify a logon account in the Account
Information area.
Note: The logon account you specify must be a member of the Administrators
group on the server. It must also be in the same domain as the server or in a
domaint hat has a two-way trust relationship with the domain containing the
server.
Adding Norstar TSP Clients to the Norstar TSP Server
Refer to Adding Norstar TSP clients to the Norstar TSP server on page 16.
Assigning a telephone t o a Nors tar TSP c lient
For each Norstar TSP client, you must as sign an extension number to their network
User ID. The Norstar TSP server uses this information to ensure that the correct
telephone is controlled by a Norstar TSP client.
1. In the console tree of the Telephony command console, click the service
provider you want to manage. The following dialog appears:
2. In the details pane, under Line Name or Phone Name area, click the
appropriate line or telephone.
Page 28

28 Assigning a telephone to a Norstar TSP client
Norstar TSP Server Configuration Guide P0605043 Issue 01
3. On the Action menu, click Edit Users.
The following dialog appears:
4. Click Add.
A new dialog appears.
5. In the Look in box, click the domain that contains the user.
6. In the list, click the user, and then click Add.
The name appears on the list in the right frame.
Note: You can also start the Telphony management console in Windows 2000
Server from the Start menu: Click Run. Type in tapimgmt.msc. Click OK.
This procedure determines which clients can use the telephony devices that are
accessible to the server. Changes take effect the next time the computer attempts to
start the TAPI service.
To manage the Telephony service, you must be a telephony administrator on the
server or logged on as an administrator of the server.
Page 29

Client installation overview 29
P0605043 Issue 01 Norstar TSP Server Configuration Guide
Installing Norstar TSP on client PCs
To use the Norstar TSP server functionality from a client PC, you must install and
configure applications on the client PCs.
Client installation overview
1. Install Microsoft TAPI 2.1 on the client PCs.
For mo re i n formation, refer Installing Microsoft TAPI 2.1 on client PCs on
page 29.
2. Configure TAPI Client on the client PCs.
For mo re i n formation, refer t o Configuring TAPI Client on a client PC on
page 31.
3. Windows 2000 Professional uses built-in TAPI 3.0 for telephony access and
services.
Installing Microsoft TAPI 2.1 on client PCs
Microsoft TAPI 2.1 and its installation program are made by Microsoft
Corporation.
Microsoft TAPI 2.1 provides the following features:
• full 32-bit architecture and backward compatibility with 16-bit TAPI
applications
• ability for Windows NT, Windows 9 8 and Windows 95 to be telephony clients
• ability for Windows NT Server to be a telephony server
You must install Microsoft TAPI 2.1 on each of the client PC s. TAPI 2.1 must also
be installed on the Server bef ore you install Norstar TSP.
Note: The Microsoft TAPI 2.1 information in this guide is a supplement to the
Microsoft TAPI Readme.txt file provided with the Microsoft TAPI 2.1
Upgrade. Be sure to read the Microsoft TAPI Readme.txt file and install
TAPI 2.1 according those instructions.
Installing TAPI 2.1 on Windows NT 4.0 Workstation
To install Microsoft TAPI 2.1 on Windows NT 4.0 Workstation PCs, use Windows
NT 4.0 Service Pack 4. Service Pack 4 automatically adds TAPI 2.1 to
Windows NT Workstation. You must install Windows NT 4.0 Service pack 4
before you install Norstar TSP.
Important: TAPI 2.1 must be installed on Windows NT Workstation using the
Service Pack 4. Service Pack 4 contains additional improvements to the Windows
NT Workstation telephony component that are required for Norstar TSP.
Page 30

30 Installing Microsoft TAPI 2.1 on client PCs
Norstar TSP Server Configuration Guide P0605043 Issue 01
Windows NT 4.0 Service Pack 4 is available on the Microsoft web site. A copy of
Service Pack 4 is also included on the Personal Productivity Suite CD-ROM in the
directory NT4SP4.
To install Service Pack 4, follow the instructions in the Readme.txt file included
with Service Pack 4.
Installing TAPI 2.1 on Windows 95
You must install TAPI 2.1 on the client PCs. TAPI 2.1 allows the client PCs and the
Server to communicate.
Microsoft TAPI 2.1 is available on the Microsoft web site. A copy of Microsoft
TAPI 2.1 is also included on the Personal Productivity Suite CD-ROM in the
directory Tapi21. Be sure to read the Readme.txt file and the license agreement
included with the upgrade before installing.
To install TAPI 2.1:
1. Insert the Personal Productivity Suite CD-ROM into the CD drive of the client
PC.
Note: If Auto Start is enabled on the CD drive, the initial window for
Personal Productivity Suite appears. Click the EXIT button.
2. Double click the My Computer icon.
3. Click the CD drive icon.
4. Click the File menu and then click Explore.
5. Double click the TAPI21 folder.
6. Double click on TAPI2195.EXE.
7. Restart the client PC.
8. Repeat steps 1 to 7 for each client PC that requires Norstar TSP. Make sure
that all of the client PCs have TAPI 2.1 installed.
Installing TAPI 2.1 on Windows 98
You do not need to install TAPI 2.1 on Windows 98 PCs. TAPI 2.1 is included with
Windows 98.
Page 31

Configuring TAPI Cli ent on a client PC 31
P0605043 Issue 01 Norstar TSP Server Configuration Guide
Configuring TAPI Client on a client PC
You must configure each client PC to work with the Norstar TSP server.
Note: The dialog boxes shown in this section for Dialing Properties are those
which appear on a Windows 95 system. These boxes will be different in
Windows 98, Windows NT 4.0 Workstation, Windows 2000 Professional,
and so on.
To configure the client PC you must:
• configure the network settings
• log on to the Norstar TSP server
• set the dialing properties
• restart the client PC
Configuring the networ k sett ings on the cli en t PC
For the client PC to communicate with the Norstar TSP server, there are two
network settings required.
The client PC must be in the same domain as the Norstar TSP server.
The client PCs can only be logged in to one domain at any one time. Remove the
client PCs from any prior domains before proceeding with setting up the client.
The Access Control must be set to User le ve l.
On Windows 95 client machines, you must ensure the File and Print Sharing are
both enabled with user level access control.
To set the Access Control on the client PC:
1. On the client PC, click the Start button.
2. Point to Settings and then click Control Panel.
3. Double click the Network icon.
Page 32

32 Configuring TAPI Cli ent on a client PC
Norstar TSP Server Configuration Guide P0605043 Issue 01
4. Click the Access Control tab.
5. Click User-level access control.
6. Ensure the correct domain name is entered in the Obtain list of users and
groups from field. In this example, SALTLAKE.
7. Click the OK button.
The Network window closes.
8. Click the Start button.
9. Double click the Network icon.
10. Click the File and Print Sharing button.
The File and Print Sharing dialog box appears.
11. Select the File and Print Sharing options and click the OK button.
Page 33

Configuring TAPI Cli ent on a client PC 33
P0605043 Issue 01 Norstar TSP Server Configuration Guide
Registering with the Norsta r TSP server
A client PC must register with the Norstar TSP server. Registering identifies which
Windows NT server the Norstar TSP client will be using.
To register with the Norstar TSP server:
1. On the client PC, click the Start button and then click Run.
The Run dialog box appears.
2. Enter TCMSETUP /C servername.
Note: In this step servername is used as an example. It represents the
name of the Norstar TSP server the user is registering with. Contact
your network administrator for the name of the Norstar TSP server.
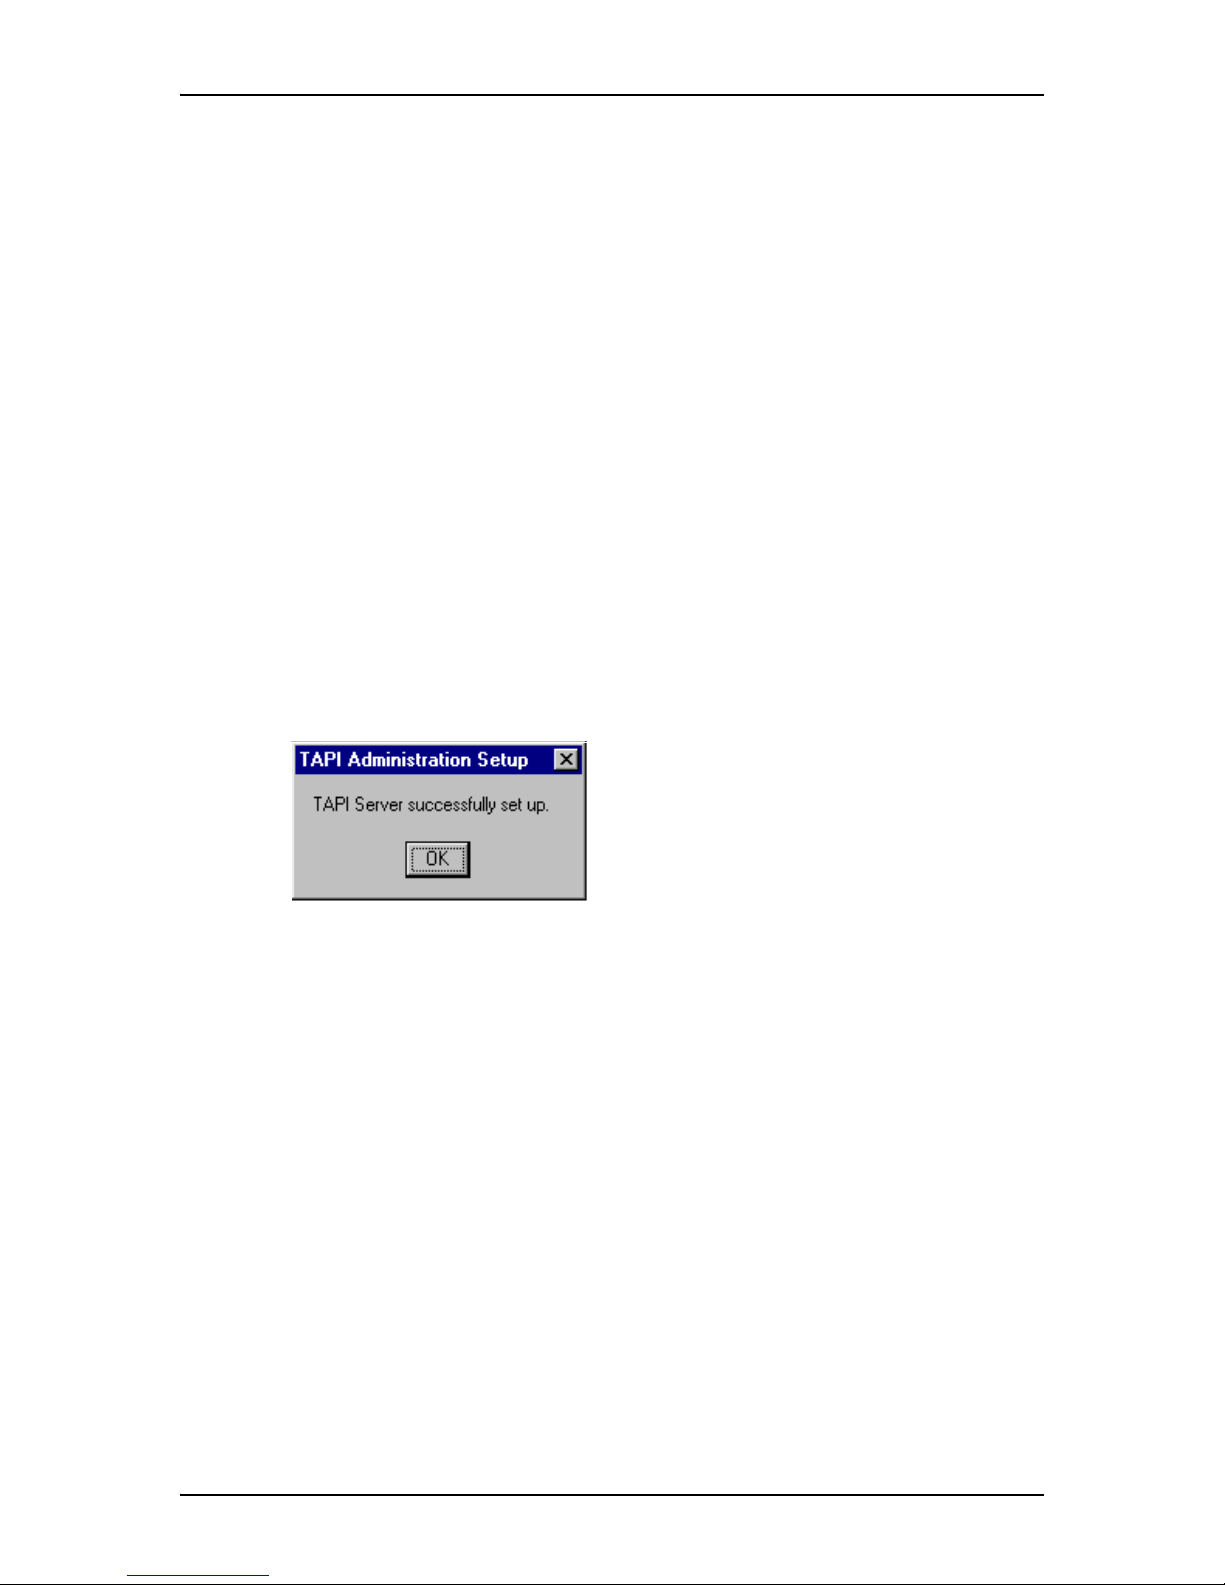
3. Click the OK button.
A dialog box appears confirming that you have registered with the Norstar
TSP server.
4. Click the OK button.
5. Reboot the server after you have finished setting up the Server and the Client.
Changing the Nors ta r T S P server a client uses
If there are more than one Norstar TSP servers in one domain on the network,
clients can change the server they use. To change the Norstar TSP server used:
1. On the client PC, click the Start button and then click Run.
The Run dialog box appears.
2. Enter TCMSETUP /C servername.
Note: In this step, servername is used as an example. It represents the
name of the Norstar TSP server the user is registering with. Contact
your network administrator for the name of the Norstar TSP server.
3. Click the OK button.
A dialog box appears confirming that you have registered with the new
Norstar TS P serv e r.
4. Click the OK button.
Canceling regist ration with the Norstar TSP serve r
On many Norstar TSP servers, there is a limit to the number of users that can be
registered at one time. Occasionally you may need to cancel registration with the
Norstar TSP server to allow another user to log on.
Tip: If you have more people who want to use Norstar TSP than you have
licenses, you can obtain a Norstar TSP Station License Upgrade kit from
your Norstar representative.
Page 34

34 Configuring TAPI Cli ent on a client PC
Norstar TSP Server Configuration Guide P0605043 Issue 01
To log off of the Norstar TSP server:
1. On the client PC, click the Start button and then click Run.
The Run dialog box appears.
2. Enter TCMSETUP /C /D.
3. Click the OK button.
A dialog box appears confirming that you have logged off of the Norstar TSP
server.
4. Click the OK button.
Setting the Dialing Properties
After logging on to the server, the Norstar TSP user must s et the dialing properties.
The dialing properties define how Norstar TS P will dial calls.
The dialing properties are accessed from the Dialing Properties dialog box.
To open the Dialing Properties dialog box:
1. Click the Start button.
2. Point to Settings and then click Control Panel.
3. Double click the Telephony icon.
The Dialing Properties dialog box appears.
Page 35

Configuring TAPI Cli ent on a client PC 35
P0605043 Issue 01 Norstar TSP Server Configuration Guide
From the Dialing Properties dialog box you can:
• choose the location you are dialing from (I am dialing from)
• choose the country you are in (I am in this country)
• set the area code you are dialing from (Area Code)
• choose if you are using a calling card (Use a calling card for long distance)
• set the number used to disable Call Waiting (Disable call waiting by dialing)
• set how to access lines (To access an outside lines)
• choose the type of dialing system (Dial using)
I am dialing from
The I am dialing from field is used to save different sets of dialing properties. It is
used when you have a computer (such as a lap top) that you use at different
locations. The settings for the different locations can be saved under different
names in the I am dialing from field. You can then quickly change to the new
settings when you switch locations.
For example, you may have a lap top computer that you use at both the north and
south locations. If the north and south locations have different dialing requirements
(such as call waiting in the north but not in the s outh), you can set up two different
sets of dialing properties in the I am dialing from field. Then, when you switch
locations, you can change the dialing properties by changing the name that appears
in the I am dialing from field .
Creating a new location
When you create a new location, you are creating the name that is used to access the
new set of dialing properties. After you create the location, any changes made to
Dialing Properties dialog box are saved with this name.
To create a new location:
1. Click the New button.
A dialog box appears confirming that a new location was created.
2. Ensure the text in the I am dialing from field is highlighted.
3. Enter the name of the new location.
4. Change the other fields on the Dialing Properties dialog box to match the
dialing properties required for this location.
These fields are described later in this section.
5. Click the Apply button to store the changes with the new location.
Page 36

36 Configuring TAPI Cli ent on a client PC
Norstar TSP Server Configuration Guide P0605043 Issue 01
Selecting a location
When you select a location, all of the dialing properties are changed to the settings
that are stored for that location. To select a location:
1. Click the drop list arrow that is on the right side of the I am dialing from
field. A list of locations appears.
2. Click the location you are currently at.
The dialing properties are changed to the setting stored for this location.
Deleting a location
When you no longer need a location, you can delete it from the list of locations.
To delete a location:
1. Click the drop list arrow that is on the right side of the I am dialing from
field. The list of locations appears.
2. Click the location you want to delete.
3. Click the Remove button.
A confirm deletion dialog box appears.
4. Click the Yes button.
I am in this coun t ry
This field defines the country of the you are currently in.
To select a country:
1. Click the drop list arrow beside the I am in this country field.
2. Scroll through the list of countries.
3. Click on the country you are in.
Tip: Y ou can scroll quickly through the list of countries by typing the first few
letters of the country’s name. As you type, the list will move to the country
that matches the letters you type.
Area Code
The Area Code field defines the area code you are currently in. Norstar TSP uses
the number in this field to determine if a call is a local call (to the same area code)
or a long distance call.
To enter an area code:
1. Highlight all of the characters in the Area Code field.
2. Type the area code.
In some locations, the area code must always be added when dialing a telephone
number. To make Norstar TSP include the area code, ensure the I always have to
dial the area code before the phone number field contains a check mark ().
Page 37

Configuring TAPI Cli ent on a client PC 37
P0605043 Issue 01 Norstar TSP Server Configuration Guide
Dialing Rules
In some locations, calls within the same area code are considered long distance
calls. These calls require the country code and area code (for example, 1-403) to be
added to the front of the telephone number before they are dialed.
The Dialing Rules feature allows you to define the prefixes (for example, 222-xxxx)
that are long distance calls in your area code.
To set the prefixes that are long distance:
1. Click the Dialing Rules button.
The Dialing Rules dialog box appears.
To add a prefix that is considered long distance
1. Click the New button located in the top half of the dialog box.
The New Area Code and Prefix dialog box appears.
2. Enter the prefix and click the OK button.
To delete a pr ef ix that is considered long distance
1. Click the prefix you want to delete.
2. Click the Remove button.
Page 38

38 Configuring TAPI Cli ent on a client PC
Norstar TSP Server Configuration Guide P0605043 Issue 01
To add a prefix that is considered local
1. Click the New button located in the bottom half of the dialog box.
The New Area Code and Prefix dialog box appears.
2. Enter the prefix and click the OK button.
To delete a pr ef ix that is considered local
1. Click the prefix you want to delete.
2. Click the Remove button.
Use a calling card for long distance
Choose this field if you want to use a calling card for long distance telephone
numbers. This field also lets you define which calling card you are using.
To use a calling card:
1. Ensure the Use calling card for long distance check box contains a check
mark ().
If you have previously set up a calling card, the settings for that calling card
are used.
If you have not set up a calling card, refer to Setting up a calling card.
To stop using a calling card
1. Ensure the Use calling card for long distance check box is empty.
Setting up a calling card
You must set up the calling card parameters before you can use a calling card. To
set up a calling card:
1. Click the Calling Card button.
The Calling Card dialog box appears.
Page 39

Configuring TAPI Cli ent on a client PC 39
P0605043 Issue 01 Norstar TSP Server Configuration Guide
2. Click the drop list box at the top of the dialog box.
3. Scroll through the list to find the calling card you are using and then click the
calling card.
Note: I f the calling card you are using is not on this list, refer to Adding a
custom calling card.
4. Click the Calling Card Phone Number field.
5. Enter the calling card telephone number.
6. Click the PIN number field.
7. Enter your calling card PIN number.
8. Click the OK button.
Adding a custom call ing card
The dialing parameters for some calling cards are already configured in Norstar
TSP and appear in the list of calling cards. If the calling card you are using is not on
the list of cards, you must set up how to use your calling card.
To add a custom calling card:
1. Click the Calling Card button.
The Calling Card dialog box appears.
2. Click the New button.
The Cr eat e New Ca l l i ng Ca rd dial og box appears.
3. Type the name of the calling card and click the OK button.
A dialog box appears informing you that you must set up the dialing rules for
the new calling card.
4. Click the OK button.
5. Click the Calling Card Phone Number field.
6. Enter the calling card number.
7. Click the PIN number field.
8. Enter your calling card PIN number.
Page 40

40 Configuring TAPI Cli ent on a client PC
Norstar TSP Server Configuration Guide P0605043 Issue 01
9. Click the Long Distance Usage button.
A second Calling Card dialog box appears.
10. Click the Dial field in the first step.
11. Choose the first set of numbers that must be dialed.
12. Click the next Dial field and then click the next set of numbers to be dialed.
13. Repeat step 12 until you have completed all of the steps needed to make a call
using your calling card.
Note: Re fer to the documentation that came with your calling card for the
sequence of steps that are required with your card.
14. When all of the required steps are added, click the OK button.
15. Click the International Usage button.
16. Repeat steps 10 to 14 to add the steps required to make an international call.
17. Click on the OK button to return to the Dialing Properties dialog box.
Page 41

Configuring TAPI Cli ent on a client PC 41
P0605043 Issue 01 Norstar TSP Server Configuration Guide
Disable call waiting by dialing
If call waiting is available for the current location, use this field to define the
numbers required to disable call waiting. Your telephony application will use these
numbers to disable call waiting when required.
To enter the numbers required to disable call waiting:
1. Click the Disable call waiting by dialing check box.
A check mark () appears.
2. Click the drop list arrow beside the Disable call waiting by dialing field and
then click the appropriate disable call waiting code.
If the appropriate code does not appear on the list, click the field and type the
disable call waiting code.
To identify that call waiting is not used, ensure the Disable call waiting by dialing
check box is empty.
To access outside lines
There are two fields for accessing outside lines. The first field is for the digits
required to access local numbers and the second field is for the digits required to
access long distance lines. These access numbers are required if you are using a line
pool or call routing t o make calls . These numbers are the same numbers you dial if
you are making an outside call from your telephone.
If you do not dial an extra number (e.g. 9) when making a call from your telephone,
leave these fields blank.
To change the outside line access numbers:
1. Highlight the for long distance field and then type the number required to
access an outside line for a long distance call.
2. Highlight the for local field and then type the number required to access an
outside line for a local call.
Dial using
Use this field to choose tone dialing signals or pulse dialing signals when making a
call. To select pulse dialing, click on the Pulse dial button. To select tone dialing,
click on the Tone dial button.
Page 42

42 Accessing the Norstar TSP Control Panel
Norstar TSP Server Configuration Guide P0605043 Issue 01
Viewing Norstar TSP information
After Norstar TSP is installed and configured, you can view information about
Norstar TSP and how it is operating. You can view:
• information about Norstar TSP from the Norstar TSP Control Panel
• Norstar TSP error messages
• Norstar CTI diagnostics
Accessing the Norstar TSP Control Panel
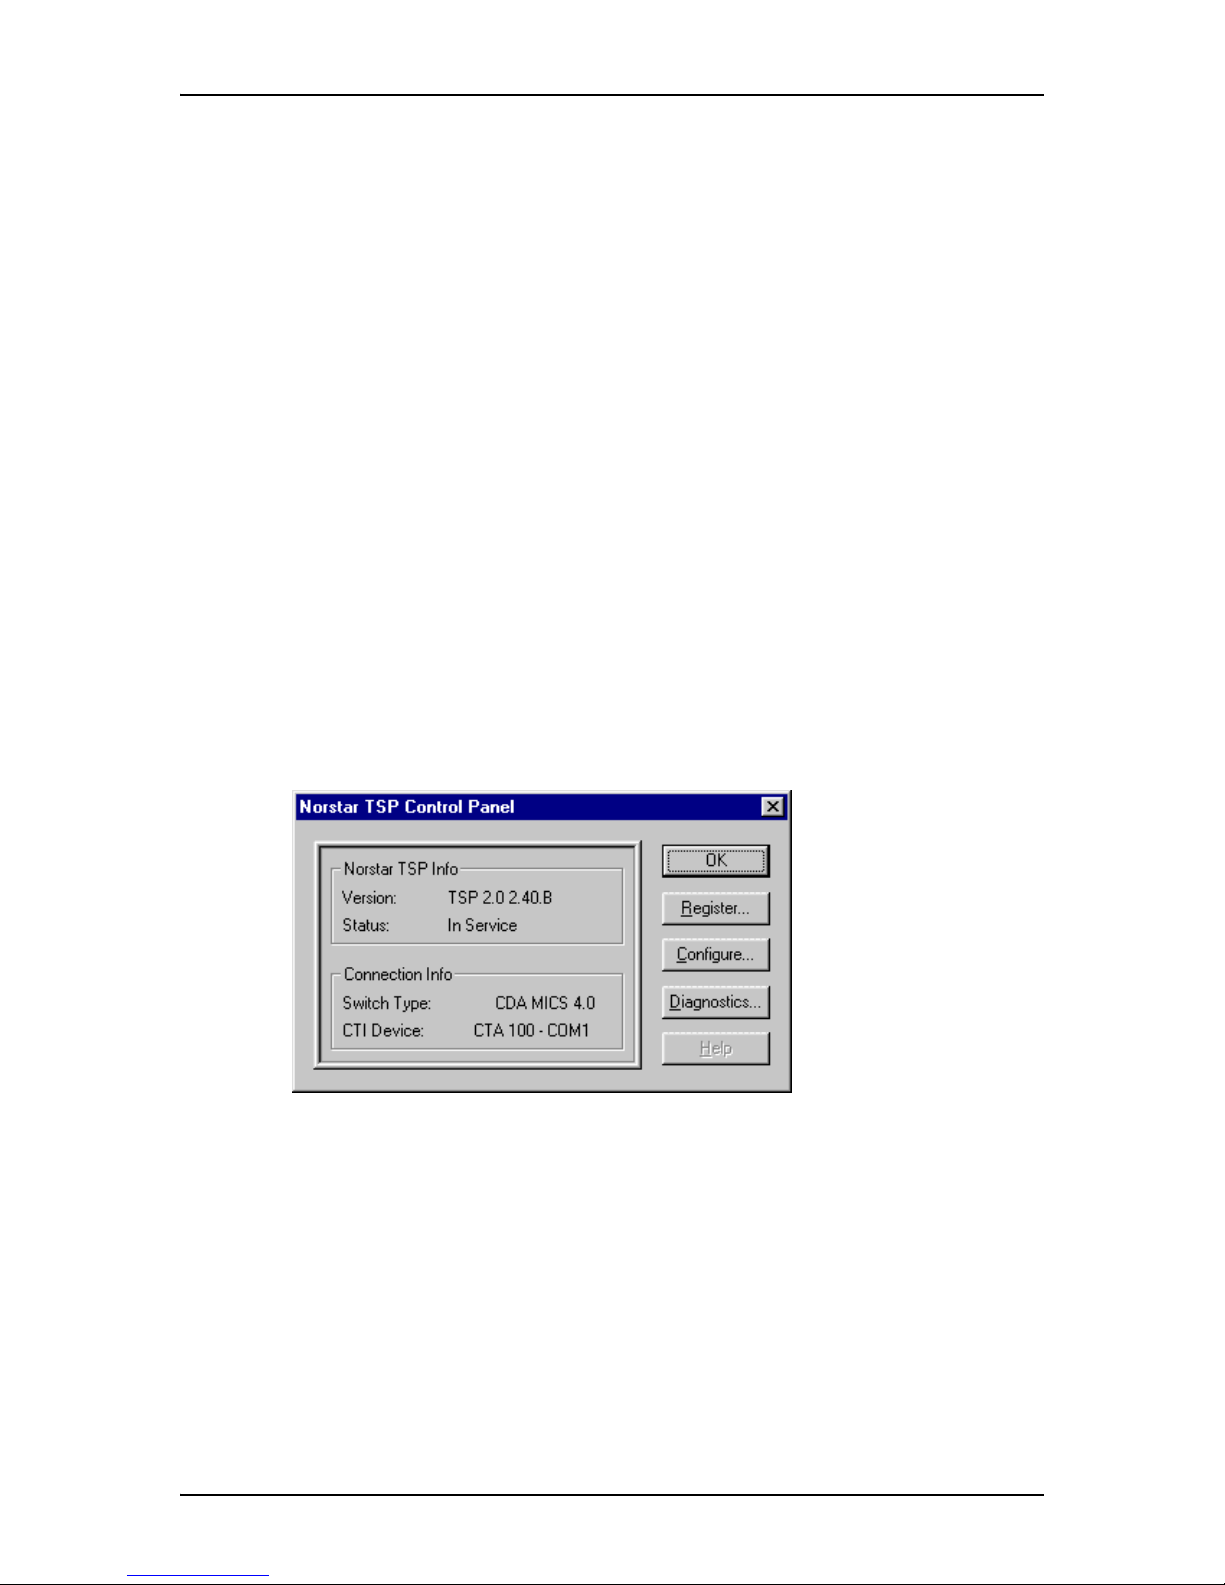
The Norstar TSP C ontrol Panel provides infor mation about Norstar TSP. From this
dialog box you can:
• view the Norstar TSP version number
• view the Norstar TSP status
• check the current upgrade status
• view the connection information
To access the Norstar TSP Control Panel:
1. Click the Start button.
2. Point to Settings and then click Control Panels.
3. Double click the Telephony icon.
The Dialing Properties dialog box appears.
4. Click the Telephony Drivers tab.
The Dialing Properties dialog box changes to show the installed telephony
drivers.
5. Click Norstar TAPI Service Provider.
6. Click the Configure button.
The Norstar TSP Control Panel dialog box appears.
Page 43

Norstar TSP error messages 43
P0605043 Issue 01 Norstar TSP Server Configuration Guide
Viewing the Norstar TSP version number
The Norstar TSP version number appears on the N or star T SP Control P anel in the
Version field. The information in this field identifies the Norstar TSP software
version that is installed on your PC.
Viewing the Norstar TSP status
The Norstar TSP status appears on the Norstar TSP Control Panel in the Status
field. This field indicates whether Norstar TSP is functioning.
In Service - Norstar TSP is functioning and can communicate with the CTA and
the Norstar telephone system.
Not in Service - Norsta r TSP can not communicat e with the CTA or the Norstar
telephone system. Typical causes for no communication are:
• the cables are disconnected or damaged
• the CTA is not working
• the Norstar telephone system is not working
Viewing the connection information
The connection information appears on the Norstar TSP Control Panel in the
Conne c ti o n Info section. This section of the Norstar TSP Control Panel contains
two fields which show what Norstar equipment your PC is connected to.
The Switch Type field shows the type of Norstar telephone system your PC is
connected to. Unknown appears in this field if the connection between your PC and
the Norstar telephone system is broken. Typical causes of a bad connection are:
• the cables are disconnected or damaged
• the CTA is not working
• the Norstar telephone system is not working
The CTI Device field shows the type of CTA connected to your PC.
Norstar TSP error messages
When Norstar TSP encounters an error, an error dialog box appears on the PC
display. In this dialog box is a description of what the error is and a recommendation
about what to do. An example of an error message dialog box is shown below.
Page 44

44 Using the Norstar CTI Diagnostics
Norstar TSP Server Configuration Guide P0605043 Issue 01
Using the Norstar CTI Diagnostics
The Norstar CTI Diagnostics is a tool you use in conjunction with your Norstar
service representative to help you track down problems with your Norstar Desktop
CTI applications. These diagnostics allow you to view the Norstar CTI Diagnostics
window. From this window you can:
• Choose the information you want to view
• View detailed information about Norstar TSP
• View information about the Norstar TSP software
• Save the information to a file on your PC
To access the Norstar CTI Diagnostics window:
1. Click the Start button.
2. Point to Settings and then click Control Panels.
3. Double click the Telephony icon.
The Dialing Properties dialog box appears.
4. Click the Telephony Drivers tab.
The Dialing Properties dialog box changes to show the installed telephony
drivers.
5. Click Norstar TAPI Service Provider.
6. Click the Configure button.
The Norstar TSP Control Panel dialog box appears.
Page 45

Using the Norstar CTI Diagnostics 45
P0605043 Issue 01 Norstar TSP Server Configuration Guide
7. Click the Diagnostics button.
The Norstar CTE Diagnostics window appears
Choosing the information you want to view
You can select the type of information that is displayed on the Norstar CT E
Diagnostics window. This includes:
• Debug settings
• Software information
• CTE modules
• TSP modules
Page 46

46 Using the Norstar CTI Diagnostics
Norstar TSP Server Configuration Guide P0605043 Issue 01
To view debugging information:
Click the View menu and then click Debug settings.
For debugging, you can capture various information by clicking the options
available under the CTE tab. For instance, FUMP messages.
Viewing detailed information about Norstar TSP
After you have chosen information to display, detailed technical information about
Norstar TSP begins to appear on the Norstar CTE Diagnostics window.
The information on this win dow is intended for your Norstar service representative.
Contact your Norstar service representative for assistance in interpreting the
information provided by this window.
Viewing information about the Norstar TSP software
On the Norstar CTE Diagnostics window, you can also view the version number
and location of all the components of the Norstar TSP software (the CTE modules
and the Norstar TSP modules).
To view th e component s of the CTE modules:
1. Click the View menu and then point to Software In fo r ma tion.
2. Click CTE Module s.
Page 47

Using the Norstar CTI Diagnostics 47
P0605043 Issue 01 Norstar TSP Server Configuration Guide
To view the components of the Norstar TSP modules:
1. Click the View menu and then point to Software In fo r ma tion.
2. Click Norstar TSP Mod ule s.
Saving the information to a file
In most instances, your Norstar service representative will ask you to send them a
copy of the Norstar CTE Diagnostics window. To do this, you first need to save the
information to a file. You can then send this file to your Norstar service
representative.
To save the information to a file:
1. Click the File menu and then click Select Log File.
The Norstar TSP Diagnostics - Log File dialog box appears.
2. Enter a name for the log file and choose the directory you want to save the file
in.
3. Click the Save button.
The Norstar TSP information will now be saved in a file.
4. When you are finished saving information in the file, click the File menu and
then click Log File to turn off saving the information to file.
Deleting information from the log
The Norstar CTE Diagnostics window collects information the entire time it is
open. At any time you can delete the old messages and only have the current
information shown. To delete the old information:
1. Click the Edit menu and then click Clear Window.
All of the information in the Norstar CTE Diagnostics window is deleted.
Exiting from the Norstar CTE Diagnostics window
To exit from the Norstar CTE Diagnostics window:
1. Click the File menu and then click Exit Norstar CTE Diagnostics.
Page 48

48 Troubleshooting while installing Norstar TSP
Norstar TSP Server Configuration Guide P0605043 Issue 01
Troubleshooting
This section describes possible problems you may encounter when installing and
using Norstar TSP. With each problem is a recommended solution.
Troubleshooting while installing Norstar TSP
The following problem may occur while you are installing Norstar TSP.
After install in g a CTA on th e serial port and rebootin g my PC, Windows NT starts ins talling
seria l mo use drivers.
• To prevent Windows NT from installing the serial mouse drivers, add
/noserialmice to the end of your Windows NT startup command in the
Boot.ini file.
• If the serial mouse drivers are already installed, disable them using Devices in
the Control Panel window. Refer to your Windows NT documentation for
instructions on how to access and disable the mouse drivers.
Troubleshooting after installing Norstar TSP
Normally, when Norstar TSP encounters an error, an error dialog box appears on
the display. These error messages describe the problem and recommend an action
to solve the problem.
If Norstar TSP is not functioning properly and there are no error messages, open the
Norstar TSP Control Panel. Check that the CTE device field and the Switch field
contain the correct information. The points below recommend an action if these
fields do not contain correct information.
The type of CTA does not appear in the CTE device field on the Norstar TSP Control Panel.
This occurs when Norstar TSP cannot find your CTA device.
• If you are using an internal CTA device (CTA 160i), check that the device is
properly seated in PC expansion slot.
• If you are using an external CTA device (CTA 100 or CTA 200) , check that the
cable between the CTA and your PC is connected properly and is not damaged.
Also check that the CTA power supply is connected and the LED on the CTA
is lit.
• If you have your CTA device connected to the serial port, check that the serial
mouse drivers are turned off on that port.
Page 49

Troubleshooting after installing Norstar TSP 49
P0605043 Issue 01 Norstar TSP Server Configuration Guide
Unknown appears in the Switch field on the Norstar TSP Control Panel.
Unknown appears when there is no connection to the Norstar telephone system.
• Check that the CTA is properly connected to your PC.
• Check that the CTA power supply is connected and the LED on the CTA is lit.
• Check that the CTA is connected to the Norstar telephone system.
• Check that the Norstar telephone system is operating and the port the CTA is
connected to is operational.
Norstar TSP stops functioning on client PCs that were previously functioning
• Check that the TAPI server is acquiring telephones correctly.
Open the TCMAPP application. For more information, refer to Assigning a
telephone to a Norstar TSP client on page 19.
Check to see if the affected TAPI clients still have a telephone assigned to them.
If a TAPI client does not have a telephone device assigned, the TAPI server is
not acquiring the telephones properly. This can be caused by changing the
directory number (DN) of the telephone or the telephone going out of service.
For information on correcting this problem, refer to Tips for the assigning lines
on page 22.
• Check if the password for the TAPI administration account has changed.
If the password has changed, run the TCMSETUP command using the new
password. For information on how to run this command, refer to Enabling the
Norstar TS P serv e r on page 15.
Page 50

50 Starting Norstar TSP
Norstar TSP Server Configuration Guide P0605043 Issue 01
Norstar TSP tips
Starting Norstar TSP
TAPI server starts up when any TAPI application or service is launched (e.g. RAS,
Norstar TSP Service). During start up, TAPI server acquires all of the telephones
identified in the TAPI User Configuration. Acquiring the telephones runs in the
background and can take as long a five seconds to for each telephone. If you have
a TAPI service setup to start at boot time, the Server’s startup may take a number
of minutes to complete. For example, if you have a Server configured with 50
telephones, initialization of TAPI server can add four minutes to the server startup
time.
Windows atte mpts to re-instal l th e CTA
Under some conditions (e.g. a busy processor), rebooting the Server may cause a
Plug-and-play re-enumeration of the CTA. If the CTA was previously installed and
functioning correctly, shutdown the Server and restart. Do not re-install the
device. Re-installing will cause the Norstar TSP Securit y Code to expire.
Page 51

To set up the TAPI Server as a Primary Domain Controller 51
P0605043 Issue 01 Norstar TSP Server Configuration Guide
Appendix A – Using a Primary Domain
Controller as a TAPI Server
Carefully consider the decision to use a Domain Controller as a your TAPI Server.
Doing this may have significant implications for your Windows NT network. For
more information about choosing your TAPI Server, ref er to Selecting a Windows
NT Server / Windows 2000 Server PC on page 9.
To set up the TAPI Server as a Primary Domain Controller
1. Add a TAPI administration account with domain user capabilities to the
server.
2. Click the Start button and then point to Programs.
3. Point to Administrative Tools and then click Server Manager.
4. Click the Configurator menu and then click Add to Domain.
Note: The clients you are adding to this server can not be logged in to two
domains at one time.
5. Add the Norstar TSP Client computer name, as it appears on the Client PC.
6. Click WINNT Workstation or Server and click ADD.
7. Repeat steps 5 and 6 for each client being added to the server.
8. Proceed with installation as described in this document.
Caution
Nortel recommends that you do not use Primary Domain Controllers
and Backup Domain Controllers as TAPI servers.
Page 52

52 Windows 95
Norstar TSP Server Configuration Guide P0605043 Issue 01
Appendix B - Reinstalling the older version
of Microsoft TAPI
Windows 95
If you are you wish to uninstall TAPI 2.1 and return to Microsoft TAPI 1.4:
1. Locate the remtapi.inf file.
2. Right click on the correct file and select the Install option.
Windows NT
If you wish to uninstall TAPI 2.1 and return to Microsoft TAPI 2.0:
1. Locate the remtapin.inf file.
2. Right click on the correct file and select the Install option.
Note: If you use the remtapi files, you may have to copy the Telephony.cpl file
back into the Windows\system directory.
Page 53

Glossary 53
P0605043 Issue 01 Norstar TSP Server Configuration Guide
Glossary
List of acronyms
CTA
Computer Telephony Adapter
CTI
Computer Telephony Integration
TAPI
Telephony Application Programming Interface
Glossary terms
Computer Telephony Adapter
A hardware device that provides connection between the PC and the Norstar
telephone system.
Computer Telephony Integration
A set of hardware and software components that allows computers to access and
control telephones.
TAPI service provider
A set of commands developed by the telephone manufacturer which interpret TAPI
commands into a form that is understood by the telephone system.
Telephony Application Programming Interface (TAPI)
A set of programming tools developed by Microsoft which provides a standard set
of commands used to control any telephone. For most telephone systems, a TAPI
service provider is required to use TAPI.
Page 54

54 Glossary
Norstar TSP Server Configuration Guide P0605043 Issue 01
Page 55

Page 56

1-800-4 NORTEL
http://www.nortel.com/norstar
Norstar is a trademark of Nortel Networks.
P0605043 Issue 01
Printed in Canada
 Loading...