

Page 1

Part No. P0937240 03.1
Business Communications
Manager 2.5
Telephone Features
Programming Guide
Page 2

2
Copyright © 2002 Nortel Networks
All rights reserved.
The information in this document is subject to change without notice. The statements, configurations, technical data, and
recommendations in this document are believed to be accurate and reliable, but are presented without express or implied warranty.
Users must take full responsibility for their applications of any products specified in this document. The information in this
document is proprietary to Nortel Networks NA Inc.
Trademarks
NORTEL NETWORKS is a trademark of Nortel Networks.
Microsoft, MS, MS -DOS, Windows, and Windows NT are registered trademarks of Microsoft Cor por ation.
Symbol, Spectrum24, and Net Vision are registered trademarks of Symb ol Technologies, Inc.
All other trademarks and registered trademarks are t he property of their respective owners.
P0937240 03.1
Page 3

Contents
Preface . . . . . . . . . . . . . . . . . . . . . . . . . . . . . . . . . . . . . . . . . . . . . . . . . . . . . . 17
Before you begin . . . . . . . . . . . . . . . . . . . . . . . . . . . . . . . . . . . . . . . . . . . . . . . . . . . . . 17
Text conventions . . . . . . . . . . . . . . . . . . . . . . . . . . . . . . . . . . . . . . . . . . . . . . . . . . . . . 18
Acronyms . . . . . . . . . . . . . . . . . . . . . . . . . . . . . . . . . . . . . . . . . . . . . . . . . . . . . . . . . . . 18
Emergency 911 Dialing . . . . . . . . . . . . . . . . . . . . . . . . . . . . . . . . . . . . . . . . . . . . . . . . 19
Related publications . . . . . . . . . . . . . . . . . . . . . . . . . . . . . . . . . . . . . . . . . . . . . . . . . . 20
Chapter 1
Telephone configuration overview. . . . . . . . . . . . . . . . . . . . . . . . . . . . . . . . 21
Configuration tool: Unified Manager . . . . . . . . . . . . . . . . . . . . . . . . . . . . . . . . . . . . . . 21
Telephone types . . . . . . . . . . . . . . . . . . . . . . . . . . . . . . . . . . . . . . . . . . . . . . . . . . . . . . 21
Digital telephone installation . . . . . . . . . . . . . . . . . . . . . . . . . . . . . . . . . . . . . . . . . 23
IP telephones and cordless handsets . . . . . . . . . . . . . . . . . . . . . . . . . . . . . . . . . . 25
Telephone buttons . . . . . . . . . . . . . . . . . . . . . . . . . . . . . . . . . . . . . . . . . . . . . . . . . . . . 26
Accessing features (digital sets) . . . . . . . . . . . . . . . . . . . . . . . . . . . . . . . . . . . . . . 27
Accessing features (NetVision telephones) . . . . . . . . . . . . . . . . . . . . . . . . . . . . . . 27
One-line and two-line displays . . . . . . . . . . . . . . . . . . . . . . . . . . . . . . . . . . . . . . . . . . . 27
Display exceptions . . . . . . . . . . . . . . . . . . . . . . . . . . . . . . . . . . . . . . . . . . . . . . . . 28
Buttons under the display . . . . . . . . . . . . . . . . . . . . . . . . . . . . . . . . . . . . . . . . . . . 28
Memory buttons . . . . . . . . . . . . . . . . . . . . . . . . . . . . . . . . . . . . . . . . . . . . . . . . . . . . . . 29
Program buttons . . . . . . . . . . . . . . . . . . . . . . . . . . . . . . . . . . . . . . . . . . . . . . . . . . . . . 29
Labeling your telephone buttons . . . . . . . . . . . . . . . . . . . . . . . . . . . . . . . . . . . . . . . . . 29
Name a telephone or a line . . . . . . . . . . . . . . . . . . . . . . . . . . . . . . . . . . . . . . . . . . . . . 30
Extension numbers . . . . . . . . . . . . . . . . . . . . . . . . . . . . . . . . . . . . . . . . . . . . . . . . . . . . 30
Line assignment . . . . . . . . . . . . . . . . . . . . . . . . . . . . . . . . . . . . . . . . . . . . . . . . . . . . . . 30
Prime line . . . . . . . . . . . . . . . . . . . . . . . . . . . . . . . . . . . . . . . . . . . . . . . . . . . . . . . . 31
Private line . . . . . . . . . . . . . . . . . . . . . . . . . . . . . . . . . . . . . . . . . . . . . . . . . . . . . . . 31
Target line . . . . . . . . . . . . . . . . . . . . . . . . . . . . . . . . . . . . . . . . . . . . . . . . . . . . . . . 31
Overflow call routing. . . . . . . . . . . . . . . . . . . . . . . . . . . . . . . . . . . . . . . . . . . . . . . . 31
Call anomalies for telephones without line buttons . . . . . . . . . . . . . . . . . . . . . . . . 32
Contents 3
Feature operability notes . . . . . . . . . . . . . . . . . . . . . . . . . . . . . . . . . . . . . . . . 26
Describing the display buttons . . . . . . . . . . . . . . . . . . . . . . . . . . . . . . . . . . . . 28
Chapter 2
Answering calls . . . . . . . . . . . . . . . . . . . . . . . . . . . . . . . . . . . . . . . . . . . . . . . 33
Understanding ring types . . . . . . . . . . . . . . . . . . . . . . . . . . . . . . . . . . . . . . . . . . . . . . . 33
System ring indicators . . . . . . . . . . . . . . . . . . . . . . . . . . . . . . . . . . . . . . . . . . . . . . 33
Ring tones (7000) . . . . . . . . . . . . . . . . . . . . . . . . . . . . . . . . . . . . . . . . . . . . . . 33
Distinctive ring patterns . . . . . . . . . . . . . . . . . . . . . . . . . . . . . . . . . . . . . . . . . . . . . 34
Telephone Features Programming Guide
Page 4

4
Contents
Line buttons . . . . . . . . . . . . . . . . . . . . . . . . . . . . . . . . . . . . . . . . . . . . . . . . . . . . . . . . . 34
What line indicators mean . . . . . . . . . . . . . . . . . . . . . . . . . . . . . . . . . . . . . . . . . . . 35
Information about call display . . . . . . . . . . . . . . . . . . . . . . . . . . . . . . . . . . . . . . . . . . . 35
Viewing call information for a specific call . . . . . . . . . . . . . . . . . . . . . . . . . . . . . . . 35
View call information before or after answering . . . . . . . . . . . . . . . . . . . . . . . 36
View call information for a call on hold . . . . . . . . . . . . . . . . . . . . . . . . . . . . . . 36
Make call display appear automatically . . . . . . . . . . . . . . . . . . . . . . . . . . . . . . 36
Change which call information a ppears first. . . . . . . . . . . . . . . . . . . . . . . . . . 36
Priority call . . . . . . . . . . . . . . . . . . . . . . . . . . . . . . . . . . . . . . . . . . . . . . . . . . . . . . . . . . 36
Answer calls at a prime telephone . . . . . . . . . . . . . . . . . . . . . . . . . . . . . . . . . . . . . . . . 37
Central answering position (CAP) module . . . . . . . . . . . . . . . . . . . . . . . . . . . . . . . . . . 37
Customize your CAP(N) module . . . . . . . . . . . . . . . . . . . . . . . . . . . . . . . . . . . . . . 38
Monitor telephones with the CAP(N) module . . . . . . . . . . . . . . . . . . . . . . . . . . . . 39
Releasing a call or feature programming . . . . . . . . . . . . . . . . . . . . . . . . . . . . . . . . . . . 39
Pick up a call ringing at another telephone . . . . . . . . . . . . . . . . . . . . . . . . . . . . . . . . . 39
Directed Pickup . . . . . . . . . . . . . . . . . . . . . . . . . . . . . . . . . . . . . . . . . . . . . . . . . . . 39
Group Pickup . . . . . . . . . . . . . . . . . . . . . . . . . . . . . . . . . . . . . . . . . . . . . . . . . . . . 40
Pickup group prompts . . . . . . . . . . . . . . . . . . . . . . . . . . . . . . . . . . . . . . . . . . . 40
Change a pickup group . . . . . . . . . . . . . . . . . . . . . . . . . . . . . . . . . . . . . . . . . . 40
Trunk Answer . . . . . . . . . . . . . . . . . . . . . . . . . . . . . . . . . . . . . . . . . . . . . . . . . . . . . 40
Trunk Answer prompts . . . . . . . . . . . . . . . . . . . . . . . . . . . . . . . . . . . . . . . . . . 41
Answer DNs . . . . . . . . . . . . . . . . . . . . . . . . . . . . . . . . . . . . . . . . . . . . . . . . . . . . . . 41
Answer keys . . . . . . . . . . . . . . . . . . . . . . . . . . . . . . . . . . . . . . . . . . . . . . . . . . 42
Listen to a call as a group . . . . . . . . . . . . . . . . . . . . . . . . . . . . . . . . . . . . . . . . . . . . . . 43
Cancel Group Listening . . . . . . . . . . . . . . . . . . . . . . . . . . . . . . . . . . . . . . . . . . . . . 43
Chapter 3
Make a call . . . . . . . . . . . . . . . . . . . . . . . . . . . . . . . . . . . . . . . . . . . . . . . . . . . 45
Using line pools . . . . . . . . . . . . . . . . . . . . . . . . . . . . . . . . . . . . . . . . . . . . . . . . . . . . . . 47
Programming line access. . . . . . . . . . . . . . . . . . . . . . . . . . . . . . . . . . . . . . . . . . . . 47
Use a line pool to make a call . . . . . . . . . . . . . . . . . . . . . . . . . . . . . . . . . . . . . . . . 47
Program a line pool feature code . . . . . . . . . . . . . . . . . . . . . . . . . . . . . . . . . . . . . 48
Line buttons . . . . . . . . . . . . . . . . . . . . . . . . . . . . . . . . . . . . . . . . . . . . . . . . . . . . . . . . . 48
Select how you dial your calls . . . . . . . . . . . . . . . . . . . . . . . . . . . . . . . . . . . . . . . . . . . 48
Standard dial . . . . . . . . . . . . . . . . . . . . . . . . . . . . . . . . . . . . . . . . . . . . . . . . . . . . . 48
Automatic dial . . . . . . . . . . . . . . . . . . . . . . . . . . . . . . . . . . . . . . . . . . . . . . . . . . . . 49
Pre-dial . . . . . . . . . . . . . . . . . . . . . . . . . . . . . . . . . . . . . . . . . . . . . . . . . . . . . . . . . 49
Receive a busy signal on an internal call . . . . . . . . . . . . . . . . . . . . . . . . . . . . . . . . . . . 49
Priority Call . . . . . . . . . . . . . . . . . . . . . . . . . . . . . . . . . . . . . . . . . . . . . . . . . . . . . . 49
Ring Again . . . . . . . . . . . . . . . . . . . . . . . . . . . . . . . . . . . . . . . . . . . . . . . . . . . . . . . 50
P0937240 03.1
Program a telephone to make priority calls . . . . . . . . . . . . . . . . . . . . . . . . . . . 49
Make a priority call . . . . . . . . . . . . . . . . . . . . . . . . . . . . . . . . . . . . . . . . . . . . . 50
Page 5

Contents 5
Turn on Ring Again . . . . . . . . . . . . . . . . . . . . . . . . . . . . . . . . . . . . . . . . . . . . . 50
Cancel Ring Again . . . . . . . . . . . . . . . . . . . . . . . . . . . . . . . . . . . . . . . . . . . . . 51
Message . . . . . . . . . . . . . . . . . . . . . . . . . . . . . . . . . . . . . . . . . . . . . . . . . . . . . . . . 51
Create a conference call . . . . . . . . . . . . . . . . . . . . . . . . . . . . . . . . . . . . . . . . . . . . . . . 51
Disconnect one party . . . . . . . . . . . . . . . . . . . . . . . . . . . . . . . . . . . . . . . . . . . . . . 52
Holding two calls . . . . . . . . . . . . . . . . . . . . . . . . . . . . . . . . . . . . . . . . . . . . . . . . . . 53
Put a conference on hold . . . . . . . . . . . . . . . . . . . . . . . . . . . . . . . . . . . . . . . . . . . 53
Split a conference . . . . . . . . . . . . . . . . . . . . . . . . . . . . . . . . . . . . . . . . . . . . . . . . . 53
Leave a conference call . . . . . . . . . . . . . . . . . . . . . . . . . . . . . . . . . . . . . . . . . . . . 54
Conference call prompts . . . . . . . . . . . . . . . . . . . . . . . . . . . . . . . . . . . . . . . . . . . . 54
Chapter 4
Time-saving features . . . . . . . . . . . . . . . . . . . . . . . . . . . . . . . . . . . . . . . . . . . 55
Autodial . . . . . . . . . . . . . . . . . . . . . . . . . . . . . . . . . . . . . . . . . . . . . . . . . . . . . . . . . . . . 55
Select a line for Autodial . . . . . . . . . . . . . . . . . . . . . . . . . . . . . . . . . . . . . . . . . . . . 55
Use intercom as the line for Autodial . . . . . . . . . . . . . . . . . . . . . . . . . . . . . . . . . . . 56
Programming T7000 memory keys for auto dial . . . . . . . . . . . . . . . . . . . . . . . . . . 57
Programming external autodial . . . . . . . . . . . . . . . . . . . . . . . . . . . . . . . . . . . . 57
Programming internal autodial (DSS) . . . . . . . . . . . . . . . . . . . . . . . . . . . . . . . 57
Last Number Redial . . . . . . . . . . . . . . . . . . . . . . . . . . . . . . . . . . . . . . . . . . . . . . . . . . . 57
Last Number Redial prompts . . . . . . . . . . . . . . . . . . . . . . . . . . . . . . . . . . . . . . . . 57
Prevent Last Number Redial . . . . . . . . . . . . . . . . . . . . . . . . . . . . . . . . . . . . . . . . . 58
Programming speed dialing . . . . . . . . . . . . . . . . . . . . . . . . . . . . . . . . . . . . . . . . . . . . . 58
System Speed Dial codes . . . . . . . . . . . . . . . . . . . . . . . . . . . . . . . . . . . . . . . . . . . 58
Using Personal Speed Dial codes . . . . . . . . . . . . . . . . . . . . . . . . . . . . . . . . . . . . . 59
Speed dial prompts . . . . . . . . . . . . . . . . . . . . . . . . . . . . . . . . . . . . . . . . . . . . . . . . 59
User Speed Dial programming for T7000 . . . . . . . . . . . . . . . . . . . . . . . . . . . . . . . 60
Saved Number Redial . . . . . . . . . . . . . . . . . . . . . . . . . . . . . . . . . . . . . . . . . . . . . . . . . 60
Save a number . . . . . . . . . . . . . . . . . . . . . . . . . . . . . . . . . . . . . . . . . . . . . . . . . . . 60
Dial a saved number . . . . . . . . . . . . . . . . . . . . . . . . . . . . . . . . . . . . . . . . . . . . . . . 60
Saved Number redial prompts: . . . . . . . . . . . . . . . . . . . . . . . . . . . . . . . . . . . . . . . 61
Prevent Saved Number Redial. . . . . . . . . . . . . . . . . . . . . . . . . . . . . . . . . . . . . . . . 61
Chapter 5
Handling calls. . . . . . . . . . . . . . . . . . . . . . . . . . . . . . . . . . . . . . . . . . . . . . . . . 63
Use Hold . . . . . . . . . . . . . . . . . . . . . . . . . . . . . . . . . . . . . . . . . . . . . . . . . . . . . . . . . . . 63
Retrieve a held call . . . . . . . . . . . . . . . . . . . . . . . . . . . . . . . . . . . . . . . . . . . . . . . . 63
Hold automatically (Auto Hold) . . . . . . . . . . . . . . . . . . . . . . . . . . . . . . . . . . . . . . . 63
Listen on hold . . . . . . . . . . . . . . . . . . . . . . . . . . . . . . . . . . . . . . . . . . . . . . . . . . . . 64
Hold a call exclusively . . . . . . . . . . . . . . . . . . . . . . . . . . . . . . . . . . . . . . . . . . . . . . 64
Call Queuing . . . . . . . . . . . . . . . . . . . . . . . . . . . . . . . . . . . . . . . . . . . . . . . . . . . . . 64
Transfer calls . . . . . . . . . . . . . . . . . . . . . . . . . . . . . . . . . . . . . . . . . . . . . . . . . . . . . . . . 65
Telephone Features Programming Guide
Page 6

6
Contents
Transfer external calls . . . . . . . . . . . . . . . . . . . . . . . . . . . . . . . . . . . . . . . . . . . . . . 65
Cancel a transfer . . . . . . . . . . . . . . . . . . . . . . . . . . . . . . . . . . . . . . . . . . . . . . . . . . 66
Transfer prompts . . . . . . . . . . . . . . . . . . . . . . . . . . . . . . . . . . . . . . . . . . . . . . . . . . 66
Camp-on . . . . . . . . . . . . . . . . . . . . . . . . . . . . . . . . . . . . . . . . . . . . . . . . . . . . . . . . 67
Call Park . . . . . . . . . . . . . . . . . . . . . . . . . . . . . . . . . . . . . . . . . . . . . . . . . . . . . . . . . . . 68
Park a call . . . . . . . . . . . . . . . . . . . . . . . . . . . . . . . . . . . . . . . . . . . . . . . . . . . . . . . 68
Retrieve a parked call . . . . . . . . . . . . . . . . . . . . . . . . . . . . . . . . . . . . . . . . . . . . . . 68
Call park prompts . . . . . . . . . . . . . . . . . . . . . . . . . . . . . . . . . . . . . . . . . . . . . . . . . 69
Callback . . . . . . . . . . . . . . . . . . . . . . . . . . . . . . . . . . . . . . . . . . . . . . . . . . . . . . . . . . . . 69
Managing system-wide calls using SWCA . . . . . . . . . . . . . . . . . . . . . . . . . . . . . . . . . 70
Programming SWCA keys . . . . . . . . . . . . . . . . . . . . . . . . . . . . . . . . . . . . . . . . . . . 71
How SWCA works in a call group . . . . . . . . . . . . . . . . . . . . . . . . . . . . . . . . . . . . . 72
Parking and retrieving calls on SWCA keys . . . . . . . . . . . . . . . . . . . . . . . . . . . . . 73
Manually associating a call . . . . . . . . . . . . . . . . . . . . . . . . . . . . . . . . . . . . . . . 74
Parking a call to an SWCA key . . . . . . . . . . . . . . . . . . . . . . . . . . . . . . . . . . . . 74
Retrieving a parked call from a SWCA key . . . . . . . . . . . . . . . . . . . . . . . . . . . 75
Call interactions with SWCA controls . . . . . . . . . . . . . . . . . . . . . . . . . . . . . . . . . . 75
Transferring calls . . . . . . . . . . . . . . . . . . . . . . . . . . . . . . . . . . . . . . . . . . . . . . . 75
Conference calls . . . . . . . . . . . . . . . . . . . . . . . . . . . . . . . . . . . . . . . . . . . . . . . 75
Hold . . . . . . . . . . . . . . . . . . . . . . . . . . . . . . . . . . . . . . . . . . . . . . . . . . . . . . . . 76
Auto-Hold . . . . . . . . . . . . . . . . . . . . . . . . . . . . . . . . . . . . . . . . . . . . . . . . . . . . 76
NetVision telephone interactions with SWCA keys . . . . . . . . . . . . . . . . . . . . . . . . 76
Chapter 6
Forward your calls . . . . . . . . . . . . . . . . . . . . . . . . . . . . . . . . . . . . . . . . . . . . . 77
Call Forward . . . . . . . . . . . . . . . . . . . . . . . . . . . . . . . . . . . . . . . . . . . . . . . . . . . . . . . . 77
Cancel Call Forward . . . . . . . . . . . . . . . . . . . . . . . . . . . . . . . . . . . . . . . . . . . . . . . 77
Override Call Forward . . . . . . . . . . . . . . . . . . . . . . . . . . . . . . . . . . . . . . . . . . . . . . 77
Call Foward prompts . . . . . . . . . . . . . . . . . . . . . . . . . . . . . . . . . . . . . . . . . . . . . . . 78
Programming Call Forward . . . . . . . . . . . . . . . . . . . . . . . . . . . . . . . . . . . . . . . . . . 78
Call Forward and voice mail . . . . . . . . . . . . . . . . . . . . . . . . . . . . . . . . . . . . . . 79
Line redirection . . . . . . . . . . . . . . . . . . . . . . . . . . . . . . . . . . . . . . . . . . . . . . . . . . . . . . 79
Allowing a telephone to redirect lines. . . . . . . . . . . . . . . . . . . . . . . . . . . . . . . . . . . 80
Turning the redirect ring on or off. . . . . . . . . . . . . . . . . . . . . . . . . . . . . . . . . . . . . . 80
How Line Redirection is different from Call Forward . . . . . . . . . . . . . . . . . . . . . . . 80
Turn on Line Redirection . . . . . . . . . . . . . . . . . . . . . . . . . . . . . . . . . . . . . . . . . . . . 80
Cancel Line Redirection . . . . . . . . . . . . . . . . . . . . . . . . . . . . . . . . . . . . . . . . . . . . 81
Line Redirection prompts . . . . . . . . . . . . . . . . . . . . . . . . . . . . . . . . . . . . . . . . . . . 81
DND on Busy . . . . . . . . . . . . . . . . . . . . . . . . . . . . . . . . . . . . . . . . . . . . . . . . . . . . . . . . 82
Allowing DND . . . . . . . . . . . . . . . . . . . . . . . . . . . . . . . . . . . . . . . . . . . . . . . . . . . . . 83
P0937240 03.1
Page 7

Contents 7
Chapter 7
Communicating in the office. . . . . . . . . . . . . . . . . . . . . . . . . . . . . . . . . . . . . 85
Paging in the office . . . . . . . . . . . . . . . . . . . . . . . . . . . . . . . . . . . . . . . . . . . . . . . . . . . 85
Making a page announcement . . . . . . . . . . . . . . . . . . . . . . . . . . . . . . . . . . . . . . . 85
Page Shortcuts . . . . . . . . . . . . . . . . . . . . . . . . . . . . . . . . . . . . . . . . . . . . . . . . . . . 86
Allowing access to the Page feature . . . . . . . . . . . . . . . . . . . . . . . . . . . . . . . . . . . 86
Creating page zones . . . . . . . . . . . . . . . . . . . . . . . . . . . . . . . . . . . . . . . . . . . . . . . 86
Page prompts . . . . . . . . . . . . . . . . . . . . . . . . . . . . . . . . . . . . . . . . . . . . . . . . . . . . 87
Using Page with external equipment . . . . . . . . . . . . . . . . . . . . . . . . . . . . . . . . . . . 87
Messages . . . . . . . . . . . . . . . . . . . . . . . . . . . . . . . . . . . . . . . . . . . . . . . . . . . . . . . . . . 87
Send a message . . . . . . . . . . . . . . . . . . . . . . . . . . . . . . . . . . . . . . . . . . . . . . . . . . 88
Cancel a message you have sent . . . . . . . . . . . . . . . . . . . . . . . . . . . . . . . . . . 88
Review your messages . . . . . . . . . . . . . . . . . . . . . . . . . . . . . . . . . . . . . . . . . . . . . 88
Reply to a message . . . . . . . . . . . . . . . . . . . . . . . . . . . . . . . . . . . . . . . . . . . . . . . 89
Reply to a message from an analog telephone connected to an ASM . . . . . . 89
Remove items from your message list . . . . . . . . . . . . . . . . . . . . . . . . . . . . . . . . . 89
Remove messages from an analog telephone connected to an ASM . . . . . . 90
View messages you sent . . . . . . . . . . . . . . . . . . . . . . . . . . . . . . . . . . . . . . . . . . . . 90
Message prompts . . . . . . . . . . . . . . . . . . . . . . . . . . . . . . . . . . . . . . . . . . . . . . . . . 90
Voice Call . . . . . . . . . . . . . . . . . . . . . . . . . . . . . . . . . . . . . . . . . . . . . . . . . . . . . . . . . . . 91
Make a Voice Call . . . . . . . . . . . . . . . . . . . . . . . . . . . . . . . . . . . . . . . . . . . . . . . . . 91
Mute Voice Call tones . . . . . . . . . . . . . . . . . . . . . . . . . . . . . . . . . . . . . . . . . . . . . . 91
Answer a Voice Call using Handsfree Answerback . . . . . . . . . . . . . . . . . . . . . . . . 91
Voice Call Deny . . . . . . . . . . . . . . . . . . . . . . . . . . . . . . . . . . . . . . . . . . . . . . . . . . . 92
Cancel Voice Call Deny . . . . . . . . . . . . . . . . . . . . . . . . . . . . . . . . . . . . . . . . . 92
Voice Call prompts . . . . . . . . . . . . . . . . . . . . . . . . . . . . . . . . . . . . . . . . . . . . . . . . 92
Chapter 8
Track your incoming calls . . . . . . . . . . . . . . . . . . . . . . . . . . . . . . . . . . . . . . . 93
Call log . . . . . . . . . . . . . . . . . . . . . . . . . . . . . . . . . . . . . . . . . . . . . . . . . . . . . . . . . . . . . 93
Call Log options . . . . . . . . . . . . . . . . . . . . . . . . . . . . . . . . . . . . . . . . . . . . . . . . . . 94
Log a call manually . . . . . . . . . . . . . . . . . . . . . . . . . . . . . . . . . . . . . . . . . . . . . . . . 94
Delete old log items . . . . . . . . . . . . . . . . . . . . . . . . . . . . . . . . . . . . . . . . . . . . . . . . 94
View your Call Log . . . . . . . . . . . . . . . . . . . . . . . . . . . . . . . . . . . . . . . . . . . . . . . . 94
View a Call Log item . . . . . . . . . . . . . . . . . . . . . . . . . . . . . . . . . . . . . . . . . . . . . . . 95
Erase log items . . . . . . . . . . . . . . . . . . . . . . . . . . . . . . . . . . . . . . . . . . . . . . . . . . . 95
Make a call using Call Log . . . . . . . . . . . . . . . . . . . . . . . . . . . . . . . . . . . . . . . . . . 95
Call log prompts . . . . . . . . . . . . . . . . . . . . . . . . . . . . . . . . . . . . . . . . . . . . . . . . . . 95
Create a password to your Call Log . . . . . . . . . . . . . . . . . . . . . . . . . . . . . . . . . . . 97
Change your Call Log password . . . . . . . . . . . . . . . . . . . . . . . . . . . . . . . . . . . 97
Delete an assigned password . . . . . . . . . . . . . . . . . . . . . . . . . . . . . . . . . . . . . 97
Programing automatic call logging . . . . . . . . . . . . . . . . . . . . . . . . . . . . . . . . . . . . . 98
Telephone Features Programming Guide
Page 8

8
Contents
Chapter 9
Customize your telephone . . . . . . . . . . . . . . . . . . . . . . . . . . . . . . . . . . . . . . 99
Adjust the contrast on the display . . . . . . . . . . . . . . . . . . . . . . . . . . . . . . . . . . . . . . . . 99
Change the language on the display . . . . . . . . . . . . . . . . . . . . . . . . . . . . . . . . . . . . . . 99
Change the type of ring . . . . . . . . . . . . . . . . . . . . . . . . . . . . . . . . . . . . . . . . . . . . . . . 100
Adjust the ring volume . . . . . . . . . . . . . . . . . . . . . . . . . . . . . . . . . . . . . . . . . . . . . . . . 100
Button inquiry . . . . . . . . . . . . . . . . . . . . . . . . . . . . . . . . . . . . . . . . . . . . . . . . . . . . . . . 101
Programming feature codes . . . . . . . . . . . . . . . . . . . . . . . . . . . . . . . . . . . . . . . . . . . 101
Erase a feature button . . . . . . . . . . . . . . . . . . . . . . . . . . . . . . . . . . . . . . . . . . . . . 102
Feature button prompts . . . . . . . . . . . . . . . . . . . . . . . . . . . . . . . . . . . . . . . . . . . . 102
Default button assignments . . . . . . . . . . . . . . . . . . . . . . . . . . . . . . . . . . . . . . . . . . . . 103
Rules of default button assignment . . . . . . . . . . . . . . . . . . . . . . . . . . . . . . . . . . . 103
T7316 Button mapping . . . . . . . . . . . . . . . . . . . . . . . . . . . . . . . . . . . . . . . . . . . . 103
T7208/M7208(N) telephone button defaults . . . . . . . . . . . . . . . . . . . . . . . . . . . . 105
M7324 button mapping . . . . . . . . . . . . . . . . . . . . . . . . . . . . . . . . . . . . . . . . . . . . 106
T7100/M7100(N) telephone button defaults . . . . . . . . . . . . . . . . . . . . . . . . . . . . 107
T7000/M7000 telephone button defaults . . . . . . . . . . . . . . . . . . . . . . . . . . . . . . . 108
These telephones have four programmable memory keys which default to: . . . . 108
NetVision telephones . . . . . . . . . . . . . . . . . . . . . . . . . . . . . . . . . . . . . . . . . . . . . 108
Move line buttons . . . . . . . . . . . . . . . . . . . . . . . . . . . . . . . . . . . . . . . . . . . . . . . . . . . . 108
Move button prompts . . . . . . . . . . . . . . . . . . . . . . . . . . . . . . . . . . . . . . . . . . . . . . 108
Hide the message or call indications . . . . . . . . . . . . . . . . . . . . . . . . . . . . . . . . . . . . . 109
Restore the messages and calls indication . . . . . . . . . . . . . . . . . . . . . . . . . . . . . . . . 109
Chapter 10
Telephone features . . . . . . . . . . . . . . . . . . . . . . . . . . . . . . . . . . . . . . . . . . . 111
Moving telephones . . . . . . . . . . . . . . . . . . . . . . . . . . . . . . . . . . . . . . . . . . . . . . . . . . . 111
Prevent calls from ringing at your telephone . . . . . . . . . . . . . . . . . . . . . . . . . . . . . . . 111
Use Do Not Disturb . . . . . . . . . . . . . . . . . . . . . . . . . . . . . . . . . . . . . . . . . . . . . . . 111
Stop calls . . . . . . . . . . . . . . . . . . . . . . . . . . . . . . . . . . . . . . . . . . . . . . . . . . . . . . . 112
Refuse to answer a call . . . . . . . . . . . . . . . . . . . . . . . . . . . . . . . . . . . . . . . . . . . . 112
Turn Privacy on or off for a call . . . . . . . . . . . . . . . . . . . . . . . . . . . . . . . . . . . . . . 112
Handsfree and Mute . . . . . . . . . . . . . . . . . . . . . . . . . . . . . . . . . . . . . . . . . . . . . . . . . 113
Answer calls without lifting the handset . . . . . . . . . . . . . . . . . . . . . . . . . . . . . . . . 113
Make calls without lifting the handset . . . . . . . . . . . . . . . . . . . . . . . . . . . . . . . . . 114
Mute Handsfree . . . . . . . . . . . . . . . . . . . . . . . . . . . . . . . . . . . . . . . . . . . . . . . . . . 114
Change a normal call to handsfree . . . . . . . . . . . . . . . . . . . . . . . . . . . . . . . . . . . 114
Change a handsfree call to a normal call . . . . . . . . . . . . . . . . . . . . . . . . . . . . . . 114
Handsfree . . . . . . . . . . . . . . . . . . . . . . . . . . . . . . . . . . . . . . . . . . . . . . . . . . . . . . 114
P0937240 03.1
Cancel Do Not Disturb . . . . . . . . . . . . . . . . . . . . . . . . . . . . . . . . . . . . . . . . . 112
Create a conference call by releasing privacy . . . . . . . . . . . . . . . . . . . . . . . 113
Make a call private . . . . . . . . . . . . . . . . . . . . . . . . . . . . . . . . . . . . . . . . . . . . 113
Page 9

Contents 9
Change Handsfree for a telephone . . . . . . . . . . . . . . . . . . . . . . . . . . . . . . . . 115
Handsfree Answerback . . . . . . . . . . . . . . . . . . . . . . . . . . . . . . . . . . . . . . . . . 115
Hearing aid compatibility . . . . . . . . . . . . . . . . . . . . . . . . . . . . . . . . . . . . . . . . . . . . . . 115
Call Duration Timer . . . . . . . . . . . . . . . . . . . . . . . . . . . . . . . . . . . . . . . . . . . . . . . . . . 115
Accidental disconnect . . . . . . . . . . . . . . . . . . . . . . . . . . . . . . . . . . . . . . . . . . . . . . . . 115
Disconnect supervision . . . . . . . . . . . . . . . . . . . . . . . . . . . . . . . . . . . . . . . . . . . . . . . 116
Time . . . . . . . . . . . . . . . . . . . . . . . . . . . . . . . . . . . . . . . . . . . . . . . . . . . . . . . . . . . . . . 116
Background music . . . . . . . . . . . . . . . . . . . . . . . . . . . . . . . . . . . . . . . . . . . . . . . . . . . 116
Cancel background music . . . . . . . . . . . . . . . . . . . . . . . . . . . . . . . . . . . . . . 116
Chapter 11
System features . . . . . . . . . . . . . . . . . . . . . . . . . . . . . . . . . . . . . . . . . . . . . . 117
ISDN . . . . . . . . . . . . . . . . . . . . . . . . . . . . . . . . . . . . . . . . . . . . . . . . . . . . . . . . . . . . . 117
Network name display . . . . . . . . . . . . . . . . . . . . . . . . . . . . . . . . . . . . . . . . . . . . . 117
Name and number blocking . . . . . . . . . . . . . . . . . . . . . . . . . . . . . . . . . . . . . 117
Use alternate or scheduled services . . . . . . . . . . . . . . . . . . . . . . . . . . . . . . . . . . . . . 118
Restriction service . . . . . . . . . . . . . . . . . . . . . . . . . . . . . . . . . . . . . . . . . . . . . . . . 118
Ringing service . . . . . . . . . . . . . . . . . . . . . . . . . . . . . . . . . . . . . . . . . . . . . . . . . . 118
Routing service . . . . . . . . . . . . . . . . . . . . . . . . . . . . . . . . . . . . . . . . . . . . . . . . . . 119
Defining services activation mode . . . . . . . . . . . . . . . . . . . . . . . . . . . . . . . . . . . . 119
Turn services on and off . . . . . . . . . . . . . . . . . . . . . . . . . . . . . . . . . . . . . . . . . . . 120
View active services on a two-line display . . . . . . . . . . . . . . . . . . . . . . . . . . . . . 121
View active services on a one-line display . . . . . . . . . . . . . . . . . . . . . . . . . . . . . 121
Overriding services with a Control telephone . . . . . . . . . . . . . . . . . . . . . . . . . . . 122
Direct-dial telephone ringing service . . . . . . . . . . . . . . . . . . . . . . . . . . . . . . . . . . 122
User passwords . . . . . . . . . . . . . . . . . . . . . . . . . . . . . . . . . . . . . . . . . . . . . . . . . . . . . 122
Registration password . . . . . . . . . . . . . . . . . . . . . . . . . . . . . . . . . . . . . . . . . . . . . 122
Log password. . . . . . . . . . . . . . . . . . . . . . . . . . . . . . . . . . . . . . . . . . . . . . . . . . . . 122
Special telephones . . . . . . . . . . . . . . . . . . . . . . . . . . . . . . . . . . . . . . . . . . . . . . . . . . 123
Direct dial . . . . . . . . . . . . . . . . . . . . . . . . . . . . . . . . . . . . . . . . . . . . . . . . . . . . . . 123
Change direct dial telephone assignments . . . . . . . . . . . . . . . . . . . . . . . . . . 123
Hotline . . . . . . . . . . . . . . . . . . . . . . . . . . . . . . . . . . . . . . . . . . . . . . . . . . . . . . . . . 123
Hotline bypass . . . . . . . . . . . . . . . . . . . . . . . . . . . . . . . . . . . . . . . . . . . . . . . 123
Making a telephone a hotline telephone . . . . . . . . . . . . . . . . . . . . . . . . . . . . 124
Control telephone . . . . . . . . . . . . . . . . . . . . . . . . . . . . . . . . . . . . . . . . . . . . . . . . . 124
Set lock . . . . . . . . . . . . . . . . . . . . . . . . . . . . . . . . . . . . . . . . . . . . . . . . . . . . . . . . 124
Auxiliary ringer . . . . . . . . . . . . . . . . . . . . . . . . . . . . . . . . . . . . . . . . . . . . . . . . . . . . . . 125
Allowing the auxiliary ringer . . . . . . . . . . . . . . . . . . . . . . . . . . . . . . . . . . . . . . . . . 125
Host System dialing signals . . . . . . . . . . . . . . . . . . . . . . . . . . . . . . . . . . . . . . . . . . . . 125
Link . . . . . . . . . . . . . . . . . . . . . . . . . . . . . . . . . . . . . . . . . . . . . . . . . . . . . . . . . . . 125
Allow or disallow the Link feature . . . . . . . . . . . . . . . . . . . . . . . . . . . . . . . . . 125
Pause . . . . . . . . . . . . . . . . . . . . . . . . . . . . . . . . . . . . . . . . . . . . . . . . . . . . . . . . . 126
Telephone Features Programming Guide
Page 10

10
Contents
Long Tones . . . . . . . . . . . . . . . . . . . . . . . . . . . . . . . . . . . . . . . . . . . . . . . . . . . . . 126
Run/Stop . . . . . . . . . . . . . . . . . . . . . . . . . . . . . . . . . . . . . . . . . . . . . . . . . . . . . . . 126
Wait for Dial Tone . . . . . . . . . . . . . . . . . . . . . . . . . . . . . . . . . . . . . . . . . . . . . . . . 127
Pulse or tone dialing . . . . . . . . . . . . . . . . . . . . . . . . . . . . . . . . . . . . . . . . . . . . . . . . . 127
Pulse dialing for a call . . . . . . . . . . . . . . . . . . . . . . . . . . . . . . . . . . . . . . . . . . . . . 127
Access your system from an external location . . . . . . . . . . . . . . . . . . . . . . . . . . . . . 127
Direct Inward System Access (DISA) . . . . . . . . . . . . . . . . . . . . . . . . . . . . . . . . . 128
Class of Service (COS) . . . . . . . . . . . . . . . . . . . . . . . . . . . . . . . . . . . . . . . . 128
COS passwords . . . . . . . . . . . . . . . . . . . . . . . . . . . . . . . . . . . . . . . . . . . . . . 128
Maintain security . . . . . . . . . . . . . . . . . . . . . . . . . . . . . . . . . . . . . . . . . . . . . . . . . 128
Change your Class of Service . . . . . . . . . . . . . . . . . . . . . . . . . . . . . . . . . . . 129
Remote access over the public network . . . . . . . . . . . . . . . . . . . . . . . . . . . . . . . 129
Tones . . . . . . . . . . . . . . . . . . . . . . . . . . . . . . . . . . . . . . . . . . . . . . . . . . . . . . . . . . 130
Voice mail . . . . . . . . . . . . . . . . . . . . . . . . . . . . . . . . . . . . . . . . . . . . . . . . . . . . . . . . . 130
Service provider features . . . . . . . . . . . . . . . . . . . . . . . . . . . . . . . . . . . . . . . . . . . . . . 130
Call Forward . . . . . . . . . . . . . . . . . . . . . . . . . . . . . . . . . . . . . . . . . . . . . . . . . . . . 131
Cancel Call Forward . . . . . . . . . . . . . . . . . . . . . . . . . . . . . . . . . . . . . . . . . . . 131
Call the number where your calls are forwarded . . . . . . . . . . . . . . . . . . . . . 131
Automatic Call Back . . . . . . . . . . . . . . . . . . . . . . . . . . . . . . . . . . . . . . . . . . . . . . 131
Automatic Recall . . . . . . . . . . . . . . . . . . . . . . . . . . . . . . . . . . . . . . . . . . . . . . . . . 131
Malicious Caller ID (MCID). . . . . . . . . . . . . . . . . . . . . . . . . . . . . . . . . . . . . . . . . . 132
Chapter 12
Hunt Groups. . . . . . . . . . . . . . . . . . . . . . . . . . . . . . . . . . . . . . . . . . . . . . . . . 133
Hunt Group programming features. . . . . . . . . . . . . . . . . . . . . . . . . . . . . . . . . . . . . . . 133
Members of the group . . . . . . . . . . . . . . . . . . . . . . . . . . . . . . . . . . . . . . . . . . . . . . . . 134
Distribution mode . . . . . . . . . . . . . . . . . . . . . . . . . . . . . . . . . . . . . . . . . . . . . . . . . 134
Chapter 13
Hospitality Services. . . . . . . . . . . . . . . . . . . . . . . . . . . . . . . . . . . . . . . . . . . 137
Types of telephones . . . . . . . . . . . . . . . . . . . . . . . . . . . . . . . . . . . . . . . . . . . . . . . . . . 137
Programming Hospitality features . . . . . . . . . . . . . . . . . . . . . . . . . . . . . . . . . . . . . . . 137
Hospitality passwords . . . . . . . . . . . . . . . . . . . . . . . . . . . . . . . . . . . . . . . . . . . . . 138
Desk admin password . . . . . . . . . . . . . . . . . . . . . . . . . . . . . . . . . . . . . . . . . 138
Room condition password . . . . . . . . . . . . . . . . . . . . . . . . . . . . . . . . . . . . . . 138
Alarm time (AL) feature . . . . . . . . . . . . . . . . . . . . . . . . . . . . . . . . . . . . . . . . . . . . . . . 138
Setting the alarm time feature . . . . . . . . . . . . . . . . . . . . . . . . . . . . . . . . . . . . . . . 138
Change or cancel an alarm time . . . . . . . . . . . . . . . . . . . . . . . . . . . . . . . . . . 139
Turn off an alarm . . . . . . . . . . . . . . . . . . . . . . . . . . . . . . . . . . . . . . . . . . . . . . 140
Hospitality Services admin alarm feature . . . . . . . . . . . . . . . . . . . . . . . . . . . . . . 140
Room occupancy . . . . . . . . . . . . . . . . . . . . . . . . . . . . . . . . . . . . . . . . . . . . . . . . . . . . 141
Programming for occupancy restrictions . . . . . . . . . . . . . . . . . . . . . . . . . . . . . . . 141
P0937240 03.1
Page 11

Contents 11
Setting the state of a room at a telephone . . . . . . . . . . . . . . . . . . . . . . . . . . . . . 141
Room condition . . . . . . . . . . . . . . . . . . . . . . . . . . . . . . . . . . . . . . . . . . . . . . . . . . . . . 142
Setting room condition from a room telephone . . . . . . . . . . . . . . . . . . . . . . . . . . 142
Setting room condition with a HS admin telephone . . . . . . . . . . . . . . . . . . . . . . 143
Chapter 14
Cordless telephones and features . . . . . . . . . . . . . . . . . . . . . . . . . . . . . . . 145
Multiple-handset/base station, local . . . . . . . . . . . . . . . . . . . . . . . . . . . . . . . . . . . . . 145
Decreased voice quality . . . . . . . . . . . . . . . . . . . . . . . . . . . . . . . . . . . . . . . . . . . 146
Feature access with cordless telephones . . . . . . . . . . . . . . . . . . . . . . . . . . . . . . 146
Companion features . . . . . . . . . . . . . . . . . . . . . . . . . . . . . . . . . . . . . . . . . . . . . . 146
Directed Call Pickup . . . . . . . . . . . . . . . . . . . . . . . . . . . . . . . . . . . . . . . . . . . 147
Group Pickup . . . . . . . . . . . . . . . . . . . . . . . . . . . . . . . . . . . . . . . . . . . . . . . . 147
Language selection . . . . . . . . . . . . . . . . . . . . . . . . . . . . . . . . . . . . . . . . . . . 147
Call Forward No Answer enhancement . . . . . . . . . . . . . . . . . . . . . . . . . . . . 148
DECT handsets . . . . . . . . . . . . . . . . . . . . . . . . . . . . . . . . . . . . . . . . . . . . . . . . . . 148
Single base station, local (T7406) . . . . . . . . . . . . . . . . . . . . . . . . . . . . . . . . . . . . . . . 149
Wireless IP telephones . . . . . . . . . . . . . . . . . . . . . . . . . . . . . . . . . . . . . . . . . . . . . . . 150
Making calls . . . . . . . . . . . . . . . . . . . . . . . . . . . . . . . . . . . . . . . . . . . . . . . . . . . . 151
Making a second call . . . . . . . . . . . . . . . . . . . . . . . . . . . . . . . . . . . . . . . . . . 151
Receiving calls . . . . . . . . . . . . . . . . . . . . . . . . . . . . . . . . . . . . . . . . . . . . . . . . . . 151
Handling two calls . . . . . . . . . . . . . . . . . . . . . . . . . . . . . . . . . . . . . . . . . . . . . . . . 151
Releasing calls . . . . . . . . . . . . . . . . . . . . . . . . . . . . . . . . . . . . . . . . . . . . . . . . . . 151
Releasing a single call . . . . . . . . . . . . . . . . . . . . . . . . . . . . . . . . . . . . . . . . . 151
Releasing a call, with a call on hold . . . . . . . . . . . . . . . . . . . . . . . . . . . . . . . 152
Accessing call on Hold after hang up . . . . . . . . . . . . . . . . . . . . . . . . . . . . . . . . . 152
Retrieving a held call from an on hook handset . . . . . . . . . . . . . . . . . . . . . . 152
Using the display menu . . . . . . . . . . . . . . . . . . . . . . . . . . . . . . . . . . . . . . . . . . . . 152
Preprogrammed features . . . . . . . . . . . . . . . . . . . . . . . . . . . . . . . . . . . . . . . 152
Unprogrammed features . . . . . . . . . . . . . . . . . . . . . . . . . . . . . . . . . . . . . . . . 153
Ending feature sessions . . . . . . . . . . . . . . . . . . . . . . . . . . . . . . . . . . . . . . . . . . . 153
Feature restraints . . . . . . . . . . . . . . . . . . . . . . . . . . . . . . . . . . . . . . . . . . . . . . . . 153
Supported features . . . . . . . . . . . . . . . . . . . . . . . . . . . . . . . . . . . . . . . . . . . . . . . 154
Chapter 15
Troubleshooting alarm codes. . . . . . . . . . . . . . . . . . . . . . . . . . . . . . . . . . . 157
Alarm codes . . . . . . . . . . . . . . . . . . . . . . . . . . . . . . . . . . . . . . . . . . . . . . . . . . . . . . . . 157
Report and record alarm codes . . . . . . . . . . . . . . . . . . . . . . . . . . . . . . . . . . . . . 157
Test a digital telephone . . . . . . . . . . . . . . . . . . . . . . . . . . . . . . . . . . . . . . . . . . . . 157
Test the telephone display . . . . . . . . . . . . . . . . . . . . . . . . . . . . . . . . . . . . . . 157
Test the telephone buttons . . . . . . . . . . . . . . . . . . . . . . . . . . . . . . . . . . . . . . 158
Test the speaker in the telephone handset . . . . . . . . . . . . . . . . . . . . . . . . . . 158
Telephone Features Programming Guide
Page 12

12
Contents
Test the telephone headset . . . . . . . . . . . . . . . . . . . . . . . . . . . . . . . . . . . . . . 158
Test the telephone speaker . . . . . . . . . . . . . . . . . . . . . . . . . . . . . . . . . . . . . . 159
Test the power supply to a telephone . . . . . . . . . . . . . . . . . . . . . . . . . . . . . . 159
Appendix A
Feature codes. . . . . . . . . . . . . . . . . . . . . . . . . . . . . . . . . . . . . . . . . . . . . . . . 161
Appendix B
Common display prompts and error messages . . . . . . . . . . . . . . . . . . . . 167
Index . . . . . . . . . . . . . . . . . . . . . . . . . . . . . . . . . . . . . . . . . . . . . . . . . . . . . . . 171
P0937240 03.1
Page 13

Figures
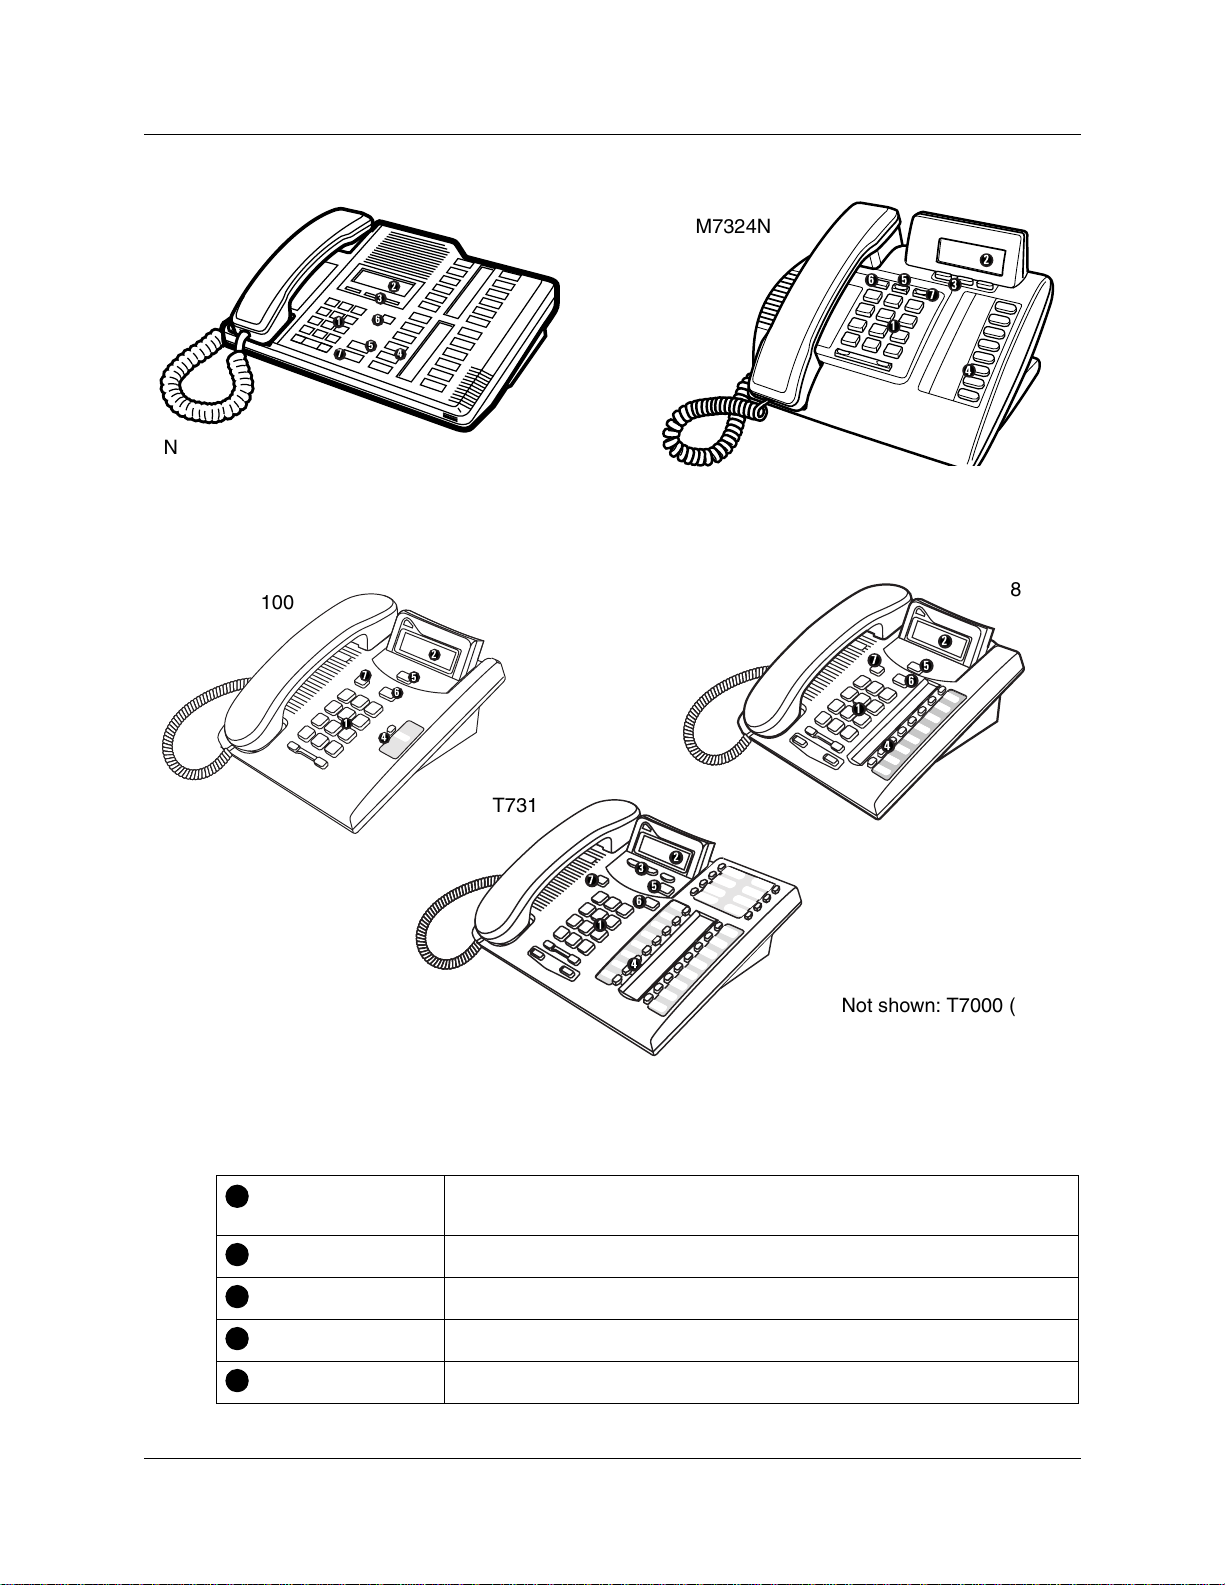
Figure 1 M7324 and M7324N digital telephones . . . . . . . . . . . . . . . . . . . . . . . . . . 22
Figure 2 T7100, T7208, T7316 digital telephones . . . . . . . . . . . . . . . . . . . . . . . . . 22
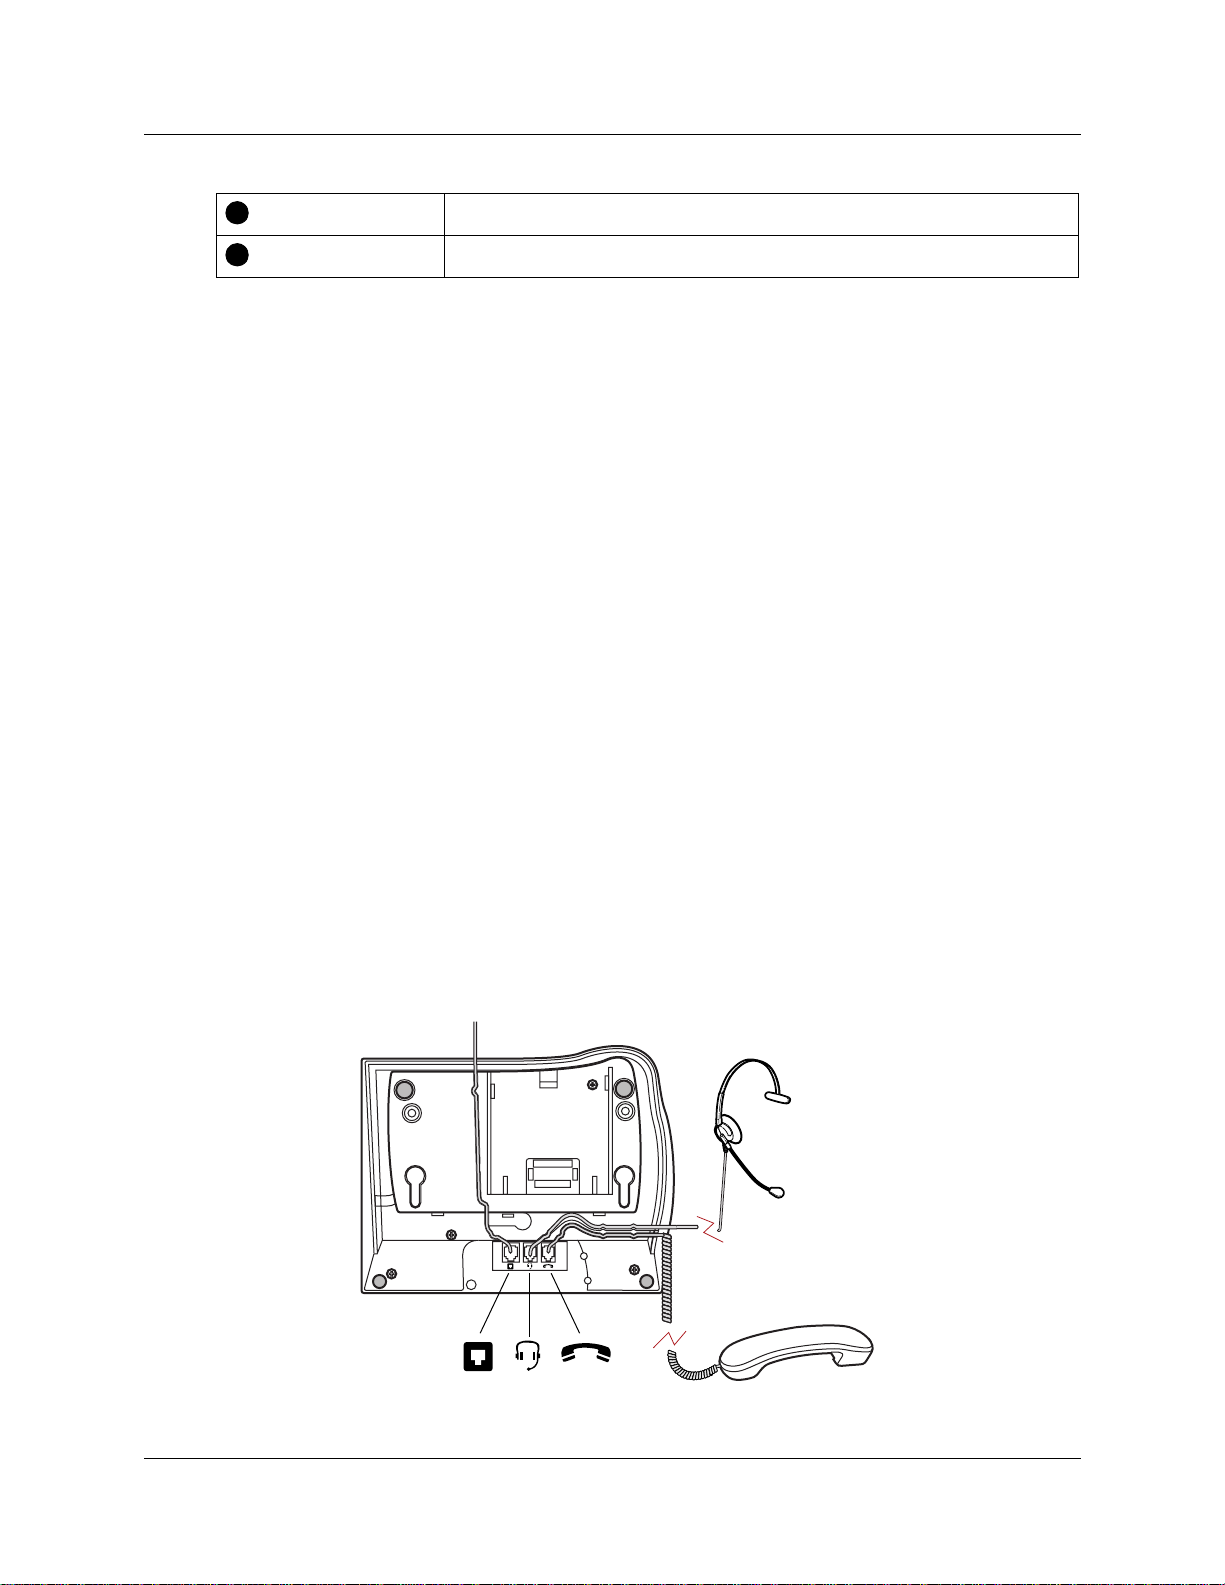
Figure 3 T7316 telephone peripheral connections . . . . . . . . . . . . . . . . . . . . . . . . . 23
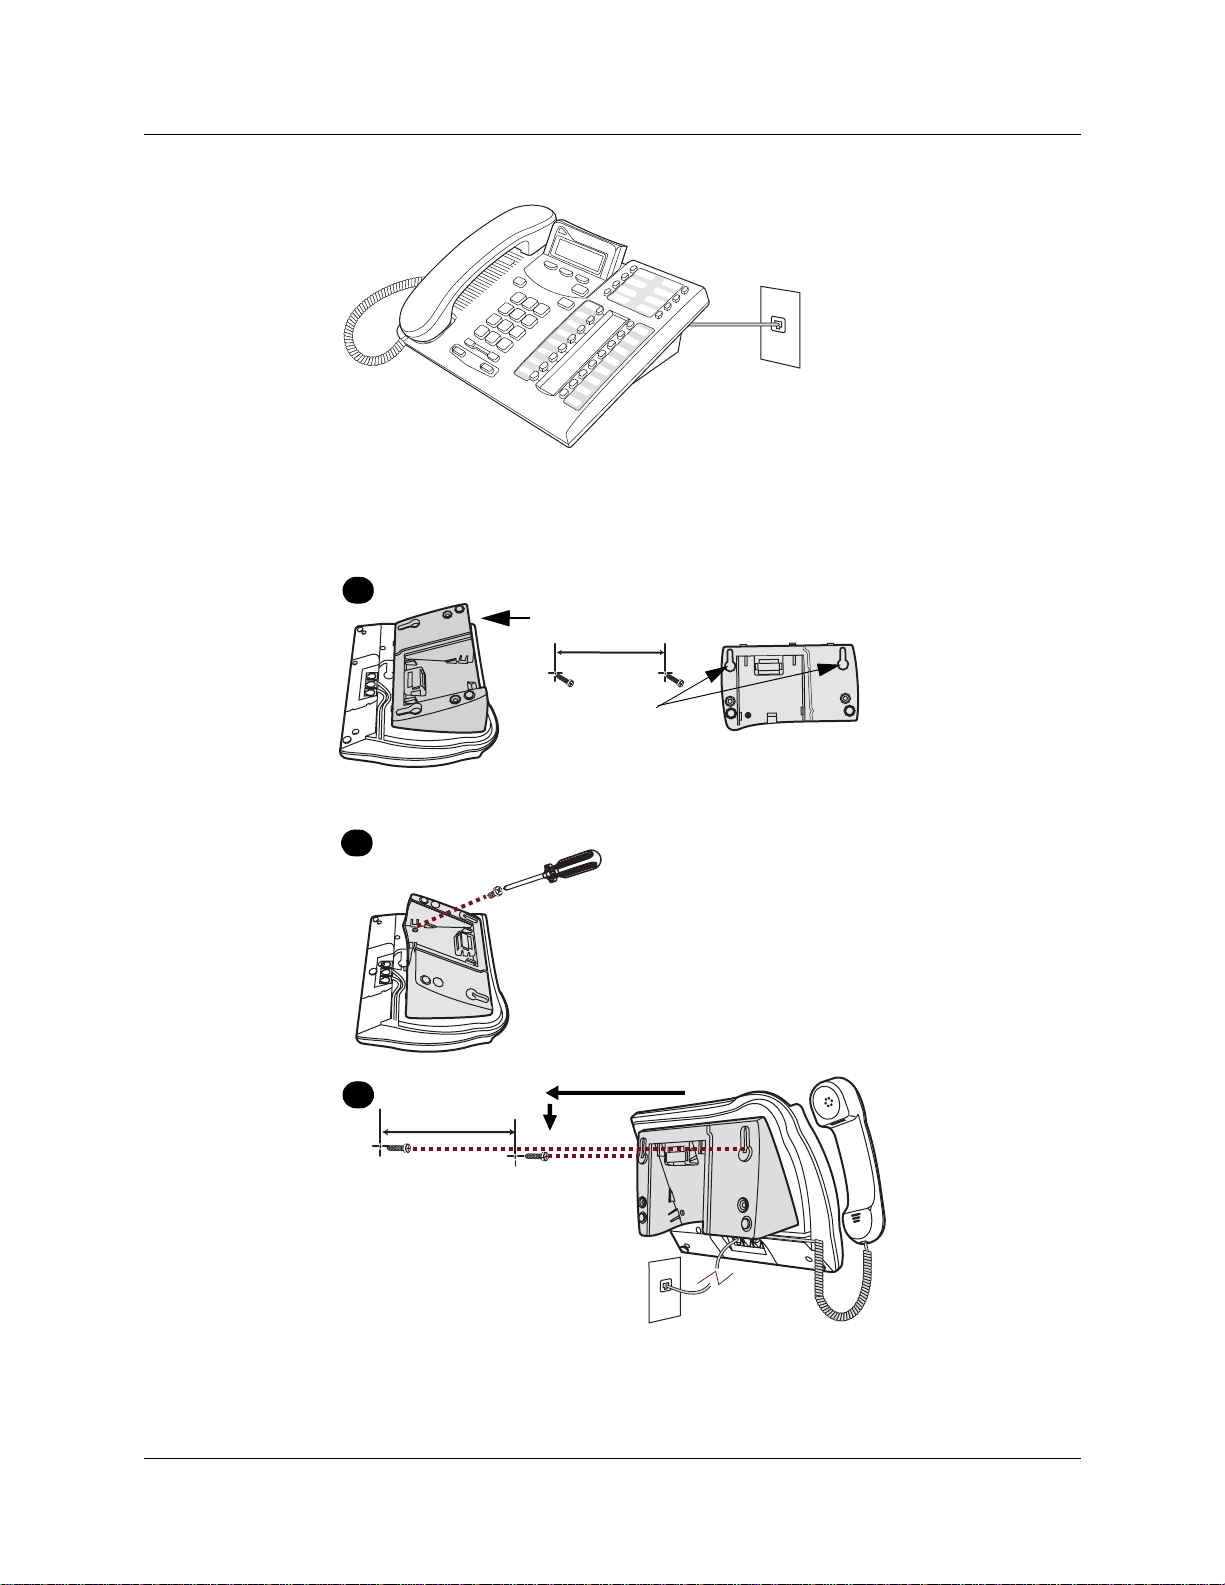
Figure 4 Connecting the T7316 telephone . . . . . . . . . . . . . . . . . . . . . . . . . . . . . . . 24
Figure 5 Mounting a T7316 telephone with a stand on the wall . . . . . . . . . . . . . . . 24
Figure 6 Mounting a T7316 telephone without a stand on the wall . . . . . . . . . . . . 25
Figure 7 Some of the supported IP telephones and wireless telephones . . . . . . . 25
Figure 8 Two-line displays and display buttons . . . . . . . . . . . . . . . . . . . . . . . . . . . 27
Figure 9 CAP module with M7324 and M7324N telephones . . . . . . . . . . . . . . . . . 38
Figure 10 SWCA indicators, incoming call from a line (auto SWCA association is on) 72
Figure 11 SWCA indicators, incoming call from an intercom (auto SWCA association for
Figure 12 Button assignment on the T7316 telephone . . . . . . . . . . . . . . . . . . . . . 104
Figure 13 T7406 button defaults . . . . . . . . . . . . . . . . . . . . . . . . . . . . . . . . . . . . . . . 105
Figure 14 Button assignment on the M7324 telephone . . . . . . . . . . . . . . . . . . . . . 106
Figure 15 Broadcast mode . . . . . . . . . . . . . . . . . . . . . . . . . . . . . . . . . . . . . . . . . . . 134
Figure 16 Linear call mode . . . . . . . . . . . . . . . . . . . . . . . . . . . . . . . . . . . . . . . . . . . 134
Figure 17 Rotary mode . . . . . . . . . . . . . . . . . . . . . . . . . . . . . . . . . . . . . . . . . . . . . 135
Figure 18 System-compatible handset features . . . . . . . . . . . . . . . . . . . . . . . . . . . 149
Figure 19 NetVision handset features that are used to access system call features 150
Figures 13
intercom is on) 73
Telephone Features Programming Guide
Page 14

14
Figures
P0937240 03.1
Page 15

Tables
Table 1 Digital telephone button functions, refer to Figure 1 and Figure 2. . . . . . 22
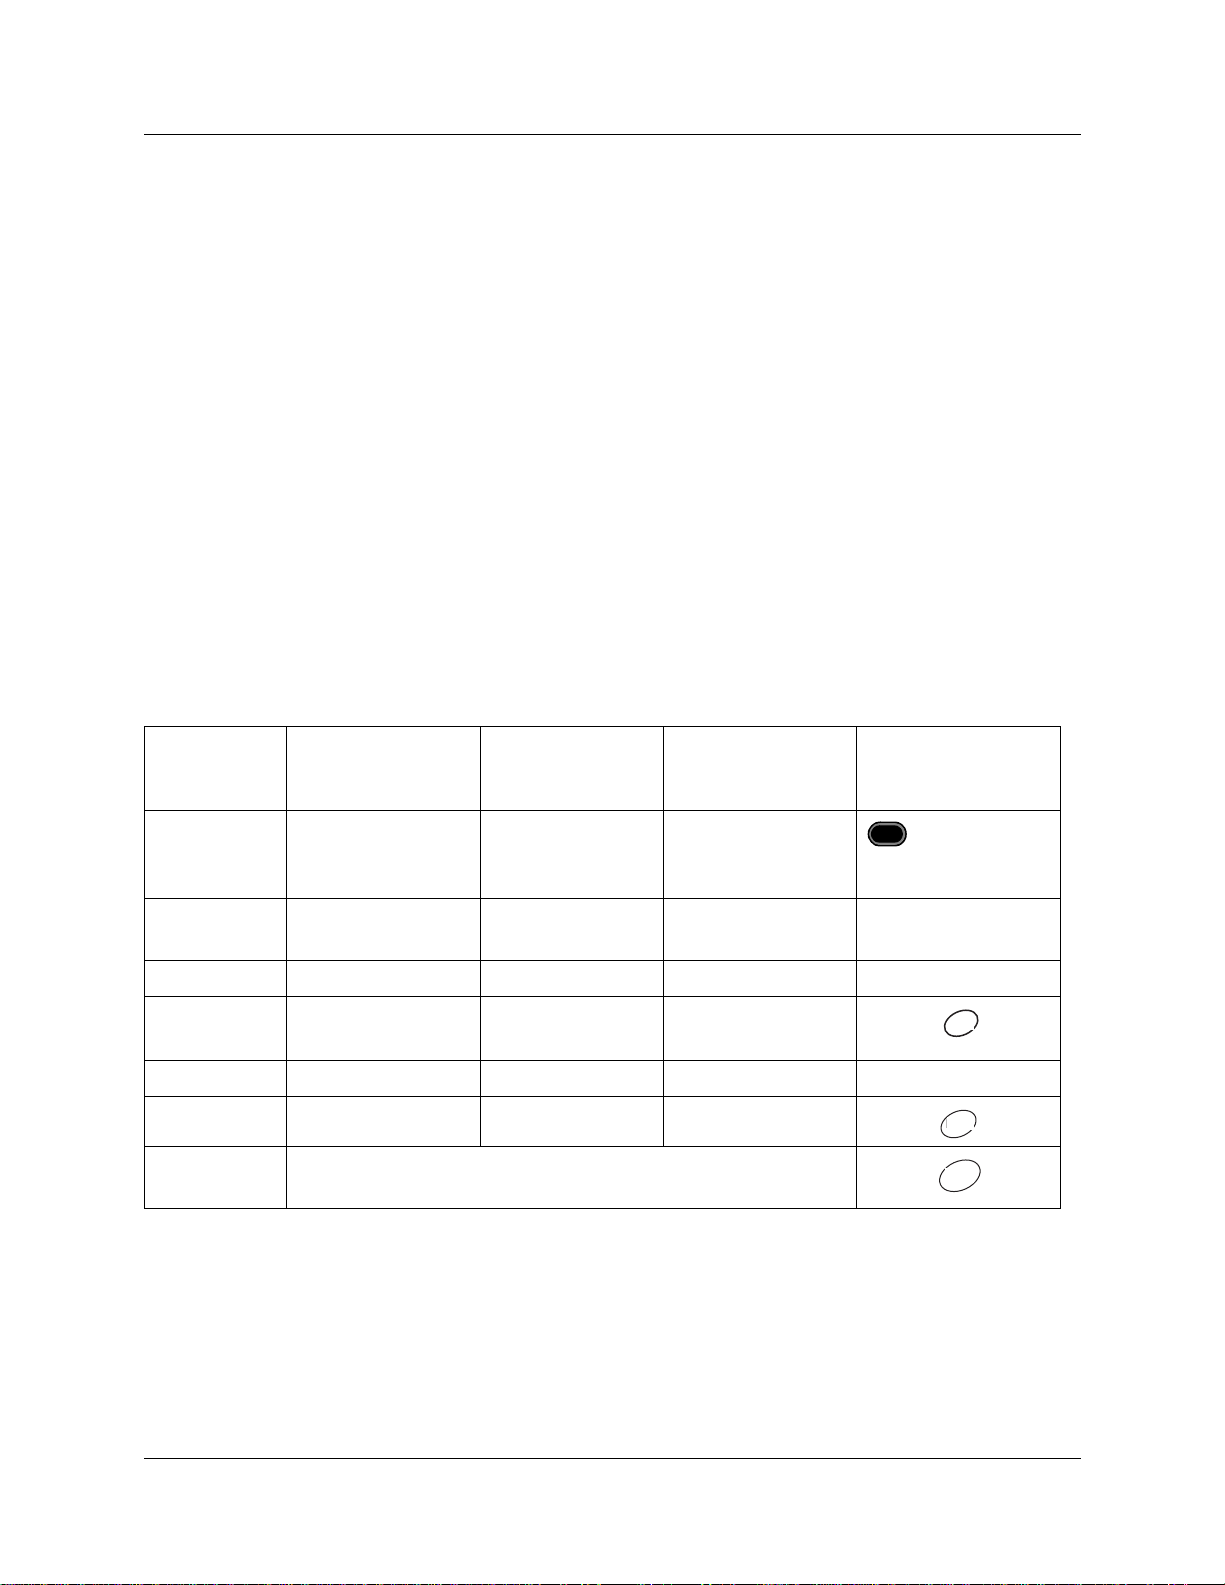
Table 2 Telephone buttons . . . . . . . . . . . . . . . . . . . . . . . . . . . . . . . . . . . . . . . . . . 26
Table 3 Display button equivalents on a one-line display telephone . . . . . . . . . . . 28
Table 4 Answer keys . . . . . . . . . . . . . . . . . . . . . . . . . . . . . . . . . . . . . . . . . . . . . . . 42
Table 5 SWCA prompts . . . . . . . . . . . . . . . . . . . . . . . . . . . . . . . . . . . . . . . . . . . . 74
Table 6 Language options . . . . . . . . . . . . . . . . . . . . . . . . . . . . . . . . . . . . . . . . . . 100
Table 7 T7316 button assignment template . . . . . . . . . . . . . . . . . . . . . . . . . . . . 104
Table 8 T7208 button assignment template . . . . . . . . . . . . . . . . . . . . . . . . . . . . 105
Table 9 M7324(N) button assignment template . . . . . . . . . . . . . . . . . . . . . . . . . 106
Table 10 Turning services on and off . . . . . . . . . . . . . . . . . . . . . . . . . . . . . . . . . . 120
Table 11 Tones and what they mean . . . . . . . . . . . . . . . . . . . . . . . . . . . . . . . . . . 130
Table 12 Features available to a Companion portable handset . . . . . . . . . . . . . . 146
Table 13 DECT handset features . . . . . . . . . . . . . . . . . . . . . . . . . . . . . . . . . . . . . 148
Table 14 Supported features for NetVision handsets . . . . . . . . . . . . . . . . . . . . . 154
Table 15 Features sorted by feature name and by activation code . . . . . . . . . . . . 161
Tables 15
Telephone Features Programming Guide
Page 16

16
Tables
P0937240 03.1
Page 17

Preface
This guide provides information about how to program a telephone on the Business
Communications Manager syst em. This infor mation includes i tems such as programming p ersona l
speed dials, transferring a call, and using special features.
The Business Communicati ons Mana ger s uppo rts a number of t ypes of te lephon es. Thi s docu ment
is based on the feature capabilities of the Nortel M-series and T-series digital telephones. The
feature anomalies for such telephones as the Nortel IP telephones, Companion portables, DECT
portables, and Symbol NetVision wireless handsets are noted within the context of each feature.
Some of the features included in the Business Communications Manager telephone system are:
• conference calls
• group listening and pickup
• call fowarding and line redirection
• directed pickup
• call tracking (logging)
17
This guide is aimed at the day-to-day operators of the Business Communications Manager
telephone system.
Before you begin
Plan the programming changes you want to make before you begin. Record the changes so that
you hav e t he information at hand. The Bu si nes s Communi ca ti ons Manager Programming Records
provide a number of forms to support your record keeping. For example, before you program
system speed dial numbers, create a record so that you have all the numbers and codes available.
Programming applies to both North America and International telephones in your Business
Communications Manager system.
Telephone Features Programming Guide
Page 18

18 Preface
Text conventions
This guide uses the following text conventions:
angle brackets < > Indicate the generic title on the telephone display.
Indicates variable for a command-line interface.
Indicates keyboard key.
Example, display: When querying a feature button,
name
name>
appears in angle brackets.
namename
Example, command line: IP address:<IP address>
Example, keyboard:<ENTER>
<Fea t ure
Featur e
Featur e Featur e
Bold
ClearDisplay font Indicates what appears on the telephone display.
italic text Indicates new terms and book titles.
Forward slash /
Acronyms
This guide uses the following acronyms:
AL Alarm
ASM Analog Station Module
ATA Analog Terminal Adapter
Indicates a programming level within the telephone menu.
Example: System DNs programming level
.
Prompts for the soft keys are underlined.
Example, display:
Fwd to:
Example, softkey prompt: CHANGE.
Example: Business Communicat ion s Manager Telephone
Feature Card.
Separates names where two actions are assigned to one button.
Example:
Run/Stop.
BLF Busy Lamp Field
BRI Basic Rate Interface
CAP Central Answering Position
CFB Call Forward on Busy
CFAC Call Forward All Calls
CFNA Call Forward No Answer
CLID Calling Line Identification
COS Class of Service
DID Direct Inwa rd Dial
P0937240 03.1
Page 19

Preface 19
DISA Direct Inward Sy stem Access
DN Directory Number (Extension Number)
DND Do Not Disturb
DLR Distinctive Line Ring
DRP Distinctive Ring Pattern
DRT Delayed Ring Transfer
ERC Express Routing code
HS Hospitality Services
IP Internet Protocol
ISDN Integra t ed Services Digital Network
ISO Internatio nal Organizatio n for Standardization
PBX Priv a te Branch Exchange
PRI P rimary Rate In terface
RC Room Condition
RJXX Registered Jack XX (Where XX is used to denote numbers, for
example: 45 or 5.)
RO Room Occupancy
SLR Selective Line Redirection
SWCA System-wide call alert
URL Unif or m Resource Locato r
Emergency 911 Dialing
Emergency 911 dialing is the capability to access a public emergency response system.
State and local requirements for support of Emergency 911 dialing service by Customer Premises
Equipment vary. Ask your local telecommunications service provider about compliance with
applicable laws and regulations.
Emergency 911 dialing may not apply to International systems.
IP telephones: If you allow this service on IP telephones that are installed or used off-site, you
must ensure that the 911 telephone number is not mapped to the system address in the emergency
response system.
Telephone Features Programming Guide
Page 20

20 Preface
Related publications
For more information about installing and programming telephones on the Business
Communications Manager 2.5, refer to your system administrator or to the following publications:
• Installation and Maintenance Guide
• Programming Operations Guide.
This document provides more information about using Unified Manager programming,
including Companion programming.
• DECT Installation and Maintenance Guide.
• IP Telephony Configuration Guide (IP telephones and Netvision wireless IP telephones).
• T7406 Cordle ss Telephone Installation Guide .
P0937240 03.1
Page 21

Chapter 1
Telephone configuration overview
Your Business Communications Manager telephone system has many features that you can
customize on your telephones t o ac commodat e changes in your workpla ce . The system sup por ts a
variety of telephone types, and not all features are available on all types of telephones. These
anomalies are noted.
Configuration tool: Unified Manager
Unified Manager is the computer-based tool used to program the system telephony features, and
settings for each telephone and all external lines. Multiple levels of programming are accessible
through Unified Manager, based on your user name and password. The system administrator has
full access, and must unde rstand ho w the entire system functions. As a telep hony adminis trator , the
user name and password you use to access the Business Communications Manager Unified
Manager from your web browser, probably provides access only to specific telephone functions.
21
This guide only describes procedures that can be performed at a telephone. This guide also
describes the function of features that require access to the Unified Manager to configure, but the
process for setting the feature is not detailed. For more information about navigation and
performing feature configuration using Unified Manager, refer to the Business Communications
Manager Programming Operations Guide.
Telephone types
The Business Communications Manager supports a number of digital telephones, IP telephones,
cordless telephones, and ISDN equipment.
Features described in this guide are based on what is available on digital telephones with
two-line displays that have display keys, such as the M7310/M7310N, M7324/M7324N,
and the T7316 telephones. Telephones with one-line displays use dialpad characters to
respond to prompts. The T7000 has no display, but it does have four programmable
memory buttons.
Not all features described in this manual are available through the cordless handsets or
ISDN equipment. Refer to the telephone user cards and feature cards, and to the specific
installation and configuration guides, for feature information specific to these telephones.
Figure 1 sho ws the M7324 ( North Amer ica) and M732 4N (Intern ational) digital t elephones , which
can be used for systems that require a central call management person.
Telephone Features Programming Guide
Page 22
22 Chapter 1 Telephone configuration overview
Figure 1 M7324 and M7324N digital telephones
M7324
2
3
6
1
5
7
4
Not shown: M7100N, M7208, M7208N
Figure 2 shows three different Business Series Terminals.
Figure 2 T7100, T7208, T7316 digital telephones
T7100
2
7
5
6
1
4
T7316
M7324N
5
6
1
1
2
3
3
7
4
T7208
7
1
2
5
6
4
2
3
7
5
6
1
4
Not shown: T7000 (not
available in all regions)
Table 1 shows the buttons and their functions for the digital telephones.
Table 1 Digital telephone button functions, refer to Figure 1 and Figure 2.
1
Dial pad Used for dialing numbers and for entering numbers and letters when you are
2
Display Shows instructions for calling and programming.
3
Display buttons Displays current programming on button.
4
Memory buttons Dials a number or feature code stored on the button.
5
Feature button Allows you to enter a feature code while using or programming the telephone.
programming.
P0937240 03.1
Page 23
Chapter 1 Telephone configuration overview 23
Table 1 Digital telephone button functions, refer to Figure 1 and Figure 2.
6
Hold button Puts an active call on hold.
7
Release button Hangs up an active call or ends programming.
Digital telephone installation
If you are connecting a Business Communications Manager digital telephone for the first time,
refer to the f ollowing illustrations and steps for install ation instruc tions.
1 Disconnect the line cord from the wall socket before trying to carry out any work on the
telephone.
2 To re mov e an y o f the cords, press th e rel ease l atch on the plug a nd c arefu lly pu ll th e plug from
the socket.
3 Connect the ha ndset cord to the jack labe led with the te lephone icon and route the cord as
shown.
4 If you are u sing a headset, ro ute the cord along the channel in the base and connect the c ord to
the telephone jack that i s labeled with the headset i con.
5 Route the line cord through the support and connect the cord to the telephone jack that is
labeled with the jack icon.
6 Attach the support using either pair of slots. To raise the back of the telephone to its highest
position, use these slots.
7 When the above work is complete, plug the line cord back into the wall socket.
Figure 3 and Figure 4 show the T7316 peripheral connection points, and how to connect the
telephone to a wall jack.
Figure 3 T7316 telephone peripheral connections
Telephone Features Programming Guide
Page 24
24 Chapter 1 Telephone configuration overview
Figure 4 Connecting the T7316 telephone
Figure 5 shows the T7316 and stand wall mounting procedure.
Figure 5 Mounting a T7316 telephone with a stand on the wall
1
Press here to remove the stand.
2
3
Mount the telephone
onto the screws and
slide it down.
Connect line cord to
wall jack.
key hole slots
Use the key hole slots on the stand
to mark the location for the screws.
Tighten screws for a secure fit.
Mount the stand as shown and
insert screw. Use the screw that
came with your telephone.
Connect cords to the telephone,
refer to “Cord connections”
illustrations.
P0937240 03.1
Page 25

Chapter 1 Telephone configuration overview 25
1
Figure 6 shows the T7316 without a stand wall mounting procedure.
Figure 6 Mounting a T7316 telephone without a stand on the wall
IP telephones and cordless handsets
IP telephones and th e cor d l ess te lephones hav e ind ividual user manu al s or user cards that desc ri be
how to install the telephones and the supporting equipment. Figure 7 shows some types of IP and
cordless telephones that the Business Communications Manager supports.
Figure 7 Some of the supported IP telephones and wireless telephones
i2004 IP telephone
i2002 IP telephone
ABC DEF
1 2 3
GHI JKL MNO
4 5 6
PQRS TUV WXYZ
7 8 9
0
T7406
(cordless portable)
NetVision Data Telephone
(IP portable)
#
NetVision
Telephone
(IP portable)
FCTMENU
NAMERCL
ABC3DEF
1 2
JKL4GHI
5
TUV7PQRS9WXYZ
8
OPR
<
0
STOCLR
<
>
END
SND
FCT NAME HOLD
ABC3DEF
21
JKLGHI6MNO
54
TUV
PQRS
WXYZ
87
9
OPR
< >
0
#
CLR STO RCL
MENU
SND
END
MNO
6
>
#
HOLD
10179EA
Not shown: DECT and Companion cordless handsets
and the Nortel Networks i2050 Software Phone
Telephone Features Programming Guide
Page 26
26 Chapter 1 Telephone configuration overview
Feature operability notes
The T7406 and the NetVision and NetVision Data telephone feature operability is based on
existing digital telephone operation as described below:
• The T7406 wireless portable handset memory buttons are mapped to the T7316 telephone
firmware and they perform feature programming in a similar manner. Refer to “T7316 Button
mapping” on page 103. They have eight less programmable buttons than the M7310.
• The NetVision and NetVision Data IP cordless handsets are based on the operability of the
T7100 telephone, but feature programming is not set up in the same way. These handsets do
not have memory or line buttons. A menu on the multi-line display provides access to
preprogrammed features, and to the Feature code that allows you to enter feature codes from
the handset dialpad.
Telephone buttons
This guide shows the Business Series Terminals button icons. Table 2 shows which buttons on the
different types of Nortel Networks telephones to use for programming and feature access.
Table 2 Telephone buttons
T7000, T7100,
Button Name
Feature
Handsfree
T7208, T7316
≤ ƒ
Bottom right-hand
button
Mute
Hold
© ©
≥
≥(T7000)
Volume Control
Release
Answer call
√ √
® ®
Sets with line buttons: Press line button and lift handset.
Sets with no buttons: Lift handset.
ú
M7100, M7208,
M7310, M7324
©
˙
M7000, M7100N,
M7208N, M7310N,
M7324N
Ä accesses
NetVision
NetVision Data
FCT
Feature
on menu
©N/A
©N/A
ú
HOLD
HOLD
≥(M7000)
ÃN/A
¨
END
END
SND
SND
P0937240 03.1
Page 27

Accessing features (digital sets)
Chapter 1 Telephone configuration overview 27
You can enter ≤, ƒ, or
Ä
and the code to use a feature. For example: Press
≤·°⁄ to access your mailbox.
If the telephone has memory buttons, they can be programmed to access specific features. In this
case, all you do is press the memory button on the set to activate the feature.
Accessing features (NetVision telephones)
The NetVision telephones have the equivalent of the ≤ programmed on the handset display
menu.
FCT
1 Press the
By default, the Feature entry is usually the first entry in the menu.
Scroll to Feature on the menu.
2
SND
SND
Press .
3
Enter the feature code.
4
You can also use
this shortcut either on an idle line or during a call.
button to access the display menu.
FCT
1<feature code>
, (if Feature is the first entry on the menu). Yo u can use
Another shortcut to en ter a feat ure code is •
there is no active call. Refer to the NetVision Telephone Feature Card for details about using
feature codes.
One-line and two-line displays
The T7100 and T7208 telephones have a one-line display.
The T7316, M73100/M7310(N), th e M7324(N), the i2002 and i 2004 IP tel ephones, an d the T7406
portable telephones have a second line on the display, which displays the intended function of the
three buttons (display buttons) below it. Figure 8 shows the different types of digital telephones
with display butt ons .
Figure 8 Two-line displays and display buttons
Contrast level 2
Contrast level 2
DOWN UP OK
DOWN UP OK
Display buttons
<feature code>
, howe ver, this can only be used if
Contrast level 2
DOWN UP OK
Telephone Features Programming Guide
Page 28

28 Chapter 1 Telephone configuration overview
Display exceptions
The Companion, DECT, and NetVision handsets have multi-line displays, but they do not have
display buttons and so do not display the prompts.
• The NetVision telephone has a two-line display. The display is 10-characters-per-line.
Therefore, the standard 16-character displays are split across the two lines, and there is no
display of softkey labels.
• The NetVision Data telephone has a 16-line display, with 12 characters per line. The standard
16-character displays are split across the first two lines, and there is no display of softkey
labels. Refer to Table 3.
Buttons under the display
The three buttons found under the display are for interacting with the programming prompts or
internal menus, in the case of IP and NetVision telephones. The programming session determines
what the display shows and what each button does. Some display instructions are
. In this guide, display button instructions appear underlined.
COPY
OK, CHANGE
or
All examples in this guide show the digital 16-character, two-line display.
Describing the display buttons
Some display b utton s, such as TRANSFR an d
display. Other display buttons, such as
Table 3 shows display button functions and dialpad buttons on a one-line display telephone.
Table 3 Display button equivalents on a one-line display telephone
Dialpad display buttons on T7100, T7208, M7100(N), M7208(N)
Display buttons
OK
QUIT
ADD
SHOW
CANCEL
VIEW
and NetVision telephones
≥ or
® or
˙ or on
® or on NetVision:
•
£
£
£
, are shortcuts that are only avail able on a tw o-l ine
ALL
and SHOW, perform a function necessary to proceed.
OK
HOLD
NetVision:
END
END
HOLD
OVERRIDE
P0937240 03.1
£
Page 29

Chapter 1 Telephone configuration overview 29
Table 3 Display button equivalents on a one-line display telephone (Continued)
BKSP
ANY This key allows you to enter a wild card character that allows the user to
√ or
Note: The NetVision telephone volume buttons cannot be used to perform
feature programming functions.
enter any digit from 1 to 9.
Note: For system programming, the keyboard equivalent is a capital A.
Memory buttons
You can use memory buttons as answer, autodial, line, and programmed feature buttons. Line,
intercom and answer buttons must have indicators. The T7316, T7208, M7324(N), and T7406
telephones have memory buttons with indicators.
• There is a single memory button, without an indicator, on the M7100(N)/T7100 telephones.
• Companion, DECT handsets, and NetVision telephones do not have memory buttons.
Companion and DECT have their own feature set, accessed through dialpad buttons.
• On the NetVision and NetVision Data telephones, the key can be used to access the
feature for programming memory buttons, which are administered by the handset.
Program buttons
√
FCT
The system automatica lly assi gns some featur es to progr am bu ttons on ne wly-inst alled tel ephones.
Your system administrator may choose to change or add to these settings.
You can use ≤•‹ to program any of the memory keys on your telephone except line and
intercom keys , incl uding t he ones that ha v e prior programmin g. You can then access the f eatur e by
pressing the single memory key to activate the feature. For a summary of all the Feature button
programming, refer to Appendix A, “Feature codes,” on page 161.
Labeling your telephone buttons
The M-series telephones come with p rinte d k e y caps , or blan k ke y ca ps that you can l abel yo urs elf
with sticky labels.
The T-series telephones are labelled beside the buttons. You can use the Desktop Assistant utility
to make changes a nd pr in t a new label c ard . The application is avail abl e o n th e documentation CD
under Optional Softwar e/Desktop Assi stant or do wnload i t from http ://www.nortelnetworks.com
(Customer Support/Software Distribution, under Product Selection choose Desktop Assistant).
IP telephones have soft labels that can be changed through the Unified Manager by your system
administrator when the telephone is se t up. Refer to th e IP Telephony Configuration Guide for
details.
Telephone Features Programming Guide
Page 30
30 Chapter 1 Telephone configuration overview
Name a telephone or a line
You can assign names to identify external lines, target lines, and your colleagues’ telephones.
During a call, the name (if programmed) appears on the telephone display instead of the external
line number or internal telephone number of the caller.
Telephone names and line names can contain both letters and numbers, but cannot be longer than
seven characters. You cannot use the # and * symbols.
Note: You can give the same name to a telephone and a line in your system. Use initials,
abbrevia tions, or even nickn ames to give each t eleph one a un ique na me to a v o id conf usion.
If you have trunks that have caller ID features, you can also receive caller information from
external calls.
You need to start a Unified Manager session to program this feature. For more information about
programming using Unified Manager, see the Business Communications Manager Programming
Operations Guide.
Extension numbers
(Unified Manager Programming)
(Unified Manager Programming)
Each telephone in the system has an extension (directory) number (DN). The length of extension
numbers in your system can range from two to seven digits. All numbers in your system are the
same length. Your installer assigns the length of extension numbers, called the DN length. The
default DN length is three.
To find out your internal number, use the Button Inquiry feature (≤•‚), then press the
button marked Intercom. On the T7100 telephone, Button Inquiry shows your internal number
followed by the function assigned to the memory button.
Line assignment
The installer or system administrator assigns lines to each telephone or device, such as fax
machines. Lines assigned to a telephone automatically assign to a line button on that telephone,
when a button is available. Users can use ≤•°⁄ to rearrange lines on the telephone. Refer
to “Move line buttons” on page 108.
Lines can be set to:
• appear only: an indicator flashes beside the line button
• appear and ring: an indicator flashes and you hear a ring tone
• ring only: you hear a ring tone (usually used if the line is assigned to a button with no
indicator) The T7000, T7100, Companion, DECT and NetVision telephones have no line
buttons. All incoming lines must be set to ring-only.
(Unified Manager Programming)
P0937240 03.1
Page 31

Chapter 1 Telephone configuration overview 31
In larger systems, lines are assigned to line pools and routes. To call out, you may have automatic
access to lines through the Intercom button on your telephone. You may also be given Access
Codes or Destination Codes that you need to dial as part of the dialout sequence to access a
specific line pool. Refer to “Using line pools” on page 47.
Prime line
You can program your telephone to select an internal line, an external line, or a line pool
automatically when you lift the handset. This is your prime line. The line choosen must be
assigned to the telephone under Line Access, as well.
Note: If you select a voice over IP (VoIP) tr unk or VoIP line pool as a pr ime l ine , the u ser
does not receive dial tone when the line is selected, therefore, it is not a recommended
setup for most applications.
Private line
A priv at e lin e is limit ed to a sele cted t eleph one. You can pick up calls put on hold, or not ans wered
on a private line, only at the prime telephone for that telephone.
Target line
A target line routes a call directly to a selected telephone, or group of telephones. Target lines are
only for incoming calls. A single incoming line can provide connections to several different target
lines. Target lines allow each person or department in the office to have their own number without
having a separate external line for each number.
(Unified Manager Programming)
(Unified Manager Programming)
(Unified Manager Programming)
You can also assign a target line to a group of telephones, such as in the case of a Hunt group,
where you assign the target line to the Hunt DN.
Overflow call routing
If a call comes into a target lin e that is busy, the system routes the call to the p rime telephone for
that target line. If there is no prime telephone assigned to the target line, or if you cannot direct a
call to a target line, the call goes to the prime telephone for the external line.
Overflow routing for incoming calls uses the routing service programmed by your installer.
Service must be active for overflow routing to operate. Overflow routing is not available in normal
service.
Note: When you make a call and the programmed route is busy, you hear the expensive
route warning tone and see a display indicating the use of an expensive route. To avoid
using the normal, expensive route, release your call. Overflow routing directs calls use
different line pools, therefore, a call might be affected by different line filters.
Telephone Features Programming Guide
(Unified Manager Programming)
Page 32

32 Chapter 1 Telephone configuration overview
Call anomalies for telephones without line buttons
The T7100, Companion, DECT and NetVision telephones work differently from other telephones
on your system because they do not have line buttons.
• To answer a call, pick up the handset. On other telephones, you se lect a line butt on. Ne tVision
SND
SND
handsets: Press
• To take a call off hold, press ≥. On other telephones, you select the line button.
• Answer a second call by pressing ≥. Your active call is put on hold and you connect to the
waiting call. You can have no more than two active calls at one time.
• There is no handsfree/mute feature since these telephones do not have a © button. In the
case of the Companion, DECT, and NetVision handsets, they also do not have a speaker, so
they cannot receive pages. Voice calls must be set to ring at these sets.
NetVision notes:
• To make a call, enter all the digits of the number you are calling, then press
.
SND
SND
.
• The button activates the feature display menu.
FCT
• The volume buttons on the handset can only control the volume on the handset. It cannot
interact with system features in the way that the T7100 telephones do.
For more information about telephone buttons, refer to the Telephone User Card for each product.
P0937240 03.1
Page 33

Chapter 2
Answering calls
There are three possible indications of an incoming call:
• ringing
• a line button flashing
• a message on the display
You do not always receive all three indications for a call. For example, you can have a line set up
not to ring at your telephone, even though your telephone may have a line appearance. If so, you
see only a flashing line button when a call comes in. There are many possible combinations,
depending on your system setup. For more information about the use of lines, see “Line buttons”
on page 48.
Understanding ring types
33
The type of ring you receive from an incoming call determines the type of call.
System ring indicators
There are several d i ffer ent types of ring.
A double beep every 10 seconds A call is camped to your telephone.
A long single ring There is an external call on the line for you.
A shorter double ring There is an internal c all on the line for you, or a call is b eing
transferred to you.
A brief single ring A call arriving on an external line is redirected to a
telephone outside of your system. You cannot answer this
call.
Three beep s descendi ng in tone You are receiving a priority call.
Ring tones (7000)
Since the T7000/M7000 telephones do not have a display you will hear the following tones:
• stuttered dialtone for Do Not Disturb and Divert
• single, low frequency command input tone
• single, high frequency confirmation tone
Telephone Features Programming Guide
Page 34

34 Chapter 2 Answering calls
Distinctive ring patterns
There are four Distinctive ring patterns (DRP) that can be assigned by the system administrator to
lines, telephones, or Hunt Groups to differentiate incoming calls:
DRP 4 Highest priority
DRP 3 2nd highest priority
DRP 2 3rd highest priority
DRP 1 (default) Lowest priority
Call Ringing: When more than one call rings at a telephone, highest priority DRP rings through
first.
Hunt groups: If the Hunt Group DRP is higher than the DRP of line of the incoming call and the
telephone DRP, all telephones in the group will ring with the ring pattern assigned to the Hunt
Group.
Note: External calls have a higher priority than internal calls.
You cannot press ≤•fl to change the ring type on a telephone when the Distinctive
Line Ring feature is i n service. Whe n the call is finis hed, your te lephone re verts to the ring
you set on your telephone.
(Unified Manager Programming)
• Call Answering: When more than one call rings at a telephone, the user lifts the handset and
automatically answers the call with the highest priority.
If your telephone has line buttons, you can choose to answer a lower-priority call by pressing
the line button for that call before you pick up the handset.
For more information about configuring the Distinctive Line Ring feature, refer to the Business
Communications Manag er Programming Operations Guide sec tions on sett in g up lines , sett ing up
terminal records, and setting up Hunt Group records.
Line buttons
For each line as signed to your telephone , you ha ve one line b utton. Press the fl ashing lin e but ton to
select the line you want to answer. Assignment of several line buttons gives you immediate access
to more than one line.
The T7100 and NetVision telephones have two intercom paths, instead of line buttons, to answer
calls. You can assign two lines to each telephone. Press ≥ to switch between two calls. When
you press ≥ the current call is put on hold and the other call becomes active.
P0937240 03.1
Page 35

What line indicators mean
Chapter 2 Answering calls 35
Ω Flashing on and off for
equal lengths of time
Ω Flashing on and of f more
quickly
Ω Flashing on for longer
than off
Ω On, but not flashing You are connected to the call on that line or the line is in use.
Off The line is free.
There is an incoming call on the line.
You have placed a call on hold.
A person has put a call on hold on that line.
Information about call display
If you subscribe to Call Display services from your local telephone company, one line of
information about an external caller appears on the display after you answer a call. Depending on
the setting and the external information available, either the caller name or telephone number
appears on the displ ay. When you transfer an external call to anot her te lephone in y our syst em, the
same information appears on the recipient’s telephone display.
Depending on the services you subscribe to, Call Display information can contain up to three
parts:
• the name o f the caller
• the number of the caller
• the name o f the line in your system that the call is o n
For each telephone, you can determine which information appears on the display first.
Call Display information becomes available between the first and second ring of an incoming call.
If you answer before the Call Disp lay informat ion appears on your display, press ≤°⁄⁄ to
view the line number or line name. To use logging features with Call Display, see “Call log” on
page 93.
Viewing call information for a specific call
Call Inform ation allows you to s ee information about incoming calls. This information is more
detailed than the Call Display information you can receive automatically. For external calls, you
can see the caller name, tel ephone number , and the line name. For an int er nal cal l, you can see the
caller name and the internal number. You can see information for ringing, answered, or held calls.
Call Log shows the same information as Call Information, with the da te and time of the call, and
the number of times the caller called.
Telephone Features Programming Guide
Page 36

36 Chapter 2 Answering calls
View call information before or after answering
To find out who is calling or to view information about your current call:
1 Press ≤°⁄⁄.
2 Press £ or VIEW
for more information about an external call.
Call Display information appears between the first and second ring of an incoming call. If you
answer before the Call Displa y informati on appears on your display, and you press ≤°⁄⁄,
you see only the line number or line name.
View call information for a call on hold
To view the call information for a call that is on ho ld:
1 Press ≤°⁄⁄.
Select a call.
The display shows
Ω
2 Select the line on hold. Information about the call appears on the display.
3 Press £ or VIEW
to display m ore information about an external call.
Note: If your telephon e automatically shows Call Display information for a call, press
≤°⁄⁄ before you press £ or VIEW
for more information about the call.
Make call display appear automatically (Unified Manager Programming)
Each telephone that rings for an exte rnal line can sho w Call Displa y information for that line. After
answering a call, Call Display information appears on the display of the telephone that answered
the call. Your installer or customer service representative can program telephones to have
automatic Call Display.
Change which call information a ppears first (Unified Manager Programming)
If the information is not available from your telephone company, you can see
Unknown number
Private name
You need to start a Unified Manager session to program this feature. For more information about
programming using Unified Manager, see the Business Communications Manager Programming
Operations Guide.
Priority call
If you receive a priority call and your telephone has no free internal line buttons, you cannot
transfer the priority call, you must accept it or release it.
P0937240 03.1
on the display. If the caller blocks that information you can see
Private number
or
on the display.
Unknown name
or
Page 37

Answer calls at a prime telephone
The prime telephone is normally the monitored telephone in a reception area or at the desk of the
designated attendant. The installer or customer service representative programs a prime telephone
for a line. Calls not answered at thei r normal desti nations tr ansfer to the prime telephone . Business
Communications Manager allows for a prime telephone for each line, if needed. The prime
telephone display gives information about the call, as in the following examples.
DND from 221
DND from 221
DND from 221DND from 221
DND transfer
DND transfer
DND transferDND transfer
DRT Line001
DRT Line001
DRT Line001DRT Line001
Line061 callback
Line061 callback
Line061 callbackLine061 callback
CALLBCK
CALLBCK
CALLBCKCALLBCK
The person at telephone 221 has forwa rde d a call to you usi ng Do Not
Disturb.
The system has transferr ed a call to you from a telephone with Do Not
Disturb turned on.
No person answered this call so the system transferred it to you.
A person camped, parked or transferred a call on line 061, but no one
has answered the call. Press CALLBCK
the call.
Chapter 2 Answering calls 37
or the line button to connect to
Line061 to prime
There is no telephone that can receive a call on line 061 so the system
has transferred it to you.
Line002>Line052
The call coming in on line 002 for target line 052 has come to you
because Line 052 is busy.
For other displays, refer to Appendix B, “Common display prompts and error messa ges,” on page
167.
Central answering position (CAP) module
A CAP(N) module is an add-on device that provides 48 additional memory or line buttons. You
can connect one or two CAP(N) modul es to a T7324(N) telephone to increa se th e number of li nes
it can handle. A CAP(N) can monitor system telephone status, answer external calls on up to 120
lines, and send up to 30 messages to other system telephones.
A central answering position (CAP(N)) is an M7324 or M7324N telephone and a CAP(N)
module(s) that your installer or customer service representative programmed as a CAP. You can
have up to five telephones programmed as CAPs connected to Business Communications
Manager. The CAP is best as the prime telephone and direct-dial telephone for the lines and
telephones. Refer to Figure 9.
Telephone Features Programming Guide
Page 38

38 Chapter 2 Answering calls
Figure 9 CAP module with M7324 and M7324N telephones
M7324 telephone
CAP Module
M7324N telephone
CAPN Module
Customize your CAP(N) module
When a CAP(N) module is first plugged into your telephone, some of the module buttons are
automatically pr ogrammed t o dial an i nterna l number. You can progra m an y of t he buttons on your
CAP(N) module that do not select lines to dial internal or external numbers automatically.
If your installer has programmed the CAP(N) module for your system, you can move e xternal lines
to the CAP(N) module by using
You can program features on CAP (N) module buttons. See Chapter 4, “Time-saving features,” on
page 55 and Chapter 9, “Customize your telephone,” on page 9 9 for information about
programming memory buttons. You cannot assign any buttons on a CAP(N) module as answer
buttons.
Note: Under certain circumstances of system recovery, where the system administrator
runs a backup/cold start/restore procedure, the CAP may only restore line assignments to
the M7324(N) part of the station. In this case the CAP(N) lines are assigned to buttons on
the M7324(N) telephone, overwriting any existing programming on those buttons. Any
lines that cannot be assigned to buttons, will simply ring. If you experience this problem
after system recovery or maintenance, notify your system administrator.
≤•°⁄. See “Move line buttons” on page 108.
P0937240 03.1
Page 39

Monitor telephones with the CAP(N) module
The indicators Ω next to internal autodial buttons on your CAP(N) module show the status of the
telephones in your system.
The indicator is on when the telephone has:
• an active call
• Do Not Disturb turned on
The indicator is off when a telephone has:
• no active call
• a call on hold and no other active call
Releasing a call or feature programming
Press ®to end a call. You do not have to put the handset down. ® also ends feature
programming.
Chapter 2 Answering calls 39
While you are on a cal l, do no t p ress ® to end a feature you are usi ng. If you do, you disconnect
the call. Use ≤ instead.
Pick up a call ringing at another telephone
You can answer a call ringing at another telephone by using Directed Pickup or Group Pickup.
This feature must be allowed by system programming.
Directed Pickup
If this feature has been allowed by the system administrator, you can answer any telephone that is
ringing in your system.
1 Press ≤ ‡fl.
2 Enter the internal number of the ringing telephone. You cannot use Call Pickup to answer
private lines.
Answer the telephone that has a flashing indicator for the call, or use Trunk Answer. You can
answer a call that is transferred to an in tercom button on another telephone. When the auxiliary
ringer is ringing, but the call is not ringing at a telephone, you cannot answer the call using
Directed Pickup.
Note: Dir ected Pick up can retri e ve ca lls that a re ringin g on an Answer DN. Althou gh you
can enter the extension number of the telephone you hear ringing, it is possible the calls
you are answering are from another telephone.
Telephone Features Programming Guide
Page 40

40 Chapter 2 Answering calls
Group Pickup
Your system can support nine pickup gro ups. If your telephone has been as signed as a member of a
pickup group, you can pick up a call that is ringing at any telephone in your pickup group.
Press ≤‡fi to pick up.
You cannot use Group Pickup to retrieve a camped call.
With more than one incoming call at a telephone in a pickup group, a call ringing on an external
line is answered first, followed by calls on the prime line, and last, calls on intercom lines.
Pickup group prompts
When you use the group pickup feature, you may receive one of these prompts:
Already joined
Pickup denied
Pickup:
You are connected to the telephone that made the cal l you are trying to
pick up. This display appears if you are on a call to a colleague, your
colleague dials the number of a telephone in your pickup group, and
you try to pick up that call.
There is no call to pick up, or the call has been answered
or
you have tried to pick up a call on a person’s private line.
Enter the internal numbe r of the teleph one that is r inging. You can use
an internal autodial button to do this.
If you decide not to answer a ringing call after you have activated
Directed Pickup, press ≤.
Change a pickup group (Unified Manager Programming)
To place and retrieve telephones in and out of pickup groups, you need to start a Unified Manager
session to program the feature. For more information about programming using Unified Manager,
see the Business Communications Manager Programming Operations Guide.
Trunk Answer
Trunk Answer (≤°‚‚) allows you to answer a ringi ng cal l in any area in the system from
any telephone in the system. The line you are answering does not have to appear or ring at the
telephone you are using.
Trunk Ans wer works only with ca lls that are ring ing on line s for which a Ringing Ser vice sche dule
is active, and if your installer or customer service representative enabled Trunk Answer for that
schedule. If there is more than one incoming call on lines in a Ringing Service, the Trunk Answer
feature picks up the external call that has been ringing the longest.
P0937240 03.1
Page 41

Chapter 2 Answering calls 41
Trunk Answer prompts
When you use the trunk answer feature, you may receive one of these prompts:
Line denied
Pickup denied
Answer DNs
You have tried to pick up a call on a private line.
The call th at is ringing is on a line th at is not in a Ringing Service.
(Unified Manager Programming)
Your installer or system administrator can program a telephone to provide automatic call alerting
and call answering for othe r telep hones i n the s ystem. The DNs of the other te lephones are ref erred
to as Answer DNs. You can assign a maximum of eight answer DNs to a telephone.
Every Answer DN you assign to the telephone automatically designates an appearance on the
answer telephone beside an answer key with an indicator. Label the answer keys to identify the
telephone with a name or DN.
On the answer telephone, an indicator beside the answer button lights when a call comes in from
the original telephone. When the call is answered, the indicator disappears on the non-answering
telephone, freeing that li ne for another call. When incoming call traffic increases, the calls can
route to a Hunt Group to optimize call handling. For more information about Hunt Groups see
Chapter 12, “Hunt Groups,” on page 133.
Note: More than one attendant can have an Answer DN assigned for the same telephone,
allowing two or more attendants to handle calls for a busy person.
Each telephone can handle calls for up to eight other people using a separate Answer DN
for each person.
Mobility sets: F or portable systems, such as Compani on, DECT, T7406 and NetVision te lephones,
you can twin desk sets with the port ab le s et s by as si gni ng one or more Companion, DECT, T7406
or NetVision portable DNs to a desk telephone Answer DN. Companion, DECT and NetVision
portable handsets do not have answer buttons, so you can only assi gn one ori gin ating telephone to
each telephone. If you want to share a portable telephone among users, use the Call Forward
feature to temporarily call forward a desk telephone DN to the portable handset.
Warning: DECT security notice.
Ensure that your DECT handset is set to answer calls manually. Otherwise, if a call is
forwarded to the handset with appearance only, the handset will answer the call with no
indication to the user that the line is open.
For more information about programming Answer DNs, see the Business Communications
Manager Programming Operations Guide.
Telephone Features Programming Guide
Page 42

42 Chapter 2 Answering calls
Answer keys
The indicator buttons on your telephone that are assigned to answer DNs are called answer keys.
Your system administrator defines a system-wide level of call access to any designated answer
keys. The level of access determines which types of calls appear on the answer keys.
Table 4 shows the three Answer key levels.
Table 4 Answer keys
Answer keys Basic Enhanced Extended
All calls except X X X
Prime set call capture X X
Call forwarded calls X
Other answer key calls X
Priority calls
Voice calls
Ringing service X
Callbacks X
Line transferred calls X
For more information about programming Answer keys, see the Business Communications
Manager Programming Operations Guide.
T7100, Companion, DECT, and NetVision telephones have no display ke ys , ther efore they cannot
be assigned Answer keys.
You cannot make calls using Answer keys.
If two or more calls are ringing at a telephone, the first call appears on the answer telephone
Answer key. Any additional calls appear on intercom buttons, if they are available.
P0937240 03.1
Page 43

Listen to a call as a group
To allow people in your office to listen in on a call using Group Listening, press ≤°‚¤.
You hear the caller’s voic e th rough your te lephon e sp eak er. Continue to speak to the caller throug h
the telephone h andset . Your telephone mi crophon e is off, so the call er doe s not hear peo ple i n your
office.
Note: This feature only works for the M-series telephones and the Business Series
Terminals (T-series), with the exception of the T7406 cordless handset, which has no
speaker.
NetVision telephones, Companion and DECT handsets do not have access to this feature.
IP telephones cannot use the feature because they are unable to direct the voice stream to
both the speaker and the headset at the same time.
Cancel Group Listening
Group Listening cancels automatically when you hang up, or when you press ≤£°‚¤
Chapter 2 Answering calls 43
Note: Keep the handset away from the speaker, or you can hear feedback. The higher the
volume, the more the feedback. Press ® to prevent feedback when hanging up.
Telephone Features Programming Guide
Page 44

44 Chapter 2 Answering calls
P0937240 03.1
Page 45

Chapter 3
Make a call
This chapter describes the various ways you can make a call from your telephone.
The following are different ways to make a call on a digital or IP telephone, depending on the
programming and the type of call:
• Pick up the handset and dial. Business Communications Manager supports three methods of
dialing. See “Select how you dial your calls” on page 48.
• Pick up the handset, press a line button, and dial (if the call is not on your prime line).
• Press ≈ and dial (to talk wit hout using the handset) . See “Handsfree and Mute” on page 113.
• Press a line or intercom button, then press the handsfree button and dial to talk without the
handset. The speaker is active and the microphone is muted until you select the handsfree
button or pick up the handset.
• Press a line or intercom b utto n and dial to talk without the ha ndset and if Automatic Hands free
is programmed on your telephone.
• Use one of the features that make dialing easier. See Chapter 4, “Time-saving features,” on
page 55.
45
The following displays show the common messages you can receive when you are handling calls.
221 busy
PRIORITY LATER
9__
QUIT BKSP
95551234
TRANSFR
Already joined
The telephone you have called has no internal lines available. Press
to use the Ring Again or Message fe ature s or pres s PRIORITY to
LATER
make a priority call.
You are dialing using Pre-dial. To erase an incorrect digit, press the left
end of √ or BKSP
. When the number is complete, se lect a line
or lift the handset.
This prompt remains on your display while you are on a call you have
dialed. To transfer the call, press TRANSFR
.
Your telephone is connected to the telephone you are trying to call.
Check your active line buttons, and return to that call.
Calling 221
PRIORITY LATER
Wait for the telephone to be answered. If no one answers, press LATER
to use the Ring Again feature (“Ring Again” on page 50) or Message
feature (“Messages” on page 87), or press PRIORITY
to make a priority
call.
Can't ring again
You cannot use Ring Again on your current call. You can use Ring
Again while you have a busy signal on an internal call or line pool
request or while an internal call is ringing.
Do not disturb
PRIORITY LATER
The telephone you are calling has Do Not Disturb turned on. Press
to use the Ring Again or Messages features, or press PRIORITY
LATER
to make a priority call.
Telephone Features Programming Guide
Page 46

46 Chapter 3 Make a call
Expensive route
Hidden number
Line denied
Line061
TRANSFR
No last number
No line selected
Not in service
On another call
LATER
Restricted call
You have dialed a number, b ut the least e xpensi v e route progr ammed for
the system is b usy. Unless you release the call, th e number goes thro ugh
on a more expensive route.
The last number you diale d or the numbe r you sa v ed f or Saved Number
Redial was a speed dial number that displayed a name instead of the
number. You dialed the number correctly, but it is not visible.
You have tried to use another person’s private line.
Enter the digits of the number you want to dial.
You have not dialed an external telephone number since the last power
interruption or system reset.
Either you have no prime line or your prime line is busy. Select a line
manually before dialing.
You have entered the number of a telephone that is not in service.
The telephone yo u ha ve called is on anoth er ca ll. Press LATER
to use the
Ring Again or Message features.
System programming has a restriction configured for the call you are
trying to make. A possible reason is time-of-day restrictions for some
calls.
Ring Again?
YES NO EXIT
Select a line
Press YES
“Messages” on page 87 and “Turn on Ring Again” on page 50.
Either you have no prime line, or the prime line is in use, or the line
to use Ring Again. Press NO to send a message. See
programmed for an autodial number , sp eed dial numbe r , o r Hotline is in
use. Select a line and dial again.
Send message?
YES NO
Denied in Admin
Press YES
The Last Number is not allowed.
to send a message. See M essages.
For other displays, see Appendix B, “Common display prompts and error messages,” on page
167.
Note: To make a call on a NetVision or NetVision Data telephone, enter all the digits you
SND
need for the call, then press the key.
SND
P0937240 03.1
Page 47

Using line pools
A line pool allows each telephone access to external lines from a group (or pool) of lines.
To access a line pool:
• press an intercom button and enter a line pool access code
• press a memory button programmed with the line pool feature code (≤fl›) and a line
pool access code
• enter a destination code, where the line pool is programmed to a specific route/destination
Chapter 3 Make a call 47
Programming line access
The system can support a maximum of 15 line pools pl us six PRI pools. Your system adminis trator
programs and supplies acce ss and destinat ion cod es an d assig ns line pools to e ach tel ephone. Your
administrator should provide you with a list of the codes you can use, and a description of how to
use them and what they are used for.
A line pool access code is the number y ou d ial t o get a li ne pool . The a ccess code c an b e up t o four
digits long. You can have several different line pools for your system, each one giving you access
to a different set of external lines. Line pools are one way of sharing lines across telephones in a
system.
ISDN lines, such as PRI and BRI, must be assigned t o routes and provi ded with a dest ination code.
Destinatio n codes work similarly to the line pool access code.
(Unified Manager Programming)
Use a line pool to make a call
Follow these steps to use a line pool code to make a call:
1 Press ≤fl›.
2 Enter a line pool access code or destination code and the dialout number.
If you have a free internal line, you can make a call using a line pool without entering the feature
code first.
1 Select an internal line (intercom).
2 Dial the line pool access code or destination code and the dialout number.
Note: If no lines are available in the line pool, you can use Ring Again at the busy tone.
The system w ill inform you when a line in the line pool becomes available. See “Ring
Again” on page 50.
Telephone Features Programming Guide
Page 48

48 Chapter 3 Make a call
Program a line pool feature code
When you program a button with the line pool feature code (≤fl›), you must enter a line
pool access code after the feature code. The programmed line pool button accesses a specific line
pool, not the line pool feature. See “Programming feature codes” on page 101 for more
information.
If you program a button with an indicator to access a line pool, the indicator for the line pool
button turns on when all the lines in a line pool are busy. The indicator turns off when a line
becomes available.
Line buttons
There is one lin e button for ea ch l i ne a ssigned to your telephone. Press the li ne button to se le ct the
line you want to use to make a call.
The T7100(N) and NetVision telephones have two intercom paths, instead of line buttons, to
answer and make calls. You can press ≥ to switch between two calls, one active and one on
hold.
Select how you dial your calls
To select a dialing mode:
1 Press ≤•°¤.
2 Press £ or NEXT
3 Press ≤ or OK
You cannot program the dialing modes feature code on a memory button.
Standard dial
Standard dial allows you to make a call by selecting a line and dialing the number. If you have a
prime line, it is selected automatically when you lift the handset or press the handsfree button.
You cannot use Standard dial on a T7100 telephone unless you pick up the handset first.
• If you have a T710 0 tel eph one, use the Automatic dial or Pre -di al fea tu re f or on- hook dialing.
• NetV i sion telep hone s only al lo w you to use pre- dial. To make a call, dial the number, and then
SND
SND
press
until the dialing mode you want appears.
to select the dialing mode.
.
P0937240 03.1
Page 49

Chapter 3 Make a call 49
Automat ic dial
Automatic dial allows you to dial a number without selecting a line. Your prime line is selected
when you start diali ng a numbe r. Automatic dial does not work if your te lephone has no prime l ine
or when your prime line is in use.
Telephones connected to an Analog Terminal Adaptor (ATA2) or an Analog Station Module
(ASM) cannot use Automatic dial.
Pre-dial
Pre-dial allows you to enter a telephone number, check it, then change it before making the call.
The call does not dial until you select a line or line pool, or pick up the handset. You can pre-dial
both external and internal numbers. You must, however, select the correct type of line (external or
internal) for the type of number you have entered.
Note: If your telephone starts ringing while you are pre-dialing a number, you can stop
the ringing by turning on Do Not Disturb (≤°fi). When Do Not Disturb is entered
while you are dialing, the numbers you are entering are not affected.
You cannot pre-dial a telephone number if all the lines on your telephone are busy.
Receive a busy signal on an internal call
When the internal number you dialed is busy, there are three possibilities:
• Priority Call
• Ring Again
• Message
Priority Call
If you get a busy signal or a Do Not Disturb message when you call someone in your office, you
can interru pt their call by using the Priority Call feature. Use this feature for urgent calls only.
Program a telephone to make priority calls (Unified Manager Programming)
You need to start a Unified Manager session to program this feature. For more information about
programming using Unified Manager, see the Business Communications Manager Programming
Operations Guide.
Telephone Features Programming Guide
Page 50

50 Chapter 3 Make a call
Make a priority call
You can make a priority call only while your telephone display shows the following:
221 busy
PRIORITY LATER
Calling 221
PRIORITY LATER
Do not disturb
PRIORITY LATER
On another call
PRIORITY LATER
The telephone you want to transfer to is busy.
Yo u initiated the Priority cal l transfer to th is local.
The telephone you want to transfer to has Do Not Disturb active.
The telephone you want to transfer to is on another call.
To make a priority call:
1 Press ≤fl·.
2 Wait for a connection, then speak.
A person who receives a pr iority c all whi le on anothe r cal l has e ight s ec onds to accept or bl ock th e
call. For informati on about blocki ng calls see “St op calls” on p age 112 . If the p ers on does noth ing ,
the priority call feature puts their active call, including conference parties, on Exclusive Hold and
connects your call.
The display may show one of th e following:
Call blocked
You tried to place a priority call to another telephone in your system.
The person you called has blocked your call. Try to call later.
Please wait
The party you are ca ll ing has eight sec onds t o decide to accept or reject
your priority call.
Priority denied
The telephone you are calling is receiving a priority call at the same
time or cannot receive priority calls.
Ring Again
Use Ring Again when you call a person on your system and their telephone is busy or there is no
answer. Ring Again can tell you when they hang up or next use their telephone. You can use Ring
Again to tell you when a busy line pool becomes available.
Turn on Ring Again
To turn on Ring Again, press ≤¤ before you hang up.
Using Ring Again cancels any previous Ring Again requests at your telephone.
P0937240 03.1
Page 51

These are the two possible display prompts for the Ring Again feature:
Chapter 3 Make a call 51
Can't ring again
Ring Again?
YES NO EXIT
You cannot use Ring Again on your current call. You can use Ring
Again while you have a busy signal on an internal call or line pool
request, or while an internal call is ringing.
Press
Cancel Ring Again
Press ≤£¤ to cancel a Ring Again request.
Message
When using Priority Call and Ring Again do not work, you can leave a message on the display of
the telephone you are trying to call. For more information, refer to “Messages” on page 87.
Create a conference call
You can talk to two people at the same time.
to use Ring Again. Press NO if you select to send a message.
YES
1 Make sure you have two calls, one active and one on hold.
2 Press ≤‹.
3 Press the held line.
This action is automatic on the T7100(N) and NetVision telephones.
You can create a conference when you are on a call:
1 Put the call on hold.
This action is not necessary when the Automatic Hold feature is available on your system.
2 Make a second call.
3 Press ≤‹.
4 Press the held line.
Only the person who established the conference can use the procedures described in this section.
Note: You can create a confer ence by rele asing pri vac y on a c all. S ee “Turn Pri v ac y on or
off for a call” on page 112.
Telephone Features Programming Guide
Page 52

52 Chapter 3 Make a call
Disconnect one party
You can disconnect one party from a conference and continue talking to the other.
On any system telephone with line buttons:
1 Press the line button of the call that you want to disconnect. The second call is automatically
put on hold.
2 Press ® to disconnect th e fir st call.
3 Press the button of the held line to reconnect with the second call.
On a T7100 telephone:
1 Press ≤£‹ to put the first call on hold.
2 Press ® to disconnect the second call.
3 Press ≥ to reconnect with the first call.
or
1 Press ≤£‹then ≥ to put the second call on hold.
2 Press ® to disconnect th e fir st call.
3 Press ≥ to reconnect with the second call.
On a NetVision telephone:
SND
1 Press ⁄£‹ to put the first cal l on hold.
2 Press to disconnect the second call.
3 Press to reconnect with the first call.
FCT
END
END
HOLD
HOLD
SND
or
SND
1 Press ⁄£‹then to put the second call on hold.
2 Press to disconnect the first call.
FCT
END
END
SND
HOLD
HOLD
The second call automatically becomes active.
P0937240 03.1
Page 53

Chapter 3 Make a call 53
Holding two calls
For all syst em te lep hones except the T7100 and portable teleph one s, you can place the two people
in a conference call on hold separately, so that they cannot talk to each other.
1 Press the line button of one call. The other call is automatically put on hold.
2 Press ≥. The second call is put on hold.
Now you can re-establish the conference.
3 Take one call off hold.
4 Press ≤‹.
5 Take the remaining call off hold.
Put a conference on hold
You can put a conference on hold , allo wing the other tw o people to conti nue speak ing to ea ch other
by pressing ≥.
You can rejoin the confer ence b y pre ssing eith er of t he he ld li ne buttons. F or th e T7100 or portab le
telephone, press ≥.
Split a conference
You can speak with one caller while the other call is on hold. You can switch between calls using
≥.
On any system telephones with line buttons:
1 Press the li ne b utton of the cal ler wit h whom you want t o speak. T he other call is automa tically
put on hold.
2 Press ≤‹to re-establish the conference.
On a T7100 telephone:
1 Press ≤£‹. The first call is put on ho ld.
2 Press ≥ to switch between calls.
3 Press ≤‹ to re-establish the conference.
Telephone Features Programming Guide
Page 54

54 Chapter 3 Make a call
Leave a conference call
You can remove yourself from a conference, and connect the other two callers.
Enter the Transfer feature code ≤‡‚.
When you remove yourself from a conference using the Transfer feature, and both calls are from
outside your system, one of t he calls must hav e co me to you on a discon nect super vised line , or the
call disconnects.
Conference call prompts
These are some of the prompts you may receive when attempting to make a conference call:
3 parties only
You are trying to add a fourth party to your conference call, or to join
two conferences together. Release one call from the conference before
adding another, or keep the two conferences separate.
Conference busy
You have tried to make a conference call, but your system is handling
the maximum number of conference calls.
Line001 221
TRANSFR
You are on a conference with the two lines or telephones shown. You
can drop out of the c onference and l eav e the other two partie s connected
(Unsupervised Conference) by pressing TRANSFR
or entering the
Transfer feature code.
Press held line
You have activated the Conference feature with one call active and
another on hold. Press the held line to bring that person into the
conference.
For other displays, see Appendix B, “Common display prompts and error messages,” on page
167.
P0937240 03.1
Page 55

Chapter 4
Time-saving features
This chapter shows you how to use some time-saving features, such as:
• Autodial
• Last Number Redial
• Speed Dial
• Saved Number Redial
Autodial
You can program memory buttons for one -touch diali ng of inter nal or external telep hone number s.
You cannot use buttons for lines, answer or Handsfree/Mute as autodial buttons.
If the power to your Business Communications Manager system is off for more than three days,
autodial numbers and some other system programming can be lost from the memory.
55
To add an autodial button:
1 Press ≤•⁄ to program an external number or ≤•¤ to program an intern al
number.
2 Select a memory button.
3 Dial the number.
When programming Autodial you can use the following features:
• Last Number Redial
• Saved Number Redial
• destination codes (select an intercom button as the line)
Select a line for Autodial
To select a line for an external number, press the line or intercom button before you enter the
number. To select a line pool, press a programmed line pool button, or press an intercom button,
and enter a line pool access code.
If you select a line before pressing the autodial button, the call goes out on that line instead of the
line that is part of the autodialer programming.
For the T7100 and NetVision telephones, program an external autodialer by using a line and not a
line pool.
Note: If you do not include a line selection in an autodial number, the call uses your
prime line (if you have one).
Telephone Features Programming Guide
Page 56

56 Chapter 4 Time-saving features
Use intercom as the line for Autodial
If you press an intercom button as the line for an external autodial number, you must include a
valid line pool access code or a destinatio n code . If acce ss codes for line pool or destination codes
change, remember to reprogram autodial numbers.
These are some of the prompts you might receive:
987___
QUIT BKSP OK
Autodial full
Button erased
Enter digits
QUIT OK
Intercom #: ___
QUIT
Invalid number
Press a button
QUIT
Program and HOLD
Continue to enter digits until the number is complete. Press √
or BKSP
Press ≥ or OK
to erase an in correct digit.
when you finish.
The memory allocated to autodial numbers in your system is full.
While programming external Autodial, you erased the button by
pressing ≥ or OK
before entering any digits.
Enter the number you want to program, selecting the line first if
necessary, exactly as if you were making a call.
Enter the internal telephone number you want to program.
You are programming an internal autodial button and have entered a
number that is not an internal number on your system. Enter a valid
internal number. If the number you are entering is a destination code,
use external autodial.
Press the memory button you want to program.
Enter the number you want to program on the button, then press ≥.
Program and OK
QUIT OK
Programmed
For other displays, see Appendix B, “Common display prompts and error messages,” on page
167.
P0937240 03.1
Enter the number you w ant to progr am on t he b ut ton, t hen pr ess ≥ or
. You can include a line or line pool selection in an auto dial se quence
OK
by selecting the line before entering any digits.
The number is correctly stored on the button.
Page 57

Chapter 4 Time-saving features 57
Programming T7000 memory keys for auto dial
T7000/M7000 telephones ha v e four pr ogrammable k eys but no line or int ercom ke ys. Ther e is also
no display.
Programming external autodial
1 Press ≤•⁄.
2 Press the memory key you want to programme.
3 Enter the telephone number.
4 Press the ≥ key.
Programming internal autodial (DSS)
1 Press ≤•¤.
2 Press the key you want to programme.
3 Enter the telephone number.
Last Number Redial
Press ≤fi to redial the last external number you dialed.
Last Number Redial records a maximum of 24 digits.
Note: On a system telephone with a display: If you have a Last Number Redial button
programmed, use Button Inquiry (≤•‚), then press the Last Number Redial button
followed by (£) to check the last number before you dial it.
M7100 and T7100 telephones have a single memory ke y that is aut omat ic al ly as si gned as
Last Number Redial.
Last Number Redial prompts
These are prompts you may encounter while using last number redial:
Hidden number
No last number
The last number you dialed was a speed dial number that displayed a
name instead of the number. The number dials correctly, but does not
appear on the display.
You have not dialed an external tel ephone nu mber since the l ast power
interruption or system reset.
Telephone Features Programming Guide
Page 58

58 Chapter 4 Time-saving features
Prevent Last Number Redial
Last Number Redial can be restricted at individual telephones. You need to start a Unified
Manager session to program this feature. For more information about programming using Unified
Manager, see the Business Communications Manager Programming Operations Guide.
Note: You can copy a number on an autodial button using Last Number Redial.
Programming speed dialing
Business Communications Manager provides two types of speed dialing:
• System Speed Dial programming allows you to assign two-digit speed dial codes to the
external numbers called most often.
• Personal Speed Dial programming allows users to program their own speed dial numbers.
Speed dial numbers are subject to the same restri ction filters as normally-dialed numbers.
However, your system administrator can program system speed dial numbers to bypass dialing
restrictions.
(Unified Manager Programming)
Note: NetVision has s et-based spe ed dialing ca pability. For detailed instructions about
how to set this up, refer to your NetVision handset user documentation.
To make a speed dial call
1 Press ≤‚ to quickly dial external telephone numbers programmed to speed dial codes.
2 Enter the appropriate two-digit speed dial code.
Note: There is no difference between using User Speed Dial and using System Speed
Dial. Only the programming is different.
System Speed Dial codes
System Speed Dial codes are numbered from 01 to 70. The installer assigns numbers to System
Speed Dial codes for the all telephones on the system. The Business Communications
Programming records provide a system speed dial form that can be filled out and copied by your
administrator and distributed to all users. As well, you may assign specific codes to memory
buttons, for one-button speed dialing.
(Unified Manager Programming)
P0937240 03.1
Page 59

Chapter 4 Time-saving features 59
Using Personal Speed Dial codes
Personal speed dial codes can be entered by the system administrator or you can add or change a
Personal Speed Dial number at your telephone.
To change a Personal Speed Dial code at your telephone:
1 Press ≤•›.
2 Enter a two-digit code from 71 to 94.
3 Select how the call will be made:
• To include a line selection for this number, press the line or intercom button.
• To select a line pool, press a programmed line pool button. For the T7100(N) telephone,
you can only select a line pool.
• Press an intercom button and enter a line pool access code.
4 Enter the number you want to program.
5 Press ≥ or OK
.
Speed dial promp ts
These are some of the display prompts you might encounter:
01:9___
CANCL BKSP OK
Enter digits
QUIT OK
Invalid code
No number stored
Program and HOLD
Program and OK
QUIT OK
Continue entering the number you want to program. You can change
the number by pressing BKSP
press ≥ or OK
.
Enter the telephone number you want to program exactly as if you
were dialing it norma lly. When you are finished, press ≥ or OK
You have entered a code outside the code range (01-70 for system,
71-94 for personal).
There is no number stored on the speed dial code you have dialed.
If you want to program a line or line pool selection for this speed dial
number , select the line or line pool . If not, e nter the telephone number
exactly as if you were dial ing it normally. When you are finished,
press ≥.
If you want to program a line or line pool selection for this speed dial
number , select the line or line pool . If not, e nter the telephone number
you want to program exactly as if you were dialing it normally. When
you are finished, press OK
or √. When you are finished,
.
.
Select a line
There is no line related with the speed dial number you are trying to
use. Select a free external line or line pool and enter the speed dial
feature code again.
Telephone Features Programming Guide
Page 60

60 Chapter 4 Time-saving features
Unknown number
For other displays, see Appendix B, “Common display prompts and error messages,” on page
167.
Note: NetVision has s et-based spe ed dialing ca pability. For detailed instructions about
how to set this up, refer to your NetVision handset user documentation.
The system cannot dial the number stored. Reprogram the number.
User Speed Dial programming for T7000
1 Press ≤•›.
2 Enter the speed dial code.
3 Enter the telephone number.
4 Press the ≥ key.
Saved Number Redial
You can save the number of the external call you are on, provided that you dialed the call, so that
you can call it again later. Each telephone can save one number at a time with Saved Number
Redial, but not one number for each line.
Note: You can copy a number on an autodial button using Saved Number Redial.
Save a number
To save a number, press ≤fl‡ while you are on the call.
Saved Number Redial records a maximum of 24 digits.
Dial a saved number
To dial a saved number, press ≤fl‡ when you are not on a call.
If you have a programmed Saved Number Redial button, you can use Button Inquiry (≤•‚)
to check the last number before you dial it.
P0937240 03.1
Page 61

Saved Number redial prompts:
These are two possible display prompts you might encounter:
Chapter 4 Time-saving features 61
Hidden number
No number saved
Prevent Saved Number Redial
Saved Number Redial can be restricted at individual telephones.
You need to start a Unified Manager session to program this feature. For more information about
programming using Unified Manager, see the Business Communications Manager Programming
Operations Guide.
You have saved a speed dia l number that dis pla ys a name ins te ad of the
number. The number dials correctly, but does not appear on the display.
You have tried to save the number of an incoming call. You can only
save numbers that you have dialed.
(Unified Manager Programming)
Telephone Features Programming Guide
Page 62

62 Chapter 4 Time-saving features
P0937240 03.1
Page 63

Chapter 5
Handling calls
This chapter shows you how to:
• handle many calls at a time
• use SWCA keys to handle many calls for a group
• transfer calls
• park a call
Use Hold
You can put a call on hold by pressing ≥.
This prompt appears:
63
On hold: LINENAM
When a call is on hold, the button indicator flashes on all telephones that have access to that line,
and which have line buttons. Any of these telephones can retrieve the call.
You have placed one or more calls on hold . The name of the line he ld the
longest appears on the display.
Retrieve a held call
You can connect to a call on hold by pressing the flashing line button of the held call.
The T7100/M7000(N) telephones, Companion, and the NetVision portable telephones cannot
pickup calls put o n hold by ot her tele phones, sin ce the y do not have line bu ttons. A call put on hold
on these telephones can be retrieved by pressing ≥ a second time on that telephone. If you are
currently on a call, th is puts the curr ent call on hol d and re trie v es the first held call. I n this w ay, you
can toggle between two calls using the ≥ button.
For DECT operation, refer to the user guide for your handset.
Hold automatically (Auto Hold)
If a line or the telephone are pro grammed wi th full auto hol d, you can answer a s econd c all without
dropping the first call and without pressing ≥. Default: feature is active.
If autohold is specified on th e line: Press the line button of the second caller. The current caller is
put on hold automatically.
If auto hold is active on the telephone: The first call is automatically put on hold when the second
call is answered.
Telephone Features Programming Guide
Page 64

64 Chapter 5 Handling calls
• Telephones with system wide call appearance buttons (SWCA) must always have this feature
set to Yes.
• The user can change this setting at their telephone by pressing ≤‡‹.
For telephones without line buttons, these features have no affect, since the only way you can
answer a second call is to press the ≥ button.
Listen on hold
If your call is placed on hold, you can hang up the handset while you wait for the other person to
return.
1 Press ≥.
2 Hang up the handset.
3 Press the li ne button of the call. You can hear in dicat ions f rom the f ar end t hat you are on hold ,
such as tones or music).
4 When the person returns, lift the handset to continue th e conversation.
Note: With Automatic Handsfree assigned to your telephone, you can use the Handsfree/
Mute feature instead of List en on Hold.
T7100, Companion, DECT and NetVision telephones do not have Handsfree/Mute
capability.
Hold a call exc lusively
You can put a call on Exclusive Hold so that you can retrieve it only at your telephone.
Press ≤‡· or ≤≥. The line appears busy on all other telephones, and the call cannot
be picked up by another person in the office.
Call Queuing
If you hav e more than one call r inging at your te lephone, y ou can select the call that h as the hi ghest
priority by pressing ≤°‚⁄.
Call Queuing answers incoming exter nal calls before callback, camped, and transferred calls.
P0937240 03.1
Page 65

Transfer calls
Transfer allows you to direct a call to a telephone in your system, within the Business
Communications Manager network, or external to your system.
1 To transfer a call, press ≤‡‚.
2 Call the person to whom you want to transfer the call.
3 If you want to ta lk to the person, wait for the person to answer and speak to person before
continuing.
Chapter 5 Handling calls 65
4 When you are ready to complete the transfer, press ® or JOIN
You cannot use Last Number Redial, Saved Number Redial, a speed dial code, Priority Call or
Ring Again to dial the number for a transfer.
The way a private network call is routed determines if it is possible for the system to return a
transferred call to you when the transferred call is not answered. When transferring a call to a
private network destination, remain on the line until the person to whom you are transferring the
call answers.
You cannot use the Line Pool feature code to access a line pool for a transfer. To use a line pool,
use a programmed line pool button, or press an intercom button, and enter a line pool access code.
If an auxiliary ring er i s p rogr ammed t o r ing for calls on an exte rna l l in e, and you transfer a call on
that line without announcing the transfer, the auxiliary ringer rings for the transferred call.
.
Transfer external calls
If you trans fer an external call to a busy telephone, or if there is no answer, the ca ll automatically
rings again at the telephone that performed the transfer. The display indicates that the telephone
was busy or that no one answ ered.
When you transfer an external call to an external number, the external call you are trying to
transfer must be an incoming call on a disconnect supervision line.
While on a conference call, you can leave the conference and connect two callers using the
Transfer feature. If the other people are from outside the system, at least one of the callers must
have called you and both of the calls must be on disconnect supervision lines.
Note: Transfer by Hold on DID lines is not supported. After answering a call, the line
appearances on all othe r sets are free immediately to take other calls. This allows you to
receive a greater num ber of calls. Use the Call Park feature to tr ansfer a call.
In some conditions, you can experience lower volume levels when transferring an external call to
an external telephone, or when transferring two external callers from a conference call.
Telephone Features Programming Guide
Page 66

66 Chapter 5 Handling calls
Cancel a transfer
You can reconnect to the person you are trying to transfer before the transfer is complete.
1 Press ≤£‡‚ or CANCL
2 If you do not reconnect to your original call, press ® and then press the held line.
Transfer prompts
System telephones with two-line displays can show any of the following prompts:
.
221>222
CANCL RETRY JOIN
221 no reply
CALLBCK
Do not disturb
CANCL RETRY JOIN
Invalid number
CANCL RETRY
Line061 hung up
Line061>221
CANCL RETRY JOIN
You are talking to the person you want to transfer the call to. Press
RETRY
if you decide to transfer the call to another person. Press ®
or JOIN
to transfer the call.
The person to whom you tried to transfer a call did not answer. Press
CALLBCK
or the flashing line button to re connect to the call.
On the T710 0 telephone, lift the handset to reconnect to the call.
SND
On a NetVision telephone, press
SND
The person to whom you tried to transfer a call has Do Not Disturb
activ e on their tel ephone. Pre ss JOIN
to transfer the call to another person. Press CANCL
to transfer the call. Press RETRY
or the flashing li ne
button to reconnect to the call.
On the T7100 or NetVision telephone, use the £‡‚ feature code
to cancel the call.
You entered an invalid internal number. Press RETRY
and enter the
number again.
On the T7100 or NetVision telephone, use the £‡‚ feature code
to cancel the call, and then retry.
The external caller you were transferring hung up before the transfer
was comple te.
Press JOIN
RETRY
to transfer the call on line 061 to telephone 221. Press
if, after talking to the person at extension 221, you decide to
transfer the call to another person.
Not in service
CANCL RETRY
Restricted call
CANCL RETRY
Still in trnsfer
CANCL RETRY
P0937240 03.1
The telephone to which you are trying to transfer a call is out of
service.
You cannot transfer the call because of telephone or line restrictions.
Complete the transfer in progress before you access a new feature,
answer another call or select an outgoing line.
Page 67

Chapter 5 Handling calls 67
Transfer denied
CANCL RETRY
Your transfer does not function for one of these reasons:
All the res ources needed to perfor m a transfer are in use. Try again
later.
You have tried to transfer an external call to another external party.
Some restri ctions apply.
You cannot transfer your conference call.
Transfer to:2___
CANCL RETRY
Press RETRY
if you entered the wrong inter nal number or if the person
to whom you are transferring the call is not available.
On the T7100 or NetVision telephone, use the £‡‚ feature code
to cancel the call, and then retry.
For other displays, see Appendix B, “Common display prompts and error messages,” on page
167.
Camp-on
You can transfer an external call to another telephone when all the lines assigned to that telephone
are busy.
1 Press ≤°¤.
2 Dial the number of the telephone to which you want to camp the call.
Camped calls appear on a line button on the receiving telephone, if one is available. If there is no
line button available, you receive a message on the display and hear Camp-on tones.
Each display telephone in your system can handle one camped call at a time.
These are some of the prompts you can encounter:
221 DND
CALLBCK
The person to whom you redir ected a call has Do No t Dist urb act i ve on
the telephone. The cal l has c ome back to you. Pr ess the CALLBCK
button
or the line button to reconnect to the call.
On the T7100 telephone, just pick up the handset. Note: Calls cannot
be camped on portable handsets, as they have no indicators.
Camp denied
You have tried to camp an internal call. You can camp external calls
only.
Camp to:
CANCL
Camped: 221
CALLBCK
Dial the number of the internal telephone to which you want to camp
the call.
The telephone to which you camped a call did not ans w er th e cal l. The
call has come back to you. Press CALLBCK
or the line button to
reconnect to the call.
On the T7100 telephone, just pick up the handset to reconnect to the
call.
Line061 hung up
A call you camped ha s come back to you, but the caller hun g u p before
you can reconnect.
Telephone Features Programming Guide
Page 68

68 Chapter 5 Handling calls
Not in service
CALLBCK
Release a call
Also refer to Append i x B , “Common display prompts and error messages,” on page 167.
Call Park
When you park a call, the system assigns one of 25 codes for the retrieval of the call. These codes
include the Call Park prefix, which can be any digit from 1 to 9, and a two-digit call number
between 01 and 25. For example, if the Call Park prefix is 1, the first parked call is assigned Call
Park retrieval code 101.
The system assigns Call Par k code s in se quence, from the lowest t o the hi ghes t, unt il all the codes
are used. A round-robin method means the use of dif feren t of codes ensure s a call reaches the right
person, especially when more than one incoming call is parked.
The highest call nu mber (the Call P ark pref i x fol lo w ed by 25) is used only by analo g tel ephones or
devices connected to the system using an ATA2 or an ASM. Analog telephones or devices cannot
use the other Call Park codes.
The telephone to which you have camped a call is out of service or is
used for programming. The call has come back to you. Press CALLBCK
or the line button to reconnect to the call.
On the T7100 telephone, just pick up the ha ndse t t o rec onne ct with t he
call.
The line that the camped call is on is in use or t ha t l ine does not appear
at your telephone. Release the line or release an internal line.
You r installer programs both the Call Park prefix and the del ay before parke d calls return to the
originating telephone. External calls parked for longer than the programmed delay return to your
telephone.
Park a call
You can interrupt a call to retrieve it from any telephone in your system.
1 Press ≤‡›.
to announce the retrieval code on your telephone display.
2 Press
PAGE
Retrieve a parked call
1 Select an internal line.
On the T7100 telephone: pick up the handset.
2 Dial the Call Park retrieval code.
On NetVision telephones: dial the code, and then press .
Your system installer can disable Call Park.
SND
P0937240 03.1
Page 69

Call park prompts
These are prompts you can encounter while using Call park:
Chapter 5 Handling calls 69
Already parked
The person you were talking to has parked your call. You cannot park
the same call.
No call to park
You have tried to use Call Park with no active call on your telephone.
If the call you want to park is on hold, rec onne ct to the call before you
park it.
Invalid number
No call on: 101
Park denied
You have entered an invalid retrieval code.
There was no call on the retrieval code you entered.
You have tried to pa rk a conference call. Spl it t he conference and park
the calls se parately. The person who retrieves the calls can reconnect
the conference.
Parked on: 402
PAGE EXIT
Parking full
Record the code shown. Use Page (≤fl‚) or press PAGE
to
announce the call and its retrieval code.
All available retrieval codes are in use. Transfer the call or take a
message instead.
For other displays, see Appendix B, “Common display prompts and error messages,” on page
167.
Callback
When you direct a call you have answered to another telephone, the system monitors the call to
make sure it is answered. If no one answers the call within a set length of time, the system returns
it to you.
Callback generate s many dif fere nt display s. Most occ ur after a set dela y and are li sted in th e inde x.
Some occur immediately if the telephone to which you direct a call is out of service or not
available. These different displays are listed with the descriptions of the specific features such as
Transfer or Camp-on.
Telephone Features Programming Guide
Page 70

70 Chapter 5 Handling calls
Managing system-wide calls using SWCA
The System W ide Call Appearances (SWCA) service defines a group of fea tur es tha t al low you to
control call park and retrieval features on any type of line, across the local system. These features
expand the Business Commuication Manager call park and call retrieve features by providing
visual indications of the status of any call parked on a SWCA button that has indicators. The calls
can also be controlled by directly entering feature codes.
You can use SWCA programming to define logical groups of telephones. Each group can be
assigned a set o f t he SWCA code s, wh ic h al l ows them to pass calls within the gr oup, regardless of
the call type or what line appearances occur on each telephone. Each telephone in the group also
displays the current status of the call, so users can determine which calls are being dealt with.
For exampl e: t elephone 221 is as signe d line 241. Telephone 222 is assigned li ne 242 . A c all comes
in on line 241 to telephone 221 who answers it. The user at telephone 221 determines that the call
is more suitable for telephone 222.
Telephone 221 has four alternatives to move the call to telephone 222:
1 Hold the call on line 241 on telephone 221, then unhold it from the 241 line key on telephone
222
a this requires that both 221 and 222 have been assigned line 241
b this will not work if the call is an internal intercom call
Transfer the call
2
a the user on telephone 221 must know the number of telephone 222 to transfer the call
b the call can only be transferred to one destination
Park the call
3
a requires that the park code be communicated to the intended destination
b there is no visual indicator that a call is parked, which could lead to forgotten calls
4 Use SWCA keys or codes to park the call on the system, to be retrieved by any telephone on
the system
a the parked call is visible to any telephone with assigned keys
b if a telephone does not have assigned SWCA keys, or has a different set of SWCA keys,
the call can still be retrieved using the feature code where the call was parked.
c telephones with the same SWCA assignments can search for the oldest or newest call
P0937240 03.1
Page 71

Chapter 5 Handling calls 71
Programming SWCA keys
There are 16 SWCA feature codes that can be assigned to buttons on a telephone. It is
recommended that you program the codes onto buttons with indicators to make full use of the
visual status features. (Services, Telephony Services, System DNS, DN<group DN>, User
Preferences, Button Programming).
SWCA codes can also be assigned by the user at the telephone, using the button programming
feature code and feature codes ≤•fi¤⁄ to ≤•fi‹fl. Refer to “Programming
feature codes” on page 101 for detailed iformation about programming buttons at the telephone.
Note: A telep hone must e ither ha v e a line ap pearan ce of th e call or a f ree in terco m b utt on
to be able to retrieve a parked SWCA call.
The number of SWCAs that can be assigned will depend on available programmable
buttons on the telephone.
Companion and DECT cordless te lephon es do not have pro gramma ble b ut tons and cannot
have programmed SWCAs.
Note: Your telephone must be set t o have Full aut ohold if you w ant t o use SWCA l ines s o
that an active call automatically gets placed on Hold if the user answers a second call.
Refer to “Hold automatically (Auto Hold)” on page 63.
Additional codes that work with the SWCA feature include:
≤•fi¤‚ searches for the next available SWCA code. If the system finds an available
code, the call is associat ed with the code an d park ed. If no code is a v aila ble, the ca ll remains active
on the current telephone, and unassigned to any SWCA button. If the call was already associated
with a SWCA code, the call is simply reparked on that code.
≤•fi‹‡ retrieves the oldest parked SWCA call. The call becomes active on the
telephone that invoked the code, and the indicator on all other telephones becomes solid.
≤•fi‹° retrieves the most recently-parked SWCA call. The call becomes active on the
telephone that invoked the code, and the indicator on all other telephones becomes solid.
When these codes are used, the system only searches within the range of SWCA buttons
programmed on the telepho ne where the code is acti v ated . Any codes not a ssigned t o the tele phone
will be ignored. The refore, to p ark or re trie v e a ca ll on an y SWCA code th at is not assigned to your
telephone, you enter the SWCA code manually, as a feature code.
For details about using the se keys, refer to “Parking and retrieving calls on SWCA keys” on page
73.
Telephone Features Programming Guide
Page 72

72 Chapter 5 Handling calls
Tips: NetVision handsets
For NetVision handsets that do not have physical programmable buttons you can program
the three SWCA search codes onto the feature menu through the NetVision Phone
Administrator (NVPA). Refer to the IP Telephony Configuration Guide for details.
SWCA codes must then be assigned under User Preferences, Button Programming on the
DN record for the handset to provide the search codes with a range of local SWCA codes
from which to park and retrieve call s. The NetVision handset can al so be used to park and
retriev e calls f rom SWCA codes that are not assigned to t he handset, by ma nually enteri ng
that code on the handset using the FCT/Feature sequence. Refer to the NetVision Feature
Card for details about us ing the FCT m enu Feature li sting.
How SWCA works in a call group
The SWCA feature displays a call appearance status on any telephones in the system which have
buttons assigned for the same SWCA answer keys.
• If you want to assign sets of SWCA answer keys to specific call groups, the same buttons on
each telephone in a grou p shou ld be programmed with the same SWCA featur e code, to allow
for consistent service across the group.
When calls are parked on a SWCA key, the call can be answered by anyone in the group.
— A solid indicator means that someone has control of the call.
— A blinking indicator means the call is on hold and can be answered by anyone in the
group.
Figure 10 SWCA indicators, incoming call from a line (auto SWCA association is on)
Call from line 1 is answered on
set 221 and automatically
associated to a SWCA.
Call is parked on the SWCA.
Intercom indicator disappears and
the SWCA indicator flash es on al l
group sets.
Call is retrieved on set 222.
A solid indicator appears beside
Intercom button and the SWCA
indicator becomes solid on all
telephones.
Set 222
Line 3
Line 4
SWCA1
SWCA2
SWCA3
Line 1
Line 2
SWCA1
SWCA2
SWCA3
Set 221
SWCA4
SWCA5
SWCA6
Intercom
Intercom
Line 3
Line 4
SWCA1
SWCA2
SWCA3
Set 222
SWCA4
SWCA5
SWCA6
Intercom
Intercom
SWCA4
SWCA5
SWCA6
Intercom
Intercom
P0937240 03.1
Page 73

Chapter 5 Handling calls 73
Figure 11 SWCA indicators, incoming call from an intercom (auto SWCA association for intercom is on)
Call is answered and
automatically associated to a
SWCA.
Line 1
Line 2
SWCA1
SWCA2
SWCA3
SWCA4
SWCA5
SWCA6
Intercom
Intercom
• Calls can still be transferred between groups. If a call received at one group seems more
appropriate for a different group, the user manually enters a SWCA code that applies to the
other group. Once th e call su ccesssfu lly transf ers, i t is dropped from the SWCA k e y of the f irst
group.
• If the call needs to be handled by a telephone without SWCA key assignments the call can be
left parked on the original associat ed SWCA ke y. The other telephone can then dial the SWCA
feature cod e to retrieve the call. At this point, the call is dropped from the SWCA key. If the
call needs to be assigned back to the group , the user who retrieved the call can manually enter
a SWCA code assigned to the group and repark the call.
Call is parked on the SWCA.
Intercom indicator disappears and
the SWCA in dicator flashes.
Line 1
Line 2
SWCA1
SWCA2
SWCA3
SWCA4
SWCA5
SWCA6
Intercom
Intercom
Call is retrieved.
A solid indicator appears beside
Intercom button and the SWCA
indicator becomes solid on all
telephones.
Line 1
Line 2
SWCA1
SWCA2
SWCA3
SWCA4
SWCA5
SWCA6
Intercom
Intercom
For a detailed description about programming buttons for SWCA codes, refer to the Business
Communications Manager Programming Operations Guide.
Parking and retrieving calls on SWCA keys
The system administrator determines whether calls automatically associate with free SWCA keys,
or whether the user must manually assign the call, either by pressing a SWCA key, by dialing a
SWCA code, or by pressing the Hold button (refer to “Hold” on page 76).
The system settings also d et ermi ne if the call is associated with the SWCA k ey for the duration of
the call or only while th e call is parked on the SWCA key.
Telephone Features Programming Guide
Page 74

74 Chapter 5 Handling calls
Manually associating a call
On the M/T-series telephones and the IP i-series telephones, there are three ways of manually
associating a call to a SWCA key. Note that in all three cases, once the call is parked, the call must
be retrieved to make it active again.
1 If the telephone has assigned SWCA keys, press one of the k eys that has no i ndi cat or showing.
2 Enter a SWCA dial code on the dialpad. If the telephone has a key programmed for that code,
a flashing indicator will appear beside the button.
3 Enter ≤•fi¤‚ and allow the system to automatically assign the ca ll to one of the
defined SWCA keys on your telephone.
These are some of the prompts that may appear when you attempt to assign a call to a SWCA key
for the first time:
Table 5 SWCA prompts
Prompt Description
Parking full
Parking full
Parking fullParking full
In use: XXX
In use: XXX
In use: XXXIn use: XXX
Hold or release
Hold or release
Hold or releaseHold or release
No avail SWCA
No avail SWCA
No avail SWCANo avail SWCA
No calls waiting
No calls waiting
No calls waitingNo calls waiting
No park resources, out of the 27 that are available on the Business
Communications Manager, are free. Wait for one to become free, and then
try again.
The requested SWCA is being used by telephone XXX. Choose another
key position.
The requested SWCA already has a call parked on it. Choose another key
position.
≤•fi¤‚
The
telephone has no associated SWCA keys, or all the SWCA keys for that
telephone are associated with other calls.
Note: If the call is an internal call and the destination set has a SWCA
associated with the call and if the originating set requests that the call gets
associated with a different SWCA, then the destination telephone transfers
the call to the new SWCA position. If the destination telephone does not
have a button programmed for the new SWCA position, the call disappears
from all SWCA button appearances and can only be retrieved by entering
the corresponding SWCA code.
≤•fi‹‡
The
there are no calls parked on any of the assigned buttons on your
telephone.
request was unsuccessful, either because the
or
≤•fi‹°
request was used, but
Parking a call to an SWCA key
If a call is manually assigned to an SWCA key, the call automatically goes into park mode.
If a call is automatical ly assigned to an SWCA k ey when it is answere d, you hav e thre e choices for
parking the call:
1 Press the SWCA key the call is assigned to. A flashing indicator fill appear beside the button.
2 Enter a SWCA dial code on the dialpad. If the telephone has a key programmed for that code,
a flashing indicator will appear beside the button.
P0937240 03.1
Page 75

Chapter 5 Handling calls 75
3 Enter ≤•fi¤‚ and allow the system to automatically assign the ca ll to one of the
defined SWCA keys on your telephone, although, not necessarily the same SWCA it was
originally assigned to.
Retrieving a parked call from a SWCA key
You can only retrieve a call if your telephone has an intercom (I/C) button that is free. Refer to
“How SWCA works in a call group” on page 72.
There are four ways to retrieve a parked SWCA call:
1 Press a SWCA key beside any flashing indicator.
2 Dial the SWCA code that you know has a call parked on it. (≤•fi¤⁄ to
≤•fi‹fl)
3 Dial ≤•fi‹‡ to retrieve the oldest parked call on your telephone.
4 Dial ≤•fi‹° to retrieve the most recent ly-parked call on your telephone.
Note: If you retrieve a call, and then repark it. That call becomes the most recently-parked
call, regardless of where it stood on the original stack of calls.
Internal calls: Y ou cannot retrieve a SWCA call at a telephone that originated the intercom
call.
Call interactions with SWCA controls
Some call features have impacts when activated from or to a call assigned to a SWCA key. For
specific fea tu re int er actions, refer to the Telephone Feature Programming Guide.
Transferring calls
If you transfer the call to a telephone that does not have the same SWCA keys assigned, the call
will disappear from the SWCA key on your t el eph one once the call is tra nsf er red . If the ca ll needs
to be reassigned to your group, the person who answered the call would manually enter a SWCA
control code that is assigned to your group, to return the call to a SWCA designation at your
telephone.
Conference calls
A conference call cannot be parked on a SWCA key.
You cannot conference a call that is park ed on a SWCA ke y. To con ference suc h a call, you nee d to
retrieve the call, and then put it on Hold, and then create the conference.
If a conference call is created from two SWCA-associated calls, and then a transfer occurs by the
conference master releasing, the remaining call between the two conference slaves will move to
being associated to only the currently associated SWCA keys (if any) on the slaves.
Telephone Features Programming Guide
Page 76

76 Chapter 5 Handling calls
If a conference call is created from two SWCA-associated external calls, and then a transfer occurs
by the conference master releasing, the remaining call between the lines/trunks will not be
associated with any SWC A keys.
Hold
Only active calls can be assigned to SWCA keys. If you want to move a call on Hold to a SWCA
key, you must un-Hold the call, and then assign the call to a SWCA key.
Your system administrator can set a SWCA system control to force a call to attempt to assign to a
SWCA key when you press Hold for an active call. If the call cannot be assigned to a SWCA key,
such as the case where all keys are already assigned, the call remains on Hold at your telephone.
Auto-Hold
If Auto-Hold is on for the telephone, and you press a SWCA key with a parked call while you are
still on an active call, the active call will automatically Hold at your telephone, assuming that an
intercom resource is available for the call.
If Auto-Hold is not on for the telephone, and you press a SWCA key with a parked call while you
are still on an active call, the active call g ets dropped.
You can change the Auto-Hold setting at t he tel ephone using ≤‡‹ to turn the f eatur e on and
≤£‡‹ to turn the fe ature of f . Or your sys tem a dminist rato r can cha nge the s etti ng thro ugh
the Unified Manager.
NetVision telephone interactions with SWCA keys
The NetVision telephone can park and answer calls assigned to SWCA keys. Since NetVision
handsets have no programmable buttons with a status display, the user accesses the SWCA codes
using a combination of display menu assignments and dial pad feature codes to park and retrieve
SWCA calls.
For information about button programming for SWCA keys for NetVision telephones, refer to the
IP Telephony Configuration Guide.
P0937240 03.1
Page 77

Chapter 6
Forward your calls
If you leave your desk but want to receive calls at another location, you can forward your calls to
an internal or e xternal telephone. You can also use Call F orw ard to auto maticall y forw ard calls to a
voice mail system.
Call Forward
When you use the Call Forward feature code, all calls go to the destination you select, regardless
of Forward on busy (CFB) and Forward no answer (CFNA) feature programming.
To forward calls:
1 Press ≤›.
2 Enter the number of the telephone to which you want your calls forwarded.
77
To forward your calls to an external destination you must enter the route plus the dialing digits of
the external telephone. For example, if you need to dial 9 for external calls, then you must enter
9 plus the dialing digits to forward your calls to an external number.
Alternatively, you can use Line Redirection to forward calls outside the system. Line Redirection
takes priority over Call Forward.
Cancel Call Forward
Press ≤£› to cancel Call Forward.
If the telephone to which you forwarded your calls does not have the same external lines as your
telephone, the forwarded calls appear on intercom buttons.
Forwarded ca lls do not ring b ut the l ine ind icato r f lashes on the t elepho ne. You can answer the cal l
by pressing the button next to the flashing indicator.
Note: If you set up forw ard loops fr om one telephon e to another in a circle, t his can resu lt
in unanswered calls at any location.
Override Call Forward
When you call a person who has Call Forward to your extension, your call rings at that person’s
telephone.
Telephone Features Programming Guide
Page 78

78 Chapter 6 Forward your calls
Call Foward prompts
These are the prompts you can encounter when using Call Forward.
Forward denied
There are several reasons why you can get this message. For example,
you cannot forward your calls to a telephone that has Call Forward
programmed to your telephone.
Forwar d>221
CANCL
Not in service
Your calls are being forwarded to telephone 221.
T w o or more t elephones are link ed in a for warding chain, and one i s out
of service or used for programming.
For other displays, see Appendix B, “Common display prompts and error messages,” on page
167.
Programming Call Forward
(Unified Manager Programming)
There are a number of v ari ables th at infl uence how Call F orwa rd work s on t he syste m. To set them,
you need to start a Unified Manager session. For more information about programming using
Unified Manager, see the Business Communications Manager Programming Operations Guide.
External call foward: To allow external destination programming you need to set the Allow
Redirect to yes.
Call Forward no answer: redirects calls to anot her telephon e in your system or to the voice mail
system.
Forward no answer delay: Determines the number of times that an incoming call rings at your
telephone before the system forwards the call. To estimate the delay time in seconds, multiply the
number of rings by six.
Call Forward on busy: redirects calls to another telephone on your system or to a voice mail
system when you are b us y on a ca ll, or when you ha v e Do Not Dist urb act ivated at your tele phon e.
Telephones that have Call Forward on busy active can receive priority calls. If you are busy on a
target line call , anot her cal l to that ta r get li ne redir ects to the prime te lep hone for th at tar ge t line or
to the designated voice mail system.
P0937240 03.1
Note: Line Redirec tion takes priority over Call Forward no answer.
Note: Line Redirec t ion takes priority over Call Forward on busy. The Call Forward
feature or Call Forward programming do not affect calls redirected by Line Redirection.
Page 79

Call Forward and voice mail
If you want a voice mail system to pick up unanswered calls automatically:
• use the internal number of your voice mail as the destination when you program Forward no
Answer and Forward on busy
or
• if your voice m essaging system or service automatically retrieves calls, make the ring delay
greater than the delay used by your voice mail system
Line redirection
Line Redirection allows you to send your external calls to a telephone outside the office. You can
decide to redirect all, or just some, of your external lines.
Warning: You redirect lines at a telephone, but after redirection programming, the lines
redirect for the entire system.
Chapter 6 Forward your calls 79
Warning: While you are programming Line Redirection, you do not receive any
indication of calls that do not actually ring at your telephone.
Warning: Be careful about redirection loops. For example, if you redirect your lines to
your branch office and your branch office redirects its lines to you, you can create a
redirection loop. If these calls are long distance, significant toll charges may result.
You can redirect only lines that appear at line buttons on your telephone. Since T7100,
Companion, DECT, and NetVision telephones do not have line b utto ns, you cannot use this feature
on those telephones. Also, you cannot use the feature on any telephone connected to an ATA2 or
ASM (analog station modules).
You can answer the telephone if it rings while you are programming Line Redirection, however,
none of the call handling features are available until the feature times out. If you need to use a
feature to process the call, quit Line Redirection programming by pressing ≤. Do not press
® or you disconnect the call you are trying to redirect.
In some conditions, callers can experience lower volume levels when you redirect calls to an
external locatio n.
Telephone Features Programming Guide
Page 80

80 Chapter 6 Forward your calls
Allowing a telephone to redirect lines
Your system administrator can determine if a telephone is allowed to redirect calls.
You need to start a Unified Manager session to program this feature. For more information about
programming using Unified Manager, see the Business Communications Manager Programming
Operations Guide.
Turning the redirect ring on or off
You can program a telephone to ring briefly (200 milliseconds) when you redirect a call on one of
its lines.
Note: If a tel ephone has redire ct ring enabled, it ri ngs brie fly for redire cted cal ls on o ne of
its lines when another telephone has set up the line redirection.
You need to start a Unified Manager session to program this feature. For more information about
programming using Unified Manager, see the Business Communications Manager Programming
Operations Guide
(Unified Manager Programming)
(Unified Manager Programming)
How Line Redirection is different from Call Forward
Call Forward forwards all calls that arrive at a selected telephone to an internal or external
telephone. Line Redirection redirects only the lines you define, no matter which telephones they
appear on, to a telephone outside the system.
Line Redirection takes priority over the Call Forward feature.
If both features are active on a telephone:
• Incoming external calls on redirected (trunk) lines route to the indicated Selective Line
Redirection (SLR) externa l destination .
• Incoming internal calls go forward to the indicated Call Forward destin ation.
Turn on Line Redirection
To turn on Line Redirection:
1 Press ≤°›.
2 Select the outgoing line to use for redirected calls.
3 Enter the number you need to redirect call to.
P0937240 03.1
Page 81

Chapter 6 Forward your calls 81
To enter the telephone number to which you want to redirect calls, use one of the following
methods:
• Press an external autodial button.
• Enter an external telephone number (using no more than 24 digits) then press ≥ or OK
• Press ≥ or OK
if the line you have se le ct ed a s t h e out goi ng l ine is a pri vate netw o rk li ne
that does not require you to dial digits.
4 Select the lines to redirect.
.
If you use ALL
light up before pressing ≥ or OK
to redirect all your lines, ensure that you wait until all the lines on your telephone
. If you press ≥ or OK before all the li nes l ight up , those line s
not lit do not redirect.
You can continue to use the line selected for redirecting calls on other lines when the line is not
busy on a redirected call. To avoid redirection failing because the selected line is in use, select a
line pool with several lines in it. The system does not check that the number you give for line
redirection is a valid one. If you redirect to an invalid number, redirection fails. To avoid a
redirections failure, use an autodial button to enter the redirection number. You must program
autodial buttons used for line redirection to use a specific line.
Cancel Line Redirection
To cancel Line Redirection:
1 Press ≤£°›.
2 Select the lines you no longer want to redirect.
Line Redirection prompts
The following displays appear when redirecting lines:
Intercom
Line Redirection
QUIT ADD REMOVE
No line to use
Outgoing line
Pool code: ___
QUIT
Yo u selected the intercom button as the facility on which to pla ce the
call. Enter a line pool code or a destination code.
Press • or ADD
to begin redirection. Press £ or REMOVE to cancel a
previous redirection.
You have one external line on your telephone, but you need a second
line to perform line re directi on. Redirec t your e xternal line usi ng a line
pool as the outgoing line.
You are trying to redirect a line and the line you have selected is the
outgoing line you have selected as a desti nat io n. You cannot redirect a
line to itse lf. Select an other line.
Enter a valid line pool access code.
Telephone Features Programming Guide
Page 82

82 Chapter 6 Forward your calls
Redir by 221
OVERRIDE
Redirect denied
Select line out
QUIT
Select line(s)
QUIT ALL
Select line(s)
ALL OK
Unequipped line
You have tried to redirect a line, but another person has red ir ect ed t hat
line. Press • or OVERRIDE
to override the previous redirection and
redirect the line.
You can redirect calls only on individual lines.
Select the line used to redirect calls out of the system.
Press the lines to redirect. To release a line selection, press the line to
redirect again. Press ALL
to redirect all your lines.
Continue to press the lines to redirect. Press ≥ or OK
The line you are trying to redirect cannot be redirected because the
hardware does not support redirection.
The following displays appear when canceling redirection:
Select line(s)
QUIT ALL
Press the lines tha t no long er need redi rection. The lines ligh t up whe n
pressed. After you cance l redir ection fo r a li ne you cannot resto re it by
pressing the line again. Press ALL
lines. When finished, press ≥ or OK
when finished.
to cancel redirection for all your
.
Select line(s)
ALL OK
For other displays, see Appendix B, “Common display prompts and error messages,” on page
167.
DND on Busy
When you are busy on a call and a second call comes in, your telephone alerts you to the second
call with a light ring. If you find this second call and ring is disruptive, you can prevent a second
call by assigning Do Not Disturb (DND) on Busy (≤°fi) to your extension.
If you use DND on Busy, the line indicator for an external incoming call flashes, but your
telephone does not ring. Internal and private network callers hear a busy tone instead of ringing
when you are on the telephone. External callers are transferred to the prime set used in your system
or to your voice mail.
Forward on Busy takes priority over DND on Busy.
If an external call uses a target line, the call is processed according to the programm ing of the
target line. If t he target line is busy, the caller hears a busy tone or routes the call to the prime set
for the target line or to the voice mail system, even with DND on Busy programming for the
telephone.
Continue to press the lines that no longer need redirection. Press ≥
when finished.
or OK
(Unified Manager Programming)
P0937240 03.1
Page 83

To cancel DND, press ≤£°fi.
Chapter 6 Forward your calls 83
Allowing DND
(Unified Manager Programming)
The system administrator can allow or disallow access to the DND feature for each telephone.
For more information about changing the status of Do Not Disturb on Busy using Unified
Manager, see the Business Communications Manager Programming Operations Guide.
Telephone Features Programming Guide
Page 84

84 Chapter 6 Forward your calls
P0937240 03.1
Page 85

Chapter 7
Communicating in the office
The Business Communications Manager offers several alternative features to allow you to
communicate within your office using your telephone, such as:
• Page
• Message
• Voice Call
Paging in the office
The Page feature al lows you to mak e announcements over the Business Communi cat io ns Man ager
system using the telephone speakers, or a loudspeaker system, if one is available.
Note: Portable ha nds ets do not have microphone s. The re for e, t hey cannot receive a page.
The user manual for each type of handset will indicate if that handset can make a page
announcement, and how to use the feature on that handset.
85
There are no warning messages that the page did not occur, either in programming these
sets to page zones, or in attempting to page a portable set.
Making a page announcement
To make a page announcement:
1 Press ≤fl‚.
2 Enter a page t ype.
Page types are:
⁄ through the telephone speakers (internal page)
¤ through an external speaker (external page)
‹ both internal and external (combined page)
3 If necessary, select a zone or press ‚ for all zone s.
4 Make your announcement.
5 Press ®.
Telephone Features Programming Guide
Page 86

86 Chapter 7 Communicating in the office
Page Shortcuts
Instead of entering the Page feature code followed by the page type, you can enter the following
shortcut codes.
All ≤fl‚
Internal ≤fl⁄ + zone (0 to 6)
External ≤fl¤
Combined ≤fl‹ + zone (0 to 6)
Allowing access to the Page feature
The system administrator can allow or disallow access to the Page feature for each telephone. This
means the user of a telepho ne where Page has been disall o w ed, cannot init iate a page. A tel ephone
that has Page disallowed cannot be entered into a Page Zone to receive a page, however, external
pages will be broadcast wherever the external speakers are mounted.
You need to start a Unified Manager session to program this feature. For more information about
programming using Unified Manager, see the Business Communications Manager Programming
Operations Guide.
Creating page zones
A zone is any group of telephones that you want to group together for paging, regardless of their
location. You can assign one of six zones to each telephone. The maximum number of telephones
in a page zone is 50.
You need to start a Unified Manager session to program this feature. For more information about
programming using Unified Manager, see the Business Communications Manager Programming
Operations Guide.
You can make a telephone part of a page zone when the telephone has Page assigned as Y
(Unified Manager Programming)
(Unified Manager Programming)
(Yes).
Your installer programs the following options:
• a tone sounds before a page announcement begins
• the maximum number of seconds a page announcement can last before it automatically times
out
P0937240 03.1
Note: If a telephone has redir ect ring ena bled, it ri ngs briefly for redir ected call s on one of
its lines when another telephone has set up the line redirection.
Page 87

Chapter 7 Communicating in the office 87
Page prompts
These are some of the prompts you may encounter when you are using Page:
Enter zone:___
ALL
Invalid zone
Page choice:
SETS SPKR BOTH
Page timeout
Paging ALL
Paging busy
For other displays, see Appendix B, “Common display prompts and error messages,” on page
167.
Enter the required page zone number (0- 6) or press
You have entered a page zone code that is not between 0 and 6.
Select the type of page you want. See the list in “Making a page
announcement” on page 85.
The time allocated for paging has expired.
You are making a page. The display shows the page zone you have
selected. Press ≤ or ® when finished.
A page is being made in the page zone you have requested.
ALL
.
Using Pa ge with external equipment
When you make a page that uses e xt ernal paging e quipment (e xter nal pag e or combi ned page) , the
Long Tones featur e automat ical ly activ ate s for the e xt ernal paging sys tem only. This allows you to
control optional equipment with the Long Tones feature.
Messages
The Messages feature allows you to leave a message on the display of another telephone in your
system or to analog telephones connected to an Analog Station Module (ASM). The Messages
feature indicates if you have any messages waiting.
The Messages feature uses a message waiting list to keep a record of your internal messages and
your (external) voice mail messages.
Note: You can make an announcement to one person by placing a voice call to their
telephone.
Note: To keep a record of e xtern al v oice mail messages, yo u must ha v e access t o Business
Communications Manager Voice Messaging service with visual message waiting
indication and a Business Communications Manager digital telephone.
Telephone Features Programming Guide
Page 88

88 Chapter 7 Communicating in the office
Send a message
You can leave a message on the display of another telephone in your system. You can send up to
four messages to different telephones, including your message center. If your telephone is a
direct-dial telephone or a CAP, you can send up to 30 messages.
Only the assigned direct-dial telephone for an analog telephone connected to an ASM can send
messages to analog telephones by pressing ≤⁄. The analog telephone provides a Stuttered
Dial Tone to tell the user of messages waiting.
To send a message:
1 Press ≤⁄.
2 On a telephone with a two-line display, press ADD
This step is not necessary on a telephone with a one-line display.
3 Enter the internal number of the person you want to send the message. The display at that
telephone reads
Message for you
.
.
Cancel a message you have sent
To cancel a message:
1 Press ≤£⁄.
The display reads
2 Enter the internal number of the person you sent the message.
Cancel for:
.
Review your messages
You can receive up to four messages from different telephones, including your message center. A
single message from your message center can represent several messages.
On a telephone with a one-line display:
1 Press ≤flfi.
The display shows the first message.
2 Press • or £ to move through your messages.
On a telephone with a two-line display:
1 Press
The display shows the first message you received.
2 Press
P0937240 03.1
.
MSG
to move through your messages.
NEXT
Page 89

Chapter 7 Communicating in the office 89
Reply to a message
You can call the person who sent a message, or your message center, while you are viewing the
message.
If your reply to a message is forwarded or is answered at another telephone using the Call Pickup
feature, the message remains on your telephone until you cancel it or contact the telephone that
sent the message.
Press ‚ to reply to a message on a telephone with a one-line display.
Press CALL
If you want to call your message center using a line different from the programmed line, exit your
message list and dial the message center telephone number using normal dialing methods.
to reply to a message on a telephone with a two-line display.
Reply to a message from an analog telephone connected to an ASM
On an analog telephone connected to an ASM, press
automatic ally retrieves and c onnects the user to the oldest messa ge sender. The message can
originate from either the assigned direct-dial telephone or the internal voice mail system.
For analog telephones connected to an ASM, using the Message Waiting Reply feature
(
˚•flfi
Analog telephones connected to an ASM cannot retrieve external messages by using the Message
Waiting Reply feature (
voice mail center to retrieve their messages.
If Voice Messaging is not installed on your system, only the assigned direct-dial telephone can
send messages to an analog te le phone conn ected to an ASM using ≤⁄. The analog tel ephone,
in turn, can ent er a s ing le-digit access cod e t o reach the assigned direct-dial tele phon e and retrie v e
messages.
), retrieves only internal messages sent to the user.
˚•flfi
). For external messages, users must call the external
˚•flfi
. The system
If the assigned direct-dial telephone of an analog telephone connected to an ASM changes,
messages sent by the previous assigned direct-dial telephone remain in the incoming message list
of the analog telephone until you retrieve them.
Remove items from your message list
You can erase a message while you are vi e w ing it in you r messag e lis t. If th e mess age is from your
message center, this action only erases the message notification at your telephone. To erase the
message at your message center, refer to your message center documentation.
To remove items from your message list on a telephone with a one-line display, press ≥.
To remove items from your message list on a telephone with a two-line display, press
Telephone Features Programming Guide
ERASE
.
Page 90

90 Chapter 7 Communicating in the office
Remove messages from an analog telephone connected to an ASM
To remove both internal and external messages on an analog telephone connected to an ASM,
press
˚£flfi
to invoke the Cancel Message Waiting feature.
On analog telephones connected to an ASM, the Cancel Message Waiting feature cancels the
oldest message received. The system no longer provides a Stuttered Dial Tone if there are no
messages waiting.
View messages you sent
On a telephone with a two-line display, you can view the messages you have sent.
1 Press ≤⁄.
2 Press SHOW
3 Press NEXT
to view your first sent message.
to view the rest of your sent messages.
Message prompts
These are prompts you can encounter when you use the Message feature:
Cancel denied
Cleared>LINENAM
NEXT
In use: 221
L061:LINENAMVMsg
NEXT CALL CLEAR
Message denied
Message list
SHOW ADD EXIT
You entered an invalid number when trying to cancel a message.
You cleared an external message from your message waiting list. The
message exists in your message center until you erase it there.
You are trying to call from your message waiting list. The line that you
are trying to use is in use by the identified user in your system.
You are viewing your message list. The display shows the number and
name of the line used for your message.
You tried to send a message to an invalid internal number or to a
telephone that is out of service.
appears when you ha ve r emaining messages. P ress SHOW to re vie w
SHOW
messages you have sent. Press ADD
to send a new message.
Message to:
Messages & Calls
MSG CALLS
No button free
No number stored
P0937240 03.1
Enter the internal nu mber of the telephone to which you want to send a
message.
You have one or more messages and one or more new Call Logs. Press
≤°‚fl to cha nge the first line of the display to the current tim e
and date.
You have no line button free with which to reply to a message.
There has been no number programmed f or the message cen ter . Conta ct
your voice messaging service provider.
Page 91

Chapter 7 Communicating in the office 91
Start of list
NEXT
Their list full
Your list full
For other displays, see Appendix B, “Common display prompts and error messages,” on page
167.
Voice Call
You can make an announcement or begin a conversation through the speaker of another telephone
in the system.
You are at the beginning of your list of messages. Press NEXT
through your messages.
You are trying to send a message to a user whose message wa iting list i s
full.
You tried to send a message but your list of sent messages is full.
Cancel one of the messages you se nt, if possible , or w ait un til you have
received a reply to one of those messages.
Note: Voice calls made to portable handsets that do not have speakers, such as
Companion, the T7406 cordle ss handset, and Net V is ion telephones, will recei ve the call as
a ringing call.
to move
Make a Voice Call
To make a Voice Call:
1 Press ≤flfl.
2 Foll ow the instructions on the display.
Mute Voice Call tones
When a voice call begins at your telephone, you hear a beep every 15 seconds as a reminder that
the microphone is on. To stop the beep, pick up the handset or press the handsfree button.
Answer a Voice Call using Handsfree Answerback
With Handsfree Answerback assigned to your telephone, you can respond to a voice call without
touching the telephone.
When a person makes a v oice cal l to you, jus t start tal king. The micro phone on th e telephone picks
up your voice.
After you have answered a voice call, you can put the call on hold, transfer it, or treat the call as a
normal call.
Handsfree Answerback is not available to the T7100 telephone or the portable telephones.
Telephone Features Programming Guide
Page 92

92 Chapter 7 Communicating in the office
Voice Call Deny
Press ≤°° to turn off the Voice Call feature on your telephone.
Voice calls ring like normal internal calls. Your other calls continue normally.
Cancel Voic e Call Deny
Press ≤£°° to cancel the Voice Call Deny feature.
Voice Call prompts
You can encounter these display prompts when using the Voice Call feature:
Dial voice call
Microphone muted
No voice call
Voice call
Dial the internal number or press the internal autodial button of the
person you want to speak to.
Your handsfree microphone is on the mu te set ting. Press © or pick up
your handset to respond to the voice call.
The telephone receiving the call cannot ac cept voice calls for one of t he
following reasons:
• the telephone is active or ringing with another call
• Call Forward is on
• Do Not Disturb is on
• Voice Call Deny is on
• it is not a Business Communications Manager telephone
Your call continues as a normal ringing call.
The line is open for you to speak.
P0937240 03.1
Page 93

Chapter 8
Track your incoming calls
You can track information about calls using a Call Log. This chapter shows you a Call log, and
how to use it.
Call log
If your system has the appropriate equipment and you subscribe to the call information feature
supplied by your service provider, you can record information about calls on an external line. The
line must appear on that telephone before you can log it, but it does not have to be a ringing line.
ISDN service packages that come with calling line identification (CLID) can supply the same
feature.
Note: Portable telephones: Your portable telephone may not support this feature, or it
may only support some of the functions of the feature.
93
Call Log creates a record of incoming external calls. For each call, the log can contain:
• sequence number in the Call Log
• name and number of the caller
• indication if the call was long distance
• indication if the call was answered and by whom
• time and date of the call
• number of repeated calls from the same source
• name of the line on which the call came
Call Log can help you to
• keep track of discarded calls or calls not answered
• track patterns for your callers (for example volume of calls and geographic area of calls)
• record caller information quickly and accurately
• build a personal telephone directory from log items
Information such as lo ng distance indicator and the call er’s name and number, may not show in the
log. The appearance depends on the Call Display services provided by your local telephone
company and th e caller’s local telephone company.
To use the features on the following pages, your telephone must have spaces available in its Call
Log. Your installer programs each telephone with an appropriate number of spaces.
Telephone Features Programming Guide
Page 94

94 Chapter 8 Track your incoming calls
Call Log options
You can select the type of calls to store in your Call Log. Select from four Autolog options:
No one answered, Unanswerd by me, Log all calls, No autologging
To use Call Log:
1 Press ≤•°›.
The display shows the current option.
.
2 Press £ or NEXT
3 Press ≥ or OK
to change the option.
to select the display option.
Log a call manually
If your calls are not automatically logged, you can manually log call information when connected
to an external call. You can store information for your current call for future reference.
For example, you can:
• record caller information without using paper and pencil
• record only selected calls as opposed to logging all calls
• quickly record call information before a caller hangs up
Press ≤°⁄‹ to log an external call manually.
Delete old log items
Your log has a set number of items that it can hold. When the log is ful l, you can no longer l og ne w
calls. When your log is full, the Autobumping function automatically deletes the oldest Call Log
item when a new call is logged.
Press ≤
Press ≤
°⁄fi
£°⁄fi
View your Call Log
To view your log:
1 Press ≤
number of new items in the log.
2 Press
3 Press
Log.
When you subscribe to Call Display services from your local telephone company, names and
numbers for external callers appear on the display.
P0937240 03.1
°⁄¤
or OLD to view old items; press £ or
•
or RESUME to display the last item you viewed, the last time you accessed your Call
‚
to enable autobumping.
to disable autobumping.
. The display shows the number of previously read items (old) and the
to view new items.
NEW
Page 95

Chapter 8 Track your incoming calls 95
View a Call Log item
Press √ or MORE to v iew the information for a call log item.
Erase log items
You must erase log items that you have read, to make space for new items in your log.
1 Display the item you want to erase.
2 Press ≥ or ERASE
3 Press ® to exit.
If you accidentally erase an item, you can retrieve the item.
1 Press ≥ or UNDO
2 Press ® to exit.
.
after accidentally erasing an item.
Make a call using Call Log
You can place calls from within your Call Log. Th e number s tored fo r a call can v ary dep ending on
the type of call. For example, if the call came from a Centrex or PBX system, you can trim the first
few numbers before you make the call. If the number you want to call is long distance, or if you
want to use a line pool, you may need to add numbers.
To place a call:
1 Display the log item for the call you want to place.
2 Display the related telephone number.
one time for every digit that you want to remove.
3 Press √ or TRIM
,
4 Dial any additional digits required.
5 Press an external line or line pool button.
6 Lift the handset or press Handsfree.
Call log prompts
These prompts can appear when you use the Call Log feature:
1:Unknown name
1:Unknown number
The caller's name is not available.
The caller’s number is not available.
Telephone Features Programming Guide
Page 96

96 Chapter 8 Track your incoming calls
12:KATE SMITH
NEXT ERASE MORE
12¯KATE SMITH
NEXT ERASE MORE
12§KATE SMITH
NEXT ERASE MORE
49/1234567890123
NEXT ERASE MORE
Call(s) bumped
Hold or release
In use: SETNAME
Jan 4 9:00a 3X
NEXT ERASE MORE
Line061 ¯227
NEXT ERASE MORE
Line061 ¯Logit
NEXT ERASE MORE
_ indicates a new item.
indicates that the call was answered.
¯
indicates a long distance call.
§
indicates the stored number was trimmed to its final 11 digits.
/
Press
√
or MORE to show additional information about the
call.
One or more log entries are deleted by the Autobumping feature while
you are viewing at the Call Log.
Hold or release your active call be fore entering Call Log.
The external line is in use.
The repeat call counter, shown with time and date, indicates the
number of calls you have received from the same caller.
This call was answered at anothe r tel epho ne (227) .
This call was logged manually.
Line061
NEXT ERASE MORE
Messages & Calls
MSG CALLS
New calls begin
This call was not answered.
There are one or more items in your message waiting list, and there
are one or more new items in your Call Log. Press ≤
°‚fl
change the first line of the display to the current time and date.
You have viewed your last old log item and now you can view your
new log items.
No info to log
No log assigned
No resume item
No informat ion is available for the call.
No log space has been assigned to the telephone.
The resume item has been removed because of Autobumping, repeat
call update, or log reallocation while you are looking at the Call Log.
For other displays, see Appendix B, “Common display prompts and error messages,” on page
167.
to
P0937240 03.1
Page 97

Create a passwo rd to yo ur Call Log
To access your Call Log through a password:
Chapter 8 Track your incoming calls 97
1 Press ≤
•°fi
. The displays shows
New passwrd:
2 E nter your fou r -digit password. The display shows
3 Re-enter your four-digit password. The display shows
.
Repeat New:
Password changed
.
, to confirm the
change.
To enter Call Log using a password:
1 Press ≤
°⁄¤
If you have programmed a password, the display shows
to enter Call L og.
Password:.
2 E nter your four-digit pas sword.
If you do not remember your Call Log password, programming from Unified Manager can delete
the password. For more information about programming using Unified Manager, see the Business
Communications Manager Programming Operations Guide.
Change your Call Log password
1 Press ≤
•°fi
The display shows
2 Enter your old password.
.
Old passwrd:
.
The display shows
New passwrd:
.
3 E nter your new four -digit password.
The display shows
Repeat New:
.
4 Re-enter your password.
The display shows
Password changed
Delete an assigned pa ssword
1 Press ≤
•°fi
The display shows
2 Enter your old password.
The display shows
3 Press ≥ or OK
The display shows
.
Old passwrd:
New passwrd:
.
No pswd assigned
.
.
to confirm the change.
, to confirm the change.
Telephone Features Programming Guide
Page 98

98 Chapter 8 Track your incoming calls
Programing automatic call lo gging
(Unified Manager Programming)
Your installer can program each telephone to automat ically log calls coming in on a li ne. You must
run a Unified Manager session to do this. For more information about allowing logging, refer to
the Business Communications Manager Programming Operations Guide.
P0937240 03.1
Page 99

Chapter 9
Customize your telephone
You can customize your telephone to suit your needs.
The following functions can be performed on all Business Series Terminals T-series telephones
and M-series telephones which have the hardware or firmware option. Refer to note, regarding
cordless handsets.
• check the functions of buttons using button inquiry
• change the contrast of display
• change the language
• adjust the ring type and volume
• change button assignment
Note: Portable handsets have set-based menus or controls that adjust contrast and ring
type and volume, if these features are available on the handset. Refer to the user manual
that came with the handset for details about setting these features.
99
The T7406 handset contrast cannot be changed.
The NetVision volume control buttons only adjusts handset volume, and cannot be used
for button programming functions.
Adjust the contrast on the display
1 Press ≤•‡.
2 Press a number on the dial pad to select the contrast level you prefer.
3 Press ≥ to save your setting.
On a two-line telephone, you can use the UP
number of contrast levels available varies from one telephone model to another.
and DOWN display buttons to adjust the contrast. The
Change the language on the display
You can select the language that appears on the display of each telephone. System software
supports four language options: Primary, Alternate, Alternate 2, and Alternate 3. All telephones
default to the Primary language at installation.
Table 6 shows the different language options available to each telephone.
Telephone Features Programming Guide
Page 100

100 Chapter 9 Customize your telephone
Table 6 Language options
Language feature code Language
≤•fi‚⁄ Language - Primary
≤•fi‚¤ Language - Alternate
≤•fi‚‹ Language - Alternate 2
≤•fi‚› Language - Alternate 3
If you program ≤•fi‚⁄ to a memory b ut ton, yo u can press that b utt on unt il t he l anguage
you want appears on the display. You cannot program ≤•fi‚¤, ≤•fi‚‹ or
≤•fi‚› to a memory button.
Change the type of ring
You can select one of four different rings for your telephone. This selection makes it easier to
identify your telephone in an open office.
1 Press ≤•fl.
2 Press ⁄, ¤, ‹, ›, or NEXT
You hear the selected ring for two seconds.
3 Repeat until you hear the ring you like, then press ≥ or OK
Adjust the ring volume
Use a combination of feature code and volume bar on a digital telephone to change the ring
volume.
1 Press ≤•°‚.
The telephone rings.
to adjust the volume: left end to decrease, and right end to increase .
2 Press √
.
.
P0937240 03.1
 Loading...