

Page 1
Page 1 of 8
CICS WITH SYSTEM ANSWER
ADMINISTRATION GUIDE
Page 2

Page 2 of 8
Table of Contents
Phone System Programming ..................................................................................................... 3
Programming Overlay ............................................................................................................ 3
Change the Name of a Set ..................................................................................................... 4
Program/Make Changes to Call Forward No Answer or Busy ............................................... 4
Program System Speed Dials ................................................................................................ 4
Program Keys on the Phones ................................................................................................ 5
Common Feature Codes: ....................................................................................................... 5
System Answer .......................................................................................................................... 6
Turn System Answer On/Off .................................................................................................. 6
Change to Day mode / Night Mode ........................................................................................ 6
Record Greetings ................................................................................................................... 6
Greeting Options .................................................................................................................... 7
** Important Note:
The extension and mailbox numbers referenced in this guide are the most commonly
used configuration. It does not guarantee that your company will use the same extension and
mailbox numbers due to each systems customized configuration. If you are unsure of what
numbers were used in your configuration, please call or email the NATG service department.
Page 3
Phone System Programming
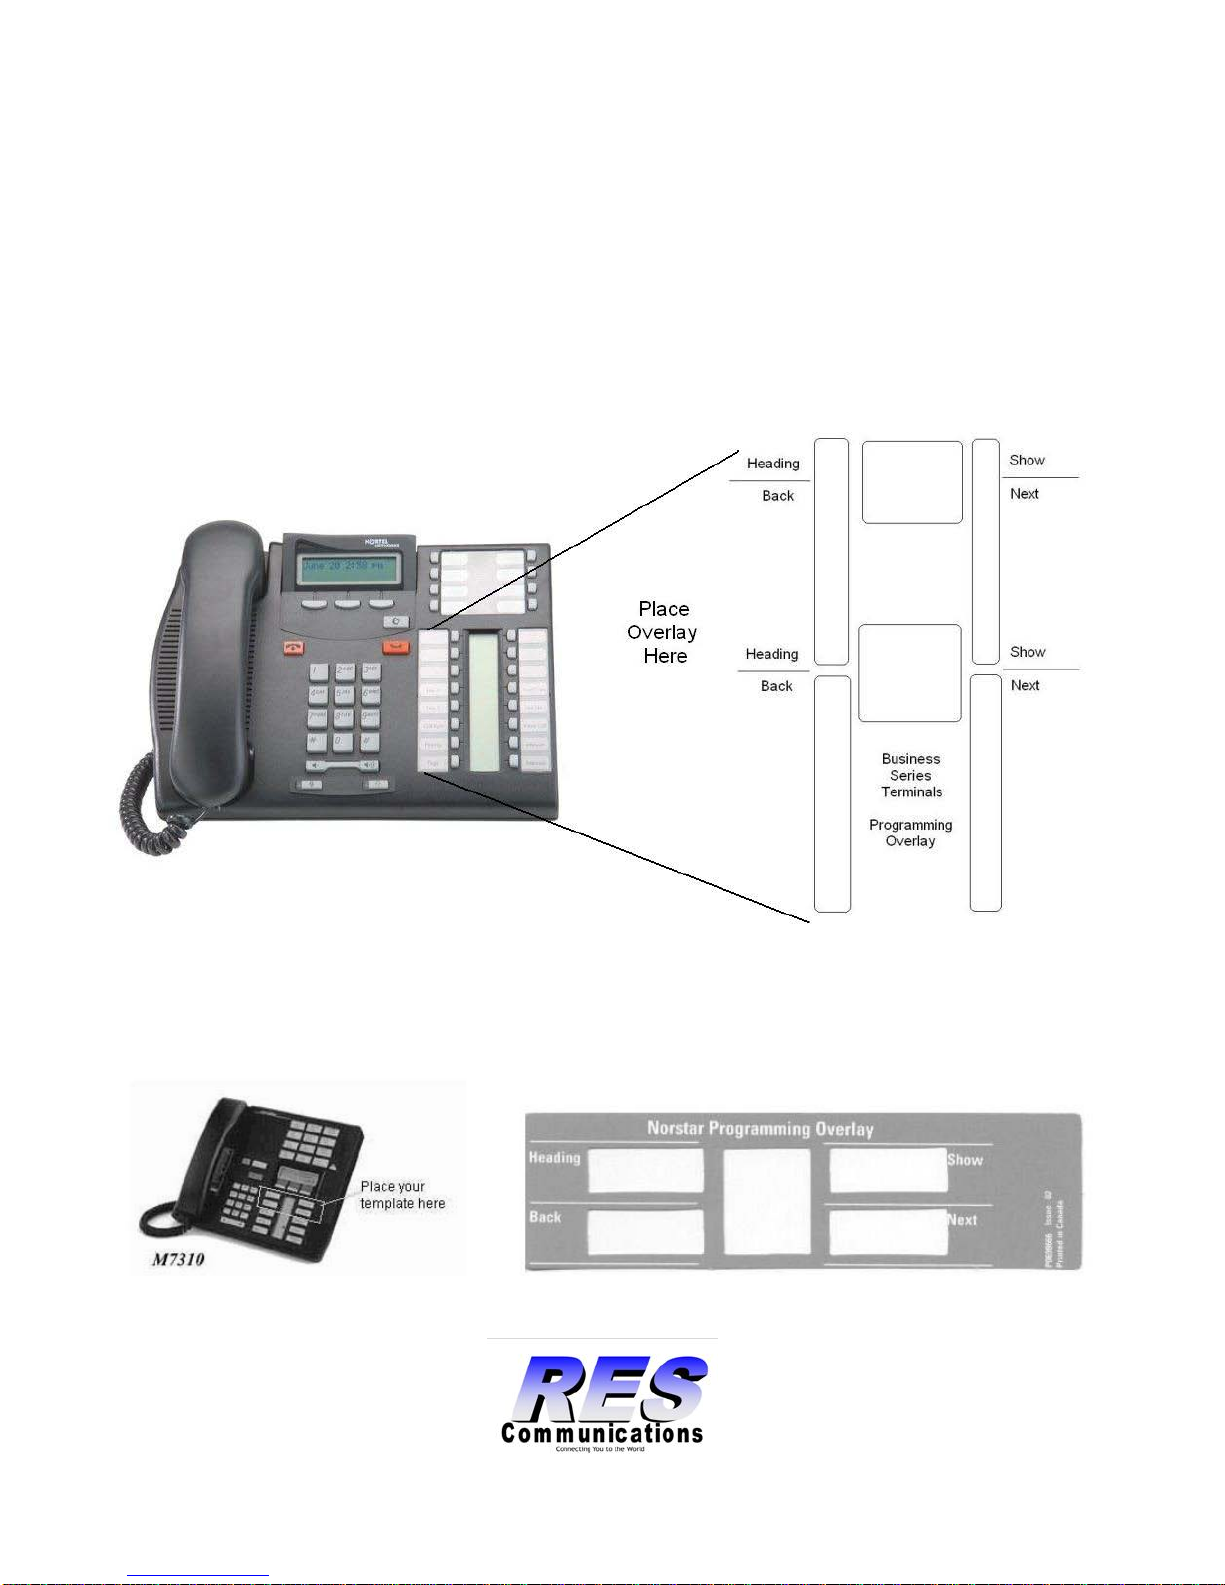
Programming Overlay
Page 3 of 8
T-Series
M-Series
Page 4

Page 4 of 8
Change the Name of a Set
1. Press FEATURE ** 266344
2. Password: 23646, press OK
3. See Terminals and Sets: press SHOW (top right button)
4. Enter the extension number
5. Press SHOW
6. Press NEXT until you see the current name (NEXT=second key down on right hand
side)
7. Press CHANGE (see on display)
8. Spell out the new name, press # after each letter
9. Press NEXT
10. Press RLS to exit programming
Program/Make Changes to Call Forward No Answer or Busy
1. Press FEATURE ** 266344
2. Password: enter 23646 Press OK
3. See TERMINALS AND SETS: press SHOW
4. Enter the extension number
5. Press SHOW, then press NEXT, see CAPABILITIES, press SHOW
6. See Fwd no answer: press SHOW
7. See the extension number where calls are being forwarded (usually the voicemail ext. If
unknown press Feature 985 and display will show vmail ext)
8. Press CHG to enter a different extension OR
9. Press NEXT to see the number of rings and press CHANGE if you want to change the
number of rings
10. Press HEADING (top left button) then NEXT to make changes to call forward BUSY
11. Press SHOW then CHG and enter in vmail ext.
12. RLS to exit programming
Program System Speed Dials
1. Enter FEATURE ** 266344
2. Password: enter 23646, press OK
3. Press NEXT until you see SYS SPEED DIAL
4. Press SHOW
5. Enter a speed dial code : 001-255, press SHOW
6. Press CHNG on display and enter the phone number, then press OK
7. Press NEXT, then CHG until you see POOL
8. Enter 9
9. Press NEXT then press CHANGE to enter a NAME for the speed dial OR go to step 9 if
no name wanted; if entering a name, press NEXT then CHANGE, spell out name (
press # after each lette r ) , then press NEXT
10. Then HEADING to enter another speed dial
Page 5

Feature:
Description:
Feature *0
Button Inquiry
Feature 4
Call Forward
Feature 984
Call Forward to Mailbox (Voicemail Required)
Feature 74
Call Park
Feature 82
Camp On
Feature 3
Conference Call
Feature 85
Do Not Disturb
Feature 5
Last Number Redial
Feature 980
Leave Message (Voicemail Required)
Feature 71
Link
Feature 630
Page – External & Internal
Feature 620
Page – External
Feature 610
Page – Internal
Feature 76
Pick up – Direct
Feature 75
Pick up – Group
Feature 989
Record Call (Voicemail Required)
Feature *6
Ring Type
Feature *80
Ring Volume
Feature 871
Ringing Service
Feature 0
Speed Dial
Feature 983
System Administration (Voicemail Required)
Feature 70
Transfer
Feature 986
Transfer to Mailbox (Voicemail Required)
Program Keys on the Phones
A. For Outside
B. For Internal
C. For Features
numbers
1. Press FEATURE *1
2. Press a key
3. Enter the phone number and press OK
extensions:
1. Press FEATURE *2
2. Press a key
3. Enter the desired extension number
:
1. Press FEATURE *3
2. Press a key
3. Press Feature key the desired feature code
Page 5 of 8
Common Feature Codes:
Page 6

System Answer
Turn System Answer On/Off
1. Press FEATURE *831
2. Press CHANGE
3. Password: enter 23646
4. Press CHANGE again until it says ON or OFF
5. Press OK to confirm change then
6. Press the RLS key
Change to Day mode / Night Mode
1. Press FEATURE *832
2. Press CHANGE
3. Password; 23646
4. Press CHANGE to Choose:
a. Bus open (day mode)
b. Bus closed (night mode)
c. OFF
5. Press OK to confirm change
6. Press the RLS key
Page 6 of 8
Record Greetings
1. Press FEATURE *833
2. Pswd: 23646
3. Auto attnd greetings: p r ess SHOW
4. See ModeA: Press SHOW
5. Press REC
6. Hang up when done recording
Note
You Must turn system answer OFF under Feature *831 : And Feature *832 in
order to record the greeting, then turn it back ON
the greeting has been
after
recorded.
Page 7

Greeting Options
GREETING A = Company Introduction Greeting
Introduces your company; the first thing callers hear w hen business is set to open or cl ose d
Example : “ Thank you for calling ABC company”
GREETING B = Closed Greeting
Plays after A when business closed is set to ON.
Example : Our office is now closed. Regular hours are 8-5 Mon-Fri.
GREETING C = Options Menu
Plays after A when business open is set to ON.
Example : Press 1 for sales, press 2 for admin, press 3 for accounting etc.
GREETING D = All operators are Busy G reeting
Usually you can turn this greeting OFF
GREETING E = Further Options Menu
Plays after A & C when business OPEN is set to ON; also plays after A & B when
business CLOSED is set to ON
Example : I f you know the extension of the person you are calling enter it now.
Page 7 of 8
GREETING F = Hold the Line Greeting
Plays after A, C & E to take care of those callers who do not make any selection
Example: hold the line and your call will be answered as soon as possible.
Page 8

 Loading...