

Nortel Agent, Symposium Agent 2.3 Supplementary Manual

Product Bulletin Bulletin: P-2003-0157-Global
Issue: 1.3
Date: April 2004
Symposium Agent 2.3
Supplementary Technical Information
Introduction
This bulletin provides supplementary information to the current Symposium Agent 2.3
documentation issued with the product on the following items:
• 1) Updated Symposium Agent 2.0 to 2.3 upgrade procedure
• 2) Supplementary Engineering Information
• 3) Sybase 12.0 issues affecting Symposium Agent 2.3 servers
• 4) Win2000 Symposium Agent 2.3 Server with Win95, 98, NT 4.0 Symposium Agent
Clients.
• 5) Running the SA Client using a Domain User account (without Administrator
privileges)
It should be used in conjunction with the Symposium Agent 2.3 documentation supplied on the
product CD, namely:
Symposium Agent 2.3 Installation Guide
Standard 2.1, February 2001
File name on CD sa2install.pdf
Symposium Agent 2.3 Programmer's Guide
Product Release 2.3 Document Release 2.0 , January 2001
File name on CD SAR2ProgrammerStd.pdf
Page 1 of 28

1) Updated Symposium Agent 2.0 to 2.3 upgrade procedure
The procedures stated in the Symposium Agent 2.3 Installation Guide, Chapter 3 Section B
“Upgrade Instructions”, Pages 51 to 65 have been found to be difficult to follow.
The following procedure is recommended for Symposium Agent 2.0 to 2.3 upgrades:
• 1.1 Upgrade overview
• 1.2 Backup Symposium Agent 2.0 database
• 1.3 Upgrade Symposium Agent 2.0 Sybase 11.5 database to Sybase 12
• 1.4 Configure Sybase 12 database
• 1.5 Upgrade to Symposium Agent 2.3
• 1.6 Configure Microsoft Transaction Server
• 1.7 Upgrading SA Symposium Agent Clients 2.3
1.1 Upgrade overview
The upgrade from Symposium Agent 2.0 to 2.3 involves upgrading of the Server software,
followed by upgrading of the clients.
The procedure for upgrading the server software from Symposium Agent 2.0 to 2.3 allows for the
database to be backed up and restored.
Symposium Agent 2.0 uses Sybase 11.5, whereas Symposium Agent 2.3 uses Sybase 12 so the
sequence of the procedure should be closely followed.
1.2 Backup Symposium Agent 2.0 database
Backup Sybase Database.
The Sybase database consists of two separate databases. The master database which holds
information about the database itself and any other databases. And the sar2 database which holds
all the Symposium Agent specific information.
In order to ensure that the complete Sybase environment can be recreated both the databases need
to be backed up before you upgrade Sybase.
Note: The backups that are taken at this point will only be valid for a Sybase 11.5 installation. So
if it becomes necessary to do a restore you will have to restore Sybase 11.5 before you will be
allowed to restore the databases. It should also be noted that Sybase has some over 100 pages of
documentation outlining backup and recovery procedures and the information that is contained
here is primarily aimed at a user that is familiar with backup/recovery procedures.
Backup Symposium Agent Database
Before you backup the database you should:
• Ensure that the relevant Sybase services are running.
• Ensure that there are no users connected to the database.
Once the above has been checked you will be ready to:
Page 2 of 28
• Backup the Sybase master database.
• Backup the Sybase Symposium Agent database (sar2).
Ensure Sybase Services are running.
In order to perform a backup in Sybase you will need to have both:
• “Sybase SQLServer_<computername>” and
• “Sybase BCKServer_<computername> running.
These can be checked using Control Panel – Services. If they are not running then start them.
Ensure that there are no users connected.
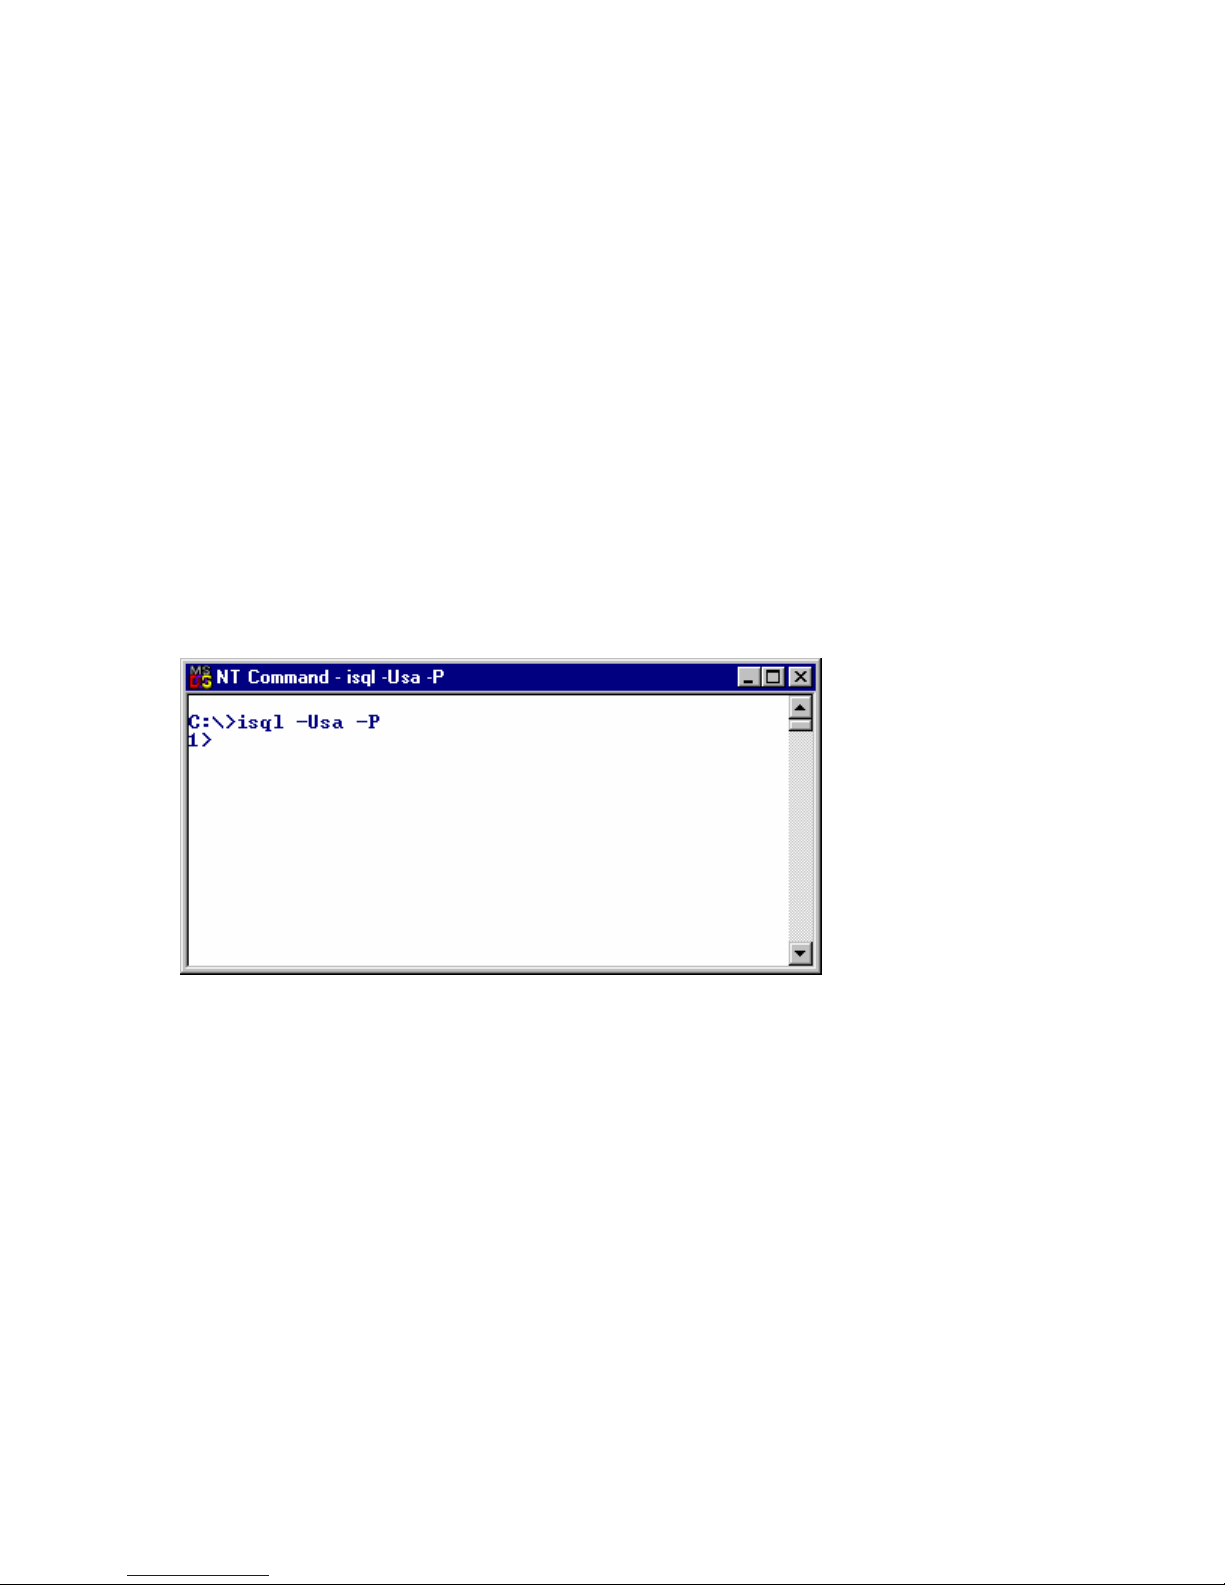
To ensure that there are no users connected to the database, start up a command prompt and
connect to the Sybase database.
You now need to open an isql window (connect to the database). The following command will
connect you to the Sybase database as the sa user. This user has the correct privileges to perform
a backup (dump) of the database.
From the command prompt type: isql –Usa –P followed by a carriage return (<CR>). This
should present you with the isql 1> prompt.
Once connected type sp_who followed by <CR> and then type go followed by <CR>, this
should show you something like this. But basically it will tell you who is currently connected to
the DB.
Page 3 of 28
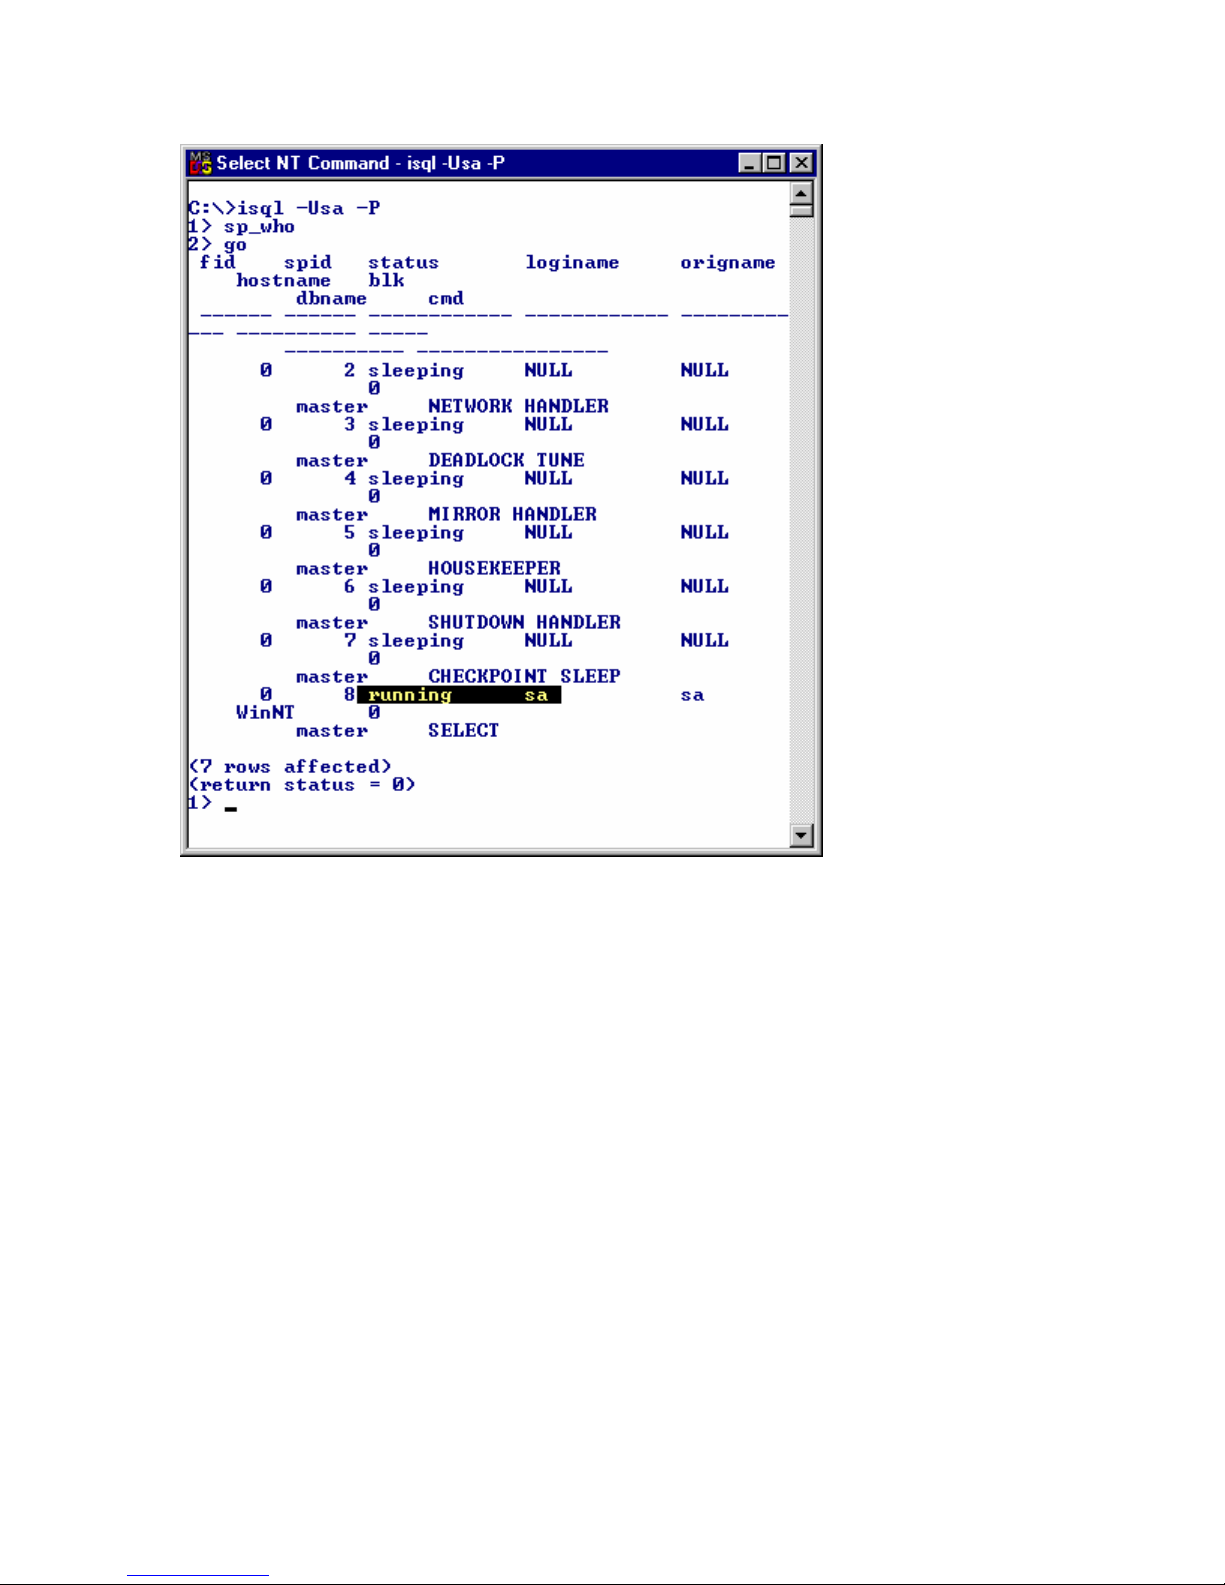
The only user shown as running in the above example is “sa” which is of course the user that we
have logged in as, so that is fine.
Backup the master database.
It is safe at this point to backup the master database.
Type dump database master to “file_name” <CR> followed by go <CR>.
file_name being the name of the dump file that you will create.
Page 4 of 28

This should take approximately one minute.
Backup the sar2 database.
You are now ready to backup the Symposium Agent database, this is known as sar2 within
Sybase. So you would type the following command:
dump database sar2 to “file_name” <CR> followed by go <CR>. file_name being
the name of the dump file that you will create.
This may take some time, and will depend on the quantity of data that is in the database.
As a guideline, it takes the dump command about 10 minutes to write a 50Mb file.
Once this dump has completed you can exit the isql window by typing exit <CR>
Page 5 of 28

1.3 Upgrade Symposium Agent 2.0 Sybase 11.5 database to Sybase 12
Run the pre-upgrade script
Run the Pre-upgrade script
The upgrade script will create a sybsystemdb Database and increase the size of sybsystemprocs
database.
In version 12.0, all servers must have a sybsystemdb database. Version 12.0 uses this database for
tracking transactions and during recovery.
The minimum size for sybsystemprocs is 80MB. If your sybsystemprocs is smaller than 80MB
the upgrade script will increase the size of this database.
The Sybase isql tool will be used to run the upgrade script to create a new sybsystemdb database
and increase the size of sybsystemprocs.
Before you run the isql command, you may need to edit the upgrade.sql file to reference the
default location for your Sybase database files. If the default drive is not the "c:\" then you will
need to edit the upgrade.sql file.
Using notepad, open the upgrade.sql file, located under Nortel\server\nndbcfg
Search for physname="c:/Sybase/data"
Replace the "c" in the pathname with the drive where Sybase is installed. For example, if your
Sybase is on the D drive, the above line will look like this physname= "d:/Sybase/data. .."
There are three instances of this line in the file. Update all three lines.
Now run the following command (all on the same line) to execute the upgrade script:
isql-Usa -p -i x:\Nortel\server\nndbcfg\upgrade.sql-o
x: \Nortel\server\nndbcfg\up grade. out
Note: X is the drive on which you have installed your Symposium Agent server files.
Stop the SQL services
From the services control panel applet stop the SQL services. i.e. Sybase SQLSERVER<COMPUTERNAME>
Run Sybase ASE 12.0 installation
From the SA Server CD-ROM, run the Symposium Agent Software installation menu program,
"nnsamenu.exe", and click on the "Install database files" option. You will be prompted for a drive
and folder in which to install the new database files. The drive should have at least 500MB of free
space. Then, a series of batch files will be started that copy the Sybase ASE v12.0 client and
server files. The server will automatically reboot twice during this process.
To complete the upgrade process and convert your existing database to the 12.0 format, use the
Sybase Server Config program and execute the following ten steps:
1 ) Start the Server Config program from Start Menu->Sybase->Server Config
Page 6 of 28
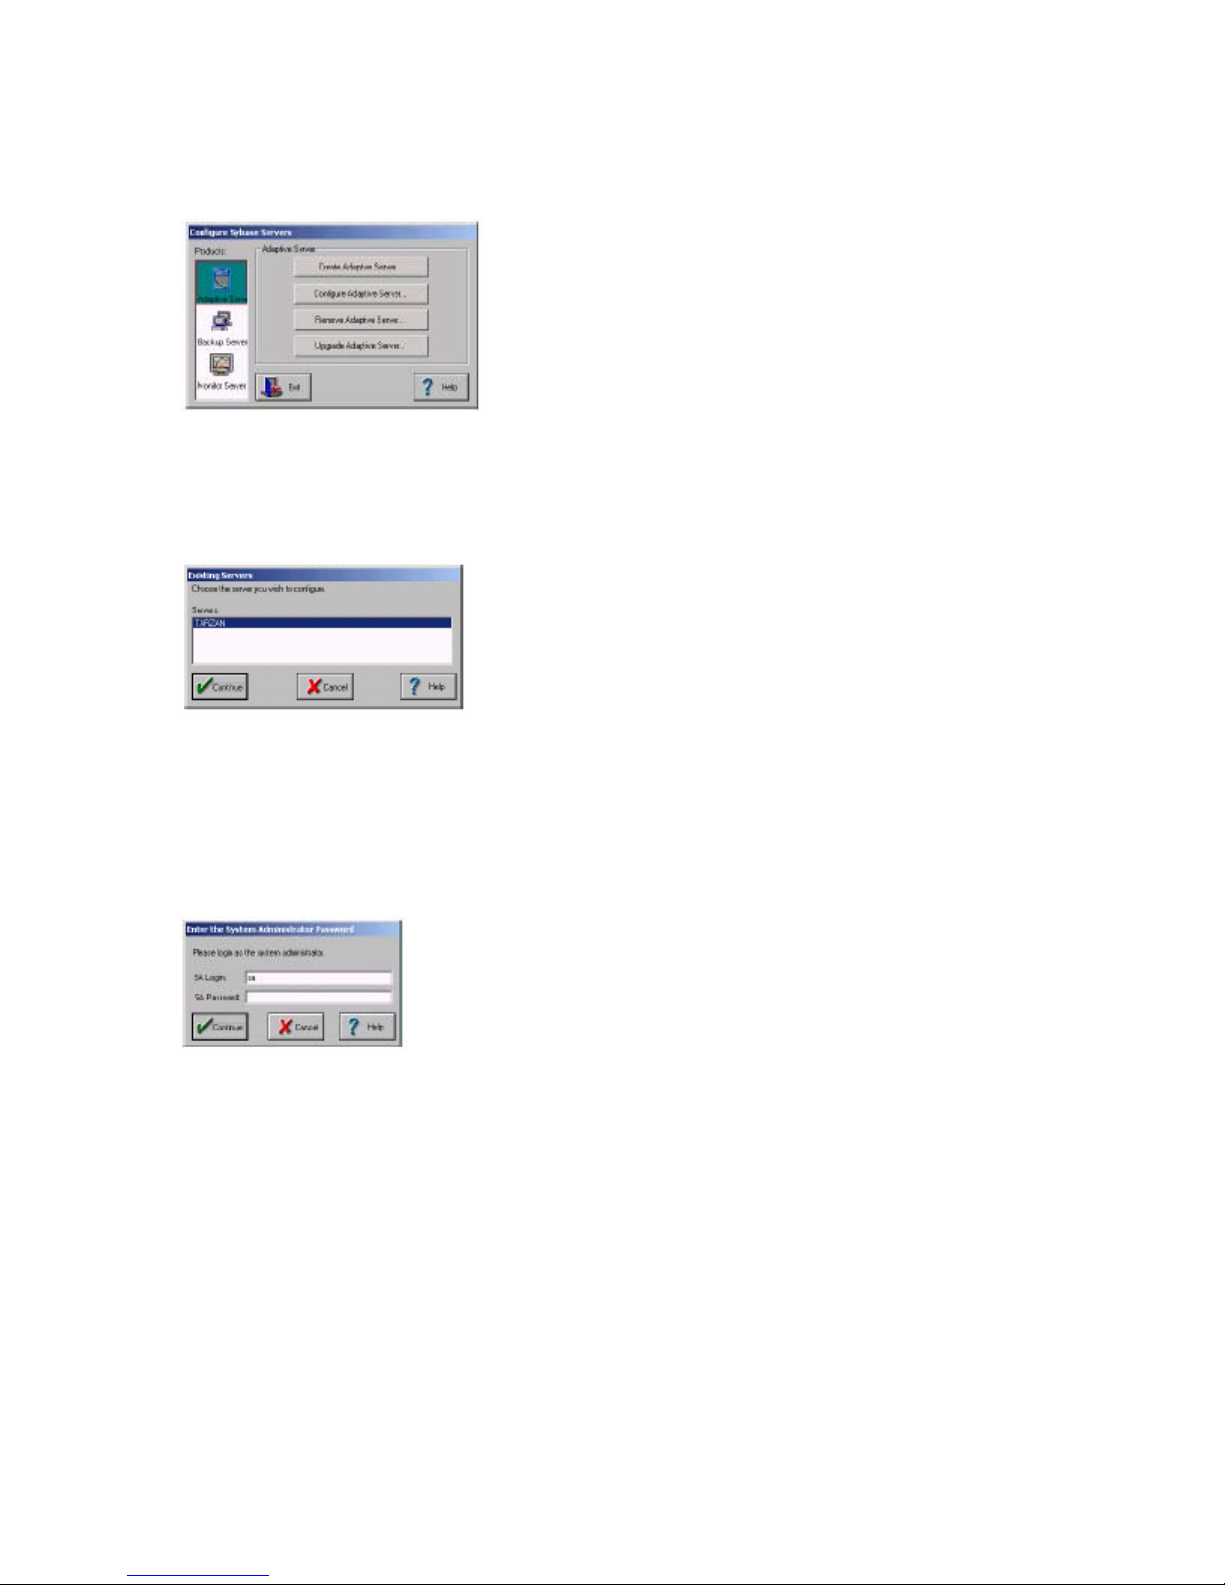
2 ) Click Configure Adaptive Server in the Configure Sybase Servers window.
3) In the Existing Servers window, select the Adaptive Server or SOL Server.
4) Click Configure Adaptive Server.
5) Click Continue.
When Sybase detects that the selected database needs to be upgraded, it will prompt you with a
series of dialogs that will walk you through the rest of the database upgrade process.
6) In the Enter the System Administrator Password window, type the Sybase administrator login
name and password.
7) Select continue.
8) If the Adaptive Server is not running, the upgrade program starts it for you.
9) When prompted backup your database and confirm proceeding with the upgrade.
a. If you have not backed-up the existing database, choose "No" in the Upgrade window and use
NNDBCFG tool or use dump database command to make backup copies.
b. If you have made the necessary backups, select "Yes". The installer begins the database
eligibility test to assure that the Pre-Upgrade steps (above) have been completed.
10) Sybase will now complete the upgrade changes to your database.
Restoring Functionality in ASE
The Sybase isql tool will be used to reset SAR2 database options: .
Page 7 of 28
Bring up a DOS-prompt.
Type l!isql-Usa -pIt.
You will be presented with a 1!>1! prompt.
Use the following commands to reset SAR2 database options:
l>sp-dboption sybsystemprocs, 'trunc log on chkpt', true
2>go
1.4 Configure Sybase 12 database
The database administration utility configures the Symposium Agent database schema. During
the upgrade the Sybase script wizard allows you to make selections to upgrade your database
without destroying existing data.
To configure the database:
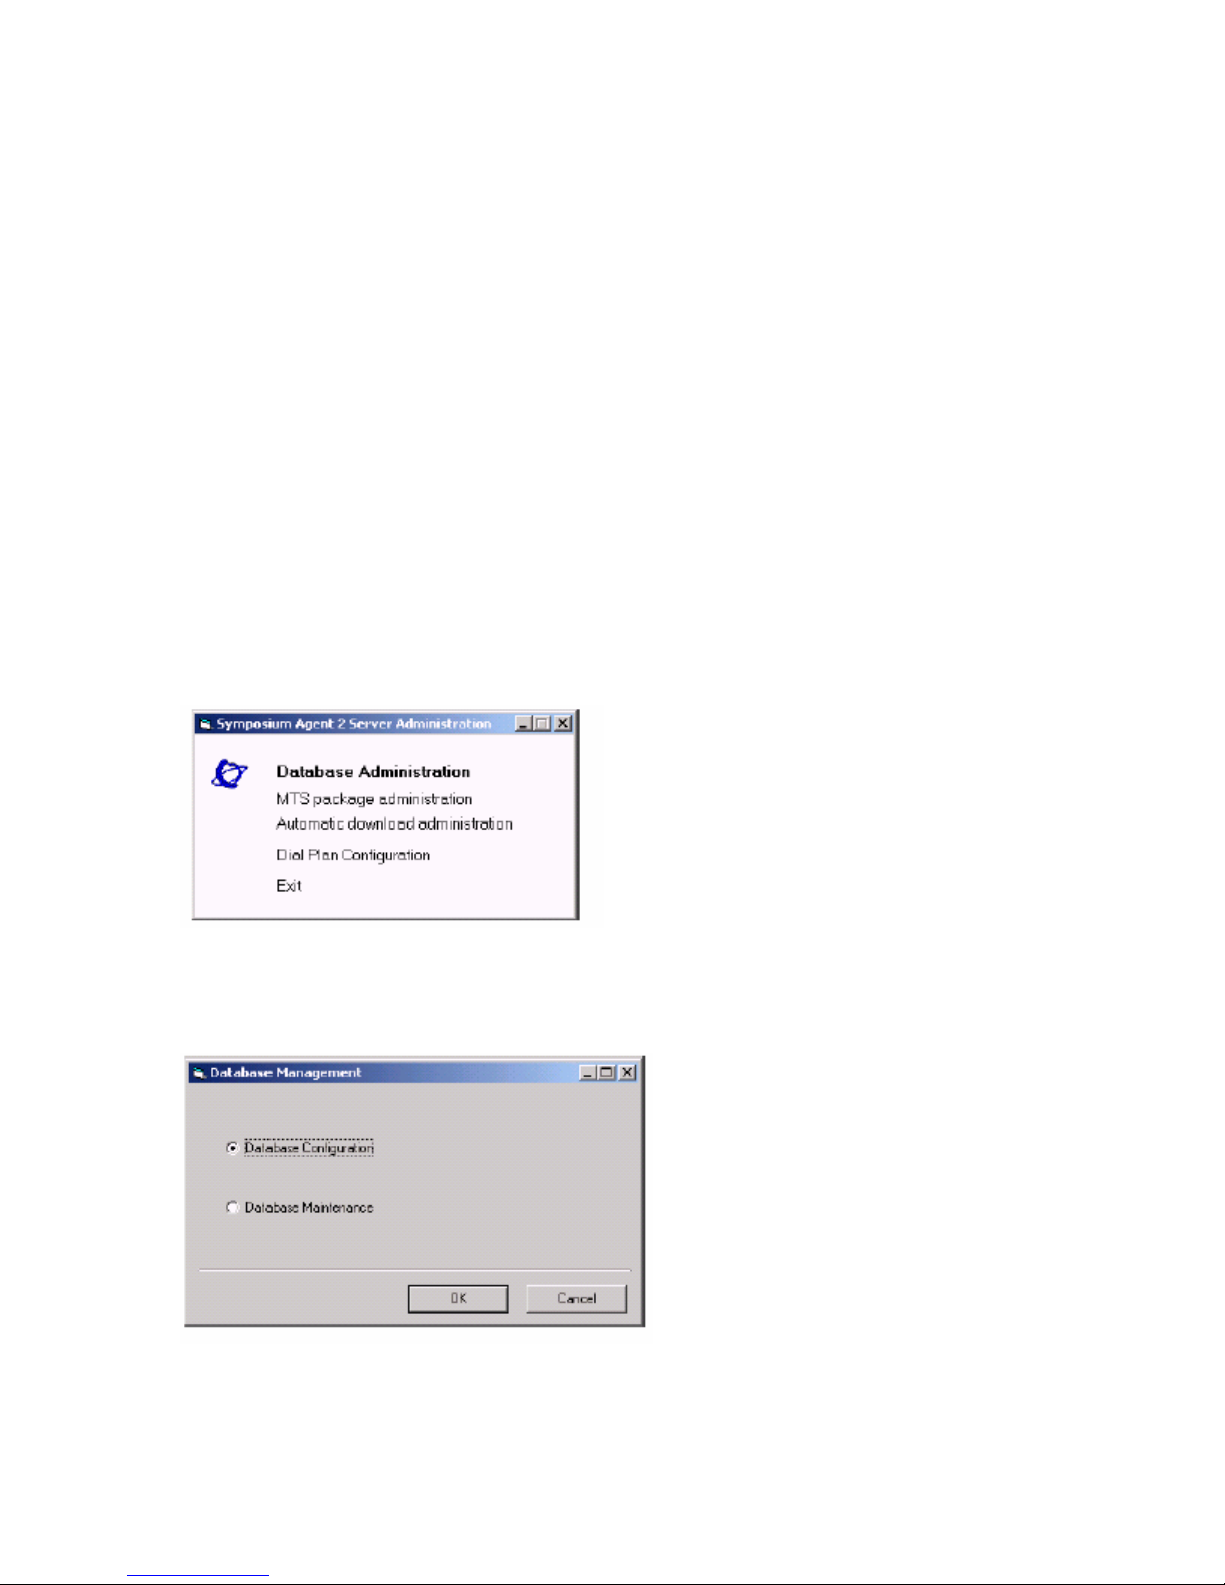
1) From the Windows Start menu, choose Settings > Control Panel > Symposium Agent Server,
or select the Desktop shortcut SA Server Configuration.
Result: The Symposium Agent Server Administration window appears
2) Click Database Administration
3) If Sybase Adaptive Server is not running, then click Yes at the prompt.
4) Select Database Configuration, and then click OK
Page 8 of 28
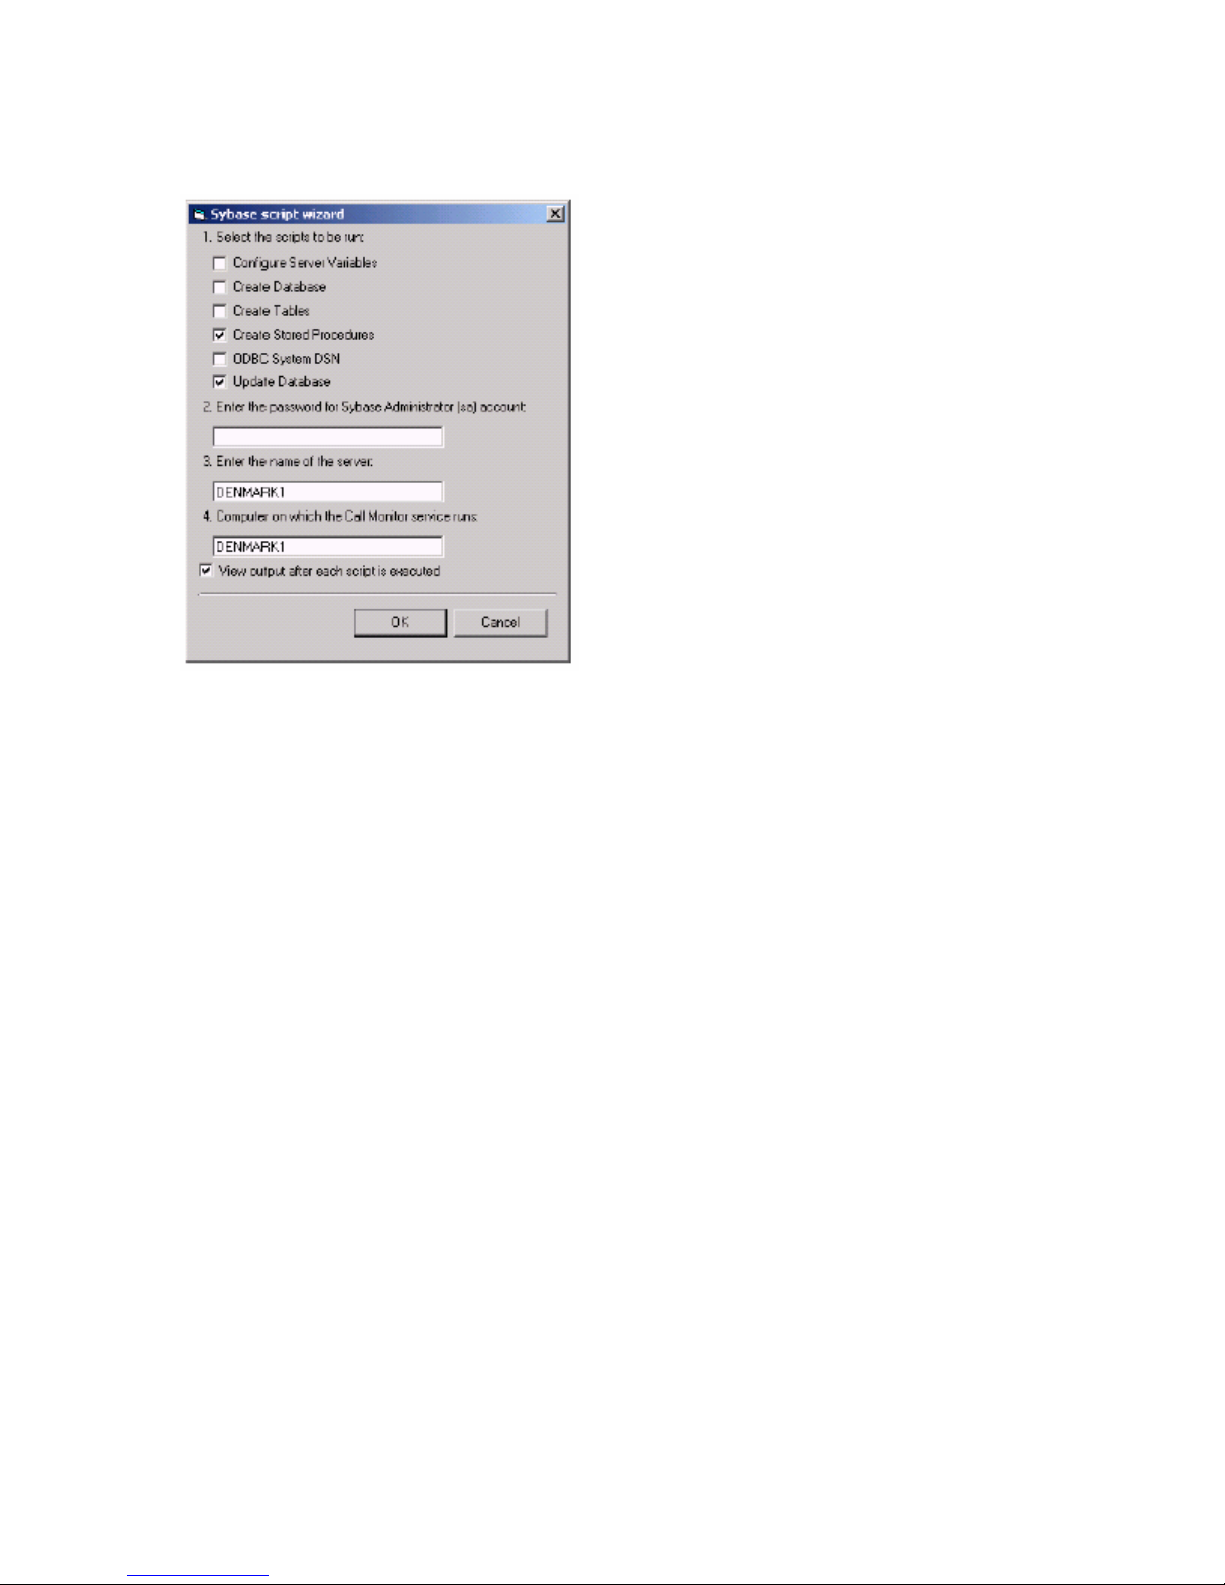
Result: The Sybase script wizard starts.
5) Uncheck all options except “Create Stored Procedures” and “Update Database”.
6) In the SA ( Sybase Administrator) account requires a password, then type the password in
section 2. By default the password is empty.
7) In Section 2, type the name of the computer that is running Sybase Adaptive Server. By
default, it was the name that was previously configured. Select this default.
8) In Section 4, type the name of the computer running the Symposium Agent Call Monitor
service. By default, it was the name that was previously configured. Select this default.
9) In you do not want to view the output after the execution of each SQL script, then clear the
View output check box.
Note: If you select this option, then you are prompted to review the results of each executed
script. Deselect this option for a faster installation.
All script output files are saved in the Symposium Agent directory, in the subdirectory
NNDBCfg. By default, this directory is C:\Nortel\Server\NNDBCfg
10) Click OK.
Result: Various dialog boxes are displayed to indicate progress with the updating of the database
to the latest schema as well as the creation of the stored procedures. It will update the Application
Text Strings as well as the English Strings.
Note: During an upgrade, it is normal for error messages to appear on the screen in the
Lang1033.out file. These messages are caused by inserting duplicate language text strings, and
are informational only.
Page 9 of 28
 Loading...