

Page 1

Nortel Quality Monitoring
Installation Guide
Product Release 6.01 Standard 4.0 September 2007
297-2183-948
Page 2

Page 3

Nortel Quality Monitoring
Installation Guide
Publication number: 297-2183-948
Product release: 6.01
Document release: Standard 4.0
Date: September 2007
Copyright © 2007 Nortel Networks, All Rights Reserved.
All materials provided herein are the exclusive property of Nortel Networks and its licensors.
Only expressly authorized individuals under obligations of confidentiality are permitted to
review materials in this document. By reviewing these materials, you agree to not disclose
these materials to any third party unless expressly authorized, and to protect the materials
as confidential and trade secret information. Any unauthorized review, retransmission,
dissemination or other use of these materials is strictly prohibited. If you are not authorized
to review these materials, please return these materials (and any copies) from where they
were obtained. All materials found herein are provided "AS IS" and without warranty of any
kind.Information is subject to change without notice.
Information is subject to change without notice. Nortel Networks reserves the right to make
changes in design or components as progress in engineering and manufacturing may
warrant.
The process of transmitting data and call messaging between the Nortel Quality Monitoring
server and the switch or the system is proprietary to Nortel Networks. Any other use of the
data and the transmission process is a violation of the user license unless specifically
authorized in writing by Nortel Networks prior to such use. Violations of the license by
alternative usage of any portion of this process or the related hardware constitutes grounds
for an immediate termination of the license and Nortel Networks reserves the right to seek
all allowable remedies for such breach.
Nortel, the Nortel logo and the Globemark are all trademarks of Nortel Networks.
All other trademarks are the property of their respective owners.
Page 4

Installation Guide iv
Revision history
September 2007
Standard 4.0. Nortel Quality Monitoring Installation
Guide is up-issued for Product Release 6.01.
April 2007
Standard 3.0. Updates to hardware requirements in
Chapter 2, Getting Started.
March 2007
Standard 2.0. Nortel Quality Monitoring Installation
Guide is
released.
November 2006
Standard 1.0. Nortel Quality Monitoring Installation
Guide is
released.
July 2006
Nortel Quality Monitoring Installation Guide reformatted
according to Nortel guidelines.
Page 5

Installation Guide v
Contents
Getting Started 7
Intended audience . . . . . . . . . . . . . . . . . . . . . . . . . . . . . . . . . . . . . . . . . . . . . 8
How to get help. . . . . . . . . . . . . . . . . . . . . . . . . . . . . . . . . . . . . . . . . . . . . . . 9
Software and documentation version numbering . . . . . . . . . . . . . . . . . . . . 11
Installation Overview 13
Nortel Quality Monitoring Overview . . . . . . . . . . . . . . . . . . . . . . . . . . . . . 14
System Requirements . . . . . . . . . . . . . . . . . . . . . . . . . . . . . . . . . . . . . . . . . 16
Component Co-residency . . . . . . . . . . . . . . . . . . . . . . . . . . . . . . . . . . . . . . 19
Installation Prerequisite Checklist . . . . . . . . . . . . . . . . . . . . . . . . . . . . . . . 21
Installation Procedures . . . . . . . . . . . . . . . . . . . . . . . . . . . . . . . . . . . . . . . . 23
Nortel Quality Monitoring Server Installation 25
Nortel Quality Monitoring Server Overview . . . . . . . . . . . . . . . . . . . . . . . 26
Before You Begin the Installation . . . . . . . . . . . . . . . . . . . . . . . . . . . . . . . 27
Installing the Server Software. . . . . . . . . . . . . . . . . . . . . . . . . . . . . . . . . . . 29
Creating the Nortel Quality Monitoring Database . . . . . . . . . . . . . . . . . . . 51
Final Steps for the Nortel Quality Monitoring Server Setup . . . . . . . . . . . 56
Upgrading to Release 6.01 . . . . . . . . . . . . . . . . . . . . . . . . . . . . . . . . . . . . . 61
Nortel Quality Monitoring Client Installation 65
Nortel Quality Monitoring Client Overview . . . . . . . . . . . . . . . . . . . . . . . 66
Before You Begin the Installation . . . . . . . . . . . . . . . . . . . . . . . . . . . . . . . 68
Installing the Client Software . . . . . . . . . . . . . . . . . . . . . . . . . . . . . . . . . . . 71
Populating the Database . . . . . . . . . . . . . . . . . . . . . . . . . . . . . . . . . . . . . . . 81
Nortel Quality Monitoring Agent Installation 89
Nortel Quality Monitoring Agent Overview . . . . . . . . . . . . . . . . . . . . . . . 90
Before You Begin the Installation . . . . . . . . . . . . . . . . . . . . . . . . . . . . . . . 92
Installing the Agent Software . . . . . . . . . . . . . . . . . . . . . . . . . . . . . . . . . . . 93
Making Configuration Changes after Installation . . . . . . . . . . . . . . . . . . 102
Page 6

Contents Standard 4.0
vi Nortel Quality Monitoring
Verifying the Installation 105
Basic test procedures . . . . . . . . . . . . . . . . . . . . . . . . . . . . . . . . . . . . . . . . 106
Troubleshooting Tips . . . . . . . . . . . . . . . . . . . . . . . . . . . . . . . . . . . . . . . . 108
Quality Monitoring in a Citrix Environment 113
Overview. . . . . . . . . . . . . . . . . . . . . . . . . . . . . . . . . . . . . . . . . . . . . . . . . . 114
Setting up the Quality Monitoring Client . . . . . . . . . . . . . . . . . . . . . . . . . 115
Setting Up the Nortel Quality Monitoring Agent . . . . . . . . . . . . . . . . . . . 118
Checking the Quality Monitoring Server Settings . . . . . . . . . . . . . . . . . . 120
Setting the Citrix Application Security Policy . . . . . . . . . . . . . . . . . . . . . 122
Problems and Resolutions. . . . . . . . . . . . . . . . . . . . . . . . . . . . . . . . . . . . . 123
Silent Agent Installation 129
Overview. . . . . . . . . . . . . . . . . . . . . . . . . . . . . . . . . . . . . . . . . . . . . . . . . . 130
Properties for Configuration . . . . . . . . . . . . . . . . . . . . . . . . . . . . . . . . . . . 131
Quality Monitoring FAQs 147
Notification System 153
Feature Description. . . . . . . . . . . . . . . . . . . . . . . . . . . . . . . . . . . . . . . . . . 154
Page 7

Installation Guide 7
Chapter 1
Getting Started
In this chapter
Intended audience 8
How to get help 9
Software and documentation version numbering 11
Page 8

Getting Started Standard 4.0
8 Nortel Quality Monitoring
Intended audience
The Nortel Quality Monitoring Installation Guide provides details of how to
install and configure the Nortel Quality Monitoring software.
This guide is designed to be used by professional services staff, business
partners, and system integrators.
Additional references
The following Nortel Quality Monitoring guides contain additional
information you may find helpful.
Administration Guide
Evaluations Guide
Graphing and Reporting Guide
Server Infrastructure Guide
Page 9

September 2007 Getting Started
Installation Guide 9
How to get help
This section explains how to get help for Nortel products and services.
However, before contacting Nortel for support, consult the Troubleshooting
section of this guide.
Finding the latest updates on the Nortel Web site
The content of this documentation was current at the time the product was
released. To check for updates to the latest documentation for Nortel
Contact Recording and Quality Monitoring, click on the following link:
The Nortel page for Nortel Contact Recording and Quality Monitoring
documentation is located at
http://www.nortel.com/helmsman
.
Getting help from the Nortel Web site
The best way to get technical support for Nortel products is the Nortel
Support Web site:
http://www.nortel.com/support
This site provides quick access to software, documentation, bulletins, and
tools to address issues with Nortel products. From this site, you can:
download software and related tools
download technical documents, release notes, and product bulletins
sign up for automatic notification of new software and documentation
search the Support Web site and Nortel Knowledge Base for answers to
technical issues
open and manage technical support cases
Page 10

Getting Started Standard 4.0
10 Nortel Quality Monitoring
Getting help over the phone from a Nortel Solutions Center
If you do not find the information your require on the Nortel Technical
Support Web site, and you have a Nortel support contract, you can also get
help over the phone from a Nortel Solutions Center.
In North America, call 1-800-4NORTEL (1-800-466-7835).
Outside North America, go to the Web site below to obtain the phone
number for your region:
http://www.nortel.com/callus
Getting help from a specialist by using an Express Routing
Code
You can use an Express Routing Code (ERC) to more quickly route your
call to the appropriate support specialist. To locate the ERC for your
product or service, go to:
http://www.nortel.com/erc
Getting help through a Nortel distributor or reseller
If you purchased a service contract for your Nortel product from a
distributor or authorized reseller, you can contact the technical support staff
for that distributor or reseller.
Page 11

September 2007 Getting Started
Installation Guide 11
Software and documentation version
numbering
Nortel Contact Recording and Quality Monitoring documentation is issued
for Nortel Contact Recording Package Release 6.01. The individual Nortel
Contact Recording and Quality Monitoring software components that you
install may display a different number. This is a known issue that does not
affect system performance. Version 6.01 will be reflected in future software
updates. Use the Nortel Contact Recording and Quality Monitoring
documentation for Release 6.01 with Nortel Contact Recording Release
6.0.1, Nortel Contact Recording Viewer, Nortel Contact Recording Archive,
and Nortel Contact Recording TDM Recorder Release 6.0.2, and Quality
Monitoring 6.0 Service Pack 4.
Page 12

Getting Started Standard 4.0
12 Nortel Quality Monitoring
Page 13

Installation Guide 13
Chapter 2
Installation Overview
In this chapter:
Nortel Quality Monitoring Overview . . . . . . . . . . . . . . . . . . . . . . . . . . . . 14
System Requirements . . . . . . . . . . . . . . . . . . . . . . . . . . . . . . . . . . . . . . 16
Component Co-residency . . . . . . . . . . . . . . . . . . . . . . . . . . . . . . . . . . . 19
Installation Prerequisite Checklist . . . . . . . . . . . . . . . . . . . . . . . . . . . . . 21
Installation Procedures. . . . . . . . . . . . . . . . . . . . . . . . . . . . . . . . . . . . . . 23
Page 14
Installation Overview Standard 4.0
14 Nortel Quality Monitoring
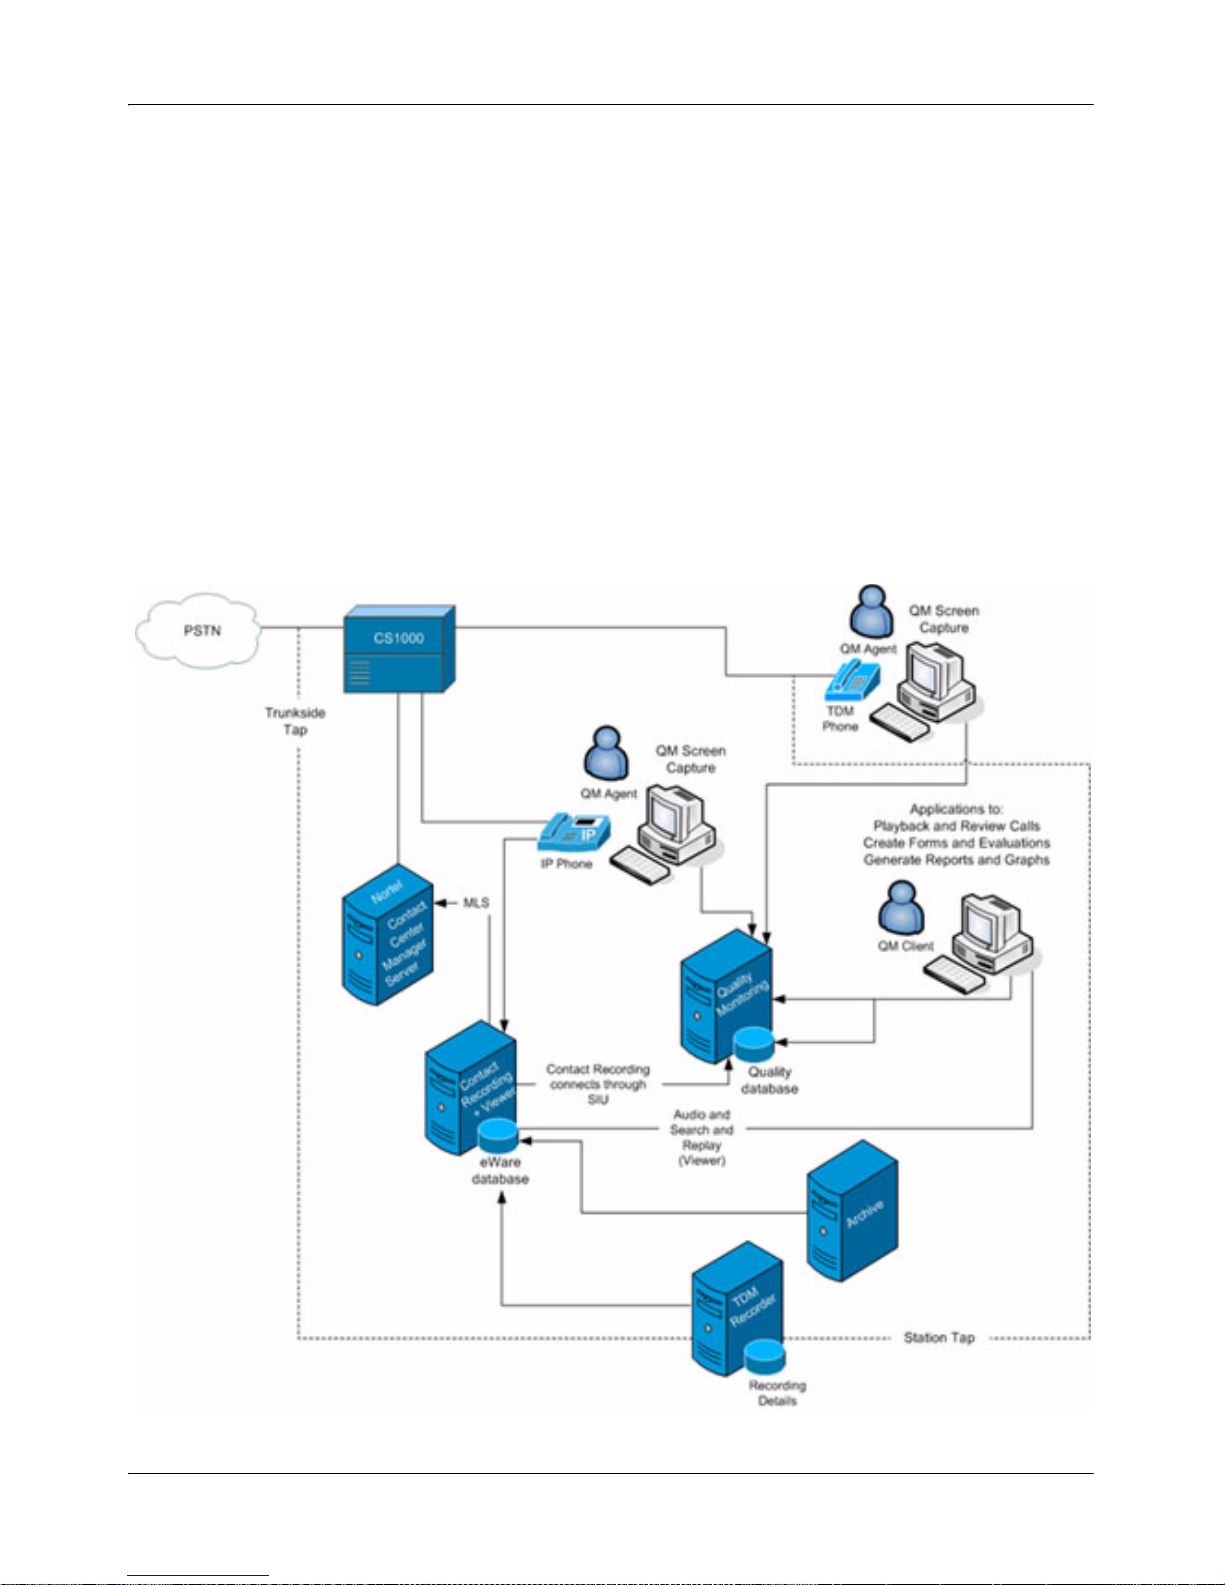
Nortel Quality Monitoring Overview
Nortel Quality Monitoring is an optional component of the Nortel Contact
Recording system. Quality Monitoring is a Windows-based application that
allows users to selectively record and review customer interactions, both
screen and voice. Users can also create forms that evaluate contact center
performance and generate reports on agent or group performance. Nortel
Quality Monitoring includes three components: Server, Client and Agent.
The following diagram shows Nortel Quality Monitoring in context with the
rest of the Nortel Contact Recording system.
Page 15

September 2007 Installation Overview
Installation Guide 15
The Nortel Quality Monitoring Server communicates with the Nortel
Contact Recording Server, requesting and receiving call recordings (audio)
which it stores locally. The Nortel Quality Monitoring Server also
communicates with the Nortel Quality Monitoring Agent, requesting and
receiving the screens captured during those calls; these files are also stored
locally. Call data and voice (audio) are stored in separate files.
Once a contact recording has been stored, users of the Nortel Quality
Monitoring Client can retrieve, replay and manage the contact data (both
screen and voice content). If a Nortel Call Recording Card (CRC) is
installed at the PBX, users can replay calls over the phone; they can also
monitor calls in progress (Live Monitoring). If the card is not installed, live
monitoring and phone replay is not available. By default, calls are replayed
through the PC speakers. When a user selects a call to replay, the AVI
Conversion Service merges that call’s voice and data files to generate an
.AVI output file. The .AVI file is played back through the Client UI. Once
the .AVI has been generated for a call, it is stored and used whenever that
call is replayed
The Nortel Quality Monitoring Server runs as a service. This service, called
WitnessService, launches other background processes that run the ServerClient and Server-Agent communications. The service also accesses the
Quality Monitoring database for agent information and call recording
"rules".
The Nortel Quality Monitoring Client includes a suite of applications. Some
applications are used for system and user configuration and maintenance;
others are designed for call review or agent evaluation. These applications
write directly to the Quality database.
The Nortel Quality Monitoring Agent includes the screen capture service,
called Capture Service, and an optional program, AIMtray.exe, that provides
the Agent Initiated Monitoring (AIM) capability. AIM enables the agent to
start and stop call (and screen) recording on demand. The application is
available from the user’s system tray.
Page 16

Installation Overview Standard 4.0
16 Nortel Quality Monitoring
System Requirements
This section lists the minimum requirements for the Nortel Quality
Monitoring system components.
Server Requirements
The Nortel Quality Monitoring Server can be installed on the same machine
as the Nortel Contact Recording Server when the recorder is not used for
bulk recording. If installing the two components together, follow the
recommendations for the Nortel Contact Recording Server as shown in the
Nortel Contact Recording Planning, Installation and Administration Guide
(297-2183-216).
When installing the Nortel Quality Monitoring Server on another machine,
the machine must meet the minimum requirements listed here.
Hardware:
Processor - Pentium III 1 Ghz or Xeon 700 MHz minimum. Multiple 32-
bit processors optional: dual core, core duo, and quad processors are
supported.
One processor provides acceptable performance for up to 96 channels.
Two processors are recommended for up to 120 channels, which is the
channel limit per server
RAM - 1GB per 100 channels + 25 MB per concurrent user + 5 MB per
concurrent Agent
Storage - 10 GB local storage for operating system (4 GB) and for
supporting applications (excludes call storage)
Network Interface Card (NIC) (100 base T); one NIC per server
CD-ROM drive
Internet connection (for customer interaction center support)
Page 17

September 2007 Installation Overview
Installation Guide 17
Software:
Operating System - Microsoft Windows Server 2003 SP1
Internet Information Services (IIS) installed with Windows OS.
Database - Microsoft SQL 2000 Database Server at SP4 or greater
Client Requirements
The Nortel Quality Monitoring Client can be installed on the same machine
as the Nortel Quality Monitoring Server for set up and testing purposes.
When installing the Nortel Quality Monitoring Client on a supervisor’s
machine, the machine must meet the minimum requirements listed here.
Hardware:
Processor - Pentium III 500 MHz processor
RAM - 512MB
Storage - 500MB available disk space
Network Interface Card (NIC) (100 base T); one NIC per server
CD-ROM drive
Internet connection (for customer interaction center support)
Software:
Operating System - Windows XP Professional (SP2) or Windows 2000
Professional (SP3 or greater)
Internet Information Services (IIS) installed with Windows OS.
Agent Requirements
The Nortel Quality Monitoring Agent can be installed on the same machine
as the Nortel Quality Monitoring Server for set up and testing purposes.
When installing the Nortel Quality Monitoring Agent on the agent’s
machine, the machine must meet the minimum requirements listed here.
Page 18

Installation Overview Standard 4.0
18 Nortel Quality Monitoring
Hardware:
Processor - Pentium III 200 MHz, P-300Mhz for use on XP (note data
capture quality increases with faster machines)
RAM - 128 MB
Storage - 75 MB available disk space
Network Interface Card (NIC) (100 MB NIC) per customer’s network
topology
CD-ROM drive, Network Share Access or FTP for application
installation
Internet connection (for customer interaction center support)
Software:
Operating System - Windows 2000 (SP3 or greater) or Windows XP
Professional (SP2)
Page 19

September 2007 Installation Overview
Installation Guide 19
Component Co-residency
As you set up your system, you may need to install more than one
component on a server.
The chart below shows the currently supported co-resident configurations of
the Nortel Contact Recording and Quality Monitoring system components.
* This co-residency configuration is subject to engineering review/approval
due to potential application contention/performance issues.
Contact
Recording
IP
Contact
Recording
TDM
Viewer/
eWare
Quality
Monitoring Archive
CTI
Integratio
n Adapter
Other
Nortel MA
servers
Contact
Recording
IP
No No Yes* No Yes* No
Contact
Recording
TDM
No Yes* Yes* No Yes* No
Viewer/
eWare
No Yes* No Yes** No No
Quality
Monitoring
Yes * Yes * No Yes * Yes No
Archive
No No Yes** No No No
CTI
Integration
Adapter
Yes * Yes * No Yes No N o
Other
Nortel MA
servers
No No No No No No
Page 20

Installation Overview Standard 4.0
20 Nortel Quality Monitoring
** Archive and Viewer can be co-resident on the same server as long as the
total channel count does not exceed 144.
Page 21

September 2007 Installation Overview
Installation Guide 21
Installation Prerequisite Checklist
Confirm that the minimum hardware and software requirements for the
Nortel Quality Monitoring components are met. For information about
hardware and software requirements, see “Server Requirements,” on
page 16, “Client Requirements,” on page 17 and “Agent Requirements,”
on page 17.
Confirm that the latest patches have been applied to the operating
system.
Ensure that you run Windows Update and that Windows Installer 3.1 is
installed.
Confirm that the Nortel Quality Monitoring Server has network
connectivity and can ping a computer and replies to pings from other
computers on the same network.
Confirm that the Nortel Contact Recording Server can ping the Nortel
Quality Monitoring Server and vice versa.
Make sure that Microsoft SQL 2000 Server has been installed, at service
level 4 or greater, with any security patches applied.
Note: When installing Microsoft SQL, make sure that you select the
Mixed Authentication mode, as the Nortel Quality Monitoring Server
needs this option to function properly.
Confirm that IIS Admin service (Internet Information Services) has been
installed and that the latest patches have been applied.
Note: The AVI Conversion server is not compatible with the "Worker
Process Isolation Mode" introduced in IIS 6.0 (the version on Windows
2003 Server). The Quality Server installation automatically sets the
isolation mode to "IIS 5.0 isolation mode" for proper compatibility. This
may affect installations where the AVI Conversion server is co-hosted
with other web services. For detailed information about isolation modes
in IIS, please refer to the on-line help associated with IIS (Start >
Programs > Administrative Tools > Internet Information Services
(IIS) Manager
.)
Page 22
Installation Overview Standard 4.0
22 Nortel Quality Monitoring
Confirm that the Nortel Contact Recording Server is setup.
Confirm that the Nortel Contact Recording Server is configured with the
extensions and hunt groups the Nortel Quality Monitoring Server will
need.
Confirm that the Nortel Quality Monitoring CD-ROM is available or has
been copied to a shared network folder that the Nortel Quality
Monitoring Server has access to.
Confirm that the Nortel Quality Monitoring CD-ROM is available or has
been copied to a shared network folder that the Nortel Quality
Monitoring Server has access to.
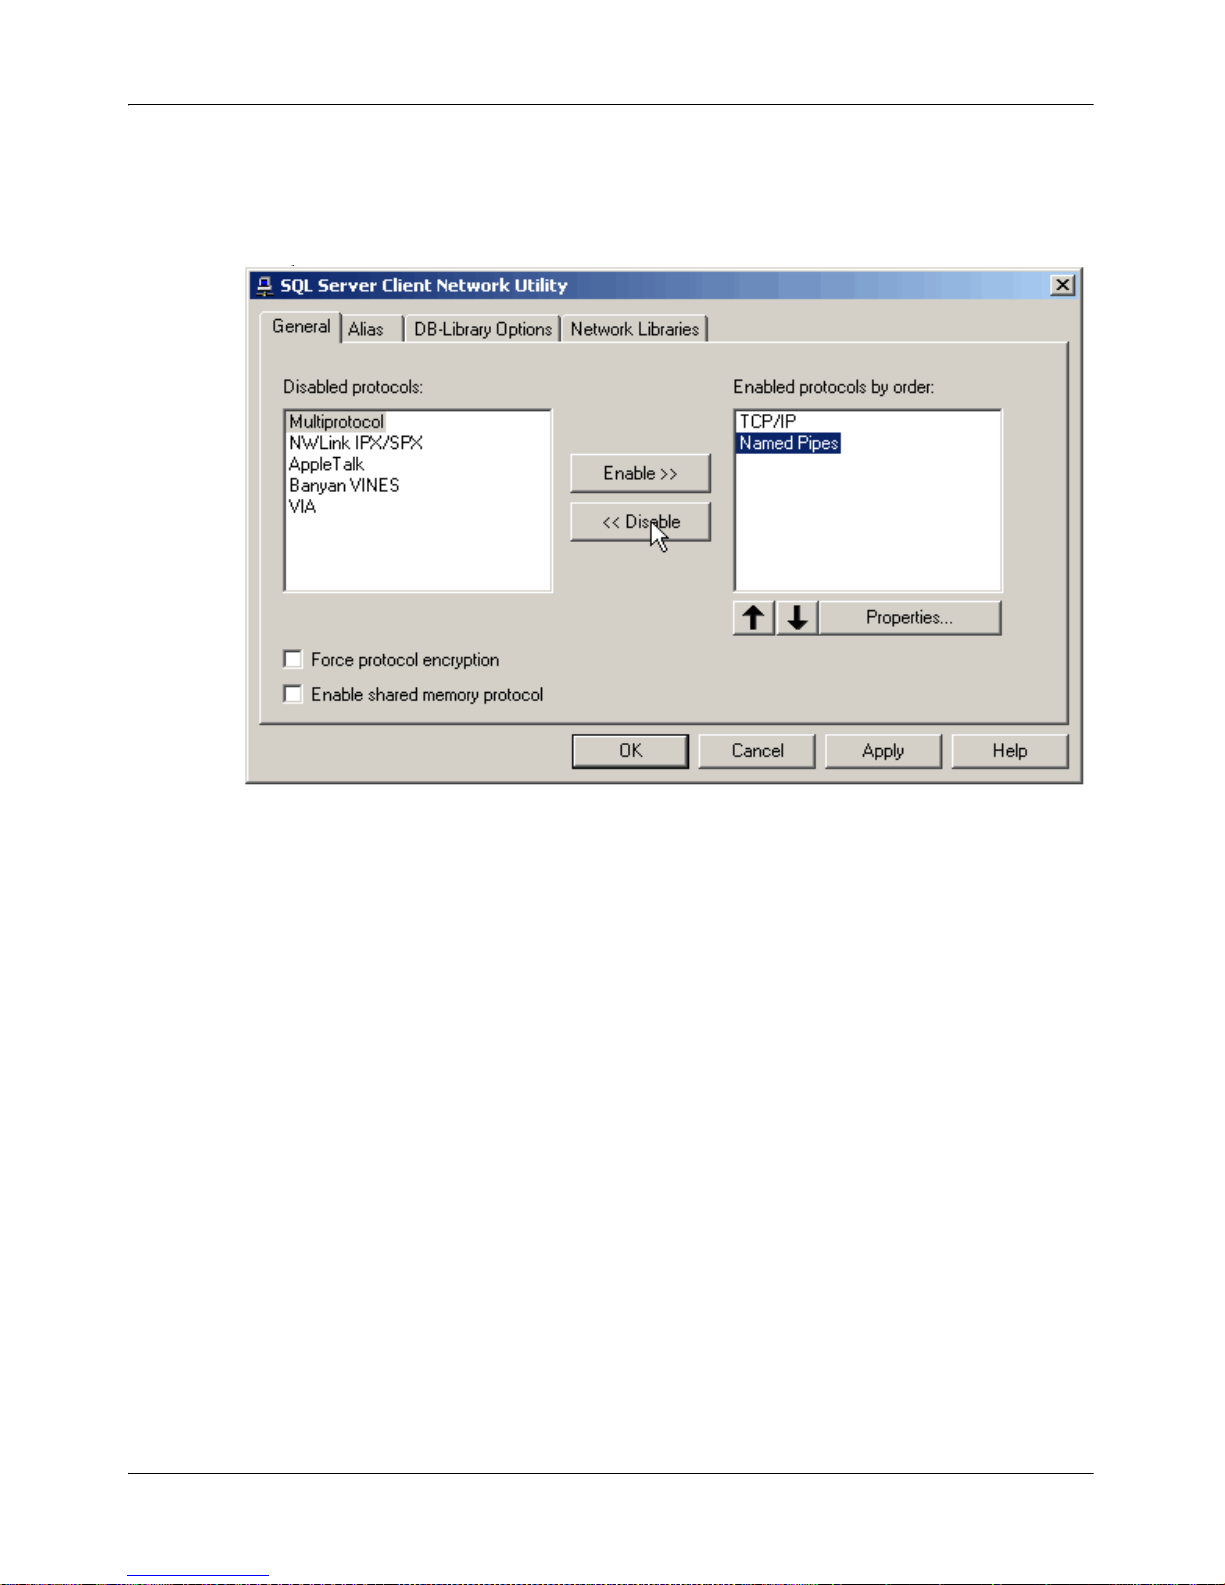
If installing the Nortel Quality Monitoring Server and the Microsoft SQL
Database Server on the same computer, disable the
Named Pipes
protocol so that the Server uses the TCP/IP protocol as its standard
network protocol.
Open the Client Network Utility. (Start4 Programs4Microsoft
SQL Server
4Client Network Utility.)
Verify that Named Pipes is listed in Disabled protocols. If it is not, then
select Named Pipes, and then select Disable to transfer Named Pipes to
the Disabled protocols.
Verify that the Enable shared memory protocol check box is cleared,
otherwise system memory resources are limited.
Page 23

September 2007 Installation Overview
Installation Guide 23
Installation Procedures
This section describes the procedures involved in installing the Nortel
Quality Monitoring system and the order in which to perform them.
1 Confirm that you have met all the prerequisites described in “Installation
Prerequisite Checklist,” on page 21.
2 Install the Nortel Quality Monitoring Server. For detailed information, see
“Nortel Quality Monitoring Server Installation,” on page 25.
3 Create the Nortel Quality Monitoring database. For detailed information,
see “Creating the Nortel Quality Monitoring Database,” on page 51.
4 Reboot the Nortel Quality Monitoring Server in order for the install to
complete the remaining post-processing steps.
Note: When rebooted, the system attempts to start both the AVI
Conversion Service and the WitnessService. The WitnessService will not
start until the basic database records have been created using the Nortel
Quality Monitoring Client. See item 6.
5 Install the Nortel Quality Monitoring Client. For detailed information, see
“Nortel Quality Monitoring Client Installation,” on page 65.
6 Use the Client to set up the basic database records. For detailed
information, see “Populating the Database,” on page 81.
7 Install the Nortel Quality Monitoring Agent using either the interactive
install detailed in “Installing the Agent Software,” on page 93 or the silent
install, described in “Silent Agent Installation,” on page 129.
Note: The Agent install can be done at any point during the Nortel
Quality Monitoring installation - before, during, or after the Server and
Client installations.
8 Verify the system setup. See “Verifying the Installation,” on page 105.
Page 24

Installation Overview Standard 4.0
24 Nortel Quality Monitoring
Page 25

Installation Guide 25
Chapter 3
Nortel Quality Monitoring Server
Installation
In this chapter:
Nortel Quality Monitoring Server Overview . . . . . . . . . . . . . . . . . . . . . . 26
Before You Begin the Installation . . . . . . . . . . . . . . . . . . . . . . . . . . . . . . 27
Installing the Server Software . . . . . . . . . . . . . . . . . . . . . . . . . . . . . . . . 29
Final Steps for the Nortel Quality Monitoring Server Setup . . . . . . . . . . 56
Upgrading to Release 6.01 . . . . . . . . . . . . . . . . . . . . . . . . . . . . . . . . . . 61
Page 26
Nortel Quality Monitoring Server Installation Standard 4.0
26 Nortel Quality Monitoring
Nortel Quality Monitoring Server Overview
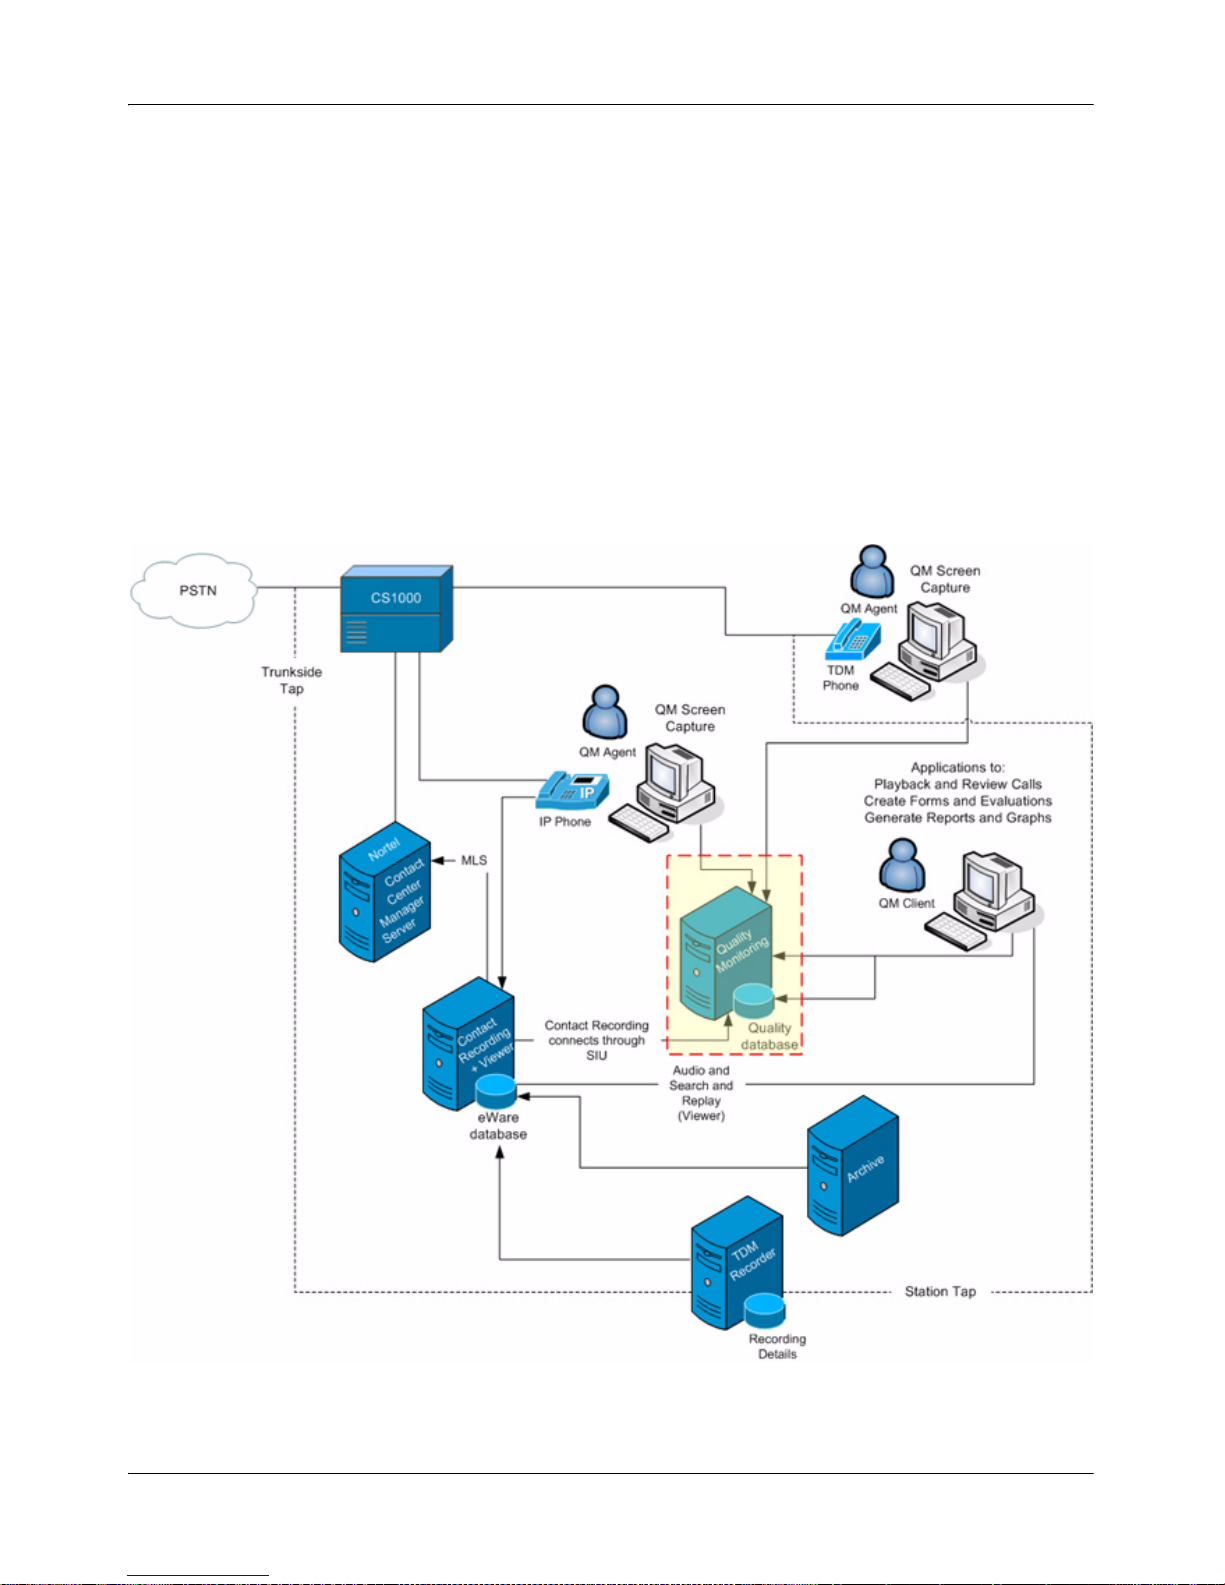
The Nortel Quality Monitoring Server is the component of the system that:
communicates with the Nortel Contact Recording Server
communicates with the capture service on the agent machine
responds to requests from the Nortel Quality Monitoring Client machine.
The Server’s place in the system is shown in the following diagram.
Figure 1: The Server Component in the Nortel Quality Monitoring System
Page 27

September 2007 Nortel Quality Monitoring Server Installation
Installation Guide 27
Before You Begin the Installation
Before you install the Nortel Quality Monitoring Server, be sure that:
the Server machine meets the hardware and software requirements listed
in “Server Requirements,” on page 16.
you have any patches necessary for installation and whether the patches
should be applied before or after the server is installed and whether the
patches require a reboot. (The README file for each patch incluse this
type of information.)
the machine you are installing the server on can "ping" the Nortel
Contact Recording Server
the Server machine is is co-located with the Microsoft SQL Server.
(WAN connection is not supported.)
you have created the folder in which to put the Quality database. If the
folder is not created when you create the database, the database will be
placed in the Microsoft default directory, C:\Program Files\Microsoft
SQL Server\MSSQL\Data.
you know the name of the Quality Monitoring database server and
whether the database is in its own database instance
you have a user name and password to access the SQL database. (User
must have administrator rights. SA is the user most commonly used.)
you know how many ports are licensed for Quality Monitoring. You can
view this information on the
System4Licenses tab of the Nortel
Contact Recording Master.
whether to enable Call Export. If yes, then you need to know the type of
mail system to use and a username and password on that system for the
Quality Monitoring Server.
whether to enable Agent Initiated Monitoring (AIM). If yes, then you
need to know the type of mail system to use and a username and
password on that system for the Quality Monitoring Server.
Page 28

Nortel Quality Monitoring Server Installation Standard 4.0
28 Nortel Quality Monitoring
For other specific program options, review the installation procedure
described in “Installing the Server Software,” on page 29.
Page 29
September 2007 Nortel Quality Monitoring Server Installation
Installation Guide 29
Installing the Server Software
To install the Nortel Quality Monitoring Server, follow these steps:
1 Close all applications on the workstation.
2 Be sure that the WWW Publishing and IIS Admin services are stopped.
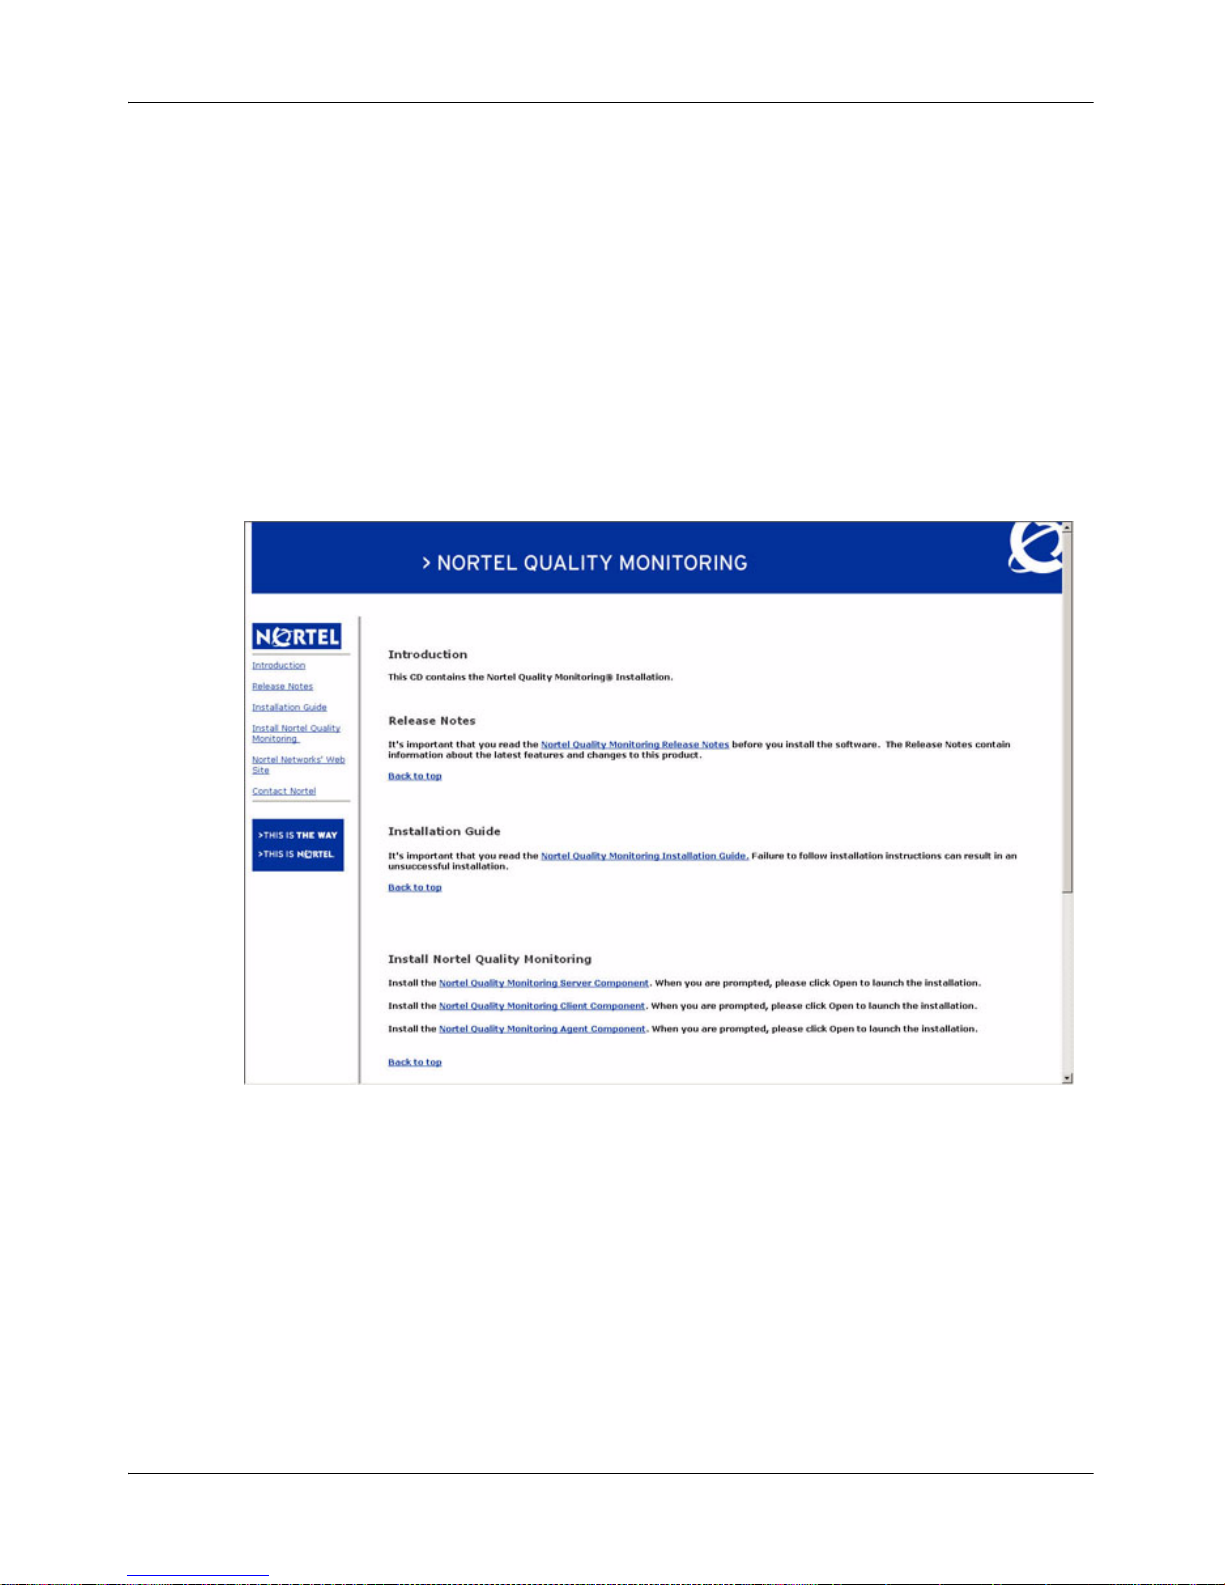
3 Place the Nortel Quality Monitoring CD into the CD-ROM drive on the
workstation. The Welcome page appears automatically.
Note: If this page is not automatically displayed, open Windows Explorer
and navigate to the CD drive to select install.htm.
4 Under Install Nortel Quality Monitoring, select Nortel Quality
Monitoring Server Component.
Page 30
Nortel Quality Monitoring Server Installation Standard 4.0
30 Nortel Quality Monitoring
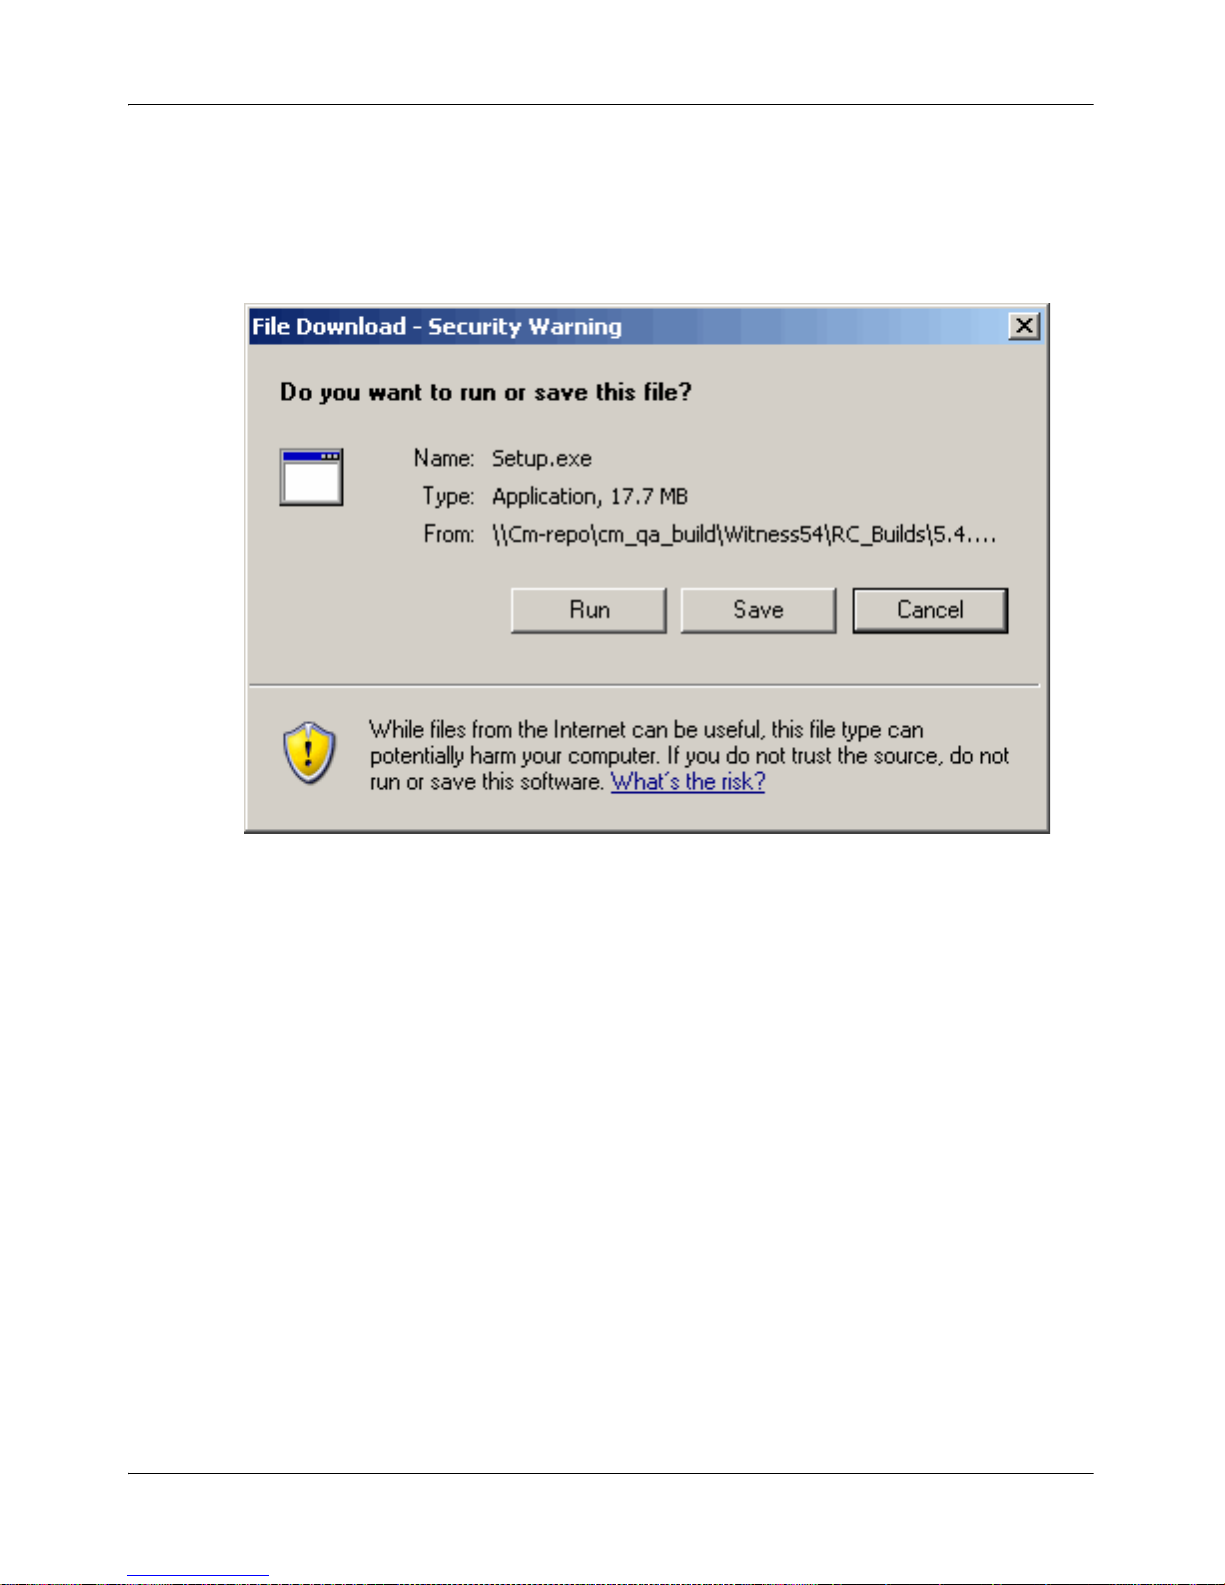
The File Download dialog box may or may not appear, depending on
your Internet Explorer (or other web browser) settings. Also, the dialog
box may vary slightly from the one shown below, depending on the
browser version.
5 Click Run (or Open depending on the dialog displayed).
Page 31

September 2007 Nortel Quality Monitoring Server Installation
Installation Guide 31
A screen indicates that the installation wizard is being prepared. Once
started, the Welcome to the InstallShield Wizard for Nortel Server
screen is displayed.
6 Click Next.
Page 32

Nortel Quality Monitoring Server Installation Standard 4.0
32 Nortel Quality Monitoring
The Language Settings screen is displayed.
7 Use the drop-down list to select the appropriate language for the Nortel
Quality Monitoring Server.
8 Click Next.
Page 33

September 2007 Nortel Quality Monitoring Server Installation
Installation Guide 33
The Customer Information screen is displayed.
9 Enter your User Name and Organization.
10 Select one of the following options in the Install this application for
field:
Anyone who uses this computer (all users). This application is
accessible to anyone who has a logon for this machine.
Only for me (User Name). The application is only accessible when
the specified user name is used to log on.
11 Click Next.
Page 34

Nortel Quality Monitoring Server Installation Standard 4.0
34 Nortel Quality Monitoring
The Destination Folder screen is displayed:
12 Click the Change button.
Page 35

September 2007 Nortel Quality Monitoring Server Installation
Installation Guide 35
The Change Current Desination Folder dialog is displayed.
13 Specify the D: drive, leaving the other path information as it is.
Click OK to return to the Destination Folder screen.
Click Next.
Page 36

Nortel Quality Monitoring Server Installation Standard 4.0
36 Nortel Quality Monitoring
The Journal Storage screen is displayed.
14 Use the drop-down list to select the drive on which the recorded calls
(journal files) will be stored. Typically, the files are stored on the F: drive.
During the installation process, a journal file storage folder will be
created and named as follows:
<selected drive>:\Journals - stores .dat files that hold the data
(screen information and call details) for the calls
<selected drive>:\Journals\Voice - stores .wav files that hold the audio
for the calls.
Also, two folders for the Archive system will be created and named as
follows:
<selected drive>:\Archive - stores files to be removed from the
database
<selected drive>:\Restore - stores files to be restored to the database
Note: This Archive system is specific to the files in the Quality Monitoring
database.
Page 37

September 2007 Nortel Quality Monitoring Server Installation
Installation Guide 37
15 Click Next.
The Datasource screen appears:
16 Use this screen to enter the SQL Server Instance name where the
Nortel Quality Monitoring database resides. The local server name is
entered by default, since this is typically the case.
Normally, the database for Nortel Quality Monitoring is installed in the
default (only) instance. In this case, the SQL Server Instance name is the
same name as the TCP/IP host name where the instance resides. On
rare occasions, the database instance might be installed as a named
instance, for example, MyDBServer\Nortel Quality Monitoring.
Page 38

Nortel Quality Monitoring Server Installation Standard 4.0
38 Nortel Quality Monitoring
If you are unsure of the name or whether a named instance is used, run
Start
4Programs4Microsoft SQL Server4Service Manager on
the machine where SQL is installed.
The server name is listed in the Server field.
17 Click Next.
Page 39

September 2007 Nortel Quality Monitoring Server Installation
Installation Guide 39
The Playback and Record Settings screen is displayed.
18 Set the Fast Forward and 2X Forward intervals, in seconds, to use
when replaying calls with the Nortel Quality Monitoring Client software.
This setting applies to phone replay, which is only available if a Nortel
Contact Recording Card is installed at the PBX.
19 Set the Data Poll Rate to capture data from the agent desktops. The
default poll rate is 1000 milliseconds.
20 Choose a Scheduled Recording option:
Record entire block of scheduled time: Recording is based on a
block of time, which may contain more than one call.Choose this option
to record all activity (call and screen) during the scheduled time. This
enables you to review agent activity both on and off calls to get a full view
of productivity.
Record discrete calls during scheduled time: Recording starts
and stops based on call events. Choose this option to record only agent
call activity. This is the typical selection.
21 Click Next.
Page 40

Nortel Quality Monitoring Server Installation Standard 4.0
40 Nortel Quality Monitoring
The System Maintenance screen appears:
22 Set the purge criteria for journal files and the removal of events from the
Nortel Quality Monitoring Server log files.
This setting will not affect journals that have been saved to call buckets.
This setting only affects calls which have not been reviewed or which
have been marked for deletion.
23 Set the time at which these processes occur. Use the 24-hour format, for
example, 4:00 p.m. is 16:00.
Do not set these two processes to run at the same time.
Schedule them to run at a low activity period for the Quality Monitoring
system.
24 Click Next.
Page 41

September 2007 Nortel Quality Monitoring Server Installation
Installation Guide 41
The Export Call screen is displayed
.
25 Enable the Click here to turn Export Call on feature to enable the
Nortel Quality Monitoring Server to send recorded voice calls to others
via e-mail. To use this feature, you must have an account set up on your
mail server for Nortel Quality Monitoring to use. If necessary, contact
your LAN administrator to have an e-mail account set up.
26 Use the drop-down list (which is disabled until you select the Click here
to turn Export Call on check box) to specify the type of mail service
your network uses:
Microsoft MAPI (Microsoft Exchange mail systems)
SMTP/POP (Internet-based mail systems)
VIM Systems (Lotus mail systems)
Page 42

Nortel Quality Monitoring Server Installation Standard 4.0
42 Nortel Quality Monitoring
For Login Name, enter the name on the account that is set up on your
mail server for the Nortel Quality Monitoring Server to use. The default
mail logon is Quality with a Password of password. If your mail
system uses a character other than ; (semi-colon) to separate recipients,
replace the ; (semi-colon) in the Recipient Delimiter text box with that
character.
The Post Office refers to Microsoft Exchange and VIM systems for mail
received. For Lotus mail systems, it should be the path to the post office,
not the post office itself (for example, N:\CCMAIL). For Microsoft
Exchange, it is the name of the Exchange server.
Note: This field is only used for Microsoft Exchange and Lotus VIM
systems.
27 If you selected None, Microsoft MAPI, or VIM Systems as the mail
system on the Export Call screen, go directly to step 30 on page 43.
If you selected SMTP/POP, click Next.
The SMTP screen is displayed.
28 Enter the following SMTP configuration parameters:
Page 43

September 2007 Nortel Quality Monitoring Server Installation
Installation Guide 43
In the SMTP Server field, specify the hostname or IP address of the
SMTP mail server. Use the fully qualified domain name for your SMTP
mailserver/gateway.
Example: mail.witsys.com
Accept the default SMTP Port (which is 25), unless the SMTP port has
been modified by your mail implementor for security reasons.
Specify the timeout, in milliseconds, for the initial connection (Timeout
Connect) and communications (Timeout Protocol). Leave the default
values (30000) unless you know that the connection to the SMTP Server
is slow.
29 Click Next.
The Agent Initiated Monitoring screen is displayed.
30 Click to Enable Agent Initiated Monitoring. (Recommended).
Page 44

Nortel Quality Monitoring Server Installation Standard 4.0
44 Nortel Quality Monitoring
Agent Initiated Monitoring, referred to as AIM, is the feature that allows
the agents to start and stop monitoring sessions. The feature must be
enabled at the Nortel Quality Monitoring Server as well as at the agent
desktop to function; therefore, it is typically installed here so that the
option to use the feature is always available.
31 Click to Enable Block monitor for Agent Initiated Monitoring.
(Recommended)
This option allows agents to stop the monitoring that they have initiated
through AIM feature and discard the recording. The Stop command at
the agent desktop stops the monitoring, but the recording is retained.
32 Set the Maximum Record time (in minutes) of all Nortel Quality
Monitoring recordings, except for Live Monitor calls. The default setting
for maximum record time is 0, which allows unlimited recording time.
Note: Live Monitor is only available if a Nortel Contact Recording Card is
installed at the PBX.
33 Click Next.
Page 45

September 2007 Nortel Quality Monitoring Server Installation
Installation Guide 45
The Switch Configuration screen is displayed.
(This screen is designed to be used in a future release of this product.)
34 Click Next.
Page 46

Nortel Quality Monitoring Server Installation Standard 4.0
46 Nortel Quality Monitoring
The Voice Ports screen is displayed.
35 Use the drop-down list for Total Ports to specify the number of active
ports on your system. This is generally the total number of ports available
on your T1/E1 connections. This number is typically 24 active ports. The
port value is written to the voice.ini file which is used to set up
communications with the Contact Recording Server. The voice.ini file will
have one line that states:
CHANNEL: 0 CS N 0 TRACE DEBUG TEST
N is the is the number of ports; the 0 must be there.
Note: Make sure that the number of To tal Por ts selected is less than or
equal to the number of Nortel Quality Monitoring ports licensed for the
Nortel Contact Recorder.
36 Use the drop-down list for Random Ports to specify the maximum
number of monitor ports to be used for random monitoring. In most
configurations, the Random Ports setting will be the same as the Tota l
Ports setting.The remaining monitor ports will be used for scheduled
recordings and live monitoring. For example, if 20 monitor ports are
specified as random ports, the remaining 4 monitor ports would be used
Page 47

September 2007 Nortel Quality Monitoring Server Installation
Installation Guide 47
for scheduled recording and live monitoring. The 4 monitor ports
specified as random ports could be used for the other types of recording,
if they are not being used as random ports. Live Monitor is only available
if a Nortel Call Recording Card is installed at the PBX.
37 Click Next.
The Voice URL screen is displayed.
38 Leave this as the default voice.
Recordings made under the control of a Quality Monitoring application
are only held temporarily in the recorder’s bulk recording call storage
area and, after the call completes, are copied to a file-share (the voice
URL) on the Quality Monitoring Server. This folder must be accessible by
the Nortel Contact Recording Server
39 Click Next.
Page 48

Nortel Quality Monitoring Server Installation Standard 4.0
48 Nortel Quality Monitoring
The AVI Conversion Server Settings screen is displayed.
40 Leave the default value for the directory in which to store the files created
by the AVI Conversion Service.
The voice and data files generated when a call is recorded are stored
separately. When a user selects a call to replay, the AVI Conversion
Service generates an .AVI output file that is played through the Client UI.
Once the .AVI has been generated for a call, it is stored and used
whenever that call is replayed.
41 Enter a Database Username and Database Password to use to
create a system DSN (QualityforAVI) for the AVI Conversion Service.
This user user must have full administrator rights. (The most commonly
used is dba with manchupinchu as the password.) If this DSN is not set
correctly, there will be problems with call replay.
42 Click Next.
Page 49

September 2007 Nortel Quality Monitoring Server Installation
Installation Guide 49
The Ready to Install the Program screen is displayed.
43 Leave the Launch Database Update Utility checked if there are no
patches to apply to the Nortel Quality Monitoring Server.
Uncheck the option if there are patches to apply to the server installation.
44 Click Install.
The installation program begins the installation process.
Once the installation is complete, the program:
launches the Database Update Utility if the option is selected
displays the InstallShield Wizard Completed screen if the option
is not selected
45 If the utility is started, go to “Creating the Nortel Quality Monitoring
Database,” on page 51 for complete instructions.
If the Completed screen is displayed, click Finish.
46 Following the instructions in the patches’ readme files, apply the patches
issued for the Nortel Quality Monitoring Server.
Page 50

Nortel Quality Monitoring Server Installation Standard 4.0
50 Nortel Quality Monitoring
47 Run the database utility as described in “Creating the Nortel Quality
Monitoring Database,” on page 51.
Page 51

September 2007 Nortel Quality Monitoring Server Installation
Installation Guide 51
Creating the Nortel Quality Monitoring
Database
You must create the Nortel Quality Monitoring database for the system to
function.
Note: Create a database folder before beginning this procedure. The
recommended location for the folder is D:\Program Files\Nortel\Nortel DB.
To create the database, follow these steps:
1 If the installation program did not launch the utility, click Start4
Programs
4Nortel Quality Monitoring Server4DBUtil.
The Database Utility dialog box is displayed:
2 The SQL database server specified when the Nortel Quality Monitoring
was installed is displayed in the Database Server Name field.
3 Click Run.
Page 52

Nortel Quality Monitoring Server Installation Standard 4.0
52 Nortel Quality Monitoring
The Database Login dialog box is displayed:
4 Enter the SA (system administrator) user name in the User Name field.
This value is typically SA, but may be any user that has full administrator
rights on the SQL server.
5 Enter the password in the Password field.
6 Click OK.
Note: If the program cannot connect to the database, make sure that the
user that you specified has administrative rights and that you entered the
correct password for that user.
Note: You can also go to the Windows Control Panel. Under
Administrative Tools, open Data Sources and review the System DSN
settings. The DSN named Quality should be set with the server and
username\password for the SQL server that will house the database.
Start Dbutil again.
Page 53

September 2007 Nortel Quality Monitoring Server Installation
Installation Guide 53
Do not proceed until you have successfully connected to the database.
When it connects successfully to the database, the program displays the
Database Parameters dialog box.
7 Enter the path of the database folder in the Database Path field. This
folder must exist; the program will not create it for you. The reccomended
path is D:\Program Files\Nortel\Nortel DB.
8 Select the language to be used at the Quality Monitoring Client from the
Language drop-down list.
9 Click Go.
The Database Creation window is displayed.
The program displays a list of actions performed. The last line is Done.
Page 54

Nortel Quality Monitoring Server Installation Standard 4.0
54 Nortel Quality Monitoring
You can use the scroll bar to review the actions; there should be no
errors for a new database.
10 If the SQL Server and Nortel Quality Monitoring Server are installed on
the same machine, reboot the machine to complete the remaining postprocessing steps.
If the SQL Server is on a separate machine, follow the procedure in
“MSSQLSERVER Considerations,” on page 55 BEFORE you reboot.
Note: When rebooted, the system attempts to start both the AVI
Conversion Service and the WitnessService. The WitnessService will not
start until the basic database records have been created using the Nortel
Quality Monitoring Client.
Note: When setting up the database, you should set up a maintenance
plan at the same time, to ensure that the database gets backed up
automatically, and to avoid disk storage problems in the future. You must
also set up a maintenance plan for the transaction log file. This is
necessary as the transaction log continues to grow cumulatively over
time, and requires periodic truncation by way of an automated MS SQL
maintenance plan schedule.
To verify the creation of the Quality Monitoring SQL database, open
Start
4All Programs4 Microsoft SQl Server4 Enterprise
Manager
.
The witness database must be available for the Nortel Quality
Monitoring system to be functional.
Page 55

September 2007 Nortel Quality Monitoring Server Installation
Installation Guide 55
MSSQLSERVER Considerations
By default, the WitnessService has a dependency for MSSQLSERVER. If
MSSQLSERVER is not installed on the machine where the Nortel Quality
Monitoring Server is installed, you need to do the following:
If.... Then.... Otherwise....
You are installing the
SQL Database on a
separate server (on a
different machine than
the Nortel Quality
Monitoring Server).
Go into the Windows
Service manually (Nortel
Quality Monitoring Server >
WitnessService), and delete
the dependency for
MSSQLSERVER.
The Nortel Quality
Monitoring Server will not
start.
You remove the
dependency.
Make sure that the SQL
Database Server is up and
online before you start or
restart the Nortel Quality
Monitoring Server.
The Nortel Quality
Monitoring Server will fail,
since there are no
dependencies set up to
make sure that the Nortel
Quality Monitoring
Database is available
before the Nortel Quality
Monitoring Server tries to
start up and access the
database.
Page 56

Nortel Quality Monitoring Server Installation Standard 4.0
56 Nortel Quality Monitoring
Final Steps for the Nortel Quality
Monitoring Server Setup
To complete the Nortel Quality Monitoring Server setup, you need to:
Change the Permission for the Voice Folder
Confirm the Quality Monitoring Setup at the Contact Recording Server
Changing the Permission for the Voice Folder
The permission setting for the local voice folder that is created during
installation is read only. For the Contact Recording Server to access the
folder, the permission needs to be read\write.
To change it to read/write:
Page 57

September 2007 Nortel Quality Monitoring Server Installation
Installation Guide 57
1 In Windows Explorer, navigate to the voice folder. The default path is
\Journals\Voice.
2 Right-click on the voice folder, and select Sharing and Security.
3 Ensure that the Share This Folder radio button is selected.
Page 58

Nortel Quality Monitoring Server Installation Standard 4.0
58 Nortel Quality Monitoring
4 Click the Permissions button.
5 In the Allow category, ensure that all the options are selected that
enable access to the voice folder.
Page 59

September 2007 Nortel Quality Monitoring Server Installation
Installation Guide 59
Confirming the Quality Monitoring Setup at the Contact
Recording Server
The Nortel Quality Monitoring Server communicates with the Nortel
Contact Recording Server. The communication is established by the
Recording Server; therefore that server must be configured with the details
of the Nortel Quality Monitoring Server.
To verify that the appropriate data is entered at the Nortel Contact Recording
Server:
1 Log in to the Nortel Contact Recording Server:
2 Click the Operations tab.
3 Click the Quality Monitoring tab.
4 If this tab is not present, you need to update the licensing for the
recorder.
Page 60

Nortel Quality Monitoring Server Installation Standard 4.0
60 Nortel Quality Monitoring
5 Verify the following:
URL of Nortel Quality Monitoring application to connect to.
This is the IP node name of the Quality Monitoring server. The port
numbers for the recording control and CTI links between these
applications will default to 1415 and 1416 respectively. If you installed
Quality Monitoring on the same server as the recorder, you can specify
127.0.0.1 or localhost.
Username/Password for file-share on Quality server. This is the
username and password that the Recording server can use to access
the voice URL (typically left as voice) to write recordings to and read
recordings from the share.
For complete information about the Nortel Contact Recording
configuration, please refer to the Nortel Contact Recording Planning,
Installation and Administration Guide.
Page 61

September 2007 Nortel Quality Monitoring Server Installation
Installation Guide 61
Upgrading to Release 6.01
Before you upgrade to Release 6.01 from an earlier version of Nortel
Quality Monitoring, be sure to:
Stop the witnessservice and AVI conversion service
Back up the server.ini, voice.ini, and process.ini files. These files are
located in the \Program Files\Nortel\ Nortel Quality Monitoring Server
folder.
To upgrade the server:
1 Run the Nortel Quality Monitoring Server installation program, from a CD
or network drive.
2 Follow the onscreen prompts.
3 Start the witnessservice and AVI Conversion Service.
For a more detailed description of the installation/upgrade options, please
refer to “Installing the Server Software,” on page 29.
Note: If you upgrade the Nortel Quality Monitoring Server, you must also
upgrade the Client and Agent versions. The Server, Client, and Agent
versions must be the same in order for the system to work properly.
Upgrading the Nortel Quality Monitoring Database
After upgrading the Nortel Quality Monitoring Server, you need to use
dbutil32.exe, the database upgrade/creation utility, to upgrade the Nortel
Quality Monitoring database. When you are upgrading your system to a new
service level, you should make it standard procedure to run this program in
order to incorporate the latest schema changes and other changes in your
database.
Note: If you have not already done so, create a full backup of your database
before continuing.
Page 62

Nortel Quality Monitoring Server Installation Standard 4.0
62 Nortel Quality Monitoring
To upgrade an existing version of the Nortel Quality Monitoring database,
follow these steps:
1 If the installation/upgrade program did not launch the utility, click Start4
Programs
4Nortel Quality Monitoring Server4DBUtil.
The Database Utility dialog box is displayed:
2 Enter the name of your database server (typically the local host name) in
the Database Server Name field.
3 Select Run.
The Database Login dialog box is displayed:
4 Enter the SA (system administrator) user name in the User Name field.
5 Enter the password in the Password field.
6 Select OK.
Page 63

September 2007 Nortel Quality Monitoring Server Installation
Installation Guide 63
7 A message box appears, asking if you would like to upgrade the current
database. Select Yes.
The Database Parameters dialog box is displayed:
8 Select the desired language from the Language drop-down list.
9 ClickGo.
The Database Creation window appears, and the database is updated:
Page 64

Nortel Quality Monitoring Server Installation Standard 4.0
64 Nortel Quality Monitoring
You will see a number of messages scroll by in the Database Creation
window. Based on the size of your database, the database upgrade
process can take between a few minutes and several hours. The last
message you will see is “Done” (as shown in the figure above). Once the
"Done" message appears, you can close the Database Creation
window.
After the upgrade is complete and the database upgrade utility has been
run, it is recommended that you backup your database and also your
Nortel Quality Monitoring Server folder.
Once you have finished updating the Nortel Quality Monitoring database,
reboot the Nortel Quality Monitoring Server in order for the installation
program to complete the remaining post-processing steps.
Page 65

Installation Guide 65
Chapter 4
Nortel Quality Monitoring Client
Installation
In this chapter:
Nortel Quality Monitoring Client Overview . . . . . . . . . . . . . . . . . . . . . . . 66
Before You Begin the Installation . . . . . . . . . . . . . . . . . . . . . . . . . . . . . . 68
Installing the Client Software . . . . . . . . . . . . . . . . . . . . . . . . . . . . . . . . . 71
Populating the Database . . . . . . . . . . . . . . . . . . . . . . . . . . . . . . . . . . . . 81
Page 66

Nortel Quality Monitoring Client Installation Standard 4.0
66 Nortel Quality Monitoring
Nortel Quality Monitoring Client Overview
The Nortel Quality Monitoring Client is the component of the system that
supervisors use to:
administer the system
review the recorded calls (journals)
create and use evaluation forms
generate Agent performance and call handling reports and graphs
The Client is typically installed on each supervisor’s desktop; it
communicates directly with the Nortel Quality Monitoring Server and
database, as shown in the following diagram.
Note: We recommend that you install an instance of the Client on the Nortel
Quality Monitoring Server machine itself so that you can test the system
prior to full deployment.
Page 67

September 2007 Nortel Quality Monitoring Client Installation
Installation Guide 67
Page 68

Nortel Quality Monitoring Client Installation Standard 4.0
68 Nortel Quality Monitoring
Before You Begin the Installation
Before you install the Nortel Quality Monitoring Client, be sure that:
the Client machine is on the same network as the Nortel Quality
Monitoring Server and the Quality Monitoring database server
the Client machine is running Windows 2000 SP4 or Windows XP SP2
Microsoft .NET Framework 1.1 is installed on the Client machine
the World Wide Web Publishing Service and the IIS Admin Service are
stopped on the Client Machine
you know the name of the Nortel Quality Monitoring Server machine
you know the name of the Quality Monitoring database server and
whether the database is in its own database instance
you know the database connection port number
you know whether or not to enable the Call Export feature
you know whether you need to use a typical or custom installation
For help with the program options, review the installation procedure
described in “Installing the Client Software,” on page 71.
Note: The Client applications on the supervisorís computers should always
match the Nortel Quality Monitoring Server version to prevent an out-ofdate Client application from possibly corrupting the database. If the
database is corrupted, the Client application could become unusable.
Stopping and Starting Services
Before you install the Client (or any application which is dependent on IIS
Admin or the World Wide Web Publishing Service), you should be sure that
these services are not running.
To stop (then restart the services), follow these steps:
Page 69

September 2007 Nortel Quality Monitoring Client Installation
Installation Guide 69
1 Access the Services management component of the Control panel.
2 Open the IIS Admin Properties dialog.
3 Change the IIS Admin Startup type to Manual.
4 Access the World Wide Web Publishing Service Properties dialog.
5 Change the World Wide Web Publishing Service Startup type to
Manual.
6 Restart the machine.
Page 70

Nortel Quality Monitoring Client Installation Standard 4.0
70 Nortel Quality Monitoring
7 Once the machine restarts, ensure that IIS Admin and World Wide Web
Publishing Service are not running.
8 Install the Nortel Quality Monitoring Client as described in the “Installing
the Client Software,” on page 71.
9 Once the Client is installed, change the IIS Admin Service and World
Wide Web Publishing Service Startup types to Automatic.
10 Restart the machine.
Page 71

September 2007 Nortel Quality Monitoring Client Installation
Installation Guide 71
Installing the Client Software
To install the Nortel Quality Monitoring Client, follow these steps:
1 Close all applications on the workstation.
2 Be sure that the WWW Publishing and IIS Admin services are stopped.
3 Place the Nortel Quality Monitoring CD into the CD-ROM drive on the
workstation. The Welcome page appears automatically.
Note: If this page is not automatically displayed, open Windows Explorer
and navigate to the CD drive to select install.htm.
4 Under Install Nortel Quality Monitoring, select Nortel Quality
Monitoring Client Component.
Page 72

Nortel Quality Monitoring Client Installation Standard 4.0
72 Nortel Quality Monitoring
The File Download dialog box may or may not appear, depending on
your Internet Explorer (or other web browser) settings. Also, the dialog
box may vary slightly from the one shown below, depending on the
browser version.
5 Click Run (or Open depending on the dialog displayed).
A screen indicates that the installation wizard is being prepared. Once
started, the Welcome to the InstallShield Wizard for Nortel Client
screen is displayed.
Page 73

September 2007 Nortel Quality Monitoring Client Installation
Installation Guide 73
6 Click Next.
Page 74

Nortel Quality Monitoring Client Installation Standard 4.0
74 Nortel Quality Monitoring
The Customer Information screen is displayed.
7 Enter your User Name and Organization.
8 Select one of the following options in the Install this application for
field:
Anyone who uses this computer (all users). This application is
accessible to anyone who has a logon for this machine.
Only for me (User Name). The application is only accessible when
the specified user name is used to log on.
9 Click Next.
Page 75

September 2007 Nortel Quality Monitoring Client Installation
Installation Guide 75
The Server Connections screen is displayed.
10 Enter the host name or IP address of the Nortel Quality Monitoring
Server in the Enter the host name for the Quality Voice Server field.
11 Enter the TCP/IP host name of the SQL Server in the Enter the
Database Server Name field. For information on finding the correct
name, please see page 37 in this guide.
Note: In rare cases, the database is created in its own separate
database instance. If the database was created in its own separate
database instance in your environment, enter the instance name in the
following format: TCP/IP host name\instance name. For example,
\\SQL_SVR\quality.
12 Enter the number of the port used to communicate with the Quality
database in the Enter the Database Port Number field. The default
is 3033; this should not need to be changed.
13 Enter the host name or IP address of the server hosting the SQL Server
database in the Enter the host name for the Database Server field.
The local machine name is entered by default. This entry should always
Page 76

Nortel Quality Monitoring Client Installation Standard 4.0
76 Nortel Quality Monitoring
be the same as the Server name entered above in the Enter the host
name for the Quality Voice Server field.
14 Click Next.
The Phone Extension and Export screen is displayed.
15 If you do not have a Nortel Call Recording Card installed in your PBX: Go
to the next step.
If you have a Nortel Call Recording Card installed in your PBX: Enter the
extension of the phone you intend to use when replaying or live
monitoring agents. If you enter your default callback extension here, it is
saved for later reference. When you play back a call, this phone
extension is used as the default.
16 Select the Check to enable the Export Call Feature to be able to email
recorded calls to people not on the system and to write the calls to disk.
17 The Export feature needs to be set both here and on the Nortel Quality
Monitoring Server. Please see page 76 for information on the Server
settings.
Page 77

September 2007 Nortel Quality Monitoring Client Installation
Installation Guide 77
18 Click Next.
The Setup Type screen is displayed.
19 Select Custom to install all of the available Nortel Quality Monitoring
Client applications.
Minimal installs the Client main UI, the System Administration Utility, the
Evaluations, Site Editor, and Graphing applications. It was designed as a
way to install the basic applications for lower-level supervisors, but in
practice it is easier to install all applications and then restrict access to
certain applications using the Security application.
20 Click Next.
Page 78

Nortel Quality Monitoring Client Installation Standard 4.0
78 Nortel Quality Monitoring
The Custom Setup screen is displayed.
21 All of the applications are selected; you do not need to make any
selections. You can use the scroll bar to review the programs and verify
that you are installing the Client applications to the correct drive. (Nortel
typically installs Quality Monitoring applications on the D: drive.)
Note: As mentioned in the previous step, you must provide the
supervisors access rights to these applications through the Nortel
Quality Monitoring Client’s Security application.
22 Click Next.
Page 79

September 2007 Nortel Quality Monitoring Client Installation
Installation Guide 79
The Ready to Install the Program screen appears:
23 Click Install.
If Microsoft .NET Framework 1.1 is not installed on the machine, a
message box is displayed.
Click Yes.
When the licensing screen is displayed, accept the licensing agreement.
Page 80

Nortel Quality Monitoring Client Installation Standard 4.0
80 Nortel Quality Monitoring
When the installation process is complete, the InstallShield Wizard
Completed screen appears.
24 Click Finish to exit the installation program.
25 If any patches have been released for the Nortel Quality Monitoring
Client, install those now. Follow the instructions issued with the patch.
Page 81

September 2007 Nortel Quality Monitoring Client Installation
Installation Guide 81
Populating the Database
In order for the Nortel Quality Monitoring Server to function correctly, you
must populate the Quality database with some basic records. Use the Client
applications to define at least one department, one Position ID/DN, and one
agent.
Note: You do not have to do this on every supervisor’s machine. You only
need to do this to populate the Quality database with the basic set of records.
To start the Nortel Quality Monitoring Client:
1 Select Start > Programs > Nortel Quality Monitoring Client> Client.
2 Enter admin in the User ID field.
3 Enter NewUser in the Password field. The password is case-sensitive;
be sure to use a capital N and a capital U.
4 Click Logon.
If prompted to confirm logging in without an extension. Click Yes.
Page 82

Nortel Quality Monitoring Client Installation Standard 4.0
82 Nortel Quality Monitoring
A message is displayed.
5 Click Yes.
The Nortel Quality Monitoring Client is displayed.
Note: If the icons are not shown in the Applications column on the left,
right-click in that area and select Properties. In the dialog displayed,
select all of the applications.
6 Select the Departments icon on the Applications toolbar, then create at
least one department record as described in “Creating a Department,”
on page 83.
Page 83

September 2007 Nortel Quality Monitoring Client Installation
Installation Guide 83
7 Select the SIU icon on the Applications toolbar, then create at least one
extension record as described in “Defining Position IDs/DNs,” on page
85.
8 Select the Agents icon on the Applications toolbar, then create at least
one agent record as described in “Defining an Agent,” on page 86.
9 Close the Nortel Quality Monitoring Client application.
10 Start the Nortel Quality Monitoring Server.
11 Start the Nortel Quality Monitoring Client.
Creating a Department
Departments are used to control user access to agents in most Nortel Quality
Monitoring applications. You must have a department defined before you
can set up the agents. The departments usually correspond to the functional
groups in your contact center.
To create a department:
Page 84

Nortel Quality Monitoring Client Installation Standard 4.0
84 Nortel Quality Monitoring
1 Select the Departments icon from the Applications toolbar.
The Departments dialog box is displayed.
2 Select New.
3 Enter the name of the department in the Departments field. You can
enter up to 25 alphanumeric characters.
4 Select Save.
The name appears in the departments list.
5 Select Exit to save your changes and close the Departments dialog
box.
For complete information about departments, please refer to the Nortel
Quality Monitoring Administration Guide, Chapter 2: Setting Up the
Departments Database Table.
Page 85

September 2007 Nortel Quality Monitoring Client Installation
Installation Guide 85
Defining Position IDs/DNs
The SIU database table lists the "instruments" to be monitored. These
"instruments" are the physical extension numbers (Position IDs/DNs). The
Nortel Quality Monitoring service reads and initializes SIU information
when the Server is started. You must define at least one instrument for the
service to start. Typically, you define the one PositionID/DN that you will
use to test the system, though each Position ID/DN or range of Position IDs/
DNs must be listed in the table for monitoring to be enabled.
Note: The Position IDs/DNs you define here must also be defined in Nortel
Contact Recording on the Operations
4Bulk Recording tab.
To define an instrument number:
1 Select the SIU icon on the Applications toolbar.
The SIU Utility dialog box is displayed.
2 Select the Instr No. option button.
3 Select New.
Page 86

Nortel Quality Monitoring Client Installation Standard 4.0
86 Nortel Quality Monitoring
4 Type the Position ID/DN in the Instrument Number field.
5 Select Save.
6 Select Exit to close the SIU Utility dialog box.
For complete information about the SIU Utility, please refer to the Nortel
Quality Monitoring Administration Guide, Chapter 5: Setting Up the SIU
Database Table.
Defining an Agent
To create an agent record:
1 Select the Agents icon on the Applications toolbar.
The Agent Data dialog box is displayed.
2 Select New.
3 Type a name in the Agent field.
Page 87

September 2007 Nortel Quality Monitoring Client Installation
Installation Guide 87
4 Select admin as the Supervisor for this agent.
5 Select the PhoneDef + tab.
6 In the Phone Definition field, enter the agent’s login ID.
7 Select Depts.
Page 88

Nortel Quality Monitoring Client Installation Standard 4.0
88 Nortel Quality Monitoring
The Add Departments dialog box is displayed.
8 Select the department and click > to move it to the Departments Added
field.
9 Select Return to return to the Agent Data dialog box.
10 Select Exit to save your changes and close the Agent Data dialog box.
For complete information about agent definitions, please refer to the Nortel
Quality Monitoring Administration Guide.
Page 89

Installation Guide 89
Chapter 5
Nortel Quality Monitoring Agent
Installation
In this chapter:
Nortel Quality Monitoring Agent Overview . . . . . . . . . . . . . . . . . . . . . . . 90
Before You Begin the Installation . . . . . . . . . . . . . . . . . . . . . . . . . . . . . . 92
Installing the Agent Software . . . . . . . . . . . . . . . . . . . . . . . . . . . . . . . . . 93
Making Configuration Changes after Installation . . . . . . . . . . . . . . . . . 102
Page 90

Nortel Quality Monitoring Agent Installation Standard 4.0
90 Nortel Quality Monitoring
Nortel Quality Monitoring Agent Overview
The Nortel Quality Monitoring Agent component is installed on the agent
workstations. The Agent software includes:
the Capture Service that records the desktop screen
the Agent Initiated Monitoring application
the Agent logging service that records interactions between the Agent
and Server
The Agent communicates directly with the Nortel Quality Monitoring
Server, as shown in the following diagram.
Note: We recommend that you install an instance of the Agent on the Nortel
Quality Monitoring Server machine itself so that you can test the system
prior to full deployment.
Page 91

September 2007 Nortel Quality Monitoring Agent Installation
Installation Guide 91
Page 92

Nortel Quality Monitoring Agent Installation Standard 4.0
92 Nortel Quality Monitoring
Before You Begin the Installation
Before you install the Nortel Quality Monitoring Agent, be sure that:
the Agent machine is on the same network as the Nortel Quality
Monitoring Server
the Agent machine is running Windows 2000 SP4 or Windows XP SP2
you know the name of the Nortel Quality Monitoring Server machine
you know whether or not to install Agent Initiated Monitoring (AIM)
whether or not you want to use the annotation with AIM
For help with the program options, review the installation procedure
described in the next section.
For instructions on installing the software using a batch file, please refer to
“Silent Agent Installation,” on page 129.
Page 93

September 2007 Nortel Quality Monitoring Agent Installation
Installation Guide 93
Installing the Agent Software
To install Agent, follow these steps:
1 Close all applications on the workstation.
2 Place the Nortel Quality Monitoring CD into the CD-ROM on the
workstation.
The installation page is launched automatically.
Note: If this page is not launched automatically, open Windows Explorer
and navigate to the CD drive to select install.htm.
3 Under Install Nortel Quality Monitoring, select Nortel Quality
Monitoring Agent Component.
4 When prompted to run or save the file, select Run.
5 Ignore the security warning about the unknown publisher and click Run.
Page 94

Nortel Quality Monitoring Agent Installation Standard 4.0
94 Nortel Quality Monitoring
The Welcome to the InstallShield Wizard for Nortel Quality
Monitoring Agent is displayed.
6 Click Next.
Page 95

September 2007 Nortel Quality Monitoring Agent Installation
Installation Guide 95
The Destination Folder screen is displayed.
7 Select the location where you want the Agent files to reside. The default
location is c:\Program Files\Nortel\Nortel Quality Monitoring Agent.
To specify another drive or folder location, click Change. In the Change
Destination Folder screen, type in the desired location or use the
browse tools to select it. Click OK to return to the Destination Folder
screen.
8 Click Next.
Page 96

Nortel Quality Monitoring Agent Installation Standard 4.0
96 Nortel Quality Monitoring
The Agent Initiated Monitoring (AIM) screen is displayed.
9 Select Install Agent Initiated Monitoring to allow agents to record
calls. This feature must also be enabled on the Nortel Quality Monitoring
Server to work. See Step 31 on page 44 in this guide.
If installing AIM, specify the Nortel Quality Monitoring Server Name.
This name is the TCP/IP host name of the computer that is running the
Nortel Quality Monitoring Server.
Note: Select Browse to change the path of the folder where the AIM log
files reside.
Note: Logging is disabled by default. To enable logging, set the registry
value LogEnable = 1 in the registry key
HKEY_LOCAL_MACHINE\Software\Witness Systems\eQuality
Agent\AIM. In addition, you will either need to :
Change the LogPath value in
HKEY_LOCAL_MACHINE\Software\Witness Systems\eQuality
Agent\AIM to a path where all users have write permissions.
OR
Page 97

September 2007 Nortel Quality Monitoring Agent Installation
Installation Guide 97
Give write permissions to users for the path currently set.
10 Click Next.
The AIM Options screen is displayed.
11 Leave the selection as Use CTI with AIM.
The Nortel Quality Monitoring environment includes CCMS as the CTI,
which sends logon, logoff, and call event information to the Nortel Quality
Monitoring Server. If necessary, this function can be replaced with the
ability of agents to log in and log out manually, as well as initiate and end
a monitoring session.
12 Choose whether to Enable Block Monitoring for this agent.
When block monitoring is enabled, the agent is able to end any
monitoring session. He can use the Block Monitoring command on his
desktop to cause the Nortel Quality Monitoring Server to stop monitoring
and remove all references to the journal file.
13 Click Next.
If you selected the Use CTI with AIM option, proceed to step 17.
Page 98

Nortel Quality Monitoring Agent Installation Standard 4.0
98 Nortel Quality Monitoring
If you selected the Use Manual Login option in the previous screen, the
Manual Logon Configuration screen is displayed.
14 Provide the following information:
Agent ID. Enter the ID that the user must enter to log on to the phone
system. If more than one agent will use this workstation, enter any one of
those IDs. This is the same number that you entered as the Phone
Definition in the Agents application at the Client.
Lock ID. Select Ye s to "tie" this workstation to this agent within the
Quality system. (This is known as static seating.) Select No to allow
other agents to log in to the system with this workstation (free seating). If
you have an environment where Agents share workstations over different
shifts, then you would select No.
Agent Extension. Enter the phone extension number that the agent
uses. This will be one of the Position ID/DNs that you defined in the
Nortel Quality Monitoring SIU Utility.
Page 99

September 2007 Nortel Quality Monitoring Agent Installation
Installation Guide 99
Lock Extension. Select Yes to "tie" this extension to this agent ID
within the Quality system. Select No to allow other agents to use this
extension. If you have a free seating environment where Agents are not
assigned a specific extension, then you would select No.
15 Click Next.
The AIM Annotation Setup screen is displayed.
16 Select Enable annotation for Agent Initiated Monitors to enable
the Annotate menu item at the agent’s workstation.
When the agent selects Annotate from the AIM pop-up menu during a
monitored call, a screen with data entry fields is displayed on the agent’s
desktop. The information that the agent enters in these fields is stored
with the call and displayed with the journal file in the Nortel Quality
Monitoring Client.
17 If you enable the annotation option, you need to configure the annotation
fields (User Field 1, User Field 2, and so on). Enter descriptive
information for all of the fields that you will be using. When annotation
Page 100

Nortel Quality Monitoring Agent Installation Standard 4.0
100 Nortel Quality Monitoring
fields are used, supervisors can search for a journal entry by these field
names. Any field left blank will not be included on the agent screen.
Note: It is important that these fields do not vary from desktop to
desktop. These fields must also match the corresponding data types in
the database.
Note: To avoid having to set up each agent workstation manually, you
can use the batch file procedure described in “Silent Agent Installation,”
on page 129 to apply a common configuration to multiple agent
workstations.
18 Click Define User Tips to enable tool tips that can assist agents when
answering calls.
The Add User Tips to Annotation Labels screen appears.
19 Enter information in any of the User Tip fields and click OK.
20 Click Next.
 Loading...