

Page 1

Part No. 206906-D Rev 00
October 2001
4401 Great American Parkway
Santa Clara, CA 95054 USA
Using the Passport4400
InstallTool Version4.2
Page 2

2
Copyright © 2000 Nortel Networks, Inc.
All rights reserved. Printed in the USA. October 2001.
The informatio n in this docum ent is subject to change w ithout notice. The stat ements, configura tions, technical
data, and recommendatio ns in this document are believed to be accurate and reliable, but are presented wit hout
express or implied warranty. Users must take full responsibility for their applicati ons of any products specified in
this doc ument. The information in this document is proprietary to Norte l Networks, Inc.
The software described in this document is furnished under a license agreement and may only be us ed in
accordance with the terms of that license. A summary of the Software License is included in this document.
Trademarks
Nortel Networks, the Nortel Networks logo, the Globemark, Unified Networks, Marathon, Optivity, Passport, and
Preside are trademarks of Nortel Networks.
Adobe an d A crobat Reader are tra dem arks of Adobe Systems Incorporated.
Pentium is a registered trademark of Intel Corporation.
Microsoft, MS-DOS, Windows, and Windows N T are registered trademarks of Microsoft Corporation.
Netscape and Netscape Navigator are registered trademarks of Net scape Communicati ons C orporation
All other trademarks and registered trade marks are the property of their respective owners.
Restricted Rights Legend
Use, duplication, or dis closure by the Unit ed States Government is subject to restricti ons as set forth in
subparagraph (c)(1)(ii) of the Rights in Technical Data an d Com puter Software clause at DFARS 252.227-7013.
Notwithstanding any other license agreement that may pertain to, or accompany the delivery of, this computer
software, the rights of the United States Gove rnment regarding its use, reproduction, and disclosure are as set f orth
in the Commercial Computer Softwa re-Restricted Rights clause at FAR 52.227-19.
Statement of Conditions
In the interest of improving internal design, operational functi on, and/or reliability, Nortel Networks, Inc. reserves
the right to make ch anges to the products described in this document without notice.
Nortel Networ ks , Inc. does no t ass ume an y liabi li ty tha t may oc cur due to the use or ap pli ca tion of the product (s ) or
circui t layout (s) described herein.
Portio ns of the cod e in t hi s so ftwar e pro duc t may be Copyr ight © 2000, Reg ent s of the U niv ersi ty of Calif or nia. All
rights reserved. Redistribution and use in source and binary f orms of such portions are permitted, provided that the
above copyright notice a nd this paragraph are duplicated in all such forms and tha t any documentation, advertising
materials, and other materials related to such distributi on and use acknowledge that such portions of the software
were developed by the University of Califor nia, Berkeley. The name of the University may not be used to endorse
or promote products derived from such portions of the software without specific prior written permission.
SUCH PORTIONS OF THE SOFTWARE ARE PROVIDED “AS IS” AND WITHOUT ANY EXPRESS OR
IMPLIED WARRANTIES, INCLUDING, WITHOUT LIMITATION, THE IMPLIED WARRANTIES OF
MERCHANTABILITY AND FITNESS FOR A PARTICULAR PURPOSE.
In addition, the program and information contained herein are licensed on ly pursuant to a license agreement that
contai ns restrictions on use and discl osure (that may incorporate by reference certa in limitations and no tices
imposed by third parties).
206906-D Rev 00 4.2
Page 3

EC Declaration of Conformity
This product conforms (or these products conform) to the pr ovisions of Council Dir ective 89/336/EEC and 73/23/
EEC. The Declaration of Conformity is available at Nortel Networks, 4100 Guardian St reet Simi Valley, CA 93065
attention: Regulatory Department.
LIMITATIONS OF REMEDIES
Nortel’s entir e liability and Customer’s exclusive remedies are as follows: N ortel shall (i) use commercially
reasonable eff orts to correct any failure of the software program, of which it is g iven written notice b y Customer
during the Warranty Period, to perform substantially in accordance with the documentation, provided such failure
can be recreated by Nortel in an unmodified version of the software program, or if Nortel is unable to correct such
failu re the software progr am and documentation may be returned and the license fee paid will be refunded, or (ii)
replace any diskette not meeting Nortel’s “Limited Warranty” or, if Nortel is unable to deliver a replacement
diskette which is free from defects in materials or workmansh ip, the software program and documentat ion may be
returned and the license fee paid will be refunded.
IN NO EVENT WILL NORTEL OR ITS SUPPLIERS BE LIABLE TO CUSTOMER FOR ANY LOST
PROFILES, LOST SAVINGS OR OTHER INCIDENTAL OR CONSEQUENTIAL DAMAGES ARISING OUT
OF THE USE OR INABILITY TO USE THE PROGRAM EVEN IF NORTEL HAS BEEN ADVISED OF THE
POSSIBLITY OF SUCH DAMAGES. THE LIABILITY OF NORTEL, IF ANY, FOR DAMAGES RELATING
TO ANY NORTEL SOFTWARE PRODUCT SHALL BE LIMITED TO THE ACTUAL AMOUNTS PAID BY
CUSTOMER FOR SUCH SOFTWARE PRODUCT.
SOME STATES DO NOT ALLOW THE EXCLUSION OF IMPLIED WARRANTIES OR THE LIMITATION
OR EXCLUSION OF LIABILITY FOR INCIDENTAL OR CONSEQUENTIAL DAMAGES, SO THE ABOVE
EXCLUSIONS OR LIMIT ATION MAY NOT APPLY.
3
Using Passport 4400 Install Tool Version 4.2
Page 4

4
PASSPORT SOFTWARE LICENSE
THIS LICENSE AGREEMENT (“License”) BETWEEN CUSTOMER AND NORTEL NETWORKS
GOVERNS CUSTOMER’S USE OF PASSPORT SOFTWARE DELIVERED BY NORTEL NETWORKS
FOR USE WITH PASSPORT HARDWARE AS ORDERED BY CUSTOMER UNDER THE AGREEMENT
FOR PURCHASE AND LICENSE OF NOR T EL NETWORKS PRODUCTS AND SERVICES (“Agreement ”)
TO WHICH THIS ADDENDUM IS ATTACHED AND FORMS A PART.
Subject to the terms hereinafter set forth, Nortel Networks grants to Customer and/or its repr esentatives, wit h a
“need to know,” a personal, non- exclusive licens e (1) to use th e Software, proprie tary to Nortel Networks or its
suppli ers and (2) to use the as sociated documentation. Cu stomer is granted no ti tle or ownership ri ghts, in or to the
Software, in whole or i n part, and Customer acknowledges that tit le to and all copyr ights, patents, trade secrets and/
or any other intellectual property rights to and in al l such Software and associated documentation are and shall
remain t he p rop er ty of N orte l Ne two rks and /or Nor tel Ne tw orks ’ su ppl iers . The r igh t to us e So ft war e is rest ri cted t o
the Nort el Networ ks Pass port Hardw are wit h wh ich th e Sof twa re is deli ve red and may be re st rict ed b y a meas ure of
usage of applications bas ed upon number of lines, number of ports, number of terminal numbers assigned, number
of users, or some similar measure. Expans ion beyond the specified usage level may require payment of an
incremental charge or another license f ee.
Nortel Networks considers the Software to contain “trade secrets” of Nortel Networks and/or its suppliers. Such
“trade secrets” include, without limit ation thereto, the specific design, structure and logic of individual Software
program s, their intera ctions with other portions of Software, both internal and externa l, and the programming
techniques employed therein. In order to maintain the “trade secret” st atus of the information contained within the
Software, the Software is being deli vered to Customer in object code form only.
Nortel Networks or any of its suppliers holding any intellectual prop erty rights in any Software, and/or any t hird
party owning any intellectual property rights in software from which the Software was deri ved, are intended third
party beneficiaries of this License. All grants of rights to use intellectual property intended to be accomplished by
this License are explicitly stated. No other grants of such rights shall b e inferred or shall arise by implication.
Customer warrant s to Nortel Networks that Customer is not purc hasing the rights gr anted by this License in
anticipation of reselling those rights.
Customer shall :
• Hold the So ftwa re in con fi den ce fo r the benef i t of Nort el Netwo rks and/or Norte l Netw ork s’ su ppl ie rs using no
less a degree of care than it uses to protect its own mo st confidential and valuable inform ation; and
• Keep a cu rrent record of the location of each copy of Software made by it; and
• Instal l and use each copy of Software on ly on a single CPU at a time (for this purpose, single CPU shall include
systems with redundant processing units); and
• Affix to each copy of Softwar e m ade by it, in the same form and location, a repr oduction of the copyright
notice s, trade mark s, and al l other pro pri et ary le gen ds an d/ or logos of Nor te l Net work s and /o r Nort el Net work s’
supp lie rs , ap p ea ring on th e or ig in a l copy of su ch So ft w ar e d el ivered to Cu st omer; and retain th e sa m e wit h ou t
alteration on all original copies; and
• Issue instructions to each of its authorized employees, agents, and/or representati v es to whom Softw are is
disclo se d, advi si ng them of the c onf ide ntia l na ture of suc h Sof tware an d to prov ide them with a summar y of the
requirements of this License; and
• Return the Software and all copies through an Authorized Distributor to No rtel Networks at such time as
Customer chooses to permanently cease using it.
• Customer shall not:
• Use Software (i) for any purpose other than Customer’ s own internal business purposes and (ii) other than as
provided by this License; or
• Allow anyone other than Customer’s employees, agents and/or representatives with a “need to know” to have
physical access to Software; or
206906-D Rev 00 4.2
Page 5

• Make a ny copies of Softwa re except such limited number of object code copies in ma chine readable form only,
as may be reasonably necessar y for execution or arch ival purposes only; or
• Make any modifications, enhancements, adaptations, or translations to or of Software, except as ma y result
from those Customer int eractions with the Software associated with no rm al use and explained in t he associated
documentation; or
• Attempt to reverse engineer, disassemble, reverse translate, decompile, or in any other manner decode
Software, in order to derive the source code form or for any other reason; or
• Make full or partial copies of any documentation or other similar print ed or machine-readable matter provided
with Software unless the same has been supplied in a form by Nortel Networks intended for periodic
reproduction of partia l copies; or
• Export or re-export Software and/or associate d documentation from the fifty states of the United States and the
District of Columbia.
• Notwithstanding the above restrictions, if Customer has licensed the Software under a “site license” option as
set for th in the applicable Service Order, Customer is authorized to make a limited number of copies of the
Software and documentation to support additional us ers as specified in Customer’s purchase agreement.
Customer may assign collectiv ely its rights under this License to any subsequent owner of the associated hardware,
but not otherwise, subject to the paym ent of the then current license fee for new users, if any. No such assignment
shall be valid until Customer (1) has delegated all of its obligat ions under this License to the assignee; and (2) has
obtain ed fr om th e ass ig nee an uncondi t io nal wr itt en as sump ti on of a ll suc h obl ig ation s; and ( 3) ha s provi ded Nort el
Networks a copy of such assignment, del egation and assumption; and (4) has tr ansferred physical possession of all
Software and all associated documentation to the assig nee and dest royed all archival copies. Except as provided,
neither this License nor any rights acquired by Cus tomer through this License are assignable. Any attempted
assignment of rights and/or transfer of S oftware not specifically allowed shall be void and conclusively presumed a
material breach of this License.
If Nortel Networks (i) claims a materia l breach of this License, and (ii) provides written notice of such claimed
material breach to Customer and (iii) observes that such claimed m a terial breach remains uncorrected and/or
unmitigated more than th irty (30) days following Cust om er’s receipt of writte n notice specifying in reasonable
detail th e na ture of th e clai med m ater ia l brea ch, th en Cust omer ackn owl edge s that th is Licens e may be im med iatel y
terminated by Nortel Networks and Customer furth er acknowledges that any such termination shall be without
prejudice to any other rights and reme dies that Nortel Networks may have at la w or in equity.
THE EXPRESS LIMITED WARRANTIES FOR THE SOFTWARE ARE SOLELY THOSE LIMITED
WARRANTIES GRANTED TO CUSTOMER BY NORTEL NETWORKS IN THE MAIN BODY OF THE
AGREEMENT TO WHICH THIS LICENSE IS ATTACHED. THIS LICENSE DOES NOT CONFER ANY
WARRANTY TO CUSTOMER FROM OR BY NORTEL NETWORKS.
IN NO EVENT WILL NORTEL NETWORKS AND/OR NORTEL NETWORKS’ SUPPLIERS AND THEIR
DIRECTORS, OFFICERS, EMP LOYEES OR AGENTS BE LIABLE TO OR THROUGH CUSTOMER FOR
INCIDENTAL, INDIRECT, SPECIAL, CONSEQUENTIAL, PUNITIVE, OR EXEMPLARY DAMAGES OF
ANY KIND, INCLUDING LOST PROFITS, LOSS OF BUSINESS OR BUSINESS INFORMATION,
BUSINESS INTERRUPTION, OR OTHER ECONOMIC DAMAGE, AND FURTHER INCLUDING INJURY
TO PROPERTY , AS A RESULT OF USE OR INABILITY TO USE THE SOFTWARE OR BREACH OF ANY
WARRANTY OR OTHER TERM OF THIS LICENSE, REGARDLESS OF WHETHER NORTEL NETWORKS
AND/OR NOR TEL NETWORKS’ SUPPLIERS WERE ADVISED, HAD OTHER REASON TO KNOW, OR IN
FACT KNEW OF THE POSSIBILITY THEREOF.
THE RIGHTS AND OBLIGATIONS ARISING UNDER THIS LICENSE SHALL BE CONSTRUED IN
ACCORDANCE WITH THE LAWS OF THE STATE OF CALIFORNIA EXCEPT FOR ITS RULES
CONCERNING THE CONFLICT OF LAWS.
5
Using Passport 4400 Install Tool Version 4.2
Page 6

6
206906-D Rev 00 4.2
Page 7

Contents
About This Guide. . . . . . . . . . . . . . . . . . . . . . . . . . . . . . . . . . . . . . . . . . . . . . 13
Purpose of This Manual . . . . . . . . . . . . . . . . . . . . . . . . . . . . . . . . . . . . . . . . . . . . . . . .13
Who Should Use This Manual . . . . . . . . . . . . . . . . . . . . . . . . . . . . . . . . . . . . . . . . . . .14
How This Manual Is Organized . . . . . . . . . . . . . . . . . . . . . . . . . . . . . . . . . . . . . . . . . .14
Related Publication s . . . . . . . . . . . . . . . . . . . . . . . . . . . . . . . . . . . . . . . . . . . . . . . . . .15
Chapter 1
Passport 4400 Device Management. . . . . . . . . . . . . . . . . . . . . . . . . . . . . . . 17
Overview . . . . . . . . . . . . . . . . . . . . . . . . . . . . . . . . . . . . . . . . . . . . . . . . . . . . . . . . . . . 17
Passport 4400 Device Management Tools . . . . . . . . . . . . . . . . . . . . . . . . . . . . . . . . . .18
Which Tool To Use? . . . . . . . . . . . . . . . . . . . . . . . . . . . . . . . . . . . . . . . . . . . . . . . . . . .19
Initial Device Setup and Configuration . . . . . . . . . . . . . . . . . . . . . . . . . . . . . . . . .19
7
Detailed Configura tion . . . . . . . . . . . . . . . . . . . . . . . . . . . . . . . . . . . . . . . . . . . . . . 19
Update a Device Configuration . . . . . . . . . . . . . . . . . . . . . . . . . . . . . . . . . . . . . . .20
Diagnose F aults . . . . . . . . . . . . . . . . . . . . . . . . . . . . . . . . . . . . . . . . . . . . . . . . . . .20
Monitor Device Status . . . . . . . . . . . . . . . . . . . . . . . . . . . . . . . . . . . . . . . . . . . . . . 20
Generate Configuration Reports . . . . . . . . . . . . . . . . . . . . . . . . . . . . . . . . . . . . . .21
Replicate a Configuration . . . . . . . . . . . . . . . . . . . . . . . . . . . . . . . . . . . . . . . . . . .21
Chapter 2
Product Overview . . . . . . . . . . . . . . . . . . . . . . . . . . . . . . . . . . . . . . . . . . . . . 23
About Install Tool . . . . . . . . . . . . . . . . . . . . . . . . . . . . . . . . . . . . . . . . . . . . . . . . . . . . .23
Install Tool Software Versions . . . . . . . . . . . . . . . . . . . . . . . . . . . . . . . . . . . . . . . .23
What Is Install Tool? . . . . . . . . . . . . . . . . . . . . . . . . . . . . . . . . . . . . . . . . . . . . . . .23
Passport 4400 Software Support Levels . . . . . . . . . . . . . . . . . . . . . . . . . . . . . . . .24
Availabilit y . . . . . . . . . . . . . . . . . . . . . . . . . . . . . . . . . . . . . . . . . . . . . . . . . . . . . . .24
Workstation Requirements . . . . . . . . . . . . . . . . . . . . . . . . . . . . . . . . . . . . . . . . . . . . . .24
Security Considera tions . . . . . . . . . . . . . . . . . . . . . . . . . . . . . . . . . . . . . . . . . . . . . . . .25
Using Passport 4400 Install Tool Version 4.2
Page 8

8 Contents
Chapter 3
Connecting a Workstation. . . . . . . . . . . . . . . . . . . . . . . . . . . . . . . . . . . . . . . 27
Readying a New Passport 4400 . . . . . . . . . . . . . . . . . . . . . . . . . . . . . . . . . . . . . . . . . .27
Ethernet Connection . . . . . . . . . . . . . . . . . . . . . . . . . . . . . . . . . . . . . . . . . . . . . . . . . .28
Management Port Direct Connection . . . . . . . . . . . . . . . . . . . . . . . . . . . . . . . . . . . . . .29
Management Port Modem Connect ion . . . . . . . . . . . . . . . . . . . . . . . . . . . . . . . . . . . .30
Configuring the Mo dems . . . . . . . . . . . . . . . . . . . . . . . . . . . . . . . . . . . . . . . . . . . . . . .31
Community Strings . . . . . . . . . . . . . . . . . . . . . . . . . . . . . . . . . . . . . . . . . . . . . . . .25
Dial-Up Connections . . . . . . . . . . . . . . . . . . . . . . . . . . . . . . . . . . . . . . . . . . . . . . .25
Example . . . . . . . . . . . . . . . . . . . . . . . . . . . . . . . . . . . . . . . . . . . . . . . . . . . . . . . . . 28
Other Connection Options . . . . . . . . . . . . . . . . . . . . . . . . . . . . . . . . . . . . . . . . . . .28
Example . . . . . . . . . . . . . . . . . . . . . . . . . . . . . . . . . . . . . . . . . . . . . . . . . . . . . . . . . 29
About the Management Cables . . . . . . . . . . . . . . . . . . . . . . . . . . . . . . . . . . . . . . .29
Passport 4430/50/55 Modem Connections . . . . . . . . . . . . . . . . . . . . . . . . . . . . . .30
Passport 4460 Modem Connections . . . . . . . . . . . . . . . . . . . . . . . . . . . . . . . . . . .31
Configuring the Mo dem Attached to the PC . . . . . . . . . . . . . . . . . . . . . . . . . . . . .32
Configuring the Modem Attached to the Passport 4400 . . . . . . . . . . . . . . . . . . . .32
Testing the Modem Configuration . . . . . . . . . . . . . . . . . . . . . . . . . . . . . . . . . . . . .33
Chapter 4
Installing Install Tool . . . . . . . . . . . . . . . . . . . . . . . . . . . . . . . . . . . . . . . . . . . 3 5
Obtaining the Install Tool Softw are . . . . . . . . . . . . . . . . . . . . . . . . . . . . . . . . . . . . . . . . 35
Obtaining the Latest Release . . . . . . . . . . . . . . . . . . . . . . . . . . . . . . . . . . . . . . . .35
What the Installation Procedure Does . . . . . . . . . . . . . . . . . . . . . . . . . . . . . . . . . . . . .36
Installed Software Components . . . . . . . . . . . . . . . . . . . . . . . . . . . . . . . . . . . . . . .36
Null Modem Driver Troubleshooting Tip . . . . . . . . . . . . . . . . . . . . . . . . . . . . . . . .36
Preparing for the Installation . . . . . . . . . . . . . . . . . . . . . . . . . . . . . . . . . . . . . . . . . . . .37
Installing the Software . . . . . . . . . . . . . . . . . . . . . . . . . . . . . . . . . . . . . . . . . . . . . . . . .38
Installation Procedures . . . . . . . . . . . . . . . . . . . . . . . . . . . . . . . . . . . . . . . . . . . . . 38
Chapter 5
Configuring the Workstation. . . . . . . . . . . . . . . . . . . . . . . . . . . . . . . . . . . . . 43
Purpose . . . . . . . . . . . . . . . . . . . . . . . . . . . . . . . . . . . . . . . . . . . . . . . . . . . . . . . . . . . .43
For Information About Cable Connections . . . . . . . . . . . . . . . . . . . . . . . . . . . . . . . . . .43
206906-D Rev 00
Page 9

Contents 9
About the Passport Null Modem Driver . . . . . . . . . . . . . . . . . . . . . . . . . . . . . . . . . . . .44
Locating the Null Modem Driver . . . . . . . . . . . . . . . . . . . . . . . . . . . . . . . . . . . . . .44
If You Are Using a Dial-Up Modem Connection . . . . . . . . . . . . . . . . . . . . . . . . . . .44
Required Software Components . . . . . . . . . . . . . . . . . . . . . . . . . . . . . . . . . . . . . . . . .44
If You Have a Windows NT or Windows 2000 Workstation . . . . . . . . . . . . . . . . . . 45
If You Have a Windows 95, Windows 98, or Windows Me Workstation . . . . . . . .45
Configurin g a Dial-Up Networking Connection . . . . . . . . . . . . . . . . . . . . . . . . . . . . . . .46
Define a New Connection . . . . . . . . . . . . . . . . . . . . . . . . . . . . . . . . . . . . . . . . . . .46
Fine Tune the New Connection . . . . . . . . . . . . . . . . . . . . . . . . . . . . . . . . . . . . . . .48
Chapter 6
Install Tool Basics . . . . . . . . . . . . . . . . . . . . . . . . . . . . . . . . . . . . . . . . . . . . . 5 1
Collecting Configuration Data . . . . . . . . . . . . . . . . . . . . . . . . . . . . . . . . . . . . . . . . . . .51
Obtaining the Data Collection Forms . . . . . . . . . . . . . . . . . . . . . . . . . . . . . . . . . . .52
Sample Data Collection Form . . . . . . . . . . . . . . . . . . . . . . . . . . . . . . . . . . . . . . . .52
For More Information . . . . . . . . . . . . . . . . . . . . . . . . . . . . . . . . . . . . . . . . . . . . . . .53
Starting Install Tool . . . . . . . . . . . . . . . . . . . . . . . . . . . . . . . . . . . . . . . . . . . . . . . . . . . .53
Before Running the Software . . . . . . . . . . . . . . . . . . . . . . . . . . . . . . . . . . . . . . . .53
Procedure . . . . . . . . . . . . . . . . . . . . . . . . . . . . . . . . . . . . . . . . . . . . . . . . . . . . . . .53
What You Will S e e . . . . . . . . . . . . . . . . . . . . . . . . . . . . . . . . . . . . . . . . . . . . . . . . .55
Multiple Sessions O n a Single Unit Not Recommended . . . . . . . . . . . . . . . . . . . . 56
What the Backpanel Colors Mean . . . . . . . . . . . . . . . . . . . . . . . . . . . . . . . . . . . . . . . .56
Operating Modes . . . . . . . . . . . . . . . . . . . . . . . . . . . . . . . . . . . . . . . . . . . . . . . . . . . . .57
Wizard Mode . . . . . . . . . . . . . . . . . . . . . . . . . . . . . . . . . . . . . . . . . . . . . . . . . . . . .57
Standard Mode . . . . . . . . . . . . . . . . . . . . . . . . . . . . . . . . . . . . . . . . . . . . . . . . . . .57
Demo Mode . . . . . . . . . . . . . . . . . . . . . . . . . . . . . . . . . . . . . . . . . . . . . . . . . . . . . .58
Overview of the Install Tool Menus . . . . . . . . . . . . . . . . . . . . . . . . . . . . . . . . . . . . . . .59
File Menu . . . . . . . . . . . . . . . . . . . . . . . . . . . . . . . . . . . . . . . . . . . . . . . . . . . . . . . .59
Wizard Menu . . . . . . . . . . . . . . . . . . . . . . . . . . . . . . . . . . . . . . . . . . . . . . . . . . . . .59
System Menu . . . . . . . . . . . . . . . . . . . . . . . . . . . . . . . . . . . . . . . . . . . . . . . . . . . . .59
Help Menu . . . . . . . . . . . . . . . . . . . . . . . . . . . . . . . . . . . . . . . . . . . . . . . . . . . . . . .60
Chapter 7
Using Install Tool Wizards. . . . . . . . . . . . . . . . . . . . . . . . . . . . . . . . . . . . . . . 61
About the Wizards . . . . . . . . . . . . . . . . . . . . . . . . . . . . . . . . . . . . . . . . . . . . . . . . . . . .61
Using Passport 4400 Install Tool Version 4.2
Page 10

10 Contents
Purpose . . . . . . . . . . . . . . . . . . . . . . . . . . . . . . . . . . . . . . . . . . . . . . . . . . . . . . . . .61
Available Wizards . . . . . . . . . . . . . . . . . . . . . . . . . . . . . . . . . . . . . . . . . . . . . . . . .62
Starting a Wizard . . . . . . . . . . . . . . . . . . . . . . . . . . . . . . . . . . . . . . . . . . . . . . . . . . . . .64
From Within Install Tool . . . . . . . . . . . . . . . . . . . . . . . . . . . . . . . . . . . . . . . . . . . . .64
From the Windows Start Menu . . . . . . . . . . . . . . . . . . . . . . . . . . . . . . . . . . . . . . . 64
What You See When You Start a Wizard . . . . . . . . . . . . . . . . . . . . . . . . . . . . . . . .64
How Wizard Mo de Works . . . . . . . . . . . . . . . . . . . . . . . . . . . . . . . . . . . . . . . . . . . . . . .66
Basic Tasks . . . . . . . . . . . . . . . . . . . . . . . . . . . . . . . . . . . . . . . . . . . . . . . . . . . . . . . . .67
Navigating Within a Wizard . . . . . . . . . . . . . . . . . . . . . . . . . . . . . . . . . . . . . . . . . .67
Specifying Configuration Values . . . . . . . . . . . . . . . . . . . . . . . . . . . . . . . . . . . . . . 67
Resetting the Passport 4400 . . . . . . . . . . . . . . . . . . . . . . . . . . . . . . . . . . . . . . . . .72
Verifying the Configuration Values . . . . . . . . . . . . . . . . . . . . . . . . . . . . . . . . . . . . .73
Saving and Activating Your New Configuration . . . . . . . . . . . . . . . . . . . . . . . . . . .73
Chapter 8
Using Standard Mode . . . . . . . . . . . . . . . . . . . . . . . . . . . . . . . . . . . . . . . . . . 77
Configuring Selected Ports . . . . . . . . . . . . . . . . . . . . . . . . . . . . . . . . . . . . . . . . . . . . .77
Purpose . . . . . . . . . . . . . . . . . . . . . . . . . . . . . . . . . . . . . . . . . . . . . . . . . . . . . . . . .77
Procedure . . . . . . . . . . . . . . . . . . . . . . . . . . . . . . . . . . . . . . . . . . . . . . . . . . . . . . .77
Entering Multiple Values . . . . . . . . . . . . . . . . . . . . . . . . . . . . . . . . . . . . . . . . . . . .79
Displaying the Status of the Unit . . . . . . . . . . . . . . . . . . . . . . . . . . . . . . . . . . . . . . . . .83
Purpose . . . . . . . . . . . . . . . . . . . . . . . . . . . . . . . . . . . . . . . . . . . . . . . . . . . . . . . . .83
Procedure . . . . . . . . . . . . . . . . . . . . . . . . . . . . . . . . . . . . . . . . . . . . . . . . . . . . . . .83
Displaying the Status of a Port . . . . . . . . . . . . . . . . . . . . . . . . . . . . . . . . . . . . . . . . . . . 83
Purpose . . . . . . . . . . . . . . . . . . . . . . . . . . . . . . . . . . . . . . . . . . . . . . . . . . . . . . . . .83
Procedure . . . . . . . . . . . . . . . . . . . . . . . . . . . . . . . . . . . . . . . . . . . . . . . . . . . . . . .84
Testing a Port . . . . . . . . . . . . . . . . . . . . . . . . . . . . . . . . . . . . . . . . . . . . . . . . . . . . . . . .84
Purpose . . . . . . . . . . . . . . . . . . . . . . . . . . . . . . . . . . . . . . . . . . . . . . . . . . . . . . . . .84
Procedure . . . . . . . . . . . . . . . . . . . . . . . . . . . . . . . . . . . . . . . . . . . . . . . . . . . . . . .84
Performing a Reset Operation . . . . . . . . . . . . . . . . . . . . . . . . . . . . . . . . . . . . . . . . . . .85
Resetting to Factory Defaults . . . . . . . . . . . . . . . . . . . . . . . . . . . . . . . . . . . . . . . . . . . .86
Chapter 9
Accessing Remote Passport 4400s . . . . . . . . . . . . . . . . . . . . . . . . . . . . . . . 89
Purpose . . . . . . . . . . . . . . . . . . . . . . . . . . . . . . . . . . . . . . . . . . . . . . . . . . . . . . . . . . . .89
206906-D Rev 00
Page 11

Contents 11
IP Address Requirements . . . . . . . . . . . . . . . . . . . . . . . . . . . . . . . . . . . . . . . . . . . . . .89
Which Remote Nodes Are Reachable? . . . . . . . . . . . . . . . . . . . . . . . . . . . . . . . . . . . .90
Workstation Default Gateway . . . . . . . . . . . . . . . . . . . . . . . . . . . . . . . . . . . . . . . . . . . .90
Setting the Default Gateway Option . . . . . . . . . . . . . . . . . . . . . . . . . . . . . . . . . . .90
Defining a Route . . . . . . . . . . . . . . . . . . . . . . . . . . . . . . . . . . . . . . . . . . . . . . . . . .91
For More Information . . . . . . . . . . . . . . . . . . . . . . . . . . . . . . . . . . . . . . . . . . . . . . .92
Connecting To a Remote Passport 4400 . . . . . . . . . . . . . . . . . . . . . . . . . . . . . . . . . . .92
Chapter 10
Using Telnet to Access the CLI. . . . . . . . . . . . . . . . . . . . . . . . . . . . . . . . . . . 95
Purpose . . . . . . . . . . . . . . . . . . . . . . . . . . . . . . . . . . . . . . . . . . . . . . . . . . . . . . . . . . . .95
Establishing a Local Telnet Connection . . . . . . . . . . . . . . . . . . . . . . . . . . . . . . . . . . . .95
Establishing a Remote Telnet Connect ion . . . . . . . . . . . . . . . . . . . . . . . . . . . . . . . . . .96
Prerequisites . . . . . . . . . . . . . . . . . . . . . . . . . . . . . . . . . . . . . . . . . . . . . . . . . . . . .96
Procedure . . . . . . . . . . . . . . . . . . . . . . . . . . . . . . . . . . . . . . . . . . . . . . . . . . . . . . .97
Restriction on Reset Operations . . . . . . . . . . . . . . . . . . . . . . . . . . . . . . . . . . . . . . . . .98
Closing the Telnet Connection . . . . . . . . . . . . . . . . . . . . . . . . . . . . . . . . . . . . . . . . . . .98
Appendix A
Troubleshooting. . . . . . . . . . . . . . . . . . . . . . . . . . . . . . . . . . . . . . . . . . . . . . 101
All Backpanel Ports Are Gray . . . . . . . . . . . . . . . . . . . . . . . . . . . . . . . . . . . . . . . . . . .102
Cannot Access a Passport 4400 . . . . . . . . . . . . . . . . . . . . . . . . . . . . . . . . . . . . . . . .102
Cannot Change DLCI Value . . . . . . . . . . . . . . . . . . . . . . . . . . . . . . . . . . . . . . . . . . . .102
Desktop Folder Icons are Incorrect . . . . . . . . . . . . . . . . . . . . . . . . . . . . . . . . . . . . . .103
Direct-Connect Modem Not In Dial-Up Network List . . . . . . . . . . . . . . . . . . . . . . . . .103
Dial-Up Networking Connection Fails . . . . . . . . . . . . . . . . . . . . . . . . . . . . . . . . . . . .103
Error 621 . . . . . . . . . . . . . . . . . . . . . . . . . . . . . . . . . . . . . . . . . . . . . . . . . . . . . . . . . .104
Help Page Error . . . . . . . . . . . . . . . . . . . . . . . . . . . . . . . . . . . . . . . . . . . . . . . . . . . . .104
Help Page Does Not Open . . . . . . . . . . . . . . . . . . . . . . . . . . . . . . . . . . . . . . . . . . . . .105
Incorrect Backpanel Display . . . . . . . . . . . . . . . . . . . . . . . . . . . . . . . . . . . . . . . . . . . .105
Install Tool Window Is Empty . . . . . . . . . . . . . . . . . . . . . . . . . . . . . . . . . . . . . . . . . . .105
Installation Error (Missing File) . . . . . . . . . . . . . . . . . . . . . . . . . . . . . . . . . . . . . . . . . .106
Installation Fails (No Error Message) . . . . . . . . . . . . . . . . . . . . . . . . . . . . . . . . . . . . .106
“Invalid Data” Message Appears . . . . . . . . . . . . . . . . . . . . . . . . . . . . . . . . . . . . . . . .106
No Response from the Next Button . . . . . . . . . . . . . . . . . . . . . . . . . . . . . . . . . . . . . .107
Using Passport 4400 Install Tool Version 4.2
Page 12

12 Contents
Passport 4400 Fails Following a Reset . . . . . . . . . . . . . . . . . . . . . . . . . . . . . . . . . . .107
Unable To Add Multiple IP Addresses . . . . . . . . . . . . . . . . . . . . . . . . . . . . . . . . . . . .107
Uninstall Fails . . . . . . . . . . . . . . . . . . . . . . . . . . . . . . . . . . . . . . . . . . . . . . . . . . . . . . . 108
Appendix B
Services and Features Supported . . . . . . . . . . . . . . . . . . . . . . . . . . . . . . . 109
System Parameters . . . . . . . . . . . . . . . . . . . . . . . . . . . . . . . . . . . . . . . . . . . . . . . . . .109
LAN Services . . . . . . . . . . . . . . . . . . . . . . . . . . . . . . . . . . . . . . . . . . . . . . . . . . . . . . . 110
WAN IP/IPX Routing . . . . . . . . . . . . . . . . . . . . . . . . . . . . . . . . . . . . . . . . . . . . . . . . . 110
WAN Hardware Interfaces . . . . . . . . . . . . . . . . . . . . . . . . . . . . . . . . . . . . . . . . . . . . . 110
WAN Services . . . . . . . . . . . . . . . . . . . . . . . . . . . . . . . . . . . . . . . . . . . . . . . . . . . . . . 111
Voice Services . . . . . . . . . . . . . . . . . . . . . . . . . . . . . . . . . . . . . . . . . . . . . . . . . . . . . . 112
Appendix C
Passport 4400 IP Addressing . . . . . . . . . . . . . . . . . . . . . . . . . . . . . . . . . . . 113
Overview . . . . . . . . . . . . . . . . . . . . . . . . . . . . . . . . . . . . . . . . . . . . . . . . . . . . . . . . . . 113
Default IP Addresses . . . . . . . . . . . . . . . . . . . . . . . . . . . . . . . . . . . . . . . . . . . . . . . . . 113
Bridging and Routing Modes . . . . . . . . . . . . . . . . . . . . . . . . . . . . . . . . . . . . . . . . . . . 114
Basic Configuration Tasks . . . . . . . . . . . . . . . . . . . . . . . . . . . . . . . . . . . . . . . . . . 114
IP Address Requirements . . . . . . . . . . . . . . . . . . . . . . . . . . . . . . . . . . . . . . . . . . 115
Examples . . . . . . . . . . . . . . . . . . . . . . . . . . . . . . . . . . . . . . . . . . . . . . . . . . . . . . . 117
Appendix D
Uninstalling Install Tool. . . . . . . . . . . . . . . . . . . . . . . . . . . . . . . . . . . . . . . . 119
Uninstalling the InstallTool Software . . . . . . . . . . . . . . . . . . . . . . . . . . . . . . . . . . . . . 119
Before Starting the Uninstall Operation . . . . . . . . . . . . . . . . . . . . . . . . . . . . . . . . 119
Procedure . . . . . . . . . . . . . . . . . . . . . . . . . . . . . . . . . . . . . . . . . . . . . . . . . . . . . . 119
Removing the Installation Directory . . . . . . . . . . . . . . . . . . . . . . . . . . . . . . . . . . .120
Glossary . . . . . . . . . . . . . . . . . . . . . . . . . . . . . . . . . . . . . . . . . . . . . . . . . . . . 121
Index . . . . . . . . . . . . . . . . . . . . . . . . . . . . . . . . . . . . . . . . . . . . . . . . . . . . . . . 139
206906-D Rev 00
Page 13

About This Guide
This chapter desc ribe s the conte nt and org ani zation of this g uide and ide ntifies th e
audience to which it is targeted.
Topics in this chapter:
• Purpose of This Manual
• Who Should Use This Manual
• How This Manual Is Organized
• Related Publications
Purpose of This Manual
13
This manual identifies the requirements for using the Passport 4400 Install To ol
Release 4.2 software, provides detailed instructions for inst alling it and
configurin g a workstat ion to support it, and provides an introduc tion to the basic
Install Tool operations.
Using Passport 4400 Install Tool Version 4.2
Page 14

14
Who Should Use This Manual
You should use this manual if you are performing any of the following tasks.
Task Who Typically Does It Refer to
Installing the software onto a
workstation
Cabling a workstat ion to a
Passport 4400
Configuring a work station for
Install To o l ac tivit i es
Providing conf iguration data to the
Install Tool user
Performing a basic Passport 4400
configurati on (using Install Tool)
How This Manual Is Organized
This manual is organized as follows:
Chapter Description
System Administrator Chapters 2 and 4 and
Appendix D
System Adminis tr ator Chapters 3 and 9
System Adminis tr ator Chapter 5
Network Architect or
Network Engineer
Network Engineer or
Operator
Appendixes B and C
and the online help
Planning Forms
Chapters 1, 6
through 10, and
Appendix A
1 Presents an ov erview of the devi ce manage ment tool s that ar e avail able fo r the
2 Identifies the system requirements for using Install Tool , and describes its
3 Provides procedures for connecting the workstat ion to a Passport 4400.
4 Provides procedures for installing InstallT ool on a workstation.
5 Provides guidelines for confi guring a Windows workstation to support
6 Provides instructions for starting I nstall Tool and describe s its basic operati onal
7 Describes and provides instructions for using the Install Tool wizards.
8 Provides in structions for configurin g, testing, and displaying the status of
206906-D Rev 00 4.2
Passport 4400.
overall capabilities.
Install Tool operations.
features.
selected ports.
Page 15

Chapter Description (cont inued)
9 Provides instructions for est ablishing an Ethernet connection wit h a remote
Passport 4400.
10 Provides instructions for establishing a local or remote Telnet connection,
thereby allowi ng access to the Passport 4400 CLI so that you can perform
additional configuration tasks.
A Identifi es Install Tool error conditions and m essages and provides procedures
for working aroun d, correcting, or recovering from them.
B Identifi es the parameters that you can configure through Install Too l.
C Presents an overview of Passport 4400 IP addressing requirements.
D Provides instructions for r emoving Install T ool from your workstation.
Related Publications
15
For more information about the Passport 4400, refer to the following documents:
• Passport 4400 Setup Poster (Nortel Networks part number 209444-A)
• Passport 4400 Hardware Installation Manual (For Passport 4430/50/55)
(Nortel Networks part number 800-1951-40)
• Refere nce for the Passport 4460 Hardw are (Nort el Networks part number
205677)
• Getting Started with the Passport 4400, Release 4.1 (Nortel Networks part
number 209664)
• Refere nce for Passport 4400 Cables (Nortel Networks part num ber 205678)
• Configuring and Operating Passport 4400 (Nortel Networks part number
206916) online doc umentation
• Passport 4400 Refere nce for CLI (Nortel Networks part number 209666)
• Using the Passport 4400 Mass Deployment and Reporting Tool (Nortel
Networks part number 209665)
• Refere nce for Passport 4400 and 6400 Interworking (Nortel Networks part
number 209372)
• Getting Start ed with Passport 4400 and 6400 Interworking (Nortel Networks
part number 209371)
• Passport 4400 Release Notes for Passport 4430/50/55 Release 4.0 (Nortel
Networks part number 800-1953-40)
Using Passport 4400 Install Tool Version 4.2
Page 16

16
• Passport 4400 Release Notes f or Pas sport 4400 Release 4.1 ( Nortel Net works
part number 205679)
206906-D Rev 00 4.2
Page 17

Chapter 1
Passport 4400 Dev ice Man agem ent
This chapter provides a brief overvie w of the device management tools that are
available for the Passport 4400.
Topics in this chapter:
• Overview
• Passport 4400 Device Management T ools
• Which Tool To Use?
Overview
17
Passport 4400s are managed through Simple Network Management Protocol
(SNMP), an application- level pr ot ocol that o perate s over TCP/IP. Th erefore, all of
the Passport 4400 device management tools (refer to “Passport 4400 Device
Management Tools” on page 18) accept your commands and instructions, then
translate them into SNMP commands.
Using Passport 4400 Install Tool Version 4.2
Page 18

18
Passport 4400 Device Management T oo ls
The Passport 4400 provides the following device management tools:
Tool When To Use It For More I nformation
Install Tool Use Install Tool to set up a factory-new
or factory-defaulted Passport 4400,
such that network connectivi ty and
basic services are enabled. I n addition,
you can use Install Tool to perform
real-ti me monitoring of Passport 4400s
units in your net work.
Passport 4400
Configurator
Use the Configurator to perform any
Passport 4400 confi guration task.
Note 1: The Passport 4400
Configurator is an embedded web
interface. It is a built-in component of
Passport 4400 units ru nning software
release 4.0 and higher.
Note 2: To access the Passport 4400
Configurato r fr om wit hin Install Tool,
select
Web C o nfigu rator
System menu.
Note 3: Like InstallT ool, the
Passport 4400 Config urator can acce ss
the Passport4400 through PPP IP
connecti vity.
from the
Refer to this manual and
the Instal l T ool on line help
for com pl e te
documentation.
Refer to the
Configuring
and Operating
Passport 4400 Software
(Nortel Net works part
number 206916) onl ine
documentat ion.
Command Line
Interface (CLI )
Passport 4400
Mass Deployment
and Reporting Tool
206906-D Rev 00 4.2
Use the CLI to perfor m any
configuration task, esp ecially low-level
or specialized tasks.
Use the Mass Deployment and
Reporting Tool to generate
configurati on reports and to replicate
the configuration of one unit to mul tiple
units.
Refer to the
Passport 4400 Reference
for CLI
part number 209666).
Refer to the
(Norte l Networks
Using the
Passport 4400 Mass
Deployment and
Reporting Tool
Networks part number
209665)
(Nortel
Page 19

Which Tool To Use?
Configuring a Passport 4400 typically involves the use of Install Tool and one or
more of the other device management tools.
The following paragraphs provide recommendations for using one or another of
the Passport 4400 device management tools for pe rforming some basic de vice
management tasks.
Initial Device Setup and Configuration
The task: Set up a factory- new or factory-defaulted Passport 4400 to
Recommended tool: Install Tool
19
enable basic network connectivity and basic service
functionality.
Alternative: Configurat or or CLI
Description: No specialized skills or knowledge are required to use
Install Tool.
Note: You can also use the Mass Deployment and Reporting
Tool to replicate th e configuration of one unit to a group of
factory-new or factory-defaulted units.
Detailed Configuration
The task: Configure all ports and servic es on the uni t.
Recommended tool: Configurat or
Alternative: CLI
Description: Once you have used Install Tool to configure all Passpor t 4400
services to a basic level, you can then use the Configurator to
configure these services to a much more detailed level. In
addition, you may need to use the CLI for some low-level or
rarely-used configuration settings.
Using Passport 4400 Install Tool Version 4.2
Page 20

20
Update a Device Configuration
The task: Update a device configuration to support the addi tion,
modification, or removal of har dware and services.
Recommended Tool: Install Tool or Configurator
Alternatives: CLI
Description: In simp le cases, you can use an Install Tool wizard to configure
a new service or a new hardware module.
Diagnose Faults
The task: Diagnose Device Faults.
Recommended tool: CLI or Instal l Tool
Alternative: Configurat or
Description: Both Install T ool and Configurator provide some leve l of
Monitor Device Status
The task: Monitor the status of a Passport 4400 (in rea l- ti m e).
Recommended tool: Install Tool
Alternative: Configurat or
Description: Install Tool polls t he unit with which it has a connection every
diagnostic support for the Passpo rt 4400. The CLI provides the
most comprehensive level of support.
ten seconds and updates the backpanel di splay if there is a
change in the status of any ports. In addition, You can get a
detailed di splay of the status of any port on the unit. Install Tool
updates the display with each polling cycle.
206906-D Rev 00 4.2
Page 21

Generate Configuration R eports
The task: Produce a report showing the configuration settings of a
Passport 4400.
Recommended tool: Mass Deployment and Reporting Tool
Alternative: None
Description: Mass Deployment and Reporting Tool generates reports that
detail the configuratio n of the unit to which you are connected.
Replicate a Configuration
The task: Replicate t he configur ation of one Passpor t 4400 to any number
of other Passport 4400s.
Recommended tool: Mass Deployment and Reporting Tool
21
Alternative: None
Description: Mass Deployment and Reporting Tool allows you to ext ract the
configuration of one Passport 4400 and replicate it to any
number of other Passport 4400s that require a similar
configuration. The replication process i ncludes a
parameter -r eplacement mechanism in which you designat e
values for pa rameter s (such as IP addresses) that ar e uniq ue to
each target system.
Using Passport 4400 Install Tool Version 4.2
Page 22

22
206906-D Rev 00 4.2
Page 23

Chapter 2
Product Overview
This chapte r provide s a brie f ove rview of Pass port 4400 Install Too l and desc ribe s
the requirements for run ning it.
Topics in this chapter:
• About Install Tool
• Workstation Requirements
• Security Considerations
About Install Tool
23
Install Tool Software Versions
This manual pertains only to the Passport 4400 Install Tool Release 4.x
software. For infor mation about Install Tool Version 1.0, refer to Install Tool
Version 1.0 Setup Guide, document number 800-1983-30. For information abou t
Install Tool Version 2.0x, refer to Install Tool V ersion 2.0x Startup Guide,
document number 800-1983-31.
What Is Install Tool?
Install Tool is a standalone program for configuring the basic services of a
Passport 4400 unit sufficient to make it accessibl e wi thin a Passport network. It is
designed to simplify the initial setup of a new unit that you are installing in a
network.
Using Passport 4400 Install Tool Version 4.2
Page 24

24
Install Tool provides a graphical representation of a Passport 4400 backpanel to
show the current configur ation of the unit and to allow basic configuration of the
primary services available on the unit.
Passpo rt 4400 Software Support Levels
Passport 4400 Install Tool Release 4.2 supports the following Passport 4400
models, running Release 3.x and Release 4.x system software:
• Passport 4430
• Passport 4450 and Passport 4455
• Passport 4460
Availability
Install Tool is included on the Passport 4400 software distribution CD. In
addition, distributors can download the Install Tool sof tware, at no cost, from the
Partner B u s ine ss Ce nter web site (http://www57.nortelnetworks.com/global/
products/passport/software.html).
Workstation Requirements
The workstation on which you install the Install Tool program must meet the
following hardware and software requirements:
• A Pentium 90 MHz PC (166 MHz or higher is recommended)
• 100 MB free disk space (minimum)
• W indows 95, 98, or Me with 24MB DRAM (minimum), or Windows NT 4.0
or 2000 Workstation with 48MB DRAM (minimum)
• Netscape Communicator 4.7 (or higher) or Internet Explorer 4.x (or higher)
• SVGA video with 800 x 600 dpi resolution support ing 256 colors or better
(1024 x 768 dpi resolution supporting 65535 colors recommended)
• An Ethernet network card
• An available serial port
• A mouse or other pointing device
206906-D Rev 00 4.2
Page 25

Refer to “What the Installation Procedure Does” on page 36 for a description of
additional sof twa re that is required to run Install Tool.
Security Considerations
There are two security-related issues to consider when planning your
Passport 4400 device management operations.
Community Strings
The Passport 4400 uses SNMP Version 1 for all of its dev ice management
operations (confi guring, monitoring, resetting, and so forth). SNMP Version 1
uses community strings to control access to devices in a network. Since these are
simple text strings, they are relatively insecure.
25
You can use the Passport 4400 Configurator or the Passport 4400 CLI to change
your community strings. Install Tool allows you to specify a node’s community
string (password) when you establish a connection with the node, but it does not
include a provision to change the community string.
Dial- Up Connections
The Passport 4400 provides a PPP stack, thereby enabling access to Passport 4400
nodes through dial-up connections. This PPP implementation doe s not provide
authentication controls. Therefor e, if you connect a modem to a Passport 44 00 to
support a dial- up connec tion , tha t node bec omes accessi ble to a ny rem ote hos t t hat
knows the phone number of the modem and the community string of that node.
Furthermore, any host that successfully connects to a dial-up port can potentially
gain access to all devices that are visible to the Passport 4400.
It is recommended that you take appropriate measures to protect your network
from unauthorize d access. For example:
• If you access a Passport 4400 through a dial-up connecti on, disconnect the
modem from the Passport 4400 at the completion of your session.
• Consider using a dial-back modem rather than a dial-up modem.
Using Passport 4400 Install Tool Version 4.2
Page 26

26
• Treat your community strings as passwords and manage them as you would
any other password system.
For more information about dial-up connections, refer to “Connecting a
Workstation” on page 27 and “Configuring a Dia l-Up Networking Connection”
on page 46.
206906-D Rev 00 4.2
Page 27

Chapter 3
Connecti ng a Work station
This chapte r describe s the requ irements a nd proce dures for est ablishi ng a direct or
modem connection between a Passport 4400 and the workstation upon which you
will install Inst all Tool.
Topics in this chapter:
• Readying a New Passport 4400
• Ethernet Connection
• Management Port Direct Connection
• Management Port Modem Connection
• Configuring the Modems
27
Readying a New Passport 4400
A factory-new Passport 44 00 requires some prepar ation before you can configure
it using Install Tool. The following manuals provide specif ic instructions for
Passport 4400 physical installation, preparation, and cable connections:
If you have a . . . Refer to . . .
Passport 4430, 4450, or 4455
Passport 4460
Passport 4400 Hardware Instal lation Manual
Reference for Passport 4460 Hardware
Reference for Passport 4400 Cables
, and
Using Passport 4400 Install Tool Version 4.2
Page 28
28
Ethernet Connection
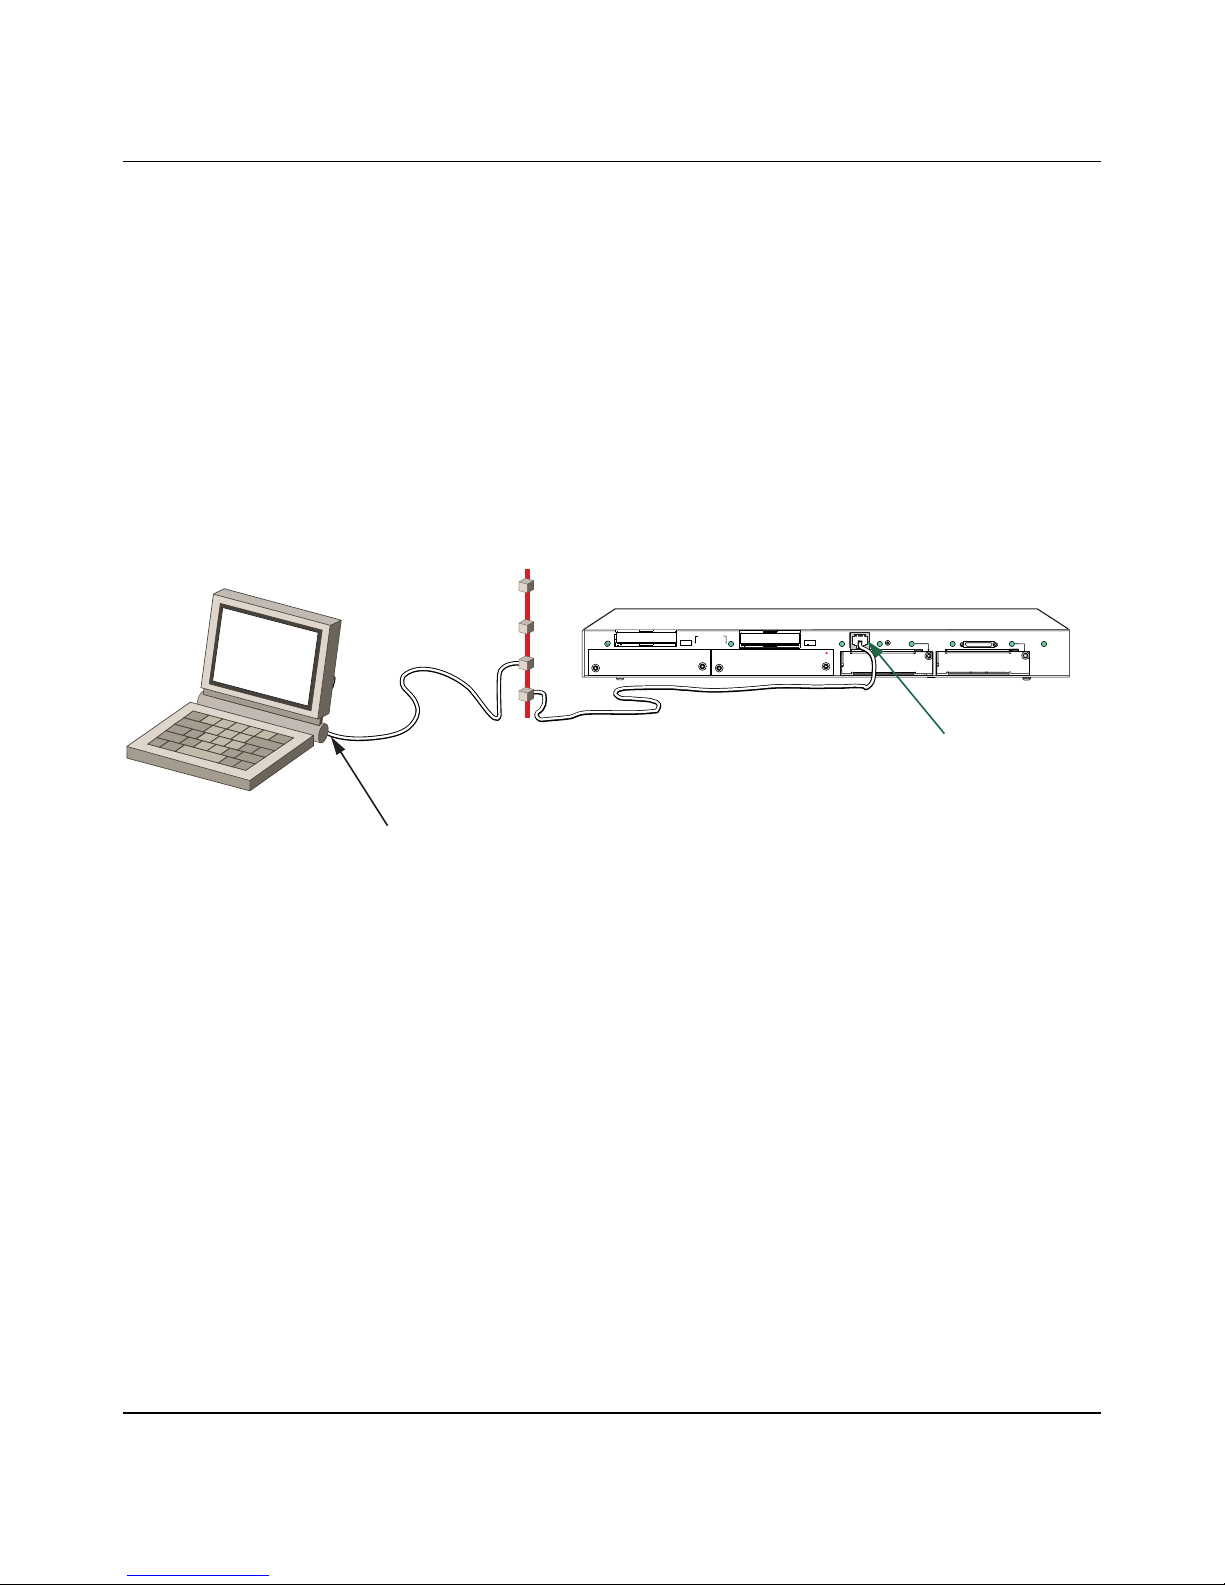
The Passport 4400 is shipped from the factory with a pre-configur ed IP address
(192.168.200.200). You can connect your workstation to the unit using the
Ethernet port, as long as the worksta tion is in the same IP segment as the
Passport 4400.
Example
This illustration shows an Ethernet connection on a Passport 4460.
Passport 4460
Network
Interface Card
Other Connection Options
If your workstation’s Ethernet port is not configured for the same IP segment as
that of the Passport 4400, you must connect your workstation to the unit ove r the
management port, as describe d in “Management Por t Direct Connection” on
page 29 and “Management Port M odem Connection” on page 30.
EXPANSION
STAT
RST
2
10/100
P
O
R
T
2
P2 STATUS
P1 STATUS
PORT 1
P3 STATUS
SYSTEM
P
STATUS
O
R
T
3
LAN Port
206906-D Rev 00 4.2
Page 29
Management Port Direct Connection
If the PC and Passport 4400 are in physical proximity to one another, you can
directly connect them using the management cable supplied with the
Passport 4400.
Example
This illustration shows a direct management port connection on a Passport 4460.
PC
29
Management Port Connector
Serial Port
About the Management Cables
There are two types of management cables used on Passport 4400 units:
• Use management cable number NTAU17AA for Passport 4430,
Passport 4450, and Passport 4455 units. In this case, you connect the DB-25
end of the cable to the PC and the RJ-45 end of the cable to the Passport 4400
management port. ( You may need a 9 pin-to- 25 pin RS-232 ser ial port a dapte r
or a female-t o-female 25-pin ad ap ter t o connect the cable to the PC.)
• Use management cable 207490-A for Passport 4460 units. This is a standard
DB9 femal e to DB9 fem al e seri al cabl e.
115/230V
MGNT
PORT
RESERVED
SERVICE
PORT
Using Passport 4400 Install Tool Version 4.2
Page 30
30
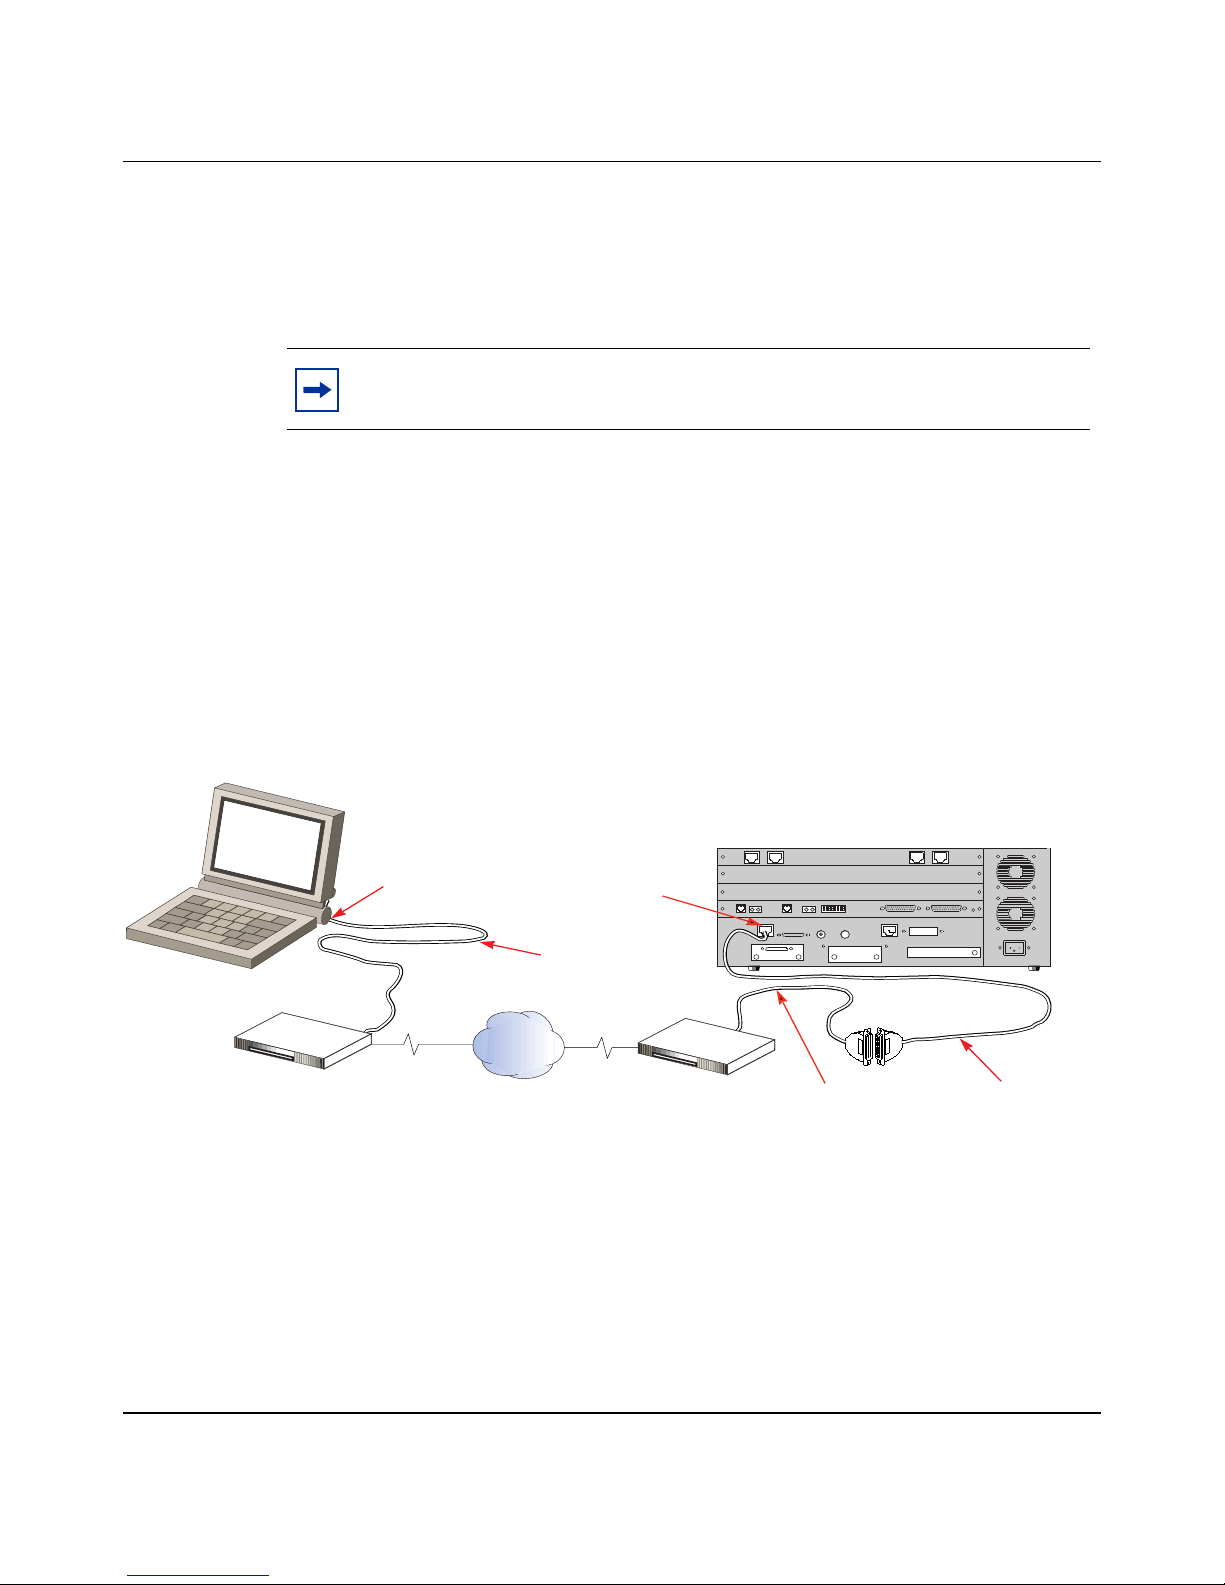
Management Port Modem Connection
If the PC and the Passport 4400 are not in physical proximity to one another, you
can connect them through a modem.
Note: For more detailed infor mation on connecting a modem to the
Passport 4400, see the hardware reference manuals.
Passport 4430/50/55 Modem Connections
With Passport 4430, Passport 4450, and Passpor t 4455 units, you use a null
modem cable to connect the modem to the management port.
Example
This illustration shows a modem connection on a Passport 4450.
PC
Passport 4400
tSerial Por
Modem
Management
Port
Serial Cable
Modem
Null Modem
Cabling the Modem to the Passport 4430/50/55
You need to make the following cable connection between a Passport 4430/50/55
and the modem to which it is connected:
NTAU17AA
206906-D Rev 00 4.2
Page 31

• Connect one end of the management cabl e to the Passport 4400 management
port. (For cable number NTAU17AA, connect the RJ-45 end of the cable to
the management por t.)
• Connect the other end of the management cable to a null modem. (For cable
number NTAU17AA, connect the DB-25 end of the management cable to the
null-modem. You may need a 9 pin-to-25 pin RS-232 serial port adapter or a
female-to-female 25-pin adapter to make this connection.)
• Connect the null-modem cable to the modem.
Passport 4460 Modem Connections
With Passport 4460s, the modem connects directly to the management port.
Example
31
This illustration shows a modem connection on a Passport 4460.
PC
Serial Port
Serial Cable
Modem
Configuring the Modems
Modem
115/230V
Management Port Connector
MGNT
PORT
RESERVED
SERVICE
PORT
If you are using a modem connection between your workstation and a
Passport 4400, the modems at each end of the connection must be configured
correctly to support communications with a Passport 4400.
Using Passport 4400 Install Tool Version 4.2
Page 32

32
Configuring the Mode m Attached to the PC
When you configure the modem that is attached to your PC, be sure to choose the
correct driver for the device. Once the modem is installed, configure the modem
properties with the phone number of the modem that is atta ched to the
Passport 4400.
Configuring the Modem Attached to the Passport 4400
The modem that is attached to the Passport 4400 must be configured for Quiet
operations (no result code, no command echo/local echo).
Caution: Do not connect a modem to the Passport 4400 management
port unless it is configu red for Quiet operations (as described in the
procedure below). Otherwise, the unit will not boot up succe ssfully
following a reset operation. Refer to your hardware manual for more
detailed information.
You use a terminal emulation program or a dumb terminal to configure the
modem. In either case, you must set the modem baud rate to match that of the
Passport 4400 management port (the default is 9600 baud).
Use your modem documentation and the procedu re that follows as a guide to
configuring the modem.
Procedure
T o configure a Hayes-c ompatible mode m for Quiet ope ratio ns, foll ow these ste ps:
1 Connect the P C (or terminal) to the modem.
Refer to your modem documentation to determine the cabling requirement.
2 Start the termina l emulation program.
3 Set the seria l port baud rate to match that of the Passport 4400 management
port (the default is 9600 baud).
206906-D Rev 00 4.2
Page 33

4 Issue the following sequence of AT commands:
AT Command Description
33
AT&F
ATS0=1
ATE0
ATQ1
AT&B1
AT&D
AT&W
Set the modem to start wi th factory default s. Refer to your modem
documentat ion to determine the requi red format for th is command.
Set the modem to answer on the first ring.
Disable command echo/ local echo.
Do not return result codes.
Lock the serial por t rate to the current baud rat e (this is the rate
you set in step 3 above).
Ignore DTR (always on).
Write the current settings t o NVRAM (nonvolatile RAM). This
retains the configuration thr ough power cycles.
5 Once the modem is configured, conne ct it to the Passport 4400 management
port (refer to “Management Port Modem Connection” on page 30.)
The Passport should now be ready to receive calls.
Note: I f your modem doesn't support the Hayes AT commands, consult
your modem documentation for the proce dure for your particular modem.
Testing the Modem Configuration
You can test the modem configuration by using a terminal emula tion program
(such as HyperTerminal or ProComm) to call the mode m connected to the
Passport 4400. You will see the CLI prompt when you successfully connect.
In Case of Difficulty
Your modem baud rate must match th at of the Passport 4400 manage ment port. If
your modem is set to something other than 9600 baud, and you subsequently r eset
the Passport 4400 to its factory defaults, your modem connection will fail. In this
case, you need t o res et the modem to 9 600 baud by unlocking the spe ed ( AT&B0),
Using Passport 4400 Install Tool Version 4.2
Page 34

34
changing the speed of the PC (or terminal connection) to 9600 baud, the n locking
the modem to this new speed. For this reason, al though it slows communications
with the Passport 4400, it is recommended that you not change the management
port speed from the default value (9600 baud).
206906-D Rev 00 4.2
Page 35

Chapter 4
Installing Install Tool
This chapter of the manual provides step-by-step instructions for installing the
Passport 4400 Install Tool software on a Windows workstati on.
Topics in this chapter:
• Obtaining the Install Tool Software
• What the Installation Procedure Does
• Preparing for the Installation
• Installing the Software
35
Obtaini ng t he Install Tool Softwar e
Install Tool is included on the Passport 4400 software distribution CD as a
self-extracting executable.
Obtaining the Latest Release
The latest Passport 4400 software is available for download from the Custom er
Services web site (http://www.nortelnetworks.com). From this site, select
Customer Services > Software Distribution > Passport 4400.
You can determine whether the Install Tool software on the web site is newer than
the software on the distribution CD by comparing the file names. The last two
digits of the executable name indicates the build number. For example,
it420012.exe is build 12 of release 4.2.
Using Passport 4400 Install Tool Version 4.2
Page 36

36
What the Installation Procedure Does
Depending upon the type of workstation you are using, the installa tion procedure
installs certain software components (in addition to Install Tool), if they are not
already installed.
Installed Software Components
The following table indicates which software compone n ts are in stal led on eac h
workstation type:
Software
Component
Java Runtime
Environment (J RE)
Micro soft TCP/ IP Yes Yes N o No
Microsoft Dial-Up
Networking
Passport 4400 Null
Modem Driver
Windows 95/98 Windows Me Windows NT
Yes Yes Yes Yes
Ye s Yes No No
Ye s Yes No No
In the case of W indows NT and Windows 2000, you must manually install TCP/IP
and Dial-Up Networking, if they are not al ready installed. In addition, you must
install the Passport 4400 null modem driver. Refer to your Windows
documentation for detailed instructions.
Null Modem Driver Troubleshooting Tip
When you install Install Tool for the first time on a W indows 95, Windows 98, or
Windows Me workstation, the installation process install s the Pass port 4400 null
modem driver, as well as TCP/IP and Dial-Up Networkin g (if they are not already
installed).
Windows
2000
206906-D Rev 00 4.2
Page 37

37
The Problem
However , if you uni nstall the null m odem d river and the n reinsta ll I nstall T oo l, the
installation process does not automatically reinstall that driver. Consequently, you
will be unable to configure a Dial-Up Networking connection between your
workstation and the Passport 4400 .
The Solution
T o avoid thi s proble m, per form the f ollowi ng sequenc e of task s befo re reinsta lling
Install T ool:
1 Start Windows Explorer.
2 Change the Explore r displa y att ribute to show al l files ( inclu ding hi dden fi les).
3 Go to the Windows\inf directory (normally, this directory is hidden).
4 Delete or rename the Passport.inf file from the Windows\inf directory.
5 Change the Explorer display attribute back to its norm al state.
Once you remove the Passport.inf file , the In stall Tool insta llation process will
automatically reinstall the null modem driver.
Preparing for the Installation
Before starting the installation procedures, complete the following tasks:
• If you are running an older version of Inst all T ool, it is rec ommended that you
uninstall the older version before installing the latest ver sion. If you decide to
retain an older version, be sure to install the new version in a dif ferent
directory. (Installing one version in the same directory as an existing version
can cause problems if you try to uninstall either version. )
• If necessary, download the Install Tool executable from the Partner B usiness
Center web site (Refer to “Obtai ning the Install Tool Software” on page 35).
• If Windows Dial-Up Networking or TCP/IP is not installed on your
workstation, make sure that your Windows software distribution media is
available (you will need it to install those components) .
Using Passport 4400 Install Tool Version 4.2
Page 38

38
• If you are reinstalling Install Tool, see “Null Modem Drive r Troubleshooting
Tip” on page 36 before starting the installation.
• It is recommended that you close all other applications on your workst ation.
• If Windows Dial-Up Networking is not installed on your workstation, decide
which COM port you are using before starting the installation.
Installing the S oftware
Use the procedures that follow to install the Passport 4400 Install Tool sof tware.
Installation Procedures
To install the Install Tool program and any additional required software
components, complete the following procedures.
Starting the Installation
To start the installation program, follow the se steps:
1 Start Windows Explorer and open the directory containing the executable file.
If you are installing from the distribution CD, open the software directory,
then open the installtool directory.
2 Double-click the executable file name.
3 The first installation window opens, prompting you to continue.
4 Click on Yes to continue.
206906-D Rev 00 4.2
Page 39

A message box appears while the Installer program initializes:
After a brief pause, the Installer window opens.
39
5 Click on Next to continue.
The software license agreement window opens.
6 Click on I Agree to continue.
The Installer program displays the default installation directory name
(C:\NortelNetworks\InstallTool4).
7 Optionally, use the Browse button to change the installation directory.
Using Passport 4400 Install Tool Version 4.2
Page 40

40
8 Click on Next to continue.
If you are reinstalling Install Tool, the Installer pr ogram displays this prompt:
9 Click on Yes to reuse the installation dir ectory.
If Dialup Networking is not installed on your workstation, the following
Dialup Networking Parameter window opens.
a Ensure that the Install Dialup Networking box is checked.
b Select the COM port you are using fo r your physical connection.
206906-D Rev 00 4.2
Page 41

c Click on Next to continue.
A series of messages appear as the inst allation progresses. For examp le:
41
10 If the installation procedure does not need to install additional network
components, it acti vates the Fini shed button . In this case, clic k on Finishe d to
complete the installation.
If the Installe r program insta lled any Wind ows networking c omponents, it will
prompt you to restart your workstation. In this case, click on Yes to restart
your workstation now, or No if you choose to restart it later. (The network
components that were installed will not be operational until you restart your
workstation.)
Install Tool is now available from the Windows Start menu (in the Nortel
Networks Passport Installation program group) and from a desktop folder.
Using Passport 4400 Install Tool Version 4.2
Page 42

42
206906-D Rev 00 4.2
Page 43

Chapter 5
Configuring the Workstation
This chapter describes the requir ements for configuring a Windows workstation
for Install Tool operations.
Topics in this chapter:
• Purpose
• For Information About Cable Connections
• About the Passport Null Modem Driver
• Required Software Components
• Configuring a Dial-Up Networking Connection
43
Purpose
To use Install Tool, you need an appropriatel y-configured Microsoft Windows
workstation to esta bli sh a connection wi th a Pa ssport 4400. This workstati on need
not be dedicated to Install Tool operations, but it must be configured to support
these operations.
For Information About Cable Connections
Refer to Chapter 3, “Connecting a Workstation” for information about the cable
connections between the workstation and the Passport 4400.
Using Passport 4400 Install Tool Version 4.2
Page 44

44
About the Passport Null Modem Driver
Install Tool provides a “null modem” driver to support a direct connection
between a wor kstation serial port and the Passport 4400 management port. This
modem driver is copied to your workstation when you install Install Tool.
Locating the Null Modem Driver
The Install Tool installation process copies the null modem driver to your
Install Tool installation dir ectory. (The name of the modem driver is
PP4400Direct. The file name is PassportNullModem.inf.)
Note: If you uninstall the null modem driver and subsequent ly reinsta ll
Install Tool, the installation pr ocess does not reinstall the driver. Refer
to “Null Modem Driver Troubleshooting Tip” on page 36 for a
description of and recommended solution to the problem.
If You Are Using a Dial-Up Modem Connection
You do not need to install the null modem driver if your workstation is using a
modem (versus a se rial cable) to c onnec t to the Passport 4400. In this c ase, use the
driver provided with your modem.
Required Software Components
Your workstation needs the following software compo nen ts to support an IP
connection betwe en one of its serial ports and the Passport 4400 management
port:
Software Component : Description:
TCP/IP TCP/IP protoc ol suppo rt is nee ded to s uppor t a ser ial
line IP connection between the workstation and the
Passport 4400.
206906-D Rev 00 4.2
Page 45

Software Component: Description: (continued)
Microsoft Dial-Up Networking Microsoft Dial-Up Networking provides PPP protocol
support.
A modem driver A modem driver is requi red whether you are usin g a
direct-cable connection or a di al-up modem
connecti on.
Once these components are in place, you configure a Dial-Up Networking
connection to enable communication between the workstation and the
Passport 4400. (Refer to “Configuring a Dial-Up Networking Connection” on
page 46 for more information.)
If You Have a Windows NT or Windows 2000 Workstation
The Install Tool installation process does not install the required networking
components on Win dows NT or Windows 2000 workstations. You must manually
install t hose components, once you have complete d the installation of Install Tool.
45
Use your Windows installation media and documen tation to ensure that the
following components are installed, in the order listed:
1 Networking
2 TCP/IP
3 Microsoft Dial-Up Networking
4 A modem driver (or the Passport 4400 null modem driver)
5 One or more Dial-Up connection entri es.
If You Have a Windows 95, Windows 98, or Win dows Me
Wo rkstation
The Install Tool installation process performs most of the setup of a Windows 95,
Windows 98, or W indows Me workstation. Spe cificall y, it installs t he null m odem
driver and, if necessary, installs any required network software components.
(Refer to “What the Installation Proce dure Does” on page 36 for a list of thes e
components.)
Using Passport 4400 Install Tool Version 4.2
Page 46

46
However, you must m anually configure a Dia l-Up Networking connection,
following the installation of Install Tool. (Refer to “Configur ing a Dial- Up
Networking Connection” on page 46 for more infor mation.)
Configuring a Dial-Up Networking Connection
Following the Install Tool installation (and in the case of Windows NT or
Windows 2000, installat ion of TCP/IP, Dial-Up Networking, and the null modem
driver), you must define and configur e a new Dial-Up Networ king c onnection.
Define a New Connection
Microsoft Dial-Up Networkin g requires de finiti on of a “conn ection” for each host
system with which the wor kstation will communicate. (A “connectio n” is referred
to as a Phonebook Entry in Windows NT.)
Windows 95 Example
To define a new connection in Windows 95, follow these steps:
1 Double-click on My Computer.
2 Double-click on Dial-Up Networking.
3 Double-click on Make a New Connection.
The Make New Connection dialog box opens.
206906-D Rev 00 4.2
Page 47

For Example:
4 Enter a name for the connection (such as PP4400Dir ect or PP4400Com1).
47
5 Choose the modem driver that this connection will use to establish
communications with the Passport 4400:
• For a direct cable connection, choose the PP4400Direct driver.
• For a dia l-up modem connection, c hoose the driver for your modem.
6 Click on Next.
The next dia log box opens.
For examp le:
Using Passport 4400 Install Tool Version 4.2
Page 48

48
7 Enter a phone number and select a Country code.
Note that a direct cable connection requires entries in the Area cod e and
Telephone number fields. Because the phone number is not used by the
software, you can simply ent er one or more digi ts in these fields, or you can
enter any area co de an d phone number that is meaningful to you (your office
phone number, for example).
8 Click on Next.
The last in the sequence of dialog boxes opens.
9 Click on Finish.
For More Information
If you are defining a new connection under Windows 98, Windows Me,
Windows NT, or Windows 2000, consult your operating system documentation
for the specific procedures required to define a new Dial-Up Networking
connection.
Fine Tune the New Connection
Once you complete the definition of a Dial-Up Networking connection, it is
recommended that you modify the configuration to optim ize performance for
Passport 4400 communications.
The following configuration settings are recommended.
Network Protocol Options
Deselect the IPX/SPX Compatible and NetBEUI network protocol options.
Neither is r equir ed for a se rial l ine IP con nection be twee n a worksta ti on seria l port
and the Passport 4400 management port.
206906-D Rev 00 4.2
Page 49

Default Gateway Option
You access the Default Gateway option from the TCP/IP Settings window:
49
There are several factors to consider when deciding whether or not to sele ct the
Default Gateway option, including:
• If you are using your workstation to access other services and applications on
the network, it is recommended that you deselect Use default gateway on
remote network. When the Use default gateway on remote network box is
checked, W indows r outes a ll IP packe ts t hrough the de fault ga teway, which in
this case is the Passport 4400 PPP connection. This can signific antly degrade
the performance of other network applications.
• If you are using your workstation only for Passport 4400 device management
activities, it is rec ommended that you select the Use default gateway on
remote netw ork option.
• If you are using your workstation to manage remote Passpor t 4400s, it is
recommended that you select the Use d efault gateway on remote network.
option.
Using Passport 4400 Install Tool Version 4.2
Page 50

50
206906-D Rev 00 4.2
Page 51

Chapter 6
Install Tool Basics
This chapter provides basic instructions for using Install Tool.
Topics in this chapter:
• Collecting Configuration Data
• Starting Install Tool
• What the Backpanel Colors Mean
• Operating Modes
• Overview of the Install Tool Menus
51
Collecting Configuration Data
Install Tool provides a graphical user interface for entering and activa ting
Passport 4400 configuration values. Often, the person who collects the
configuration data is not the same as the person who inputs that data. A common
division of labor is:
• The Network Designer or Ne twork Engineer provides detailed Passport 4400
configuration data to the Install Tool operator.
• The Install Tool Operator enters that configuration data and brings the
Passport 4400 up to an operational state.
The Install Tool online help provides a set of forms for recor ding Passport 4400
configuration data.
Using Passport 4400 Install Tool Version 4.2
Page 52

52
Obtaining the Data Collection Forms
To access these forms, go to any Install Tool online help page, click on TOC (a
link appears on the t op and bot tom o f each pa ge), the n selec t " Install T ool Basics".
This page provides a link (“Collecting Configuration Data”) to a series of pages
that you can print out and use for collecting your data.
Sample Data Collection Form
This is an example of a data collection form:
System Configuration Sheet
This configuration form is provided as an aid in specifying the values to be set in the Passport
4400 InstallTool System Configuration Panels. Print a copy of this form and write in the
correct values for the Passport 4400 to be installed. Then, while using the InstallTool, use the
values specified when prompted for values by the tool.
System Configuration Values
Node Name
Device Network Address
Type of Node
Server T ype
Passport 4400 IP Address
/ Passport 6400 DNA
Address
This field specifies the unique
name for the the node (maximum 50
characters).
This field specifies the unique
Device Network Address for this
node. Minimum of 4 digits,
maximum of 15.
This field sspecifies the
operational mode of the node.
Choices are "Branch-Node".
"Regional-Node", or "CentralNode".
If there are no Passport 6400's in
the network, choose "Server on
Passport 4400", otherwise choose
"Server on Passport 6400".
This field specifies the Voice
Phone Directory Server: either a
Passport 4400 IP address or a
Passport 6400 DNA address. One
node in the network will act as
the address server for voice calls.
206906-D Rev 00 4.2
Page 53

For More Information
See Appendix B, “Services and Features Supported” for a list of the parameters
available for each service.
Starting Install Tool
Before Running the Software
Verify that you have a physical connection between the workstation and your
Passport 4400 before running the Install Tool software. Refer to Chapter 3,
“Connecting a Workstation” for instructions.
53
Procedure
To start Install Tool, follow these steps:
1 Click the Start button, select Programs, select Norte l Networks Passport
Installation, then select one of the Ins tall Tool options. (Select Install Tool f or
standard mode, I nstall T ool Wizard for wizard mode, or Install T ool Demo fo r
demo mode . Ref er to “Operating Modes” on page 57 for a description of
each.)
Alternatively, you can open the Nortel Networks Passpor t Installation folder
on the desktop, then double-c lick the desired icon.
A message displays while Install Tool loads into memory.
Using Passport 4400 Install Tool Version 4.2
Page 54

54
The Install Tool Startup Definition sc ree n opens.
2 If necessary, enter the password for this unit.
3 Choose one of the following:
206906-D Rev 00 4.2
You only need to enter the password if it is different from the default value of
private.
• To connect to the Passport 4400 through the Management port (either
directly or using a modem), select the Dial-up Networking connection
that you configured for this purpose (described in Chapter 5,
“Configuring the Workstation”), then click on Serial Connect.
• To connect to the Passport 4400 through the Ethernet port, enter its IP
address, then clic k on IP Connect.
Page 55

What You Will See
Once you click the Serial Connect or IP Connect button, Install Tool establishes
the connection, reads configuration data from the unit, then displays an image of
the backpanel of the Passp ort 4400, including all modules and ports pr esent on the
unit.
Passport 4430 Example
This is an example of the backpanel display that appears when you start
Install Tool and connect to a Passport 4430:
55
Passport 4460 Example
This is an example of the backpanel display that appears when you start
Install Tool and connect to a Passport 4460:
Using Passport 4400 Install Tool Version 4.2
Page 56

56
Multiple Sessions On a Single Unit Not Recommended
If you are running Install Tool over the Ethernet port, there is no technical
limitation on the number of simultaneous Install Tool sessions that you can
establish with a Passport 4400. However, as a practica l matter , multiple
Install Tool sessions with a single unit can result in excessive polling, which
manifests itself in the form of frequent timeouts and retrie s. The ref ore, it is
recommended that you maintain onl y one Install Tool session whi le working with
a Passport 4400.
What the Backpanel Colors Mean
The backpanel uses color to indicate the status of the Passport 4400 ports:
Color For Meaning
Red PAN L links None of the links on the port are operational.
Non-PANL serial ports The port is not operational.
Voice ports The port is not oper ational.
Green PANL links The port is operational.
Non-PANL serial ports The servi ce is functional.
Voice ports The service is functional. (However, this does not
necessarily mean that the port is pro perl y
configured.)
Yellow All ports with multiple
DLCIs
Blue WAN backup links The port is configured t o provi de backup se rvice i f
Gray All ports Install Tool cannot determine the status of the
At least one DLCI is up whi le at leas t on e is down.
In addition, yellow can indicate t hat the WAN port
physical layer is up but the fr am e rel a y layer is
down.
the primary li nk fails. (Howev er, this does not
guarantee that the port configuration is correct .)
port. (Thi s can happen as a result of problems
with the SNMP communications with the
Passport, or as a result of Passports not having
been properly reset when WAN Modul es are
removed from ei ther port 2 or port 3 on the base
card.)
206906-D Rev 00 4.2
Page 57

Operating Modes
Install Tool provides three operating modes: wizard mode, standard mode, and
demo mode.
Wiza r d Mode
Description
Install Tool provides several wizards, each of which leads you through the
configuration of a specific set of Passport 4400 services (or, in the case of the
Setup Wizard, it leads you through the configuration of the entire unit). Ea ch
wizard pres ents a sequence of dialog panels through which you provide the
required configuration data. As you configure eac h port on the unit, the wizard
highlights tha t port on the backpanel image.
57
When to Use It
It is recommended that you use wizard mode to configure a fa c tory-new or
factory-defaulted Passport 4400.
For More Information
See Chapter 7, “Using Install Tool Wizards, ” for a detailed description of wizar d
mode.
Standard Mode
Description
Standard mode allows you to select and modify the config uration of any availa ble
port from the backpanel image. In addition, it allows you to provision services,
test ports, and display port status.
Using Passport 4400 Install Tool Version 4.2
Page 58

58
When to Use It
There are no restrictions on the use of standard mode. For example, you may
decide to use s tandard mode af ter you ha ve esta blished a ba sic conf igura tion usi ng
wizard mode. Or, you may pr efer to use it exclu sively, and not use wizard mode at
all.
For More Information
See Chapter 8, “Using Standard Mode,” for a de tailed description of this
operating mode.
Demo Mode
Description
Demo mode allows you to engage in a simulated configuration session. The
operation is identical to an actual Install Tool session, but it makes no changes to
the Passport 4400 (in the event that you have established a connec tion between
your workstation a nd a Passpor t 4400). Demo mode does not require a connec tion
from your workstation to a Passport 4400.
When to Use It
Demo mode is designed as to help you evaluate and learn the product. Since it
performs no operations on the Passport 4400, it is ideal for learning and
experimenti ng.
How to Use It
You can start Demo mode from the Install Tool folder on t he desktop (or from the
Wizards menu). When you start the demo, the Install Tool Startup Definition
screen opens with the text string “demo” in the IP Address field. Click on
IP Connect to start the demo.
206906-D Rev 00 4.2
Page 59

Overview of the Install Tool Menus
The Install Tool backpanel display provides four menus. Each is described below.
File Menu
The File menu offers the following options:
Option: Use this menu option to:
Connect make a connection to a different Passpor t 4400.
Exit close all Install Tool windows and exit the program.
Wiza r d Menu
59
The Wizard menu lists all the wizards tha t are availab l e for you r s peci fi c
Passport 4400 configuration. Refer to “Available Wizards” on page 62 for a
description of each wizard.
System Menu
The System menu offers the following options:
Option: Use this menu option to:
Web Configurator launch the Pass por t 4400 Configurat or int erface . ( Note that the Web
Configure config ure system-level parameters and system-level IP parameters
System Status dis play the status of the Passp ort 4400 to which you are presently
Test run system-l evel diagnostic tests and display the results in the
Configurator requires either Netscape Communicator 4.7 or higher,
or Internet Explorer 4.1 or higher. In addition, your browser must be
set to accept all cookie s.)
for the Passport 4400 to which you are presently connected.
connected .
Diagnostics panel.
Telnet launch a Telnet session to access the Command Line Interface
Ping ping an IP ho st in your ne t work .
(CLI).
Using Passport 4400 Install Tool Version 4.2
Page 60

60
Option: Use this menu option to: (continued)
Reset reset the Passport 4400 to which you ar e presently connect ed.
Default Reset perform a factory-default reset operation on the Passport 4400 to
which you are presently connected.
Reporters use the Mass Deployment and Reporting Tool to generate HTML,
text, and CLI rep orts. (This menu options appears only if you install
the Mass Deploy me nt and Reporting Tool after you install
Install Tool.)
Help Menu
The Help menu offers the following options:
Option: Use this menu option to:
About display information about the version of Install Tool that you are
presently running.
Overview display the Install Tool Overview page from the online help.
206906-D Rev 00 4.2
Page 61

Chapter 7
Using Install Tool Wizards
This chapter provides basic instructions for using the Install Tool wizards to
configure Passport 4400s.
Topics in this chapter:
• About the Wizards
• Starting a Wizard
• How Wiz ard Mode Works
• Basic Tasks
61
About the Wizards
Purpose
The Install Tool wizards lead you through the configuration of the physical ports
and the basic services on a Passport 4400. The wizards present an appropr iate
sequence of dialog panels, based upon the choices you make as you proceed
through the operation. In addition, the wizards prompt you to rese t the unit at
appropriate points in the process. Following a reset, the wizards perform
diagnostics on the port or service that you are configuring.
Using Passport 4400 Install Tool Version 4.2
Page 62

62
Available Wizards
Install Tool provides the following wizards:
Wizard Use this wizard to . . .
Setup Wizard configure t he enti re un it: all ports and ba sic ser vices
that are avail able on the Passport 4400.
Basic Wizard configure system information (such as node name),
the phone directory server, the primary WAN link,
the Ethernet port, IP routing or bridging, and
(optionally) IPX rout ing.
Note: This wizard is available only on
Passport 4430, Passport 4450, and Passport 4455
units.
Backup Wizard configure the backup WAN link. This wizard is
available onl y if either of the following conditions is
true:
• the Passport 4400 is equipped with a WAN
module in port 3, or
• port 1 has been selected as the primary port
and there is a W AN modu le i n port2.
Note: This wizard is available only on
Passport 4430, Passport 4450, and Passport 4455
units.
Incoming PANL Wizard configure WAN ports that meet the following criteria:
Service Wizard configure any serial ports that are not currently
Voi ce Wizard configure v oice c hanne ls f or T1, E1, F XS, E&M, and
206906-D Rev 00 4.2
• The unit is co nfigur ed as a Cent ra l or a Reg ional
node (but not a Branch node).
• The Port is either unconfigured or is configured
for switching.
• The port is not configured as the Primary or the
Backup port on the Regional switch.
In all other case s, the wizard is unavailable.
Note: This wizard is available only on
Passport 4430, Passport 4450, and Passport 4455
units.
configured, or are configured for a service other
than Switching. For each such port, you can select
and configure the following data ser vice for that
port: Frame Relay DCE, HTDS, CBR, SNA, or X. 25.
ISDN BRI services.
Page 63

Wizard (continued) Use this wizard to . . .
Transp arent CCS Wizard set up Transparent CCS for this unit . Specificall y,
you use this wizard to:
• select and configure a T1 or E1 data port,
• select and confi gure a WAN port,
• select a DS0 channel.
Note: This wiz ard assumes that the T1 or E1 line
parameters and the DVMs (digital voice modules)
are already confi gured; you can configure these
using the Voice Wizard or the Setup Wizard. Note
also that the Transparent CCS Wizard is available
only if t he Passport 4400 is equipped with either a
T1 or an E1 voice module.
Voice Over IP Wizard configure the unit for Voice over IP (VoIP)
operations. Specifically, you will configure System
Identification parameters, IP parameters, and voice
services (for all available voi ce ports).
63
Demo Wizard walk through a complete Setup Wizard session
without actual ly changing the conf iguration of the
Passport 4400. (Although the Demo Wizard
prompts you to reset the unit at several points
during the process, it will not actual ly perform a
reset.)
Note: The Demo Wizard does not require a
connection to a Passport 4400.
If a wizard is grayed out, it is not available for your current configuration.
Using Passport 4400 Install Tool Version 4.2
Page 64

64
Starting a Wizard
From Within Install Tool
To start one of the Install Tool wizards when Install Tool is running, make one of
the selections from the WizardMode menu:
From the Windows Start Menu
You can directly launch either the Setup wizard or the Demo wizard without first
starting Insta ll Tool. To do so:
1 Click the Windows Start button.
2 Choose Programs, Nortel Networks Passport I nstallation, then se lect either
Install Tool Wizar d or Insta ll Tool Demo.
What You See When You Start a Wizard
Install Tool displays a progress bar while it gathers configuration values from the
unit. (This may take a few minutes.)
206906-D Rev 00 4.2
Page 65

65
Once Install T ool has colle cted the conf igura tion valu es from the Pass port 4400, it
displays a graphical image of the device backpanel and opens the first in a
sequence of dialog panels. For example, the following dialog panel opens when
you start the Setup Wizard:
Using Passport 4400 Install Tool Version 4.2
Page 66

66
How Wizard Mode Works
Each of the wizards follows this sequence of ta sks:
Tasks:
1. Upon starting, the wizard gather s configuration values from the unit.
(For addition al i nformation, see “Starting a Wizard” on page 64.)
The wizard examines the unit, collects t he current confi guration values, then displays
the first in a sequence of dialog panel s. There is one group of dialog panels for each
service, por t, or feature that you can configure.
2. The wizard presents a sequence of dialog panels, through whi ch you provide the
necessary configuration dat a.
(For addition al i nformation, see “Specifying Configuration Values” on page 67.)
You can click the Hel p button from any dialog panel to display detailed information
about the parameters on that panel.
3. When you click t he Next button, the wizard advances t o the next dialog panel in the
sequence.
(For addition al i nformation, see “Navigating Within a W izard” on page 67.)
4. The wizard gives you t he oppor tunit y to res et th e un it an d sa ve your co nfigur atio n data
before advancing from one group of dialog panels to the next gro up in t he sequence.
(For addition al i nformation, see “Resetting the Passport 4400” on page 72.)
5. Following a reset, the wizard ru ns a diagnostic test on the selected port. Thi s gives
you the opportunit y to verify that you can access the port befo re continuing on to the
next sequence of dial og panels.
(For addition al i nformation, see “Verifying the Configuration Values” on page 73.)
6. Once you have provi ded all necessary data for all of the ports on the Passport 4400
unit, the wizard presents a Save & Activat e panel. This is the final dialog panel that
appears during the wi zard session.
Norm ally, you will cli ck Save & Activate to ensure that your config uration values are
written to Flash memor y and to apply all of your conf iguration set ti ngs.
(For addition al i nformation, see “Saving and Activating Your New Configuration” on
page 73.)
7. The wizard exits at the conclusion of the Save & Activate operation.
206906-D Rev 00 4.2
Page 67

Basic Tasks
As you work with a wizard, you typically perform these basic tasks:
• Navigating Within a Wizard
• Specifying Configuration Values
• Resetting the Passport 4400
• Verifying the Configuration Values
• Saving and Activating Your New Configuration
Each of these tasks is described in the paragraphs that follow.
Navigating Within a Wizard
67
Each dialog panel provides the following navigation buttons:
Button Name Descriptions
Back Return to the previous dialog panel.
Next Advance to the next panel in this sequence.
Prev... Return to the previously-select ed port.
NextPort Advance to the next port (skippi ng any rem aining panels in the
current sequence).
Exit Exit the wizard.
Help Display HTML help pages in your default web browser.
Specifying Configuration Values
You specify configuration values using standard use r interface controls, inc luding:
• Text fields
• Radio buttons
• Checkboxes
• Drop-down sele ct ion boxes
Using Passport 4400 Install Tool Version 4.2
Page 68

68
Entering Multiple Values
Many Passport 4400 parameters accept multiple values. For example, in routing
mode, you can assign multiple LAN and WAN IP addresses to an interface.
Adding New Entries
To enter multiple values in a field that permits such, follow these steps:
1 Click the New button.
Install Tool displays empty fields in which you will enter your new entries.
For examp le:
2 Specify the new values.
3 Repeat steps 1 and 2 for each new entry.
4 Click the Next button to save the new entries.
Modifying Entries
To select and modify one value from a multiple set, follow these steps:
1 Select the desired entry from the drop-down menu.
206906-D Rev 00 4.2
In many dialog panels, Install Tool ent ers default or calcula te d values for you
when you click in an empty field.
Page 69

For examp le:
2 Place the cursor in the field needing modification.
3 Use the keyboard to modify the value in that field.
For examp le:
69
4 Click the mouse pointer in one of the othe r fiel ds on t he dialog pa nel once you
have completed modification of the value.
5 Repeat steps 1 through 4 for each entry requiring modification.
Using Passport 4400 Install Tool Version 4.2
Page 70

70
6 Click the Next button to save the changes.
Caution: If you are communicating with the Pa ssport 4400 through the
LAN, and you change that IP address and then perfor m a Save & Reset,
Install T ool will be unable to loca te your Passport 4400: It will be looking
for the old IP Address. In this case, you will receive the following
messag e: The system is not up. (See “If You Need to Reestablish the
Install Tool Connection to Your Passport 4400” on page 71 for
instructions for recovering.)
Deleting Entries
To select and delete one value from a multiple set, follow these steps:
1 Select the desired entry from the drop-down menu.
For examp le:
2 Highlight the item (such as the IP address or DLCI number) that you wish to
delete.
206906-D Rev 00 4.2
Page 71

For examp le:
3 Use the Backspace or Delete key to delete the value.
4 Repeat steps 1 through 3 for each entry that you wish to delete.
5 Click the Next button to c omplete the deletion.
71
Note: It may be necessary to use the Sav e & Reset fe ature be fore t he new
configuration takes effect. See “Resetting the Passpo rt 4400” on page 72.
If You Need to Reestablish the Install Tool Connection to Your
Passport 4400
If you change the IP Address that you used to establ ish a connection with your
Passport 4400, you will ne ed to reestablish the connection, as follows:
1 Click on Exit to close the Install Tool panel.
2 Choose Connect from the File menu.
The Install Tool Startup Definition panel opens.
3 Enter the new IP Address in the “Connect using an IP Address ” fie ld, then
click on IP Conn ect. Install T ool reconnects to your Passport 4400 using the
new IP Address.
Once you have completed these steps, you can continue with the configuration
process.
Using Passport 4400 Install Tool Version 4.2
Page 72

72
Resetting the Passport 4400
Once you ha ve provide d al l nec essary data f or a partic ular port , servi ce, or fe ature,
the Install Tool wizard pres ents the Save & Reset panel.
To reset the unit:
1 Click on Save & Reset to save the configuration values you entered.
2 Click on Yes.
206906-D Rev 00 4.2
A Confirmation message appears
A progress bar is displayed while Install Tool resets the Passport 4400.
Page 73

Verifying the Configuration Values
Once the reset operation completes, the Install Tool wizard executes a diagnostic
test of the selected por t. This allows you to verify your configuration va lues before
continuing.
This is an example of a diagnostic display:
73
If you wish to run the diagnostic test again, click on Check.
Saving and Activating Your New Configuration
Purpose
You must use the Save & Activate function to ensure that your confi guration
values are written to Flash memory. If you do not perform this function, your
changes could be lost if any type of power interruption occurs.
Using Passport 4400 Install Tool Version 4.2
Page 74

74
When To Use It
Once you have provided all necessary data f or a ll of t he ports on t he Pass port 440 0
unit, the I nstall Tool wizard presents the Save & Activate panel. The Save &
Activate panel is the fina l dialog panel that appears during a wizard session.
Procedur e
To perform the Save & Activate operation follow these steps:
1 Click on Save & Activat e.
2 Click on Yes.
206906-D Rev 00 4.2
A Confirmation message appears.
Page 75

A progress bar is displayed while the Passport 4400 saves your configuration
to Flash m emory and performs a CPU re set.
After the Save & Activate function is co mplete, the Wizar d exits.
Note: The Close button gives you the option of exiting the wizard
without saving your configuration data to Flash. If you click the Close
button, the wizard displays a warning dialog tha t requires you to confirm
this action.
75
Using Passport 4400 Install Tool Version 4.2
Page 76

76
206906-D Rev 00 4.2
Page 77

Chapter 8
Using Standard Mode
This chapter provides instructions for using the Install Tool standard mode
features. Standa rd mode allows you to configure, test, and display the status of
selected por ts. In addition, it provides options for resetting the unit.
Topics in this chapter:
• Configuring Selected Ports
• Entering Multiple Values
• Displaying the Status of the Unit
• Displaying the Status of a Port
• Testing a Port
77
• Perform ing a Res e t Op era tio n
• Resetting to Factory Defaults
Configuring Selected Ports
Purpose
Use this operation to change the configuration of a specific port, after the basic
setup is complete.
Procedure
To configure a port, follow these steps:
1 Point to the desired port on the backpanel display, then right-click the mouse.
Using Passport 4400 Install Tool Version 4.2
Page 78

78
A popup menu appears.
2 Click on Configure.
A configuration window (with tabbed panels specific to the port that you
selected) o pen s. Fo r example:
3 Select the appropriate dialog panel from the available tabs.
4 Enter or modify values, as requ ir ed.
For additional information, see “Entering Multiple Values” on page 79.
5 Click on Apply to save your updates.
Install Tool transmits the configuration values from this panel to the
Passport 4400.
6 Repeat steps 3 through 5 until you have made all the requir ed changes.
7 Click on Close to close the configuration window.
206906-D Rev 00 4.2
Page 79

8 Reset the P assport 4400, then test the port to c onfirm that it is operational.
For additional information, see “Perform ing a Res et O pe ration” on page 85
and“Testing a Port” on page 84.
Note: I t is recommended that you always pe rform a Save & Reset
operation to ensure that your configuration changes take effect and are
retained.
Entering Multiple Values
Many Passport 4400 parameters accept multiple value s. For example, in routing
mode, you can assign multiple LAN and WAN IP addresses to an interface.
Adding New Entries
79
To enter multiple values in a field that permits such, follow the se steps:
1 Click the New button.
Install Tool displays empty fields in which you will enter your new entries.
For examp le:
2 Enter the new values.
In many dialog panels, Install Tool ent ers default or calcula te d values for you
when you click in an empty field.
3 Click the Apply button to save the new entry.
4 Repeat steps 1 through 3 for each new entry.
Using Passport 4400 Install Tool Version 4.2
Page 80

80
Modifying Entries
To select and modify one value from a multiple set, follow these steps:
1 Select the desired entry from the drop-down menu.
For examp le:
2 Place the cursor in the field needing modification.
3 Use the keyboard to modify the value in that field.
For examp le:
4 Click the Apply button to save the changes.
206906-D Rev 00 4.2
Page 81

5 Repeat steps 1 through 4 for each entry requiring modification.
Caution: If you are communicating with the Pa ssport 4400 through the
LAN, and you change that IP address and then perfor m a Save & Reset,
Install T ool will be unable to loca te your Passport 4400: It will be looking
for the old IP Address. In this case, you will receive the following
messag e: The system is not up. (See “If You Need to Reestablish the
Install Tool Connection to Your Passport 4400” on page 82 for
instructions for recovering.)
Deleting Entries
To select and delete one value from a multiple set, follow these steps:
1 Select the desired entry from the drop-down menu.
81
For examp le:
2 Highlight the item (such as the IP address or DLCI number) that you wish to
delete.
Using Passport 4400 Install Tool Version 4.2
Page 82

82
For examp le:
3 Use the Backspace or Delete key to delete the value.
4 Click the Apply button to complete the deletion.
5 Repeat steps 1 through 4 for each entry that you wish to delete.
Note: It may be necessary to use the Sav e & Reset fe ature be fore t he new
configuration takes effect. See “Performing a Reset Operation” on
page 85.
If You Need to Reestablish the Install Tool Connection to Your
Passport 4400
If you change the IP Address configured for your Passport 4400, you wil l need to
reestablish the connection, as follows:
1 Click the Close button to close the Ins tall T ool panel.
2 Choose Connect from the File menu.
The Install Tool Startup Definition panel opens.
3 Enter the new IP Address in the “Connect using an IP Address ” fie ld, then
click on IP Connect. Install Tool reconnects to your Passport 4400 using the
new IP Address.
Once you have completed these steps, you can continue with the configuration
process.
206906-D Rev 00 4.2
Page 83

Displaying the Status of the Unit
Purpose
Use this feature to get a current status display for all major components of the
Passport 4400.
Proced ure
To display the status of the unit, follow these steps:
1 Choose System Status from the System menu.
Install Tool opens a status window.
83
2 Click on OK when you are ready to close the status display.
Displaying the Status of a Port
Purpose
Use this feature to get a real-t ime status display for a selected port. I nstall Tool
polls the port and updates the display every ten seconds.
Using Passport 4400 Install Tool Version 4.2
Page 84

84
Procedure
To display the status of a port, follow the se steps:
1 Place the cursor on the desired p ort (on the backpanel image), then right-cl ic k
the mouse.
A popup menu appears.
2 Click on Status.
A status window, specific to the port that you selected, opens.
3 Click on OK to when you are ready to close the status display.
Testing a Port
Purpose
The Test feature allows you to verify that a port configuration is valid and
operational.
Proced ure
To test the validity of a port configuration, follow these steps:
1 Place the cursor on the desired p ort (on the backpanel image), then right-cl ic k
the mouse.
206906-D Rev 00 4.2
Page 85

85
A pop-up menu appears.
:
2 Click on Test.
A Diagnostics panel opens, showing the results of the diagnostic test. For
example:
If you wish to run the diagnostic test again, click on Check.
Performing a Reset Operation
As you work with Install Tool, your pending configuration changes are held in
volatile memory (DRAM). When you perform a Save & Reset operation, the
Passport 4400 saves those changes to the active configur ation data bank in
nonvolatil e (Flash) memory, then resets the unit.
To perform a Save & Reset operation, follow these steps:
Using Passport 4400 Install Tool Version 4.2
Page 86

86
:
1 Select Reset from the System menu.
The Reset dialog screen opens.
2 Click on Save & Reset.
A confirmation screen opens .
3 Click on Yes.
The Passport 4400 saves your configuration changes to Flash and resets the
unit. A message appears once the operation is complete.
4 Click on OK.
Resetting to Factory Defaults
Install Tool allows you to reset a unit to factory defaul t values. Resetting a
Passport 4400 to factory default s dele tes all use r-define d conf iguration va lues a nd
restarts the unit using f actory-default values.
To reset a Passport 4400 to its factory default settings:
206906-D Rev 00 4.2
Page 87

1 Select Default Reset from the Syste m menu.
The Factory Default Reset dialog panel opens.
87
2 If you decide to continue, click on Default Reset.
The first of two confirmation dia log panels opens.
3 If you decide to continue, click on Yes.
Using Passport 4400 Install Tool Version 4.2
Page 88

88
The second confirmation dialog panel opens.
4 If you decide to continue, click on Yes to reset the unit to factory default
values.
Install Tool displays a progress bar while resetting the Passport 4400 unit.
Once the reset is complete, Install Tool displays a message indicatin g the
device is operational.
5 Click on OK to continue.
Note: If your PC is connected to the Passport 4400 through the LAN
port (rather than through the management port), your LAN connection
will be dropped (resetting to factory defaults erase s all user-defined
settings, incl uding IP address).
206906-D Rev 00 4.2
Page 89

Chapter 9
Accessing Remote Passport 4400s
This chapter provides basic instructions for using Install Tool to access remote
Passport 4400s in an IP network.
Topics in this chapter:
• Purpose
• IP Address R equirements
• Which Remote Nodes Are Reachable?
• Workstation Default Gateway
• Connecting To a Remote Passport 4400
89
Purpose
You can use your local connection (between your workstation and a
Passport 4400) to access remote Passport 4400s in your network. This enables you
to configure and monitor remote units.
IP Address Requirements
To use Install Tool to access remote Passport 4400s:
• Your local Passport 4400 (the unit with which you are presently connect ed)
must be configured with appropriate I P addresses. The IP address
requirements depend upon the mode (bridging or routing) for whic h this
Passport 4400 is configured.
• The remote Passport 4400 must be configured with appropri at e IP addresses,
such that it is accessible across the IP network.
Using Passport 4400 Install Tool Version 4.2
Page 90

90
For more information, ref er to “Br idging and Routing Modes” on page 114.
Which Remote Nodes Are Reachable?
The routing mode of your local Passport 4400 determines which nodes you can
reach in your network:
If the routing mode is: Then you can access:
Bridging Passport 4400s that are in the same seg ment as the unit t o
which you are presently connected.
Routing Passport 4400s that are in the same seg ment as the unit t o
which you are presently connected, as wel l as
Passport 4400s in other network segment s.
You can use the Ping utility to quic kly determine whether you can reac h a specif ic
node in the network. (Select Ping from the Install Tool System menu.)
Workstation Default Gateway
The Default Gateway option that you have set for your Windows Dial-Up
Networking connection also impacts your ability to access remote nodes.
Setting the Default Gateway Option
If you are using your workstation to manage remote Passport 4400s, it is
recommended that you select the Use d efault gateway on remote network
option in the TCP/IP settings for your Windows Dial-Up Networking connection.
206906-D Rev 00 4.2
Page 91

For examp le:
91
When the Use default gateway on remote network box is checked, Windows
routes all IP packets through the default gateway, which in this case is the
Passport 4400 PPP connection. This al lows you to reach any Passpor t 4400 in the
IP network.
Defining a Route
If you are using PPP to connect your workstation to your local Passp ort 4400, and
you did not select the Use default gateway on remote network option in the your
Windows Dial-Up Networking connection, you may need to define a route for
accessing rem ote Passport 4400s.
Procedure
1 Ping any remote node in your Passport network to determine whether or not
you need to add a specific route to access the Passport network.
2 If the Ping operation is successful, you do not need to define a route.
However , if the Ping operation fails, continue with step 3.
3 Start a DOS session, and at the DOS prompt, enter thi s command:
ROUTE ADD <IP Network> MASK <Net Mask> <Local IP Address>
Using Passport 4400 Install Tool Version 4.2
Page 92

92
Where:
<IP Network> is the IP address of the network that you need to access
through the Passport 4400 to which you are presently connected. For
example, 192.168.1.0.
<Net Mask> is the network mask for this IP Network address. For
example, 255.255.255.0 is the network mask for IP Network address
192.168.1.0.
<Local IP Address> is either the internal IP address assigned to the PPP
stack in the Passport 4400 (when the unit is in ro uting mode); or it is the
bridging IP address (when the unit is in bridging mode). In either case, it
is the Gateway Address used to route pack ets from the PPP stack to other
nodes in the network.
4 If you are running Windows NT, you may enter an optional paramete r that
allows the new route to be persistent through dial-up connections and PC
reboots. To do this, include the "-p" switch, as shown in this exa mple:
ROUTE -p ADD 192.168.1.0 MASK 255.255.255.0 192.168.200.200
5 To verify that the command has taken effect, try pinging the new route you
entered (or use the "route print" DOS command).
For More Information
Refer to “Connecting a Workstation” on page 27 for a description of the physical
connections between the Passport 4400 and a workstation.
Connecting To a Remote Passport 4400
To use Install Tool to establish an IP connection with a remote Passport 4400,
follow these steps:
1 Select Connect from the File menu.
206906-D Rev 00 4.2
Page 93

The Install Tool Startup Definition dia log ope ns.
93
2 If necessary, enter the password for the unit.
You only need to enter the password if it has been changed from the default
value of private.
3 Enter the IP address of the unit, then click on IP Connect.
After a brief pause, Install Tool changes the backpanel display to that of the
specified remote Passport 44 00.
Using Passport 4400 Install Tool Version 4.2
Page 94

94
For examp le:
You can now configure and monitor this devic e just as if it were locally c onnected
to your workstation.
206906-D Rev 00 4.2
Page 95

Chapter 10
Using Telnet to Access the CLI
This chapter provides basic instructions for using the Telnet service client,
provided with Install Tool, to access the Passport 4400 CLI (command line
interfac e).
Topics in this chapter:
• Purpose
• Establishing a Local Telnet Connection
• Establishing a Remote Telnet Connection
• Restriction on Reset Operations
• Closing the Telnet Connection
95
Purpose
Install Tool provides access to a Telnet facility to allow you to use the
Passport 4400 CLI to perform configur ation ta sks that are not available through
the Install Tool interface.
Establishing a Local Telnet Connection
To establish a Telnet connection to the Passport 4400 device to which you are
presently atta c hed, follow these steps:
1 Select Telnet from the Install Tool System menu.
Using Passport 4400 Install Tool Version 4.2
Page 96

96
The Telnet window opens.
2 To login to the CLI facility:
a Type
b Press Enter at the Password prompt.
Note: New Passpor t 4400 units are shipped with a null password . If the
Passport 4400 that you are configuring has bee n assigned a pa ssword, you
will enter it here.
The CLI facility displays a greeting and a prompt.
cli at the Login prompt, then press Enter.
Establishing a Remote Telnet Connection
You can access a remote Passpor t 4400 if your Dial-Up Networ king function is up
and the IP address is properly configured.
Prerequisites
Before establishing the remote Telnet connection, ensure tha t you have satisfied
the following prerequisites:
• Microsoft Dial-Up Networking must be installed on your workstat ion before
you can establish a remote Telnet session.
206906-D Rev 00 4.2
Page 97

If you are running Windows 95, Windows 98, or Windows Me, the
Install T ool ins tallation pro cedure insta lls Dia l-Up Ne tworking for you (if it is
not already present). If you are running Windows NT or W indows 2000, you
must manually install it.
• If you are using a PPP connection, you may need to add a route to acces s the
Passport network. Ref er to “Defining a Route” on page 91 for instructions.
Proced ure
To establish a Telnet connection to a remote Passport 4400 device, follow these
steps:
1 Open the Dial-Up Networking window and double-click on the icon for the
connection that you pr evi ously defined.
2 Select Telnet from the Insta ll Tool System menu.
97
The Telnet window opens.
3 Select Connect, then select Remote System.
The Connect dialog box opens.
4 Enter the Host IP address (the IP address of the remote Passport 4400).
5 Click on Connect.
6 Login to the CLI facility:
a Type
cli at the Login prompt, then press Enter.
Using Passport 4400 Install Tool Version 4.2
Page 98

98
b Press Enter at the Password prompt.
Note: New Passport 4400 units are shipped with a null password. If the
Passport 4400 that you are c onfigur ing ha s bee n assigned a pas sword, you
will enter it here.
You are now ready to begin your Telnet session.
Restriction on Reset Operations
Do not issue any reset commands f rom the Telnet window. If you have made
configuration changes and you need to reset the Passport 4400, first close your
Telnet session, then use Install To ol to perform the reset operation.
Closing the Telnet Connection
To close your session and end your Telnet connection, follow these steps:
1 Select Disconnect from the Connect menu.
The Telnet window clears.
206906-D Rev 00 4.2
Page 99

2 Select Exit to close the Telnet session.
The Telnet window closes.
99
Using Passport 4400 Install Tool Version 4.2
Page 100

100
206906-D Rev 00 4.2
 Loading...