

Nortel ICB, MICB 3, Meridian 1 User Manual

Meridian 1
Meridian Integrated Conference Bridge
Release 3
User Guide
Document Number: P0989944
Document Release: Standard 1.00
Date: June 2002
Year Publish FCC TM
Copyright © 2002 Nortel Networks
All Rights Reserved
Printed in Canada
Information is subject to change without notice. Nortel Networks reserves the right to make changes in design
or components as progress in engineering and manufacturing may warrant. This equipment has been tested
and found to comply with the limits for a Class A digital device pursuant to Part 15 of the FCC rules, and the
radio interference regulations of Industry Canada. These limits are designed to provide reasonable protection
against harmful interference when the equipment is operated in a commercial environment. This equipment
generates, uses and can radiate radio frequency energy, and if not installed and used in accordance with the
instruction manual, may cause harmful interference to radio communications. Operation of this equipment in a
residential area is likely to cause harmful interference in which case the user will be required to correct the
interference at their own expense.
SL-1 and Meridian 1 are trademarks of Nortel Networks.
MICB Release 3 User Guide


4
Page 3 of 96
Contents
Overview . . . . . . . . . . . . . . . . . . . . . . . . . . . . . . . . . 5
Browser User Interface (BUI) options for
administrators . . . . . . . . . . . . . . . . . . . . . . . . . . . . . 7
Overview . . . . . . . . . . . . . . . . . . . . . . . . . . . . . . . . . . . . . . . . . . . . . . . 8
About the MICB Dashboard . . . . . . . . . . . . . . . . . . . . . . . . . . . . . . . . 9
Accessing the BUI . . . . . . . . . . . . . . . . . . . . . . . . . . . . . . . . . . . . . . . . 11
Installing MICB using the Installation Wizard . . . . . . . . . . . . . . . . . . 15
Configuring general settings . . . . . . . . . . . . . . . . . . . . . . . . . . . . . . . . 22
Configuring a confirmation E-mail . . . . . . . . . . . . . . . . . . . . . . . . . . . 25
Customizing greetings . . . . . . . . . . . . . . . . . . . . . . . . . . . . . . . . . . . . . 28
Customizing images . . . . . . . . . . . . . . . . . . . . . . . . . . . . . . . . . . . . . . . 31
Configuring users . . . . . . . . . . . . . . . . . . . . . . . . . . . . . . . . . . . . . . . . . 33
Configuring call-out groups . . . . . . . . . . . . . . . . . . . . . . . . . . . . . . . . . 40
Configuring permanent conferences . . . . . . . . . . . . . . . . . . . . . . . . . . 48
Upgrading the number of ports . . . . . . . . . . . . . . . . . . . . . . . . . . . . . . 52
Upgrading the firmware version . . . . . . . . . . . . . . . . . . . . . . . . . . . . . 53
Backing up data . . . . . . . . . . . . . . . . . . . . . . . . . . . . . . . . . . . . . . . . . . 54
Generating reports . . . . . . . . . . . . . . . . . . . . . . . . . . . . . . . . . . . . . . . . 56
Using the Command Line Interface (CLI) . . . . . . . . . . . . . . . . . . . . . . 57
MICB Release 3 User Guide

Page 4 of 96
Browser User Interface (BUI) options for non-
administrators . . . . . . . . . . . . . . . . . . . . . . . . . . . . . 59
Things to know . . . . . . . . . . . . . . . . . . . . . . . . . . . . . . . . . . . . . . . . . . 60
Accessing the BUI . . . . . . . . . . . . . . . . . . . . . . . . . . . . . . . . . . . . . . . . 64
Scheduling a new one-time conference call . . . . . . . . . . . . . . . . . . . . 68
Scheduling a new recurrent conference call . . . . . . . . . . . . . . . . . . . . 74
Editing a conference call (one-time or recurrent) before it starts . . . . 76
Controlling a conference call in progress . . . . . . . . . . . . . . . . . . . . . . 77
Telephone User Interface (TUI) . . . . . . . . . . . . . . . 85
Overview . . . . . . . . . . . . . . . . . . . . . . . . . . . . . . . . . . . . . . . . . . . . . . . 85
Scheduling a conference . . . . . . . . . . . . . . . . . . . . . . . . . . . . . . . . . . . 86
Recording a brandline greeting . . . . . . . . . . . . . . . . . . . . . . . . . . . . . . 87
Acquiring and releasing chairperson control . . . . . . . . . . . . . . . . . . . . 88
Invoking a chairperson command on a participant . . . . . . . . . . . . . . . 89
Adjusting audio volume . . . . . . . . . . . . . . . . . . . . . . . . . . . . . . . . . . . . 90
Recording a conference-specific greeting . . . . . . . . . . . . . . . . . . . . . . 92
TUI command summary . . . . . . . . . . . . . . . . . . . . . . . . . . . . . . . . . . . 93
P0989944 Standard 1.00 June 2002

6
Page 5 of 96
Overview
There are two ways to configure a conference on the Meridian Integrated
Conference Bridge (MICB) Release 3 system:
1 Use the Browser User Interface (BUI).
2 Use the Telephone User Interface (TUI).
The MICB Release 3 BUI is built into the MICB 3 Web server. It offers one
set of configuration options for administrators and a second set for other
users. The administrator interface is called the Dashboard.
• For information about BUI options for administrators, “Browser User
Interface (BUI) options for administrators” on page 7.
• For information about BUI options for non-administrators, “Browser
User Interface (BUI) options for non-administrators” on page 59.
The MICB Release 3 TUI lets administrators and other users enter commands
on a telephone keypad to configure conferences. For information about TUI
options, see “Telephone User Interface (TUI)” on page 85.
MICB Release 3 User Guide

Page 6 of 96
P0989944 Standard 1.00 June 2002

58
Page 7 of 96
Browser User Interface (BUI) options for
administrators
This chapter contains the following sections:
• Overview (page 8)
• About the MICB Dashboard (page 9)
• Accessing the BUI (page 11)
• Installing MICB using the Installation Wizard (page 15)
• Configuring general settings (page 22)
• Configuring a confirmation E-mail (page 25)
• Customizing greetings (page 28)
• Customizing images (page 31)
• Upgrading the number of ports (page 52)
• Configuring users (page 33)
• Configuring call-out groups (page 40)
• Configuring permanent conferences (page 48)
• Upgrading the number of ports (page 52)
• Upgrading the firmware version (page 53)
• Backing up data (page 54)
• Generating reports (page 56)
• Using the Command Line Interface (CLI) (page 57)
MICB Release 3 User Guide

Page 8 of 96
Overview
Figure 1 depicts the logical layout of the Meridian Integrated Conference
Bridge (MICB) Release 3 BUI administration system.
Figure 1
Administration BUI navigation flowchart
P0989944 Standard 1.00 June 2002
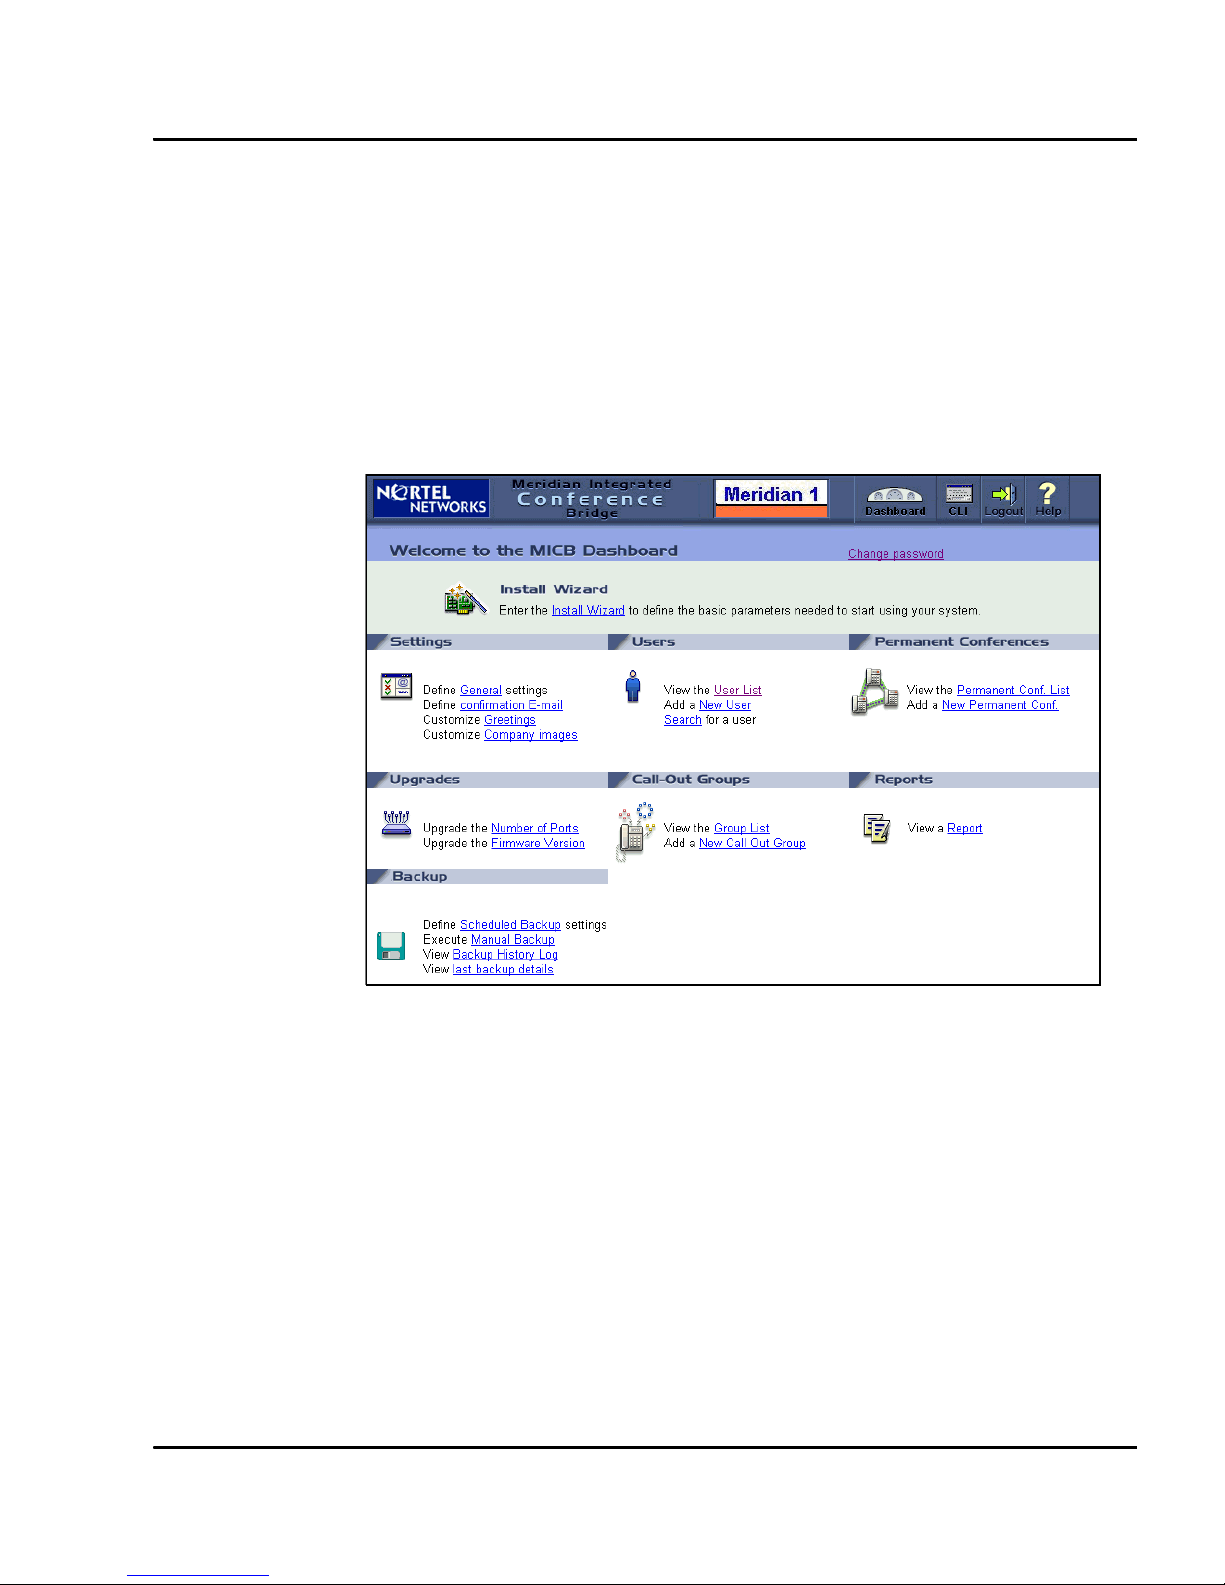
About the MICB Dashboard
The home screen for the MICB Release 3 system is the Dashboard, shown in
Figure 2. It appears when an administrator logs in to the system. The MICB
Dashboard, which is organized as an Internet portal, contains the following
links to key configuration options: Settings, Users, Permanent Conference,
Upgrades, Call-out Groups, Reports, and Backup.
Figure 2
Administration MICB Dashboard window
Page 9 of 96
MICB Release 3 User Guide
Page 10 of 96
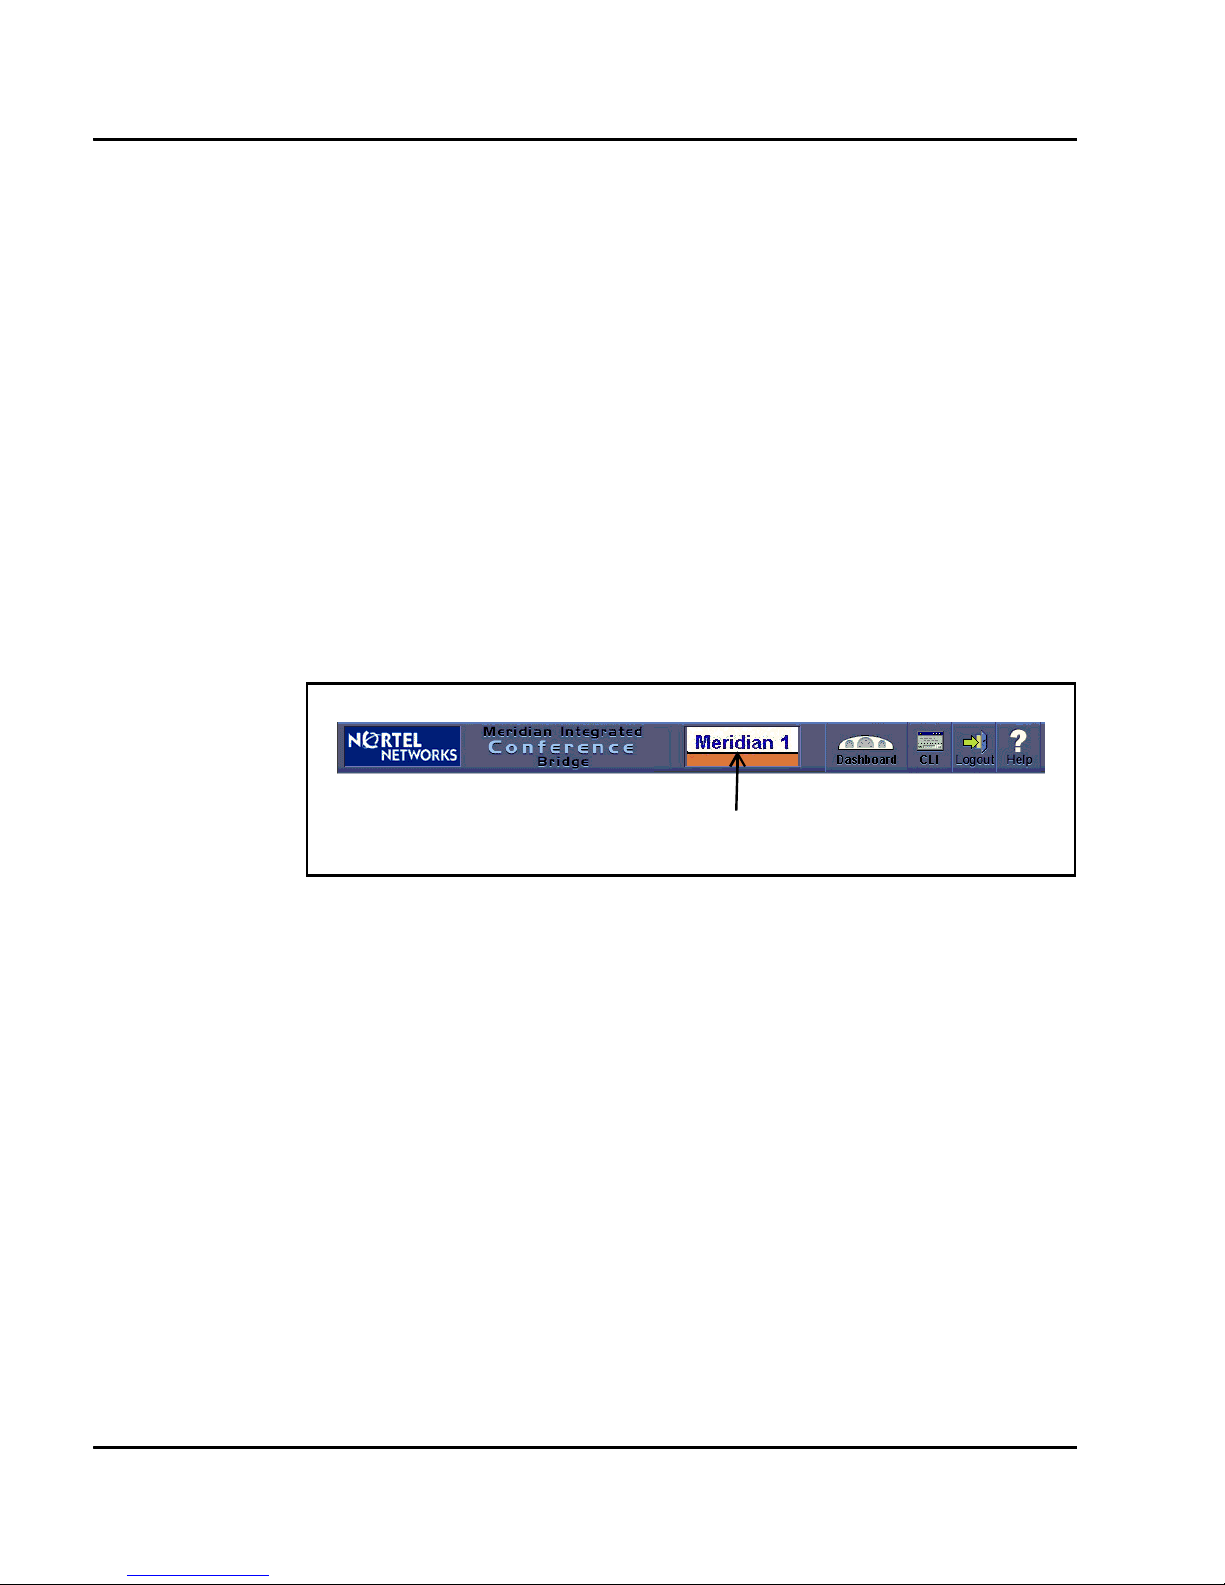
Title frame
The title frame sits atop the Dashboard window for all administration
windows. It contains the following buttons:
• Dashboard – Click to return to the dashboard. New settings will not be
saved.
• CLI – Opens an additional window for input and output of Command
Line Interface (CLI) commands.
• Logout – Terminates the session and returns the user to the home page
login window.
• Help – Displays help information relevant to the current window in a
separate window.
Figure 3
Administration MICB Dashboard title frame
Option al Cus t om er Logo
P0989944 Standard 1.00 June 2002

Accessing the BUI
This section contains the following topics:
• General information (page 11)
• Preparing to use the BUI (page 11)
• Logging in to the BUI (page 12)
• Changing the administrator password (page 14)
General information
The MICB Release 3 BUI supports open access from anywhere on the
Internet, including gateways and firewalls. The MICB web server is accessed
over an Ethernet connection. The system does not support browsers running
on MacIntosh computers. Cookies enabled is the default setting in Web
browsers. Do not disable the cookies function in the browsers.
Page 11 of 96
Preparing to use the BUI
Follow the steps in Procedure 1 before using the BUI.
Procedure 1
Preparing to use the BUI
1 Check the Web browser version.
a Netscape Communicator users must run version 4.5 or higher. To
check the version, select About Communicator from the Help
menu.
b Microsoft Internet Explorer users must run version 4.01 or higher
with Service Pack 1. To check the version, select About Explorer
from the Help menu.
To upgrade the Web browser, ask your system administrator about the
upgrade procedure.
MICB Release 3 User Guide
Page 12 of 96
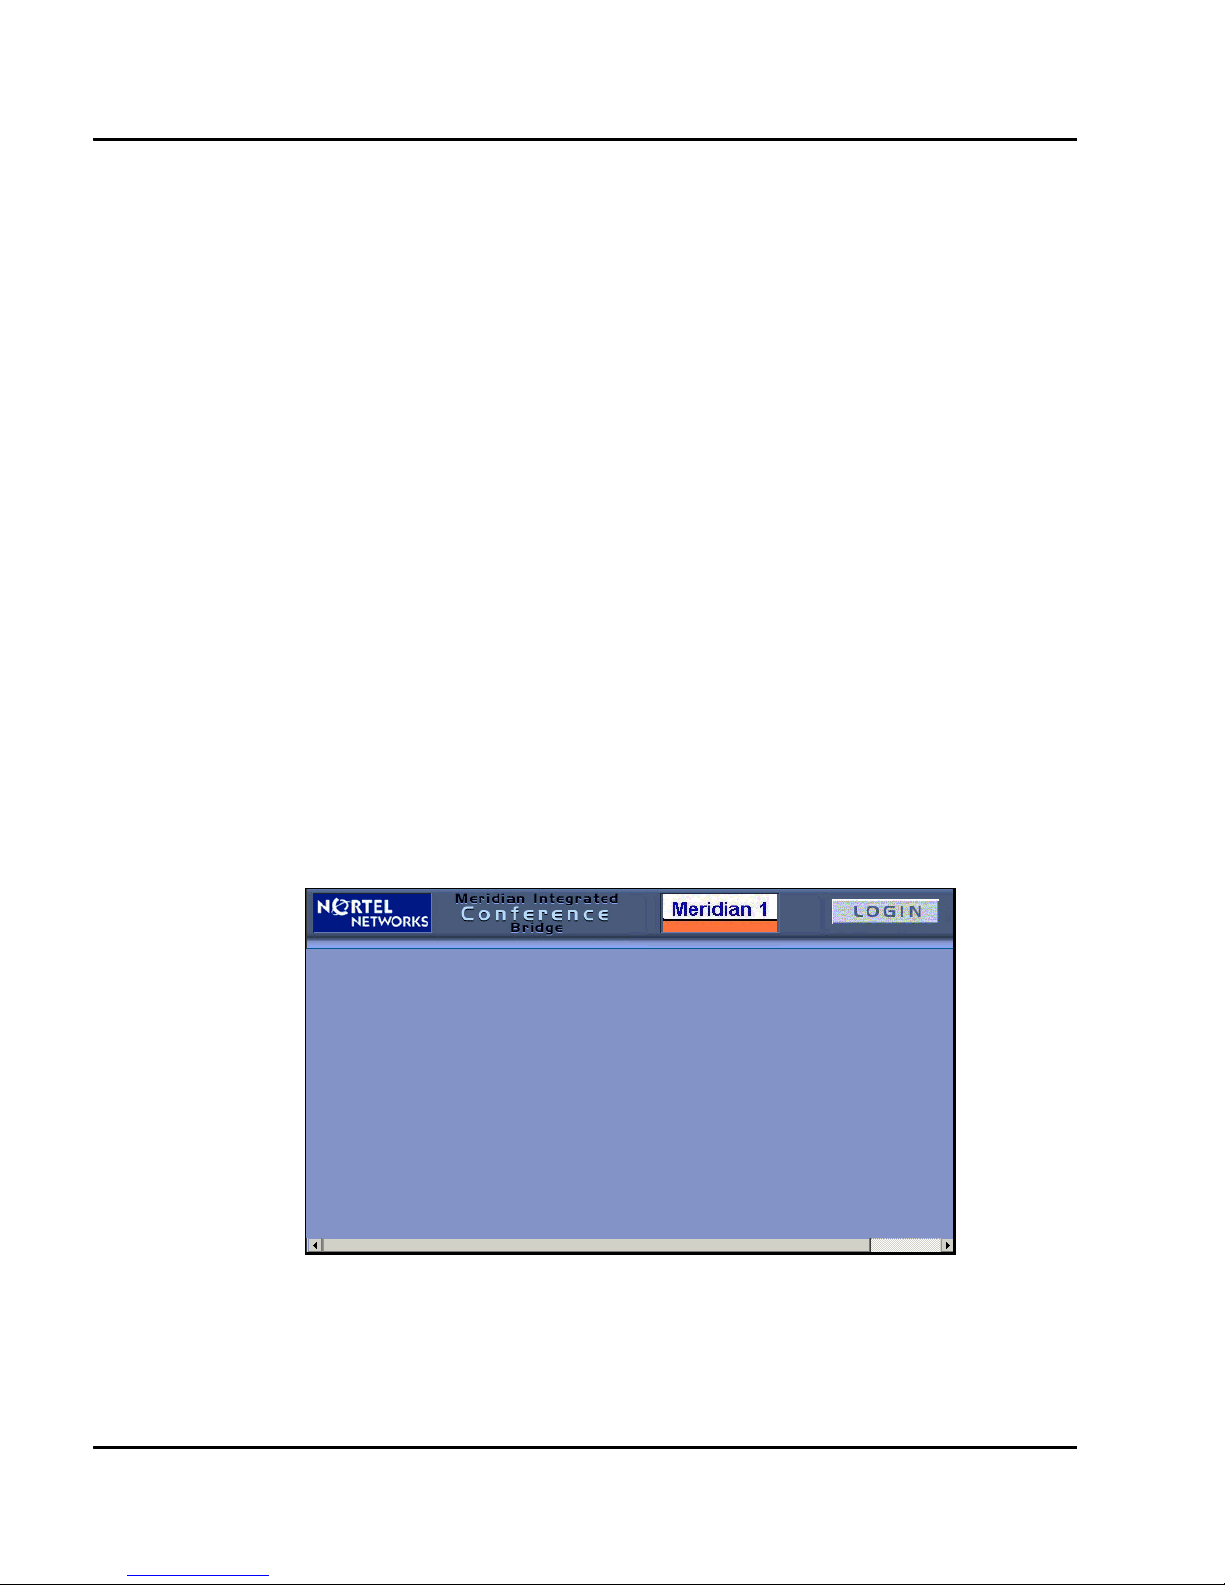
Logging in to the BUI
2 Obtain the following information from your MICB Release 3
administrator.
a your MICB Release 3 UserID name
b your MICB Release 3 login password
c the MICB Release 3 IP address (http://47.14.38.104 for example)
Follow the steps in Procedure 2 to log into the BUI.
Procedure 2
Logging in to the BUI
1 Enter the MICB Release 3 IP address in the browser’s Location or
Address field and press Enter or Return. The MICB Release 3 Login
window opens as shown in Figure 4.
Note: By default, the Login window has a generic image. Customers
can replace this image with their own. See “Customizing images” on
page 31. In Figure 4, the image has been removed.
Figure 4
MICB Release 3 login window
2 Bookmark this URL for future use.
P0989944 Standard 1.00 June 2002
Page 13 of 96
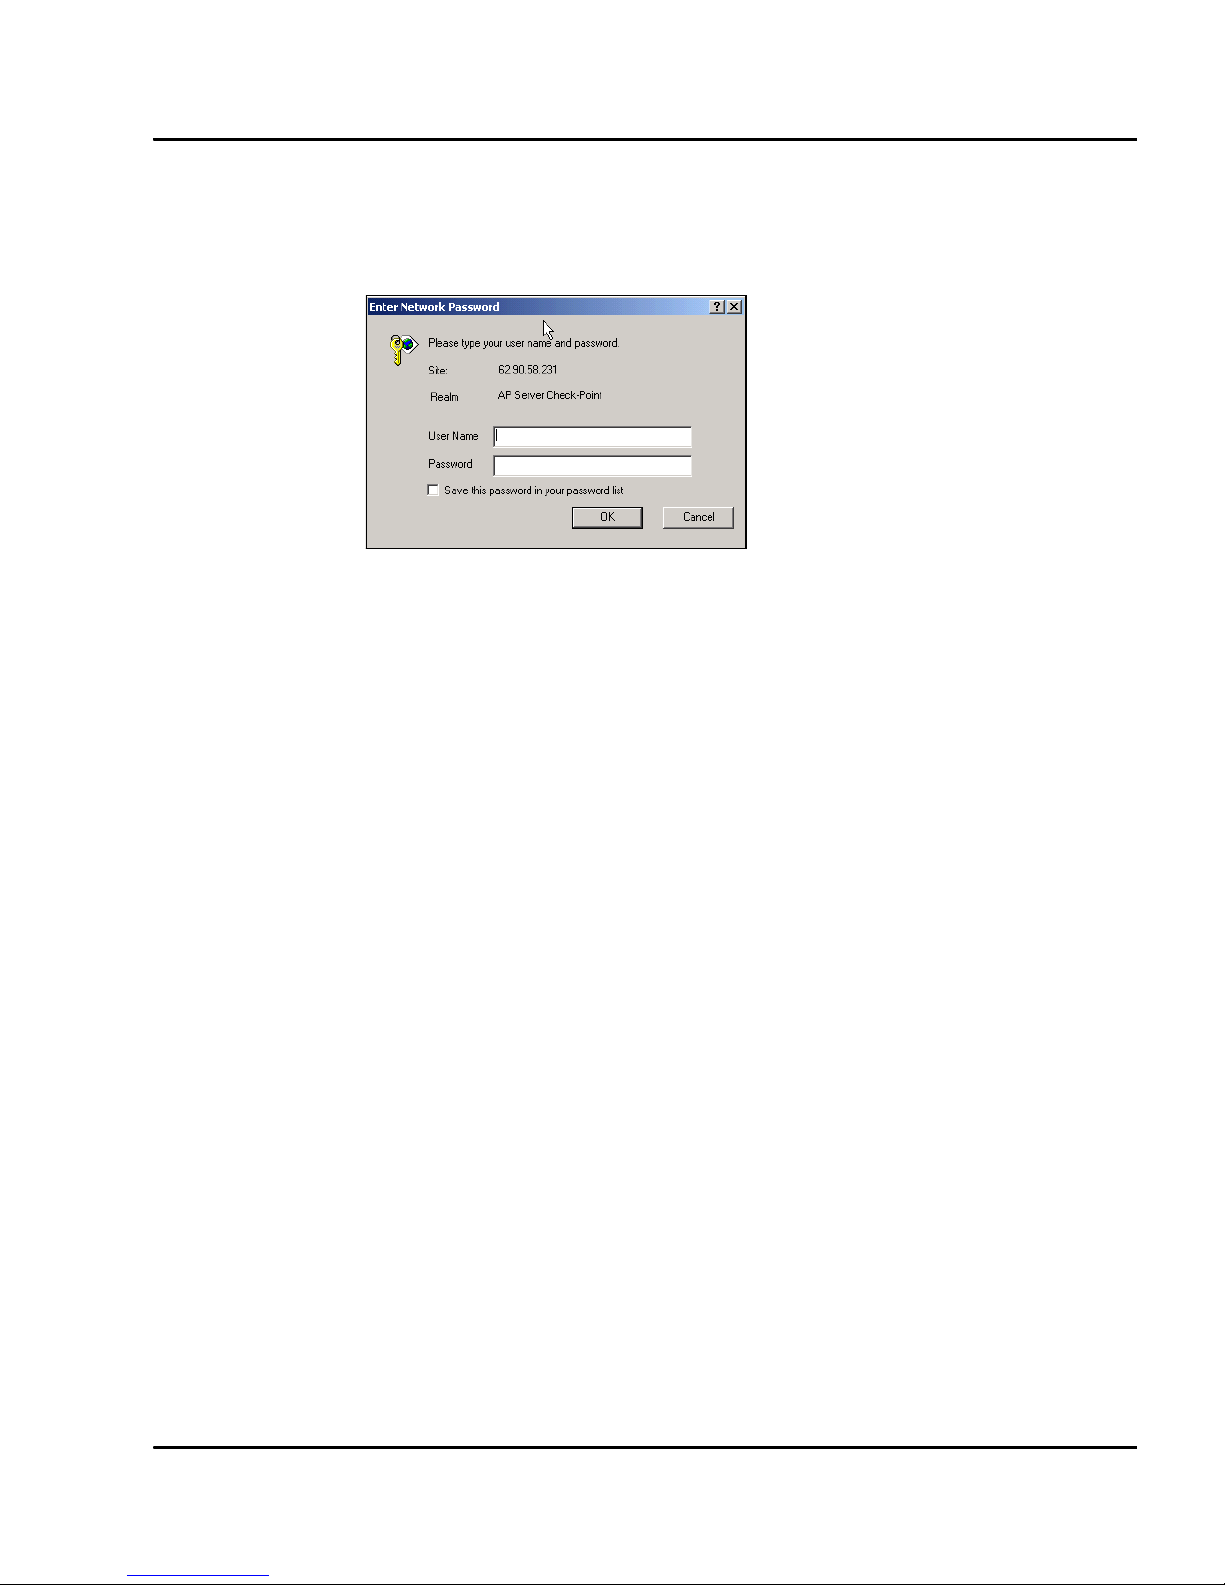
3 Select the LOGIN button. The Network Password window appears.
Figure 5
Network Password window
4 Enter the User Name in the User Name field. To log in as administrator,
enter the administrator ID. To log in as chairperson, enter the chairperson
access number and the conference password (this is the same numbers
the chairperson dials when joining the conference from a telephone).
5 Enter the six-digit password in the Password field. To log in as
administrator BUI, enter the administrator password.
6 Option: Click Save this password in your password list.
7 Click OK.
MICB Release 3 User Guide
Page 14 of 96
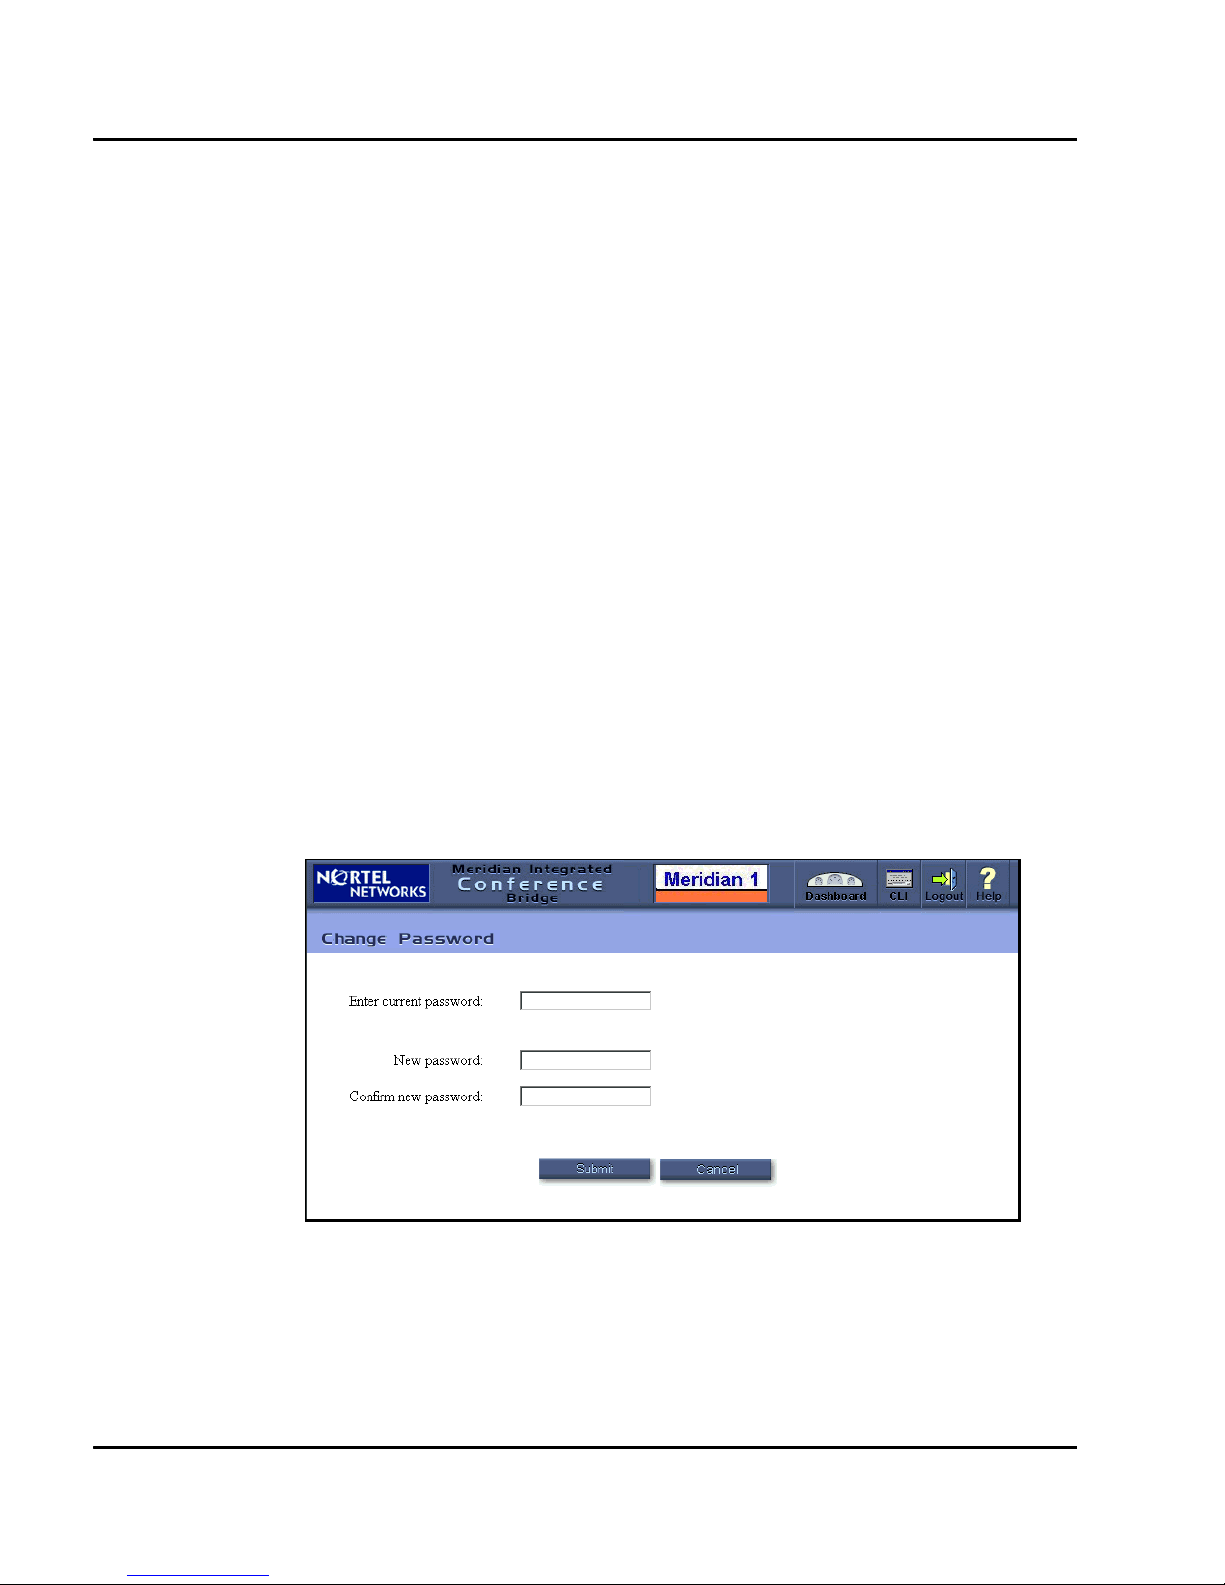
Changing the administrator password
Follow the steps in Procedure 3 to change the administrator password.
Procedure 3
Changing the administrator password
1 Access to the BUI. See “Accessing the BUI” on page 11.
2 Select Change Password in the Dashboard (Figure 2 on page 9). The
Change Password window opens, as shown in Figure 6.
3 Enter current password in the Enter current password: field.
4 Enter new password in the New password: field.
5 Reenter new password in the Confirm new password: field.
Note: When the Change Password window is accessed from the
Dashboard, it changes the current password.
6 Select Submit to save the password change. Select Cancel to abort the
password change.
Figure 6
Password change window
P0989944 Standard 1.00 June 2002

Installing MICB using the Installation Wizard
The MICB Installation Wizard provides an easy method for configuring
new systems. To access the Installation Wizard, administrators can select
the Install Wizard link on the MICB Dashboard.
All Installation Wizard windows list steps on the left side of the window.
During installation, clicking the Submit and Continue buttons advance users
step-by-step. After installation is complete, users can reach a specific step by
clicking its name.
The Installation Wizard has four main groups: Basic Card Settings,
Access Numbers, First User, and Dual Card Meeting. Each group appears
in a separate window. For a new installation, follow the Wizard step-by-step.
For installed systems, users can access a specific window to modify one or
more fields.
Procedure 4
Installing MICB using the Installation Wizard
Page 15 of 96
1 Access to the BUI. See “Accessing the BUI” on page 11.
2 Select Install Wizard on the Dashboard. The Basic Card Settings
window opens as shown in Figure 7 on page 16.
3 In the Basic Card Settings window, complete the following steps.
a In the Name field, enter up to 20 characters of free text for the card’s
name. Note that the IP address field is a read-only field that shows
the IP address of the card. Users define the card address using the
CLI.
b In the Type field, define the card’s configuration type as:
(1) single card / stand-alone, (2) primary card in a dual-card pair, or
(3) secondary card in a dual-card pair. A dual-card meeting uses this
information. If the information is changed here, a window opens to
change the settings of a dual-card meeting.
c In the Default Conference Language field, determine the default
voice-prompt language for conferences and the TUI. When
scheduling a conference, users can select a language from the
available set. However, if the user does not specify a language this
parameter applies.The default is American English.
MICB Release 3 User Guide
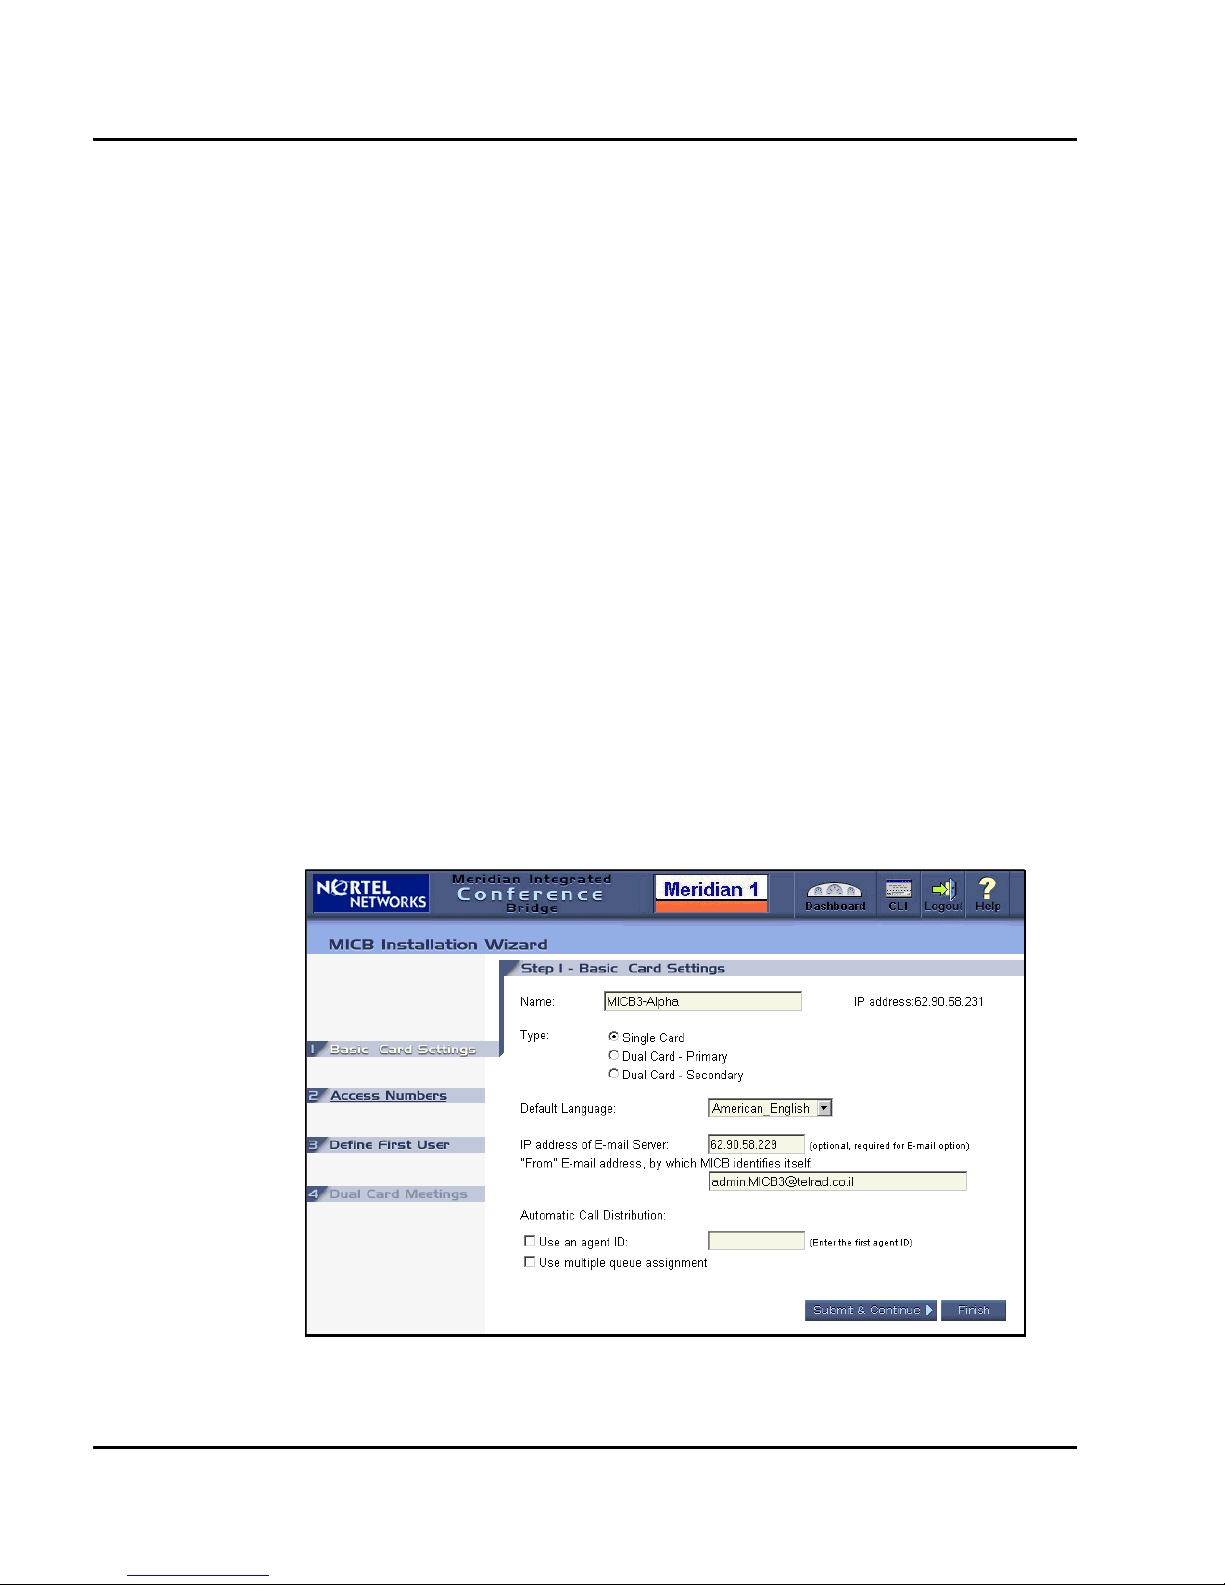
Page 16 of 96
d In the IP address of E-mail Server field, enter the IP address of the
server that the MICB uses to send scheduling confirmation and
administer E-mail messages. If this field is empty, or specified
incorrectly, the MICB does not send E-mail messages. However, the
rest of the system operates properly.
e In the From: field, enter the E-mail address which the MICB uses to
identify itself. This item appears in the From: field of sent E-mails.
Some E-mail servers require this information.
f In the Automatic Call Distribution field, define the ACD setup
according to the Meridian System ACD configuration.
i. Select Use an agent ID to indicate whether ACD is configured
with the agent ID option. If yes, enter the four-digit agent ID in
the first MICB port in the adjacent text box. Other ports use the
succeeding agent IDs.
ii. Select Use multiple queue assignment to indicate that ACD is
configured with the multiple-queue option. An entry must be
made because this option impacts the agent login process that
the system applies to ports.
Figure 7
Installation Wizard: Basic Card Settings window
P0989944 Standard 1.00 June 2002

Page 17 of 96
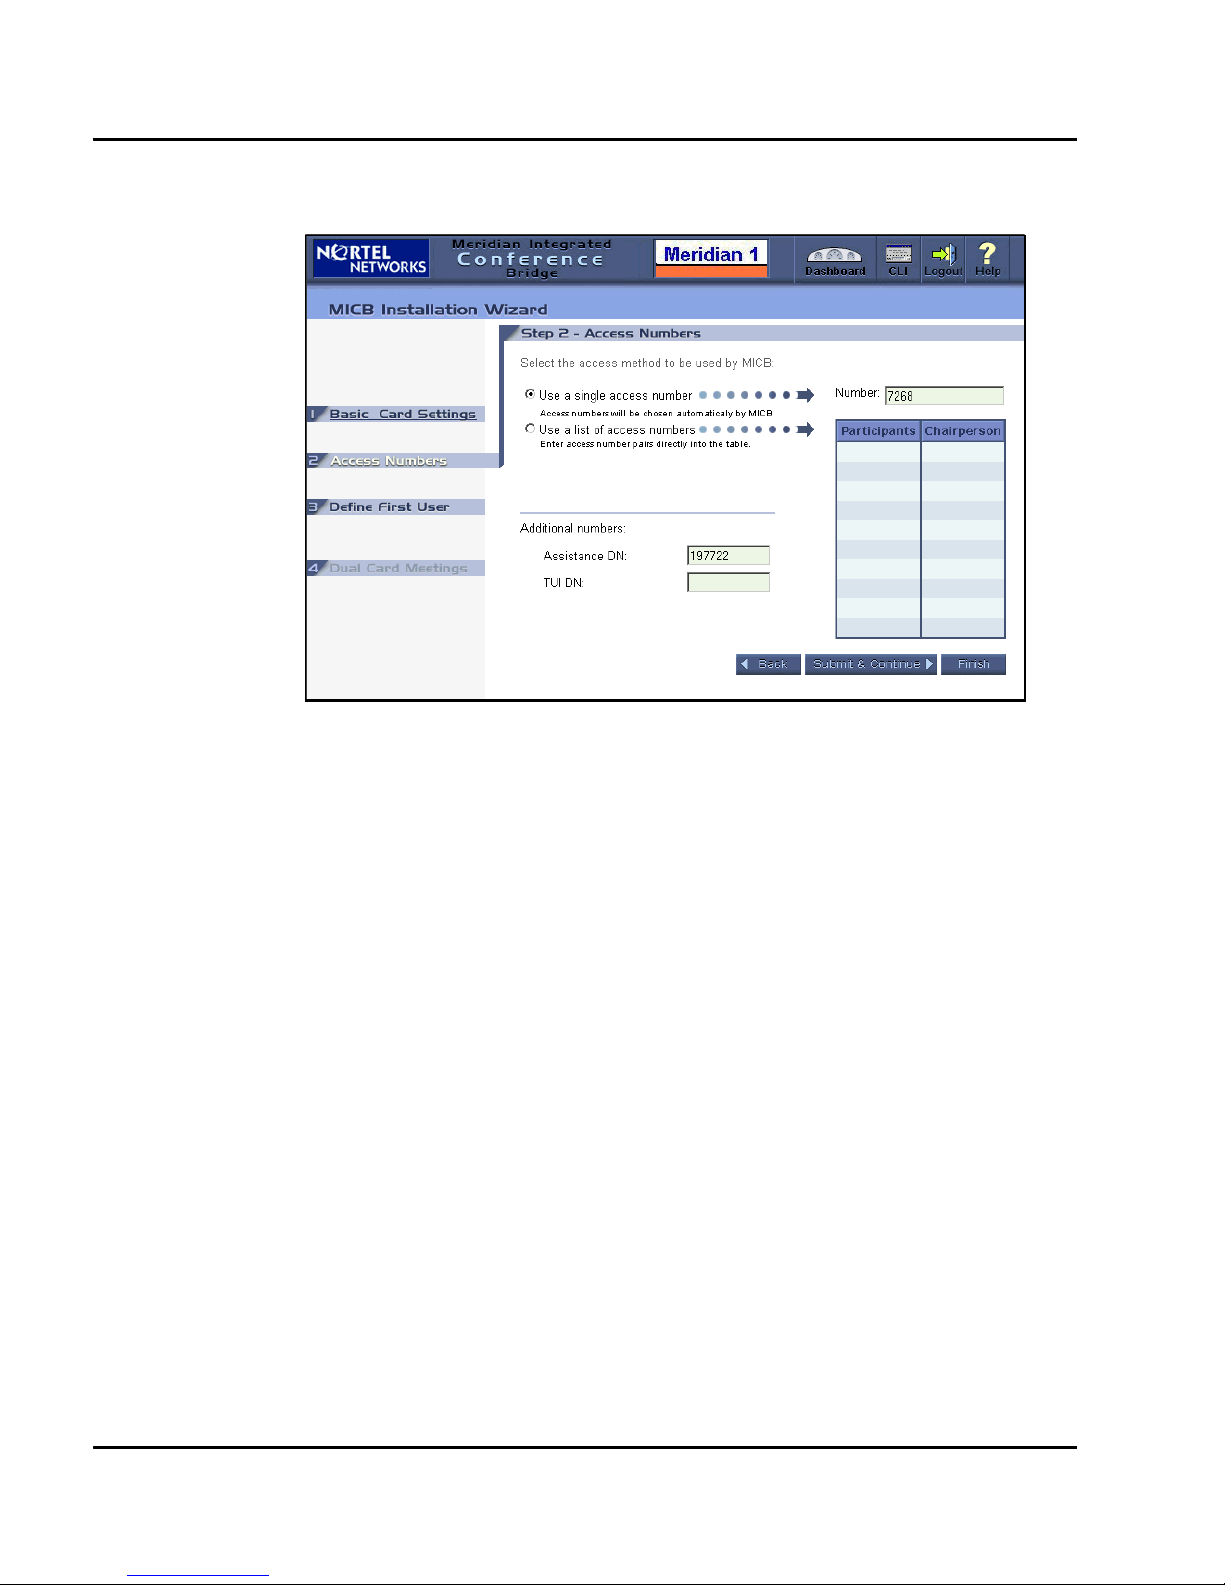
4 Select Access Numbers. The Access Numbers window opens as shown
in Figure 9 on page 19. Select an access method and then configure DNs
as required, according to Meridian System configuration rules. There are
two access options. The first is to use a single access number. The second
is to use a list of access numbers. The two options are mutually exclusive.
a Option A: Select Use a single access number and enter one DN to
access all conferences.
b Option B: Select Use a list of access numbers and then enter a list
of DN pairs. This method requires users to dial the conference DN
or the chairperson DN to enter the meeting. The number of defined
DNs equals the maximum number of simultaneous conferences
allowed. Users can configure up to 10 DN pairs.
i. Users can define only nine DN pairs for primary or secondary
cards in a dual-card set. One DN pair must be reserved for
dual-card meetings (see step 6 on page 19).
ii. Users can select a table cell and press the Delete key to delete
DNs. This action leaves the cell empty. DNs dedicated to a
current or future conference cannot be deleted. If a user
attempts to delete such a DN, an error message appears. When
upgrading from MICB Release 2, the system uses the same
table. The old DN pairs appear in the table.
c In the Assistance DN field, enter the DN of an operator or attendant.
The system dials this DN when the chairperson in an active
conference selects “call assistant” from the TUI or BUI.
d In the TUI DN field, enter the DN to access TUI services.
MICB Release 3 User Guide
Page 18 of 96
Figure 8
Installation Wizard: Access Numbers window
5 Select First User and define at least one user to perform sanity tests, such
as scheduling conferences and placing calls. Define a user that can be
deleted or modified from the regular User Administration window. This
step eliminates the need to open a separate window to define a user and
perform basic testing after the Wizard is finished.
Note 1: This window is identical to the “New User” window (see
Figure 17 on page 36), except it includes the Wizard step titles at the top
of the window.
Note 2: This step is only required during initial installation. The BUI
grays this field out after successful installation. Perform normal user
administration from a separate window in the Administration BUI.
P0989944 Standard 1.00 June 2002
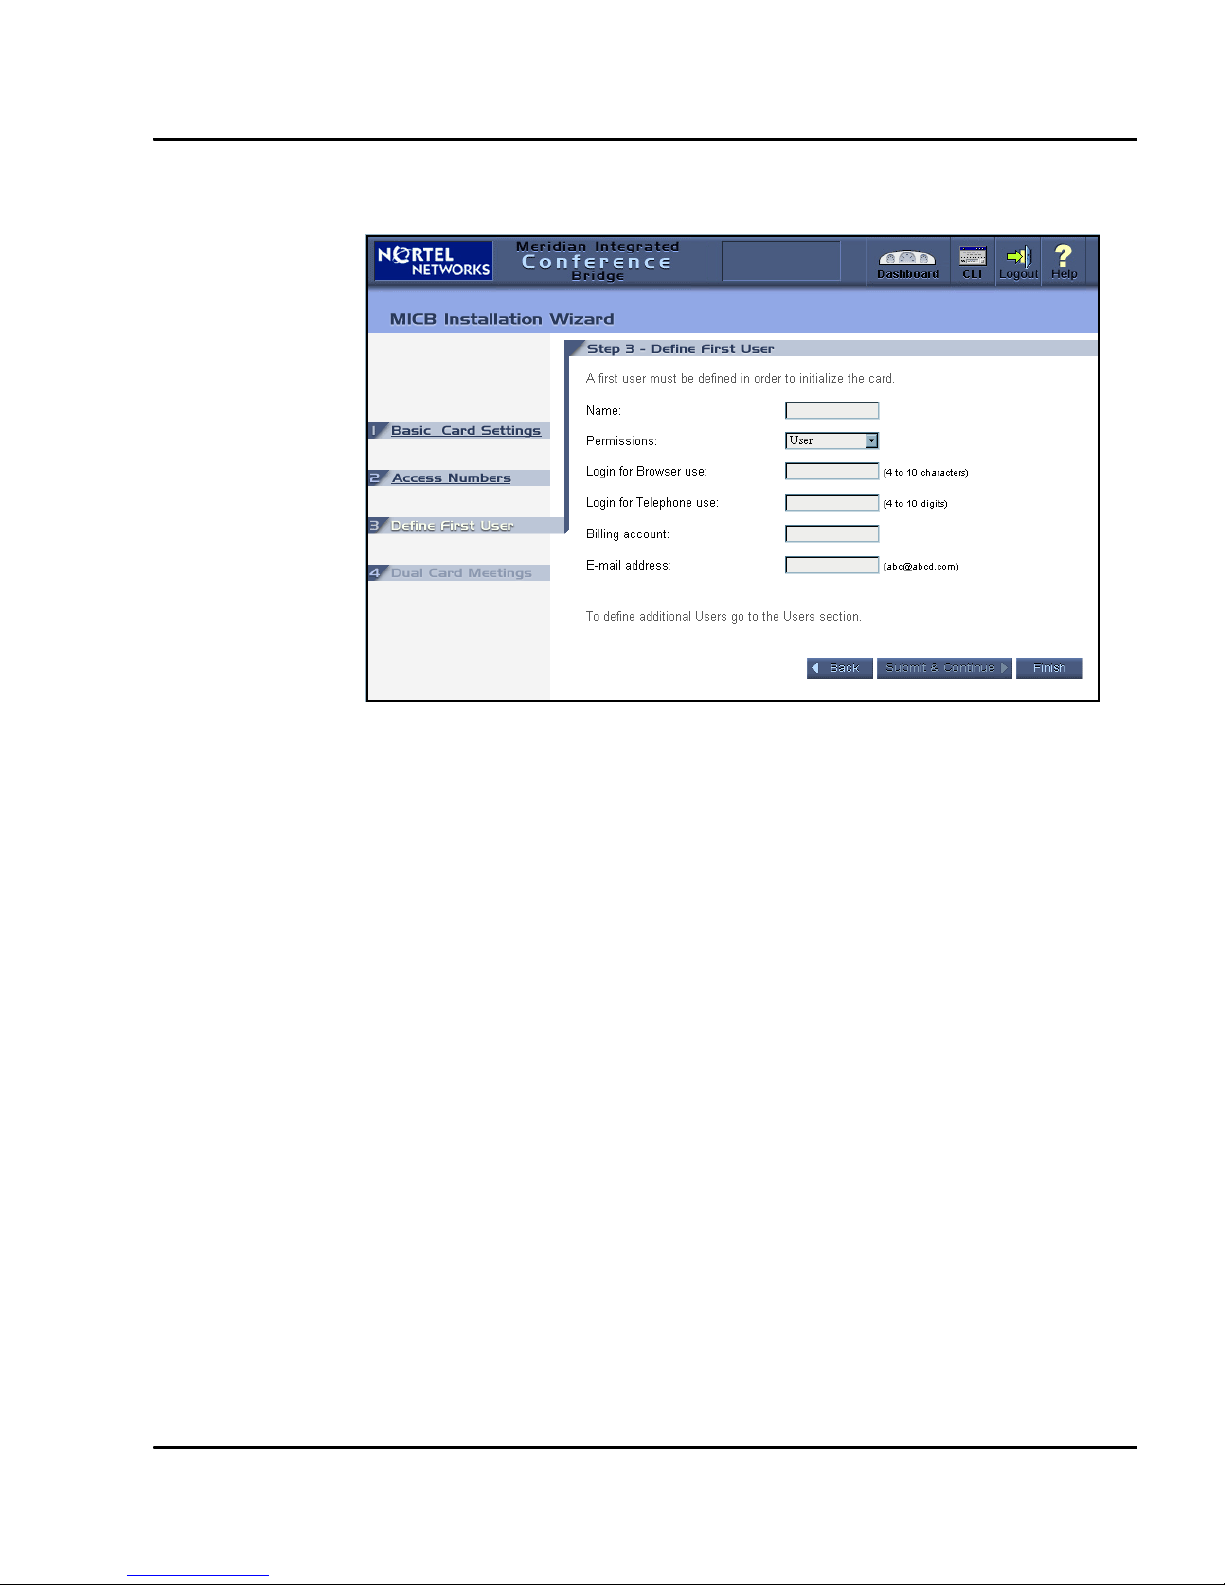
Figure 9
Installation Wizard: Define First User
Page 19 of 96
6 Select Dual Card Meeting and define the parameters for dual-card
meetings. The Dual Card Meeting window opens as shown in Figure 10
on page 21.
a In the IP address of secondary card field, enter the IP address of
the secondary card.
b In the Conference access number field, enter the DN for the
dual-card meeting. Callers will dial this number to access the
dual-card meeting.
c In the Chairperson number in primary card field, enter the
chairperson DN for the dual-card meeting. The chairperson uses this
number to access the dual-card meeting.
d In the Transfer number field, enter the DN that the MICB uses to
transfer calls from the primary card to the secondary card. The
system hides this number from end users.
e In the Link number field, enter the DN that the MICB uses to create
a voice path between both cards. The system hides this number from
end users.
MICB Release 3 User Guide

Page 20 of 96
f In the Chairperson control of dual meeting field, select one of the
following options.
i. Full control including secondary card. The chairperson
commands apply to both cards. In this case, the maximum
conference size for a 64-port card pair is 60 ports.
ii. Control of secondary card is limited. Some chairperson
commands apply only to the primary card (for example, TUI
roll call command and dial out). The maximum conference size
in a 64-port card pair is 62-ports.
Note 1: This step appears only when the card is a member of a dual-card
set (that is, when configuration type is “Dual Card – Primary” or “Dual
Card – Secondary”). Users can only input data on the primary card. This
field is view-only for the secondary card.
Note 2: All DNs must be configured in the Meridian System.
Note 3: Define all DNs if access method is single-number access
because single-number access does not apply to dual-card meetings.
P0989944 Standard 1.00 June 2002
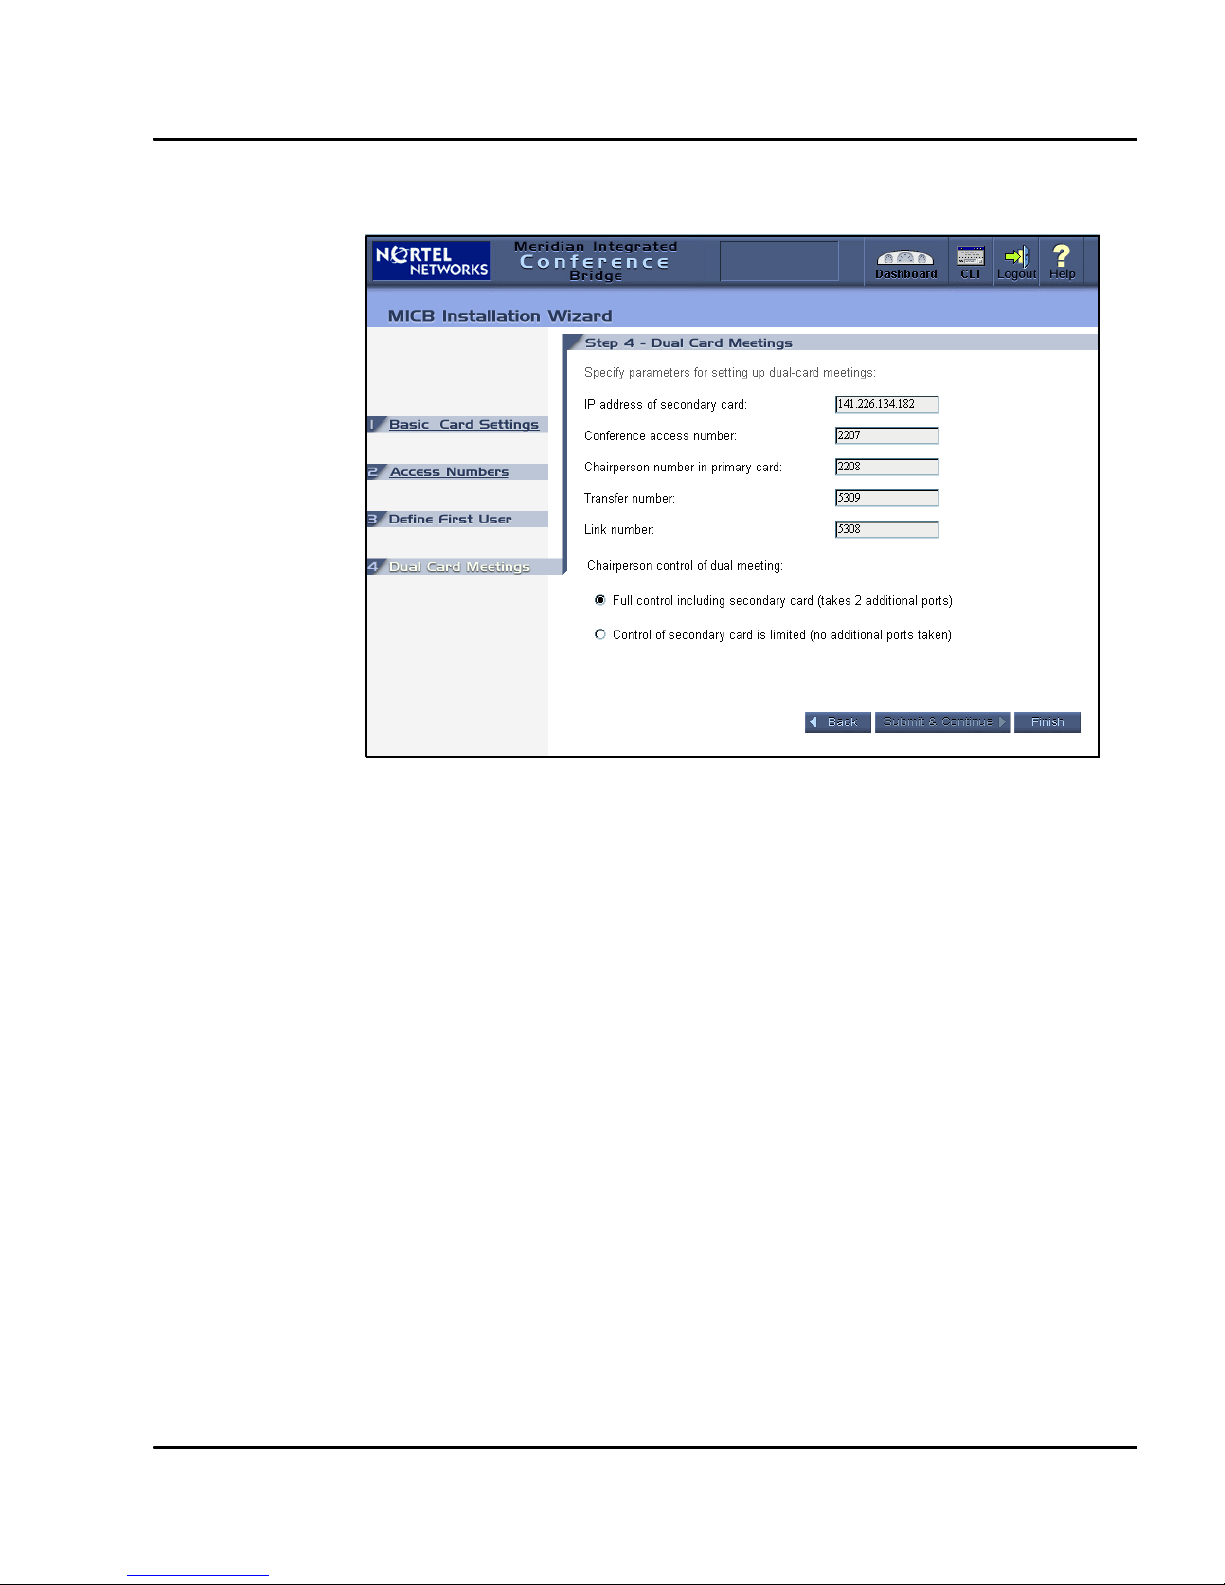
Figure 10
Installation Wizard: Dual Card Meetings
Page 21 of 96
7 After the Wizard setup session is complete, schedule a conference and
place a call to test the card. If necessary, return to the Installation Wizard
to change system definitions.
MICB Release 3 User Guide

Page 22 of 96
Configuring general settings
The General Settings window displays several parameters and definitions.
Links to related subjects appear on the Dashboard. Figure 11 on page 22
shows the General Settings window. When a user selects Submit, the system
activates the setting. When a user selects Reset, the system reinforces default
values.
Figure 11
MICB Dashboard – General Settings window
Tab le 1
General Settings window fields (Part 1 of 3)
Field Description
Administration
E-mail
P0989944 Standard 1.00 June 2002
Enter the E-mail address to which the MICB sends administration
material, including backup files.

Page 23 of 96
Tab le 1
General Settings window fields (Part 2 of 3)
Field Description
Billing option Select a billing option for this card from the pull-down menu. The
options are as follows:
• No billing – The MICB does not issue a billing report.
• Billing reports – The MICB issues a billing report.
• Billing Reports & Call Detail Recording (CDR).
Card ID Enter the card ID that the system uses for billing purposes.
Range: A four-digit decimal.
Enable
overbooking of
ports
Keep one port for
telephone access
Time limit for
recording
participant name
Conference
auto-generated
password length
Enter the number of ports added by the Overbooking feature. The
available values are shown in the form of 32 + N, where 32 is the
physical capacity and N is the addition for overbooking.
Range:
From 32 + 0 (no overbooking) to 32 + 8 for cards with 32 ports.
In cards with less than 32 ports, the maximum N is the proportional
fraction of 8 (for example, 16 + 4 for a card with 16 ports).
Default:
N = 0 (no overbooking).
Click the check box to dedicate one card port for TUI access. The
dedicated port is no longer available for meetings. When this box is not
checked the system does not reserve a port for the TUI. If no port is
reserved when the card is fully booked, the TUI is inaccessible.
Enter the duration in seconds of the spoken name in the name-entry
option. When the system prompts the callers for their name, recording
takes place for the specified duration after the beep.
Range:
Default:
2-10 seconds.
2 seconds.
Enter the number of digits for the length of conference or chairperson
password, when a user selects the password to be automatically
generated by the MICB.
Range:
Default:
4-8 digits.
4 digits.
MICB Release 3 User Guide

Page 24 of 96
Tab le 1
General Settings window fields (Part 3 of 3)
Field Description
Weekly working
days
Outdated
conferences and
reports
Select the range of working days from the pull-down menu. The MICB
uses this information when creating recurrent conferences with the
option “Workday”.
Range:
Default:
Any day of the week.
Monday to Friday.
From the pull-down menu, select the number of days these files are
kept before deletion. For scheduling data, this field applies to
conferences that have already taken place. The system keeps future
conferences as long as required.
Range:
Default:
1-120 days.
32 days.
P0989944 Standard 1.00 June 2002
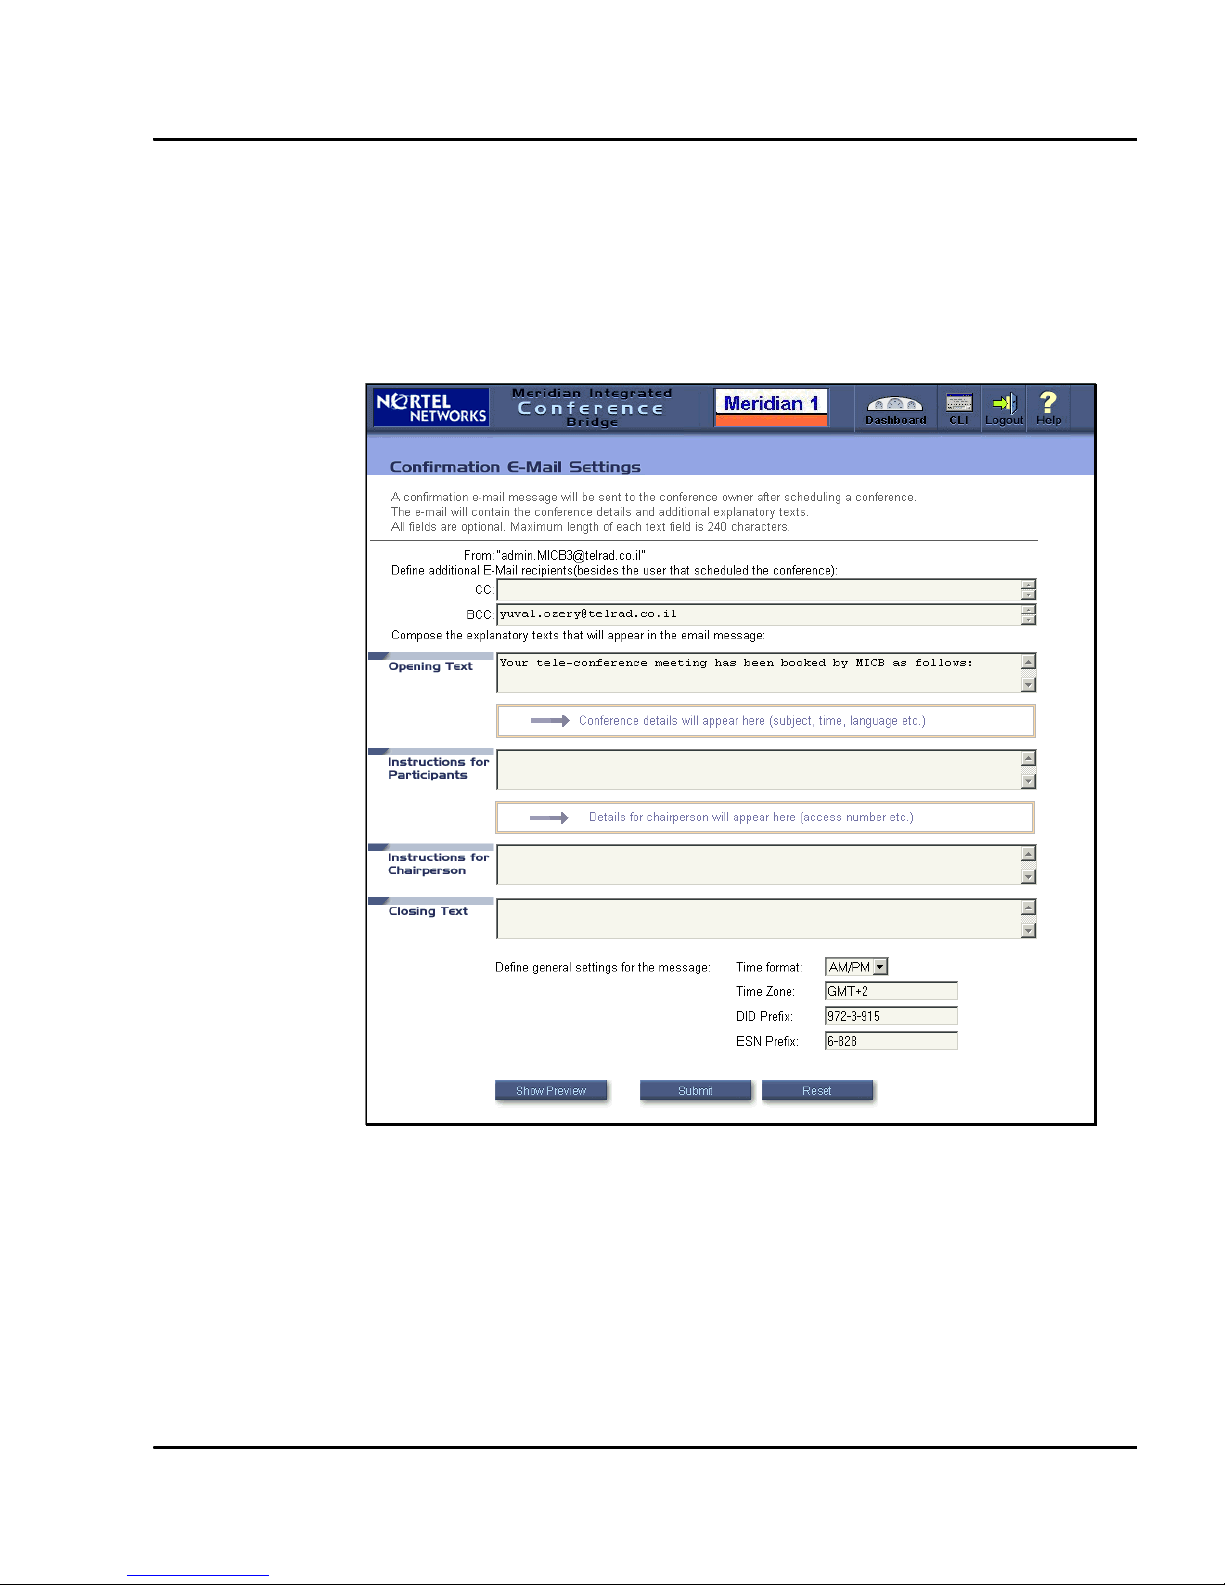
Configuring a confirmation E-mail
Figure 12 on page 25 shows the window in which an administrator configures
the scheduling of a confirmation E-mail.
Figure 12
MICB Dashboard – E-mail Template
Page 25 of 96
MICB Release 3 User Guide

Page 26 of 96
The E-mail Template window shows the layout of the E-mail. Table 2
describes options available in the Confirmation E-mail Settings window.
Tab le 2
Confirmation E-mail Settings (Part 1 of 2)
Field Description
From: The sender’s address defined in the first step of the Installation
Wizard.This field cannot be edited; it is view only.
CC: Enter the E-mail address or list of addresses to receive a copy of all
confirmation E-mails. Separate addresses with a space.
BCC: Enter the E-mail address or list of addresses to receive a copy of all
confirmation E-mails. The system hides these addresses; they do not
appear on the E-mails.
Opening text Enter the header that appears before the fixed part of the E-mail (the
meeting details).
Example:
company name or slogan.
Instructions for
participants
Instructions for
chairperson
Closing text Enter the information that appears as a footer at the bottom of the
Time format From the pull-down menu, select the time format that the E-mail uses
Time Zone Enter the time zone of the MICB in free text. The MICB does not check
Enter the information that appears after the meeting details.
Example:
Enter information for the chairperson in this field.
Example:
chairperson.
E-mail body.
(24-hour or AM/PM).
the syntax.
Example:
(GMT-5).
dialing instructions and list of TUI commands.
chairperson TUI commands and other tips for the
GMT-5 (EST), Eastern Standard Time, or New York
P0989944 Standard 1.00 June 2002

Page 27 of 96
Tab le 2
Confirmation E-mail Settings (Part 2 of 2)
Field Description
DID Prefix Enter the DID prefix that callers use to access the card from the public
network. Enter this value as free text.
Example:
(613) 961.
ESN Prefix Enter the prefix that callers use when accessing the card by Electronic
Switched Network (ESN).
Example:
846.
MICB Release 3 User Guide
Page 28 of 96
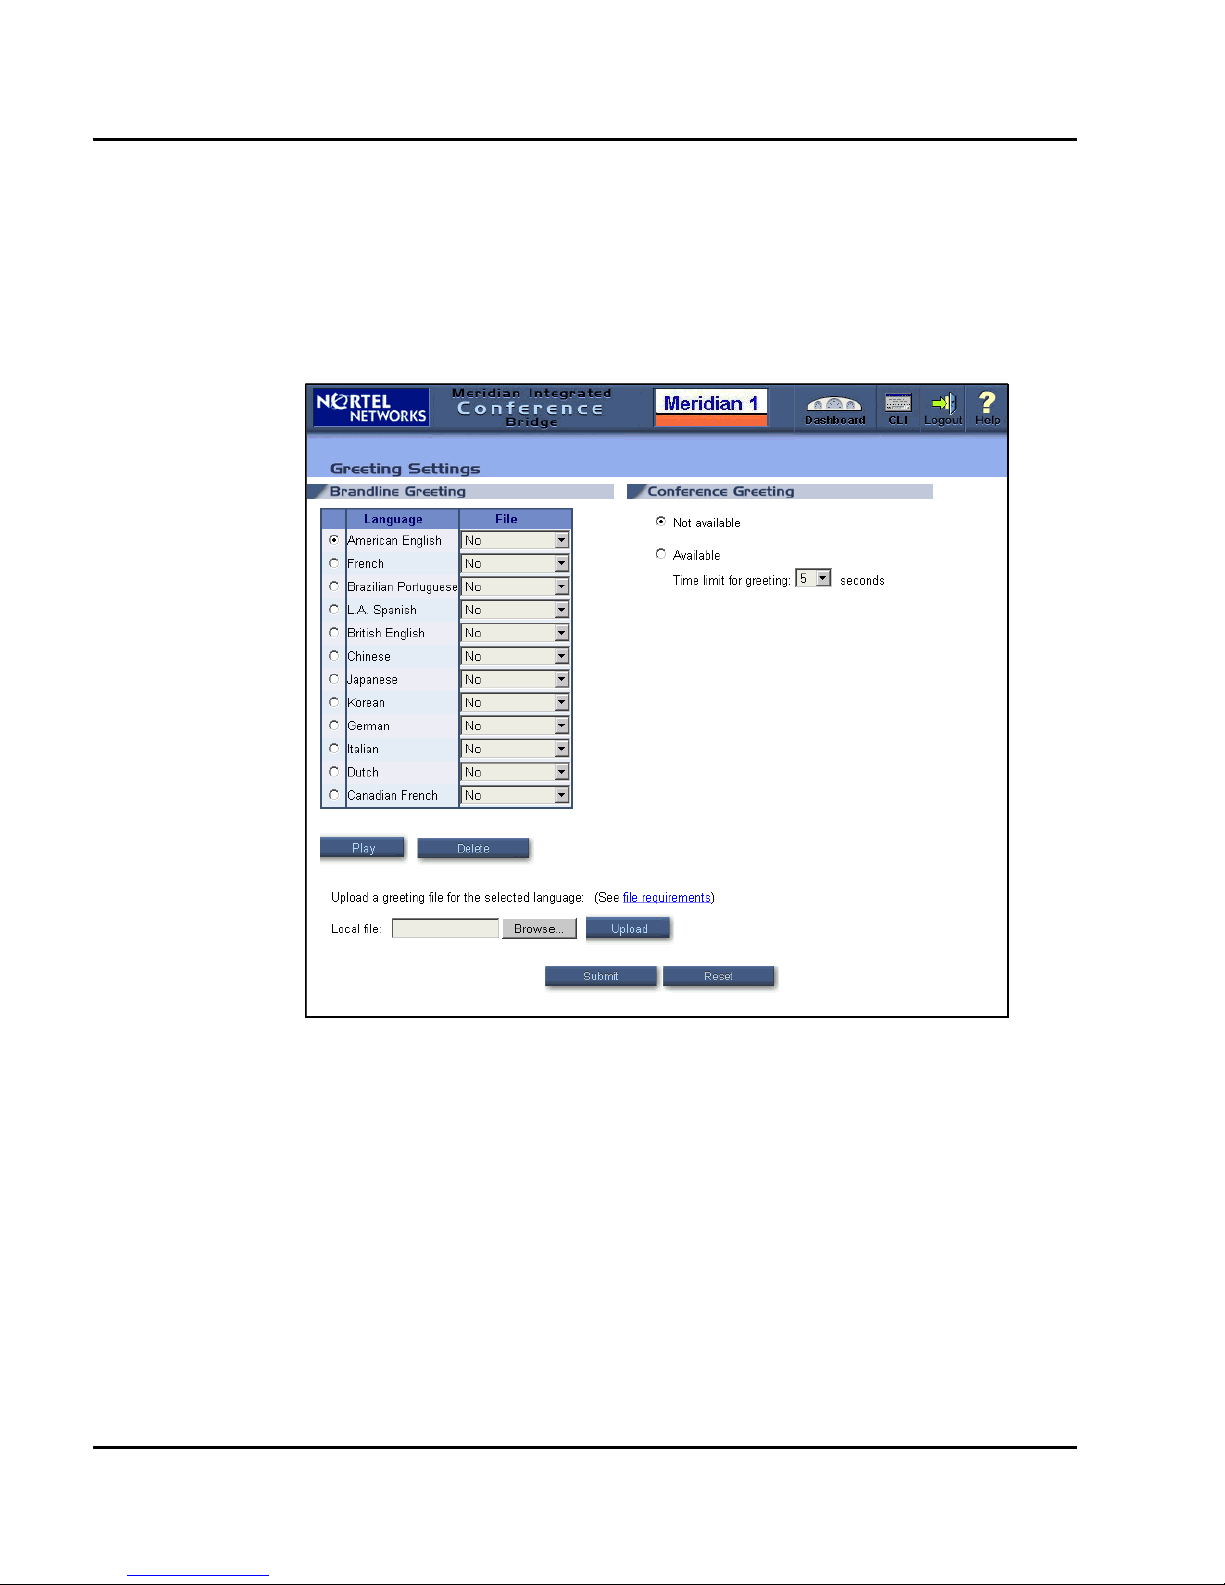
Customizing greetings
Figure 13 shows the window used to customize the brandline greeting and the
per-conference user’s greeting.
Figure 13
MICB Dashboard – Greeting Settings window
The Greetings Settings window lists available languages. For each language,
users can replace the factory-made greeting with a customized greeting in the
form of a .WAV file. See Procedure 5 on page 29.
P0989944 Standard 1.00 June 2002

Page 29 of 96
Procedure 5
Customizing the Brandline Greeting
1 Access to the BUI. See “Accessing the BUI” on page 11.
2 In the Dashboard, select Customizing Greetings.
3 To choose the language, select the appropriate radio button in the
Greeting Settings screen. Note that the table shows all languages
configured for the card. No empty rows are displayed in the table.
4 Upload button the .WAV file to the MICB.
a Click Select File.
b Browse to locate the file.
c Select the file and click Open.
d Click Upload button.
When the upload completes successfully, the .WAV file name displays
under Brandline Greeting in the file column. See Figure 13 on page 28.
5 Select the desired .WAV file in the File column for that language.
6 Click on the Submit button to save the change.
MICB Release 3 User Guide

Page 30 of 96
Selecting action buttons in the Greetings Settings window
Use buttons below the table to perform actions for the selected language.
Select the radio button beside the language to select it. Table 3 shows the
actions that these buttons perform.
Tab le 3
Action buttons in the Greeting Settings window
Field Description
Play Click Play to play the selected greeting. The system plays the .WAV
file of the selected language on the computer.
Delete Click Delete to delete the selected greeting from the card. Before
deleting the file, the dialog box asks: “Are you sure you want to delete
greeting file xxxx.WAV?”. CLick Yes. The system removes the file’s
name from the combo-box. The selection returns to the “factory
default” greeting. Note that the delete action is immediate and
irreversible. It is not necessary to submit and save it. It cannot be
cancel by clicking on the Reset button. Also note that the “factory
default” greeting cannot be deleted.
Configuring a conference-specific greeting
In the Greeting Settings window, users can enable or disable a
conference-specific greeting. Select the Available radio button to enable the
conference-specific greeting. When selected, the maximum length of the
greeting can be defined. The range is from two to ten seconds. The default is
five seconds.
P0989944 Standard 1.00 June 2002
 Loading...